

Page 1
COMBAT RUDDER PEDALS
USER GUIDE
Page 2
CLOSER TO REALITY
WITH SAITEK’S PRO FLIGHT RANGE
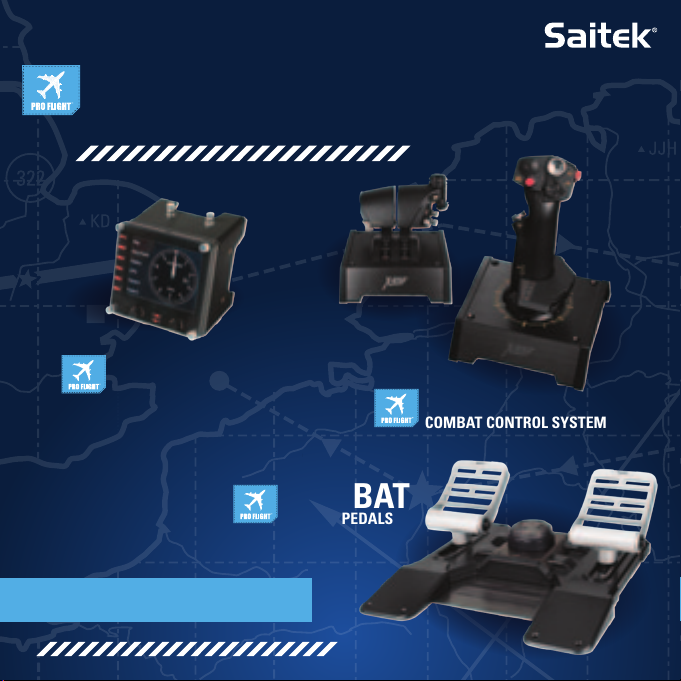
YOUR COMPLETE COCKPIT SOLUTION //
FIP
DIGITAL LCD DISPLAY
COMBAT
RUDDER PEDALS
PERFECT PARTNERS
X65F
COMBAT CONTROL SYSTEM
Page 3
ENGLISH
GEttING StartEd 4
INtroductIoN 6
INStaLLatIoN 6
ENabLING Your coNtroLLEr IN GamES 8
How to tESt aNd adjuSt Your coNtroLLEr 10
Smart tEcHNoLoGY ProGrammING SoftwarE 11
fraNÇaIS
démarraGE 15
INtroductIoN 17
INStaLLatIoN 17
actIvatIoN dE votrE coNtrôLEur daNS LES jEux 19
commENt tEStEr Et réGLEr votrE coNtrôLEur 22
Smart tEcHNoLoGY ProGrammING SoftwarE 23
dEutScH
ErStE ScHrIttE 27
EINfüHruNG 29
SoftwarEINStaLLatIoN 29
aktIvIErEN IHrES coNtroLLErS IN SPIELEN 32
tEStEN uNd EINStELLEN IHrES coNtroLLErS 34
Smart tEcHNoLoGY ProGrammING SoftwarE 35
ItaLIaNo
avvIo 39
INtroduzIoNE 41
INStaLLazIoNE 41
attIvazIoNE dEL coNtroLLEr NEI GIocHI 42
comE vErIfIcarE E rEGoLarE IL coNtroLLEr 45
Smart tEcHNoLoGY ProGrammING SoftwarE 46
ESPañoL
PrImEroS PaSoS 50
INtroduccIóN 52
INStaLacIóN 52
actIvar EL maNdo EN LoS juEGoS 54
cómo Probar Y ajuStar Su maNdo 56
Smart tEcHNoLoGY ProGrammING SoftwarE 57
Page 4
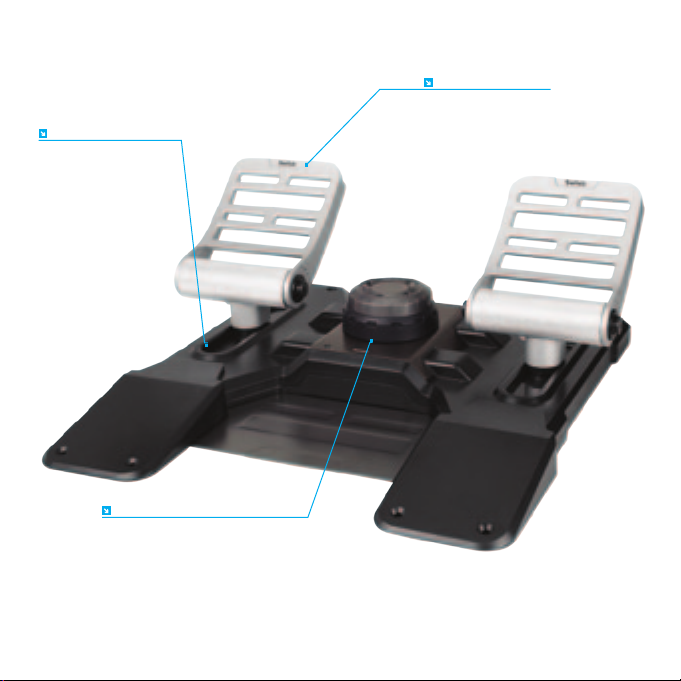
GEttING StartEd
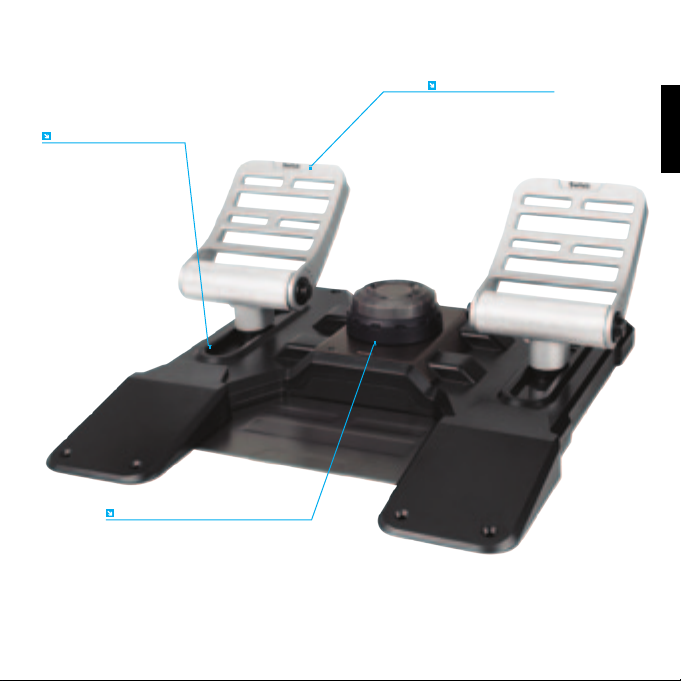
RUDDER AXIS
With self-centering mechanism
Avec mécanisme d’autocentrage
Mit selbstzentrierendem Mechanismus
Con meccanismo autocentrante
Con mecanismo autoajustable
ADJUSTABLE TENSION
Adjust the resistance to suit any plane
Ajustez la résistance pour s’adapter à tous les avions
Stellen Sie den Widerstand für Ihr jeweiliges Flugzeug ein
Per regolare la resistenza, in modo da adattarsi a qualsiasi aereo
Ajusta la resistencia para que se adapte a cualquier avión
DURABLE METAL PEDALS
With independent toe brakes
Avec axes de freins de palonnier indépendants
Mit unabhängigen Zehenbremsen
Con freni indipendenti
Con frenos de dedos independientes
4
Page 5
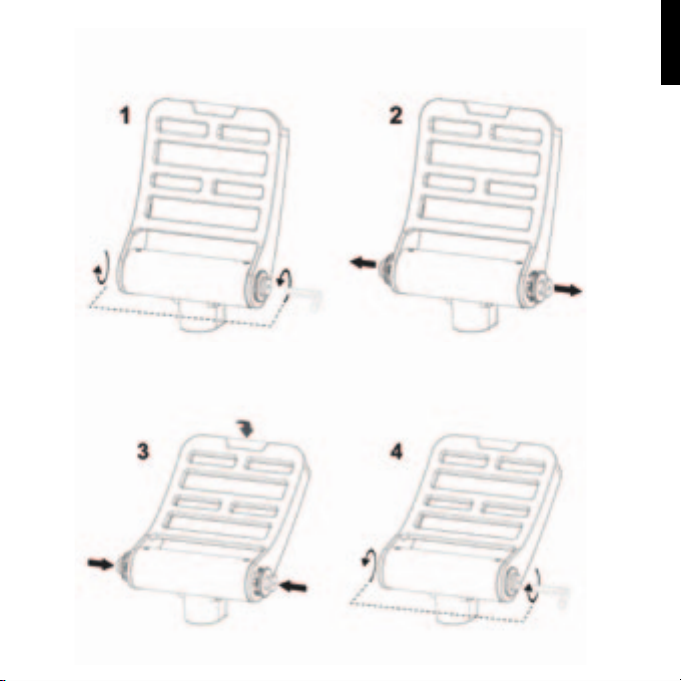
How to adjuSt tHE PEdaL aNGLE
ENGLISH
5
Page 6

INtroductIoN
The Saitek Pro Flight Combat Rudder Pedals are solid 3-axis rudder pedals designed
to maximize realism by enabling foot control of the rudder and brakes function in ight
simulation PC Games. The Pro Flight Combat Rudder Pedals work with any Saitek PC
product.
fEaturES:
• Independent left and right brake axes
• Rudder axis
• Self-centering with adjustable damping
• Silent, smooth action for optimum control and precision
• Adjustable pedal angle to suit all styles of ying
• High-quality, part metal construction for long life
• Smart Technology (ST) Programming Software allows gamers to congure their
controls to suit their preferred gaming style, and to save the congurations as
personal proles
drIvErS aNd SoftwarE INStaLLatIoN for uSErS of wINdowS® xP, 32- aNd 64-bIt
1. With your computer powered on, close down any programs that are currently running,
and then insert the Installation CD into your CD-ROM drive.
2. When the Introduction Screen appears, click Install Software to continue. If the CD
does not run automatically, select Start from the Windows Taskbar, then Run, then type
D:\Setup.exe into the Run window’s text entry eld, and then click OK (assuming D:\ is
the letter of your CD-ROM drive).
3. When the Welcome screen appears, click Next to continue.
4. After reading the Disclaimer, select the I accept the terms of the Disclaimer option
and click Next to continue.
5. At the Driver Setup screen, if you haven’t already done so, plug the USB cable into
one of your computer’s USB ports, and then click Next.
6
Page 7

6. At the Driver Setup screen, click Next to test your controller.
7. When the Saitek Controller screen appears, try out all of your controller’s controls to
determine if it is working properly. When you have nished, click OK.
8. In the following Software Setup screen, click Next and follow the on-screen
instructions. At this point you will be asked to install such features as the
Programmable Support for Mouse, Programmable Support for Keyboard and
Programmable Hotkeys (these are important components of the programming
software and are required).
9. If you are asked if Windows can connect to Windows Update to search for software,
choose No, not at this time. Continue to click Next and Finish to accept the installation
until the Registration screen appears.
10. The next window will install the important components of the software. When asked
what to do, choose Install the software automatically (recommended). Do this for the
Keyboard, Mouse and Hotkeys.
11. At the Registration screen, select Check this box to register now and follow the
on-screen instructions, or do not select this option and register later.
12. Upon completion of the installation, you have the option to Run Prole Editor, which
will give you a view of the programming environment. If you do not wish to see the
Prole Editor at this point, uncheck the box and click Finish to complete the installation.
drIvErS aNd SoftwarE INStaLLatIoN for uSErS of wINdowS® vISta aNd 7, 32aNd 64-bIt
1. With your computer powered on, close down any programs that are currently running,
and then insert the Installation CD into your CD-ROM drive.
2. When the Introduction Screen appears, click Install Software to continue. If the CD
does not run automatically, select Start from the Windows Taskbar, then Run, then type
D:\Setup.exe into the Run window’s text entry eld, and then click OK (assuming D:\ is
the letter of your CD-ROM drive).
3. When the Welcome screen appears, click Next to continue.
4. After reading the Disclaimer, select the I accept the terms of the Disclaimer option
and click Next to continue.
7
ENGLISH
Page 8

5. At the Driver Setup screen, if you haven’t already done so, plug the USB cable into
one of your computer’s USB ports and then click Next.
6. At the Driver Setup screen, click Next to test your controller.
7. When the Saitek Controller screen appears, try out all of your controller’s controls to
determine if it is working properly. When you have nished, click OK.
8. In the following Software Setup screen, click Next and a pop-up box will appear
asking if you “want to trust software from Saitek.” Click yes, and then click Next. The
installation will automatically continue until the Registration screen appears.
9. At the Registration screen, select Check this box to register now and follow the on-
screen instructions, or do not select this option and register later.
10. Upon completion of the installation, you have the option to Run Prole Editor,
which will give you a view of the programming environment. If you do not wish to see
the Prole Editor at this point, uncheck the box and click on Finish to complete the
installation.
ENabLING Your coNtroLLEr IN GamES
Most games support game controllers, which you can enable by using the [control]
options menu within the Main Menu of the game itself. If you are having trouble with
this, or are not sure if the game supports game controllers, please refer to the game’s
user manual for assistance.
SEtuP IN fLIGHt SIm x aNd fLIGHt SIm 2004
The Rudder Pedals have three axes, one for the rudder and two foot pedal axes that
are used for the toe brakes. There is also a rotary wheel in the center that allows for the
rudder movement’s tension to be increased and decreased. Due to the way in which
Flight Sim detects the pedals, they need to be correctly congured before you can start
getting the most out of them.
Start by opening FSX and going to Settings > Controls > Control Axes. Select the
Rudder Pedals in Controller Type. Double-click the Event Brake (left axis) and depress
8
Page 9

the left brake when the Change Assignment window appears. Left toe will appear in the
window, and then click ok. Repeat the process for Brake (right axis) and the right pedal.
Ensure that there is a tick in the Reverse box for both brake axes. Finally, double-click
Rudder Axis and perform the rudder movement, so that the Change Assignment window
detects the rudder axis. These are the only three axes that should be set to the pedals;
if there are any more in the list, delete them using the Delete Joystick Assignment
command.
Now that the axes are set, go to the Calibration window. Select the Rudder Pedals and
then select Advanced Controls. Ensure that the sensitivities for both brake axes are set
to 75-80% and that the null zones are set to 0% for both. The rudder should be set to
50-75% sensitivity with a small null zone of about 5%. Before you load a ight, you will
need to disable Auto Rudder. To do this, go to Settings > Realism and ensure that the
Auto Rudder box does not have a tick inside it.
You should now be good to go. Load up a ight and when the plane is stationary
on the runway, depress the pedal, and then release it. You should see the brake
announcement in the corner of your screen. If all is well, the indicator will appear and
then disappear when the brake is released. If the brakes stay on, go back to Settings
> Controls > Control Axes, and remove the ticks from the reverse box for the brake
pedals.
ENGLISH
9
Page 10

How to tESt aNd adjuSt Your coNtroLLEr
You can test your controller at any time by Clicking on Start, then Control Panel in
Windows. Look for an icon titled either Game Controllers or Gaming Options (Windows
7 users may have to click Printers and Other Hardware rst).
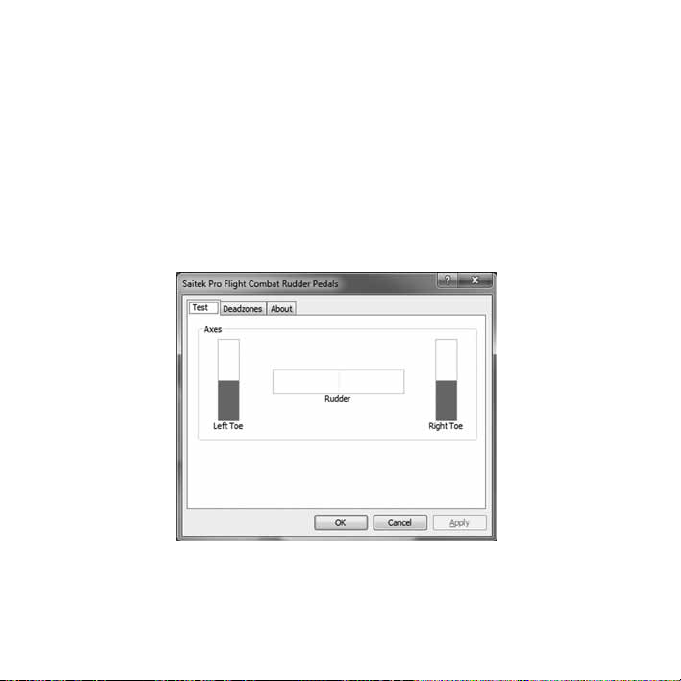
Open the Game Controllers/Gaming Options window and the Saitek Pro Flight Combat
Rudder pedals should appear. Click on Properties to bring up the test screen. Click on
the Test tab. Moving your rudder pedals should result in a response in this screen; if
there is a response you know that the rudder pedals are functioning correctly.
10
Page 11
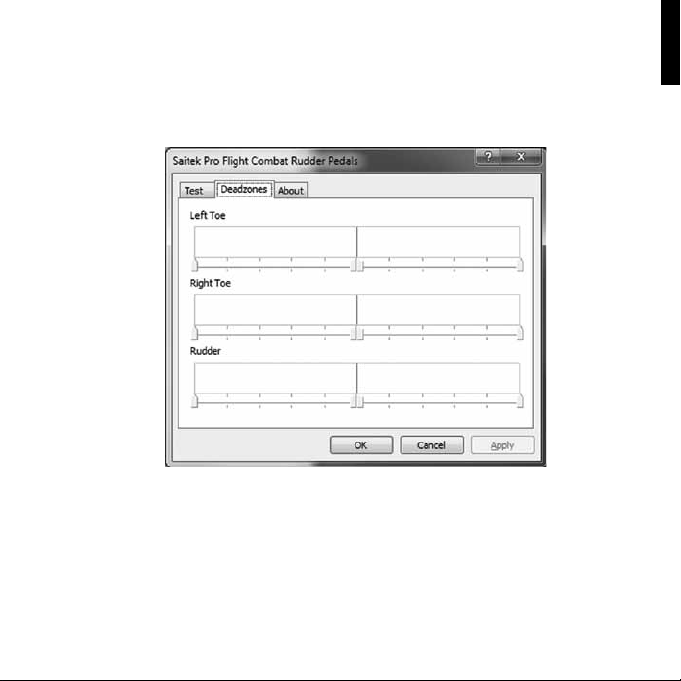
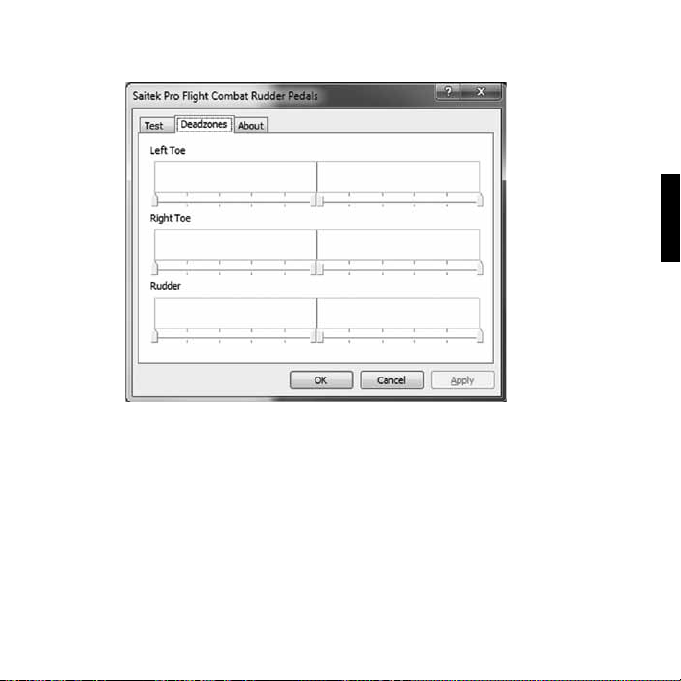
Click on the Deadzones tab of the Properties window. You can adjust the deadzones
(i.e., the distance of pedal travel which doesn’t result in a corresponding in-game rudder
movement) of the Pro Flight Combat Rudder Pedals by clicking on the deadzone axes
and dragging the deadzone indicators to the desired level. To test the new settings,
either click on the Test tab or play a ight sim game.
ProGrammING Your Pro fLIGHt coNtroLLEr wItH Smart tEcHNoLoGY ProGrammING
SoftwarE
INtroducING Smart tEcHNoLoGY ProGrammING SoftwarE
Smart Technology (ST) Programming Software is the software supplied to congure
your controller for enhanced functionality. ST delivers a powerful set of features,
11
ENGLISH
Page 12

allowing you to program your device with the ultimate conguration for total interaction.
Despite a level of sophistication previously unseen in the market, the software remains
simple and intuitive to use.
fEaturES of Smart tEcHNoLoGY ProGrammING SoftwarE:
• Quick and easy setup in any game
• Personalize the controller settings for your favorite games
• Congure your controller with an on-screen, high resolution model and interface
• Multiple setup options for each controller - ideal if a controller is used by several
people
• Program special moves with sophisticated timing features
• Special game setups available as “Proles” from the Saitek website and on the
Smart Technology CD
• Download the latest version of Smart Technology Programming Software from
the Saitek website
ruNNING tHE Smart tEcHNoLoGY ProGrammING SoftwarE
A. Click on Start, then All Programs, and then look for Smart Technology in your list
of programs. Click on this and under this heading you will see another heading with an
icon saying Prole Editor. Click on this and the Smart Technology software will open
up.
B. Look on your desktop for the Smart Technology icon. Once found, double-click and
the Smart Technology software will load.
C. Right-click the controller icon next to your clock, and click Prole Editor from the
list.
Once the ST software has opened, you will be presented with a “tip” screen (if it’s the
rst time you have run the software). This screen gives useful information pertaining
to the prole software. If you do not wish to see this screen when you start the ST
software, uncheck the small check box in the corner of the tip screen. The tip box can
12
Page 13

be closed by clicking on the OK icon in the bottom right corner. You can get the tip box
back by going to the support tab and clicking on SHOW STARTUP TIPS PAGE.
Product
The product page is the main screen that appears when the Smart Technology software
is rst opened (as shown above). Any Pro Flight hardware connected to your computer
will be automatically detected and displayed on this screen. Since they are always rst
in the list of connected hardware, the Pro Flight Rudder Pedals will always appear in
the software’s product page, although no Pro Flight hardware is physically connected to
your computer.
ProGrammING
From the programming tab, you can mimic your controller to directly copy any of the
keyboard commands that are used in your favorite games. The commands are then
saved in what we call a Prole. When you click on the programming tab, you will be
presented with a high resolution image of the controller you are going to program on the
left, and going down the right side of the screen you will see a list of command boxes
called “Cells.” For a detailed guide on the programming, go to the support tab and click
READ PROGRAMMING MANUAL.
SuPPort
From the support tab, you can access the following features by clicking on them:
SHow tIPS
Once clicked, the tip screen will appear; this is the same screen that appears the
very rst time you run the ST software and you can run through all tips from this
screen if desired.
ENGLISH
13
Page 14

dowNLoad drIvErS aNd SoftwarE
Clicking on this link will open your default browser and direct it to the download drivers
and software page.
dowNLoad GamE ProfILES
Clicking on this link will open your default browser and direct it to the download
proles page. From this page, choose your controller and a list of pre-made proles
that match all the latest games will appear.
rEad St ProGrammING maNuaL
The full ST programming manual will open in your default browser window.
coNtact uS
Clicking on Contact Us will open your default browser and direct it to the contact
information page; from here you can choose from a list of contacts.
14
Page 15
démarraGE
RUDDER AXIS
With self-centering mechanism
Avec mécanisme d’autocentrage
Mit selbstzentrierendem Mechanismus
Con meccanismo autocentrante
Con mecanismo autoajustable
ADJUSTABLE TENSION
Adjust the resistance to suit any plane
Ajustez la résistance pour s’adapter à tous les avions
Stellen Sie den Widerstand für Ihr jeweiliges Flugzeug ein
Per regolare la resistenza, in modo da adattarsi a qualsiasi aereo
Ajusta la resistencia para que se adapte a cualquier avión
DURABLE METAL PEDALS
With independent toe brakes
Avec axes de freins de palonnier indépendants
Mit unabhängigen Zehenbremsen
Con freni indipendenti
Con frenos de dedos independientes
fraNÇaIS
15
Page 16

commENt ajuStEr L’aNGLE dES PédaLES
16
Page 17

INtroductIoN
Les pédales de gouverne de direction pour le combat Saitek Pro Flight sont des pédales
compactes de direction selon 3 axes conçues pour optimiser le réalisme en permettant
de contrôler avec les pieds les fonctions de gouverne de direction et de freins dans les
jeux de simulation de vol sur PC. Les pédales de direction pour le combat Pro Flight
fonctionnent avec tous les produits Saitek pour PC.
caractérIStIquES :
• Axes de frein gauche et droit indépendants
• Axe de gouverne de direction
• Centrage automatique avec amortissement réglable
• Action silencieuse et souple pour un contrôle idéal et une précision optimale
• Angle de pédale réglable an de s’adapter à tous les styles de vol
• Construction avec des pièces métalliques de haute qualité pour une longue durée
de vie
• Le logiciel Smart Technology (ST) Programming Software permet aux joueurs de
congurer leurs commandes an qu’elles s’adaptent à leur style de jeu préféré, ainsi
que d’enregistrer les congurations dans des prols personnels
INStaLLatIoN dES PILotES Et du LoGIcIEL Pour LES utILISatEurS dE wINdowS® xP, 32
Et 64 bItS
1. Lorsque votre ordinateur est allumé, fermez tous les programmes en cours de
fonctionnement, puis insérez le CD d’installation dans le lecteur de CD-ROM.
2. Lorsque l’écran d’introduction apparaît, cliquez sur Install Software pour poursuivre.
Si le CD ne s’exécute pas automatiquement, sélectionnez Start dans la barre des
tâches Windows, puis Run, puis saisissez D:\Setup.exe dans le champ de saisie de la
fenêtre Run, puis cliquez sur OK (en supposant que D:\ correspond à la lettre de votre
lecteur de CD-ROM).
3. Lorsque l’écran de bienvenue apparaît, cliquez sur Next pour poursuivre.
17
fraNÇaIS
Page 18

4. Après avoir lu l’avis d’exclusion de responsabilité, sélectionnez l’option I accept the
terms of the Disclaimer et cliquez sur Next pour poursuivre.
5. Dans l’écran de conguration du pilote, si vous ne l’avez pas encore fait, branchez le
câble USB dans l’un des ports USB de l’ordinateur, puis cliquez sur Next.
6. Dans l’écran de démarrage du pilote, cliquez sur Next pour tester le contrôleur.
7. Lorsque l’écran du contrôleur Saitek apparaît, essayez toutes les commandes de
votre contrôleur an de déterminer s’il fonctionne correctement. Lorsque vous avez
terminé, cliquez sur OK.
8. Dans l’écran Software Setup suivant, cliquez sur Next et suivez les instructions
à l’écran. À ce stade, il vous sera demandé d’installer des fonctions telles
que Programmable Support for Mouse, Programmable Support for Keyboard
et Programmable Hotkeys (il s’agit de composants importants du logiciel de
programmation et ils sont nécessaires).
9. S’il vous est demandé si Windows peut se connecter à Windows Update pour
rechercher le logiciel, choisissez No, not at this time. Poursuivez pour cliquer sur Next
et Finish pour accepter l’installation jusqu’à ce que l’écran Registration apparaisse.
10. La fenêtre suivante va installer les composants importants du logiciel. Lorsqu’il
vous est demandé ce qu’il faut faire, choisissez Install the software automatically
(recommended). Effectuez cela pour le clavier, la souris et les touches de raccourci.
11. Dans l’écran Registration, sélectionnez Check this box to register now et suivez
les instructions à l’écran, vous pouvez également choisir de ne pas sélectionner cette
option et de vous enregistrer ultérieurement.
12. À la n de l’installation, il vous est proposé l’option Run Prole Editor, qui vous
donnera un aperçu de l’environnement de programmation. Si vous ne souhaitez pas
voir l’éditeur de prol à ce stade, décochez la case et cliquez sur Finish pour achever
l’installation.
INStaLLatIoN dES PILotES Et du LoGIcIEL Pour LES utILISatEurS dE wINdowS® vISta
Et 7, 32 Et 64 bItS
1. Lorsque votre ordinateur est allumé, fermez tous les programmes en cours de
fonctionnement, puis insérez le CD d’installation dans le lecteur de CD-ROM.
18
Page 19

2. Lorsque l’écran d’introduction apparaît, cliquez sur Install Software pour poursuivre.
Si le CD ne s’exécute pas automatiquement, sélectionnez Start dans la barre des
tâches Windows, puis Run, puis saisissez D:\Setup.exe dans le champ de saisie de la
fenêtre Run, puis cliquez sur OK (en supposant que D:\ correspond à la lettre de votre
lecteur de CD-ROM).
3. Lorsque l’écran de bienvenue apparaît, cliquez sur Next pour poursuivre.
4. Après avoir lu l’avis d’exclusion de responsabilité, sélectionnez l’option I accept the
terms of the Disclaimer et cliquez sur Next pour poursuivre.
5. Dans l’écran de conguration du pilote, si vous ne l’avez pas encore fait, branchez le
câble USB dans l’un des ports USB de l’ordinateur, puis cliquez sur Next.
6. Dans l’écran de démarrage du pilote, cliquez sur Next pour tester le contrôleur.
7. Lorsque l’écran du contrôleur Saitek apparaît, essayez toutes les commandes de
votre contrôleur an de déterminer s’il fonctionne correctement. Lorsque vous avez
terminé, cliquez sur OK.
8. Dans l’écran de conguration du logiciel suivant, cliquez sur Next et une zone
contextuelle va apparaître en vous demandant si vous « voulez faire conance au
logiciel de Saitek ». Cliquez sur yes, puis sur Next. L’installation va se poursuivre
automatiquement jusqu’à ce que l’écran d’enregistrement apparaisse.
9. Dans l’écran Registration, sélectionnez Check this box to register now et suivez
les instructions à l’écran, vous pouvez également choisir de ne pas sélectionner cette
option et de vous enregistrer ultérieurement.
10. À la n de l’installation, il vous est proposé l’option Run Prole Editor, qui vous
donnera un aperçu de l’environnement de programmation. Si vous ne souhaitez pas
voir l’éditeur de prol à ce stade, décochez la case et cliquez sur Finish pour achever
l’installation.
actIvatIoN dE votrE coNtrôLEur daNS LES jEux
La plupart des jeux prennent en charge les contrôleurs de jeux, que vous pouvez
activer en utilisant le menu des options [control] dans le menu principal ou le jeu luimême. Si vous rencontrez des problèmes pour cela, ou si vous n’êtes pas sûr que le
jeu prenne en charge des contrôleurs de jeu, reportez-vous au manuel de l’utilisateur du
19
fraNÇaIS
Page 20

jeu pour obtenir de l’aide.
coNfIGuratIoN daNS fLIGHt SIm x Et fLIGHt SIm 2004
Les pédales de gouverne de direction possèdent trois axes, un pour la gouverne de
direction et deux pour les axes de pédales utilisées pour les freins de palonnier. Il existe
également une molette de rotation au centre qui permet d’augmenter ou de diminuer
la tension pour le mouvement de la gouverne de direction. En fonction de la manière
dont Flight Sim détecte les pédales, celles-ci doivent être tout d’abord congurées
correctement pour que vous puissiez commencer à en tirer parti de manière optimale.
Commencez par ouvrir FSX et allez dans Paramètres > Commandes > Axes de
commande. Sélectionnez les pédales de gouverne de direction dans le type de
contrôleur. Double-cliquez sur le frein d’événement (axe de gauche) et appuyez sur
le frein gauche lorsque la fenêtre Changer l’affectation apparaît. Le palonnier gauche
va apparaître dans la fenêtre, cliquez alors sur OK. Répétez le processus pour le frein
(axe de droite) et la pédale de droite. Assurez-vous que la case Marche arrière est
cochée pour les deux axes de frein. Pour terminer, double-cliquez sur l’axe de gouverne
de direction, an que la fenêtre Changer l’affectation détecte l’axe de gouverne de
direction. Ces trois axes sont les seuls qui doivent être affectés aux pédales ; s’il y en a
plus dans la liste, supprimez-les en utilisant la commande Supprimer l’affectation de la
manette.
À présent que les axes sont dénis, allez dans la fenêtre Étalonnage. Sélectionnez les
pédales de gouverne de direction puis sélectionnez Commandes avancées. Assurezvous que la sensibilité des deux axes de frein est réglée sur 75-80 % et que les zones
minimales sont toutes deux réglées sur 0%. La gouverne de direction doit être réglée
sur une sensibilité de 50-75 % avec une petite zone minimale d’environ 5 %. Avant
de charger un vol, vous devez désactiver la gouverne de direction automatique. Pour
ce faire, allez dans Paramètres > Réalisme et assurez-vous que la case Gouverne de
direction automatique n’est pas cochée.
20
Page 21

Vous devez maintenant être prêt. Chargez un vol et, lorsque l’avion est immobile sur
la piste, appuyez sur la pédale, puis relâchez-la. Vous devez voir le message relatif
aux freins dans le coin de votre écran. Si tout se passe bien, le message d’indication
va apparaître, puis disparaître lorsque le frein est relâché. Si les freins restent bloqués,
allez dans Paramètres > Commandes > Axes de commande, et décochez la case
Marche arrière pour les pédales de frein.
fraNÇaIS
21
Page 22

commENt tEStEr Et réGLEr votrE coNtrôLEur
Vous pouvez tester votre contrôleur à tout moment en cliquant sur Démarrer, puis sur
Paramètres, et en sélectionnant Panneau de conguration dans Windows. Recherchez
une icône intitulée Contrôleurs de jeu ou Options de jeu (les utilisateurs de Windows 7
devront peut-être cliquer tout d’abord sur Imprimantes, puis sur Autre matériel).
Ouvrez la fenêtre Contrôleurs de jeu/Options de jeu et les pédales de gouverne de
direction pour le combat Saitek Pro Flight doivent apparaître. Cliquez sur Propriétés
pour faire apparaître l’écran de test. Cliquez sur l’onglet Tester. Le déplacement des
pédales de gouverne de direction doit se traduire par une réponse sur cet écran ; s’il
y a une réponse, cela indique que les pédales de gouverne de direction fonctionnent
correctement.
22
Page 23

Cliquez sur l’onglet Zones de non-sensibilité dans la fenêtre Propriétés. Vous pouvez
ajuster les indicateurs de zone de non-sensibilité (c’est à dire la course de la pédale qui
n’entraîne pas de mouvement de la gouverne de direction correspondante) des pédales
de gouverne de direction pour le combat de Pro Flight Combat en cliquant sur les axes
des zones de non-sensibilité et en faisant glisser les indicateurs de non-sensibilité sur
le niveau souhaité. Pour tester les nouveaux paramètres, cliquez sur l’onglet Tester ou
jouez à un jeu de simulation de vol.
ProGrammatIoN dE votrE coNtrôLEur Pro fLIGHt avEc LE LoGIcIEL Smart
tEcHNoLoGY ProGrammING SoftwarE
PréSENtatIoN du LoGIcIEL Smart tEcHNoLoGY ProGrammING SoftwarE
fraNÇaIS
Smart Technology (ST) Programming Software est le logiciel fourni pour congurer
23
Page 24

votre contrôleur an de disposer de fonctionnalités avancées. ST offre un ensemble
puissant de fonctions, en vous permettant de programmer votre périphérique avec une
conguration optimale pour une interaction totale. En dépit d’un niveau de sophistication
encore jamais vu sur le marché, le logiciel reste d’utilisation simple et intuitive.
foNctIoNNaLItéS du LoGIcIEL Smart tEcHNoLoGY ProGrammING SoftwarE :
• Conguration rapide et facile avec n’importe quel jeu
• Personnalisez les paramètres du contrôleur pour vos jeux favoris
• Congurez votre contrôleur avec un modèle et une interface à l’écran de haute
résolution
• Plusieurs options de conguration pour chaque contrôleur – idéal lorsqu’un
contrôleur est utilisé par plusieurs personnes
• Programmez des déplacements spéciaux avec des fonctions de synchronisation
sophistiquées
• Congurations de jeu spéciales disponibles en tant que « Proles » sur le site Web
de Saitek et sur le CD Smart Technology
• Téléchargez la dernière version du logiciel Smart Technology Programming Software
sur le site Web de Saitek
ExécutIoN du LoGIcIEL Smart tEcHNoLoGY ProGrammING SoftwarE
A. Cliquez sur Start, puis sur All Programs, puis recherchez Technology dans la liste
des vos programmes. Cliquez sur celui-ci et sous cet en-tête, vous allez apercevoir
un autre en-tête avec une icône libellée Prole Editor. Cliquez sur cette dernière pour
ouvrir le logiciel Smart Technology.
B. Regardez l’icône Smart Technology sur votre bureau. Lorsque vous l’avez trouvée,
double-cliquez pour charger le logiciel Smart Technology.
C. Cliquez avec le bouton droit sur l’icône du contrôleur à côté de votre horloge, et
cliquez sur Prole Editor from the list.
Une fois que le logiciel ST est ouvert, vous allez voir apparaître un écran de « Conseil
24
Page 25

» (s’il s’agit de la première fois que vous exécutez le logiciel). Cet écran vous donne
des informations utiles concernant le logiciel pour le prol. Si vous ne souhaitez pas voir
cet écran lorsque vous démarrez le logiciel ST, décochez la petite case dans le coin de
l’écran de conseil. Vous pouvez fermer la zone de conseil en cliquant sur l’icône OK
dans le coin inférieur droit. Vous pouvez faire réapparaître la zone de conseil en allant
dans l’onglet Aide et en cliquant sur SHOW STARTUP TIPS PAGE.
ProduIt
La page produit est l’écran principal qui apparaît lors de la première ouverture du
logiciel Smart Technology (comme illustré ci-dessous). Tout matériel Pro Flight connecté
à votre ordinateur sera automatiquement détecté et afché sur cet écran. Étant
données qu’elles se trouvent toujours en début de la liste des matériels connectés, les
pédales de gouverne de direction Pro Flight apparaîtront toujours dans la page produit
du logiciel, bien qu’aucun matériel Pro Flight ne soit connecté physiquement à votre
ordinateur.
ProGrammatIoN
Dans l’onglet de programmation, vous pouvez imiter votre contrôleur pour copier
directement toute commande du clavier utilisée dans vos jeux favoris. Les commandes
sont ensuite enregistrées dans ce que nous appelons un prol. Lorsque vous cliquez
sur l’onglet de programmation, vous allez voir s’afcher sur la gauche une image haute
résolution du contrôleur que vous allez programmer, et en descendant sur le côté droit,
vous allez voir une liste de zones de commandes appelées « cellules ». Pour obtenir
un guide détaillé de la programmation, allez dans l’onglet Aide et cliquez sur READ
PROGRAMMING MANUAL.
aSSIStaNcE
Dans l’onglet Aide, vous pouvez accéder aux fonctions suivantes en cliquant dessus.
fraNÇaIS
25
Page 26

affIcHEr LES coNSEILS
Lorsque vous cliquez dessus, l’écran de conseil va apparaître ; il s’agit du même écran
que celui qui apparaît lors de la toute première fois que vous exécuter le logiciel ST et
vous pouvez parcourir tous les conseils à partir de cet écran si vous le souhaitez.
téLécHarGEr LES PILotES Et LE LoGIcIEL
Un clic sur ce lien ouvre votre navigateur par défaut et le dirige vers la page de
téléchargement des pilotes et du logiciel.
téLécHarGEr LES ProfILS dE jEu
Un clic sur ce lien ouvre votre navigateur par défaut et le dirige vers la page de
téléchargement des prols. Dans cette page, choisissez votre contrôleur et une liste de
prols préétablis qui correspondent aux jeux les plus récents va apparaître.
LIrE LE maNuEL dE ProGrammatIoN St
L’intégralité du manuel de programmation ST s’ouvre dans votre fenêtre de navigation
par défaut.
coNtactEz-NouS
Un clic sur Contact Us ouvre votre navigateur par défaut t le dirige vers la page
d’informations sur les contacts ; là, vous pouvez faire un choix dans une liste de
contacts.
26
Page 27

ErStE ScHrIttE
RUDDER AXIS
With self-centering mechanism
Avec mécanisme d’autocentrage
Mit selbstzentrierendem Mechanismus
Con meccanismo autocentrante
Con mecanismo autoajustable
ADJUSTABLE TENSION
Adjust the resistance to suit any plane
Ajustez la résistance pour s’adapter à tous les avions
Stellen Sie den Widerstand für Ihr jeweiliges Flugzeug ein
Per regolare la resistenza, in modo da adattarsi a qualsiasi aereo
Ajusta la resistencia para que se adapte a cualquier avión
DURABLE METAL PEDALS
With independent toe brakes
Avec axes de freins de palonnier indépendants
Mit unabhängigen Zehenbremsen
Con freni indipendenti
Con frenos de dedos independientes
dEutScH
27
Page 28

aNPaSSEN dES PEdaLwINkELS
28
Page 29

EINfüHruNG
Die Saitek Pro Flight Combat-Ruderpedale sind stabile Ruderpedale mit drei Achsen,
die das Spielvergnügen so realistisch wie möglich machen sollen. Sie ermöglichen in
PC-Flugsimulationsspielen die Steuerung der Ruder- und Bremsfunktionen mit dem
Fuß. Die Pro Flight Combat-Ruderpedale funktionieren mit jedem Saitek PC-Produkt.
fEaturES:
• Unabhängige Bremsachsen für links und rechts
• Ruderachsen
• Selbstausrichtung mit einstellbarer Dämpfung
• Lautloses und reibungsloses Spielen mit optimaler Kontrolle und Präzision
• Einstellbarer Pedalwinkel für alle Flugweisen
• Hochwertiges Design mit Teilen aus Metall für eine lange Lebensdauer
• Smart Technology (ST) Programming Software ermöglicht Gamers, Ihre
Bedienelemente je nach bevorzugter Spielweise anzupassen und die Kongurierung
als persönliches Prol zu speichern
trEIbEr- uNd SoftwarEINStaLLatIoN für bENutzEr voN wINdowS® xP 32-bIt uNd
64-bIt
1. Schließen Sie alle Programme, die auf Ihrem eingeschalteten Computer ausgeführt
werden, und legen Sie die Installations-CD in Ihr CD-ROM-Laufwerk ein.
2. Klicken Sie, wenn der Willkommensbildschirm angezeigt wird, auf Install Software,
um fortzufahren. Wenn die CD nicht automatisch ausgeführt wird, wählen Sie Start
auf der Windows-Taskleiste und dann Run und geben Sie D:\Setup.exe in das
Texteingabefeld des Fensters Run ein. Klicken Sie anschließend auf OK (vorausgesetzt,
D:\ ist der Buchstabe Ihres CD-ROM-Laufwerks).
3. Klicken Sie, wenn der Willkommensbildschirm angezeigt wird, auf Next, um
fortzufahren.
4. Wählen Sie, nachdem Sie den Garantieausschluss gelesen haben, die Option I
29
dEutScH
Page 30

accept the terms of the Disclaimer und klicken Sie auf Next, um fortzufahren.
5. Wenn der Bildschirm für das Treiber-Setup angezeigt wird, schließen Sie das USBKable an einen USB-Anschluss Ihres Computers an, sollten Sie das noch nicht getan
haben, und klicken Sie dann auf Next.
6. Wenn der Bildschirm für das Treiber-Setup angezeigt wird, klicken Sie auf Next, um
Ihren Controller zu testen.
7. Wenn der Saitek Controller-Bildschirm angezeigt wird, testen Sie alle Steuerungen
Ihres Controllers, um zu überprüfen, ob er ordnungsgemäß funktioniert. Klicken Sie auf
OK, wenn Sie fertig sind.
9. Klicken Sie auf dem folgenden Software-Setupbildschirm auf Next und befolgen
Sie die Bildschirmanweisungen. An diesem Punkt werden Sie aufgefordert, Features
wie Programmable Support for Mouse, Programmable Support for Keyboard und
Programmable Hotkeys zu installieren (dies sind wichtige Komponenten der
Programmiersoftware, die notwendig sind).
10. Wenn die Option Windows can connect to Windows Update to search for software
angezeigt wird, wählen Sie No, not at this time. Klicken Sie weiter auf Next und Finish,
um die Installation zu akzeptieren, bis der Bildschirm Registration angezeigt wird.
11. Im nächsten Fenster werden die wichtigen Komponenten der Software installiert.
Wenn Sie dazu aufgefordert werden, wählen Sie Install the software automatically
(recommended). Führen Sie diese Schritte für die Tastatur, Maus und die Hotkeys aus.
12. Wenn der Registrierungsbildschirm angezeigt wird, wählen Sie die Option Check
this box to register now und befolgen Sie die Bildschirmanweisungen. Alternativ
können Sie diese Option auch später auswählen und sich zu einem anderen Zeitpunkt
registrieren.
13. Nach Abschluss der Installation erhalten Sie die Option Run Prole Editor, die Ihnen
die Programmierumgebung anzeigt. Wenn Sie den Proleditor zu diesem Zeitpunkt
nicht anzeigen möchten, deaktivieren Sie das Kontrollkästchen und klicken Sie auf
Finish, um die Installation abzuschließen.
30
Page 31

trEIbEr- uNd SoftwarEINStaLLatIoN für bENutzEr voN wINdowS® vISta uNd 7 32bIt uNd 64-bIt
1. Schließen Sie alle Programme, die auf Ihrem eingeschalteten Computer ausgeführt
werden, und legen Sie die Installations-CD in Ihr CD-ROM-Laufwerk ein.
2. Klicken Sie, wenn der Willkommensbildschirm angezeigt wird auf Install Software
, um fortzufahren. Wenn die CD nicht automatisch ausgeführt wird, wählen Sie
Start auf der Windows-Taskleiste und dann Run und geben Sie D:\Setup.exe in das
Texteingabefeld des Fensters Run ein. Klicken Sie anschließend auf OK (vorausgesetzt,
D:\ ist der Buchstabe Ihre CD-ROM-Laufwerks).
3. Klicken Sie, wenn der Willkommensbildschirm angezeigt wird auf Next , um
fortzufahren.
4. Wählen Sie, nachdem Sie den Garantieausschluss gelesen haben, die Option I
accept the terms of the Disclaimer und klicken Sie auf Next , um fortzufahren.
5. Wenn der Bildschirm für das Treiber-Setup angezeigt wird, schließen Sie das USBKable an einen USB-Anschluss Ihres Computers an, sollten Sie das noch nicht getan
haben, und klicken Sie dann auf Next.
6. Wenn der Bildschirm für das Treiber-Setup angezeigt wird, klicken Sie auf Next, um
Ihren Controller zu testen.
7. Wenn der Saitek Controller-Bildschirm angezeigt wird, testen Sie alle Steuerungen
Ihres Controllers, um zu überprüfen, ob er ordnungsgemäß funktioniert. Klicken Sie auf
OK, wenn Sie fertig sind.
8. Klicken Sie auf dem folgenden Software-Setupbildschirm auf Next. Ein Popupfenster
wird mit der Meldung angezeigt, ob Sie der Software von Saitek vertrauen möchten.
Klicken Sie auf Yes und dann auf Next. Die Installation wird automatisch fortgesetzt, bis
der Registrierungsbildschirm angezeigt wird.
9. Wenn der Registrierungsbildschirm angezeigt wird, wählen Sie Check this box to
register now und befolgen Sie die Bildschirmanweisungen. Alternativ können Sie diese
Option auch später auswählen und sich zu einem anderen Zeitpunkt registrieren.
10. Nach Abschluss der Installation erhalten Sie die Option Run Prole Editor, die Ihnen
die Programmierumgebung anzeigt. Wenn Sie den Proleditor zu diesem Zeitpunkt
nicht anzeigen möchten, deaktivieren Sie das Kontrollkästchen und klicken Sie auf
31
dEutScH
Page 32

Finish, um die Installation abzuschließen.
aktIvIErEN IHrES coNtroLLErS IN SPIELEN
Die meisten Spiele unterstützen Spiel-Controller, die über das Menü für die
Steuerungsoptionen im Hauptmenü des Spiels aktiviert werden können. Wenn Sie
Probleme damit haben oder sich nicht sicher sind, ob das Spiel Spiel-Controller
unterstützt, lesen Sie die Bedienungsanleitung des Spiels.
SEtuP IN fLIGHt SIm x uNd fLIGHt SIm 2004
Die Ruderpedale haben drei Achsen, eine für das Ruder und zwei für die Fußpedale,
die für die Zehenbremsen genutzt werden. Es gibt außerdem einen Drehregler in der
Mitte, mit dem die Spannung der Ruderbewegung erhöht oder verringert werden kann.
Aufgrund der Art und Weise, wie Flight Sim die Pedale erkennt, müssen sie korrekt
konguriert werden, bevor Sie von ihnen protieren können.
Starten Sie dazu FSX und gehen Sie zu „Settings“ > „Controls“ > „Control Axes“.
Wählen Sie für die Steuerweise die Ruderpedale aus. Doppelklicken Sie auf die
Aktionsbremse (linke Axe) und drücken Sie auf die linke Bremse, wenn das Fenster
„Change Assignment“ angezeigt wird. Die linke Zehenbremse wird im Fenster
angezeigt. Klicken Sie dann auf „Ok“. Wiederholen Sie diesen Vorgang für die Bremse
(rechte Achse) und das rechte Pedal. Stellen Sie sicher, dass das Kontrollkästchen
„Reverse“ für beide Achsen aktiviert ist. Doppelklicken Sie abschließend auf die
Ruderachse und führen Sie die Ruderbewegung durch, damit die Ruderachse vom das
Fenster „Change Assignment“ erkannt wird. Dies sind die einzigen drei Achsen, die
auf die Pedale eingestellt werden sollten. Wenn weitere Achsen in der Liste vorhanden
sind, löschen Sie sie mithilfe des Befehls „Delete Joystick Assignment“.
Nachdem die Achsen eingerichtet wurden, gehen Sie zum Kalibrierfenster. Wählen
Sie die Ruderpedale aus und anschließend „Advanced Controls“. Stellen Sie sicher,
dass die Empndlichkeit für beide Bremsachsen auf 75 % bis 80 % eingestellt ist
32
Page 33

und dass die Nullzonen für beide auf 0 % eingestellt sind. Das Ruder sollte auf eine
Empndlichkeit von 50 % bis 75 % mit einer geringen Nullzone von ungefähr 5 %
eingestellt werden. Bevor Sie einen Flug laden, müssen Sie das automatische Ruder
deaktivieren. Gehen Sie hierzu zu „Settings“ > „Realism“ und stellen Sie sicher, dass
das Kontrollkästchen „Auto Rudder“ nicht deaktiviert ist.
Jetzt können Sie starten. Laden Sie einen Flug und wenn das Flugzeug auf der
Startbahn steht, drücken Sie das Pedal nach unten und lassen sie es los. In der Ecke
des Bildschirms sollte eine Bremsmeldung angezeigt werden. Normalerweise wird die
Meldung wieder geschlossen, wenn die Bremse gelöst wird. Wenn die Bremsen aktiviert
bleiben, gehen Sie zu „Settings“ > „Controls“ > „Control Axes“ und deaktivieren Sie das
Kontrollkästchen „Reverse“ für die Bremspedale.
dEutScH
33
Page 34
tEStEN uNd EINStELLEN IHrES coNtroLLErS
Sie können Ihren Controller jederzeit testen, indem Sie auf „Start“ und „Settings“ klicken
und die Systemsteuerung in Windows auswählen. Suchen Sie nach einem Symbol mit
dem Namen „Game Controllers“ oder „Gaming Options“ (Windows 7-Anwender müssen
ggf. erst auf „Printers“ und „Other Hardware“ klicken).
Öffnen Sie das Fenster für die Spiel-Controller/Spieloptionen und die Saitek Pro Flight
Combat-Ruderpedale sollten angezeigt werden. Klicken Sie auf „Properties“, um
den Testbildschirm zu öffnen. Klicken Sie auf die Registerkarte „Test“. Wenn Sie die
Ruderpedale bewegen, sollten Sie eine Reaktion auf dem Bildschirm sehen. In diesem
Fall funktionieren die Ruderpedale ordnungsgemäß.
Klicken Sie im Fenster „Properties“ auf die Registerkarte „Deadzones“. Sie können
die toten Zonen (d. h. die Pedalbewegung, die nicht zu einer korrespondierenden
Ruderbewegung im Spiel führt) der Pro Flight Combat-Ruderpedale anpassen, indem
Sie auf die Achsen der toten Zone klicken und die Anzeige der toten Zone auf das
34
Page 35
gewünschte Niveau ziehen. Um die neuen Einstellungen zu testen, klicken Sie auf die
Registerkarte „Test“ oder spielen Sie ein Flight Sim-Spiel.
ProGrammIErEN dES Pro fLIGHt-coNtroLLErS mIt Smart tEcHNoLoGY ProGrammING
SoftwarE
EINfüHruNG IN Smart tEcHNoLoGY ProGrammING SoftwarE
Smart Technology (ST) Programming Software ist die Software, die bereitgestellt
wird, damit Sie Ihren Controller für erweiterte Funktionen kongurieren können. ST
bietet leistungsstarke Features zur Programmierung des Geräts mit der ultimativen
Konguration für absolute Interaktion. Trotz der auf dem Markt einmaligen Technologie
bleibt die Software einfach und intuitiv.
35
dEutScH
Page 36

fEaturES voN Smart tEcHNoLoGY ProGrammING SoftwarE:
• Schnelles und einfaches Setup in jedem Spiel
• Personalisieren Sie die Controller-Einstellungen für Ihre bevorzugten Spiele
• Kongurieren Sie Ihren Controller am Bildschirm mit einem hochauösenden Modell
und hochauösender Schnittstelle
• Mehrere Setup-Optionen für jeden Controller – ideal für Controller, die von mehreren
Benutzern verwendet werden
• Programmieren Sie bestimmte Bewegungen mit hoch entwickelten Timing-Features
• Spezielle Spiel-Setups als Proles von der Saitek-Website und auf der Smart
Technology-CD verfügbar
• Laden Sie die aktuelle Version der Smart Technology Programming Software von
der Saitek-Website herunter
auSfüHrEN dEr Smart tEcHNoLoGY ProGrammING SoftwarE
A. Klicken Sie auf Start und dann auf All Programs. Suchen Sie in der Programmliste
nach Smart Technology. Klicken sie auf dieses Programm. Es wird ein weiteres Symbol
namens Prole Editor angezeigt. Klicken Sie darauf. Smart Technology Software wird
geöffnet.
B. Gehen Sie auf Ihrem Desktop zum Smart Technology-Symbol. Doppelklicken Sie
darauf und die Smart Technology Software wird geladen.
C. Klicken Sie mit der rechten Maustaste auf das Controller-Symbol neben Ihrer Uhr
und anschließend in der Liste auf Prole Editor.
Wenn die ST-Software geöffnet ist, wird ein Hinweisbildschirm angezeigt (bei der ersten
Ausführung der Software). Über diesen Bildschirm erhalten Sie nützliche Informationen
zur Prolsoftware. Wenn dieser Bildschirm nicht angezeigt werden soll, wenn Sie die
ST-Software starten, deaktivieren Sie das kleine Kontrollkästchen in der Ecke des
Hinweisbildschirms. Der Hinweisbildschirm kann geschlossen werden, indem Sie auf
das OK-Symbol unten rechts klicken. Sie können den Hinweisbildschirm wieder öffnen,
indem Sie zu der Registerkarte „Support“ gehen und auf SHOW STARTUP TIPS PAGE
36
Page 37

Produkt
Die Produktseite ist der Hauptbildschirm, der angezeigt wird, wenn die Smart
Technology Software das erste Mal geöffnet wird (wie oben dargestellt). Pro FlightHardware, die an Ihren Computer angeschlossen ist, wird automatisch erkannt und
in dem Bildschirm angezeigt. Da die Pro Flight-Ruderpedale immer ob auf der Liste
der angeschlossenen Hardware stehen, werden sie immer auf der Produktseite der
Software angezeigt, auch wenn keine Pro Flight-Hardware physisch an Ihren Computer
angeschlossen.
ProGrammIErEN
In der Registerkarte „Programming“ können Sie mit Ihrem Controller alle Tastaturbefehle
direkt kopieren, die Sie in Ihren beliebtesten Spielen verwenden. Die Befehle werden
dann in einem sogenannten Prol gespeichert. Wenn Sie auf die Registerkarte
„Programming“ klicken, wird auf der linken Seite ein hochaufgelöstes Bild des
Controllers angezeigt, den Sie programmieren möchten, und weiter unten auf der
rechten Seite des Bildschirms wird eine Liste mit Befehlsfeldern namens „Cells“
angezeigt. Eine detaillierte Anleitung zur Programmierung erhalten Sie, wenn Sie in der
Registerkarte „Support“ auf READ PROGRAMMING MANUAL klicken.
SuPPort
Über die Registerkarte „Support“ können Sie per Mausklick auf die folgenden Features
zugreifen:
SHow tIPS
Klicken sie darauf, um den Hinweisbildschirm anzuzeigen. Dies ist derselbe Bildschirm,
der angezeigt wird, wenn Sie die ST-Software zum ersten Mal öffnen. Sie können über
diesen Bildschirm alle Tipps durchgehen.
37
dEutScH
Page 38

dowNLoad drIvErS aNd SoftwarE
DURABLE METAL PEDALS
With independent toe brakes
Avec axes de freins de palonnier indépendants
Mit unabhängigen Zehenbremsen
Con freni indipendenti
Con frenos de dedos independientes
RUDDER AXIS
With self-centering mechanism
Avec mécanisme d’autocentrage
Mit selbstzentrierendem Mechanismus
Con meccanismo autocentrante
Con mecanismo autoajustable
ADJUSTABLE TENSION
Adjust the resistance to suit any plane
Ajustez la résistance pour s’adapter à tous les avions
Stellen Sie den Widerstand für Ihr jeweiliges Flugzeug ein
Per regolare la resistenza, in modo da adattarsi a qualsiasi aereo
Ajusta la resistencia para que se adapte a cualquier avión
Wenn Sie auf diesen Link klicken, wird die Seite zum Herunterladen von Treibern und
Software in Ihrem Standardbrowser geöffnet.
dowNLoad GamE ProfILES
Wenn Sie auf diesen Link klicken, wird die Seite zum Herunterladen von Prolen in
Ihrem Standardbrowser geöffnet. Wählen Sie auf dieser Seite Ihren Controller aus.
Anschließend wird eine Liste von voreingestellten Prolen für alle aktuellen Spiele
angezeigt.
rEad St ProGrammING maNuaL
Das vollständige ST-Programmierhandbuch wird in Ihrem Standardbrowser geöffnet.
coNtact uS
Klicken Sie auf Contact Us, um die Seite mit den Kontaktangaben in Ihrem
Standardbrowser zu öffnen. Auf dieser Seite können Sie Ihren Kontakt aus einer
Kontaktliste auswählen.
38
Page 39

avvIo
RUDDER AXIS
With self-centering mechanism
Avec mécanisme d’autocentrage
Mit selbstzentrierendem Mechanismus
Con meccanismo autocentrante
Con mecanismo autoajustable
ADJUSTABLE TENSION
Adjust the resistance to suit any plane
Ajustez la résistance pour s’adapter à tous les avions
Stellen Sie den Widerstand für Ihr jeweiliges Flugzeug ein
Per regolare la resistenza, in modo da adattarsi a qualsiasi aereo
Ajusta la resistencia para que se adapte a cualquier avión
DURABLE METAL PEDALS
With independent toe brakes
Avec axes de freins de palonnier indépendants
Mit unabhängigen Zehenbremsen
Con freni indipendenti
Con frenos de dedos independientes
ItaLIaNo
39
Page 40

comE rEGoLarE L’aNGoLazIoNE dEL PEdaLE
40
Page 41

INtroduzIoNE
La pedaliera Saitek Pro Flight Combat Rudder Pedals è formata da robusti pedali
di comando a 3 assi, progettati per il massimo realismo. Consentono il controllo a
pedali delle funzioni di guida e di frenata nei giochi per PC con simulazioni di volo. La
pedaliera Pro Flight Combat Rudder Pedals funziona con qualsiasi prodotto Saitek per
PC.
carattErIStIcHE:
• Assi di frenata destro e sinistro indipendenti
• Asse della barra di comando
• Autocentrante, con smorzamento regolabile
• Azione uida e silenziosa, per controllo e precisione ottimali
• Regolabile, con angolazione del pedale per adattarsi a tutti gli stili di volo
• Alta qualità, struttura con parti metalliche per durare più a lungo
• Smart Technology (ST) Programming Software consente ai giocatori di congurare
i controlli per adattarli allo stile di gioco preferito, e di salvare le congurazioni come
proli personali
INStaLLazIoNE dEI drIvEr E dEL SoftwarE PEr utENtI dI wINdowS® xP a 32 E a 64 bIt
1. Con il computer acceso, chiudere tutti i programmi in esecuzione e inserire il CD di
installazione nell’unità CD-ROM.
2. Non appena viene visualizzata la schermata di introduzione, fare clic su Install
Software per proseguire. Se il CD non si avvia automaticamente, selezionare Start dalla
barra degli strumenti di Windows, quindi Run, e digitare D:\Setup.exe, nella casella
di immissione testo Run; quindi, fare clic su OK (si presuppone che D:\ sia la lettera
corrispondente all’unità CD-ROM in uso).
3. Non appena viene visualizzata la schermata di benvenuto, fare clic su Next per
proseguire.
4. Dopo aver letto la dichiarazione di non responsabilità, selezionare l’opzione I accept
41
ItaLIaNo
Page 42

the terms of the Disclaimer e fare clic su Next per proseguire.5. Alla schermata di
Installazione driver, se non è stato già fatto, collegare il cavo USB in una delle porte
USB del computer, quindi fare clic su Next.
6. Alla schermata Installazione driver, fare clic su Next per provare il controller.
7. Non appena viene visualizzata la schermata Controller Saitek, provare tutti i comandi
del Controller per vericarne il corretto funzionamento. Al termine, fare clic su OK.
8. Nella schermata di Installazione software seguente, fare clic su Next e seguire
le istruzioni a schermo. A questo punto, sarà richiesta l’installazione di funzioni
come Programmable Support for Mouse, Programmable Support for Keyboard
e Programmable Hotkeys (si tratta di componenti importanti del software di
programmazione, e sono richiesti).
9. Alla domanda se Windows è in grado di connettersi a Windows Update per cercare
il software, scegliere No, not at this time. Proseguire facendo clic su Next e Finish per
accettare l’installazione no a che non viene visualizzata la schermata Registration.
10. La nestra successiva installerà i componenti importanti del software. Alla domanda
cosa fare ora, scegliere Install the software automatically (recommended). Eseguire
l’operazione per la tastiera, il mouse e i tasti di scelta rapida.
11. Alla schermata Registrazione, selezionare Check this box to register now e seguire
le istruzioni a schermo, oppure non selezionare l’opzione per registrarsi in un secondo
momento.
12. Al completamento dell’installazione, si dispone dell’opzione Run Prole Editor, che
fornisce una vista dell’ambiente di programmazione. Se non si desidera visualizzare
l’editor del prolo a questo punto, deselezionare la casella e fare clic su Finish per
completare l’installazione.
INStaLLazIoNE dEI drIvEr E dEL SoftwarE PEr utENtI dI wINdowS® vISta E 7, a 32 E a
64 bIt
1. Con il computer acceso, chiudere tutti i programmi in esecuzione e inserire il CD di
installazione nell’unità CD-ROM.
2. Non appena viene visualizzata la schermata di introduzione, fare clic su Install
Software per proseguire. Se il CD non si avvia automaticamente, selezionare Start dalla
42
Page 43

barra degli strumenti di Windows, quindi Run, e digitare D:\Setup.exe, nella casella
di immissione testo Run; quindi, fare clic su OK (si presuppone che D:\ sia la lettera
corrispondente all’unità CD-ROM in uso).
3. Non appena viene visualizzata la schermata di benvenuto, fare clic su Next per
proseguire.
4. Dopo aver letto la dichiarazione di non responsabilità, selezionare l’opzione I accept
the terms of the Disclaimer e fare clic su Next per proseguire.
5. Alla schermata Installazione driver, se non è stato già fatto, collegare il cavo USB in
una delle porte USB del computer, quindi fare clic su Next.
6. Alla schermata Installazione driver, fare clic su Next per provare il controller.
7. Non appena viene visualizzata la schermata Controller Saitek, provare tutti i comandi
del Controller per vericarne il corretto funzionamento. Al termine, fare clic su OK.
8. Nella schermata di Installazione software seguente, fare clic su Next e verrà
visualizzata una nestra popup con la domanda se “si considera attendibile il software
Saitek”. Fare clic su yes, quindi su Next. L’installazione proseguirà automaticamente
no alla visualizzazione della schermata Registrazione.
9. Alla schermata Registrazione, selezionare Check this box to register now e seguire
le istruzioni a schermo, oppure non selezionare l’opzione per registrarsi in un secondo
momento.
10. Al completamento dell’installazione, si dispone dell’opzione Run Prole Editor, che
fornisce una vista dell’ambiente di programmazione. Se non si desidera visualizzare
l’editor del prolo a questo punto, deselezionare la casella e fare clic su Finish per
completare l’installazione.
attIvazIoNE dEL coNtroLLEr NEI GIocHI
La maggior parte dei giochi supporta i controller, che è possibile attivare utilizzando il
menu opzioni [controllo] all’interno del menu principale del gioco stesso. Se si hanno
problemi su questo aspetto, oppure non si è sicuri se il gioco supporta dei controller,
fare riferimento al manuale d’uso del gioco per il supporto tecnico.
ItaLIaNo
43
Page 44

ImPoStazIoNE IN fLIGHt SIm x E fLIGHt SIm 2004
La pedaliera Rudder Pedals dispone di tre assi, una per la barra di comando e due assi
dei pedali usati per i freni indipendenti. Inoltre, è presente una manopola rotativa che
consente di aumentare o diminuire la tensione di movimento della barra di controllo.
Grazie alla modalità di rilevamento dei pedali di Flight Sim, questi ultimi devono essere
congurati correttamente prima di iniziare ad utilizzarli al meglio delle possibilità.
Iniziare con l’apertura di FSX e andare su Impostazioni > Controlli > Assi di controllo.
Selezionare la pedaliera Rudder Pedals nel tipo di controller. Fare doppio clic sul freno
di emergenza (asse sinistro) e premere il freno di sinistra non appena viene visualizzata
la nestra Modica assegnazione. Verrà visualizzato nella nestra il freno a pedale
di sinistra, quindi fare clic su ok. Ripetere la procedura per il freno (asse destro) e
pedale destro. Controllare che la casella Inverti sia selezionata per entrambi gli assi
dei freni. Inne, fare clic sull’asse della barra di comando ed effettuare un movimento
di comando, in modo che la nestra Modica assegnazione rilevi l’asse della barra.
Sono solo tre gli assi che devono essere impostati sui pedali; se ne sono presenti di più
nell’elenco, eliminarli usando il comando Elimina assegnazione joystick.
Ora che gli assi sono impostati, passare alla nestra Calibrazione. Selezionare la
pedaliera Rudder Pedals, quindi Controlli avanzati. Assicurarsi che la sensibilità per
entrambi gli assi dei freni sia impostata su 75-80% e che le zone null siano impostate
su 0% per entrambi. La barra dovrebbe essere impostata su una sensibilità compresa
tra 50-75%, con una zona null ridotta di circa il 5%. Prima di caricare un volo, occorre
disabilitare il pilota automatico. Per fare questo, andare su Impostazioni > Realismo e
assicurarsi che la casella pilota automatico non sia selezionata.
Ora dovrebbe essere tutto a posto per partire. Caricare un volo; quando l’aereo è
stabile sulla pista, premere e rilasciare il pedale. Si dovrebbe visualizzare l’avviso di
frenata nell’angolo dello schermo. Se va tutto bene, verrà visualizzato l’indicatore, che
scomparirà nel momento in cui il freno viene rilasciato. Se i freni rimangono attaccati,
tornare su Impostazioni > Controlli > Assi di controllo e rimuovere le spunte dalla casella
44
Page 45

di inversione per i pedali dei freni.
comE vErIfIcarE E rEGoLarE IL coNtroLLEr
È possibile provare il controller in qualsiasi momento facendo clic su Start, Impostazioni,
e selezionando Pannello di controllo in Windows. Cercare un’icona denominata
Controller di gioco oppure Opzioni di gioco (gli utenti di Windows 7 potrebbero dover
fare clic prima su Stampanti e Altro hardware).
Aprire Controller di gioco/Opzioni di gioco: dovrebbe essere visualizzata la pedaliera
Saitek Pro Flight Combat Rudder pedals. Fare clic su Proprietà per richiamare la
schermata di test. Fare clic sulla scheda Test. Lo spostamento dei pedali dovrebbe
riettersi in una risposta su questa schermata; se è così, sappiate che i pedali di
comando funzionano a dovere.
ItaLIaNo
45
Page 46

Fare clic sulla scheda Deadzone della nestra Proprietà. È possibile regolare
le deadzone (cioé la distanza della corsa del pedale che non si riette in un
corrispondente movimento del comando nel gioco) della pedaliera Pro Flight Combat
Rudder Pedals facendo clic sugli assi della deadzone e trascinando i relativi indicatori al
livello desiderato. Per provare le nuove impostazioni, fare clic sulla scheda Test oppure
giocare una sessione di volo simulato.
ProGrammazIoNE dEL coNtroLLEr Pro fLIGHt coN IL SoftwarE Smart tEcHNoLoGY
INtroduzIoNE a Smart tEcHNoLoGY ProGrammING SoftwarE
Smart Technology (ST) Programming Software è il software fornito per congurare il
controller e avere una funzionalità ancora migliorata. ST fornisce un gruppo di funzioni
46
Page 47

straordinarie, consentendo di programmare il proprio dispositivo con la congurazione
più avanzata, per un’interazione totale. Il software presenta un livello di rafnatezza
mai visto sul mercato, ma nonostante questo rimane semplice e intuitivo da usare.
carattErIStIcHE dI Smart tEcHNoLoGY ProGrammING SoftwarE:
• Impostazione semplice e rapida in qualsiasi gioco
• Personalizza le impostazioni del controller per i giochi preferiti
• Congura il controller con un modello e un’interfaccia a schermo ad alta risoluzione
• Opzioni di impostazioni multiple per ciascun controller - ideale se un controller viene
utilizzato da più persone
• Programmazione di movimenti speciali con sosticate funzionalità di
temporizzazione
• Impostazioni di gioco speciali disponibili come “Proles” dal sito Web Saitek e sul
CD Smart Technology
• Download dell’ultima versione di Smart Technology Programming Software dal sito
Web Saitek
ESEcuzIoNE dI Smart tEcHNoLoGY ProGrammING SoftwarE
A. Fare clic su Start, quindi su All Programs, poi cercare Smart Technology nell’elenco
dei programmi. Fare clic sull’elenco e sotto questa intestazione se ne visualizzerà
un’altra con un’icona denominata Prole Editor. Fare clic su di essa e si aprirà il
software Smart Technology.
B. Cercare sul desktop l’icona Smart Technology. Una volta rilevata, fare double-click
per caricare il software Smart Technology.
C. Fare clic con il pulsante destro su controller icon accanto all’orologio, quindi fare clic
su Prole Editor dall’elenco.
Non appena aperto il software ST, verrà visualizzata una schermata di “suggerimenti”
(se è la prima volta che si è attivato il software) Questa schermata fornisce le
informazioni utili sul prolo software. Se non si desidera vedere questa schermata
47
ItaLIaNo
Page 48

all’avvio del software ST, deselezionare la piccola casella posta nell’angolo della
schermata dei suggerimenti. É possibile chiudere la casella suggerimenti facendo clic
sull’icona OK nell’angolo inferiore destro. È possibile richiamare la casella suggerimenti
andando sulla scheda supporto e facendo clic su SHOW STARTUP TIPS PAGE.
Prodotto
La pagina di prodotto è la pagina principale visualizzata non appena viene aperto per la
prima volta il software Smart Technology (come illustrato sopra). Qualunque hardware
collegato al computer sarà automaticamente rilevato e visualizzato sullo schermo.
Poiché è sempre in prima posizione nell’elenco dell’hardware collegato, la pedaliera Pro
Flight Rudder Pedals verrà visualizzata sempre nella pagina di prodotto del software,
anche se nessun hardware Pro Flight è sicamente collegato al computer.
ProGrammazIoNE
Dalla scheda programmazione, è possibile mimare il controller per copiare direttamente
qualcuno dei comandi sulla tastiera che sono usati nei giochi preferiti. I comandi
vengono salvati in ciò che viene denominato un Prole. Facendo clic sulla scheda
di programmazione, sarà presentata sulla sinistra un’immagine ad alta risoluzione
del controller in corso di programmazione, mentre andando verso il lato destro dello
schermo si vedrà un elenco di caselle di comando denominate “Celle”. Per una guida
dettagliata sulla programmazione, andare alla scheda supporto e fare clic su READ
PROGRAMMING MANUAL.
SuPPorto
Dalla scheda supporto, è possibile accedere alle seguenti funzionalità, facendo clic su
di esse:
moStra SuGGErImENtI
Una volta selezionata, viene visualizzata la relativa schermata, che è la stessa ad
48
Page 49

apparire la prima volta che si esegue il software ST. Da qui è possibile navigare
attraverso tutti i suggerimenti, se lo si desidera.
dowNLoad dEI drIvEr E dEL SoftwarE
Facendo clic su questo link si aprirà il browser predenito, che porterà alla pagina di
download dei driver e del software.
dowNLoad dEI ProfILI dI GIoco
Facendo clic su questo link si aprirà il browser predenito, che porterà alla pagina di
download dei proli. Da questa pagina, scegliere il controller; quindi verrà visualizzato
un elenco di proli già pronti, adatti agli ultimi giochi.
LEGGErE IL maNuaLE dI ProGrammazIoNE St
Il manuale di programmazione ST completo verrà aperto nella nestra del browser
predenito.
coNtattI
Facendo clic su Contact us si aprirà il browser predenito, che porterà alla pagina
informazioni sui contatti; da qui è possibile scegliere da un elenco di contatti.
ItaLIaNo
49
Page 50

PrImEroS PaSoS
RUDDER AXIS
With self-centering mechanism
Avec mécanisme d’autocentrage
Mit selbstzentrierendem Mechanismus
Con meccanismo autocentrante
Con mecanismo autoajustable
ADJUSTABLE TENSION
Adjust the resistance to suit any plane
Ajustez la résistance pour s’adapter à tous les avions
Stellen Sie den Widerstand für Ihr jeweiliges Flugzeug ein
Per regolare la resistenza, in modo da adattarsi a qualsiasi aereo
Ajusta la resistencia para que se adapte a cualquier avión
DURABLE METAL PEDALS
With independent toe brakes
Avec axes de freins de palonnier indépendants
Mit unabhängigen Zehenbremsen
Con freni indipendenti
Con frenos de dedos independientes
50
Page 51

cómo ajuStar EL áNGuLo dEL PEdaL
ESPañoL
51
Page 52

INtroduccIóN
Los pedales Pro Flight Combat Rudder Pedals de Saitek son unos rmes pedales
de timón con tres ejes diseñados para maximizar el realismo al permitir el control
del timón con los pies y la función de frenado en juegos de simulación de vuelo para
ordenadores. Los pedales Pro Flight Combat Rudder Pedals funcionan con cualquier
producto Saitek para ordenador.
caractEríStIcaS:
• Ejes de freno izquierdo y derecho independientes
• Eje de timón
• Autocentrado con amortiguamiento ajustable
• Movimiento silencioso y suave para un control y precisión óptimos
• Ángulo de pedal ajustable para que se adapte a todos los estilos de vuelo
• Estructura parcialmente metálica de alta calidad para una gran durabilidad
• El software de programación Smart Technology (ST) permite que los jugadores
conguren sus mandos para que se adapten a sus estilos de juego preferidos, y
para que guarden las conguraciones como perles personales
INStaLacIóN dE drIvErS Y SoftwarE Para uSuarIoS dE wINdowS® xP, 32- Y 64-bIt
1. Con el ordenador encendido, cierre todos los programas que se estén ejecutando, y
luego inserte el CD de instalación en la unidad de CD-ROM.
2. Cuando aparezca la pantalla Introduction, haga clic en Install Software para
continuar. Si el CD no se ejecuta automáticamente, seleccione Inicio en la barra de
tareas de Windows, después Ejecutar, luego escriba D:\Setup.exe en el campo de
entrada de texto de la ventana Ejecutar y a continuación haga clic en OK (suponiendo
que D:\ sea la letra de la unidad de CD-ROM).
3. Cuando aparezca la pantalla Welcome, haga clic en Next para continuar.
4. Después de leer la cláusula de exención de responsabilidad (Disclaimer) seleccione
la opción I accept the terms of the Disclaimer y haga clic en Next para continuar.
52
Page 53

5. En la pantalla Driver Setup, si todavía no lo ha hecho, conecte el cable USB en uno
de los puertos USB de su ordenador, y luego haga clic en Next.
6. En la pantalla Driver Setup, haga clic en Next para probar su mando.
7. Cuando aparezca la pantalla Saitek Controller, pruebe todos los controles de su
mando para determinar que funcionan correctamente. Cuando haya terminado, haga
clic en OK.
8. En la pantalla Software Setup siguiente, haga clic en Next y siga las instrucciones
en pantalla. Llegados a este punto, se le pedirá que instale características como
Programmable Support for Mouse (soporte programable para ratón), Programmable
Support for Keyboard (soporte programable para teclado) y Programmable Hotkeys
(teclas programables de acceso rápido).
9. Si se le pregunta si Windows puede conectarse a Windows Update para buscar
software, elija Esta vez no. Continúe haciendo clic en Next y Finish para aceptar la
instalación hasta que aparezca la pantalla Registration.
10. La siguiente ventana instalará los componentes importantes del software.
Cuando se le pregunte qué desea hacer, escoja Install the software automatically
(recommended). «Haga lo mismo para el teclado, ratón y teclas de acceso rápido.
11. En la pantalla Registration, seleccione Check this box to register now y siga las
instrucciones en pantalla, o no elija esta opción y regístrese más tarde.
12. Tras completar la instalación, tiene la opción de ejecutar Prole Editor, el cual le
introducirá al entorno de programación. Si no desea ejecutar Prole Editor en ese
momento, desmarque la casilla y haga clic en Finish para completar la instalación.
INStaLacIóN dE drIvErS Y SoftwarE Para uSuarIoS dE wINdowS® vISta Y 7, 32- Y
64-bIt
1. Con el ordenador encendido, cierre todos los programas que se estén ejecutando, y
luego inserte el CD de instalación en la unidad de CD-ROM.
2. Cuando aparezca la pantalla Introduction, haz clic en Install Software para continuar.
Si el CD no se ejecuta automáticamente, seleccione Inicio en la barra de tareas de
Windows, después Ejecutar, luego escriba D:\Setup.exe en el campo de entrada de
texto de la ventana Ejecutar y a continuación haga clic en OK (suponiendo que D:\ sea
53
ESPañoL
Page 54

la letra de la unidad de CD-ROM).
3. Cuando aparezca la pantalla Welcome, haga clic en Next para continuar.
4. Después de leer la cláusula de exención de responsabilidad (Disclaimer), seleccione
la opción I accept the terms of the Disclaimer y haga clic en Next para continuar.
5. En la pantalla Driver Setup, si todavía no lo ha hecho, conecte el cable USB en uno
de los puertos USB de su ordenador, y luego haga clic en Next.
6. En la pantalla Driver Setup, haga clic en Next para probar su mando.
7. Cuando aparezca la pantalla Saitek Controller, pruebe todos los controles de su
mando para determinar que funcionan correctamente. Cuando haya terminado, haga
clic en OK.
8. En la pantalla Software Setup siguiente, haga clic en Next y aparecerá una casilla
emergente preguntándole si “you want to trust software from Saitek” (desea conar
en el software de Saitek). Haga clic en yes y luego en Next. La instalación continuará
automáticamente hasta que aparezca la pantalla Registration.
9. En la pantalla Registration, seleccione Check this box to register now y siga las
instrucciones en pantalla, o no elija esta opción y regístrese más tarde.
10. Tras completar la instalación, tiene la opción de ejecutar Prole Editor, el cual le
introducirá al entorno de programación. Si no desea ejecutar Prole Editor en ese
momento, desmarque la casilla y haga clic en Finish para completar la instalación.
actIvar EL maNdo EN LoS juEGoS
La mayoría de los juegos son compatibles con mandos para juegos, los cuales puede
activar utilizando el menú opciones dentro del menú principal del juego. Si tiene
problemas o no está seguro de si el juego es compatible con mandos para juegos,
consulte el manual de usuario del juego para obtener ayuda.
coNfIGuracIóN EN fLIGHt SIm x Y fLIGHt SIm 2004
Los pedales Rudder Pedals tienen tres ejes, uno para el timón de dirección y dos en
los pedales del pie que se utilizan para frenar con los dedos. También hay una rueda
rotatoria en el centro que permite que la tensión del movimiento del timón aumente
54
Page 55

y disminuya. Dado el modo en que el simulador de vuelo detecta los pedales, estos
necesitan estar congurados correctamente para que pueda sacarles el máximo
partido.
Empiece abriendo FSX y yendo a Settings > Controls > Control Axes. Seleccione
los pedales Rudder Pedals en Controller Type. Haga doble clic en Event Brake (eje
izquierdo) y pise el freno izquierdo cuando aparezca la ventana Change Assignment.
Aparecerá el dedo izquierdo en la ventana. Haga clic en ok. Repita el proceso para
Brake (eje derecho) y el pedal derecho. Asegúrese de que la casilla Reverse esté
marcada para ambos ejes de freno. Finalmente, haga doble clic en Rudder Axis y
realice el movimiento del timón, para que la ventana de Change Assignment detecte el
eje del timón. Estos son los únicos tres ejes que deben asignarse a los pedales; si hay
más en la lista, bórrelos utilizando el comando Delete Joystick Assignment.
Ahora que los ejes ya han sido establecidos, vaya a la ventana de Calibration.
Seleccione los pedales Rudder Pedals y luego elija Advanced Controls. Asegúrese
de que la sensibilidad para ambos ejes de freno esté entre 75 y 80%, y que las zonas
nulas estén establecidas en 0% para ambos. El timón debería tener una sensibilidad de
entre 50 y 75%, con una zona nula mínima de un 5%. Antes de cargar un vuelo, tendrá
que desactivar Auto Rudder. Para ello, vaya a Settings > Realism y compruebe que la
casilla de Auto Rudder no esté marcada.
Ahora ya está listo para empezar. Cargue un vuelo, y cuando el avión esté quieto en la
pista, pise el pedal y luego suéltelo. Debería ver el aviso de freno en el extremo de la
pantalla. Si todo va bien, el indicador aparecerá y luego desaparecerá cuando se suelte
el freno. Si los frenos siguen activados, vuelva a Settings > Controls > Control Axes y
desmarque la casilla Reverse de los pedales de freno.
ESPañoL
55
Page 56

cómo Probar Y ajuStar Su maNdo
Puede probar su mando en cualquier momento en Windows haciendo clic en Inicio,
luego en Ajustes y seleccionando Panel de Control. Busque un icono llamado
Dispositivos de juegos u Opciones de juegos (los usuarios de Windows 7 quizás tengan
que hacer clic primero en Impresoras y otro hardware).
Abra la ventana de Dispositivos de juegos/Opciones de juego, donde deberían aparecer
los pedales Pro Flight Combat Rudder Pedals de Saitek. Haga clic en Propiedades
para ver la pantalla de pruebas. Haga clic en la pestaña Test. Si mueve los pedales
del timón, debería haber una respuesta en esta pantalla; de este modo, sabrá que los
pedales del timón funcionan correctamente.
56
Page 57

Haga clic en la pestaña Deadzones de la ventana Propiedades. Puede ajustar las
deadzones (es decir, la distancia del desplazamiento del pedal que no da como
resultado un movimiento correspondiente por parte del timón durante el juego) de los
pedales Pro Flight Combat Rudder Pedals haciendo clic en los ejes de las deadzones
y arrastrando los indicadores de las deadzones hasta el nivel deseado. Para probar la
nueva conguración, haga clic en la pestaña Test o juegue a un simulador de vuelo.
ProGramar Su maNdo Pro fLIGHt coN EL SoftwarE dE ProGramacIóN Smart
tEcHNoLoGY
INtroduccIóN aL SoftwarE dE ProGramacIóN Smart tEcHNoLoGY (St)
ESPañoL
El software de programación Smart Technology (ST) es el software que le ha sido
57
Page 58

proporcionado para que congure su mando y obtenga una funcionalidad mejorada.
ST ofrece un gran número de características, permitiéndole programar su dispositivo
con la mejor de las conguraciones para que disfrute de una interacción total. Pese a
presentar un nivel de sosticación nunca antes visto en el mercado, el software es al
mismo tiempo sencillo y su uso resulta intuitivo.
caractEríStIcaS dEL SoftwarE dE ProGramacIóN Smart tEcHNoLoGY:
• Conguración rápida y fácil en cualquier juego
• Personalice los ajustes del mando para sus juegos favoritos
• Congure su mando con un modelo e interfaz en pantalla de alta resolución
• Opciones de conguración múltiple para cada mando. Ideal si un mando es utilizado
por varias personas
• Programa movimientos especiales con sosticadas características de tiempo
• Ajustes especiales para juegos disponibles como “Proles” desde el sitio web de
Saitek y en el CD de Smart Technology
• Descargue la última versión del software de programación Smart Technology desde
el sitio web de Saitek
EjEcutar EL SoftwarE dE ProGramacIóN Smart tEcHNoLoGY
A. Haga clic en Inicio, después en Todos los programas y luego busque Smart
Technology en la lista de programas. Haga clic sobre él y debajo del título verá otro
título con un icono que dice Prole Editor. Haga clic sobre él y se abrirá el software de
Smart Technology.
B. Busque en su escritorio el icono de Smart Technology. Cuando lo encuentre, haga
doble clic sobre él y se cargará el software de Smart Technology.
C. Haga clic con el botón derecho en el icono de mando que hay junto al reloj, y
seleccione de la lista Prole Editor.
Cuando el software ST se abra, aparecerá una pantalla de sugerencias (si es la primera
vez que ejecuta el software). Esta pantalla le ofrece información útil sobre el software
58
Page 59

de perles. Si no desea ver esta pantalla cuando inicie el software ST, desmarque la
casilla pequeña que hay en el extremo de la pantalla de sugerencias. La ventana de
sugerencias se puede cerrar haciendo clic en el icono OK situado en el extremo inferior
derecho. Puede volver a ver la ventana de sugerencias yendo a la pestaña Support y
haciendo clic en SHOW STARTUP TIPS PAGE.
Producto
La página del producto es la pantalla principal que aparece cuando el software de
Smart Technology se abre por primera vez (como se muestra arriba). Cualquier
hardware de Pro Flight conectado a su ordenador se detectará y mostrará
automáticamente en esa pantalla. Dado que siempre están en la primera posición de la
lista de hardware conectado, los pedales Pro Flight Rudder Pedals siempre aparecerán
en la página del producto del software, aunque no haya ningún hardware de Pro Flight
conectado físicamente a su ordenador.
ProGramacIóN
Desde la pestaña Programming, puede simular su mando para que copie directamente
cualquiera de los comandos de teclado utilizados en sus juegos favoritos. Los
comandos se guardan en lo que llamamos un Prole. Cuando haga clic en la pestaña
Programming, aparecerá a la izquierda una imagen en alta resolución del mando que
va a programar, y bajando por la derecha de la pantalla verá una lista de casillas de
comando llamadas “Cells”. Para obtener una guía detallada sobre la programación,
vaya a la pestaña Support y haga clic en READ PROGRAMMING MANUAL.
aYuda
Desde la pestaña Support, puede acceder a las siguientes características haciendo clic
sobre ellas:
ESPañoL
59
Page 60

SHow tIPS (moStrar SuGErENcIaS)
Al hacer clic, aparecerá la pantalla de sugerencias. Se trata de la misma pantalla que
aparece la primera vez que se ejecuta el software de ST. Si lo desea, desde esta
pantalla puede repasar todas las sugerencias.
dowNLoad drIvErS aNd SoftwarE (dEScarGar drIvErS Y SoftwarE)
Al hacer clic en este enlace se abrirá su navegador por defecto y le dirigirá a la página
de descarga de drivers y software.
dowNLoad GamE ProfILES (dEScarGar PErfILES dE juEGoS)
Al hacer clic en este enlace se abrirá su navegador por defecto y le dirigirá a la página
de descarga de perles. Desde esta página, escoja su mando y aparecerá una lista de
perles predenidos que coincidirán con los últimos juegos.
rEad St ProGrammING maNuaL (LEEr maNuaL dE ProGramacIóN dE St)
Su navegador por defecto abrirá el manual de programación completo de ST.
coNtact uS (coNtactE coN NoSotroS)
Al hacer clic en Contact Us se abrirá su navegador por defecto y le dirigirá a la página
de información de contacto; una vez allí, podrá elegir entre una lista de contactos.
60
Page 61

Page 62

Page 63

YOKE SYSTEM
AND QUADRANT
SWITCH PANEL
IN-COCKPIT CONTROLS
MULTI PANEL
IN-COCKPIT CONTROLS
NEW FOR 2010!
BIP
BACKLIT INFORMATION PANEL
RADIO PANEL
IN-COCKPIT CONTROLS
NEW FOR 2010!
TPM
THROTTLE/PROP./MIXTURE CONTROLS
Page 64

 Loading...