

Page 1
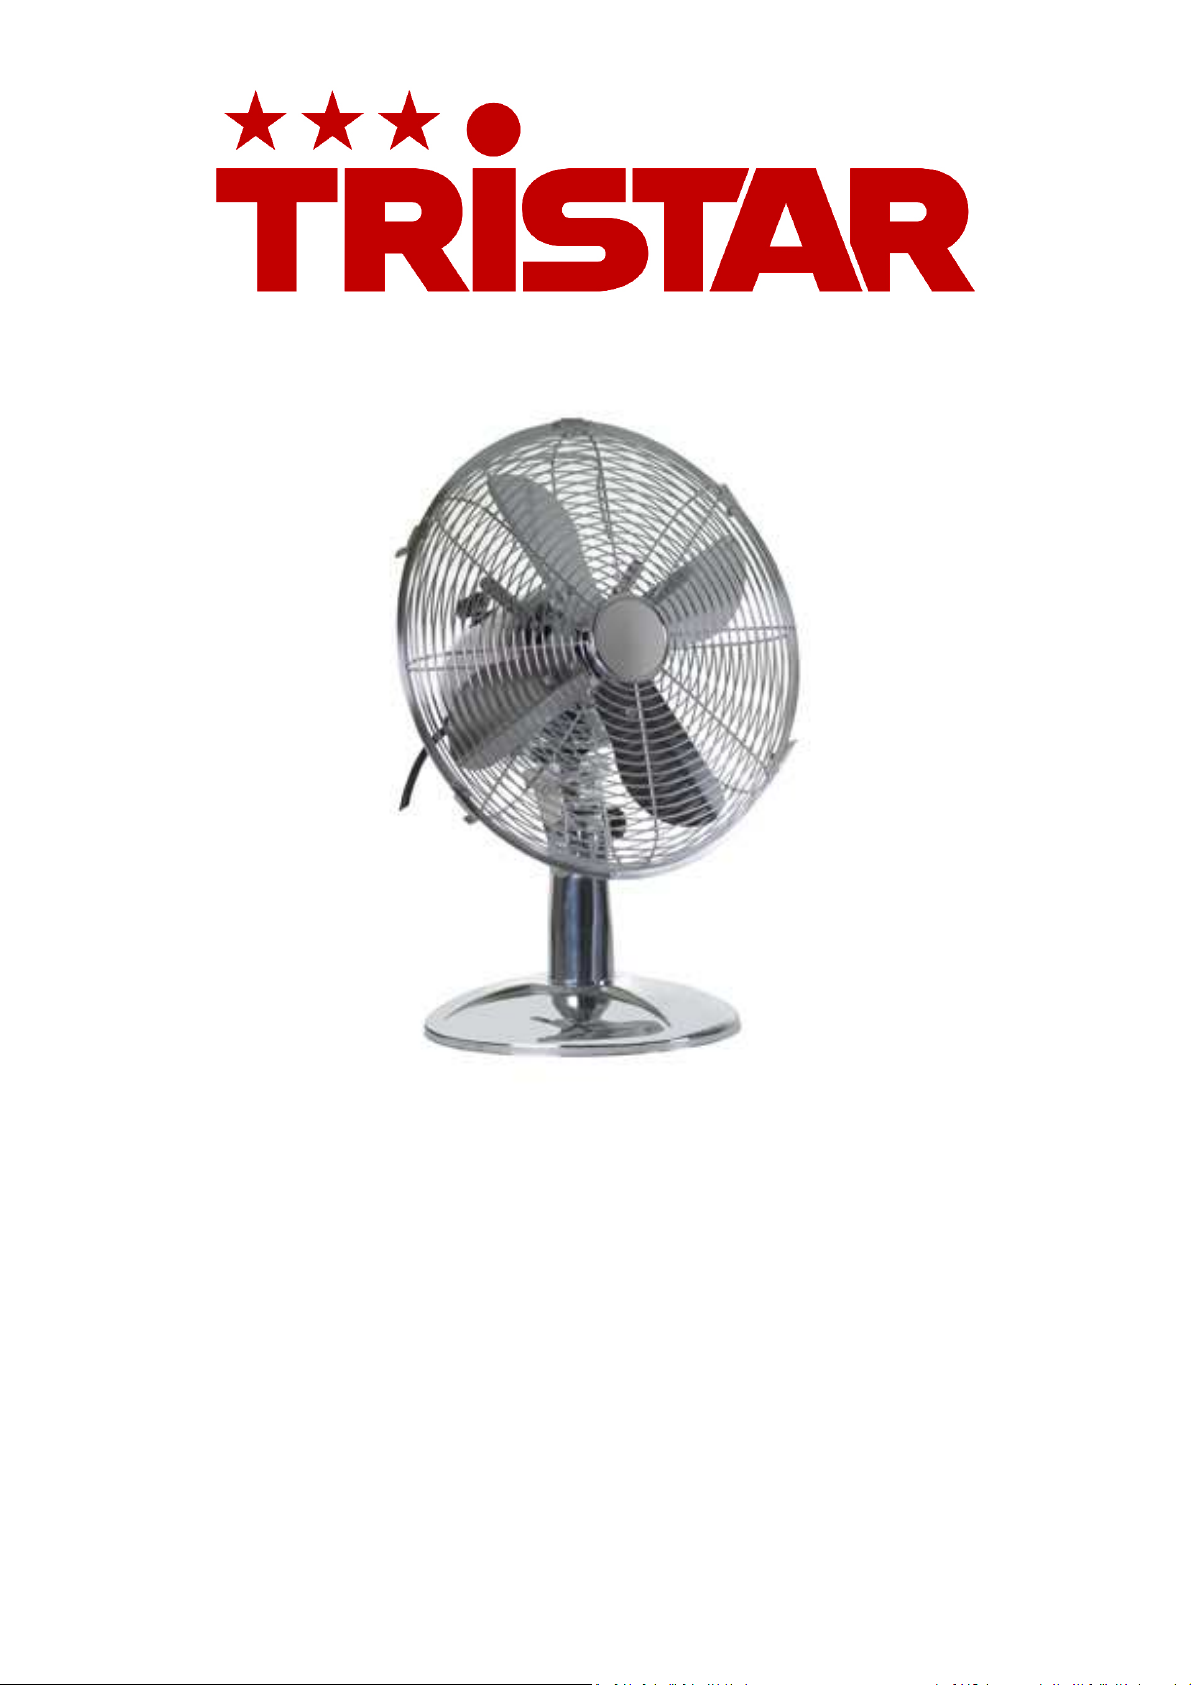
VE-5953
Page 2

NL
Algemene Veiligheidsaanwijzingen.
Controleer of de spanning van uw stroomnetwerk overeenkomt met de spanning aangegeven op het
label van uw apparaat.
• Voordat u dit apparaat in gebruik gaat nemen, lees a.u.b. eerst de gebruiksaanwijzing grondig
door en bewaar het zodat u het later weer kunt nalezen.
• Bewaar deze gebruiksaanwijzing, het garantiecertificaat, de verkoopbon en indien mogelijk
de kartonnen doos met de binnenste verpakking.
• Het apparaat is uitsluitend bedoeld voor privé gebruik en niet voor commercieel gebruik.
Houd het uit de buurt van directe warmte, zon en vocht en bescherm het tegen zware
botsingen.
• Haal altijd de stekker uit het stopcontact wanneer het apparaat niet in gebruik is, wanneer er
accessoires op aangesloten worden, tijdens het schoonmaken van het apparaat of wanneer
er een storing plaatsvindt. Schakel het apparaat van tevoren uit. Trek aan de stekker niet aan
de kabel.
• Dit apparaat is niet bedoeld om gebruikt te worden door personen (waaronder kinderen) met
verminderde fysieke, zintuiglijke of mentale capaciteiten of een gebrek aan ervaring en
kennis, tenzij zij onder toezicht staan of aanwijzingen hebben gekregen m.b.t. het gebruik van
dit apparaat door iemand die verantwoordelijk is voor hun veiligheid.
• Om kinderen te beschermen tegen de gevaren van elektrische apparatuur mag u ze nooit
zonder toezicht bij het apparaat laten. Selecteer daarom een plek voor uw apparaat op
dusdanige wijze dat kinderen er niet bij kunnen. Zorg er voor dat de kabel niet naar beneden
hangt.
• Test het apparaat, de stekker en de kabel regelmatig op schade. Als er schade is dan dient
het apparaat niet gebruikt te worden maar dient het gerepareerd te worden door een
gekwalificeerd technicus om gevaar te vermijden. Alleen de oorspronkelijke onderdelen
mogen gebruikt worden.
• Een beschadigd snoer of stekker moet vervangen worden door een geautoriseerde technicus
om gevaar te vermijden. Repareer het apparaat niet zelf.
• Houd het apparaat uit de buurt van hitte, direct zonlicht, vochtigheid en scherpe randen e.d.
• Laat het apparaat nooit alleen wanneer het gebruikt wordt. Schakel het apparaat uit
wanneer u het niet gebruikt zelfs al is het maar voor een ogenblik.
• Het gebruik van een verlengsnoer of afstandbediende schakelaar is niet toegestaan.
• Gebruik het apparaat niet buitenshuis.
• Dompel in geen geval het apparaat onder in water of een andere vloeistof en laat het er niet
mee in contact komen. Gebruik het apparaat niet met natte of vochtige handen.
• Wanneer het apparaat vochtig of nat wordt, haal dan onmiddellijk de stekker uit het
stopcontact. Reik niet met uw hand in het water.
• Gebruik het apparaat alleen waarvoor het bedoeld is.
Page 3
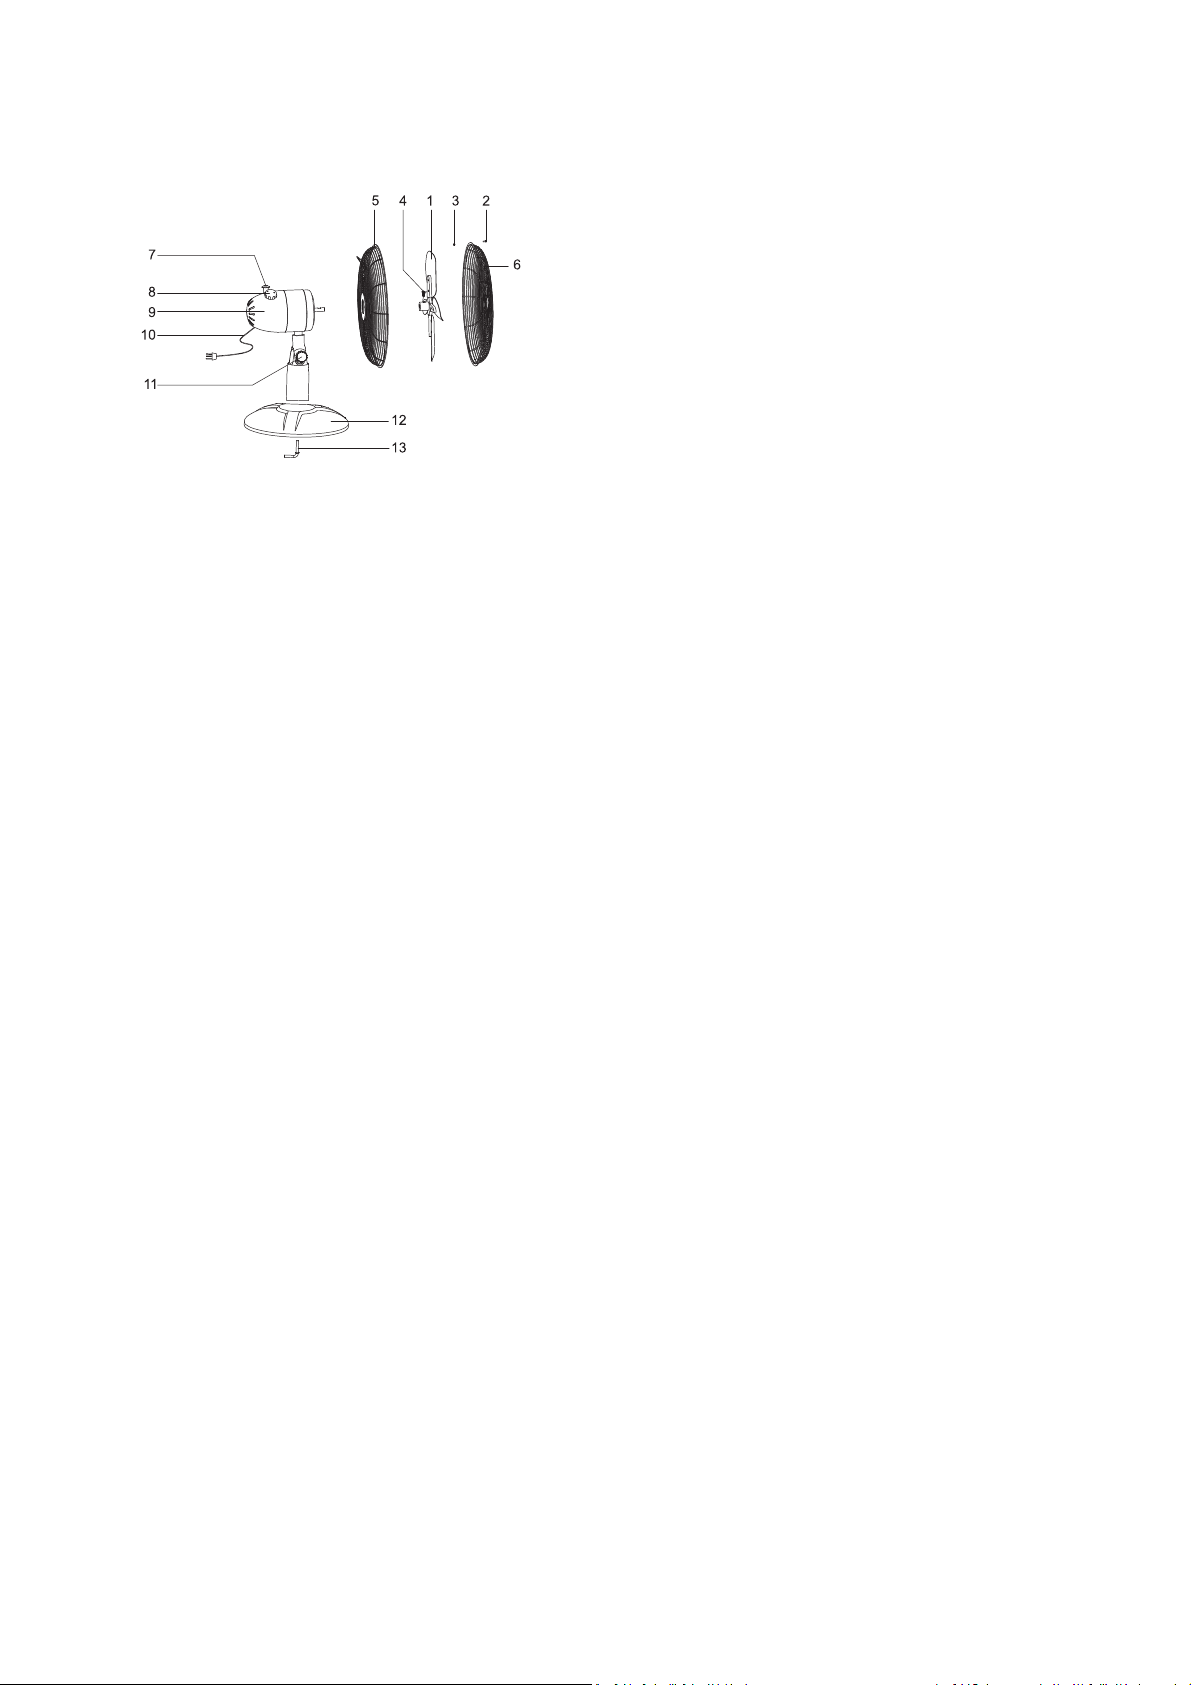
O
NDERDELENLIJST
1. Ventilatorblad
2. S
CHROEF
3. M
4. I
NSTELSCHROEF
5. A
6. V
7. O
OER
CHTERPLAAT
OORPLAAT
SCILLATIEKNOP
8. S
TROOMKNOP
9. M
OTOR
10. S
TROOMSNOER
11. I
NSTELKNOP
12. V
OETSTUK
13. I
NSTELSCHROEF VOETSTUK
A
SSEMBLEREN
A
LS DE VENTILATOR REEDS IN ELKAAR GEZET GELEVERD WORDT, DAN KUNT U DEZE 6 PUNTEN OVERSLAAN
1. V
ZITTEN
2. S
TEL HET ACHTERROOSTER IN OP DE JUISTE POSITIE MET DE HANDGREEP NAAR BOVEN TOE GERICHT.
3. S
CHROEF DE MOER GOED VAST OM HET ROOSTER TE BEVESTIGEN
4. D
DRAAI DE INSTELSCHROEF OP HET PLATTE DEEL VAN DE AS OM HET VENTILATORBLAD VAST TE ZETTEN. CONTROLEER
OF HET VENTILATORBLAD DE BESCHERMPLATEN NIET RAAKT
5. B
KLEMMEN VAST
6.
VERWIJDER DE SCHROEF OP DE STEEL, GOOI DEZE WEG EN ZET HET VOETSTUK MET HET GAT IN DE STEEL. DOE DE
INSTELSCHROEF VAN HET VOETSTUK ER IN EN DRAAI DEZE VAST.
.
.
ERWIJDER DE ONDERDELEN UIT DE VERPAKKING. SCHEID DE VOOR- EN ACHTERPLAAT ALS ZE AAN ELKAAR VAST
.
.
RAAI DE INSTELSCHROEF OP HET VENTILATORBLAD LOS, SCHUIF HET VENTILATORBLAD OP DE AS VAN DE MOTOR,
.
EVESTIG DE VOORPLAAT OP DE ACHTERPLAAT. DRAAI DE VERBINDINGSCHROEF EN MOER VAST EN ZET DE
.
B
EDIENING
D
E BUREAUVENTILATOR HEEFT DRIE SNELHEDEN. DE AAN-/UITKNOP IS GEÏNTEGREERD IN DE DRAAISCHAKELAAR VAN DE
MOTORBEHUIZING
.
.
0- D
E VENTILATOR IS UITGESCHAKELD
1- D
E VENTILATOR FUNCTIONEERT OP DE LAAGSTE STAND
2- D
E VENTILATOR FUNCTIONEERT OP DE MIDDELSTE STAND
3- D
E VENTILATOR FUNCTIONEERT OP DE HOOGSTE STAND
• D
E VENTILATOR KAN IN DE OSCILLATIEMODUS OF STATISCHE MODUS FUNCTIONEREN
• O
M DE VENTILATORKOP TE LATEN OSCILLEREN, MOET U DE OSCILLATIEKNOP INDRUKKEN
• O
M DE VENTILATORKOP TE LATEN STOPPEN MET OSCILLEREN MOET U DE OSCILLATORKNOP OMHOOG TREKKEN
• D
E KOP VAN DE VENTILATOR KAN OMHOOG OF OMLAAG INGESTELD WORDEN; OM DIT TE DOEN KUNT U DE
INSTELKNOP LOSDRAAIEN, STEL DE VENTILATOR IN DE GEWENSTE HOEK EN DRAAI DE INSTELKNOP STRAK OM
HET VAST TE ZETTEN.
.
.
.
.
Page 4
Thermische uitschakelaar
Er is een thermische bescherming in de motor geïnstalleerd. Wanneer er door verschillende oorzaken
oververhitting plaatsvindt, dan zal de temperatuur van de motor het smeltpunt bereiken. Het zal dan
automatisch stoppen daarbij de ventilator efficiënt veiliger maken. Wanneer de bescherming
gesmolten is dan dient het probleem in de ventilator verholpen te worden en een nieuwe thermische
bescherming geïnstalleerd te worden voordat de ventilator weer gebruikt wordt.
Schoonmaak gebruiksaanwijzingen
1. Z
ORG ER VOOR OM DE STEKKER UIT HET STOPCONTACT TE HALEN VOORDAT HET SCHOONGEMAAKT WORDT
2. D
E ONDERDELEN DIENEN MET EEN MILD AFWASMIDDEL EN EEN VOCHTIGE DOEK OF SPONS SCHOONGEMAAKT TE
WORDEN. SPOEL DE AFWASMIDDELLAAG ER GRONDIG AF MET SCHOON WATER
3. O
M ELK ONDERDEEL UIT ELKAAR TE HALEN MOET U DE ASSEMBLAGE VOLGORDE OMDRAAIEN.
.
.
Aanwijzingen ter bescherming van het milieu
Dit product mag aan het einde van zijn levensduur niet bij het normale huisafval worden gedeponeerd, maar dient bij een speciaal
inzamelpunt voor het hergebruik van elektrische en elektronische apparaten te worden aangeboden. Het symbool op artikel,
gebruiksaanwijzing en verpakking attendeert u hier op. De gebruikte grondstoffen zijn geschikt voor hergebruik. Met het hergebruik van
gebruikte apparaten of grondstoffen levert u een belangrijke bijdrage voor de bescherming van ons milieu. Informeer bij uw lokale overheid
naar het bedoelde inzamelpunt.
Page 5

D
Allgemeine Sicherheitshinweise
Überprüfen Sie, ob Ihre Haushaltsspannung mit der Spannung auf dem Typenschild Ihres Geräts
übereinstimmt.
• Lesen Sie diese Bedienungsanleitung vor der Inbetriebnahme bitte sorgfältig durch und
bewahren Sie diese für die Zukunft gut auf.
• Bewahren Sie bitte diese Bedienungsanleitung, den Garantieschein, die Kaufquittung, und
wenn möglich, den Karton mit der inneren Verpackung auf!
• Dieses Gerät ist nur für den privaten und nicht den kommerziellen Gebrauch! Schützen Sie es
vor direkter Hitze, Sonne und Feuchtigkeit, und schützen Sie es vor Einwirkungen scharfer
Gegenstände.
• Ziehen Sie immer den Stecker, wenn das Gerät nicht in Gebrauch ist, wenn Sie Zubehörteile
anschließen, das Gerät reinigen oder eine Störung auftritt. Ziehen Sie den Stecker vorher.
Halten Sie das Kabel am Stecker und ziehen Sie nicht am Kabel selbst.
• Dieses Gerät ist nicht für Personen mit körperlich, sensorisch oder geistig eingeschränkten
Fähigkeiten, oder für unerfahrene und unwissende Personen geeignet, es sei denn, diese
wurden von einer schutzbefohlenen Person in Bezug auf den Gebrauch des Geräts
beaufsichtigt oder angeleitet.
• Lassen Sie Kinder nicht unbeaufsichtigt mit dem Gerät, um sie vor den Gefahren im Umgang
mit elektrischen Geräten zu schützen. Suchen Sie für das Gerät also einen Platz aus, der für
Kinder unzugänglich ist. Achten Sie darauf, dass das Kabel nicht herunterhängt.
• Überprüfen Sie das Gerät, den Stecker und das Kabel regelmäßig auf Schäden. Verwenden Sie
das Gerät nicht bei Vorhandensein irgendwelcher Schäden, sondern lassen Sie es von einem
Techniker reparieren, um Gefahrensituationen zu vermeiden. Es dürfen nur Originalteile
verwendet werden.
• Beschädigte Kabel oder Stecker müssen von einem authorisierten Techniker ersetzt werden,
um Gefahrensituationen zu vermeiden. Reparieren Sie das Gerät nicht selbst.
• Verwendung einer Verlängerungskabel oder externe Zeitschalter ist nicht erlaubt.
• Schützen Sie das Gerät und das Kabel vor Hitze, direktem Sonnenlicht, Feuchtigkeit, scharfen
Kanten und ähnlichem.
• Verwenden Sie das Gerät nicht unbeaufsichtigt! Schalten Sie das Gerät immer aus, wenn Sie
es nicht benutzen, auch wenn es nur für einen kurzen Moment ist.
• Verwenden Sie das Gerät nicht im Freien.
• Das Gerät darf unter keinen Umständen in Wasser oder andere Flüssigkeiten gestellt werden
oder mit solchen in Berührung kommen. Benutzen Sie das Gerät nicht mit nassen oder
feuchten Händen.
• Wenn das Gerät feucht oder nass wird, ziehen Sie bitte umgehend den Stecker. Fassen Sie
nicht in das Wasser.
• Verwenden Sie das Gerät nur für seinen Bestimmungszweck.
Page 6

Komponentenliste
1. Rotor
2. Schraube
3. Mutter
4. Feststellschraube
5. Hinterer Schutzkorb
6. Vorderer Schutzkorb
7. Oszillationsschalter
8. Ein-/Ausschalter
9. Motor
10. Netzkabel
11. Feststellknopf
12. Standfuß
13. Standfuß-Stellschraube
Montage
Wenn Ihr Ventilator schon zusammengebaut ist, überspringen Sie diesen Abschnitt.
1. Nehmen Sie die Komponenten aus der Verpackung. Wenn der vordere und der hintere
Schutzkorb verbunden sind, trennen Sie beide.
2. Setzen Sie den hinteren Schutzkorb mit dem Handgriff nach oben an die richtige Position.
3. Ziehen Sie die Mutter zum Befestigen des Schutzkorbs gut fest.
4. Lösen Sie die Einstellschraube am Rotor, schieben ihn auf die Motorwelle und ziehen die
Stellschraube auf der flachen Aussparung der Welle zum Sichern des Rotors fest. Achten Sie
darauf, dass der Rotor nicht die Schutzkörbe berührt.
5. Befestigen Sie den vorderen Schutzkorb auf dem hinteren. Ziehen Sie die
Verbindungsschraube und die Mutter fest. Sichern Sie die Halteclips.
Inbetriebnahme
Der Tischventilator bietet drei Geschwindigkeitsstufen und einen Ventilatorkopf mit einer
ruckelfreien Schwenkfunktion bei geringer Geräuschentwicklung, niedrigem Stromverbrauch,
Zuverlässigkeit und Sicherheit und der Garantie eines wirkungsvollen Luftstroms. Der Ein/Ausschalter ist in den Drehschalter im Motorgehäuse integriert.
0. Der Ventilator ist ausgeschaltet
1. Der Ventilator arbeitet mit der niedrigsten Geschwindigkeit
2. Der Ventilator arbeitet mit mittlerer Geschwindigkeit
3. Der Ventilator arbeitet mit der höchsten Geschwindigkeit
• Der Ventilator kann im Schwenk-oder statischen Modus arbeiten.
• Durch Hereindrücken des Oszillationsschalters können Sie die Schwenkfunktion einschalten.
• Durch Herausziehen des Oszillationsschalters können Sie die Schwenkfunktion ausschalten.
• Die Richtung des vertikalen Luftstroms durch Neigen oder Anheben des Ventilatorkopfes
eingestellt werden. Lösen Sie den Feststellknopf, stellen den gewünschten Neigungswinkel
ein und ziehen den Feststellknopf fest.
Page 7
Thermische Schutzschaltung
Im Motor ist eine thermische Schutzschaltung eingebaut. Wenn bei einer Überhitzung die
Motortemperatur den Ansprechpunkt der Schutzschaltung erreicht, wird die Stromversorgung
automatisch unterbrochen und sichert so den Ventilator wirkungsvoll ab. Wenn die Schutzschaltung
ausgelöst hat, sollte die Ursache für das Problem beseitigt werden.
Reinigung
1. Ziehen Sie vor dem Reinigen zuerst den Netzstecker.
2. Reinigen Sie die Komponenten mit milder Seife und einen feuchten Tuch oder
Schwamm. Entfernen Sie die Seifenrückstände gründlich mit sauberem Wasser.
3. Das Auseinanderbauen des Geräts erfolgt in der der umgekehrten Reihenfolge des
Zusammenbaus.
Hinweise zum Umweltschutz
Dieses Produkt darf am Ende seiner Lebensdauer nicht über den normalen Haushaltsabfall entsorgt werden, sondern muss an einem
Sammelpunkt für das Recycling von elektrischen und elektronischen Geräten abgegeben werden. Das Symbol auf dem Produkt, der
Gebrauchsanleitung oder der Verpackung weist darauf hin. Die Werkstoffe sind gemäß ihrer Kennzeichnung wieder verwertbar. Mit der
Wiederverwendung, der stofflichen Verwertung oder anderen Formen der Verwertung von Altgeräten leisten Sie einen wichtigen Beitrag
zum Schutze unserer Umwelt. Bitte erfragen Sie bei der Gemeindeverwaltung die zuständige Entsorgungsstelle.
Page 8

FR
Instructions générales de sécurité
Vérifiez si la tension de votre alimentation correspond au voltage indiqué sur le label de votre
appareil.
• Avant de mettre cet appareil en service, veuillez lire le manuel d’instructions attentivement
et conservez-le afin de pouvoir vous y référer dans le futur.
• Veuillez conserver ces instructions, le certificat de garantie, le ticket de caisse et, si possible,
le carton contenant l’emballage interne.
• L’appareil est conçu uniquement pour un usage privé et non pour un usage commercial !
Tenez le á l’écart de la chaleur, du soleil et de l‘humidité et protégez-le des impacts
coupants.
• Débranchez toujours la prise quand vous n’utilisez pas l’appareil, quand vous attachez des
parties accessoires, quand vous nettoyez l’appareil ou quand vous observez un problème.
Eteignez d’abord l’appareil. Tirez sur la prise et non sur le câble.
• Cet appareil n'est pas prévu pour être utilisé par des personnes (y compris les enfants) don't
les capacities physiques, sensorielles ou mentales sont réduites, oou des personnes dénuées
d'expérience ou de connaissance, sauf si elles ont pu bénéficier, par l'intermédiaire d'une
personne responsable de leur sécurité, d'une surveillance ou d'instructions préalables
concernant l'utilisation de l'appareil.
• Il convient de surveiller les enfants pour s'assurer qu'ils ne jouent pas avec l'appareil.
• Afin de protéger les enfants des dangers des appareils électriques, ne les laissez jamais sans
surveillance à proximité de l’appareil. En conséquence, lorsque vous choisissez
l’emplacement de l’appareil, faites-le de telle manière que l’enfant n’aura pas accès à
l’appareil. Vérifiez et assurez-vous que les câbles ne pendent pas.
• Testez régulièrement l’appareil, la prise et le câble au cas ou ils seraient endommagés..
Seules des parties de remplacement originales peuvent être utilisées.
• Si la prise ou de câble d’alimentation serait endommagé, il doit être remplacé par le
fabricant, son service après vente ou des personnes de qualification similaire afin d’éviter un
danger Ne réparez pas l’appareil vous-même.
• Tenez l’appareil et le câble à l’écart de la chaleur, des rayons directs du soleil, de l’humidité
ou des coins tranchants…etc.
• N’utilisez jamais l’appareil sans surveillance ;éteignez l’appareil quand vous ne l’utilisez pas,
même pour un court moment.
• L’appareil n’est pas destiné à etre mis en fonctionnement au moyen d’une minuterie
extérieure ou par un système de commande à distance séparé.
• N’utilisez pas l’appareil en extérieur.
• L’appareil ne doit être placé dans l’eau ou un autre liquide en aucune circonstance. N’utilisez
pas l’appareil si vos mains sont humides ou mouillées.
• Si l’appareil devient humide ou mouillé, débranchez la prise principale immédiatement. Ne
touchez pas l’eau.
• Utilisez l’appareil seulement pour les fins auxquelles il a été conçu.
Page 9

Liste des pièces
1. P
ALE
2. Vis
3. Boulon
4. Jeu d'écrous
5. Protection arrière
6. Protection avant
8. Bouton de marche
9. Moteur
10. Cordon d'alimentation
11. Bouton de réglage
12. Base
13. Jeu d'écrous de la base
7. Bouton des oscillations
Montage
Si votre ventilateur est livré déjà monté, ignorez ce passage.
1. Retirez les éléments de l'emballage. Séparez les protections avant et arrière si elles sont
attachées.
2. Placez la grille arrière en position, avec la poignée dirigée vers le haut.
3. Serrez bien les boulons pour fixer la grille.
4. Desserrez le jeu d'écrous des pales, insérez les pales sur l'arbre du moteur, serrez les écrous sur
la partie plate de l'arbre afin de bien les maintenir. Assurez-vous que les pales ne touchent pas
les protections.
5. Installez la protection avant sur la protection arrière. Serrez les écrous et les boulons de
montage, placez les fixations de sécurité.
6. Retirez le jeu d'écrous du manche, présentez et alignez la base avec le trou du manche. Insérez la
base et serrez les écrous.
Utilisation
Le ventilateur de bureau dispose de trois vitesses, d'une action de rotation offrant une légère
oscillation relativement silencieuse, et d'une faible consommation électrique tout en étant fiable et
sûr et en fournissant un flux d'air suffisant. L'interrupteur marche/arrêt est placé sur le bouton
d'oscillation, sur le bloc moteur.
0- Le ventilateur est éteint.
1- Le ventilateur fonctionne à sa vitesse la plus faible.
2- Le ventilateur fonctionne à vitesse intermédiaire.
3- Le ventilateur fonctionne à sa vitesse la plus rapide.
• Le ventilateur peut fonctionner en oscillant ou en restant statique.
• Pour faire osciller la tête du ventilateur, enfoncez le bouton de réglage de l'oscillation.
• Pour arrêter les oscillations, tirez sur le bouton de réglage de l'oscillation.
• La tête du ventilateur peut être ajustée vers le bas ou vers le haut, il suffit de desserrer le
bouton de réglage et d'incliner le ventilateur selon l'angle de votre choix, resserrez le bouton
de réglage pour maintenir en place.
Page 10

Interruption par le thermostat
Un thermostat a été monté dans le moteur. Si l'appareil surchauffe pour une raison ou une autre et
que la température du moteur atteint le point déterminer, le moteur sera automatiquement arrêté
par mesure de sécurité. Lorsque l'arrêt automatique est déclanché, il convient d'identifier l'origine du
problème et de remplacer le dispositif d'arrêt avant d'utiliser le ventilateur à nouveau.
Instructions de nettoyage
1. Assurez-vous de débrancher le ventilateur de l'alimentation électrique avant de le nettoyer.
2. Les éléments doivent être nettoyés avec un savon doux et un chiffon ou une éponge humide.
Rincez bien le film de savon avec de l'eau claire.
3. Pour démonter chaque élément, procédez en sens inverse du montage.
Renseignements pour la protection de l’environnement
Ce produit ne devrait pas être mis dans les déchets ménager à la fin de son existence mais doit être remis à une point de ralliement pour des
produits électroménager et électronique. Ce symbole sur article, mode d’emploi et boite vous indique ce recyclage. Les matières de cet
article sont appropriées pour recyclage. Par le recyclage des appareils ou de ses matières premières vous contribuez à la protection de notre
environnement. Renseignez-vous auprès les autorités locales pour cet endroit de rassemblement.
Page 11

EN
General safety instructions
Check if the tension of your supply corresponds with the voltage indicated on the rating plate of
your appliance.
• Before commissioning this device please read the instruction manual carefully and keep this so
that you can check them later .
• Please keep these instructions, the guarantee certificate, the sales receipt and, if possible, the
carton with the inner packaging!
• The device is intended exclusively for private and not for commercial use! Keep it away from
direct heat, sun and moist and protect it against sharp impacts.
• Always remove the plug from the socket whenever the device is not in use, when attaching
accessory parts, cleaning the device or whenever a disturbance occurs. Switch off the device
before. Pull on the plug, not on the cable.
• This appliance is not intended for use by persons with reduced physical, sensory or mental
capacities , or lack of experience and knowledge (including children) , unless they have been
supervised or instructed concerning use of the appliance by a person responsible for their
safety.
• In order to protect children from the dangers of electrical appliances, never leave them
unsupervised with the device. Consequently, when selecting the location for your device, do so
in such a way that children do not have access to the device. Take care to ensure that the cable
does not hang down.
• Test the device, plug and the cable regularly for damage. If there is damage of any kind, the
device should not be used but the appliance must be repaired by a qualified technician in order
to avoid a hazard. Only original spare parts must be used.
• A damaged cord or plug must be replaced by an authorized technician to avoid a hazard. Do
not repair the device yourself,.
• Keep the device and the cable away from heat, direct sunlight, moisture, sharp edges and such
like.
• Never use the device unsupervised! Switch off the device whenever you are not using it, even if
this is only for a moment.
• Do not use the device outdoors.
• Under no circumstances must the device be placed in water or other liquid, or come into contact
with such. Do not use the device with wet or moist hands.
• Should the device become moist or wet, remove the mains plug from the socket immediately.
Do not reach into the water.
• Use the device only for the intended purpose.
Page 12

Partslist
1. Blade
2. Screw
3. Nut
4. Set screw
5. Rear guard
6. Front guard
8. Power knob
9. Motor
10. Power cord
11. Adjusting knob
12. Base
13. Base set screw
7. Oscillation knob
Assembly
If your fan comes ready assembled ignore this part.
1. Remove the parts from the packing. Separate the front and rear guard if they are
connected.
2. Set the rear grille in the proper position with handle up.
3. Screw on nut tightly to attach grille.
4. Loosen the set screw on the blade, slide the blade onto the shaft of the motor,
tighten the set screw onto the flat of the shaft to secure the blade. Ensure that
the blade does not touch the guards.
5. Assemble the front guard to the rear guard. Tighten the connecting screw and
nut, secure the retaining clips.
6. Remove the set screw on the pole , offer up and align the base with the hole on
the pole insert the base set screw and tighten.
Operation
The Desk Fan features three speeds, a swivel action head giving a smooth oscillation action along
with low noise levels, low electrical usage, reliability with safety, while still providing efficient air
flow. The on/off switch is incorporated in the rotary switch in the motor housing.
0- The Fan is switched Off
1- The Fan operates at the lowest speed
2- The Fan operates at the medium speed
3- The Fan operates at the highest speed
• The fan can operate in oscillation or static mode.
• To make the fan head oscillate, push down the oscillation Knob.
• To stop the fan head from oscillating, pull-up the oscillation Knob.
• The head of the fan can be adjusted up or down, to do this loosen the adjusting knob, adjust
the fan to the desired angle, to secure tighten the adjusting knob.
Page 13

Thermal cut-out device
A thermal cut-out device was mounted in the motor. When overheats due to various reasons, the
temperature of the motor reaches the fusing point, it will cut off automatically, make the fan safe
efficiently. When the cut-out is fused, the fan should be eliminated trouble and replace a new cut-out
before the fan is used again.
Cleaning instructions
1. Be sure to unplug the fan from electrical supply source before cleaning.
2. Parts should be cleaned with mild soap and a damp cloth or sponge. Thoroughly remove soap
film with clean water.
3. To disassemble each part, reverse the order of assembly.
Guidelines for protection of the environment
This appliance should not be put into the domestic garbage at the end of its useful life, but must be disposed of at a central point for
recycling of electric and electronic domestic appliances. This symbol on appliance, instruction manual and packaging puts your attention to
this important issue. The materials used in this appliance can be recycled. By recycling used domestic appliances you contribute an
important push to the protection of our environment. Ask your local authorities for information regarding the point of recollection.
Page 14

IT
Istruzioni di sicurezza generale
Controllare che la tensione dell’alimentazione corrisponda con quella indicate nella targhetta di
classificazione dell’apparecchio.
• Prima di far usare a qualcuno questo dispositivo si prega di leggere attentamente il manuale
d’istruzioni e tenerlo in modo da poterlo controllare in futuro.
• Si prega di tenere queste istruzioni, il certificato di garanzia, la ricevuta di acquisto e, se
possibile, il cartone con l’imballaggio interno!
• Il dispositivo è inteso esclusivamente per uso privato e non commerciale! Tenerlo lontano dal
calore diretto, sole e umidità e proteggerlo da urti con oggetti affilati.
• Togliere sempre la spina dalla presa tutte le volte che il dispositivo non viene usato, quando si
attaccano gli accessori, quando si pulisce il dispositivo o quando si ha qualche disturbo. Prima
spegnere il dispositivo. Tirare la spina, non il cavo.
• Questo apparecchio non è inteso per l’uso da parte di persone con ridotte capacità fisiche,
sensoriali o mentali, o mancanza di esperienza e conoscenza (inclusi bambini), se non sono
supervisionate o istruite sull’uso dell’apparecchio da una persona responsabile per la loro
sicurezza.
• Per proteggere i bambini dai pericoli degli apparecchi elettrici, non lasciarli mai senza
controllo con il dispositivo. Di conseguenza, quando si sceglie il luogo per il dispositivo, si
deve farlo in modo che i bambini non vi abbiano accesso. Fare attenzione che il cavo non
penzoli.
• Controllare regolarmente che il dispositivo, la spina e il cavo non siano danneggiati. Se c’è un
qualche danno, il dispositivo non dovrebbe essere usato ma l’apparecchio deve essere
riparato da un tecnico qualificato in modo da evitare un qualsiasi pericolo. Devono essere
usate solo pezzi di ricambio originali.
• Un filo o una spina danneggiata devono essere sostituiti da un tecnico autorizzato per evitare
un rischio. Non riparare da se il dispositivo.
• Tenere il dispositivo e il cavo lontano da calore, luce diretta del sole, umidità, bordi affilati e
simili.
• Non usare mai il dispositivo senza controllo! Spegnere il dispositivo tutte le volte che non si
usa, anche se solo per un momento.
• Non usare il dispositivo all’aperto.
• In nessuna circostanza il dispositivo deve essere messo in acqua o altro liquido, o entrare in
contatto con essi. Non usare il dispositivo con mani bagnate o umide.
• Se il dispositivo diventasse umido o bagnato, togliere la spina dalla presa immediatamente.
Non toccare l’acqua.
• Usare il dispositivo solo per lo scopo per cui è inteso.
Page 15

Elenco componenti
1. L
AMA
2. Vite
3. Dado
4. Vite di regolazione
5. Protezione posteriore
6. Protezione anteriore
8. Manopola di alimentazione
9. Motorino
10. Cavo di alimentazione
11. Manopola di regolazione
12. Base
13. Vite di regolazione base
7. Manopola di oscillazione
Montaggio
Se la ventola viene fornita preassemblata, ignorare questa parte.
1. Togliere le parti dall’imballaggio. Separare le protezioni anteriore e posteriore se sono
collegate.
2. Posizionare la griglia posteriore correttamente con l’impugnatura rivolta verso l’alto.
3. Serrare il dado per fissare la griglia.
4. Allentare la vite di regolazione sulla lama, far scivolare la lama sull’albero del motorino e
serrare la vite di regolazione sulla parte piatta dell’albero per fissare la lama. Controllare che
la lama non tocchi le protezioni.
5. Assemblare una all’altra le protezioni anteriore e posteriore. Serrare vite e dadi di
collegamento e fissare I clip di fissaggio.
Funzionamento
La ventola da tavolo funziona a tre diverse velocità; una testina girevole assicura un’oscillazione
uniforme e rumore ridotto, ridotta usura elettrica, affidabilità e sicurezza, assicurando al contempo
un efficiente flusso di aria. L’interruttore ON/OFF è integrato nel selettore dell’alloggiamento del
motore.
0- La ventola si trova su OFF
1- La ventola funziona alla velocità più bassa
2- La ventola funziona alla velocità media
3- La ventola funziona alla velocità più alta
• La ventola può funzionare nel modo con oscillazione o statico.
• Per far oscillare la ventola, premere la manopola di oscillazione.
• Per far sì che la testina della ventola smetta di oscillare, spostare la manopola di oscillazione
verso l’alto.
• La testina della ventola può essere regolata verso l’alto oppure il basso; a questo scopo,
allentare la manopola di regolazione, regolare la ventola all’angolazione desiderata e serrare
la manopola di regolazione.
Page 16

Termica
Il motorino è dotato di termica. In caso di surriscaldamento dovuto a motivi diversi, la temperatura
del motorino raggiunge il punto di fusione. In questo caso, il motorino si spegne automaticamente; in
questo modo viene assicurato il funzionamento sicuro della ventola.
Istruzioni per la pulizia
1. Scollegare la ventola dall’alimentazione elettrica prima di effettuare la pulizia.
2. Pulire le parti con sapone neutro e un panno o una spugna umidi. Rimuovere quindi il sapone
con acqua pulita.
3. Per smontare le parti, procedere nell’ordine inverso.
Avvertenza per la tutela dell’ambiente
Come indicato dal simbolo riportato sul prodotto, sulle istruzioni per l'uso oppure sull'imballaggio, una volta terminata la vita utile di questo
prodotto, non smaltirlo nei normali rifiuti domestici, bensì portarlo ad un centro di raccolta per il riciclaggio di apparecchi elettrici ed
elettronici. I materiali sono riutilizzabili in conformità alla loro marcatura. Con il riutilizzo, il ricupero dei materiali oppure altre forme del
ricupero di apparecchi vecchi si contribuisce in modo importante alla tutela del nostro ambiente. Richiedete all’amministrazione comunale i
dati relativi al punto di smaltimento competente.
Page 17

ES
Instrucciones generales de seguridad
Asegúrese de que el voltaje de la toma de corriente se corresponde con el voltaje indicado en la placa
de especificaciones del aparato.
• Antes de utilizar el aparato, lea el manual de instrucciones atentamente y consérvelo para
futuras consultas.
• Conserve el manual de instrucciones, el certificado de garantía, el recibo de compra y, si es
posible, el embalaje original.
• El aparato está diseñado exclusivamente para uso particular y no comercial. Manténgalo
alejado de fuentes de calor, del sol y de la humedad, y protéjalo de impactos fuertes.
• Desconecte el enchufe de la toma de corriente siempre que no utilice el aparato, que desee
acoplar accesorios, que lo limpie o cuando detecte algún problema. Desenchufe el aparato
antes de realizar estas operaciones. Tire del enchufe, no del cable.
• El aparato no está diseñado para ser utilizado por personas con disminuciones físicas,
sensoriales o mentales, o con falta de experiencia y conocimiento (niños incluidos), a menos
que estén supervisados o hayan sido instruidos sobre el uso del aparato por una persona
responsable de su seguridad.
• Para proteger a los niños de los peligros de los aparatos eléctricos, nunca los deje solos con el
aparato sin supervisión. Consecuentemente, al seleccionar el emplazamiento del aparato,
piense en un lugar fuera del alcance de los niños. Asegúrese de que el cable no quede
colgando.
• Pruebe el aparato, el enchufe y el cable para detectar cualquier daño posible. En caso de
detectar cualquier tipo de daño, no utilice el aparato y hágalo reparar por un técnico
cualificado. Sólo se deben utilizar piezas originales.
• Si el cable o el enchufe están dañados deberán ser sustituidos por un técnico autorizado para
evitar cualquier tipo peligro. No repare el aparato usted mismo.
• Mantenga el aparato y el cable alejados de fuentes de calor, de la luz directa del sol, de la
humedad, de bordes afilados y semejantes.
• Nunca utilice el aparato sin vigilancia. Desconecte el aparato cuando no lo utilice, aunque
sólo sea por un rato.
• No utilice el aparato al aire libre.
• Bajo ninguna circunstancia coloque el aparato bajo agua o cualquier otro líquido, ni permita
que entre en contacto con dichos líquidos. No utilice el aparato con las manos mojadas o
húmedas.
• En caso de que el aparato se moje, desenchúfelo de la corriente inmediatamente. No permita
que entre en contacto con el agua.
• No utilice el aparato para otros usos que no sean para el que ha sido fabricado.
Page 18

Lista de piezas
1. P
ALA
2. Tornillo
3. Rosca
4. Tornillo de fijación
5. Protección trasera
6. Protección delantera
8. Mando de potencia
9. Motor
10. Cable de alimentación
11. Mando de ajuste
12. Base
13. Tornillo de fijación de base
7. Mando de oscilación
Montaje
Si el ventilador ya viene montado, ignore esta parte.
1. Saque las piezas del embalaje. Separe las protecciones delantera y trasera si están
conectadas.
2. Ponga la rejilla trasera en la posición adecuada con el asa arriba.
3. Enrosque con firmeza la rosca para unir la rejilla.
4. Afloje el tornillo de fijación en la pala, deslice la pala en el eje del motor, apriete el tornillo de
fijación en la parte plana del eje para fijar la pala. Asegúrese de que la pala no toque las
protecciones.
5. Monte la protección delantera con la protección trasera. Apriete el tornillo y la rosca de
conexión, y fije los clips de sujeción.
Funcionamiento
El ventilador de sobremesa tiene tres velocidades, un cabezal de acción oscilante que ofrece una
suave oscilación junto con bajos niveles de ruido, fiabilidad y seguridad, y ofrece un flujo de aire
eficiente. El interruptor de encendido/apagado está incluido en el interruptor giratorio del chasis del
motor.
0- El ventilador está apagado
1- El ventilador funciona a la velocidad más baja
2- El ventilador funciona a la velocidad media
3- El ventilador funciona a la velocidad más alta
• El ventilador puede funcionar oscilando o estático
• Para que el cabezal del ventilador oscile, presione hacia abajo el mando de oscilación.
• Para que el cabezal del ventilador deje de oscilar, tire hacia arriba el mando de oscilación.
• El cabezal del ventilador puede ajustarse hacia arriba o abajo, para hacerlo afloje el mando
de ajuste, ajuste el ventilador al ángulo deseado, y para asegurar apriete el mando de ajuste.
Page 19

Dispositivo de desconexión térmica
Se incluye un dispositivo de desconexión térmica en el motor. Cuando se sobrecaliente por diversos
motivos, la temperatura del motor llega a punto de fusión, se desconectará automáticamente, y
protegerá eficientemente al ventilador.
Instrucciones de limpieza
1. Asegúrese de desenchufar el ventilador de la corriente antes de limpiarlo.
2. Las piezas deben limpiarse con jabón suave y un trapo o esponja húmedo. Elimine a fondo la
película de jabón con agua limpia.
3. Para desmontar cada pieza, invierta el orden de montaje.
Indicaciones para la protección del medio ambiente
Este producto no debe desecharse con la basura normal una vez finalizada su vida útil, sino que debe depositarse en un punto de recogida
selectiva para el reciclaje de aparatos eléctricos y electrónicos, tal como advierte el símbolo que aparece en el producto, en las instrucciones
de uso o en el embalaje. Los materiales se pueden reutilizar según su clasificación. Al reutilizar los aparatos antiguos, ya sea de forma
material o de cualquier otra forma, contribuye de manera importante a la protección de nuestro medio ambiente. Infórmese en su
ayuntamiento sobre los puntos de eliminación de residuos correspondientes.
Page 20

PT
Instruções gerais de segurança
Verifique se a sua tensão de alimentação corresponde à tensão indicada na placa de identificação do
seu aparelho.
• Antes de ligar este aparelho, leia o manual de instruções, e guarde-o para consulta futura.
• Guarde estas instruções, o certificado de garantia, o recibo de compra e, se possível, a caixa
com os respectivos materiais de acondicionamento!
• Este aparelho destina-se exclusivamente a utilização privada e não a utilizações comerciais!
Mantenha-o afastado da luz directa do sol, do calor e da humidade para o proteger contra
avarias.
• Retire sempre a ficha da tomada quando não estiver a utilizar o aparelho, quando fixar
acessórios, quando limpar o aparelho ou quando ocorrer uma avaria. Desligue primeiro o
aparelho. Retire o cabo da tomada e não do aparelho.
• Este aparelho não deve ser utilizado por pessoas com capacidades físicas, sensoriais ou
mentais reduzidas, ou com pouca experiência e conhecimento (incluindo crianças), a não ser
que tenham sido instruídas e supervisionadas na utilização do aparelho pela pessoa
responsável pela sua segurança.
• No sentido de proteger as crianças dos perigos dos aparelhos eléctricos, nunca as deixe sem
supervisão junto do aparelho. Da mesma forma, quando seleccionar o local onde vai colocar
o aparelho, faça-o de modo a que as crianças não lhe consigam aceder. Certifique-se de que o
cabo não fica suspenso.
• Verifique regularmente se o dispositivo, a ficha e o cabo estão danificados. Se houver algum
tipo de dano, não deve utilizar o aparelho. Deve entregá-lo a um técnico qualificado para que
este o repare, evitando assim mais perigos. Só podem ser utilizadas peças de substituição
originais.
• Se o cabo ou o fio estiverem danificados, devem ser substituídos por um técnico autorizado
para evitar mais perigos. Não tente reparar o aparelho sozinho.
• Mantenha o aparelho e o cabo longe do calor, da luz directa do sol, da humidade, de
extremidades afiadas e de outras situações semelhantes.
• Não utilize este aparelho sem supervisão! Desligue o aparelho sempre que não o estiver a
utilizar, mesmo que seja por breves momentos.
• Não utilize o aparelho ao ar livre.
• O aparelho não pode, em nenhuma circunstância, entrar em contacto ou ser colocado dentro
de água ou de outro líquido. Não utilize o aparelho se tiver as mãos molhadas ou húmidas.
• Se o aparelho ficar húmido ou molhado, retire imediatamente a ficha da tomada. Não
coloque as mãos dentro de água.
• Utilize o aparelho exclusivamente para o fim a que se destina.
Page 21

Lista de componentes
1. L
ÂMINA
2. Parafuso
3. Porca
4. Parafuso de fixação
5. Protecção traseira
6. Protecção dianteira
8. Botão de energia
9. Motor
10. Cabo de alimentação
11. Botão de ajuste
12. Base
13. Parafuso de fixação da base
7. Botão de oscilação
Montagem
Se a sua ventoinha for fornecida já montada, ignore esta secção.
1. Retire os componentes da embalagem. Separe a protecção traseira e a protecção dianteira,
se estas estiverem encaixadas.
2. Coloque a grelha traseira na posição correcta com a pega virada para cima.
3. Aperte bem a porca para encaixar a grelha.
4. Desaperte o parafuso de fixação da lâmina, deslize a lâmina para o eixo do motor, aperte o
parafuso de fixação na superfície plana do eixo para fixar a lâmina. Certifique-se que a lâmina
não toca nas protecções.
5. Encaixe a protecção dianteira na protecção traseira. Aperte o parafuso e a porca de ligação,
aperte os grampos de retenção.
6. Retire o parafuso de fixação do poste, alinhe a base com o orifício do poste; insira o parafuso
de fixação da base e aperte.
Funcionamento
A ventoinha de mesa possui três velocidades, uma cabeça giratória que proporciona uma oscilação
suave em conjunto com um nível reduzido de ruído, um baixo consumo de energia, fiabilidade em
termos de segurança, ao mesmo tempo que proporciona um fluxo de ar eficaz. O interruptor
ligar/desligar está incorporado no interruptor de rotação na caixa do motor.
0- A ventoinha está desligada
1- A ventoinha funciona à velocidade mínima
2- A ventoinha funciona à velocidade média
3- A ventoinha funciona à velocidade máxima
• A ventoinha pode funcionar no modo oscilatório ou estático.
• Para fazer a cabeça da ventoinha oscilar, empurre para baixo o botão de oscilação
• Para impedir que a cabeça da ventoinha oscile, puxe para cima o botão de oscilação.
• A cabeça da ventoinha pode ser ajustada para cima ou para baixo; para fazer isso, desaperte
o botão de oscilação, ajuste a ventoinha para o ângulo pretendido; no final, aperte o botão
de oscilação.
Page 22

Dispositivo de corte térmico
Foi instalado no motor um dispositivo de corte térmico. Se, por vários motivos, a ventoinha aquecer
demasiado, a temperatura do motor atinge o ponto de fusão; o motor é automaticamente desligado,
tornando a ventoinha eficaz em termos de segurança. Se o dispositivo de corte atingir o ponto de
fusão, a ventoinha deve ser reparada e o dispositivo de corte substituído antes de utilizar novamente
o aparelho.
Instruções de limpeza
1. Certifique-se que a ventoinha está desligada da fonte de alimentação antes de a limpar.
2. As peças deverão ser limpas com um detergente suave e um pano húmido ou uma esponja.
Limpe totalmente os resíduos de detergentes com água limpa.
3. Para desmontar cada peça, siga as instruções de montagem, pela ordem inversa.
Indicações para a protecção ambiental
Este produto não pode ser deitado no lixo doméstico normal no final da sua vida útil, tendo de ser colocado num ponto de recolha selectiva para reciclagem de
aparelhos eléctricos e electrónicos. O símbolo apresentado no produto, o manual de instruções ou a embalagem avisam sobre esta situação. Os materiais são
reutilizáveis de acordo com a sua identificação. Através da reutilização, do aproveitamento de materiais ou de outras formas de
aproveitamento de aparelhos antigos, irá contribuir significativamente para proteger o ambiente. Informe-se no seu município para saber
qual o ponto de eliminação de resíduos responsável.
 Loading...