

Page 1
EN INSTRUCTION MANUA L
NL GEBRUIKSAANWIJZING
FR MODE D'E MP LOI
DE BEDIENUNGSANLEITUNG
ES M A N UAL DE U SUARIO
PT MANUA L DE UTILIZADOR
PL INSTRUKCJA OBSŁU G I
IT MANUA LE UTENTE
SV AN VÄNDA RETR2553
|
Page 2
2
Page 3

3
EN INSTRUCTION MANUAL
De ar cus tomer,
Co ngr atu lation s and tha nk you fo r purc hasing this high
qu alit y p roduct. P lease rea d th e i nstruc tion manua l care fully
so that you wil l b e able to ma ke the best poss ibl e use of t he
ap plianc e. Th is manual inc lud es all the ne ces sary instruction s
an d advi ce for using , c leanin g an d m aintai ning t he a ppl iance.
If yo u f ollow the se i nst ruct ion s you will b e gu ara nte ed of an
exce llent res ult, i t save s y ou tim e and will avoi d prob lems.
We h ope yo u w ill have a grea t deal of pl easure from using
th is app lian ce.
Safety inStructionS
• Please read the instruction manual carefully before using the device.
Please keep these instructions, the guarantee certicate, the sales
receipt and, if possible, the carton with the inner packaging.
• This appliance is not intended to be used by persons (including
children) with reduced physical, sensory or mental capabilities, or lack
of experience and knowledge, unless they have been given supervision
or instructions concerning the use of the appliance by a person that is
responsible for their safety.
• By ignoring the safety instructions the manufacturer can not be hold
responsible for the damage.
• This appliance is only to be used for household purposes and only for
the purpose it is made for.
• Do not use when the appliance is fallen, if there are any signs of damage
or when it leaks.
• Never use the device unsupervised.
• All repairs should be made by a competent qualied electrician(*).
• Make sure that the appliance is stored in a dry environment.
• Check if the voltage of the appliance corresponds to the main voltage
of your home. Rated voltage: AC220-240V 50Hz. The socket must be at
least 16A or 10 A slow-protected.
• This appliance complies with all standards regarding electromagnetic
elds (EMF). If handled properly and according to the instructions in this
user manual, the appliance is safe to use based on scientic evidence
available today.
• The use of accessory that are not recommended by the manufacturer
can cause injuries and will invalidate any warranty that you may have.
• Do not wind the cord around the appliance and do not bend it.
• To protect yourself against an electric shock, do not immerse the cord,
plug or appliance in the water or any other liquid.
• Unplug the appliance from the socket when changing the spare parts or
for maintenance.
• Do not use this appliance with a damaged cord or plug or when the
appliance has malfunctions, or has been damaged in any manner. To
avoid a hazard make sure that a damaged cord or plug will be replaced
by an authorized technician(*). Do not repair this appliance yourself.
• Make sure that the cord is not hanging over the edge of the table or
counter, does not touch any hot surfaces or is coming directly into
contact with the hot parts of the appliance. Do not place the appliance
underneath or close to curtains, window coverings etc.
• For additional protection, we advise you to install a residual current
device (RCD) in the electrical circuit that supplies the bathroom his
electricity. This RCD must have a rated residual operating current no
higher than 30mA. Ask your installer for advice.
• Do not use this appliance in the bathroom or near a sink lled with
water. If this appliances has fallen into the water do not under no
circumstances directly grab this appliance, but rst pull the plug from
the socket.
Page 4
4
EN INSTRU CT IO N MANUAL
(*) Competent qualied electrician: after sales department of the producer or
importer or any person who is qualied, approved and competent to perform
this kind of repairs in order to avoid all danger. In any case you should return
the appliance to this electrician.
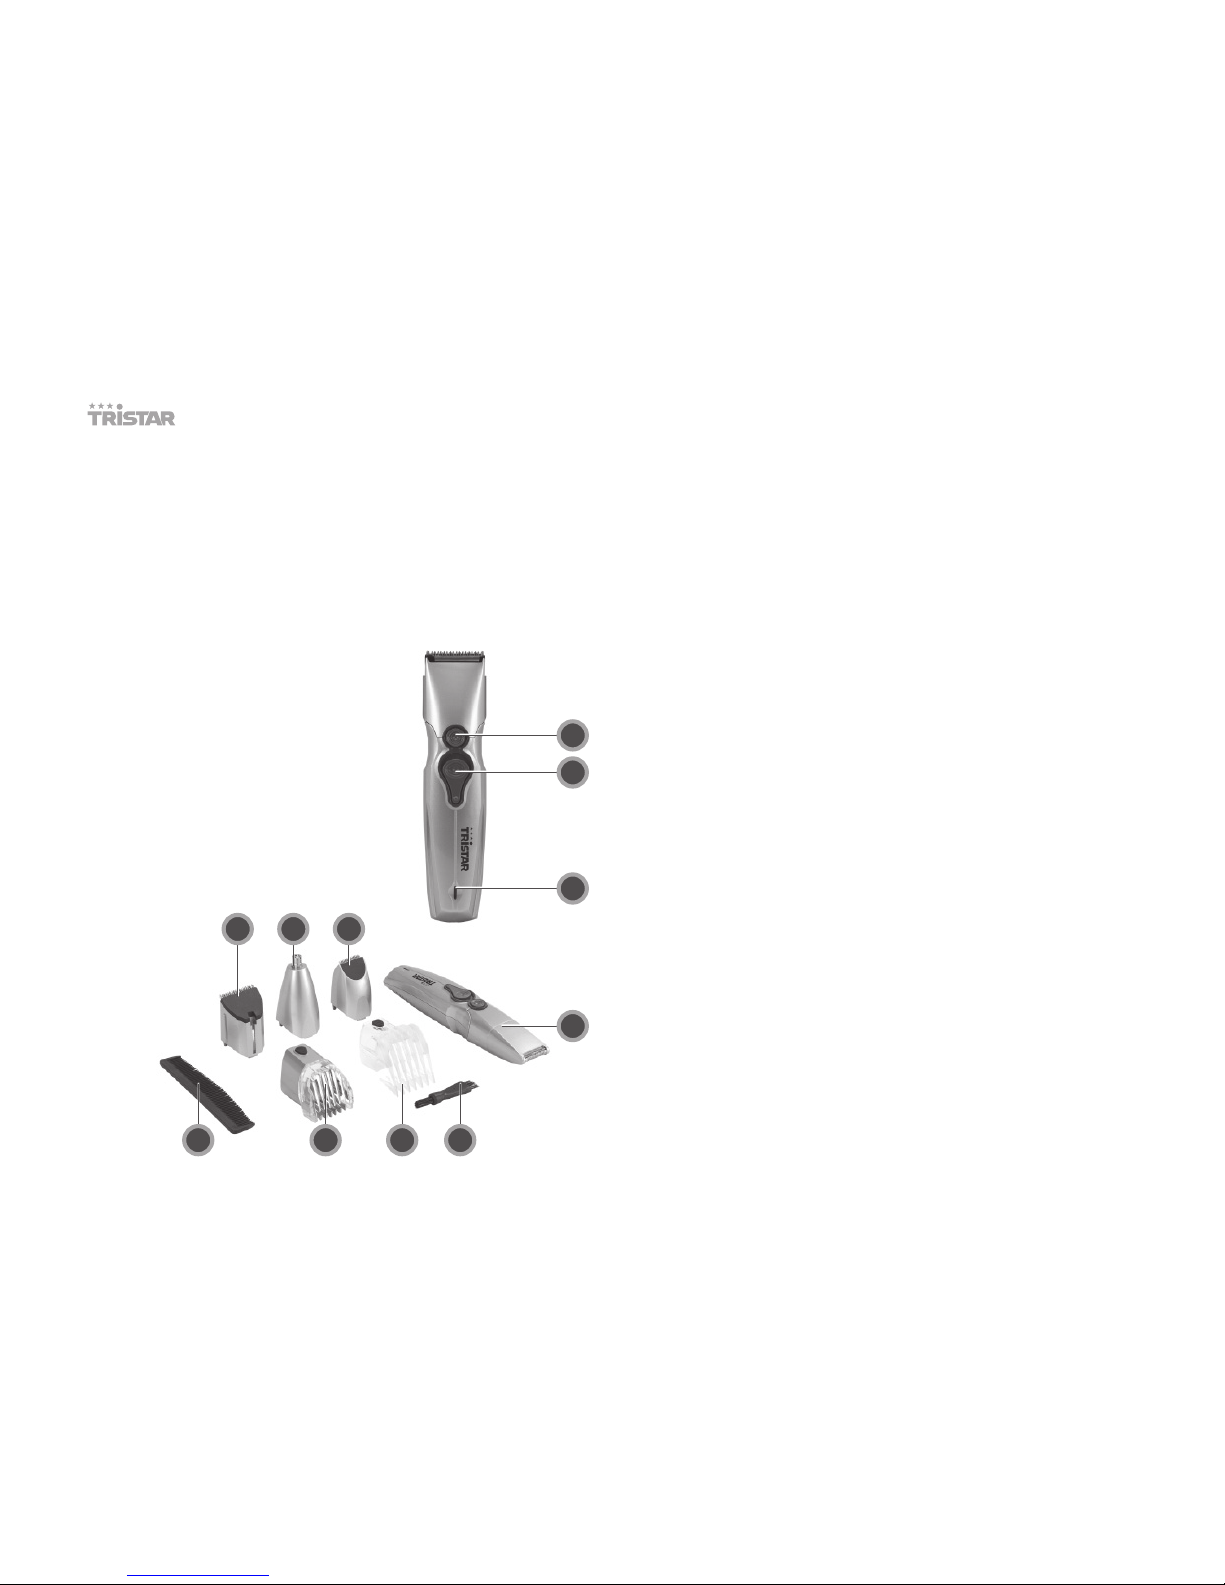
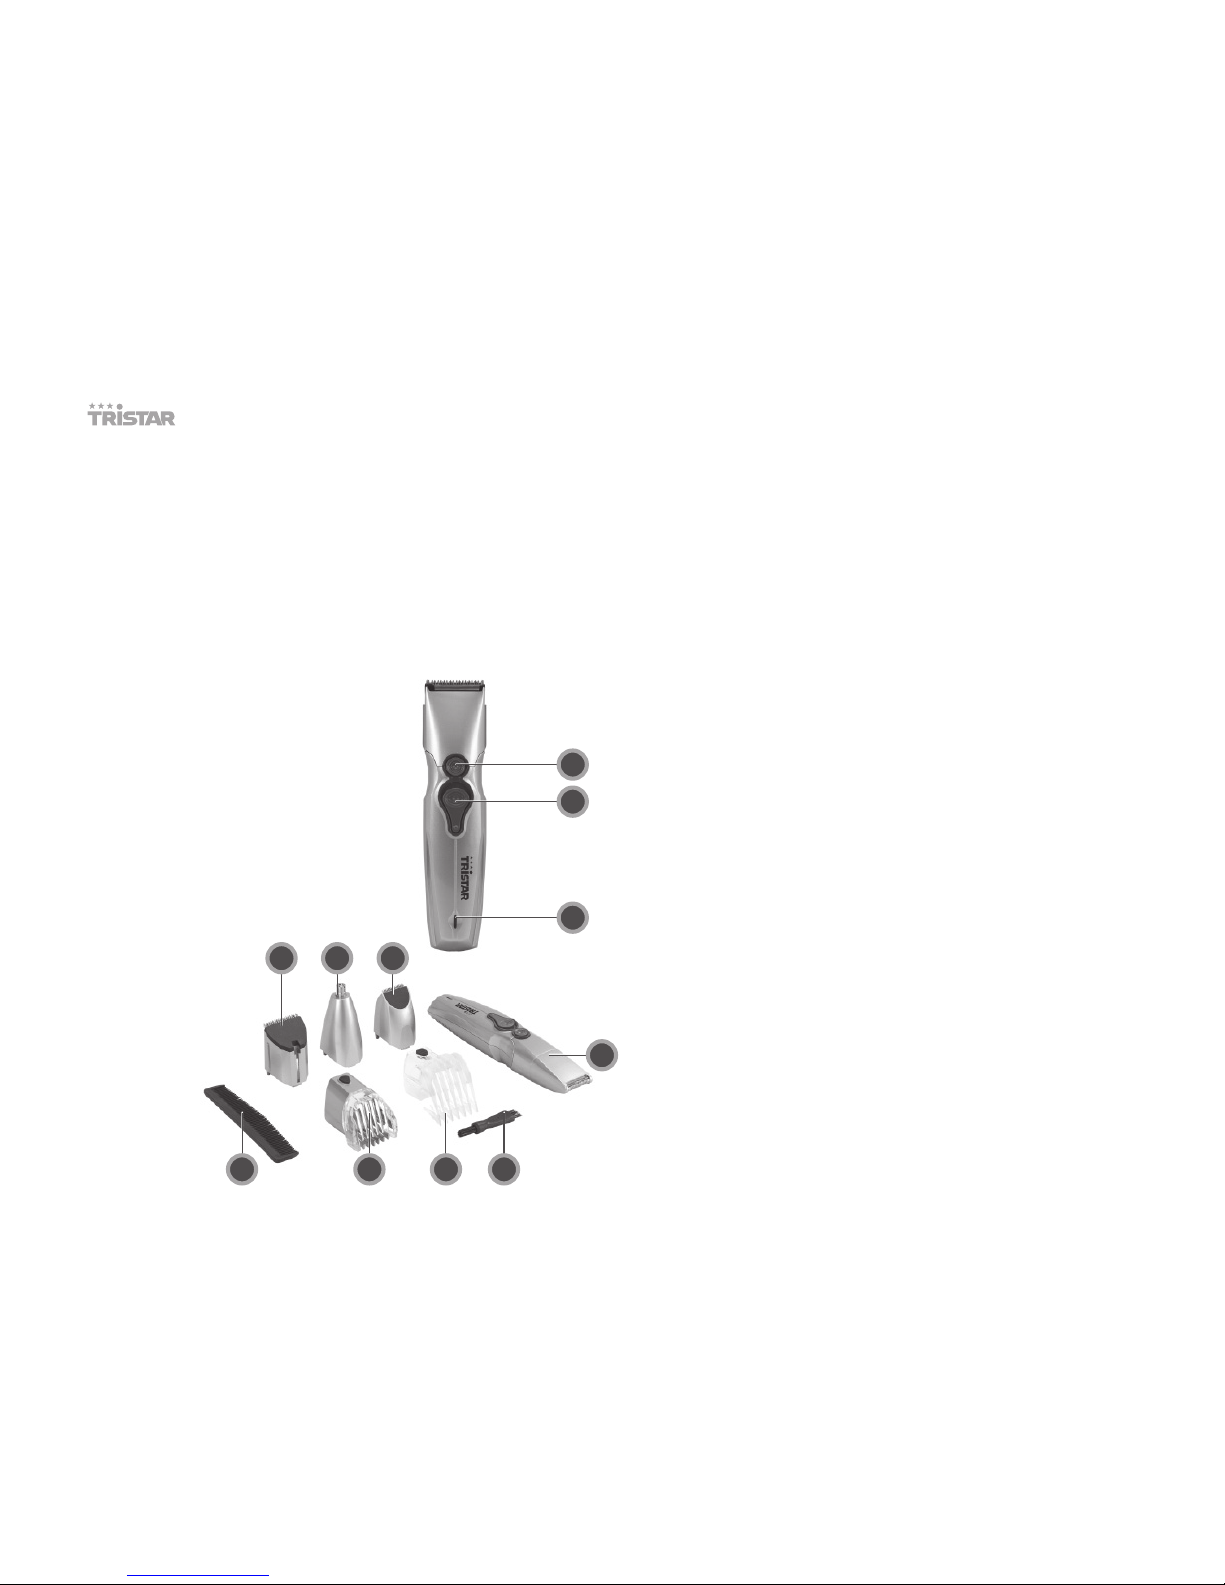
PartS deScriPtion
1. Release button
2. On/o switch
3. Charging indicator light
4. Full width trimmer
5. Nose, ear, eyebrow trimmer
6. Precision trimmer
7. Micro shaver
8. Styling comb
9. Beard and mustache comb
10. Hair comb
11. Cleaning brush
Before uSe
cha rg e
Charge the appliance for at least 16 hours before you use it for the rst
time and after a long period of disuse. When the appliance is fully charged,
it has a cordless operating time of up to 45 minutes. Do not charge the
appliance for more than 24 hours.
1. Make sure the appliance is switched o.
2. Insert the small plug into the appliance and put the adapter in the
wall socket.
3. After a few seconds, the charging light goes on to indicate that the
appliance is charging.
not e: The charging light does not change color and does not go out
when the appliance is fully charged.
uSe
Bea rd a nd m uS tac he c om B an d ha ir c om B
1. Only use the appliance on clean, dry hair. Do not use it on freshly
washed/wet hair.
2. Make sure that the head of the person whose hair you intend to cut is
at the same level as your chest. This ensures that all parts of the head
are clearly visible and within easy reach.
3. Comb the hair in the growth direction.
4. Put the comb on the full width trimmer attachment until you hear it
click into place. The comb will not work with the precision trimmer, or
mini shaver attachments.
5. Press the hair length selector and slide it to the desired trimming
length setting.
1
2
3
7
6
10 1198
54
Page 5

5
EN INSTRUCTION MANUAL
6. If you are trimming for the rst time, start by using the comb at the
maximum trimming length setting to prevent accidentally trimming
hairs too short.
7. Switch the groomer on.
8. To trim in the most eective way, move the groomer against the
direction of hair growth. Make sure the surface of the comb always
stays in contact with the skin. Make overlapping passes over the head
to ensure that all hair that should be cut has been cut.
9. If a lot of hair has collected in the comb remove the comb and blow
and/or shake the hair out of the comb. You can also use the cleaning
brush provided to remove hair from the comb area.
tri mm in g
1. You can use the appliance without comb to clip hair very close to the
skin or to contour the neckline and the area around the ears.
2. Tilt the appliance in such a way that only one edge of the cutting
element touches the hair ends when you shape the contours around
the ears.
3. To contour the neckline and sideburns, turn the appliance and make
downward strokes.
noS e, ea r, e ye Br ow trim me r
1. Put the Nose, ear, eyebrow trimmer on the groomer.
2. Switch the groomer on and insert the tip of the attachment into one
nostril.
3. Slowly move it in and out your nose or ear while turning it around
at the same time in order to remove unwanted hair. For best results,
make sure the side of the trimmer is rm against skin.
min i Sh ave r
1. Put the mini shaver attachment on the groomer.
2. Gently press the mini shaver onto the skin. Do not press too hard for
an even shaving result.
3. Make overlapping passes over the head to ensure that all hair that
should be cut has been cut.
mai nt en an ce
1. Cleaning the clipper blades regularly will maintain their optimal
performance.
2. Brush the blades and appliance with the cleaning brush to remove
any hair.
3. When you notice the clipper isn’t performing as well. Squeeze a few
drops of oil onto the pad. The enclosed oil is specially formulated for
clippers, it will not evaporate or slow the blades down.
guarantee
• Tristar is not liable for damages occurred through:
o In case the appliance has fallen.
o In case the appliance has been technically changed by the owner or
another third party.
o In case of improper use of the appliance.
o In case of normal wear of the appliance.
• By executing repairs the original warranty period of 2 years will not
be extended, nor the right to a complied new warranty. This warranty
is only legal on European soil. This warranty does not overrule the
European directive 1944/44CE.
• Always keep your receipt, without this receipt you cannot claim any
form of warranty what so ever.
Page 6
6
• Damage caused by not following the instruction manual, will lead to a
void of warranty, if this results in consequential damages Tristar will not
be liable.
• Tristar will not be liable for material damage or personal injury caused
by improper use or if the safety instruction are not properly executed.
• Other then cleaning, as mentioned in this manual, is the only
maintenance that is necessary for this appliances.
• When the application should be repaired, make sure that this will de
preformed by an authorized company.
• This appliance may not be amended or changed.
• If problems arise during the 2 years from the date of purchase, which
are covered by the factory warranty, you can go back to the point of
purchase to replace it for a new one.
• For questions or compliances please contact your retailer “point of
purchase”
• This appliances is covered with a 24 month guarantee starting on the
date of purchase (receipt).
• Only material or manufacturing defects are included in this warranty.
• If you wish to make a claim please return the entire machine in the
original packaging to your dealer together with the receipt.
• Damage to accessories does not mean automatic free replacement of
the whole appliances. In such cases please contact our hotline. Broken
glass or breakage of plastic parts are always subject to a charge.
• Defects to consumables or parts subject to wearing , as well as cleaning,
maintenance or the replacement of said parts are not covered by the
guarantee and hence are to be paid!
• The guarantee lapses in case of unauthorized tampering.
• After the expiry of the guarantee repairs can be carried by the
competent dealer or repair service against the payment of the ensuing
costs.
guidelineS for P rotection of the
environment
This appliance should not be put into the domestic garbage at
the end of its durability, but must be oered at a central point
for the recycling of electric and electronic domestic appliances.
This symbol on the appliance, instruction manual and packaging puts
your attention to this important issue. The materials used in this appliance
can be recycled. By recycling used domestic appliances you contribute
an important push to the protection of our environment. Ask your local
authorities for information regarding the point of recollection.
Packa gi ng
The packaging is 100% recyclable, return the packaging separated.
Pro du ct
This device is equipped with a mark according to the European Directive
2002/96/EC on Waste Electrical and Electronic Equipment (WEEE). By
ensuring that this product will be correctly processed into waste, it will
help prevent possible negative consequences for the environment and
human health.
ec de cl ar ati on o f conf or mi ty
This device is designed, manufactured and marketed in accordance with
the safety objectives of the Low Voltage Directive "No 2006/95/EC", the
protection requirements of the EMC Directive 2004/108/EC "Electromagnetic
Compatibility" and the requirement of Directive 93/68/EEC.
487
EN INSTRU CT IO N MANUAL
Page 7

NL GEBRUIKSAANWIJZING
7
Geach te klan t,
Gefel iciteerd met d e aankoop van dit kwaliteit sproduct.
Lees de gebruiksa anwijzingen zorgvuldig door zodat u optimaal
gebruik kunt maken van dit apparaat. In deze handleiding v indt
u alle benodigde aanwijzingen en adviezen voor het gebruiken,
schoonmaken en on derhouden van het apparaat.
Als u deze aanwijzingen volgt, hebt u altijd een uitstekend
resultaat, bespaart u tijd en k unt u problemen voo rkomen.
Wij hopen dat u dit apparaat met plezier zult gebruiken.
veiligheidSvoorSchriften
• Lees de gebruiksaanwijzing aandachtig door voordat u het apparaat voor
het eerst gebruikt. Bewaar de gebruiksaanwijzing, het garantiecerticaat,
de verkoopbon en indien mogelijk de kartonnen doos met de binnenste
verpakking om deze indien nodig later te kunnen raadplegen.
• Dit apparaat is niet bedoeld voor gebruik door personen (waaronder
kinderen) met verminderde lichamelijke, zintuiglijke of geestelijke
vermogens, of die gebrek aan ervaring of kennis hebben, tenzij iemand
die verantwoordelijk is voor hun veiligheid toezicht op hen houdt of hun
heeft uitgelegd hoe het apparaat dient te worden gebruikt.
• Als de veiligheidsinstructies niet worden opgevolgd, kan de fabrikant
niet verantwoordelijk worden gesteld voor schade die daar eventueel het
gevolg van is.
• Dit apparaat is alleen voor huishoudelijk gebruik en voor het doel waar
het voor bestemd is.
• Dit apparaat mag niet gebruikt worden als het gevallen is, er tekenen van
schade zijn of als het lekt.
• Laat het apparaat nooit onbeheerd achter wanneer het in werking is.
• Reparaties dienen te geschieden door een bekwame gekwaliceerde
dienst(*).
• Zorg dat het apparaat opgeborgen wordt op een droge plaats.
• Controleer of het voltage dat wordt aangegeven op het apparaat,
overeenkomt met de plaatselijke netspanning voordat u het apparaat
aansluit. Voltage 220V-240V 50Hz. De contactdoos moet met ten minste
16 A of 10 A traag beveiligd zijn.
• Dit apparaat voldoet aan alle richtlijnen met betrekking tot
elektromagnetische velden (EMV). Mits het apparaat op de juiste wijze en
volgens de instructies in deze gebruiksaanwijzing wordt gebruikt, is het
veilig te gebruiken volgens het nu beschikbare wetenschappelijke bewijs.
• Gebruik nooit accessoires die niet aanbevolen worden door de fabrikant.
Deze kunnen gevaar opleveren voor de gebruiker en schade toebrengen
aan het apparaat.
• Wind het snoer niet om het apparaat heen en buig het niet.
• Dompel het snoer, de stekker en/of het apparaat nooit in het water of een
andere vloeistof, dit om u te beschermen tegen een elektrische schok.
• Haal de stekker uit het stopcontact als u toebehoren wisselt en voor
onderhoudswerkzaamheden.
• Gebruik het apparaat niet indien de stekker, het netsnoer of het apparaat
zelf beschadigd is. Indien het netsnoer beschadigd is, moet u het laten
vervangen door een geautoriseerd servicecentrum(*) om gevaar te
voorkomen.
• Laat het snoer niet over de rand van de tafel hangen, tegen hete
oppervlakken of in contact komen met het apparaat. Plaats het product
niet onder of dicht bij de gordijnen, raambekleding enz.
• Voor extra veiligheid adviseren we u een aardlekschakelaar te installeren
in de elektrische groep die de badkamer van stroom voorziet. Deze
aardlekschakelaar dient een waarde te hebben die niet hoger is dan 30
mA. Raadpleeg uw installateur.
• Gebruik het apparaat nooit in de buur van een met water gevulde
gootsteen of iets dergelijks. Pak een apparaat dat in het water is gevallen
nooit zomaar vast, maar trek eerst de stekker uit het stopcontact.
Page 8

1
2
3
7
6
10 1198
54
8
NL GEBRU IK S A A N W I J Z I N G
(*) Bekwame gekwaliceerde dienst: after-sales dienst van de fabrikant of de
invoerder, die erkend en bevoegd is om dergelijke herstellingen te doen zodat
elk gevaar vermeden wordt. Gelieve het toestel bij problemen naar deze dienst
terug te brengen.
onderdelenBeSchrijving
1. Ontgrendelknop
2. Aan/uit schakelaar
3. Oplaad indicatielampje
4. Brede trimmer
5. Neus, oor en wenkbrauw trimmer
6. Smalle trimmer
7. Scheer opzetstuk
8. Kam
9. Baard en snor opzetstuk
10. Opzetstuk voor het hoofdhaar
11. Schoonmaakborsteltje
voor het geBruik
oPl ad en
Laad het apparaat minstens 16 uur op voordat u het voor de eerste keer
gebruikt en wanneer u het langere tijd niet hebt gebruikt. Wanneer het
apparaat volledig is opgeladen, kunt u het tot 45 minuten zonder snoer
gebruiken. Laad het apparaat niet langer dan 24 uur op.
1. Zorg ervoor dat het apparaat is uitgeschakeld.
2. Steek de kleine stekker in de aansluiting op het apparaat en steek de
adapter in het stopcontact.
3. Na enkele seconden gaat het oplaadlampje branden om aan te geven
dat het apparaat wordt opgeladen.
oPm er ki ng: Het oplaadlampje verandert niet van kleur en gaat niet
uit wanneer het apparaat volledig is opgeladen.
geBruik
Baa rd en S no r oP ze tS tu k en o PzetS tu k v oo r het
hoo fd ha ar
1. Gebruik het apparaat alleen op schoon, en droog haar. Gebruik het
niet op pas gewassen/nat haar.
2. Voordat u met trimmen begint, moet u ervoor zorgen dat het hoofd
van de persoon van wie u het haar gaat knippen zich op dezelfde
hoogte bevindt als uw borst. Zo zijn alle delen van het hoofd goed
zichtbaar en bereikbaar.
3. Kam het haar in de haargroeirichting.
4. Bevestig de kam op de brede trimmer. Deze kam past niet op de
smalle trimmer of op het scheerapparaat.
5. Met de verstelknop op de opzetkam kunt u de gewenste lengte
instellen.
Page 9

9
NL GEBRUIKSAANWIJZING
6. Als u het voor de eerste keer gebruikt start dan met de kam op de
maximale lengte om te voorkomen dat u per ongeluk uw haren te
kort afscheert.
7. Zet de groomer aan met de aan/uitschakelaar.
8. Door de groomer tegen de haargroeirichting in te bewegen trimt u op
de meest eectieve manier. Zorg ervoor dat het oppervlak van de kam
altijd in contact blijft met de huid. Maak overlappende bewegingen
om ervoor te zorgen dat u al het haar knipt dat moet worden geknipt.
9. Als er zich veel haar heeft verzameld in de kam, verwijder deze dan
van het apparaat en blaas en/of schud het eruit. U kunt hiervoor
gebruik maken van het bijgeleverde borsteltje.
tri mm en zon de r kam
1. U kunt het apparaat zonder kam gebruiken om het haar zeer kort te
knippen of om de contouren van de neklijn en de haarlijn rond de
oren bij te werken.
2. Houd het apparaat een beetje schuin zodat één hoek van het
knipelement de haarpunten raakt op deze manier kunt u nauwkeurig
de haarlijn rond de oren bijwerken.
3. Om de neklijn en de bakkebaarden bij te werken moet u het apparaat
omdraaien en neerwaartse bewegingen maken.
neu S, oor , we nk Br auw tri mm er
1. Plaats de neus, oor, wenkbrauw trimmer op de groomer.
2. Zet het apparaat aan en steek de punt van de trimmer in uw neus of oor.
3. Beweeg het apparaat langzaam op en neer in neus of oor, maak hierbij
ook een draaiende beweging voor het beste resultaat. Zorg ervoor dat
u de zijkant van de kop goed tegen de huid houd.
Sch ee r oPze tS tu k
1. Plaats het scheer opzetstuk op de groomer.
2. Druk het scheer opzetstuk op de huid, zorg ervoor dat u niet te hard drukt.
Zorg ervoor dat de scheerkop steeds goed in contact blijft met de huid
voor een gelijkmatig scheerresultaat. Maak overlappende bewegingen om
ervoor te zorgen dat u al het haar knipt dat moet worden geknipt.
ond er ho ud
1. Om de optimale prestaties te behouden zullen de messen regelmatig
gereinigd moeten worden.
2. Borstel de messen en het apparaat met het schoonmaakborsteltje om
zo alle haren te verwijderen.
3. Knijp een paar druppels olie op de messen. De bijgevoegde olie is
speciaal ontwikkeld voor tondeuses en zal de messen niet vertragen.
garantievoorwa arden
• Tristar is niet verantwoordelijk voor schade:
o Ten gevolge van een val of ongeluk.
o Indien het apparaat technisch is gewijzigd door gebruiker of derden.
o Door oneigenlijk gebruik van het apparaat.
o Door normale gebruiksslijtage.
• Door eventuele reparatie wordt de oorspronkelijke garantieperiode
van 2 jaar niet verlengd. Deze garantie is slechts geldig op Europees
grondgebied. Deze garantie heft de gebruikersrechten volgens
Europese richtlijn 1944/44CE niet op.
• Bewaar altijd uw aankoopbewijs, zonder dit aankoopbewijs kunt u geen
aanspraak maken op enige vorm van garantie.
• Bij schade veroorzaakt door het niet opvolgen van de
gebruiksaanwijzing vervalt het recht op garantie! Voor vervolgschade
die hieruit ontstaat zijn wij niet aansprakelijk.
Page 10

10
NL GEBRU IK S A A N W I J Z I N G
• Voor materiële schade of persoonlijk letsel veroorzaakt door ondeskundig
gebruik of het niet opvolgen van de veiligheidsvoorschriften zijn wij niet
aansprakelijk. In dergelijke gevallen vervalt elke aanspraak op garantie.
• Anders dan het schoonmaken, zoals genoemd in deze handleiding, is
aan dit apparaat geen onderhoud noodzakelijk.
• Indien er reparaties moeten worden uitgevoerd, mag dit uitsluitend
door een geautoriseerd bedrijf gebeuren.
• Het product mag niet worden gewijzigd of veranderd.
• Indien zich problemen zouden voordoen gedurende 2 jaar na
aankoopdatum, welke gedekt zijn door de fabrieksgarantie, kunt u het
apparaat ter vervanging aanbieden bij uw aankooppunt.
• Voor vragen of klachten kunt zich melden bij uw verkooppunt.
• Dit apparaat heeft 24 maanden garantie vanaf de datum van aankoop
(kassabon).
• Uitsluitend materiaal- en/of fabricagefouten zijn inbegrepen in deze garantie.
• Als u gebruik wilt maken van uw garantieaanspraak, zorgt u er dan voor
dat u het volledige apparaat in zijn originele doos en aankoopbewijs
inlevert bij uw aankooppunt.
• Schade aan accessoires of onderdelen betekent niet automatisch dat
het gehele apparaat zal worden vervangen. In dit soort gevallen moet u
contact opnemen met onze serviceafdeling. Afgebroken glazen/plastic
onderdelen of accessoires vallen niet onder de garantie en zullen dus
altijd tegen een vergoeding kunnen worden vervangen.
• Defecten aan hulpstukken of aan de slijtende onderdelen, alsmede
reiniging, onderhoud of de vervanging van slijtende delen vallen niet
onder de garantie en zullen dus in rekening worden gebracht!
• De garantie vervalt in geval van ongeoorloofde manipulatie.
• Na het verstrijken van de garantie kunnen reparaties worden uitgevoerd
door de bevoegde dealer of reparatieservice tegen de betaling van de
daaruit voortvloeiende kosten.
aanwijzingen ter BeScherming van
het milieu
Dit product mag aan het einde van zijn levensduur niet bij het
normale huisafval worden gedeponeerd, maar dient bij een
speciaal inzamelpunt voor het hergebruik van elektrische en
elektronische apparaten te worden aangeboden. Het symbool op artikel,
gebruiksaanwijzing en verpakking attendeert u hierop. De gebruikte
grondstoen zijn geschikt voor hergebruik. Met het hergebruik van
gebruikte apparaten of grondstoen levert u een belangrijke bijdrage aan
de bescherming van ons milieu. Informeer bij uw lokale overheid naar het
bedoelde inzamelpunt.
ver Pakk in g
Het verpakkingsmateriaal is 100% recyclebaar, lever het
verpakkingsmateriaal gescheiden in.
Pro du ct
Dit apparaat is voorzien van het merkteken volgens de Europese
richtlijn 2002/96/EG inzake afgedankte elektrische en elektronische
apparaten(AEEA). Door ervoor te zorgen dat dit product op de juiste
manier als afval wordt verwerkt, helpt u mogelijk negatieve consequenties
voor het milieu en de menselijke gezondheid te voorkomen.
eg- co nform it ei tSver kl ar in g
Dit apparaat is ontworpen om in contact te komen met levensmiddelen en
is ontworpen in overeenstemming met de EG-richtlijn 89/109/EEC
Dit apparaat is ontworpen, vervaardigd en in de handel gebracht
in overeenstemming met de veiligheidsdoeleinden van de
“laagspanningsrichtlijn”nr. 2006/95/EC, de beschermingsvoorschriften van
de EMC-richtlijn 2004/108/EC “Electromagnetische compatibiliteit” en de
vereiste van richtlijn 93/68/EG.
487
Page 11

11
FR MODE D 'EMPLOI
Ch er Cli ent,
Féli citati ons et merci d’a voi r a cheté ce pro dui t de ha ute
qu alité. Vei llez à lire a tte ntivem ent la no tice d ’emploi afin
de profi ter au mieux de l’uti lisati on de l’a pparei l. Cette
no tice d ’emploi co mpor te tou tes le s cons ign es n éce ssaire s
et les r eco mman dat ions p our ut ilis er, net toy er et entret eni r
l’ app are il. En respe ctan t c es con sig nes, u n excell ent ré sul tat
vo us sera g aranti t, qui vou s é conomi sera d u temp s et é vitera
de s prob lèmes. Nous espéro ns que l’u til isatio n de c et
ap pareil vo us apportera beauc oup de pla isir.
conSigneS de Sécurité
• Veuillez lire attentivement la notice d’emploi avant l’utilisation de
l’appareil. Veuillez conserver cette notice, le certicat de garantie, le
ticket de caisse et si possible, le carton avec l’emballage intérieur.
• Cet appareil n’est pas destiné à être utilisé par ces personnes (y compris
les enfants) ayant des dicultés physiques, sensorielles ou mentales,
ou sans expérience et connaissance, à moins de leur en donner la
responsabilité ou d'être informés sur l'utilisation de l'appareil par une
personne responsable de leur sécurité.
• Le fabricant ne sera pas tenu responsable de tous dommages si les
consignes de sécurité ne sont pas respectées.
• Cet appareil est uniquement destiné à des utilisations domestiques et
seulement dans le but pour lequel il est fabriqué.
• Ne pas utiliser l’appareil s’il est tombé, s’il apparaît endommagé ou s’il fuit.
• Ne jamais utiliser l’appareil sans supervision.
• Toutes les réparations doivent être eectuées par un électricien qualié
agréé (*).
• Veillez à ce que l’appareil soit rangé dans un lieu sec.
• Vériez si la tension de l'appareil correspond à la tension du secteur de
votre domicile. Tension nominale : 220-240V CA 50Hz. La prise doit être
d’au moins 16A ou 10A et à fusible lent.
• Cet appareil est conforme à toutes les normes des champs
électromagnétiques (EMF). L’appareil est sans danger à l’utilisation selon
les preuves scientiques disponibles à ce jour, à condition de manipulation
correcte et en respectant les consignes de cette notice d’emploi.
• L’utilisation d’accessoires qui ne sont pas recommandés par le fabricant
peut entrainer des blessures et annulera toutes garanties en votre
possession.
• N’enroulez pas le cordon autour de l’appareil et ne le pliez pas.
• Ne pas immerger le cordon, la prise ou l'appareil dans de l'eau ou autre
liquide an de vous éviter un choc électrique.
• Débranchez l’appareil de la prise lors du changement de pièces ou pour
l’entretien.
• Ne pas utiliser cet appareil avec un cordon ou une prise endommagés
ou s’il ne fonctionne pas correctement, ou a subi des dégâts
quelconques. An d’éviter tous dangers, veillez à ce qu’un cordon ou
prise endommagés soient remplacés par un technicien agréé (*). Ne
réparez pas vous-même cet appareil.
• Veillez à ce que le cordon ne soit pas suspendu au bord d'une table
ou d’un comptoir, qu’il ne touche aucune surface chaude ou n'entre
pas en contact direct avec des parties brulantes de l'appareil. Ne pas
positionner l’appareil sous ou à proximité de rideaux, de tentures, etc.
• Il est conseillé, pour une meilleure protection, d’installer un dispositif
diérentiel à courant résiduel (DDR) sur le réseau électrique
approvisionnant l'électricité à la salle de bain. Ce DDR doit avoir un
courant d’alimentation de la tension résiduelle inférieur à 30mA.
Demandez conseil à votre installateur.
Page 12
1
2
3
7
6
10 1198
54
12
• Ne pas utiliser cet appareil dans la salle de bain ou à proximité d’un
évier rempli d’eau. Si cet appareil est tombé dans l’eau il ne faut en
aucun cas le saisir directement. Débranchez d’abord la che de la prise.
(*) Electricien qualié agréé : Service après vente du fabricant ou de
l’importateur ou tout autre personne qualiée, agréé et apte à eectuer ce
type de réparation an d’éviter tous dangers. L'appareil doit, dans tous les cas,
être renvoyé à cet électricien.
deScriPtion deS P iè ceS
1. Boutons de déverrouillage
2. Bouton Marche/Arrêt
3. Voyant lumineux de rechargement
4. Tondeuse grande lame
5. Accessoire nez, oreilles, sourcils
6. Tondeuse de précision
7. Micro rasoir
8. Peigne à coier
9. Peigne à barbe et moustache
10. Peigne à cheveux
11. Brosse de nettoyage
avant l’utiliSat ion
cha rg em en t
Charger l’appareil pendant au moins 16 heures avant la première
utilisation et après une longue période d’inutilisation. Lorsque l’appareil est
complètement rechargé, sa durée maximum de fonctionnement sans l est
de 45 minutes. Ne pas recharger l’appareil pendant plus de 24 heures.
1. Veillez à ce que l’appareil soit éteint.
2. Connectez la petite prise à l'appareil et branchez l'adaptateur à la prise
murale.
3. Le voyant de rechargement s'allume après quelques secondes
indiquant que l'appareil se recharge.
nB : Le voyant de rechargement ne change pas de couleur et ne s’éteint
pas lorsque l’appareil est totalement rechargé.
utiliSation
Pei gn e à Ba rB e et mo uS tache et Pe ig ne à c he ve ux
1. N’utilisez l’appareil que sur des cheveux propres et secs. Ne pas
l’utiliser sur des cheveux venant d’être lavés ou mouillés.
2. Veillez à ce que la tête de la personne dont les cheveux doivent être
coupés soit à hauteur de votre poitrine. Cela permet de rendre toutes
les parties de la tête bien visibles et faciles d’accès.
3. Peignez les cheveux dans le sens de leur pousse.
4. Mettez le peigne sur l’accessoire de tête de rasage jusqu’au déclic
d’enclenchement. Le peigne ne fonctionnera pas avec la tondeuse de
précision ou les accessoires du micro rasoir.
5. Appuyez sur le guide de coupe et faites le glisser sur la position de la
longueur de coupe désirée.
FR MODE D'EMPLOI
Page 13

13
FR MODE D 'EMPLOI
6. Pour la première coupe, commencez en utilisant le peigne sur la
position de coupe la plus longue an d’éviter de faire une coupe trop
courte accidentellement.
7. Allumez la tondeuse.
8. An de couper de manière ecace, déplacez l’appareil dans le sens
opposé à la pousse des cheveux. Veillez à ce que la surface du peigne
reste toujours au contact du cuir chevelu. Passez en chevauchant sur
la tête pour être sûr que tous les cheveux devant être coupés le sont.
9. Si beaucoup de cheveux se sont accumulés sur le peigne, retirez le
peigne et souez et/ou secouez pour en éliminer les cheveux. Il est
aussi possible d'utiliser la brosse de nettoyage fournie pour retirer les
cheveux du peigne.
co uP e
1. Il est possible d’utiliser l’appareil sans peigne pour couper les cheveux
très près de la peau ou de couper autour du cou et autour des oreilles.
2. Penchez l’appareil de manière à ce qu’un seul côté de l’élément de
coupe touche les extrémités des cheveux pour tailler les côtés autour
des oreilles.
3. Pour couper le ras du cou et les pattes, tournez l’appareil et faites des
mouvements vers le bas.
ac ce SSoir e nez, o re illeS , Sou rc il S
1. Mettez l'accessoire nez, oreilles, sourcils sur la tondeuse.
2. Allumez la tondeuse et insérez le bout de l’accessoire dans une
narine.
3. Rentrez-la et sortez-la doucement de votre nez ou oreille tout en la
faisant tourner simultanément an de retirer les pois indésirables.
Pour de meilleurs résultats, veillez à ce que le côté de l’accessoire soit
tout à fait contre la peau
mic ro r aSoir
1. Mettez l'accessoire du micro rasoir sur la tondeuse.
2. Appuyez doucement le micro rasoir contre la peau. N’appuyez pas
trop fort pour un résultat uniforme de rasage.
3. Passez sur la peau en chevauchant pour être sûr que tous les poils
devant être coupés le sont.
ent re ti en
1. Nettoyez régulièrement les lames de la tondeuse an de conserver
leurs performances optimales.
2. Brossez les lames et l’appareil avec la brosse de nettoyage pour retirer
tous les cheveux.
3. Si la tondeuse ne semble pas fonctionner aussi bien. Extraire
doucement quelques gouttes d’huile sur le coussinet. L’huile fournie
est une formule spéciale pour les tondeuses, elle ne s’évaporera pas
ou ne ralentira pas les lames.
garantie
• Tristar décline toute responsabilité pour les dommages entraînés par
les cas suivants :
o En cas de chute de l’appareil.
o Si l’utilisateur ou un tiers a eectué des modications techniques sur
l’appareil.
o En cas d’utilisation inappropriée de l’appareil.
o En cas usure normale de l’appareil.
• Si l’appareil subi des réparations, la garantie initiale de 2 ans ne sera pas
prolongée, cela n’entraîne pas de droit à une nouvelle garantie. Cette
garantie n’est valable que sur le sol européen. Cette garantie n’annule
pas la directive européenne 1944/44CE.
Page 14

14
FR MODE D'EMPLOI
• Conservez toujours votre reçu, car sans celui-ci vous ne pourrez
réclamer aucune sorte de garantie.
• Les dommages causés par le non respect des instructions de ce manuel
rendront la garantie caduque, Tristar décline toute responsabilité en cas
de dommages indirects.
• Tristar décline toute responsabilité en cas de dégâts matériels ou de
dommages corporels causés par une utilisation inappropriée ou si les
instructions de sécurité n’ont pas été convenablement observées.
• Seuls le nettoyage et l’entretien mentionnés dans ce manuel sont
nécessaires à cet appareil.
• Conez toute réparation à un centre technique agréé.
• Il est interdit de modier cet appareil.
• Si des problèmes surviennent pendant la période de 2 ans suivant la date
d’achat, qui est couverte par la garantie d’usine, vous pouvez ramener
l’appareil au point d’achat pour en demander un nouveau.
• Adressez vos questions sur la conformité au « point d’achat » de votre
détaillant.
• Cet appareil est couvert par une garantie de 24 mois à partir de la date
d’achat (reçu).
• Cette garantie ne couvre que les défauts matériels et les vices de
fabrication.
• Si vous souhaitez faire une réclamation, veuillez retourner à votre distributeur
toute la machine dans l’emballage d’origine, accompagnée du reçu.
• Si les accessoires sont endommagés, cela ne signie pas que toute
la machine sera remplacée gratuitement. Dans de tels cas, veuillez
contacter notre assistance téléphonique. Des pièces brisées en verre ou
en plastique sont toujours sujettes à des frais.
• Les défauts des consommables ou des pièces susceptibles de s’user,
ainsi que le nettoyage, l’entretien ou la réparation desdites pièces ne
sont pas couverts par la garantie et doivent donc être payés.
• La garantie est caduque en cas de modication non autorisée.
• Après l’expiration de la garantie, les réparations peuvent être eectuées
par un distributeur compétent ou par un réparateur contre un paiement
pour les frais occasionnés.
directiveS Pour la P ré Servation d e
l'environnement
Cet appareil ne doit pas être jeté aux ordures ménagères à
la n de sa durée de vie, mais doit être rendu à un centre de
recyclage d’appareils ménagers électriques et électroniques.
Ce symbole sur l’appareil, La notice d’emploi et l’emballage attirent votre
attention sur ce sujet important. Composants utilisés dans cet appareil
sont recyclables. En recyclant les appareils ménagers. Usagés, vous
contribuez à un apport important à la protection de notre. Environnement.
Adressez vous aux autorités locales pour des renseignements concernant
le centre de Recyclage
emB al lage
L’emballage est 100% recyclable, retournez-le séparément.
Pro du it
Cet appareil comporte un symbole conforme à la Directive Européenne
2002/96/CE relative aux Déchets d’Equipements Electriques et
Electroniques (DEEE). En veillant à ce que cet appareil soit correctement
recyclé, des eets éventuellement nuisibles à l’environnement et à la santé
humaine seront évités.
déc la rat io n de c on formi té ce
Cet appareil est conçu, fabriqué et distribué en respectant les objectifs
de sécurité de la Directive Basse Tension no 2006/95/EC, les exigences
de protection de la Directive EMC 2004/108/EC "Compatibilité
Electromagnétique" et les exigences de la Directive 93/68/EEC.
487
Page 15

15
DE BEDIENUNGSANLEITUNG
Li eber K unde,
He rzli che n Gl ück wuns ch und da nke, d ass Sie di eses
qu alitat iv hoc hwe rtig e Produkt e rwor ben haben . Bitte
le sen Si e di ese Bed ien ungsan leitung s org fält ig, so dass
Si e das Gerät auf bes tmögli che Weise nutzen kö nnen .
Di ese Bed ienung sanl eit ung be inha lte t alle not wen dig en
Instr uktion en und Hinwe ise zu Ben utzu ng, Re inigun g
un d War tung d es G erä ts. Wenn S ie diese Instru ktio nen
be folgen , er zie len Si e gara ntiert ein ex zellen tes Er gebnis ,
Si e spar en Zei t und ver meiden Prob leme. Wir hoffen , dass die
Verwend ung di eses G eräts Ihne n v iel Freu de bereit et.
SicherheitSanweiSungen
• Bitte lesen Sie die Bedienungsanleitung sorgfältig, bevor Sie
das Gerät verwenden. Bitte bewahren Sie diese Anleitung , die
Garantiekarte, die Rechnung und, wenn möglich, den Karton mit dem
Verpackungsmaterial sorgfältig auf.
• Dieses Gerät darf nicht von Personen (einschließlich Kindern) mit
eingeschränkten körperlichen, sensorischen oder geistigen Fähigkeiten,
oder Mangel an Erfahrung und Wissen bedient werden, außer wenn sie
unter Beaufsichtigung oder Anleitung bezüglich des Geräts von einer
für ihre Sicherheit verantwortlichen Person stehen.
• Beim Ignorieren der Sicherheitshinweise kann der Hersteller nicht für
Schäden haftbar gemacht werden.
• Dieses Gerät darf nur für Haushaltszwecke, und für die Anwendung, für
die es hergestellt wurde, verwendet werden.
• Benutzen Sie es nicht, wenn das Gerät heruntergefallen ist oder wenn es
Anzeichen von Beschädigung aufweist oder wenn es nicht dicht ist.
• Lassen Sie das Gerät niemals unbeaufsichtigt.
• Alle Reparaturen müssen durch einen kompetenten, qualizierten
Elektriker durchgeführt werden(*).
• Stellen Sie sicher, dass das Gerät in einer trockenen Umgebung gelagert wird.
• Überprüfen Sie, ob die Gerätespannung mit der Spannung Ihrer
Hausversorgung übereinstimmt. Betriebsspannung: AC 220 -240 V 50 Hz.
Die Anschlussdose muss mindestens mit 16A oder 10 A abgesichert sein.
• Dieses Gerät stimmt mit allen Standards elektromagnetischer Felder
(EMF) überein. Wenn das Gerät ordnungsgemäß und den Instruktionen
in dieser Bedienungsanleitung entsprechend behandelt wird, ist es sicher
im Gebrauch, da es auf aktuellen wissenschaftlichen Grundlagen basiert.
• Die Benutzung von Zubehör, das nicht vom Hersteller empfohlen wurde,
kann zu Verletzungen führen und den Garantieanspruch erlöschen lassen.
• Wickeln Sie das Kabel nicht um das Gerät und knicken Sie es nicht.
• Um sich vor einem Stromschlag zu schützen, tauchen Sie das Kabel, den
Stecker oder das Gerät niemals in Wasser oder eine andere Flüssigkeit.
• Trennen Sie das Gerät vom Strom, bevor Sie Teile austauschen oder
Wartungsarbeiten durchführen.
• Verwenden Sie das Gerät niemals, wenn Kabel oder Stecker beschädigt
sind, oder wenn das Gerät eine Fehlfunktion aufweist, oder auf irgendeine
Weise beschädigt wurde. Um einer Gefahr vorzubeugen, stellen Sie sicher,
dass beschädigte Kabel oder Stecker von einem autorisierten Techniker
(*) ausgetauscht werden. Reparieren Sie das Gerät nicht selbst.
• Stellen Sie sicher, dass das Kabel nicht über die Kante eines Tischs
oder einer Theke hängt, irgendeine heiße Oberäche berührt oder in
direkten Kontakt mit heißen Teilen des Geräts kommt. Platzieren Sie das
Gerät nicht unter oder neben Gardinen, Fenstervorhängen usw.
• Für zusätzlichen Schutz empfehlen wir Ihnen, eine FehlerstromSchutzeinrichtung in den Stromkreis einzubauen, der das Badezimmer
mit Strom versorgt. Diese Fehlerstrom-Schutzeinrichtung muss einen
Nenn-Ansprechdierenzstrom haben, der nicht höher als 30 mA ist.
Bitten Sie Ihren Installateur um Rat.
Page 16

1
2
3
7
6
10 1198
54
16
DE BEDIENUNGSANLEITUNG
• Benutzen Sie dieses Gerät nicht im Badezimmer oder in der Nähe des
Waschbeckens, das mit Wasser gefüllt ist. Wenn dieses Gerät ins Wasser
gefallen ist, greifen Sie unter keinen Umständen ins Wasser, um das Gerät
herauszuholen, sondern ziehen Sie zuerst den Stecker aus der Steckdose.
(*) Kompetenter, qualizierter Elektriker: nach der Verkaufsabteilung des
Herstellers oder des Importeurs oder jede Person, die qualiziert, genehmigt
und kompetent ist, um diese Art von Reparatur durchzuführen, um alle
Gefahren zu vermeiden. In jedem Falle sollten Sie das Gerät zu diesem
Elektriker zurückbringen.
teileBezeichnung
1. Release button
2. An/Aus-Schalter
3. Batterie-Anzeigeleuchte
4. Trimmer mit voller Breite
5. Nasen-, Ohren-, Augenbrauen-Trimmer
6. Präzisionstrimmer
7. Mikrorasierer
8. Styling-Kamm
9. Bart- und Schnauzbart-Kamm
10. Haarkamm
11. Reinigungsbürste
vor dem geBr auch
lad en
Laden Sie das Gerät mindestens 16 Stunden lang, bevor Sie es zum ersten
Mal und nach einer langen Zeit der Nichtnutzung verwenden. Wenn das
Gerät vollständig aufgeladen ist, hat es eine schnurlose Betriebszeit von
bis zu 45 Minuten. Laden Sie das Gerät nicht länger als 24 Stunden.
1. Stellen Sie sicher, dass das Gerät ausgeschaltet ist.
2. Führen Sie den kleinen Stecker in das Gerät ein und stecken Sie den
Adapter in die Steckdose.
3. Nach ein paar Sekunden geht die Ladeanzeige an und zeigt an, dass
das Gerät aufgeladen wird.
hin we iS : Die Ladeanzeige ändert nicht die Farbe und geht auch nicht
aus, wenn das Gerät vollständig aufgeladen ist.
verwendung
Bar t- un d Sch nauzB ar t- ka mm u nd h aarka mm
1. Verwenden Sie das Gerät nur auf sauberem und trockenem Haar.
Verwenden Sie es nicht bei Haaren, die gerade gewaschen/ nass sind.
2. Stellen Sie sicher, dass der Kopf der Person, deren Haare Sie zu
schneiden beabsichtigen, in Höhe Ihrer Brust ist. Dadurch wird
sichergestellt, dass alle Teile des Kopfes deutlich sichtbar und leicht zu
erreichen sind.
3. Kämmen Sie das Haar in Wuchsrichtung.
4. Schieben Sie den Kamm auf die Befestigung am breiten Trimmer, bis
Sie das Einrasten am Platz hören. Der Kamm funktioniert nicht mit den
Präzisionstrimmer- oder der Mikrorasierer-Befestigungen.
5. Drücken Sie den Wahlschalter für die Haarlänge und schieben Sie ihn,
bis Sie die gewünschte Trimming-Länge eingestellt haben.
Page 17

17
6. Wenn Sie zum ersten Mal trimmen, beginnen Sie mit dem Kamm bei
der Einstellung der maximalen Länge, um zu verhindern, dass die
Haare unbeabsichtigt zu kurz geschnitten werden.
7. Schalten Sie den Trimmer an.
8. Um möglichst eektiv zu trimmen, bewegen Sie den Trimmer
gegen die Wachstumsrichtung der Haare. Stellen Sie sicher, dass die
Oberäche des Kamms immer in Kontakt mit der Haut bleibt. Führen
Sie überlappende Bewegungen über die Haut aus, um sicherzustellen,
dass alle zu schneidenden Haare geschnitten werden.
9. Wenn sich im Kamm viele Haare angesammelt haben, entfernen
Sie den Kamm und blasen und/oder schütteln Sie die Haare aus
dem Kamm. Sie können auch die mitgelieferte Reinigungsbürste
verwenden, um Haare aus dem Bereich des Kamms zu entfernen.
tri mm in g
1. Sie können das Gerät ohne Kamm benutzen, um Haare sehr nah an
der Haut abzuschneiden oder um die Konturen am Nacken und um
die Ohren herum zu gestalten.
2. Neigen Sie das Gerät so, dass nur eine Kante des Schneid-Elements die
Haarenden berührt, wenn Sie die Konturen um die Ohren schneiden.
3. Um die Konturen am Nacken und Koteletten zu gestalten, drehen Sie
das Gerät und machen Sie Abwärtsbewegungen.
naS en -, o hr en -, a ug enBra uen-t ri mm er
1. Stecken Sie den Nasen-, Ohren-, Augenbrauen-Trimmer auf den
Basistrimmer.
2. Schalten Sie den Trimmer an und führen Sie die Spitze des Aufbaus in
ein Nasenloch ein.
3. Bewegen Sie ihn langsam in und aus der Nase oder dem Ohr, während
Sie ihn gleichzeitig drehen, um unerwünschte Haare zu entfernen. Um
das bestmögliche Ergebnis zu erzielen, stellen Sie sicher, dass die Seite
des Trimmers fest an der Haut anliegt.
min ir aS ie re r
1. Stecken Sie den Minirasierer-Aufbau auf den Trimmer.
2. Drücken Sie den Minirasierer sanft gegen die Haut. Drücken Sie nicht zu
fest, um ein ebenmäßiges Rasierergebnis zu erzielen.
3. Führen Sie überlappende Bewegungen über den Kopf aus, um
sicherzustellen, dass alle zu schneidenden Haare geschnitten werden.
wa rt ung
1. Ein regelmäßige Reinigung der Schermesser erhält deren optimal
Leistung aufrecht.
2. Bürsten Sie die Klingen und das Gerät mit der Reinigungsbürste, um alle
Haare zu entfernen.
3. Wenn Sie bemerken, dass der Haarschneider nicht mehr so gut arbeitet,
geben Sie einige Tropfen Öl auf das Pad. Das beigefügte Öl ist eine
spezielle Mischung für Haarschneider, es verdampft nicht und verlangsamt
die Klingen nicht.
garantie
• Tristar ist nicht haftbar für nachstehende Schäden
o Falls das Gerät heruntergefallen ist.
o Falls am Gerät technische Änderungen vom Besitzer oder Dritten
vorgenommen wurden.
o Falls das Gerät falsch bedient wurde.
o Falls das Gerät normal verschlissen ist.
• Beim Durchführen von Reparaturen wird weder die originale Garantiezeit
von 2 Jahren noch das Recht auf eine gültige neue Garantie verlängert.
Diese Garantie ist nur auf europäischem Boden rechtskräftig. Diese
Garantie setzt die Europäische Richtlinie 1944/44CE nicht außer Kraft.
• Die Quittung immer aufbewahren, ohne Quittung wird jegliche
Garantie ausgeschlossen
• Bei Schäden durch Nichteinhalten der Bedienungsanleitung erlischt die
DE BEDIENUNGSANLEITUNG
Page 18

18
Garantie; Tristar ist für daraus resultierende Folgeschäden nicht haftbar.
• Tristar ist für Materialschäden oder Verletzungen aufgrund falscher
Anwendung oder Nichtbefolgen der Sicherheitshinweise nicht haftbar.
• Die in dieser Anleitung erwähnte Reinigung ist die einzige erforderliche
Wartung für dieses Gerät.
• Reparaturen dürfen nur von einem autorisierten Unternehmen
vorgenommen werden.
• Dieses Gerät darf nicht abgeändert oder verändert werden.
• Wenn innerhalb 2 Jahren ab Kaufdatum Probleme entstehen, die durch
die Werksgarantie gedeckt sind, können Sie das Gerät am Einkaufsort
umtauschen.
• Bei Fragen oder Reklamationen kontaktieren Sie den „Einkaufsort“ Ihres
Händlers.
• Dieses Gerät ist durch eine Garantie von 24 Monaten ab Kaufdatum
(Quittung) gedeckt.
• Diese Garantie beinhaltet nur Material- oder Herstellungsfehler.
• Bei Reklamationen geben Sie bitte das gesamte Gerät in der
Originalverpackung zusammen mit der Quittung an Ihren Händler zurück.
• Schäden an den Zubehörteilen bedeutet nicht automatisch, dass das
gesamte Gerät kostenlos ausgetauscht wird. In diesem Fall kontaktieren
Sie unsere Hotline. Zerbrochenes Glas oder Kunststoteile sind immer
kostenpichtig.
• Schäden an Verbrauchsmaterialien oder Verschleißteilen, sowie
Reinigung, Wartung oder Austausch der besagten Teile werden durch
die Garantie nicht abgedeckt und sind deshalb kostenpichtig!
• Die Garantie erlischt, wenn unerlaubte Änderungen vorgenommen
werden.
• Nach dem Ablauf der Garantie können Reparaturen von einem
kompetenten Händler oder Reparaturservice gegen Bezahlung der
anfallenden Kosten vorgenommen werden.
hinweiSe zum u mw eltSchutz
Dieses Gerät darf am Ende seiner Lebensdauer nicht im
Hausmüll entsorgt werden, sondern muss an einer zentralen
Sammelstelle für das Recycling von elektrischen und
elektronischen Haushaltsgeräten abgegeben werden. Dieses
Symbol auf dem Gerät, der Bedienungsanweisung und der Verpackung
lenkt Ihre Aufmerksamkeit auf diesen wichtigen Fakt. Das bei diesem
Gerät verwendete Material kann recycled werden. Durch das Recyclen
gebrauchter Haushaltgeräte leisten Sie einen wichtigen Beitrag zum
Umweltschutz. Fragen Sie Ihre örtliche Behörde nach Informationen
bezüglich einer Sammelstelle.
ver Pac ku ng
Die Verpackung ist zu 100 % recyclebar, geben Sie die Verpackung
getrennt zurück.
Pro du kt
Dieses Gerät ist in Übereinstimmung mit der Europäischen Richtlinie
2002/96/EC für die Entsorgung von elektrischen und elektronischen
Geräten (WEEE) gekennzeichnet. Indem die korrekte Entsorgung des
Produkts sichergestellt wird, werden mögliche negative Folgen für Umwelt
und Gesundheit vermieden.
eu konf or mi tätS er kl är ung
Dieses Gerät wurde entsprechend der Niederspannungsrichtlinie 2006/95/
EC und der EMC-Richtlinie 2004/108/EC sowie der Richtlinie 93/68/EEC
gefertigt und vermarktet.
487
DE BEDIENUNGSANLEITUNG
Page 19

19
ES MANUA L DE USUA RI O
Es tima do client e:
Le agrad ece mos la co mpra d e este produ cto de alta c alid ad.
Le a el m anual de ins trucci ones co n d etenim iento para p oder
sa car el máx imo provech o al ap ara to. Es te man ual inc luye
to das la s inst ruccio nes y los co nsej os necesa rios p ara ut ilizar,
li mpiar y ma nte ner el apa rat o. Si sigue esta s i nstruc ciones ,
le garan tizamo s excele nte s resu ltados, a hor rará t iempo y
ev itará pro blem as. Es peramo s que dis frute con el uso de es te
ap arato.
inStrucc io neS de Seguridad
• Lea el manual de instrucciones detenidamente antes de utilizar el
dispositivo. Guarde estas instrucciones, el certicado de garantía, el
ticket de venta y, si es posible, el cartón con el embalaje interior.
• Este aparato no se ha diseñado para ser utilizado por personas con
capacidades físicas, sensoriales o mentales reducidas, ni por personas
con falta de experiencia y conocimientos (niños incluidos), a no ser que
hayan recibido supervisión o instrucciones respecto al uso del aparato
por parte de una persona responsable de su seguridad.
• Si ignora las instrucciones de seguridad, eximirá al fabricante de toda
responsabilidad por posibles daños.
• Este aparato se debe utilizar únicamente para el uso doméstico y sólo
para las funciones para las que se ha diseñado.
• No lo utilice cuando el aparato se haya caído, si hay algún signo de
daños o si tiene fugas.
• No utilice el dispositivo sin supervisión.
• Todas las reparaciones deberá realizarlas un electricista competente
cualicado (*).
• Asegúrese de que el aparato esté almacenado en un entorno seco.
• Compruebe si el voltaje del electrodoméstico es igual la tensión principal
de su hogar. Tensión nominal: CA 220-240 V 50 Hz. La toma debe ser de al
menos 16 A o 10 A con protección frente a suministros lentos.
• Este aparato cumple con todos los estándares relativos a los campos
electromagnéticos(CEM). Si se manipula correctamente conforme a las
instrucciones de este manual de usuario, el uso del aparato será seguro
según la evidencia cientíca disponible en la actualidad.
• El uso de accesorios no son recomendados por el fabricante puede
provocar heridas e invalidar la garantía que pueda tener.
• No enrolle el cable alrededor del aparato y no lo doble.
• Como medida de protección contra las descargas eléctricas, no sumerja
el cable, el enchufe o el aparato en agua o cualquier otro líquido.
• Desenchufe el aparato de la toma cuando cambie piezas o realice tareas
de mantenimiento.
• No utilice ningún aparato con el cable o el enchufe dañados, después
de que se haya sufrido una avería o de que se haya dañado de cualquier
manera. Para evitar riesgos, asegúrese de que un técnico autorizado (*)
sustituya el cable o el enchufe dañado. No repare usted mismo el aparato.
• Asegúrese de que el cable no cuelgue por el lo de la mesa o encimera,
no toque ninguna supercie caliente o entre en contacto directo con las
partes calientes del aparato. No coloque el aparato debajo o cerca de las
cortinas, persianas, etc.
• Para una protección adicional, le aconsejamos instalar un interruptor
diferencial (ID) en el circuito eléctrico que suministre su electricidad
el cuarto de baño. Este ID no debe tener una corriente nominal de
funcionamiento residual mayor de 30mA. Pida consejo a su instalador.
• No utilice el dispositivo en el cuarto de baño ni cerca de un fregadero
llenó de agua. Si este aparato se ha caído en el agua, bajo ninguna
circunstancia agarre el aparato, primero saque el enchufe de la toma.
Page 20

1
2
3
7
6
10 1198
54
20
ES MA NUAL DE USUARIO
(*) Electricista competente cualicado: departamento post-venta del
fabricante o importador o cualquier persona cualicada, autorizada y
competente para realizar este tipo de reparación para evitar cualquier peligro.
En cualquier caso deberá devolver el aparato a este electricista.
deScriPción de l aS PiezaS
1. Botón de suelta
2. Interruptor de encendido/apagado
3. Luz indicadora de carga
4. Recortador de anchura total
5. Recortador de cejas, orejas y nariz
6. Recortador de precisión
7. Afeitadora pequeña
8. Peine de estilismo
9. Peine de barba y bigote
10. Peine de pelo
11. Cepillo de limpieza
anteS de u ti lizar
carg a
Cargue el aparato durante por lo menos 16 horas antes de utilizarlo por
primera vez y después de un largo período en desuso. Cuando el aparato esté
cargado completamente, tiene un tiempo de funcionamiento inalámbrico de
hasta 45 minutos. No cargue el aparato durante más de 24 horas.
1. Asegúrese de que el aparato esté apagado.
2. Inserte el pequeño enchufe en el aparato y ponga el adaptador en la
toma de pared.
3. Después de unos segundos, la luz de carga se encenderá para indicar
que el aparato se está cargando.
nota : La luz de carga no cambia de color y no se apaga cuando el
aparato está completamente cargado.
utilización
Pei ne d e Ba rB a y B igot eS y Pe in e de P elo
1. Sólo utilice el aparato en pelo limpio y seco. No lo utilice en pelo
recién lavado/mojado.
2. Asegúrese de que la cabeza de la persona cuyo pelo pretende cortar
está al mismo nivel que su pecho. Esto garantiza que todas las partes
de la cabeza son claramente visibles y están al alcance.
3. Peine el pelo en la dirección de crecimiento.
4. Ponga el peine en el accesorio de recortador de anchura total hasta
que oiga que hace clic en el sitio. El peine no funcionará con el
recortador de precisión, ni con accesorios de afeitadora pequeña.
5. Apriete el selector de longitud de pelo y deslícelo al ajuste deseado de
longitud de recorte.
Page 21

21
6. Si va a recortar por primera vez, empiece utilizando el peine con el
máximo ajuste de longitud de recorte para evitar recortar el pelo
accidentalmente demasiado corto.
7. Encienda el cuidador.
8. Para recortar de la manera más efectiva, mueva el cuidador contra
la dirección de crecimiento del pelo. Asegúrese de que la supercie
del peine siempre está en contacto con la piel. Haga pasadas
superpuestas sobre la cabeza para asegurarse de que se corta todo el
pelo que deba ser cortado.
9. Si se junta mucho pelo en el peine, quite el peine y sople y/o sacuda
el pelo fuera del mismo. También puede utilizar el cepillo de limpieza
proporcionado para quitar el pelo de la zona del peine.
rec or tar
1. Puede utilizar el aparato sin peine para cortar pelo muy cercano a la
piel o para contornear la línea del cuello y la zona alrededor de las
orejas.
2. Incline el aparato de tal manera que sólo una orilla del elemento
cortante toque los extremos del pelo cuando dé forma a los contornos
alrededor de las orejas.
3. Para contornear la línea del cuello y las patillas, gire el aparato y haga
trazadas hacia abajo.
rec or tad or d e ce ja S, o re ja S y na riz
1. Ponga el recortador de nariz, orejas y cejas en el cuidador.
2. Encienda el cuidador e inserte la punta del accesorio en una ventana
de la nariz.
3. Muévalo lentamente dentro y fuera de la nariz o la oreja girándolo
alrededor al mismo tiempo para quitar el pelo no deseado. Para
mejores resultados, asegúrese de que el lado del recortador se apoya
rme contra la piel.
min i- af ei tad or a
1. Ponga el accesorio de mini-afeitadora en el cuidador.
2. Apriete suavemente la mini-afeitadora sobre la piel. No apriete
demasiado fuerte para obtener un resultado uniforme del afeitado.
3. Haga pasadas superpuestas sobre la piel para asegurarse de que se
corta todo el pelo que deba ser cortado.
man te ni mi ento
1. La limpieza regular de las hojas del cortapelo mantendrá sus
prestaciones óptimas.
2. Cepille las hojas y el aparato con el cepillo de limpieza para quitar
cualquier pelo.
3. Cuando advierta que el cortapelo no funciona también. Aplique unas
pocas gotas de aceite en la almohadilla. El aceite contenido tiene una
fórmula especial para cortapelos, no se evaporará ni ralentizará las hojas.
garantía
• Tristar no se hace responsable de los daños producidos:
o En caso de que el aparato se haya caído.
o En caso de que el aparato haya sido cambiado técnicamente por el
propietario o un tercero.
o En caso de uso indebido del aparato.
o En caso de desgaste normal del aparato.
• Al realizar reparaciones no se prorrogará el período original de garantía
de 2 años, ni el derecho a una nueva garantía de cumplimiento. Esta
garantía sólo es legal en territorio europeo. Esta garantía no prevalece
sobre la Directiva europea 1944/44CE
• Guarde siempre la factura, sin ella no podrá reclamar ningún tipo de
garantía.
ES MANUA L DE USUA RI O
Page 22

22
• Los daños originados por no seguir el manual de instrucciones, darán
lugar a la invalidez de la garantía. Si ello deriva en daños importantes,
Tristar no será responsable.
• Tristar no será responsable de los daños materiales o daños físicos
provocados por el uso indebido o si no se han ejecutado correctamente
las medidas de seguridad.
• La limpieza, tal como se menciona en este manual, es el único
mantenimiento necesario para estos aparatos.
• Cuando se deba reparar el aparato, asegúrese de que la reparación la
lleva a cabo una empresa autorizada.
• Este aparato no se puede arreglar ni modicar.
• Si surgen problemas durante los 2 años a partir de la fecha de compra,
que están cubiertos por la garantía de fábrica, puede volver al punto de
venta para reemplazarlo por uno nuevo.
• Si tiene preguntas o requerimientos, debe dirigirse al "punto de venta”.
• La garantía de este aparato dispone de una cobertura de 24 meses a
partir de la fecha de compra (factura).
• Sólo están incluidos en la garantía los defectos de material o de fabricación.
• Si usted desea hacer una reclamación, devuelva toda la máquina
completa con el embalaje original y la factura al proveedor.
• Daños en el acceso teorías no signica libre de sustitución automática del
aparato completo. En dichos, consulte el teléfono de atención al cliente. Los
vidrios rotos o rotura de piezas de plástico están siempre sujetas a pago.
• Los defectos de los consumibles o piezas susceptibles a desgaste, así
como la limpieza, mantenimiento o la sustitución de dichas piezas no
están cubiertas por la garantía y por lo tanto, se deben pagar
• La garantía queda anulada en caso de manipulación no autorizada.
• Después del vencimiento de la garantía, las reparaciones las puede
llevar a cabo el proveedor o servicio de reparación correspondiente con
el pago de los costes que conlleven.
normaS de Protección del
medioamBiente
Este aparato no se debe desechar con los residuos domésticos
cuando nalice su durabilidad, sino que se debe ofrecer a
un centro de reciclaje de aparatos eléctricos y electrónicos
domésticos. Este símbolo en el aparato, manual de instrucciones
y embalaje le avisa de este aspecto importante. El los materiales
utilizados en este aparato se pueden reciclar. Mediante el reciclaje
de electrodomésticos, usted contribuye a fomentar la protección del
medioambiente. Consulte a sus autoridades locales para obtener
información acerca del punto de recogida.
emB al aj e
El embalaje es 100% reciclable, devuelva el embalaje por separado.
rod uc to
Este aparato está marcado de acuerdo con la Directiva Europea 2002/96/
EC para Desechos de Aparatos Eléctricos y Electrónicos (WEEE). Si se
asegura de que este producto se desecha correctamente, ayudará a
prevenir posibles consecuencias negativas para medio ambiente y la salud
humana.
dec la ra ción de cum Pl im ie nto ce
Este dispositivo ha sido diseñado, fabricado y comercializado de acuerdo
con los objetivos de seguridad de la Directriz de Baja Tensión "Nº 2006/95/
EC, los requisitos de protección de la Directriz EMC 2004/108/EC de
"Compatiblidad Electromagnética" y los requisitos de la Directriz 93/68/EEC.
487
ES MA NUAL DE USUARIO
Page 23

23
PT MANUA L DE UTILIZADOR
Es tima do client e,
Pa rab éns e obriga do por ter a dqui rid o este produ to
de eleva da qua lida de. Le ia este m anua l d e inst ruções
cu idados amente para que po ssa uti lizar este a parelh o
da melho r form a. E ste manua l incl ui tod as as inst ruç ões
e consel hos ne cessár ios pa ra a u tilização, limpez a e
ma nutenç ão do aparel ho. Se se guir esta s inst ruções é
ga rantid o que terá e xcele ntes r esu ltad os, qu e po upa rá tempo
e que ev itará proble mas. E speram os que se di virt a a ut iliz ar
es te apa relho.
inStruçõ eS de Segurança
• Leia cuidadosamente o manual de instruções antes de utilizar o aparelho.
Guarde estas instruções, o certicado de garantia, o comprovativo de
compra e, se possível, a caixa com as embalagens interiores.
• Este aparelho não deve ser utilizado por pessoas (incluindo crianças)
com capacidades físicas, sensoriais ou mentais reduzidas, ou com
falta de experiência e conhecimento, a não ser que tenham recebido
supervisão ou instruções sobre a utilização do aparelho por uma pessoa
responsável pela sua segurança.
• Se não seguir as instruções de segurança, o fabricante não pode ser
considerado responsável pelo dano.
• Este aparelho destina-se apenas a uma utilização doméstica e para os
ns para os quais foi concebido.
• Não use o aparelho quando este tiver caído e se houver sinais de danos
ou de fugas.
• Nunca utilize o aparelho sem supervisão.
• Todas as reparações devem ser realizadas por um electricista qualicado
e competente (*).
• Certique-se de que o aparelho é guardado num ambiente seco.
• Verique se a tensão do aparelho corresponde à corrente eléctrica de
sua casa. Tensão indicada: 220-240 V CA 50Hz. A tomada deve ser de,
pelo menos, 16 A ou 10 A de baixa protecção.
• Este aparelho está em conformidade com todos os padrões relativos a
campos electromagnéticos (EMF). Se manuseado de forma adequada e
de acordo com as instruções deste manual de instruções, o aparelho é
seguro com base em provas cientícas disponíveis actualmente.
• A utilização de acessórios que não sejam recomendados pelo fabricante
pode provocar ferimentos e invalidará qualquer garantia que possa ter.
• Não enrole o cabo à volta do aparelho nem dobre-o.
• Para se proteger de choque eléctrico, não mergulhe o cabo, a cha ou o
aparelho em água ou noutro líquido.
• Desligue o aparelho da tomada quando trocar para peças
sobresselentes ou para manutenção.
• Não utilize este aparelho com um cabo ou cha danicado ou quando o
aparelho está avariado, após ocorrer avaria ou qualquer outro dano. Para
evitar perigos, certique-se de que o cabo ou a tomada danicados são
substituídos por um técnico autorizado (*). Não repare o aparelho sozinho.
• Certique-se de que o cabo não ca pendurado no canto da mesa ou
do balcão, não toca em nenhuma superfície quente nem entra em
contacto directo com as partes quentes do aparelho. Não coloque o
aparelho por baixo ou perto de cortinas, coberturas de janelas, etc.
• Para uma protecção adicional, aconselhamos a instalação de um
dispositivo de corrente residual (RCD) no circuito eléctrico que fornece
electricidade à casa de banho. Este RCD deve ter uma corrente residual
nominal de funcionamento não superior a 30mA. Peça o conselho do
seu instalador.
Page 24

1
2
3
7
6
10 1198
54
24
PT MA NUAL DE UTILIZADOR
• Não utilize este aparelho na casa de banho ou nas proximidades de um
lavatório com água. Se este aparelho tiver caído na água, não o agarre,
em nenhumas circunstâncias. Primeiro, desligue-o da corrente.
(*) Electricista qualicado competente: departamento pós-venda do
fabricante ou do importador ou qualquer outra pessoa qualicada, aprovada
e competente para realizar este tipo de reparações para evitar perigos. De
qualquer das formas, deve entregar o aparelho a esse electricista.
deScrição d aS PeçaS
1. Botão para libertar
2. Interruptor de Ligar/Desligar
3. Luz indicadora de carregamento
4. Aparador completo
5. Aparador de nariz, ouvido e sobrancelha
6. Aparador de precisão
7. Micro barbeador
8. Pente para pentear
9. Pente para bigode e barba
10. Pente para cabelo
11. Escova de limpeza
anteS de u Sa r
carg a
Carregue o aparelho durante, pelo menos, 16 horas antes de o utilizar pela
primeira vez e após um longo período de inactividade. Quando o aparelho
está totalmente carregado, tem autonomia até 45 minutos. Não carregue o
aparelho durante mais de 24 horas.
1. Certique-se que o aparelho está desligado.
2. Insira a cha pequena no aparelho e ligue o adaptador à corrente.
3. Passados alguns segundos, a luz de carregamento acende-se a indicar
que o aparelho está a carregar.
not e: A luz de carregamento não muda de cor nem se apaga quando o
aparelho estiver totalmente carregado.
utilização
Pen te Pa ra B igode e Ba rB a e Pe nt e Para ca Be lo
1. Utilize o aparelho somente em cabelos lavados e secos. Não utilize em
cabelos acabados de lavar/cabelos molhados.
2. Certique-se que a cabeça da pessoa a quem vai cortar o cabelo se
encontra ao nível do seu peito. Tal garante que todos os lados da
cabeça estão claramente visíveis e que são de alcance fácil.
3. Penteie o cabelo na direcção do crescimento.
4. Coloque o pente no acessório aparador complete até ouvi-lo encaixar.
O pente não funcionará com o aparador de precisão ou com o micro
barbeador.
5. Prima o selector de comprimento do cabelo e deslize-o para o
comprimento de corte desejado.
6. Se estiver a cortar pela primeira vez, comece por utilizar o pente no
comprimento máximo de corte para evitar o cabelo demasiado curto.
Page 25

25
7. Ligue a máquina.
8. Para cortar da forma mais ecaz, mova a máquina na direcção do
crescimento do cabelo. Certique-se de que a superfície do pente ca
sempre em contacto com a pele. Passe várias vezes pela cabeça para
garantir que corta todo o cabelo que deve ser cortado.
9. Se car demasiado cabelo no pente, retire o pente e sopre e/ou
agite o pente para retirar o cabelo. Pode também utilizar a escova de
limpeza fornecida para remover o cabelo da área do pente.
aParar
1. Pode utilizar o aparelho sem o pente para um corte mais rente ou para
contornar a nuca e a área à volta das orelhas.
2. Incline o aparelho de forma que apenas uma extremidade do
elemento de corte toque nas extremidades do cabelo quando modela
os contornos à volta das orelhas.
3. Para fazer o contorno da nuca e patilhas, gire o aparelho e efectue
movimentos descendentes.
aParad or de n ar iz, ou vi do e S oB ra ncelh a
1. Coloque o aparador de nariz, ouvido e sobrancelha na máquina.
2. Ligue a máquina e insira a ponta do acessório numa narina.
3. Mova-a lentamente para dentro e para fora do nariz ou ouvido enquanto
roda para remover o pêlo indesejado. Para melhores resultados,
certique-se de que a lateral do aparador está bem contra a pele.
mic ro BarB ea do r
1. Coloque o micro barbeador na máquina.
2. Pressione com cuidado o micro barbeador contra a pele. Não
pressione com demasiada força para obter um resultado uniforme.
3. Passe várias vezes pela pele para garantir que corta todo o cabelo que
deve ser cortado.
man ut en ção
1. Limpar as lâminas de corte regularmente mantê-las-á num
desempenho óptimo.
2. Escove as lâminas e o aparelho com a escova de limpeza para remover
cabelos.
3. Quando notar que a máquina já não trabalha da mesma forma,
deite algumas gotas de óleo no amortecedor. O óleo junto foi
especialmente formulado para máquinas de corte e não irá evaporar
ou diminuir a velocidade das lâminas.
garantia
• A Tristar não é responsável por danos ocorridos através de:
o Queda do aparelho.
o Alteração técnica do aparelho realizada pelo proprietário ou por
terceiros.
o Utilização inadequada do aparelho.
o Desgaste normal do aparelho.
• Ao realizar reparações, o período de garantia original de 2 anos não será
estendido nem terá direito a uma nova garantia. Esta garantia é válida
apenas na Europa. Esta garantia não anula a directiva europeia 1944/44/CE.
• Guarde sempre o seu recibo, sem ele não pode reivindicar nenhum tipo
de garantia.
• Danos causados por não seguir o manual de instruções tornarão a
garantia nula. Se isto resultar em danos consequentes, a Tristar não
deverá ser considerada responsável.
• A Tristar não será responsável por danos no material ou ferimentos
pessoais causados por uma utilização inadequada ou se não se
seguirem adequadamente as instruções de segurança.
PT MANUA L DE UTILIZADOR
Page 26

26
• A limpeza, conforme mencionado neste manual, é a única manutenção
necessária para estes aparelhos.
• Quando for necessário reparar o aparelho, certique-se de que a
reparação será realizada por uma empresa autorizada.
• Este aparelho não deve ser alterado.
• Se ocorrerem problemas durante os 2 anos após a data de compra, que
correspondem à cobertura da garantia de fábrica, pode dirigir-se ao
local da compra para substituí-lo por um novo.
• Para questões ou concordâncias, contacte o seu "ponto de venda".
• Este aparelho tem garantia de 24 meses, com início na data de compra
(recibo).
• Apenas os defeitos de fabrico e do material estão cobertos pela
garantia.
• Se deseja apresentar uma reclamação, entregue o aparelho na sua
totalidade na embalagem de origem ao seu vendedor juntamente com
o recibo.
• Os danos nos acessórios não signicam uma substituição automática
sem encargo dos aparelhos na totalidade. Nesses casos, contacte a
nossa linha directa. O vidro partido ou as peças de plástico partidas
estão sempre sujeitos a custos.
• Os defeitos em consumíveis ou peças sujeitos a desgaste, assim como
a limpeza, a manutenção ou a substituição dessas peças não estão
cobertos pela garantia e devem ser pagos!
• A garantia perde a validade no caso de modicação não autorizada no
aparelho.
• Findo o prazo da garantia, a reparação pode ser levada a cabo
pelo fabricante competente ou pelo serviço de reparação contra o
pagamento dos custos daí decorrentes.
inStruçõ eS geraiS SoBre a
Prot ecção do a mB iente
Este aparelho não deve ser colocado juntamente com os
resíduos domésticos no nal do seu tempo de vida útil,
deve ser entregue num local adequado para reciclagem de
aparelhos domésticos eléctricos e electrónicos. Este símbolo indicado
no aparelho, no manual de instruções e na embalagem chama a sua
atenção para a importância desta questão. Os materiais utilizados neste
aparelho podem ser reciclados. Ao reciclar electrodomésticos usados está
a contribuir para dar um importante passo na protecção do nosso meio
ambiente. Peça às autoridades locais informações relativas aos pontos de
recolha.
emB al agenS
A embalagem é 100% reciclável, entregue a embalagem em separado.
Pro du to
Este aparelho está equipado com uma marca, de acordo com a Directiva
europeia 2002/96/EC relativa a Resíduos de Equipamentos Elétricos e
Electrónicos (REEE). Ao assegurar que este produto é correctamente
processado enquanto resíduo, ajudará a evitar possíveis consequências
negativas no ambiente e na saúde humana.
dec la ra ção de con fo rm idad e ce
Este aparelho foi construído, fabricado e é comercializado em conformidade
com os objectivos de segurança da Directiva “Baixa Tensão” Nº 2006/95/
EC, com as exigências da Directiva CEE Nº 2004/108/CE “Compatibilidade
Electromagnética” e as exigências da Directiva Nº 93/68/CEE.
487
PT MA NUAL DE UTILIZADOR
Page 27

27
PL INSTRUKC JA OBSŁUGI
Sz anowny klien cie,
Gr atuluj emy i dzi ękujemy z a z akup t ego wysok iej jak ości
pr oduktu . Aby móc możli wie na jlep iej korzysta ć z te go
ur ządzenia, należ y na jpierw pr zecz ytać u ważnie instrukc ję
ob sługi. Ins tru kcja t a zawi era wszel kie nie zbędne
in strukc je i p orady dotycz ące uż ytkowa nia, c zyszcz enia
or az utr zymy wania tego u rządze nia. S tosowa nie się do tych
in strukc ji gwa rantuj e uz ysk anie d oskona łyc h wy ników,
os zczędz a czas i zap obie ga wystąp ieni u p rob lemów. M amy
na dzieję , że k orzyst anie z te go urzą dze nia bę dzie ba rdz o
pr zyje mne.
inStrukc je BezPieczeńSt wa
• Przed rozpoczęciem korzystania z urządzenia należy przeczytać uważnie
instrukcję obsługi. Należy zachować niniejszą instrukcję, kartę gwarancyjną,
paragon oraz, o ile to możliwe, pudełko z wewnętrznym opakowaniem.
• Urządzenie to nie jest przeznaczone do użytku przez osoby (w tym
dzieci) o ograniczonych zdolnościach zycznych, sensorycznych lub
umysłowych, a także przez osoby pozbawione doświadczenia i wiedzy,
chyba że osoby odpowiedzialne za ich bezpieczeństwo zapewnią
nadzór lub udzielą instrukcji dotyczących używania tego urządzenia.
• Producent nie ponosi odpowiedzialności za uszkodzenia wynikające z
niestosowania się do instrukcji dotyczących bezpieczeństwa.
• Urządzenie to może być używane wyłącznie do celów domowych i tylko
zgodnie z przeznaczeniem.
• Z urządzenia nie należy korzystać, gdy spadło, gdy widoczne są oznaki
uszkodzenia lub gdy przecieka.
• Nigdy nie należy zostawiać włączonego urządzenia bez nadzoru.
• Wszelkie naprawy powinny być wykonywane przez kompetentnego i
wykwalikowanego elektryka(*).
• Urządzenie należy przechowywać w suchym miejscu.
• Sprawdzić, czy napięcie urządzenia odpowiada napięciu sieciowemu w
domu użytkownika. Napięcie znamionowe: AC220-240V 50Hz. Gniazdo
elektryczne musi być swobodnie chronione, a wartość natężenia prądu
musi wynosić co najmniej 16 A lub 10 A.
• Urządzenie to jest zgodne ze wszystkimi standardami w zakresie
pól elektromagnetycznych (EMF). Zgodnie z dostępnymi obecnie
dowodami naukowymi użytkowanie tego urządzenia jest bezpieczne, o
ile jest ono obsługiwane właściwie i zgodnie z instrukcjami zawartymi w
niniejszym podręczniku użytkownika.
• Korzystanie z akcesoriów, które nie są zalecane przez producenta,
może prowadzić do obrażeń ciała, a także spowoduje unieważnienie
posiadanej gwarancji.
• Kabla nie należy owijać wokół urządzenia ani zaginać.
• Aby chronić siebie przed porażeniem prądem, nie należy zanurzać
kabla, wtyczki ani urządzenia w wodzie ani żadnym innym płynie.
• Przed wymianą części zamiennych lub podjęciem czynności
konserwacyjnych urządzenie należy odłączyć od gniazda elektrycznego.
• Urządzenia nie należy używać, jeśli kabel lub wtyczka są uszkodzone
albo gdy urządzenie działa wadliwie lub zostało w jakikolwiek sposób
uszkodzone. Aby uniknąć zagrożenia, uszkodzony kabel lub wtyczkę
powinien wymienić upoważniony technik(*). Urządzenia tego nie należy
naprawiać samodzielnie.
• Kabel nie powinien zwisać z krawędzi stołu ani blatu, stykać się z gorącymi
powierzchniami, a także nie powinien stykać się z gorącymi elementami
innych urządzeń. Urządzenia nie należy umieszczać pod zasłonami i innymi
materiałami wykończeniowymi okien ani w ich pobliżu.
• Jako dodatkową ochronę zaleca się zamontowanie wyłącznika
różnicowo-prądowego (RCD) w obwodzie elektrycznym zapewniającym
zasilanie w łazience. Wartość znamionowego roboczego prądu
różnicowego wyłącznika różnicowo-prądowego nie może być większa
niż 30 mA. Należy skonsultować się z instalatorem.
Page 28

1
2
3
7
6
10 1198
54
28
PL INSTRU KCJA OBSŁUGI
• Urządzenia tego nie należy używać w łazience ani w pobliżu zlewu
wypełnionego wodą. Jeśli urządzenie wpadnie do wody, pod żadnym
pozorem nie można dotykać bezpośrednio urządzenia; należy najpierw
wyciągnąć wtyczkę z gniazda elektrycznego.
(*) Kompetentny i wykwalikowany elektryk: dział posprzedażny producenta,
importer lub inna osoba, która jest wykwalikowana, zatwierdzona i
kompetentna do wykonywania tego rodzaju napraw; korzystanie z usług tych
osób ma na celu uniknięcie wszelkich zagrożeń. W każdym wymagającym
tego przypadku urządzenie należy przekazać jednemu z wymienionych
powyżej elektryków.
oPiS części
1. Przycisk zwalniania
2. Przycisk włączania/ wyłączania
3. Wskaźnik świetlny ładowania
4. Trymer do pełnej szerokości
5. Trymer do włosów z uszu, nosa oraz brwi
6. Precyzyjny trymer
7. Mikro- golarka
8. Grzebień do stylizacji
9. Grzebień do brody i wąsów
10. Grzebień do włosów
11. Pędzelek do czyszczenia
Przed użyciem
Ład owan ie
Przed pierwszym użyciem urządzenie należy ładować przez co najmniej
16 godzin. Podobnie po długim okresie nieużywania. Gdy urządzenie jest
naładowane do pełna, może pracować nawet 45 minut. Nie ładować dłużej
niż przez 24 godziny.
1. Upewnić się, czy urządzenie jest wyłączone.
2. Wstawić małą wtyczkę do urządzenia i włożyć adapter do gniazdka
ściennego.
3. Po kilku sekundach zapali się kontrolka ładowania, wskazując na to, że
urządzenie się ładuje.
uwaga : Kontrolka ładowania nie zmienia koloru, ani nie gaśnie po
zakończeniu ładowania.
użytkowanie
grz eB ie ń do Br ody i wąSów oraz gr zeBie ń do
wŁo Sów
1. Urządzenia należy używać wyłącznie na czystych i suchych włosach.
Nie używać na włosach świeżo umytych/mokrych.
2. Głowa osoby, której włosy będą strzyżone, powinna znajdować się na
wysokości piersi osoby strzygącej. Każdy fragment głowy jest wtedy
dobrze widoczny i znajduje się w zasięgu.
3. Uczesać włosy zgodnie z kierunkiem ich wzrostu.
4. Nałożyć grzebień na trymer do pełnej szerokości, aż zatrzaśnie się na
miejscu. Grzebień nie działa z trymerem precyzyjnym ani końcówkami
do mikro- golarki.
5. Nacisnąć selektor długości włosów i zsunąć go do wybranego
ustawienia długości strzyżenia.
Page 29

29
6. Jeśli strzyżemy po raz pierwszy należy zacząć od maksymalnej
długości strzyżenia, aby zapobiec temu, że włosy zostaną ostrzyżone
zbyt krótko.
7. Włączyć maszynkę do strzyżenia.
8. Aby strzyc w najbardziej efektywny sposób należy przesuwać
maszynkę w kierunku przeciwnym do wzrostu włosa. Sprawdzić, czy
powierzchnia grzebienia zawsze pozostaje w styczności ze skórą.
Należy przesuwać maszynką, nachodząc na poszczególne pasma na
całej głowie, tak, aby ściąć wszystkie włosy, które należy ściąć.
9. Jeśli w grzebieniu nagromadziło się dużo włosów, należy zdjąć
grzebień i wydmuchać i/lub wytrząsnąć włosy z grzebienia. Można
również użyć pędzelka do czyszczenia pod warunkiem, że usuwamy
włosy z obszaru grzebienia.
Str zy że ni e
1. Urządzenia wraz z grzebieniem można używać do cięcia bardzo blisko
przy skórze lub przycinania linii karku oraz wokół uszu.
2. Nachylić urządzenie w taki sposób, ze tylko jedna krawędź elementu
tnącego styka się z końcówkami włosów, kiedy nadajemy kształt
wokół uszu.
3. Aby przyciąć linię karku i bokobrody, należy obrócić urządzenie i
wykonywać ruchy w dół.
try mer do wŁoSów z uS zu, no Sa or az B rwi
1. Nałożyć trymer do włosów z uszu, nosa oraz brwi na maszynkę.
2. Włączyć maszynkę i włożyć koniuszek końcówki do jednego nozdrza.
3. Powoli wkładać i wyjmować ją nosa lub ucha, jednocześnie obracając
nią, aby usunąć niepożądane włosy. Aby uzyskać najlepsze wyniki,
sprawdzić, czy boczna część trymera mocno przylega do skóry.
mik ro - gol ar ka
1. Nałożyć końcówkę mikro- golarki na maszynkę.
2. Delikatnie docisnąć mikro- golarkę do skóry. Nie dociskać zbyt mocno,
aby uzyskać równomierne efekty golenia.
3. Należy przesuwać maszynką, nachodząc na poszczególne pasma na
całej skórze, tak, aby ściąć wszystkie włosy, które należy ściąć.
ko nS er wac ja
1. Regularne czyszczenie ostrzy w maszynce utrzymuje optymalną
wydajność.
2. Wyczyścić ostrza i urządzenie pędzelkiem do czyszczenia, aby usunąć
wszelkie włosy.
3. Kiedy zauważamy, że maszynka nie działa zbyt dobrze. Wycisnąć kilka
kropel oliwki na wacik. Dołączona oliwka przeznaczona jest specjalnie
do maszynek do strzyżenia, nie paruje ani nie powoduje zwolnienia
pracy ostrzy.
gwar anc ja
• Firma Tristar nie ponosi odpowiedzialności za uszkodzenia powstałe na
skutek:
o Upadku urządzenia.
o Jeśli właściciel lub osoby trzecie wymieniały cokolwiek w urządzeniu.
o Nieprawidłowego użycia urządzenia.
o Naturalnego zużywania się urządzenia.
• Po wykonaniu napraw okres 2 lat dla oryginalnej gwarancji nie będzie
poszerzony ani nie pojawi się prawo do uzyskania nowej gwarancji.
Gwarancja jest ważna tylko na terenie Europy. Gwarancja ta nie jest
nadrzędna wobec Dyrektywy Europejskiej 1944/44CE
• Zawsze zachowywać paragon, bez paragonu nie ma możliwości
ubiegania się jakiekolwiek działania na mocy gwarancji.
PL INSTRUKC JA OBSŁUGI
Page 30

30
• Uszkodzenia spowodowane niedostosowaniem się do instrukcji
prowadzą do unieważnienia gwarancji, a jeśli w konsekwencji dojdzie
do uszkodzeń, rma Tristan nie ponosi za nie odpowiedzialności.
• Firma Tristar nie ponosi odpowiedzialności za uszkodzenia materiałowe ani
obrażenia ciała spowodowane niewłaściwym użytkowaniem urządzenia
lub gdy nie dostosowano się właściwie do instrukcji bezpieczeństwa.
• Poza czyszczeniem, jak podano w niniejszym podręczniku istotna jest
również konserwacja konieczna dla urządzeń.
• Kiedy konieczna jest naprawa urządzenia, należy zapewnić, aby
dokonała jej autoryzowana rma.
• Tego urządzenia nie można naprawić ani wymienić samodzielnie.
Jeśli problemy pojawiły się w ciągu 2 lat od daty zakupu, które obejmuje
gwarancja producenta, można odnieść urządzenie do miejsca, gdzie
zostało nabyte i wymienić je na nowe.
• W razie pytań lub reklamacji prosimy o kontakt ze sprzedawcą Państwa
w “punkcie zakupu”
• Urządzenie objęte jest 24- miesięczną gwarancją, zaczynając od dnia
zakupu (odbioru).
• Niniejsza gwarancja obejmuje tylko materiałowe lub produkcyjne usterki.
• W przypadku reklamacji należy zwrócić całe urządzenie w oryginalnym
opakowaniu do sprzedawcy i dołączyć paragon.
• Uszkodzenia akcesoriów nie oznaczają możliwości automatycznej i
darmowej wymiany na inne urządzenie. W takich przypadkach prosimy
o kontakt na infolinię. Zbita szybka lub pęknięcia części plastikowych
zawsze podlegają zwrotom.
• Usterki w częściach wymienialnych lub narażonych na zużycie,
podobnie jak czyszczenie, konserwacja i wymiana tych części nie są
objęte gwarancją i należy je opłacić we własnym zakresie.
• Gwarancja zostaje unieważniona w razie nieautoryzowanych
manipulacji przy urządzeniu.
• Po upływie terminu gwarancji wszelkie naprawy mogą być
przeprowadzane przez kompetentnego sprzedawcę oraz serwis
naprawczy po dokonaniu stosownych opłat.
wytyc zn e dotycz ące ochrony
środowiSka
Po zakończeniu okresu żywotności urządzenia tego nie
należy wyrzucać wraz z odpadami domowymi; urządzenie
to powinno zostać zutylizowane w centralnym punkcie
recyklingu domowych urządzeń elektrycznych i elektronicznych. Symbol
ten znajdujący się na urządzeniu, w instrukcji obsługi i na opakowaniu
zwraca uwagę na tę ważną kwestię. Materiały, z których wytworzono to
urządzenie, nadają się do przetworzenia. Recykling zużytych urządzeń
gospodarstwa domowego jest znaczącym wkładem użytkownika w
ochronę środowiska. W celu uzyskania informacji dotyczących punktów
zbiórki należy skontaktować się z przedstawicielem władz lokalnych.
oPako wan ie
Opakowanie jest w 100% materiałem podlegającym ponownemu
wykorzystaniu, należy go zwrócić po wyodrębnieniu.
Pro du kt
Urządzenie to posiada znak zgodności z dyrektywą europejską 2002/96/
EC w sprawie zużytego sprzętu elektrycznego i elektronicznego (WEEE).
Zapewnienie właściwego przetworzenia tego produktu pomoże w
uniknięciu możliwego niekorzystnego wpływu na środowisko i zdrowie
ludzkie.
dek la ra cj a zg od no ści ue
Urządzenie zaprojektowano, wyprodukowano i wprowadzono na
rynek, zgodnie z zasadami bezpieczeństwa, podanymi w Dyrektywie
Niskiego Napięcia - nr 2006/95/EC, Dyrektywie Kompatybilności
Elektromagnetycznej (EMC) – nr 2004/108/EC oraz wymogami Dyrektywy
93/68/EEC.
487
PL INSTRU KCJA OBSŁUGI
Page 31

31
IT MANUA L E UTENTE
Es tima do client e,
Pa rab éns e obriga do por ter a dqui rid o este produ to
de eleva da qua lida de. Le ia este m anua l d e inst ruções
cu idados amente para que po ssa uti lizar este a parelh o
da melho r form a. E ste manua l incl ui tod as as inst ruç ões
e consel hos ne cessár ios pa ra a u tilização, limpez a e
ma nutenç ão do aparel ho. Se se guir esta s inst ruções é
ga rantid o que terá e xcele ntes r esu ltad os, qu e po upa rá tempo
e que ev itará proble mas. E speram os que se di virt a a ut iliz ar
es te apa relho.
iStruzioni di Sicurezz a
• Leggere attentamente il manuale istruzioni prima di mettere in funzione
l’apparecchio. Conservare istruzioni, certicato di garanzia, ricevuta di
acquisto e, se possible, la scatola con l’imballaggio interno.
• L’apparecchio non deve essere utilizzato da persone (compresi i bambini)
con ridotte abilità siche, sensoriali o mentali o mancanza di esperienza
e conoscenza, se non sotto la supervisione e le istruzioni sull’uso
dell’apparecchio fornite dalla persona responsabile della loro sicurezza.
• Il produttore non è responsabile di eventuali danni e lesioni
conseguenti alla mancata osservanza delle istruzioni.
• Questo apparecchio ha uso esclusivamente domestico e deve essere
utilizzato soltanto per gli scopi previsti.
• Non utilizzare l’apparecchio se è caduto, se presenta danni o se vi sono
perdite.
• Non lasciare mai l’apparecchio senza sorveglianza.
• Far eettuare tutte le riparazioni da un elettricista qualicato (*).
• Conservare l’apparecchio in ambiente asciutto.
• Assicurarsi che il voltaggio dell’apparecchio corrisponda a quello della
vostra rete domestica. Tensione nominale: AC220-240V 50Hz. La presa
deve essere almeno 16 A o 10 A a protezione lenta.
• L’apparecchio è conforme agli standard sui campi elettromagnetici
(EMF). Se utilizzato in modo corretto e secondo le istruzioni del manuale,
l’apparecchio è sicuro secondo i controlli eettuati no al momento.
• L’uso di accessori non consigliati dal produttore può provocare lesioni e
invalidare la garanzia.
• Non avvolgere il cavo intorno all’apparecchio e non piegarlo.
• Per proteggervi da scosse elettriche, non immergere cavo, spina o
apparecchio in acqua o altri liqiudi.
• Slare la spina dalla presa prima di sostituire parti durante la
manutenzione.
• Non utilizzare l’apparecchio se il cavo o la spina sono danneggiati
oppure in caso di anomalie o danni di qualunque tipo. Per evitare
pericoli, far sostituire un cavo o una spina danneggiati da un tecnico
autorizzato (*). Non riparare l’apparecchio da soli.
• Controllare che il cavo non penzoli sul bordo di un tavolo o un supporto,
non entri in contatto con superci calde e non entri in contatto con le
parti calde dell’apparecchio. Non collocare l’apparecchio sotto o vicino
a tende, tendine ecc..
• Per fornire una maggiore protezione, consigliamo di installare un
dispositvo corrente residua (RCD) nel circuito elettrico che fornisce
elettricità alla stanza da bagno. Il RCD dee avere una corrente
di esercizio residua non superiore a 30mA. Consultare il proprio
installatore di ducia.
• Non utilizzare l’apparecchio nella stanza da bagno o vicino a un
lavandino pieno d’acqua. Se l’apparecchio è caduto nell’acqua, non
aerrare l’apparecchio, ma slare prima la spina dalla presa .
Page 32

1
2
3
7
6
10 1198
54
32
IT MA NUALE UTENTE
(*) Elettricista competente qualicato: reparto post-vendite del produttore o
dell’importatore o qualunque persona qualicata, approvata e competente
per eseguire questo tipo di riparazioni per evitare pericoli. In ogni caso,
restituire personalmente l’apparecchio all’elettricista.
deScrizione Parti
1. Tasto di rilascio
2. Interruttore on/o
3. Spia indicatore di carica
4. Rasoio larghezza intera
5. Rasoio naso, orecchie e sopracciglia
6. Rasoio di precisione
7. Rasoio micro
8. Pettine per styling
9. Pettine barba e ba
10. Pettine capelli
11. Spazzola per pulizia
Prima dell’u So
cari ca
Caricare l’apparecchio per almeno 16 ore prima di utilizzarlo per la prima
volta e se non lo si è utilizzato per lungo tempo. Quando l’apparecchio è
completamente carico, può funzionare come cordless per 45 minuti. Non
caricare l’apparecchio per più di 24 ore.
1. Controllare che l’apparecchio sia spento.
2. Inserire lo spinotto piccolo nell'apparecchio e collegare l’alimentatore
alla presa di corrente.
3. Dopo pochi secondi la spia di carica si accende per indicare che
l’apparecchio è in carica.
nota :la spia di carica non cambia colore e non si spegne quando
l’apparecchio è completamente carico.
uSo
Pet tin e BarBa e B af fi e P et ti ne P er c aP el li
1. Utilizzare l’apparecchio soltanto su capelli puliti e asciutti. Non
utilizzarlo su capelli bagnati/umidi.
2. Controllare che la testa della persona di cui si desiderano tagliare i
capelli si trovi all’altezza del vostro busto. In questo modo tutte le parti
della testa sono chiaramente visibili e facili da raggiungere.
3. Pettinare I capelli dalle radici verso le punte.
4. Porre il pettine sul rasoio a larghezza intera nché non si sente un clic.
Il pettine non funziona con il rasoio di precisione o con il rasoio micro.
5. Premere il selettore della lunghezza dei capelli e impostare la
lunghezza di rasatura desiderata.
6. Se ti stai radendo per la prima volta, inizia usando il pettine
impostato alla lunghezza di rasatura massima per evitare di tagliare
accidentalmente i capelli troppo corti.
Page 33

33
7. Accendere il regolatore.
8. Per rasare in modo corretto, muovere il regolatore in contropelo.
Assicurarsi che la supercie del pettine sia sempre a contatto con la
pelle. Passare in modo uniforme sulla testa per assicurarsi che tutti i
capelli da tagliare siano tagliati.
9. Se troppi capelli sono raccolti nel pettine, rimuoverlo e soare e/o
scuotere i capelli fuori dal pettine. È possibile anche usare la spazzola
di pulizia per rimuovere i capelli dall’area del pettine.
rit occh i
1. È possibile utilizzare l’apparecchio senza pettina per tagliare capelli
molto vicino alla pelle o per rinire la sfumatura del collo e l’area
intorno alle orecchie.
2. Inclinare l’apparecchio in modo tale che solo il bordo dell’elemento
di taglio tocchi le punte dei capelli quando si da forma al contorno
intorno le orecchie.
3. Per rinire la linea del collo e le basette, accendere l’apparecchio e
proseguire verso il basso.
raS oi o naSo, o re cchi e e SoP ra ccig li a
1. Porre il rasoio naso, orecchie e sopracciglia sul regolatore.
2. Accendere il regolatore e inserire la punta dell’accessorio in una
narice.
3. Muoverlo lentamente dentro e fuori dal naso e dall'orecchio mentre si
gira intorno per rimuovere i capelli indesiderati. Per risultati ottimali,
assicurarsi che il lato del rasoio sia contro la pelle.
raS oi o mini
1. Porre il rasoio mini sul regolatore.
2. Premere delicatamente il rasoio mini sulla pelle. Non premere troppo
forte per una rasatura regolare.
3. Passare in modo uniforme sulla pelle per assicurarsi che tutti i capelli
da tagliare siano tagliati.
man ut en zi one
1. Pulendo con regolarità le lame si manterrà le loro prestazioni ottimali.
2. Spazzolare le lame e l’apparecchio con la spazzola per pulizia per
rimuovere i capelli.
3. Se si nota che la macchinetta non sta funzionando bene. Applicare
alcune gocce d’olio sul cuscinetto. L’olio in dotazione è formulato in
modo speciale per le macchinette, non evapora o rallenta le lame.
guarantee
• Tristar non è responsabile per danni vericatisi:
o In caso di caduta dell’apparecchio.
o Nel caso in cui l’apparecchio è stato tecnicamente modicato dal
proprietario o da terzi.
o In caso di uso improprio dell’apparecchio.
o In caso di usura normale dell’apparecchio.
• Se vengono eseguite riparazioni, la garanzia di 2 anni non viene
priolungata, né viene emessa una nuova garanzia. La presente garanzia
ha valore soltanto nei Paesi Europei. Questa garanzia non ha maggior
valore della Direttiva Europea 1944/44CE.
• Conservare la ricevuta, senza la quale non è possibile richiedere
interventi in garanzia.
• Danni conseguenti alla non osservanza del manuale istruzioni comportano
il decadimento della garanzia. Tristar non sarà responsabile.
• Tristar non si assume alcuna responsabilità per danni materiali o lesioni
personali conseguenti a un utilizzo improprio dell’apparecchio o a un
utilizzo senza l’osservanza delle iustruzioni di sicurezza. .
IT MANUA L E UTENTE
Page 34

34
• ´L’unica manutenzione necessaria per questo apparecchio, come
indicato nel presente manuale, è la pulizia.
• Se l’apparecchio deve essere riparato, consegnarlo a una ditta
autorizzata.
• Non eettuare adattamenti o modiche.
• In caso di problemi entro due anni dalla data di acquisto, ovverosia
nel periodo coperto da garanzia di fabbrica, l’apparecchio può essere
sostituito presso il punto di acquisto con uno nuovo.
• Per domande o problemi, contattare il rivenditore “punto
vendita”.
• Il presente apparecchio é coperto da garanzia biennale a partire dalla
data di acquisto (ricevuta).
• La garanzia copre esclusivamente difetti di materiale e di fabbricazione.
• Se si desidera esporre un reclamo, restituire l’apparecchio
nell’imballaggio orginale al rivenditore insieme alla ricevuta.
• Danni agli accessori non comportano l’automatica sostituzione gratuita
dell’intero apparecchio. In questi casi contattare il nostro servizio
assistenza. La rottura di parti in vetro o in plastica è sempre soggetta a
pagamento.
• Difetti alle parti consumabili o alle parti soggette a usura, così come la
pulizia, la manutenzione o la sostituzione di dette parti non è coperta
da garanzia e quindi deve essere pagata!
• La garanzia decade in caso di manomissione non autorizzata.
• Dopo la scadenza della garanzia le riparazione possono essere
eettuata da un rivenditore autorizzato o dal servizio assistenza dietro
pagamento dei costi previsti.
linee guida Per la Protezione
dell’amBiente
Al termine del suo utilizzo questo apparecchio non deve essere
gettato tra I riuti domestici, ma deve essere consegnato ad un
punto centrale di raccolta per il riciclo delle apparecchiature
elettriche ed elettroniche domestiche. Questo simbolo sull'apparecchio,
il manuale di istruzioni e la confezione mettono in evidenza questo
problema importante. I materiali usati in questo apparecchio possono
essere riciclati. Riciclando i dispositivi domestici puoi contribuire
alla protezione del nostro ambiente. Contattare le autorità locali per
informazioni in merito ai punti di raccolta.
imB al laggi o
La confezione è riciclabile al 100%, restituire la confezione separatamente.
Pro do tto
Questo apparecchio è contrassegnato da un marchio corrispondente alla
Direttiva Europea 2002/96/EC sui Riuti delle Apparecchiature Elettriche
ed Elettroniche (RAEE). Assicurarne il corretto riciclo aiuterà a prevenire
possibili conseguenze negative all’ambiente e alla salute.
dic hi ar az io ne d i conf or mi tà ec
Questo dispositivo è progettato, prodotto e marchiato secondo gli
obiettivi di sicurezza della Direttiva sul Basso Consumo N° 2006/95/EC, i
requisiti di protezione della Direttiva EMC 2004/108/EC sulla "Compatibilità
Elettromagnetica" e i requisiti della Direttiva 93/68/EEC.
487
IT MA NUALE UTENTE
Page 35

35
SV ANVÄNDARE
Kära kun d,
Vi ta ckar oc h lyck öns kar dig fö r d itt inköp av denna
hö gkva lit ativa pro dukt. Läs br uksanv isning en nog grant
så att d u ka n a nvä nda ap parate n på b ästa s ätt. D enna
br uksanv isning inneh åller all a nödv ändiga anvis ningar fö r
an vän dning, re ngörin g och unde rhå ll av appara ten . Om d u
fö ljer d essa a nvi snin gar ko mmer du att e rhålla utm ärk ta
re sultat samt spara tid och un dvik a p roblem . Vi hoppas att d u
ko mmer a tt få myc ket nöje av den na app arat.
SäkerhetSanviSningar
• Läs bruksanvisningen noga innan du börjar använda apparaten. Förvara
dessa anvisningar, garantibeviset, inköpskvittot och, om möjligt,
förpackningen (även innerförpackningen) på en säker plats.
• Denna apparat är ej avsedd att användas av personer (inkl. barn) med
nedsatta sinnesförmågor, eller nedsatt fysisk eller mental förmåga, eller
som saknar erfarenhet och kunskap, om de inte är under tillsyn av eller
erhållit anvisningar om apparatens användning av en person som är
ansvarig för deras säkerhet.
• Om dessa säkerhetsanvisningar ignoreras kan inget ansvar utkrävas av
tillverkaren för eventuella skador som uppkommer.
• Denna apparat får endast användas för hushållsändamål och endast för
det syfte den är konstruerad för.
• Använd den inte när apparaten har fallit, om det nns några tecken på
skada eller om den läcker.
• Använd aldrig apparaten oövervakad.
• Alla reparationer måste utföras av en kompetent kvalicerad elektriker (*).
• Var noga med att förvara apparaten i en torr miljö.
• Kontrollera så att apparatens spänning stämmer överens med hemmets
huvudspänning. Märkspänning: AC220-240V 50Hz. Vägguttaget måste
vara minst 16 A eller 10 A trög säkring.
• Denna apparat uppfyller alla standarder för elektromagnetiska fält
(EMF). Om den hanteras ordentligt och enligt anvisningarna i denna
bruksanvisning är apparaten säker att använda enligt de vetenskapliga
bevis som nns tillgängliga för närvarande.
• Användning av tillbehör som inte rekommenderas av tillverkaren kan
orsaka skador och ogiltiggör eventuella garantier.
• Linda inte sladden runt apparaten och vik inte sladden.
• För att undvika eltötar ska du aldrig sänka ned sladden, kontakten eller
apparaten i vatten eller någon annan vätska.
• Dra alltid ut kontakten ur uttaget när du ska byta revervdelar eller utföra
underhåll på apparaten.
• Använd inte den här apparaten om sladden eller kontakten är skadad
eller om apparaten inte fungerar ordentligt eller om den har skadats på
något sätt. För att undvika faror ska alltid en skadad sladd eller kontakt
bytas av en auktoriserad tekniker (*). Försök inte reparera apparaten själv.
• Kontrollera så att sladden inte hänger över bords- eller diskkanten,
att den inte rör vid varma ytor eller kommer i direkt kontakt med
apparatens varma delar. Placera inte apparaten under eller i närheten av
gardiner, fönsterövertäckningar etc.
• För ytterligare skydd råder vi dig att installera en jordfelsbrytare i den
strömkrets som förser badrummet med el. Denna jordfelsbrytare får inte ha
en grad av kvarvarande ström högre än 30mA. Fråga din installatör om råd.
• Använd inte denna apparat i badrum eller nära en ho fylld med
vatten. Om denna apparat faller ner i vatten får du inte under några
omständigheter ta i apparaten utan att först ha dragit ur kontakten ur
vägguttaget.
Page 36

1
2
3
7
6
10 1198
54
36
SV ANVÄNDARE
(*) Kompetent kvalicerad elektriker: tillverkarens eller importörens kundtjänst
eller en kvalicerad, godkänd och kompetent person som kan utföra den här
typen av reparationer utan att utsätta sig själv eller andra för faror. Lämna
alltid in apparaten till den elektrikern.
BeSkrivning av delar
1. Utlösningsknapp
2. Strömbrytare
3. Laddningsindikatorlampa
4. Fullbreddstrimmer
5. Trimmer för näsa, öra, ögonbryn
6. Precisionstrimmer
7. Minirakapparat
8. Frisyrläggningskam
9. Skägg- och mustaschkam
10. Hårkam
11. Rengöringsborste
innan användning
lad dn in g
Ladda apparaten i minst 16 timmar innan du använder den första gången
och om du inte använt apparaten under lång tid. När apparaten är
fulladdad har den en sladdlös drifttid på upp till 45 minuter. Ladda inte
apparaten längre än 24 timmar.
1. Kontrollera att apparaten är avstängd.
2. För in den lilla pluggen i apparatens uttag och sätt adaptern i ett
vägguttag.
3. Efter ett par sekunder tänds laddningslampan som visar att apparaten
laddas.
oBS : Laddningslampan byter inte färg och slocknar inte när apparaten är
fulladdad.
användning
Skäg g- o ch m uStaSch ka m och h år ka m
1. Använd endast apparaten på rent och torrt hår. Använd den inte på
nytvättat/vått hår.
2. Se till att huvudet på personen som du ska klippa är på samma nivå
som din bröstkorg. Då är alla delar av huvudet tydligt synliga och lätta
att nå.
3. Kamma håret i växriktningen.
4. Sätt fast kammen på fullbreddstrimmern så att den klickar på plats.
Kammen fungerar inte med tillbehören precisionstrimmer eller
minirakapparat.
5. Tryck på hårlängdsväljaren och skjut den till önskad inställning för
trimningslängd.
Page 37

37
6. Första gången du trimmar ska du kanske börja med att använda kammen
på maximal trimningslängd för att inte av misstag trimma håret för kort.
7. Sätt på trimmern.
8. Det eektivaste sättet att trimma är att röra trimmern i motsatt
hårväxriktning. Se till att kammens kant alltid är i kontakt med
hårbotten. Gör överlappande rörelser över huvudet genom håret så
att du får med allt hår som ska klippas.
9. Om det samlats mycket hår i kammen tar bu bort kammen och
blåser/skakar bort håret från kammen. Du kan också använda den
medföljande rengöringsborsten för att ta bort hår från området vid
kammen.
tri mn in g
1. Du kan använda apparaten utan kam för att klippa hår väldigt nära
huden eller för konturklippning av nacklinjen och området runt öronen.
2. Luta apparaten på sådant sätt att endast kanten av klippningsdelen
rör vid hårändarna när du formar konturerna runt öronen.
3. För konturklippning vid nacklinjen och polisongerna vrider du på
apparaten och gör nedåtrörelser.
tri mm er för nä Sa, ör a, ö go nB ryn
1. Sätt på trimmern för näsa, öra, ögonbryn på apparaten.
2. Sätt på apparaten och för in spetsen på tillbehöret i en näsborre.
3. För den långsamt in och ut ur näsan eller örat medan du samtidigt
vrider runt den för att ta bort oönskat hår. För att få bäst resultat bör
sidan på trimmern ligga stadigt mot huden.
min ir ak aP Par at
1. Sätt på minirakapparaten på apparaten.
2. Tryck försiktigt ned minirakapparaten på huden. För att få ett jämnt
rakresultat ska du inte trycka för hårt.
3. Gör överlappande rörelser över huden så att du får med allt hår som
ska rakas.
und er hå ll
1. Om du rengör klippbladen regelbundet behåller de sin optimala
förmåga.
2. Borsta av hår från bladen och apparaten med rengöringsborsten.
3. När du märker att klipparen inte presterar lika bra som den brukar kan
du försiktigt pressa ett par droppar olja på plattan. Den medföljande
oljan är speciellt utformad för klippare, den avdunstar inte och den
saktar inte ned bladen.
garanti
• Tristar är inte ansvariga för skador som har uppstått:
o Om apparaten har fallit.
o Om apparaten har ändrats tekniskt av ägarna eller annan tredje part.
o Om apparaten har använts på fel sätt.
o Om apparaten slitits ut p.g.a. normal användning.
• Den ursprungliga garantiperioden på 2 år kommer inte att förlängas
efter reparation, inte heller rätten till en samlad ny garanti. Denna
garanti är endast giltig i Europa. Denna garanti står inte över det
europeiska direktivet 1944/44CE.
• Behåll alltid ditt kvitto. Utan kvitto kan du inte begära någon som helst
garanti.
• Skador orsakade av att instruktionsmanualen inte har följts kommer
göra garantin ogiltig och om påföljande skador uppstår kan Tristar inte
hållas ansvariga.
• Tristar kan inte hållas ansvariga för materialskador eller personskador
som orsakas av felaktig användning eller om säkerhetsföreskrifterna
inte följts.
• Förutom rengöring, på det sätt som anges i denna manual behöver
inget annat underhåll utföras på denna apparat.
SV ANVÄNDARE
Page 38

38
• När apparaten ska repareras, se till att detta utförs av ett auktoriserat
företag.
• Denna apparat får inte ändras eller byggas om.
• Om problem uppstår inom 2 år efter inköpsdatumet, som täcks
av fabriksgarantin, kan du gå tillbaka till inköpsstället och få en ny
apparat.
• För frågor eller överensstämmelser, kontakta din återförsäljare på
inköpsplatsen.
• Denna apparat täcks av en 24 månaders garanti som börjar gälla på
inköpsdatumet (kvitto)
• Endast material- och tillverkningsdefekter täcks av denna garanti.
• Om du vill göra ett garantianspråk ska du lämna in hela din maskin i
originalförpackningen tillsammans med kvittot.
• Skador på tillbehören innebär inte per automatik ersättning av hela
apparaten. I sådana fall ska du kontakta vår hotline. Trasigt glas och
trasiga plastdelar innebär alltid en kostnad.
• Defekter på förbrukningsartiklar eller slitdelar och även skador orsakade
av rengöring, underhåll eller byte av sagda delar täcks inte av garantin
och ska således betalas av ägaren!
• Garantin förfaller i fall av otillåten manipulation.
• Efter att garantin har förfallit kan reparationer utföras av en kompetent
återförsäljare eller reparationsservice mot betalning.
riktlinjer för S kydd av miljön
Denna apparat ska ej slängas bland vanligt hushållsavfall när
den slutat fungera. Den ska slängas vid en återvinningsstation
för elektriskt och elektroniskt hushållsavfall. Denna symbolen
på apparaten, bruksanvisningen och förpackningen gör dig
uppmärksam på denna viktiga fråga. Materialen som används i denna
apparat kan återvinnas. Genom att återvinna hushållsapparater gör du en
viktig insats för att skydda vår miljö. Fråga de lokala myndigheterna var
det nns insamlingsställen.
för Pac kn in g
Förpackningen består av 100 % återvinningsbart material, lämna in
förpackningen uppdelad.
Pro du kt
Denna apparat är märkt enligt EU-direktivet 2002/96/EC om avfall från
elektrisk och elektronisk utrustning (WEEE). Genom att se till att produkten
återvinns ordentligt hjälper du till att förhindra att den påverkar miljön
och människors hälsa på ett negativt sätt
til lk än nagivand e för ö ve renSS täm me lS e med e c
Denna apparat är designad, tillverkad och marknadsförd enligt de
säkerhets direktiv som gäller får låg spänningsdirektivet ”Nr 2006/95/
EC, skyddskraven för EMC direktiv 2004/108/EC” elektromagnetisk
kompabilitet” och kraven för direktiv 93/68/EEC.
487
SV ANVÄNDARE
Page 39

39
Page 40

TR2553
|
Jules Verneweg 87
5015 BH Tilbu rg, Th e Netherlands
WWW.TRISTA R.EU
 Loading...