

Page 1

U209-004
Four-Port USB to Serial Adapter
Users Manual
Tripp Lite
World Headquarters:
1111 West 35th Street,
Chicago, Il, 60609
(773) 869-1234
http://www.tripplite.com
U209-004
User’s Manual P/N: 932145
Page 2

Copyright Copyright © 2003, Tripp Lite, Inc.
Trademarks TRIPP LITE® is a registered trademark of Tripp Lite, Inc. Other product
and brand names listed in this manual may be trademarks of their
respective owners.
Page 3

Tripp Lite USB to Serial Adapter User’s Manual Table of contents
Table of contents
Introduction----------------------------------------------------------------------------------------------------------------------- 1
System requirements ----------------------------------------------------------------------------------------------------- 1
Getting started-------------------------------------------------------------------------------------------------------------- 1
Installing the USB to serial adapter--------------------------------------------------------------------------------------- 3
Installing under Windows XP------------------------------------------------------------------------------------------ 3
Uninstalling from Windows XP ---------------------------------------------------------------------------------- 9
Installing under Windows 2000 --------------------------------------------------------------------------------------- 9
Uninstalling from Windows 2000-------------------------------------------------------------------------------17
Installing under Windows NT-----------------------------------------------------------------------------------------17
Installing under Windows Me-----------------------------------------------------------------------------------------18
Uninstalling from Windows Me ---------------------------------------------------------------------------------21
Installing under Windows 98/98SE----------------------------------------------------------------------------------22
Uninstalling from Windows 98/98SE--------------------------------------------------------------------------28
Making external connections -----------------------------------------------------------------------------------------------29
RS-232 serial connections ----------------------------------------------------------------------------------------------29
Testing DB-9 serial ports in HyperTerminal ---------------------------------------------------------------------30
Running Hyperterminal ------------------------------------------------------------------------------------------- 30
Using Device Manager--------------------------------------------------------------------------------------------------------31
Accessing Device Manager ---------------------------------------------------------------------------------------------31
Win XP and 2000 ----------------------------------------------------------------------------------------------------31
Win 98, 98SE, and Me----------------------------------------------------------------------------------------------31
Exploring Device Manager screens----------------------------------------------------------------------------------31
Win XP and 2000 ----------------------------------------------------------------------------------------------------31
Win 98, 98SE, and Me----------------------------------------------------------------------------------------------36
Setting advanced options -----------------------------------------------------------------------------------------------40
Data rate multiplier ------------------------------------------------------------------------------------------------40
Troubleshooting-----------------------------------------------------------------------------------------------------------------41
Appendix A -----------------------------------------------------------------------------------------------------------------------42
Specifications---------------------------------------------------------------------------------------------------------------42
Appendix B -----------------------------------------------------------------------------------------------------------------------43
Warranty information ---------------------------------------------------------------------------------------------------43
Page i Rev 2.0 (5/30/2003)
Page 4

Table of Contents Tripp Lite USB to Serial Adapter User’s Manual
Figures
Figure 1 - Win XP Found new hardware prompt ......................................................................................4
Figure 2 - Win XP Searches drivers prompt ..............................................................................................4
Figure 3 - Win XP software logo warning ..................................................................................................5
Figure 4 - Win XP Wizard installs the software prompt...........................................................................5
Figure 5 - Win XP Finished installing prompt ..........................................................................................6
Figure 6 - Win XP Install software for USB serial port prompt...............................................................6
Figure 7 - Win XP Searches for Tripp Lite serial port screen ..................................................................7
Figure 8 - Win XP Wizard installs the software prompt...........................................................................8
Figure 9 - Win XP Installation complete prompt ......................................................................................8
Figure 10 - Win 2000 Found new hardware prompt ................................................................................. 9
Figure 11 - Win 2000 Search for or display drivers prompt ...................................................................10
Figure 12 - Win 2000 Locate driver files prompt.....................................................................................11
Figure 13 - Win 2000 Finished searching for driver files prompt .......................................................... 12
Figure 14 - Win 2000 Software logo warning .......................................................................................... 12
Figure 15 - Win 2000 Finished installing prompt ................................................................................... 13
Figure 16 - Win 2000 Install software for USB serial port prompt........................................................13
Figure 17 - Win 2000 Search for or display device driver prompt..........................................................14
Figure 18 - Win 2000 Locate driver files prompt.....................................................................................15
Figure 19 - Win 2000 Finished searching for driver files prompt .......................................................... 16
Figure 20 - Win 2000 Installation complete prompt ...............................................................................16
Figure 21 - Win Me Found new hardware prompt.................................................................................. 18
Figure 22 - Win Me Driver file search prompt ........................................................................................19
Figure 23 - Win Me Finished installing prompt ...................................................................................... 19
Figure 24 - Win Me Ready to install prompt ........................................................................................... 20
Figure 25 - Win Me Driver file search prompt ........................................................................................20
Figure 26 - Win Me Finished installing prompt ...................................................................................... 21
Figure 27 - Win 98/98SE Searches for new drivers prompt.................................................................... 22
Figure 28 - Win 98/98SE Search or select prompt...................................................................................23
Figure 29 - Win 98/98SE Search for new drivers prompt .......................................................................23
Figure 30 - Win 98/98SE Ready to install the best driver prompt ......................................................... 24
Figure 31 - Win 98/98SE Finished installing software prompt.............................................................. 25
Figure 32 - Win 98/98SE Searches for new drivers prompt.................................................................... 25
Figure 33 - Win 98/98SE Search or display prompt................................................................................26
Figure 34 - Win 98/98SE Search for new drivers prompt .......................................................................26
Figure 35 - Win 98/98SE Ready to install prompt ..................................................................................27
Figure 36 - Win 98/98SE Finished installing prompt .............................................................................28
Figure 37 - RS-232 DB-9 pin designations............................................................................................... 29
Figure 38 - Use of DTEs and DCEs in a communication link ................................................................29
Figure 39 - Cabling requirements for RS-232C devices .......................................................................... 30
Figure 41 - Win XP/2000 Device Manager USB serial port properties, General tab............................ 32
Figure 42 - Win XP/2000 RS-232 Advanced Options dialog window .....................................................33
Figure 43 - Win XP/2000 USB serial port, Port settings box..................................................................34
Figure 44 - Win XP/2000 USB serial port, Advanced settings box ........................................................34
Figure 45 - Win XP/2000 USB serial port properties, Driver box .......................................................... 35
Figure 46 - Win 98/98SE/Me USB serial port properties, General tab.................................................. 36
Figure 47 - Win 98/98SE/Me USB serial port properties, USB Serial Port Settings tab .....................37
Figure 48 - Win 98/98SE/Me USB serial port properties, USB Serial Port Advanced Options box ....38
Figure 49 - Win 98/98SE/Me USB serial port properties Driver box .....................................................39
Rev 2.0 (5/30/2003) Page ii
Page 5

Tripp Lite USB to Serial Adapter User’s Manual Table of contents
Tables
Table 1 - Device port and connection.......................................................................................................... 1
Table 2 - RS-232 DB-9 signal definitions ................................................................................................. 29
Page iii Rev 2.0 (5/30/2003)
Page 6

Tripp Lite USB to Serial Adapter User’s Manual Introduction
Introduction
Note: These products comply
fully with USB Specification
version 1.1 and are fully
supported under Windows
98/ME/XP/2000/NT4.
Note: The 16550 is well suited
for applications involving high
data rates and for heavy
multitasking environments. The
larger FIFO allows each
read/write access to the UART
to move more data, resulting in
fewer interrupts and less
processor time spent servicing
the UART.
This Users Manual describes how to setup and install your Tripp Lite
USB to Serial Adapter.
The Tripp Lite U209-004 provides four independent RS-232 serial
interfaces to the host PC via the Universal Serial Bus (USB) port.
The following table details the port and connection configuration for
the USB to Serial Adapter device.
Table 1 - Device port and connection
Device Ports Connection
U209-004 4 RS-232
Each adapter comes standard with 16550 Universal Asynchronous
Receiver/Transmitters (UARTs) containing 16-byte First In First Out
(FIFO) storage devices. These FIFOs, in conjunction with the USB
micro controller FIFOs, help to relieve the CPU of excessive
interrupts by buffering received and transmitted data. This
configuration allows each channel to obtain data rates up to 460.8
kbps. The adapters are USB bus-powered; therefore no external
power supply is required.
The USB to Serial Adapter product is a Plug-and-Play device and
requires no hardware configuration. Your computer's BIOS or
operating system automatically configures the ports when you install
the device.
System requirements
Note: The Tripp Lite USB to
Serial Adapter requires one
USB port.
Tripp Lite’s USB to Serial Adapter requires the Windows
98/Me/XP/2000/NT4 operating system and an IBM or IBM-compatible
PC with a standard USB port or an add-in USB host adapter. Contact
our sales department for details on current software offerings. Most
device drivers are available for download from the Tripp Lite World
Wide Web site at http://www.tripplite.com/
Getting started
Follow these steps to unpack your USB to Serial Adapter.
Step Procedure Description
! Step 1 Remove the Tripp Lite USB to Serial
Adapter from the box.
! Step 2 Remove all packing material from the USB
adapter.
Save the packaging in case you ever need
to store the unit or return it to Tripp Lite
for service.
.
Rev 2.0 (5/30/2003) Page 1
Page 7

Introduction Tripp Lite USB to Serial Adapter User’s Manual
Step Procedure Description
Step 3 Check the contents of the package to make
!
sure you have received everything listed
below:
# Tripp Lite U209-004 USB to Serial Adapter,
# USB cable,
# DB-9 loopback connector
# Installation CD-ROM containing the device drivers
and configuration software
Step 4 Check the USB to Serial Adapter and
!
accessories for shipping damage.
The complete USB adapter package ships
in a single box.
Pay particular attention to the case and
port connectors. If anything is missing or
damaged, contact Tripp Lite Tech
Support.
Page 2 Rev 2.0 (5/30/2003)
Page 8

Tripp Lite USB to Serial Adapter User’s Manual Installing the software
f
Installing the USB to serial adapter
Note: The installation process
takes place in two stages: the
serial adapter board and then
the serial ports.
This section explains how to install the USB to Serial Adapter under
different operating systems. Please locate and follow the procedure
for your computer’s operating system.
Windows maintains a registry of all known hardware installed in
your computer in which it keeps track of all of your system resources,
such as I/O locations, IRQ levels, and DMA channels. The Add New
Hardware Wizard utility helps you to add new hardware and updates
Caution! Be sure to allow
the installation process to
finish without interruption.
If you stop the process
before the adapter board
and all of the serial ports
are installed, you will
corrupt the installation.
this registry.
The USB to Serial Adapter includes an INF configuration file to allow
easy configuration in the Windows environment. Windows uses the
INF file to determine the system resources required by the adapter,
searches for available resources to fill the board's requirements, and
then updates the hardware registry with an entry that allocates these
resources.
The USB to Serial Adapter also includes Windows device drivers that
enable the adapter’s serial ports to appear to Windows as standard
COM ports.
Installing under Windows XP
Follow these steps to install the USB to Serial Adapter under
Windows XP.
Step Procedure Description
Step 1 Turn on the power to your computer
!
system.
Step 2 Plug the wide flat end of the USB cable
!
into the downstream connector.
Step 3 Plug the square end of the USB cable into
!
the back of the USB to Serial Adapter box.
This is the system in which the USB to
Serial Adapter is to be installed.
This is the connector located on the back o
the computer or USB hub.
Windows tells you that it has found new
hardware and launches the Found New
Hardware Wizard.
Step 4 Insert the Tripp Lite installation CD into
!
your CD-ROM drive.
This is the CD that shipped with your
USB to Serial Adapter.
Rev 2.0 (5/30/2003) Page 3
Page 9

Installing the software Tripp Lite USB to Serial Adapter User’s Manual
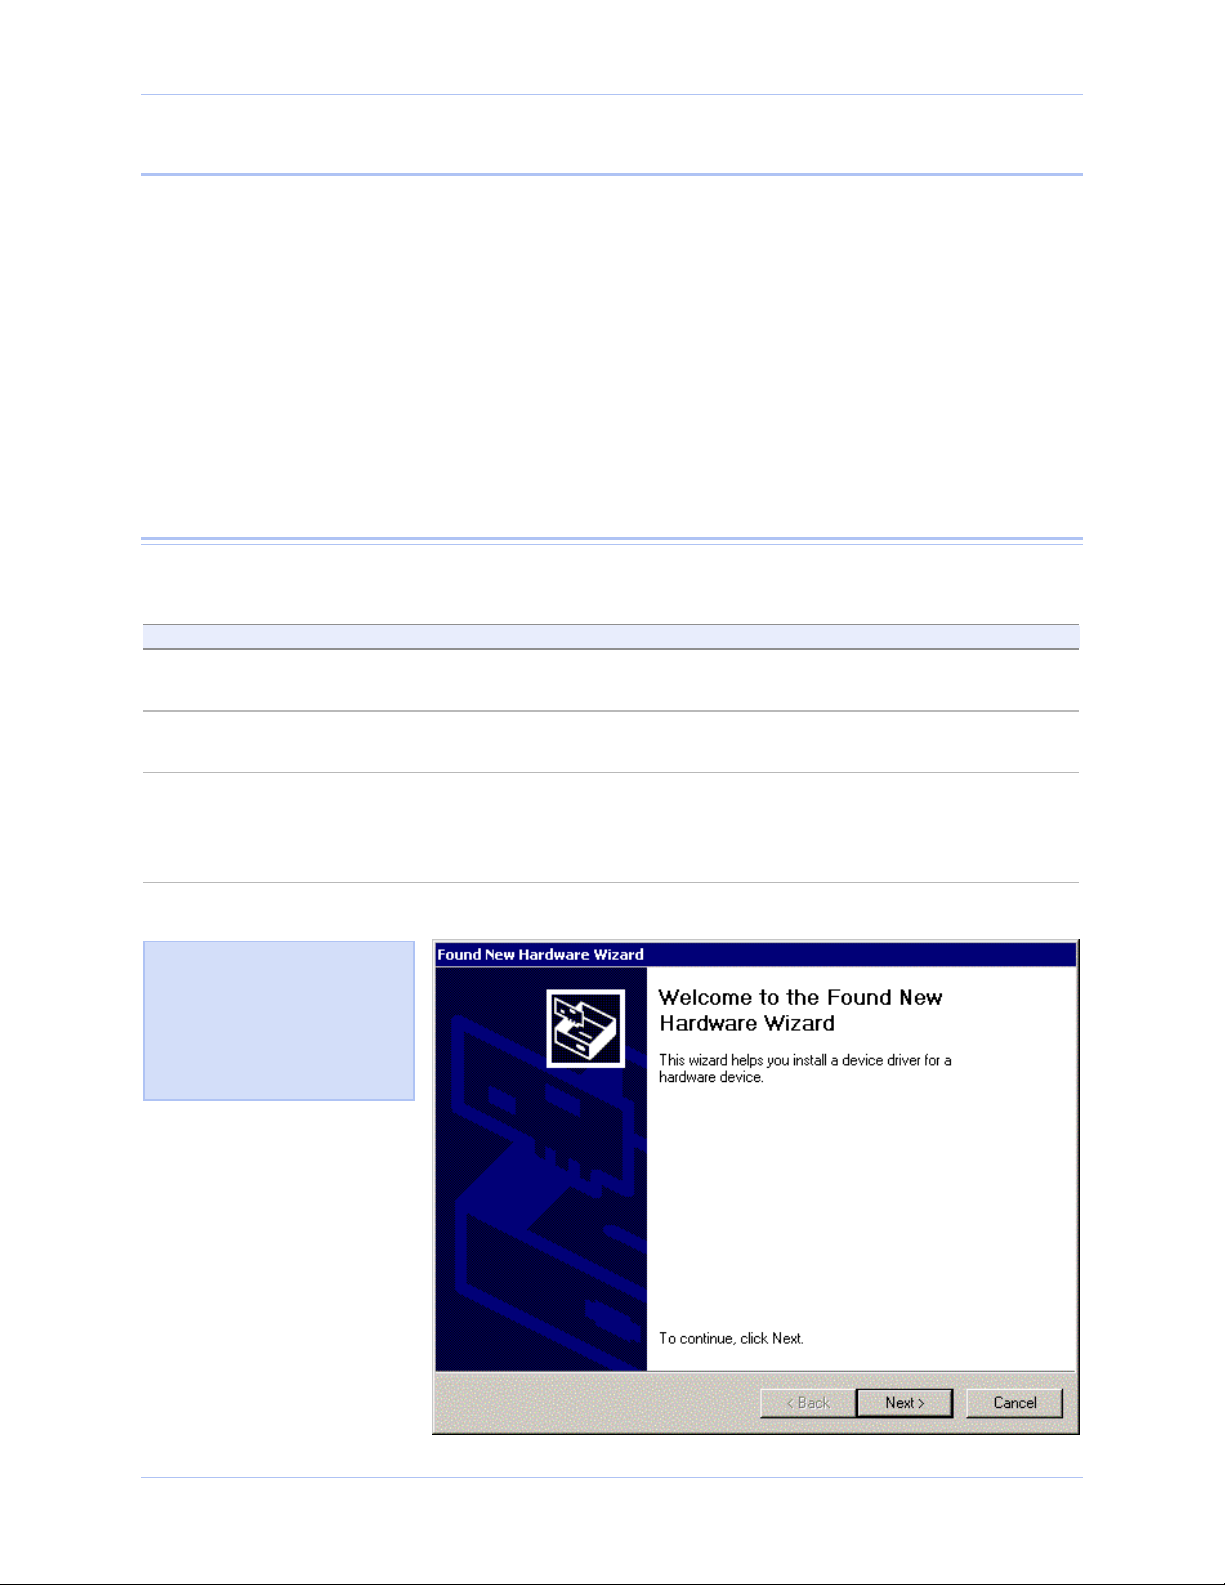
Figure 1 - Win XP Found new hardware prompt
Figure 1 illustrates the Win
XP Found new hardware
prompt. The Found New
Hardware Wizard launches
automatically when you first
plug in the USB to Serial
Adapter.
Step Procedure Description
Step 5 Click the Next button. Windows searches for drivers for the
!
serial USB adapter.
Figure 2 - Win XP Searches drivers prompt
Figure 2 illustrates the Win
XP Searches for drivers
prompt. When the Wizard
finds the USB to Serial
Adapter drivers, this screen
disappears.
Page 4 Rev 2.0 (5/30/2003)
Page 10
Tripp Lite USB to Serial Adapter User’s Manual Installing the software
Step Procedure Description
Step 6 The Wizard locates and starts to install
!
the necessary software, then notifies you
that Windows XP has not certified the
software.
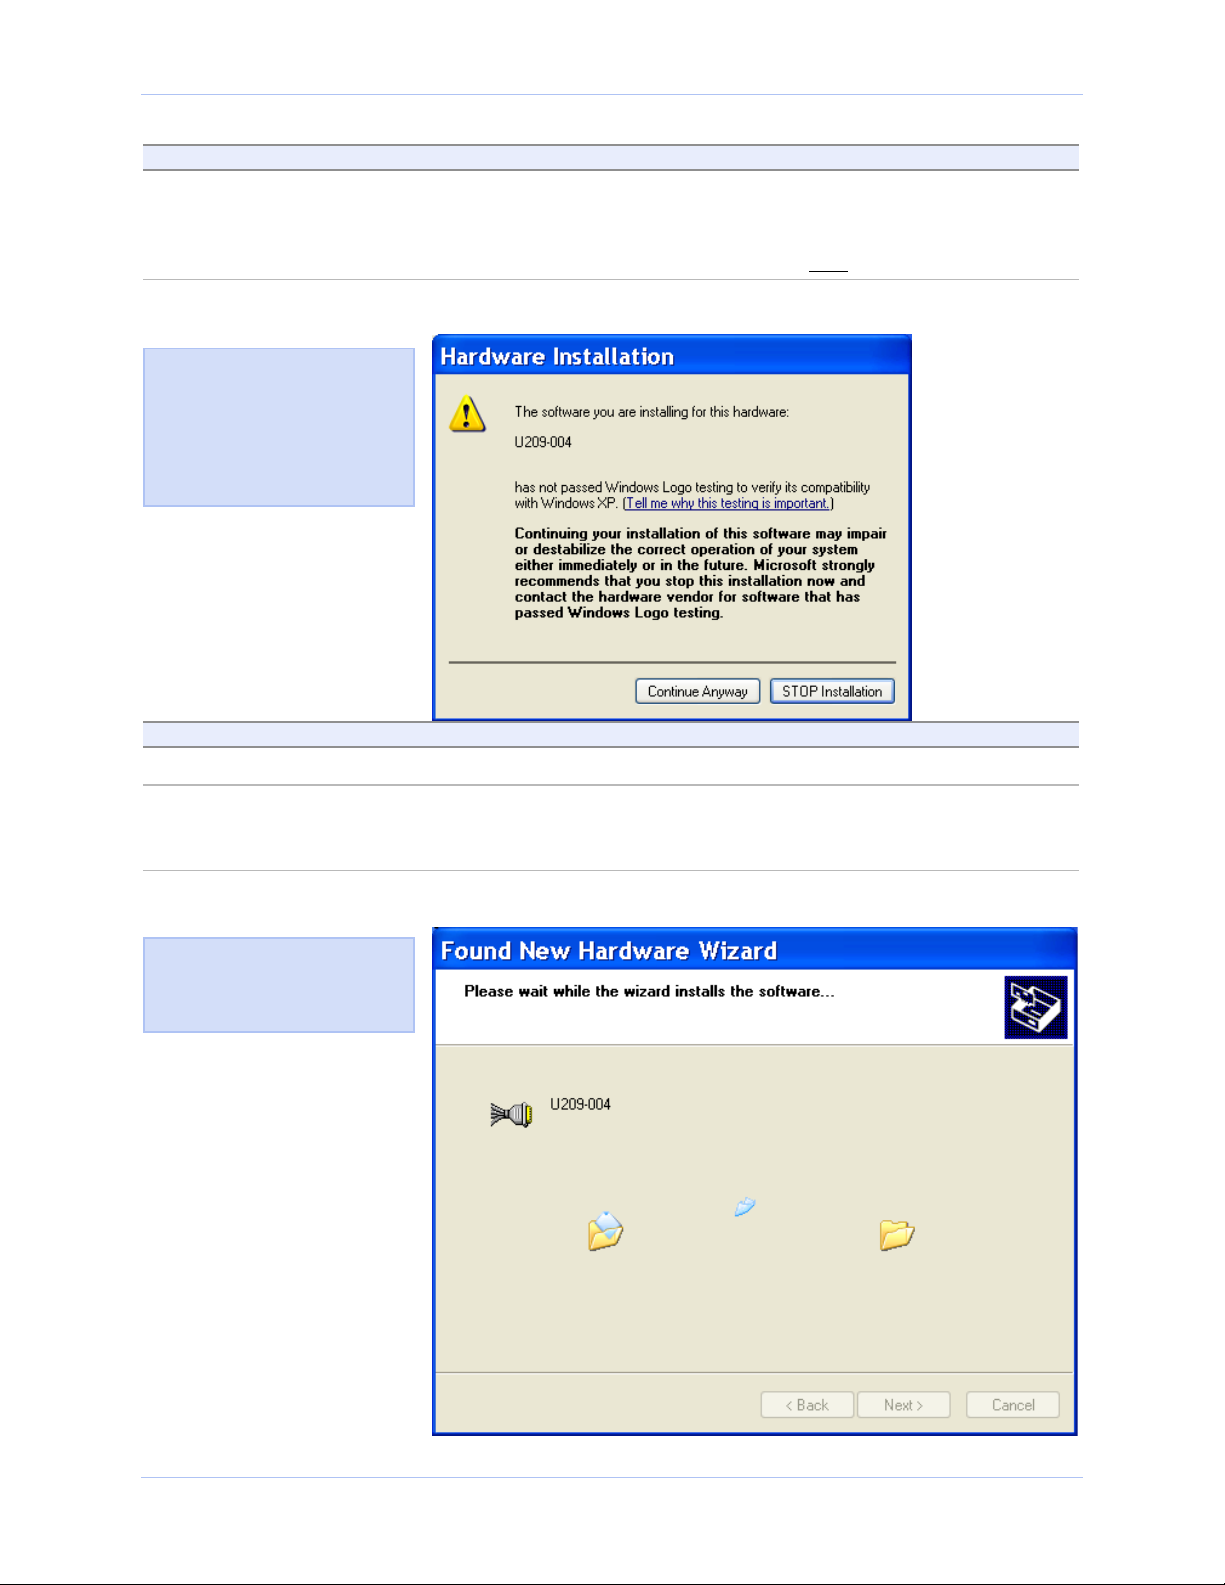
Figure 3 - Win XP software logo warning
Figure 3 shows the Windows
XP Logo testing warning. This
indicates only that Windows
has not certified the USB to
Serial Adapter. Rest assured
that Tripp Lite’s drivers work
properly with Windows XP.
The warning appears just as the installation
starts and indicates that Windows XP
has not yet tested the software. Note that
the software does
work properly with XP.
Step Procedure Description
Step 7 Click the Continue Anyway button.
!
Step 8 The Wizard proceeds with the
!
installation.
The Wizard installs the software prompt
displays, followed by the Finished
installing prompt.
Figure 4 - Win XP Wizard installs the software prompt
Figure 4 is the Win XP Wizard
installs the software prompt.
This prompt closes when the
installation is complete.
Rev 2.0 (5/30/2003) Page 5
Page 11
Installing the software Tripp Lite USB to Serial Adapter User’s Manual
Figure 5 - Win XP Finished installing prompt
Figure 5 shows the Win XP
Finished installing prompt. It
indicates that the serial USB
adapter has been successfully
installed.
Step Procedure Description
Step 9 Press the Finish button to continue. The USB adapter installation is
!
complete. Next, the Wizard installs the
serial USB ports.
The Install software for USB serial port
prompt displays.
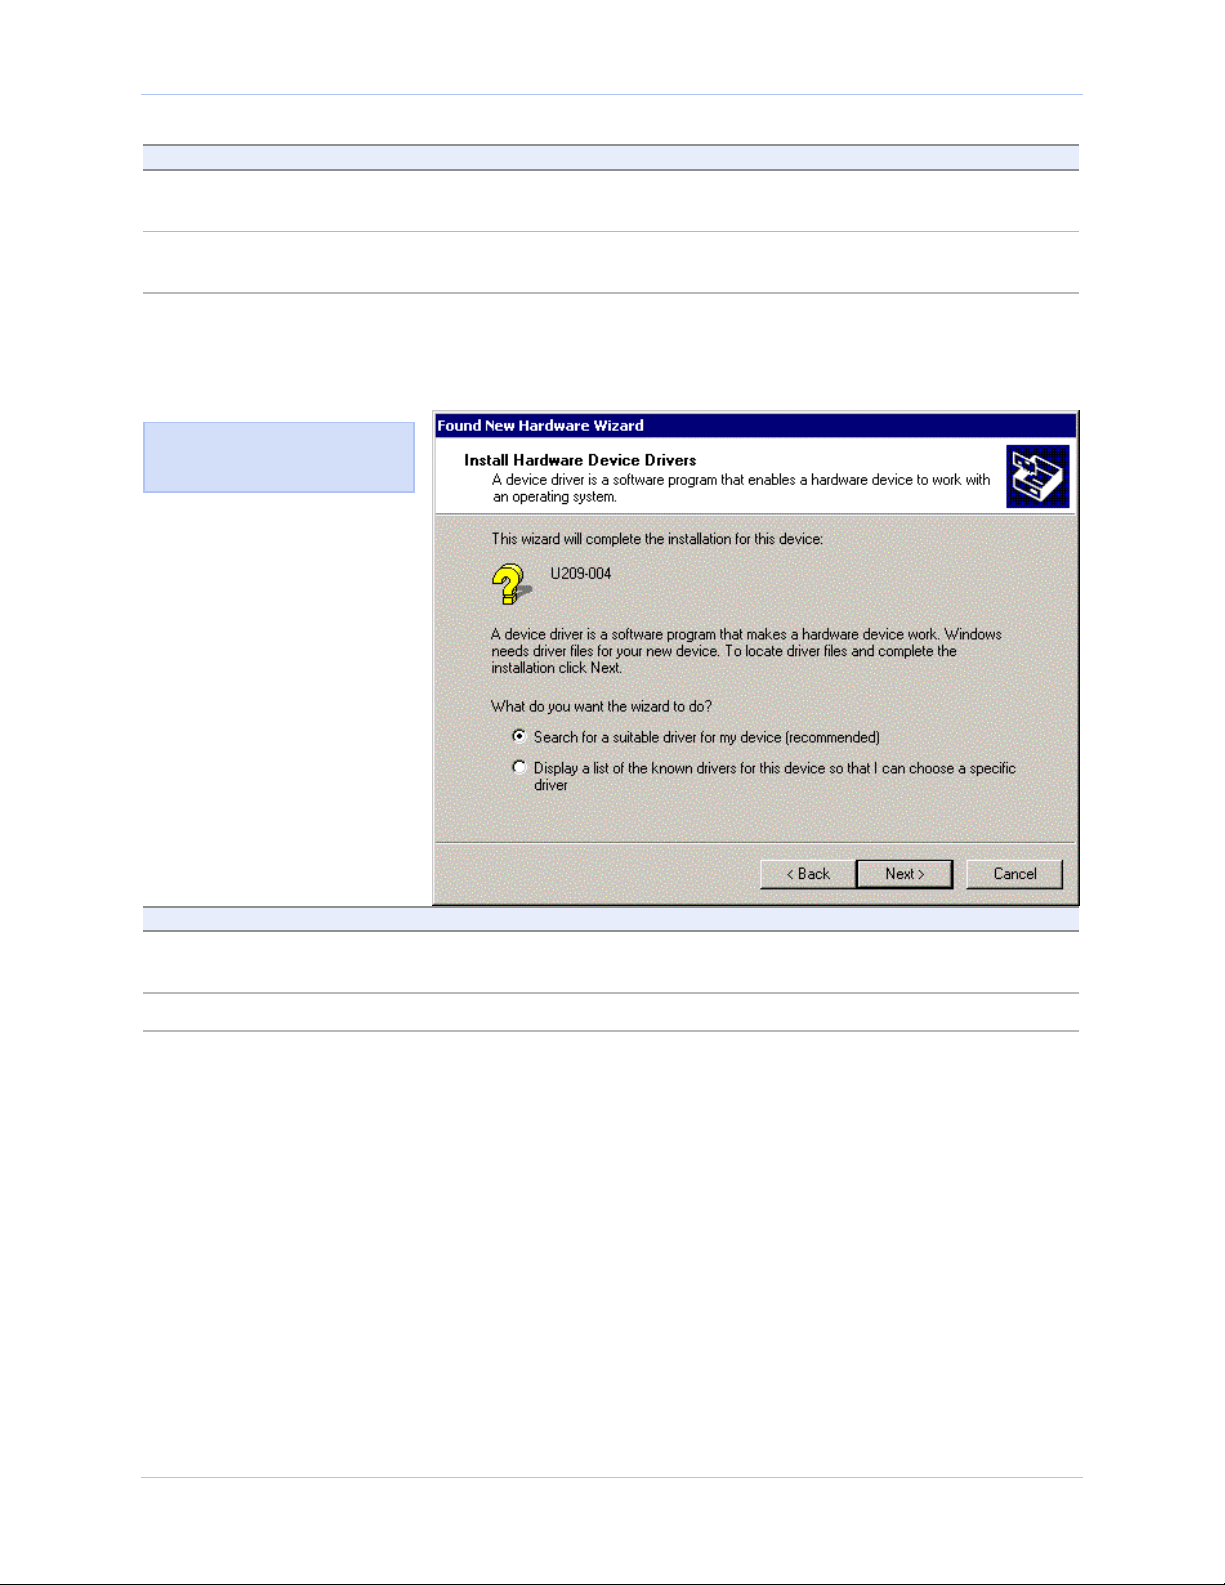
Figure 6 - Win XP Install software for USB serial port prompt
Figure 6 indicates that the
wizard is ready to install the
USB ports.
Page 6 Rev 2.0 (5/30/2003)
Page 12
Tripp Lite USB to Serial Adapter User’s Manual Installing the software
Step Procedure Description
Step 10 Make sure that the Tripp Lite CD is still
!
in your CD-ROM drive.
This is the CD that shipped with your
USB to serial Adapter.
Step 11 Select the Install the software
!
automatically (Recommended) option.
The Wizard should go automatically to
the USB driver location. If necessary,
you can browse to the correct location.
The complete path is E:\. Replace E:
with your CD-ROM drive designation.
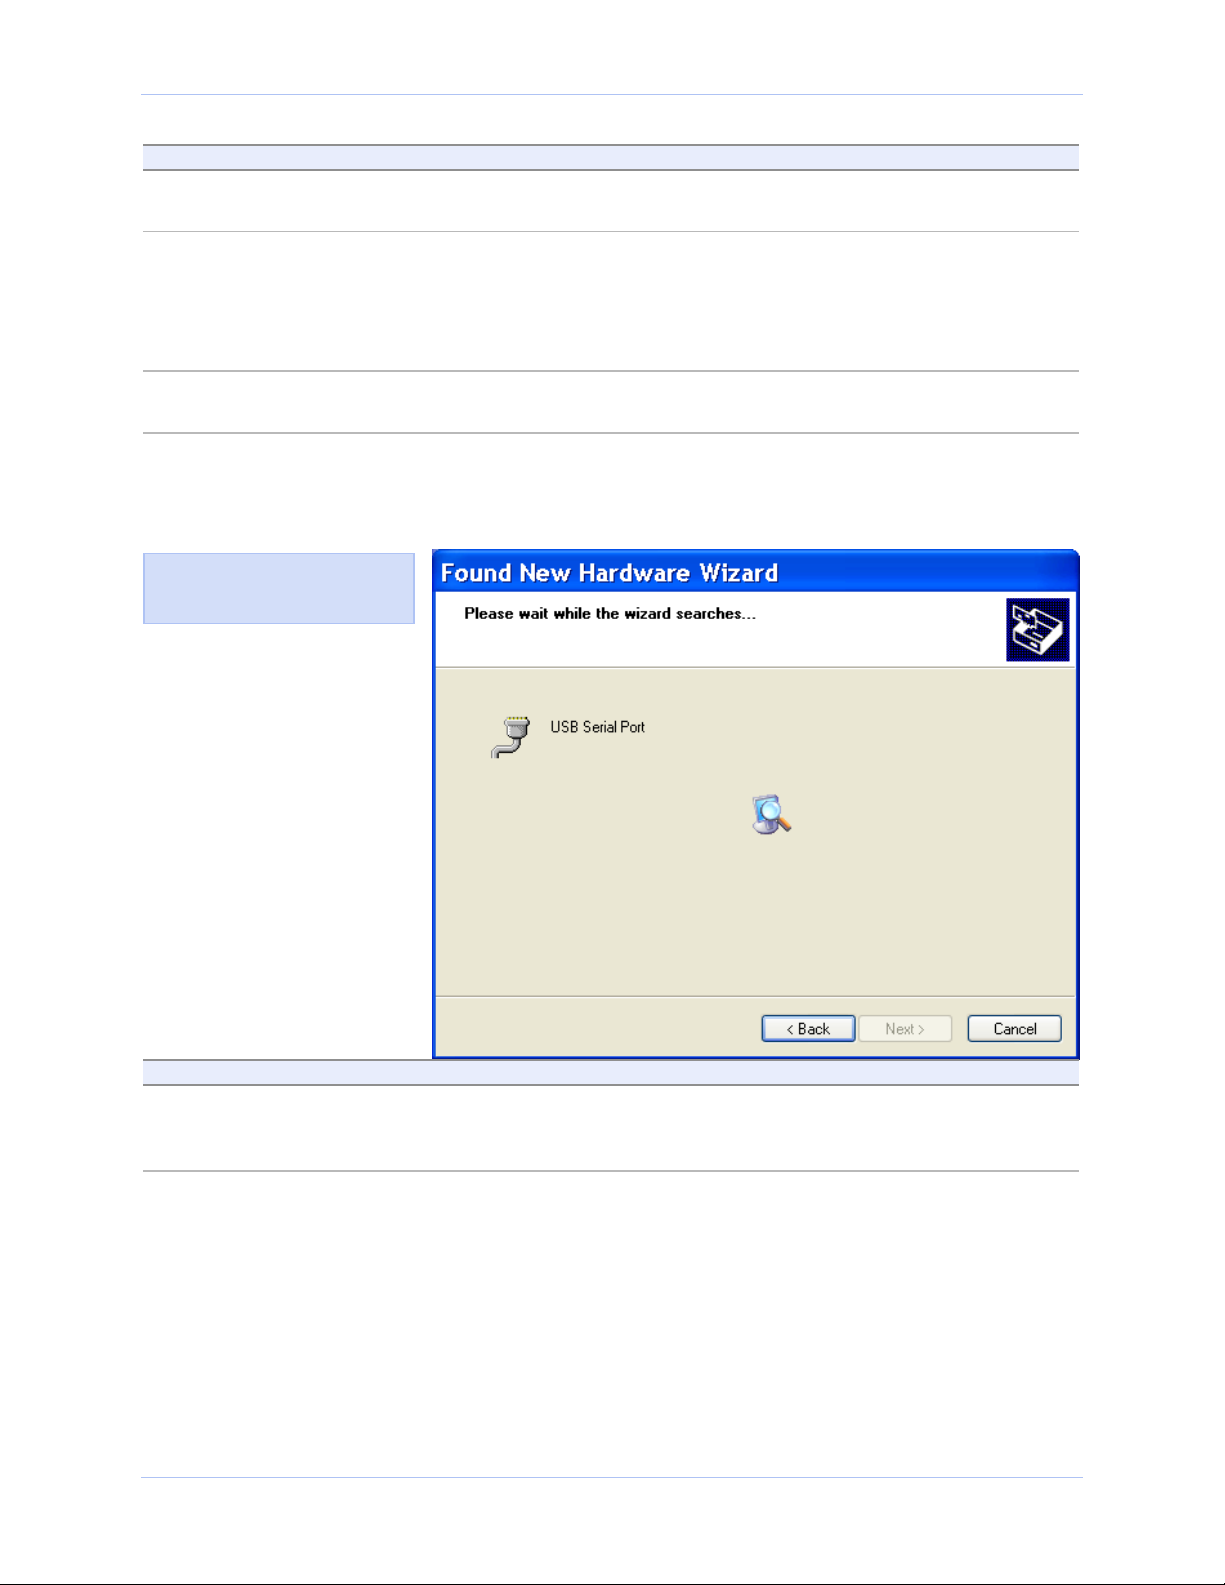
Step 12 Click the Next button to continue. The wizard prompts you to wait while it
!
searches for serial USB port drivers.
Figure 7 - Win XP Searches for Tripp Lite serial port screen
Figure 7 illustrates the wizard
searching for the serial USB
port driver.
Step Procedure Description
Step 13 The Wizard proceeds with the
!
installation.
The Wizard installs the software prompt
displays, followed by the Installation
complete prompt.
Rev 2.0 (5/30/2003) Page 7
Page 13
Installing the software Tripp Lite USB to Serial Adapter User’s Manual
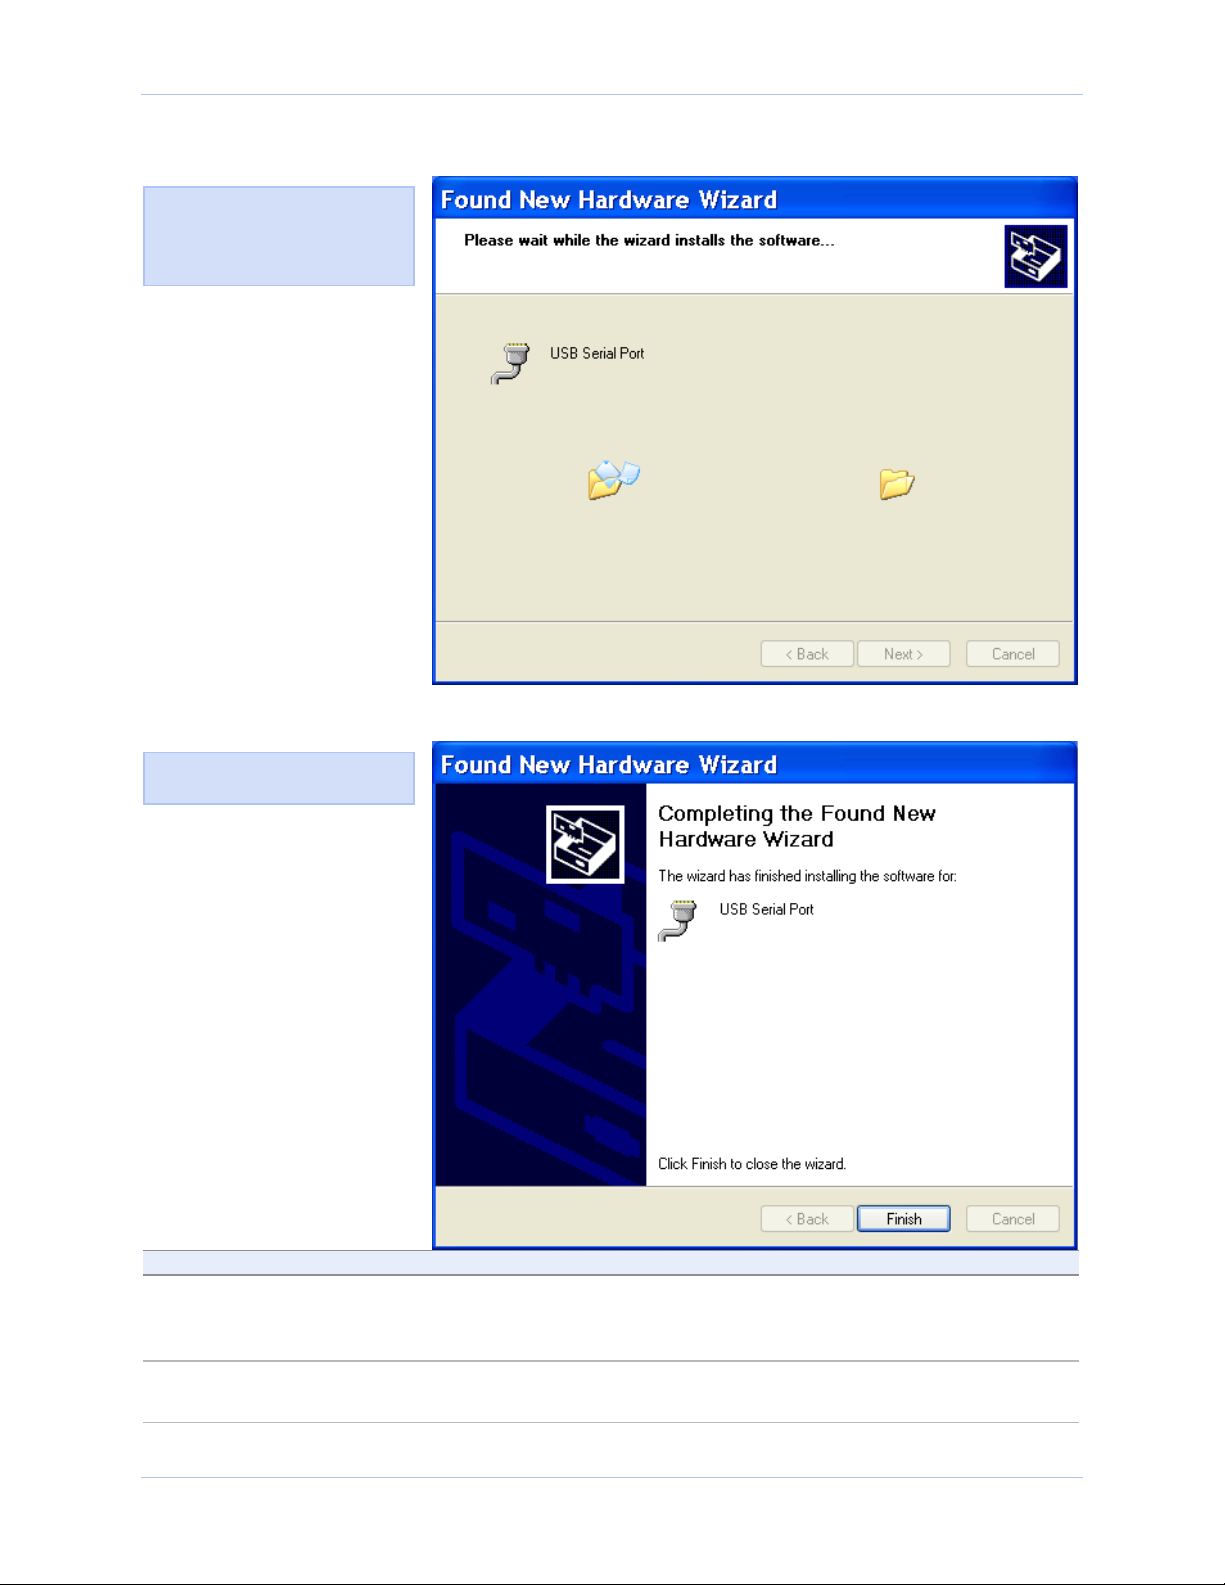
Figure 8 - Win XP Wizard installs the software prompt
Figure 8 is the Win XP Wizard
installs the software prompt.
This screen shows you the
progress of the installation.
Figure 9 - Win XP Installation complete prompt
Figure 9 displays when the file
copying process is finished.
Step Procedure Description
! Step 14 Click the Finish button. The Wizard briefly displays the Unknown
hardware found and Installing messages
as it installs the serial USB port.
! Step 15 Repeat Steps 11-14 for each port. Your USB to Serial Adapter installation
is complete!
Page 8 Rev 2.0 (5/30/2003)
Page 14
Tripp Lite USB to Serial Adapter User’s Manual Installing the software
f
Uninstalling from Windows XP
Follow these steps in the event that you need to uninstall or reinstall
the USB to Serial Adapter software.
1. From the Control Panel, select System.
2. Press the Hardware tab.
3. Click on Device Manager.
4. Scroll down to Multi-port serial adapters and expand.
5. Highlight your Tripp Lite U209-004 USB to Serial Adapter.
6. Select the Action menu option.
7. Select Uninstall from the drop down menu.
8. Click OK at the Confirmation screen. Note that this also removes
all the serial ports associated with your USB to Serial Adapter.
Installing under Windows 2000
Follow these steps to install the USB to Serial Adapter under
Windows 2000.
Step Procedure Description
Step 1 Turn on the power to your computer
!
system.
This is the system in which the USB to
Serial Adapter is to be installed.
Step 2 Plug the wide flat end of the USB cable
!
into the downstream connector.
Step 3 Plug the square end of the USB cable into
!
the back of the USB to Serial Adapter box.
Figure 10 - Win 2000 Found new hardware prompt
Figure 10 illustrates the Win
2000 Found new hardware
prompt. The Found New
Hardware Wizard launches
automatically when you first
plug in the USB to Serial
adapter.
This is the connector located on the back o
the computer or USB hub.
Windows tells you that it has found new
hardware and launches the Found New
Hardware Wizard. The Found new
hardware prompt displays.
Rev 2.0 (5/30/2003) Page 9
Page 15
Installing the software Tripp Lite USB to Serial Adapter User’s Manual
Step Procedure Description
Step 4 Click the Next button. The Search for or display drivers
!
prompt displays.
Step 5 Insert the Tripp Lite installation CD into
!
your CD-ROM drive.
Figure 11 - Win 2000 Search for or display drivers prompt
Figure 11 shows the Win 2000
Search for or display drivers
prompt.
This is the CD that shipped with the
USB to Serial Adapter.
Step Procedure Description
Step 6 Select Search for a suitable driver for
!
my device (recommended).
Step 7 Click the Next button. The Locate driver files prompt displays.
!
Page 10 Rev 2.0 (5/30/2003)
Page 16

Tripp Lite USB to Serial Adapter User’s Manual Installing the software
Figure 12 - Win 2000 Locate driver files prompt
Figure 12 illustrates the Win
2000 Locate driver files prompt.
Step Procedure Description
Step 8 Select CD-ROM drives. If necessary, you can also select Specify
!
a location and browse to the desired
location with the USB to Serial Adapter
drivers.
The complete path is E:\. Replace E:
with your CD-ROM drive designation.
Step 9 Click the Next button. Windows searches for drivers for the
!
serial USB adapter. The Finished
searching for driver files prompt
displays.
Rev 2.0 (5/30/2003) Page 11
Page 17

Installing the software Tripp Lite USB to Serial Adapter User’s Manual
Figure 13 - Win 2000 Finished searching for driver files prompt
Figure 13 illustrates the Win
2000 Finished searching for
driver files prompt.
Step Procedure Description
Step 10 Click the Next button.
!
Step 11 The Wizard locates and starts to install
!
the necessary software, then notifies you
that Windows 2000 has not certified the
software.
The warning appears just as the installation
starts and indicates that Windows 2000
has not yet tested the software. Note that
the software does
Windows 2000.
Figure 14 - Win 2000 Software logo warning
Figure 14 shows the Windows
2000 Logo test warning. This
indicates only that Windows
has not certified the USB to
Serial Adapter. Rest assured
that Tripp Lite’s drivers work
properly with Windows 2000.
work properly with
Step Procedure Description
Step 12 Click the Yes button.
!
Step 13 The Wizard proceeds with the
!
installation.
The Please wait while the Wizard installs
the software screen displays, followed by
the Finished installing prompt.
Page 12 Rev 2.0 (5/30/2003)
Page 18

Tripp Lite USB to Serial Adapter User’s Manual Installing the software
Figure 15 - Win 2000 Finished installing prompt
Figure 15 is the Win 2000
Finished installing prompt. It
indicates that the serial USB
adapter has been successfully
installed.
Step Procedure Description
Step 14 Press the Finish button to continue. The USB adapter installation is
!
complete. Next, the Wizard installs the
USB ports.
The Install software for USB serial port
prompt displays.
Figure 16 - Win 2000 Install software for USB serial port prompt
Figure 16 indicates that the
wizard has detected and is
ready to install the USB ports.
Rev 2.0 (5/30/2003) Page 13
Page 19

Installing the software Tripp Lite USB to Serial Adapter User’s Manual
Step Procedure Description
Step 15 Make sure that the Tripp Lite CD is still
!
in your CD-ROM drive.
Step 16 Click the Next button to continue. The Search for or display device driver
!
This is the CD that shipped with your
USB to Serial Adapter.
prompt displays.
Figure 17 - Win 2000 Search for or display device driver prompt
Figure 17 illustrates the Win
2000 Search for or display
device driver prompt.
Step Procedure Description
Step 17 Select Search for a suitable driver for my
!
device (recommended).
! Step 18 Click the Next button. The Locate driver files prompt displays.
Page 14 Rev 2.0 (5/30/2003)
Page 20

Tripp Lite USB to Serial Adapter User’s Manual Installing the software
Figure 18 - Win 2000 Locate driver files prompt
Figure 18 illustrates the Win
2000 Locate driver files prompt.
Step Procedure Description
Step 19 Select CD-ROM drives. If necessary, you can also select the
!
Specify a location option and browse to
the location with the USB to Serial
Adapter drivers.
The complete path is E:\. Replace E:\
with your CD-ROM drive designation.
! Step 20 Click the Next button. Windows searches for drivers for the
serial USB adapter. The Finished
searching for driver files prompt
displays.
Rev 2.0 (5/30/2003) Page 15
Page 21

Installing the software Tripp Lite USB to Serial Adapter User’s Manual
Figure 19 - Win 2000 Finished searching for driver files prompt
Figure 19 illustrates the Win
2000 Finished searching for
driver files prompt.
Step Procedure Description
Step 21 Click the Next button. The wizard completes the installation
!
and displays the Installation complete
prompt.
Figure 20 - Win 2000 Installation complete prompt
Figure 20 displays when the
file copying process is finished.
Page 16 Rev 2.0 (5/30/2003)
Page 22

Tripp Lite USB to Serial Adapter User’s Manual Installing the software
Step Procedure Description
Step 22 Click the Finish button. The Wizard briefly displays a series of
!
Unknown hardware found and
Installing messages as it installs each
serial USB port. Your USB to Serial
Adapter installation is complete!
Uninstalling from Windows 2000
Follow these steps in the event that you need to uninstall or reinstall
the USB to serial Adapter software.
1. From the Control Panel, select System.
2. Press the Hardware tab.
3. Click on Device Manager.
4. Scroll down to Multi-port serial adapters and expand.
5. Highlight your Tripp Lite U209-004 USB to Serial Adapter.
6. Select the Action menu option.
7. Select Uninstall from the drop down menu.
8. Click OK at the Confirmation screen. Note that this also removes
all the serial ports associated with your USB to Serial Adapter.
Installing under Windows NT
Note: Windows NT supports up
to 256 serial ports.
Step Procedure Description
Step 1 Turn on the power to your computer
!
system and insert the Tripp Lite
installation CD into your CD-ROM drive.
Step 2 Select Start – Run from the task bar.
!
Navigate to the CD-ROM’s WINNT4
directory and select Setup.exe.
Click OK.
Step 3 Click Next or Yes as prompted
!
Click Finish at the final installation
screen
Step 4 Connect your USB to Serial Adapter to
!
your computer as follows:
Plug the wide flat end of the USB cable
into the downstream connector.
Plug the square end of the USB cable into
the back of the USB to Serial Adapter box.
You must install the Windows NT device driver by running the
SETUP program, a command line-based configuration utility for
adding USB bus and ISA bus serial ports.
This is the system in which the USB to
Serial Adapter is to be installed and the
CD that shipped with the USB adapter.
This complete path is E:\WINNT4\.
Replace E:\ with your CD-ROM drive
designation.
The Installation Wizard launches.
Be sure to answer Yes to launch the USB
device support setup.
Your computer will reboot.
This is the connector located on the back
of the computer or USB hub.
Your USB to Serial Adapter installation
is complete!
Contact Tripp Lite support for further information.
Rev 2.0 (5/30/2003) Page 17
Page 23

Installing the software Tripp Lite USB to Serial Adapter User’s Manual
f
Installing under Windows Me
Follow these steps to install the USB to Serial Adapter under
Windows Me.
Step Procedure Description
Step 1 Turn on the power to your computer
!
system.
This is the system in which the USB to
Serial Adapter is to be installed.
Step 2 Plug the wide flat end of the USB cable
!
into the downstream connector.
Step 3 Plug the square end of the USB cable
!
into the back of the USB to Serial Adapter
box.
Step 4 Insert the Tripp Lite installation disk in
!
your CD-ROM drive.
Figure 21 - Win Me Found new hardware prompt
Figure 21 illustrates the Win
Me Add New Hardware
Wizard’s Found new hardware
prompt. The Add New
Hardware Wizard launches
automatically when you first
connect the USB adapter. The
Found new hardware prompt
lets you specify the directory in
the Tripp Lite installation disc
from which to install the USB
to Serial Adapter under Win
Me.
This is the connector located on the back o
the computer or USB hub.
Windows tells you that it has found new
hardware and launches the Add New
Hardware Wizard.
This is the CD that shipped with the USB
to Serial Adapter.
Step Procedure Description
Step 5 Check the Automatic search for a better
!
driver (Recommended) checkbox and click
the Next button.
Windows searches for drivers for your
USB to Serial Adapter and then begins
copying them from the CD-ROM.
If necessary, you can browse to the correct
directory location. The correct path is E:\.
Replace E:\ with your CD-ROM drive
designation.
Page 18 Rev 2.0 (5/30/2003)
Page 24

Tripp Lite USB to Serial Adapter User’s Manual Installing the software
Figure 22 - Win Me Driver file search prompt
Figure 22 shows the Win Me
Driver file search prompt.
If Windows finds the files for
you automatically, this screen
notifies you that Windows is
installing the software.
If you specify a driver location,
this screen displays that
location. It also offers you the
chance to press Back to select a
different driver or to press
Next to begin the installation
process.
Step Procedure Description
! Step 6 When the file copying process is
completed, the wizard displays the
finished installing prompt.
Figure 23 - Win Me Finished installing prompt
Figure 23 indicates that
Windows has finished installing
the software for your USB.
Step Procedure Description
! Step 7 Click the Finish button. Windows tells you that it has found new
hardware and launches the Add New
Hardware Wizard to install the serial
ports.
Rev 2.0 (5/30/2003) Page 19
Page 25

Installing the software Tripp Lite USB to Serial Adapter User’s Manual
Figure 24 - Win Me Ready to install prompt
Figure 24 shows the Win Me
Found new hardware prompt.
You can choose either to have
Windows automatically search
for a driver or to specify the
location of the driver you want
to use.
Step Procedure Description
Step 8 Check the Automatic search for a better
!
driver (Recommended) checkbox and click
the Next button.
Figure 25 - Win Me Driver file search prompt
Figure 25 shows the Win Me
Driver file search prompt.
If Windows finds the files for
you automatically, this screen
notifies you that Windows is
installing the software.
If you specify a driver location,
this screen displays that
location. It also offers you the
chance to press Back to select a
different driver or to press
Next to begin the installation
process.
Windows searches for drivers for your
USB to Serial Adapter and then begins
copying them from the CD-ROM.
Step Procedure Description
! Step 9 When the file copying process is
completed, the wizard displays the
finished installing prompt.
Page 20 Rev 2.0 (5/30/2003)
Page 26

Tripp Lite USB to Serial Adapter User’s Manual Installing the software
Figure 26 - Win Me Finished installing prompt
Figure 26 shows the Win Me
Finished installing prompt.
This prompt displays at the
end of the installation process.
Step Procedure Description
Step 10 Click the Finish button. The wizard briefly displays Unknown
!
hardware found and Installing
messages as it installs the serial ports.
When the desktop displays, your USB to
Serial Adapter installation is complete!
Uninstalling from Windows Me
Follow these steps in the event that you need to uninstall or reinstall
the USB to serial Adapter software.
1. From the Control Panel, select System.
2. Select the Device Manager tab.
3. Expand Multifunction adapters.
4. Highlight the Tripp Lite U209-004 USB to Serial Adapter. Click
5. Click OK at the Confirmation screen. Note that this also removes
Remove.
all the serial ports associated with your USB to Serial Adapter.
Rev 2.0 (5/30/2003) Page 21
Page 27

Installing the software Tripp Lite USB to Serial Adapter User’s Manual
f
Installing under Windows 98/98SE
Follow these steps to install your USB to serial Adapter in Windows
98/98SE.
Step Procedure Description
Step 1 Turn on the power to your computer
!
system.
This is the system in which the USB to
Serial Adapter is to be installed.
! Step 2 Plug the wide flat end of the USB cable
into the downstream connector.
Step 3 Plug the square end of the USB cable into
!
the back of the USB to Serial Adapter box.
Figure 27 - Win 98/98SE Searches for new drivers prompt
Figure 27 shows the Win
98/98SE Add New Hardware
Wizard searching for new
drivers prompt. The Wizard
launches automatically when
you first connect the USB to
Serial Adapter.
This is the connector located on the back o
the computer of USB hub.
Windows tells you that it has found new
hardware and launches the Add New
Hardware Wizard.
Step Procedure Description
Step 4 Click the Next button. The Search or select prompt displays.
!
Step 5 Insert the Tripp Lite installation disk in
!
your CD-ROM drive.
Page 22 Rev 2.0 (5/30/2003)
This is the CD that shipped with the
USB to Serial Adapter.
Page 28

Tripp Lite USB to Serial Adapter User’s Manual Installing the software
Figure 28 - Win 98/98SE Search or select prompt
Figure 28 shows the 98/98SE
Search or select prompt with
the Search for the best driver
option selected.
Step Procedure Description
Step 6 Select Search for the best driver for your
!
device (Recommended); then click the
The Search for new drivers prompt
displays.
Next button.
Figure 29 - Win 98/98SE Search for new drivers prompt
Figure 29 shows the Search for
new drivers prompt.
If Windows finds the files for
you automatically, this screen
notifies you that Windows is
installing the software.
If you specify a driver location,
this screen displays that
location. It also offers you the
chance to press Back to select a
different driver or to press
Next to begin the installation
process.
Rev 2.0 (5/30/2003) Page 23
Page 29

Installing the software Tripp Lite USB to Serial Adapter User’s Manual
Step Procedure Description
Step 7 Select the CD-ROM drive check box. You may be able to install the software
!
by checking the CD-ROM drive check
box. If not, you need to specify a location.
The complete path is E:\. Replace E:\
with your CD-ROM drive designation.
Step 8 Click the Next button. The Ready to install the best driver
!
prompt displays.
Figure 30 - Win 98/98SE Ready to install the best driver prompt
Figure 30 shows the 98/98SE
Ready to install the best driver
prompt, which lets you doublecheck the device that you are
installing and the location of
the driver.
Step Procedure Description
Step 9 Confirm that the device and driver
!
location are correct.
Click the Next button.
If necessary, use the Back button to
return to the previous screen.
Windows builds a driver information
base, copies the appropriate files from
the CD, and then displays the Finished
installing software prompt.
Page 24 Rev 2.0 (5/30/2003)
Page 30

Tripp Lite USB to Serial Adapter User’s Manual Installing the software
Figure 31 - Win 98/98SE Finished installing software prompt
Figure 31 indicates that
Windows has finished installing
the software for your U209004’s adapter. Next it will
install each serial port.
Step Procedure Description
! Step 10 Click the Finish button. Windows tells you that it has found new
hardware and launches the Add New
Hardware Wizard to install the serial
ports.
Figure 32 - Win 98/98SE Searches for new drivers prompt
Figure 32 shows the start of
the serial port installation
process.
Step Procedure Description
! Step 11 Click the Next button. The Search or display prompt displays.
Rev 2.0 (5/30/2003) Page 25
Page 31

Installing the software Tripp Lite USB to Serial Adapter User’s Manual
Figure 33 - Win 98/98SE Search or display prompt
Figure 33 shows the 98/98SE
Search or display prompt.
Step Procedure Description
Step 12 Select Search for the best driver for your
!
device; then click the Next button.
Figure 34 - Win 98/98SE Search for new drivers prompt
Figure 34 shows the 98/98SE
Search for new drivers prompt.
If Windows finds the files for
you automatically, this screen
notifies you that Windows is
installing the software.
If you specify a driver location,
this screen displays that
location. It also offers you the
chance to press Back to select a
different driver or to press
Next to begin the installation
process.
The Search for new drivers prompt
displays.
Step Procedure Description
! Step 13 Select the CD-ROM drive check box. You may be able to install the software
by checking the CD-ROM drive check
box. If not, you need to specify a location.
The complete path is E:\. Replace E:\
with your CD-ROM drive designation.
Page 26 Rev 2.0 (5/30/2003)
Page 32

Tripp Lite USB to Serial Adapter User’s Manual Installing the software
Step Procedure Description
Step 14 Make sure that the Tripp Lite installation
!
CD is still in your CD-ROM drive.
Step 15 Click the Next button. The Ready to install prompt displays.
!
Figure 35 - Win 98/98SE Ready to install prompt
Figure 35 shows the 98/98SE
Ready to install the prompt,
which lets you double-check
the device that you are
installing and the location of
the driver.
This is the CD that shipped with the
USB to Serial Adapter.
Step Procedure Description
Step 16 Confirm that the device and driver
!
location are correct.
Click the Next button.
If necessary, use the Back button to
return to the previous screen.
Windows copies the appropriate files
from the CD, then displays the Finished
installing software prompt.
Rev 2.0 (5/30/2003) Page 27
Page 33

Installing the software Tripp Lite USB to Serial Adapter User’s Manual
Figure 36 - Win 98/98SE Finished installing prompt
Figure 36 indicates that
Windows has finished installing
the software for the USB serial
port.
Step Procedure Description
Step 17 Click Finish. The wizard briefly displays a series of
!
Unknown hardware found and
Installing messages as it installs the rest
of the serial ports. When the desktop
displays, your USB to Serial Adapter
installation is complete!
Uninstalling from Windows 98/98SE
Follow these steps in the event that you need to uninstall or reinstall
the USB to serial Adapter software.
1. From the Control Panel, select System.
2. Select the Device Manager tab.
3. Scroll down to Multi-port serial devices and expand.
4. Highlight the Tripp Lite U209-004 USB to Serial Converter. Click
Remove.
5. Click OK at the Confirmation screen. Note that this also removes
all the serial ports associated with your USB to Serial Adapter.
Page 28 Rev 2.0 (5/30/2003)
Page 34

Tripp Lite USB to Serial Adapter User’s Manual Making external connections
Making external connections
RS-232 serial connections
The Tripp Lite USB to Serial Adapter comes with standard male DB9 connectors. The figure below shows the pin designations.
Figure 37 - RS-232 DB-9 pin designations
RS-232-C devices are classified by their function as either Data
Terminal Equipment (DTE) or Data Communication Equipment
(DCE).
Figure 38 - Use of DTEs and DCEs in a communication link
Figure 38 illustrates role of
DTE and DCE devices in a
communications link.
Note: A DTE devices is the
communication source. A DCE
device provides a communication
channel between two DTE-type
devices.
Note: In many applications,
DCEs are unnecessary. This
allows you to use a null modem
cable (modem eliminator cable)
to directly connect two DTEtype devices.
Tripp Lite’s USB to Serial Adapters are DTE devices that connect to
peripheral equipment through a male DB-9 connector. The following
table lists the serial port connector definitions.
Table 2 - RS-232 DB-9 signal definitions
RS-232 signal
description
DTE connection
DB-9
Data Carrier Detect (DCD) 1
Receive Data (RxD) 2
Transmit Data (TxD) 3
Data Terminal Ready (DTR) 4
Signal Ground 5
Data Set Ready (DSR) 6
Request To Send (RTS) 7
Clear To Send (CTS) 8
Ring Indicate (RI) 9
DTE- and DCE-type devices have complementary pinouts that allow
terminals and modems to connect directly using a one-to-one cable as
shown in Figure 39.
See Figure 39 on the following page for a typical null modem cable.
Rev 2.0 (5/30/2003) Page 29
Page 35

Making external connections Tripp Lite USB to Serial Adapter User’s Manual
Figure 39 illustrates the RS232C pinouts for typical DTEto-DCE and DTE-to-DTE (null
modem) cables with 25-pin
connectors.
Figure 39 - Cabling requirements for RS-232C devices
Testing DB-9 serial ports in HyperTerminal
This section explains how to test the functionality of your USB serial
adapter using Hyperterminal. Follow the directions under Running
Hyperterminal below.
Running Hyperterminal
This procedure explains how to troubleshoot RS-232 DB-9 serial ports
Note: Use the DB-9 loopback
connector that shipped with
your USB to Serial Adapter.
using Hyperterminal.
Before testing your serial ports, you must first hook up a loopback. A
loopback connects the output signal (TxD) to the input signal (RxD) in
a single serial port connector to make it seem like there are two ports
connected together.
A loopback connector shipped with your USB adapter. Use it to test
each individual serial port in Hyperterminal.
Step Procedure Description
Step 1 Launch HyperTerminal. In Windows, select Programs/
!
Accessories/ Communications/
HyperTerminal.
Step 2 Connect the loopback connector to the
!
port you wish to test.
Step 3 Create a new session. When prompted, give the session any
!
You will need to test each port
individually.
name you wish.
Step 4 Select the COM # associated with the port
!
you are testing from the drop down list.
Step 5 With the session open, type any text. If the text you type is echoed on the
!
You are now set up to test that serial
port.
Note: Leave all settings at default.
screen, the port is functioning properly.
! Step 6 Close the session.
! Step 7 Repeat steps 2 through 6 for each serial
port in turn.
Page 30 Rev 2.0 (5/30/2003)
Page 36

Tripp Lite USB to Serial Adapter User’s Manual Using configuration utilities
Using Device Manager
This section explains how to use Device Manager to view the
properties of the serial ports enumerated by the Tripp Lite USB to
Serial Adapter.
Accessing Device Manager
Win XP and 2000
Step Procedure Description
Step 1 Select Start – Control Panel.
!
Step 2 Double click the System icon. The System Properties dialog box opens.
!
Step 3 Click the Hardware tab, and then press
!
the Device Manager button.
Device Manager lists all the hardware
devices that are registered inside the
Windows registry.
Win 98, 98SE, and Me
Step Procedure Description
Step 1 Select Start – Settings – Control Panel.
!
Step 2 Double click the System icon. The System Properties dialog box opens.
!
Step 3 Click the Device Manager tab. Device Manager lists all the hardware
!
devices that are registered inside the
Windows registry.
Exploring Device Manager screens
Win XP and 2000
Device Manager provides two USB to Serial Adapter property dialog
boxes:
# Ports (COM & LPT) device group property box
# Multi-port serial adapters device group property box
Use the Ports (COM & LPT) device group property box to view and
set the port settings and to view device usage and driver information
for the USB serial ports. Use the Multi-port serial adapters device
group property box to view and set the advanced options and to view
device usage and driver information for the U209-004 USB to Serial
Adapter.
Step Procedure Description
! Step 1 With Device Manager open, expand the
Multi-port serial adapters device group.
Rev 2.0 (5/30/2003) Page 31
Your USB to Serial Adapter should
appear in the list – for example, U209004 (Group ID1).
Page 37

Using configuration utilities Tripp Lite USB to Serial Adapter User’s Manual
Step Procedure Description
Step 2 Double click the U209-004 adapter. The USB Serial Port Properties dialog
!
box opens and displays the General tab.
Figure 40 - Win XP/2000 Device Manager USB serial port properties, General tab
Figure 40 illustrates the
Win XP/2000 General Tab,
which tells you whether the
USB to Serial Adapter is
working properly and allows
you to determine the device
usage:
# Use this device (enable)
# Do not use this device
(disable)
This dialog box also contains
a link to Window’s generic
hardware troubleshooter.
Step Procedure Description
Step 3 Click the USB Serial Port Advanced
!
Options tab to view the port setting
The Advanced Options dialog box
displays.
properties.
Page 32 Rev 2.0 (5/30/2003)
Page 38

Tripp Lite USB to Serial Adapter User’s Manual Using configuration utilities
Figure 41 - Win XP/2000 RS-232 Advanced Options dialog window
Figure 41 illustrates the
Win XP/2000 USB Serial
Ports Advanced Options
box, which lets you set the
data rate multiplier:
Step Procedure Description
! Step 4 The USB Serial Port Advanced Options
dialog box lets you set the data rate
multiplier and restore the default
settings.
! Step 5 Click Cancel to close the USB to Serial
See the Data rate multiplier section on
page 40 for details.
Adapter property box.
Step 6 With Device Manager open, expand the
!
Ports (COM & LPT) device group.
The ports associated with the USB to
Serial Adapter should appear in the list
of ports.
Step 7 Double click the desired port. The USB Serial Port Properties dialog
!
box opens and displays the General tab.
Step 8 Click the Port settings tab. The Port Settings dialog box displays.
!
Rev 2.0 (5/30/2003) Page 33
Page 39

Using configuration utilities Tripp Lite USB to Serial Adapter User’s Manual
Figure 42 - Win XP/2000 USB serial port, Port settings box
Figure 42 illustrates the
Win XP/2000 USB Ports
Settings box, which lets you
set the default port settings,
view the advanced options,
and restore the default
settings.
Step Procedure Description
Step 9 This Port Settings tab allows you to set
!
default values for the following:
# Bits per second
# Data bits
The Port Settings window sets default
values for the selected port.
See the Setting advanced options section
on page 40 section for details.
# Parity
# Stop bits
# Flow control
Step 10 Press the Advanced button. The Advanced Options dialog box opens.
!
Figure 43 - Win XP/2000 USB serial port, Advanced settings box
Step Procedure Description
! Step 11 Use the drop down box to select the port
whose settings you wish to change.
Click Cancel to return to the Port Settings
tab.
Page 34 Rev 2.0 (5/30/2003)
Page 40

Tripp Lite USB to Serial Adapter User’s Manual Using configuration utilities
Step Procedure Description
Step 12 Click the Driver tab to view the driver
!
information and update the driver.
Figure 44 - Win XP/2000 USB serial port properties, Driver box
The USB Serial Driver properties dialog
box displays.
Figure 44 illustrates the
Win XP/2000 USB Serial
Ports Driver box, which lets
you view the driver details
and update, roll back (XP
only), and uninstall the
driver:
Step Procedure Description
Step 13 You have several options:
!
# View detailed driver information.
# Update the device drivers.
# Roll Back Driver (XP only)
# Uninstall your USB to Serial Adapter.
# Save your changes and exit.
Clicking Update Driver opens the
Installation Wizard.
Revert to the previously installed driver.
This also removes all the associated
serial USB ports.
Clicking OK also saves any changes
from the other tabs.
# Abandon your changes and return to
the Device Manager.
Step 14 Click Cancel to close the USB to Serial
!
Adapter port property box.
Rev 2.0 (5/30/2003) Page 35
Page 41

Using configuration utilities Tripp Lite USB to Serial Adapter User’s Manual
Win 98, 98SE, and Me
The Device Manager provides two USB to Serial Adapter property
dialog boxes.
# Ports (COM & LPT) device group property box
# Multi-port serial adapters device group property box
Use the Ports (COM & LPT) device group property box to view and
set the port settings and the advanced options and to view device
usage and driver information for the USB serial ports. Use the Multiport serial adapters device group property box to view device usage
and driver information for the U209-004 USB to Serial Adapter.
Step Procedure Description
Step 1 With Device Manager open, expand the
!
Ports (COM & LPT) device group.
Step 2 Double click the desired port. The USB Serial Port Properties dialog
!
The ports associated with the USB to
Serial Adapter should appear in the list
of ports.
box opens and displays the General tab.
Figure 45 illustrates the
Win 98/98SE/Me General
tab, which tells you whether
the USB to Serial Adapter is
working properly and allows
you to determine the device
usage:
# Disable in this hardware
profile
# Exists in all hardware
profiles
Figure 45 - Win 98/98SE/Me USB serial port properties, General tab
Step Procedure Description
! Step 3 Click the USB Serial Port Settings tab to
view the port setting properties.
Page 36 Rev 2.0 (5/30/2003)
The USB Serial Port Settings properties
dialog box displays.
Page 42

Tripp Lite USB to Serial Adapter User’s Manual Using configuration utilities
Figure 46 - Win 98/98SE/Me USB serial port properties, USB Serial Port Settings tab
Figure 46 illustrates the
Win 98/98SE/Me USB Serial
Port Settings tab, which lets
you view and set default
values for the following
serial port settings:
# Bits per second
# Data bits
# Parity
# Stop bits
# Flow control
Step Procedure Description
Step 4 The USB Serial Port Settings tab allows
!
you to set default values for the following:
# Bits per second
# Data bits
# Parity
The Port Settings window can set
defaults for the selected port.
See the Setting advanced options section
on page 40 for details.
# Stop bits
# Flow control
Step 5 Click the Advanced button to open the
!
Advanced Options dialog box.
The USB Serial Ports Advanced Options
box displays. This dialog box lets you set
the data rate multiplier and restore the
default settings.
See the Data rate multiplier section on
page 40 for details.
Rev 2.0 (5/30/2003) Page 37
Page 43

Using configuration utilities Tripp Lite USB to Serial Adapter User’s Manual
Figure 47 - Win 98/98SE/Me USB serial port properties, USB Serial Port Advanced Options box
Figure 47 illustrates the
Win 98/98SE/Me RS-232
USB Serial Ports Advanced
Options box, which lets you
set the data rate multiplier:
Step Procedure Description
Step 6 Click Cancel. The USB Serial Port Settings properties
!
dialog box returns.
Step 7 You have three additional options:
!
# Click the Restore Defaults button to
restore the selected port to the default
settings.
# Click the Driver tab to view the driver
information and update the driver.
# Click the OK button to save your
changes.
Step 8 Click the Driver tab. The USB Serial Driver properties dialog
!
Clicking OK saves any changes you
made in any of the dialog boxes.
box displays. See the figure on the
following page.
Page 38 Rev 2.0 (5/30/2003)
Page 44

Tripp Lite USB to Serial Adapter User’s Manual Using configuration utilities
Figure 48 - Win 98/98SE/Me USB serial port properties Driver box
Figure 48 illustrates the
Win 98/98SE/Me USB Serial
Ports Driver box, which lets
you view the driver details
and update the driver.
Step Procedure Description
! Step 9 This tab provides two options:
# Click the Driver Details button to view
detailed driver information.
# Click the Update Driver button to
install the latest drivers.
! Step 10 Click Cancel to close the USB to Serial
This option opens the Driver File Details
dialog box.
This option launches the Installation
Wizard.
Adapter port property box.
Rev 2.0 (5/30/2003) Page 39
Page 45

Using configuration utilities Tripp Lite USB to Serial Adapter User’s Manual
Setting advanced options
Notes: Changing any setting in
the advanced options window
affects all ports on the
USB to Serial Adapter.
Data rate multiplier
Notes: We recommend leaving
the Data Rate Multiplier in
Auto mode unless the application
specifically requires otherwise.
Auto (default)
Note: This setting is suitable
for most applications.
Force X1 mode
Note: This setting will not
enhance most applications.
The USB to Serial Adapter port properties can only be altered from
the Device Manager window. Attempting to access these properties
from another software program generates an error message box that
refers you to the Device Manager.
See Exploring Device Manager screens on page 31 for help in
navigating through the Device Manager screens.
The USB to Serial Adapter uses an accelerated UART clock frequency
to boost data rates to as high as 460,800 bits per second. This setting
determines the amount of data rate acceleration applied.
Select this radio button to allow the USB serial port device drivers to
automatically adjust the clock as necessary. The software application
can request any desired baud rate up to 460,800 bits per second.
Select this radio button to limit each serial port to a maximum of
115,200 bits per second. The software application can request any
desired baud rate up to 115,200 bits per second.
Force X2 mode
Note: This setting allows
applications not capable of
asking for higher baud rates to
achieve them.
Select this radio button to allow each serial port to run at a maximum
of 230,400 bits per second. The software application can request any
desired baud rate up to 115,200 bits per second. The actual baud rate
will be two (2) times higher than requested.
Force X4 mode
Note: This setting allows
applications not capable of
asking for higher baud rates to
achieve them.
Select this radio button to allow each serial port to run at a maximum
of 460,800 bits per second. The software application can request any
desired baud rate up to 115,200 bits per second. The actual baud rate
will be four (4) times higher than requested.
Page 40 Rev 2.0 (5/30/2003)
Page 46

Tripp Lite USB to Serial Adapter User’s Manual Troubleshooting
Troubleshooting
Note: Any unauthorized repairs
or modifications will void the
U209-004's warranty.
Problem Cause Solution
The USB to Serial
Adapter cannot
communicate with
other equipment.
# The cables are not
#
#
This section lists some common problems and their causes. If the
information below does not provide a solution, contact Tripp Lite
technical support.
Check the USB to Serial Adapter cables
1.
connected correctly.
The device driver is not
installed.
The USB port is faulty.
to make sure that they are connected
correctly.
Make sure that each cable is securely
2.
attached.
Double check the Device Manager per the
1.
instructions in the Using Device
Manager section starting on page 31.
Make sure that drivers are installed
correctly and that all devices are working
properly.
Try removing the USB adapter from the
2.
Device Manager window and then repeat
the hardware installation instructions.
If possible, connect a known good USB
1.
device to the PC or hub connector and see
if it operates properly.
Rev 2.0 (5/30/2003) Page 41
Page 47

Appendix A Tripp Lite USB to Serial Adapter User’s Manual
Appendix A
Specifications
Bus interface USB Specification 1.1
Data rates Number of
simultaneously
operating ports
1, 2 230k bps*
3, 4 115k bps
* 460.8k bps is possible for any one port under
certain conditions
Actual baud rates depend on the following:
# Hardware flow control
# Horsepower of the host computer
# Quality of and length of cables
# Continuous or “bursty” data
Ports 4
UARTs One 16650 UART with 16-byte FIFO per port
Transceivers:
(SP211HB)
Connectors DB-9 Male Connectors
Dimensions 6.08” L x 4.26” W x 1.50” H (U209-004)
Power Requirements USB bus powered,
Temperature: Operating: 0 to 70 C
Humidity 10 to 90%
OS Support
RS-232 Output
Voltage Swing: +/–5V min, +/–7V typical
RS-232 Input
Voltage Range: –15V min, +15V max
Input Threshold Low: 0.8V min, 1.2V typical
Input Threshold High: 2.4V max, 1.7V typical
(no external connection required)
Suspend Power: < 500 uA
Unconfigured Power: < 100 mA
Configured Power: < 500 mA
Storage: –50 to 80 C
Windows 98, Windows ME , Windows 2000,
Windows XP, Windows NT 4.0
Data rate
Page 42 Rev 2.0 (5/30/2003)
Page 48

Tripp Lite USB to serial AdapterAdapter User’s Manual Appendix C
Appendix B
Warranty information
5-YEAR LIMITED WARRANTY
TRIPP LITE warrants its products to be free from defects in materials and workmanship for a period
of five (5) years from the date of initial purchase. TRIPP LITE’s obligation under this warranty is
limited to repairing or replacing (at its sole option) any such defective products. To obtain service
under this warranty, you must obtain a Returned Material Authorization (RMA) number from
TRIPP LITE or an authorized TRIPP LITE service center. Products must be returned to TRIPP
LITE or an authorized TRIPP LITE service center with transportation charges prepaid and must be
accompanied by a brief description of the problem encountered and proof of date and place of
purchase. This warranty does not apply to equipment that has been damaged by accident, negligence
or misapplication or has been altered or modified in any way.
EXCEPT AS PROVIDED HEREIN, TRIPP LITE MAKES NO WARRANTIES, EXPRESS OR
IMPLIED, INCLUDING WARRANTIES OF MERCHANTABILITY AND FITNESS FOR A
PARTICULAR PURPOSE. Some states do not permit limitation or exclusion of implied warranties;
therefore, the aforesaid limitation(s) or exclusion(s) may not apply to the purchaser.
EXCEPT AS PROVIDED ABOVE, IN NO EVENT WILL TRIPP LITE BE LIABLE FOR DIRECT,
INDIRECT, SPECIAL, INCIDENTAL OR CONSEQUENTIAL DAMAGES ARISING OUT OF THE
USE OF THIS PRODUCT, EVEN IF ADVISED OF THE POSSIBILITY OF SUCH DAMAGE.
Specifically, TRIPP LITE is not liable for any costs, such as lost profits or revenue, loss of equipment,
loss of use of equipment, loss of software, loss of data, costs of substitutes, claims by third parties, or
otherwise.
TRIPP LITE has a policy of continuous improvement. Specifications are subject to change without
notice.
Rev 2.0 (5/30/2003) Page 43
 Loading...