

Page 1
WARRANTY
REGISTRATION:
register online today for a
chance to win a FREE Tripp Lite
product—www.tripplite.com/warranty
Owner’s Manual
SmartRack™
High-Capacity Vertical Cable Manager
Models:
SRCABLEVRT3, SRCABLEVRT6 & SRCABLEVRT12
Single-Depth Installation ..................2
SR42UBWD Installation: Front-Facing......11
42U Enclosure with PDU Manager Installation Side-Facing......16
Double-Depth Installation .................6
SR42UBWD Installation: Side-Facing......14
Introduction
SRCABLEVRT models are high capacity cable managers for Tripp Lite open frame racks and rack enclosures. The SRCABLEVRT6
and SRCABLEVRT12 models are designed for use in either a 2-post or 4-post open frame rack, while the SRCABLEVRT3 is
designed for installation in the SR42UBWD extra-wide enclosure. Each SRCABLEVRT unit includes three cable trays along
with three adapter plates that allow the unit to be mounted to PDU managers in 42U SmartRack enclosures.
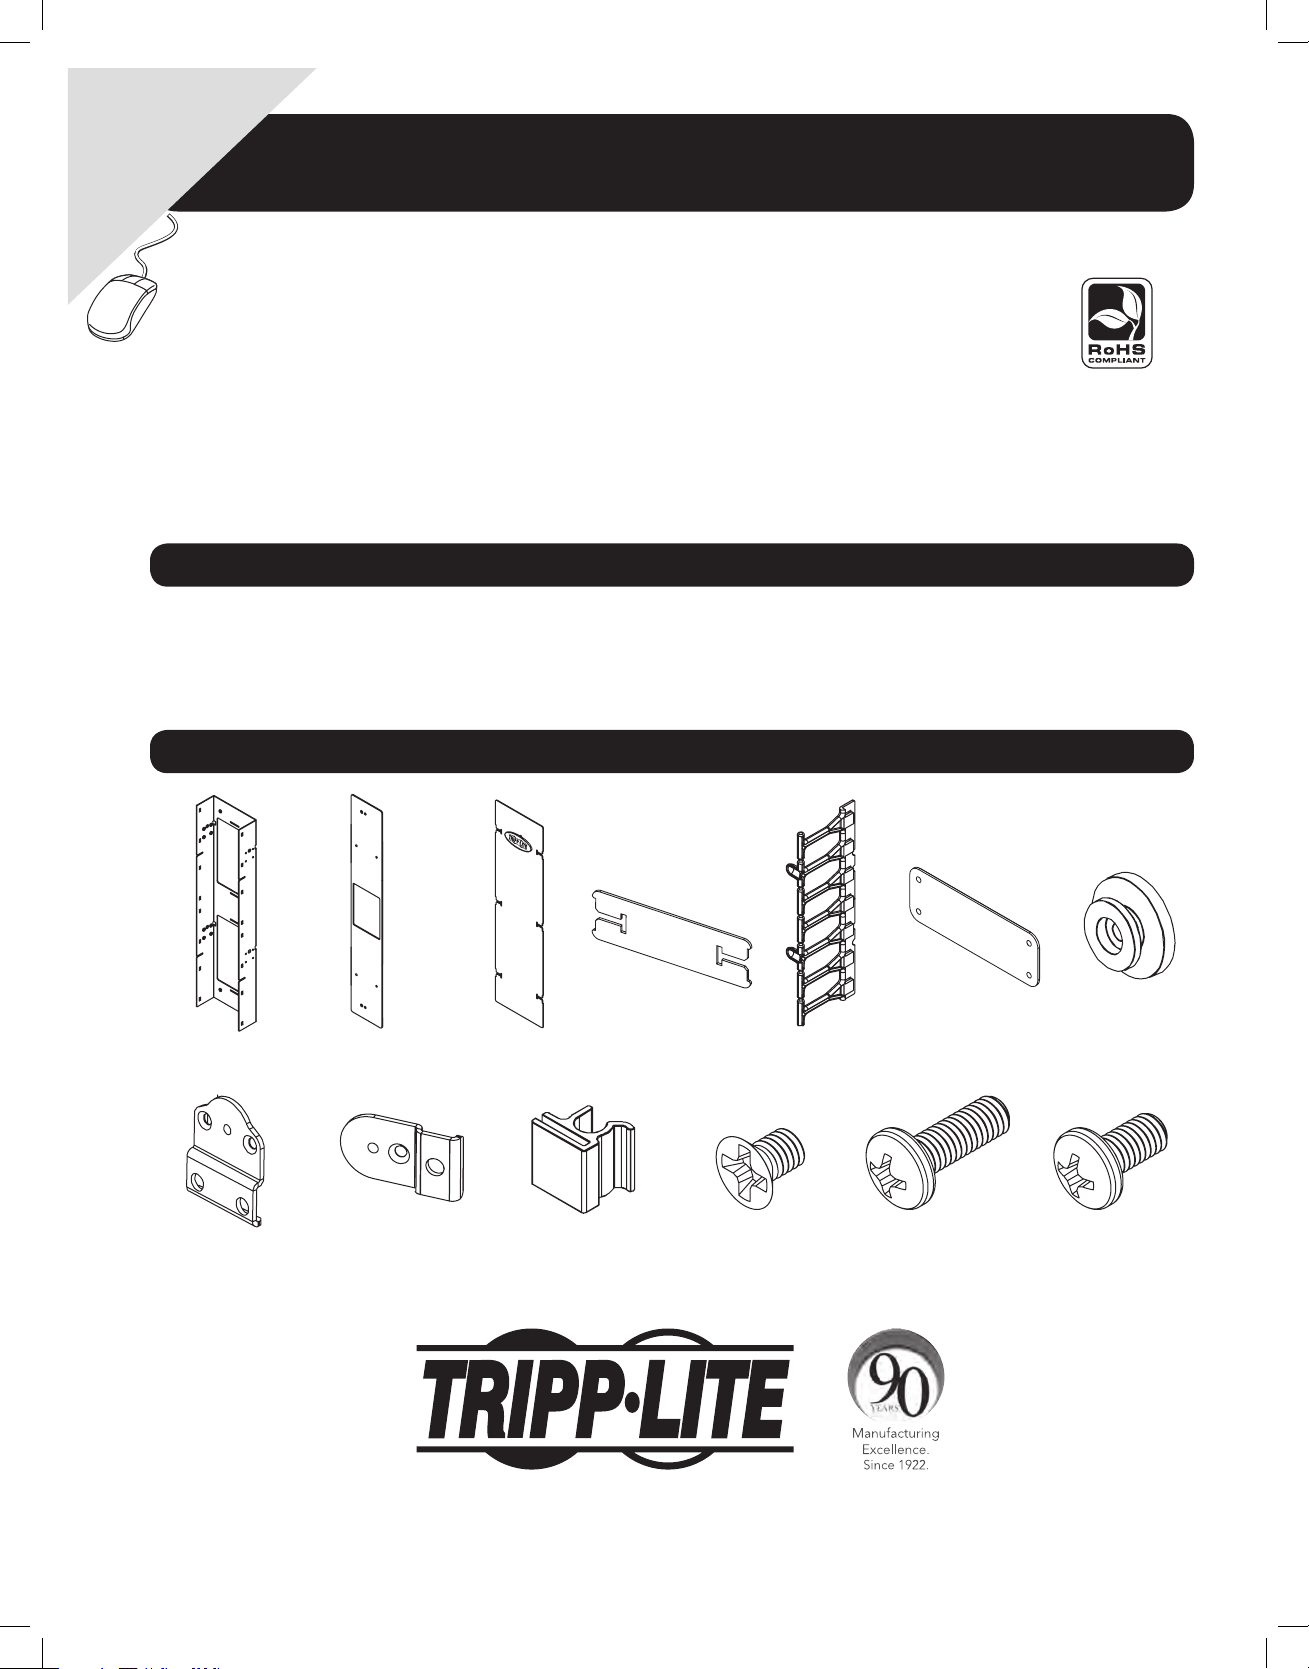
Parts List
Cable Tray
Frames (3)
Mounting
Brackets (6)*
*SRCABLEVRT6 & SRCABLEVRT12 only.
**SRCABLEVRT3 only.
†SRCABLEVRT3 includes 6 pieces.
‡SRCABLEVRT3 includes 12 pieces.
Adapter Plates
(3)**
Mounting
Brackets (6)**
Copyright © 2012 Tripp Lite. All rights reserved. SmartRack is a trademark of Tripp Lite.
Cable Tray
Doors (3)*
Door Hinges (18) M4 x 6 mm
1111 W. 35th Street, Chicago, IL 60609 USA
www.tripplite.com/support
Cable Tray
Door Straps
(9)**
Screws (12)
1
Guides (12)
Flat Head
Cable
†
Tie Plates (2)* Mounting
M4 x 12 mm Pan
Head Screws (18)
M4 x 8 mm Pan
‡
Head Screws (8)
Buttons (6)
‡
201202097 93-3029-EN with Addendum.indd 1 3/5/2012 12:14:50 PM
Page 2
Single-Depth Installation (SRCABLEVRT6 & SRCABLEVRT12 only)
Note: Each SRCABLEVRT6 and SRCABLEVRT12 unit includes 3 cable trays. If you install the cable trays in a single-depth
configuration, SR2POST (Tripp Lite’s 45U 2-post rack) will hold 3 cable trays per side (6 total – requires 2 x SRCABLEVRT6
or SRCABLEVRT12). Always begin installation at the bottom of the rack and work your way to the top.
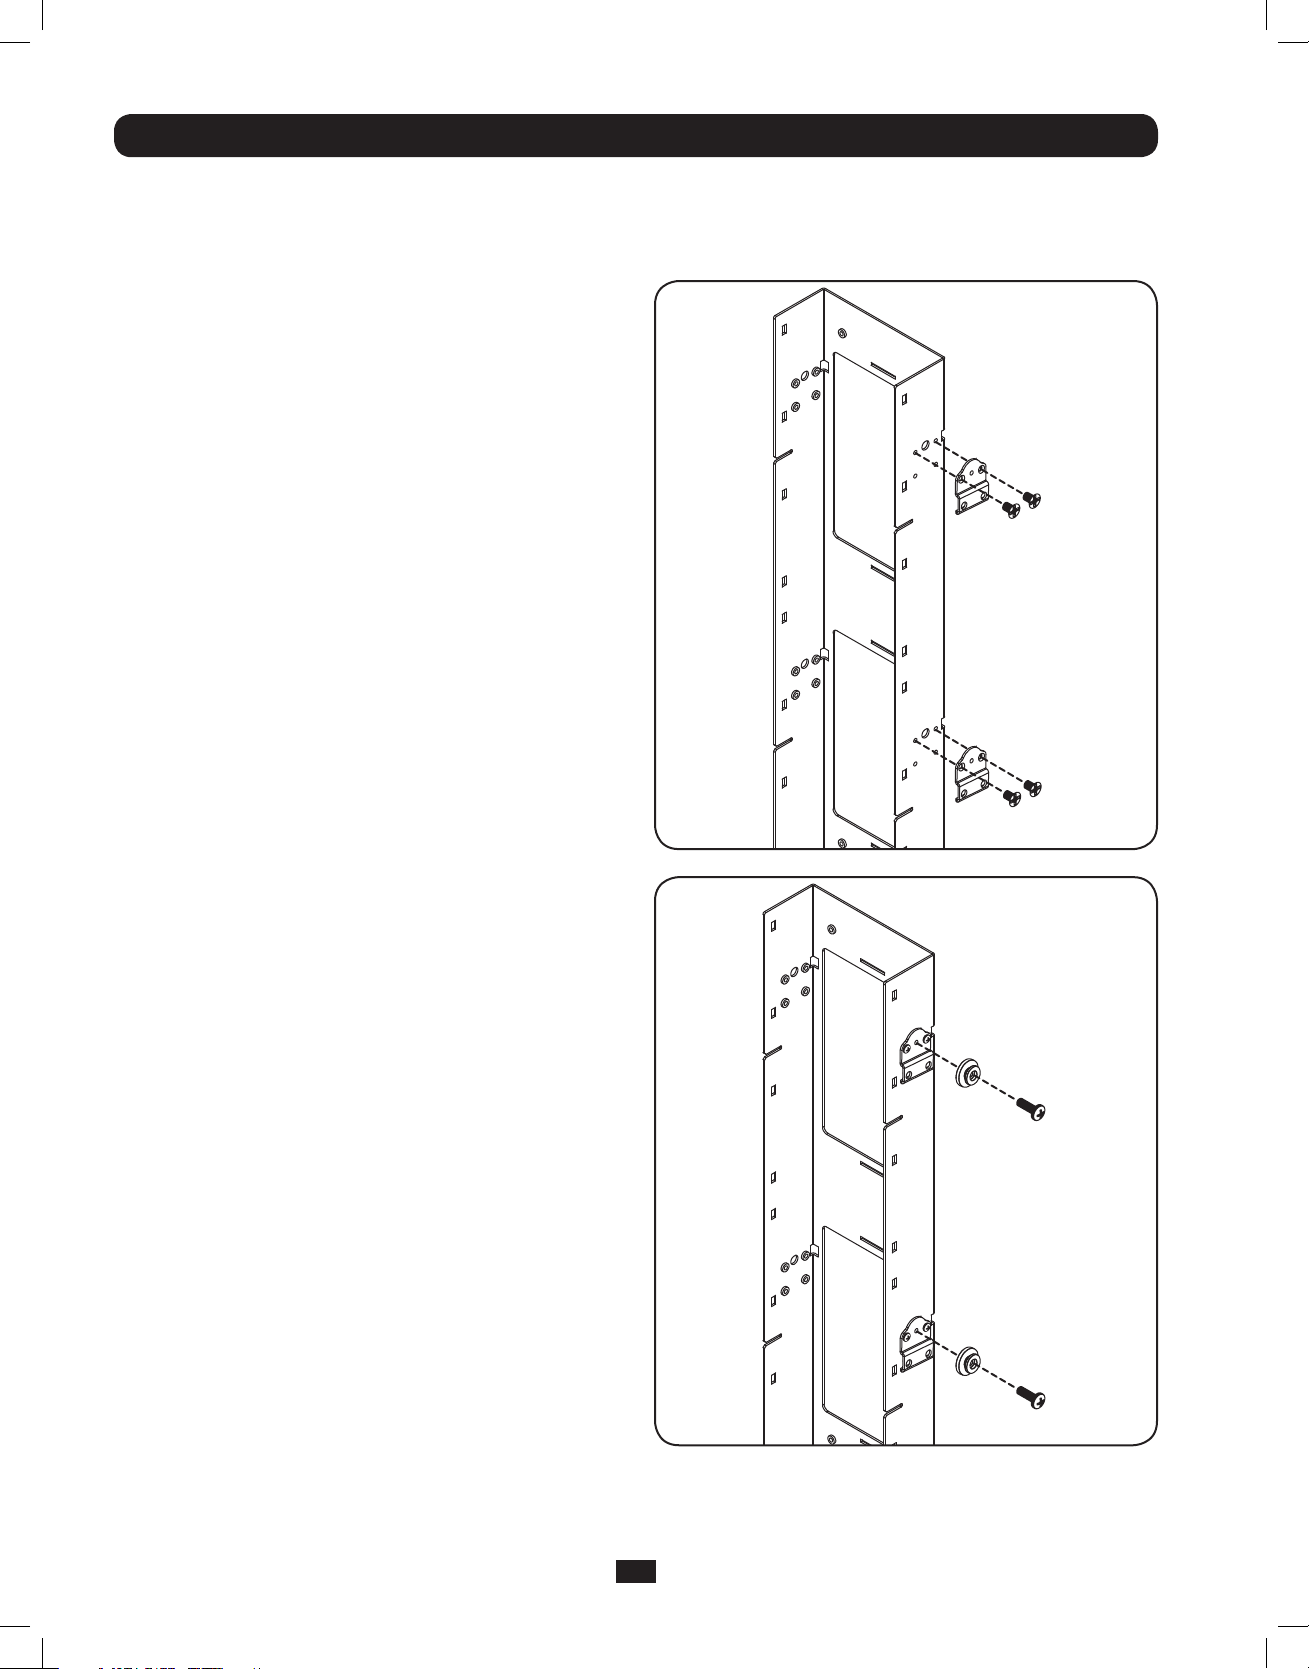
Step 1 Using (4) M4 x 6 mm flat head screws, attach (2)
mounting brackets to (1) cable tray frame.
Step 2 Using (2) M4 x 12 mm pan head screws, attach (2)
mounting buttons to the mounting brackets.
2
201202097 93-3029-EN with Addendum.indd 2 3/5/2012 12:14:50 PM
Page 3
Single-Depth Installation (SRCABLEVRT6 & SRCABLEVRT12 only)
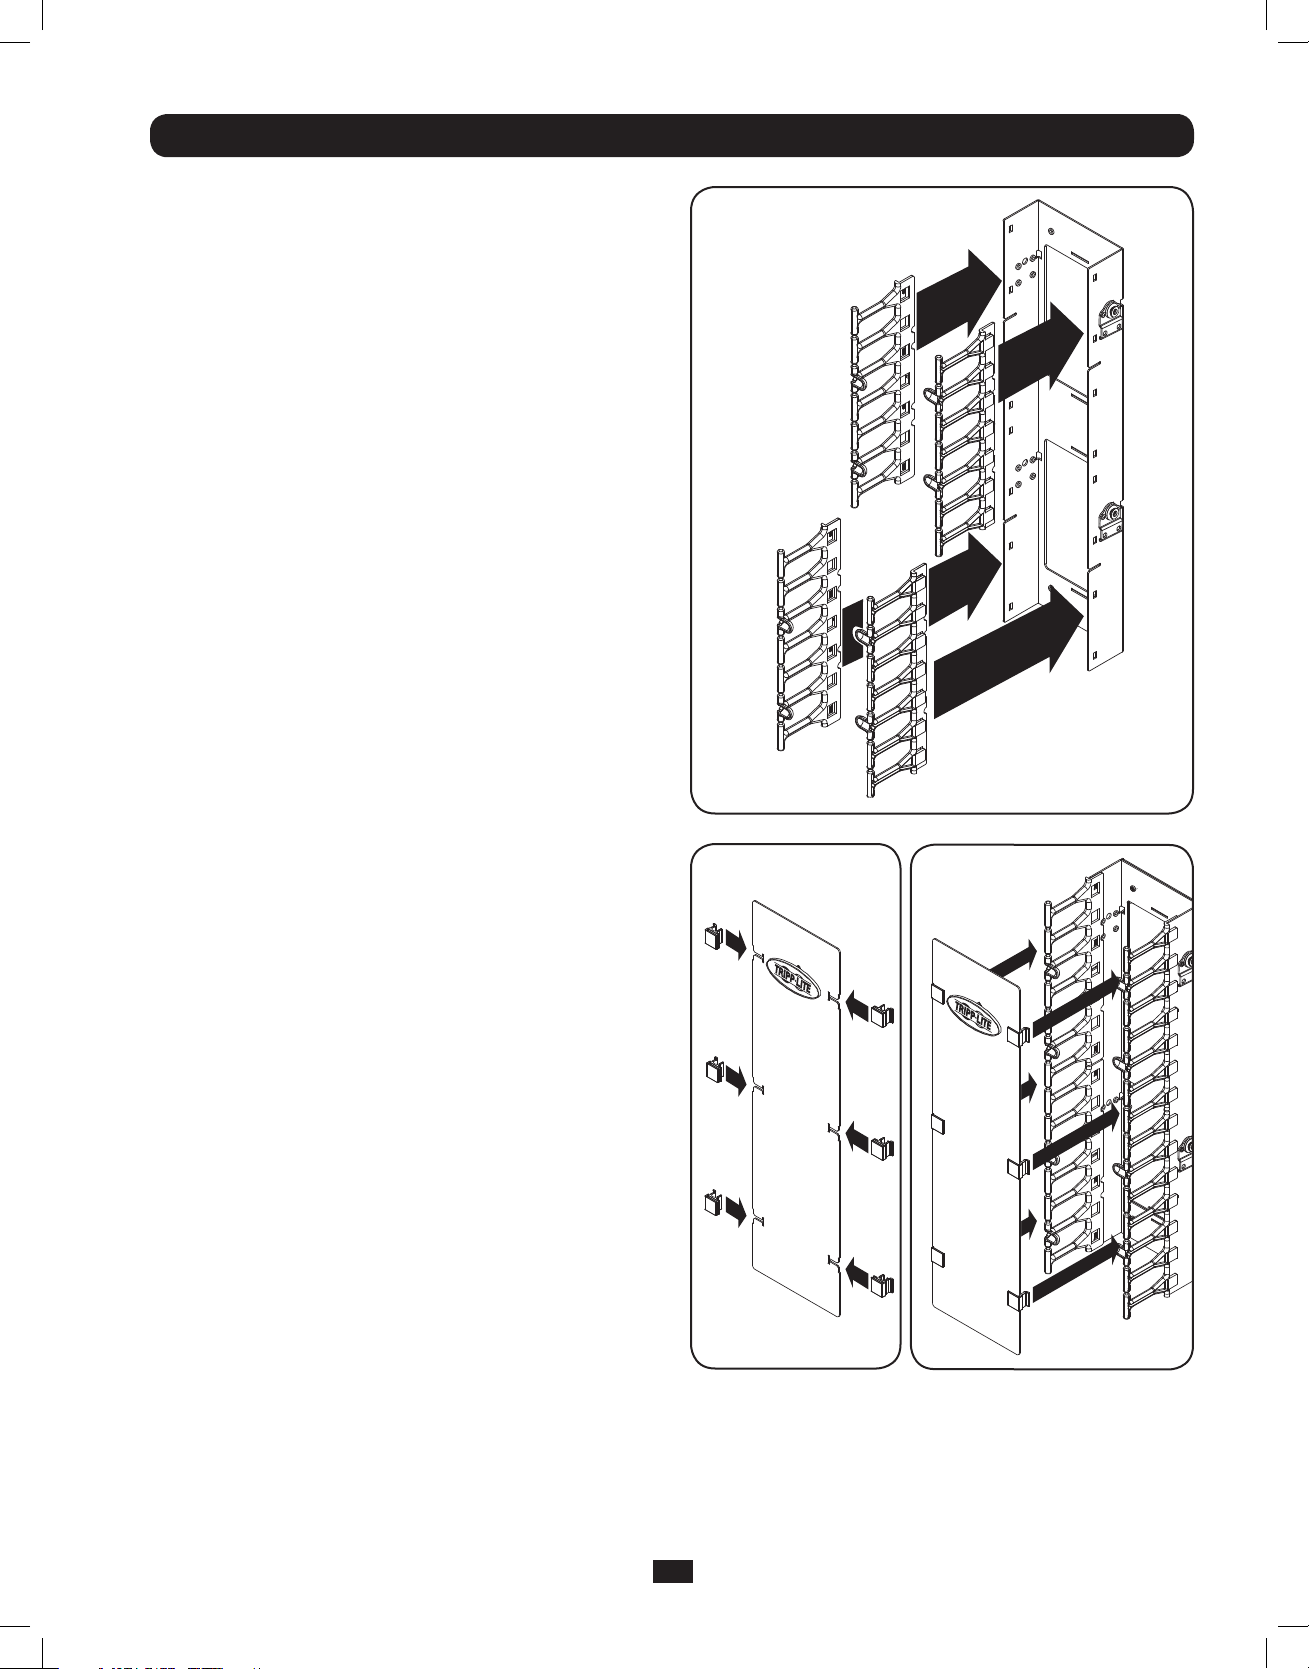
Step 3 Attach (4) cable guides to the cable tray frame. The
cable guides slide over the edges of the cable tray
frame to form a tight attachment.
Step 4 Slide (6) door hinges over the edge of (1) cable
tray door, then fasten the door to the cable guides
via the door hinges’ C clasps. After installation, you
can release the C clasps on one side of the cable
tray door to open it from either side.
3
201202097 93-3029-EN with Addendum.indd 3 3/5/2012 12:14:54 PM
Page 4
Single-Depth Installation (SRCABLEVRT6 & SRCABLEVRT12 only)
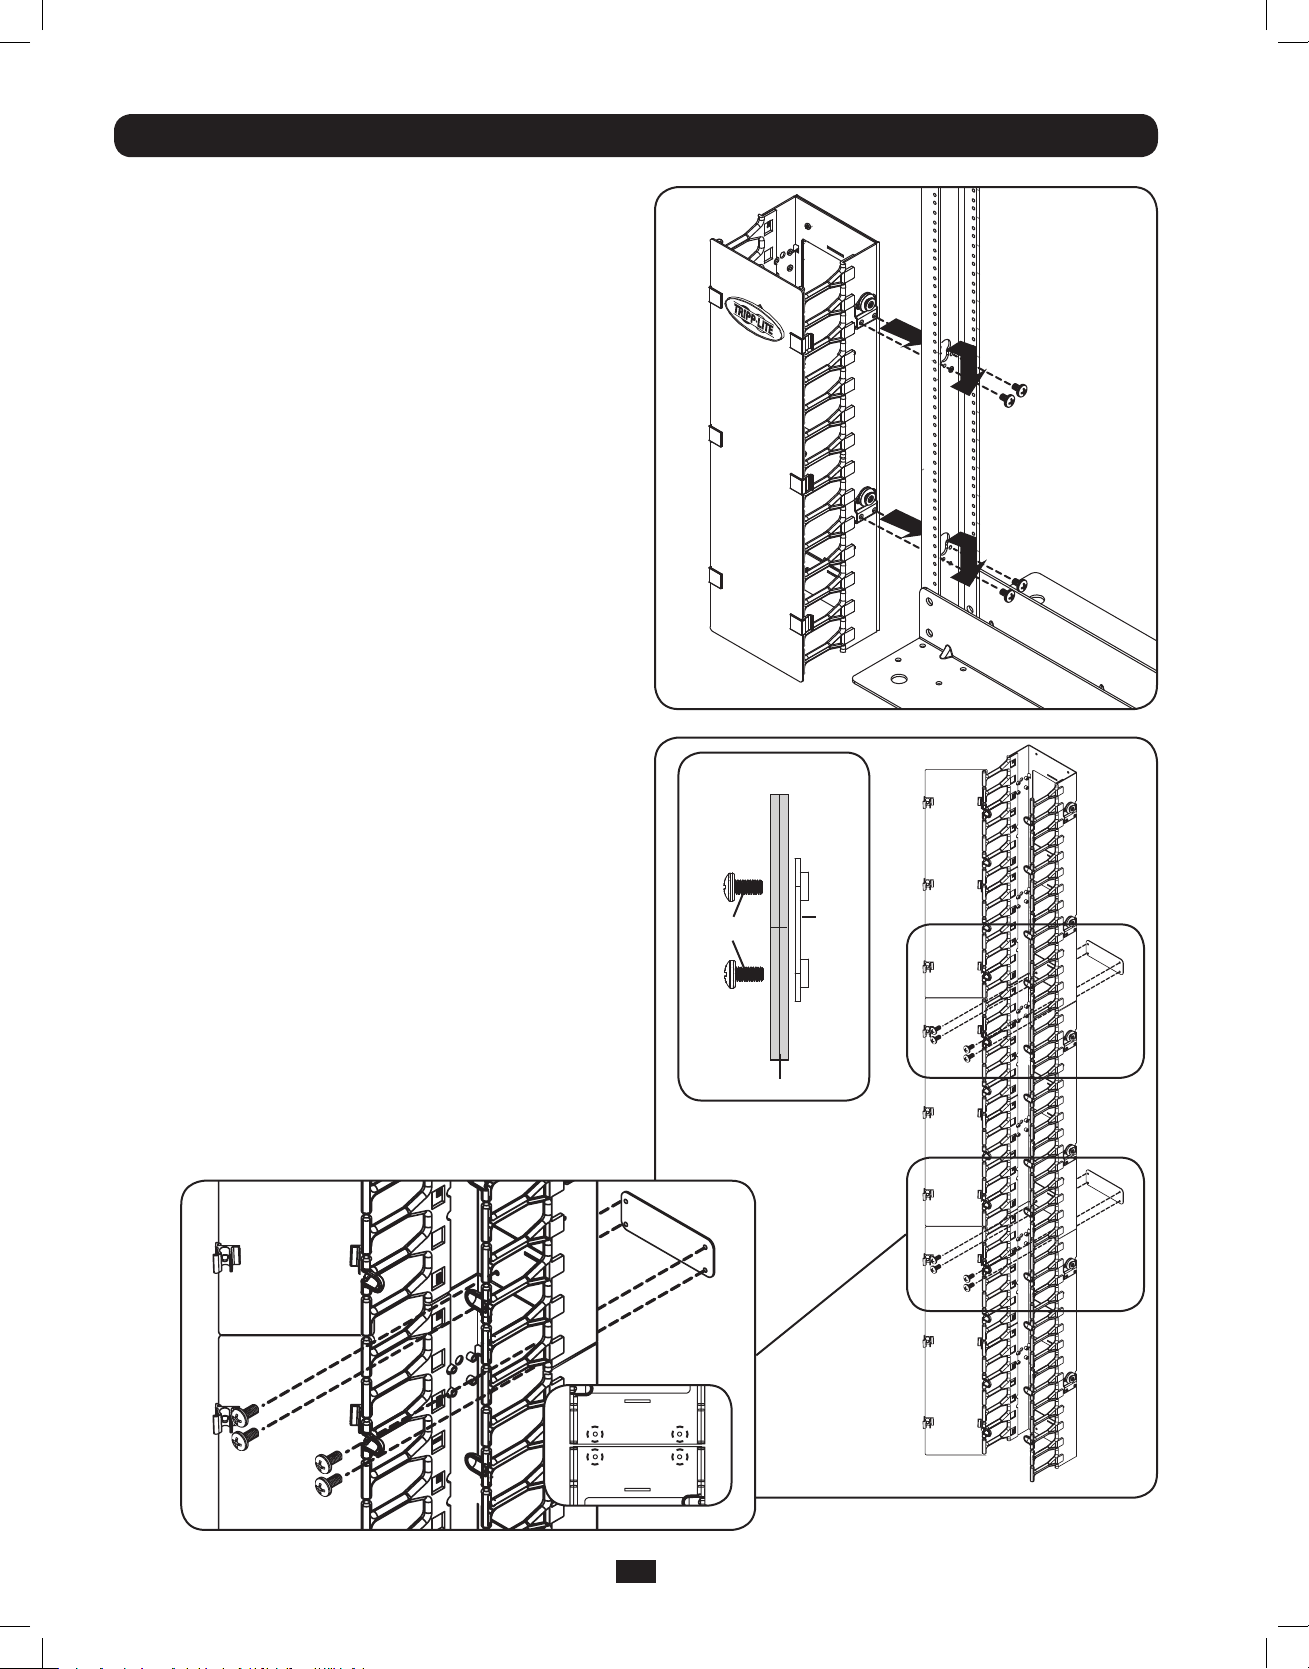
Step 5 Align the mounting buttons with the toolless
mounting slots on the side of the rack. Insert
the mounting buttons through the slots and
slide the cable tray downward until secure.
Use (4) M4 x 12 mm pan head screws inside of
the rack rail to fasten the cable tray in place.
Step 6 Repeat Steps 1-5 to assemble and mount the other
two cable trays, then use (2) tie plates and (8) M4
x 8 mm screws to connect adjacent cable trays for
added stability.
•Use (1) tie plate and (4) M4 x 8 mm screws
to connect the bottom cable tray to the middle
cable tray.
•Use(1)tieplateand(4)M4x8 mm screws to
connect the top cable tray to the middle cable
tray.
Note: Insert the screws on the opposite side of
the cable tray surface from the tie plate, as shown
in the diagram. Make sure the flat side of the tie
plate faces the cable tray surface so the screws will
thread into the tie plate properly.
SIDE VIEW
SCREWS
CABLE TRAY
TIE
PLATE
4
201202097 93-3029-EN with Addendum.indd 4 3/5/2012 12:14:58 PM
Page 5
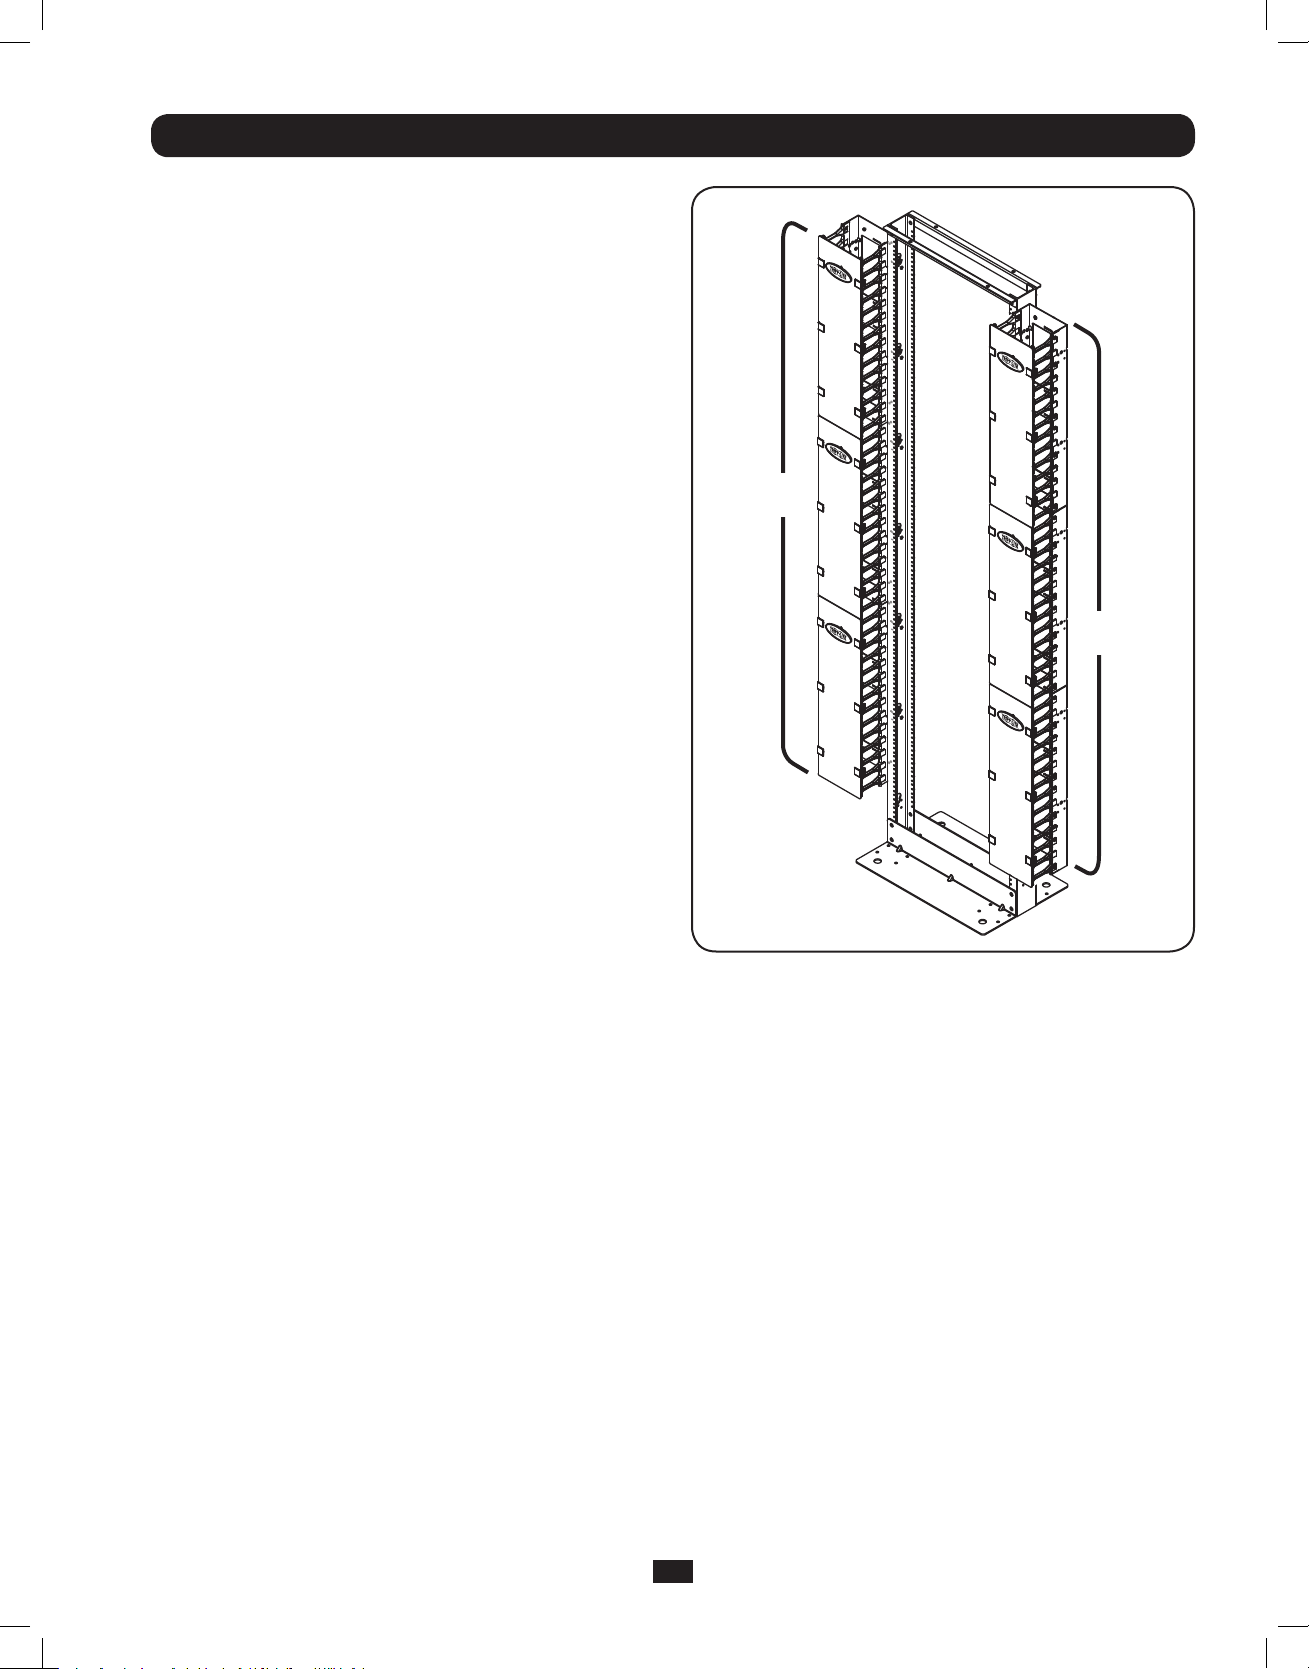
Single-Depth Installation (SRCABLEVRT6 & SRCABLEVRT12 only)
Step 7 (Optional) Repeat Steps 1-6 to install another set
of cable trays on the other side of the rack. (A
single-depth installation on both sides of the rack
requires 2 x SRCABLEVRT6 or SRCABLEVRT12.)
3
3
SRCABLEVRT6
#1
2
2
SRCABLEVRT6
#2
1
1
Note: SRCABLEVRT6 is shown. The cable tray frames and
doors of the SRCABLEVRT12 are wider, but installation is
identical.
5
201202097 93-3029-EN with Addendum.indd 5 3/5/2012 12:15:02 PM
Page 6
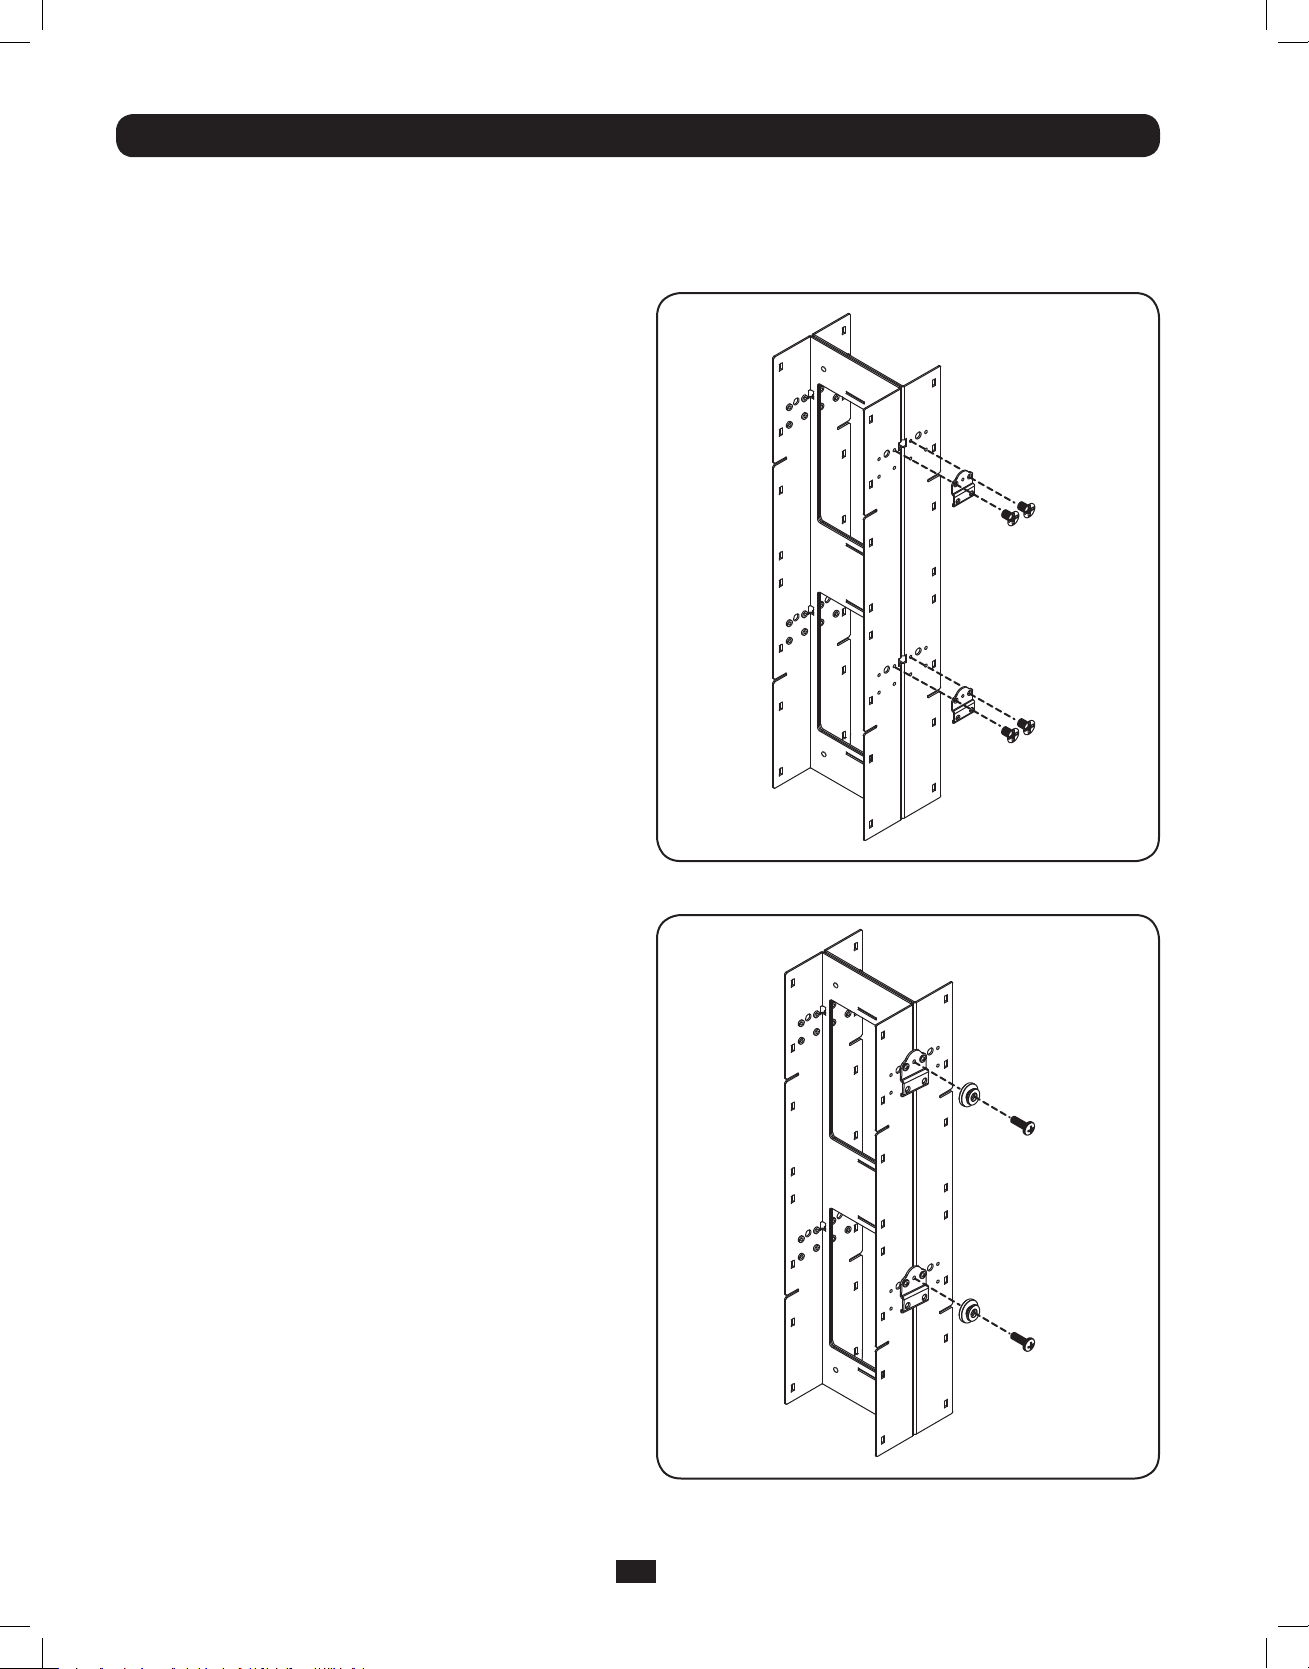
Double-Depth Installation (SRCABLEVRT6 & SRCABLEVRT12 only)
Note: Each SRCABLEVRT6 and SRCABLEVRT12 unit includes 3 cable trays. If you install the cable trays in a double-depth
configuration, SR2POST (Tripp Lite’s 45U 2-post rack) will hold 6 cable trays per side (12 total – requires 4 x SRCABLEVRT6
or SRCABLEVRT12). Always begin installation at the bottom of the rack and work your way to the top.
Step 1 Using (4) M4 x 6 mm flat head screws, attach (2)
mounting brackets to (2) cable tray frames. (The
brackets will span the frames to connect them.)
Step 2 Using (2) M4 x 12 mm pan head screws, attach (2)
mounting buttons to the mounting brackets.
6
201202097 93-3029-EN with Addendum.indd 6 3/5/2012 12:15:03 PM
Page 7
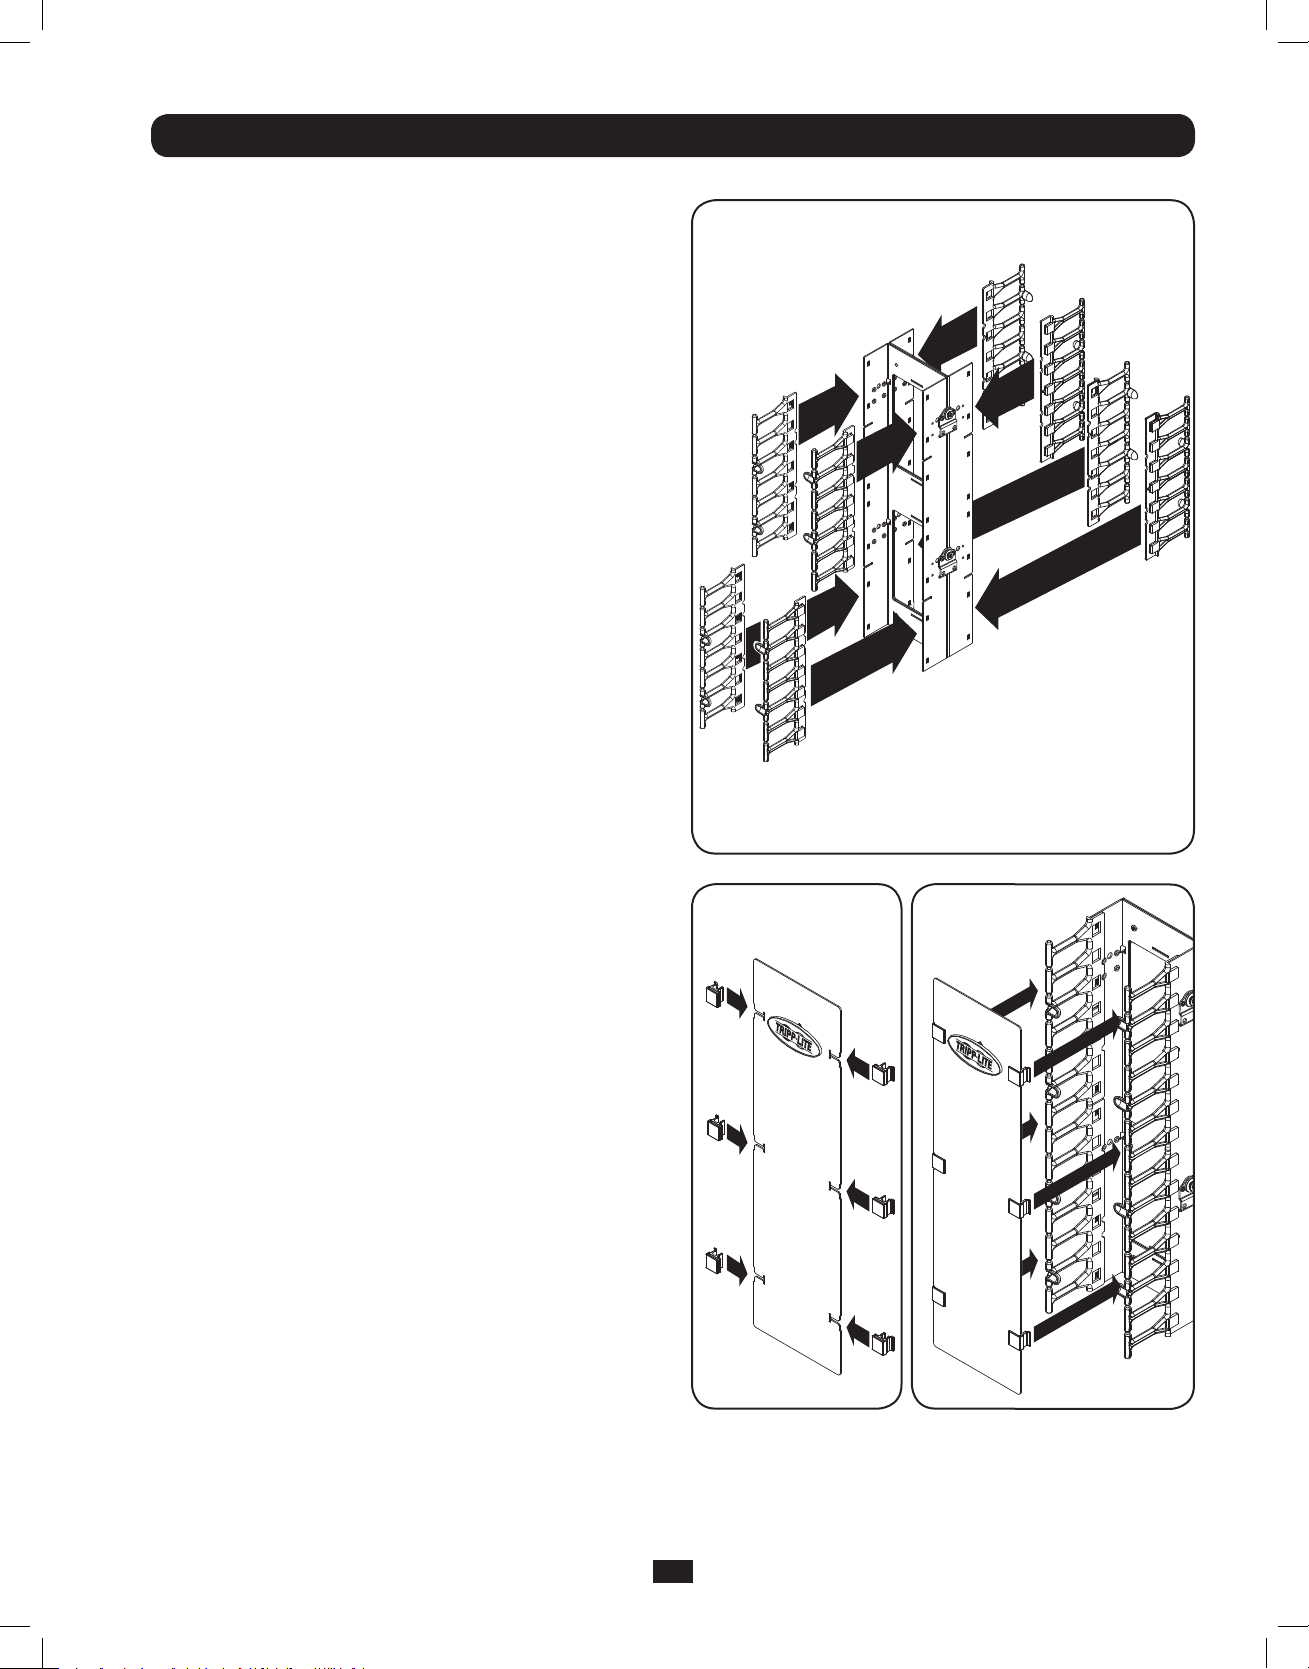
Double-Depth Installation (SRCABLEVRT6 & SRCABLEVRT12 only)
Step 3 Attach (8) cable guides to the cable tray frames.
The cable guides slide over the edges of the cable
tray frames to form a tight attachment.
Step 4 Slide (6) door hinges over the edge of (1) cable
tray door, then fasten the door to the cable guides
via the door hinges’ C clasps. Repeat for the other
cable tray. After installation, you can release the C
clasps on one side of the cable tray door to open it
from either side.
X2
X2
7
201202097 93-3029-EN with Addendum.indd 7 3/5/2012 12:15:07 PM
Page 8
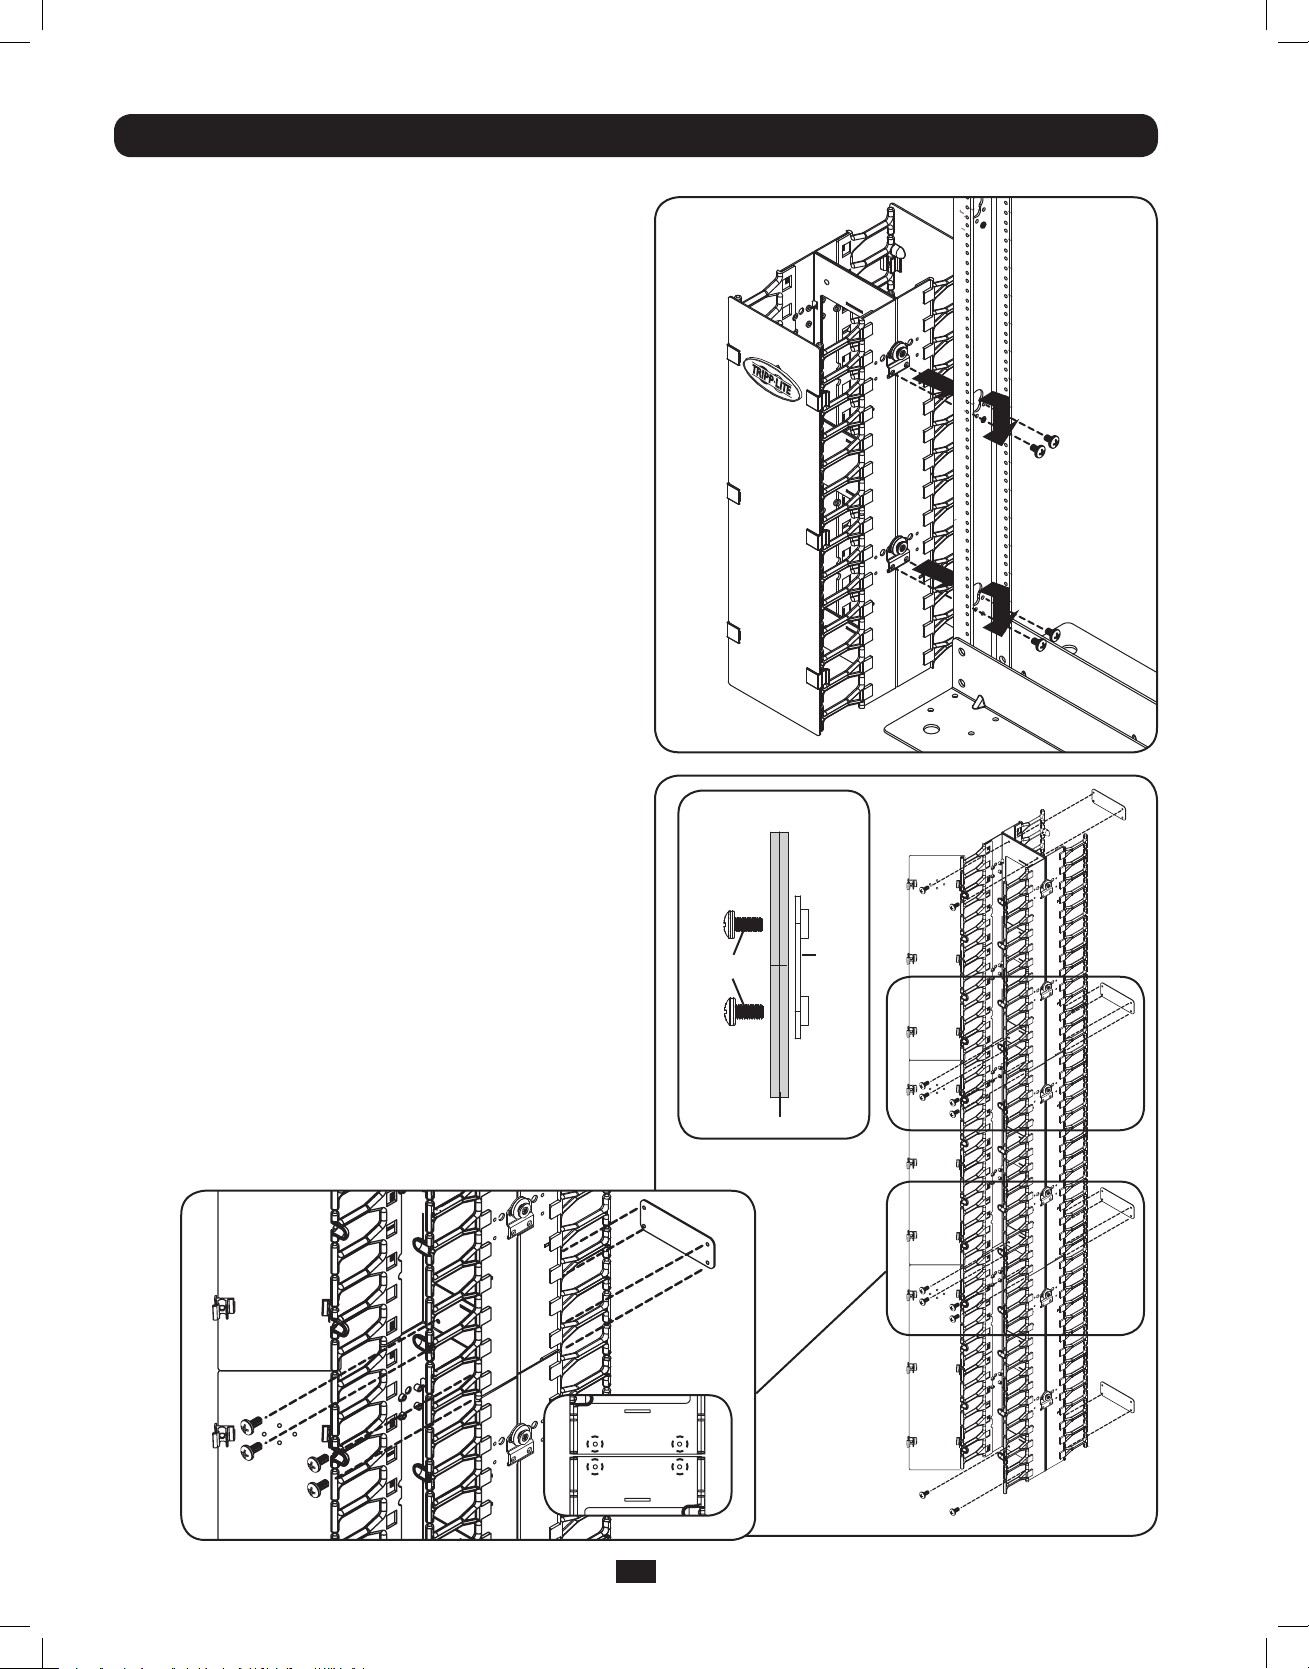
Double-Depth Installation (SRCABLEVRT6 & SRCABLEVRT12 only)
Step 5 Align the mounting buttons with the toolless
mounting slots on the side of the rack. Insert
the mounting buttons through the slots and
slide the cable trays downward until secure.
Use (4) M4 x 12 mm pan head screws inside of
the rack rail to fasten the cable trays in place.
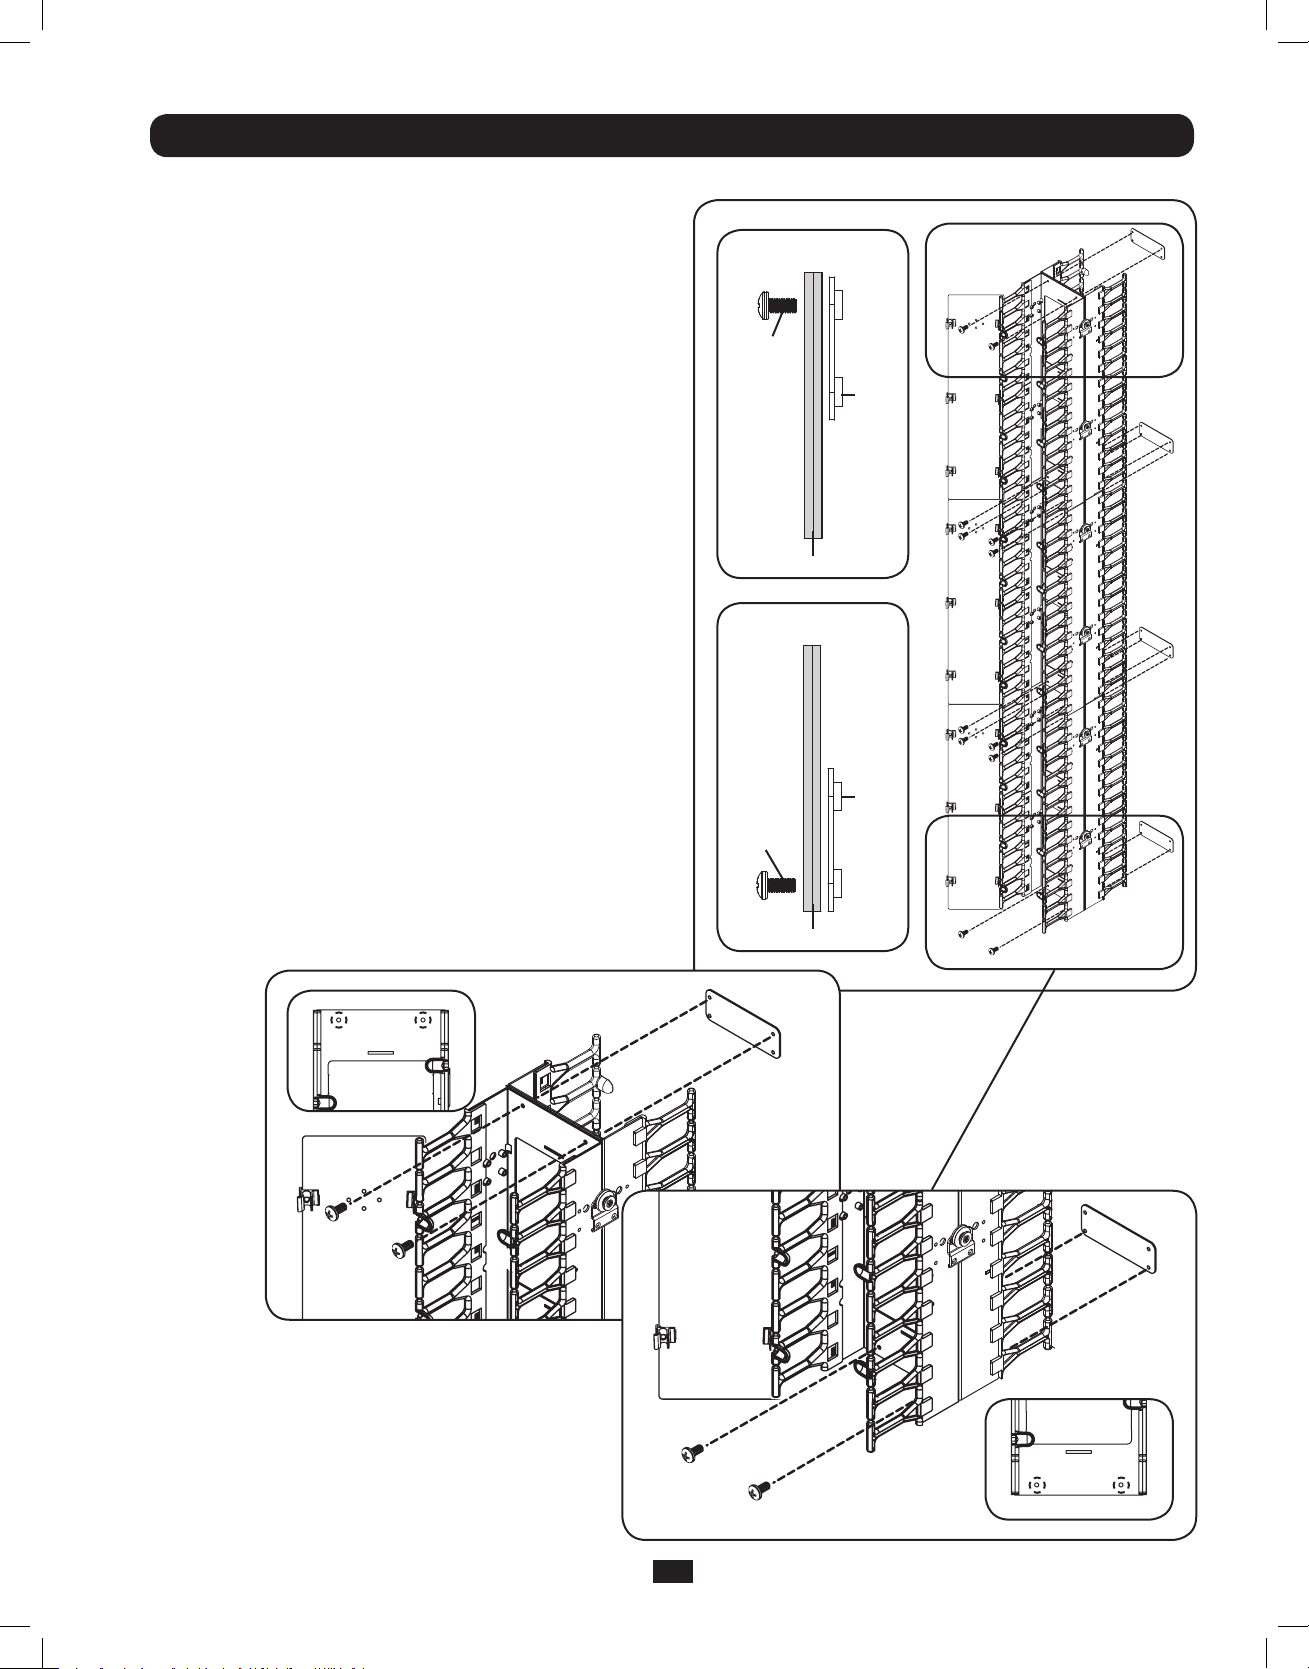
Step 6 Repeat Steps 1-5 to assemble and mount the
other four cable trays, then use (4) tie plates and
(12) M4 x 8 mm screws to connect adjacent cable
trays vertically and horizontally for added stability.
•Use(1)tieplateand(4)M4x8 mm screws to
connect the bottom cable trays to the middle
cable trays. This will also connect the cable trays
back-to-back.
•Use(1)tieplateand(4)M4x8 mm screws to
connect the top cable trays to the middle cable
trays. This will also connect the cable trays backto-back.
SIDE VIEW
SCREWS
CABLE TRAY
TIE
PLATE
8
201202097 93-3029-EN with Addendum.indd 8 3/5/2012 12:15:16 PM
Page 9
Double-Depth Installation (SRCABLEVRT6 & SRCABLEVRT12 only)
Step 6 continued
•Use(1)tieplateand(2)M4x8 mm screws to
connect the top cable trays back-to-back.
•Use(1)tieplateand(2)M4x8 mm screws to
connect the bottom cable trays back-to-back.
Note: Insert the screws on the opposite side of the
cable tray surface from the tie plate, as shown in
the diagrams. Make sure the flat side of the tie
plate faces the cable tray surface so the screws will
thread into the tie plate properly.
TOP SIDE VIEW
SCREW
TIE
PLATE
CABLE TRAY
BOTTOM SIDE VIEW
TIE
PLATE
SCREW
CABLE TRAY
9
201202097 93-3029-EN with Addendum.indd 9 3/5/2012 12:15:28 PM
Page 10
Double-Depth Installation (SRCABLEVRT6 & SRCABLEVRT12 only)
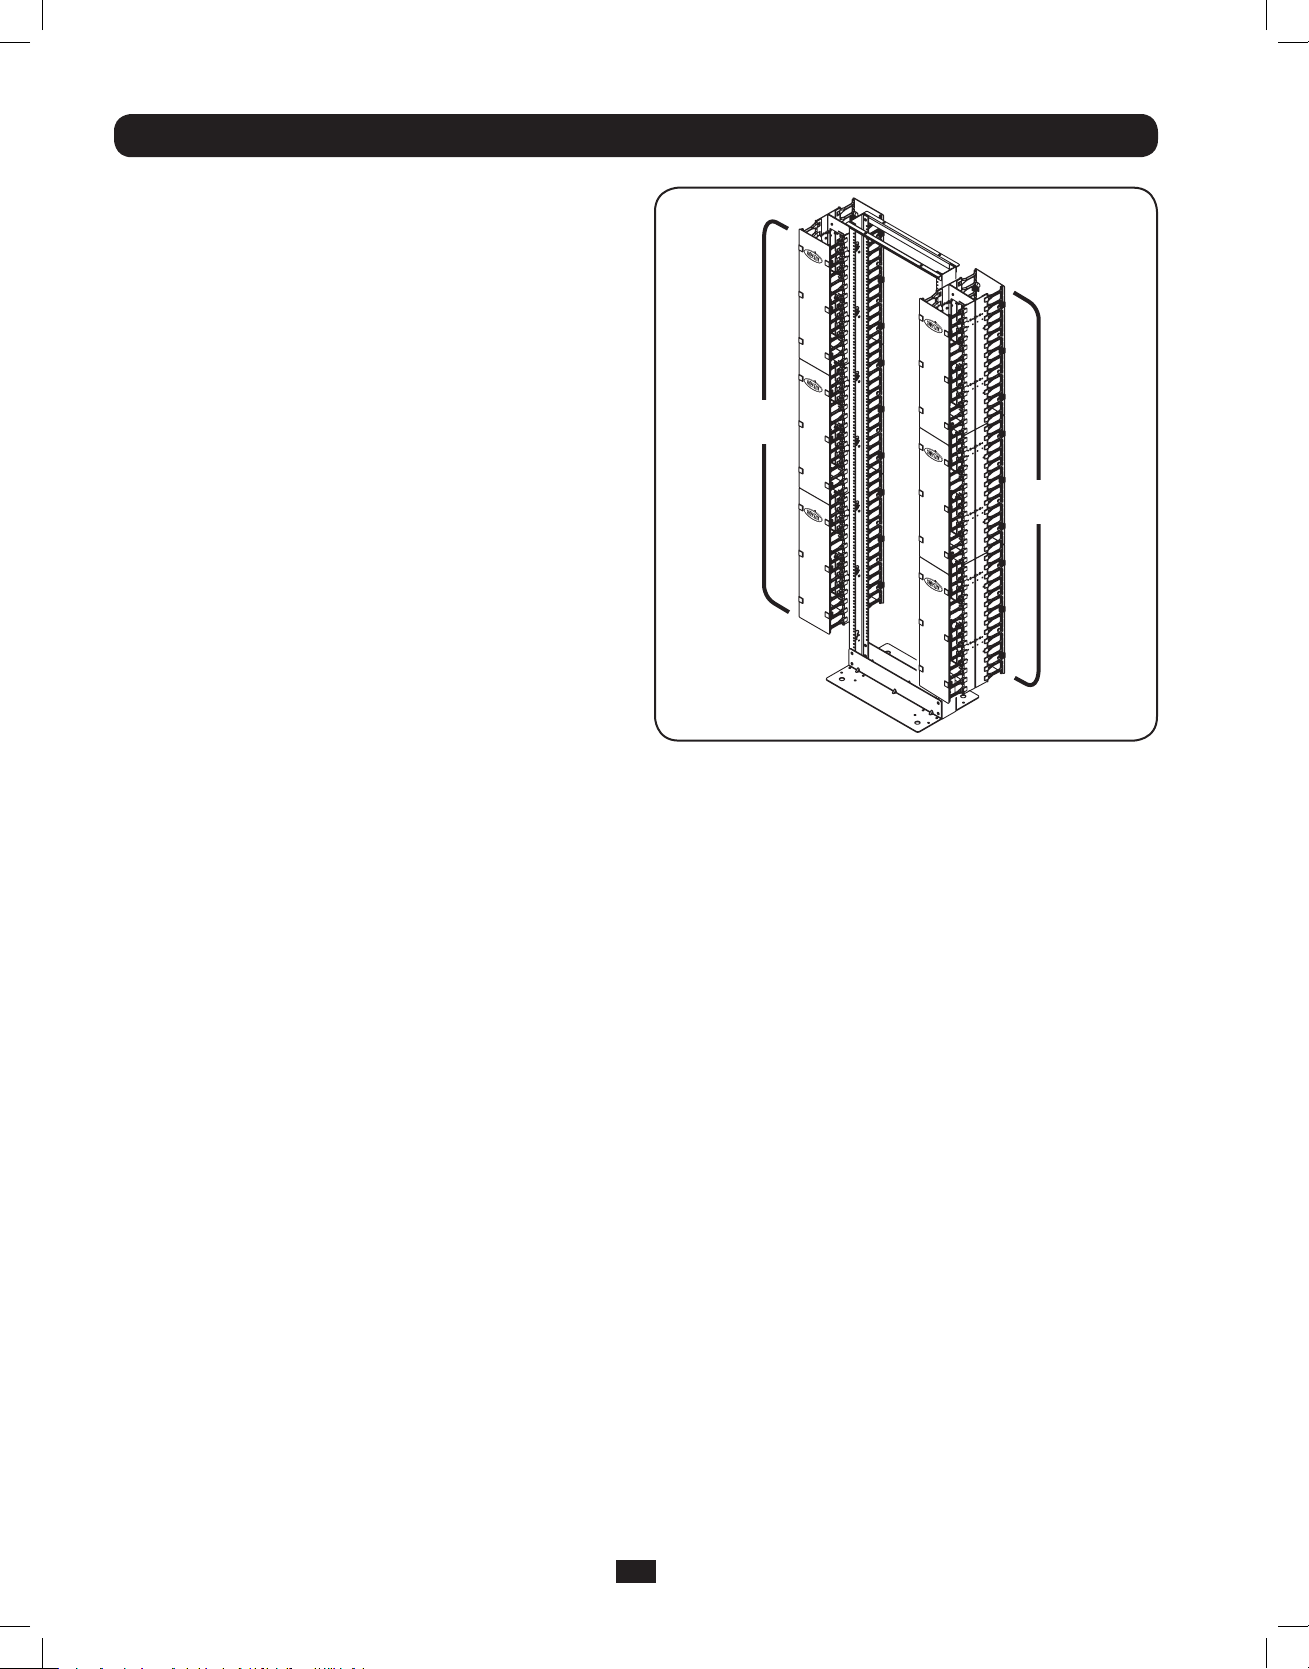
Step 7 (Optional) Repeat Steps 1-6 to install additional
cable trays on the other side of the rack. (A doubledepth installation on both sides of the rack requires
4 x SRCABLEVRT6 or SRCABLEVRT12.)
SRCABLEVRT6
#1 and #2
SRCABLEVRT6
#3 and #4
Note: SRCABLEVRT6 is shown. The cable tray frames and
doors of the SRCABLEVRT12 are wider, but installation is
identical.
10
201202097 93-3029-EN with Addendum.indd 10 3/5/2012 12:15:32 PM
Page 11
SR42UBWD Installation: Front-Facing (SRCABLEVRT3 only)
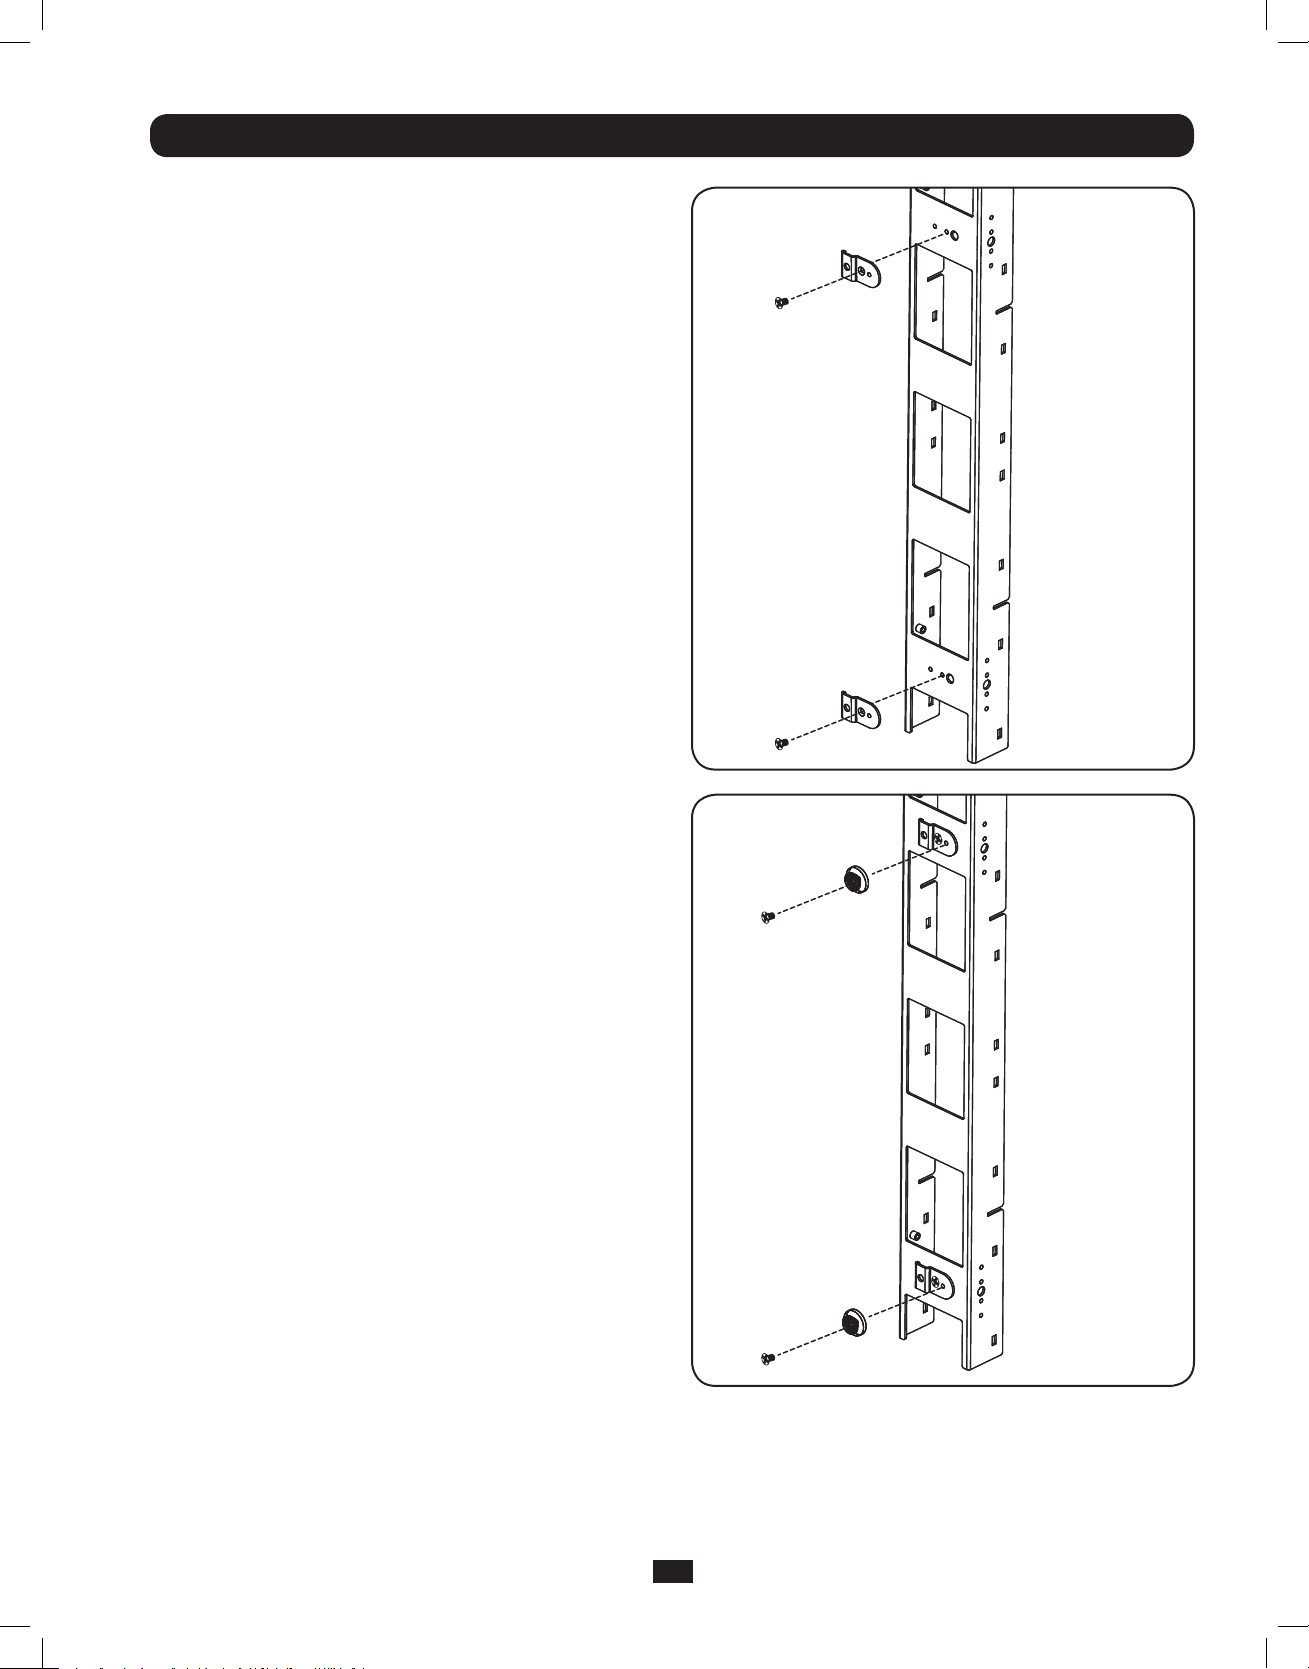
Step 1 Using (2) M4 x 6 mm flat head screws, attach (2)
mounting brackets to the rear side of (1) cable
tray frame.
Note: The mounting brackets should be aligned so
that the three mounting holes form a horizontal
line. Depending on which side of the enclosure
you choose to install the SRCABLEVRT3, the
round end of the mounting bracket should be
closest to the exterior of the enclosure.
Step 2 Using (2) M4 x 12 mm pan head screws, attach
(2) mounting buttons to the mounting brackets.
11
201202097 93-3029-EN with Addendum.indd 11 3/5/2012 12:15:34 PM
Page 12
SR42UBWD Installation: Front-Facing (SRCABLEVRT3 only)
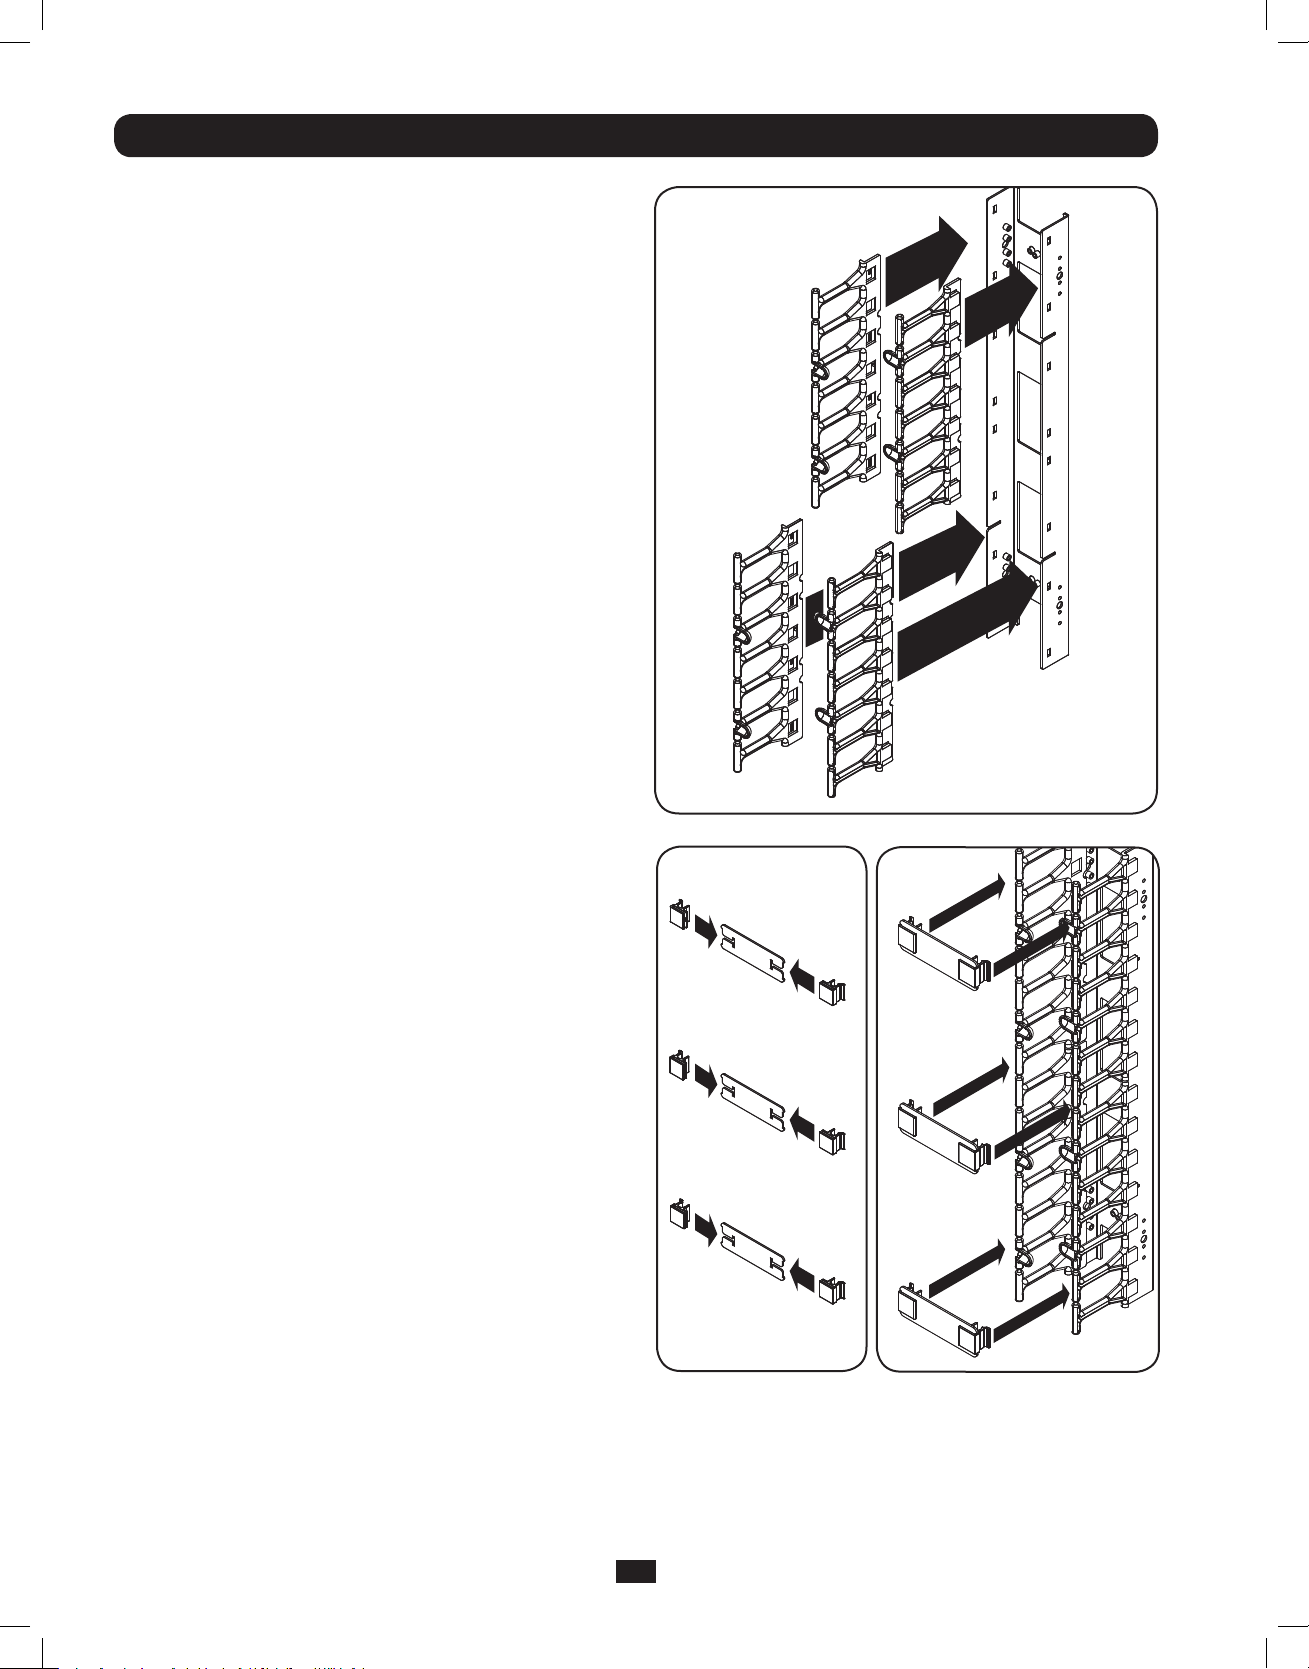
Step 3 Attach (4) cable guides to the cable tray frame.
The cable guides slide over the edges of the cable
tray frame to form a tight attachment.
Step 4 Slide (6) door hinges over the edges of (3) cable
tray door straps, then fasten the door straps to the
cable guides via the door hinges’ C clasps. After
installation, you can release the C clasps on one
side of the cable tray door straps to open them
from either side.
12
201202097 93-3029-EN with Addendum.indd 12 3/5/2012 12:15:45 PM
Page 13
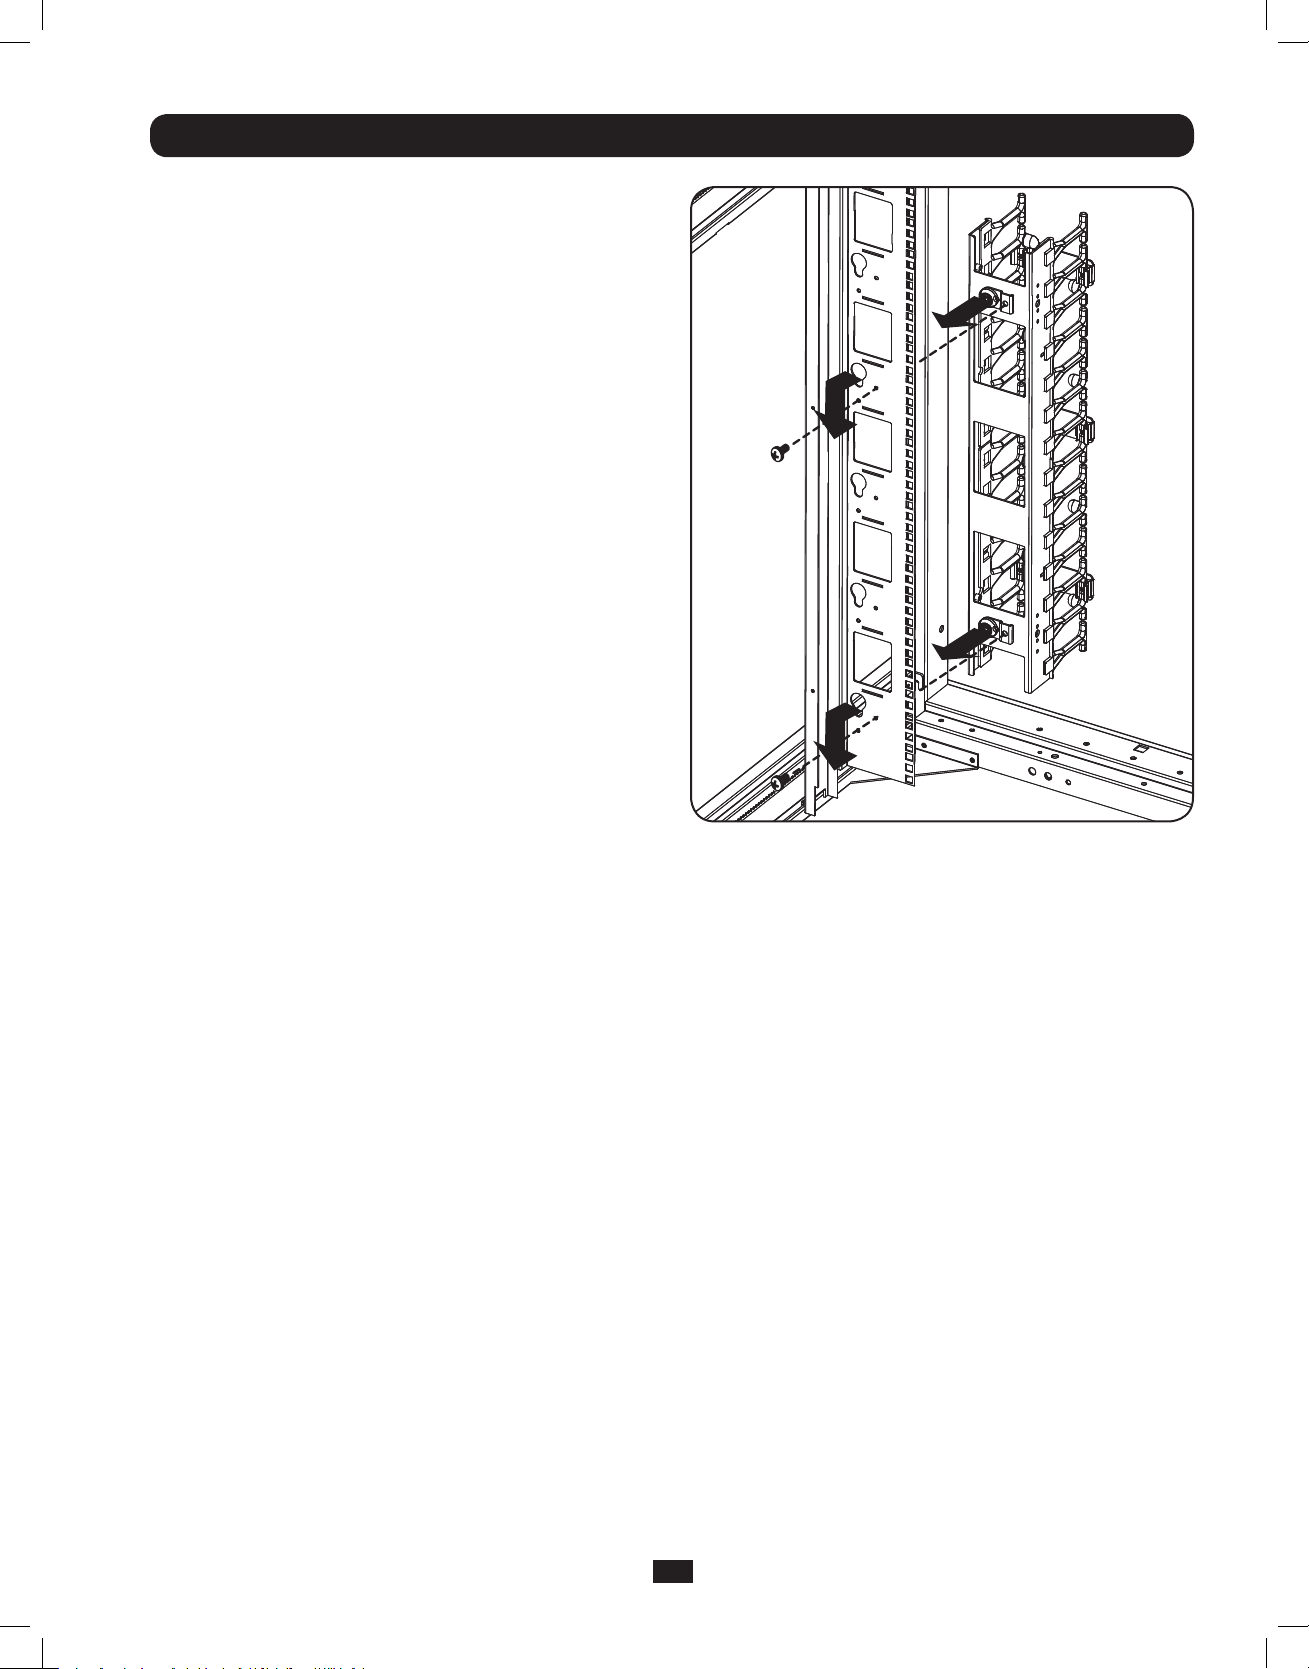
SR42UBWD Installation: Front-Facing (SRCABLEVRT3 only)
Step 5 Align the mounting buttons with the toolless
mounting slots on one of the rails on either side
of the front of the rack, so that the SRCABLEVRT3
is facing the front door. Insert the mounting
buttons through the slots and slide the cable tray
downward until secure. Use (2) M4 x 12 mm pan
head screws inside of the rack rail to fasten the
cable tray in place.
Note: Always begin installation at the bottom of
the rack and work your way to the top.
Step 6 Repeat steps 1-5 to assemble and mount the
other two cable trays.
13
201202097 93-3029-EN with Addendum.indd 13 3/5/2012 12:15:53 PM
Page 14
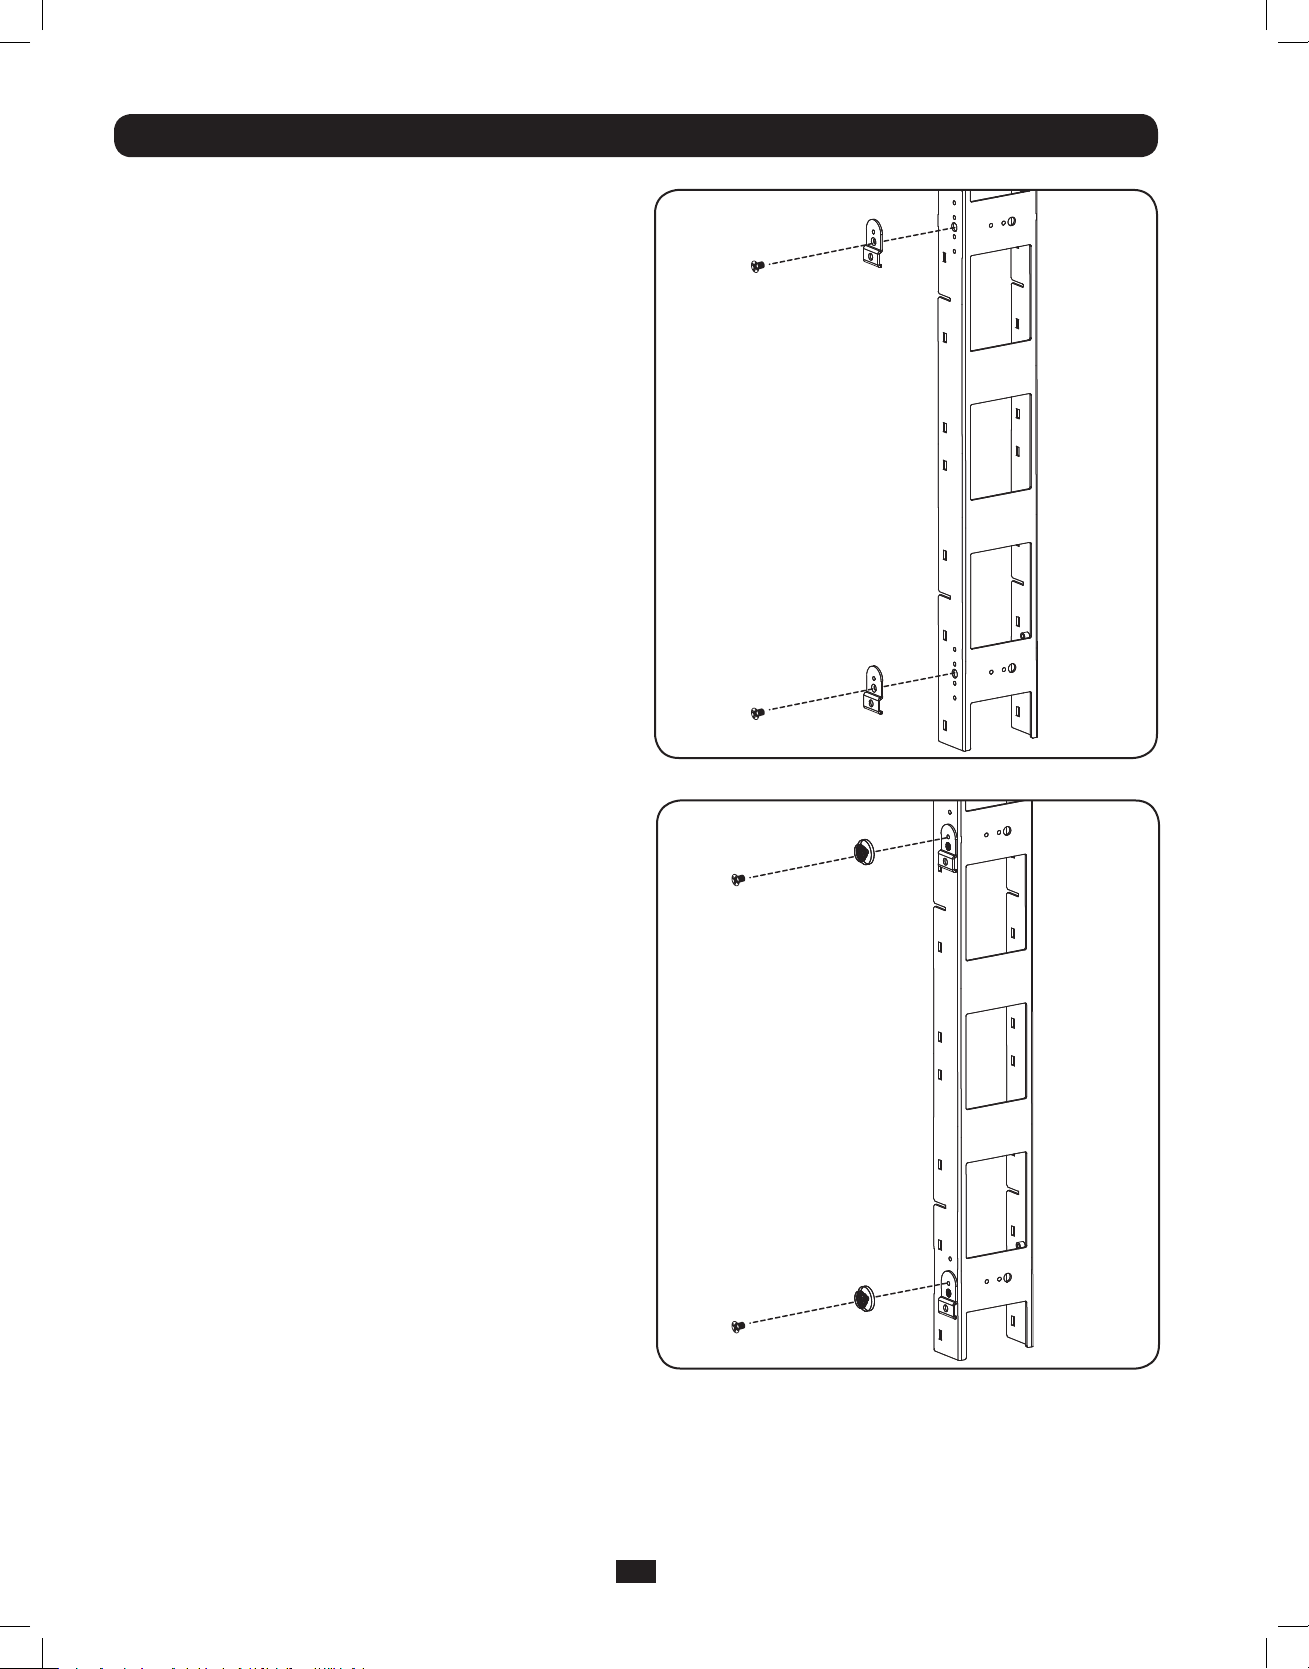
SR42UBWD Installation: Side-Facing (SRCABLEVRT3 only)
Step 1 Using (2) M4 x 6 mm flat head screws, attach (2)
mounting brackets to either side of (1) cable tray
frame.
Note: The mounting brackets should be aligned so
that the three mounting holes form a vertical line,
with the round end of the bracket at the top.
Step 2 Using (2) M4 x 12 mm pan head screws, attach
(2) mounting buttons to the mounting brackets.
14
201202097 93-3029-EN with Addendum.indd 14 3/5/2012 12:15:55 PM
Page 15
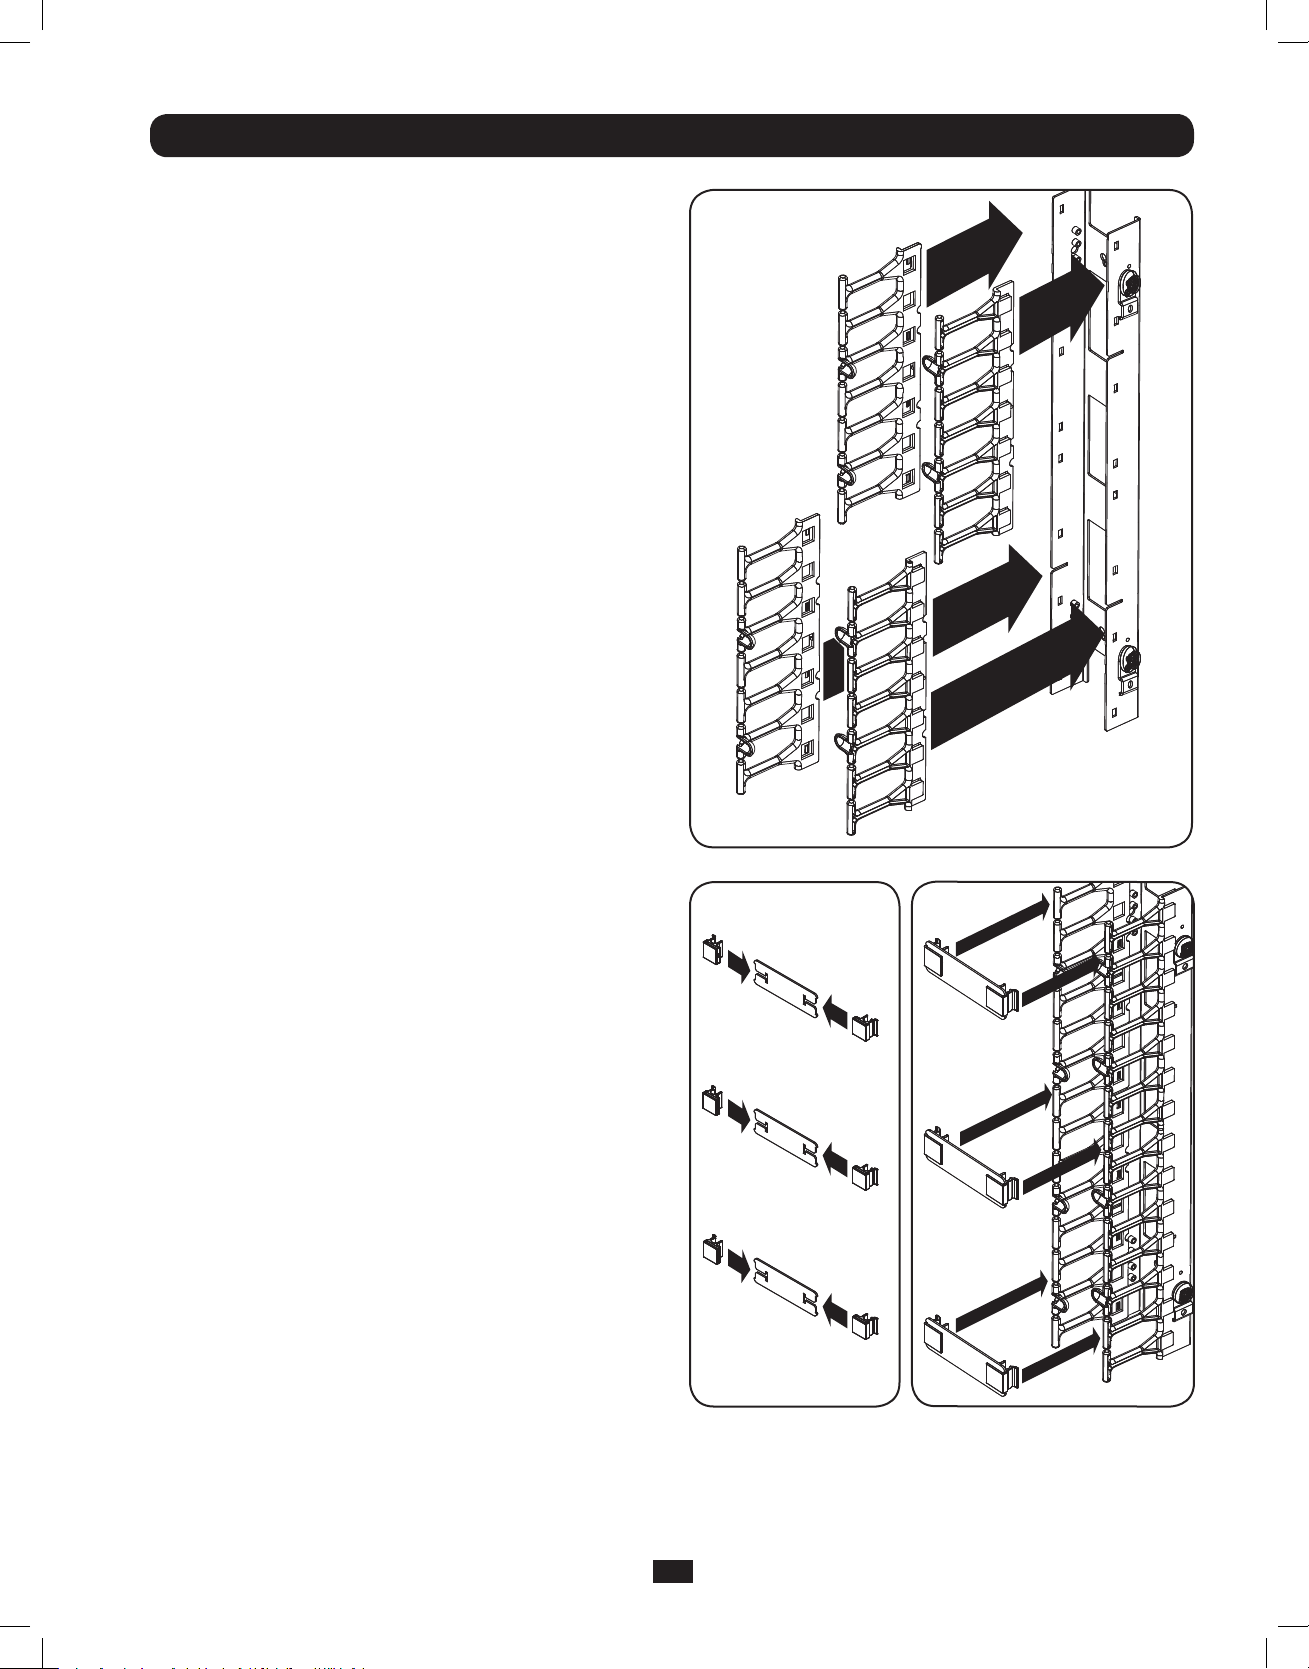
SR42UBWD Installation: Side-Facing (SRCABLEVRT3 only)
Step 3 Attach (4) cable guides to the cable tray frame.
The cable guides slide over the edges of the cable
tray frame to form a tight attachment.
Step 4 Slide (6) door hinges over the edges of (3) cable
tray door straps, then fasten the door straps to the
cable guides via the door hinges’ C clasps. After
installation, you can release the C clasps on one
side of the cable tray door straps to open them
from either side.
15
201202097 93-3029-EN with Addendum.indd 15 3/5/2012 12:16:07 PM
Page 16
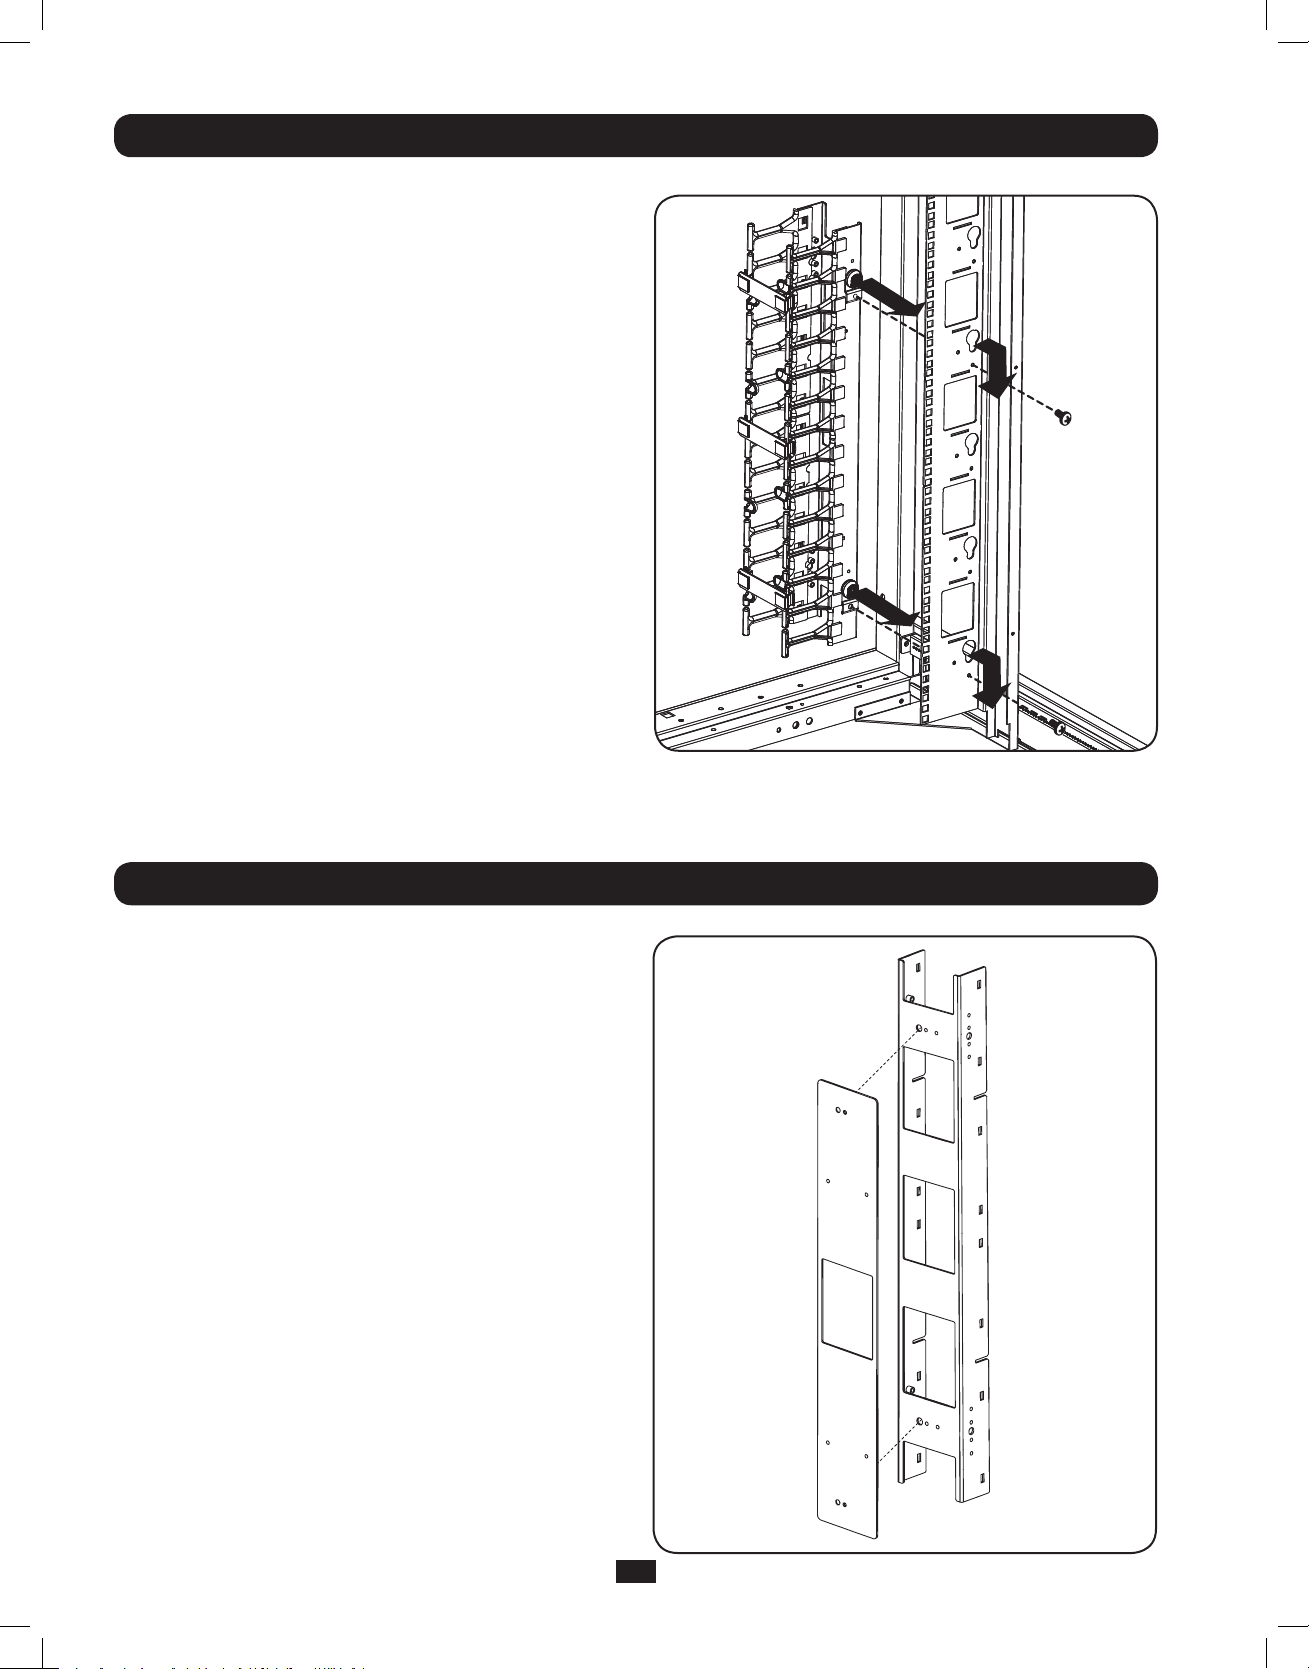
SR42UBWD Installation: Side-Facing (SRCABLEVRT3 only)
Step 5 Align the mounting buttons with the toolless
mounting slots on one of the rails on either side of
the front of the rack, so that the SRCABLEVRT3 is
facing the center of the rack. Insert the mounting
buttons through the slots and slide the cable tray
downward until secure. Use (2) M4 x 12 mm pan
head screws inside of the rack rail to fasten the
cable tray in place.
Note: Always begin installation at the bottom of
the rack and work your way to the top.
Step 6 Repeat steps 1-5 to assemble and mount the
other two cable trays.
42U Enclosure with PDU Manager Installation Side-Facing (SRCABLEVRT3 only)
Step 1 Attach the cable tray frame to the adapter plate
using (2) M4 x 8 mm screws.
16
201202097 93-3029-EN with Addendum.indd 16 3/5/2012 12:16:17 PM
Page 17
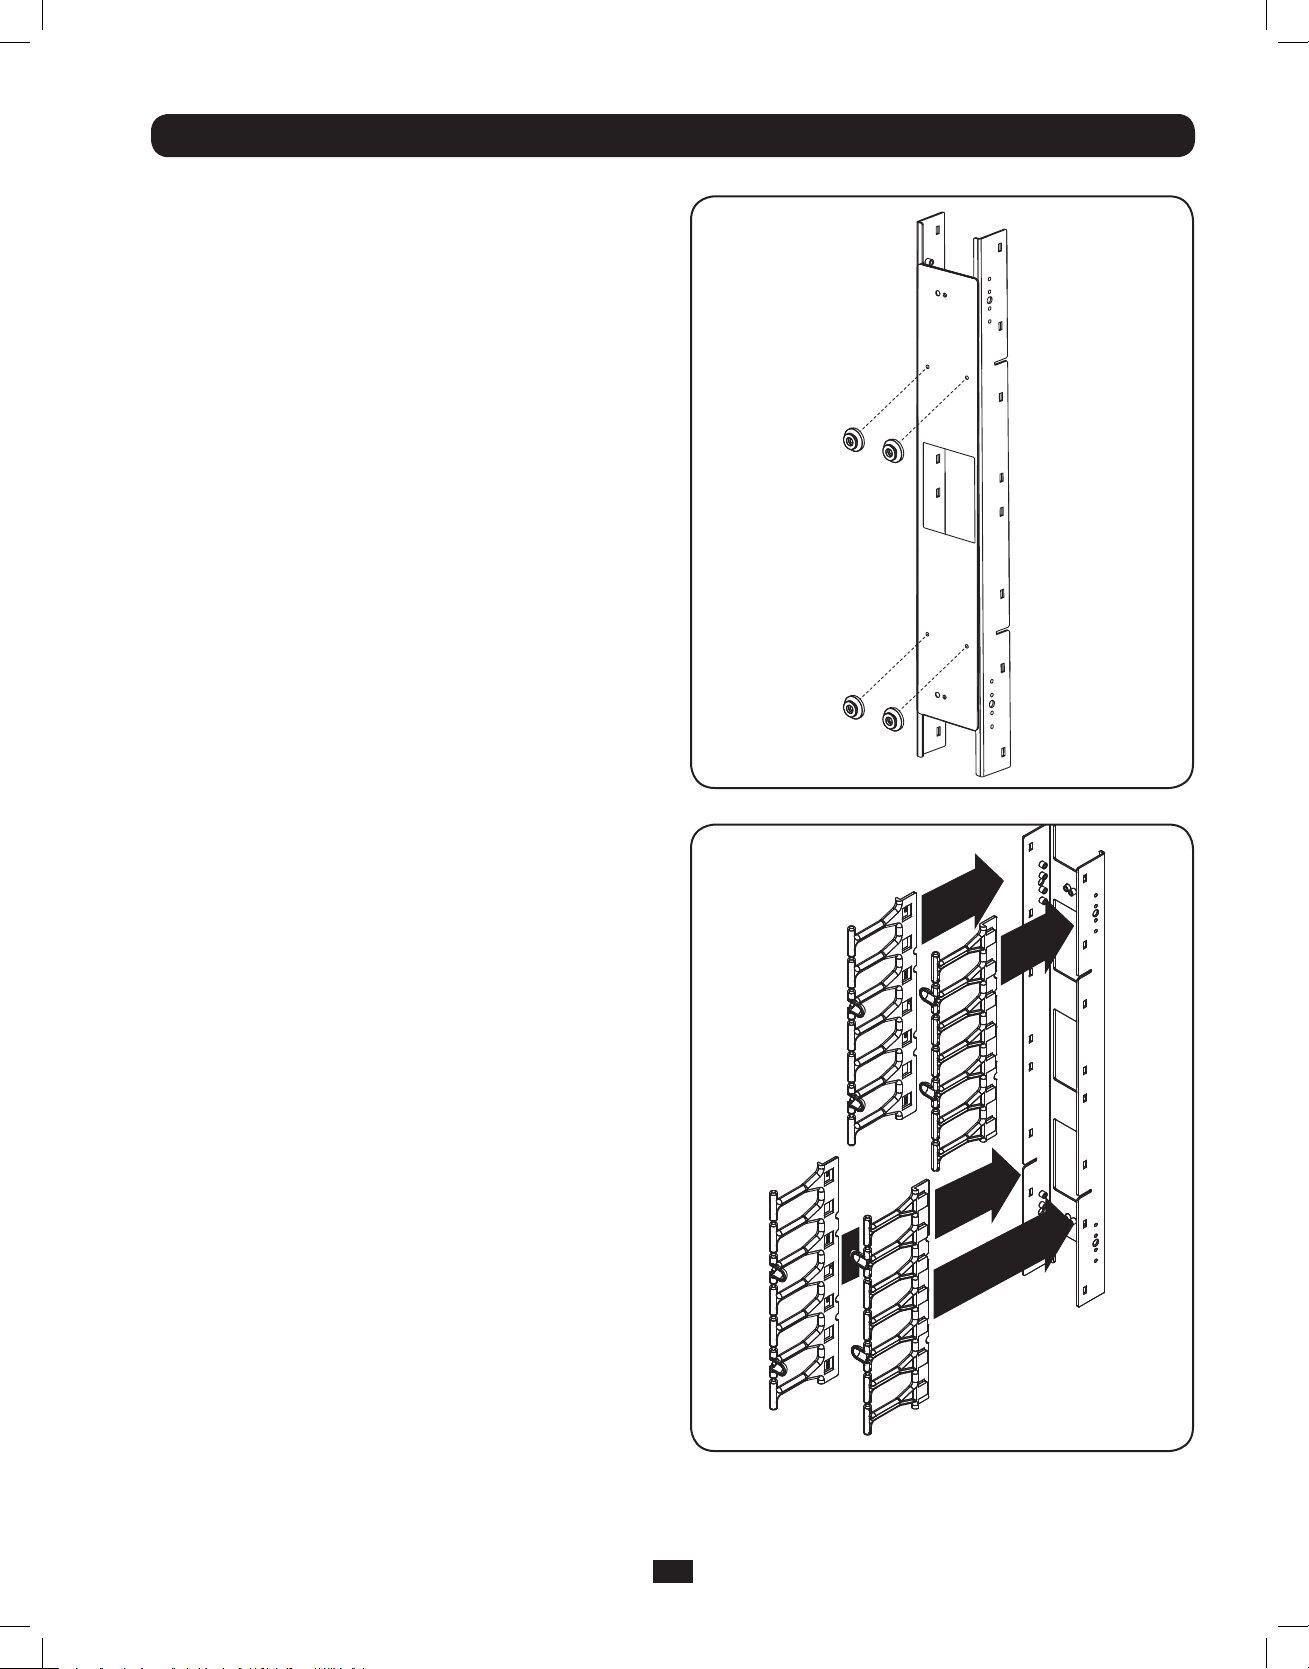
42U Enclosure with PDU Manager Installation Side-Facing (SRCABLEVRT3 only)
Step 2 Using (4) M4 x 12 mm pan head screws, attach the
mounting buttons to the back of the adapter plate
frame.
Step 3 Attach the (4) cable guides to the cable tray frame.
The cable guides slide over the edges of the cable
tray frame to form a tight attachment.
17
201202097 93-3029-EN with Addendum.indd 17 3/5/2012 12:16:23 PM
Page 18
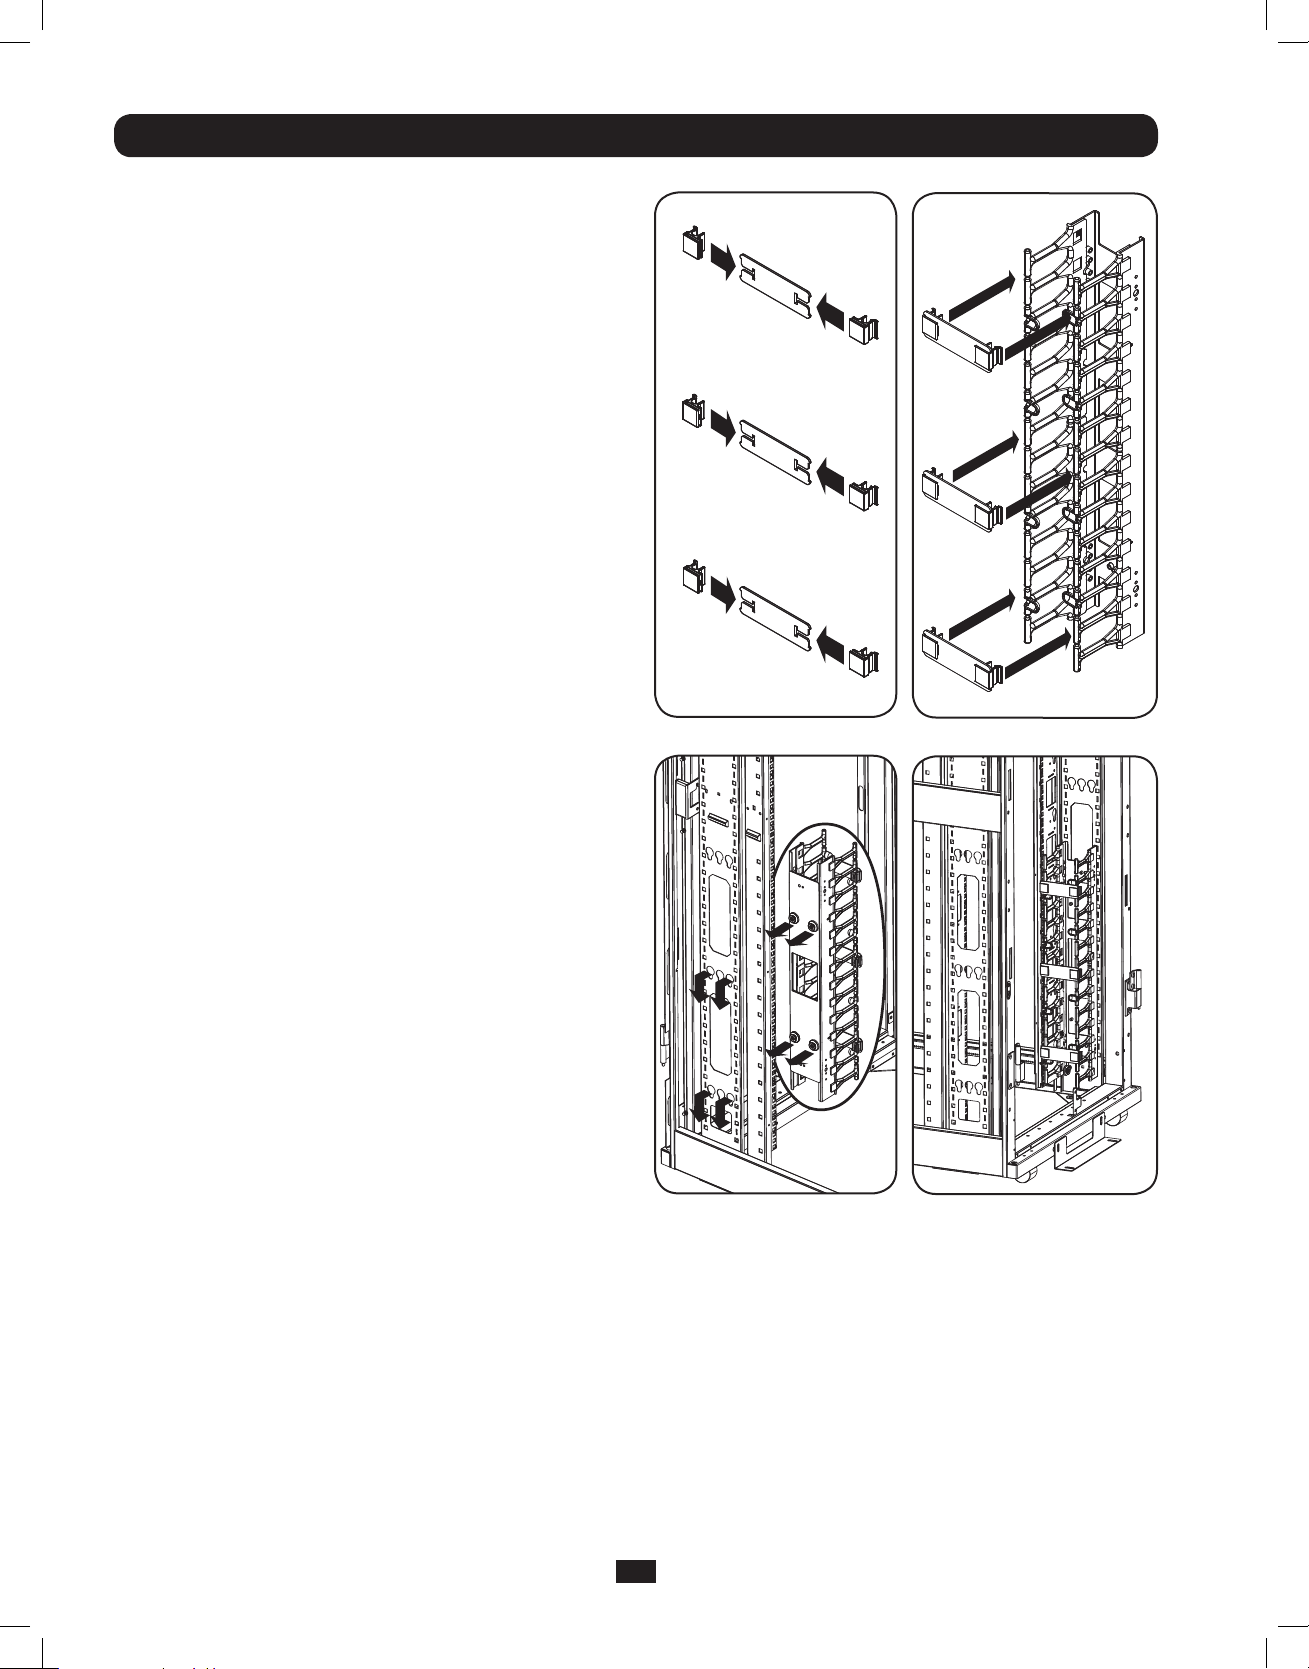
42U Enclosure with PDU Manager Installation Side-Facing (SRCABLEVRT3 only)
Step 4 Slide (6) door hinges over the edges of (3) cable
tray door straps, then fasten the door straps to the
cable guides via the door hinges’ C clasps. After
installation, you can release the C clasps on one
side of the cable tray door straps to open them
from either side.
Step 5 Align the mounting buttons with the toolless
mounting slots on the enclosure’s PDU manager, so
that the SRCABLEVRT3 is facing the center of the
rack. Insert the mounting buttons through the slots
and slide the cable tray downward until secure.
Note: Always begin installation at the bottom of the
rack and work your way to the top.
Step 6 Repeat steps 1-5 to assemble and mount the other
two cable trays.
18
201202097 93-3029-EN with Addendum.indd 18 3/5/2012 12:16:40 PM
Page 19

Warranty & Warranty Registration
5-Year Limited Warranty
Seller warrants this product, if used in accordance with all applicable instructions, to be free from original defects in material and
workmanship for a period of 5 years from the date of initial purchase. If the product should prove defective in material or workmanship
within that period, Seller will repair or replace the product, at its sole discretion.
THIS WARRANTY DOES NOT APPLY TO NORMAL WEAR OR TO DAMAGE RESULTING FROM ACCIDENT, MISUSE, ABUSE OR NEGLECT.
SELLER MAKES NO EXPRESS WARRANTIES OTHER THAN THE WARRANTY EXPRESSLY SET FORTH HEREIN. EXCEPT TO THE EXTENT
PROHIBITED BY APPLICABLE LAW, ALL IMPLIED WARRANTIES, INCLUDING ALL WARRANTIES OF MERCHANTABILITY OR FITNESS, ARE
LIMITED IN DURATION TO THE WARRANTY PERIOD SET FORTH ABOVE; AND THIS WARRANTY EXPRESSLY EXCLUDES ALL INCIDENTAL
AND CONSEQUENTIAL DAMAGES. (Some states do not allow limitations on how long an implied warranty lasts, and some states do not
allow the exclusion or limitation of incidental or consequential damages, so the above limitations or exclusions may not apply to you.
This warranty gives you specific legal rights, and you may have other rights which vary from jurisdiction to jurisdiction).
WARNING: The individual user should take care to determine prior to use whether this device is suitable, adequate or safe for the use
intended. Since individual applications are subject to great variation, the manufacturer makes no representation or warranty as to the
suitability or fitness of these devices for any specific application.
Warranty Registration
Visit www.tripplite.com/warranty today to register the warranty for your new Tripp Lite product.You’ll be automatically entered into a
drawing for a chance to win a FREE Tripp Lite product!*
* No purchase necessary. Void where prohibited. Some restrictions apply. See website for details.
Tripp Lite has a policy of continuous improvement. Specifications are subject to change without notice.
19
201202097 93-3029-EN with Addendum.indd 19 3/5/2012 12:16:41 PM
Page 20

1111 W. 35th Street, Chicago, IL 60609 USA
www.tripplite.com/support
20
201202097 93-3029-EN with Addendum.indd 20 3/5/2012 12:16:41 PM
201202097•933029-EN
 Loading...