

Page 1
Warranty
Registration:
register online today for a
chance to win a FREE Tripp Lite
product—www.tripplite.com/warranty
OMNIPOWER® UPS System
Owner’s Manual
Model: PRO550
Not suitable for mobile applications.
Important Safety Instructions
Installation
Basic Operation
Warranty Registration
Storage and Service
Español
2
3
4
5
6
7
1111 W. 35th Street, Chicago, IL 60609 USA
(773) 869-1234 • www.tripplite.com
Copyright © 2008 Tripp Lite. All rights reserved.
1
Page 2
Important Safety Instructions
SAVE THESE INSTRUCTIONS
This manual contains instructions and warnings that should be followed during the installation,
operation and storage of this product. Failure to heed these warnings will void your warranty.
UPS Location Warnings
• Install the UPS indoors, away from excess moisture, temperature extremes, conductive contaminants,
dust and direct sunlight.
• For best performance, keep the indoor temperature between 32º F and 104º F (0º C and 40º C).
• Leave adequate space around all sides of the UPS for proper ventilation.
• Do not mount the unit with its front or rear panel facing down (at any angle). Mounting in this
manner will seriously inhibit the unit’s internal cooling, eventually causing product damage
not covered under warranty.
UPS Connection Warnings
• Connect the UPS to a properly grounded AC power outlet. Do not plug the UPS into itself; this will
damage the UPS.
• Do not modify the UPS input connector, and do not use an adapter that would eliminate the ground
connection of the UPS.
• Do not use extension cords to connect the UPS to an AC outlet.
• If the UPS receives power from a motor-powered AC generator, the generator must provide clean,
ltered, computer-grade output.
Equipment Connection Warnings
• Use of this equipment in life support applications where failure of this equipment can reasonably
be expected to cause the failure of the life support equipment or to signicantly affect its safety
or effectiveness is not recommended. Do not use this equipment in the presence of a ammable
anesthetic mixture with air, oxygen or nitrous oxide.
• Do not connect surge suppressors to the output of the UPS. This might damage the UPS and will
void the surge suppressor and UPS warranties.
Battery Warnings
• The UPS does not require routine maintenance. There are no user-serviceable parts inside. Do not
open the UPS for any reason.
• Batteries can present a risk of electrical shock and burn from high short-circuit current. Observe
proper precautions. Do not dispose of the batteries in a re. Do not open the UPS or batteries. Do not
short or bridge the battery terminals with any object. Unplug and turn off the UPS before performing
battery replacement. Use tools with insulated handles. There are no user-serviceable parts inside the
UPS. Battery replacement should be performed only by authorized service personnel using the same
number and type of batteries (Sealed Lead-Acid). The batteries are recyclable. Refer to your local
codes for disposal requirements or in the USA only call 1-800-SAV-LEAD or 1-800-8-BATTERY (1800-822-8837) or visit www.rbrc.com for recycling information. Tripp Lite offers a complete line of
UPS System Replacement Battery Cartridges (R.B.C.).Visit Tripp Lite on the Web at www.tripplite.
com/support/battery/index.cfm to locate the specic replacement battery for your UPS.
• Do not operate the UPS without batteries. Do not attempt to add external batteries to the UPS.
2
Page 3
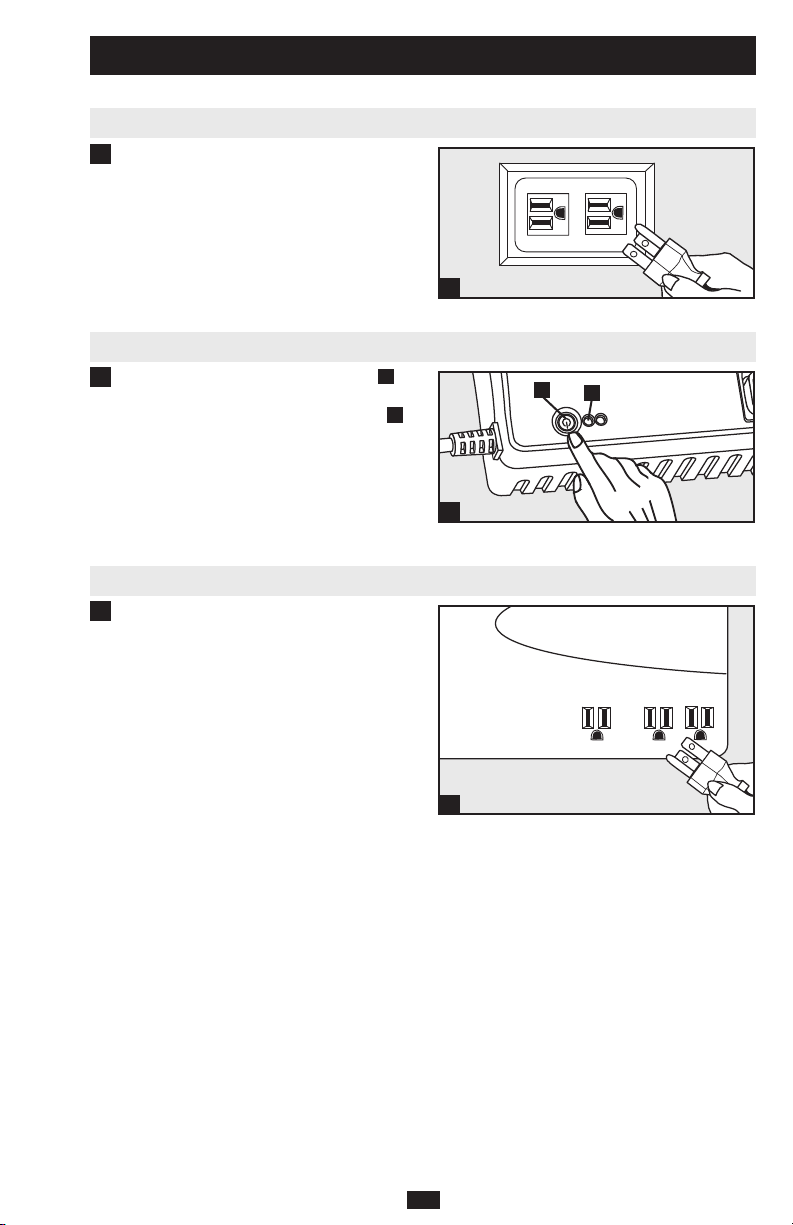
Installation
Input Connection
Connect the UPS to a grounded 120V AC
1
outlet. Ensure that the outlet does not share
a circuit with a heavy electrical load (e.g. air
conditioner or refrigerator).
Power On
Press the ON/OFF/TEST/MUTE button A
2
for 1 second (the UPS will beep) to turn the
UPS system on. The green ON/OFF light
will illuminate when the UPS system is on.
Note: The UPS system will not begin to charge its battery
until it has been turned on. Connected equipment will not
be supported adequately during a power failure until the
internal battery has charged for 4-6 hours. It will take up
to 8 hours for the battery to charge completely.
Output Connections
Plug your equipment into the UPS outlets.
3
Note: Laser printers, large household appliances or other
equipment with very high power requirements should not
be connected to the UPS. The UPS will become overloaded
if the combined power requirement for all connected
equipment exceeds the total output capacity of the UPS
(550VA). The VA rating for each piece of equipment can
be found by consulting the equipment’s documentation
and/or nameplate. If amps are shown, multiply by 120V to
determine VA (Volts x Amps = VA).
1
A
B
B
2
3
3
Page 4
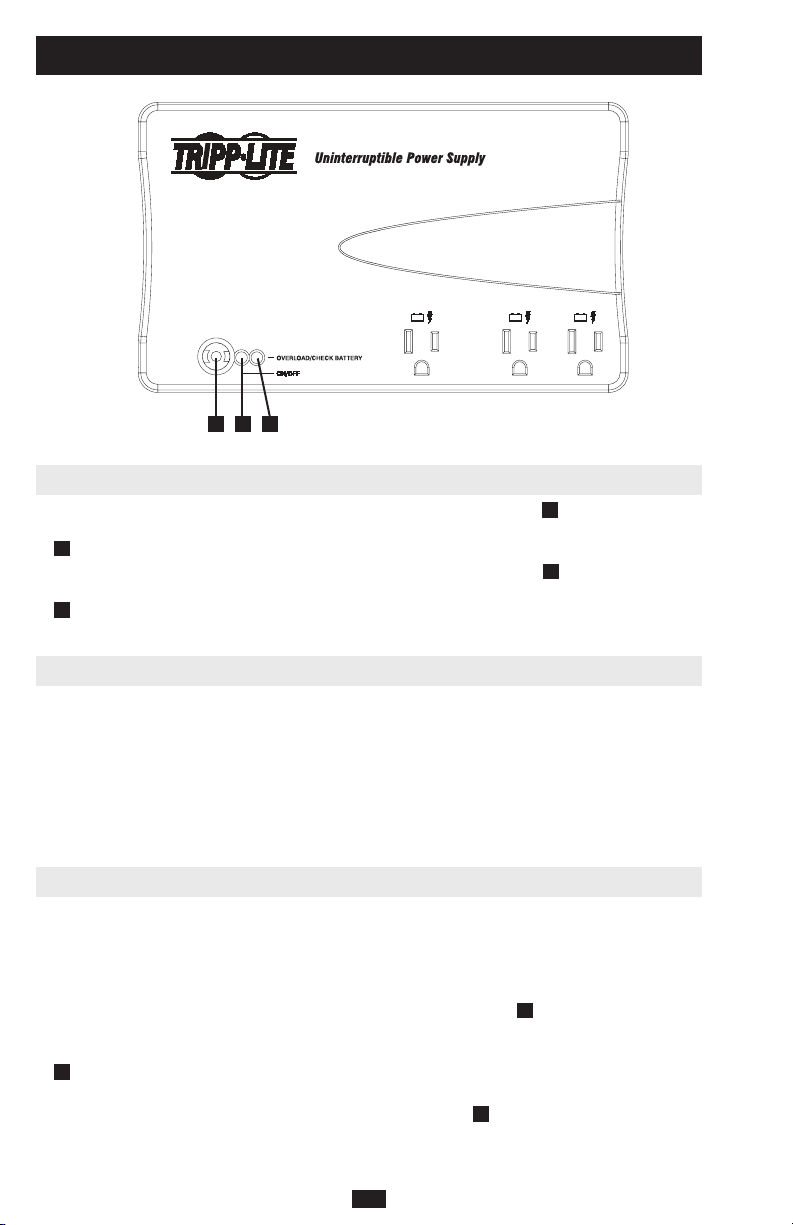
Basic Operation
A B C
Power ON/OFF
• ON: When the UPS system is OFF, press the ON/OFF/TEST/MUTE button A for 1 second (the
UPS will beep when 1 second has elapsed) to turn the UPS system ON. The green “ON/OFF” light
B
will illuminate when the UPS system is ON.
• OFF: When the UPS system is ON, press the ON/OFF/TEST/MUTE button A for 1 second (the
UPS will beep when 1 second has elapsed) to turn the UPS system OFF. The green “ON/OFF” light
B
will cease to illuminate when the UPS system is OFF. The UPS system’s outlets and connected
equipment will cease to receive AC power and the battery will cease to charge.
Automatic Voltage Regulation (AVR)
• When the UPS detects that input voltage is below the acceptable range, it will automatically adjust
the voltage to a safe level. This is an automatic function of the UPS system and does not require user
intervention.
• Faint clicking sounds may be emitted by the UPS system during automatic voltage regulation. This is
normal.
• If the input voltage is extremely far above or below the acceptable range, the UPS system will switch
to On Battery mode (see “On Battery / Low Battery / Overload” section below) in order to adjust the
voltage to a safe level.
On Battery / Low Battery / Overload
• During a utility power failure (or extreme voltage uctuation), the UPS system will switch to On
Battery mode. When the UPS switches to On Battery mode, stored battery power supports the
uninterrupted operation of connected equipment until utility power is restored or battery reserves are
depleted.
• After the UPS system switches to On Battery mode, the alarm will emit 4 beeps every 7 seconds.
The alarm may be muted by pressing the ON/OFF/TEST/MUTE button A for 2 seconds.
• If the UPS detects a Low Battery condition after switching to On Battery mode, the frequency of the
audible alarm will increase to 4 beeps every 2 seconds and the red “Overload / Check Battery” light
C
will blink.
• If the UPS detects an Overload condition after switching to On Battery mode, the audible alarm will
sound continuously and the red “Overload / Check Battery” light C will illuminate continuously. In
order to correct an overload, turn the UPS OFF and remove some of the attached equipment.
Note: If the overload exceeds 150% of the UPS system’s capacity, the UPS system will automatically shut down.
4
Page 5

Basic Operation (continued)
UPS Self-Test
• Initiate a UPS self-test by pressing the ON/OFF/TEST/MUTE button A for 2 seconds while the
UPS is ON and operating from utility power.
(Note: If you hold the ON/OFF/TEST/MUTE button for only 1 second, the UPS will turn OFF, interrupting the flow of power to
connected equipment.)
• During the self-test operation, the UPS will switch to On Battery mode for 20 seconds. The alarm
will emit a beep 4 times every 7 seconds.
• Do not attempt to test the UPS by unplugging it from the wall outlet. This will remove the UPS
system’s ground connection and places connected equipment at risk.
UPS Cold Start
• To use the UPS system as a stand-alone power source when AC power is unavailable (i.e. during a
blackout), press the ON/OFF/TEST/MUTE button A for 1 second (the UPS will beep when
1 second has elapsed) to turn the UPS system ON. The UPS will then provide power to its output
receptacles until battery reserves have been depleted.
• Do not attempt to cold-start the UPS system while it is disconnected from the wall outlet. The wall
outlet provides grounding that helps to protect connected equipment.
Mute Alarm
• Mute the audible alarm by pressing the ON/OFF/TEST/MUTE button A for 2 seconds.
Note: Muting is disabled if a Low Battery or Overload condition is detected.
Warranty Registration
Visit www.tripplite.com/warranty today to register the warranty for your new Tripp Lite product. You’ll
be automatically entered into a drawing for a chance to win a FREE Tripp Lite product!*
* No purchase necessary. Void where prohibited. Some restrictions apply. See website for details.
5
Page 6

Storage and Service
Storage
First, turn the UPS system OFF by pressing the ON/OFF/TEST/MUTE button for 1 second (the
UPS will beep and the green ON/OFF light will cease to illuminate). Second, disconnect connected
equipment. Third, disconnect the power cord from the wall outlet. If the UPS system will be stored for
an extended period of time, recharge the batteries completely once every three months by connecting
the UPS system to a live AC outlet and turning it on for 8 hours. If the UPS batteries are discharged for
an extended period of time, they may suffer permanent loss of capacity.
Service
Before returning your UPS for service, follow these steps:
1. Review the installation and operation instructions in this manual to ensure that the service problem
does not originate from a misreading of the instructions.
2. If the problem continues, do not contact or return the UPS to the dealer. Instead, call Tripp Lite
at (773) 869-1233. A service technician will ask for the UPS’s model number, serial number and
purchase date and will attempt to correct the problem over the phone.
3. If the problem requires service, the technician will issue you a Returned Material Authorization
(RMA) number, which is required for service. If you require packaging, the technician can arrange
to send you proper packaging. Securely pack the UPS to avoid damage during shipping. Do not use
Styrofoam beads for packaging. Any damages (direct, indirect, special, incidental or consequential)
to the UPS incurred during shipment to Tripp Lite or an authorized Tripp Lite service center is not
covered under warranty. UPS Systems shipped to Tripp Lite or an authorized Tripp Lite service
center must have transportation charges prepaid. Mark the RMA number on the outside of the
package. If the UPS System is within the 2-year warranty period, enclose a copy of your sales
receipt. Return the UPS for service using an insured carrier to the address given to you by the
Tripp Lite service technician.
Note on Labeling
Two symbols are used on the label:
V~ AC Voltage V DC Voltage
Regulatory Compliance Identification Numbers
For the purpose of regulatory compliance certications and identication, your Tripp Lite product has been assigned a unique series number. The series number can be found on the product nameplate label, along with all required approval markings and information. When
requesting compliance information for this product, always refer to the series number. The series number should not be confused with the
marking name or model number of the product.
Tripp Lite has a policy of continuous improvement. Product specications are subject to change without notice.
Made in China.
1111 W. 35th Street, Chicago, IL 60609 USA
(773) 869-1234 • www.tripplite.com
6
Page 7

Manual del Propietario
Sistema UPS OMNIPOWER
Modelo: PRO550
No es adecuado para aplicaciones móviles.
Instrucciones de Seguridad Importantes
Instalación
Operación Básica
Almacenaje y Servicio
English
®
8
9
10
11
1
1111 W. 35th Street, Chicago, IL 60609 USA
+1 773 869 1234 • www.tripplite.com
Derechos de Autor © 2008 Tripp Lite. Todos los derechos reservados.
7
Page 8

Instrucciones de Seguridad Importantes
CONSERVE ESTAS INSTRUCCIONES
Este manual contiene instrucciones y advertencias que deberán ser seguidas durante la instalación,
operación y almacenaje de este producto. El no seguir estas advertencias anulará la garantía.
Advertencias Sobre la Ubicación del UPS
• Instale el UPS al interior, lejos del exceso de humedad, temperaturas extremas, conductores
contaminantes, polvo y la luz solar directa.
• Para mejores resultados mantenga la temperatura en el interior entre 32º F y 104º F (0º C y 40º C).
• Deje un espacio adecuado alrededor de todos los lados del UPS para una ventilación apropiada.
• No monte la unidad con el panel delantero o trasera hacia abajo (en ningún ángulo).
Montándolo de esta manera inhibirá seriamente el enfriamiento interno de la unidad,
causando finalmente daño al equipo que no está cubierto por la garantía.
Advertencias para Conectar el UPS
• Conecte el UPS a una toma de corriente CA adecuadamente conectada a tierra. No enchufe el UPS
en el mismo, esto dañara al UPS.
• No modique el conector de entrada del UPS y no use ningún adaptador que elimine la conexión a
tierra del UPS.
• No use extensiones para conectar el UPS a una toma de corriente CA.
• Si el UPS recibe energía de un generador CA, operado por un motor, el generador debe suministrar
una salida limpia, ltrada de calidad para computadora.
Advertencias para la Conexión del Equipo
• El uso de este equipo en aplicaciones de soporte de vida en donde la falla de este equipo pueda hacer
suponer que causará la falla del equipo de soporte de vida o signicativamente afectar su seguridad o
efectividad no es recomendado. No use este equipo en presencia de una mezcla anestésica inamable
con aire, oxigeno u oxido nitroso.
• No conecte supresores de sobretensión a la salida de corriente del UPS. Esto puede dañar al UPS e
invalidará las garantías del supresor de sobretensiones y del UPS.
Advertencias sobre la Batería
• El UPS no requiere mantenimiento de rutina. No hay partes útiles para el usuario en su interior. No
abra el UPS por ningún motivo.
• Las baterías presentan un riesgo de descargas eléctricas y quemaduras de corriente de fuertes corto
circuito. Tome las precauciones adecuadas. No arroje las baterías al fuego. No abra las baterías. No
cortocircuite ni puentee las terminales de la batería con ningún objeto. Desconecte y apague el UPS
antes de efectuar el remplazo de la batería. Use herramientas con mangos o empuñaduras aislantes.
No hay partes útiles para el usuario en el interior del UPS. El remplazo de la batería debe ser llevado
a cabo personal de servicio debidamente autorizado usando baterías del mismo número y tipo
(Selladas de plomo ácido). Las baterías del UPS son reciclables. Reérase a las regulaciones locales
para los requerimientos de disposición y destrucción de las baterías. En los EE UU únicamente llame
al 1-800-SAV-LEAD o 1-800-8-BATTERY (1-800-822-8837) o visite www.rbrc.com para obtener
información sobre el reciclado. Tripp Lite ofrece una línea completa de remplazo de cartuchos de
baterías (R.B.C.) para Sistemas UPS. Visite www.tripplite.com/support/battery/index.cfm para
determinar la batería de remplazo especica para su UPS.
• No opere el UPS sin baterías. No intente añadir baterías externas al UPS.
8
Page 9

Instalación
Conexión de Entrada
Conecte el UPS a una toma de corriente
1
de 120V AC debidamente conectada a
tierra. Asegúrese que la toma de corriente
no comparte el circuito con una carga
eléctrica grande (V. gr. aire acondicionado,
refrigerador).
Encendiéndolo
Presione el botón ON/OFF/TEST/MUTE
2
[Encendido/Apagado/Prueba/Silencio] A
por 1 segundo (El UPS emitirá un pitido)
para encender el Sistema UPS. La luz
verde ON/OFF [Encendido/Apagado] B
se iluminará cuando el Sistema UPS esté
encendido.
Nota: El Sistema UPS no empezará a cargar su batería
hasta que se haya encendido. El equipo conectado no
estará soportado adecuadamente durante una falla de
energía hasta que la batería interna se haya cargado de
4 a 6 horas. Tomará hasta 8 horas a la batería cargarse
completamente.
Conexiones de Salida
Enchufe su equipo en las toma de corriente
3
del UPS.
Nota: Las impresoras láser, utensilios domésticos grandes
u otros equipos con requerimientos de energía muy altos
no deberán conectarse al UPS. El UPS se sobre cargará
si los requerimientos combinados de energía para todos
los equipos conectados excede el total de la capacidad
de salida del UPS (550VA). El nivel VA establecido para
cada pieza de equipo puede ser encontrado consultando la
documentación del equipo y/o la placa de identificación.
Si se muestran amperes, multiplique por 120V para
determinar VA (Volts x Amps = VA).
1
A
B
2
3
9
Page 10

Operación Básica
A B C
Encendido/Apagado
• Encendido: Cuando el Sistema UPS este apagado, presione el botón ON/OFF/TEST/MUTE
[Encendido/Apagado/Prueba/Silencio] A por 1 segundo (el UPS pitará cuando 1 segundo haya
pasado) para encender el Sistema UPS. La luz verde “ON/OFF” [Encendido/Apagado] B se
iluminará cuando el Sistema UPS esté encendido.
• Apagado: Cuando el Sistema UPS este encendido, presione el botón ON/OFF/TEST/MUTE
[Encendido/Apagado/Prueba/Silencio] A por 1 segundo (el UPS pitará cuando 1 segundo haya
pasado) para apagar el Sistema UPS. La luz verde “ON/OFF” [Encendido/Apagado] B estará
apagada en tanto el Sistema UPS esté apagado. Las tomas de corriente del sistema UPS y el equipo
conectado dejarán de recibir energía CA y las baterías dejarán de cargarse.
Regulación Automática de Voltaje (AVR)
• Cuando el UPS detecta que voltaje de entrada está arriba o abajo del rango aceptable, ajustará
automáticamente el voltaje a nivel seguro. Esta es una función automática del Sistema UPS y no
requiere de ninguna intervención del usuario.
• Tenues chasquidos pueden ser emitidos por el sistema UPS durante la regulación automática de
voltaje. Esto es normal.
• Si el voltaje de entrada está extremadamente arriba o abajo del rango aceptable, el sistema UPS
cambiará a modo de Respaldo [On Battery] a n de ajustar el voltaje a un nivel seguro. (Vea la
sección “En Respaldo / Batería Baja / Sobre Carga” abajo).
En Respaldo / Batería Baja / Sobre Carga
• Durante una falla de la energía del servicio público (o uctuaciones de voltaje extremas), el sistema
UPS cambiará a modo de Respaldo. Cuando el UPS cambia a modo de Respaldo, la energía
almacenada en la batería respaldará la operación, de manera ininterrumpida, del equipo conectado
hasta que la energía del servicio público sea restaurada o las reservas de carga de la batería se agoten.
• Después que el sistema UPS haya cambiado a modo de respaldo, la alarma emitirá 4 pitidos cada
7 segundos. La alarma puede apagarse presionando el botón ON/OFF/TEST/MUTE [Encendido/
Apagado/Prueba/Silencio] A durante 2 segundos.
• Si el UPS detecta condiciones de Batería Baja después de haber cambiado a modo de Respaldo, la
frecuencia de la alarma audible se incrementará a 4 pitidos cada 2 segundos y la luz roja “Overload /
Check Battery” [Sobre carga / Revise la Batería] C destellará.
• Si el UPS detecta una condición de Sobre Carga después de haber pasado a modo de Respaldo,
una alarma audible sonará continuamente y la luz roja “Overload / Check Battery” [Sobre carga /
Revise la Batería] C se iluminará de forma continua. Para corregir una sobre carga, apague el UPS y
remueva alguno de los equipos conectados.
Nota: Si la sobre carga excede el 150% de la capacidad del sistema UPS, el sistema UPS se apagará automáticamente.
10
Page 11

Operación Básica (continuación)
Auto Prueba del UPS
• Inicie la auto prueba del UPS presionando el botón ON/OFF/TEST/MUTE [Encendido/Apagado/
Prueba/Silencio]
del servicio público.
(Nota: Si usted oprime el botón ON/OFF/TEST/MUTE [Encendido/Apagado/Prueba/Silencio] solamente por 1 segundo, el UPS se
apagará, interrumpiendo el flujo de energía al equipo conectado.)
• Durante la operación de auto prueba, el UPS cambiará a modo de Respaldo por 20 segundos. La
alarma emitirá un pitido 4 veces cada 7 segundos.
• No intente probar el UPS desconectándolo de la toma de corriente de la pared. Esto eliminará la
conexión a tierra del sistema UPS y pone en riesgo al equipo conectado.
Arranque en Frío del UPS
• Para usar el sistema UPS como una fuente de energía independiente cuando no hay energía CA
disponible (i.e. durante un apagón), presione el botón ON/OFF/TEST/MUTE [Encendido/Apagado/
Prueba/Silencio] A por 1 segundo (el UPS pitará cuando 1 segundo haya transcurrido) para
encender el sistema UPS. Entonces el UPS suministrará energía a sus receptáculos de salida hasta
que las reservas de la batería se hayan agotado.
• No intente arrancar en frió el sistema UPS mientras esté desconectado de la toma de corriente de
la pared la toma de corriente de la pared tiene la conexión a tierra que ayuda a proteger el equipo
conectado.
Apagando (Silenciando) la Alarma
• Apague la alarma presionando el botón ON/OFF/TEST/MUTE [Encendido/Apagado/Prueba/
Silencio] A por 2 segundos.
Nota: La alarma se deshabilitará si se detectan condiciones de Batería baja o Sobre carga.
A
durante 2 segundos en tanto el UPS esté encendido y operando con la energía
Almacenaje y Servicio
Almacenaje
Primero, apague el sistema UPS presionando el botón ON/OFF/TEST/MUTE [Encendido/Apagado/Prueba/Silencio]
por 1 segundo (el UPS pitará y la luz verde ON/OFF [Encendido/Apagado] dejará de estar iluminada. Segundo,
desconecte el equipo conectado. Tercero, desconecte el cable de alimentación de corriente de la toma de corriente de
la pared. Si el sistema UPS será almacenado por un periodo prolongado, recargue completamente las baterías una vez
cada tres meses conectando el sistema UPS a una toma de corriente CA viva durante 8 horas. Si las baterías del UPS
se descargan por un periodo prolongado, pueden sufrir la pérdida de su capacidad en forma permanente.
Servicio
Antes de devolver su UPS a servicio, siga estos pasos:
1. Revise las instrucciones de instalación y operación de este manual para asegurarse que el problema no se origina
por una mala interpretación o incorrecta lectura de estas instrucciones.
2. Si el problema continua, no se comunique o regrese el UPS al distribuidor. En su lugar, llame a al +1 773 869 1233.
Un técnico de servicio le pedirá el número de modelo del UPS, número de serie y fecha de compra e intentará
corregir el problema telefónicamente.
3. Si el problema requiere de servicio, el técnico le emitirá un número de Autorización de Devolución de Mercancía
(RMA), que es requerido para proporcionar el servicio. Si requiere material de empaque, el técnico puede hacer
los arreglos necesarios para enviar el material de empaque adecuado. Empaque de manera segura el UPS para
evitar que se dañe durante el envió. No use pelotillas de Poliestireno [Styrofoam beads] para empacarlo. Cualquier
daño (directo, indirecto, especial, incidental o consecuencial) que le ocurra al UPS durante su envió a Tripp Lite
o un Centro de Servicio Autorizado de Tripp Lite no está cubierto por la garantía. Los Sistemas UPS enviados a
Tripp Lite o un Centro de Servicio Autorizado de Tripp Lite deben tener los gastos de transportación prepagados.
Anote el número RMA en el exterior del empaque. Si el Sistema UPS está dentro del período de garantía de 2 años,
adjunte una copia del recibo de venta. Devuelva el UPS a servicio usando un transportista asegurado a la dirección
indicada por su técnico de servicio de Tripp Lite.
11
Page 12

Almacenaje y Servicio (continuación)
Nota Sobre el Etiquetado
Se usan dos símbolos en las etiquetas:
V~ Voltaje CA V Voltaje CD
Cumplimiento con las Normas de Números de Identificación
Para nes de identicación y certicación del cumplimiento de las normas, a su producto Tripp Lite se le ha asignado un número de
serie único. El número de serie lo puede encontrar en la etiqueta de la placa de identicación del producto junto con los símbolos de
aprobación e información requeridos. Cuando solicite información sobre el cumplimiento de normas para este producto, siempre reérase
al número de serie. El número de serie no de ser confundido con el nombre de identicación ni con el número de modelo del producto.
La política de Tripp Lite es la de una mejora constante. Especicaciones sujetas a cambios sin previo aviso.
Fabricado en China.
LEA SU INSTRUCTIVO
CONSULTE SUS CONDICIONES DE GARANTÍA POR PRODUCTO
PÓLIZA DE GARANTÍA
Este equipo marca Tripp Lite, modelo _______________ está garantizado por TRIPP LITE, que tiene su domicilio en la calle de Sierra
Candela No.111-107, Col Lomas de Chapultepec, CP 11000, México, DF, y puede hacer efectiva su garantía así como obtener partes,
componentes, consumibles y accesorios en el Centro de Servicio Q PLUS ubicado en Av Coyoacan 931, Col. Del Valle, C.P. 03120
México. D.F., tel. 50 00 27 00 contra cualquier defecto de fabricación y funcionamiento, imperfecciones de materiales, piezas, componentes y mano de obra al consumidor acorde a la siguiente tabla:
Producto Modelo Vigencia
Sistema de Energía Ininterrumpible (UPS)
Sistema de Energía Ininterrumpible (UPS) Familia: SMARTONLINE 3PH 1 Año
Regulador y Acondicionador de Tensión Familia: LS, LC 2 Años
Inversores Familia: APS, PV 2 Años
Multiplexor y Conmutador Familia: KVM 5 Años
Conmutador Modelo: B020-016 6 Meses
Supresor de Picos de Tensión Familia: PROTECT IT, ISOBAR 25 Años
Familia: BC, OMNI, SMART,
SMARTONLINE MONOFASICOS
2 Años
CONDICIONES
Para hacer válida su garantía no podrán exigirse mayores requisitos que la presentación de esta póliza debidamente llenada y sellada por
el establecimiento que lo vendió junto con el producto en el lugar donde fue adquirido.
TRIPP LITE, se compromete a reparar, y en caso de que a su juicio no sea posible la reparación, a cambiar el equipo, así como las piezas
y componentes defectuosos del mismo sin cargo alguno para el propietario durante el periodo de garantía, así como los gastos de transportación razonablemente erogados del producto que deriven de su cumplimiento, dentro de su red de servicio.
El tiempo de reparación en ningún caso será mayor de 30 días contados a partir de la fecha de recepción del producto en el Centro Autorizado de Servicio, en donde también podrán adquirir refacciones y partes.
En caso de que la presente póliza de garantía se extraviara, el consumidor puede recurrir a su proveedor para que expida un duplicado de
la póliza de garantía, previa presentación de la nota de compra o factura correspondiente.
EXCLUSIONES
Esta garantía no es válida en los siguientes casos:
Cuando el producto se hubiese utilizado en condiciones distintas a la normales.
Cuando el producto no hubiese sido operado de acuerdo con el instructivo de uso que se le acompaña.
Cuando el producto hubiese sido alterado o reparado por personas no autorizadas por el fabricante nacional, importador o comercializador responsable respectivo.
Este equipo fue vendido por: _____________________________________ con domicilio en ___________________________________
el día _____ de ___________ de ________, fecha a partir de la que inicia la presente garantía.
1111 W. 35th Street, Chicago, IL 60609 USA
+1 773 869 1234 • www.tripplite.com
12
200806214 93-2720
 Loading...