

Page 1
Out-of-the-box Installation
Take the KVM Switch and included cables out of the box
to begin installation.
Note: If you are connecting a PS/2 computer to your B040-Series KVM switch, make sure
it is powered off before connecting to the KVM Switch. Otherwise, the PS/2 Computer
may not recognize the Keyboard and Mouse, preventing you from using them. USB
computers do not have this limitation.
Step 1: Connect the included AC power cord to the KVM Switch
to power it on.
If you are using an individual B040-008-19 or B040-016-19
KVM switch that is not Daisy-Chained to another switch, proceed
to step 4.
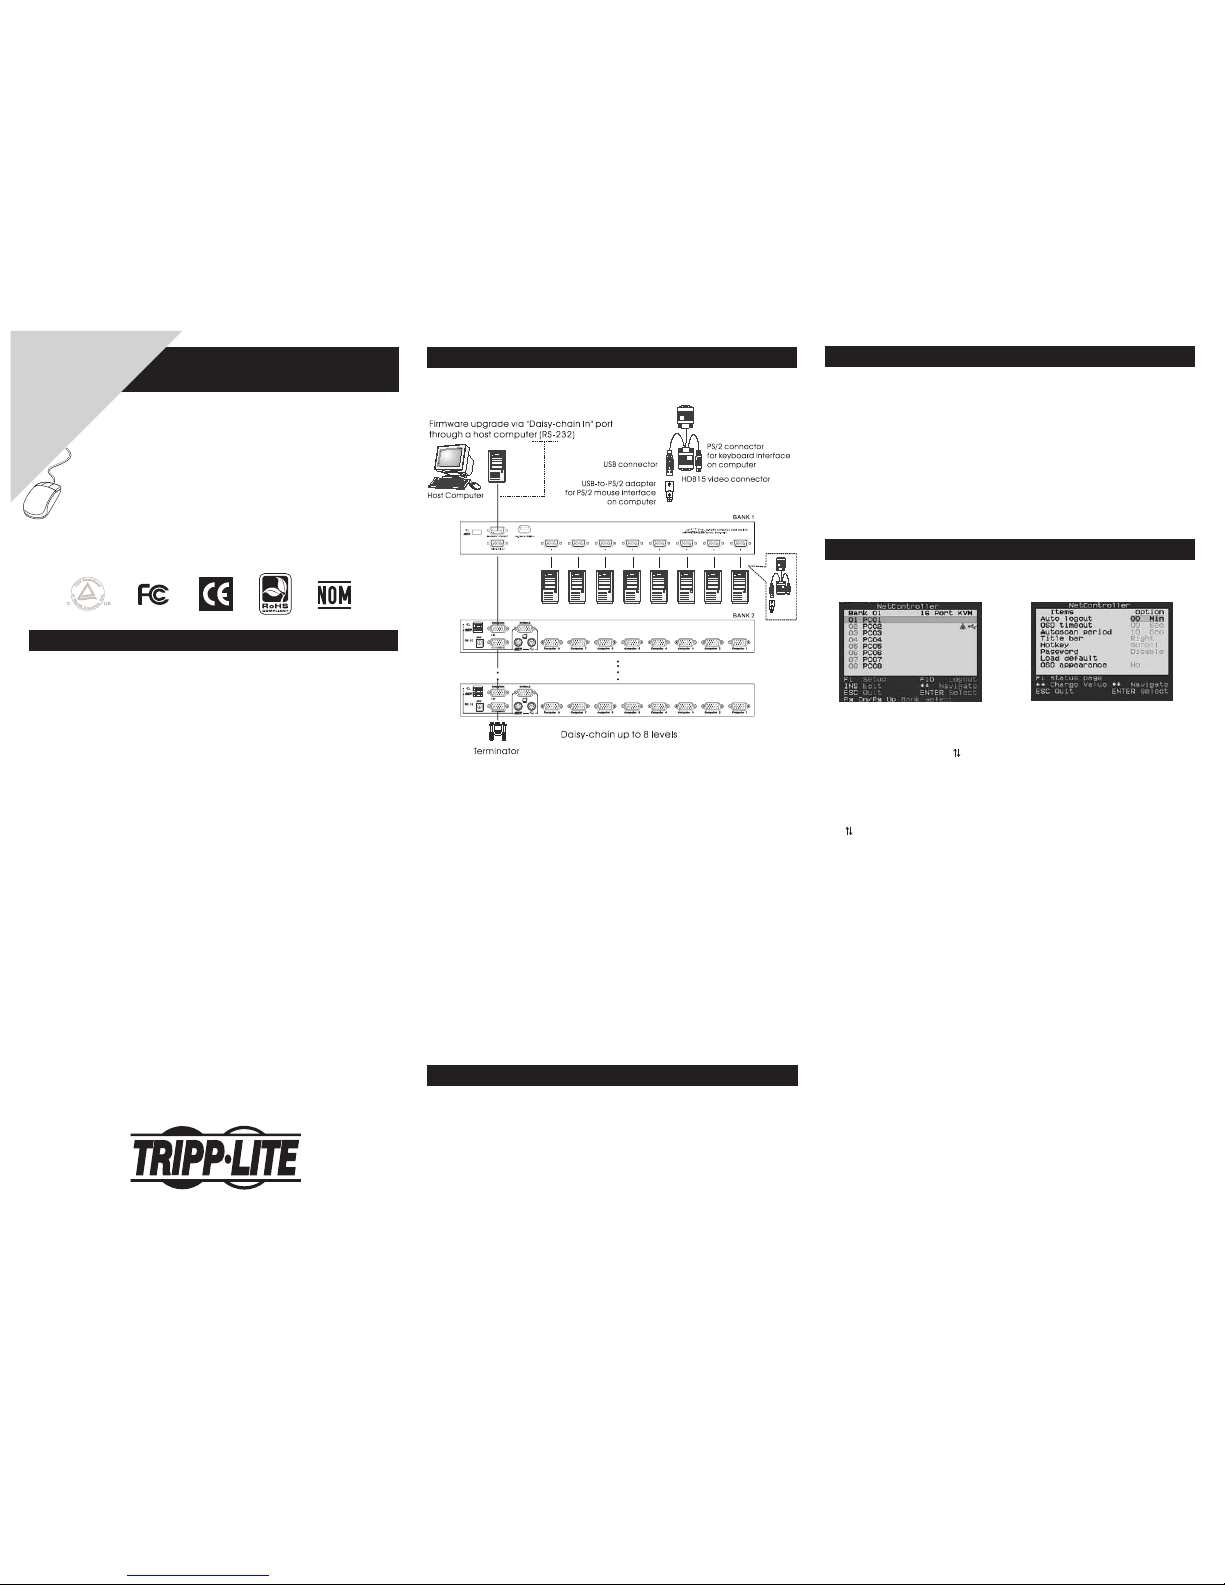
Daisy-Chaining Multiple NetController KVM Switches
Warning! The total length of daisy-chain cabling from the master KVM switch to the last
KVM switch in a daisy-chain installation (regardless of the number of levels) must not
exceed 16 ft. (5 m). If the total length of the daisy-chain cabling exceeds 16 ft. (5 m), the
installation will not function properly.
Step 2: You will need a P781 Series Daisy-Chain cable (HD15-M
to HD15-F) to connect the Daisy-Chain OUT Port (HD15-F)
of the Master KVM Switch (1st KVM switch in a chain) to
the Daisy-Chain IN Port (HD15-M) of the second KVM
switch. Connect the AC power cord to the second switch
to power it on. You can Daisy-Chain any combination
of non-console NetController KVM switches to a
maximum of 8 levels.
Step 3: Repeat Step 2 to connect more non-console NetController
KVM switches using the supplied daisy-chain cable or
another P781 Cable. Attach the included Daisy-Chain
Terminator to the Daisy-Chain OUT port of the last KVM in
the Daisy-Chain.
Note: It is not necessary to use the Daisy-Chain Terminator on the Daisy-Chain OUT port
of the NetController KVM switch if you are not Daisy-Chaining it to another KVM switch.
Easy Operation
There are three ways to select a specific computer connected to
your B040-Series KVM Switch: Push Buttons, Hotkey Commands
or On-Screen Display (OSD) Menu.
Push Buttons
Switch to any connected computer simply by pressing the
corresponding button on the front panel of your NetController
KVM switch.
Easy Operation (continued)
Hotkey Commands
A keyboard hotkey sequence consists of at least three specific
keystrokes:
Hotkey sequence = ScrLk* + ScrLk* + Command key(s)
* For a hotkey command to be validated, each hotkey must be pressed within 2 seconds
of the preceding key.
* For detailed hotkey sequences and their corresponding functional commands, see
Quick Reference Sheet on the other side of this Quick Start Guide.
* Hotkey activation keys can be switched to any of 4 keys using the OSD Setup Menu
(Scroll Lock, Caps Lock, Num Lock or F12). See Owner’s Manual CD for details.
OSD Menu
To activate the OSD (On-Screen Display) Main Menu, use the
hotkey sequence: ScrLk + ScrLk + Space Bar
OSD Main menu
Select computer: Use keys to navigate to a connected
computer. Use the Page Up/Page Down Buttons to display
connected computers on Daisy-Chained KVMs. Press enter to
select the desired computer as active.
Edit computer name: Highlight the desired computer port using
the keys (use Page Up/Page Down to scroll through DaisyChained KVMs) and hit the Insert key. Change to the desired name
and hit the Enter key to confirm it.
Go to Next OSD Menu Page: Hit the F1 key when in the OSD Main
Menu to view the OSD Setup Page. Hit F1 when in the OSD Setup
Page to view the OSD Status Page.
Logout: When the password feature is enabled and you are in the
OSD Main Menu screen, you can hit the F10 key to logout of the
KVM switch. Once F10 is pressed, one must enter the password to
operate the KVM switch.
Setup Menu (See Owner’s Manual CD for details)
Auto Logout: Specifies non-activity duration before KVM is logged
off and password is required to begin operation (00-99 min).
OSD Timeout: Specifies non-activity duration before OSD closes.
Auto Scan Period: Specifies Auto Scan time intervals.
Title Bar: Allows user to disable Title Bar, or to have it displayed on
the Right or Left side of the monitor.
Hotkey: Specifies hotkey preceding sequence (Scroll Lock, Caps
Lock, F12 or Num Lock).
Password: Specifies the security password.
Load Default: Load default settings to all KVM switches.
OSD Appearance: Keep/Hide OSD Menu after switching ports.
F1—Status Page: Opens status menu.
Out-of-the-box Installation (continued)
Step 4: Connect each of your computers to a computer port on
the rear panel of each NetController KVM switch using
a Tripp Lite P780-Series USB-PS/2 KVM Cable Kit (not
included). The Tripp Lite P780-Series KVM cable has
a HD15 connector on one end and a PS/2 Keyboard
connector, USB connector, HD15 connector and a USB
to PS/2 Mouse Adapter. When connecting with a USB
computer, the USB connector is the only connector
needed for Keyboard and Mouse, leaving the PS/2
Keyboard connector unplugged. When connecting with
a PS/2 computer, add the USB to PS/2 Mouse adapter
to the USB connector and you’ll have a PS/2 connector
for the mouse. Do not connect USB connector and PS/2
keyboard connector to a computer at the same time.
Step 5: Power up the connected computers. After your computer
is powered up, the PS/2 keyboard and mouse will be
recognized and you can now begin operating your B040Series KVM switch.
Quick Start Guide
NetController™
Rackmount Console
KVM Switches
Models: B040-008-19, B040-016-19
1111 W. 35th Street, Chicago, IL 60609 USA
(773) 869-1234 • www.tripplite.com
Warranty
Registration:
register online today for a
chance to win a FREE Tripp Lite
product—www.tripplite.com/warranty
P780 series
cables
P780 series
cable kit
BANK 8
Main OSD Menu Setup Menu
Page 2

Quick Reference Guide
Notes:
1. To activate the OSD main menu, use the hotkey sequence ScrLk + ScrLk
+ (Space Bar). For detailed OSD operation reference, please refer to the
User Guide. When OSD Main Menu is active, the mouse will be locked until
the OSD Menu is off.
2. Note that a, b, y and z each denotes a number key. ab= 01 - 08 yz= 01
- 16. (e.g. ScrLk + ScrLk + 03 + 06 is for Bank 3, Port 6.) When using a
single KVM Switch configuration, the default Bank # is 01.
3. The password has an 8 character limit. If you forget your password and
can’t access your NetController KVM switch, contact Tripp Lite Tech
Support at (773) 869-1234.
4. User-Definable Hotkey Preceding sequence. OSD Setup Menu allows user
to choose between Scroll Lock, Caps Lock, Num Lock and F12.
5. Each hotkey in a hotkey sequence must be pressed within 2 seconds of
the preceding hotkey for the command to take place.
200806025 93-2760
QUICK REFERENCE SHEET for NetController KVM Switches—Hotkey and OSD Operating Commands
Hotkey Sequence5= [ScrLk]4 + [ScrLk]4 + Command key(s)
Warranty Registration
Visit www.tripplite.com/warranty today to register the warranty for
your new Tripp Lite product. You’ll be automatically entered into a
drawing for a chance to win a FREE Tripp Lite product!*
* No purchase necessary. Void where prohibited. Some restrictions apply. See website for
details.
Tripp Lite World Headquarters
1111 W. 35th Street, Chicago, IL 60609 USA
(773) 869-1234 • www.tripplite.com
Copyright © 2008 Tripp Lite. All rights reserved. The policy of Tripp Lite is
one of continuous improvement. Specifications are subject to change without
notice. Made in China.
Command Hotkey Sequence
5
OSD Control
1
Description
Select Computer
ScrLk
4
+ ScrLk4 + ab + yz
(ab= 2-Digit Bank # yz= 2-Digit Channel #)
2
Highlight the desired computer and
hit the Enter key
Activates a desired computer to be accessed via the console
(Shared USB or PS/2 Keyboard, Mouse and Monitor)
Next Lower Channel
ScrLk
4
+ ScrLk4 + — Selects the next lower connected channel on the active KVM Switch
Next Higher Channel
ScrLk
4
+ ScrLk4 + — Selects the next higher connected channel on the active KVM Switch
Next Lower Bank
ScrLk
4
+ ScrLk4 + PgUp Hit Page Up button when in OSD Main Menu Select the next lower KVM Switch in a Daisy-Chain
Next Higher Bank
ScrLk
4
+ ScrLk4 + PgDn Hit Page Down when in OSD Main Menu Select the next higher KVM Switch in a Daisy-Chain
Beep On/Off
ScrLk
4
+ ScrLk4 + B — Turns the beep sound on/off when Auto Scanning and when hitting hotkeys
Auto Scan
ScrLk
4
+ ScrLk4 + S — Starts an Auto Scan of all the connected computers
Stop Autoscan
Any key — Stops an Auto Scan of all the connected computers
Title Bar On/Off
ScrLk
4
+ ScrLk4 + T — Turns the Title Bar On/Off
Reset Console Mouse
& Keyboard
ScrLk
4
+ ScrLk4 + End — Resets Console Mouse & Keyboard in the unlikely event of a lockup
Show OSD Main Menu
ScrLk
4
+ ScrLk4 + (Space Bar) — Opens up the OSD Main Menu
Change Computer
Name
— Highlight the desired computer in the OSD
Main Menu, hit Insert to change name
Changes the computer’s name from the default (PC01, PC02, etc)
to a user-defined name. 8 character limit
Load Default
— In OSD Setup Menu select Load Default and hit
the Enter Key
Restores all settings (Auto Logout, OSD Timeout, etc.) on all daisy-chained
KVM switches to the default settings. Does not affect password
OSD Appearance
— In OSD Setup Menu highlight OSD Appearance
and use
Keys to choose Yes/No
Specifies if you want to keep/hide the OSD Menu after a Port Switching
Operation
Auto Scan Period
(00 – 95 seconds)
— In OSD Setup Menu highlight Auto Scan Period
and use the
keys to choose time interval
Specifies a time interval for the Auto Scan to switch between computers.
Auto Scan set to 10 seconds by default. 00= Disabled
Auto Logout Timeout
(00-99 minutes)
— In OSD Setup Menu highlight Auto Logout and
use the
keys to choose time interval
Specifies the amount of time that must pass without keyboard activity before
KVM logs off. This requires password to be entered to access KVM. Auto
Logout is disabled by default: 00= Disabled
OSD Menu Timeout
(00-95 seconds)
— In OSD Setup Menu highlight OSD Timeout and
use the
keys to choose time interval
Specifies the amount of time with no activity before the OSD Menu turns off.
OSD Menu Timeout defaults at 30 seconds
Title Bar Position
— In OSD Setup Menu highlight Title Bar; use
keys to choose Left, Right or Disable
Displays the Title Bar on the Left or Right side of the monitor screen or
disables it
Password
3
— In OSD Setup Menu highlight Password and hit
the Enter key; follow steps to set password
Enables/disables the password for the B040-004, -008 or -016 KVM switch.
User-definable password has an 8-character limit
Define Hotkey
Preceding Sequence
— In OSD Setup Menu highlight the Hotkey Option;
use keys to select desired Hotkey
Selects a Hotkey preceding sequence of Scroll Lock, Caps Lock,
Num Lock or F12
 Loading...