

Page 1
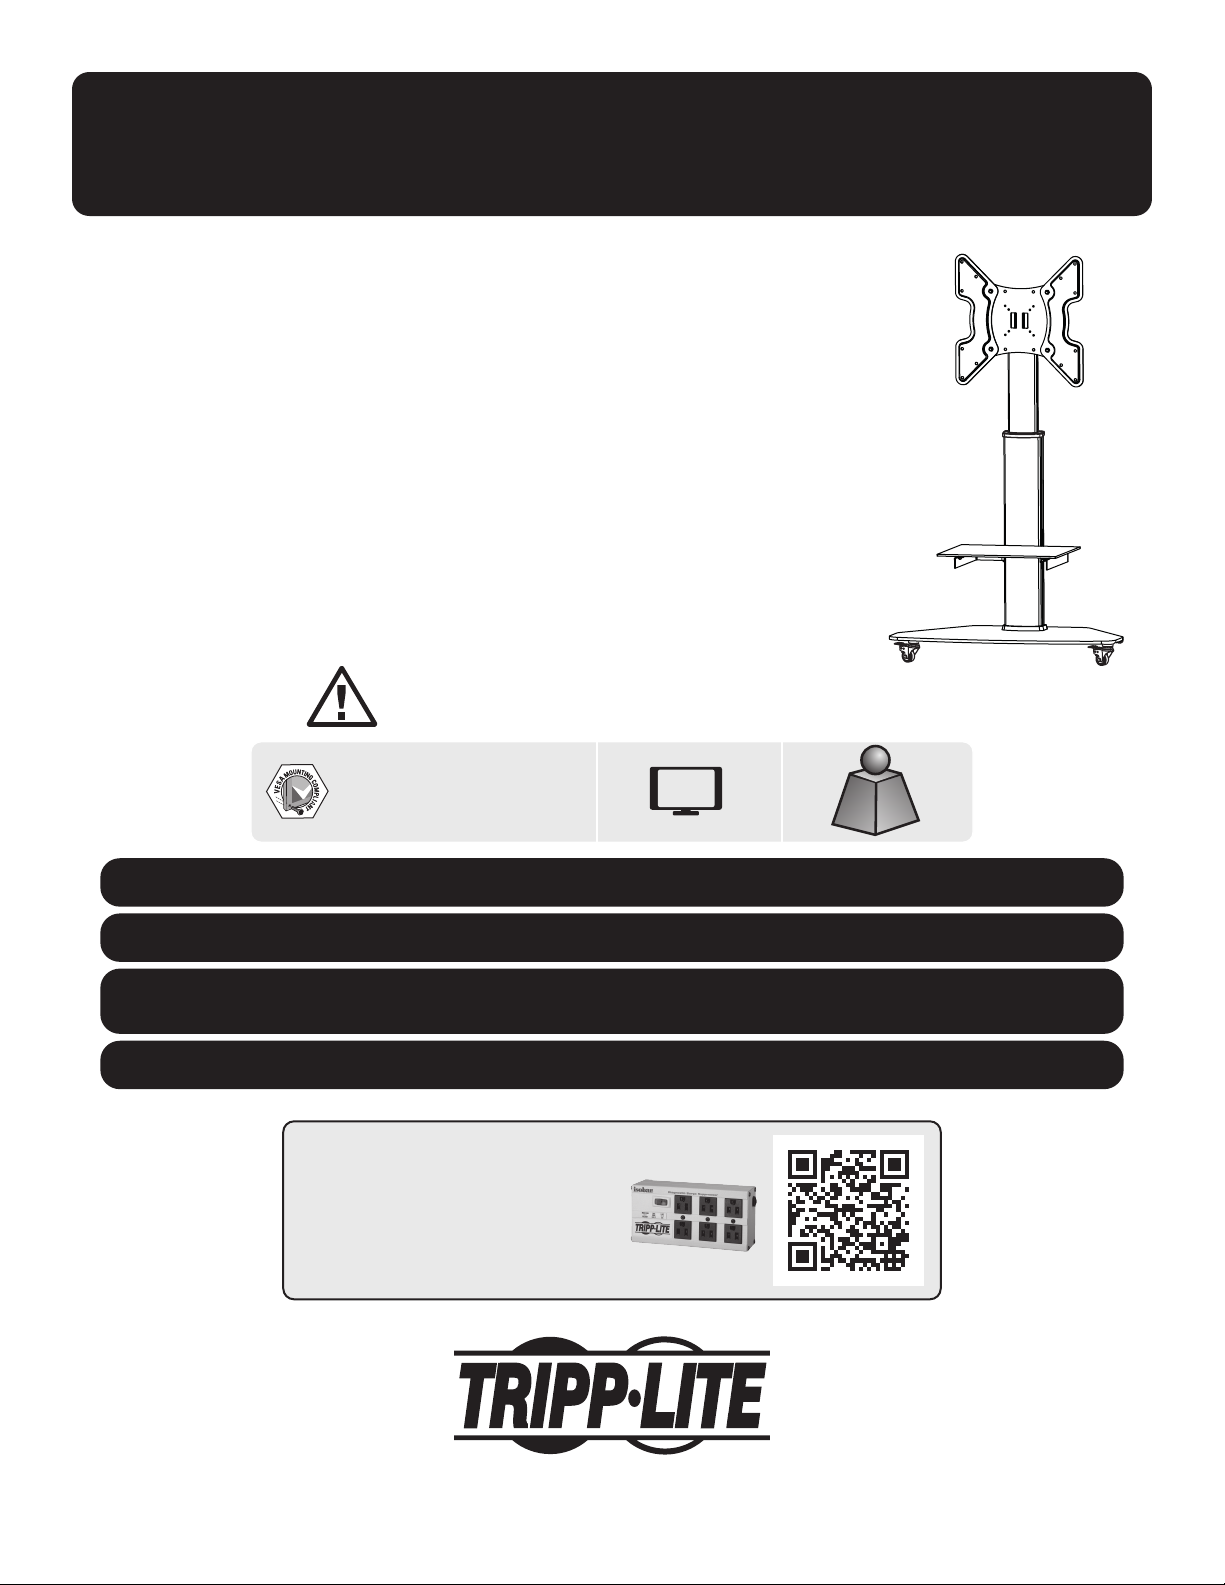
Owner’s Manual
Professional Mobile
Cart for
32" to 55" Screens
Models: DMCS3255SG62, DMCS3255SG62W
CAUTION: DO NOT EXCEED MAXIMUM LISTED WEIGHT CAPACITY. SERIOUS INJURY OR
PROPERTY DAMAGE MAY OCCUR!
75x75 / 100x100 / 200x100 / 200x200
300x300 / 400x200 / 400x400
Este manual está disponible en español en la página de Tripp Lite: tripplite.com
Ce manuel est disponible en français sur le site Web de Tripp Lite : tripplite.com
Русскоязычная версия настоящего руководства представлена на веб-сайте компании
Tripp Lite по адресу: tripplite.com
Dieses Handbuch ist in deutscher Sprache auf der Tripp Lite-Website verfügbar: tripplite.com
55"
MAX
WARRANTY REGISTRATION
Register your product today and be
automatically entered to win an ISOBAR®
surge protector in our monthly drawing!
tripplite.com/warranty
1111 W. 35th Street, Chicago, IL 60609 USA • tripplite.com/support
Copyright © 2022 Tripp Lite. All rights reserved.
1
Page 2

Safety Instructions
Note: Read the entire instruction manual before you start assembly and installation.
WARNING
• Do not begin the installation until you have read and understood the instructions and warnings contained in this
manual. If you have questions regarding any of the instructions or warnings, please visit tripplite.com/support.
• This product was designed to be installed and utilized ONLY as specied in this manual. Improper installation of
this product may cause damage or serious injury.
• Make sure the unit can safely support the combined load of the equipment and all attached hardware and
components.
• Tighten screws rmly, but do not over-tighten. Over tightening can cause damage to the items, greatly reducing
their holding power.
• This product is intended for indoor use only. Using this product outdoors could lead to product failure and personal
injury.
• By reason of the many large television construction types available, the wall-mount screen installation materials
cannot accommodate every screen type. Therefore, it is possible the provided screws may not t your TV.
• Make sure that before and after the installation of the screen and the mounting bracket, neither you nor somebody
else can be injured and other objects can be damaged. If in doubt, request for help from an expert.
• This unit is not a toy and is not suitable for use by children. Children should be supervised at all times around this
unit.
• This unit contains glass parts. Do not subject the glass parts to sudden shock, knocks or quick changes in
temperature. The unit may fracture and will form small, sharp shards. Take extreme care when handling broken
glass.
Warranty and Product Registration
5-Year Limited Warranty
Seller warrants this product, if used in accordance with all applicable instructions, to be free from original defects in material and workmanship for a
period of 5 years from the date of initial purchase. If the product should prove defective in material or workmanship within that period, Seller will repair or
replace the product, at its sole discretion.
THIS WARRANTY DOES NOT APPLY TO NORMAL WEAR OR TO DAMAGE RESULTING FROM ACCIDENT, MISUSE, ABUSE OR NEGLECT.
SELLER MAKES NO EXPRESS WARRANTIES OTHER THAN THE WARRANTY EXPRESSLY SET FORTH HEREIN. EXCEPT TO THE EXTENT
PROHIBITED BY APPLICABLE LAW, ALL IMPLIED WARRANTIES, INCLUDING ALL WARRANTIES OF MERCHANTABILITY OR FITNESS, ARE
LIMITED IN DURATION TO THE WARRANTY PERIOD SET FORTH ABOVE; AND THIS WARRANTY EXPRESSLY EXCLUDES ALL INCIDENTAL AND
CONSEQUENTIAL DAMAGES. (Some states do not allow limitations on how long an implied warranty lasts, and some states do not allow the exclusion
or limitation of incidental or consequential damages, so the above limitations or exclusions may not apply to you. This warranty gives you specic legal
rights, and you may have other rights which vary from jurisdiction to jurisdiction.)
WARNING: The individual user should take care to determine prior to use whether this device is suitable, adequate or safe for the use intended. Since
individual applications are subject to great variation, the manufacturer makes no representation or warranty as to the suitability or tness of these
devices for any specic application.
PRODUCT REGISTRATION
Visit tripplite.com/warranty today to register your new Tripp Lite product. You’ll be automatically entered into a drawing for a chance to win a FREE
Tripp Lite product!*
* No purchase necessary. Void where prohibited. Some restrictions apply. See website for details.
Tripp Lite has a policy of continuous improvement. Specications are subject to change without notice. Photos and illustrations may dier slightly from
actual products.
2
Page 3
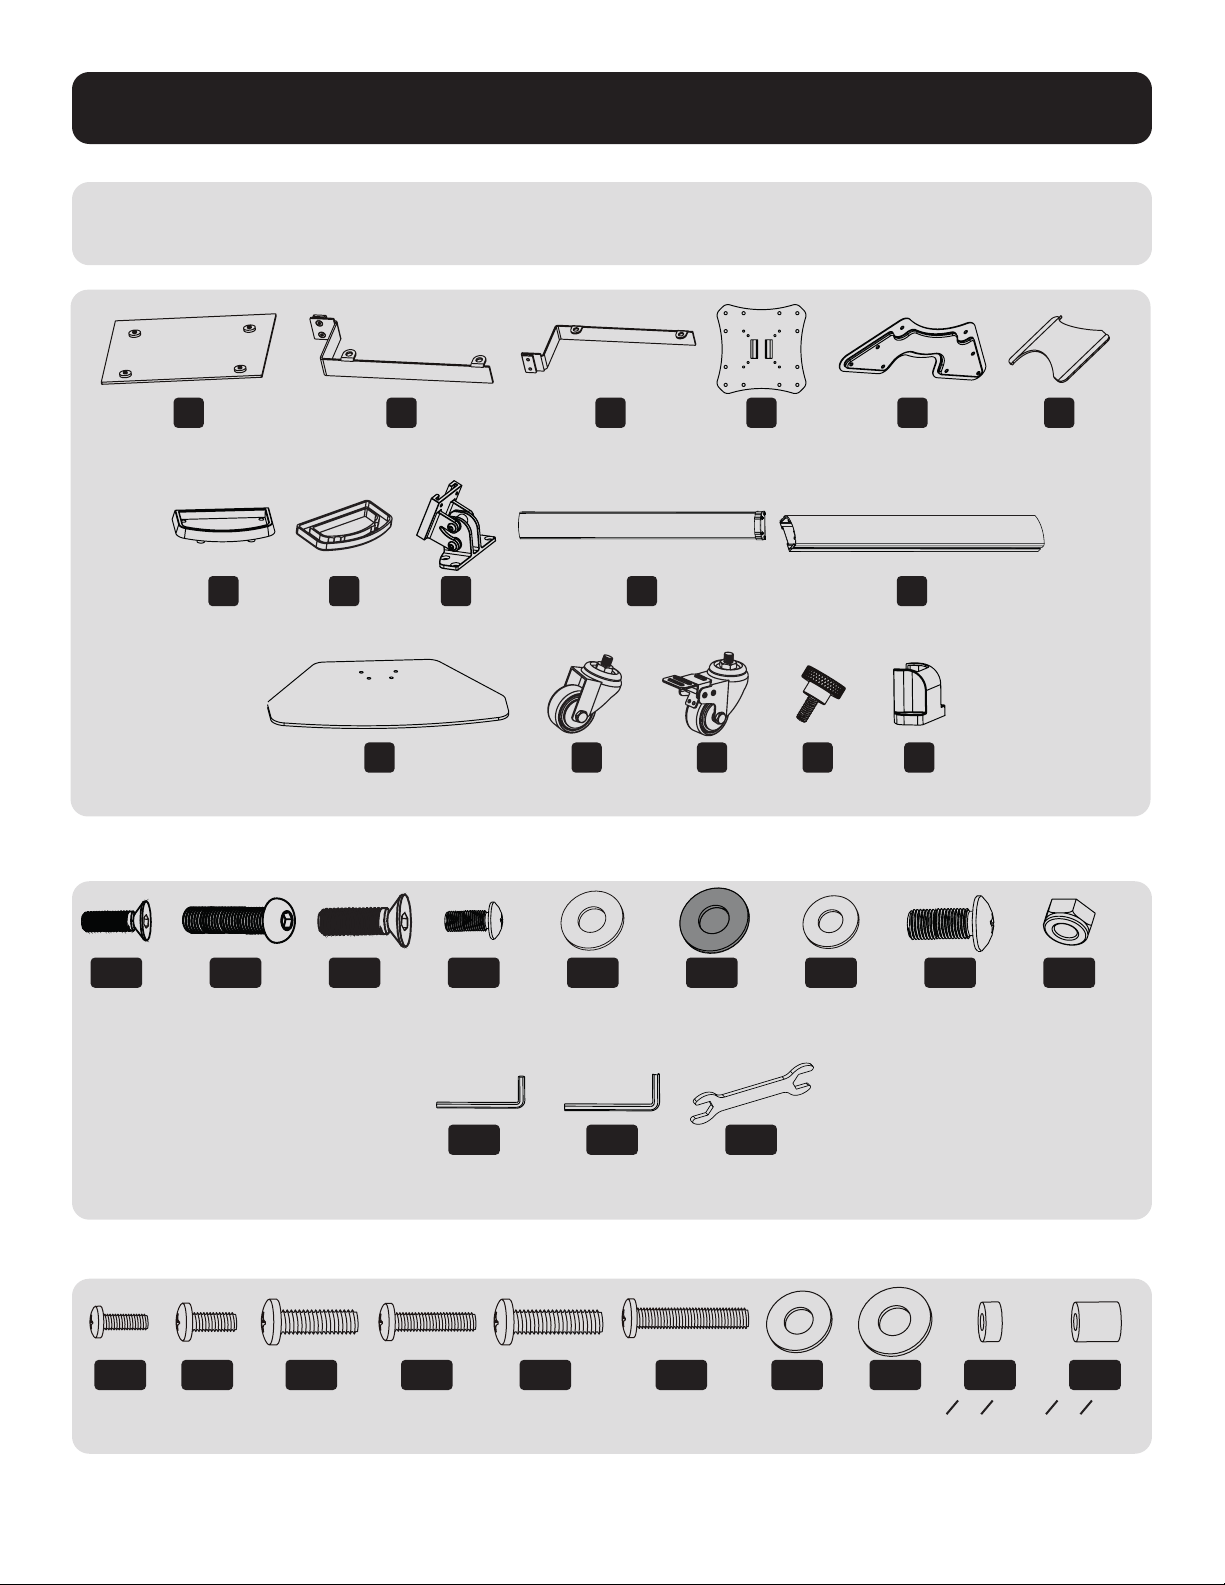
Component Checklist
IMPORTANT: Ensure you have received all parts according to the component checklist prior to installing. If any
parts are missing or faulty, visit tripplite.com/support for service.
A
(x1)
G
(x1)
Package M
M-A
M6x10
(x4)
M-B
M6x30
(x4)
B
(x1)
H
(x1)
L
(x1)
M-C
M6x16
(x4)
I
(x1)
M-D
M6*8
(x4)
C
(x1)
M
(x2)
M-E
M6*35*2
(x4)
J
(x1)
N
(x2)
M-F
M6*35*2
(x4)
(x1)
D
O
(x2)
M-G
M6*16*2
(x4)
E
(x2)
K
(x1)
P
(x1)
M-H
M8*12
(x4)
F
(x4)
M-I
M8
(x4)
Package P
P-A
M5*14
(x4)
P-B
M6*14
(x4)
P-C
M8*20
(x4)
M-J
M2
(x1)
P-D
M6*30
(x4)
P-E
M8*30
(x4)
M-K
M4
(x1)
3
P-F
M8*50
(x4)
M-L
13+17
(x1)
P-G
M6*12*1
(x4)
P-H
M8*16*1
(x4)
P-I
O9*O14*5
(x8)
P-J
O9*O17*10
(x8)
Page 4
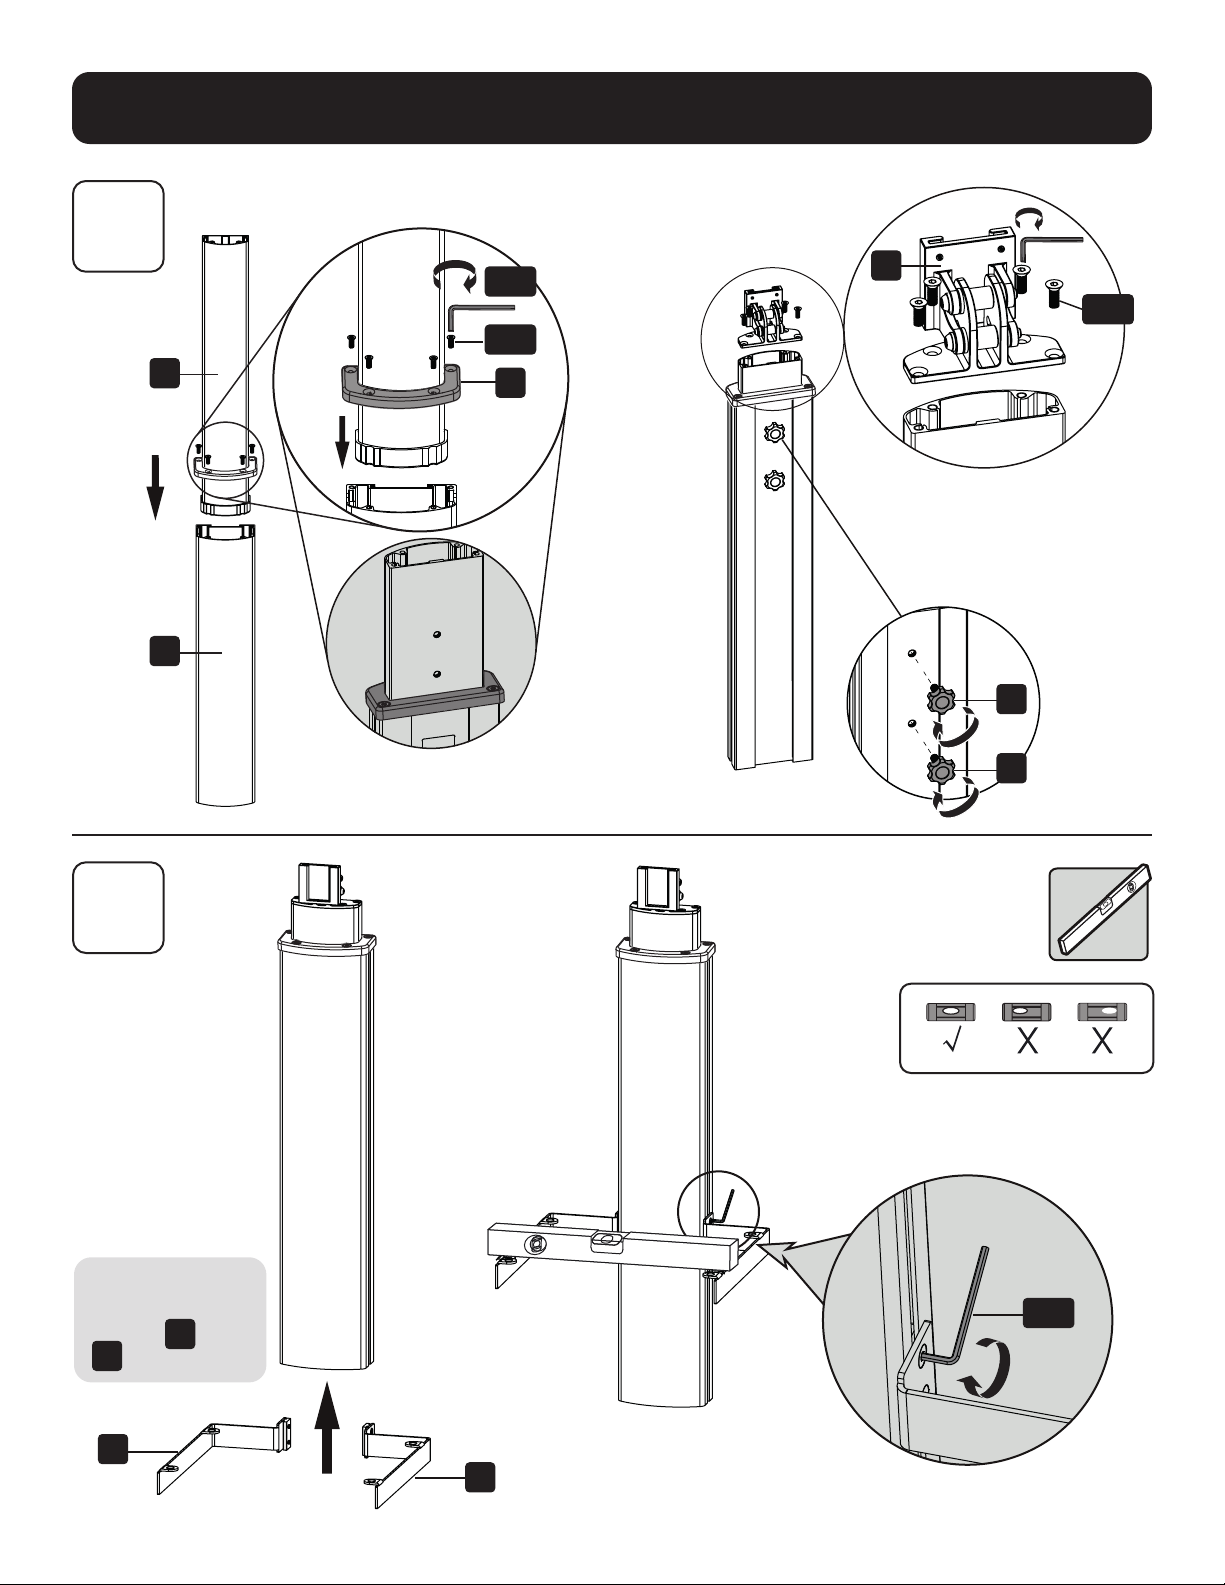
Assembly
1
J
K
M-K
M-A
G
I
M-C
2
O
O
Loosen the screws
before installing
brackets B and
.
C
B
M-K
C
4
Page 5
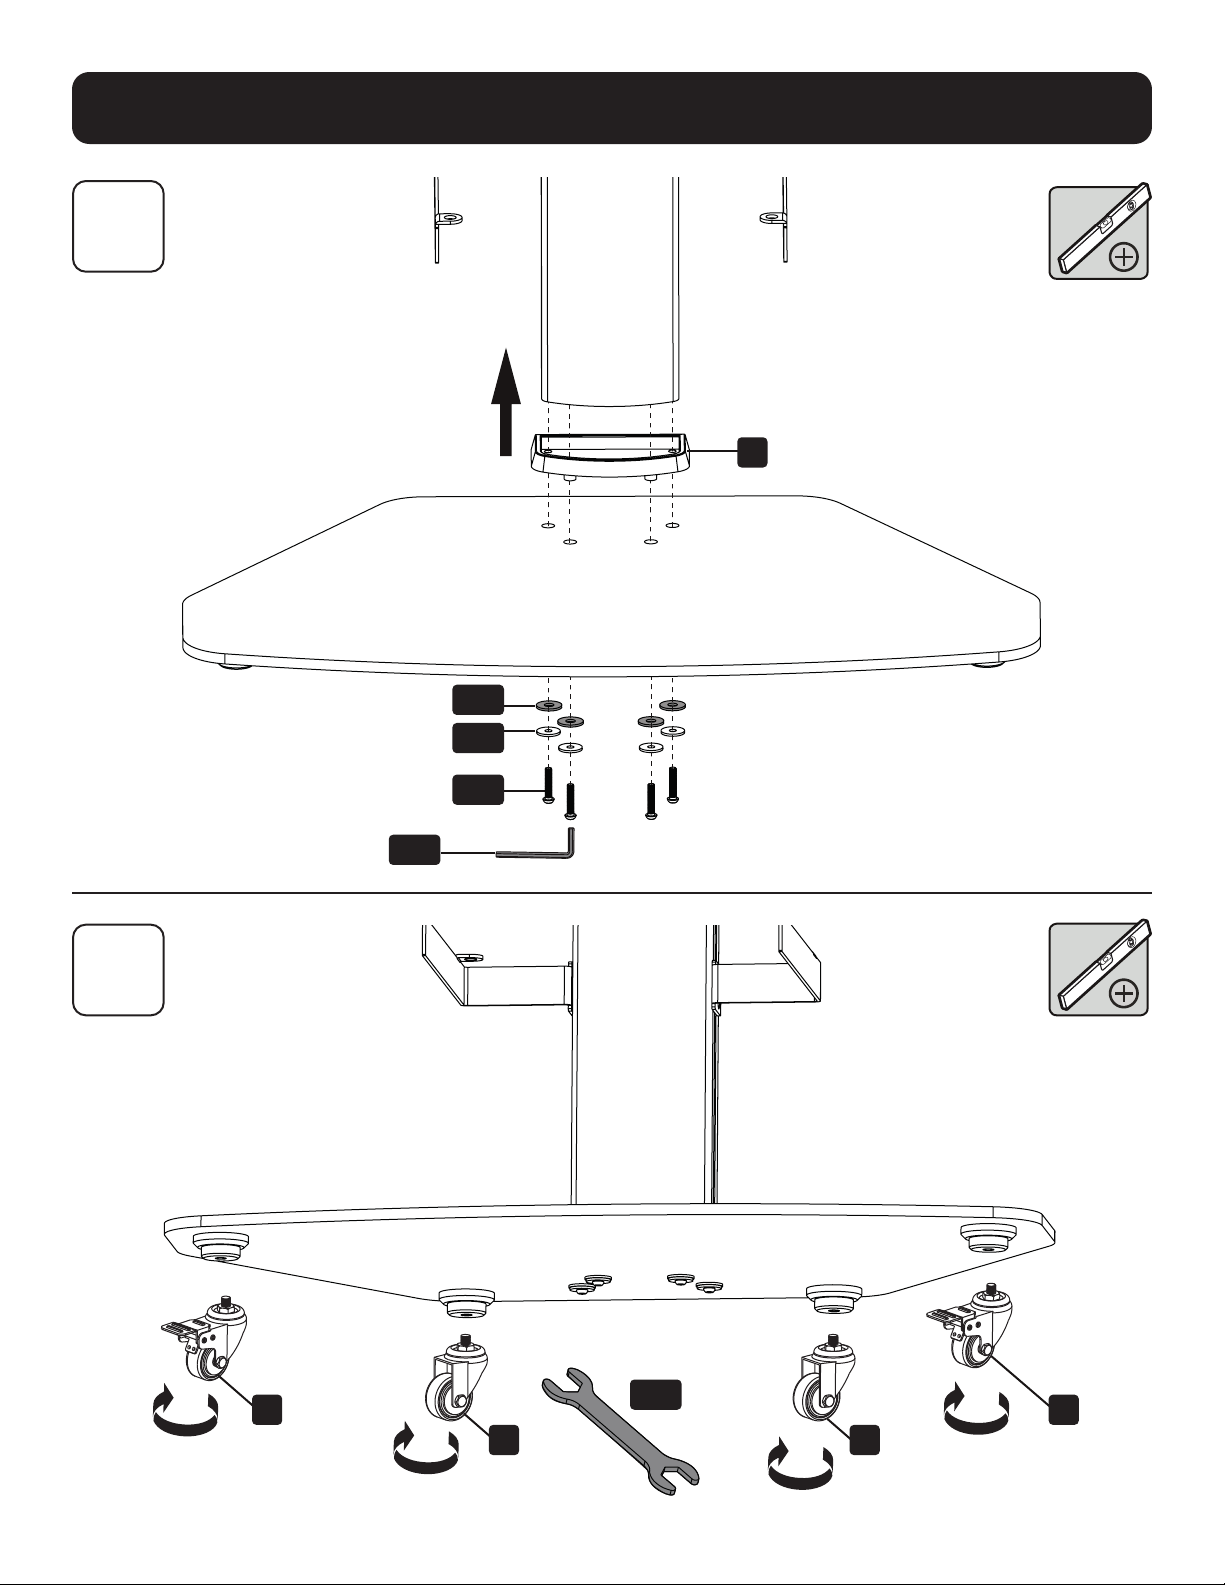
Assembly
3
H
4
M-F
M-E
M-B
M-K
N N
M M
M-L
5
Page 6
Assembly
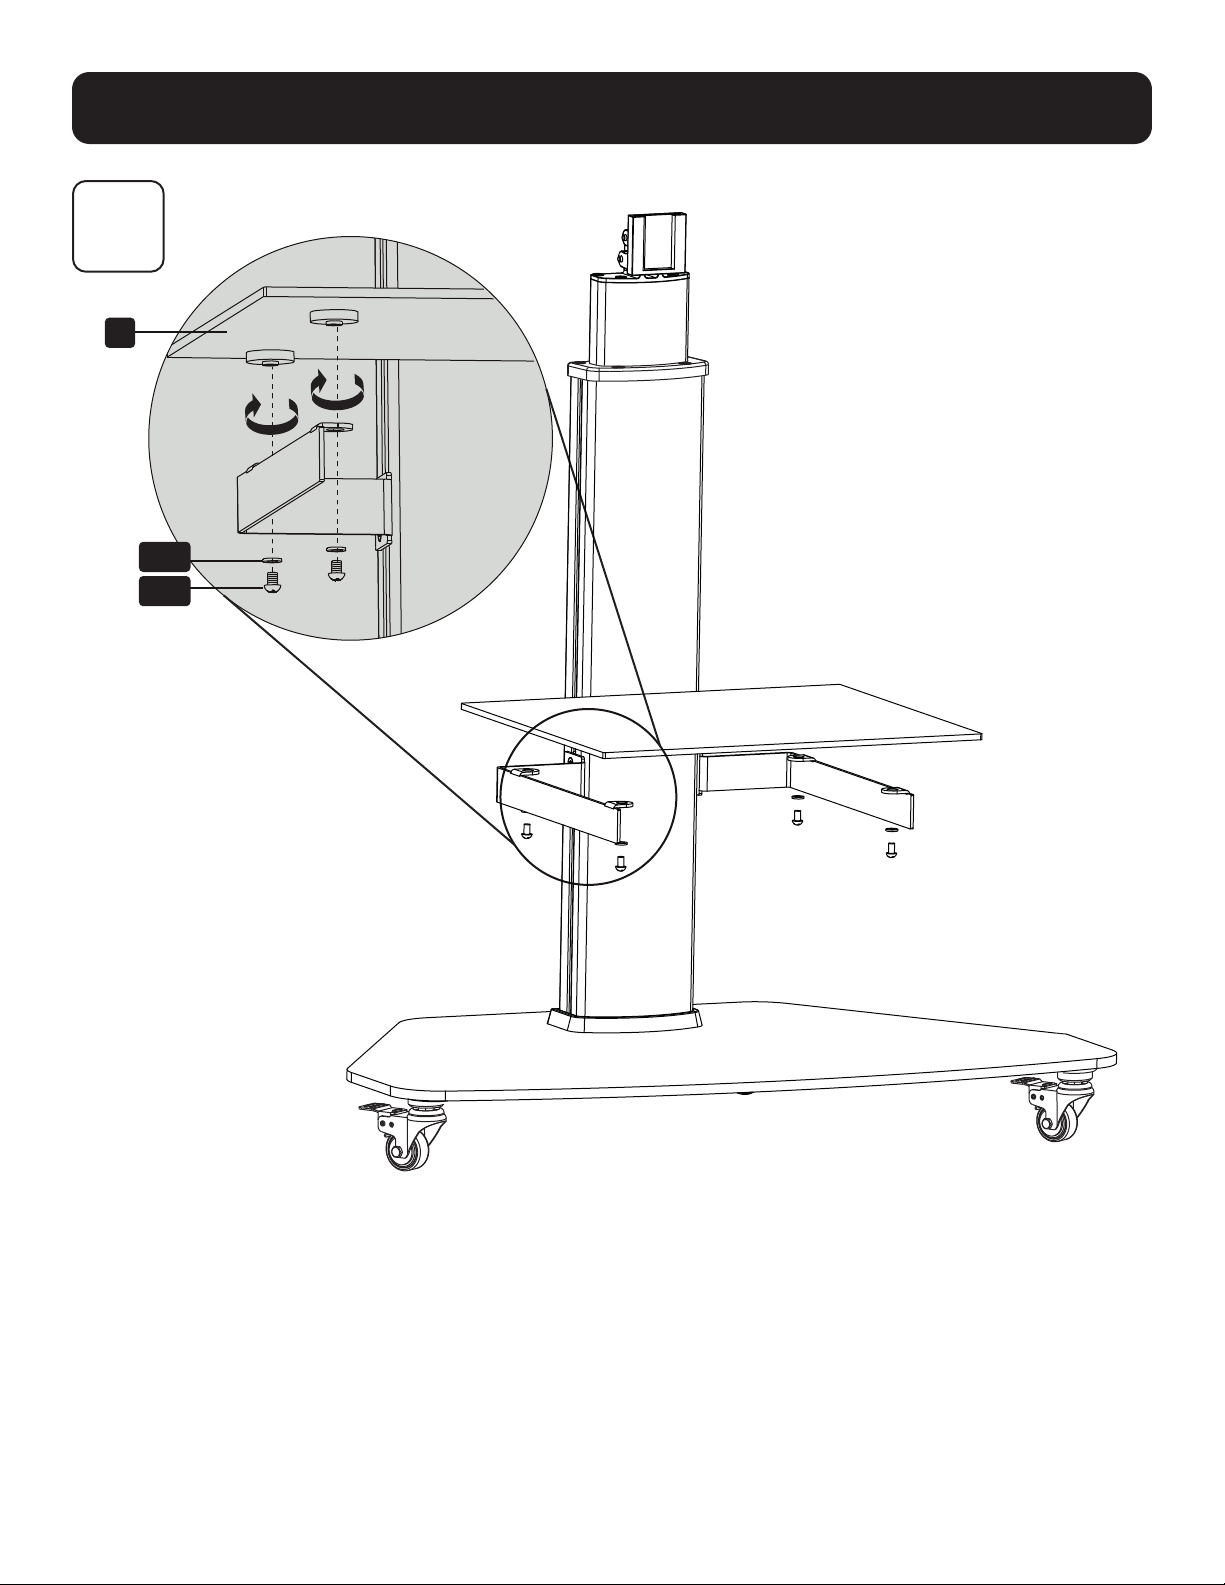
5
A
M-G
M-D
6
Page 7
Assembly
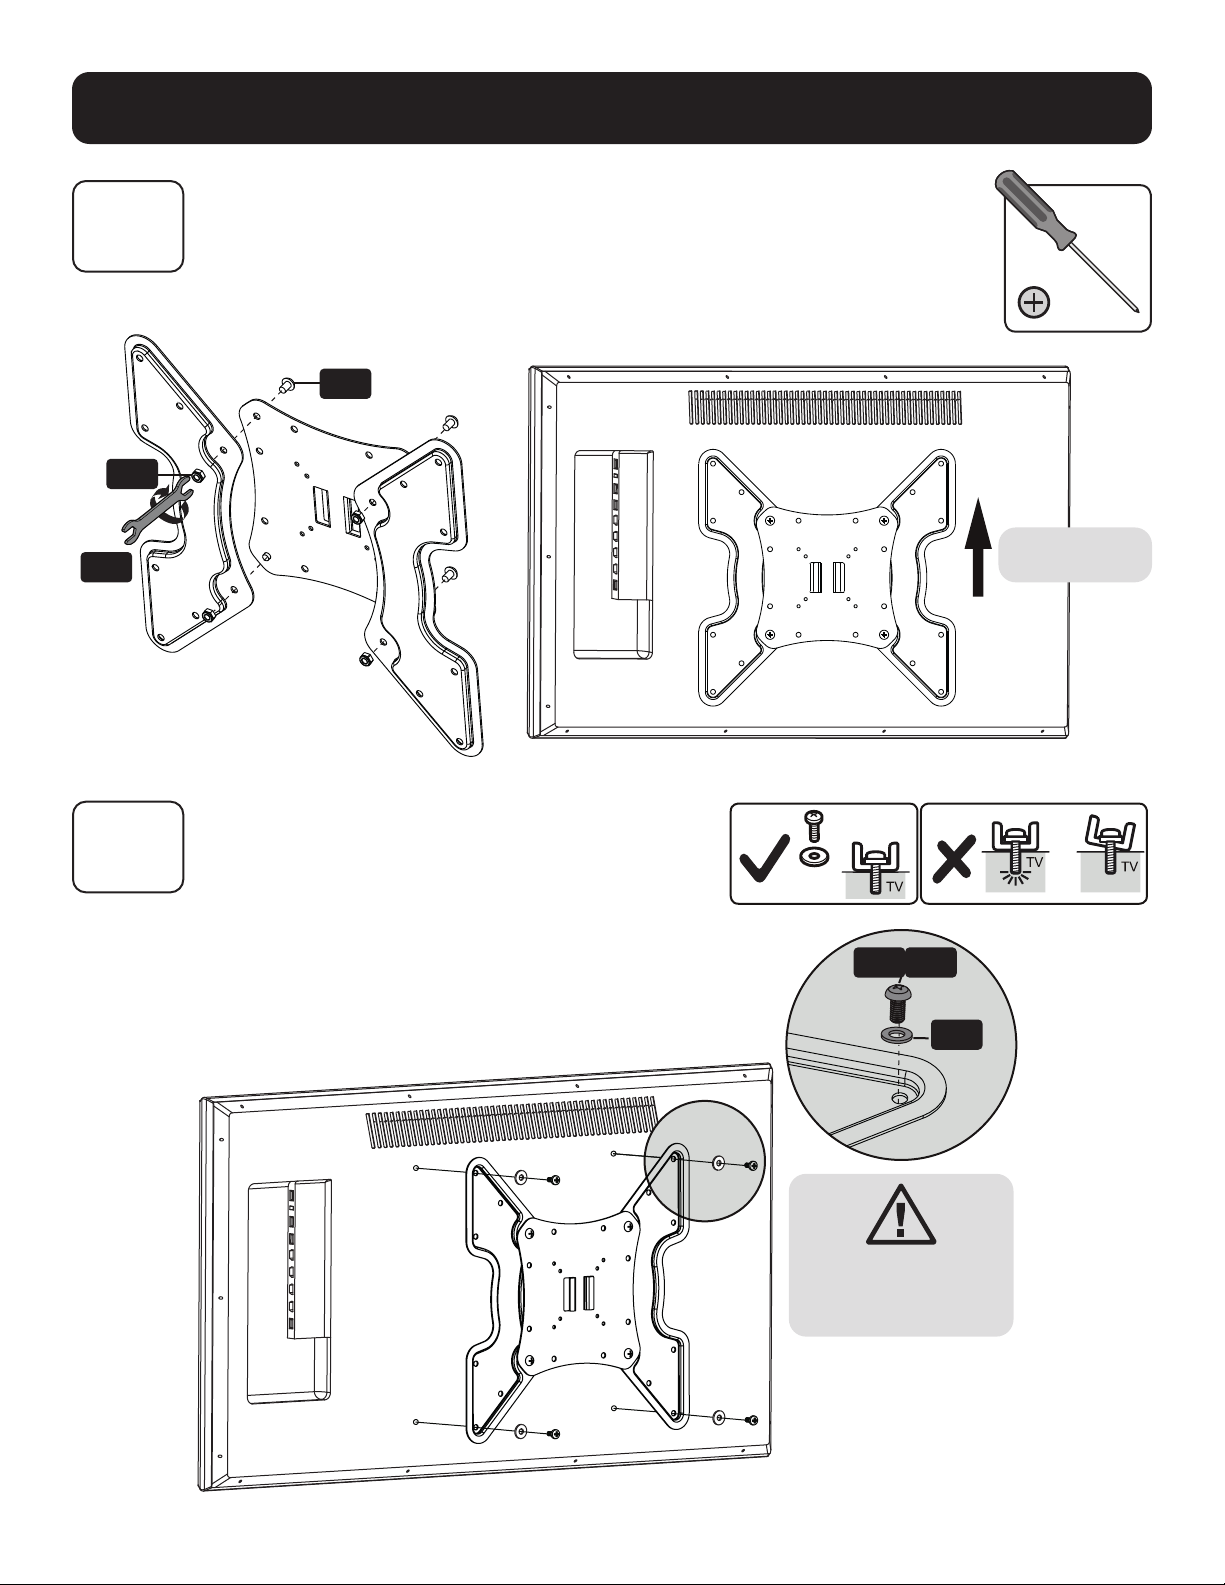
6a
M-I
M-L
For Flat-Back Screens
M-H
Top of display.
6b
P-A P-B
P-G
CAUTION:
Do not over-tighten
screws.
7
Page 8
Assembly
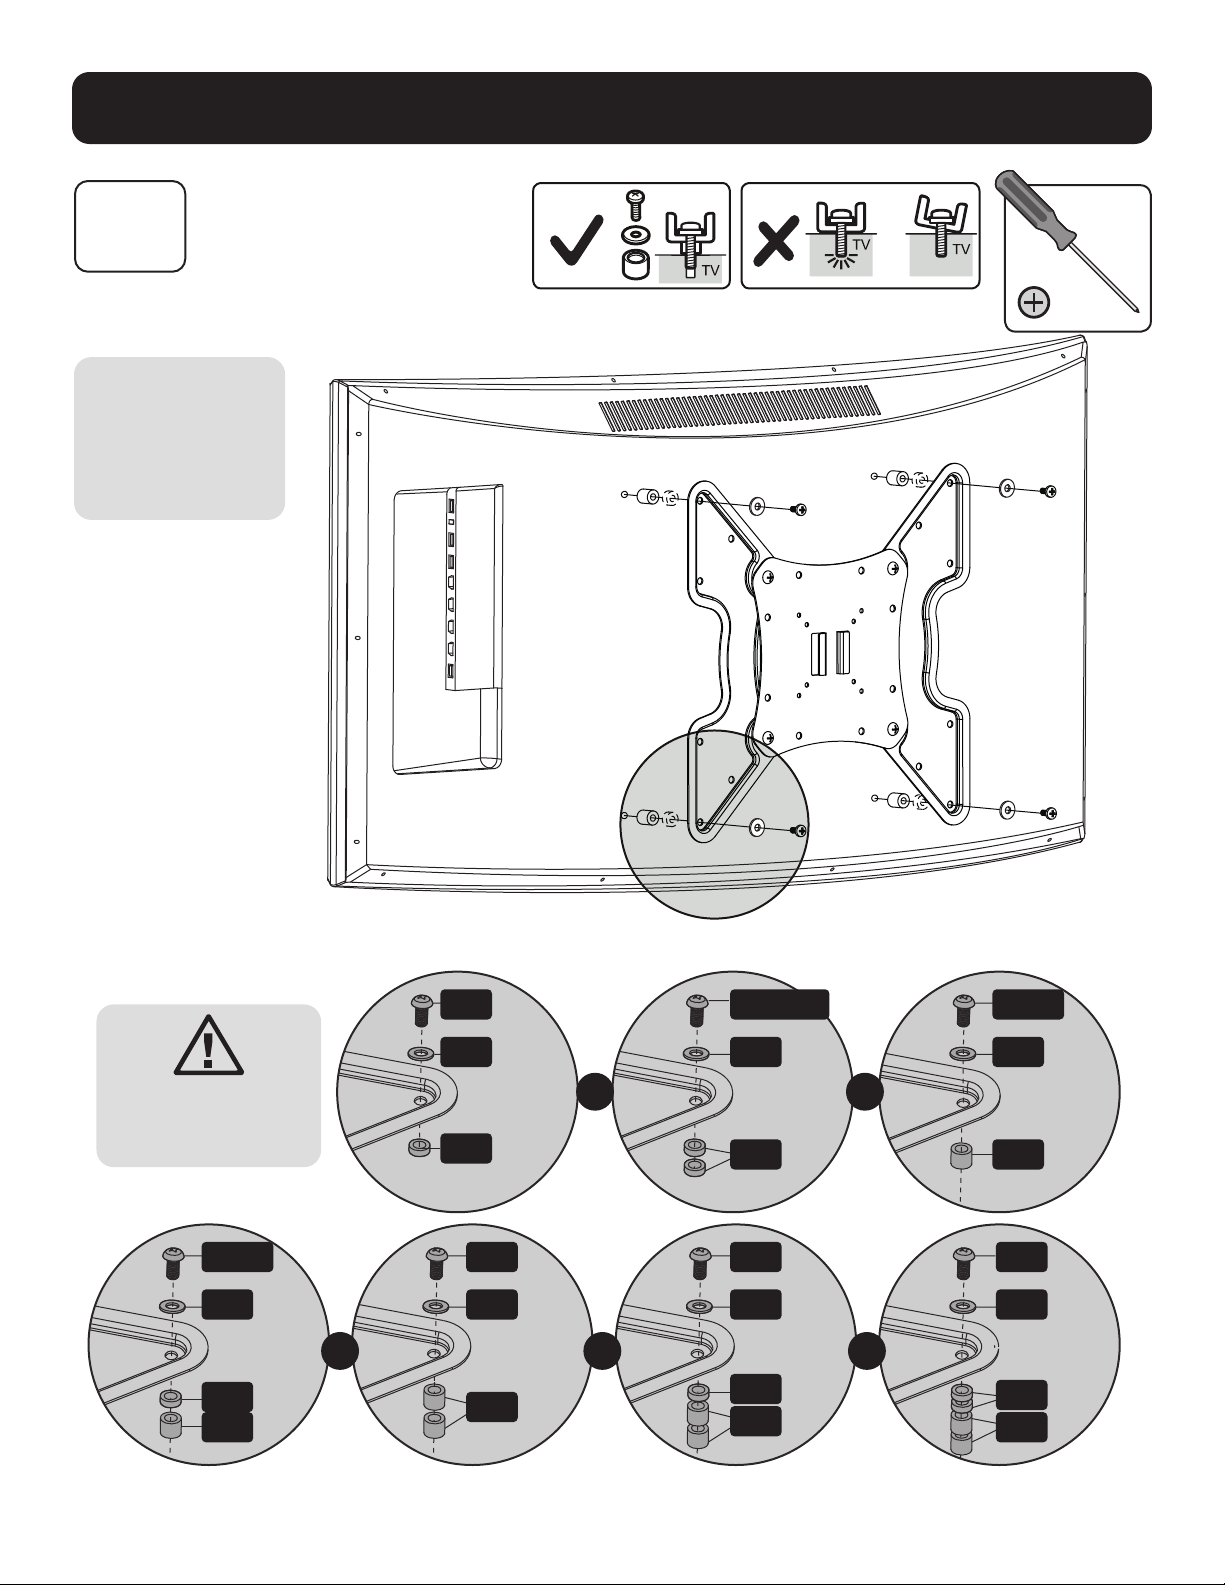
For Recessed-
6c
Back Screens or
Accessing A/V
Inputs
Note: Choose the
appropriate Screws,
Washers and
Spacers (if needed)
according to the type
of screen.
CAUTION:
Do not over-tighten
screws.
P-D/E P-F P-FP-F
P-H P-H P-HP-H
P-I
P-J
P-C P-C/D/E P-D/E
P-H P-H P-H
OR
P-I
OR OR OR
P-J
8
P-I P-J
P-I
P-J
OR
P-I
P-J
Page 9
Assembly
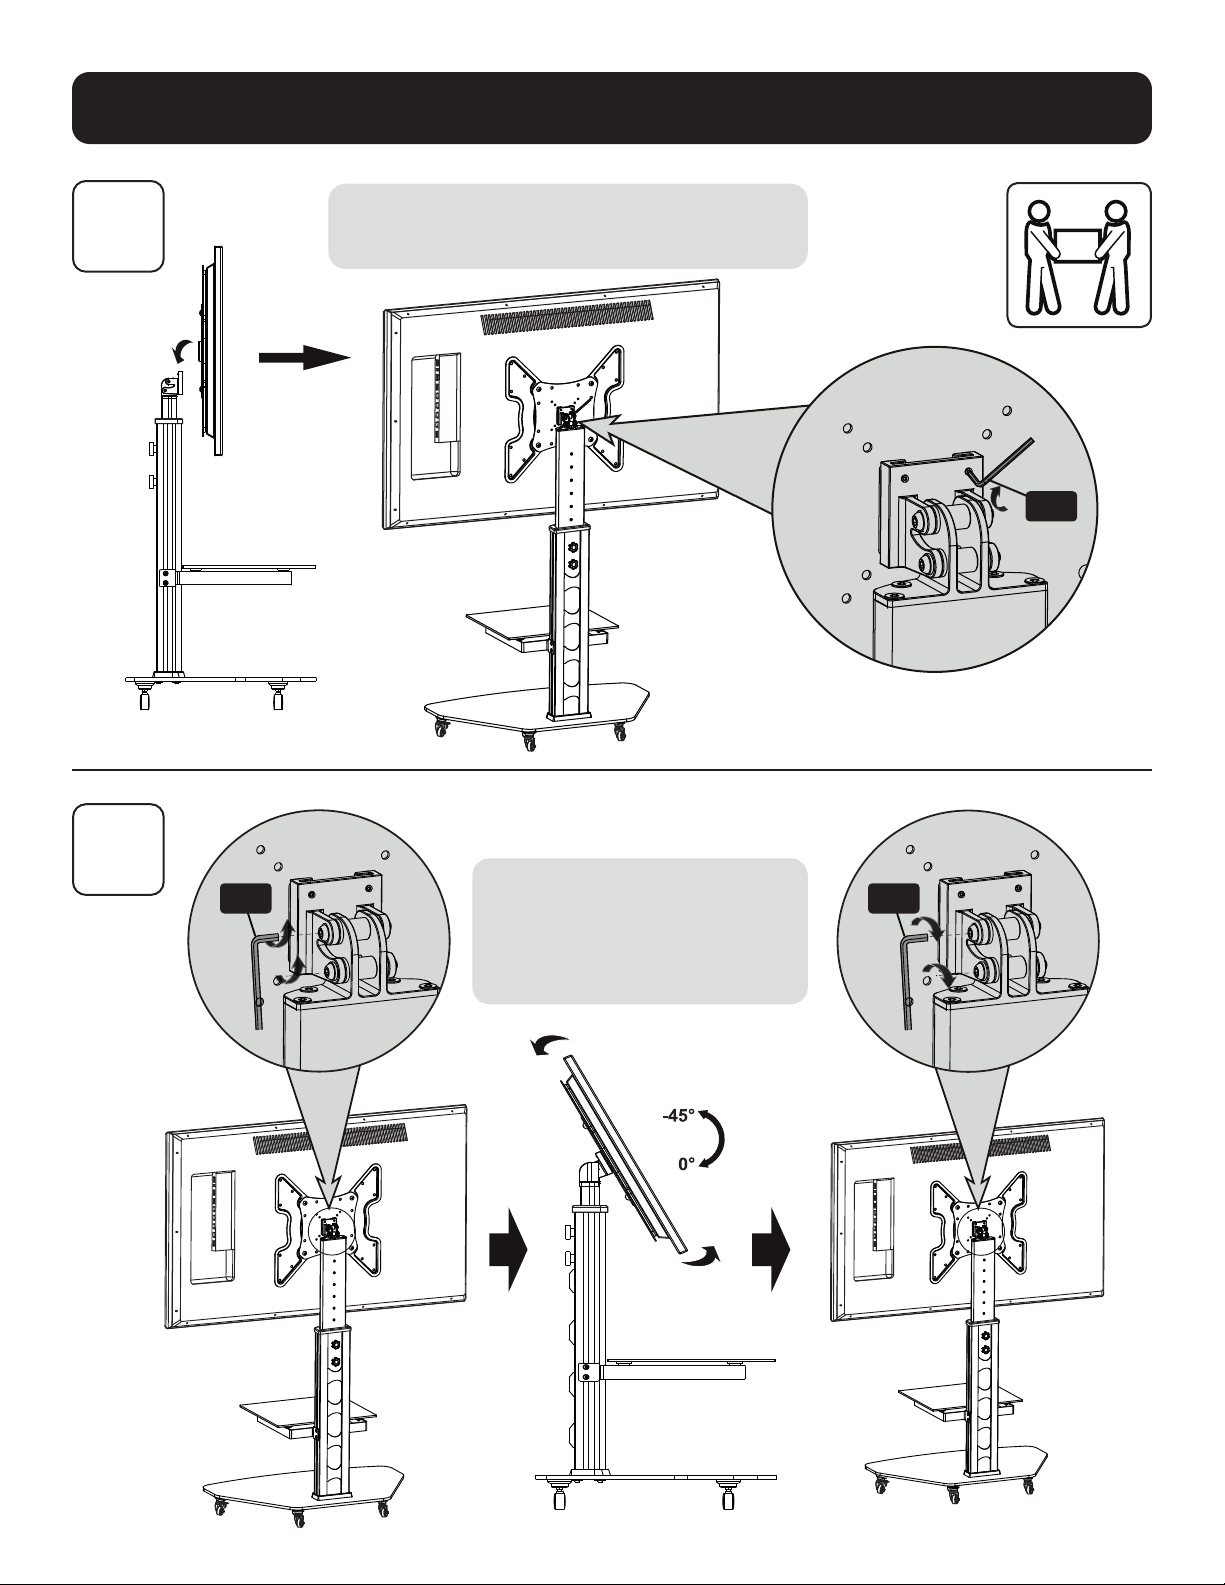
7
Note: Slowly t the VESA plate onto the top plate rail,
then tighten the safety screws to secure.
M-J
8
M-K M-K
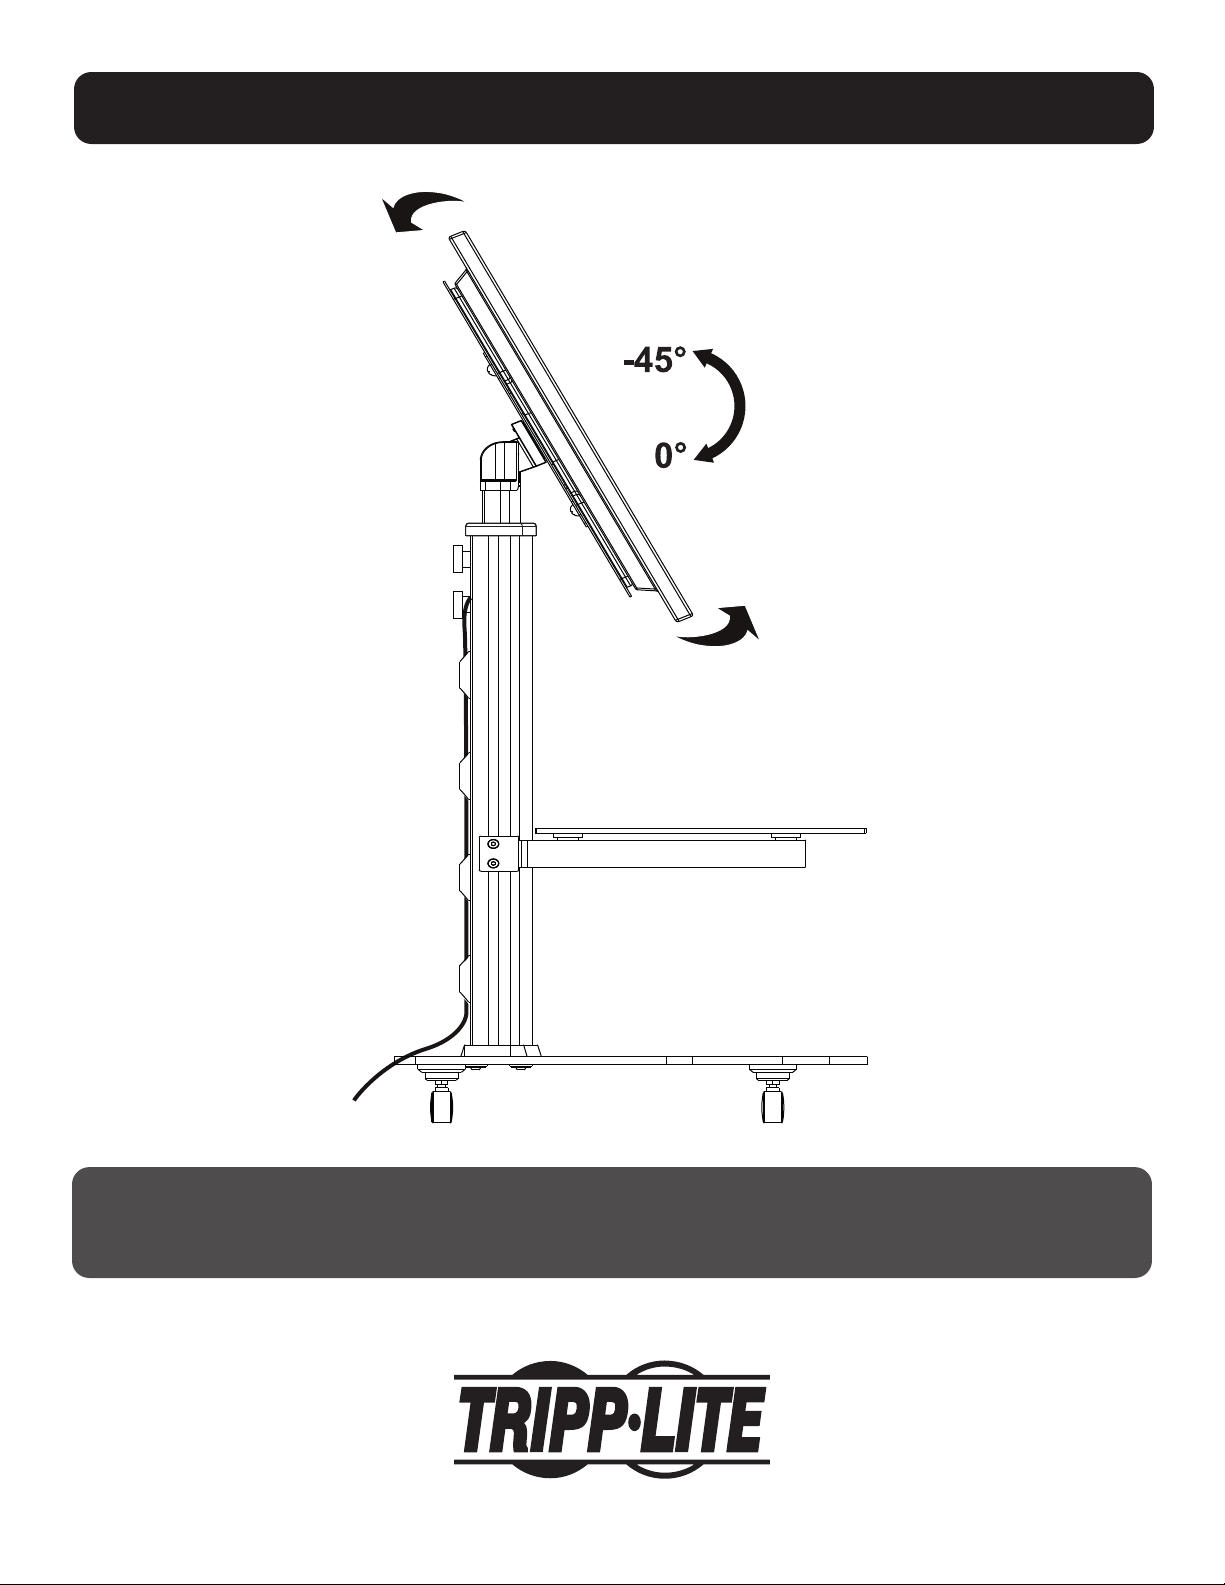
Note: The front panel can be tilted
by 45°. To do this, loosen the 2 screw
nuts on the top plate (I).
After alignment of the front panel,
tighten both nuts on the unit.
9
Page 10
Assembly
9
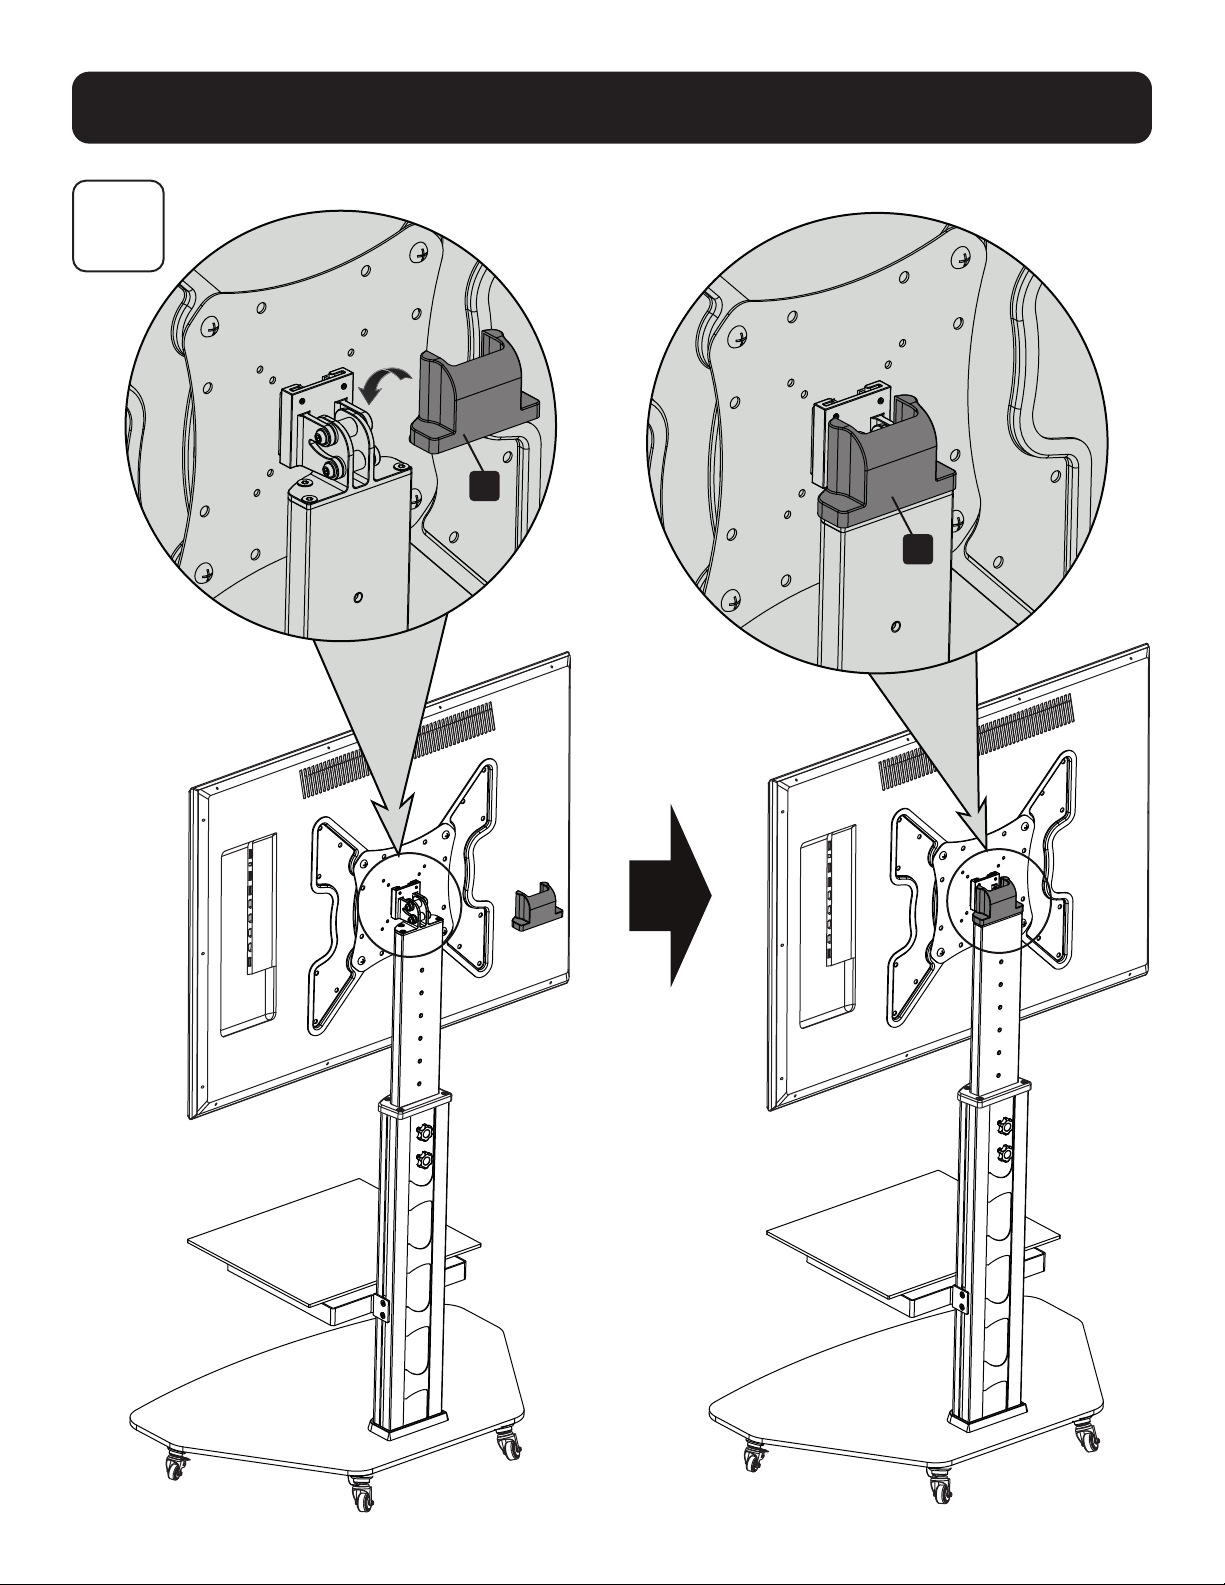
P
P
10
Page 11
Cable Routing
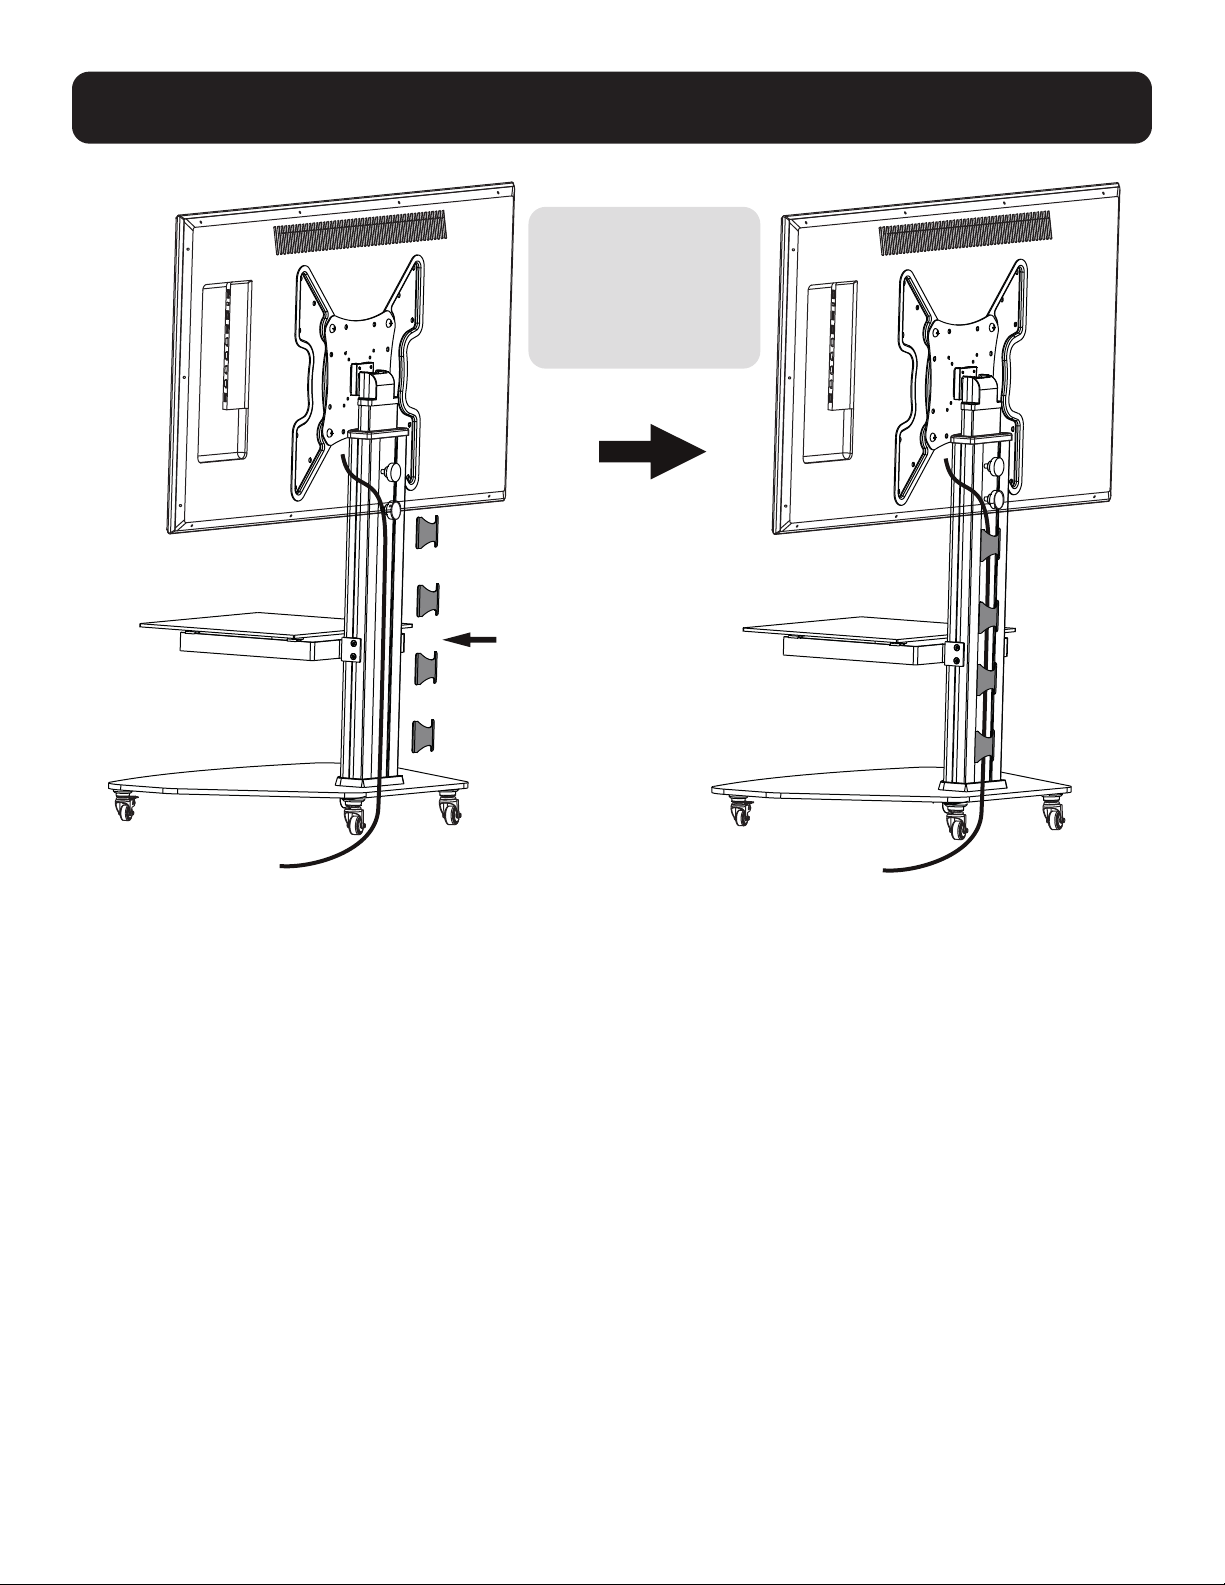
Note: Route the cables
along the column.
Attach the cable covers
to the column to hold
the cables in place.
11
Page 12
Adjustment
Maintenance
• Check that the bracket is secure and safe to use at regular intervals (at least every three months).
• Please visit tripplite.com/support if you have any questions.
1111 W. 35th Street, Chicago, IL 60609 USA • tripplite.com/support
12
22-04-156 93413D_RevB
 Loading...