

Tripp Lite B002-DP2AC4-N4, B002-DP1A2-N4, B002-H2AC4-N4, B002-DV2A4-N4, B002-DP2A2-N4 User guide
...Page 1

Owner’s Manual
Secure KVM Switches, NIAP
Protection Prole Version 4.0
DisplayPort Models:
B002-DP1A2-N4, B002-DP2A2-N4, B002-DP1A4-N4, B002-DP2A4-N4
HDMI Models:
B002-H1A2-N4, B002-H2A2-N4, B002-H1A4-N4, B002-H2A4-N4
DP to HDMI Models:
B002-HD1A2-N4, B002-HD2A2-N4, B002-HD1A4-N4, B002-HD2A4-N4
DVI:
B002-DV1A2-N4, B002-DV2A2-N4, B002-DV1A4-N4,
B002-DV2A4-N4
Este manual está disponible en español en la página de Tripp Lite: tripplite.com
Ce manuel est disponible en français sur le site Web de Tripp Lite : tripplite.com
Русскоязычная версия настоящего руководства представлена на веб-сайте
Dieses Handbuch ist in deutscher Sprache auf der Tripp Lite-Website verfügbar:
1111 W. 35th Street, Chicago, IL 60609 USA • tripplite.com/support
компании Tripp Lite по адресу: tripplite.com
tripplite.com
WARRANTY REGISTRATION
Register your product today and be
automatically entered to win an ISOBAR®
surge protector in our monthly drawing!
tripplite.com/warranty
Copyright © 2022 Tripp Lite. All rights reserved.
1
Page 2

Table of Contents
Package Includes .................................................................................. 3
Optional Accessories ............................................................................ 3
System Requirements ........................................................................... 4
Features.................................................................................................. 5
Important Safety Instructions ............................................................... 6
Installation .............................................................................................. 9
KVM LEDs ............................................................................................ 10
Port-Selection LEDs ........................................................................ 10
Push-Button LEDs .......................................................................... 10
Port-Selection and Push-Button LEDs ............................................ 10
Console Video Port LED ................................................................. 10
Miscellaneous KVM Functionality ...................................................... 11
AUDITING: Dumping the Event Log ............................................... 11
RESET: Restore Factory Defaults ................................................... 12
Power Up Self-Test ......................................................................... 13
Warranty and Product Registration ................................................... 14
2
Page 3

Package Includes
• B002-Series Secure KVM Switch
• 12V 3A External Power Supply*
• Owner’s Manual
* Includes NEMA 1-15P (North America), CEE 7/16 Schuko (Europe), BS 1363
(UK) and AS/NZS 3112 (Australia) plugs.
Optional Accessories
• P312-Series 3.5 mm Stereo Audio Cables
• P569-XXX-CERT Premium High-Speed HDMI Cables
• P782-XXX-HA HDMI/USB KVM Cable Kit
• P782-XXX-DH HDMI/DVI/USB KVM Cable Kit
• P783-Series DisplayPort KVM Cable Kit
• P580-Series DisplayPort Cables
• U022-Series USB 2.0 A/B Device Cables
*XXX refers to length (e.g. 006 = 6 ft., 010 = 10 ft., and so on)
3
Page 4

System Requirements
• DisplayPort, DVI or HDMI monitor
Note: The number of displays needed can be determined from the model
name. The number directly preceding the “A” in the model name indicates how
many monitors can be connected to the KVM switch.
• Wired USB mouse and keyboard without internal hub or composite
device functions*
• Computer with a DisplayPort, DVI or HDMI port
• Computer with an available USB port
• Computer with an available 3.5 mm stereo audio port
• Speakers with a 3.5 mm stereo audio port
• Compatible with all major operating systems
*Wireless keyboard and mouse are not supported
4
Page 5

Features
• CertiedtoNIAP/CommonCriteriaProtectionProleforPeripheral
Sharing Switches, Version 4.0.
• Safely switch between computers (up to 8) with varying security levels.
• DisplayPort models support video resolutions up to 3840 x 2160 @
30 Hz. HDMI models support resolutions up to 3840 x 2160 @
60 Hz.
• Anti-Tampering Protection – Internal Anti-Tamper switches disable
the KVM if the housing is opened, causing it to become inoperable.
Whendisabled,thefront-panelLEDswillashrepeatedlyandthe
internal buzzer will sound repeatedly. This is also caused by the
exhaustion of the internal battery, which has a life rating of over 10
years. Opening the housing will disable the unit and void the warranty.
• Tamper-Evident Seals – The enclosure of the unit is protected with
tamper-evident seals to provide visual evidence if the unit has been
tampered with or compromised. Removing these labels will void the
warranty.
• Protected Firmware – The unit features special protection that
preventsreprogrammingorreadingrmware,protectingagainst
attempts to alter the logic of the KVM.
• High Isolation on USB Channels – Opto-isolators are used to keep
USB data paths electrically isolated from each other, preventing data
leakage between ports.
• Secure EDID Emulation – Secure EDID learning and emulation
prevents unwanted and unsecure data from being transmitted through
the DDC line.
• Automatic Keyboard Buer Clearing –Thekeyboardbueris
automatically cleared after data transmission, so no information is left
stored in the switch.
• No Memory Buer – The only way to access connected computers is
via push button. Port switching methods such as On-Screen Display
(OSD) and Hotkey Commands have been excluded to further ensure
data integrity.
5
Page 6

Important Safety Instructions
• Read all instructions and save them for future reference.
• Follow all warnings and instructions marked on the device.
• Do not place the device on any unstable surface (cart, stand, table,
etc.). If the device falls, serious damage will result.
• Do not use the device near water.
• Do not place the device near, or over, radiators or heat registers. The
device cabinet contains slots and openings to allow for adequate
ventilation. To ensure reliable operation and to protect against
overheating, these openings must never be blocked or covered.
• The device should never be placed on a soft surface (bed, sofa, rug,
etc.) as this will block its ventilation openings. Likewise, the device
should not be placed in a built-in enclosure unless adequate ventilation
has been provided.
• Never spill liquid of any kind on the device.
• Unplug the device from the wall outlet before cleaning. Do not use
liquid or aerosol cleaners. Use a damp cloth for cleaning.
• The device should be operated from the power source type indicated
on the marking label. If you are not sure of the type of power available,
consult your dealer or local power utility.
• Do not allow anything to rest on the power cord or cables. Route the
power cord and cables so that they cannot be stepped on or tripped
over.
• If an extension cord is used with this device, make sure the total
ampere rating of all products used on the cord does not exceed the
extension cord ampere rating. Make sure the total rating of all products
plugged into the wall outlet does not exceed 15 amperes.
• Position system cables and power cables carefully. Make sure nothing
rests on any cables.
• To help protect your system from sudden transient increases and
decreases in electrical power, it is recommended you plug your devices
into a Tripp Lite Surge Protector, Line Conditioner or Uninterruptible
Power Supply (UPS).
6
Page 7

Important Safety Instructions
• When connecting or disconnecting power to hot-pluggable power
supplies, observe the following guidelines:
o Install the power supply before connecting the power cable to the
power supply.
o Unplug the power cable before removing the power supply.
o If the system has multiple power sources, disconnect power from the
system by unplugging all power cables from the power supplies.
• Never push objects of any kind into or through cabinet slots. They may
touch dangerous voltage points or short out parts, resulting in a risk of
electricalshockorre.
• If the following conditions occur, unplug the device from the wall outlet
andbringittoqualiedservicepersonnelforrepair.
o The power cord or plug has become damaged or frayed.
o Liquid has been spilled into the device.
o The device has been exposed to rain or water.
o The device has been dropped or the cabinet has been damaged.
o The device exhibits a distinct change in performance, indicating a
need for service.
o The device does not operate normally when the operating
instructions are followed.
• Only adjust those controls that are covered in the operating
instructions. Improper adjustment of other controls may result in
damagethatwillrequireextensiveworkbyaqualiedtechnicianto
repair.
• This device is designed for IT power distribution systems with up to
230V phase-to-phase voltage.
• To prevent damage to your installation, it is important that all devices
are properly grounded.
7
Page 8

Important Safety Instructions
• This device is equipped with a three-wire grounding-type plug.
This is a safety feature. If you are unable to insert the plug into the
outlet, contact an electrician to replace your outlet with one that will
accept this type of plug. Do not attempt to defeat the purpose of the
grounding-type plug. Always follow your local/national wiring codes.
• Warning! There is a risk of explosion if the battery is replaced with
an incorrect battery type. Do not attempt to service the device
yourself. Refer all servicing to qualied service personnel.
8
Page 9

Installation
Note: Before proceeding with installation, make sure all devices being connected
to the KVM switch are turned o.
1. Using audio/video cables appropriate for your switch model, connect
the video output port of each computer you are adding to the video
input ports of the KVM Switch.
Note: Models with Dual Monitor capability require two available video ports
per computer.
2. Using USB A/B device cables, connect a USB port on each computer
being added to the USB input port of the KVM Switch.
3. Using 3.5 mm stereo audio cables, connect the audio output of each
computer you are adding to the audio input ports of the KVM Switch.
4. Using the appropriate audio/video cable, connect a monitor
appropriate for your switch model to the console video output port of
the KVM switch.
5. Connect a wired USB keyboard and mouse to the console USB
keyboard and mouse ports of the KVM Switch.
Note: Keyboards and mice with internal USB hub or composite device
functions are not supported. Wireless keyboards and mice are not supported.
6. Connect a set of speakers to the console audio output port of the
KVM Switch using a 3.5 mm stereo audio cable.
Note: Microphones or headsets with microphones are not supported.
7. Power on the KVM by connecting the included external power supply
and plugging it into a Tripp Lite Surge Protector, Power Distribution
Unit (PDU) or Uninterruptible Power Supply (UPS).
8. Power on all connected computers and monitors. The front-panel
LEDswillbegintoash.
Note: The computer connected to port 1 will always be selected by default
after power-up.
9. To switch among the connected computers, simply push the desired
input button on the front panel of the KVM. If an input port is selected,
the LED of that port will turn on.
Note: The KVM will terminate an open session upon switching to a dierent
computer.
9
Page 10

KVM LEDs
Port-Selection LEDs
• WhentheLEDiso,thecorrespondingportisnotcurrentlyselected.
• When the LED is on, the corresponding port is currently selected.
• WhentheLEDisashing,theEDIDLearnprocessisoccurring.
Push-Button LEDs
• Whenthepush-buttonLEDofanon-selectedportiso,the
corresponding port is not currently selected.
• When the push-button LED is on, the corresponding port is currently
selected.
• Whenthepush-buttonLEDisashing,theEDIDLearnprocessis
occurring.
Port-Selection and Push-Button LEDs
• WhenallPort-SelectionandPush-ButtonLEDsareashing
simultaneously, the USB peripheral connected to the console keyboard
or mouse port has been rejected.
Console Video Port LED
• WhentheLEDiso,amonitorisnotconnected.
• When the LED is illuminated, a monitor is connected.
• WhentheLEDisashing,thereisaproblemwithEDID.Resetthe
power of the KVM to resolve these issues.
10
Page 11

Miscellaneous KVM Functionality
Note: The following steps are intended for the system administrator only.
AUDITING: Dumping the Event Log
Note: The following steps are intended for the system administrator.
The Event Log is a detailed report of critical activities stored in the KVM
or KVM memory. To view or dump the Event Log, follow the instructions
below.
Note: Only one computer connected to port 1 is required for this operation.
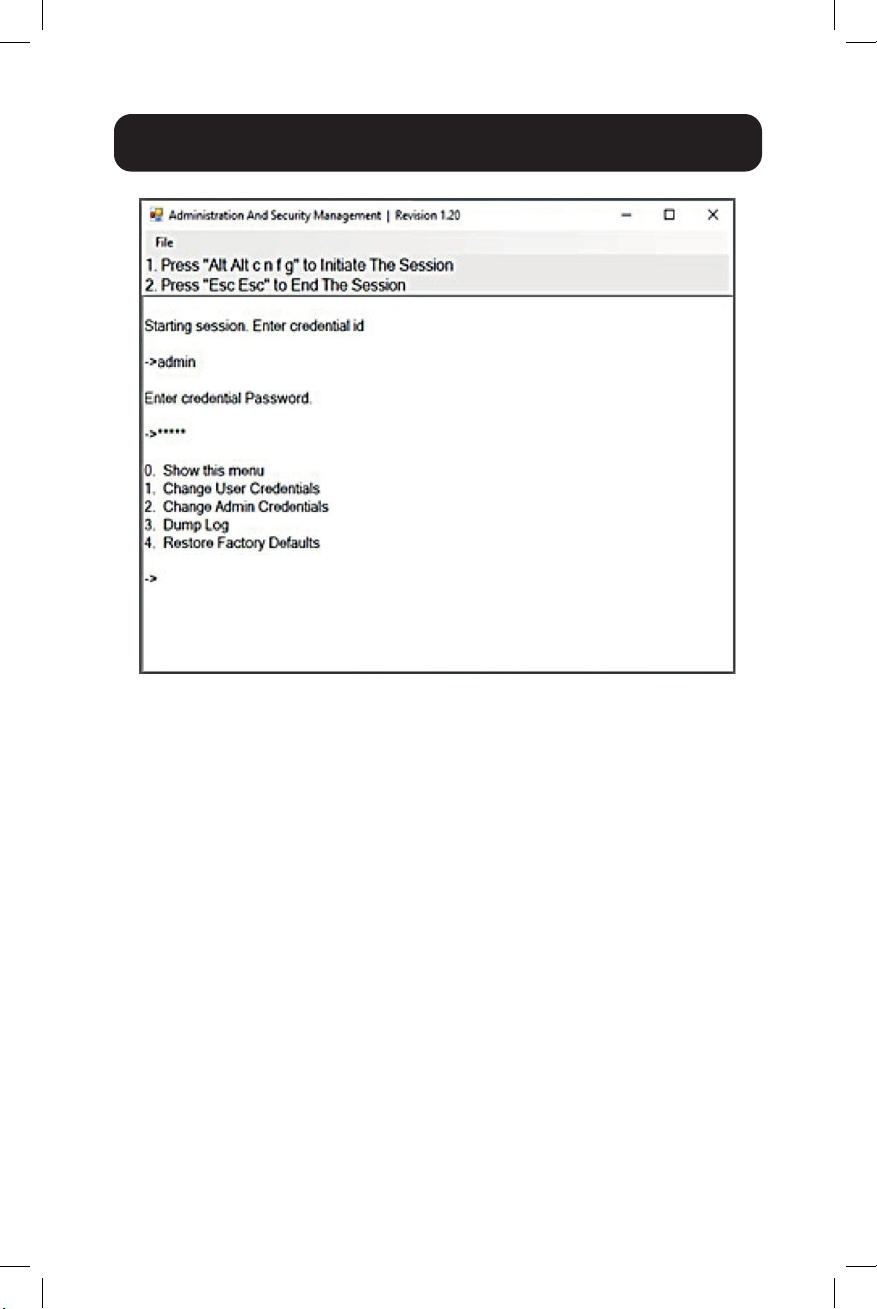
1. From the connected computer, download the Administration and
Security Management Tool from tripplite.com/support.
2. Once downloaded, run the Administration and Security Management
Toolexecutablele.TheAdministrationandSecurityManagement
screen will appear.
3. Initiate the session by pressing the following hotkey command. Hit
each key one after another.
[Alt][Alt][c][n][f][g]
4. Upon completing the command, the mouse connected to the KVM will
stop functioning. A prompt will appear to enter the Credential ID.
5. Log in by entering the default username “admin” and pressing Enter.
6. Enter the default password “12345” and press Enter.
7. Request a Log Dump by selecting option 3 in the menu.
11
Page 12
Miscellaneous KVM Functionality
RESET: Restore Factory Defaults
Note: The following steps are intended for the system administrator. Restore
Factory Defaults will reset all settings on the KVM to their original state:
• KVM settings will be reset to factory defaults
To restore Factory Defaults, follow the steps below.
Note: Only one computer connected to port 1 is required for this operation.
1. Open the Administration and Security Management Program (See the
Auditing Section for download instructions). The Administration and
Security Management screen will appear.
2. Initiate the session by pressing the following hotkey command, one
key after another.
[Alt][Alt][c][n][f][g]
3. Upon completing the command, the mouse connected to the KVM will
stop functioning. A prompt will appear to enter the Credential ID.
4. Log in by entering the default username “admin” and pressing Enter.
5. Enter the default password “12345” and press Enter.
12
Page 13

Miscellaneous KVM Functionality
6. Select “Restore Factory Default” option from the menu and press
Enter.
Note: A comprehensive feature list and instructions for the Administration and
Security Management Utility can be found in the Administrator’s Guide available
at tripplite.com/support.
Power Up Self-Test
If all front-panel LEDs are on and not ashing, the Power Up Self-Test
failed and all functions are disabled. Check if any of the front-panel
power selection buttons are jammed. In this case, release the jammed
button and recycle power. If Power Up Self-Test continues to fail, contact
Tripp Lite Technical Support at tripplite.com/support.
Front Panel Control
To switch to an input port, simply push the desired input button on the
front panel of the KVM. If an input port is selected, the LED of that port
willturnon.Anopensessionisterminateduponswitchingtoadierent
computer.
13
Page 14

Warranty and Product Registration
3-Year Limited Warranty
TRIPP LITE warrants its products to be free from defects in materials and
workmanship for a period of three (3) years from the date of initial purchase.
TRIPP LITE’s obligation under this warranty is limited to repairing or replacing
(at its sole option) any such defective products. To obtain service under this
warranty, you must obtain a Returned Material Authorization (RMA) number
from TRIPP LITE or an authorized TRIPP LITE service center. Products must
be returned to TRIPP LITE or an authorized TRIPP LITE service center with
transportation charges prepaid and must be accompanied by a brief description
of the problem encountered and proof of date and place of purchase. This
warranty does not apply to equipment which has been damaged by accident,
negligenceormisapplicationorhasbeenalteredormodiedinanyway.
EXCEPT AS PROVIDED HEREIN, TRIPP LITE MAKES NO WARRANTIES,
EXPRESS OR IMPLIED, INCLUDING WARRANTIES OF MERCHANTABILITY
AND FITNESS FOR A PARTICULAR PURPOSE. Some states do not permit
limitation or exclusion of implied warranties; therefore, the aforesaid limitation(s)
or exclusion(s) may not apply to the purchaser.
PRODUCT REGISTRATION
Visit tripplite.com/warranty today to register your new Tripp Lite product. You’ll
be automatically entered into a drawing for a chance to win a FREE Tripp Lite
product!*
* No purchase necessary. Void where prohibited. Some restrictions apply. See
website for details.
TrippLitehasapolicyofcontinuousimprovement.Specicationsaresubjectto
change without notice.
14
Page 15

15
Page 16

1111 W. 35th Street, Chicago, IL 60609 USA • tripplite.com/support
16
22-08-041 93-4104 RevD
 Loading...