

Page 1

Contents
Welcome...........................................................................1
Device Hardware ..............................................................2
Unit Setup .........................................................................3
Working with Your Unit...................................................5
Settings on Your Unit .....................................................12
Connecting to the PC......................................................14
Communication...............................................................14
Caring for Your Unit.......................................................22
Environmental Considerations........................................23
Safe Use of Your Unit.....................................................24
Environmental Specifications.........................................26
Hardware Specifications.................................................27
Troubleshooting..............................................................28
Regulatory Information...................................................31
Declaration of Conformity..............................................32
Welcome
Congratulations on your purchase of one of the most advanced
handheld computers available on the market today. The rugged
design of your handheld allows you to work in harsh outdoor
environments. You can operate your unit in blazing heat, subzero
cold, driving rain or dusty job sites – places you coul d not take a
consumer-grade handheld computer.
NOTE: Not all the features discussed in this manual will apply to
every unit, as many of the features are offered as options. If the
feature described does not apply to your unit, please disregard that
section.
1
Page 2
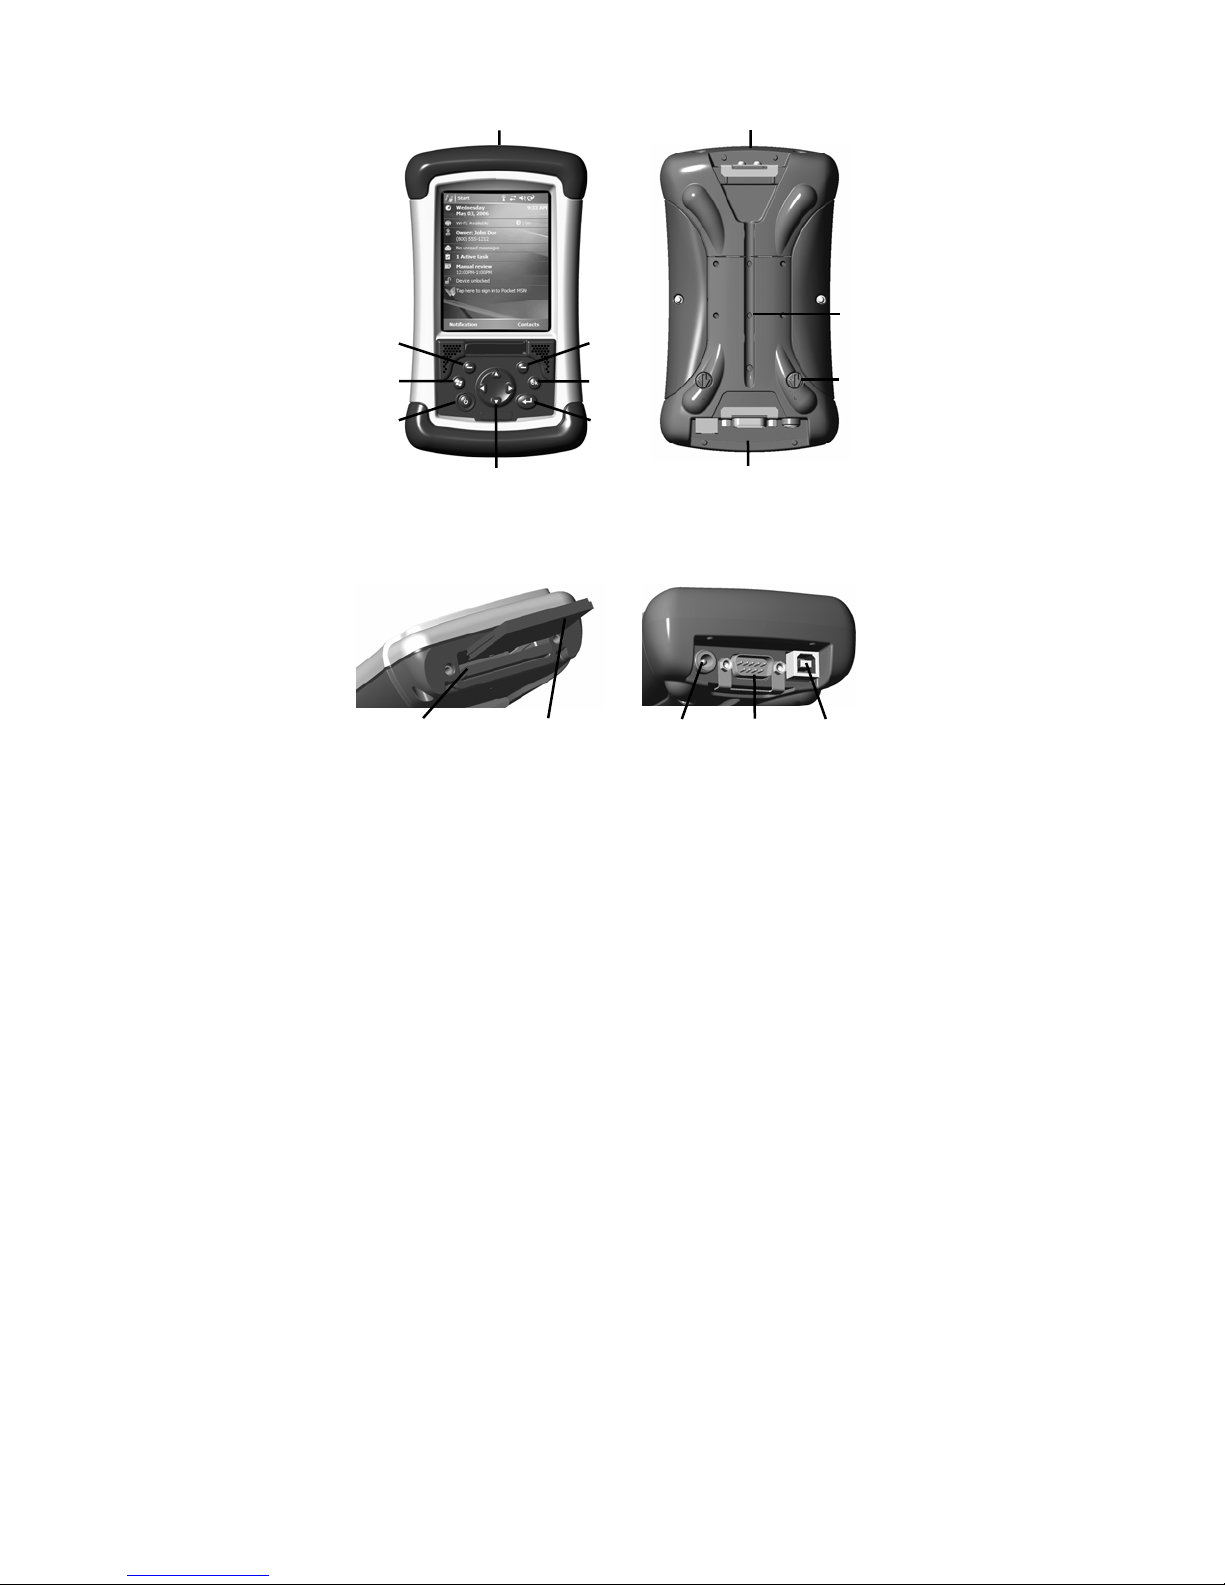
Device Hardware
Front View Back View
Removable CF-Cap
CF-Cap
Application
Soft Keys
*
Start
Power
Navigation pad
*Assignable application buttons;
see Settings
Application
Soft Keys
OK*
Enter
*
PowerBoot Module
Top View- without Cap Bottom View
CF slot #2
Type I
CompactFlash card slots
Some units do not have this feature
CF slot #1
Type I & II
External
Power
NOTE: Be sure to read the warranty and safety information in this
manual prior to using your unit.
Serial
USB
Stylus
holder
Latches
2
Page 3
Unit Setup
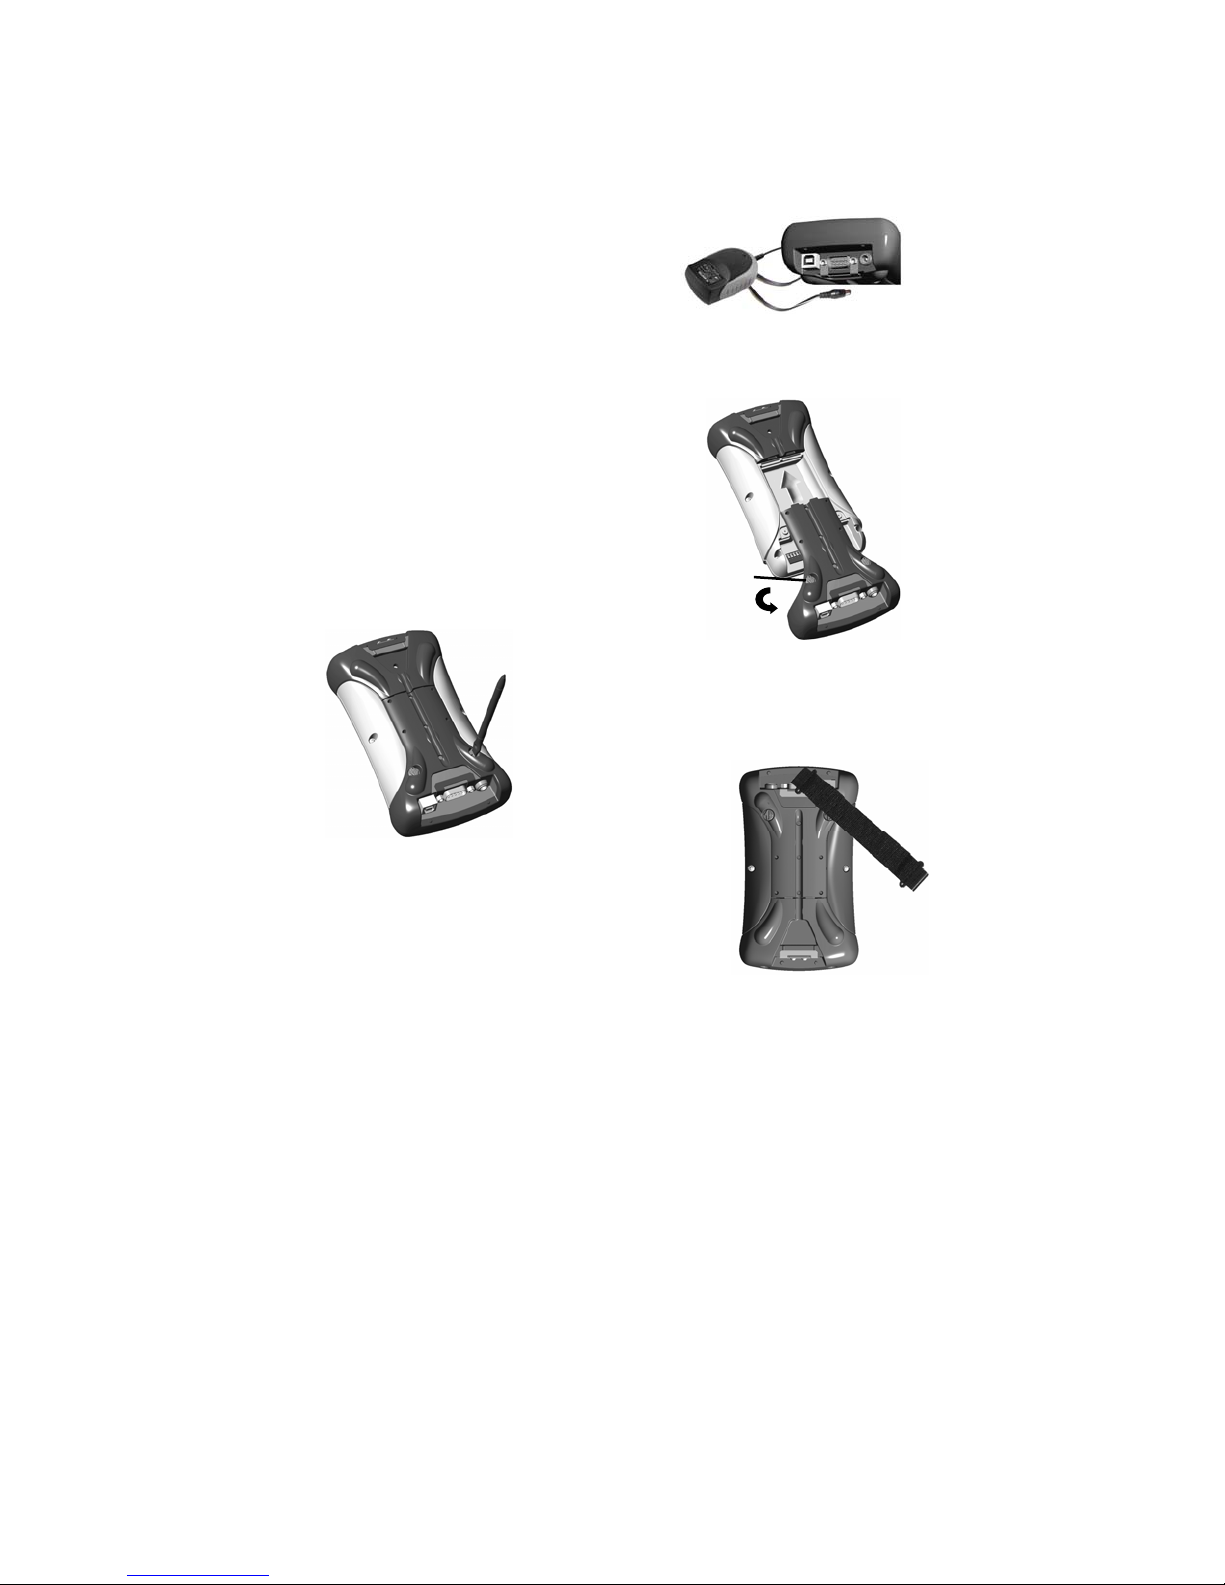
1. Charge the PowerBoot Module
The PowerBoot ModuleTM that contains the batteries is shipped
detached from the unit. Before you insert the PowerBoot into the
unit, you should charge it. The AC charger has outlet adapters to fit
almost every electrical outlet. Connect the appropriate ou tlet adap ter
to the AC charger. Plug the charger into
an electrical outlet and plug the barrel
end of the charger into the PowerBoot.
Charge at least 12 hours before using.
Warning! Be sure to always use the charger included with your
unit. Use of other chargers will void the product warranty.
2. Attach the PowerBoot Module
To attach the PowerBoot, use a
screwdriver or the flat head of the supplied
stylus to turn the latches counter-clockwise
until arrows point downward towards the
I/O ports on the PowerBoot. While
applying pressure down and forward on
the PowerBoot, firmly slide it onto the
main unit as shown.
latches
Lock the PowerBoot latches by turning
them clockwise one half turn until the
arrows on the latches point away from the
I/O ports.
3. Attach the hand strap
Hold the hand strap clip at a 45-degree angle
and push the clip onto the bracket. Repeat the
process with the other end of the hand strap.
3
Page 4

4. Turning your unit on and off
To turn your unit on, press and release the Power key on the lower
left hand corner of the keypad. To turn your unit off, press and
release the Power key again.
One of the most convenient features of the unit is “instant on” and
“instant off” (also known as “suspend/resume”). There is no waiting
for the unit to boot up every time it is turned on. “Instant on” does
not occur on the first boot-up.
When the unit first turns on, the message “Tap the screen to set up
your Windows Mobile-based device” will appear.
5. Align the touchscreen
The Align Screen message will display a series of targets to tap in
sequence on the screen. Use the stylus to tap the targets firmly and
accurately. Sometimes you need to repeat the alignment procedure
more than once to provide a satisfactory alignment.
6. Location – Time Zone
Select your time zone location and tap Next.
7. Password – Lock (Optional)
You do not have to provide a password unless you are concerned
about unauthorized use. To eliminate using a password, tap Skip.
If you opt for password protection the password must be entered
every time you turn the unit on or use the Power key to resum e
operation.
WARNING: BE CERTAIN TO REMEMBER THE PASSWORD.
The only way to recover from a forgotten password is to return to a
factory default state and you will LOSE all application software,
licenses, settings and data on your unit. See the section on page 11
on how to restore a factory default state.
4
Page 5

8. Using the CF Expansion Slots
If your unit comes with CompactFlash (CF) slots, access to the CF
slots is under the CF-Cap
the CF-Cap and slide the cap off the unit. Gently insert a CF card or
device into one of the two CF slots. Do not force the card into the
slot. The pins can be damaged if the card is not aligned correctly.
Cards must be inserted with the front of the
card facing toward the display side of the
unit. CF slot #1 supports Type I & II cards.
CF slot #2 supports Type I cards. Replace
the CF-Cap and securely tighten the
screws.
NOTE: Be sure to reattach the CF-Cap when you are finished. The
unit is NOT sealed when the CF-Cap is off. Water damage caused
by improper installation of the CF-Cap is not covered by warranty.
TM
. Unscrew the two screws on the top of
CF slot #2
Type I
CF slot #1
Type I & II
Working with Your Unit
Using the Stylus
The touchscreen on your unit works like a mouse on a PC. Use the
stylus to navigate and select objects on the screen.
Tap: Tap the screen with the stylus to select or open an item.
Tapping is equivalent to clicking the left button on the PC mouse.
Touch and hold: When you touch and hold, a circle of dots appears
around the stylus to indicate that a pop-up menu will soon appear.
Touching and holding is equivalent to clicking the right button on
the PC mouse.
Drag: Hold the stylus on the screen and drag across the screen to
select text and images. Drag in a list to select multiple items.
PowerBoot Module
The PowerBoot includes the batteries to power the unit, the power
port used to charge the unit, and the I/O ports that are used to
communicate with other devices using a USB or serial cable.
5
Page 6
Battery Life: Battery life is dependent upon the application and
operating environment. The PowerBoot contains 3800 mAh of
battery power which typically translates to approximately 15 hours
of battery life.
Heavy usage of the 802.11 wireless, frequent backlight usage, high
power consumption CF cards and cold temperatures can all
significantly reduce the battery life.
Tips for extending battery life:
- If your unit comes with embedded wireless capability (802.11
or Bluetooth) use ONLY when necessary. Turn off these
features in the Wireless Manager when they are not needed.
- Use the backlight only when necessary. Tap
System / Backligh
t to minimize the amount of time the
Start / Settings /
backlight stays on when the unit is idle. Also, a brighter
backlight uses more power than a dim setting.
- Use the most energy efficient CF cards, and use them only
when necessary to perform the desired tasks.
- When working in cold temperatures, keep the unit as warm as
possible. If feasible, keep the unit inside your coat or in a
vehicle when not in use.
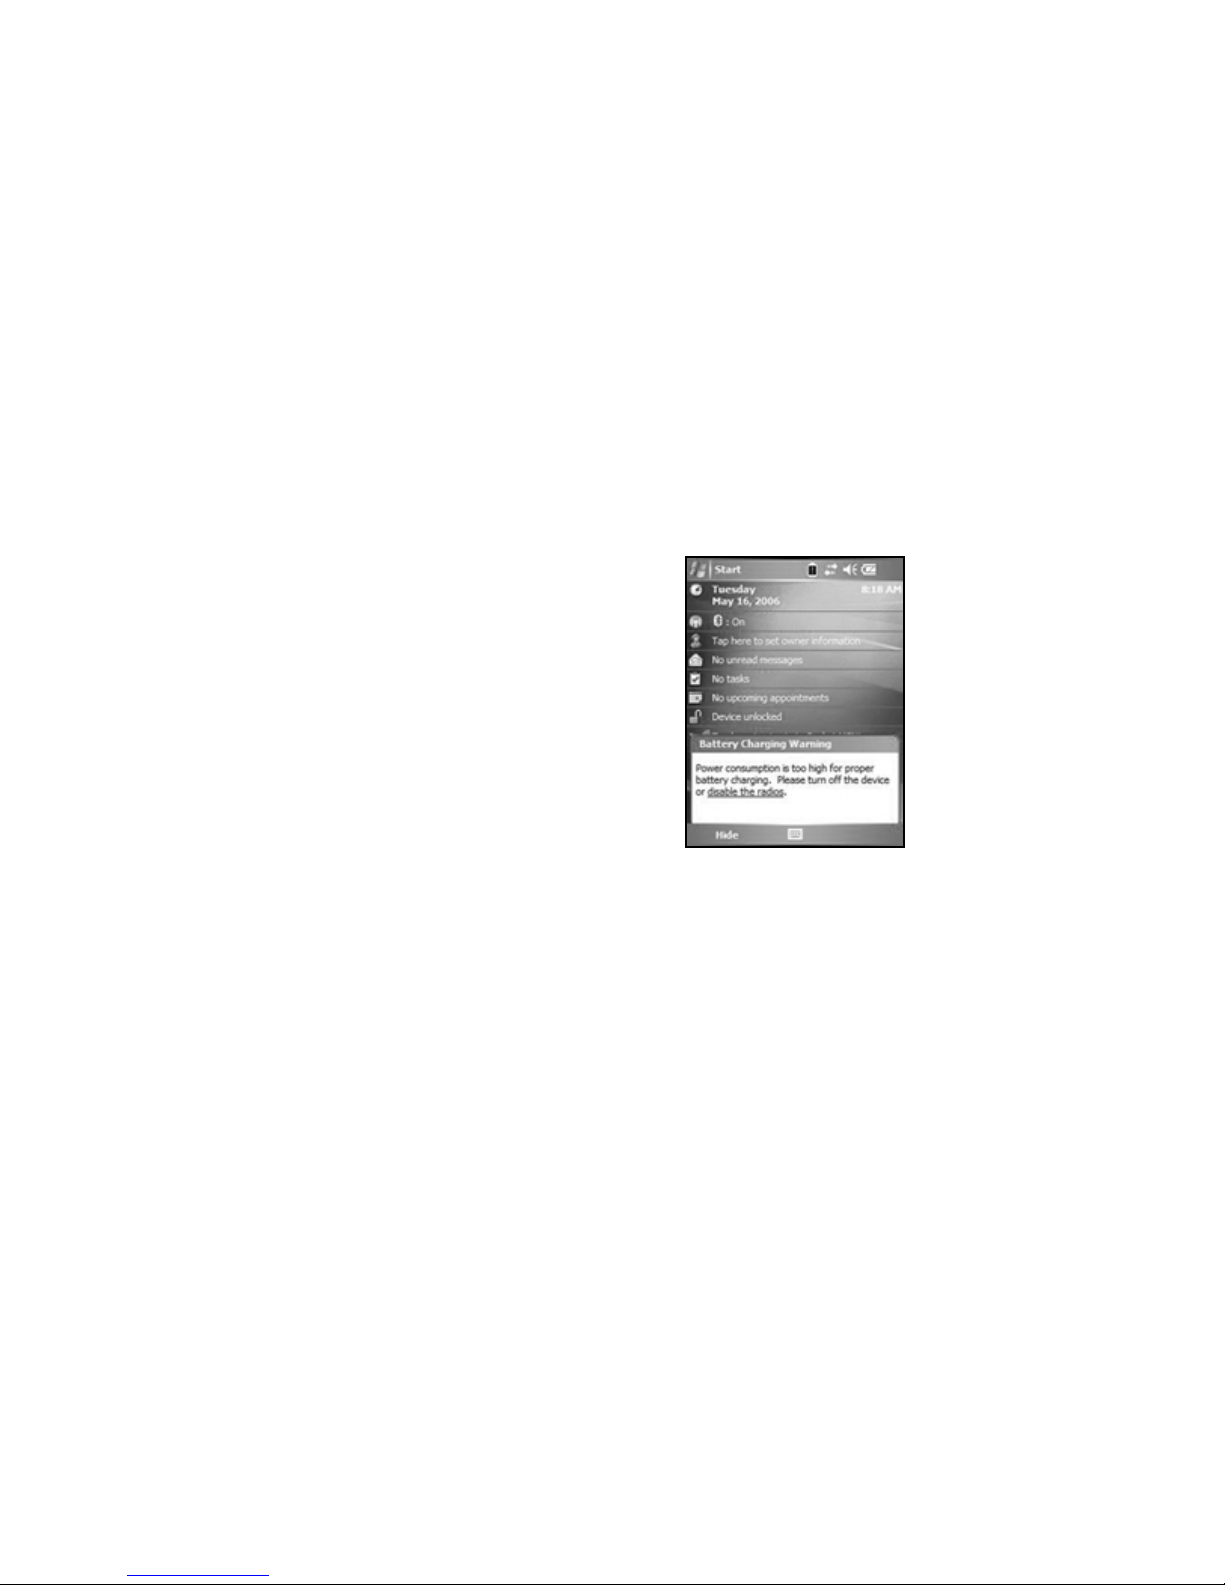
Charging the PowerBoot Module: It
is highly recommended to turn off the
unit while charging. Using the 802.11
takes power away from the charger that
is needed to replenish the battery and
may actually drain the battery. If so, a
battery charging warning will appear
that the power consumption is too high
for proper battery charging. If you need
to use the unit and the battery is really
low, you MUST turn off the 802.11.
The PowerBoot can be charged when installed or separately from
the main unit. Connect the appropriate outlet adapter to the AC
charger. Plug the charger into an electrical outlet and plug the barrel
end of the charger into the PowerBoot. If the unit is turned off, it
will be fully charged in approximately 12 hours.
6
Page 7
NOTE: If the fully-charged unit is still connected to the charger, the
status found in Settings / System / Power will report the battery
power remaining as if the unit were still on battery power.
Swapping the PowerBoot Module: The PowerBoot is designed to
be quickly swapped in the field (if you have purchased additional
PowerBoot Modules). If the current PowerBoot runs low, replace it
and continue with your work.
The unit saves enough power that if you swap the PowerBoot
within 30 seconds, it will not trigger a reset. If the saved power runs
out before the new PowerBoot is connected, the unit will reset. This
will not impact saved data, programs or configuration, however
unsaved data will be lost and the time will need to be reset.
To change a PowerBoot Module, perform the following steps:
1. Ensure the unit is turned
OFF
.
2. Remove the hand strap from the PowerBoot.
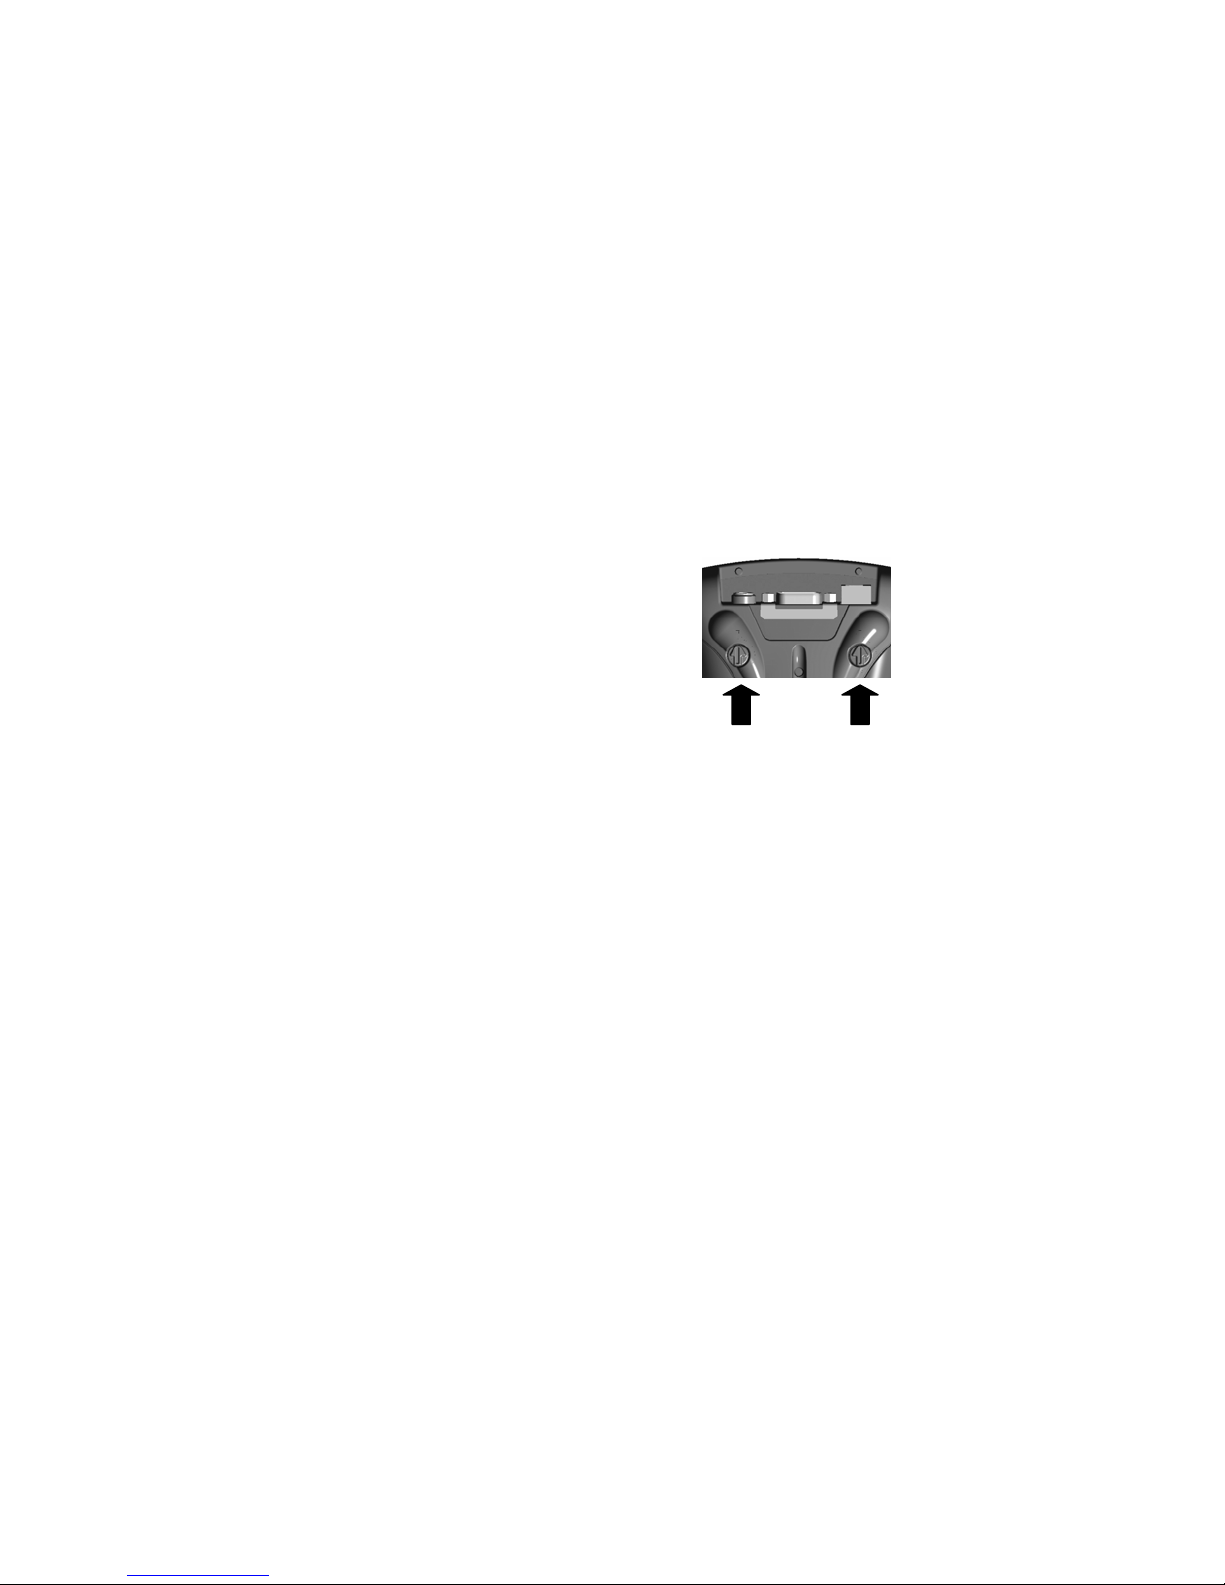
3. Unlock the latches on both PowerBoot Modules. Use a
screwdriver or the flat head of the supplied stylus to turn the
latches counter-clockwise until arrows point downward towards
the I/O ports on the PowerBoot.
4. With the unit upside down, remove
the PowerBoot by using your thumbs
to push and slide it away from the unit
as shown in the illustration. Be careful
to not press the Power key while the
PowerBoot is detached.
5. Quickly slide the new PowerBoot
Push Here
onto the unit.
6. Lock the latches on the new PowerBoot by turning them
clockwise one half turn until the arrows on the latches point
away from the I/O ports.
7. Replace the hand strap.
8. Turn the unit ON to resume operation.
7
Page 8
Storage Memory
Unlike many handheld computers which can lose data if they lose
power, all your data is always stored in non-volatile persistent
storage memory. Losing power will not impact saved data or
configurations other than the real time clock. This means that you
do not have to use a RAM backup utility to protect your data.
However, you can lose data by accidentally deleting or overwriting
it. As with any computer system, we recommend that you backup
your data to removable media or to a desktop PC on a regular basis.
Accessing Storage Memory using File Explorer
File Explorer (Start / Programs / File Explorer) lets you browse
the contents of folders on your unit. To easily delete, rename, or
copy an item, touch and hold the item.
®
NOTE: Unlike desktop PCs, Windows Mobile
5.0 does not
support a Recycle Bin. Once a file is deleted, it cannot be recovered.
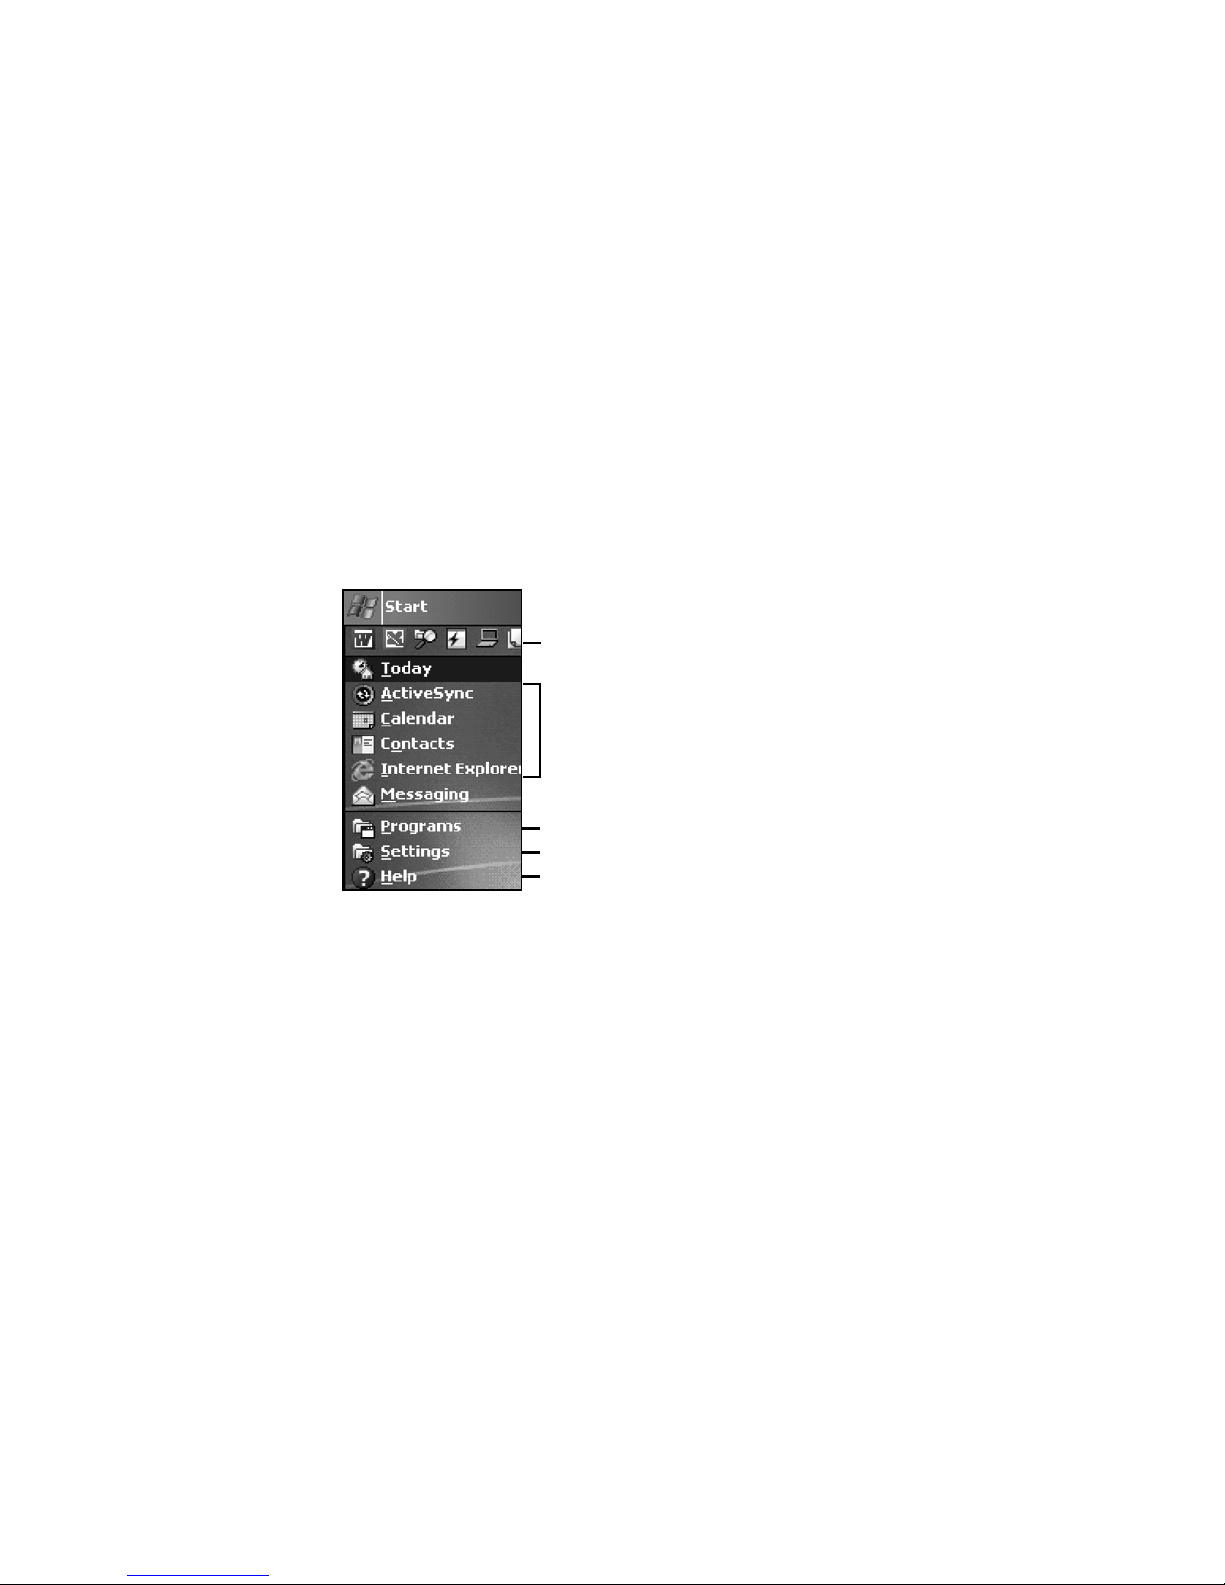
The Start Menu
From the Start Menu, you can select Programs, Settings and Help
topics. To display the Start Menu, from the top of any screen, tap
Start.
8
Tap to switch to a program that you recently used. Tap to switch to a program that you recently used.
Tap to switch to a program.
Tap to switch to a program.
Tap to see more programs.
Tap to see more programs.
Tap to change device settings.
Tap to change device settings.
Tap to see a Help topic for the current screen.
Tap to see a Help topic for the current screen.
Page 9
Pop-up menus
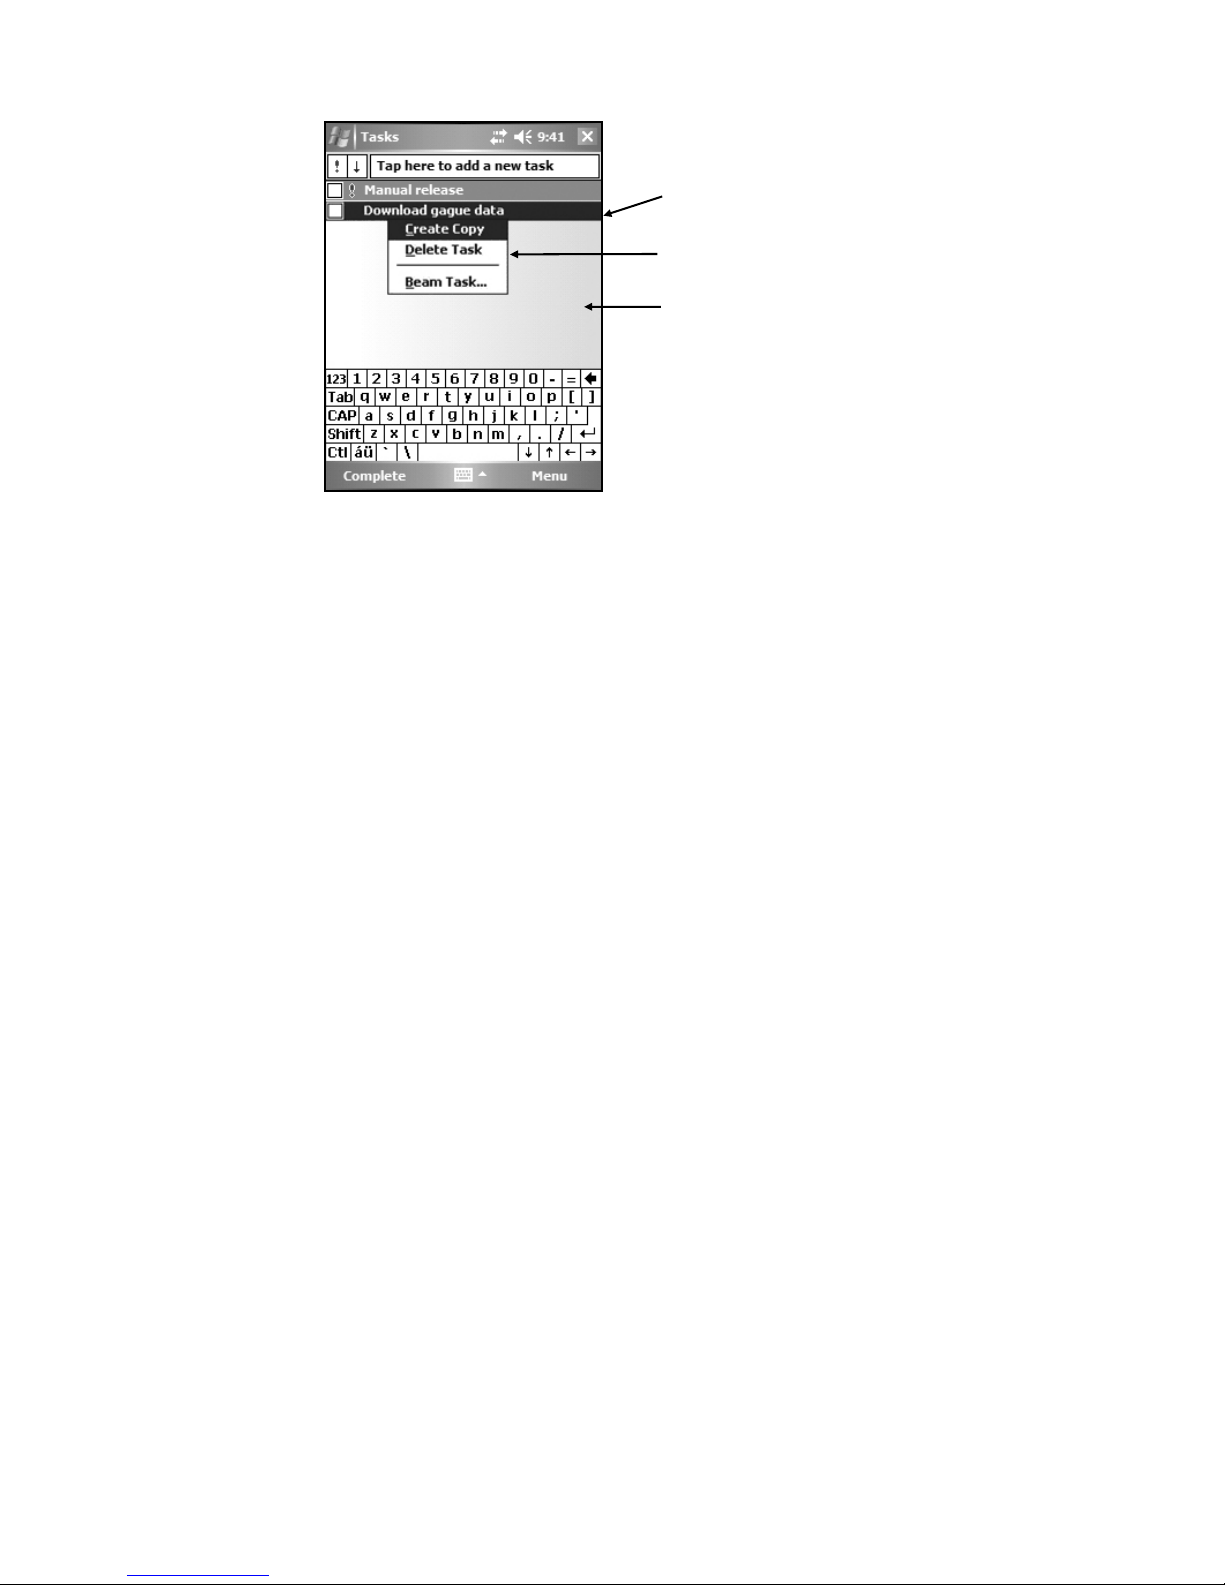
You can use pop-up menus to easily select an action for an item. To
access a pop-up menu, tap and hold the stylus on an item name.
Touch and hold to display the
pop-up menu.
Lift the stylus and tap the
action you want.
Tap outside the menu to close
it without performing an action.
Speaker and microphone
Your unit comes with an integrated speaker and a microphone. The
speaker will allow you to hear a variety of media.
To record, tap Start / Programs / Notes. If you do not see the
Recording toolbar, tap Menu / View Recording Toolbar. Tap the
round record symbol on the screen. The unit will record until Stop
is pressed. The recorded file will be saved in the Notes folder. To
change the directory where recorded files will be saved, tap the
folder icon and navigate to the desired folder.
To play the recorded file, tap the desired file from the Notes
program and it will begin to play. To begin another recording, tap
the record symbol on the screen. You cannot play and record
simultaneously; playback will be disabled during recording. To
change the volume, tap the speaker icon at the top of the display.
You can either change the volume or mute all sounds coming from
the unit.
9
Page 10
The Today Screen
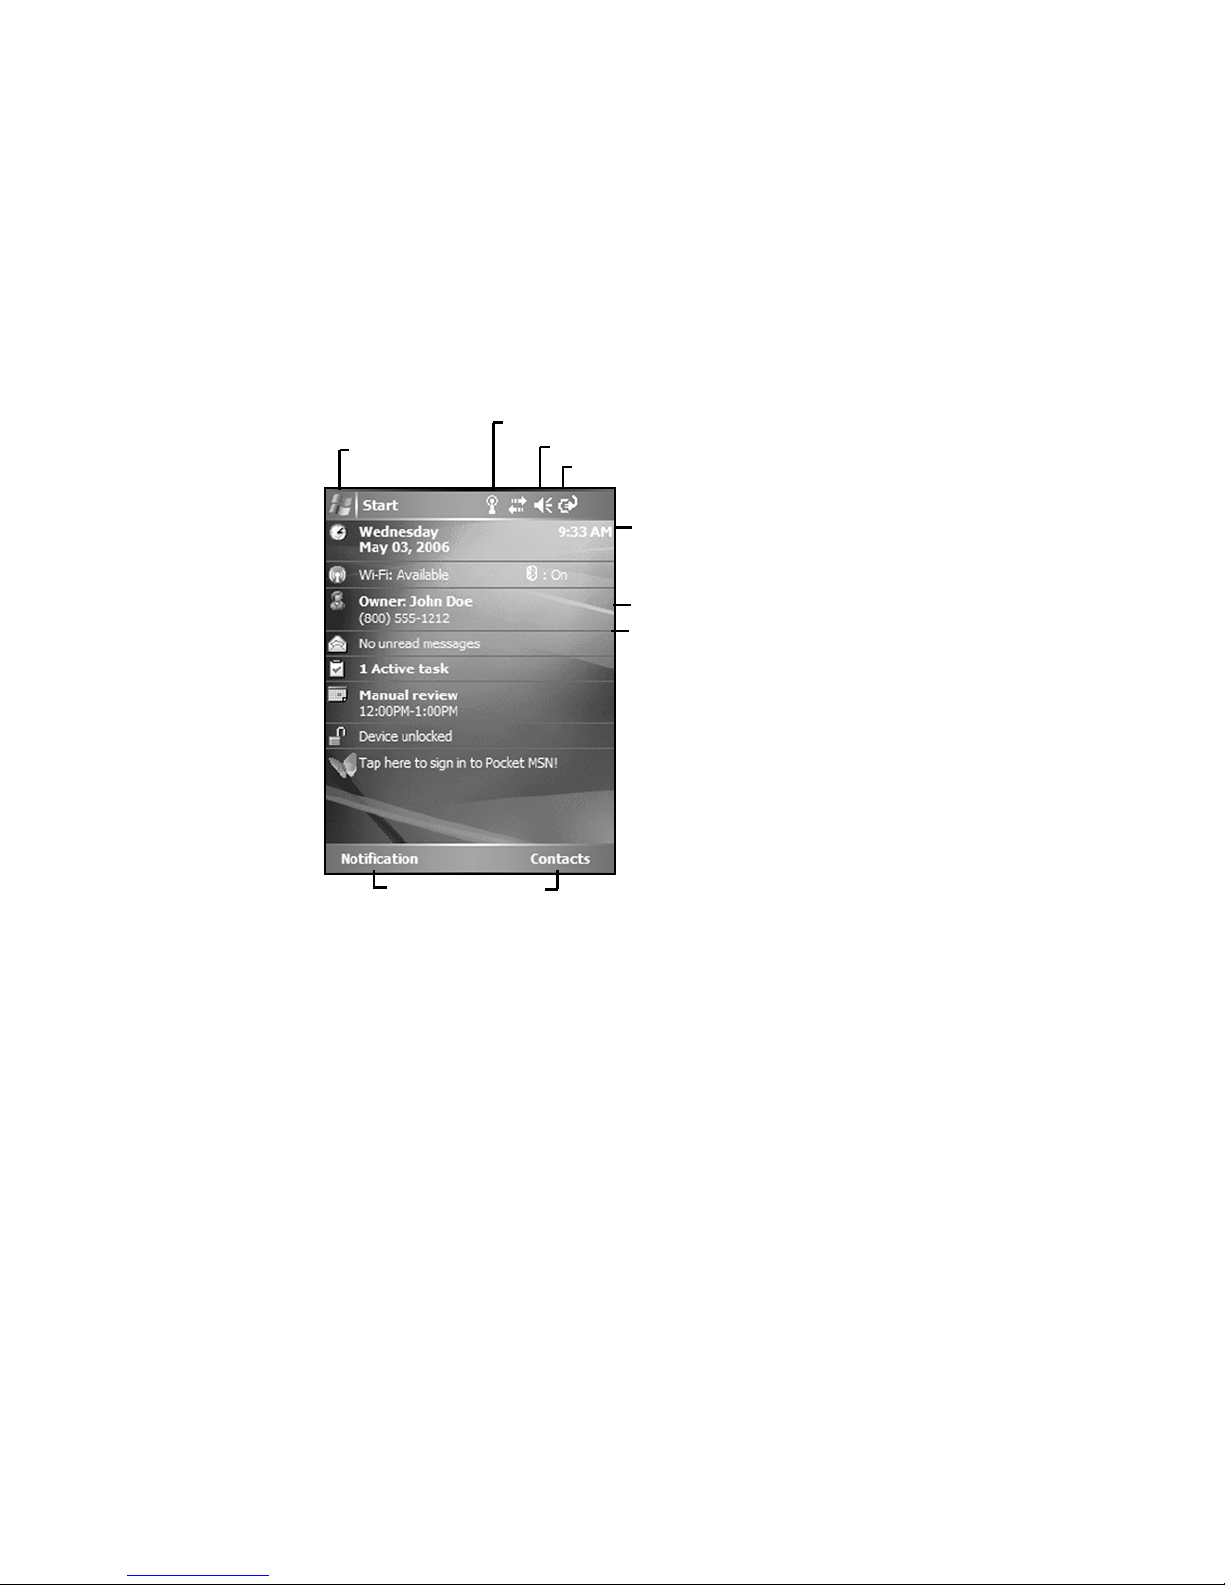
You can view the Today screen by tapping Start / Today. It will
also display when you turn on your unit for the first time each day
or after a configurable time of inactivity. (When some external
applications are running, the Today Screen will not automatically be
redisplayed.)
At the top of the screen are status icons. Tap an icon to view details
or change options. (These icons appear at the top of every screen on
your unit, not only the Today screen.)
The center of the Today screen provides information that you need
for the day. Tap an item to view or edit details. To customize which
items are shown on the Today screen, tap Start / Settings / Today /
Items.
Tap to go to
a program.
Tap to view and change connection settings.
Tap to change or mute volume.
Tap to view power settings.
Tap to change time settings
Tap to change owner information.
Your day at a glance. Tap to open
the associated program.
10
Application soft keys.
Page 11
The Keypad
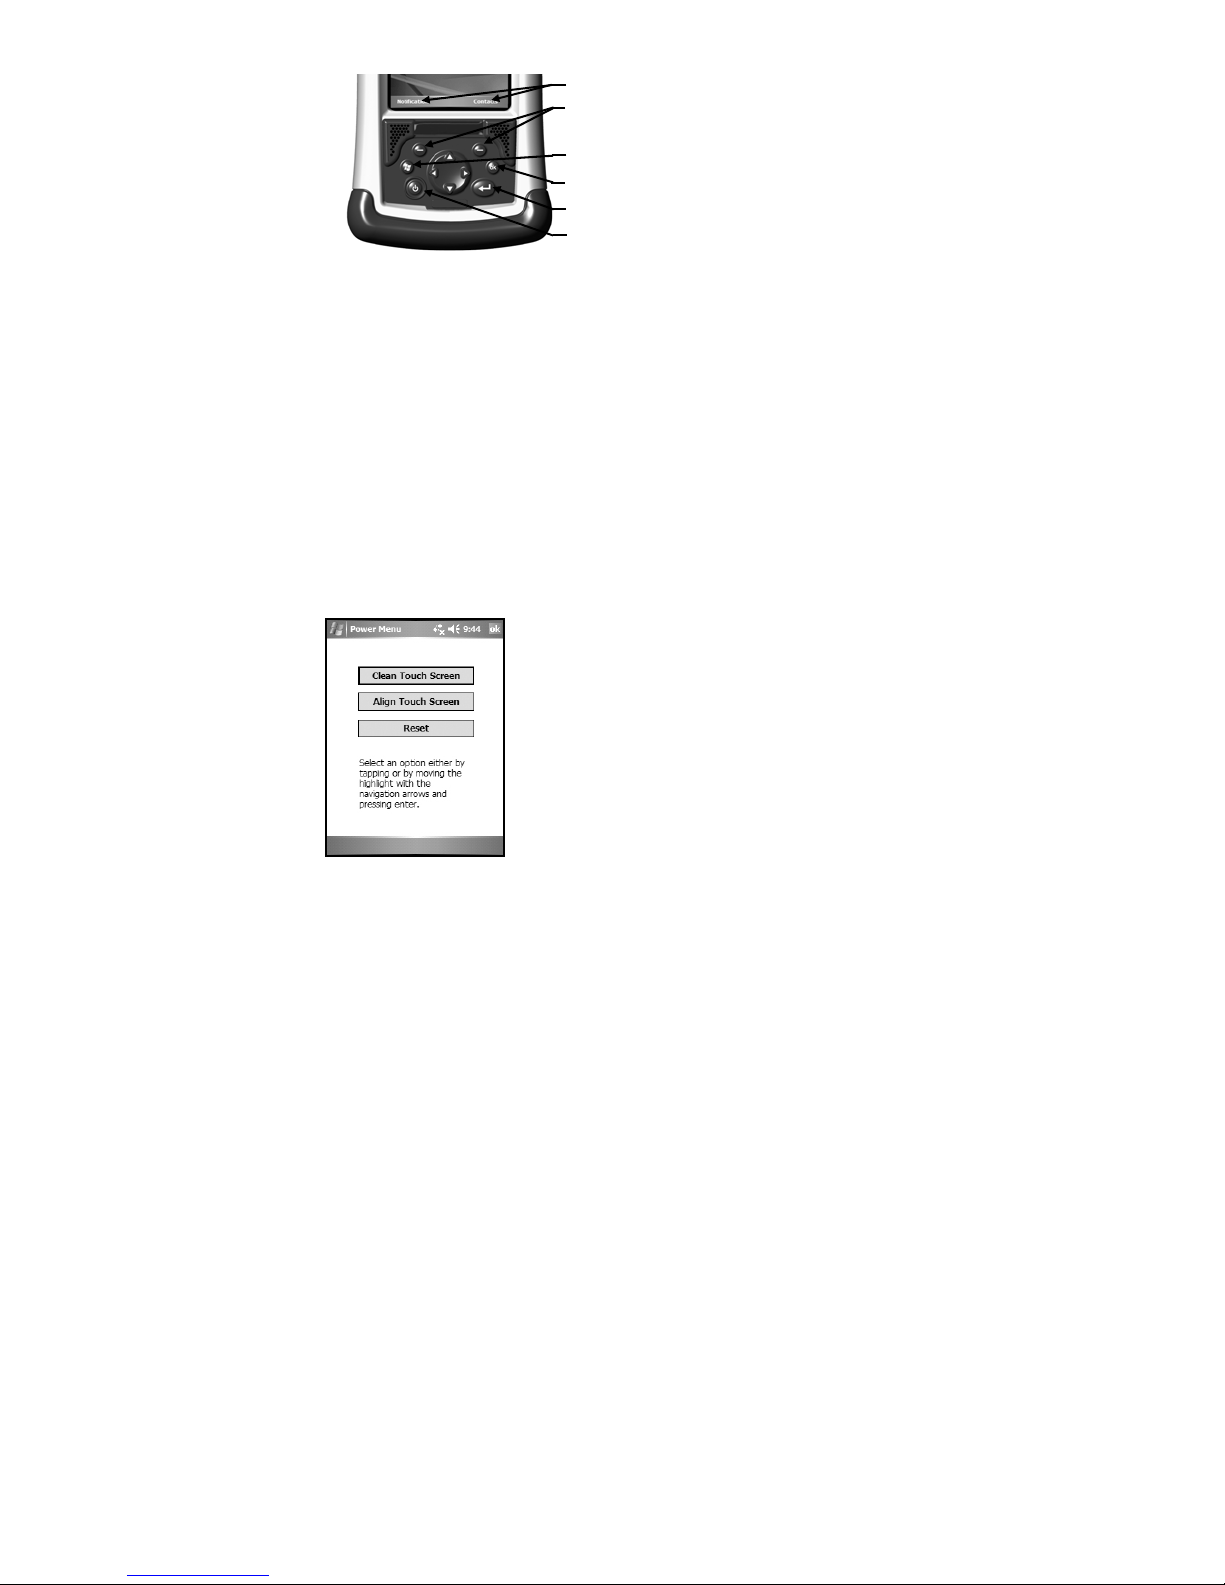
The screen shows the function of the
two application softkeys
Start key
OK key
Enter key
Power key
Power key features
The Power key turns the unit on and off and performs a number of
additional functions.
Turn backlight on/off:
To toggle the backlight on or off, hold down
the power key for approximately 1 second. Once toggled off, the
backlight will stay off until it is toggled back on. Screen taps and
key presses will not cause it to turn on.
Power menu:
Hold down the
display a countdown. Continuing to press the
a reset when the countdown reaches zero. If you release the
key for about 3 seconds to
Power
Power
key will cause
Power
key while the countdown is proceeding, you access the following
menu. Tap an option or OK to exit.
Clean Touch Screen: Disables the touchscreen for
cleaning. Press the enter key to re-enable the touchscreen.
Align Touch Screen: A series of targets is displayed. Use
a stylus to tap each target to align the touchscreen.
Reset: Use to restart a running program that has become
unresponsive. No file system data is lost, only open or
unsaved files will be lost. All registry settings, control panel,
personal information and databases are preserved.
Restore Factory Default State:
WARNING: All application software, licenses, settings and data
will be lost on your unit if you perform this function
.
11
Page 12

Hold down the Power key to display a countdown. Continue to hold
down the Power key until it counts down to zero and beeps twice.
Then immediately hold down the Start and OK keys simultaneously.
After a few seconds, a screen will come up warning that if you
continue, this operation will clear the persistent store including all
user data, applications and settings. Follow the instructions on the
screen ONLY if you want to completely clear your unit.
Settings on Your Unit
Tap Start / Settings. Tap any of the icons on the Personal, System
or Connections tabs to customize the unit settings to your own
preferences. Tap OK to exit the settings. Some of the most useful
settings are described below.
Buttons
Tap Personal / Buttons. The Buttons (Keys) setting allows you to
assign several of the keypad buttons to your favorite programs. The
list of assignable keys is on the left hand side of the screen with the
program that is assigned by default on the right. Reassign them by
selecting the key you wish to change in section 1 and chose the
desired program or action from the pull-down list in section 2.
Input
Tap Personal / Input. You can change settings related to input
method, word completion and capitalization.
Lock (password)
You do not have to provide a password unless you are concerned
about unauthorized use.
If you opt for password protection, tap Personal / Lock. The
password must be entered every time you turn the unit on or use the
Power key to resume operation.
WARNING: BE CERTAIN TO REMEMBER THE PASSWORD.
The only way to recover from a forgotten password is to return to a
factory default state and you will LOSE all application software,
licenses, settings and data on your unit. See the section above on
how to restore factory default state.
12
Page 13

Sounds and Notifications
Tap Personal / Sounds & Notifications. You can change sound
settings related to event notifications, buttons and screen taps. To
change the volume, tap the speaker icon in the status bar of the
Today screen. You can either change the volume or mute all sounds
coming from the unit.
Today
Tap Personal / Today. This screen allows you to customize the
Today screen. Choosing the “High Contrast” theme may improve
display viewing ability while working ou tdoors.
Backlight
Tap System / Backlight. Choose the settings in the Battery Power,
External Power and Brightness tabs as needed for your use of the
unit. The display backlight has significant impact on battery life.
Memory
Tap System / Memory to see how much Storage memory (Flash)
and Program memory (RAM) is available. Closing programs still
leaves them resident in RAM. As more programs are started,
available RAM decreases. If RAM resources become low, you can
stop programs and remove them from RAM. First, ensure you have
saved all your data. To stop a program, tap the tab Running
Programs. You can stop individual programs or tap Stop All.
Power
Tap System / Power. This allows you to view the approximate
battery power remaining in 20% increments, which needs the unit
running 1/2 hour before the battery driver can gather enough
information to determine the charge state. Note that both the Main
battery and Backup battery levels are shown, but only the Main
battery level is significant. Tap the Advanced tab and choo se the
settings for automatically putting the unit into suspend mode when
not in use.
The following features appear in the user interface, but are nonfunctional due to the special rugged design of the unit:
* Infrared communication is not available.
* Backup battery is not available.
13
Page 14
Screen
Tap System / Screen. The orientation can be changed to landscape
for some programs that are not screen aware. To change the size of
the text on the screen, tap Text Size to see more content or increase
the readability in many programs.
System Information
Tap System / System Information. Unit information can be found
here including firmware version, serial number, processor speed,
RAM and Flash size, as well as the wireless configurations.
Connecting to the PC
External
External
Power
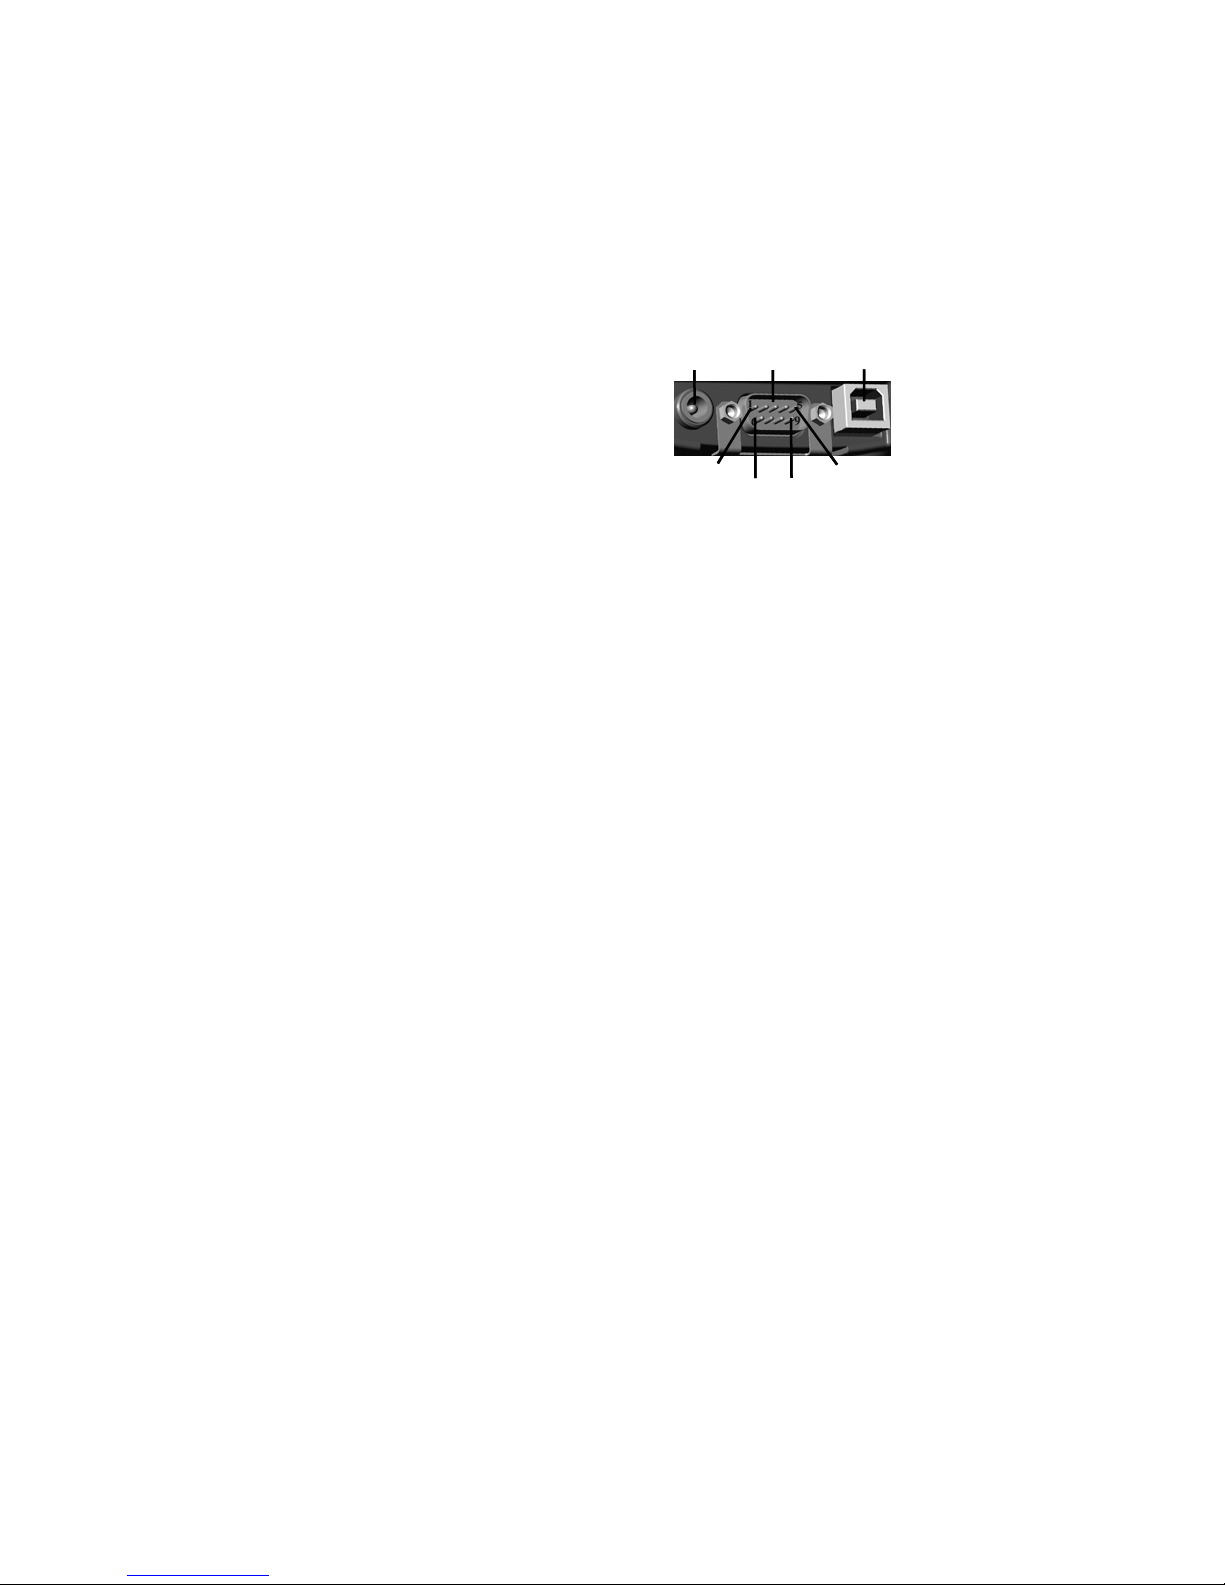
I/O ports
Power
The unit has USB and 9-pin serial
ports. Connections via USB to a PC
require an A-B USB cable (included
with the unit). Serial connections
require a 9-pin null-modem serial
Pin 1
Pin 1
Pin 6
Pin 6
Pin 9
Pin 9
Pin 5
Pin 5
cable (not included with the unit).
You may also increase your connectivity options with CF cards.
Communication
The unit is equipped with multiple ways to communicate with other
devices. Many of these are described in the following sections.
Where noted, your unit may not have that particular feature.
Connecting to a Desktop
Connecting your unit to a PC is done using Microsoft ActiveSync
4.1 or higher. It allows you to synchronize information and copy
files between your PC and your unit. ActiveSync is pre-installed on
your handheld unit. Before connecting your unit to your PC, install
ActiveSync on your PC from the Companion CD or as a free
download from the Microsoft Web site:
www.microsoft.com/windowsmobile/default.mspx
14
Page 15
IMPORTANT: Do not connect the unit to the USB port on your
PC until after you install ActiveSync. If you prematurely connect
the unit to your PC, your PC USB drivers may get into a confused
state and ActiveSync will not connect. If you suspect that something
like this has happened, uninstall your PC’s ActiveSync, reboot your
PC, reinstall ActiveSync and reconnect the unit.
Use the Setup Wizard on the Companion CD to install ActiveSync
onto the PC.
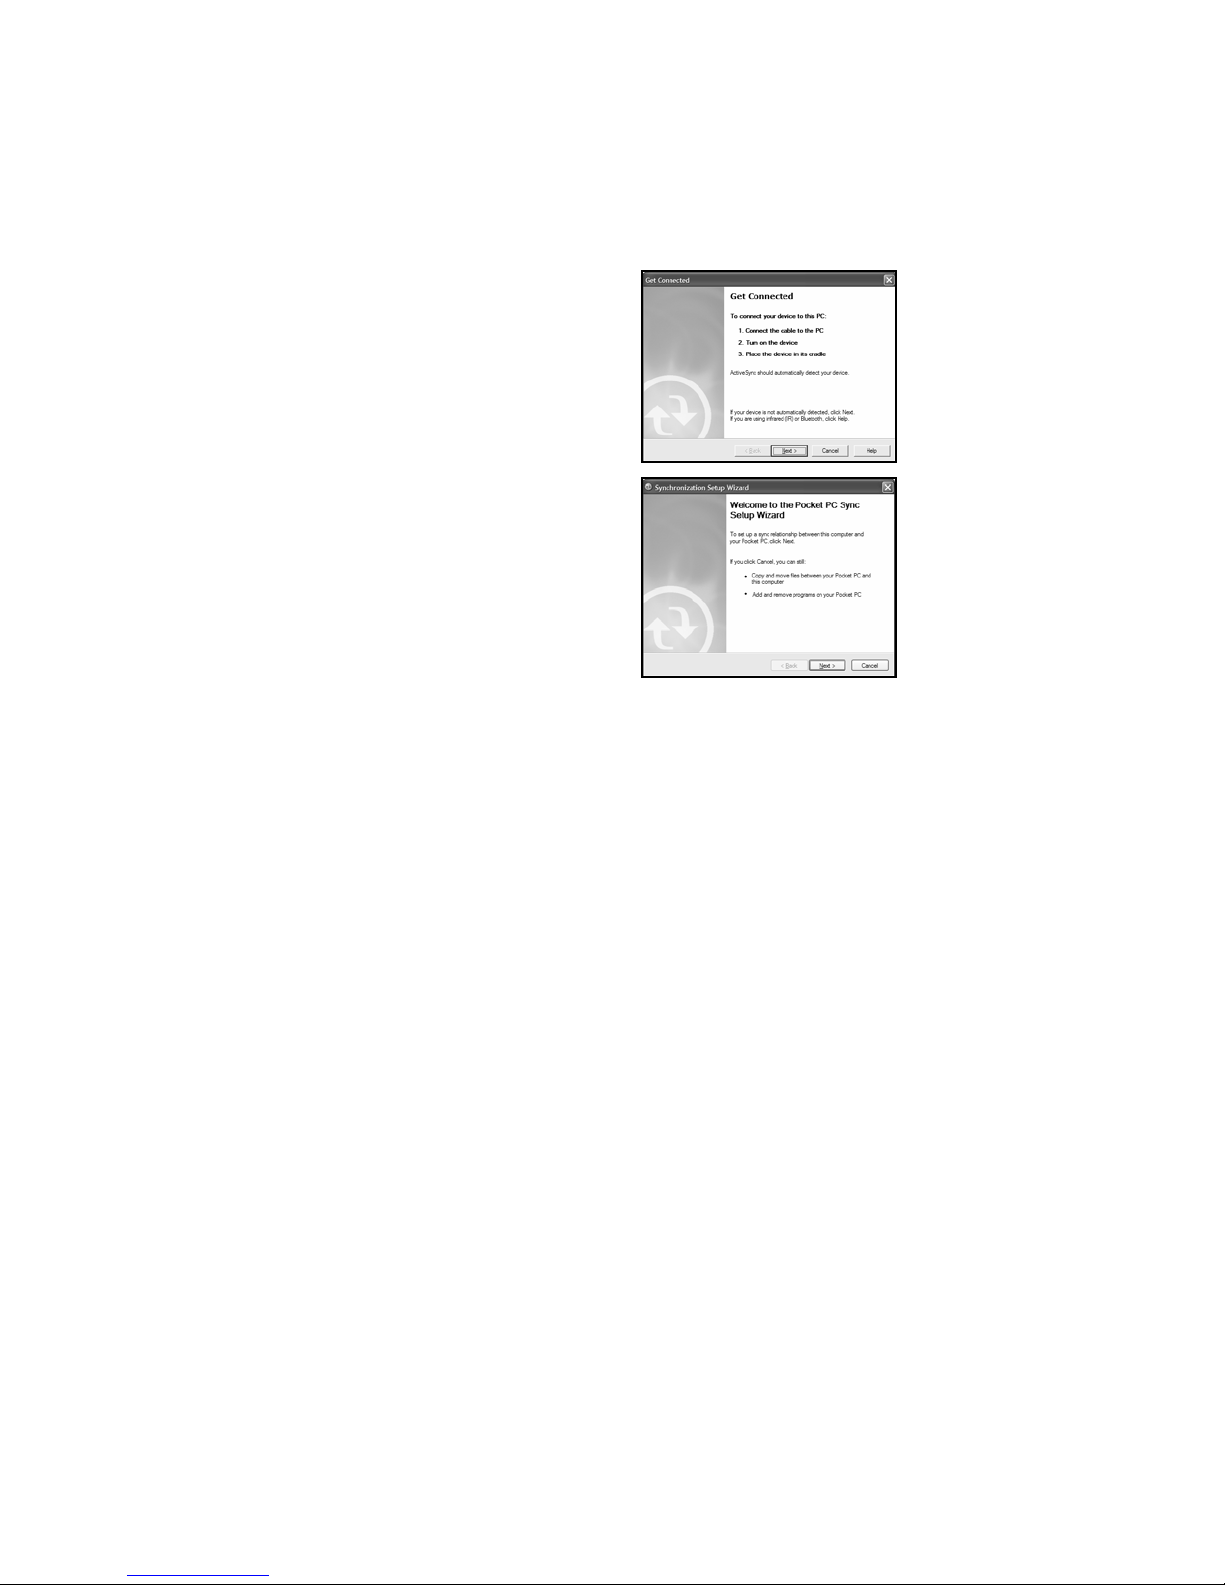
The Get Connected dialog box will
automatically appear on the PC. To
connect your unit to the PC:
1) Connect the USB cable to the PC.
2) Turn on your unit.
3) Connect the USB to your unit.
ActiveSync should automatically
detect your unit. If not, click Next.
Once your unit connects with your
PC, you will be presented with the
Synchronization Setup Wizard
window.
If you are simply interested in installing software on your unit, or in
transferring files between your unit and your PC, click Cancel.
If you want to synchronize the information in Microsoft Outlook
(such as e-mail, contacts, calendar, and time) between your
handheld unit and your PC or/and exchange server, click Next.
15
Page 16
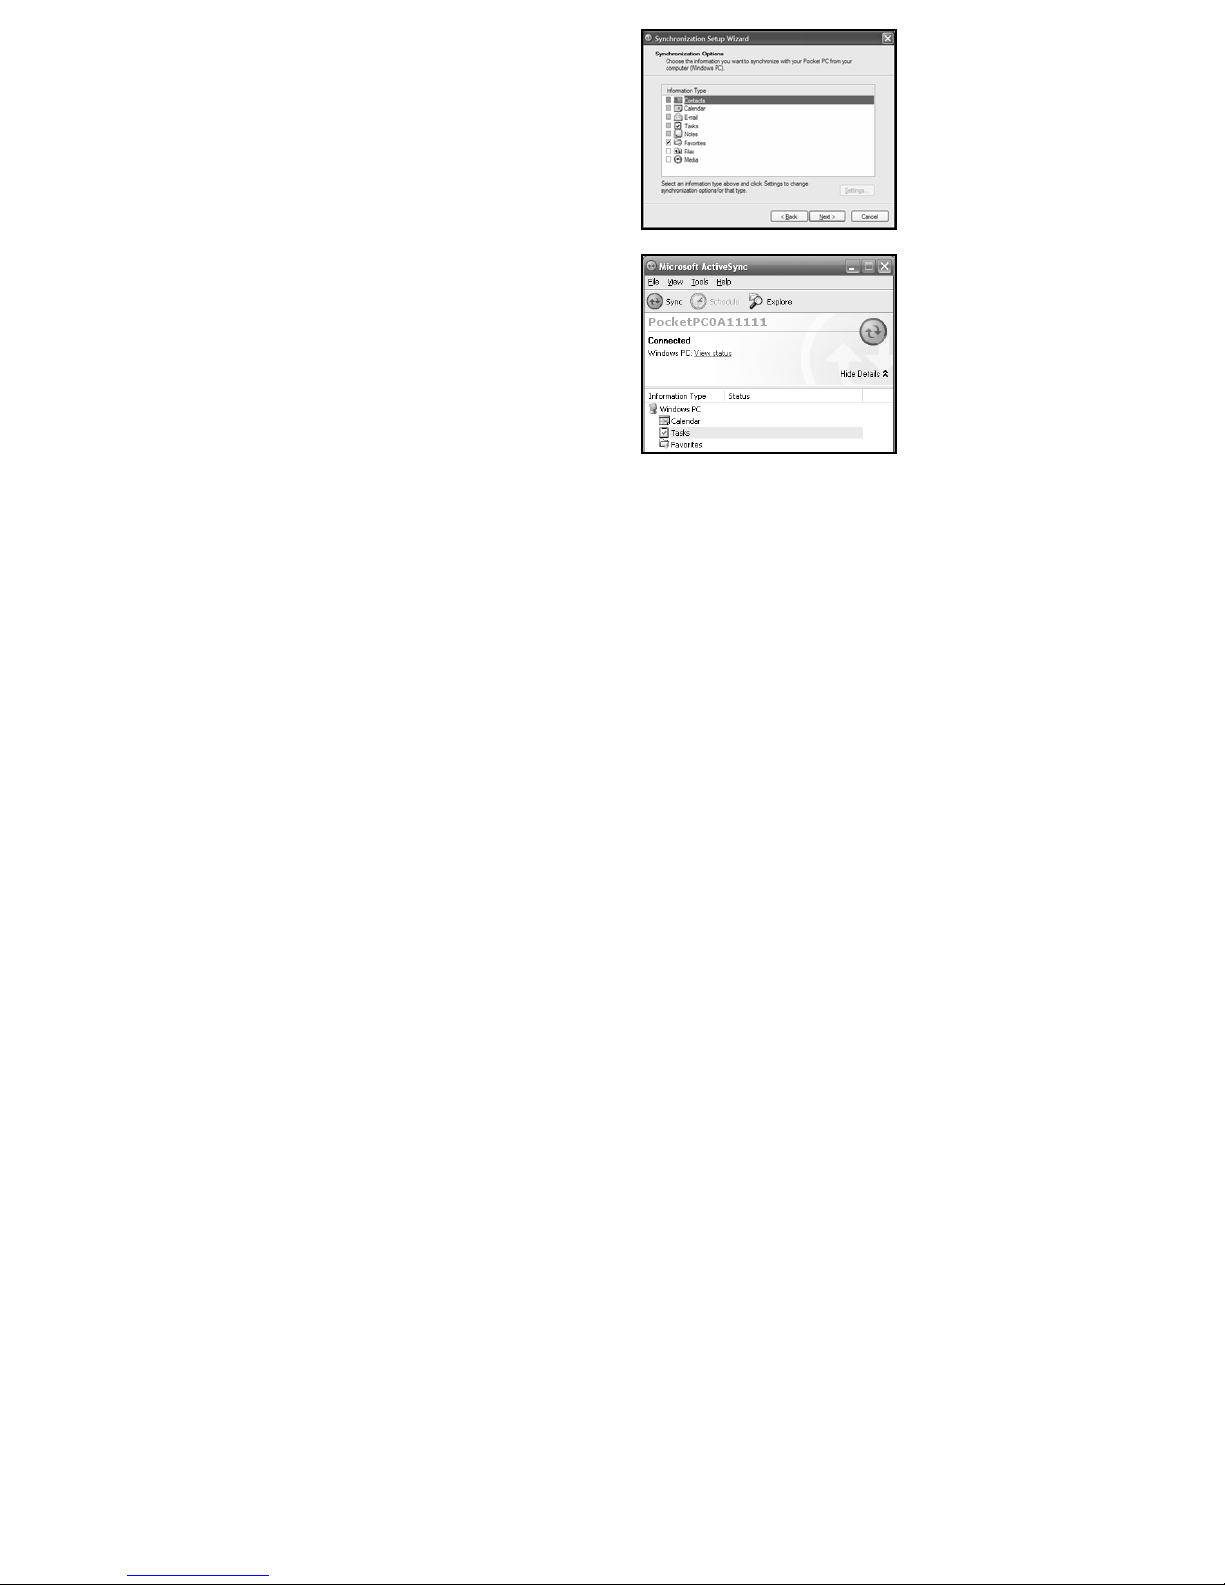
You will be presented with the
Select Synchronization Settings
window. Select the types of
information that you want to
synchronize and click Next. Wait
a few moments while ActiveSync
synchronizes the selected
information types with the unit.
Once connected over ActiveSync,
you will see this window on your
PC. Click the Explore icon to
view the file structure on the unit.
Troubleshooting ActiveSync connection problems
1. Confirm the unit is configured to communicate with the PC.
Tap
Start / Programs / ActiveSync / Menu / Connections.
Confirm the box
checked, and
Synchronize all PCs using this connection
is selected from the dropdown list.
USB
2. Try disabling any personal firewall software running on the PC.
ActiveSync needs certain TCP/IP ports to be open.
3. Try to reset the unit and reboot the PC. To reset, hold down the
Power key until
Booting - - - ->
appears on the screen.
4. If you have more than one unit, PC and/or cable, testing
different combinations of equipment can help isolate the cause
of the problem.
5. As noted earlier, if you suspect that the unit may have been
connected to the PC USB port before ActiveSync was installed,
uninstall ActiveSync, reboot the PC, and reinstall ActiveSync.
6. Confirm that the version of ActiveSync used on your PC is the
same as or later than the one on the Companion CD.
is
16
Page 17
7. Tap Start/ Settings / Connections / USB to PC and try
changing the check box Enable advanced network
functionality.
802.11 (Wireless LAN)
If your unit comes with embedded Wireless LAN (wLAN)
capability, also known as 802.11 or Wi-Fi, your unit has the ability
to wirelessly connect to the Internet and other data networks by
connecting to available access points or hot spots. Once connected,
you can browse the Internet or file shares on the local network.
To find out if you have built-in 802.11 available in your unit, tap
Start / Settings / System / System Information / Wireless.
The 802.11 is off by default and reverts to OFF after every reset. To
toggle 802.11 on or off, tap Wi-Fi from the Today screen or tap
Start / Settings / Connections / Wireless Manager and tap Wi-Fi.
Turn it off when not in use to save battery power and possibly speed
up other processes.
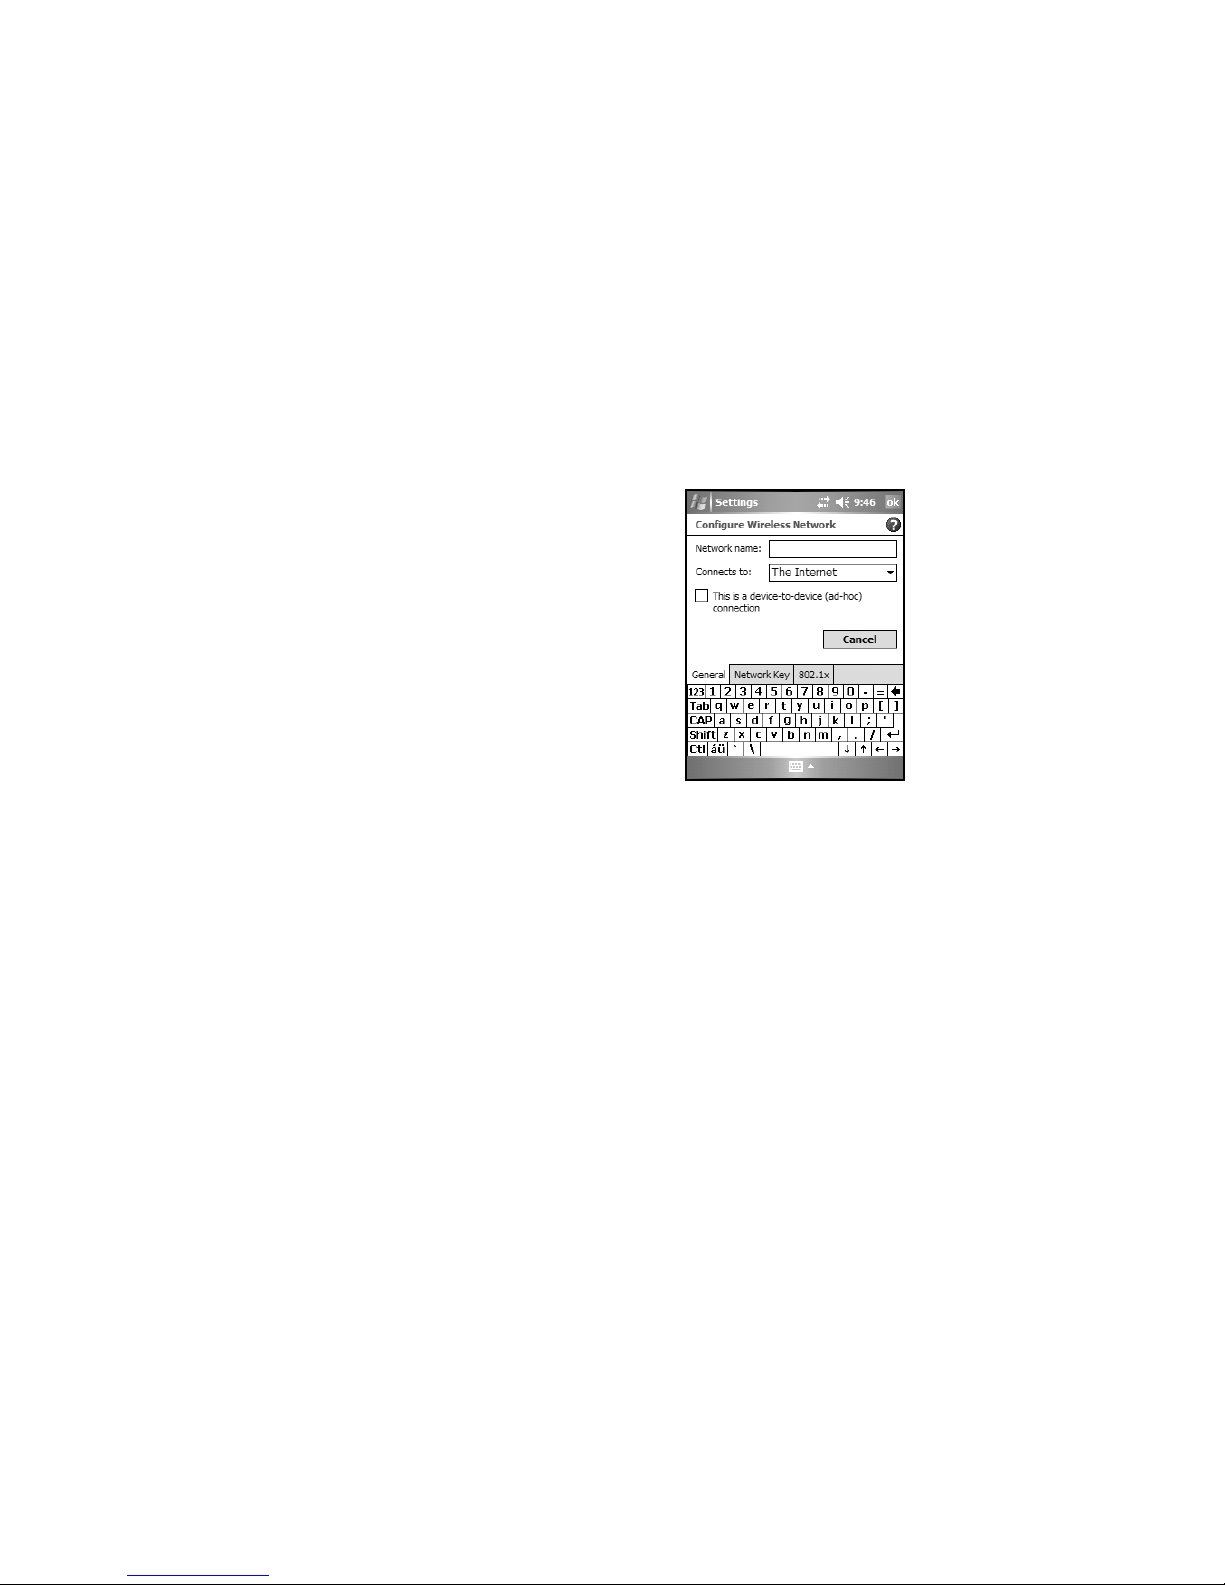
The unit will detect wireless networks or
hot spots. (There can be a slight delay
before it updates.) To add new
connections from within the Wireless
Manager, tap Menu / Wi-Fi Settings /
Add New. Type in the Network name
and select connection to Internet or
Work and tap ok. Configuring the
Work option is usually best left to
network administrators. The Internet
option is simpler and serves most needs.
Depending upon the configuration of the wireless network, you may
be prompted to enter a Wireless Encryption Protocol (WEP) key or
an internet login for authentication purposes. Obtain the WEP key
from your network administrator.
NOTE: The Internet connection is one in which Virtual Private
Network (VPN) services are not involved and proxy servers may or
may not be utilized. This can include a typical Internet connection
17
Page 18
through a corporate wireless network. A Work connection allows
you to view file shares on a corporate network.
If you chose to create an Internet connection, open Internet
Explorer Mobile on the unit (Start / Internet Explorer) to browse
the Internet. Some features supported by desktop PC browsers are
not supported by Internet Explorer Mobile. For instance, there are
no pop-up windows, some sites may not be accessible and you may
be unable to send e-mail with file attachments.
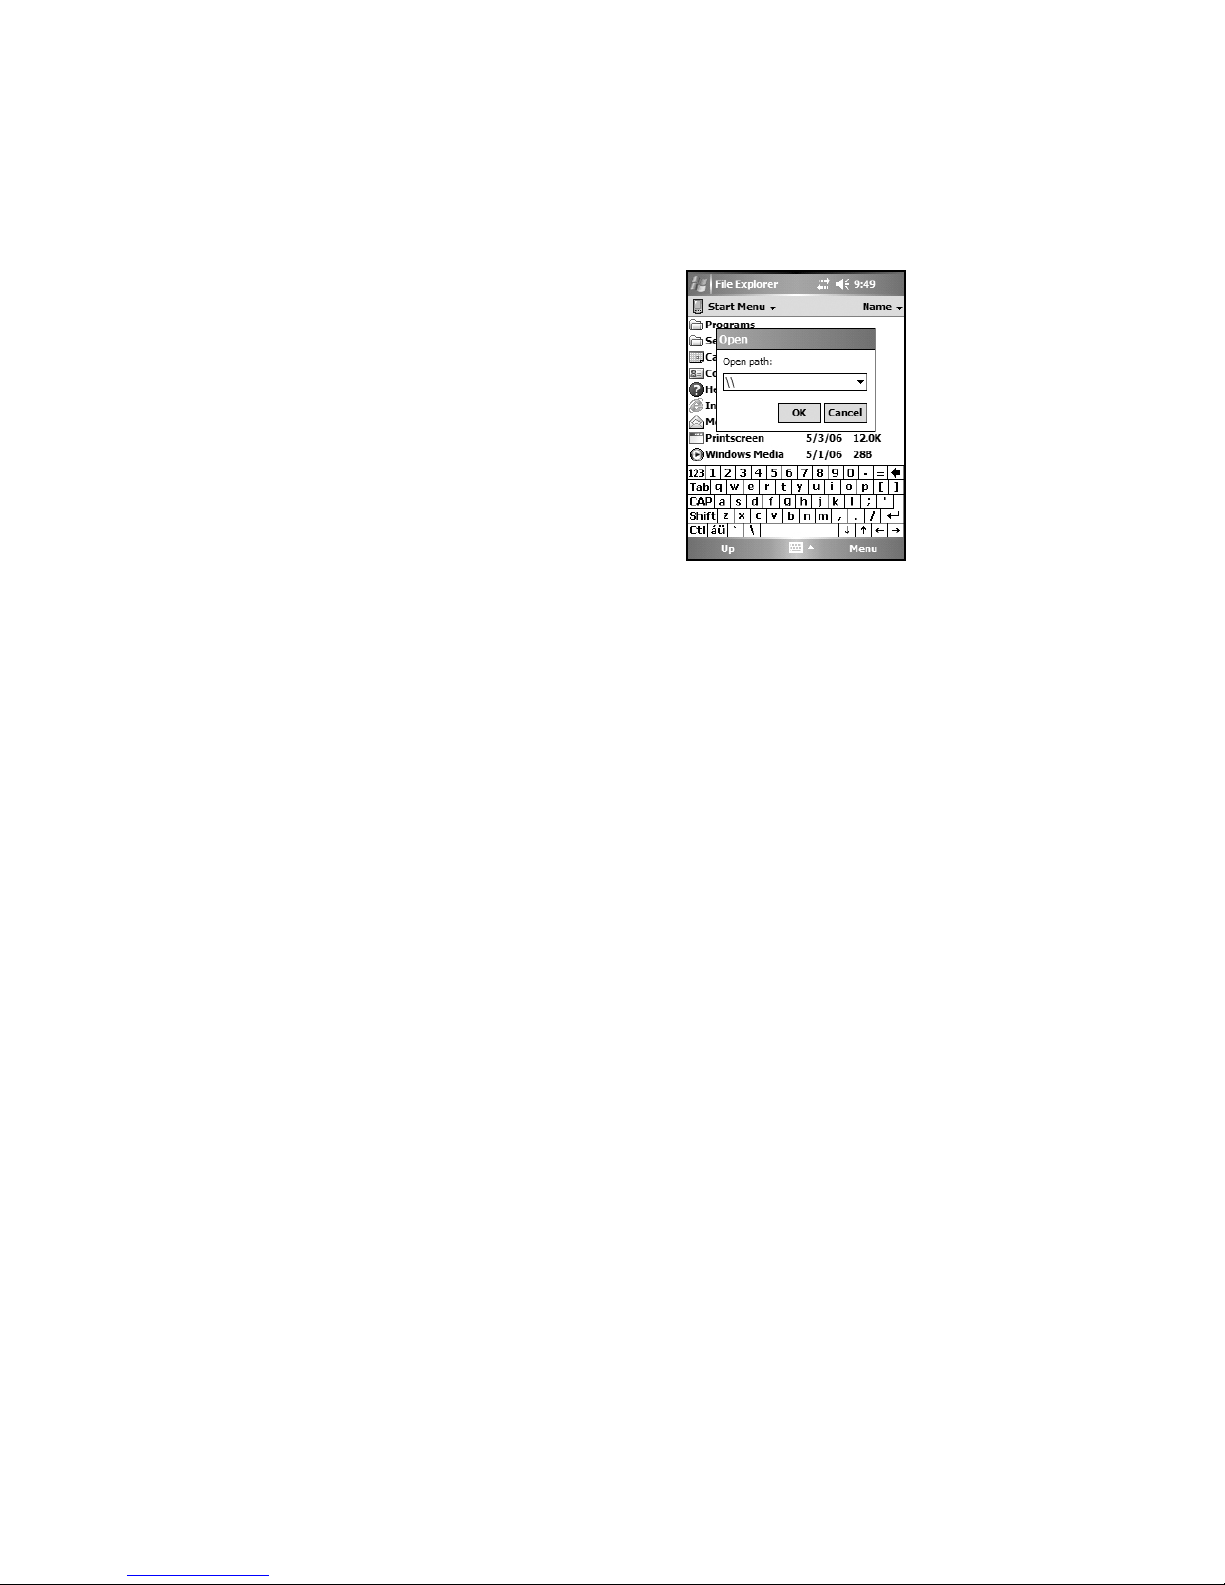
If you chose to create a Work
connection, open File Explorer on your
unit. Tap Menu / Open Path / New
Path to open a window, allowing you
to enter the name of a computer on the
network on which you want to view
file shares. Tap OK.
From here, you can browse the
network file shares and copy and paste
files between PCs on the network and
the unit.
Exchange ActiveSync
Exchange ActiveSync, a component of Exchange Server 2003,
facilitates data synchronization between your unit and an Exchange
server. This synchronization can occur over 802.11, allowing you to
maintain updated calendars, contacts, tasks and Inbox on your unit
without directly connecting it to a PC. (The server must be running
Exchange Server 2003 SP2 or later.).
To use Exchange ActiveSync, confirm with your system
administrator that an Exchange Server 2003 server is available for
synchronization. The administrator will also provide you with a
login name, password, server name, and domain name. To configure
Exchange ActiveSync on the device, choose Start / Programs /
ActiveSync / Menu / Add Server Source. Enter the server address
and confirm with your administrator whether the Exchange server
requires an encrypted (SSL) connection. Tap Next. Enter the login
18
Page 19

name, password and domain in the next window. Tap Next. Choose
the data types you want to synchronize and tap Finish.
Troubleshooting 802.11 connection problems
1. Confirm that the unit has an appropriate IP address. Tap
Start /
Settings / Connections / Network Cards / Network Adapters
/ Marvell CF8385N Wireless Card
to view the unit’s IP
address. Confirm that the IP address is appropriate for the
network to which you are trying to connect (for instance,
10.0.x.x or 192.168.x.x). Consult with your network
administrator to confirm what appropriate IP addresses look
like for your network. By default, the unit obtains an IP address
from a DHCP server. If your network uses static IP addresses,
enable the
Use specific IP address
and enter the appropriate IP
address.
2. If the unit seems to be connected to the network, but you are
having difficulty using the network connection, choose
Start /
Settings / Connections / Network Cards / Network
Adapters
configured as either a
Bluetooth
, and confirm that the connection is appropriately
or
Work
Internet
connection.
If your unit comes with embedded Bluetooth capability (a shortrange radio technology) your unit can communicate with other
Bluetooth-enabled devices without using cables. To find out if you
have built-in Bluetooth available in your unit, tap Start / Settings /
System / System Information / Wireless.
Bluetooth on the unit is disabled by default and reverts to OFF after
every reset. To enable Bluetooth on the unit, choose Start / Settings
/ Connections / Bluetooth. Check the box Turn on Bluetooth. If
you want other Bluetooth devices to be able to find your unit, also
check the box Make this device discoverable to other devices.
The details of configuring Bluetooth connections vary depending
upon how the other Bluetooth device works.
19
Page 20
Bluetooth file transfer between two units
It is possible to transfer files from one unit to another over a
Bluetooth connection. Tap Start / Settings / Connections /
Bluetooth, and confirm that Bluetooth is enabled on both units.
Confirm that the unit that will receive the file is set to Make this
device discoverable to other devices.
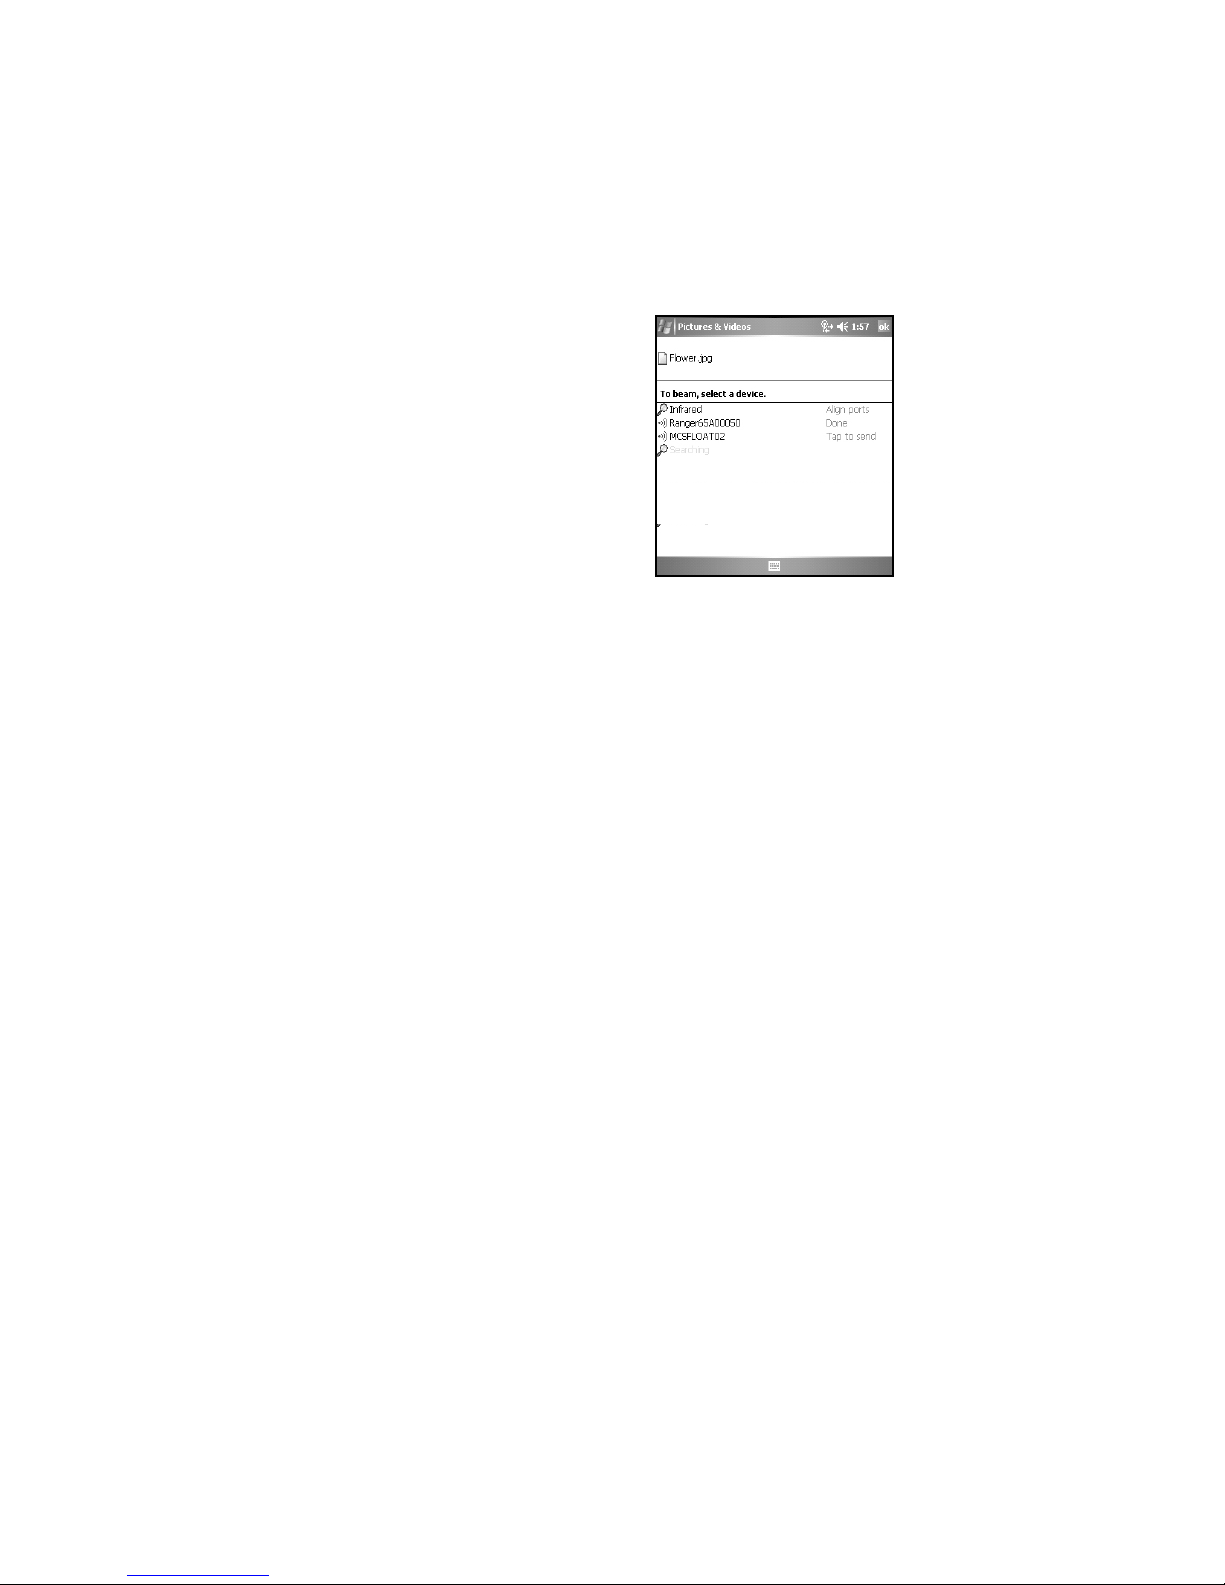
Tap Start / Programs / File Explorer on the unit that will send the
file. Browse to the file to be sent, and touch and hold on it. Choose
Beam File from the menu that appears. Wait for several moments
while the sending unit searches for Bluetooth devices in the vicinity.
Select the receiving unit from the
list, and tap Tap to send. Wait for a
few moments while the file is
transferred. The receiving unit will
open a window asking whether you
want to accept the file. Choose Yes.
The file will be saved in the My
Documents folder on the unit.
ActiveSync over Bluetooth
If your PC is Bluetooth-enabled, it is possible to establish a
Bluetooth ActiveSync connection between your unit and the PC.
Confirm that ActiveSync 4.1 or higher is installed on the PC, and
that Bluetooth on the PC is enabled and configured to be
discoverable.
On your unit, confirm that Bluetooth is enabled, and then choose
Start / Programs / ActiveSync / Menu / Connect via Bluetooth.
When the Bluetooth settings window opens, tap New Partnership.
Wait a few moments while your unit searches for Bluetooth devices
in the vicinity. Select the PC from the list and tap Next. Enter any
passkey on the device and tap Next; enter the same passkey when
prompted by the PC. On your unit, confirm that the ActiveSync
service is available and selected, and then tap Finish.
20
Page 21

Once the Bluetooth partnership has been created, you can establish
a Bluetooth ActiveSync connection by tapping Start / Programs /
ActiveSync / Menu / Connect via Bluetooth.
If you have difficulty connecting over Bluetooth ActiveSync, open
ActiveSync on the PC and confirm that serial connections are
enabled (they are disabled by default in ActiveSync 4.1). Confirm
that the serial port being used by ActiveSync is the serial port which
corresponds to the Bluetooth serial port connection profile on the
PC.
Troubleshooting Bluetooth connection problems
If your unit cannot find another Bluetooth device, confirm that the
device is within range (less than 10 meters / 30 feet) of other
Bluetooth-enabled devices. Also confirm that the device is turned
on and has been configured to be discoverable. Bluetooth devices
such as printers and cell phones are typically not discoverable by
default.
Additional Connectivity
Your unit supports several additional kinds of connections. If you
do not have embedded Bluetooth or 802.11, you can purchase CF
cards to add the functionality. The following types of additional
connectivity are also possible:
Modem: The unit supports dial-up connections to an Internet
Service Provider and sending and receiving e-mail with file
attachments. You will need to purchase an external modem or a CF
modem.
Web-enabled cell phones: The unit can connect to the Internet via
Bluetooth and web-enabled cell phones that are compatible with
Windows Mobile 5.0 devices. USB phone connections are not
supported. Refer to your phone service provider for more
information on establishing Internet connections via your cell
phone.
For more information on creating these connections, see the Web
site listed under reference materials on the cover of this manual.
21
Page 22

Installing additional software on your unit
The unit can run third-party software designed for Microsoft
Windows Mobile 5.0. However, not all Windows Mobile thirdparty programs are screen-rotation-aware and therefore may not run
properly in a portrait environment. To allow these programs to run
correctly, the screen orientation can be changed in Settings /
System / Screen.
Most third-party software is installed by running a setup program on
the PC while the unit is connected with ActiveSync. Follow the
setup instructions that came with your software. If prompted by the
installation wizard, perform a reset to complete the installation.
Caring for Your Unit
Cleaning the unit
Clean the unit with a soft cloth dampened with either water or a
diluted mild detergent. Do not use any chemical cleaners and do
not put the unit in the dishwasher.
Care of the touchscreen
Use only the included stylus or other devices specifically designed
for use with touchscreens. The use of ballpoint pens, nails or other
sharp objects to operate the touchscreen will scratch and/or damage
the unit. Abrasives may scratch touchscreens. Keep the touchscreen
clean by gently wiping the display, using a soft cloth dampened
either with clean water or glass cleaner. Do not apply any cleaner
directly to the display. Do not use any abrasive cleaners.
Use the screen protectors included with the unit to keep the
touchscreen clean and protected. To apply a screen protector, first
clean the display thoroughly. Peel the backing from the screen
protector. Align the edge, and then drop the remainder onto the
display. Use a credit card, if necessary, to squeeze the air from
underneath the screen protector.
22
Page 23

Mechanical shock
The unit is designed to resist damage for drops up to 1.22 meters
(4.0 ft). However, you should protect the display from impact,
pressure, or abrasive substances that can scratch it or crack it. The
unit should not be dropped unnecessarily
.
Case Vent Hole
The unit uses a GoreTex membrane at the
vent hole to equalize the atmospheric
pressure within the unit and to prevent
dust, water, etc. from entering. This vent
must remain clear of any obstruction. Damage to the touchscreen
will occur if the vent is covered. Covering the vent with stickers and
labels may void the warranty.
Environmental Considerations
The unit’s rugged design allows you to run your applications in
harsh outdoor environments. Here are some considerations that will
help you get the most out of your unit when working in very wet,
hot or cold conditions.
Water
This unit is designed to withstand accidental immersion. To
maintain the unit’s water resistant seal, it is important to ensure that
the screws on the CF-Cap are tightened but not over-tightened.
Removal of the back case torx screws, or failure to reattach the CFCap screws could cause leakage and will void your warranty.
Because the PowerBoot is designed to easily disconnect from the
unit, water can occasionally find its way onto the metal contacts
between the battery and the unit. After working in very wet
conditions remove the battery and check the contacts to see if they
are wet. If so, dry the contacts on both the unit and the battery with
a paper towel or clean cloth before storing for overnight or longer.
23
Page 24
Temperature Range
The operational temperature range is from -22°F to +140° F (-30C
to +60C). In addition, the unit can be stored at temperatures from
-40°F to +158°F (-40C to +70C). Although the unit is designed to
be rugged, do not leave it in direct sunlight or in a parked vehicle in
the sunlight for extended periods.
Batteries perform best at room temperature. The battery also has a
very stable capacity as temperature rises above the human comfort
level. However, cold temperatures cause battery life to drop and the
colder the temperature the greater the reduction in available battery
life. Under very cold conditions (-22°F / -30C and below), you can
expect your battery life to be shortened considerably. When
working in very cold conditions, consider carrying a fully charged,
spare battery in a warm place for easy replacement. The battery
performance will improve by keeping both the unit and the spare
battery warm (for instance, keeping them inside your coat).
Safe Use of Your Unit
Carrying the unit
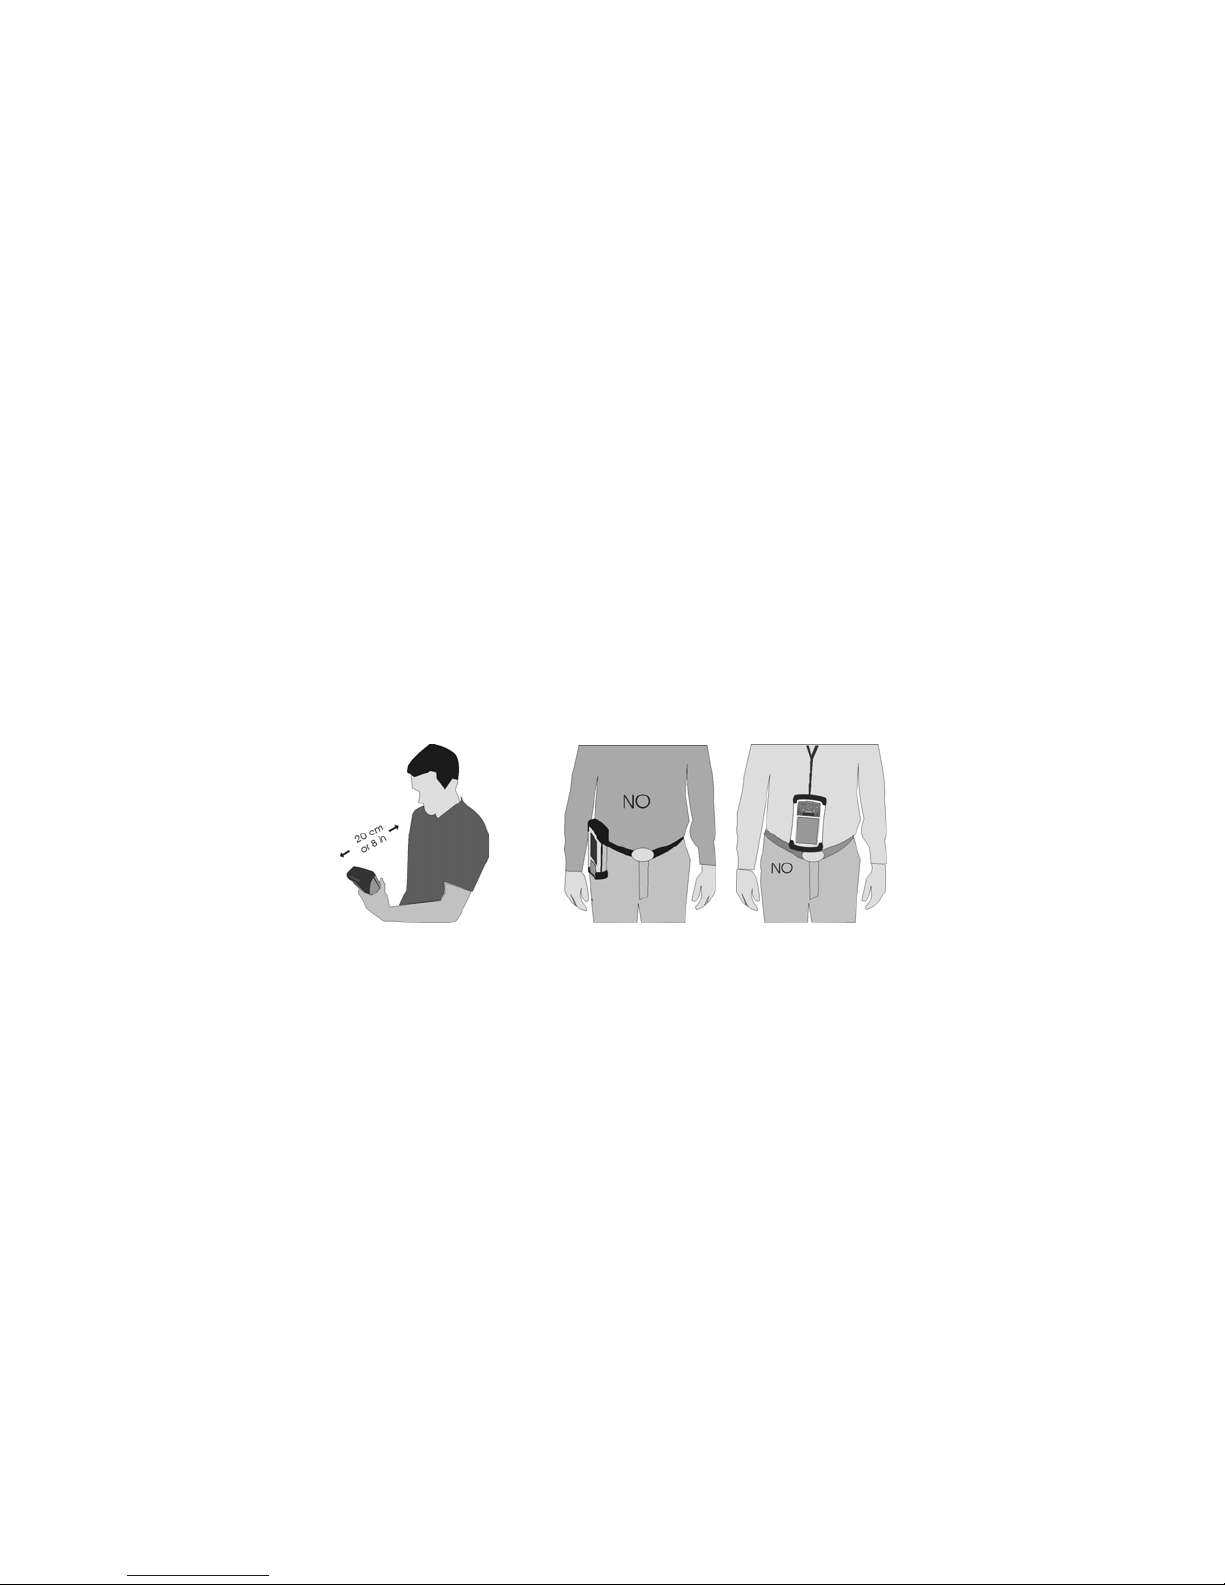
Due to radio frequency emissions, it is unsafe to operate the radio
with the unit in a holster, dangling from a lanyard, or with any
method that keeps the powered unit in very close proximity to the
head or torso. For safe operation, carry the unit in your hand with
the antennas located at least 20 cm (~8 inches) from the head or
torso. See the following illustration for the correct and incorrect
way to operate the unit.
24
Correct Incorrect
Page 25

Repair
Do not attempt to dismantle the unit for repair. There are no userserviceable parts inside. For service, use the contact details listed on
the cover of this manual or contact your local dealer.
Battery safety
• Use only the battery supplied with your unit to power the unit. Use
of other power sources could damage the unit, void your warranty
and pose safety hazards.
• Caution: Do not expose to temperatures above 60 C (140
not short external contacts. Do not attempt to disassemble or
mistreat the battery. Failure to follow those instructions may present
risk of exposure to harmful chemicals, explosion, fire or high
temperatures. There are no user serviceable parts in the battery
pack. If it is defective, return it to the manufacturer for service.
• Handle a damaged or leaking battery with extreme care. If the
electrolyte comes in contact with your skin, wash the exposed area
with soap and water. If it comes in contact with the eye, flush the
eye with water for 15 minutes and seek medical attention.
• Do not expose the PowerBoot to storage temperatures above 35C
(95°F) for extended periods.
• Do not charge the PowerBoot if the ambient temperature exceeds
35C (95°F) or is below 0C (32°F).
• Contact your local waste disposal provider regarding the disposal or
recycling of the PowerBoot.
°F) Do
Environmental Hazards
The product contains no mercury, cadmium or lead. This product is
RoHS compliant.
AC adapter safety
• Use only AC and vehicle chargers intended for the unit. Other
external power sources may damage your product and may void the
warranty.
• Make certain that the input voltage on the charger matches the
voltage in your location.
• Make certain that the charger has prongs compatible with your
outlets.
25
Page 26

• AC chargers are designed for indoor use only. Avoid using the AC
charger in wet areas.
• Unplug the AC charger from power when not in use.
• Do not short the output connector.
Environmental Specifications
TEMPERATURE Operation: -30 to +60 C (-22 to +140 °F)
Storage: -40 to +70 C (-40 to +158 °F)
WATER IP67, sealed against accidental immersion
(submersible to 1 meter for 30 minutes)
MIL-STD 810F, Method 512.4, Procedure 1
DROP MIL-STD-810F, Method 516.5, Procedure IV
26 drops @1.22 m (4 ft.) onto plywood over
concrete; 6 drops @-30 C (-22 °F)
6 drops @60 C (140 °F)
SAND AND DUST IP67, sealed against dust, MIL-STD 810F,
Method 510.4, Procedures I and II
VIBRATION MIL-STD 810F Method 514.5, Procedure I & II
ALTITUDE MIL-STD 810F, to 4572 m (15,000 ft) at a
nominal temperature of +23 C (+73 °F)
Method 500.4, Procedures I, II, & III
EMI Meets FCC class B requirements
26
Page 27

Hardware Specifications
OS Windows Mobile 5.0 (Premium edition)
CPU 200 MHz or 400 MHz Intel PXA255 XScale®
processor
RAM (VOLATILE) 64 MB SDRAM
FLASH STORAGE
MEMORY
(NONVOLATILE)
DISPLAY 240 x 320 pixel (¼ VGA) color TFT with LED
BATTERY LIFE 15 hours continuous room temperature
BATTERY CHARGING ~12 hours to full charge (w/802.11 turned off)
BATTERY CAPACITY 3800 mAh NiMH rechargeable
I/O PORTS Power, RS-232 serial (9-pin) and USB client
SOUND Integrated sealed speaker and microphone
EXPANSION PORTS Optional 2 CF slots - Type I and Type II
ENVIRONMENTAL Submersible, drop-resistant, dust-proof (see
INTEGRATED
WIRELESS
CONNECTIVITY
128 or 256 MB of nonvolatile Flash storage
front light
operation with default settings and no
embedded radios
Environmental section)
Optional Integrated Bluetooth and 802.11g
(Wireless LAN) capability
27
Page 28
Troubleshooting
How do I delete files?
Open File Explorer and browse to the file to be deleted. Touch and
hold on the file and then tap Delete from the menu that appears.
Unlike desktop PCs, Windows Mobile does not support a Recycle
Bin. Once you delete a file, it cannot be recovered.
Is there anything I can do to make the display more viewable?
The default backlight brightness is set to about 65 percent of the
maximum brightness. Tap Start / Settings / System / Backlight /
Brightness, and adjust the slider to increase display brightness;
however, doing this will reduce battery life. You can also change to
the High-Contrast theme found under Start / Settings / Personal /
Today. Also, confirm that you have only one screen protector in
place.
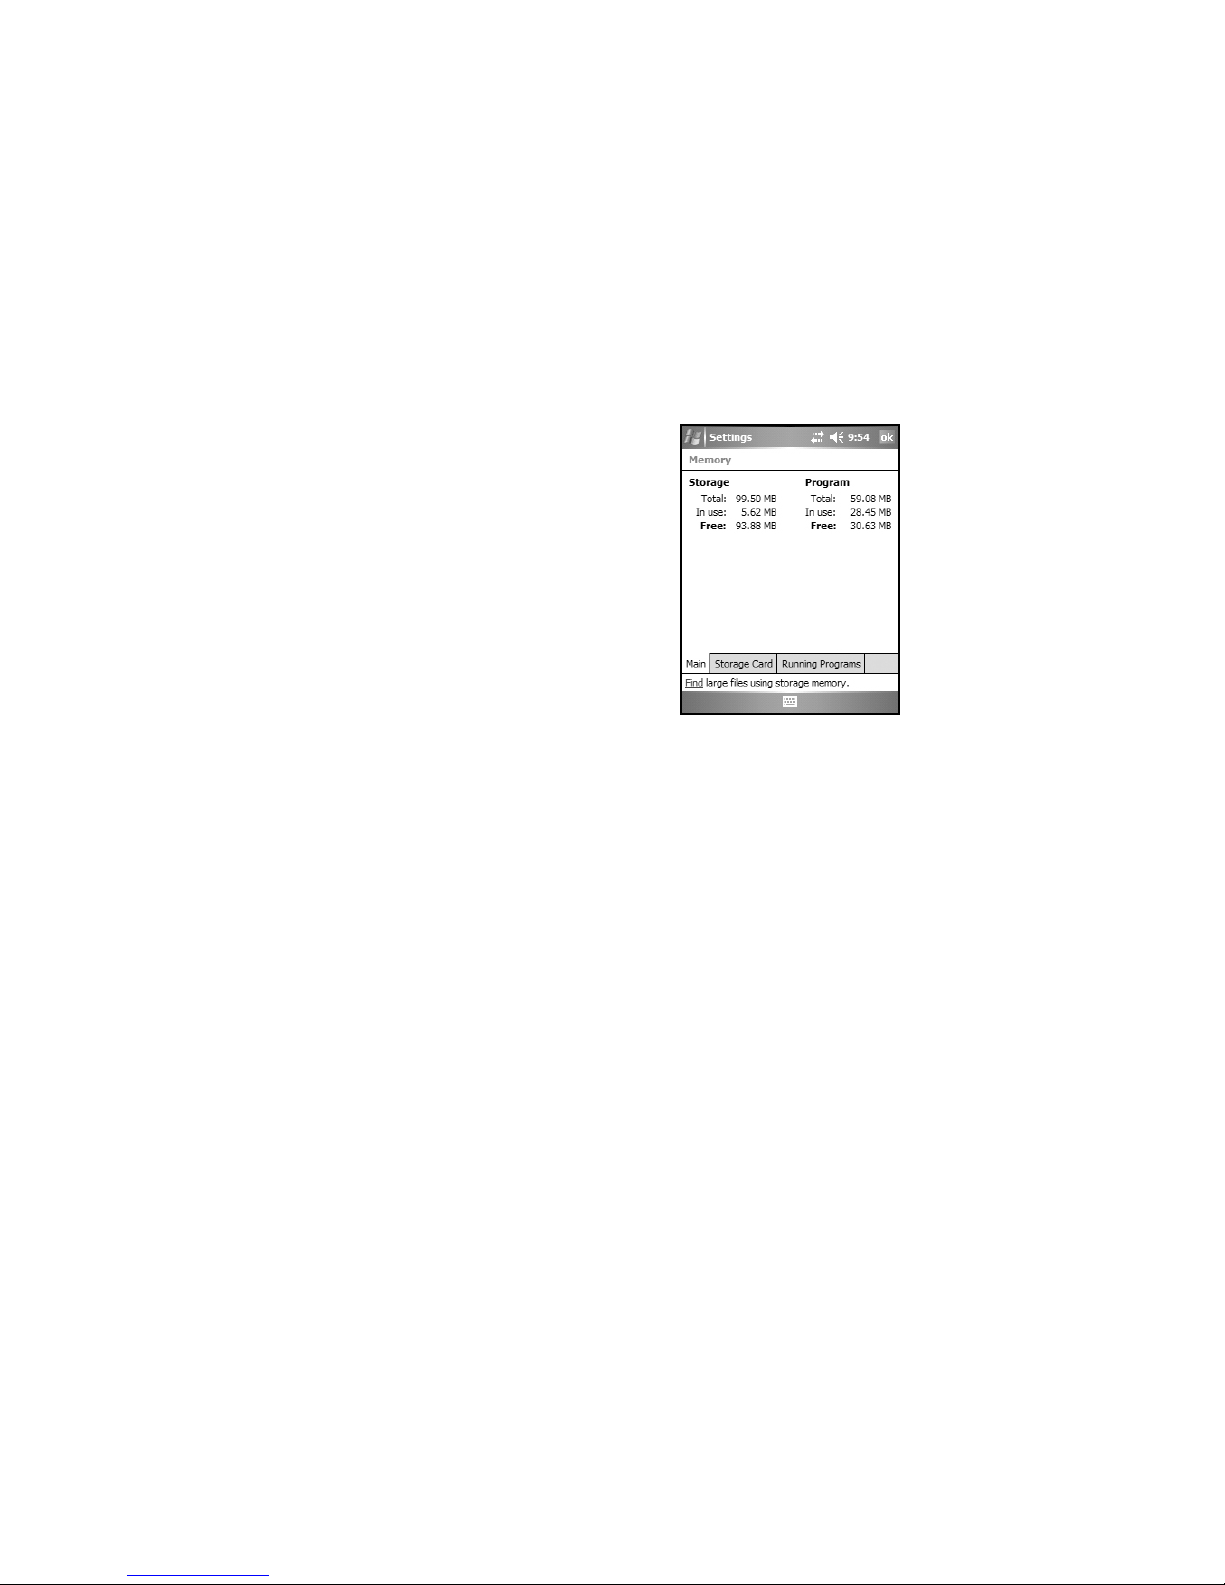
How can I tell how much memory is
available?
Choose Start / Settings / System /
Memory to view available free storage
and program memory. The screen shot
shows 94 MB of storage memory is
available for files and 31 MB of
program memory is available for
applications. If a CF card is installed,
tap Storage Card to view available
memory.
I am having intermittent problems with serial or USB
communication.
Dirt, debris or oxidation on the contacts can interfere with the
connection between the PowerBoot and the unit, resulting in
intermittent serial or USB communication problems as well as
battery power problems. Use rubbing alcohol and a Q-tip or similar
tool to clean the contacts on both the battery and the unit, taking
care not to leave fibers behind. Be sure to dry the contacts
thoroughly before re-attaching the PowerBoot to the unit.
28
Page 29

It is critically important that my battery doesn’t fail during a job.
Do you have any suggestions?
Consider carrying a fully charged spare battery in the field. The unit
is designed so that battery replacement is quick and easy.
I connected my unit to external power and nothing happened. Is
something wrong with my battery?
Turn the unit off while charging. If a battery is really low, it can
take a while for the unit to respond when external power is applied.
Allow up to an hour after AC power is first applied to see whether
the unit will turn on. Continue to charge for the full 12-hour period.
I am worried that my battery isn’t performing as well as it should.
Is there any way that I can test it to see whether it’s ok?
The operating system includes a Battery Logger utility to help
evaluate battery performance:
1. Connect the AC charger to the unit and charge the unit fully.
2. Configure the unit to never go to sleep. Tap
System / Power / Advanced
battery power
3. Run the Battery Logger utility by tapping
Battery Logger
default) and tap
4. Tap
Tools / Start Battery Logging
that records the battery volt age at intervals.
5. Disconnect external power and allow the program to run until
the battery is exhausted and the unit shuts down.
6. Reapply AC power and reset the unit to close the power
logging utility.
7. Open the battery logger file and check the time of the first and
last entry to determine how many hours elapsed before the unit
turned off. A healthy battery should run about 30 hours if the
802.11 and backlight are off.
). Tap OK.
. Enter a file name and file location (or use the
.
Save
and uncheck the box under
. This utility creates a file
Start / Settings /
On
Start / Programs /
I see a low battery warning after using the unit for a few hours.
Confirm that the battery has been charged for at least 12 hours
while the unit was turned off. Be aware that certain usage
conditions will have a significant impact on battery life: heavy use
of 802.11, the backlight, high power consumption CF cards and
using during cold temperatures.
29
Page 30

I am trying to connect my unit to the Internet using a Webenabled cell phone, but it refuses to connect.
Confirm the phone, cable, and login work by connecting to a PC.
If your cellular provider is also providing you with Internet access,
contact your provider for information about how to connect a
Windows Mobile device. Typically, the provider may require
certain modem initialization strings or APN (Access Point Name)
strings. If you try to establish the same connection from a PC,
typically you install software from the cellular provider, which
handles this configuration automatically.
If your ISP is separate from your cellular phone provider, then
simply dialing the ISP from your phone should be sufficient. Enter
the username and password needed with this ISP. Reduce your
connection baud rate to 9600, or contact your cellular provider for
specifics.
How can I see file extensions or file attributes?
The File Explorer included in Windows Mobile does not have any
support for viewing file extensions or attributes like the Windows
Explorer program on a desktop PC.
There are two ways to get around this limitation. You can connect
the unit over ActiveSync and browse from the PC to view file
extensions and attributes. (Refer to the Communication section for
ActiveSync details.) Alternatively, third-party file management
programs are available for Windows Mobile devices that may
support a Recycle bin as well as viewing file extensions, file
attributes, zip archives and more.
Can I work with Microsoft Office files in Word Mobile and Excel
Mobile?
Office Mobile applications are trimmed down versions of the PC
Microsoft Office applications. Office Mobile applications allow you
to view simple documents and make simple changes on your unit.
However, they do not support all of the formatting and other
features (such as macros) that are supported by the PC applications.
30
Page 31

Regulatory Information
U.S.A.
This device complies with Part 15 of the FCC Rules. Operation is subject to
the following two conditions: (1) this device may not cause harmful
interference, and (2) this device must accept any interference received,
including interference that may cause undesired operation.
This equipment has been tested and found to comply with the limits for a Class
B digital device, pursuant to Part 15 of the FCC Rules. These limits are
designed to provide reasonable protection against harmful interference in a
residential installation. This equipment generates, uses and can radiate radio
frequency energy and, if not installed and used in accordance with the
instructions, may cause harmful interference to radio communications.
However, there is no guarantee that interference will not occur in a particular
installation. If this equipment does cause harmful interference to radio or
television reception, which can be determined by turning the equipment off
and on, the user is encouraged to try to correct the interference by one or more
of the following measures:
- Reorient or relocate the receiving antenna.
- Increase the separation between the equipment and receiver.
- Connect the equipment to an outlet on a circuit different from that to
which the receiver is connected.
- Consult the dealer or an experienced radio/TV technician for help.
Canada
This digital apparatus does not exceed the Class B limits for radio noise
emissions from digital apparatus as set out in the radio interference regulations
of the Canadian Department of Communications. Le présent appareil
numérique n’émet pas de bruits radioélectriques dépassant les limites
applicables aux appareils numériques de Classe B prescrites dans le règlement
sur le brouillage radioélectrique édicté par le Ministère des Communications
du Canada.
31
Page 32

Declaration of Conformity
Europe
According to ISO / IEC Guide 22 and EN 450 14
Manufacturer’s Name: Tripod Data Systems, Inc.
Manufacturer’s Address: 345 SW Avery Ave.
Declares, under our sole responsibility, that the product:
Product Name: Field Data Collector
Model Number: Recon
Product Options: ALL
conforms to the following Product Specifications:
Safety: EN60950-1:2001
EMC: EN 55022: 1994 +A1, A2: 1997 EN 55022: 1998 +A1:2000
EN 61000-3-2, 1995+A1+A2: 1998
EN 61000-3-2:2000 EN 61000-3-3:1995
EN 61000-3-3:1995+A1:2001 CFR 47, Part 15, Subpart B
EN 55024:1998* EN 55024:1998+A1:2001*
R&TTE Directive 1999/5/EC:
EN 300 328 V1.6.1
EN 301 489-1 V1.4.1
EN 301 489-17 V1.2.1
Supplementary Information:
In addition to meeting the above EMC requirements during system test, the AC
Charger provided with this product has been certified to IEC 60950 +A1, A2,
A3, A4, A11.
* Product is battery powered.
Corvallis, OR USA
Corvallis, OR 97333 USA
CAUTION:
Only approved accessories may be used with this equipment. In general, all
cables must be high quality, shielded, correctly terminated and normally
restricted to two meters in length. AC chargers approved for this product
employ special provisions to avoid radio interference and should not be altered
or substituted.
Unapproved modifications or operations beyond or in conflict with these
instructions for use may void authorization by the authorities to operate the
equipment.
32
052106
 Loading...