

Page 1

Page 2

4Ch H.264 hardware codec
-Network DVR
1
INSTALLATION & SAFEGUARDS
All the safety and operating instructions should be read before the unit is operated.
Environment Condition for Installation
1. To prevent electric shock or other hazard, do not expose units to rain, moisture, or dust.
2. Place this unit in a well-ventilated place and do not place heat-generating objects on this unit.
3. This unit should not be located in an area where it is likely to be subjected to mechanical shocks.
Before You Start
1. Ensure the power switch is in the OFF position prior to starting.
2. Do not attempt to open or remove the covers. That may expose you to dangerous voltage or
other hazards.
3. Installation should be performed by qualified service personnel only.
4. This unit should be operated only from the type of power source indicated on the manufacturer’s
label and with the power supply included with the unit.
Notice
1. Before initial configuration or operation you must first set the TIME/DATE, followed by HDD clear.
If you don’t follow this steps first, that may cause non recording on the HDD or non saving
setting value. Even though it is recorded, you cannot search recorded data.
2. When it comes to HDD capacity, you can use a big size of HDD.
3. When you set the record setup, you have to set the Record Configuration and also Schedule
Setup. This unit records as per the Record type & Schedule setup. The default setting value for
Schedule setup is Continuous mode.
Installation & Safeguards
Notice
This equipment has been tested and found to comply with the limits for a Class A digital device,
pursuant to part 15 of the FCC Rules. These limits are designed to provide reasonable
protection against harmful interference when the equipment is operated in a commercial
environment. This equipment generates, uses, and can radiate radio frequency energy and, if
not installed and used in accordance with the instruction manual, may cause harmful
interference to radio communications. Operation of this equipment in a residential area may
cause harmful interference in which case the manufacturer of the device is not responsible and
the user would be responsible to correct the interference.
Page 3

4Ch H.264 hardware codec
-Network DVR
2
Contents
Contents
21--------------------------------------------- -------------------SetupCHAP. 5
21--------------------------------------------- -------------------General Operation5-1.
22--------------------------------------------- -------------------Display Setup5-2.
22--------------------------------------------- -------------------VGA Setup1)
23--------------------------------------------- -------------------Screen Display Setup2)
23--------------------------------------------- -------------------OSD Setup3)
19--------------------------------------------- -------------------Data Backup4-9.
19--------------------------------------------- -------------------PTZ Camera Operation4-8.
18--------------------------------------------- -------------------Search4-7.
CHAP. 1 Features & Package Contents --------------------------------------------- ------------------- 4
1-1. Features ---------------------------------------------------------------- 4
1-2. Package Contents ---------------------------------------------------------------- 5
CHAP. 2 Function of Each Button --------------------------------------------- ------------------- 6
2-1. Front ---------------------------------------------------------------- 6
2-2. Rear ---------------------------------------------------------------- 7
CHAP. 3 Installation --------------------------------------------- ------------------- 8
3-1. Installation ---------------------------------------------------------------- 8
1) HDD (Hard Disk Drive) ---------------------------------------------------------------- 9
2) Camera ---------------------------------------------------------------- 9
3) Monitor ---------------------------------------------------------------- 10
4) Power ---------------------------------------------------------------- 10
5) Other External Device ---------------------------------------------------------------- 11
CHAP. 4 Operation --------------------------------------------- ------------------- 12
4-1. System Log In ----------------------------------------- ----------------------- 12
4-2. HDD Clear & Factory Default ---------------------------------------------------------------- 12
4-3. Display Configura tion ---------------------------------------------------------------- 15
4-4. Live View Setup ---------------------------------------------------------------- 16
1) Full / Multiple View ---------------------------------------------------------------- 16
2) SEQ ---------------------------------------------------------------- 16
3) PIP View ---------------------------------------------------------------- 16
4) ZOOM View ---------------------------------------------------------------- 16
5) Freeze ---------------------------------------------------------------- 16
4-5. Record --------------------------------------------- ------------------- 17
4-6. Playback ---------------------------------------------------------------- 17
Page 4

4Ch H.264 hardware codec
-Network DVR
3
46--------------------------------------------- -------------------Backup6-5.
58--------------------------------------------- -------------------SpecificationCHAP. 8
30--------------------------------------------- -------------------Buzzer Setup8)
57--------------------------------------------- -------------------Web Program7-3.
53--------------------------------------------- -------------------DDNS set up in DVR7-2.
51--------------------------------------------- -------------------Registering DVR fo r DDNS7-1.
48--------------------------------------------- -------------------Player6-6.
51--------------------------------------------- -------------------DDNS Web-serverCHAP. 7
39--------------------------------------------- -------------------Spot Setup4)
5-3. Record ------------------ ---------------------------------------------- 24
1) Record Setup ---------------------------------------------------------------- 24
2) Schedule Setu p ---------------------------------------------------------------- 25
5-4. Configuration ---------------------------------------------------------------- 26
1) HDD Management ---------------------------------------------------------------- 26
2) Time/Date Setup ---------------------------------------------------------------- 27
3) Camera Setup ---------------------------------------------------------------- 27
4) Motion Setup ---------------------------------------------------------------- 28
5) Interval Setup ---------------------------------------------------------------- 29
6) Alarm Setup ---------------------------------------------------------------- 29
7) Password Setup ---------------------------------------------------------------- 29
5-5. External Device S e tup ---------------------------------------------------------------- 30
1) TCP/IP Setup ---------------------------------------------------------------- 30
2) Pan / Tilt Setup ---------------------------------------------------------------- 39
3) Audio Setup ---------------------------------------------------------------- 39
5-6. Firmware Upgrade ---------------------------------------------------------------- 40
5-7. Factory Default ---------------------------------------------------------------- 40
CHAP. 6 IRS --------------------------------------------- ------------------- 41
6-1. IRS Setup ---------------------------------------------------------------- 42
6-2. DVR Setup ---------------------------------------------------------------- 43
6-3. Viewer ---------------------------------------------------------------- 44
6-4. Search ---------------------------------------------------------------- 45
CHAP. 9 Remote Controller --------------------------------------------- ------------------- 59
Contents
Contents
Page 5

4Ch H.264 hardware codec
-Network DVR
4
CHAP 1. Features & Package Contents
1-1. Features
CHAP 1. Features & Package Contents
Live Display
Real time display per camera
Auto Sequence
PIP (Picture in picture)
Digital Zoom of display (2X ZOOM)
Freeze
Simple playback mode
Simple PTZ camera control
Record
Efficient image quality selection in 5 steps
Audio recording
Schedule recording
Event record by alarm and motion detection
Emergency recording
Network
IRS (Integrated Remote Station)
DDNS supported
Playback
Search and playback by recorded data size, date/time, and event
Various playback speed (forward and backward)
Event Search
Data backup
Backup via USB memory stick / via network
Others
Supports UNI-CODE
Supports SPOT Monitor
PAL/NTSC Auto detection
Video loss detection
Page 6
4Ch H.264 hardware codec
-Network DVR
5
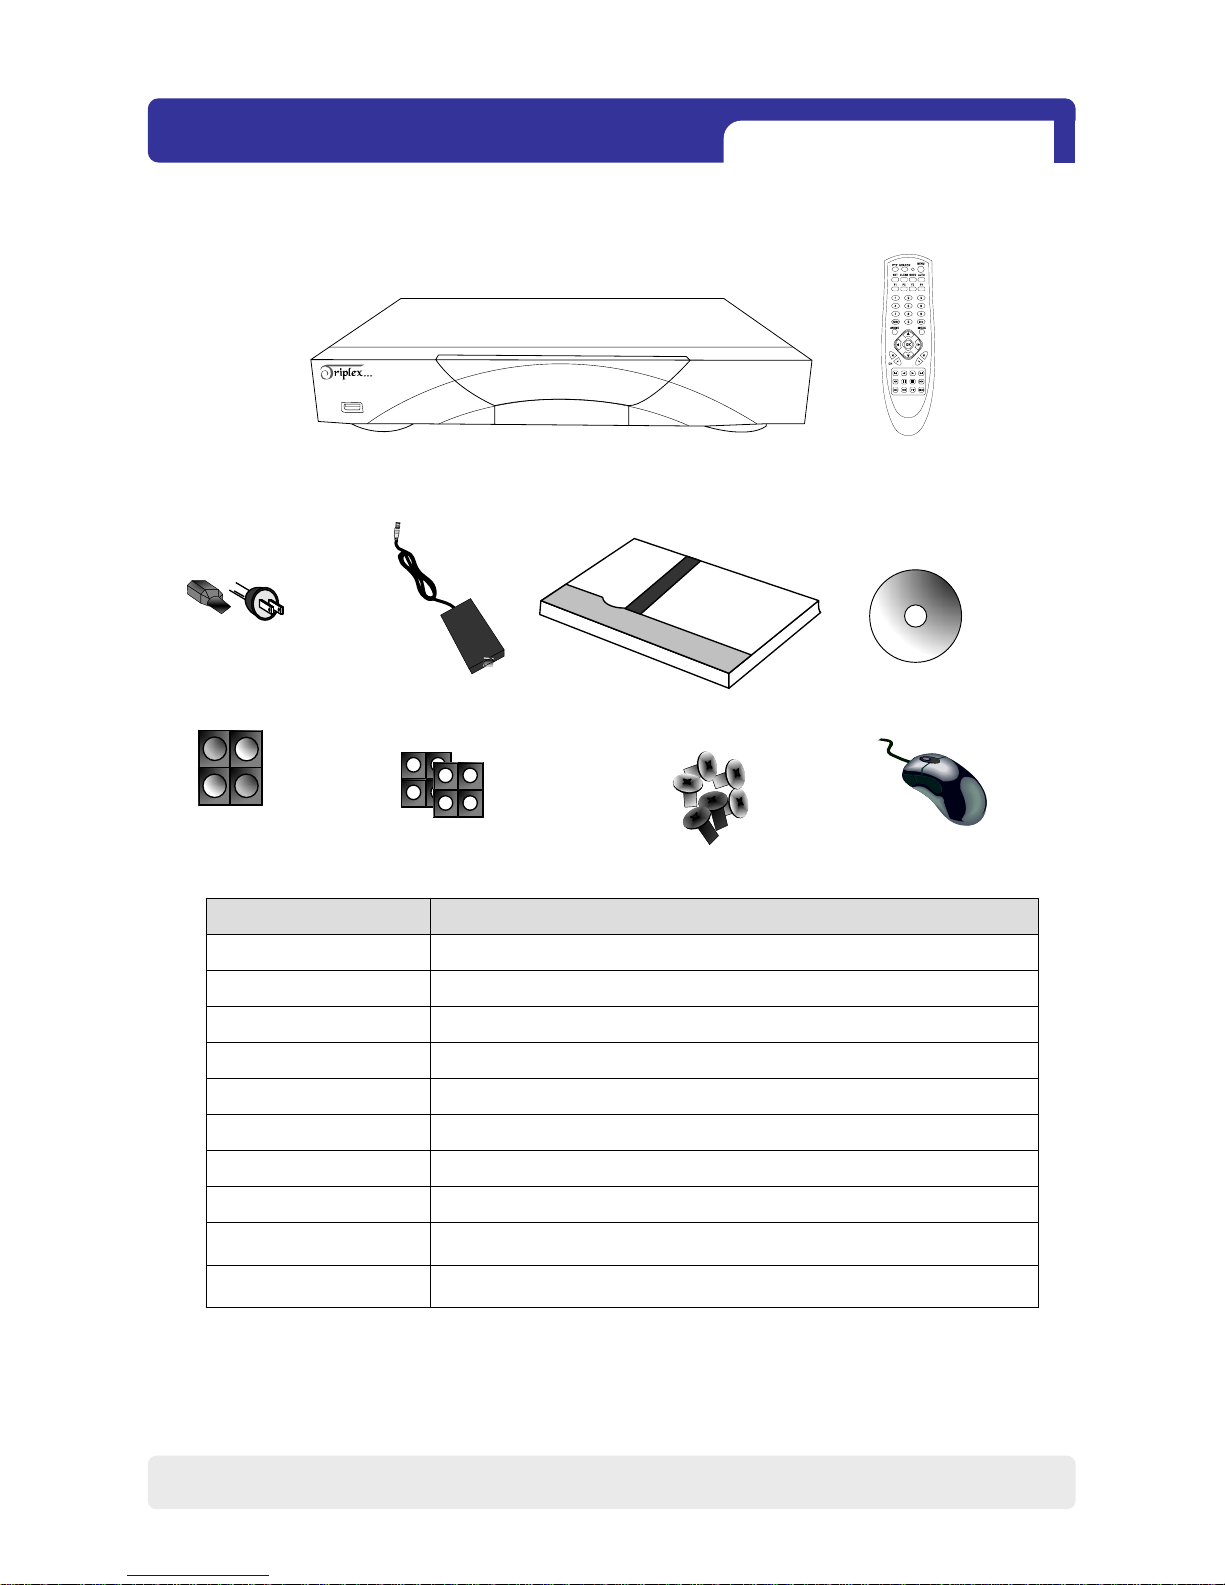
1-2. Package Contents
1. DVR Main Unit
3. Power Cable
4. Power Adapter
5. User’s Manual
7. Rubber Pad 8. HDD absorber 9. HDD Bolts
Prevents DVR from slipping. Attach it to the bottom of main unit.7. Rubber Pad
Remote controller 2. Remote Controller
Package Contents Description
1. DVR Main Unit Stand-Alone Digital Video Recorder
3. Power Cable AC power supply to adapters for 12V DC power
4. Power Adapter DC power supply
5. User’s Manual User’s Manual
6. Software CD IRS (Integrated Remote Station) program
8. HDD absorber Absorbs the mechanical shock of HDD against the case bottom.
9. Bolts Bolts for fixing HDD.
10. Mouse Enables to control all functions of DVR.
10. Mouse
CHAP 1. Features & Package Contents
USB
NETWORK DVR
POWER HDD ACTIVE
2. Remote Controller
6. Software CD
Page 7
4Ch H.264 hardware codec
-Network DVR
6
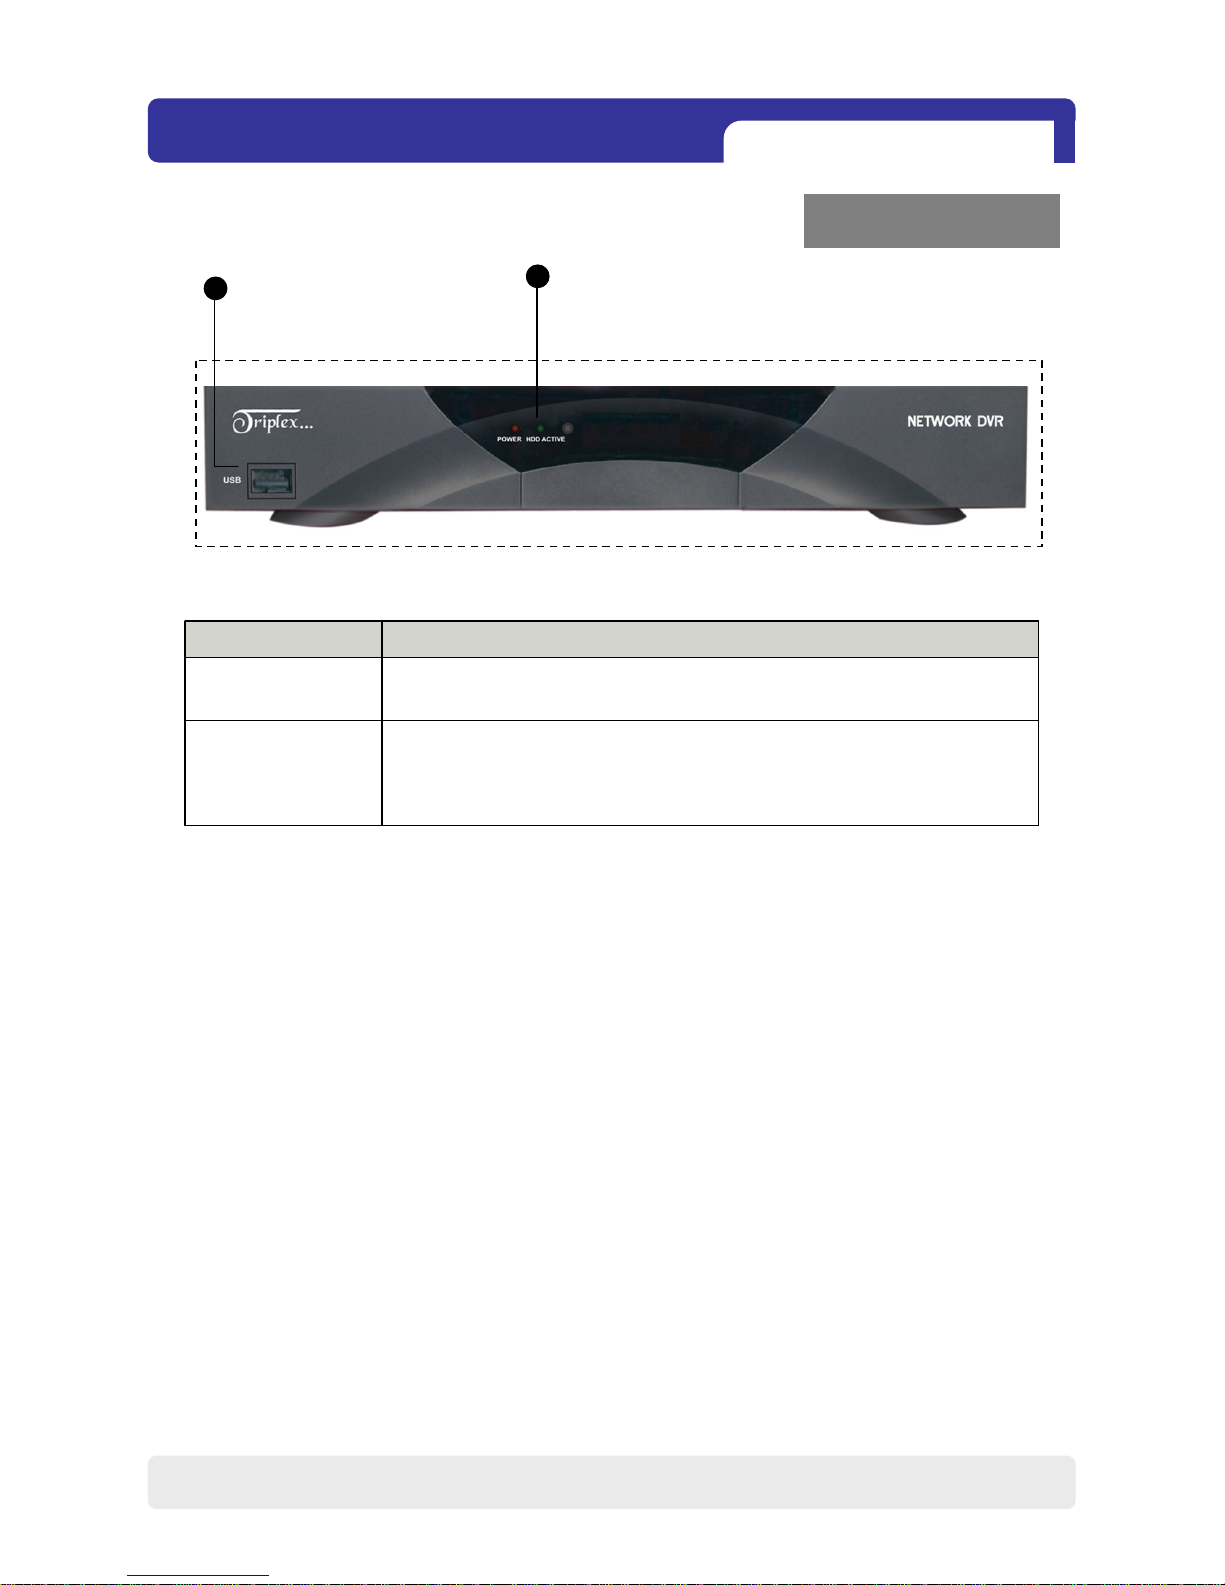
Name Function
① USB HOST Used for Data Backup and Firmware Update
(Only USB memory stick should be used.)
② LED Lamps Shows status of operation
POWER : Power status
HDD Active : HDD status
CHAP 2. Function of Each Button
2-1. Front
CHAP 2. Function of Each Button
1
2
Page 8
4Ch H.264 hardware codec
-Network DVR
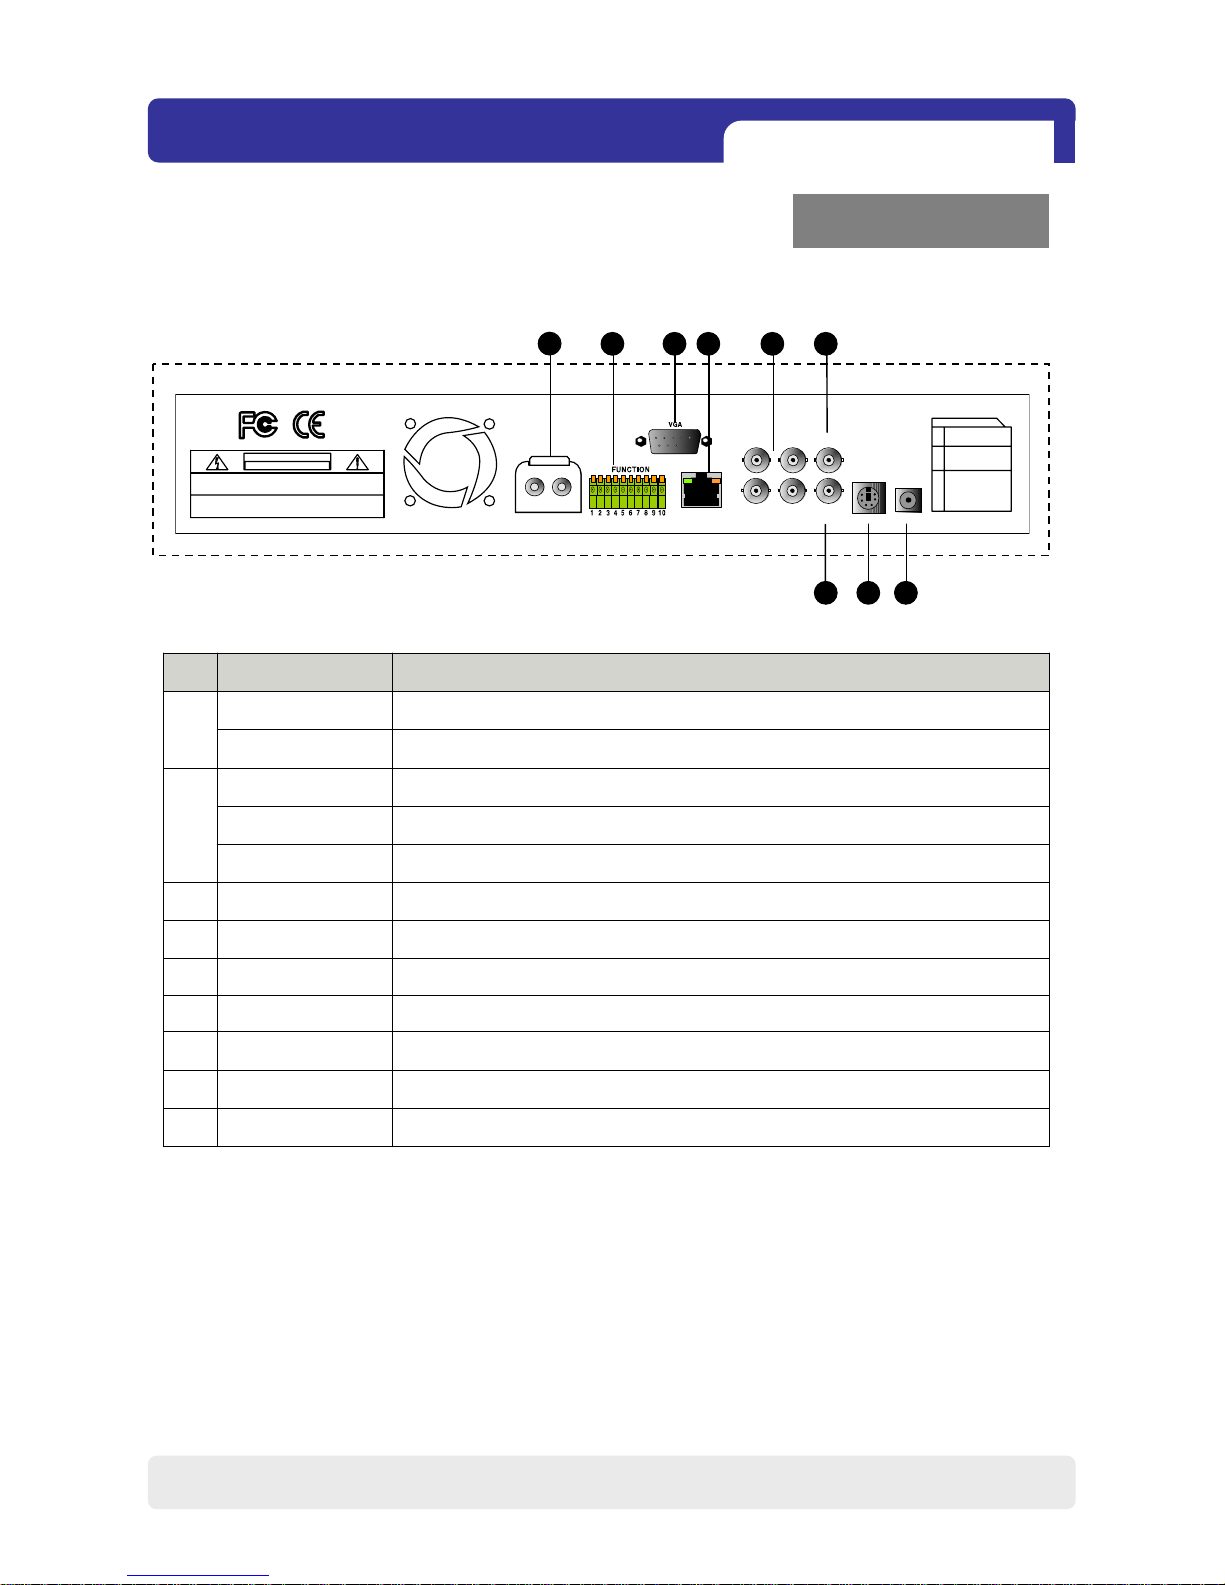
Connection to VGA monitor (CRT or TFT LCD monitor)VGA3
1ch audio inputAudio input
Connection with PTZ camera or other external device using RS 485
RS 4852
Relay out terminal
Relay output
Sensor input terminalSensor input
DC 12V DC pow er9
Connection to Ethernet deviceEthernet4
Connection to PS/2 MousePS/28
7
6
5
1
Monitor output
Camera input
Audio output
Spot monitor output
1ch spot monitor output (NTSC/ PAL)
1ch composite monitor output (NTSC/ PAL)
4ch camera input (NTSC/ PAL)
1ch audio output
FunctionName
2-2. Rear
CHAP 2. Parts name & functions
2 3 5 6
7 8 9
4
RISKO F ELECTRIC
SHOCK.DONOTOPEN!
CAUTI ON
NOUS ER SE RVI CEABL E PA RTS IN SIDE.REFERSERVICINGT OQUALIFIED
1
RS 485 D-
2
RS 485 D+
3
RELAY COM
4
RELAY NC
5
RELAY NO
6
RLARM GND
7
ALARM D4
8
ALARM D3
9
RLARM D2
10
RLARM D1
PS/2 DC12V
ETHERNET
FUNCTION
CAUTION: T O REDUCE THE RISKOF E LE CTRICAL SHOCK. DO NOT OPE N COVERS .
SERVICEP ERSONNEL .
WARNNIG : TO P REV ENT F IRE OR SHOCK HAZ ARD. DO N OT EXP OSE UNI TS NOT
SPECIFICALLYDESIGNED FOROUTDOORUSE TO RAINORMOISTURE.
AUDIO
IN OUT
CH1 CH2
SPOT
MONITOR
CH3 CH4
1
7
Page 9

4Ch H.264 hardware codec
-Network DVR
3-1. Installation configuration
CHAP. 3 Installation
CHAP.3 Installation
8
Page 10
4Ch H.264 hardware codec
-Network DVR
9
1) HDD
3-1. Installation
1. Connect Main Board and HDD using SATA data cable and HDD power cable.
2. Stick the HDD absorber (included in package) on the bottom of case and then install the
HDD on top of them by using the bolts (included in package).
3. Screws must be inserted from outside of the case bottom.
CHAP. 3 Installation
MAIN BOARD
HDD
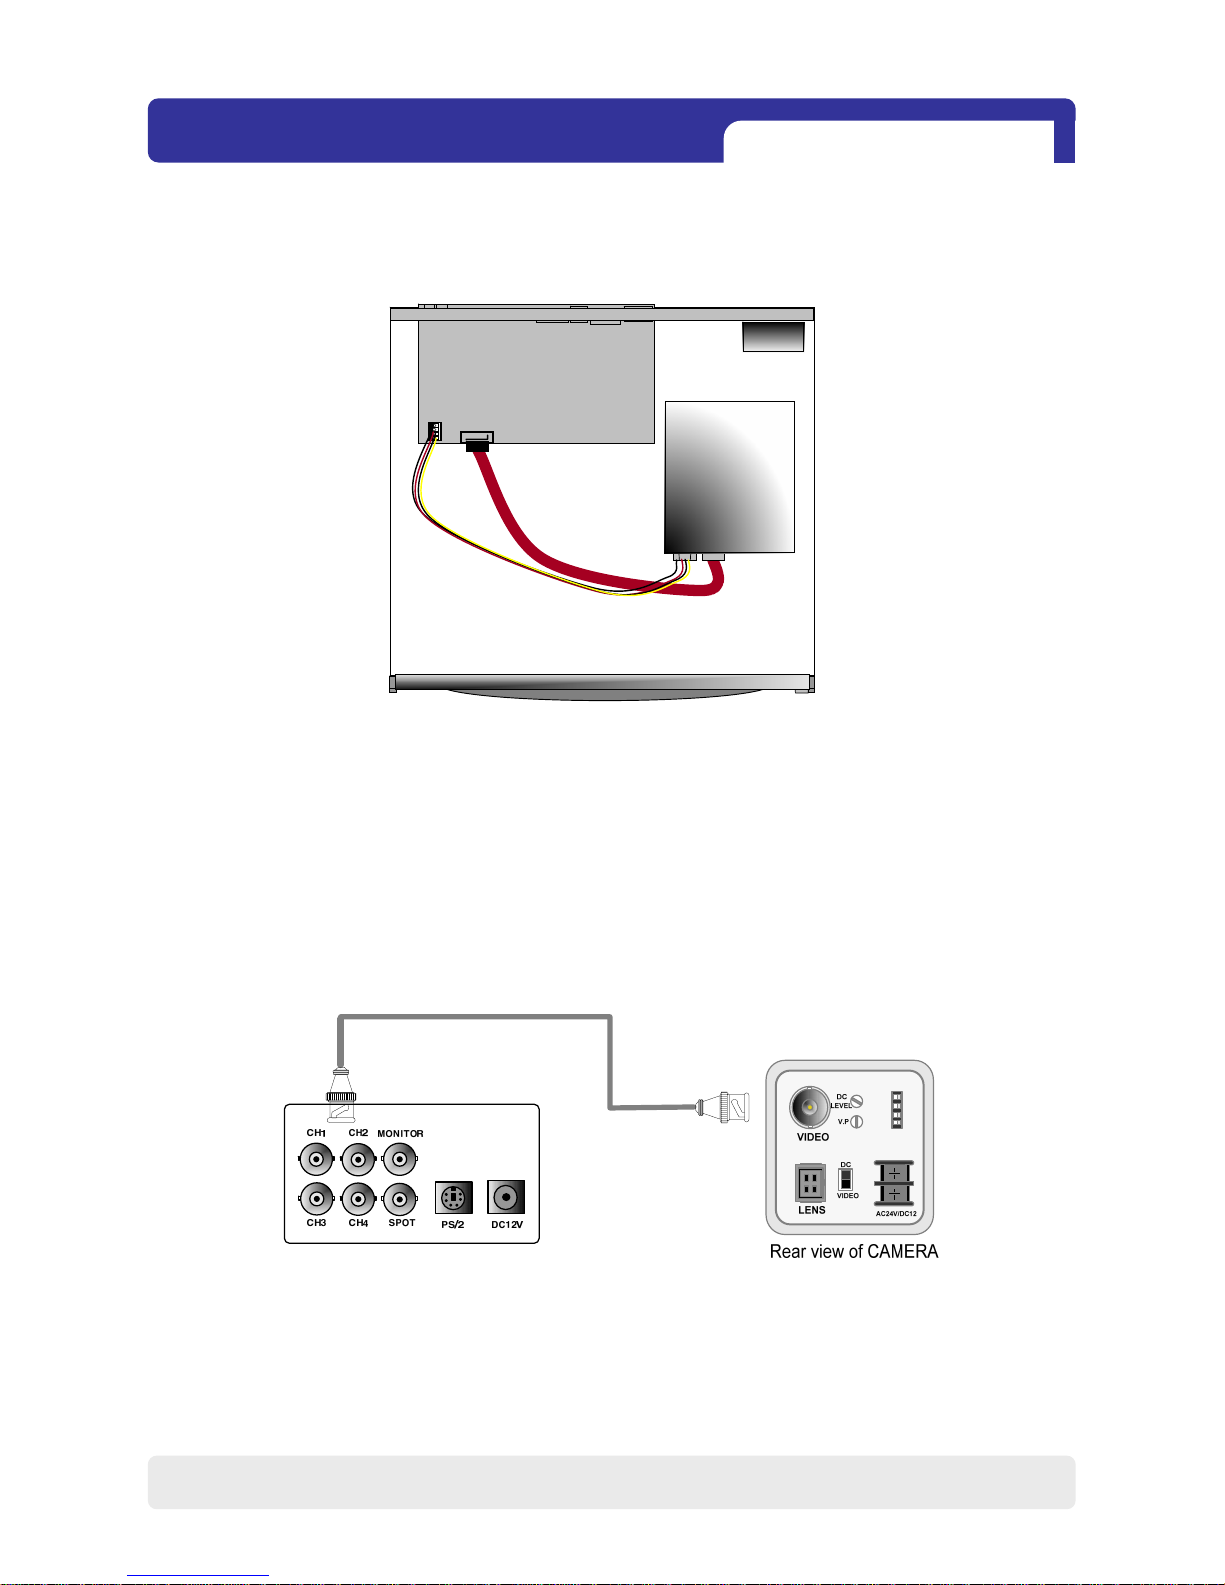
2) Camera
Connect camera to the camera input on rear panel of DVR marked CAMERA IN.
Page 11
4Ch H.264 hardware codec
-Network DVR
10
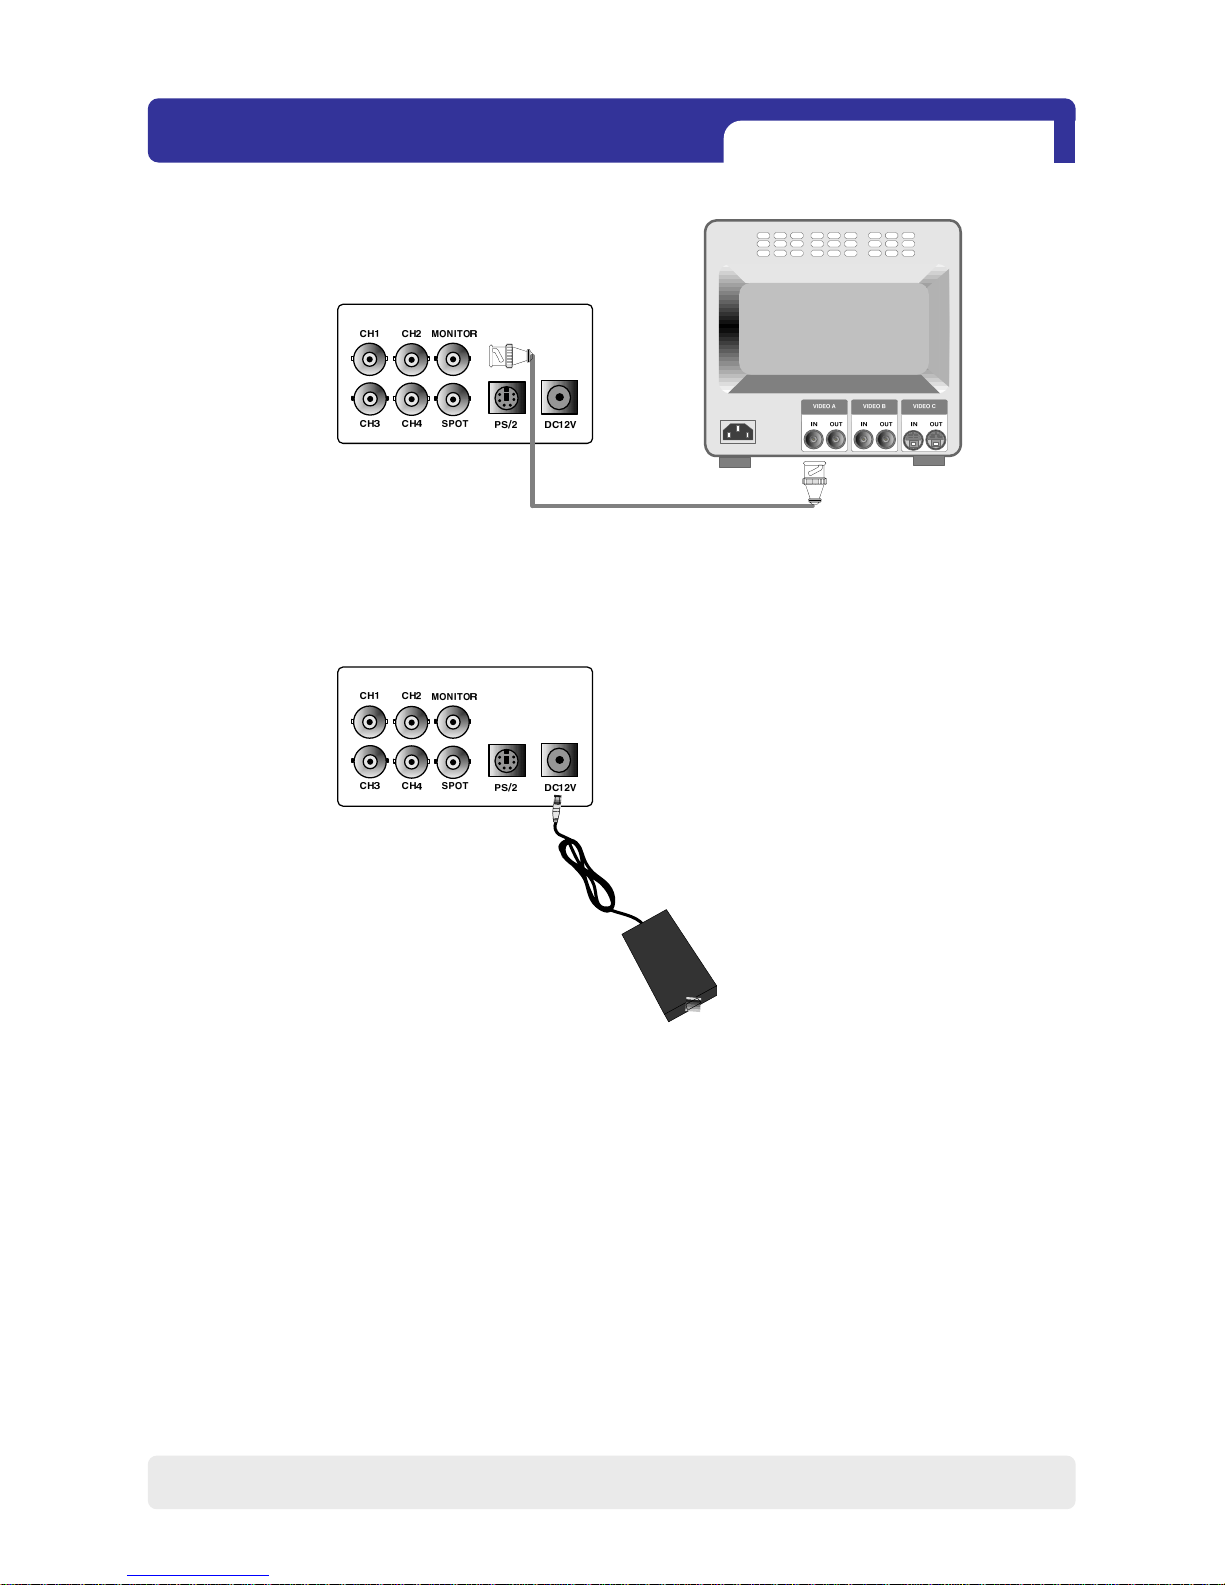
4) Power
DC over 12V adapter
CHAP. 3 Installation
3) Monitor
Connect the video output marked MONITOR to Video-In of Main monitor.
Page 12
4Ch H.264 hardware codec
-Network DVR
11
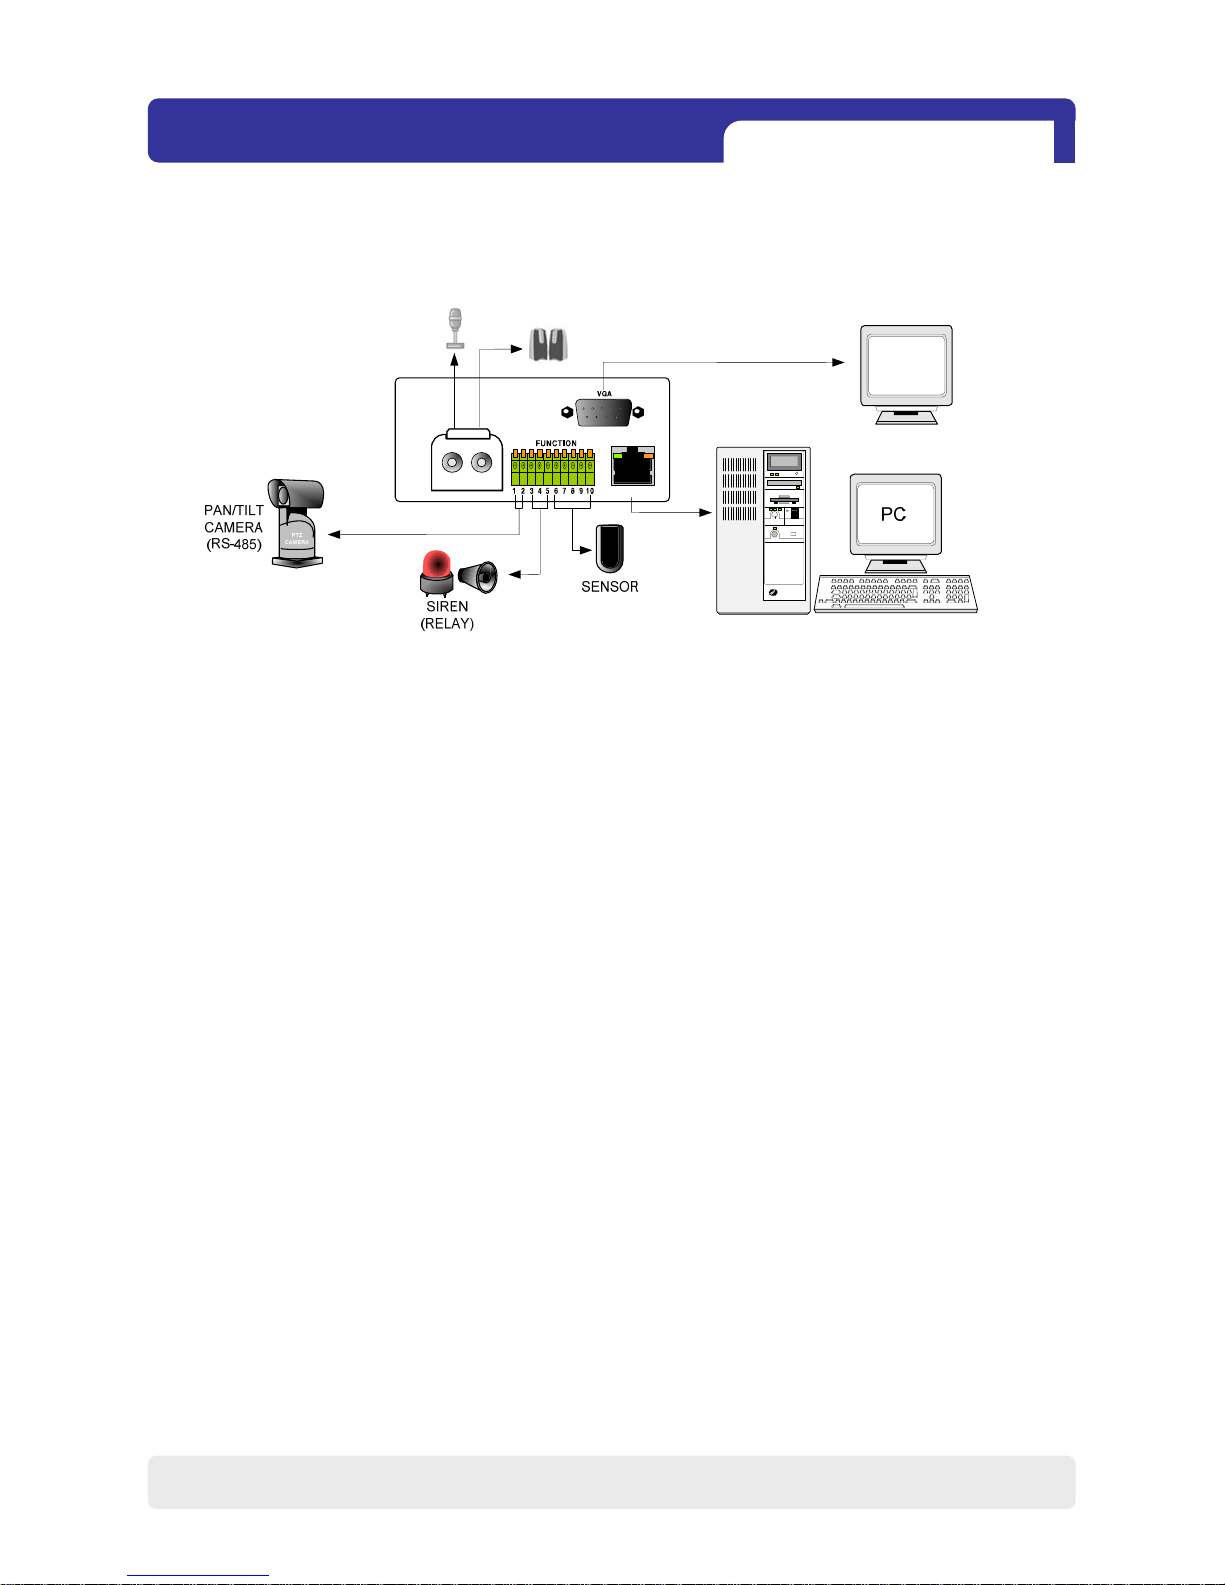
5) Other External Device
RS-485 : Controls external device like PTZ camera.
(Pin No.1 & No.2)
RELAY Output : Relay Output (Pin No.3 & No.5).
SENSOR Input : Sensor Input – Alarm Input (Pin No.6 ~ No.10).
ETHERNET: Connection to LAN, WAN
Audio Input: Connection to a microphone
Audio Output: Connection to a speaker
VGA : Connection to CRT or TFT LCD monitor (D-SUB)
CHAP. 3 Installation
ETHERNET
AUDIO
IN OUT
Page 13

4Ch H.264 hardware codec
-Network DVR
12
CHAP. 4 Operation
4-1. System Log-In
4-2. HDD Clear & Factory Default
DVR LOG-IN
USER ID ADMIN
USER PW ________
1 2 3 4 5 6 7 8 9
ENTER EXIT
If the password entered matches previously set password, you can log into ‘MAIN MENU’. If
an incorrect password is entered, you will see “PW IS NOT CORRECT” message on display.
The factory default password is none. Just click ‘ENTER’ for first time initial log in.
-Factory default password
ADMIN : (Blank)
MANAGER : ‘1’
USER1~USER8 : ‘2’~’9’
※ For security reasons, be sure to make note of your own password.
※ The authority of MANAGER & USERS for changing critical settings of DVR is limited due to security reasons.
Before first operation, you must check that each channel is displaying properly and log in
‘Main Menu’ and set Time/Date and set HDD clear.
1) After power on, a right-click of the mouse
shows an icon bar on the screen. Then click
the [Menu] icon to log in.
2) Then, you will see ‘DVR Log-In’ message
shown at right.
3) You may log in as an ADMIN, MANAGER, or
USER1 ~ USER8.
4) Input your password (Max. 8 digits are
available for password) and click ‘ENTER’.
5) To exit, click ‘EXIT’ button.
Mouse buttons Functions
Mouse Wheel Increases or decreases setup value on the Menu mode
Right Decreases setup value on the Menu mode
Left
Increases setup value on the Menu mode
Execute all of the functions (clicking icons)
GENERAL USE OF MOUSE
* Please use a mouse pad for proper operation of the mouse.
Page 14

4Ch H.264 hardware codec
-Network DVR
13
1) HDD Clear
You can see HDD Model name, serial number, number of blocks and size of HDD.
In order to clear HDD, click ‘CLEAR’ at the bottom as shown below.
CHAP. 4 Operation
HDD MANAGEMENT
MODEL WDC WD3200JS-60PDB0
SERIAL WD-WCAPD3768692
BLOCKS 1048576 LBA
SIZE 250 GB
SPEED PIO4
------------------------------OVERWRITE ENABLE
CLEAR ESC
DVR LOG-IN
USER ID ADMIN
USER PW ________
1 2 3 4 5 6 7 8 9
ENTER EXIT
HDD MANAGEMENT
MODEL WDC WD3200JS-60PDB0
SERIAL WD-WCAPD3768692
BLOCKS 1048576 LBA
SIZE 250 GB
SPEED PIO4
------------------------------OVERWRITE ENABLE
HDD CLEAR IS COMPLETED
CLEAR ESC
(6) Now you can see
“HDD CLEAR IS COMPLETED”.
CONFIGURATION
HDD MANAGEMENT
CAMERA SETUP
MOTION SETUP
ALARM SETUP
INTERVAL SETUP
TIME/DATE SETUP
PASSWORD SETUP
BUZZER SETUP
ESC
DVR LOG-IN
USER ID ADMIN
USER PW ________
1 2 3 4 5 6 7 8 9
ENTER EXIT
MAIN MENU
DISPLAY SETUP
RECORD
CONFIGURATION
EXTERNAL DEVICE
BACK-UP
FIRMWARE UPGRADE
FACTORY DEFAULT
LANGUAGE ENGLISH
EXIT
(3) Click ‘HDD MANAGEMENT’.
(1) Please refer to 4-1. System Log in again.
Then, click ‘ENTER’.
(2) Click ‘EXTERNAL DEVICE’.
(4) Click ‘CLEAR’.
(5) Please refer to 4-1. System Log in again.
Then, click ‘ENTER’.
Page 15

4Ch H.264 hardware codec
-Network DVR
14
CHAP. 4 Operation
2) Factory Default
Factory default setting initializes DVR system.
FACTORY DEFAULT
ALL OFF
--------------------------------DISPLAY SETUP OFF
RECORD SETUP OFF
SCHEDULE SETUP OFF
CAMERA SETUP OFF
CONFIGURATION OFF
EXTERNAL DEVICE OFF
DEFAULT ESC
FACTORY DEFAULT
ALL ON
--------------------------------DISPLAY SETUP ON
RECORD SETUP ON
SCHEDULE SETUP ON
CAMERA SETUP ON
CONFIGURATION ON
EXTERNAL DEVICE ON
DEFAULT ESC
FACTORY DEFAULT
ALL ON
--------------------------------DISPLAY SETUP ON
RECORD SETUP ON
SCHEDULE SETUP ON
CAMERA SETUP ON
CONFIGURATION ON
EXTERNAL DEVICE ON
FACTORY DEFAULT COMPLETED
DEFAULT ESC
(5) Now you can see “FACTORY DEFAULT
COMPLETED” as shown below.
DVR LOG-IN
USER ID ADMIN
USER PW ________
1 2 3 4 5 6 7 8 9
ENTER EXIT
MAIN MENU
DISPLAY SETUP
RECORD
CONFIGURATION
EXTERNAL DEVICE
BACK-UP
FIRMWARE UPGRADE
FACTORY DEFAULT
LANGUAGE ENGLISH
EXIT
(1) Please refer to 4-1. System Log in again.
Then, click ‘ENTER’.
(2) Click ‘FACTORY DEFAULT’.
(4) Choose ON for ‘ALL’. (2) Click ‘DEFAULT’.
Page 16
4Ch H.264 hardware codec
-Network DVR
2005 /07/ 21 22 : 05:18
10%
1 2 3 4
ETHERNET connection status icon
15
CHAP. 4 Operation
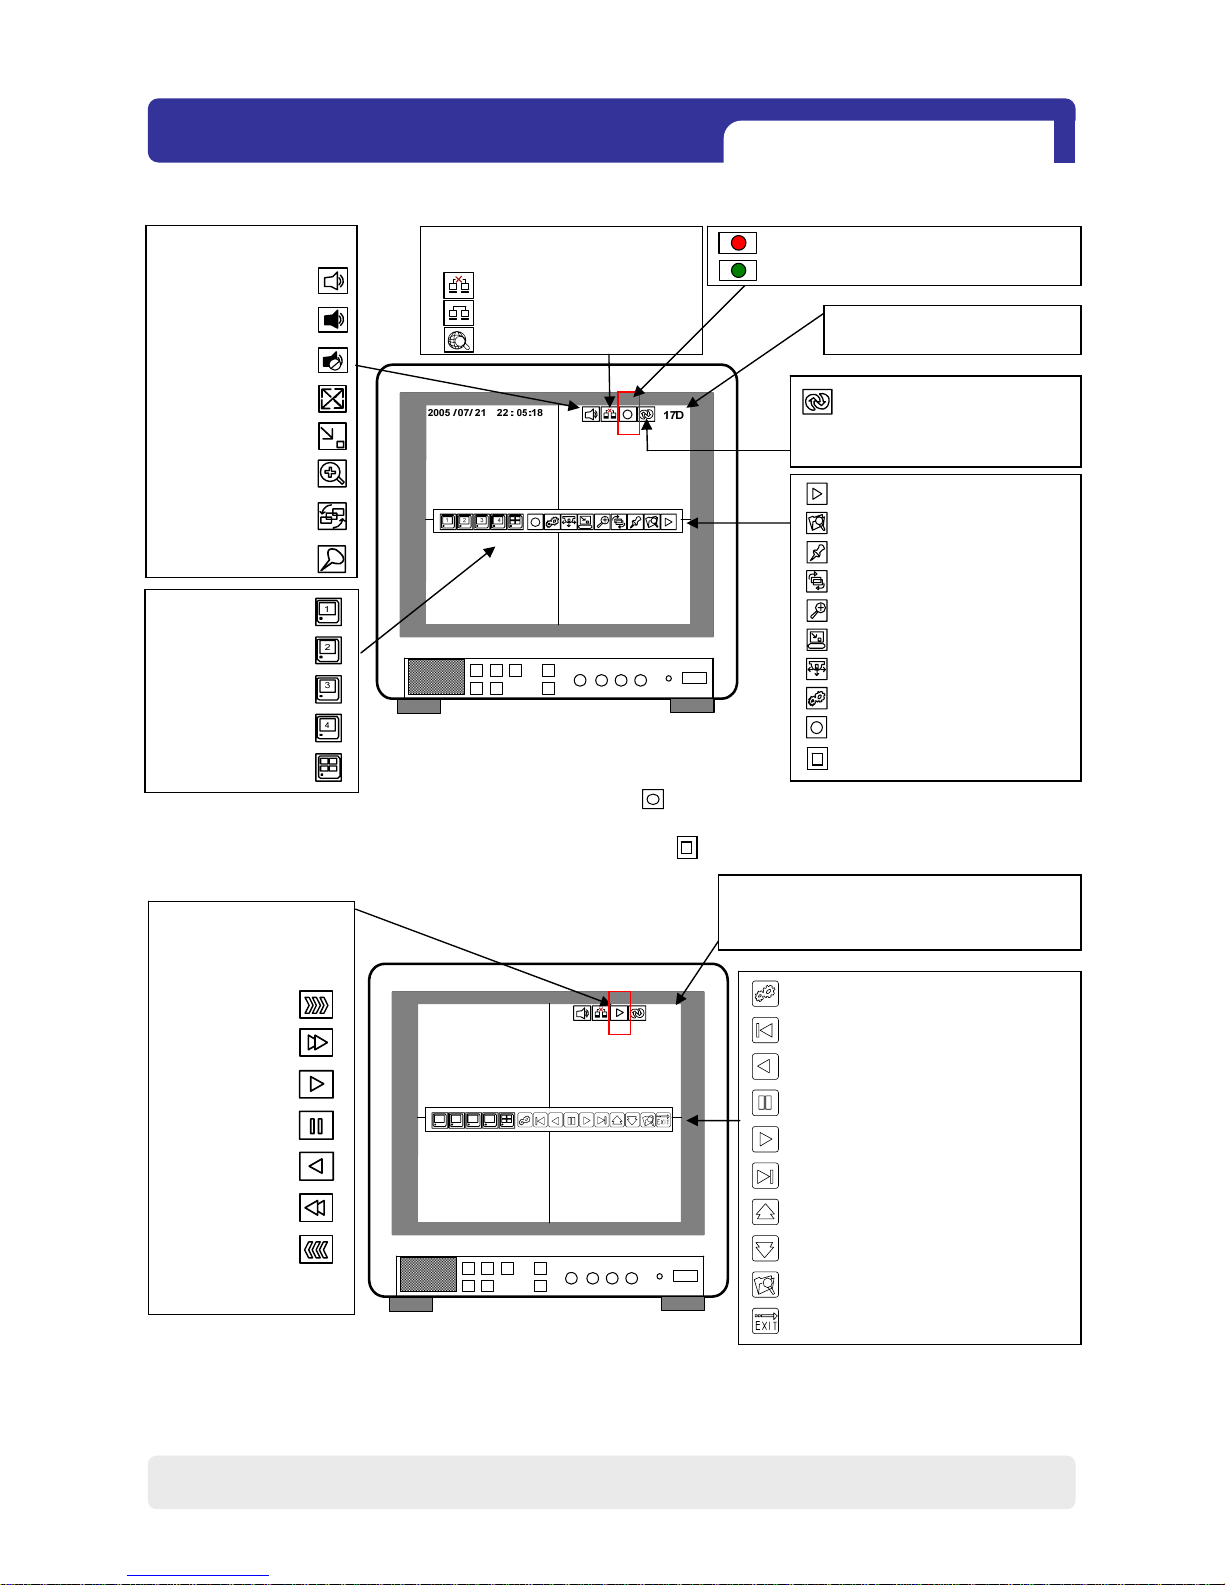
4-3. Display Configuration
Live Display
Playback Display
Playback
Search
Freeze
Sequence
Zoom
PIP
PTZ
Menu
Emergency recording start
Emergency recording stop
Ch No.1 single display
Ch No.2 single display
Ch No.3 single display
Ch No.4 single display
4 - split display
Connected
Disconnected
MENU
MOVE TO THE BEGINNING
BACKWARD PLAY
PAUSE
FORWARD PLAY
MOVE TO THE END
INCREASE PLAYBACK SPEE D
DECREASE PLAYBACK SPEED
SEARCH
EXIT
HDD space display
(Possible recording days)
Network search
HDD space display
(Location of the current playback image in HDD)
FAST PLAY
FORWARD PLAY
PAUSE
BACKWARD PLAY
FAST BACKWARD
Playback display
OVERWRITE status icon
* shown when overwrite is ENABLE
* not shown when overwrite is DISABLE
* blinking during OVERWRITE
Emergency Record & Schedule record [RED]
Stop Recording [GREEN]
FASTEST PLAY
FASTEST
BACKWARD PLAY
※ Once you click , it goes back to schedule record mode.
Audio On [Gray]
Audio Off [Blue Green]
Volume Off
PTZ mode
PIP mode
ZOOM mode
SEQ mode
FRZ mode
※ If you click during schedule record mode, it goes to emergency
record mode.
Page 17
4Ch H.264 hardware codec
-Network DVR
16
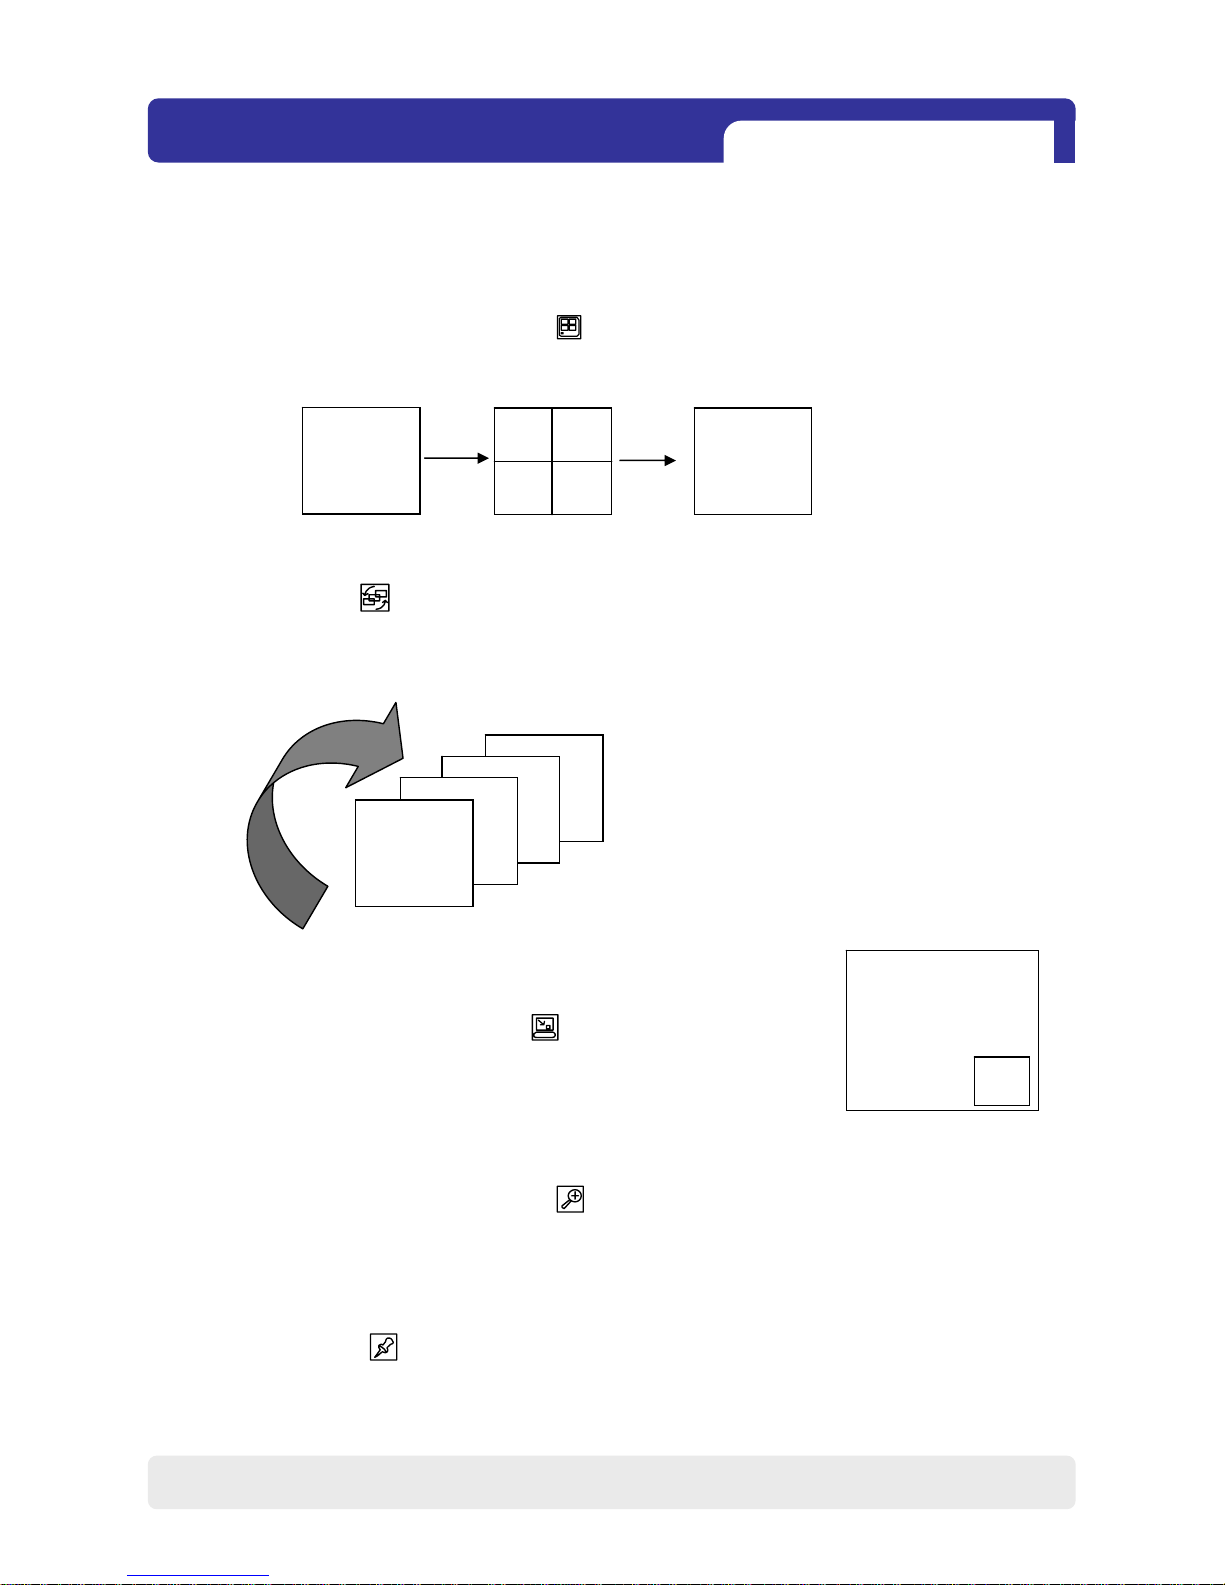
3) Picture in Picture (PIP View)
CAM01
4) ZOOM View
2) SEQ
CHAP. 4 사용방법
CH04
CH03
CH02
CH01
●
●
●
1) Full / Multiple View
Full Screen
4-4. Live View Setup
Full Screen
CHAP. 4 Operation
CAM02
Move the cursor onto [4 - split icon] in the icon bar and click it to view 4 channel division.
To enlarge each channel, click 1,2,3,4 Icon. Then, you will see a channel in full screen mode.
Click ‘SEQ’ icon . It automatically displays full screen images in sequence.
You can setup SEQ time interval on setup menu.
(MAIN MENU -> CONFIGURATION –> INTERVAL SETUP -> SEQUENCE SCREEN)
When it is in full screen display mode, you can see other camerain a
small window by clicking [PIP] icon , the other camera in small
window is rotating in sequence to next number of camera and you can
set the rotating time interval as per the procedure in MAIN MENU ->
SCREEN SETUP -> PIP INTERVAL -> PIP SCREEN.
In live mode, if you click [ZOOM] icon , images are displayed in two times larger size.
While using [ZOOM] mode, you can move the enlargement area by using the mouse.
To exit ZOOM mode, click ZOOM icon again.
5) Freeze
Click [FRZ] icon and click a channel that you want to freeze temporarily in live mode.
If you click [FRZ] icon again, it will cancel all.
Page 18
4Ch H.264 hardware codec
-Network DVR
17
4-6. Playback
CHAP. 4 Operation
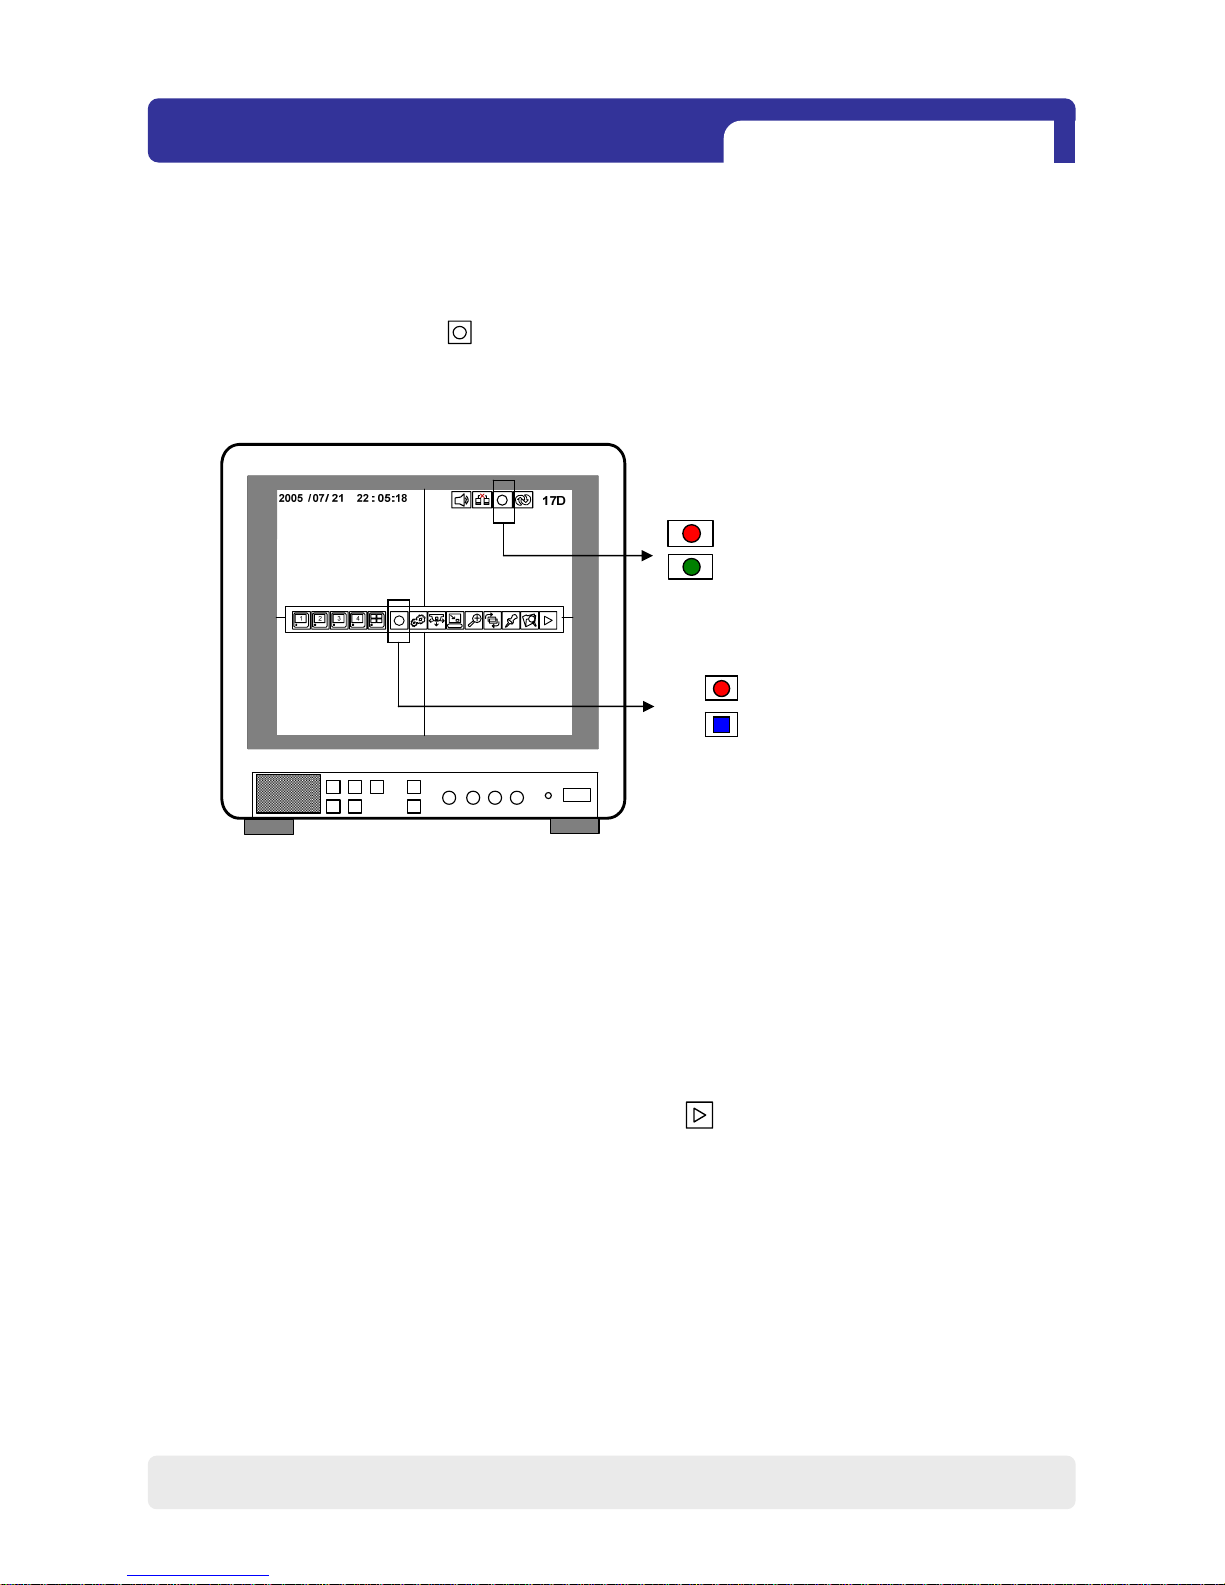
4-5. Record
It basically records as a setting made in Schedule Record mode except for emergency record mode.
- Emergency Record
Once you click this icon , it keeps recording continuously regardless of schedule setting.
- Schedule Record (Continuous, Motion, Alarm and Motion/Alarm)
Go to MAIN MENU-> RECORD -> SCHEDULE SETUP and setup schedule as you want.
It records as a setting.
- Record Icon in Red indicates Emergency Record and Schedule Record.
- This DVR unit does not record in following conditions ;
※ When overwrite function is off and HDD is full
※ When there is no scheduled recording
※ When you update a firmware
※ When there is no event detected in motion, alarm and motion/alarm record mode
of schedule record setting.
On record mode or live mode, click [playback] icon to play the recorded data in 1x speed.
Click icon to activate Emergency Record.
Click to stop Emergency Record and go
back to Schedule Record .
Record [RED]-Emergency Record & Schedule Record
Stop Recording [GREEN]
[Recording Status Display]
Page 19

4Ch H.264 hardware codec
-Network DVR
18
4-7. Search
SEARCH
PERCENT SEARCH
TIME/DATE SEARCH
EVENT SERACH
EXIT
PERCENT SEARCH
START 2006 / JUL / 09 PM 01 : 58 : 56
END 2006 / JUL / 10 PM 11 : 58 : 56
TARGET 2006 / JUL / 09 PM 05 : 58 : 56
PERCENT 20%
PLAY ESC
TIME/DATE SEARCH
SERACH MAIN MENU
PERCENT SEARCH
TIME/DATE SEARCH
START 2006 / JUL / 09 PM 01 : 58 : 56
END 2006 / JUL / 10 PM 11 : 58 : 56
TARGET 2006 / JUL / 09 PM 05 : 58 : 56
PLAY ESC
CHAP. 4 Operation
EVENT SEARCH
EVENT SEARCH
There are three search methods controlled by a mouse wheel button, left and right button of a mouse.
When you click [SEARCH] icon , then you see a window shown as below.
Select a target data by using the mouse.
In PERCENT SEARCH Mode, you can select certain data by clicking on the bar.
To move to the previous mode, click ‘ESC’.
1. PERCENT SEARCH
Search by percentage of total recorded data. It starts from image corresponding to set % of
data on the search bar.
2. TIME/DATE SEARCH
Search by time & date. Playback starts from the time & date selected.
3. EVENT SEARCH
Search by event list (Motion, Alarm, Video Loss)
DATE/TIME CHANNEL EVENT
---------------------------------/ / : : - -/ / : : - -/ / : : - -/ / : : - -/ / : : - -/ / : : - --
PAGE 000/000
ESC
Page 20
4Ch H.264 hardware codec
-Network DVR
19
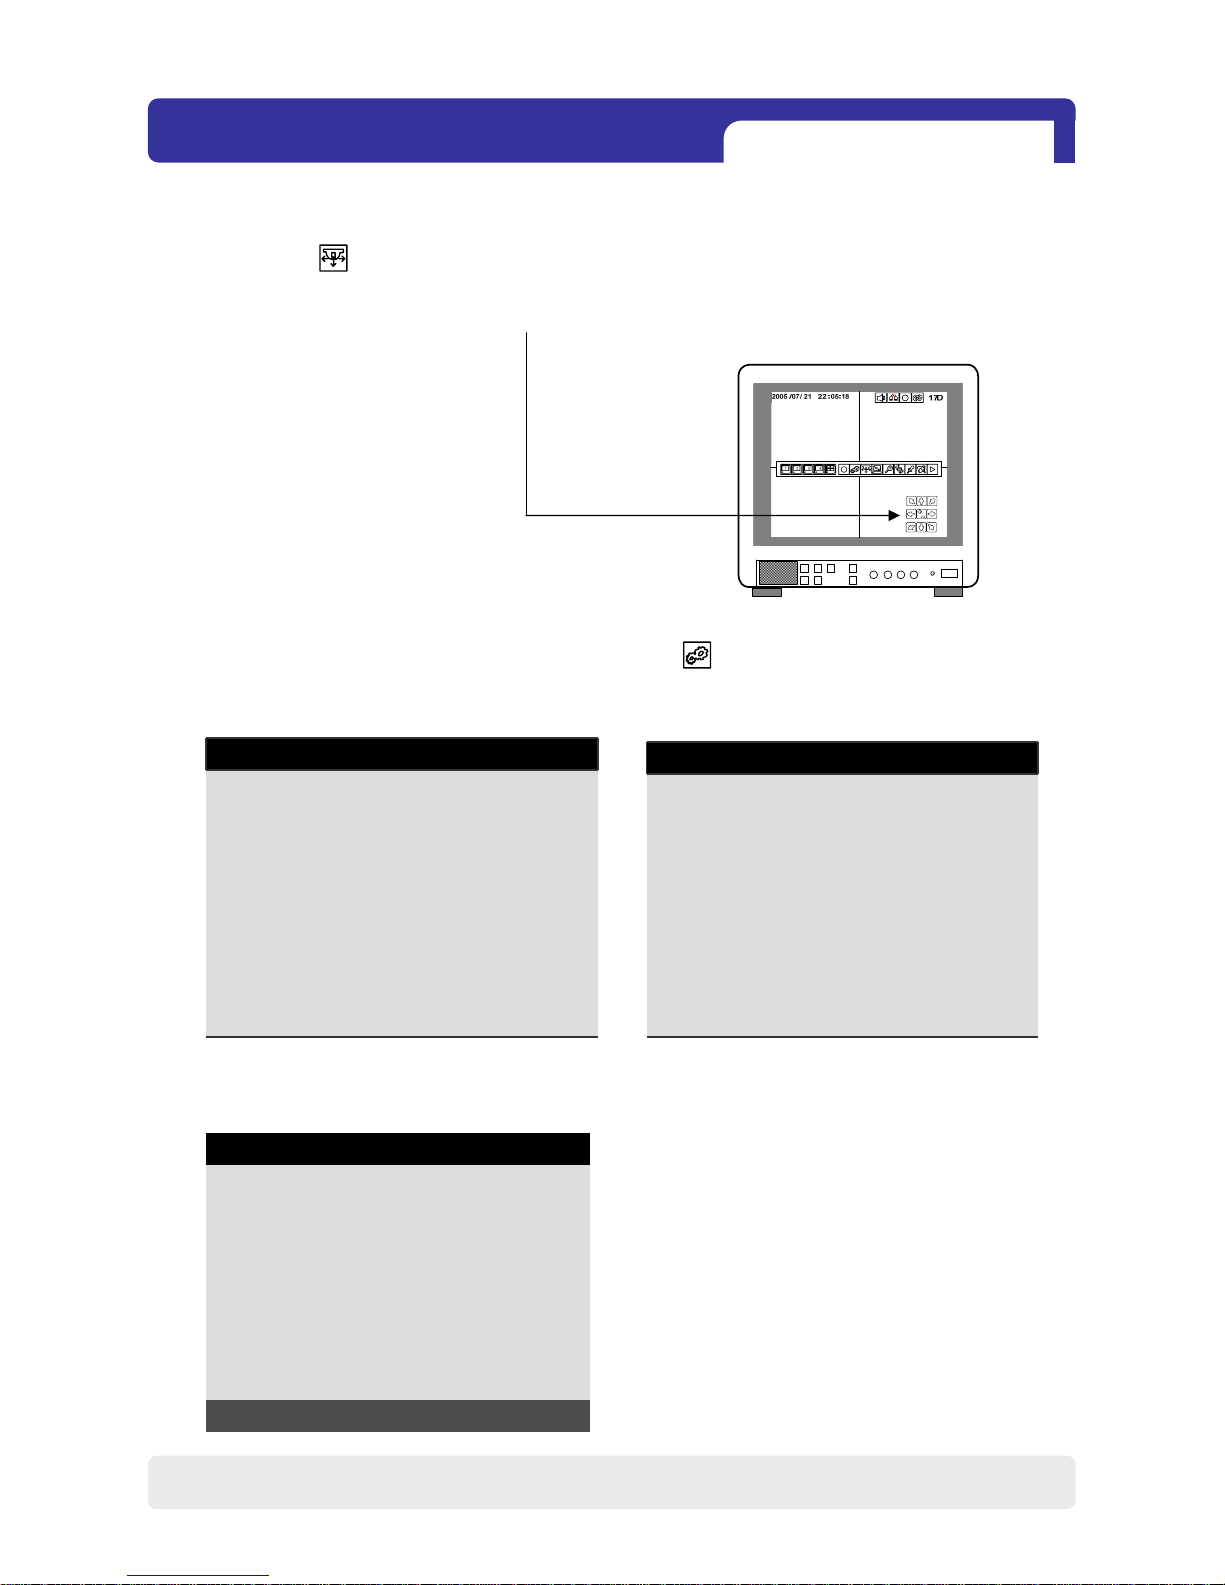
4-8. PAN/TILT/ZOOM Camera Operation
CHAP. 4 Operation
Click [PTZ] icon in the icon bar, then you can see ‘arrow’ keys & ‘+/-’ key shown below.
Click these arrow keys to move a PTZ camera to each direction. By using ‘+/-’ key, you can
control ZOON IN/OUT function. (‘+’ : ZOOM IN / ‘-” : ZOOM OUT)
4-9. Data Backup
DVR LOG-IN
USER ID ADMIN
USER PW ________
1 2 3 4 5 6 7 8 9
ENTER EXIT
(1) Please refer to 4-1. System Log in again.
Then, click ‘ENTER’.
Right-click to see the icon bar and click [MENU] icon and go to ‘Backup’.
MAIN MENU
DISPLAY SETUP
RECORD
CONFIGURATION
EXTERNAL DEVICE
BACK-UP
FIRMWARE UPGRADE
FACTORY DEFAULT
LANGUAGE ENGLISH
EXIT
(2) Click ‘BACK-UP’.
USB SETUP
HDD
START JUN/14/2007 16:19:08
END JUN/14/2007 16:36:21
MEDIA
PARTITION
START / / : :
END
SIZE MB Æ MB
CHECK USB BA CK-UP ESC
(3) Insert USB memory stick and click ‘CHECK USB’.
※ The START & END time / date in HDD sub-menu only shows start and end of recording.
This is not selectable and editable.
※ Only USB memory stick should be used for backup.
Page 21

4Ch H.264 hardware codec
-Network DVR
(6) You can verify the back-up by installing and running the Player on your PC.
Refer to 6-3. Viewer
CHAP. 4 Operation
USB SETUP
HDD
START JUN/14/2007 16:19:08
END JUN/14/2007 16:36:21
MEDIA
PARTITION 975 MB / 983 MB
START JUN/14/2007 16:19:08
END JUN/14/2007 16:36:21
SIZE 000975MB Æ 117 MB
53%
START WRITING IN USB STORAGE
CHECK USB BA CK-UP ESC
(4) To set start time of back-up and back-up data size in MEDIA sub-menu, use the mouse
(left/right/wheel button).
※ End time of back-up will be calculated automatically as per start time & date and the
back-up data size you set.
※ You can select the back-up data size (size of back-up data from start of back-up),
but END of back-up time is automatically determined by DVR itself.
(5) Click ‘Back-up’ to start USB back-up.
USB SETUP
HDD
START JUN/14/2007 16:19:08
END JUN/14/2007 16:36:21
MEDIA
PARTITION 975 MB / 983 MB
START JUN/14/2007 16:19:08
END JUN/14/2007 16:36:21
SIZE 000975MB Æ 117 MB
FINISH WRITING IN USB STORAGE
CHECK USB BA CK-UP ESC
System Status Messages
(1) When MEMORY STICK is recognized
- USB STORAGE IS CHECKING …
- USB STORAGE IS AVAILABLE
(2) During Back-Up
- START WRITING IN USB STORAGE
- FINISH WRITING IN USB STORAGE
(3) Error Messages
- THERE IS A PROBLEM ON USB PORT
(If USB PORT fails to work properly or not connected)
- INPUT DATE TIME ERROR
(If you select incorrect date & time, not in between
START and END time in HDD.)
- RECORD DATA IS NOT AVAILBLE
(When USB memory stick is full or backup data file
size is 0MB)
20
Page 22

4Ch H.264 hardware codec
-Network DVR
21
MAIN MENU
DISPLAY SETUP
RECORD
CONFIGURATION
EXTERNAL DEVICE
BACK-UP
FIRMWARE UPGRADE
FACTORY DEFAULT
LANGUAGE ENGLISH
EXIT
MAIN MENU
CHAP. 5 Setup
CHAP 5. Setup
5-1. General Operation
Click the [MENU] icon and input user password to log in.
DVR LOG-IN
USER ID ADMIN
USER PW ________
1 2 3 4 5 6 7 8 9
ENTER EXIT
(1) Please refer to 4-1. System Log in again.
Then, click ‘ENTER’.
Page 23

4Ch H.264 hardware codec
-Network DVR
22
5-2. Display Setup
1) VGA Setup
This is setup menu for display on the screen.
If you click ‘DISPLAY SET UP’, then you change setting values for display as shown below.
640X480 / 60Hz
800X600 / 60Hz
1024X768 / 60Hz
1280X1224 / 60Hz
640X480 / 75Hz
800X600 / 75Hz
1024X768 / 75Hz
1280X1024 / 75Hz
CHAP. 5 Setup
DISPLAY SETUP
VGA SETUP
SCREEN DISPLAY
OSD SETUP
ESC
VGA SETUP
RESOLUTION 800 X 600 / 60Hz
DEFAULT ESC
** Please check the resolution range that your VGA monitor supports first before you use VGA monitor.
If you select high resolution such as 1024X768, 1280X1024 on VGA SETUP with VGA monitor that does
NOT support those high resolutions, image display may NOT be seen properly.
VGA SETUP : Sets RESOLUTION for a VGA monitor (TFT LCD or CRT) as shown below.
Default Resolution for VGA is 800x600.
Page 24

4Ch H.264 hardware codec
-Network DVR
2005 /07/ 21 22 : 05:18
17D
1 2 3 4
23
3) OSD Setup
OSD SETUP
TOP OSD OFFSET 0
DEFAULT ESC
TOP OSD OFFSET : -1 ~ 1
BORDER ENABLE : ON/OFF
BORDER COLOR : COLOR SELECT
VERTICAL POSITION : -5 ~ 5
HORIZONTAL POSITION : -31 ~ 31
2) Screen Display Setup
SCREEN DISPLAY
VERTICAL POSITION 24
HORIZONTAL POSITION 00
BOARDER ENABLE ON
BOARDER COLOR GRAY
DEFAULT ESC
CHAP. 5 Setup
Page 25

4Ch H.264 hardware codec
-Network DVR
24
5-3. Record
1) Record Setup
RECORD
RECORD SETUP
SCHEDULE SETUP
ESC
This is the most important configuration of the DVR.
When you select ‘RECORD SETUP’ in the main
menu, you can see the window as shown below.
CHAP. 5 Setup
RECORD SETUP
QUALITY HIGHEST
------------------------------------REMAIN SIZE GB / GB
REMAIN TIME D-00 H-00 M-00
DEFAULT ESC
(1) QUALITY : 5 step selectable
-Highest
-High
-Normal
-Low
-Lowest
(2) REMAIN SIZE
(3) REMAIN TIME
Indicates HDD capacity remains by size (GB). / Indicates total HDD capacity (GB).
Indicates HDD capacity remains by time.
D- days, H- hours, M- Minutes
Page 26

4Ch H.264 hardware codec
-Network DVR
25
2) Schedule Setup
DVR system records in Schedule Recording mode. In Schedule Recording mode, you can choose
four different types of recording modes and schedule by 2 hour interval from Sunday to Saturday.
Default recording mode is continuous recording.
Set Recording time interval for a day of the week
(Time interval : by 2 hour ) and recording type.
: 24 hour continuous recording (Red color)
: Motion recording (Orange color)
: Alarm recording (Blue color)
: Motion & Alarm recording (Green color)
※ Each recording type is indicated in different color of boxes.
You can set up schedule by dragging the mouse. In this case, the recording type of the boxes
dragged is same as the one that you initially select. All blocks can be activated or deactivated
by using ‘ALL’ button.
※ Default setting is continuous recording.
CHAP. 5 Setup
※ Once you set up schedule record, DVR records as it is scheduled in normal times.
In emergency situation, you can click icon to make DVR record continuously.
To exit emergency recording mode and go back to scheduled recording mode, click icon.
(please see page 15)
Page 27

4Ch H.264 hardware codec
-Network DVR
26
5-4. Configuration
1) HDD Management
CONFIGURATION
HDD MANAGEMENT
CAMERA SETUP
MOTION SETUP
ALARM SETUP
INTERVAL SETUP
TIME/DATE SETUP
PASSWORD SETUP
BUZZER SETUP
ESC
When you click ‘CONFIGURATION’ on the
main menu, you can go to ‘CONFIGURATION’
menu as shown on the right.
You can see HDD Model name, serial number, number of blocks and size of HDD. You can
also clear HDD. (While you are in this HDD MANAGEMENT Mode, DVR does NOT record.)
CHAP. 5 Setup
HDD MANAGEMENT
MODEL WDC WD3200JS-60PDB0
SERIAL WD-WCAPD3768692
BLOCKS 1048576 LBA
SIZE 250 GB
SPEED PIO4
------------------------------OVERWRITE ENABLE
CLEAR ESC
MODEL : HDD MODEL NAME
SERIAL : HDD SERIAL No.
BLOCKS : HDD LBA BLOCK Number
SIZE : HDD TOTAL SIZE
SPEED : HDD MODE
OVERWRITE : ENABLE, DISABLE
What is OVERWRITE?
- When HDD is full, the oldest data in HDD is
automatically deleted as DVR records new data.
Page 28

4Ch H.264 hardware codec
-Network DVR
27
2) Time/Date Setup
3) Camera Setup
In this setup, you can select date/time of DVR
system and display format.
You can adjust values by using the mouse wheel
or left/right button of the mouse.
※ For the first time installation, date/time setup
must be completed first.
You can setup values for each camera.
(1) CHANNEL : You can select a channel which you want to change values.
(2) TITLE : You can name each camera with 8-digit number or letter combination.
Move the cursor onto a location that you want and choose numbers or letters by
using mouse wheel or left/right button of the mouse. To exit to the previous menu
mode, click ‘ESC’.
DEFAULT = CAM01___ ~ CAM03___
(3) COLOR : You can adjust color, for each camera by using the mouse.
BRIGHTNESS : Adjust brightness ( -32 ~ 31 ) [ DEFAULT = 1 ]
CONTRAST : Adjust contrast ( -32 ~ 31 ) [ DEFAULT = 7 ]
SATURATION : Adjust saturation ( -32 ~ 31 ) [ DEFAULT = 14 ]
HUE : Adjust hue ( -32 ~ 31 ) [ DEFAULT = -32 ]
(4) Executing Buttons
ALL-DEFAULT : Initializing all values for all channel as a default setting value.(CH1 ~ CH4)
DEFAULT : Initializing all values, for the applied channel, only as a default setting value.
ESC : Use to exit
DATE FORMAT : DATE(ASIAN/EUROPEAN
/AMERICAN)
HOUR FORMAT : (12H/24H)
MONTH FORMAT : (ENGLISH,NUMERIC)
CHAP. 5 Setup
TIME/DATE SETUP
DATE JUN/15/2007
TIME 15:41 :45
DATE FORMAT AMERICAN
HOUR FORMAT 24HOUR
MONTH FORMAT ENGLISH
DEFAULT ESC
CAMERA SETUP
CHANNEL CH1
TITLE CAM01___
BRIGHTNESS 1
CONTRAST 7
SATURATION 14
HUE -32
DEFAULT ALL-DEFAULT ESC
Page 29

4Ch H.264 hardware codec
-Network DVR
28
MOTION SETUP
CHANNEL
CH1
SENSITIVITY
6
DURATION
05
SIZE
2
DEFAULT ALL-DEFAULT ESC
Blocked Area (RED)
(non-motion detection area)
Non-Blocked Area
(motion detection area)
4) Motion Setup
CHAP. 5 Setup
MOTION SETUP: You can change values by mouse wheel and left/right button of the mouse.
-SENSITIVITY: Adjust sensitivity of a movement. You can adjust level 1 ~ level 7.
[DEFAULT : 6]
- DURATION : Whenever motion is detected (set in Motion Recording mode),
DVR records for a certain time from the point when motion is detected.
(2 sec.~99 sec.) [DEFAULT : 5 sec.]
- SIZE : Select the CELL SIZE for Blocked Area (RED).
(1,2,3,6, and ALL) [DEFAULT : 2]
- ALL-DEFAULT: Default setup for all channels
MOTION MASK SETUP : Set motion detection area.
- CELL : Move to the cell and then decide to make it activated or deactivated by clicking it.
W
hen the cell is activated, motion is detected. Motion is not detected on
deactivated cells.
Whenever you click a cell, it changes between activated and deactivated.
BLOCK SETUP: First, you decide ‘Activated’ or ‘Deactivated’ by clicking a cell.
Then, if the initial cell is ‘Activated’, the blocks dragged by the mouse are
also activated.
If the initial cell you select is deactivated, the blocks dragged are also deactivated.
Page 30

4Ch H.264 hardware codec
-Network DVR
29
See the switching time interval for SEQ or PIP function.
(1 sec. ~99 sec. )
SEQUENCE SCREEN :Set the sequencing switch time
interval in live full screen.
PIP SCREEN : Set the sequencing switch time interval
of PIP window.
EVENT UPDATE : Set the minimum time interval of event
to be listed on EVENT LIST.
If EVENT UPDATE time is set at 10 sec, only following event happened 10 sec
or more than 10 sec later previous event shall be listed on EVENT LIST.
INTERVAL SETUP
SEQUENCE SCREEN
PIP SCREEN
EVENT UPDATE
01 SEC
01 SEC
600 SEC
DEFAULT ESC
5) Interval Setup
6) Alarm Setup
ALRAM SETUP
CHANNEL
INPUT
DURATION
ALL-DEFAULT
CH1
DISABLE
01 SEC
DEFAULT ESC
INPUT : Select NORMAL OPEN, NORMAL CLOSE,
or DISABLE.
DISABLE represents no use of alarm sensor
connected to DVR.
DURATION : Set the duration of alarm when an ALARM
is activated. (2 sec. ~ 99 sec.)
7) Password Setup
PASSWORD SETUP
USER ID
USER PW
NEW PW
CONFIRM
ADMIN
--------
--------
--------
1 2 3 4 5 6 7 8 9
ENTER ESC
To change password, you need to click ‘USER PW’
first to activate the menu.
You must input current password and then input
new password.
And input again new password to confirm.
Set user ID and Password.
You can make up to 8-digit number combination
for a password by clicking number ‘1’ ~ ‘9’ on
password setup menu.
※ Changing the user Password in the first operation is recommended.
Number selection for password
CHAP. 5 Setup
Set type of alarm sensors connected to DVR unit.
N.O represents Normal Open type and N.C Normal
Close type.
Page 31

4Ch H.264 hardware codec
-Network DVR
30
CHAP. 5 Setup
5-5. External Device Setup
1) TCP/IP Setup
EXTERNAL DEVICE
TCP/IP SETUP
PAN/TILT SETUP
MOUSE SETUP
AUDIO SETUP
ESC
TCP/IP SETUP
IP SETUP
DDNS SETUP
ESC
Set parameters of external devices connected to
DVR like Ethernet, Mouse, etc.
If you click EXTERNAL DEVICE on the main
menu, then you will see the window shown on
the right.
8) Buzzer Setup
BUZZER SETUP
KEY TONE
VIDEO LOSS
ALARM ACTIVE
MOTION DETECT
ON
ON
ON
ON
DEFAULT ESC
You can select Buzzer OFF/ON on this setup menu.
TCP/IP function enables you to see live pictures
and recorded pictures via the Internet.
DVR LOG-IN
USER ID ADMIN
USER PW ________
1 2 3 4 5 6 7 8 9
ENTER EXIT
Please refer to 4-1. System Log in again.
Then, click ‘ENTER’.
MAIN MENU
DISPLAY SETUP
RECORD
CONFIGURATION
EXTERNAL DEVICE
BACK-UP
FIRMWARE UPGRADE
FACTORY DEFAULT
LANGUAGE ENGLISH
EXIT
Click ‘EXTERNAL DEVICE’
Page 32

4Ch H.264 hardware codec
-Network DVR
IP SETUP
MAC ADDRESS
DHCP MODE
IP PORT
IP ADDRESS
GATEWAY
SUBNET
00-0A-A2-00-FD-63
MANUAL
IP DETECT
50000
192.168.001.160
192.168.001.001
255.255.255.255
ESC
(1) IP Setup :
Shows the network information assigned to
the DVR unit. If the DHCP setup status is
AUTOMATIC, you can set the IP port only.
If the DHCP setup status is MANUAL, you
must set all parameters.
If IP port number is blocked, a network
specialist’s advice is needed.
A. Static IP
A static IP address is a number (in the form of a dotted quad) that is assigned to a computer by
an Internet service provider (ISP) to be its permanent address on the Internet.
Input IP address which is assigned by your ISP in IP CONFIG SETUP.
1) Verify if IP address is OK or not with PC before connecting DVR.
(or inquires to Internet service provider that assigned IP address, GATEWAY, SUBNET MASK)
2) Connect LAN cable to DVR after confirmation.
3) DVR : MENU → LOG IN DVR → EXTERNAL DEVICE → TCP/IP SETUP → IP SETUP .
4) Set DHCP to MANUAL.
5) Verify if MAC ADDRESS starts from 00-0A-A2….
6) Input the assigned IP address.
7) Set IP PORT. (50000 recommended)
8) Input GATEWAY (which is assigned by your ISP).
9) Input SUBNET MASK (which is assigned by your ISP).
10) Go out of MENU SETUP.
11) Turn off and on Modem (Router) which is provided by your ISP.
-> This is to reset client of MAC from your ISP.
Wait 30 seconds after turning on.
12) Access DVR with Remote Viewer Software.
See a chap.6 IRS
* If user fails to access, please verify 1,6,7,8,9,11 again.
IP SETUP
MAC ADDRESS
DHCP MODE
IP PORT
IP ADDRESS
GATEWAY
SUBNET
00-0A-A2-**-**-**
MANUAL
IP DETECT
50000
211.118.047.160
211.118.047.001
255.255.255.255
ESC
Assigned by your Internet Service Provider
PC
Internet (Static IP)
DVR
(Server)
ISP
CHAP. 5 Setup
31
Page 33

4Ch H.264 hardware codec
-Network DVR
32
* If user fails to access, please verify 1,3,4,7,8 again.
B. Dynamic IP
This contrasts with a Dynamic IP address, wherein an IP address is assigned to a computer,
usually by a remote server which is acting as a Dynamic Host Configuration Protocol server.
IP addresses assigned using DHCP may change depending on the addresses available in the set scope.
Dynamic IP Addresses assigned by Dynamic Host Configuration Protocol servers are used
because it creates effiency within a network.
If you set ‘AUTOMATIC’ for DHCP Type on TCP /IP setup menu, IP information is automatically
assigned from ISP’s DHCP.
1) Verify if IP address is OK or not with PC before connecting DVR.
(The internet connection confirmation)
2) Connect LAN cable to DVR after confirmation.
3) Turn off and on Modem ( Router ) which is provided by ISP company.
-> This is to reset client of MAC from ISP company.
Wait 30 seconds after turning on.
4) Turn off and on DVR.
5) DVR: MENU → LOG IN DVR → EXTERNAL DEVICE→TCP/IP SETUP → IP SETUP.
6) Verify if MAC ADDRESS starts from 00-0A-A2…
7) Set DHCP to AUTOMATIC and click ‘IP DETECT’.
8) Set DHCP to MANUAL
9) Go out of MENU SETUP after getting IP successfully.
10) Access DVR with Remote Viewer Software.
See a chap.6 IRS
Cable Modem
(Dynamic IP)
Internet
DVR
(Server)
LAN
PC
ISP
CHAP. 5 Setup
IP SETUP
MAC ADDRESS
DHCP MODE
IP PORT
IP ADDRESS
GATEWAY
SUBNET
00-0A-A2-**-**-**
AUTOMATIC
IP DETECT
50000
211.118.047.160
211.118.047.001
255.255.255.255
ESC
Assigned by your Internet Service Provider
IP SETUP
MAC ADDRESS
DHCP MODE
IP PORT
IP ADDRESS
GATEWAY
SUBNET
00-0A-A2-**-**-**
MANUAL
IP DETECT
50000
211.118.047.160
211.118.047.001
255.255.255.255
ESC
Page 34

4Ch H.264 hardware codec
-Network DVR
33
C. Dynamic IP of PPPoE (DSL)
DVR doesn’t support DSL (PPPoE), user will need to set NETWORK with IP SHARE in order to
access DVR remotely. At this time, user will need to port forward on DVR. Please contact IP SHARE
Manufacturer if you need to know how to forward port.
Even though the user may have a Static/Dynamic IP, if you want to use another device (PC) through
IP SHARE, set NETWORK as follows
1) Verify if IP address is OK or not with PC before connecting DVR.
(The internet connection confirmation)
2) Connect Router (IP SHARE) to DSL modem as shown the followingpicture.
3) Set the Internet connection on Router (IP SHARE). (Refer to the Router Manual).
4) Verify if sub-group of network in Router is OK or not.
5) Connect DVR to Router.
6) DVR : MENU → LOG IN DVR → EXTERNAL DEVICE →TCP/IP SETUP → IP SETUP.
7) Set DHCP to AUTOMATIC and click IP DETECT.
8) Set DHCP to MANUAL
9) Verify if MAC ADDRESS starts from 00-0A-A2….
10) Set IP PORT, (50000 recommended )
11) Go out of MENU SETUP.
12) Forward port from Router (Refer to the next page).
13) Access DVR with external IP and Port (Port forwarded).
* If Router supports DDNS, user can access Remote Viewer using Domain Information.
* If user fails to access, please verify 1,4,7,8,12 again.
DSL Modem
(Dynamic IP)
Router or
Gateway
(IP Share)
DVR
(Server)
PC
ISP
CHAP. 5 Setup
IP SETUP
MAC ADDRESS
DHCP MODE
IP PORT
IP ADDRESS
GATEWAY
SUBNET
00-0A-A2-**-**-**
AUTOMATIC
IP DETECT
50000
192.168.001.160
192.168.001.001
255.255.255.255
ESC
IP SETUP
MAC ADDRESS
DHCP MODE
IP PORT
IP ADDRESS
GATEWAY
SUBNET
00-0A-A2-**-**-**
MANUAL
IP DETECT
50000
192.168.001.160
192.168.001.001
255.255.255.255
ESC
Page 35

4Ch H.264 hardware codec
-Network DVR
34
If you are using a router, please setting up DMZ and Port Forwarding instructions below.
[How to set DMZ]
- Set DMZ as per router manual, if you want to connect a DVR by using one internet line.
- Setting procedure and name of DMZ may be various from router manufacturers.
- For more detail information, please refer to router manual.
One example of how to set DMZ is shown below.
1) Access to your router. (Please refer to router manual provided by a router manufacturer.)
2) Find ‘Applications & Gaming’ and go to ‘DMZ’.
3) Click ‘Enable’ and input IP address on ‘DMZ Host IP Address’.
4) Click ‘Save Settings’ to save.
[How to do Port Forwarding]
- Set Port Forwarding as per router manual, if you want to connect to several DVRs by using one internet line.
- Setting procedure and name of Port Forwarding may be various from router manufacturers.
- For more detail information, please refer to router manual.
One example of how to do Port Forwarding is shown below.
1) Access to your router. (Please refer to router manual provided by a router manufacturer.)
2) Find ‘Applications & Gaming’ and go to ‘Port Range Forward’ on the menu.
3) Input Port number of your DVR on ‘Start’ / ‘End’ section below.
4) Input IP Address and check ‘Enable’. Then, click ‘Save Settings’ to save.
CHAP. 5 Setup
Page 36

4Ch H.264 hardware codec
-Network DVR
D. Direct connect to DVR
DVR
(Server)
PC
When you try to connect to DVR directly, you must use DIRECT CABLE.
a. PC’s TCP/IP Setting
1. For WindowsXP/2000, Click [start] – [Control Panel] click
2. Double click [Network Connections]
CHAP. 5 Setup
35
Page 37

4Ch H.264 hardware codec
-Network DVR
36
3. Right-button click [Local Area Connection]
4. Click
‘Properties’ [General] – [Internet Protocol (TCP/IP)]
CHAP. 5 Setup
Page 38

4Ch H.264 hardware codec
-Network DVR
5. IP Address Setting
IP Address : AAA.BBB.CCC.DDD
AAA.BBB.CCC is identical with DVR’s setting
DDD with DVR’s setting is not same
Subnet mask must be 255.255.255.0
Default gateway is AAA.BBB.CCC.1
AAA.BBB.CCC is identical with HUB’s Address
DNS Server is different in the country and ISP
Supplier.
When PC does not using internet, if it does not
input, it is irrespective.
b. DVR Setting
Please reaffirm DVR setting
TCP/IP SETUP
IP SETUP
DDNS SETUP
ESC
Setting example
37
EXTERNAL DEVICE
TCP/IP SETUP
PAN/TILT SETUP
MOUSE SETUP
AUDIO SETUP
ESC
IP SETUP
MAC ADDRESS
DHCP MODE
IP PORT
IP ADDRESS
GATEWAY
SUBNET
00-0A-A2-00-FD-63
MANUAL
IP DETECT
50000
192.168.001.160
192.168.001.001
255.255.255.255
ESC
CHAP. 5 Setup
Page 39

4Ch H.264 hardware codec
-Network DVR
DDNS SETUP
DDNS ENABLE OFF
DNS SERVER 192.168.063.001
INTERVAL D-00 H-00 N-20
REGISTER
DDNS STATUS
IP ADDRESS
IP PORT
REMAIN TIME
LAST REGISTRATION DATE
ESC
(2) DDNS Setup :
Please refer to CH.8 DDNS Setup
for more information.
Refer to CH7-2 DDNS set up in DVR on page 53.
CHAP. 5 Setup
38
Page 40

4Ch H.264 hardware codec
-Network DVR
(1) CHANNEL : Selects channel
(2) MODEL : Selects camera model (protocol type) per each channel
(3) PTZ ID : Selects PTZ ID (per each channel)
(4) BAUDRATE : Selects data transmission speed
(5) CMD DELAY : Selects command delay time
3) Mouse Setup
If you increase sensitivity, mouse cursor
moves fast.
MOUSE SETUP
SENSITIVITY 3
DEFAULT ESC
AUDIO SETUP
CHANNEL CH1
INPUT VOLUME 00
OUTPUT VOLUME 00
DEFAULT ESC
4) Audio Setup
If you select a channel, the audio of the selected
channel is recorded.
(1) CHANNEL : By selecting a channel, you can set
audio recording ON/OFF.
(2) INPUT VOLUME : Volume setup for microphone
(3) OUTPUT VOLUME : Volume setup for speaker
2) Pan/Tilt Setup
PAN/TILT SETUP
COMMAND SETUP
SPEED SETUP
ESC
COMMAND SETUP
CHANNEL
MODEL
PTZ ID
BAUDRATE
CMD DELAY
COMMAND
LENGTH
CODE
DEFAULT
01
PELCO-D
000
002400 BPS
1 MSEC
PAN/TILT STOP
16
00 00 00 00
00 00 00 00
00 00 00 00
00 00 00 00
ALL-DEFAULT ESC
PAN/TILT SETUP
PAN SPEED 7
TILT SPEED 7
ZOOM SPEED 7
DEFAULT ESC
Å PTZ Camera setup
Å PTZ Speed setup
CHAP. 5 Setup
5) Spot Setup
SWITCHING INTERVAL 01 SEC
ALARM POPUP ON
MOTION POPUP ON
EVENT POPUP DURATION 05 SEC
DEFAULT ESC
SPOT SETUP
39
If events (MOTION or ALARM) happen on several channels at the same time, channel No. 1 has the
first priority to pop up. For example, if events happen on channel No. 1, channel No. 2, and
channel No. 4 at the same time, channel No. 1 pops up. If the motion disappears on channel No. 1,
then channel No. 2 pops up for the time duration that you set. However, even though motion
happens on channel No. 1 again within the duration, channel No. 2 still displays. If motion on
channel No.1 keeps on going even after the duration, channel No. 1 pops up again.
※ EVENT POP-UP DURATION
(1) SWITCHING INTERVAL
Channel switching time (01 sec. ~ 99 sec.)
(2) ALARM POP-UP
When ALARM is detected, the image of channel
connected with Alarm sensor pops up.
Set ALARM detection pop-up (ON/OFF)
(3) MOTION POP-UP
Set MOTION detection pop-up (ON/OFF)
Page 41

4Ch H.264 hardware codec
-Network DVR
40
5-6. Firmware Upgrade
When it comes to firmware upgrade, you may ask your local dealer.
5-7. Factory Default
Factory default setting initializes DVR system.
Select categories below that you want to initialize and choose ON. Then, click ‘Default’ button.
In order to initialize all of the categories below, choose ON for ‘ALL’. Then, click ‘Default’ button.
Please refer to CH.4-2 Factory default again. (see page14)
FACTORY DEFAULT
ALL OFF
--------------------------------DISPLAY SETUP OFF
RECORD SETUP OFF
SCHEDULE SETUP OFF
CAMERA SETUP OFF
CONFIGURATION OFF
EXTERNAL DEVICE OFF
DEFAULT ESC
CHAP. 5 Setup
FIRMWARE UPGRADE
CURRENT VER 9046 / V 0.35_08
UPGRADE VER
CHECH USB UPGRADE ESC
FW1 Version
FW2 Version
Page 42

4Ch H.264 hardware codec
-Network DVR
41
CHAP 6. IRS
CHAP 6. IRS (Integrated Remote Station)
MAIN INTERFACE
IRS SETUP Inputs information for IRS network connection.
DVR SETUP Changes DVR setting over a network.
VIEWER Enables to show live image display.
SEARCH Enables to search and show recorded image display.
BACKUP Enables to back up recorded images in DVR to your PC.
PLAYER Enables to play the backup images on your PC. (AM4 file)
Exit
※ Interface and functions of IRS are subject to change without prior notice.
Page 43

4Ch H.264 hardware codec
-Network DVR
42
CHAP 6. IRS
MANUAL Select “Manual” to input IP address and port number manually.
DDNS Select “DDNS” to use IP address and port number that you already registered in DDNS
server. (For more information about DDNS, please refer to page 54~59.)
MEMBER ID Input member ID that you registered in DDNS server.
NAME Input DVR name that you registered in DDNS server.
ADDRESS Input IP address manually.
PORT Input port number manually.
LOGIN
ID Input DVR ID which has been set in DVR already. (Input ‘admin’.)
Password Input password of DVR.
6-1. IRS Setup
※ Interface and functions of IRS are subject to change without prior notice.
Page 44
4Ch H.264 hardware codec
-Network DVR
43
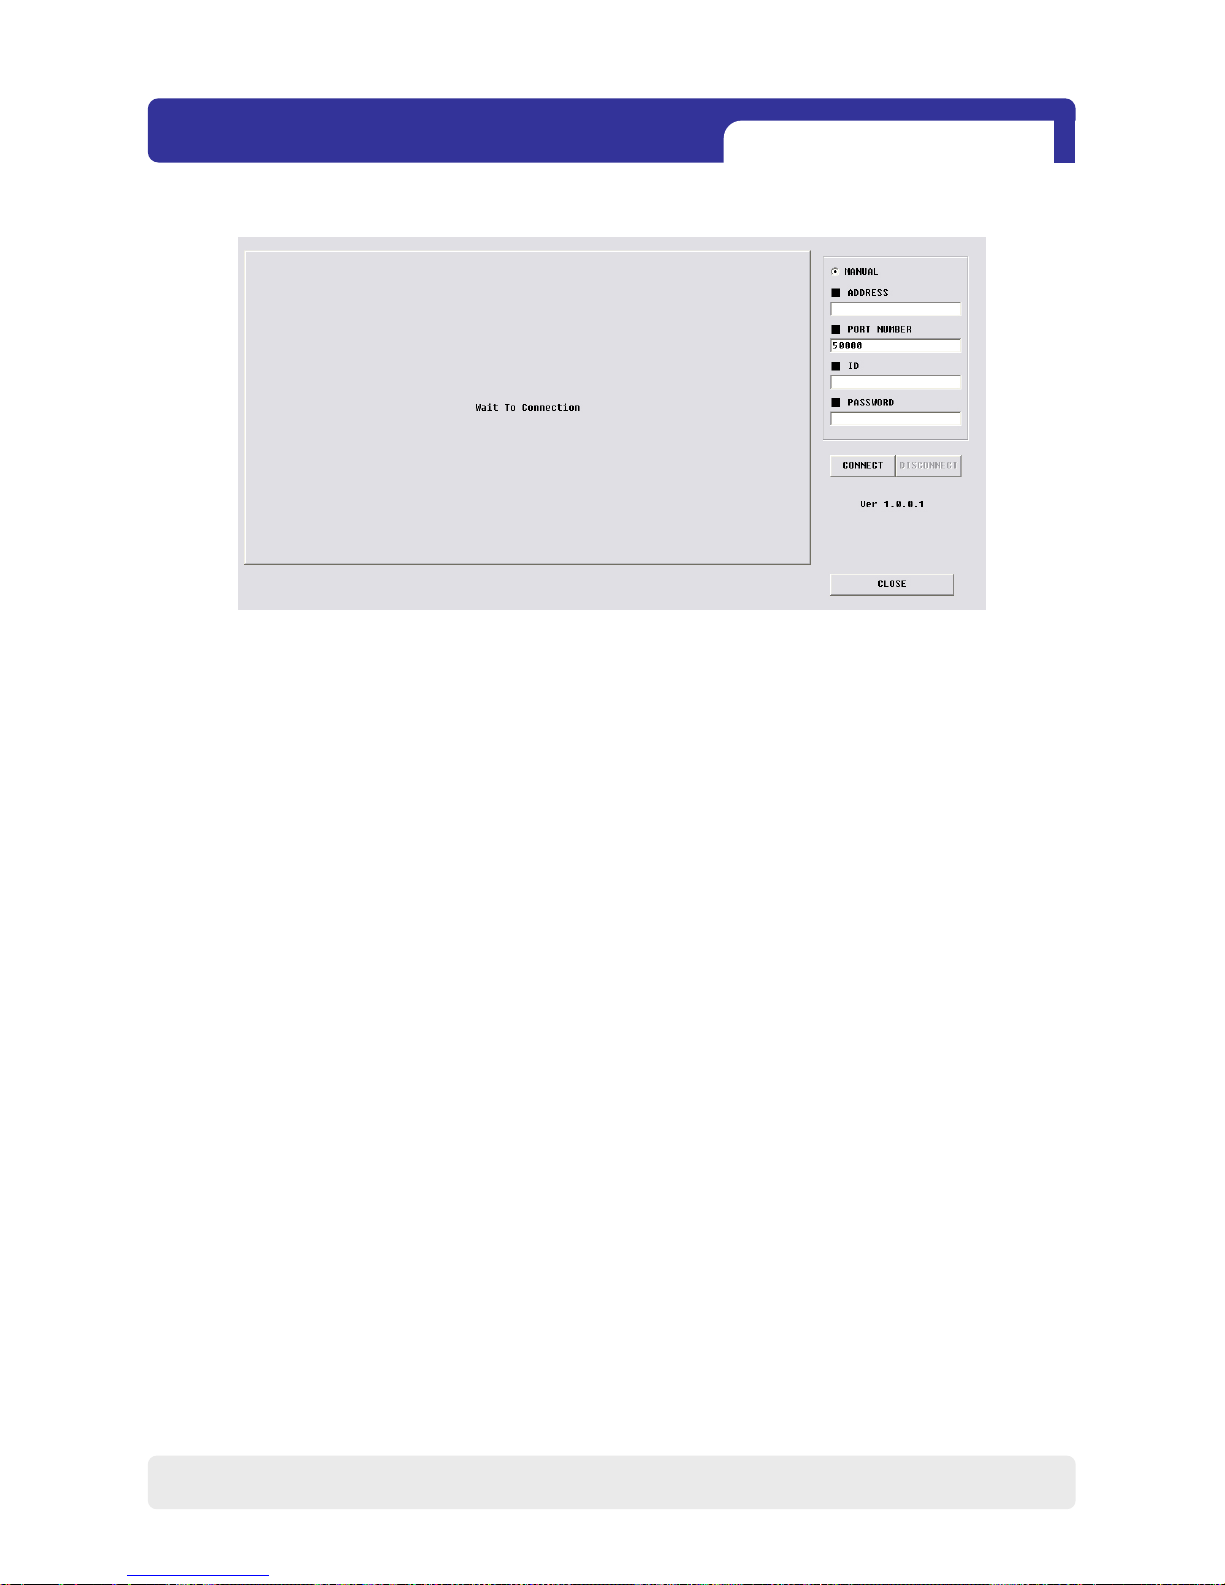
CHAP 6. IRS
You can change some settings of DVR listed below over a network.
(Alarm, Buzzer, Interval, Record Configuration, Record Schedule,Audio)
MANUAL Input IP address and port number of DVR manually.
ADDRESS Input IP address of DVR manually.
PORT NUMBER Input port number of DVR manually.
LOGIN
ID Input DVR ID which has been set in DVR already. (Input ‘admin’.)
PASSWORD Input password of DVR.
CLOSE Click “CLOSE” to exit.
6-2. DVR Setup
※ Interface and functions of IRS are subject to change without prior notice.
Page 45

4Ch H.264 hardware codec
-Network DVR
44
CHAP 6. IRS
1
2
3
4
DVR connection setup : Input network information to connect.
(IP / PORT / ID / PW)
System information : Displays connection status and operating information.
Screen display
a) SCREEN DIVISION : Selects full screen mode or 4-split mode
b) CHANNEL : Displays full screen for each channel.
Audio : Set Audio ON/OFF.
PTZ control : Controls PTZ camera remotely.
(In order to control PTZ camera, PTZ setting in DVR must be completed in advance.)
Network connection
a) CONNECT : Click this button to connect to DVR & see live view over a network.
b) DISCONNECT : Click this button to disconnect.
6-3. Viewer
5
※ Interface and functions of Viewer are subject to change without prior notice.
1
2
5
6
3
4
6
Page 46

4Ch H.264 hardware codec
-Network DVR
45
CHAP 6. IRS
6-4. Search
1
2
3
4
5
6
7
8
DVR connection setup : Input network information to connect.
(IP / PORT / ID / PW)
Screen display
a) SCREEN DIVISION : Selects full screen mode or 4-split mode
b) CHANNEL : Displays full screen for each channel.
System information : Displays connection status and operating information.
Recorded data display : Displays start time & end time of recorded data.
Network connection
a) CONNECT : Click this button to connect to DVR & see live view over a network.
b) DISCONNECT : Click this button to disconnect.
Search time : Input time and date to search images.
Operation buttons
a) Fast backward playback
b) Backward playback
c) Pause
d) Forward playback
e) Fast forward playback
Search bar : Enables to search recorded data by using this bar.
※ Interface and functions of Search are subject to change without prior notice.
a b c d
e
1
2
3
7
6
4
5
8
Page 47

4Ch H.264 hardware codec
-Network DVR
CHAP 6. IRS
6-5. Backup
46
1) To execute BACKUP, input IP Address & Port and click ‘Connect Test’ button.
2) After Connect Test is done, you can see ‘Success Connect Test!’ message. Then, click ‘lock’
button and click ‘Set Backup Time’ button.
※ Interface and functions of Backup are subject to change without prior notice.
Page 48

4Ch H.264 hardware codec
-Network DVR
47
CHAP 6. IRS
3) Now you set ‘Start Backup Time’, ‘End Backup Time’, ‘Save File Path’,
‘File Size’ and click ‘Apply’.
4) After finishing time setting, click ‘Start Backup’ to start backup. Then, you can see the backup
file on the path that you chose.
※ Interface and functions of Backup are subject to change without prior notice.
Page 49

4Ch H.264 hardware codec
-Network DVR
48
CHAP 6. IRS
6-6. Player
Time display : Displays current time.
Recorded data display : Displays start time & end time of recorded data.
Also, displays operating status during playback.
Screen display
a) SCREEN DIVISION : Selects full screen mode or 4-split mode
b) CHANNEL : Displays full screen for each channel.
Audio : set Audio ON/OFF
Operation buttons I
a) OPEN : Selects backup AM4 file.
b) EDIT : Enables to edit backup image, save and print.
*Edit function is available when one channel is selected.
d) AVI SAVE : Save backup images in AVI file format.
**AVI save function is available when one channel is selected.
c) EXIT : Ends backup player.
Operation buttons II: Search for recorded data.
a) Go to the beginning of recorded data and play.
b) Fast backward playback
c) Backward playback
d) Pause
e) Forward playback
f) Fast forward playback
g) Go to the end of recorded data and play.
Playback speed setting button : Able to adjust playback speed by using upper/ lower buttons.
DELAY : Adjusts playback interval. The higher, the slower. (1, 2, 4, 8, 16, 32)
Play bar : Enables to search recorded data by using this bar.
1
2
3
4
5
6
7
※ Interface and functions of Player are subject to change without prior notice.
1
2
3
68
a b c d ge f
5
7 4
8
Page 50

4Ch H.264 hardware codec
-Network DVR
49
CHAP 6. IRS
Image EDIT
1
2
Click “EDIT” to go to image edit mode.
EDIT TOOL : User can adjust color tone of copied images using this buttons.
-Contrast
: make bright part of image brighter and dart part of image darker
: To reduce light and shade, lower contrast a little.
-Brightness
: make an image brighter
: make an image darker
-Sharpness
: gives sharp-edge effect
-Blur
: make an image soft
- Operation buttons
: saves data in JPEG file format.
It is saved in the folder where player is installed. (
‘C:\WEB_BACKUP’)
: User can print current image selected.
EDIT : Return to player mode.
※ Interface and functions of Edit are subject to change without prior notice.
2
1
Page 51

4Ch H.264 hardware codec
-Network DVR
50
CHAP 6. IRS
AVI SAVE
1
2
OPTION : Used to save data in AVI file format.
- CHANNEL : Selects channel
- FRAMERATE : Decides frames per second of data to be saved.
- SIZE : Decides the size of data to be saved automatically.
- START : Starts saving
- STOP : Stops saving. Once it is stopped, ‘C:₩WEB_BACKUP’ folder is opened automatically.
AVI SAVE : Opens ‘Option’ setting to start AVI saving.
Closes ‘Option’ setting after finishing AVI saving and go back to player mode.
Click “AVI SAVE” to go to AVI saving mode.
※ Interface and functions of AVI SAVE are subject to change without prior notice.
2
1
Page 52

4Ch H.264 hardware codec
-Network DVR
51
7-1. Registering DVR for DDNS (DDNS Web-server)
1) Please access www.h264ip.com
and click Register Member ID.
2) Please click ‘DVR Add’ or ‘MY DVR Register’ to register DVR.
CHAP 7. DDNS Web-server
CHAP 7. DDNS Web-server
※ Interface and functions of DDNS service are subject to change without prior notice.
Page 53

4Ch H.264 hardware codec
-Network DVR
52
3) Please click confirm after inputting DVR information (DVR Name and MAC Address only). Then,
Click “Confirm” button.
4) Now, DVR is listed on DDNS web server without IP and Port number.
CHAP 7. DDNS Web-server
※ Interface and functions of DDNS service are subject to change without prior notice.
Page 54

4Ch H.264 hardware codec
-Network DVR
53
7-2. DDNS set up in DVR
* The following setting is a sample for a cable modem connected to DVR directly.
1) Go to Menu
2) Go to IP SETUP menu, if you set DHCP AUTOMATIC then it detects IP address automatically.
3) Go to the previous menu and click DDNS SETUP.
IP SETUP
MAC ADDRESS 00-0A-A2-00-00-00
DHCP MODE AUTOMATIC
IP PORT 50000
IP ADDRESS 192 168 001 160
GATEWAY 192 168 001 001
SUBNET 255 255 255 000
DEFAULT ESC
TCP/IP SETUP
IP SETUP
DDNS SETUP
DDNS SETUP
CONNECTION SETUP
ESC
CHAP 7. DDNS Web-server
Page 55

4Ch H.264 hardware codec
-Network DVR
54
4) Set DDNS ON/OFF ‘ON’.
IP address which is assigned from DHCP server is automatically input on DNS SERVER.
5) Go down to REGISTER and push ENTER button to renew IP registered on DDNS SERVER.
( Interval : connection interval time between DVR and DDNS SERVER)
D = Day, H = Hour, M = Minute
CHAP 7. DDNS Web-server
DDNS SETUP
DDNS ENABLE ON
DNS SERVER 168.126.063.001
INTERVAL D-00 H-00 M-20
REGISTER
DDNS STATUS REGISTER OK
IP ADDRESS 192.168.001.160
IP PORT 50000
REMAIN TIME D-00 H-00 M-20
LAST REGISTRATION DATE
> WED. 12 JUL 2006 09 : 21 : 36 GMT
ESC
DDNS SETUP
DDNS ENABLE ON
DNS SERVER 168.126.063.001
INTERVAL D-00 H-00 M-20
REGISTER
DDNS STATUS REGISTER OK
IP ADDRESS 192.168.001.160
IP PORT 50000
REMAIN TIME D-00 H-00 M-20
LAST REGISTRATION DATE
> WED. 12 JUL 2006 09 : 21 : 36 GMT
SUCCESS TO REGISTER DVR INFO
ESC
FAIL TO COMMUNICATE WITH DDNS SERVER :
(In this case, check out whether DNS server IP address is 168.126.063.001. If the IP address is same,
please try another DNS server IP address provided by your ISP.)
FAIL TO REGISTER DVR INFO :
(In this case, please check out whether you registered your DVR in www.h264ip.com. And also check
out your MAC address in your DVR is same as the one that has been registered in www.h264ip.com. )
<DDNS error messages>
<DDNS status messages>
Page 56

4Ch H.264 hardware codec
-Network DVR
55
6) Go to your computer again after you see “SUCCESS TO REGISTER DVR INFO” and then
Click ‘refresh’ button. Then, DDNS server automatically catches your DVR’s IP address and
Port number.
Note.
Before using Web-Viewer, please add www.h264ip.com
on Trusted Sites at first installation as follows.
(Tools -> Internet Options -> Security)
①
②
CHAP 7. DDNS Web-server
※ Interface and functions of DDNS service are subject to change without prior notice.
Page 57

4Ch H.264 hardware codec
-Network DVR
56
⑤
④③
⑥
Leave this check box empty
Click
⑦
www.h264ip.com
CHAP 7. DDNS Web-server
Page 58

4Ch H.264 hardware codec
-Network DVR
7-3. Web program
CHAP 7. DDNS Web-server
57
Some functions of IRS (Integrated Remote Station) such as Viewer, Search, Backup and
Player are also available on the web.
*If ActiveX control installation is required for the first time access, please click ‘Yes’.
Click these icons, then it connects to DVR
automatically via DDNS server.
Click and input information needed for
internet connection to DVR manually.
These functions such as Viewer, Search, Backup and Player are same as the ones in IRS.
(Please refer to ‘Chap 7. IRS’ section from page 47 to 51.)
DVR Setup Enables to setup DVR remotely.
Viewer Enables to show live image display.
Search Enables to search and show recorded image display.
Backup Enables to back up recorded images in DVR to your PC.
Player Enables to play the backup images on your PC. (AM4 file)
※ Interface and functions of DDNS service are subject to change without prior notice.
Page 59

4Ch H.264 hardware codec
-Network DVR
58
• H.264 Hardware Codec
• Real time live display in all channels
• Triplex ( Playback / Recording / Ethernet )
• Web monitoring
• Easy control by Mouse
• USB memory stick for data backup.
• Easy PTZ Camera (MOUSE)
• Password protection
• Multi-language support
CHAP. 8 Specifications
Multiplex function
Triplex ( Playback / Recording / Ethernet )
Storage Capacity Internal HDD 1 SATA HDD (no limit in capacity of HDD)
Video Inputs 4Ch
Output
Compression H.264 Hardware codec
Compression Rate
5 step selectable
Live Display Speed Real Time Live Display
Recording Mode Schedule Record (Continuous/Motion/Alarm)
Search Event Search, Date/time Search, Percent Search
Recording Speed (NTSC/PAL) Max. 120FPS(NTSC) 100FPS(PAL)
Recording Resolution CIF (352x240/352x288)
Switching Interval 1~99 Sec selectable
Live View Display Full screen / 4-Split
Digital Zoom, PIP, Freeze, Sequence in live mode
Alarm Inputs 4 Alarm (NO/NC Selectable )
Outputs 1 ( NO / NC )
Post Alarm Alarm output duration : 2 ~ 99 Sec selectable
Network Ethernet (TCP/IP)
Web Solution (DDNS) : DVR Setup, Viewer, Backup, Search
Backup USB Memory Stick / Download via IP Network
PTZ Control Via RS-485
Firmware upgrade Via USB
Power Requirements
Weight
Dimensions (W x H x D) mm
Design and specifications are subjected to change without notice.
CHAP 8. Specifications
USB
NETWORK DVR
POWER HDD ACTIVE
DC 12V 3.33A Adaptor
2kg
370 X 260 X 62
Audio Recording
1 Ch Input / 1 Ch Output
Operation
P/S2 mouse, network
Composite
2Ch (Monitor, SPOT)
Recording /
Search
Language
English, Spanish, French, Italian, German, Russian, Japanese, Chinese
To be added more
Motion Area
30x24
Page 60

4Ch H.264 hardware codec
-Network DVR
59
Select Ch. / Input number
Input number
Control Icon On/Off
Emergency Record On/Off
Go back to beginning
Backward playback
Forward playback
Go back to the end
Fast backward playback
Pause
Stop
Fast forward playback
SEQ mode
FRZ mode
PIP mode
ZOOM mode
I◀
◀
▶
▶I
◀◀
II
■
▶▶
SEQ
FRZ
PIP
ZOOM
1~4
5~9,0
FUNC
ESC
AUDIO Output Mute On/Off
4-split display
Cursor / Menu / PTZ direction
Enter / Increase values
Switching channels
Increase or decrease values
PTZ ZOOM In/Out
Audio Output Volume
AUDIO
MODE
▲◀▶▼
OK
CH + / -
+ / -
PTZ On/Off
Search Menu
Menu On/Off
PTZ
SEARCH
MENU
CHAP 10. Remote Controller
CHAP. 9 Remote Controller
No function
Page 61

4Ch H.264 hardware codec
-Network DVR
60
MEMO :
Page 62

4Ch H.264 hardware codec
-Network DVR
61
MEMO :
Page 63

4Ch H.264 hardware codec
-Network DVR
62
MEMO :
Page 64

4Ch H.264 hardware codec
-Network DVR
63
MEMO :
Page 65

4Ch H.264 hardware codec
-Network DVR
64
4Ch H.264 Hardware Codec – Network DVR
 Loading...