

Page 1

PRO TWIN DELUXE 14
PRO TWIN DELUXE 18
OPERATING & MAINTENANCE
INTRODUCTION INSTRUCTIONS
READ THIS BOOK
This operator’s book has important information for the use
and safe operation of this machine. Read this book carefully before starting the machine. Keep this book and tell
all operators to read the book. If you do not follow the
instructions, you can cause an injury or damage equipment,
furniture or buildings.
The contents of this manual are based on the latest product
information available at the time of publication. Triple S
reserves the right to make changes or improvements to its
machines without notice.
For additional information refer to the Triple S website
www.triple-s.com or write to:
Triple S
2 Executive Park Drive
Billerica, MA 01862
Carefully inspect all components to ensure that there is no
concealed freight damage. If such damage is discovered,
file a “CONCEALED DAMAGE REPORT” immediately
with the delivering carrier.
FOR YOUR CONVENIENCE, RECORD THIS
IMPORTANT INFORMATION:
MODEL_______________________________
SERIAL NUMBER______________________
PART NUMBER ________________________
DATE PURCHASED ____________________
Page 2
IMPORTANT SAFETY INSTRUCTIONS
READ AND UNDERSTAND ALL WARNINGS AND INSTRUCTIONS
BEFORE USING THIS APPLIANCE!
WARNING! To reduce the risk of fire, electric shock, or injury:
1. Do not leave appliance when plugged in. Unplug from outlet when not in use and before servicing.
2. Do not use outdoors or on wet surfaces.
3. Do not allow to be used as a toy. Close attention is necessary when used by or near children.
4. Use only as described in this manual. Use only manufacturer’s attachments.
5. Do not use with damaged cord or plug. If appliance should not work as it should, has been dropped or damaged, left outdoors,
or dropped into water, return it to service center.
6. Do not pull or carry by cord, use cord as handle, close a door on cord or pull cord around sharp edges or corners. Do not
run appliance over cord. Keep cord away from heated surfaces.
7. Do not unplug by pulling on cord. To unplug, grasp the plug, not the cord.
8. Do not handle plug or appliance with wet hands.
9. Do not put any objects into opening. Do not use with any opening blocked: keep free of dust, lint, hair and anything that
may reduce airflow.
10. Keep hair, loose clothing, fingers and all parts of the body away from openings and moving parts.
11. Turn off all controls before unplugging.
12. Use extra care when cleaning on stairs.
13. Do not use to pick up flammable or combustible liquids such as gasoline or use in areas where they may be present.
14. Connect to a properly grounded outlet only.
15. Do not pick up anything that is burning or smoking, such as cigarettes, matches or hot ashes.
16. Do not use without dust bag and/or filters in place.
17. Do not use this vacuum for pick-up of wet debris; this vacuum is for dry pick-up only.
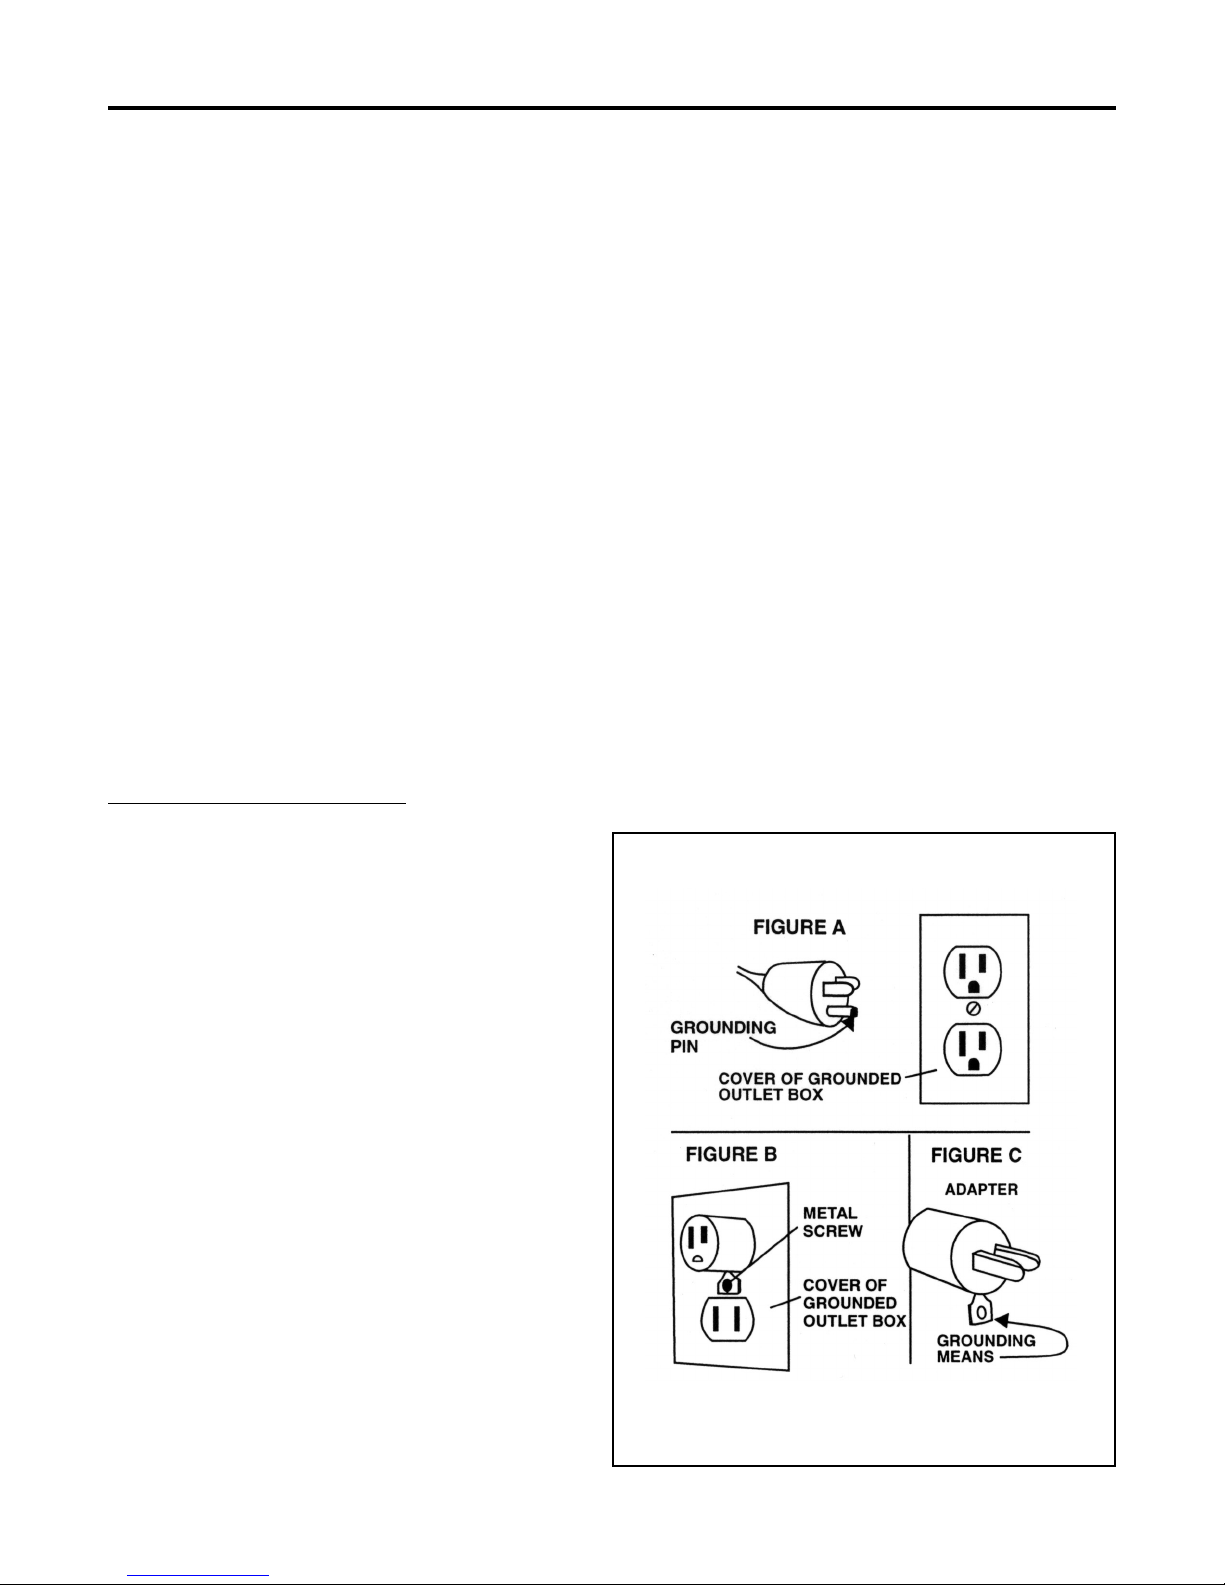
Grounding Instructions
This machine must be grounded. If it should malfunction or break down,
grounding provides a path of least resistance for electric current to reduce
the risk of electric shock. This machine is equipped with a cord having an
equipment-grounding conductor and grounding plug. The plug must be
inserted into an appropriate outlet that is properly installed and grounded
in accordance with all local codes and ordinances.
WARNING - Improper connection of the equipment-grounding conductor
can result in a risk of electric shock. Check with a qualified electrician
or service person if you are in doubt as to whether the outlet is properly
grounded. Do not modify the plug provided with the machine - if it will not
fit the outlet, have a proper outlet installed by a qualified electrician.
This machine is for use on a nominal 120-volt circuit, and has a grounded
plug that looks like the plug illustrated in figure A. A temporary adapter
that looks like the adapter illustrated in figures B and C may be used to
connect this plug to a 2-pole receptacle as shown in figure B if a properly
grounded outlet is not available. The temporary adapter should be used only
until a properly grounded outlet (figure A) can be installed by a qualified
electrician. The green colored rigid ear, lug, or the like extending from
the adapter must be connected to a permanent ground such as a properly
grounded outlet box cover. Whenever the adapter is used, it must be held
in place by a metal screw.
NOTE: In Canada, the use of a temporary adapter is not permitted by the
Canadian Electrical Code
EXTENSION CORDS
Use only three-wire 16/3 or larger gauge approved extension cords that have
three-prong grounding type plugs and three-pole receptacles that accept the
appliance’s plug. Replace or repair any damaged cords or plugs.
When servicing, refer to authorized person only. Use only identical
replacement parts.
NOTE: Do not use adapters shown in figures B & C in Canada
2
Page 3

OPERATING PROCEDURES
WARNING! For the safe operation of this machine
follow the instructions given in this booklet and the
training given by your supervisor. Failure to do
so can result in personal injury and/or damage to
machine and property!
DO NOT OPERATE MACHINE IN AN EXPLOSIVE ENVIRONMENT!
WARNING! NEVER USE THIS MACHINE
TO PICK UP VOLATILE OR EXPLOSIVE
MATERIALS.
WARNING! DO NOT PICK UP WET
MATERIAL WITH THIS MACHINE.
The model shown in this manual is intended for commercial
use and for vacuuming dry material only.
ASSEMBLY
OPERATION AS AN UPRIGHT VACUUM
1. Properly install the filter bag in the vacuum: Depress
the two white buttons on the back of the vacuum housing
door (Drawing 1, Item 8), then swing it up and open. Place
the bag into the opening with the notched portion next to
the handle tube.
2. Plug the machine’s power cable into a properly
grounded outlet (see Safety Instructions).
3. Adjust the brush height to suit the thickness of the
carpet. The adjustment ranges from positions 1 through 4:
Position 1 for very low pile carpet and Position 4 for very
high pile carpet. Adjust the height adjustment knob (Drawing 2, Item 39) to the lowest number position that results in
the green light being on and the red light off (reference the
“Electronic Power Brush Monitor” section).
4. Depress the foot pedal to lower the handle to the
operating position.
5. Turn ON the switch-the vacuum and brush motors will
start. Begin your DRY pick up vacuuming.
To prepare the machine for operation, make sure it is of
correct voltage and properly assembled. If in doubt, ask
your supervisor.
1. Place the brush head on a flat surface and latch the
swivel neck into the upright and locked position.
2. Turn the knob (Drawing 1, Item 57) located on tank
assembly counterclockwise to the right. Insert the tank
assembly over the projection ears on the lower unit while
keeping the tank in the vertical position. Return the knob
to the locked position by turning it clockwise.
3. Attach the flexible hose to the vacuum tank. The long
rigid portion of the flexible hose should be inserted into the
lower portion of the vacuum tank assembly.
OPERATION with ACCESSORIES
1. Properly install the filter bag in the vacuum.
2. Plug the machine’s power cable into a properly grounded outlet.
3. Remove the rigid portion of the flexible hose from the
lower portion of the vacuum. The brush motor will automatically stop when the hose is removed.
4. Attach the crevice or dusting tool to the wand, turn the
vacuum ON and begin.
5. Upon completion, reinsert the rigid portion of the hose
into its’ retaining hole.
3
Page 4

MAINTENANCE
ALWAYS turn the machine power switch OFF
and unplug the machine before performing any
service. Severe personal injury could result if
electrical power is not disconnected.
AFTER EACH USE:
1. Inspect the vacuum filter bag. If the bag is full or
damaged install a new one.
2. Check the cord and plug for nicks, cuts or damage.
Report these to your supervisor for correction. Wrap
the electrical cord on the hook provided.
3. Store the vacuum in a clean dry area.
FULL BAG INDICATOR
Your machine is equipped with a device that senses when
airflow inside the vacuum chamber is restricted. The red
light located next to the on/off switch will come on when
this condition exists. Restricted airflow can be caused by
the following conditions:
A. If vacuum filter bag is full; install a new bag.
VACUUM INLET FILTER
This machine has a vacuum inlet filter (Drawing 1, Item 69)
that will require periodic cleaning or replacement. The filter
is located below the paper bag cage in the housing.
To clean: Remove the filter and shake or vacuum it. If the
filter is worn or uncleanable, replace.
HEPA FILTER
The HEPA filter (Drawing 1, Item 49) will also require
periodic cleaning or replacement.
To clean: Unlatch the cover (Drawing 1, Item 50) to access
the HEPA filter, remove the filter and shake or vacuum it.
If the filter is worn or uncleanable, replace.
BRUSH STRIP REPLACEMENT
This machine has a removable brush strip. Replace it if it
becomes worn to the point where it no longer contacts the
carpet. To replace: First remove the three (3) screws that
hold the access plate on the bottom of the brush housing.
Once the brush roller is exposed, remove the R.H. Support.
The brush strip can now slide off - remove and replace
with a new one. Be sure the strip is pushed all the way in.
Reassemble.
B. If the bag is not full, there is an obstruction in the
system. Remove the vacuum hose and hold it up to the light;
clean out any debris. Next, check the inlet to the power
brush housing and clear it of any debris.
ELECTRONIC POWER BRUSH MONITOR
The machine is equipped with a control system that alerts
the operator via indicator lights if a problem ooccurs within
the power brush housing. The lighting conditions and what
they mean are:
A. Green Light Illuminated & Red Light Off - The brush
assembly is working properly.
B. Both Red & Green Lights Illuminated - Lower the
brush, the drive belt may be broken, or change the brush
strip.
C. Red Light Illuminated & Green Light Off - The brush
roller is obstructed and cannot rotate. Turn the power switch
off and unplug the machine. Remove any string, debris or
other obstruction so that the brush turns freely.
VACUUM MOTOR MAINTENANCE
Have the vacuum motor inspected annually by a Factory
Authorized Service Technician. If the carbon brushes are
worn, they should be replaced. This service will prolong
the life of the vacuum motor.
The replacement of belts and other repairs to the machine
should be performed by a Factory Authorized Service
Technician.
4
Page 5

NOTES
5
Page 6
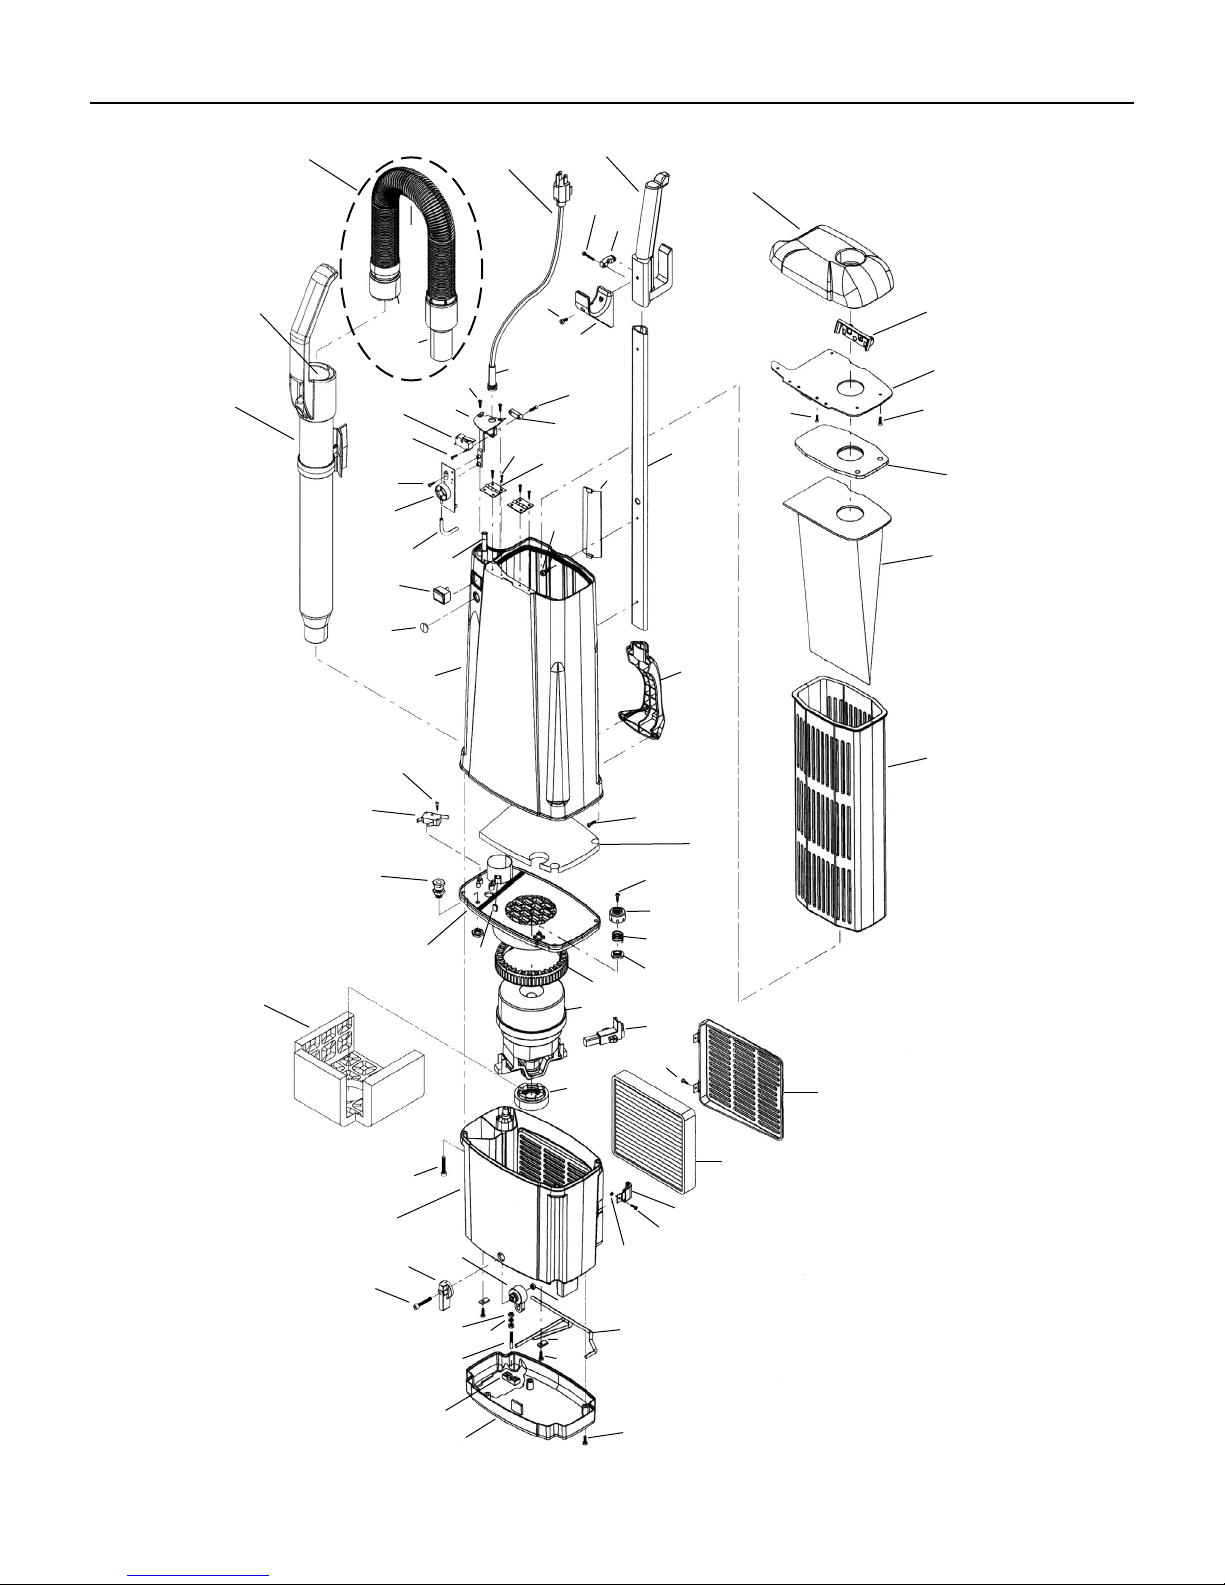
TANK & VACUUM ASSEMBLY
15
15a
1
73
72
71
18
21
22
23
24
75
76
30
31
32
2
16
17
25
3
33
8
9
10
12
11
68
13
4
5
6
7
20
19
26
29
27
28
48
35
56
36
34
55
54
57
37
58
59
60
38
74
61
63
64
47
45
44
14
39
69
40
41
42
43
46
70
50
49
51
52
53
62
65
66
67
6
Page 7
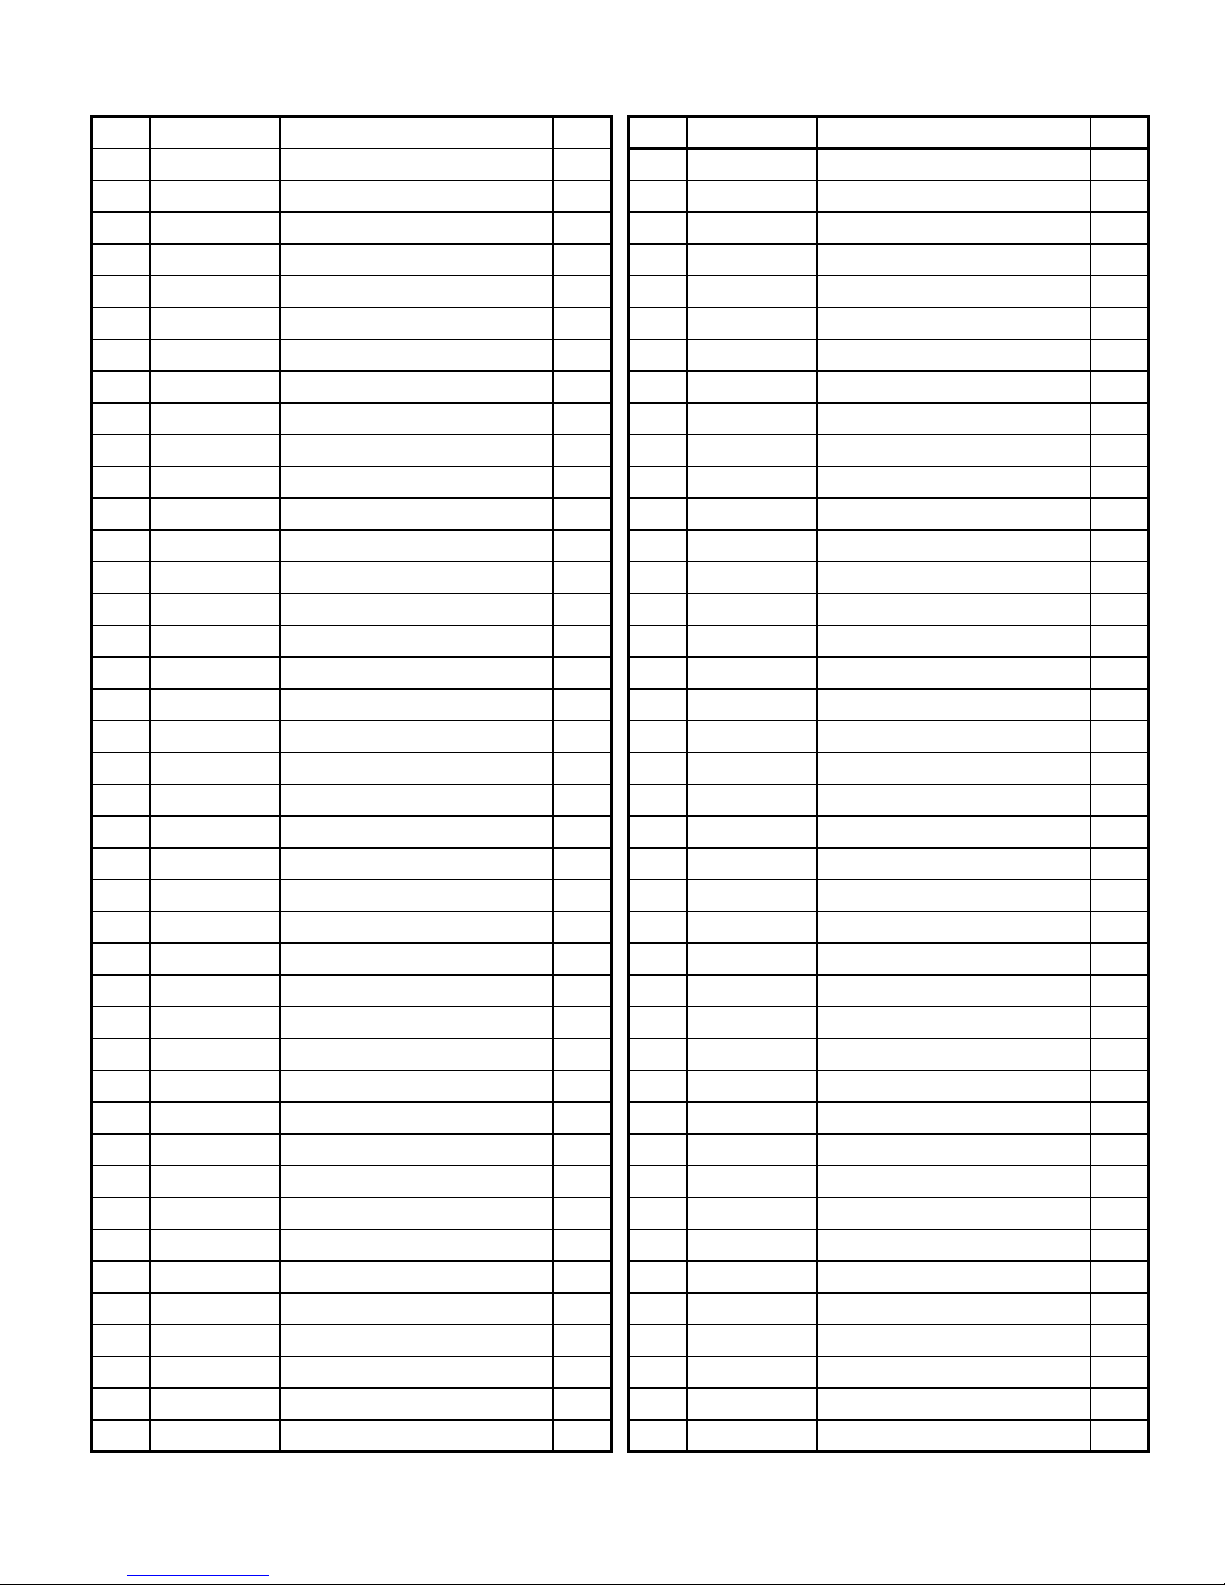
PARTS LIST - TANK & VACUUM ASSEMBLY
ITEM PART NO. DESCRIPTION QTY. ITEM PART NO. DESCRIPTION QTY.
1 644120 Hose Assembly 1 40 964138 Self-Threading Screw 3, 9x13 1
2 908099 Electric Cable 1 41 642302 Safety Valve Cover 1
3 643920 Handle Grip 1 42 648301 Safety Valve Cover Spring 1
4 964152 Screw M3x20 2 43 649401 Safety Valve 1
5 607210 Cable Clamp 1 44 643403 Vacuum Motor Gasket 1
6 964153 Screw M4x12 1 45 625201 Vacuum Motor 115V -
7 648520 Suction Hose Support 1 645208 Vacuum Motor, 115V 1
8 642320 Top Cover 1 46 620904 Carbon Brush for 625201VacMtr 2
9 648320 Closing Cover Spring 1 640910 CarbonBrush-645208 VacMtr 2
10 646620 Closing Cover Plate 1 (Brown Holder)
11 964154 Self-Threading Screw 3, 5x16 4 47 643401 Rubber Gasket 1
12 964155 Self-Threading Screw 2, 9x13 4 48 644820 Sound Insulation 1
13 640620 Paper Bag, 10 Pack 1 49 643320 HEPA Filter 1
640623 Cloth Bag 643307 Foam Filter 1
14 642420 Paper Bag Cage 1 50 642323 Filter Cover 1
15 649820 Rigid Wand (no Inner Tube) 1 51 642020 Filter Retaining Clamp 1
15a 649021 Tube, Rigid Wand Inner 1 52 964162 Screw M3x10 1
16 647501 Cable Retainer 1 53 920630 Nut M3 3
17 964156 Self-Threading Screw 3, 5x13 2 54 964141 Screw M5x30 4
18 646621 Support Plate 1 55 644220 Motor Housing 1
19 642001 Cable Holder 1 56 964141 Screw M5x30 1
20 964155 Self-Threading Screw 2, 9x13 2 57 645103 Locking Catch/Knob 1
21 911252 Microswitch 1 58 645102 Locking Catch 1
22 964158 Self-Threading Screw 2, 9x16 1 59 920631 Nut M4 3
23 964159 Self-Threading Screw 2, 9x9, 5 2 60 646720 Static Ground Pin 1
24 911253 Paper Bag Control Card 1 61 924065 Self-Locking Nut M5 1
25 964155 Self-Threading Screw 2, 9x13 4 62 647420 Locking-Rod 1
26 644520 Cover Hinge 2 63 647202 Latch 2
27 642321 Cover 1 64 964163 Self-Threading Screw 3, 5x13 2
28 649020 Handle Tube 1 65 643601 Connection Protection 1
29 964137 Screw M4x10 2 66 642322 Vacuum Motor Cover 1
30 911193 Switch 1 67 964021 Self-Threading Screw 3, 5x16 4
31 645120 Lens 1 68 643420 Gasket 1
32 641320 Upright Central Body/Housing 1 69 643321 Vacuum Inlet Filter 1
33 643921 Lifting Handle 1 70 964164 Screw M3x8 2
34 964158 Self-Threading Screw 2, 9x16 1 71 648120 Black Rotating Sleeve 1
35 911252 Microswitch 1 72 649320 Flexible Hose Union 1
36 647220 Cable Retainer 1 73 644121 Flexible Hose 1
37 644020 Vacuum Motor Holder 1 74 980639 Washer 1
38 911254 Button - Microswitch 1 75 644122 Connection Hose Pressure Reg. 1
39 964021 Self-Threading Screw 3, 5x16 2 76 647021 Post, Rubber 1
7
Page 8
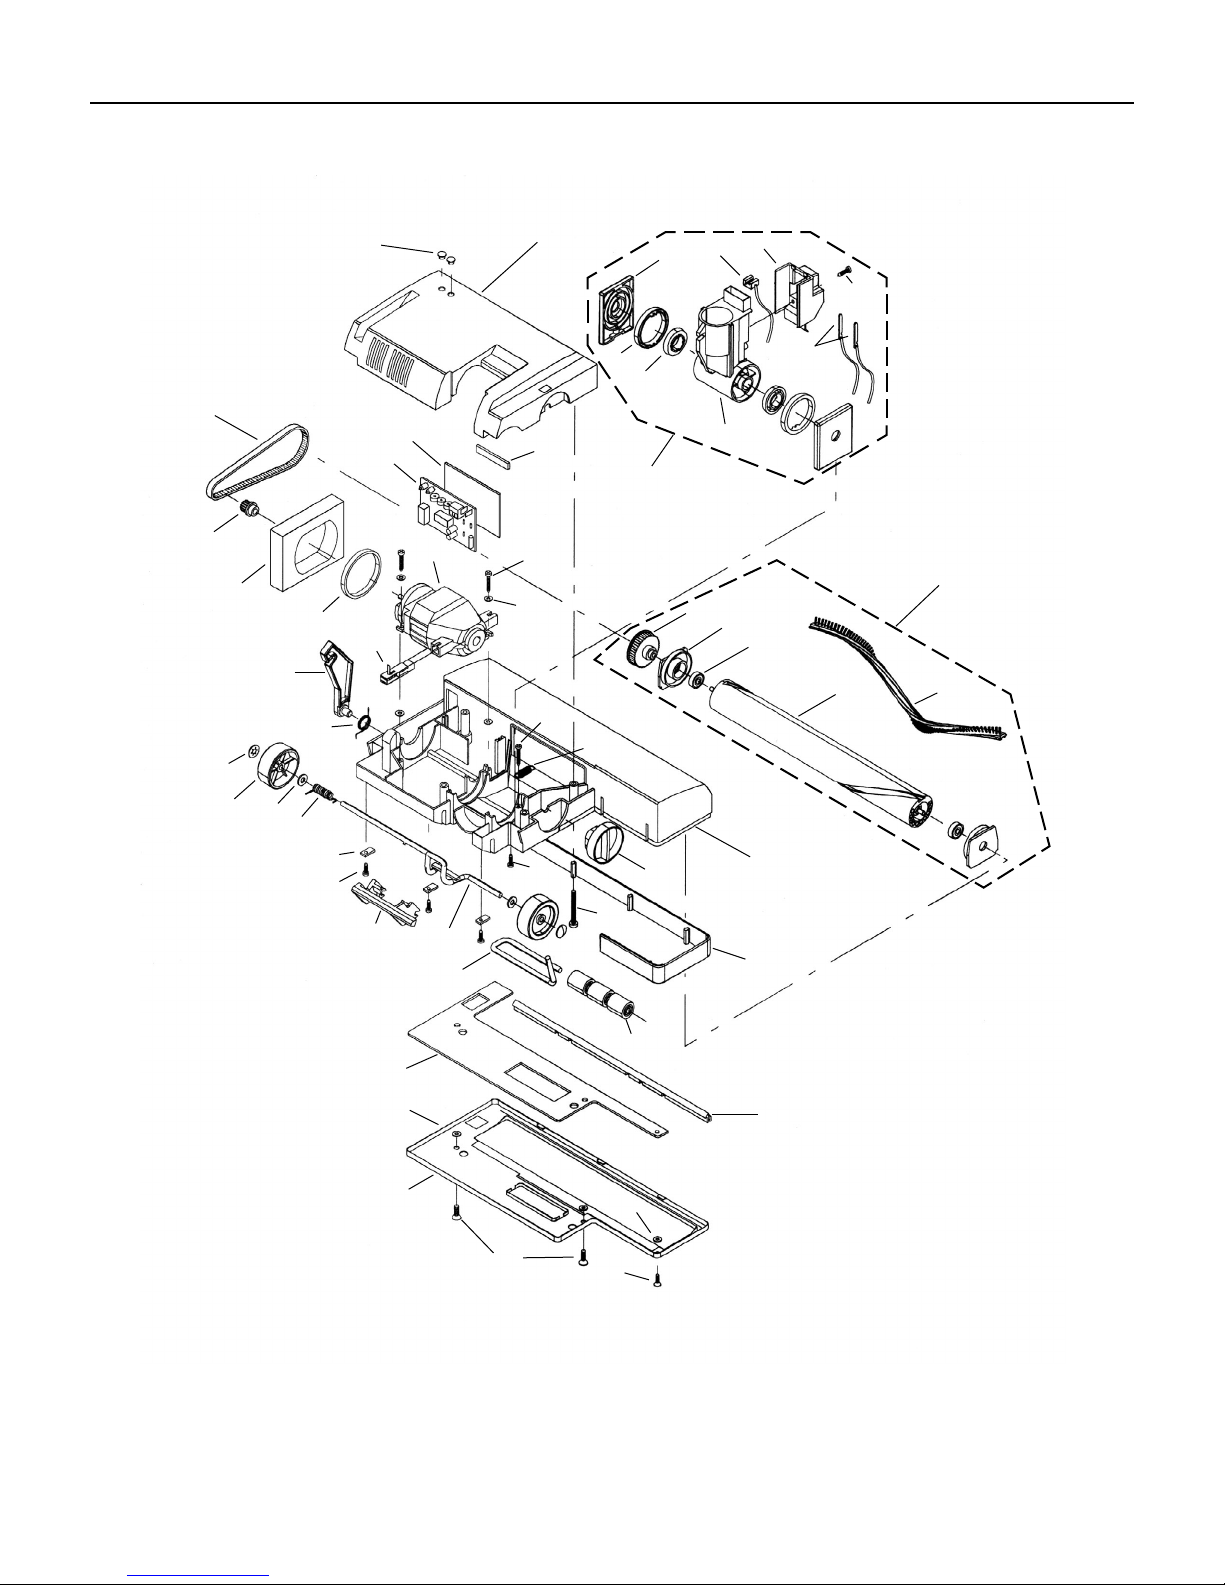
BRUSH HEAD ASSEMBLY PARTS LIST - BRUSH HEAD ASSEMBLY
13
14
30
31
15
32
20
33
16
21
34
35
55
37
1
12
11
17
36
43
19
18
40
10
2
28
29
41
6
57
3
7
24
42
38
8
52
25
26
4
5
9
51
22
23
39
46
47
48
49
44
45
56
50
8 9
Page 9

ITEM PART NO. DESCRIPTION QTY. ITEM PART NO. DESCRIPTION QTY.
1 645121 Lens 2 29 648305 Spring 1
2 642303 Base Cover 1 30 647201 Retainer 2
3 648502 Swivel Neck Support Wiring 2 31 649701 Wheel 2
4 641120 Bushing 2 32 980641 Washer D6 2
5 641121 Bushing 2 33 648302 Wheels Axle Spring 1
6 642305 Joint Cover 1 34 647202 Latch 3
7 964136 Self-Threading Screw 3, 9x16 2 35 964138 Self-Threading Screw 3, 9x13 3
8 911255 Wire on Swivel Neck 1 36 647701 Wheels Axle 1
9 644901 Swivel Neck 1 37 647020 Foot Pedal 1
10 647620 Felt Seal 2 38 644201 Chassis/Housing, Brush - 14” 1
11 911256 Electronic Card Protection 1 644202 Chassis/Housing, Brush - 18” 1
12 641302 Electronic Card 115V F350E 1 39 645001 Brush Height Adjustment Knob 1
13 903017 Belt 1 40 964138 Self-Threading Screw 3, 9x13 2
14 646902 Pulley 1 41 964139 Screw M5x45 4
15 643322 Filter 1 42 641201 Bumper - 14” 1
16 643421 Gasket 1 641202 Bumper - 18” 1
17 645201 Brush Motor, 115V - 14” 1 43 640502 Wheels Axle 1
645202 Brush Motor, 115V - 18” 1 44 647502 Brush Adjustment Wheels 3
18 964157 Self-Threading Screw 3, 9x19 2 45 643408 Gasket 1
19 980640 Washer D4 4 46 643409 Gasket 1
20 645105 Support Lever 1 47 980636 Washer 2
21 648304 Spring 1 48 647901 Shoe, Pick-Up - 14” 1
22 646901 Brush Pulley 1 647902 Shoe, Pick-Up - 18”
23 648503 Brush Support 2 49 964150 Screw M5x12 2
24 902034 Bearing 2 50 964149 Screw M4x10 1
25 642401 Brush Core w/shaft - 14” 1 51 644920 Complete Joint W/Support 1
642404 Brush Core w/shaft - 18” 1 52 640904 Complete Brush, 14” 1
26 640920 Brush Strip - 14” 1 55 640922 Carbon Brush 2
640921 Brush Strip - 18” 1 56 980637 Washer 1
28 964160 Self-Threading Screw 3, 5x25 1 57 648321 Enclosing Cover Spring 1
Page 10
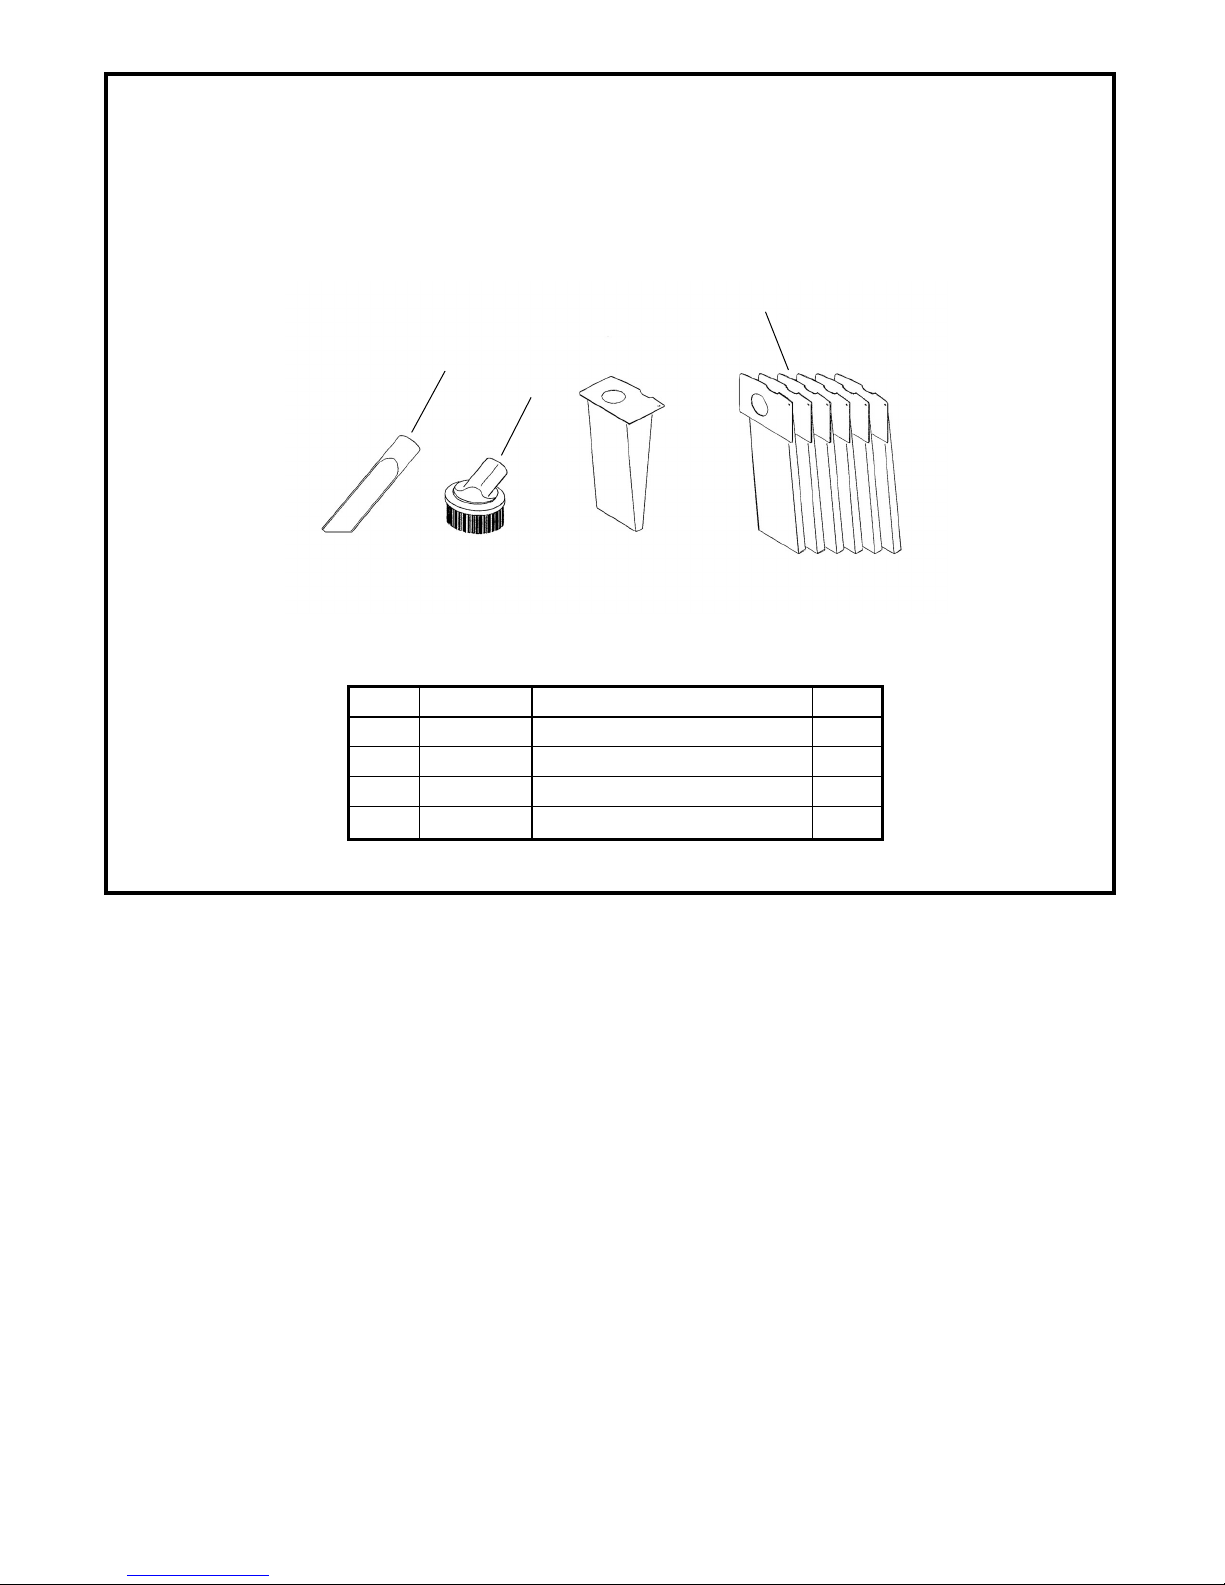
ACCESSORIES
1
2
3
ITEM PART NO. DESCRIPTION QTY.
1 648801 Crevice Tool 1
2 648802 Dusting Brush 1
3 640620 10 Pack Paper Bags 1
640623 Cloth Filter Bag
10
Page 11
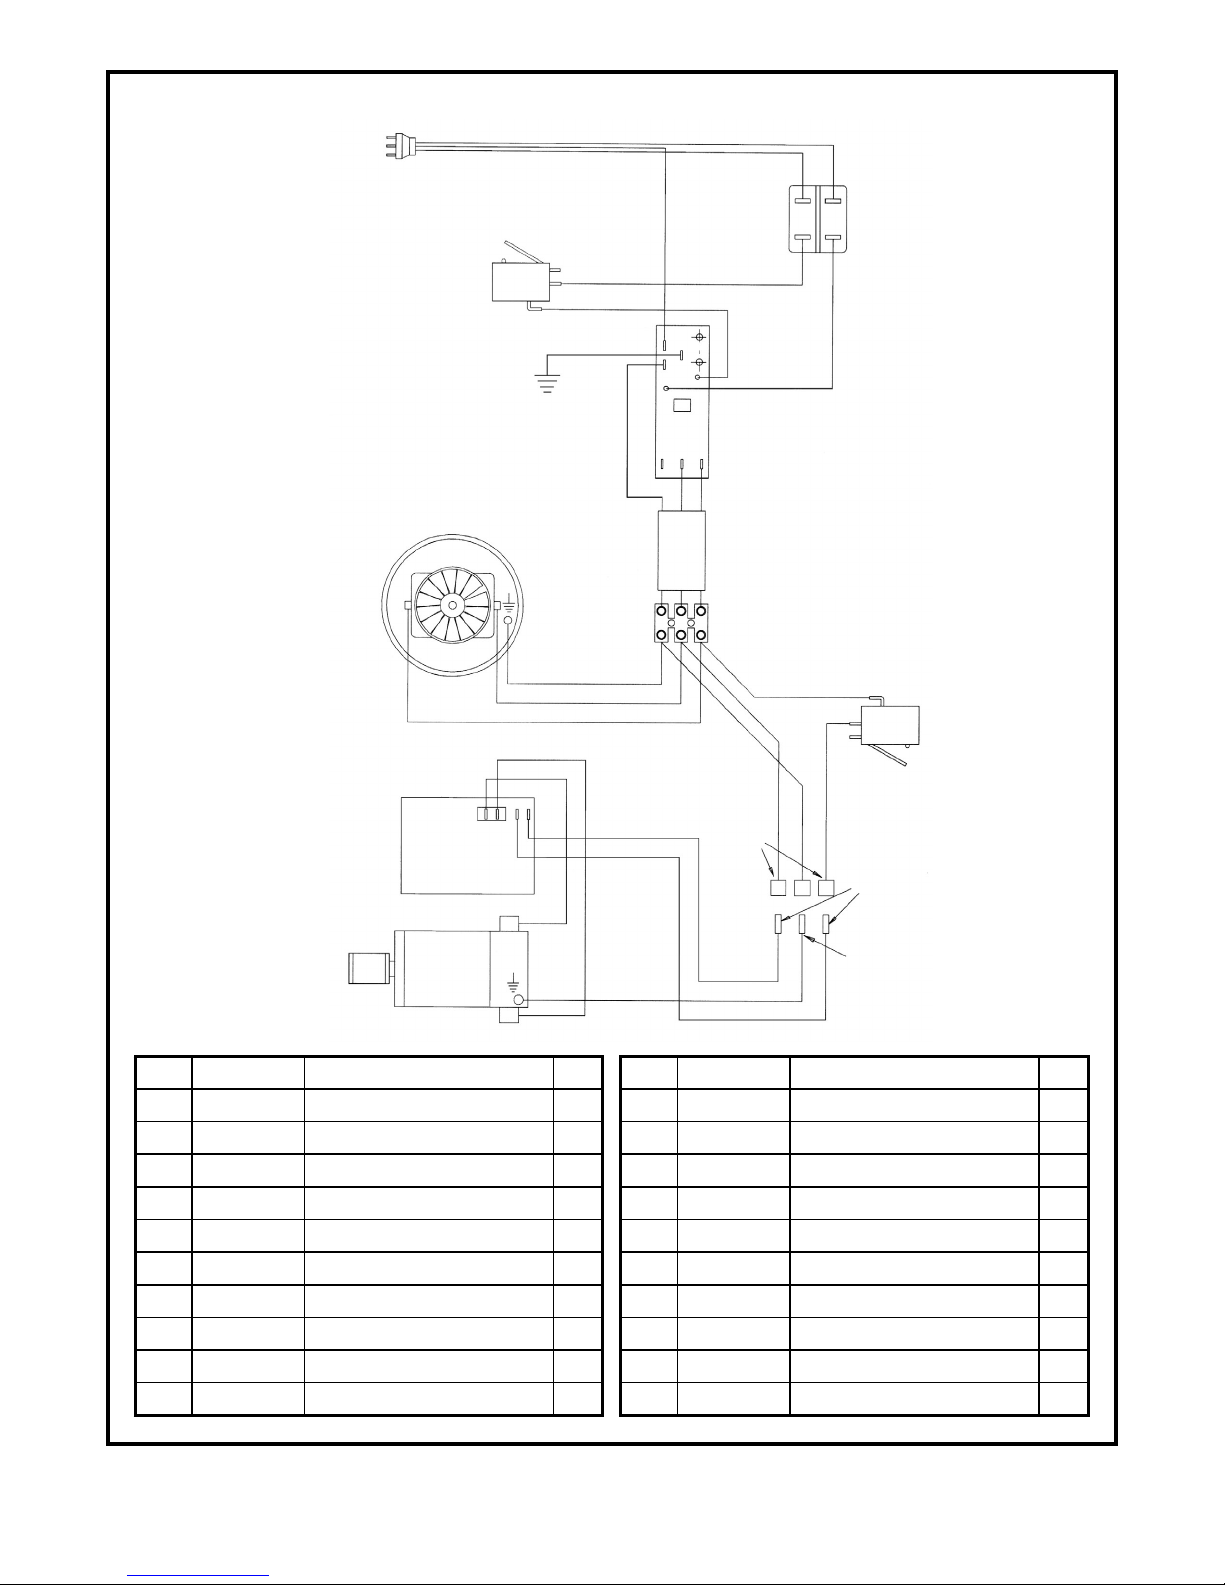
WIRING DIAGRAM
1
2
15
13
4
3
5
9
7
8
11
12
10
14
17
16
ITEM PART NO. DESCRIPTION QTY. ITEM PART NO. DESCRIPTION QTY.
1 908099 Electric Cable 1 12 911252 Microswitch 1
2 911193 Switch 1 13 911264 Elec.Lead Asm.-Vacuum Motor 2
3 911257 Lead Assembly 1 14 911262 Contact Plug 1
4 911252 Microswitch 1 15 641302 Electronic Card 115V - 14” 1
5 911253 Control Card 1 641303 Electronic Card 115V - 18” 1
7 911258 Electric Cable Assembly 1 16 645201 Brush Motor 115V - 14” 1
8 911259 Terminal board Mannut 1 645202 Brush Motor 115V - 18” 1
9 625201 Vacuum Motor 115V 1 17 911255 Wire on Swivel Neck 1
10 911260 Grounding Lead 2 18 648321 Enclosing Cover Spring 1
11 911201 Elec.Lead Asm.-Microswitch 1 19 911263 Antistatic Cable 1
18
11
Page 12

SSS PRO TWIN DELUXE VACUUMS
PRO TWIN DELUXE 14 & PRO TWIN DELUXE 18
LIMITED WARRANTY
The SSS Pro Twin Deluxe Vacuum has been manufactured, tested and inspected in accordance with specific engineering requirements, and
is WARRANTED by the manufacturer to be free from defects in workmanship and materials.
This warranty is, however, subject to the following qualifications, conditions and limitations which are set forth to provide you and all
users of the SSS Pro Twin Deluxe Vacuum with information concerning the duration, extent, availability and applicability of this Limited
Warranty, the procedure to be taken to obtain its performance and other information concerning the manufacturer’s warranty policy.
1. TO WHOM EXTENDED AND DURATION OF ITEMS COVERED
This warranty extends to the original consumer purchaser from the date it
was purchased and for the items and period as follows:
Three (3) years parts, one (1) year labor - Vacuum Motor and Brush Motor.
One (1) year parts & labor - All other components unless excluded below.
2. PARTS NOT COVERED BY WARRANTY
Certain parts of the SSS Pro Twin Deluxe require replacement in the ordinary course of use due to normal wear by reason of their characteristics.
This warranty does not cover the following normal wear items:
Part Number Part Name
908099 Cord Assembly
644121 Flexible Hose
640920 Brush Strip-14”
640921 Brush Strip-18”
643321 Filter
643320 HEPA Filter
640620 Paper Bag Filters
641201 Bumper-14”
641202 Bumper-18”
640910 Carbon Brush, Vac Motor
640922 Carbon Brush, Brush Motor
903017 Belt
3. EXCEPTIONS AND EXCLUSIONS FROM WARRANTY
The SSS Pro Twin Deluxe Vacuum is required to be used on electric current
as indicated on the nameplate. Otherwise damage, defects, malfunctions
or other failures of the SSS Pro Twin Deluxe Vacuum arising from use
on electric current not as indicated are excepted and excluded from this
warranty.
Defects, malfunctions, failure or damage of the SSS Pro Twin Deluxe
Vacuum caused by improper, unreasonable or negligent use or abuse
while in the possession of the consumer are likewise excluded from this
warranty.
If repair is done on your SSS Pro Twin Deluxe Vacuum by anyone other than
those below designated as authorized to perform such work without first
having obtained factory instructions, the manufacturer, at its sole option,
may determine that this warranty will not apply and that reimbursement
for such repair will not be made because of the failure to comply with such
factory specified instructions.
4. PROCEDURE TO BE TAKEN TO OBTAIN PERFORMANCE
OF WARRANTY
To secure repair of the SSS Pro Twin Deluxe Vacuum or any warranted
parts under this warranty, the following procedure should be taken: The
inoperative SSS Pro Twin Deluxe Vacuum or warranted parts, together with
satisfactory evidence of the purchase date, must be delivered with shipping
and delivery charges prepaid to the Dealer from whom purchased.
If you are unable to locate the Dealer, you may write or otherwise communicate with Triple S, 2 Executive Park Drive, Billerica, MA 01862
for instructions before repair service is performed by anyone else. In such
event Triple S will provide either the location of a closely available Triple
S distributor Service Department or other factory instructions.
Upon compliance with the above procedure, all warranted defects will
be repaired, at no additional charge or costs to the consumer, and the
repaired product returned to the consumer, with all shipping and delivery
charges prepaid.
In following the procedures above set forth PLEASE MAKE CERTAIN
to state the Triple S model, type and serial number as shown on the name
plate of the SSS Pro Twin Deluxe Vacuum.
REPLACEMENT
In the event of the defect, malfunction or failure of your SSS Pro Twin
Deluxe Vacuum or any warranted part to conform with this warranty, the
manufacturer may at its sole option and own expense, replace the SSS Pro
Twin Deluxe Vacuum or any warranted part with another new identical or
reasonably equivalent model or part in lieu of repairing the defect.
5. NO REFUND OF PURCHASE PRICE
Triple S will not, as a matter of its warranty policy, refund the consumer’s
purchase price.
6. WARRANTY REGISTRATION CARD FOR YOUR SSS PRO
TWIN DELUXE VACUUM AND REQUESTS FOR INFORMATION
Please fill out the warranty registration card accompanying your SSS Pro
Twin Deluxe Vacuum, giving complete information as requested on the
card, and return to Triple S.
This warranty is in lieu of all other expressed or implied warranties.
8/04 645621
 Loading...