

Triple S 17 XL, 20 XL, 17 DS XL, 20 DS XL, 1500 XL Operating & Maintenance Instructions
...
XL FLOOR MACHINES
MODELS:
17 XL, 17 XL CS & 20 XL
17 DS XL & 20 DS XL
1500 XL & 2000 XL
OPERATING & MAINTENANCE
INTRODUCTION INSTRUCTIONS
READ THIS BOOK
This operator’s book has important information for the use
and safe operation of this machine. Read this book carefully before starting the machine. Keep this book and tell
all operators to read the book. If you do not follow the
instructions, you can cause an injury or damage equipment,
furniture or buildings.
For additional information refer to the Triple S website
www.triple-s.com or write to:
Triple S
2 Executive Park Drive
Billerica, MA 01862
Carefully inspect all components to ensure that there is no
concealed freight damage. If such damage is discovered,
file a “CONCEALED DAMAGE REPORT” immediately
with the delivering carrier.
The contents of this manual are based on the latest product
information available at the time of publication. Triple S
reserves the right to make changes or improvements to its
machines without notice.
FOR YOUR CONVENIENCE, RECORD THIS
IMPORTANT INFORMATION:
MODEL_______________________________
SERIAL NUMBER______________________
PART NUMBER ________________________
DATE PURCHASED ____________________


TABLE OF CONTENTS
SAFETY INSTRUCTIONS 4
SINGLE SPEED MACHINES (175 rpm)
OPERATING PROCEDURES 5
ILLUSTRATION - Models 17 XL, 17 XL CS & 20 XL 6
PARTS LIST & WIRING DIAGRAM - Models 17 XL, 17 XL CS & 20 XL 7
AC MOTOR PARTS LIST 8
DUAL SPEED MACHINES (175 & 300 rpm)
OPERATING PROCEDURES 9
ILLUSTRATION - Models 17 DS XL & 20 DS XL 10
PARTS LIST - Models 17 DS XL & 20 DS XL 11
DC MOTOR & WIRING DIAGRAM 12
SAFETY INSTRUCTIONS 14
UHS MACHINES (1500 & 2000 rpm)
OPERATING PROCEDURES 15
ILLUSTRATION - Models 1500 XL & 2000 XL 16
PARTS LIST - Models 1500 XL & 2000 XL 17
DC MOTOR & WIRING DIAGRAM 18
WARRANTY POLICY 20
3
IMPORTANT SAFETY INSTRUCTIONS
To assure the safe operation of this machine, you must read and understand all warnings and instructions in this book. If you
do not understand, ask your supervisor.
READ ALL INSTRUCTIONS BEFORE USING THIS MACHINE
WARNING: To reduce the risk of fire, electric shock, or injury:
1. You must be trained to operate this machine. This machine is to be operated for its intended use only.
2. Do not operate this machine unless it is completely assembled.
3. Always use a three-wire electrical system connected to the electrical ground. For maximum protection against electrical
shock, use a circuit that is protected by a ground fault circuit interrupter. Consult your electrical contractor.
4. To prevent electric shock, always remove the electrical plug from the electrical outlet before doing any repairs or maintenance and when leaving the machine unattended.
5. To prevent electric shock, keep the machine surface dry. Do not subject to rain. Store the machine in a dry building area.
Clean the machine with a dry cloth only.
6. Machines can cause an explosion when near flammable materials and vapors. Do not use this machine with or near fuels,
grain dust, solvents, thinners, or other flammable materials. Do not use flammables to clean this machine.
7. A qualified or authorized person must do maintenance and repairs.
8. To prevent damage to the power cord, do not move this machine over the power cord. Always lift the power cord over the
machine. Do not pull or carry cord, use cord as a handle, close a door on cord, or pull cord around sharp edges or corners.
Keep cord away from heated surfaces.
9. Do not use with damaged cord or plug. If the machine is not working as it should, has been dropped, damaged, left outdoors,
or dropped into water, return it to a service center.
Grounding Instructions
This machine must be grounded. If it should malfunction or break down,
grounding provides a path of least resistance for electric current to reduce
the risk of electric shock. This machine is equipped with a cord having an
equipment-grounding conductor and grounding plug. The plug must be
inserted into an appropriate outlet that is properly installed and grounded
in accordance with all local codes and ordinances.
WARNING - Improper connection of the equipment-grounding conductor
can result in a risk of electric shock. Check with a qualified electrician
or service person if you are in doubt as to whether the outlet is properly
grounded. Do not modify the plug provided with the machine - if it will not
fit the outlet, have a proper outlet installed by a qualified electrician.
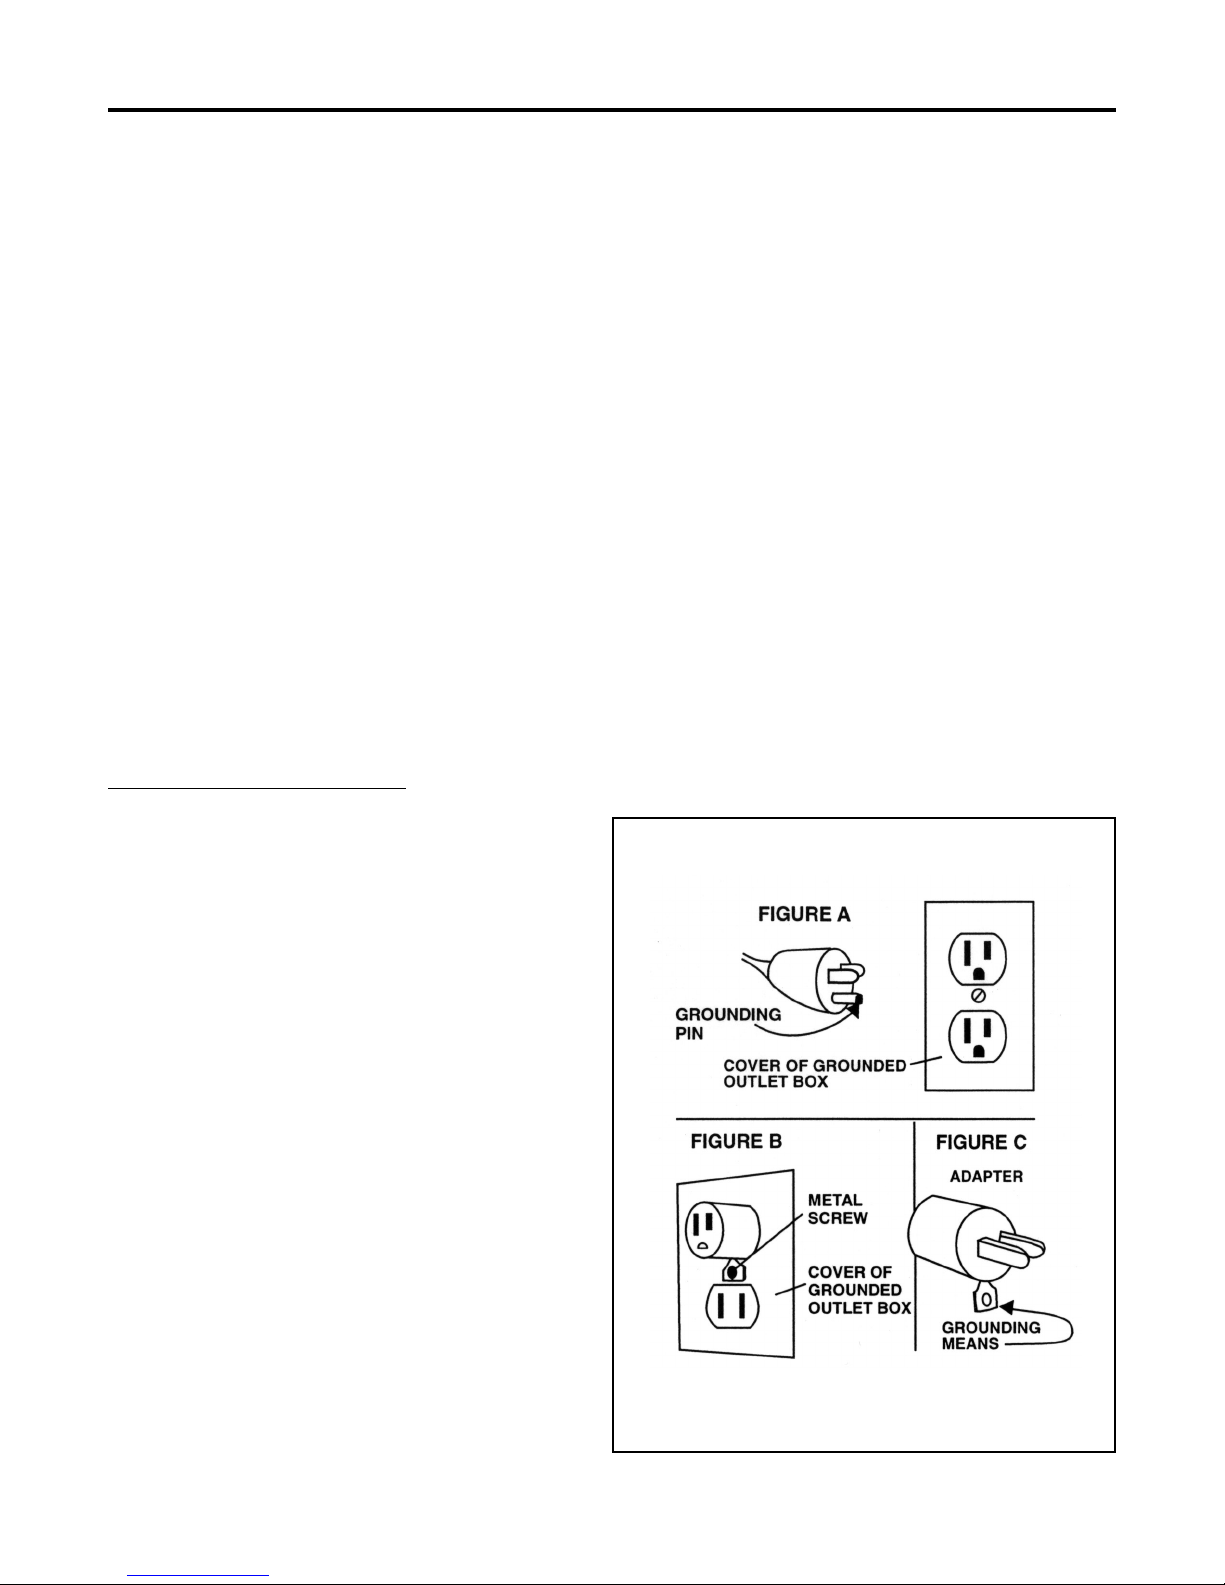
This machine is for use on a nominal 120-volt circuit, and has a grounded
plug that looks like the plug illustrated in figure A. A temporary adapter
that looks like the adapter illustrated in figures B and C may be used to
connect this plug to a 2-pole receptacle as shown in figure B if a properly
grounded outlet is not available. The temporary adapter should be used only
until a properly grounded outlet (figure A) can be installed by a qualified
electrician. The green colored rigid ear, lug, or the like extending from
the adapter must be connected to a permanent ground such as a properly
grounded outlet box cover. Whenever the adapter is used, it must be held
in place by a metal screw.
NOTE: In Canada, the use of a temporary adapter is not permitted by the
Canadian Electrical Code
EXTENSION CORDS
Use only three-wire 12/3 or larger gauge approved extension cords that have
three-prong grounding type plugs and three-pole receptacles that accept the
appliance’s plug. Replace or repair any damaged cords or plugs.
When servicing, refer to authorized person only. Use only identical
replacement parts.
NOTE: Do not use adapters shown in figures B & C in Canada
4

OPERATING PROCEDURES - SINGLE SPEED
WARNING! For the safe operation of this machine
follow the instructions given in this manual and the
training given by your supervisor. Failure to do so can
result in personal injury and/or damage to machine and
property!
DO NOT OPERATE MACHINE IN AN EXPLOSIVE
ENVIRONMENT!
This machine is intended for commercial use.
PREPARATION
To prepare the machine for operation, make sure it is of
correct voltage and properly assembled.
Your new floor machine operates in the normal side to side
motion of a conventional single disc machine. Be prepared
before starting by removing all obstructions or other obstacles in the area to be cleaned. Check the proper application
recommendations and procedures found on the label of your
cleaning or finish container. IF IN DOUBT, CALL
YOUR SUPERVISOR .
OPERATION
Plug the machine’s power cable into a properly grounded
outlet (see Safety Instructions). Next, adjust the handle
height to a comfortable position.
Pull out on the “Watch Dog” Safety Lock button and start
the machine by depressing either the left or right switch
levers.
Both hands should be placed on the handle when the machine
is in operation. The machine will glide sideways over the
floor by a slight raising and lowering of the handle. Raise
the handle slightly to go to the right. Lower the handle
slightly to go left. Releasing the switch lever stops the
machine at once.
For Spray Buffing: A diluted spray of about one part water
to one part solution is recommended. Heavier spray buff
solutions will bog down the machine, load up the pad and
adversely affect the machine’s efficiency.
MAINTENANCE
WARNING! NEVER USE THIS MACHINE WITH
FLAMMABLE OR EXPLOSIVE MATERIAL!
For Scrubbing or Polishing: Select the correct clean
SSS floor pad or brush (your Triple S Distributor can assist
you). If in doubt, ask your supervisor.
NEVER OPERATE THE MACHINE WITHOUT THE
FLOOR PAD OR BRUSH INSTALLED!
To properly attach the brush, UNPLUG THE FLOOR
MACHINE, place the handle in the vertical position, then
tilt the machine back until the handle rests on the floor.
Straddle the handle, facing the motor, and grasp the brush
with the block toward you. Place the brush or pad clutch
plate over the three lugs on the motor drive adapter. Twist
the brush right to lock it into position. To remove the brush,
UNPLUG THE MACHINE and follow the same procedure
as above, but by twisting the brush off with a firm jerk to the
left. Remove the brush or pad driver when the machine is
not in use. This will help prevent brush damage and reduce
wobble problems.
AFTER EACH USE: Store the machine in a clean dry
area. Wipe the entire machine and cord down with a clean
cloth. Remove the pad or brush and clean thoroughly. Wrap
the machine’s electrical cord onto the handles and the cord
hook provided. CHECK the cord and plug for nicks, cuts or
damage. Report these to your supervisor for correction.
WARNING! Always disconnect the machine’s electrical
plug from the electrical outlet before performing any
service, maintenance, pad changing or inspection of the
machine.
MOTOR: The motor is lubricated for life under normal
use. No oiling or greasing is necessary. However, if the
machine is used in dusty areas or is used for spray buffing,
the motor should be cleaned. Blowing the motor out with
compressed air or with the exhaust from a vacuum is suggested. Keeping the motor clean will allow the clear passage of air for ventilation and prevent overheating. If you
have any questions regarding the maintenance of your floor
machine, ASK YOUR SUPERVISOR.
5

MODELS:
17 XL, 17 XL CS & 20 XL
17 XL CS ITEMS NOT SHOWN:
508681 - Tank Assembly, 4 gallon
505903 - Pad Driver Assembly
6

MODELS: 17 XL, 17 XL CS & 20 XL
ITEM PART NO. DESCRIPTION QTY. ITEM PART NO. DESCRIPTION QTY.
1 W323D Screw, 6-32x1 Pan Hd. 2 37 962009 Bolt, Carriage 5/16-18 x 2-1/2 1
2 980016 Washer, #6 Ext. Tooth 2 38 962005 Screw, 1/4-20 x 3/8 Allen 1
3 500801 Bracket, Switch Mounting 1 39 505010 Turn Knob 1
4 911135 Switch 1 40 980007 Washer, 5/16 Flat 2
5 508301 Spring 1 41 908004 Handle Cord 1
6 507001 Plunger 1 42 509920 Yoke, Handle 1
7 500802 Bracket, Switch 1 43 504702 Insulator-Switch 1
8 962002 Screw, 10-32 x 1/2 Oval Hd. 2 44 509823 Washer, Felt 1
9 504810 Interlock Asm.-Switch 1 45 962010 Screw, 1/4-20 x 1 HH 4
10 962011 Screw, 10-32 x 3/4 Oval Hd. 2 46 506820 Plug Button 1
11 486404 Switch Cover Plate 1 47 507480 Shaft, Handle Pivot 1
12 509821 Washer, Rubber 2 48 508040 Bumper Strap, 17” 1
13 920005 Nut, 3/8-24 Hex 1 508041 Bumper Strap, 20” 1
14 508020 Switch Assembly (or 505003) 1 49 962015 Screw, Bumper Strap 2
15 505121 Lever, Switch Left 1 50 501846 Base Casting-17” 1
16 505120 Lever, Switch Right 1 501848 Base Casting-20” 1
17 920001 Nut, 10-32 Elastic Stop 1 51 509820 Washer, Fiber 4
18 509830 Washer, Handle Tube 1 52 507722 Wheel Axle Shaft 1
19 503320 Flange, Strain Relief 1 53 508221 Spacer, Wheel Shaft 1
20 505720 Handle Nipple 2 54 504421 Wheel Hinge 2
21 481304 Switch Housing,w/o Circuit Brkr. 1 55 980005 Washer, Wave 2
22 515150 Warning Label 1 56 509780 Wheel, 4” - 17” 2
23 501210 Bumper, Handle 1 509781 Wheel, 5” - 20” 2
24 962003 Screw, 10-32 x 3/4 Pan Hd. 1 57 925002 Pin, Wheel Hinge 2
25 962006 Screw, 1/4-20 x 1/2 Pan Hd. 6 58 507320 Snap Ring, Wheel 2
26 503730 Handle Grip 2 59 507721 Shaft Wheel, 2-5/16 1
501501 Cap, Protective End 2 507723 Shaft Wheel, 3-3/8 1
27 980015 Washer, #10 Shakeproof 2 60 502110 Bumper Clip 3
28 508520 Strain Relief-Complete 1 61 962001 Screw, Bumper Clip 3
502020 Strain Relief-Brass Clamp 1 62 980004 Washer, 1/4 Flat 4
29 962015 Screw, 10-32 x 3/8 Pan Hd. 2 63 980002 Washer, 1/4 Lock 6
30 980018 Washer, #10 Countersunk 1 64 501241 Base Bumper, 17” 1
32 509082 Handle Tube 1 501283 Base Bumper, 20” 1
33 504420 Cord Hook 1 65 962019 Screw, Cap 3
34 502430 Cord Asm.-50 ft., Orange 1 67 502373 Drip Cover 1
35 502021 Clamp-Handle 1 71 505249 Motor (see next page) 1
36 500820 Arm, Handle Support 2 503523 Gear Unit (see next page) 1
SINGLE PHASE
GROUNDED
POWER SUPPLY
115 VOLTS
60 HERTZ
GROUND
HANDLE
SWITCH
WHITE WHITE
POWER
SUPPLY
CORD
BLACK
GREEN
(COM)
(COM)
SWITCH HOUSING
(N.O.)
(N.O.)
HANDLE
CORD
7
BLACK
GREEN
MOTOR

MODELS: 17 XL, 20 XL CS & 20 XL
AC MOTOR PARTS LIST
ITEM PART NO. DESCRIPTION QTY.
505251 Motor & Gear Asm., 1.5HP 115V 60CY 1
505249 Motor Only, 1.5 HP
503523 Gear Asm.Only -10:1 for 1.5 HP-3 Planet
A 504209 Ring Gear Housing 1
B 902007 Bearing 1
C 504208 Planet Gear Hsing,10:1-3 Idler 1
D 902005 Bearing 1
E Screw 6
F Screw 6
G Motor Cord 1
H 911305 Run Capacitor 1
I Cover, Run Capacitor 1
J Cover, Start Capacitor 1
K 911304 Start Capacitor 1
L Bolt 4
M End Bell 1
N Stator Asm (No Capacitors), Chrome 1
O 902003 Bearing, Motor Top 1
P 911306 Stationary Switch 1
Q 911307 Rotary Switch (For 60 Cycle) 1
R Rotor Assembly (No Bearings or Switch) 1
S 502927 End Bell-Motor Lower 1
T 502317 Cover, Ring Gear 1
U 902015 Bearing 1
V 902005 Bearing 2
X 502460 Coupling Flexible 1
Y 508211 Spacer 1
Z 503510 Pinion 1
AA 507701 Shaft-Planet Gear 2/3
BB 902016 Bearing-Planet Shaft 4/6
CC 503511 Gear-Planet 2/3
503510
8

OPERATING PROCEDURES - DUAL SPEED
WARNING! For the safe operation of this machine
follow the instructions given in this manual and the
training given by your supervisor. Failure to do so can
result in personal injury and/or damage to machine and
property!
DO NOT OPERATE MACHINE IN AN EXPLOSIVE
ENVIRONMENT!
This machine is intended for commercial use.
PREPARATION
To prepare the machine for operation, make sure it is of
correct voltage and properly assembled.
Your new floor machine operates in the normal side to side
motion of a conventional single disc machine. Be prepared
before starting by removing all obstructions or other obstacles in the area to be cleaned. Check the proper application
recommendations and procedures found on the label of your
cleaning or finish container. IF IN DOUBT, CALL
YOUR SUPERVISOR .
OPERATION
Plug the machine’s power cable into a properly grounded
outlet (see Safety Instructions). Next, adjust the handle
height to a comfortable position.
Pull out on the “Watch Dog” Safety Lock button and start
the machine by depressing either the left or right switch
levers.
Both hands should be placed on the handle when the machine
is in operation. The machine will glide sideways over the
floor by a slight raising and lowering of the handle. Raise
the handle slightly to go to the right. Lower the handle
slightly to go left. Releasing the switch lever stops the
machine.
For Spray Buffing: A diluted spray material of about one
part water to one part solution is recommended. Heavier
spray buff solutions will bog down the machine, load up the
pad and adversely affect the machine’s efficiency.
MAINTENANCE
WARNING! NEVER USE THIS MACHINE WITH
FLAMMABLE OR EXPLOSIVE MATERIAL!
For Scrubbing or Polishing: Select the correct clean
SSS floor pad or brush (your Triple S Distributor can assist
you). If in doubt, ask your supervisor.
NEVER OPERATE THE MACHINE WITHOUT THE
FLOOR PAD OR BRUSH INSTALLED!
To properly attach the brush, UNPLUG THE FLOOR
MACHINE, place the handle in the vertical position, then
tilt the machine back until the handle rests on the floor.
Straddle the handle, facing the motor, and grasp the brush
with the block toward you. Place the brush or pad clutch
plate over the three lugs on the motor drive adapter. Twist
the brush right to lock it into position. To remove the brush,
UNPLUG THE MACHINE and follow the same procedure
as above, but by twisting the brush off with a firm jerk to the
left. Remove the brush or pad driver when the machine is
not in use. This will help prevent brush damage and reduce
wobble problems.
DUAL SPEED CONTROL: A rocker switch is located
on the motor drip cover. Press the switch in on the side
labeled LOW for 175 RPM pad speed or to HIGH for 300
RPM pad speed.
AFTER EACH USE: Store the machine in a clean dry
area. Wipe the entire machine and cord down with a clean
cloth. Remove the pad or brush and clean thoroughly. Wrap
the machine’s electrical cord onto the handles and the cord
hook provided. CHECK the cord and plug for nicks, cuts or
damage. Report these to your supervisor for correction.
WARNING! Always disconnect the machine’s electrical
plug from the electrical outlet before performing any
service, maintenance, pad changing or inspection of the
machine.
CIRCUIT BREAKER: A circuit breaker is used to protect
the motor. If the motor draws high amperage the circuit
breaker will stop the motor. The reset button is located in
the back of the switch housing. Push the reset button to
restart the motor. If the motor continues to stop, clean or
change the floor pad. If this does not correct the problem
consult an authorized service person.
MOTOR: The motor is lubricated for life under normal
use. No oiling or greasing is necessary. However, if the
machine is used in dusty areas or is used for spray buffing,
the motor should be cleaned. Blowing the motor out with
compressed air or with the exhaust from a vacuum is suggested. Keeping the motor clean will allow the clear passage of air for ventilation and prevent overheating. If you
have any questions regarding the maintenance of your floor
machine, ASK YOUR SUPERVISOR.
CARBON BRUSH INSPECTION: Long life 3000-hour
carbon brushes are installed in the motor. The machine is
also equipped with a carbon brush wear indicator to signal
9
when a carbon brush change is required.

MODELS 17 DS XL & 20 DS XL
10

MODELS 17 DS XL & 20 DS XL
ITEM PART NO. DESCRIPTION QTY. ITEM PART NO. DESCRIPTION QTY.
1 W323D Screw, 6-32x1 Pan Hd. 2 38 962005 Screw, 1/4-20 x 3/8 Allen 1
2 980016 Washer, #6 Ext. Tooth 2 39 505010 Turn Knob 1
3 500801 Bracket, Switch Mounting 1 40 980007 Washer, 5/16 Flat 2
4 911135 Switch 1 41 908001 Handle Cord 1
5 508301 Spring 1 42 509920 Yoke, Handle 1
6 507001 Plunger 1 43 504702 Insulator-Switch 1
7 500802 Bracket, Switch 1 44 509823 Washer, Felt 1
8 962002 Screw, 10-32 x 1/2 Oval Hd. 2 45 962021 Screw, 1/4-20 x 1 HH 4
9 504810 Interlock Asm.-Switch 1 46 506820 Plug Button 1
10 962011 Screw, 10-32 x 3/4 Oval Hd. 2 47 507480 Shaft, Handle Pivot 1
11 486404 Switch Cover Plate 1 48 508040 Bumper Strap, 17” 1
12 509821 Washer, Rubber 2 508041 Bumper Strap, 19” 1
13 920005 Nut, 3/8-24 Hex 1 49 962015 Screw, Bumper Strap 2
14 508020 Switch Assembly (or 505003) 1 50 501846 Base Casting-17” 1
15 505121 Lever, Switch Left 1 501848 Base Casting-19” 1
16 505120 Lever, Switch Right 1 51 509820 Washer, Fiber 4
17 920001 Nut, 10-32 Elastic Stop 1 52 507722 Wheel Axle Shaft 1
18 509830 Washer, Handle Tube 1 53 508221 Spacer, Wheel Shaft 1
19 503320 Flange, Strain Relief 1 54 504421 Wheel Hinge 2
20 505720 Handle Nipple 2 55 980005 Washer, Wave 2
21 501335 Switch Housing with Circuit Brkr. 1 56 509780 Wheel, 4” - 17” 2
22 515150 Warning Label 1 509781 Wheel, 5” - 19” 2
23 501210 Bumper, Handle 1 57 925002 Pin, Wheel Hinge 2
24 962003 Screw, 10-32 x 3/4 Pan Hd. 1 58 507320 Snap Ring, Wheel 2
25 962006 Screw, 1/4-20 x 1/2 Pan Hd. 6 59 507721 Shaft Wheel, 2-5/16 1
26 503730 Handle Grip 2 507723 Shaft Wheel, 3-3/8 1
501501 Cap, Protective End 2 60 502110 Bumper Clip 3
27 980015 Washer, #10 Shakeproof 2 61 962001 Screw, Bumper Clip 3
28 508520 Strain Relief-Complete 1 62 980004 Washer, 1/4 Flat 4
502020 Strain Relief-Brass Clamp 1 63 980002 Washer, 1/4 Lock 2
29 962015 Screw, 10-32 x 3/8 Pan Hd. 2 64 501241 Base Bumper, 17” 1
30 980018 Washer, #10 Countersunk 1 501283 Base Bumper, 19” 1
31 980006 Washer, 5/16 Lock 4 65 962026 Screw, Drip Cover 3
32 509082 Handle Tube 1 66 502396 Drip Cover 1
33 504420 Cord Hook 1 67 505265 Motor & Gear, 115V, 1.5 HP 1
34 502430 Cord Asm.-50 ft. 1 505266 Motor & Gear, 230V, 1.5 HP 1
35 502021 Clamp-Handle 1 See Next Page
36 500820 Arm, Handle Support 2 68 501350 Circuit Breaker, 18 A 1
37 962009 Bolt, Carriage 5/16-18 x 2-1/2 1 69 911001 Lead Asm., Switch to Breaker 1
11

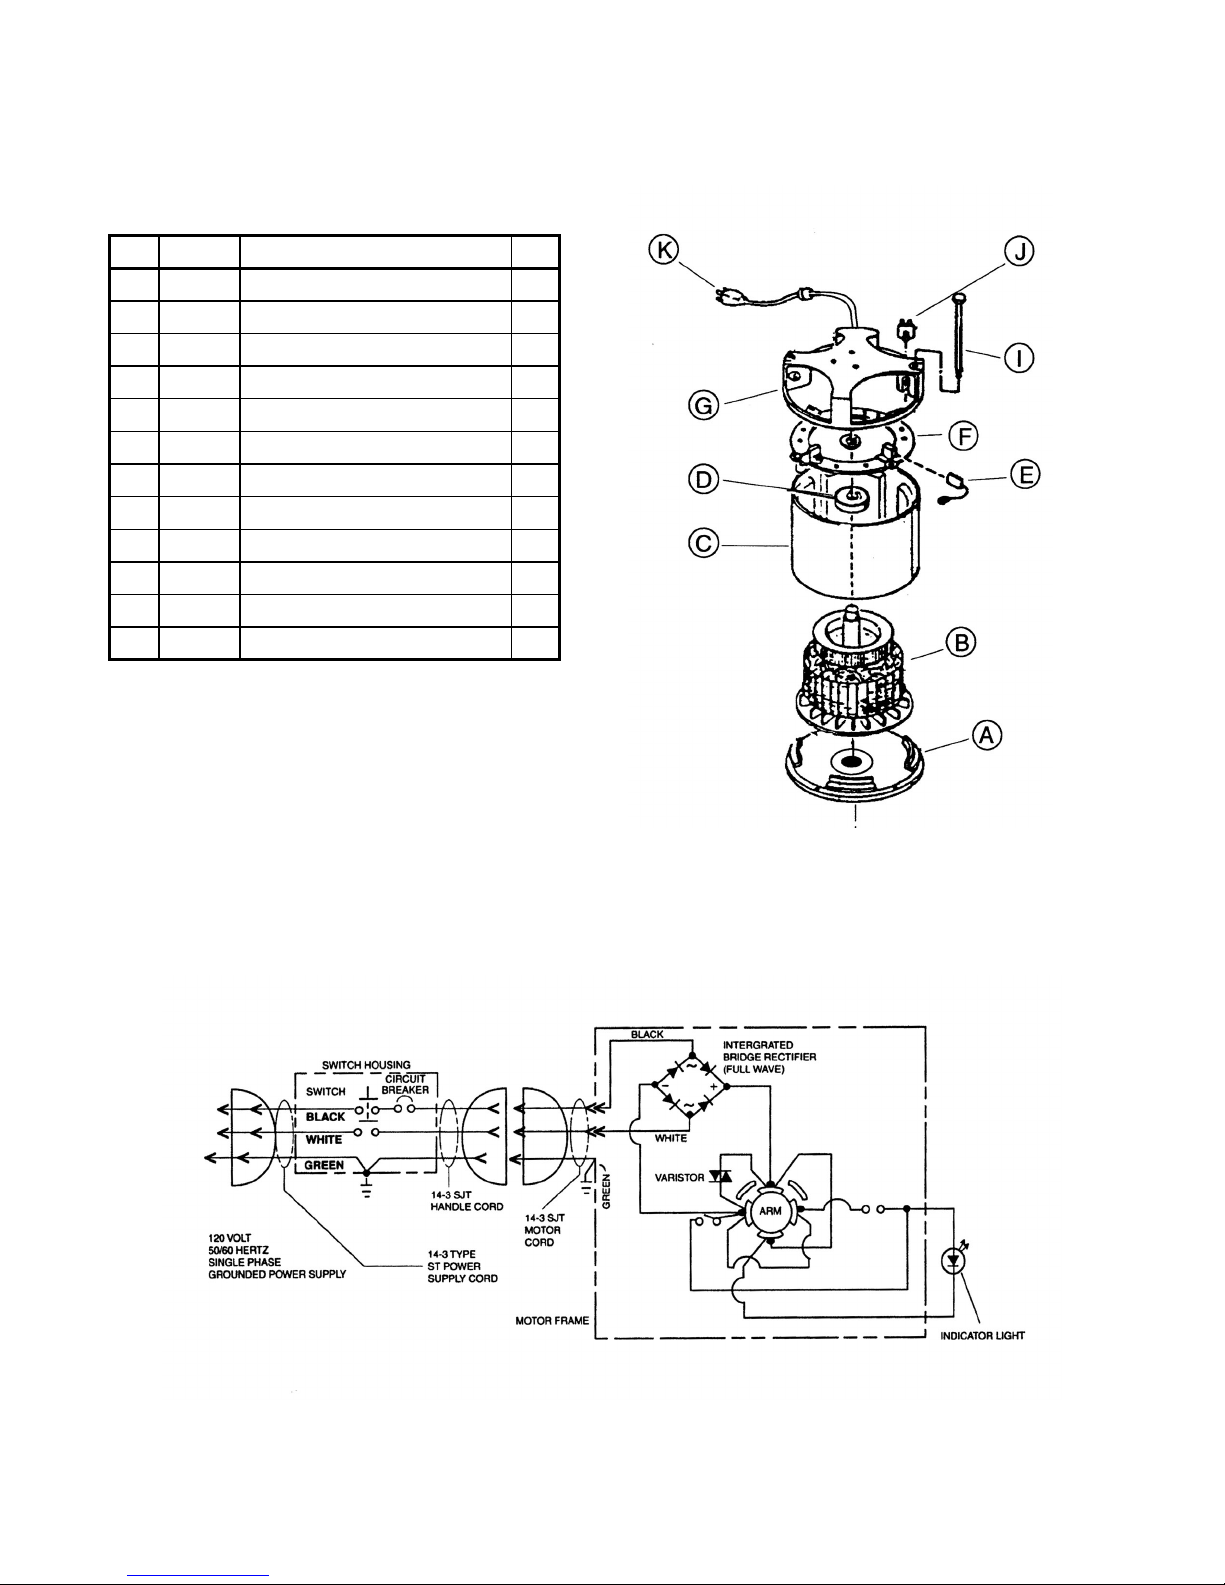
MODELS 17 DS XL & 20 DS XL
DC MOTOR PARTS LIST
ITEM PART NO. DESCRIPTION QTY. ITEM PART NO. DESCRIPTION QTY.
505265 Motor&Gear,115V,1.5 HP 1 N 911115 Switch - High/Low 1
505266 Motor&Gear,230V,1.5 HP 1 O 509323 Washer, Felt 1
A 504209 Ring Gear Housing 1 P 911048 Rectifier, 115V 1
B 902004 Bearing 1 911081 Rectifier, 230V 1
C 504208 Planet Gear Hsing,10:1-3 1 Q 960018 Bolt, Motor Thru 2
D 902005 Bearing 1 R 502928 End Bell - Motor TOP 1
E 960016 Screw 6 S 500425 Armature, 115V 1
F 960017 Screw 6 500423 Armature, 230V 1
G 503117 Field & Shell Assembly 1 T 502317 Cover Housing 1
H 902001 Bearing 1 U 902015 Bearing 1
I 500903 Carbon Brush, 115V 4 V 902005 Bearing 2
510901 Carbon Brush, 230V 4 X 502465 Coupling 1
J 911127 Speed Control, 115V 1 Y 508211 Spacer Sleeve 1
911141 Speed Control, 230V 1 Z 503510 Pinion 1
K 908024 Cord Assembly, Motor 1 AA 507701 Shaft - Planet Gear 3
L 508519 Strain Relief 1 BB 902016 Bearing - Planet Shaft 3
M 505181 Light, Brush Wear, 115V 1 CC 503511 Gear - Planet 3
505182 Light, Brush Wear, 230V 1 DD 502929 End Bell - Motor LOWER 1
MODELS 17 DS XL & 20 DS XL
WIRING DIAGRAM
12

NOTES
13

IMPORTANT SAFETY INSTRUCTIONS
To assure the safe operation of this machine, you must read and understand all warnings and instructions in this book. If you
do not understand, ask your supervisor.
READ ALL INSTRUCTIONS BEFORE USING THIS MACHINE
WARNING: To reduce the risk of fire, electric shock, or injury:
1. You must be trained to operate this machine. This machine is to be operated for its intended use only.
2. Do not operate this machine unless it is completely assembled.
3. Always use a three-wire electrical system connected to the electrical ground. For maximum protection against electrical
shock, use a circuit that is protected by a ground fault circuit interrupter. Consult your electrical contractor.
4. To prevent electric shock, always remove the electrical plug from the electrical outlet before doing any repairs or maintenance and when leaving the machine unattended.
5. To prevent electric shock, keep the machine surface dry. Do not subject to rain. Store the machine in a dry building area.
Clean the machine with a dry cloth only.
6. Machines can cause an explosion when near flammable materials and vapors. Do not use this machine with or near fuels,
grain dust, solvents, thinners, or other flammable materials. Do not use flammables to clean this machine.
7. A qualified or authorized person must do maintenance and repairs.
8. To prevent damage to the power cord, do not move this machine over the power cord. Always lift the power cord over the
machine. Do not pull or carry cord, use cord as a handle, close a door on cord, or pull cord around sharp edges or corners.
Keep cord away from heated surfaces.
9. Do not use with damaged cord or plug. If the machine is not working as it should, has been dropped, damaged, left outdoors,
or dropped into water, return it to a service center.
Grounding Instructions
This machine must be grounded. If it should malfunction or break down,
grounding provides a path of least resistance for electric current to reduce
the risk of electric shock. This machine is equipped with a cord having an
equipment-grounding conductor and grounding plug. The plug must be
inserted into an appropriate outlet that is properly installed and grounded
in accordance with all local codes and ordinances.
WARNING - Improper connection of the equipment-grounding conductor
can result in a risk of electric shock. Check with a qualified electrician
or service person if you are in doubt as to whether the outlet is properly
grounded. Do not modify the plug provided with the machine - if it will not
fit the outlet, have a proper outlet installed by a qualified electrician.
This machine is for use on a nominal 120-volt circuit, and has a grounded
plug that looks like the plug illustrated in figure A. A temporary adapter
that looks like the adapter illustrated in figures B and C may be used to
connect this plug to a 2-pole receptacle as shown in figure B if a properly
grounded outlet is not available. The temporary adapter should be used only
until a properly grounded outlet (figure A) can be installed by a qualified
electrician. The green colored rigid ear, lug, or the like extending from
the adapter must be connected to a permanent ground such as a properly
grounded outlet box cover. Whenever the adapter is used, it must be held
in place by a metal screw.
NOTE: In Canada, the use of a temporary adapter is not permitted by the
Canadian Electrical Code
EXTENSION CORDS
Use only three-wire 12/3 or larger gauge approved extension cords that have
three-prong grounding type plugs and three-pole receptacles that accept the
appliance’s plug. Replace or repair any damaged cords or plugs.
When servicing, refer to authorized person only. Use only identical
replacement parts.
NOTE: Do not use adapters shown in figures B & C in Canada
14

OPERATING PROCEDURES - UHS BURNISHERS
WARNING! For the safe operation of this machine follow
the instructions given in this booklet and the training given
by your supervisor. Failure to do so can result in personal
injury and/or damage to machine and property!
DO NOT OPERATE MACHINE IN AN EXPLOSIVE
ENVIRONMENT!
THIS MACHINE IS INTENDED FOR COMMERCIAL
USE!
PREPARATION
To prepare the machine for operation, make sure it is of correct voltage and properly assembled.
Your new floor machine operates in a straight-line forward motion,
rather than the normal side to side motion of a conventional single
disc machine. Be prepared by having your floor area cleared and
ready for the fast action of a burnisher.
Prepare the floor area by sweeping, dusting or mopping as needed.
Check the proper application recommendations and procedures found
on the label of your finish container. IF IN DOUBT, CALL YOUR
SUPERVISOR .
WARNING! NEVER USE THIS MACHINE WITH
FLAMMABLE OR EXPLOSIVE MATERIAL!
Depress the handle slightly to elevate the pad from the floor. This
is to avoid burning the floor on initial start up, before the operator is
ready to move forward. Pull out on the “Watch Dog” Safety Lock
button and start the machine by depressing either the left or right
switch levers.
When you’re ready to move forward, lower the machine head and
pad to the floor and proceed forward in a straight line, at a steady
pace. If the machine labors or slows down excessively, relieve the
condition by:
1500 XL - Pressing down on the handle.
2000 XL - Adjusting the caster wheel downward by turning the
adjusting knob clockwise.
NOTE: The compensator caster is included only on the 2000 XL.
Just turn the adjusting knob to set the pad pressure and maintain a
constant level. This adjustment may also be made to regulate for light
or heavy burnishing needs.
MAINTENANCE
AFTER EACH USE: Store the machine in a clean dry area. Wipe
the entire machine and cord down with a clean cloth. Remove the pad
and clean thoroughly. Wrap the machine’s electrical cord onto the
handles and the cord hook provided. CHECK the cord and plug for
nicks, cuts or damage. Report these to your supervisor for correction.
Store the machine so that its weight is resting upon the transport and
operating wheels to avoid pad driver distortion.
For Burnishing: Select the correct clean SSS Floor Pad (your
Triple S Distributor can assist you). The lighter color floor pads (buff
or white) are normally used for the burnishing procedure.
NEVER OPERATE THE MACHINE WITHOUT THE
FLOOR PAD INSTALLED!
It is very important to select clean, dry pads of uniform thickness.
Pads with high or low sections, or hard or soft spots are unacceptable.
Pads of open weave are recommended; because close weaves tend to
load up fast, bog down the machines, cause circuits to overload and
generally give poor results.
Unplug the power cord from the wall outlet. Tip the machine back to
expose the pad driver. Remove the pad center lock ring. Carefully
center the pad onto the pad driver and secure with the locking ring.
Check for level, centering and flatness.
OPERATION
Set the machine upright onto the pad. Plug the machine’s power
cable into a properly grounded outlet (see Safety Instructions). Next,
release the handle locking knob and allow the handle to lower into a
comfortable position. Then secure the handle locking knob. This
will allow the operator to easily control the brush pressure.
WARNING! Always disconnect the machine’s electrical
plug from the electrical outlet before performing any
service, maintenance, pad changing or inspection of the
machine.
CIRCUIT BREAKER: A circuit breaker is used to protect the
motor. If the motor draws high amperage the circuit breaker will stop
the motor. The reset button is located in the back of the switch housing. Push the reset button to restart the motor. If the motor continues
to stop, clean or change the floor pad. If this does not correct the
problem consult an authorized service person.
LUBRICATION: No motor lubrication is required. The machine
has a grease fitting on the upper and lower pad driver bearings, lubricate them annually. A drop of machine oil on the wheel axle shafts
and the handle adjusting bolt periodically will suffice.
BELT TENSION: Proper belt tension is important for smooth
operation and belt life. Check the belt tension and have no more than
a 1/8-inch deflection. If adjustment is needed, loosen the four (4)
motor mounting bolts. Then tip the machine back onto its transport
wheels, slide the motor back and tighten the bolts.
CARBON BRUSH INSPECTION: Long life 3000-hour carbon
brushes are installed in the motor. The machine is also equipped with
a carbon brush wear indicator light to signal when a carbon brush
change is required.
15

2000 XL Model Only
102
MODELS 1500 XL & 2000 XL
98
99
100
101
95
94
91
96
97
92
93
16

ITEM PART NO. DESCRIPTION QTY. ITEM PART NO. DESCRIPTION QTY.
1 W323D Screw, 6-32x1 Pan Hd. 2 54 980009 Washer, 3/8 Lock 4
2 980016 Washer, #6 Ext. Tooth 2 55 501380 Block, Bearing 2
3 500801 Bracket, Switch Mounting 1 56 962026 Screw, 8-32 x 1/2 3
4 911135 Switch 1 57 980013 Washer 1
5 508301 Spring 1 58 505181 Light,Brush Wear Indicator,115V 1
6 507001 Plunger 1 505182 Light,Brush Wear Indicator,230V 1
7 500802 Bracket, Switch 1 59 502396 Cover, Motor-1500XL 1
8 962002 Screw, 10-32 x 1/2 Oval Hd. 2 60 509823 Washer, Felt 3/16 x 3 1
9 504810 Interlock Asm.-Switch 1 61 505286 Motor, 1.5 HP 115V 1
10 962011 Screw, 10-32 x 3/4 Oval Hd. 2 62 509780 Wheel, 4” 2
11 506430 Switch Cover Plate 1 63 507781 Wheel Axle 2
12 509821 Washer, Rubber 2 64 980005 Washer, Wave 8
13 920005 Nut, 3/8-24 Hex 1 65 509820 Washer, Fiber 8
14 508020 Switch Assembly (or 505003) 1 66 507320 Snap Ring 1/2 Shaft 4
15 505121 Lever, Switch Left 1 67 509781 Wheel, 5” 2
16 505120 Lever, Switch Right 1 68 508080 Bumper Strap 1
17 920001 Nut, 10-32 Elastic Stop 1 69 962015 Screw, Bumper Strap 5
18 509830 Washer, Handle Tube 1 70 501283 Bumper, Base 1
19 503320 Flange, Strain Relief 1 71 962001 Screw, 10-32x1/4 Flt. Hd. 3
20 505720 Handle Nipple 2 72 502110 Bumper Clip 3
21 501326 Switch Housing w/Brkr. 1 73 501891 Base Casting 1
22 515150 Warning Label 1 74 962018 Screw, 3/8-16 x 1-3/4 Hex 4
23 501210 Bumper, Handle 1 75 915001 Key - 1500 XL 1
24 962003 Screw, 10-32 x 3/4 Pan Hd. 1 915002 Key - 2000 XL 1
25 962006 Screw, 1/4-20 x 1/2 Pan Hd. 7 915003 Key - 2000 XL 1
26 503730 Handle Grip 2 76 980003 Washer, 3/8 Flat 4
501501 Cap, Protective End 2 77 980009 Washer, 3/8 Lock 4
27 980015 Washer, #10 Shakeproof 2 78 962022 Screw, 3/8-16 x 1 Hex 4
28 508520 Strain Relief-Complete 1 79 962016 Set Screw, 10-32 x 3/8 Allen 1
502020 Strain Relief-Brass Clamp 1 80 506980 Pulley, Motor 1
29 962015 Screw, 10-32 x 3/8 Pan Hd. 2 81 903001 Belt-1500XL 1
30 507481 Rod, Brace 1 903005 Belt-2000XL 1
31 980007 Washer, 5/16 Flat 2 82 506994 Pulley, Pad Driver-1500 XL 1
32 509082 Handle Tube 1 506992 Pulley, Pad Driver-2000 XL 1
33 507310 Snap Ring 1 83 503382 Flange, Flex Pad Driver 1
34 502430 Cord Asm., 50 ft. 1 84 515904 Pad Asm. Flex Drive 1
35 502021 Clamp-Handle 1 85 962036 Screw, 1/4-20 x 1 Flt. 6
36 500880 Arm, Handle Support 2 86 980007 Washer, 5/16 Flat 1
37 962009 Bolt, Carriage 5/16-18 x 2-1/2 1 87 980006 Washer, 5/16 Lock 1
38 501350 Circuit Breaker, 18A 1 88 962014 Bolt, 5/16-18 x 3/4 Allen 1
39 505010 Turn Knob 1 89 504471 Pad Holder 1
40 911001 Lead Asm-Switch to Breaker 1 90 962076 Screw #8 x 5/8 Pan Hd. 3
41 908001 Handle Cord 1 Caster Assembly for 2000 XL Models
42 509920 Yoke, Handle 1 91 962010 Screw, 1/4-20 x 1 HH 4
43 962005 Screw, 1/4-20 x 3/8 Allen 1 92 980002 Washer, 1/4 Lock 4
44 504702 Insulator, Switch 1 93 920004 Nut, 1/4-20 Hex 4
45 504420 Cord Hook 1 94 515002 Knob 1
46 980018 Washer, #10 Countersunk 1 95 962034 Screw, 8-32 x 1/4 Allen 1
47 507480 Shaft, Handle Yoke 1 96 504483 Housing, Caster 1
48 980002 Washer, 1/4 Lock 2 97 501285 Bumper, Housing 1
49 962015 Screw, 10-32x3/8 Pan Hd. 3 98 518003 Spring 1
50 502382 Cover-Bearing 1 99 962061 Screw, 1/4-20 x 3/4 1
51 502481 Collar, Upper Shaft 1 100 518401 Stud, Caster 1
52 507780 Drive Shaft 1 101 509785 Caster 1
53 920002 Nut, 3/8-16 Hex 4 102 504480 Caster Assembly 1
MODELS 1500 XL & 2000 XL
DC MOTOR PARTS LIST & WIRING DIAGRAM
ITEM PART NO. DESCRIPTION QTY.
505286 Motor 115V, 1.5HP 1
A 502919 End Bell - Motor LOWER 1
B 500417 Armature Asm.w/Bearings,115V 1
902012 Bearing, Motor Lower 1
C 503117 Field & Shell Assembly 1
D 902003 Bearing, Motor Top 1
E 500903 Carbon Brush, Motor 115V 4
F 507322 Brush Ring Asm. Complete 1
G 502920 End Bell - Motor TOP 1
I 960018 Bolt, Motor Thru 4
J 911048 Rectifier, 115V 50/60C 1
K 908024 Cord Assembly, Motor 1
18

NOTES
19

SSS XL FLOOR MACHINE
LIMITED WARRANTY
The SSS XL Floor Machine has been manufactured, tested and inspected in accordance with specific engineering requirements, and is
WARRANTED by the manufacturer to be free from defects in workmanship and materials.
This warranty is, however, subject to the following qualifications, conditions and limitations which are set forth to provide you and all users
of the SSS XL Floor Machine with information concerning the duration, extent, availability and applicability of this Limited Warranty, the
procedure to be taken to obtain its performance and other information concerning the manufacturer’s warranty policy.
1. TO WHOM EXTENDED AND DURATION OF ITEMS COVERED
This warranty extends to the original consumer purchaser from the date it
was purchased and for the items and periods as follows:
Ten (10) years parts, One (1) year labor - Aluminum Base Casting
Five (5) years parts, One (1) year labor - AC Motor and Gear Unit (except
motor switches, capacitors and flex couplings which have a one (1) year
warranty.
Three (3) years parts, One (1) year labor - DC Motors (except carbon
brushes, rectifiers and varistors which have a one (1) year warranty.).
One (1) year parts and labor - All other components except wear items
excluded below.
2. PARTS NOT COVERED BY WARRANTY
Certain parts of the SSS XL Floor Machine require replacement in the ordinary course of use due to normal wear by reason of their characteristics.
This warranty does not cover the following normal wear items:
SSS-17 XL, 17 XL CS, 20XL, 17 DS XL & 20 DS XL MODELS:
Part Number Part Name
503730
502430
509780
509781
501241
501283
SSS-1500 XL & 2000 XL:
503730
502430
509780
509781
501283
903001
903005
500903
501285
509785
3. EXCEPTIONS AND EXCLUSIONS FROM WARRANTY
The SSS XL Floor Machine is required to be used on electric current as
indicated on the nameplate. Otherwise damage, defects, malfunctions or
other failures of the SSS XL Floor Machine arising from use on electric
current not as indicated are excepted and excluded from this warranty.
Defects, malfunctions, failure or damage of the SSS XL Floor Machine
caused by improper, unreasonable or negligent use or abuse while in the
possession of the consumer are likewise excluded from this warranty.
Grip, Handle
Power Cord Assembly, 14/3x50’
Wheel, 4”
Wheel, 5”
Bumper, 17”
Bumper, 20”
Grip, Handle
Power Cord Assembly, 14/3x50’
Wheel, 4”
Wheel, 5”
Bumper, Base
Belt, 1500 XL
Belt, 2000 XL
Carbon Brush Motor
Bumper, Caster Housing - 2000 XL
Caster - 2000 XL
If repair is done on your SSS XL Floor Machine by anyone other than
those below designated as authorized to perform such work without first
having obtained factory instructions, the manufacturer, at its sole option,
may determine that this warranty will not apply and that reimbursement
for such repair will not be made because of the failure to comply with such
factory specified instructions.
4. PROCEDURE TO BE TAKEN TO OBTAIN PERFORMANCE
OF WARRANTY
To secure repair of the SSS XL Floor Machine or any warranted parts under
this warranty, the following procedure should be taken: The inoperative SSS
XL Floor Machine or warranted parts, together with satisfactory evidence
of the purchase date, must be delivered with shipping and delivery charges
prepaid to the Dealer from whom purchased.
If you are unable to locate the Dealer, you may write or otherwise communicate with Triple S, 2 Executive Park Drive, Billerica, MA 01862
for instructions before repair service is performed by anyone else. In such
event Triple S will provide either the location of a closely available Triple
S Distributor Service Department or other factory instructions.
Upon compliance with the above procedure, all warranted defects will
be repaired, at no additional charge or costs to the consumer, and the
repaired product returned to the consumer, with all shipping and delivery
charges prepaid.
In following the procedures above set forth PLEASE MAKE CERTAIN
to state the Triple S model, type and serial number as shown on the name
plate of the SSS XL Floor Machine.
REPLACEMENT
In the event of the defect, malfunction or failure of your SSS XL Floor
Machine or any warranted part to conform with this warranty, the manufacturer may at its sole option and own expense, replace the SSS XL Floor
Machine or any warranted part with another new identical or reasonably
equivalent model or part in lieu of repairing the defect.
5. NO REFUND OF PURCHASE PRICE
Triple S will not, as a matter of its warranty policy, refund the consumer’s
purchase price.
6. WARRANTY REGISTRATION CARD FOR YOUR SSS XL
FLOOR MACHINE AND REQUESTS FOR INFORMATION
Please fill out the warranty registration card accompanying your SSS XL
Floor Machine, giving complete information as requested on the card,
and return to Triple S.
This warranty is in lieu of all other expressed or implied warranties.
9/04
505610
 Loading...