

Page 1
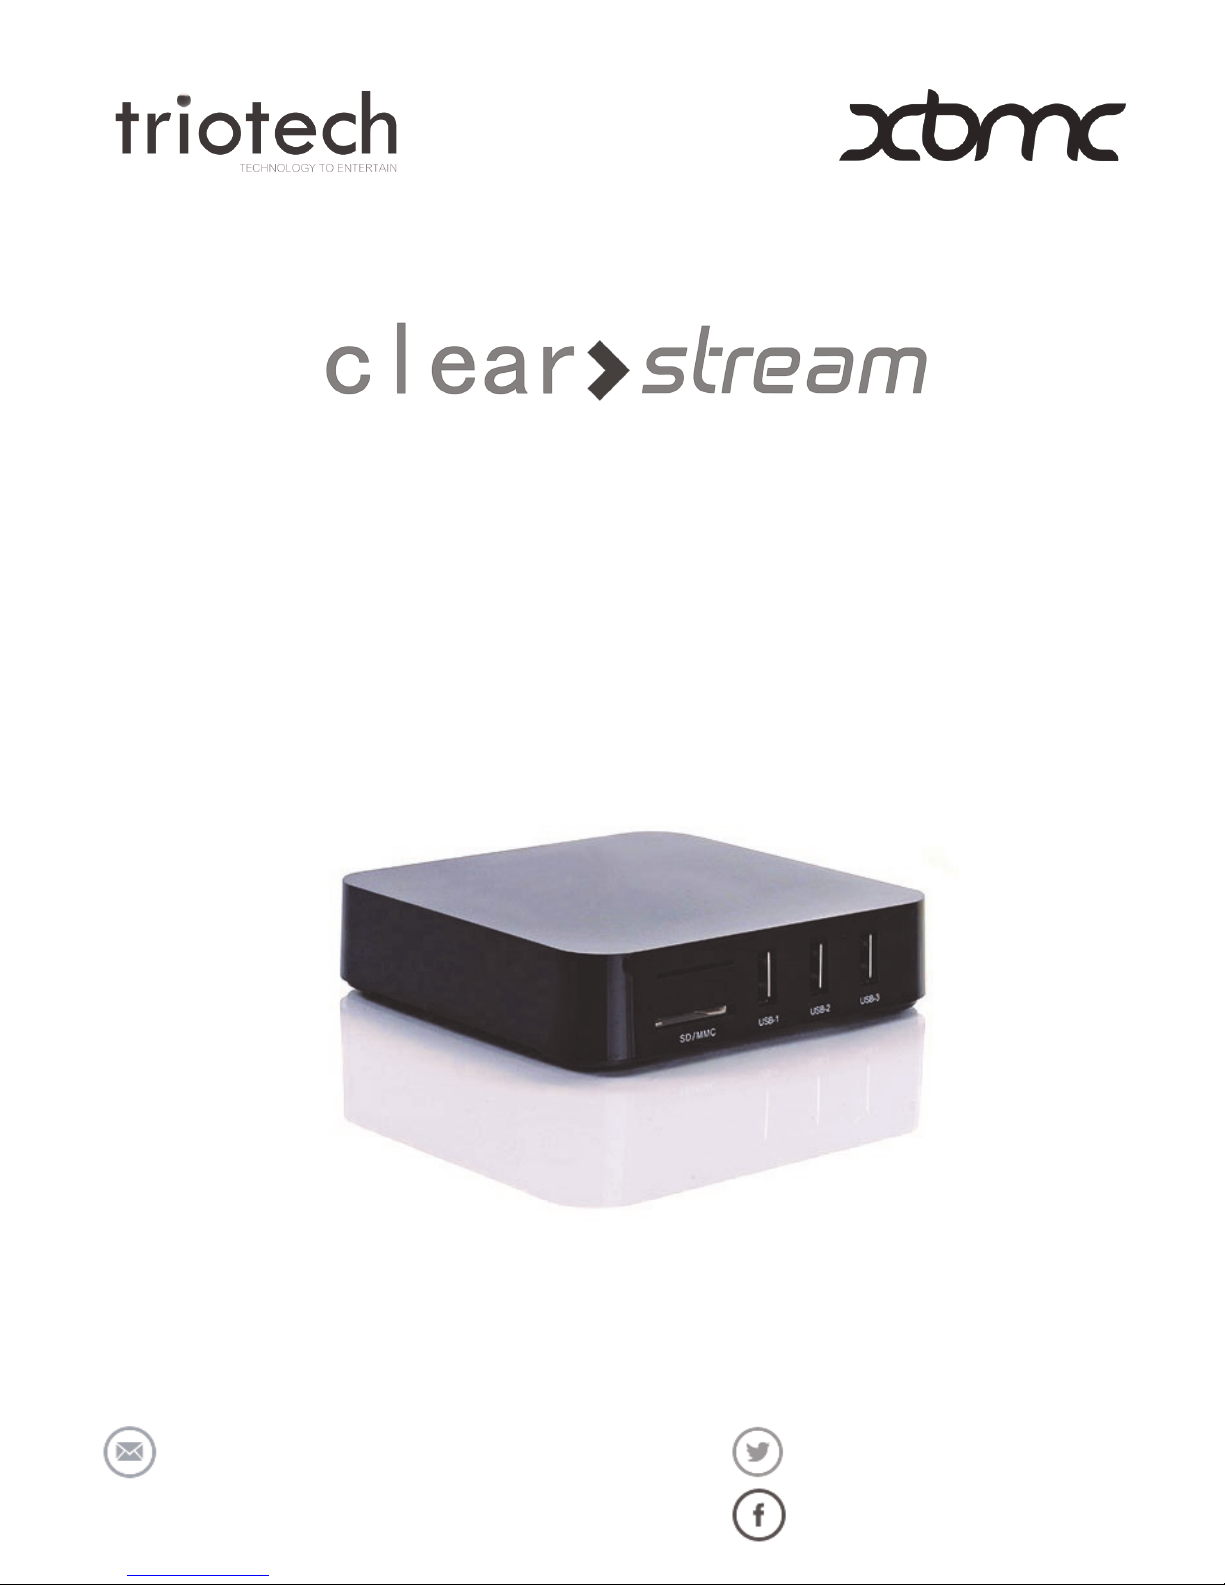
Quick Start Guide
Version 1.72
www.triotechgroup.com/
www.triotechgroup.com/contact-sales
www.triotechgroup.com/contact-support
@clearstream2013
/clearstream.freeTV
Page 2

2
Statements
This manual is provided “as is” without warranty of any kind, either expressed
or implied, including but not limited to the implied warranties or conditions of
merchantability or fitness for a particular purpose. In no event shall we, its directors, officers, employees or agents be liable for any indirect, special, incidental, or consequential damages (including damages for loss of profits, loss of
business, loss of use or data, interruption of business), even if we have been
advised of the possibility of such damages arising from any defect or error in
this manual or product. Specifications and information contained in this manual
are furnished for information use only, and are subject to change at any time
without notice, and should not be construed as a commitment by us. We assume no responsibility or liability for any errors or inaccuracies that may appear
in this manual, including the products and software described in it. No part of
this manual, including the products and software described in it, may be
reproduced, transmitted, transcribed, stored in a retrieval system, or translated
into any language in any form or by any means, except documentation kept by
the purchaser for backup purposes, without the express written permission of
us. Product warranty or service will not be extended if: (1) the product is repaired, modified or altered, unless such repair, modification of alteration is authorized in writing by us; or (2) the serial number of the product is defaced or
missing.
Products and corporate names appearing in this manual may or may not be
registered trademarks or copyrights of their respective companies, and are
used only for identification or explanation and to the owners’ benefit, without
intent to infringe.
Preface
Thank you for purchasing the Clearstream Media Unit. This quick start guide
will help you get the most out of your new media unit. Please read it carefully
before using and keep it for future reference.
Product specifications, size, and shape are subject to change without notice, and actual product appearance may differ from that depicted herein. All trademarks and brand
names are the properties of their respective holders. © 2013 Triotech Media. All rights
reserved.
Page 3

3
Contents
Chapter 1 System Introduction 1
1.1 Key Features 4
1.2 System Environment 4
1.3 Package Contents 4
Chapter 2 Connecting Your System 5
2.1 Cabling Your System 5
2.2 Powering On/Off 6
2.3 Configure Your Ethernet Network 6
2.4 Configure Your Wireless Network 7
2.5 Calibrating Your System 8
Chapter 3 Remote Controller 9
Chapter 4 Introducing XBMC Media Centre 10
4.1 Addons Overview 10
4.2 Playback Window 11
4.3 XBMC Addons 12
4.4 Using Live TV 13
4.5 UK On Demand TV 13
4.6 Other Streaming Addons 14
Chapter 5 Clearstream Maintenance 15
5.1 Troubleshooting & FAQ’s 16
Page 4

4
Chapter 1 System Introduction
1.1 Key Features
Linux operating system with ARM Cortex A9 Processor
Multiple format support including VC-1, H.264, MPEG-2, MPEG-1,
MPEG-4, DIVX
Video formats include avi, mpg, vob, mkv
Audio Formats include MP3, WMA, AC3, DTS and AAC
Support for SD/SDHC/MMC cards
Four USB 2.0 host connectors
RJ-45 Ethernet cable and wireless network connections
Infrared remote controller
1.2 Environment for System
Operation: Temperature limitation: 0-40˚C; Humidity: 20-80%
Storage: Temperature limitation: -20-50˚C; Humidity: 10-90%
It is recommended to not operate the unit in an enclosed space or to stack
the unit directly on top of another heat producing device.
I
1.3 Package Contents
Accessories
Power Adaptor 3Pin UK 1
HDMI Cable 1
Ethernet Cable 1
User Manual 1
Remote Controller 1
Page 5
5
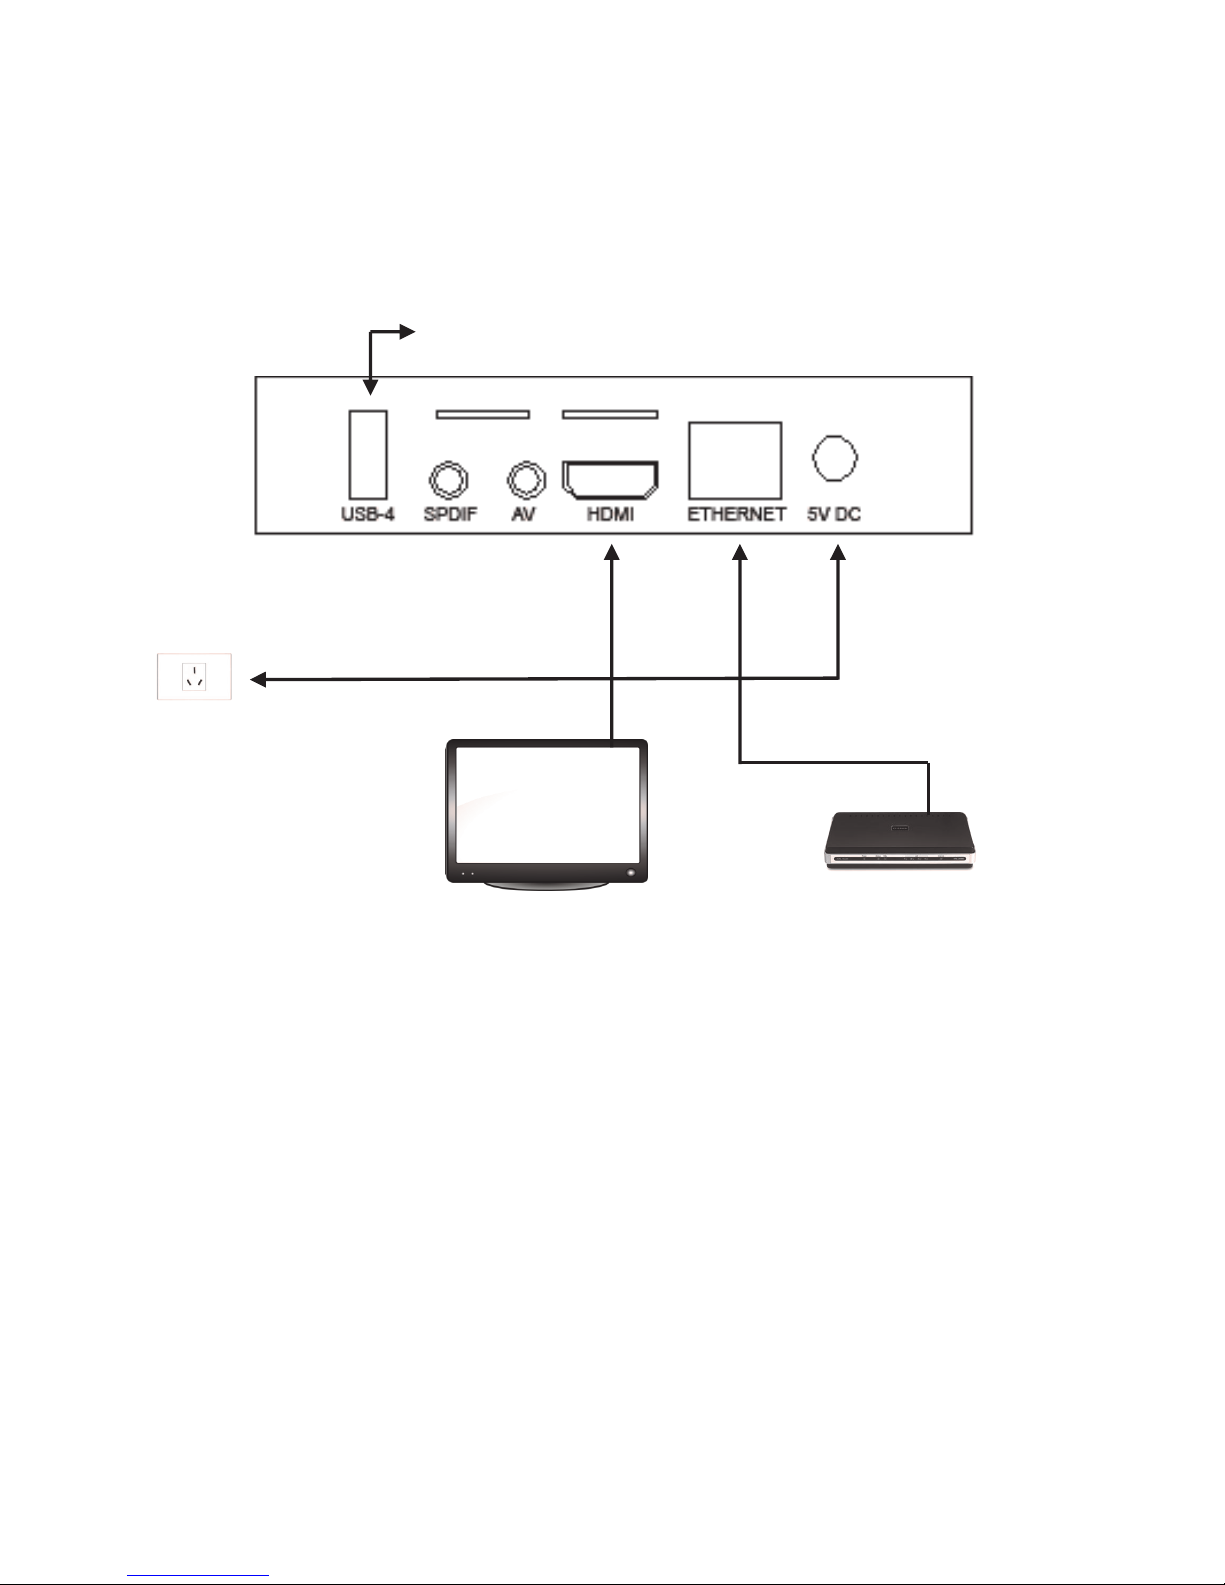
Rear View
Chapter 2 Connecting Your System
Power
Adapter
2.1 Cabling Your System
1. Connect the HDMI cable supplied into the interface marked HDMI on
your media unit and the other end into a HDMI socket on your TV.
2. Connect your Ethernet cable from the media to a free port on your
router/modem.*
3. It is highly recommended that you plug the power supply into the unit
last of all.
It is strongly recommended that you use an Ethernet connection rather than a
wireless connection to your router. If the cable will not reach the location of your
router, then a longer cable can be purchased, or a powerline Ethernet adapter
that will use your household electrical wiring to establish the connection can be
purchased via our website www.triotechgroup.com.
If you do decide to use a wireless connection, configuration details are give in section 2.4
External devices
USB Drives, Keyboard etc.
Page 6
6
2.3 Configure your Ethernet Network
Your Ethernet network should be automatically configured. To check you are online,
navigate from the VIDEO section in the centre of the screen by using the RIGHT
arrow on the remote to the SYSTEM section.
Then navigate DOWN to the System info tab and select OK on the remote.
You should see the first item showing LINK: CONNECTED followed by your IP Address and other network information. This means your network is active and your
media centre is ready for use.
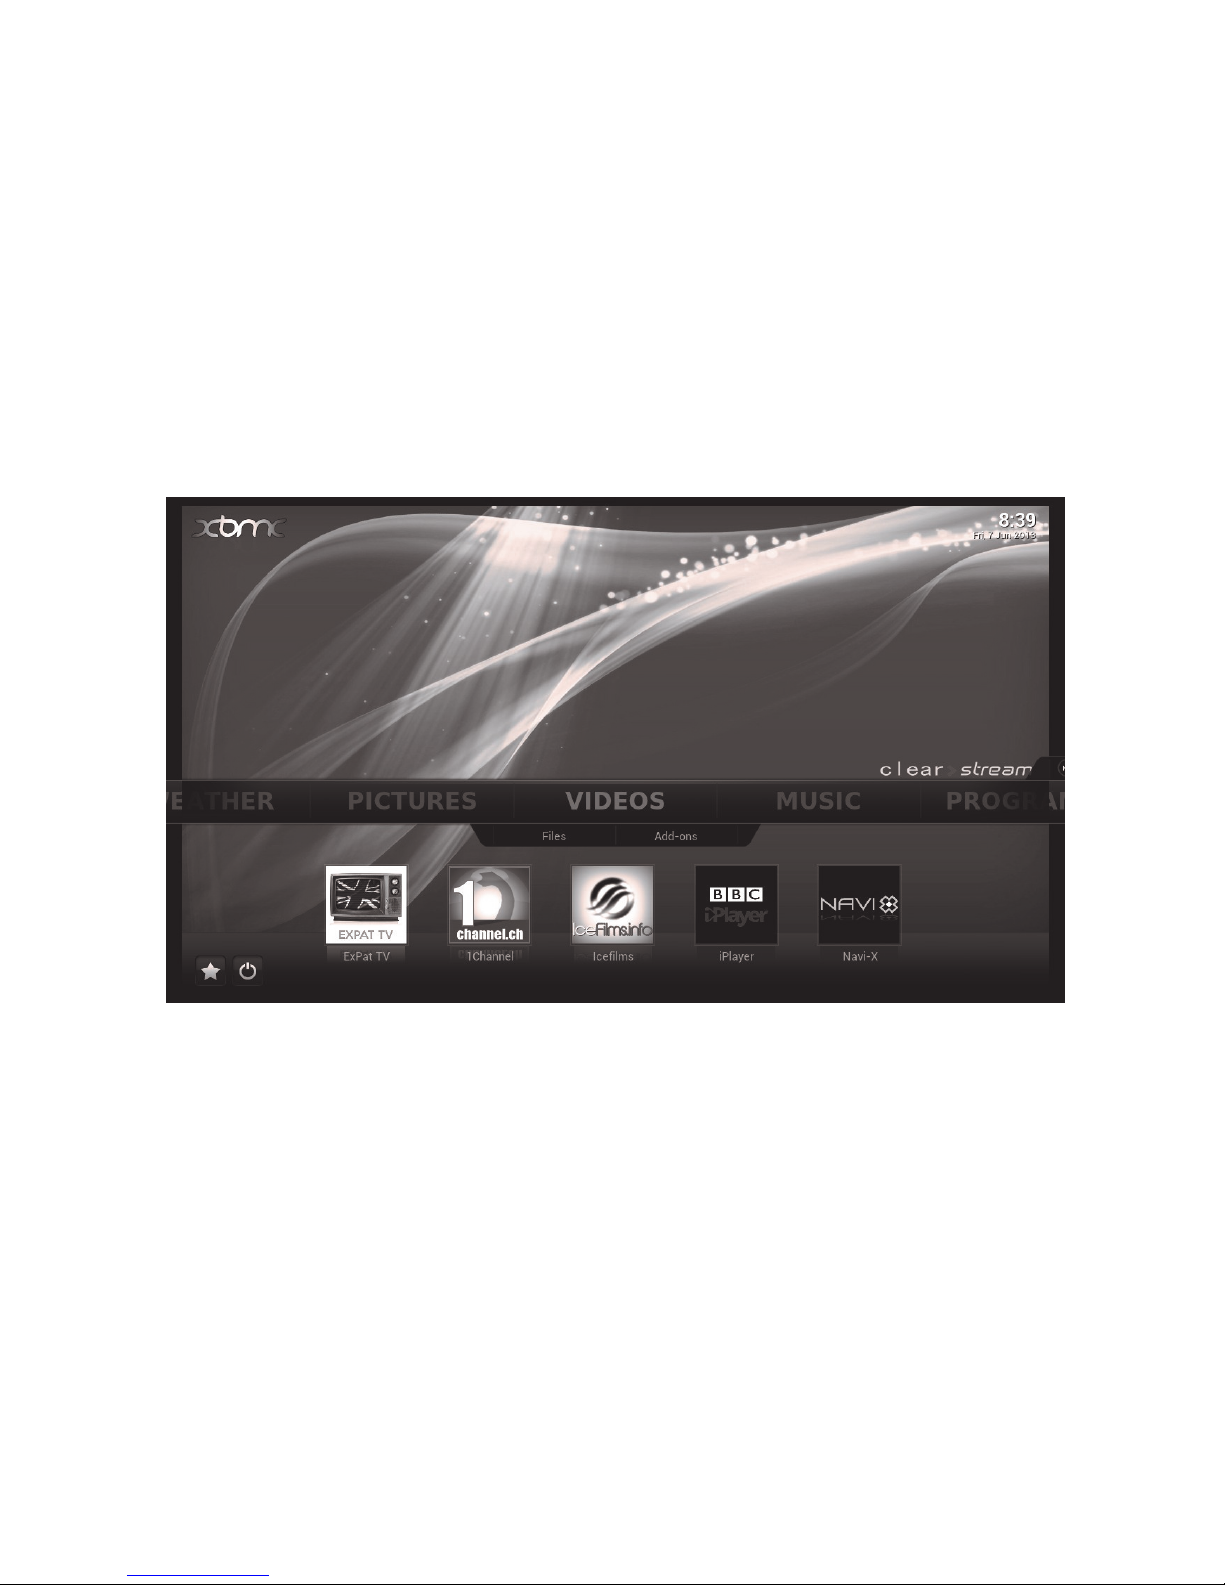
Should your link not show CONNECTED, then go to SYSTEM, SETTINGS,
INTERNET ACCESS, and highlight the NETWORK CONNECTION, and use the
OK button to select the WIRED option. This screen is shown in the following
screenshot.
2.2 Powering on/Off
Once your unit is powered on, a blue LED will be visible on the front of the unit.
By selecting the appropriate HDMI source on your television remote, you should
see the XBMC boot up screen display‘ Loading…’.
Please Note that on some televisions the XBMC Loading display may not
appear during boot up, and you may see a blank screen after the Triotech
logo has displayed, and until the home screen below appears . This is
normal. The screen may be blank for up to one minute. If after one minute
the home screen does not appear, cycle through the HDMI sources on your
TV remote to ensure you have the correct source selected.
After a minute or so, you will see the Home Screen appear.
Page 7
7
2.4 Configure your Wireless Network
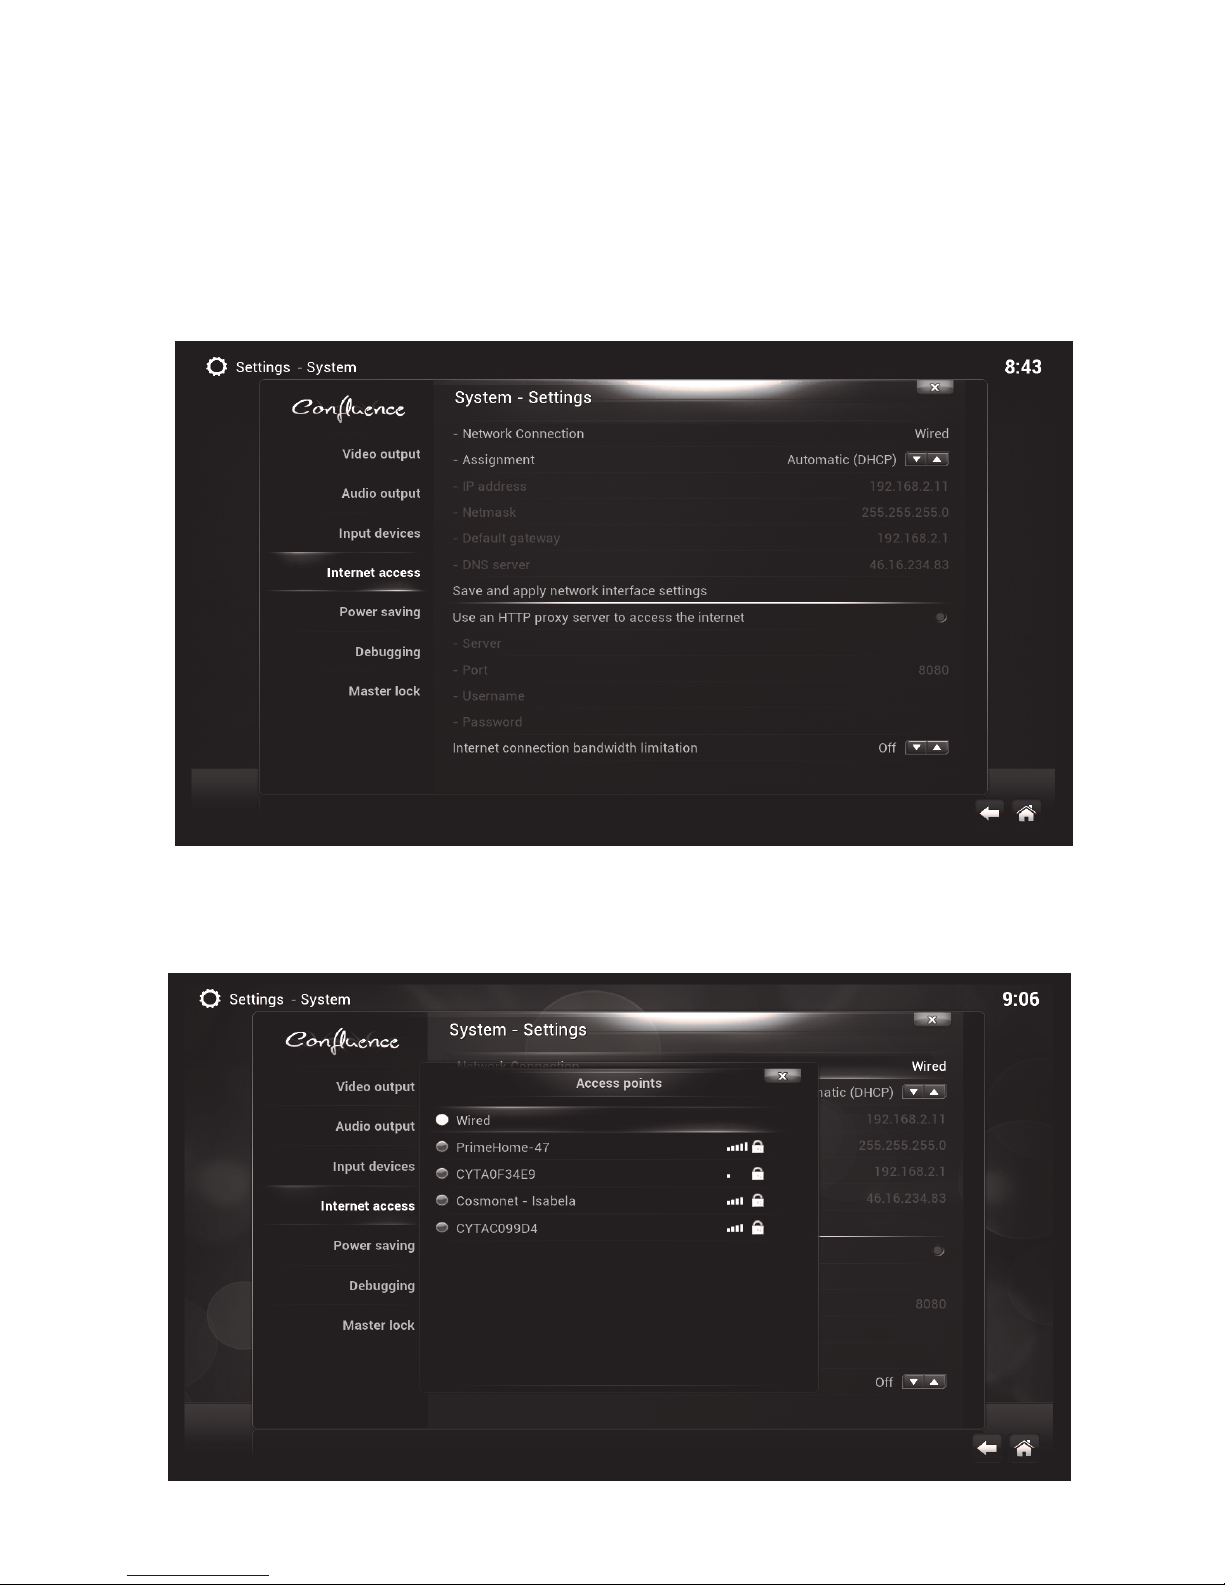
To connect your wireless network, use your remote to navigate from the front
menu across and select SYSTEM with the OK button.
Then go down to the tabs underneath and choose SETTINGS then on the fol-
lowing menu choose INTERNET ACCESS as shown below.
Select NETWORK CONNECTION and choose your wireless connection from
the list given. You will then be asked to enter your network passkey. A green
circle will indicate your are connected.
Page 8
8
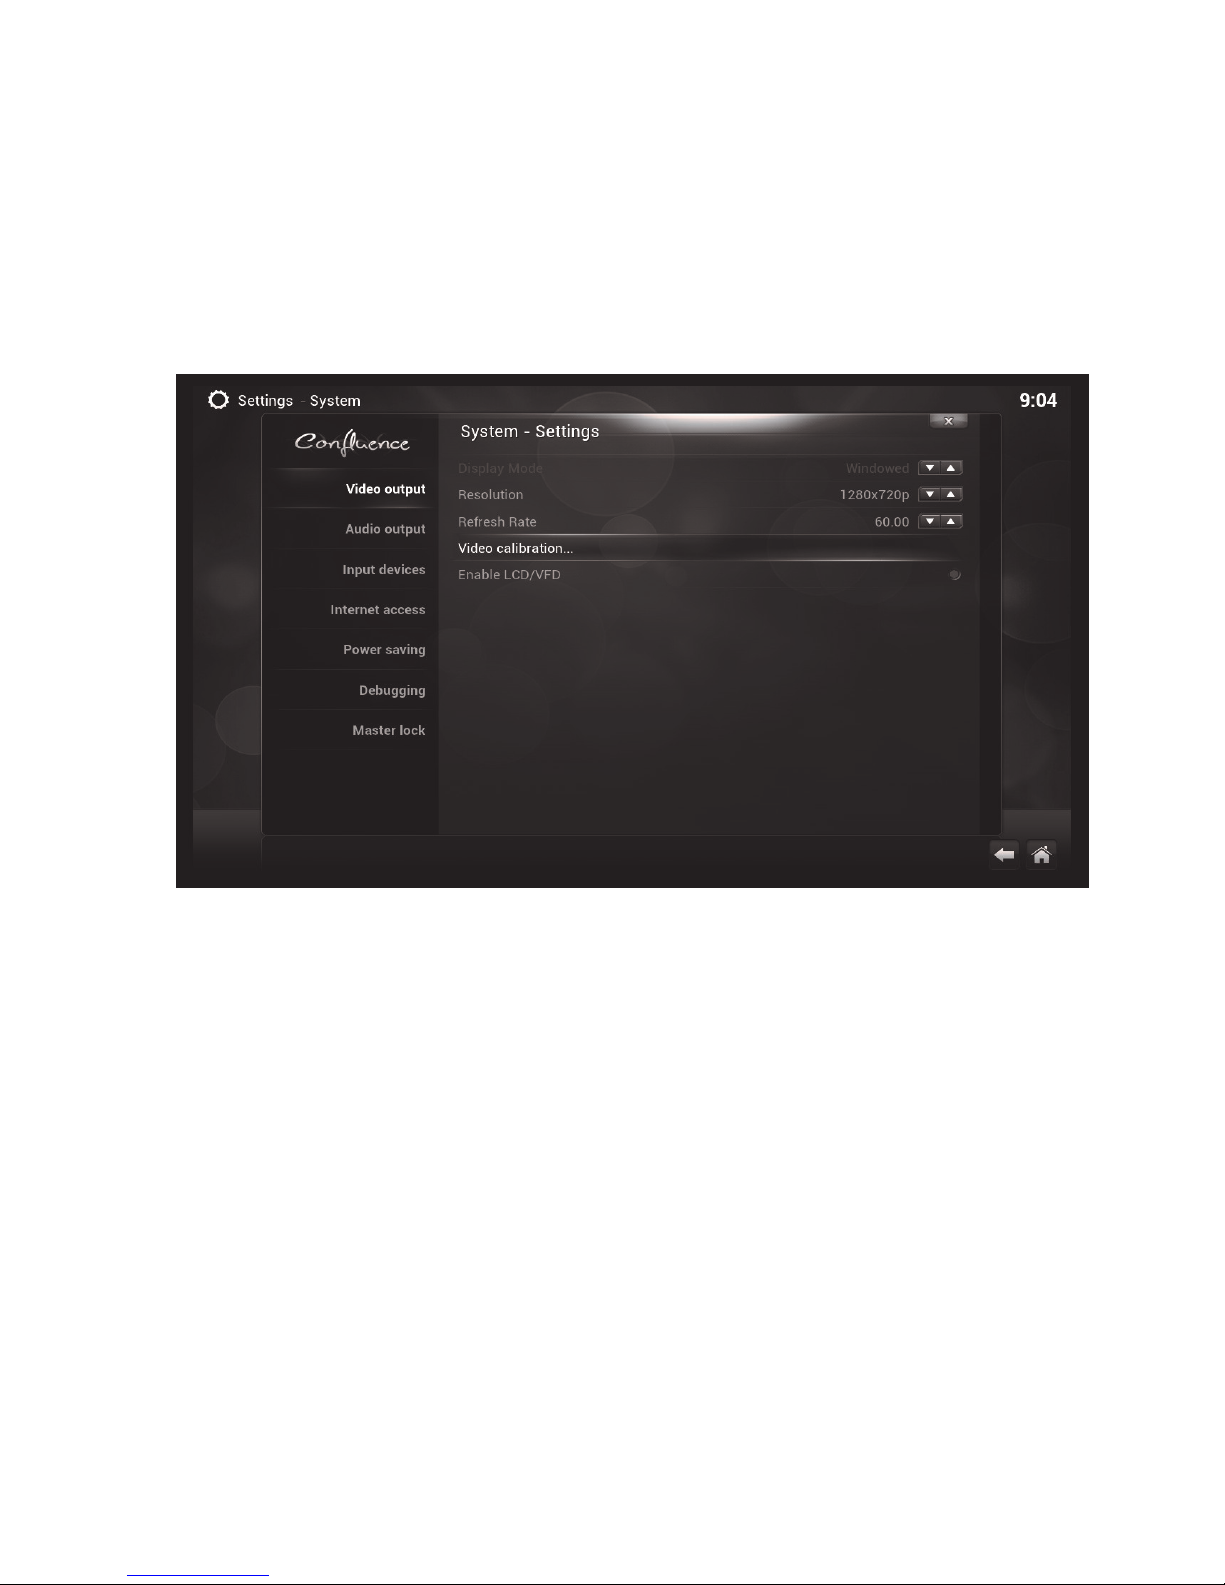
You will then go through a process of moving the RIGHT ANGLE with the
remote cursor buttons until it’s fits square in the top left of the screen. The
same process is carried out in the bottom right of the screen, followed by
selecting where the subtitles should appear. Finally you will see a square in
the centre of the screen. Use the keys to make it a perfect square and
press return. You can exit the menu back to the home screen. Your screen
is calibrated.
2.5 Calibrating Your Screen
To make sure that the system is correctly calibrated to your TV, go to SYS-
TEM—> SETTINGS Then select VIDEO OUTPUT - VIDEO CALIBRATION
as shown below.
After a minute or so, you will see the Home Screen appear.
Page 9
9
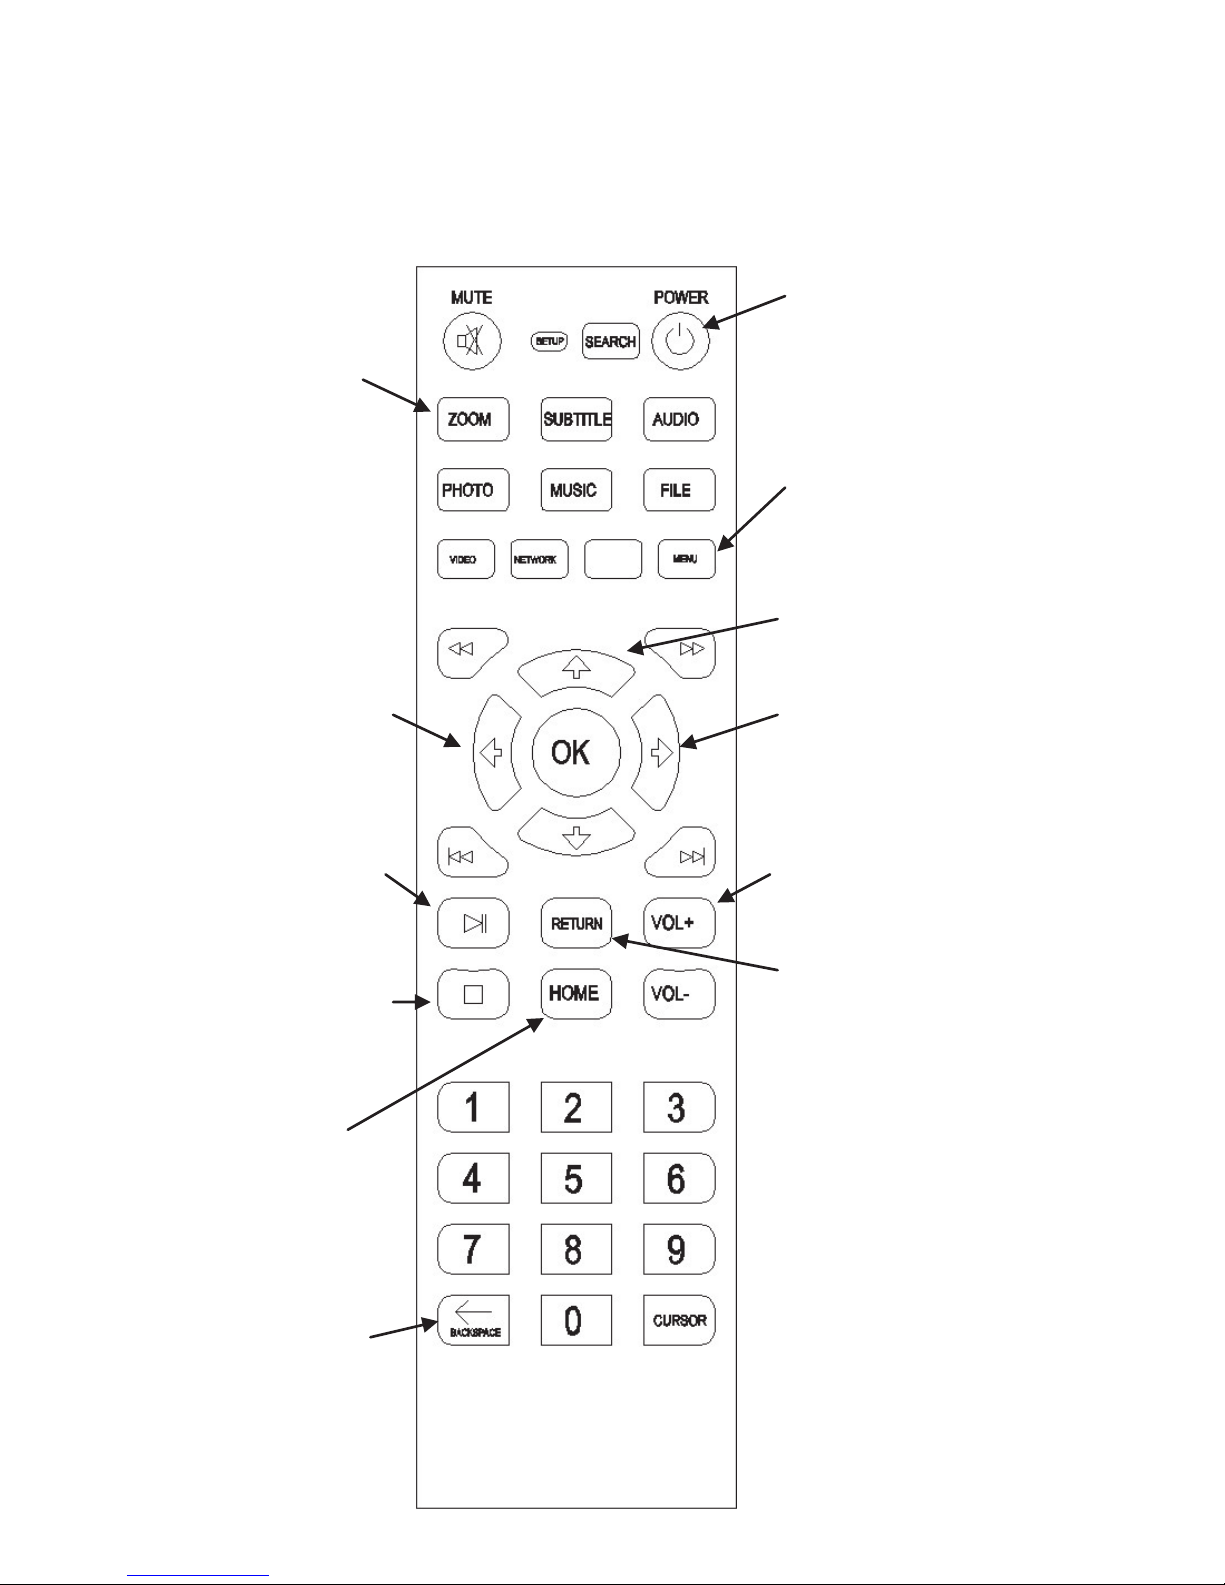
3. Introduction of Remote Controller
POWER— Power on/off
to the media unit
MENU— Press to access
CONTEXT Menu for
channels and media items
NAVIGATION— Use to
navigate UP/DOWN LEFT
& RIGHT within menus.
Press OK to select
choice.
RETURN— Press to go
back ONE menu level.
HOME— Press to return to
start HOME screen
BACKSPACE— Press to
delete character when
typing a search
PLAY/PAUSE— Press to
play or pause an ON
DEMAND Video Stream.
(Does not work with live
TV streams.)
STOP— Press to stop
current live TV or on demand video and return to
menu
VOLUME— Press to in-
crease/decrease volume.
Works in conjunction with
TV remote
UP ARROW— Press to skip
forward 10 Mins whilst playing ON DEMAND video.
RIGHT ARROW— Use to
skip forward 30 secs during
ON DEMAND video
ZOOM— Use to change
aspect ratio of picture
Page 10
10
XBMC Is an award-winning free and open source (GPL) software media
player and entertainment hub for digital media. It was designed for network
playback, so you can stream your multimedia from anywhere in the house or
directly from the internet using practically any protocol available. XBMC is
available for Linux, OSX, and Windows. Created in 2003 by a group of like
minded programmers, XBMC is a non-profit project and therefore this soft-
ware and it’s video Addons are provided free of charge with the Clearstream
media unit you have purchased.
4. Introduction of XBMC.
4.1 XBMC Addons
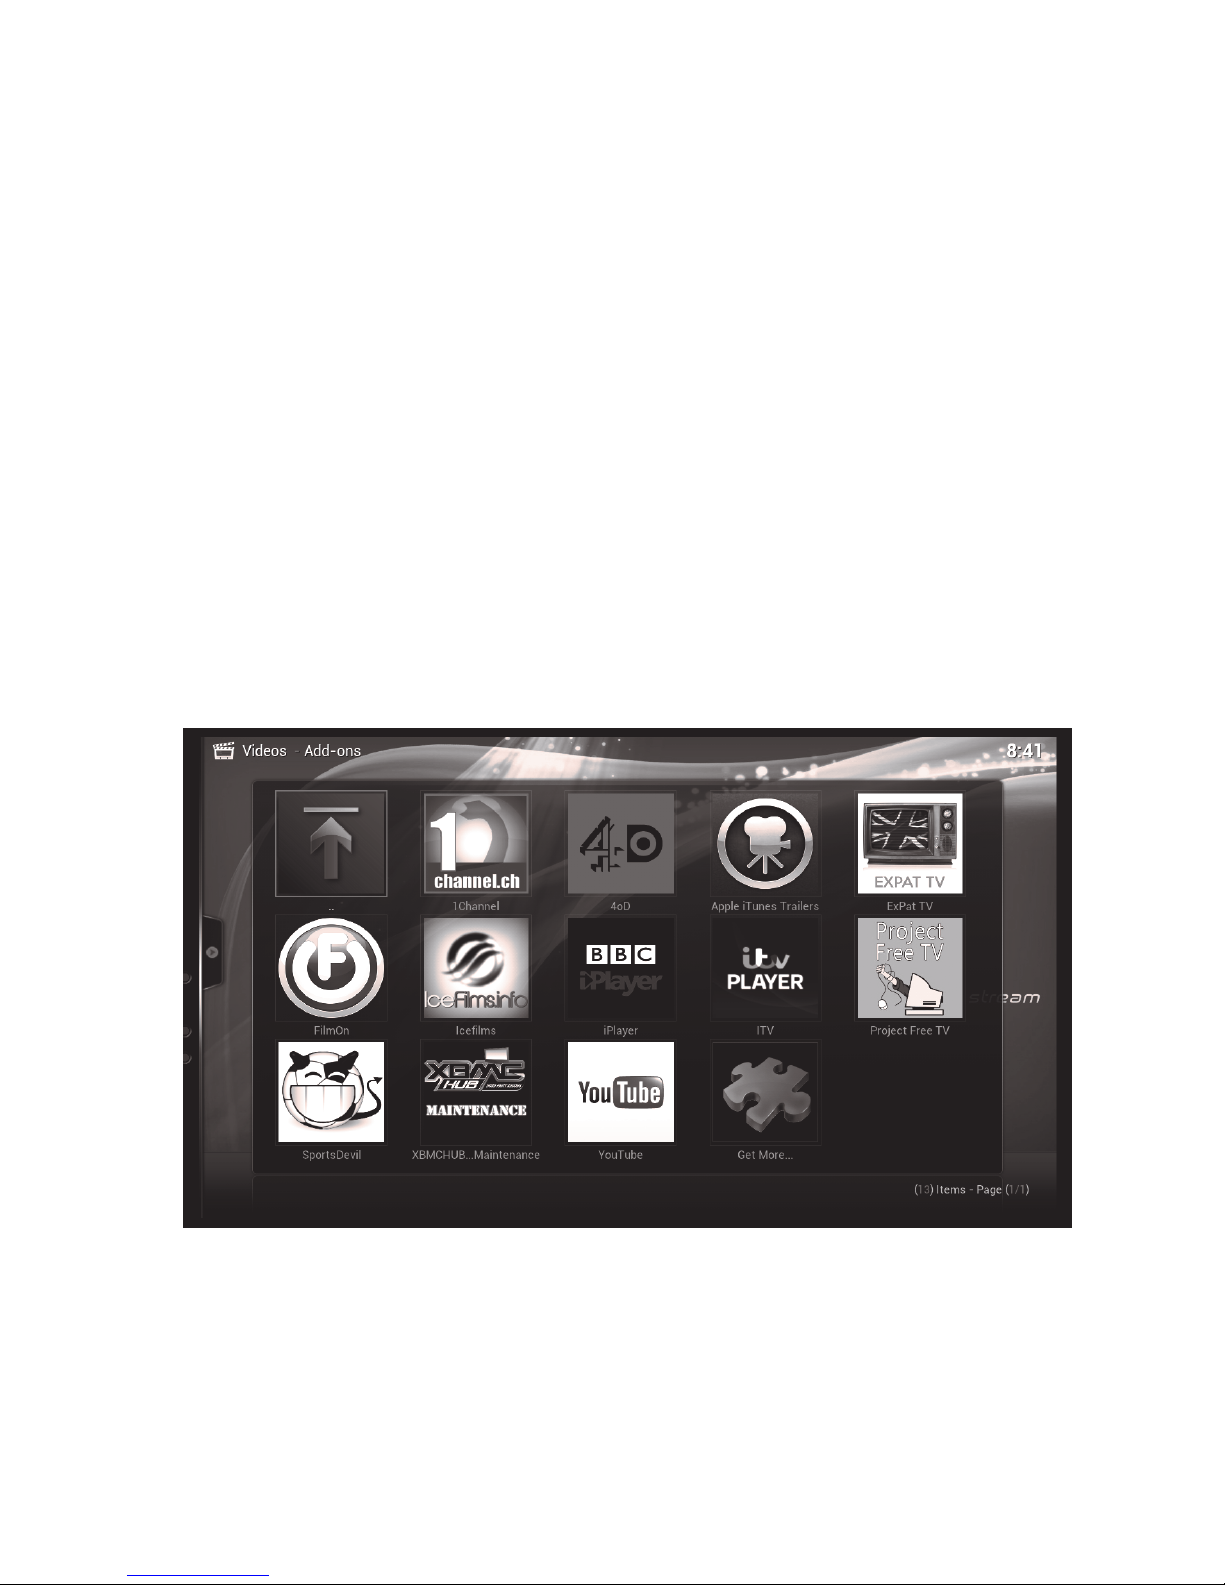
Some popular Addons have been pre-installed on your unit. The shortcuts to
some of these can be found on the main HOME screen.
All of the Addons can be accessed from the tab marked Addons on the
HOME screen, under VIDEOS.
ADDON SHORTCUTS— Navigate with
arrows on remote and press OK
The BORDER around the items indicates which is currently selected
ALL ADDONS— Select the ADDON
Tab below ‘VIDEOS’ on the HOME
screen and press OK to see all of
the Addons Installed
Page 11
11
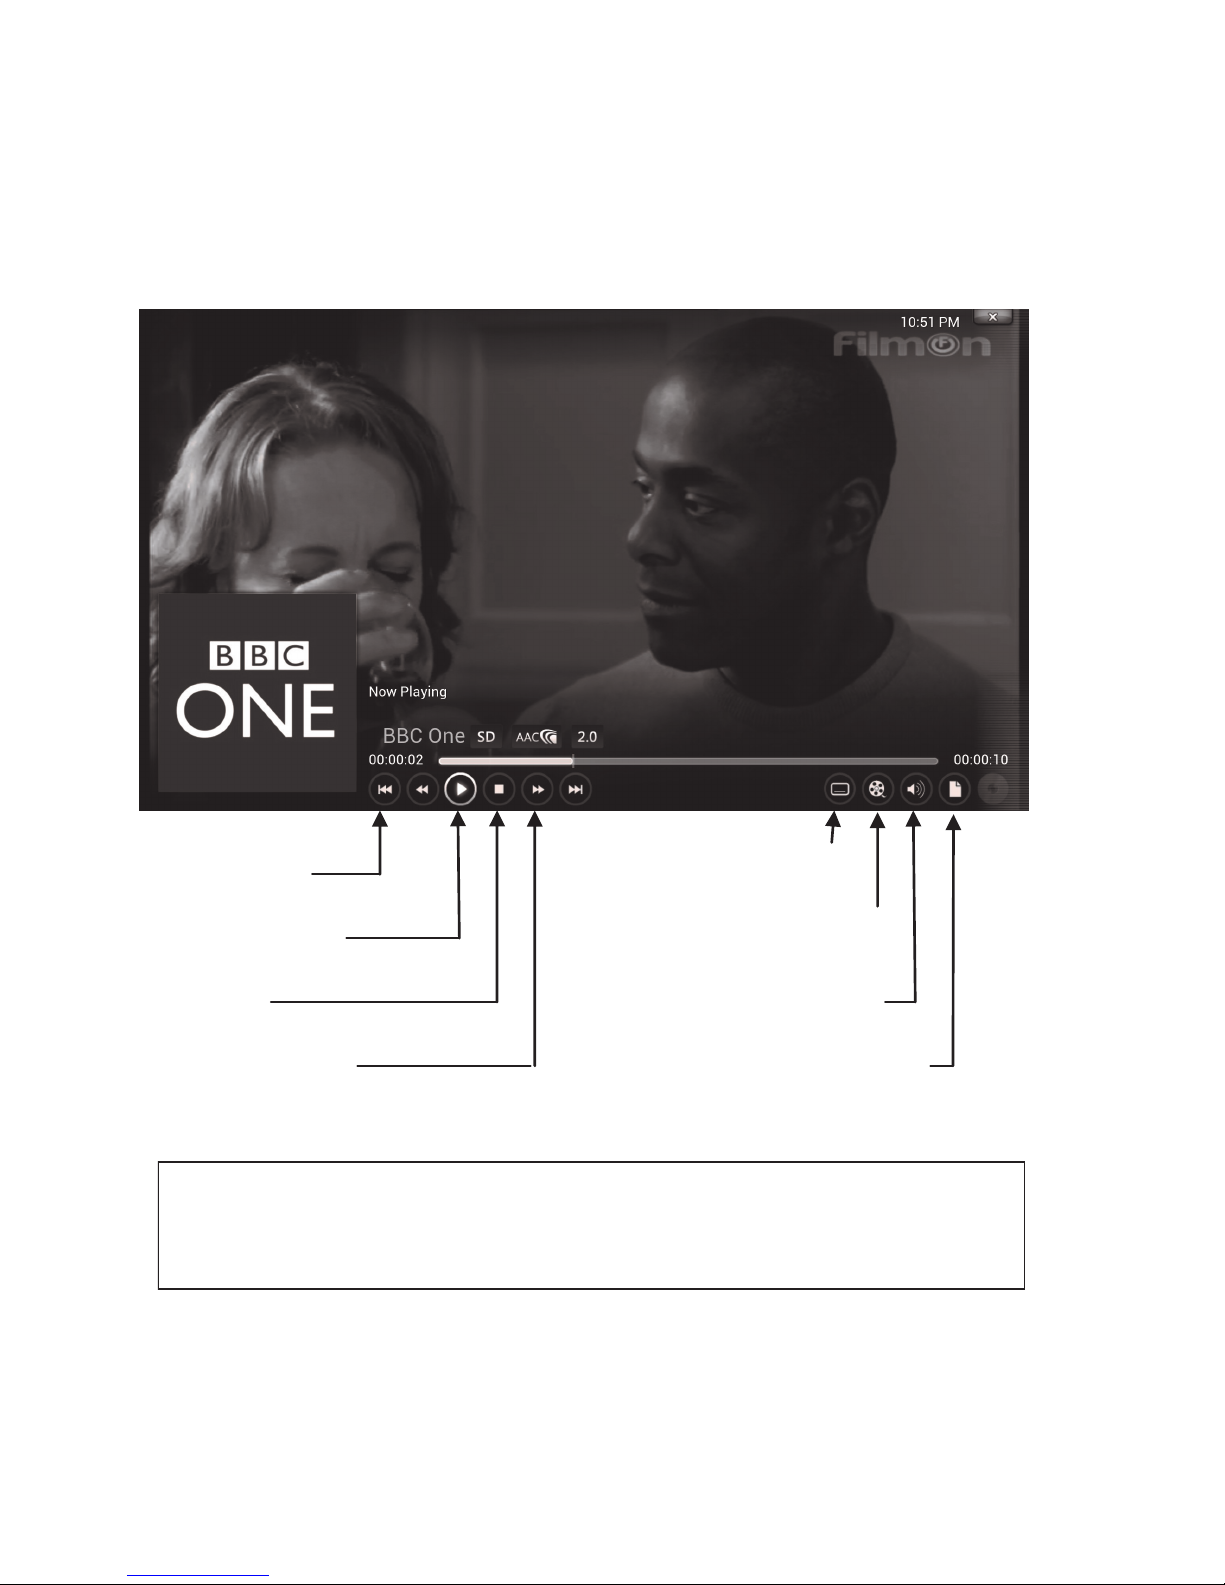
4.2 XBMC Main Playback Screen
The main video playback screen is the same regardless of which addon you are
using. This can be accessed by pressing the OK button.
PLAY/PAUSE
STOP
FFWD/REWIND*
SKIP TO
END/START
VIDEO OPTIONS
Aspect Ratio, Filters
AUDI OPTIONS
Audio Offset, Boost
SUBTITLES
CREATE BOOKMARK
FFWD/REWIND are currently not supported for streaming. Instead, use the
RIGHT arrow on your remote to skip forward 30 sec, and the UP arrow to skip
forward 10 Mins. This is not supported with live TV streams.
Page 12
12
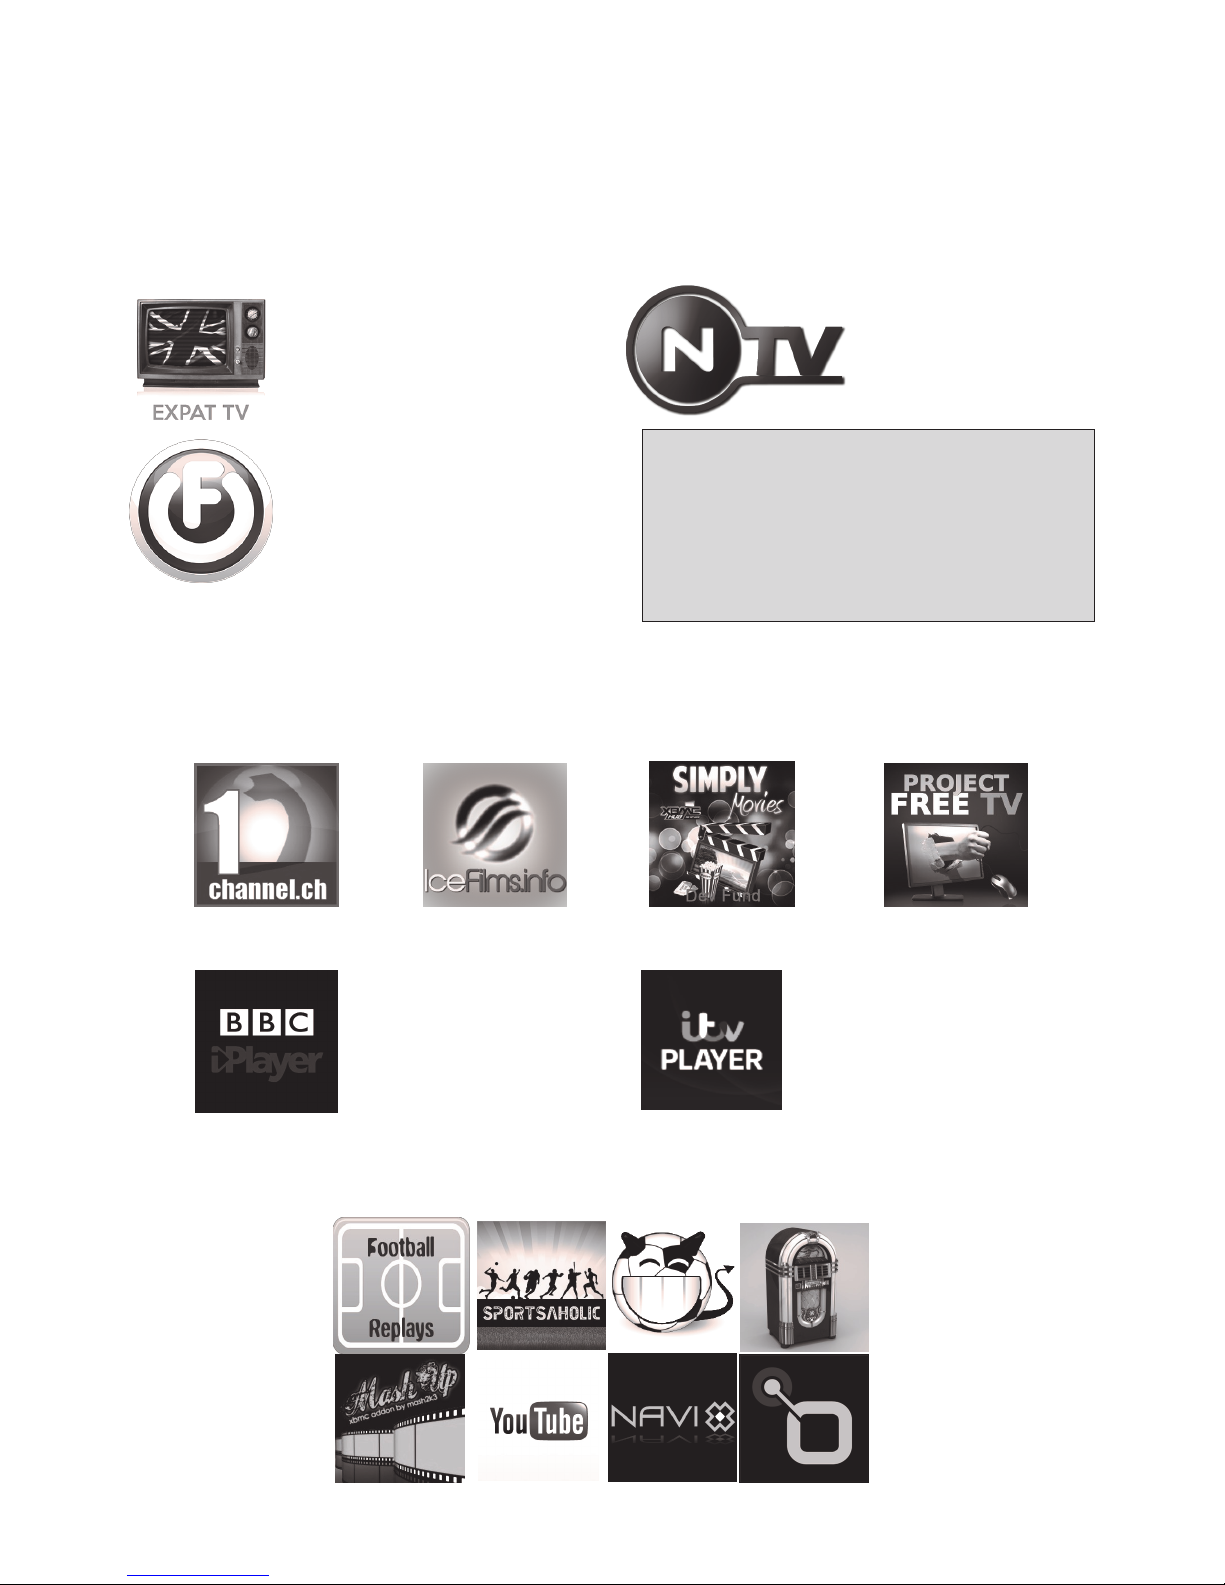
4.3 XBMC Addons
Some of the more popular Addons have already been preinstalled.
Live UK TV. Usually in
higher resolution than
Filmon. Our first choice for
live TV.
Lower resolution with a
slightly different channel list,
Filmon is free live UK TV.
Catch up on BBC channel
broadcasting, showing the
last 7 days programming
plus more
Free content from your
favourite ITV channels,
available anytime.
These Addons provide literally thousand of Movies and TV shows, available on demand.
Classic Movies and shows from yesteryear to the latest episodes from yesterday. Many in
High Definition.
A mixture of live sport action, Music, Movies, TV shows and International TV Channels
It is important to note that with the volume of
content available through these Addons,
Triotech cannot be held responsible for either
the reliability, suitability or legality of some
content in terms of copyright. Some content
may be unsuitable for young children.
Viewer discretion is advised.
Live TV Addons
Another source for
Live UK Channels.
Additional subscription
Channels available.
TV and Movies On Demand
UK Catchup Services
Sports & Other Addons
Page 13
13
4.4 Using Live TV Addons
The first time you run a live TV Addon you may be asked to enter your
username and password. To register, simply go to the Filmon
website at www.filmon.com or www.ntv.mx to register for a free account.
Then input those details into the Addon to access your live TV channels
by highlighting the Addon and selecting the BLUE MENU button on the
remote. Use ADDON SETTINGS from the menu then input the details.
Navigate to a channel thumbnail or list with the remote arrows and press
OK to select your channel. Please be aware that Internet streams
will take up to a few seconds to start, so repeated pressing of the
OK button before the stream starts may cause the unit to fail to
play the stream correctly.
To go back to your channel list, press the STOP button, and then
HOME or RETURN to go back to the main menu screen.
4.5 Using UK On Demand Addons
UK On Demand services are already preconfigured on your unit. In order
for them to work, a subscription to a service that provides dynamic DNS is
required. This enables the content to be viewed outside of the UK without
a VPN service. This service is approximately 4.00 Euros per month, and
takes only five minutes to be up and running.
To find out more, please visit.: www.triotechgroup.com/ondemand
Firstly sign up for your free trial and then check your account is active on
the UnoTelly website. Then enable it on the Clearstream unit by using the
Clearstream Maintenance Addon. Details for this can be found on page 15
of this guide.
If UK On Demand services stop working, please log into your UnoTelly
account online and check your account is active. Also, from the Quickstart
menu on the website, select the UPDATE IP ADDRESS on the menu in
case your ISP have renewed your TCP/IP address.
Important: The skip forward buttons do not work with UK live and On demand
channels. Using the arrow buttons on the remote whilst watching these could result
in the unit freezing. In this event use the On/Off button to reboot the unit.
.
Page 14
14
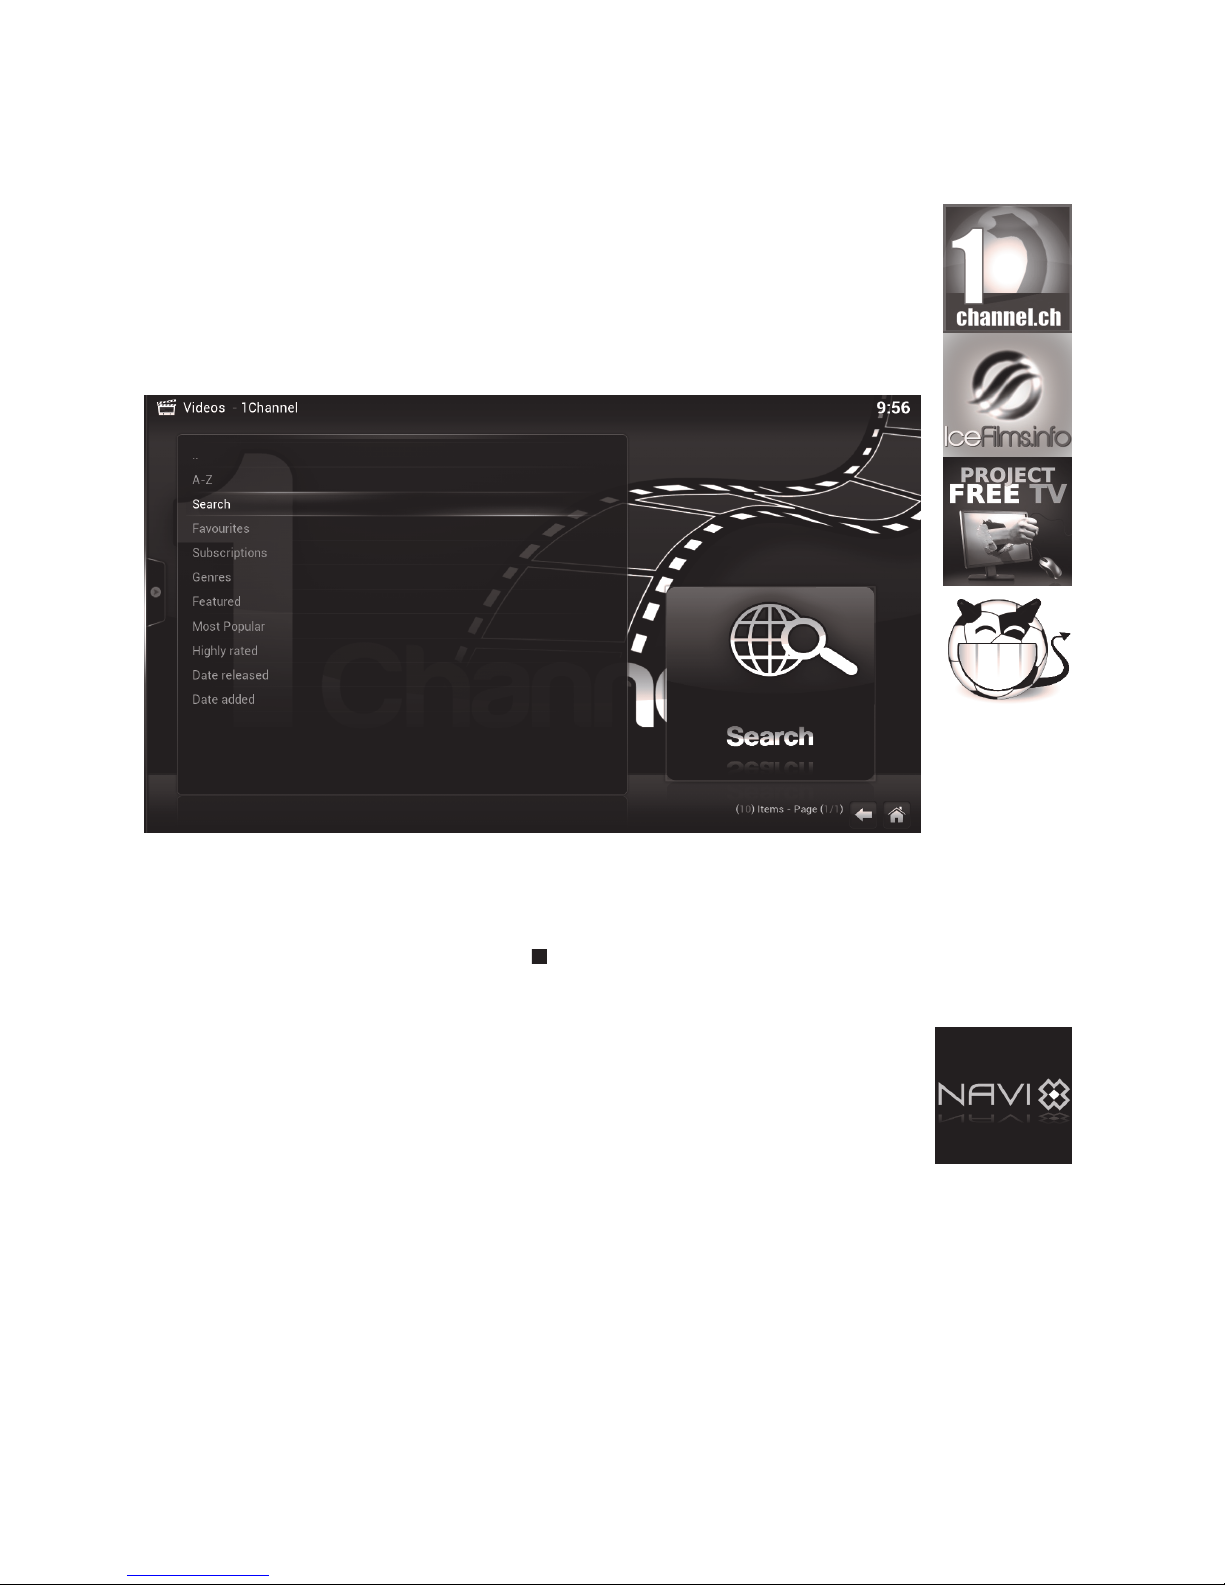
The other streaming addons operate in a similar way. Using the arrows
on the remote you can navigate between options for TV Shows or Movies, and then sort by genre, date and most popular etc. Specific content
can be searched for by using the search option from the menu and then
using the virtual keyboard on the screen to type out the search request,
as shown below:
4.6 Using Other Streaming Addons
Once you have found the title you are looking for, the following menu will
ask you to choose a source from the list to play the video from.
To exit the video stream, press the
STOP button as before.
Navi-X is a program rather than a video addon so the interface operates slightly differently. When you first start you will be presented with
an icon for ‘Media Portal’. By selecting this you will have access to the
content categorized by ‘Most popular over the last 24hrs’ etc. Here you
will find playlists of user created media for you to stream including live
TV channels from all over the world. Please note that Navi-X is a very
popular media portal and can become busy at peak evening and weekend periods.
To exit the Navi-X interface, press the LEFT remote button and a side
menu will appear. To close Navi-X, navigate down the list to EXIT and
press OK.
Page 15
15
5.0 Clearstream Maintenance Addon
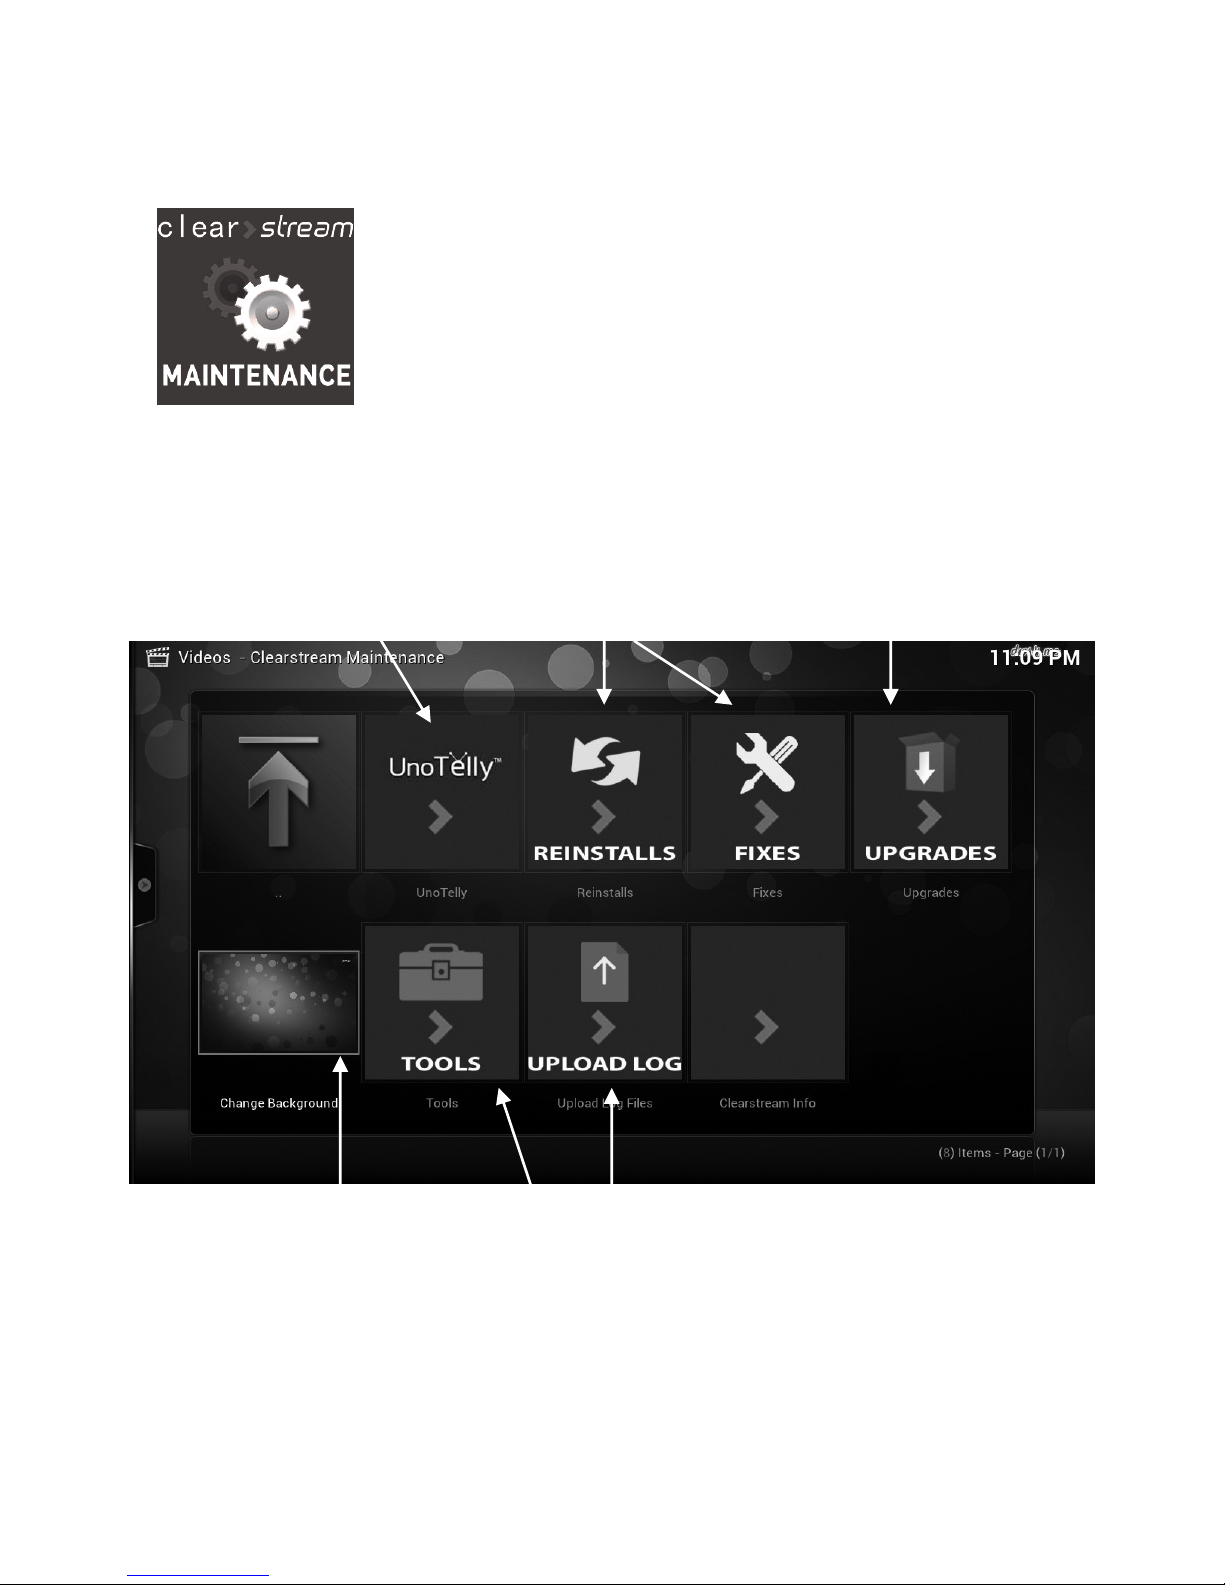
The Clearstream maintenance tool is designed to give you all the
tools and support you need to keep your unit up to date and
Functioning optimally. Here you will find all of the fixes, updates, and
version upgrades as well as diagnostic tools such as checking your
Internet connection. The Auto Update feature means that critical
updates will be applied automatically when you switch the unit on.
You will find the Clearstream maintenance Addon by using the
RIGHT button on the remote from the main screen. You will find the
Icon under PROGRAMS.
Enable Unotelly for UK
On Demand Services
Re Install your favourite
Addons in seconds &
apply the latest fixes
Free version upgrades from
Triotech are available here
A choice of backgrounds
to choose from
A tool suite for diagnosing
and checking your system
Upload a log file if required
Page 16

16
5.1 Troubleshooting
Q. I have a ‘RED cross saying script failure’ at the bottom right of my screen.
A. If all Addons are failing, it is likely you are not connected to the internet.
Check connectivity using the Clearstream maintenance tool and reboot the
media unit.
Q. My video stream keeps pausing and saying ‘Buffering’
A. Some sources can be busy due to demand. Many issues can be fixed by
pausing the stream for 30 seconds or so before resuming to allow the stream
to buffer. If you still experience buffering, do a speed check from a PC. If your
link is OK then press the STOP key and choose another source as they will
vary in speed. Many videos are available across different Addons as well, so
give a different one a try.
Q. I cannot connect to the Internet
A. If you are wired then check whether the Ethernet port is flashing and check
the router configuration is correct. For wireless, make sure you have a green
circle as connection status within the wireless setup menu and that your passkey is correct. If the problem persists, then switch off the router and the Clearstream unit. Switch on the router first and wait until it is fully active before
switching on the Clearstream unit and try connecting again.
Q. UK On Demand services are not working with script failure or URL not found
A. Please read section 4.5 regarding setting up your Unotelly account.
Q. One of my Addons is not working but the rest are fine
A. Try going to the re-install section of the Clearstream Maintenance Addon and
select the Addon to re-install it. Reboot the Clearstream and try again.
Q. My media unit is not responding when using an Addon.
A. If it does not respond within a couple of minutes, then reboot with the red
button on the remote.
Q. I cannot enter my serial number into the Clearstream Maintenance Addon
A. The serial number is printed on the underside of the media unit, starting 201..
The number can be entered without spaces or dashes. There is no need to
use the S/N prefix when entering the number.
All of the Addons are free public domain software and as such we do not offer direct
support should an individual Addon stop working or malfunction. We will of course
offer advice and fixes where we can, which you can get via our website at
www.triotechgroup.com/support . All available fixes are available via the Clearstream
Maintenance Addon.
Support for Addons
 Loading...