

Page 1
Quick Start Guide
Version 1.00
www.triotechgroup.com/
www.triotechgroup.com/contact-sales
www.triotechgroup.com/contact-support
@clearstream2013
/clearstream.freeTV
Page 2

2
Preface
Dear customer,
Thank you for purchasing the Clearstream Media player. We hope you enjoy
your experience of viewing live and pre recorded TV programming from all
around the world. For those of you who are new to the world of TV streaming
technology, please take a few minutes to read this QuickStart guide supplied
with your player. It will help you get up and running more quickly, and give you
an idea of the differences in operation between traditional terrestrial and
satellite viewing, and Internet TV.
We at Triotech Media as an independent vendor, offer a no subscription based
viewing model via publicly accessible TV feeds that offer access to live and on
demand pre-recorded content straight out of the box.
Rather than choosing a single supplier or providing our own streams, we
intentionally remain independent in order to offer the best free services
available. Additional subscription Android Apps can be downloaded online, but
this is entirely optional and are purchased direct by you from the content
provider. The choice is yours. All of the software on the unit is open source,
secure and free of charge. Our Clearstream maintenance application ensures
you are fully up to date with the latest versions of software by updating
automatically as required.
It is important to note that to get the best out of your unit, you will need a
reliable internet connection that is a minimum of 4Mbps, and that your internet
provider does not restrict your internet access.
Our support service is online, and covers the operation of the hardware and
the software. We cannot support the actual content as it is not under our
control, but we will offer advice where possible. To log a support incident,
please go to http://www.triotechgroup.com/create-support-ticket.html. Our
support service is operational from 8.30am - 8.30pm Mon-Sat, and we typically
respond to emails within 8 hours.
Best Regards
The Triotech Team
Product specifications, size, and shape are subject to change without notice, and
actual product appearance may differ from that depicted herein. All trademarks and
brand names are the properties of their respective holders. © 2013-18 Triotech Media.
All rights reserved.
15
Statements
This manual is provided “as is” without warranty of any kind, either expressed
or implied, including but not limited to the implied warranties or conditions of
merchantability or fitness for a particular purpose. In no event shall we, its
directors, officers, employees or agents be liable for any indirect, special,
incidental, or consequential damages (including damages for loss of profits,
loss of business, loss of use or data, interruption of business), even if we
have been advised of the possibility of such damages arising from any defect
or error in this manual or product. Specifications and information contained in
this manual are furnished for information use only, and are subject to change
at any time without notice, and should not be construed as a commitment by
us. We assume no responsibility or liability for any errors or inaccuracies that
may appear in this manual, including the products and software described in
it. No part of this manual, including the products and software described in it,
may be reproduced, transmitted, transcribed, stored in a retrieval system, or
translated into any language in any form or by any means, except
documentation kept by the purchaser for backup purposes, without the
express written permission of us. Product warranty or service will not be
extended if: (1) the product is repaired, modified or altered, unless such
repair, modification of alteration is authorized in writing by us; or (2) the serial
number of the product is defaced or missing. Products and corporate names
appearing in this manual may or may not be registered trademarks or
copyrights of their respective companies, and are used only for identification
or explanation and to the owners’ benefit, without intent to infringe.
Terms of usage
Triotech Media cannot be held liable for the quality, availability or legality of
either Live TV or on demand content that you choose to install on the unit you
are using, Due to this, the warranty for any unit purchased covers any and all
hardware defects but excludes any software application but the operating
system itself. The loss or withdrawal of function of any add on or application is
excluded from the warranty agreement, and refunds requested due to loss or
withdrawal of any add on or function will be unavailable.
Page 3
14
5.2 Troubleshooting
Q. I have a ‘RED cross saying script failure’ at the bottom right of my screen.
A. If all Addons are failing, it is likely you are not connected to the internet.
Check connectivity using the Clearstream maintenance NET TESTER tool
and reboot the media unit. Should the test fail, then go through the connection
procedure outlined in Chapter 2 of this guide.
Q. My video stream keeps pausing and saying ‘Buffering’
A. The unit itself will only buffer if not enough data is being received. This can be
due to either the source you are trying to watch, or by an unstable or slow
Internet connection to your location. Try going into Clearstream Maintenance
Tools section, and run the Internet test. The results will give you a good
indication of both stability and speed to you location. Also, trying the restart
option described below can sometimes help solve the issue.
Q. I cannot connect to the Internet
A. If you are wired then check whether the Ethernet port is flashing and check
the router configuration is correct. If the problem persists, then switch off the
router and the Clearstream unit. Switch on the router first and wait until it is
fully active before switching on the Clearstream unit and try connecting again.
Q. One of my Addons is not working but the rest are fine
A. Try going to the App Installer under the PROGRAMS heading and re-install
the appropriate addon or App from here.
Q. My media unit is not responding when using an Addon.
A. If it does not respond within a couple of minutes, then reboot with the power
button on the remote, or by using the Red KODI button on the second row of
buttons on your remote.
With the exception of Triotech Media authored Addon’s, all of the Addons are free
public domain software and as such we do not offer direct support should an individual
Addon stop working or malfunction. We will of course offer advice and fixes where we
can, which you can get via our website at www.triotechgroup.com/support .
All available fixes are available via the Clearstream Maintenance Addon.
Support for Addons
3
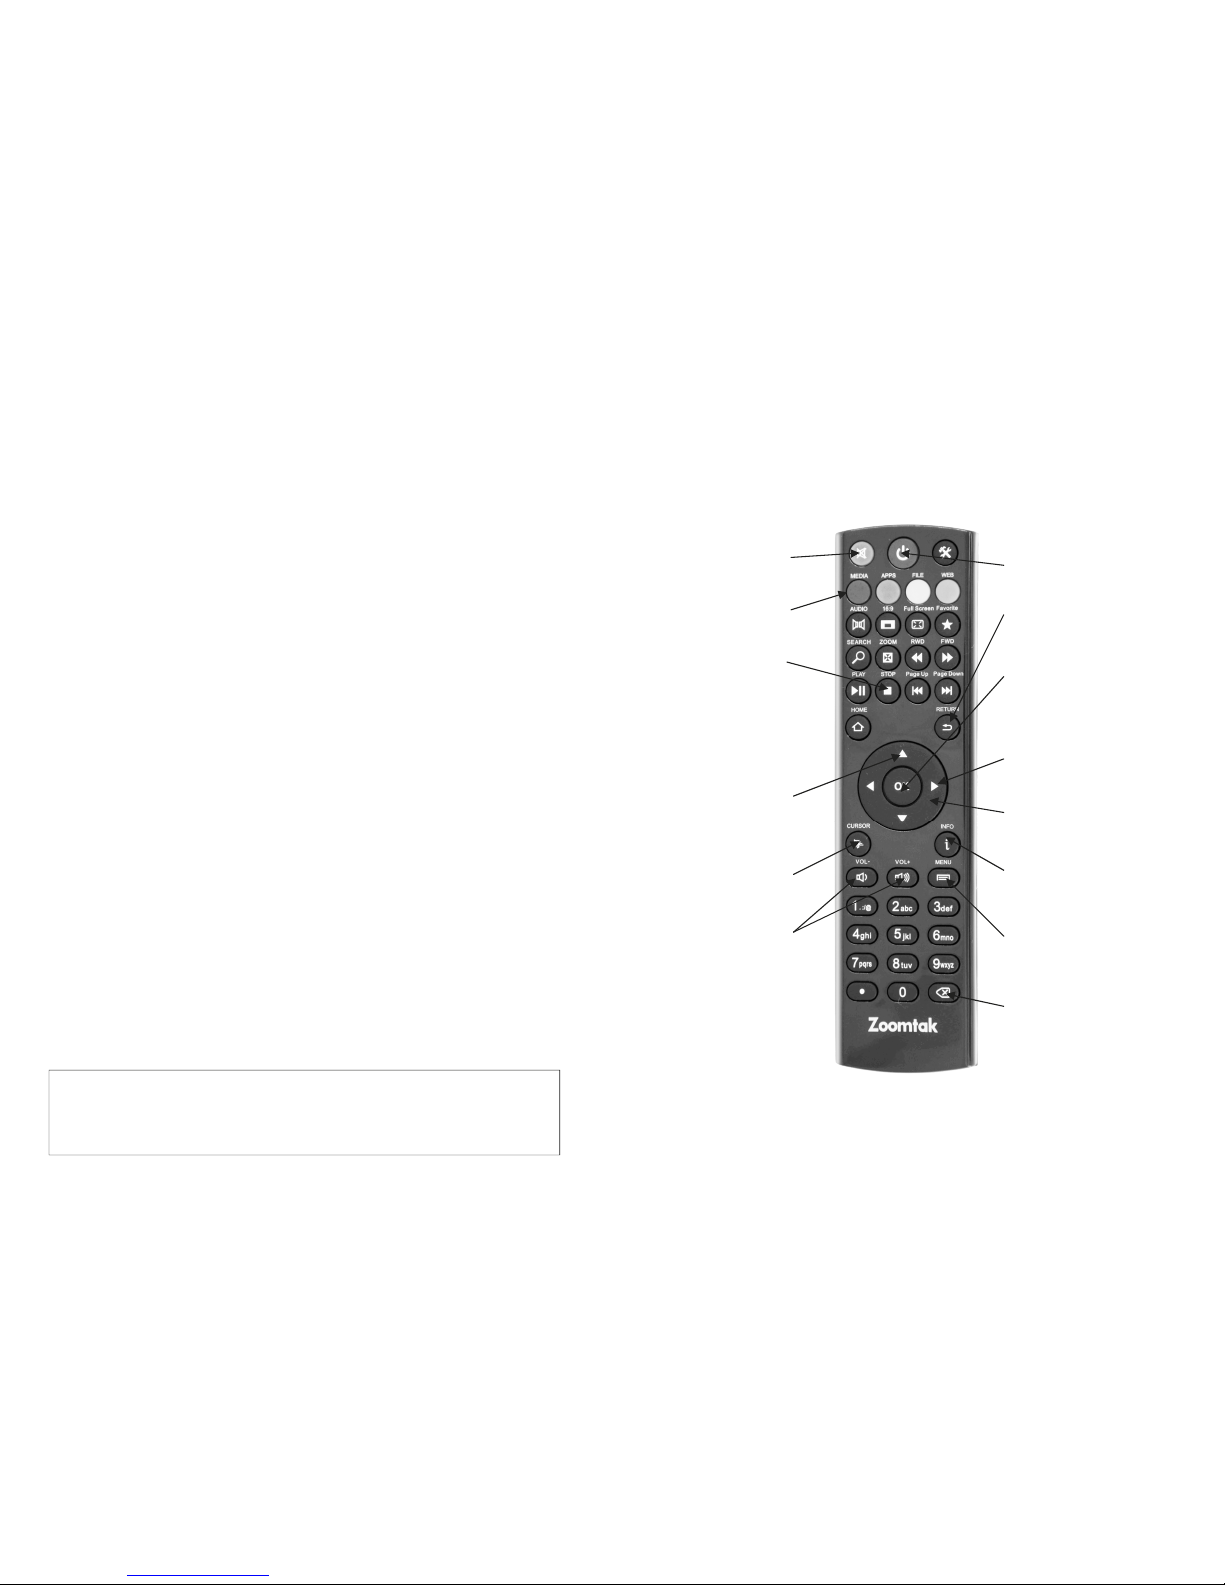
Introduction of Remote Controller
MENU— Press to
access CONTEXT Menu
for channels and media
items
OK— Use to select a
choice when navigating
the menu. Also
functions as
PLAY/PAUSE
RETURN— Press to go
back ONE menu level.
BACKSPACE— Press to
delete character when
typing a search
VOLUME— Press to
Increase/decrease
volume. Works in
conjunction with TV
UP ARROW— Press to
skip forward 10 Mins
whilst playing ON
DEMAND video.
RIGHT ARROW— Use to
skip forward 30 secs
during ON DEMAND video
POWER— Power on/off
the media unit
POINTER — Toggle a
pointer ON/OFF to aid
Navigation
MUTE— Press to mute
the volume
NAVIGATION— Use to
navigate UP/DOWN LEFT
& RIGHT within menus.
STOP— Press to stop
videos
INFO— Video Stream and
Quality Infomation
KODI— Quick Reboot
Option
Page 4
4
Contents
Preface 3
Chapter 1 System Introduction 4
1.1 Key Features 5
1.2 System Environment 5
1.3 Package Contents 5
Chapter 2 Connecting Your System 6
2.1 Cabling Your System 6
2.2 Powering On/Off 7
2.3 Setting up your system 7
2.4 Configure your network 8
2.4.1 Using the App Installer 9
Chapter 3 System Overview & Usage
3.0 Calibrating Your System 10
3.1 Main Playback screen 11
4.1 Video Addons 9
4.2 Main Playback Screen 11
4.3 Using Live TV Addons 12
4.4 Movie & Recorded TV Addons 12
Chapter 4 Clearstream Maintenance & Help
4.1 Using Maintenance 12
4.2 Clearstream Help 13
4.3 Troubleshooting & Support 14
13
4.1 Help and Support For Your Clearstream
One of the key differences between our system and many others
is that we understand how important customer service is.
In addition to the standard hardware warranty, we provide lifetime
technical support for your unit with online help, videos, & FAQ
sections etc.
For direct support, you can use the contact-us link to raise a
support ticket or ask a question at:
www.triotechgroup.com/contact-us
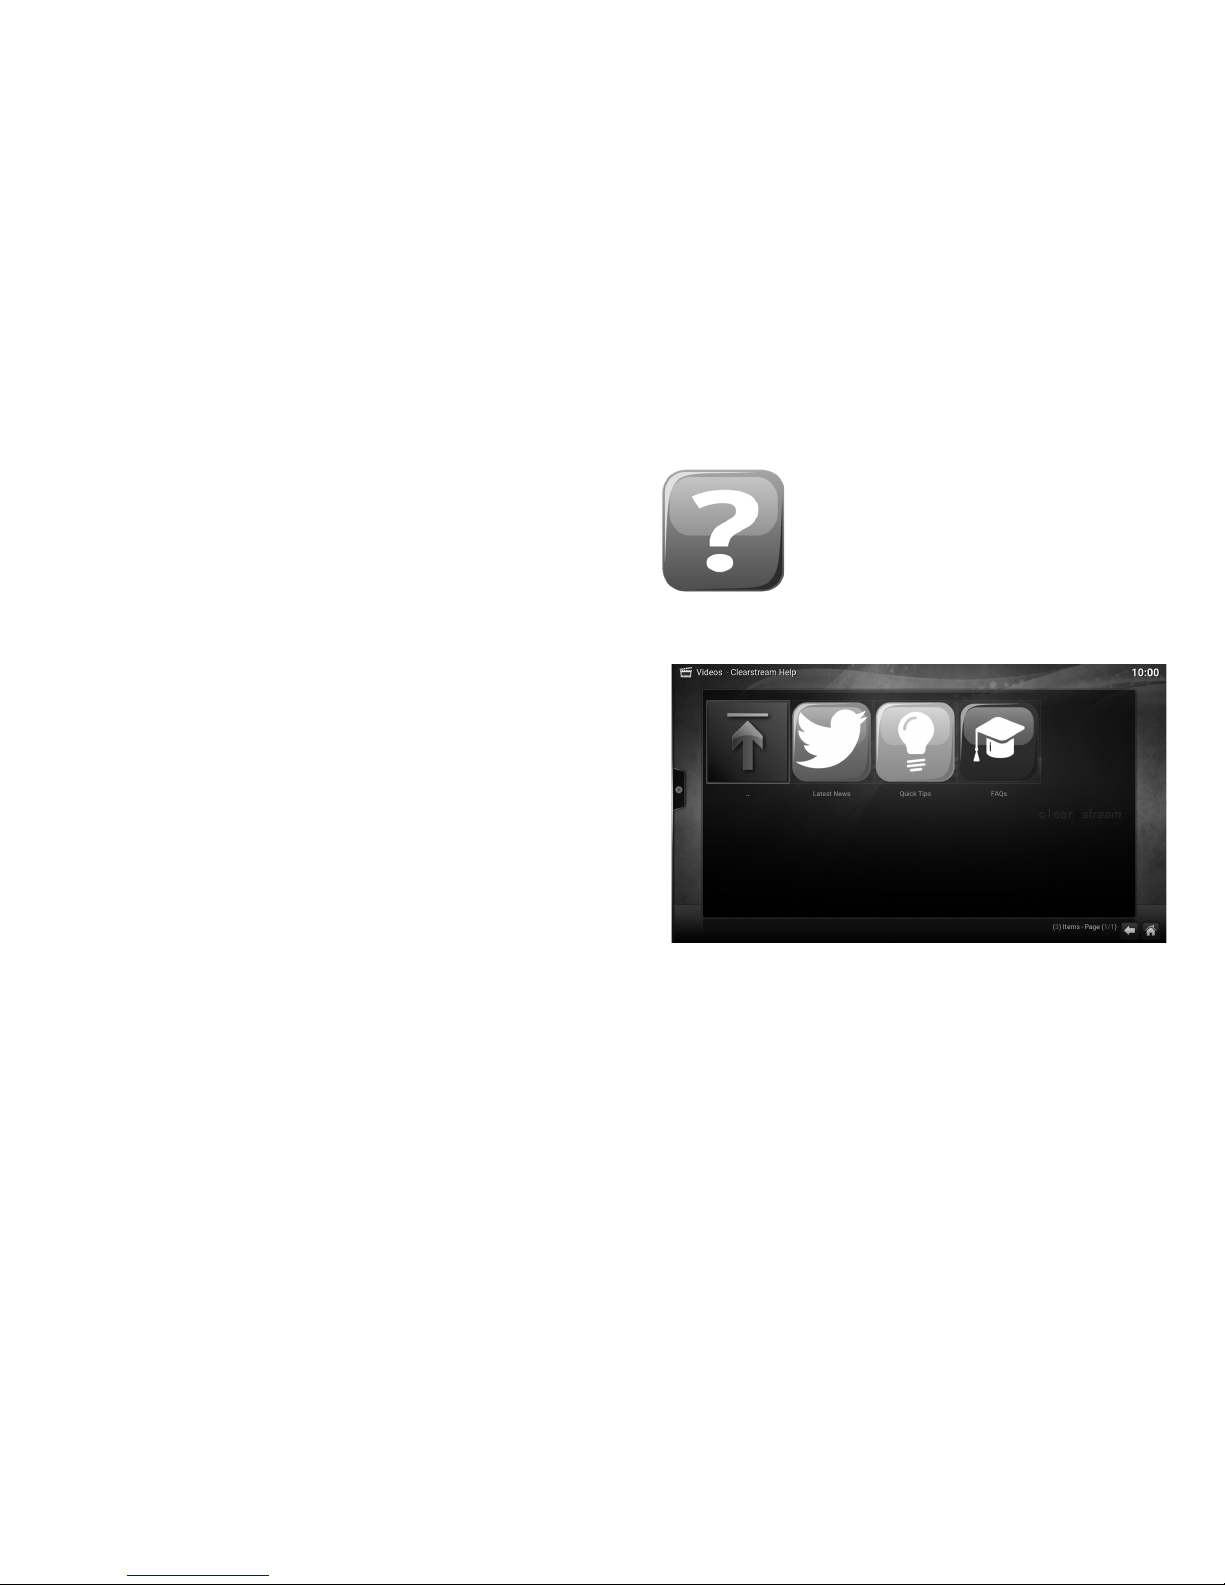
HELP
Latest news, system status updates and quick tips are available directly from your
unit by accessing the HELP Icon . You can find this in the Video Addon section
from your menu.
You can also follow us on:
Twitter @clearstream2013
Facebook /Clearstream.freeTV
Website www.triotechgroup.com
Page 5
12
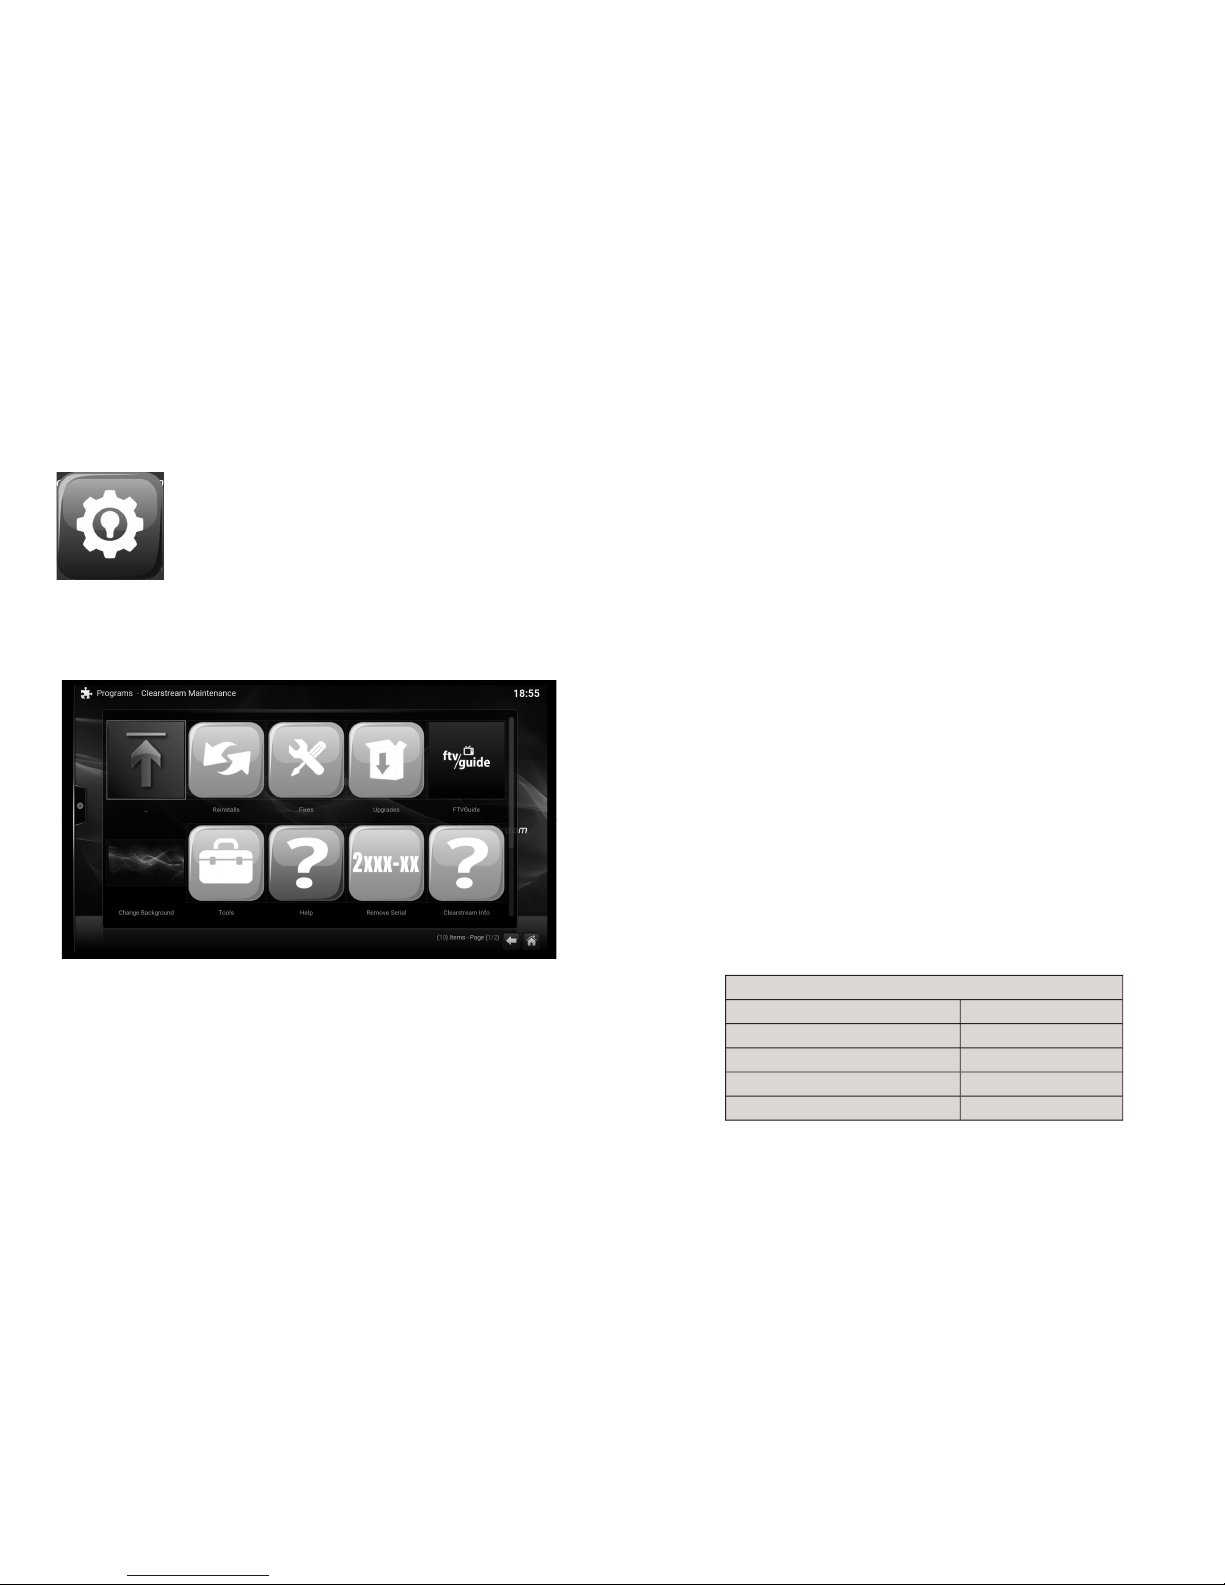
4.0 Clearstream Maintenance
The Clearstream maintenance tool is designed to give you all the
tools and support you need to keep your unit up to date and
Functioning optimally. Here you will find all of the fixes, updates, and
version upgrades as well as diagnostic tools such as checking your
Internet connection. The Auto Update feature means that critical
updates will be applied automatically when you switch the unit on.
You will find the Clearstream maintenance Addon by using the
RIGHT button on the remote from the main screen. You will find the
Icon under PROGRAMS.
You can also install new Addons on your system using the ADDON Installer icon
which is also available by selecting the PROGRAMS heading from the main
screen.
If any preinstalled Addon is not functioning correctly, you can RE-INSTALL it easily
by going to the RE-INSTALL section within Clearstream Maintenance.
.
5
Chapter 1 System Introduction
1.1 Key Features
Android or Linux operating system with ARM Multicore Processor
Multiple format support including VC-1, H.264, MPEG-2, MPEG-1,
MPEG-4, DIVX
Video formats include avi, mpg, vob, mkv
Audio Formats include MP3, WMA, AC3, DTS and AAC
Support for SD/SDHC/MMC cards
Four USB 2.0 host connectors
RJ-45 Ethernet cable and wireless network connections
Infrared remote controller
1.2 Environment for System
Operation: Temperature limitation: 0-40˚C; Humidity: 20-80%
Storage: Temperature limitation: -20-50˚C; Humidity: 10-90%
It is recommended to not operate the unit in an enclosed space or to stack
the unit directly on top of another heat producing device.
1.3 Package Contents
Accessories
Power Adaptor 3Pin UK 1
HDMI Cable 1
Ethernet Cable 1
User Manual 1
Remote Controller 1
Page 6
6
Chapter 2 Connecting Your System
2.1 Cabling Your System
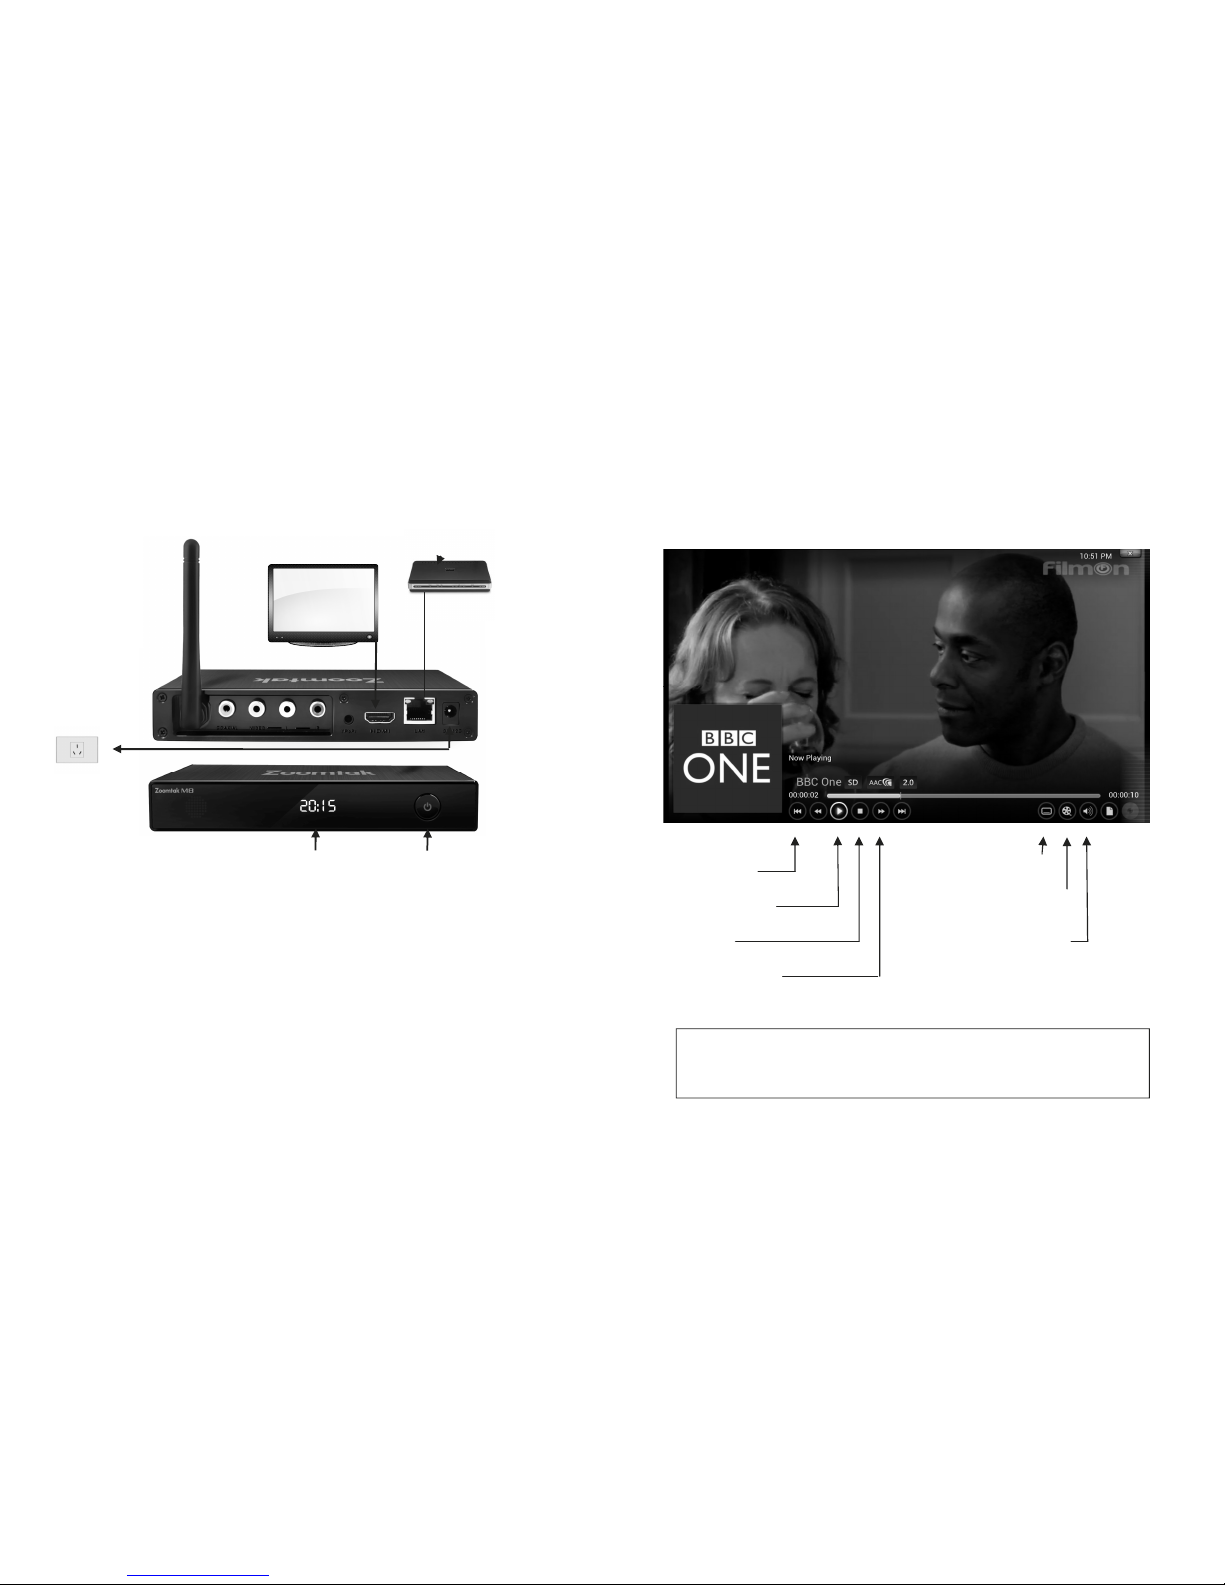
1. Connect the HDMI cable supplied into the interface marked HDMI on
your media unit and the other end into a HDMI socket on your TV.
2. Connect your Ethernet cable from the media to a free port on your
router/modem.*
3. It is highly recommended that you plug the power supply into the unit
last of all.
It is strongly recommended that you use an Ethernet connection rather than a
wireless connection to your router. If the cable will not reach the location of your
router, then a longer cable can be purchased, or a powerline Ethernet adapter
that will use your household electrical wiring to establish the connection can be
purchased via our website www.triotechgroup.com.
If you do decide to use a wireless connection, configuration details are given in section
2.4.
Time Display
On/Off Button
Rear View
Power
Adapter
The ports on your unit may differ in terms of location/order on the unit.
Wi-fi
Antenna
Ethernet
Network Cable
HDMI TV Connection
Router/
Modem
11
3.1 Main Playback Screen
The main video playback screen is the same regardless of which addon you are
using. This can be accessed by pressing the MENU button on your remote.
Here you can adjust settings such as audio offset, aspect ratio and subtitles.
Note: This is not available whilst using the FTV TV Guide.
FFWD/REWIND*
VIDEO OPTIONS
Aspect Ratio, Filters
AUDIO OPTIONS
Audio Offset, Boost
SUBTITLES
FFWD/REWIND are currently not supported for streaming. Instead, use the
RIGHT arrow on your remote to skip forward 10 sec, and the UP arrow to skip
forward 10 Mins. This is not supported with live TV streams.
PLAY/PAUSE
STOP
SKIP TO
END/START
Page 7
10
You will then go through a process of moving the RIGHT ANGLE with the remote
cursor buttons until it’s fits square in the top left of the screen. The same process is
carried out in the bottom right of the screen, followed by selecting where the subtitles
should appear. Finally you will see a square in the centre of the screen. Use the
LEFT/RIGHT buttons on your remote to make it a perfect square and press return.
You can exit the menu back to the home screen using your BACK or RETURN
button on your remote Your TV screen is now calibrated.
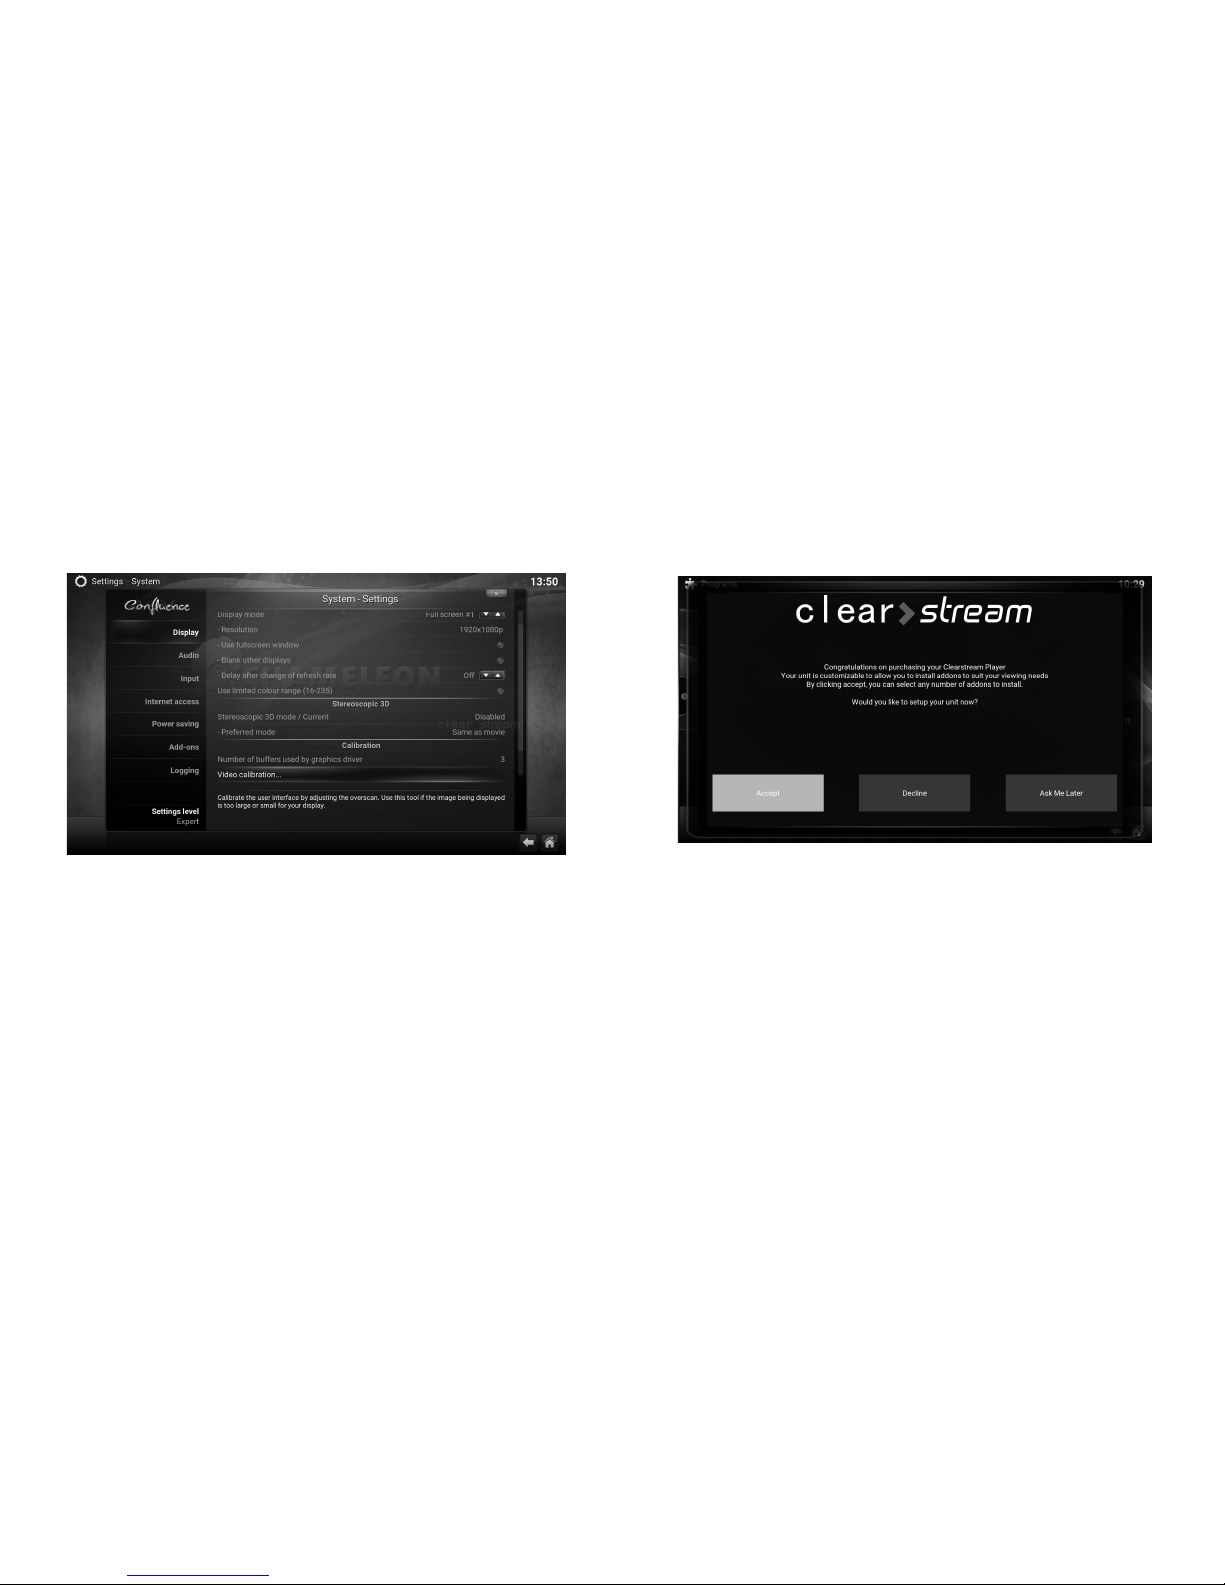
3.0 Calibrating Your Screen
If you find that some of the text is missing in the corners of your Home screen, your
system needs to be calibrated to your TV. To do this, from the Home screen, go
RIGHT to:
SYSTEM—> SYSTEM . Then select :
DISPLAY - VIDEO CALIBRATION as shown below.
After a minute or so, you will see the Home Screen appear.
7
2.3 Setting up your system
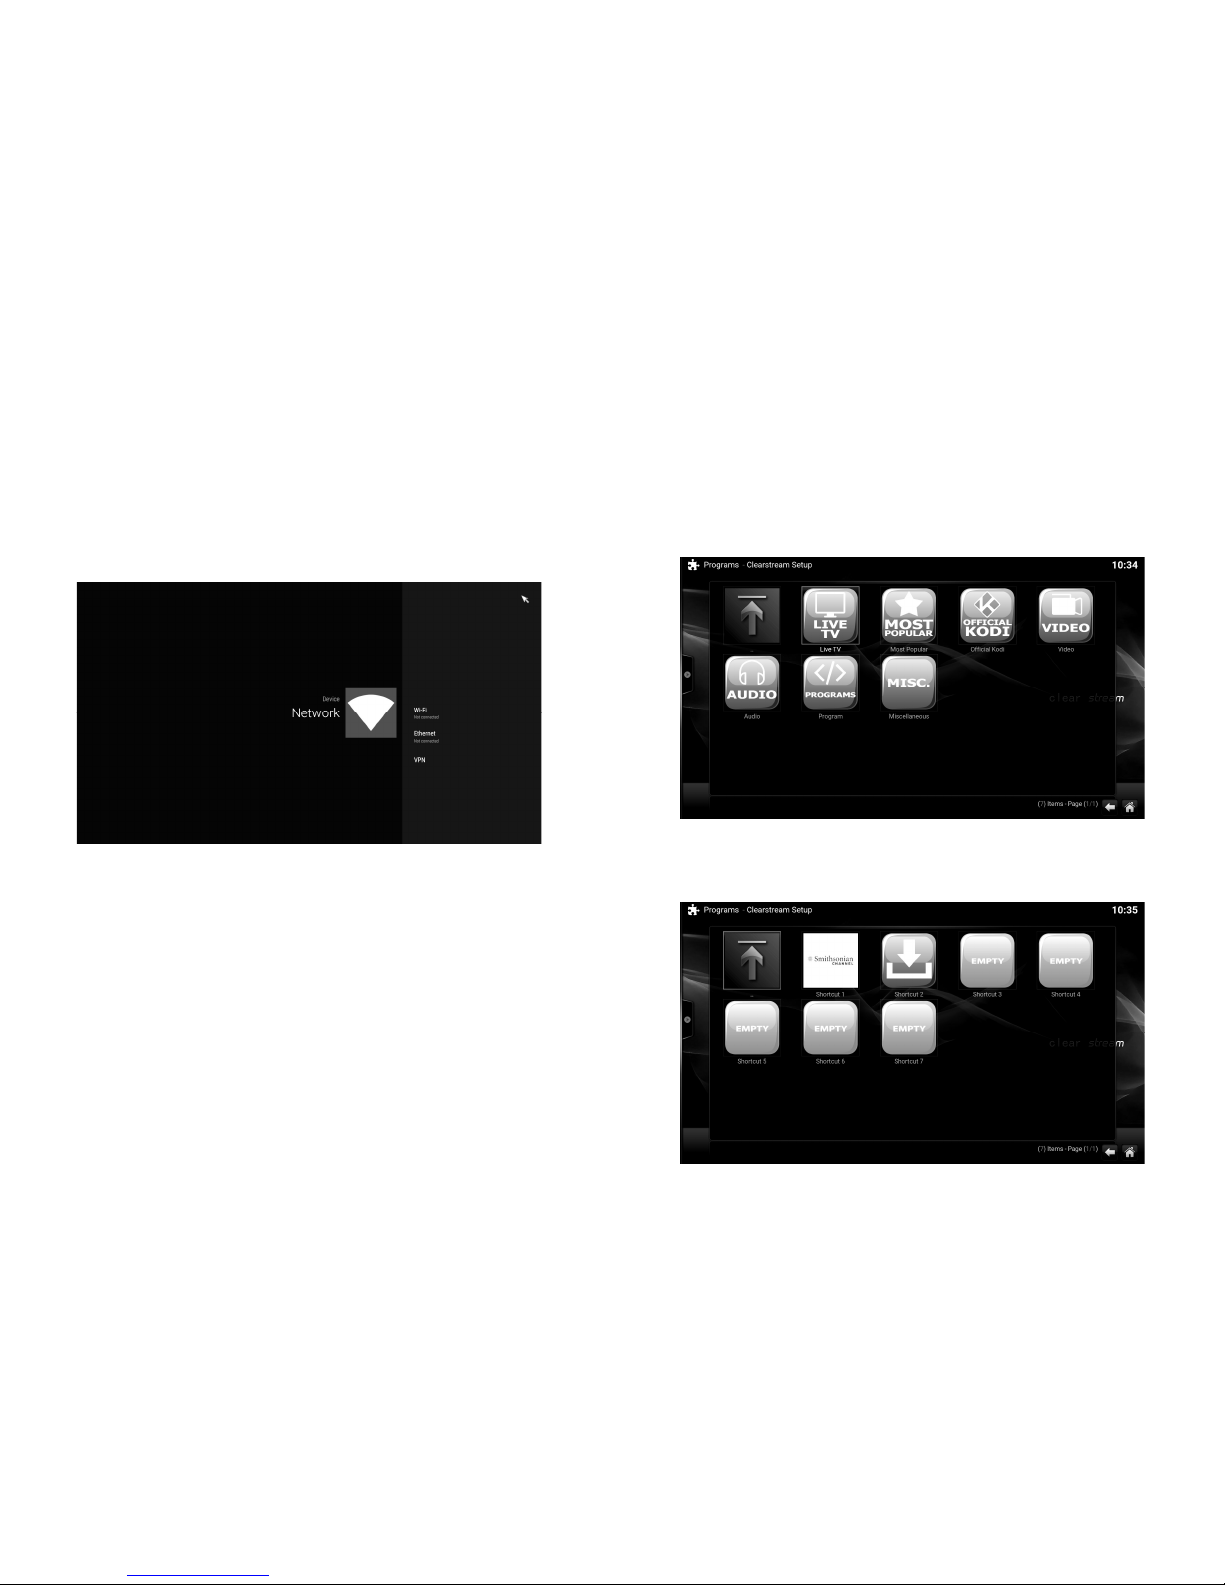
By choosing the ACCEPT option you will be taken to the setup process. If you are
using a wired Ethernet connection, your network should be automatically configured
and setup will start. If Ethernet is not used then the Network setup screen will
appear so you can configure your Wifi connection.
By choosing Ask Me Later you can defer the setup which will start again when the
unit is restarted. You can also Decline the setup and set the unit up manually
yourself thereafter.
2.2 Powering on/Off
Once your unit is plugged in, the on/off button on the front of the unit will turn red.
You can switch the unit on and off by either pressing the button or using the
power button on your remote. You can also do a very quick software restart by
using the RED KODI button on your remote, By selecting the appropriate HDMI
source on your television remote, you should see Clearstream Setup Screen as
below.
After a minute or so, you will see the Home Screen appear.
Page 8
8
2.4 Configure your Network
If you are not using a wired connection, then the screen below will appear to
enable you to connect your unit via Wifi. Highlight the Wifi connection and use
the OK button on the remote to see the option to switch Wifi to ON.
The unit will then scan for available networks and display them in a list.
Choose your correct network name, then press OK on the remote to enter your
network Key.
Note: You can access these settings any time after setup by going to the
Android settings Icon which can be found under the PROGRAMS heading in
your TV menu.
Once the status shows as ‘Connected’ the setup process will continue
automatically. The unit will begin updating available Apps and then launch the
App Installer as shown on the following page.
This may take a few minutes to complete.
9
2.4.1 Using the App Installer
Once your unit has finished updating, the App Installer screen will appear.
Here, you can choose the content you would like to install on your unit. Simply
browse the sections, select the App you require and press OK on the remote
to install it. Note: You can launch the App installer at any time again from the
Icon in the PROGRAMS section ro reinstall any App required.
Once you have finished your selections, simply press return on your remote,
and then choose if you would like to setup your shortcut icons on your
Homescreen. You will then see the options below: Here, you can choose
which App to display in which slot, then press return when done.
 Loading...