

Page 1
Page 2

1
Instruction Manual
Congratulations on purchasing your Trio Personal internet tablet! To get
the most out of your purchase, please take the time to carefully read
through this manual.
Foreword
If any problems occur while using your Trio, please feel free to contact
Mach Speed technical support at 580-272-0035, or send an email to:
.
Thank you for your support and cooperation!
Mach Speed Technologies bears no responsibility for any damage or
loss of personal data due to misuse of software and/or hardware,
damage to the player caused by human factors, replacement of battery,
or other unforeseen circumstances. To prevent loss of your data, please
backup your data regularly.
Information in the manual is subject to change without notice
and is
subject to copyright protection. Copying or otherwise reproducing this
material without prior written
co
nsent is prohibited.
Due to Firmware changes, some of the pictures and functions described
in this manual may not be the same as are included with your player.
Page 3

Before using the Device
Before using the device, please read this chapter and teach your
kids about this information. For further details, please refer to the
safety instructions and announcement.
Acknowledgement
Thanks for your purchase of our product. The product is a MID
(Mobile Internet Device), with a touch screen native resolution of
480x272 pixels. It is designed with Boxchip A13 high speed
processor and 512RAM,DDR III and 4GB flash storage memory. The
operating system is Android 4.04.
The product has built in WIFI, a front f
aci
ng camera, is designed to
provide a fast and easy internet experience, and displays HD video
and images.
Precautions
Please always keep the device dry. To avoid damaging the
device, please keep the device, battery and charger from water
and moisture. Do not operate the device or charger when your
hands are wet.
Do not drop or strike the device against a hard surface.
Never disassemble the device or its accessories as this will
immediately VOID any and all warranties you have for the device.
ever use the device when operating a vehicle.
In hospitals and areas vulnerable to EMI such as an airplane,
please follow the area’s posted rules and regulations regarding
electronic devices.
To avoid electrical damage, please power off the device before
2
Page 4
3
entering an area with unshielded high voltage.
Subjecting the device to an area with a powerful magnetic field
may erase all data on the device.
This device can connect to the internet, and has access to chat
rooms, messenger programs, etc. Please always supervise
children using the device.
Please comply with your areas rules and regulations regarding
the use of electronic devices, and respect others’ privacy and
legal rights while using the device.
Introduction
Charging the Battery
When you first receive the device, please fully charge the battery
before use. It takes approximately 4 hours to completely charge a
drained battery.
Status and Reminders
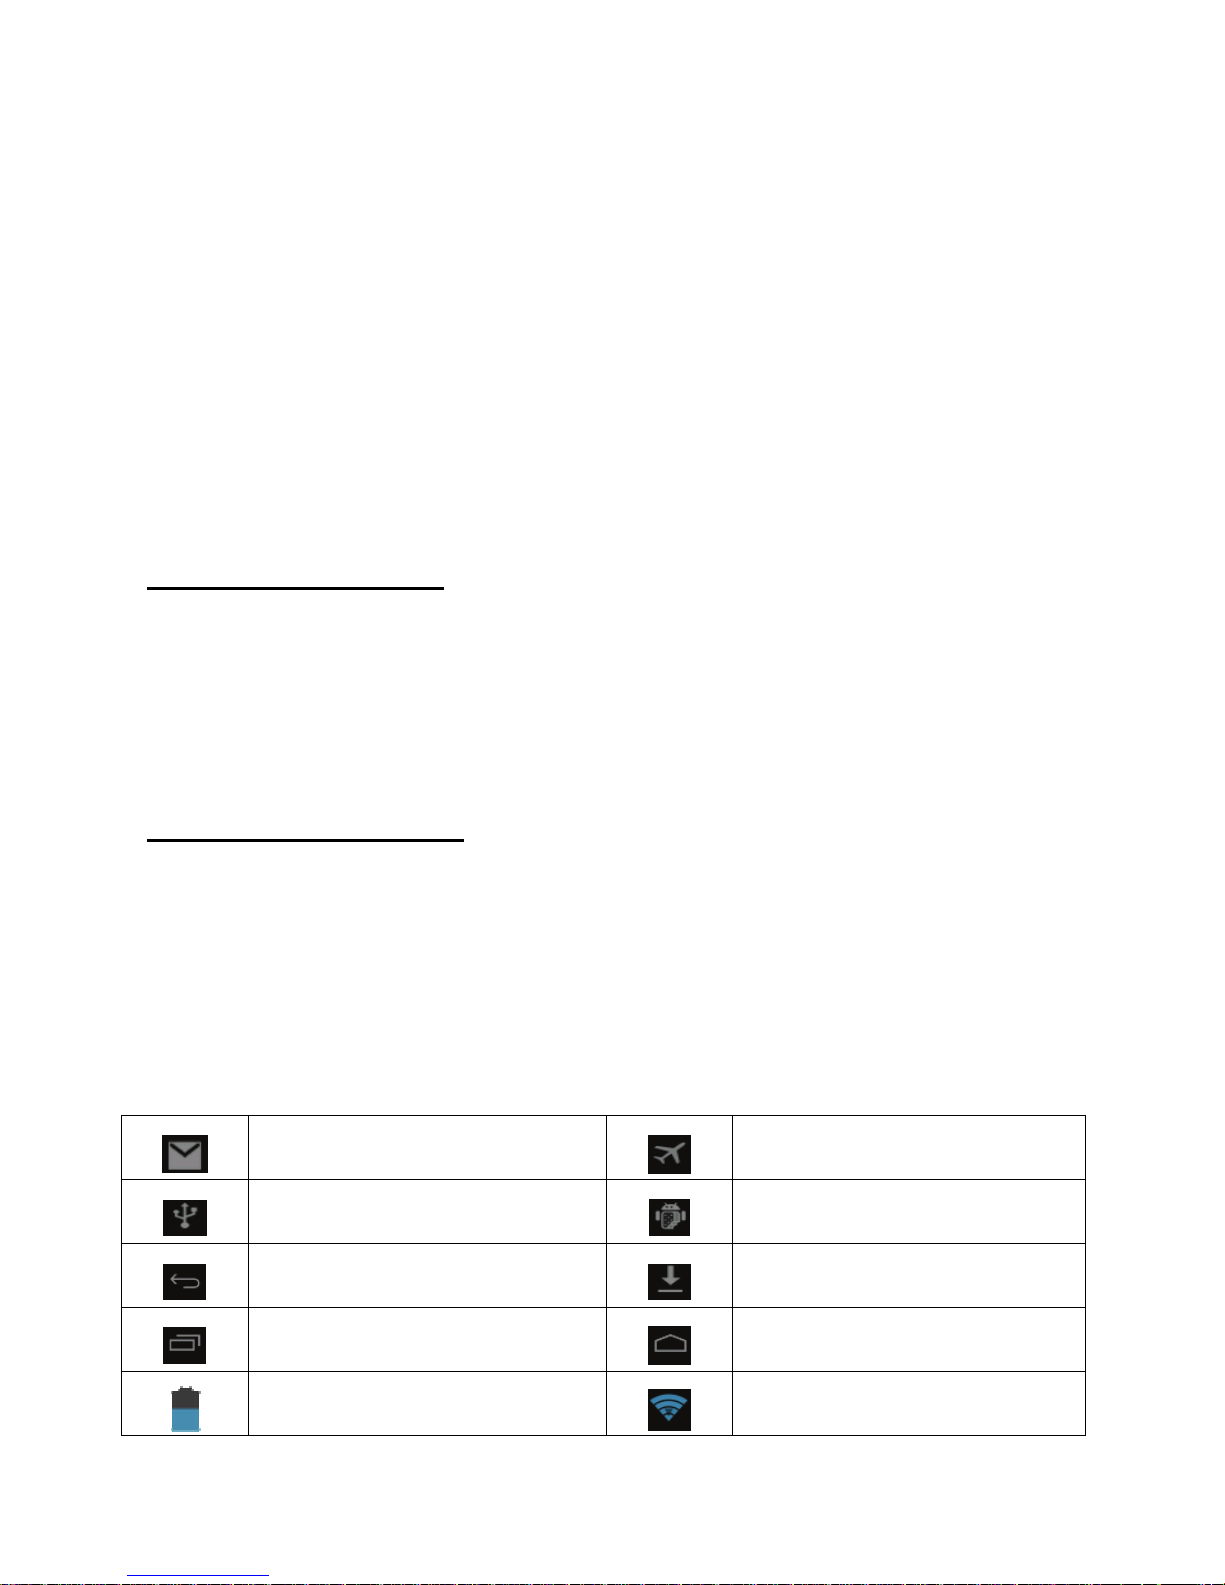
1. Reminder icons:
When an icon appears in your reminder window (lower right hand
corner of your screen) you can tap the icon to open your
reminder.Below are several of the most common reminder icons.
New email
Airplane mode
USB is connected
USB adjustment is
Return icon
Downloading
Recent application icon
Home icon
Battery volume mark WIFI signal icon
Page 5
4
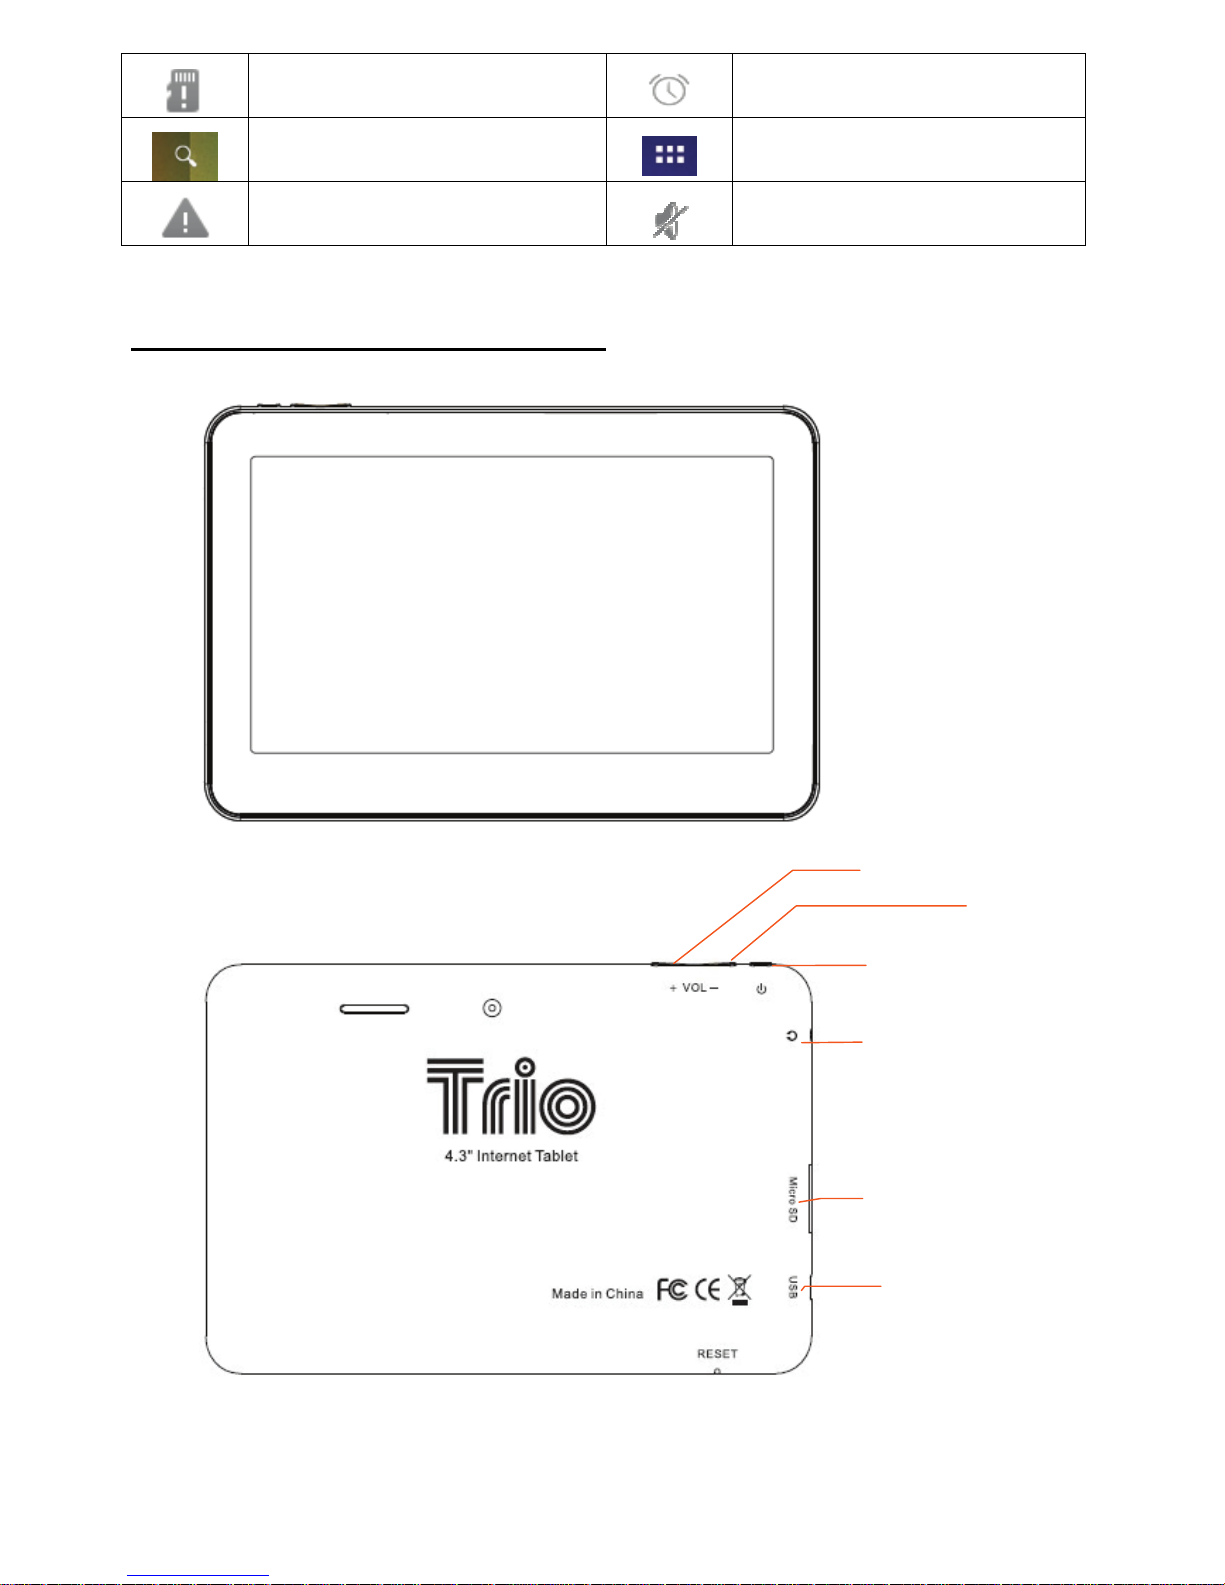
No SD card
Alarm on
Google search
Application icon
General Notice Mute
Button and Touchpad Functions
USB port
Micro SD card slot
Power
Earphone jack
VOL+
VOL-
Page 6
5
Functions:
Power(power)
Press and hold this button to turn the device
on and off. Tap this button briefly to put the
player in standby or wake the player up.
Vol +(up) Press to increase volume.
Vol-(down)
Press to decrease volume.
Power up and Shut down
1. Power up
Press and hold the Power button for three seconds to power on..
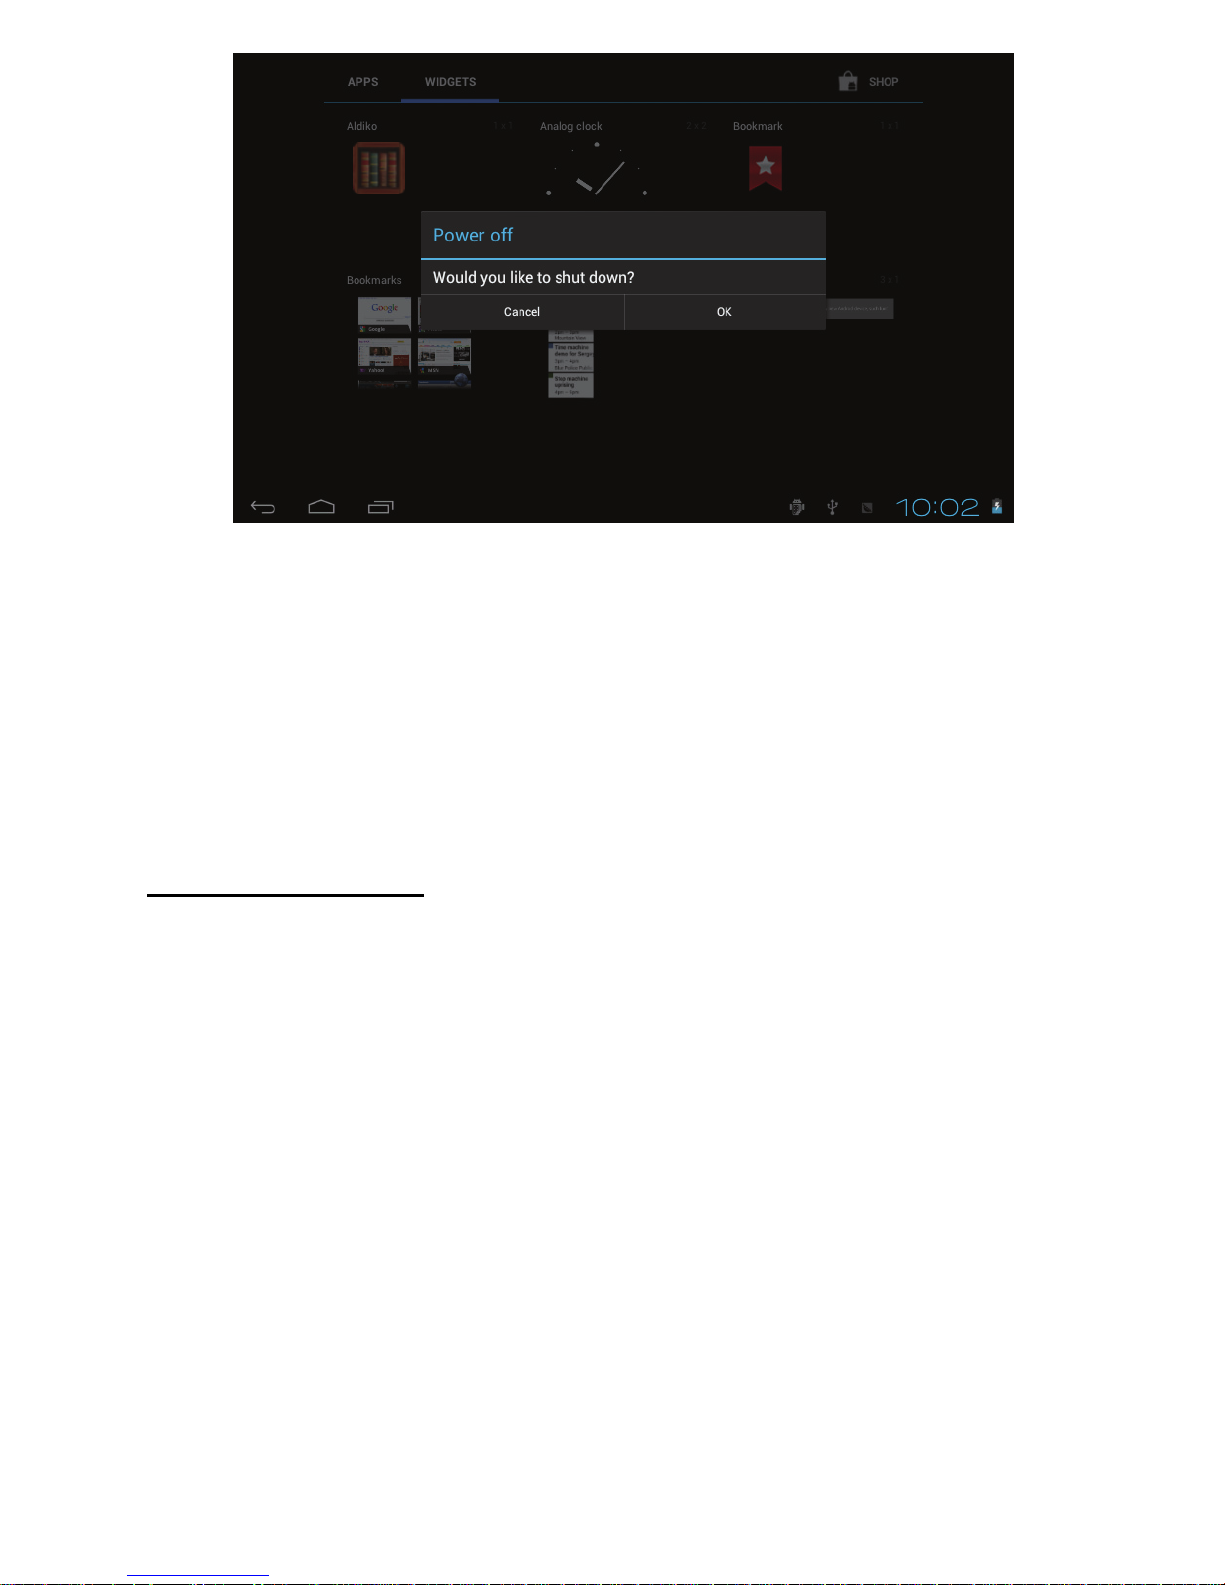
2. Shut down
Press and hold the Power button for three seconds, it will pop up a
shut down window. Tap “OK” to confirm the power off, or tap Cancel
to continue using the device.
Page 7
6
3. Standby mode
Tapping the power button will place the device in standby mode,
tapping it again will wake the player back up.
Please note that if the player sits idle the device will enter standby
mode automatically to conserve battery life.
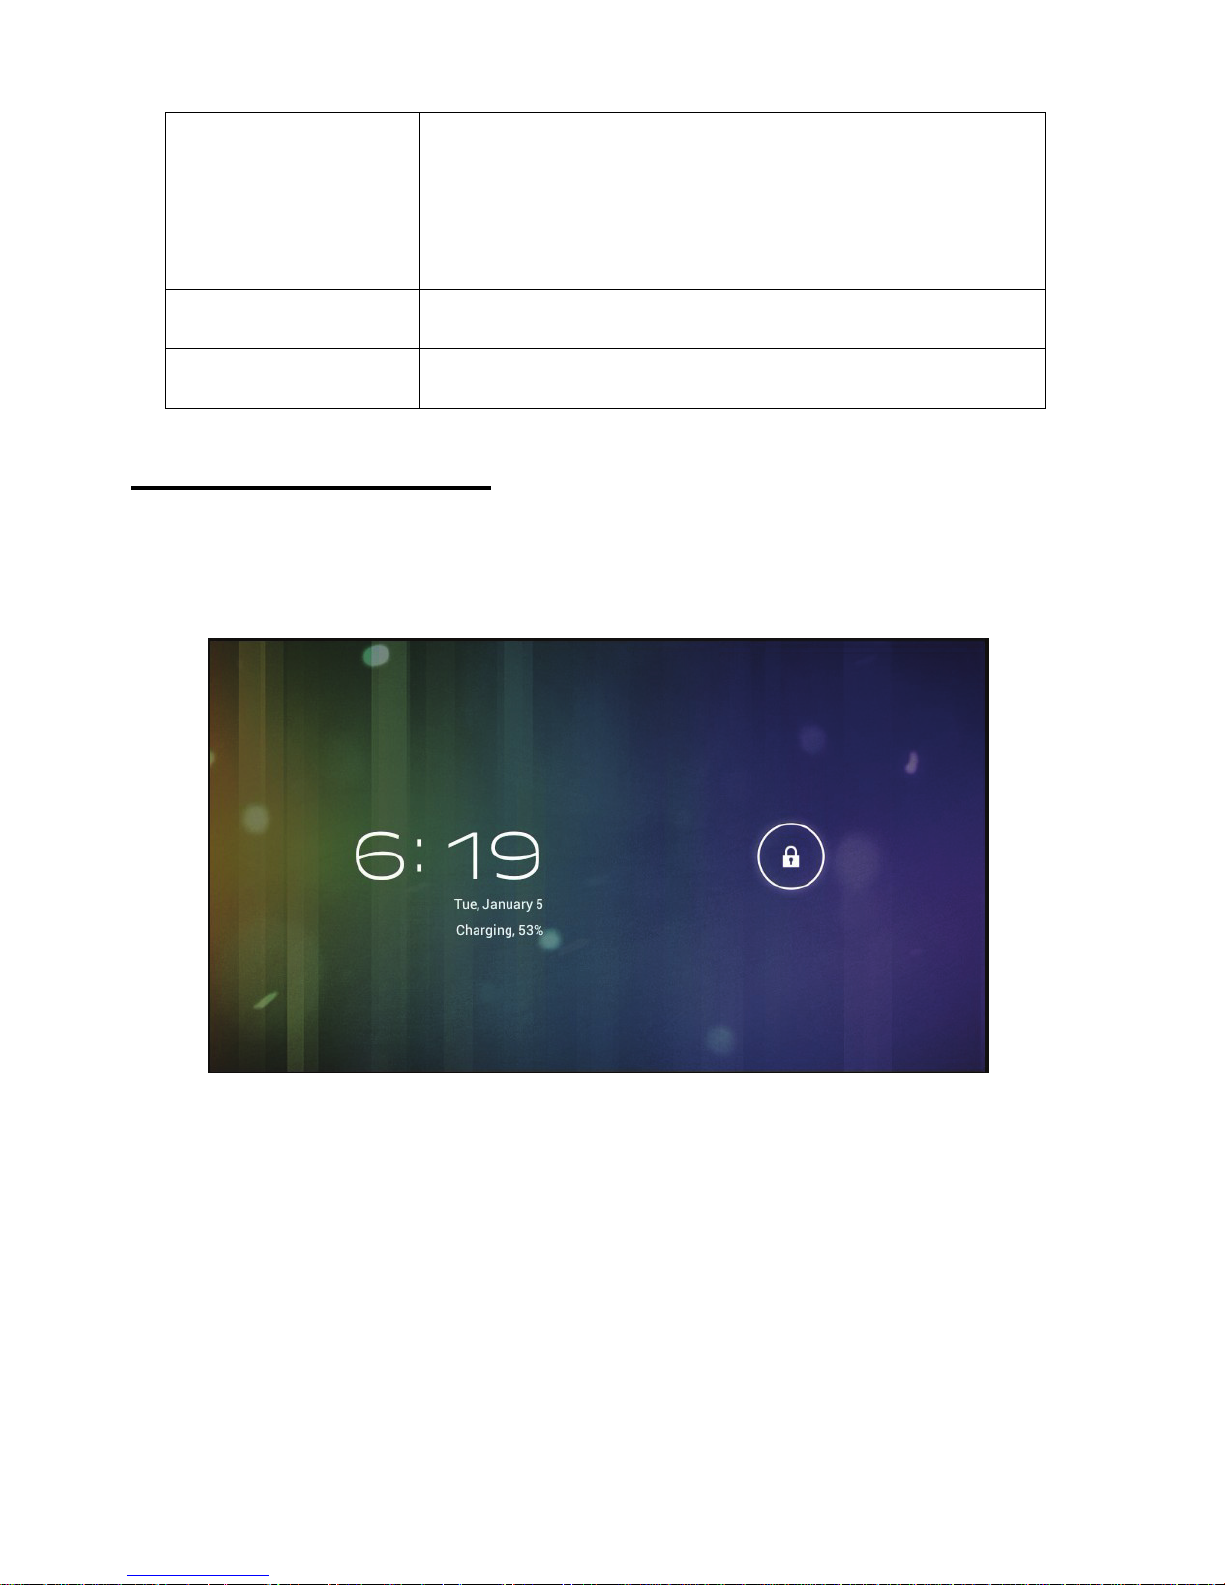
Main User Interface
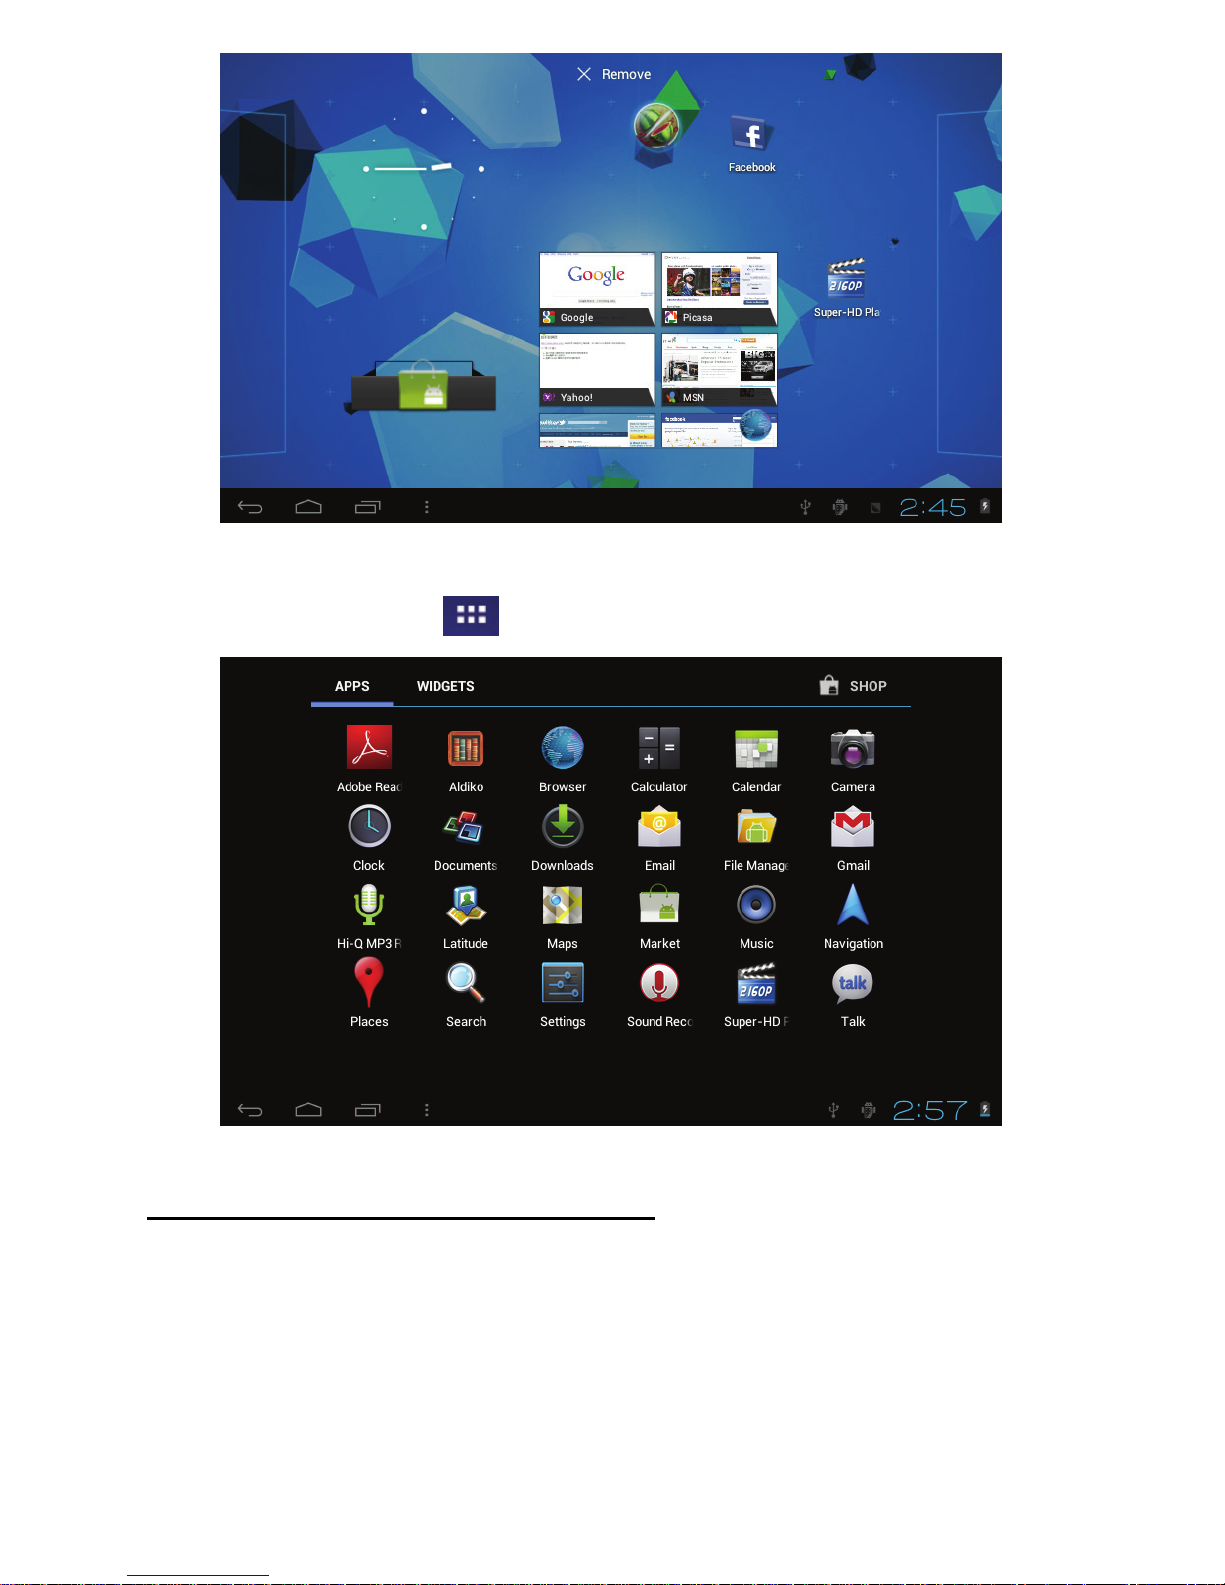
The main portion of your UI is referred to the Desktop.
Note- To scroll the screen left, place your finger on the left side of
the screen and slide it to the right. To scroll right, place your
finger on the right side of the screen and slide it to the left. To
scroll up, place your finger at the top of the screen and slide it
down. To scroll down, place your finger at the bottom and slide it
up.
Page 8
7
The second most used portion of your UI is the apps menu accessed by
tapping the apps icon
on the main menu.
Icon and Application manangement
1. To move the icons on the Desktop:
Press and hold an icon in your apps menu to drag it to your desktop.
Once you have reached the location you want to drop the icon, let go
of the screen.
Page 9
8
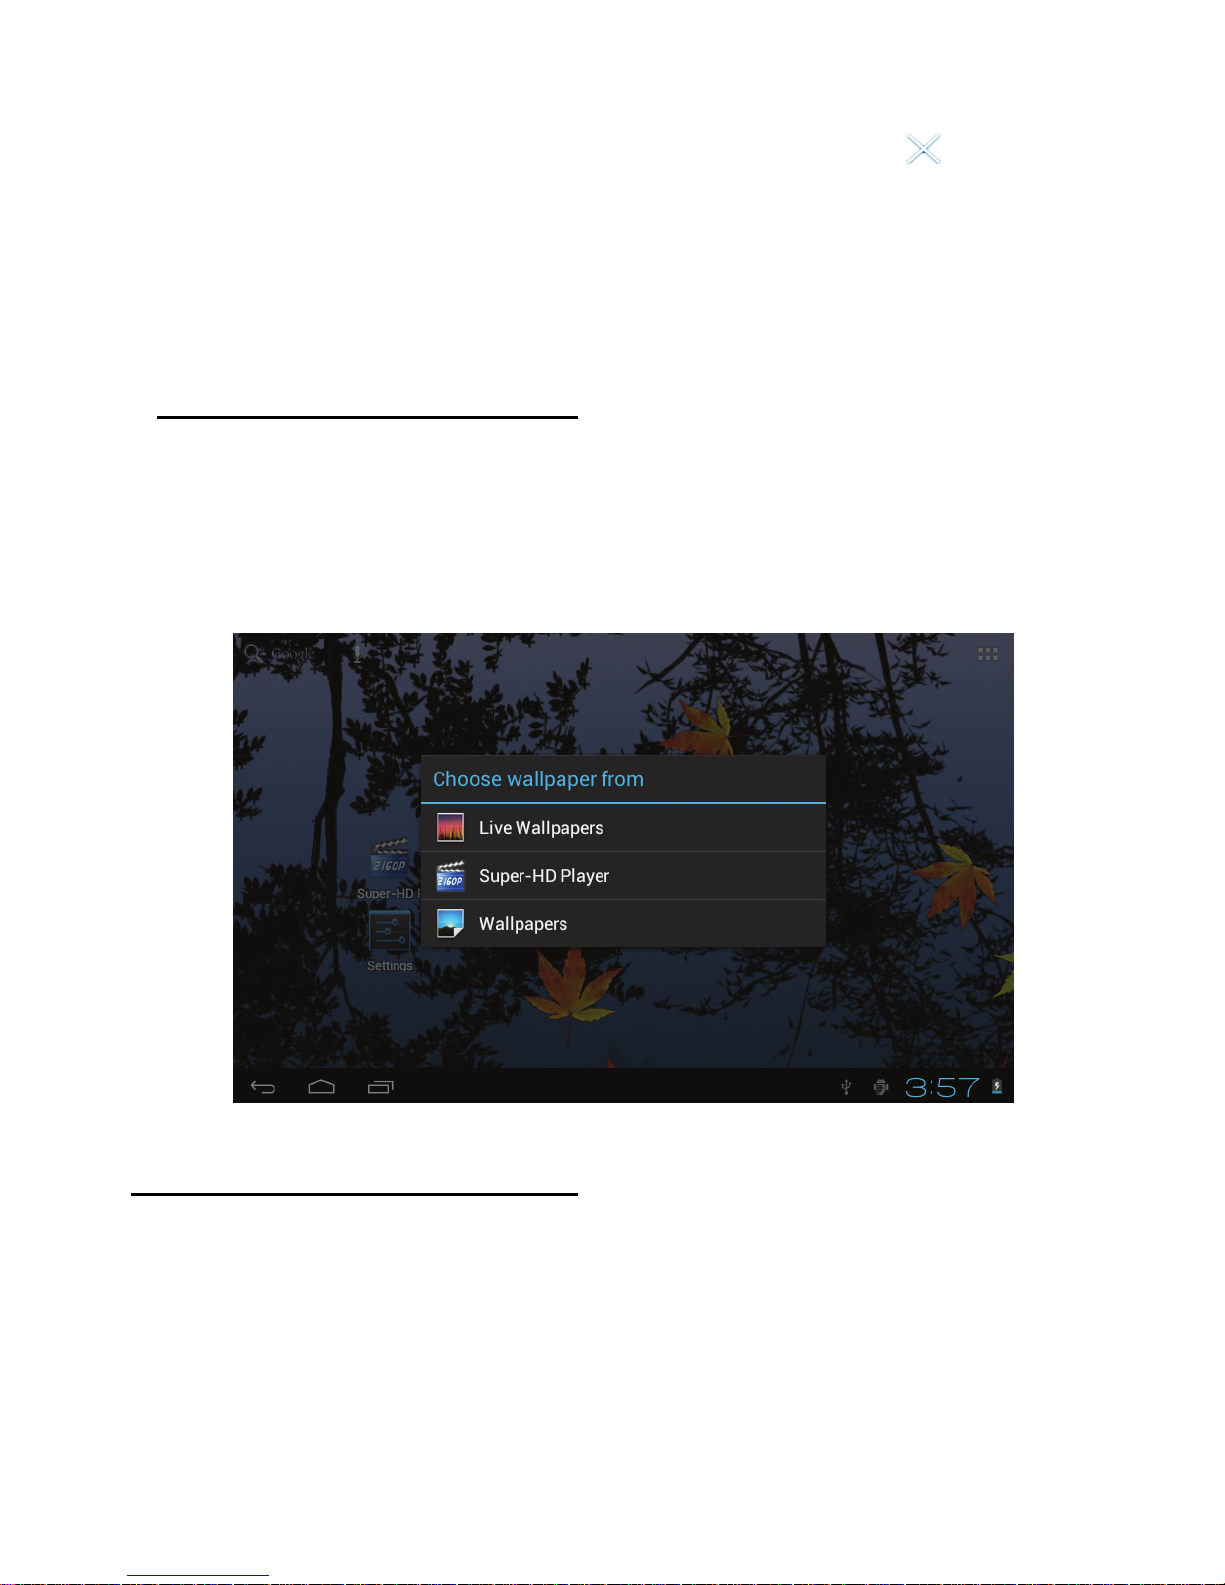
2. Delete the icons on the Desktop
Touch and hold desktop icons, then drag it to the
“Remove”
icon. Please note that this will only delete the icon from your desktop,
the app will still be located in your apps menu.
Change the Destop wallpaper
1. Touch and hold an empty spot on main screen, and a window will
open with several selections.
2. Select the image gallary or wallpapers gallary to choose image.
USB Connection & input words
1. When connected to a computer via USB the below window will
open. Select “Turn on USB storage” and the device will act as a
removable disk drive, allowing you to add or delete files to both an
inserted SD card and the internal memory.
Page 10
9
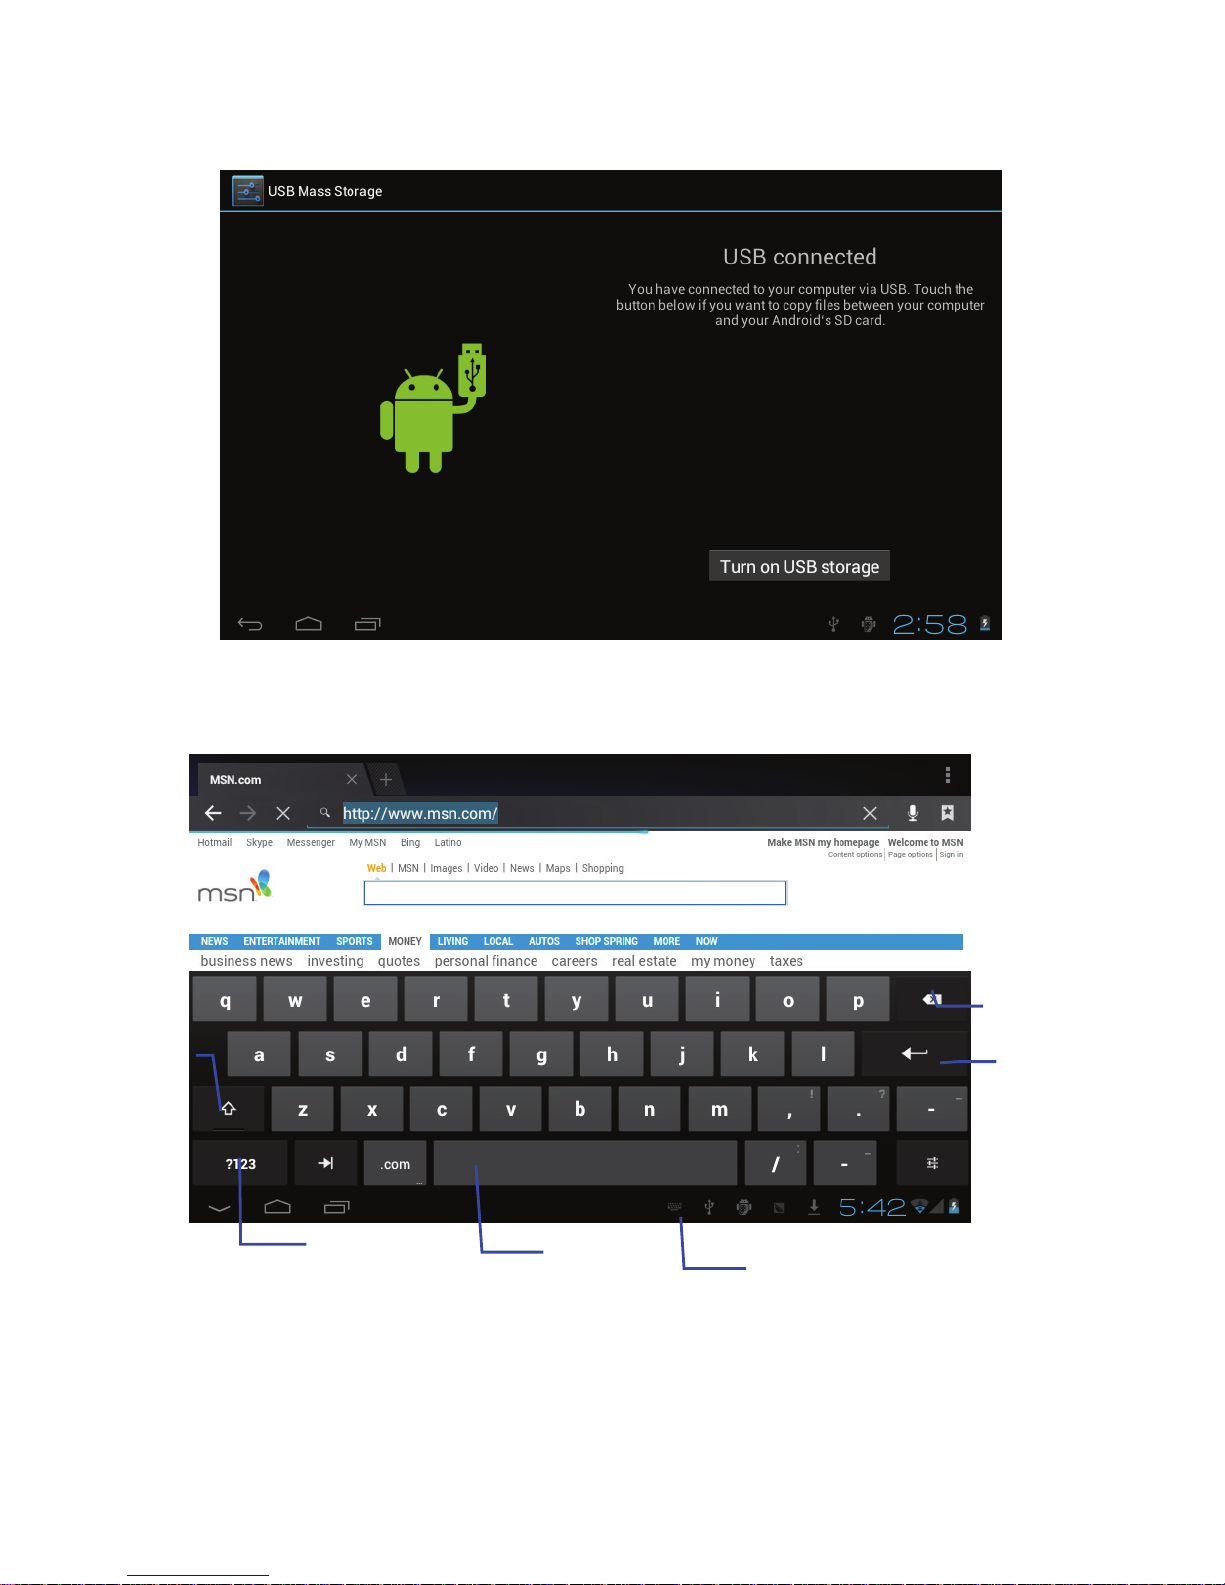
Using the Android keyboard
①
②
③
⑤
④
⑥
Page 11
10
1
Switch between caps and lowercase letters
2
Switch between letter and symbol/number mode
3
Spacebar
4
Enter button
5 Delete- tapping once will delete the last input character,
6
Select a different Keyboard (if installed)
Basic settings
1. Voice and display
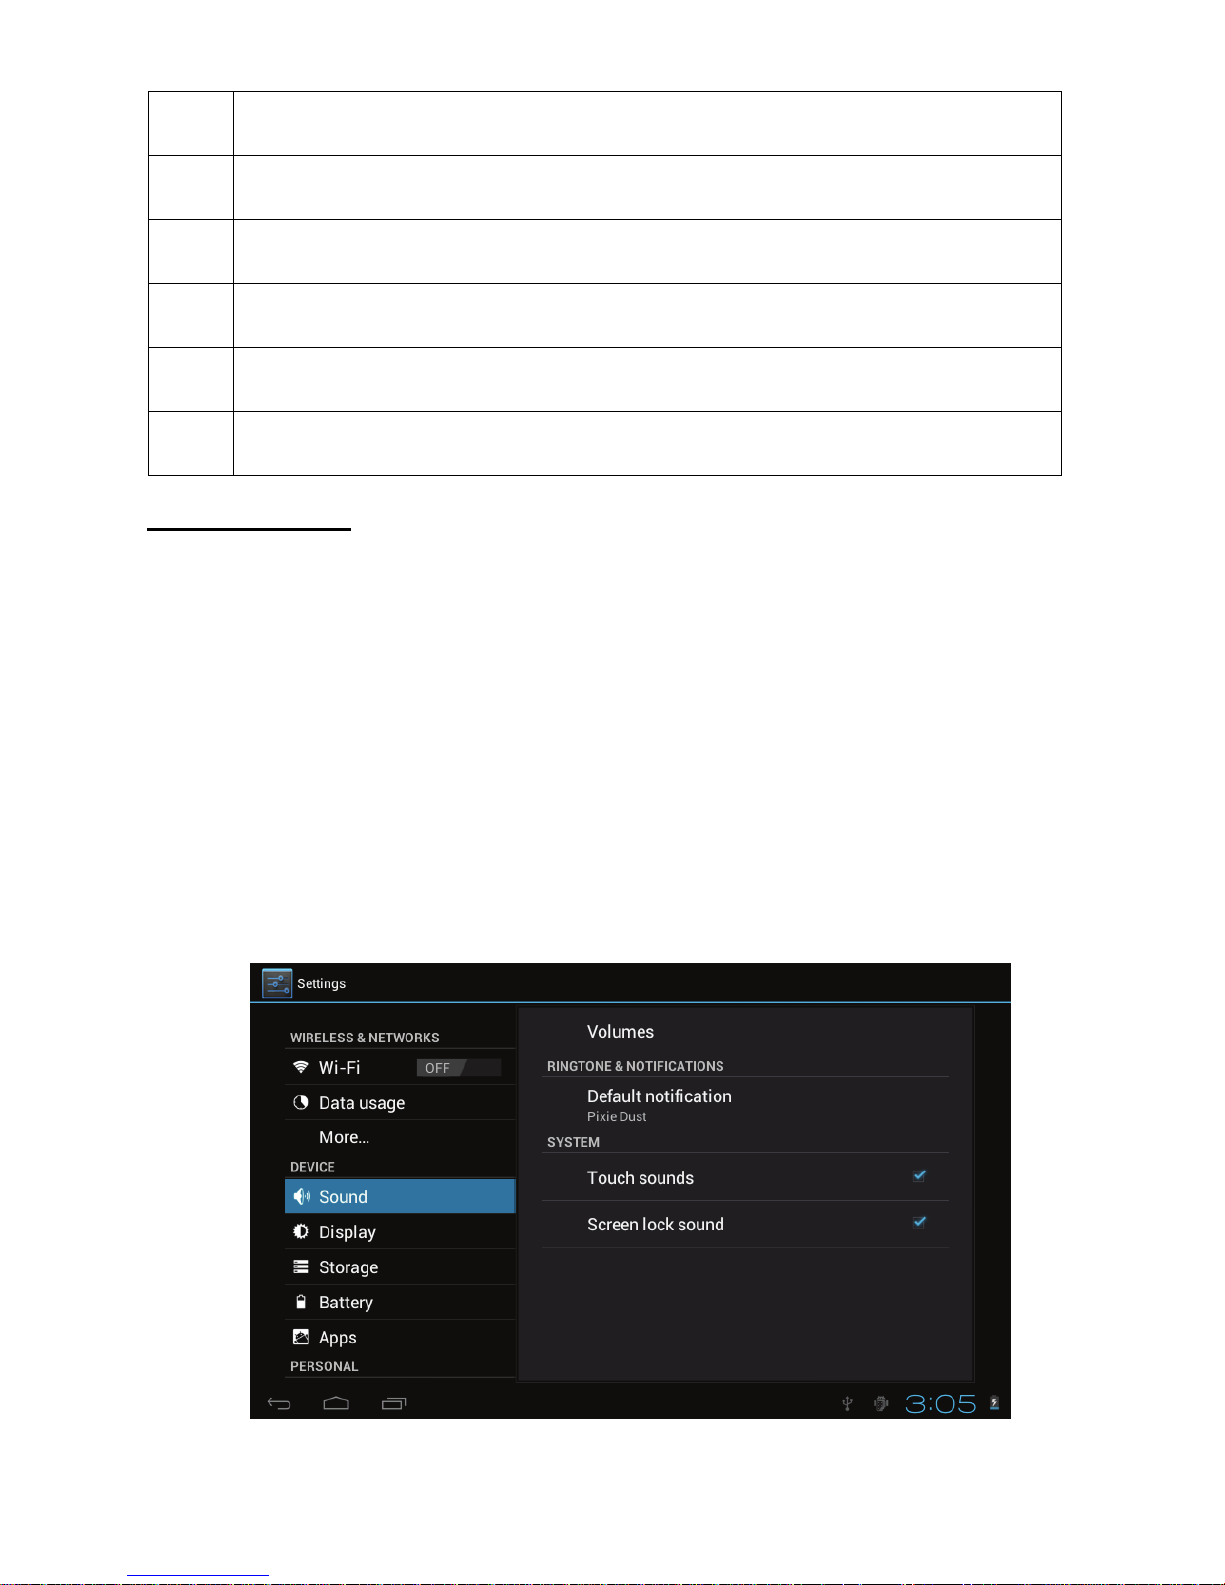
A. Sound and volume setting
1. Tap the Setting icon.
2. Tap Sound.
3. Tap volume to adjust the volume for music and video.
4. Or press “VOL +” or “VOL – Button” to adjust the volume.
Page 12
11
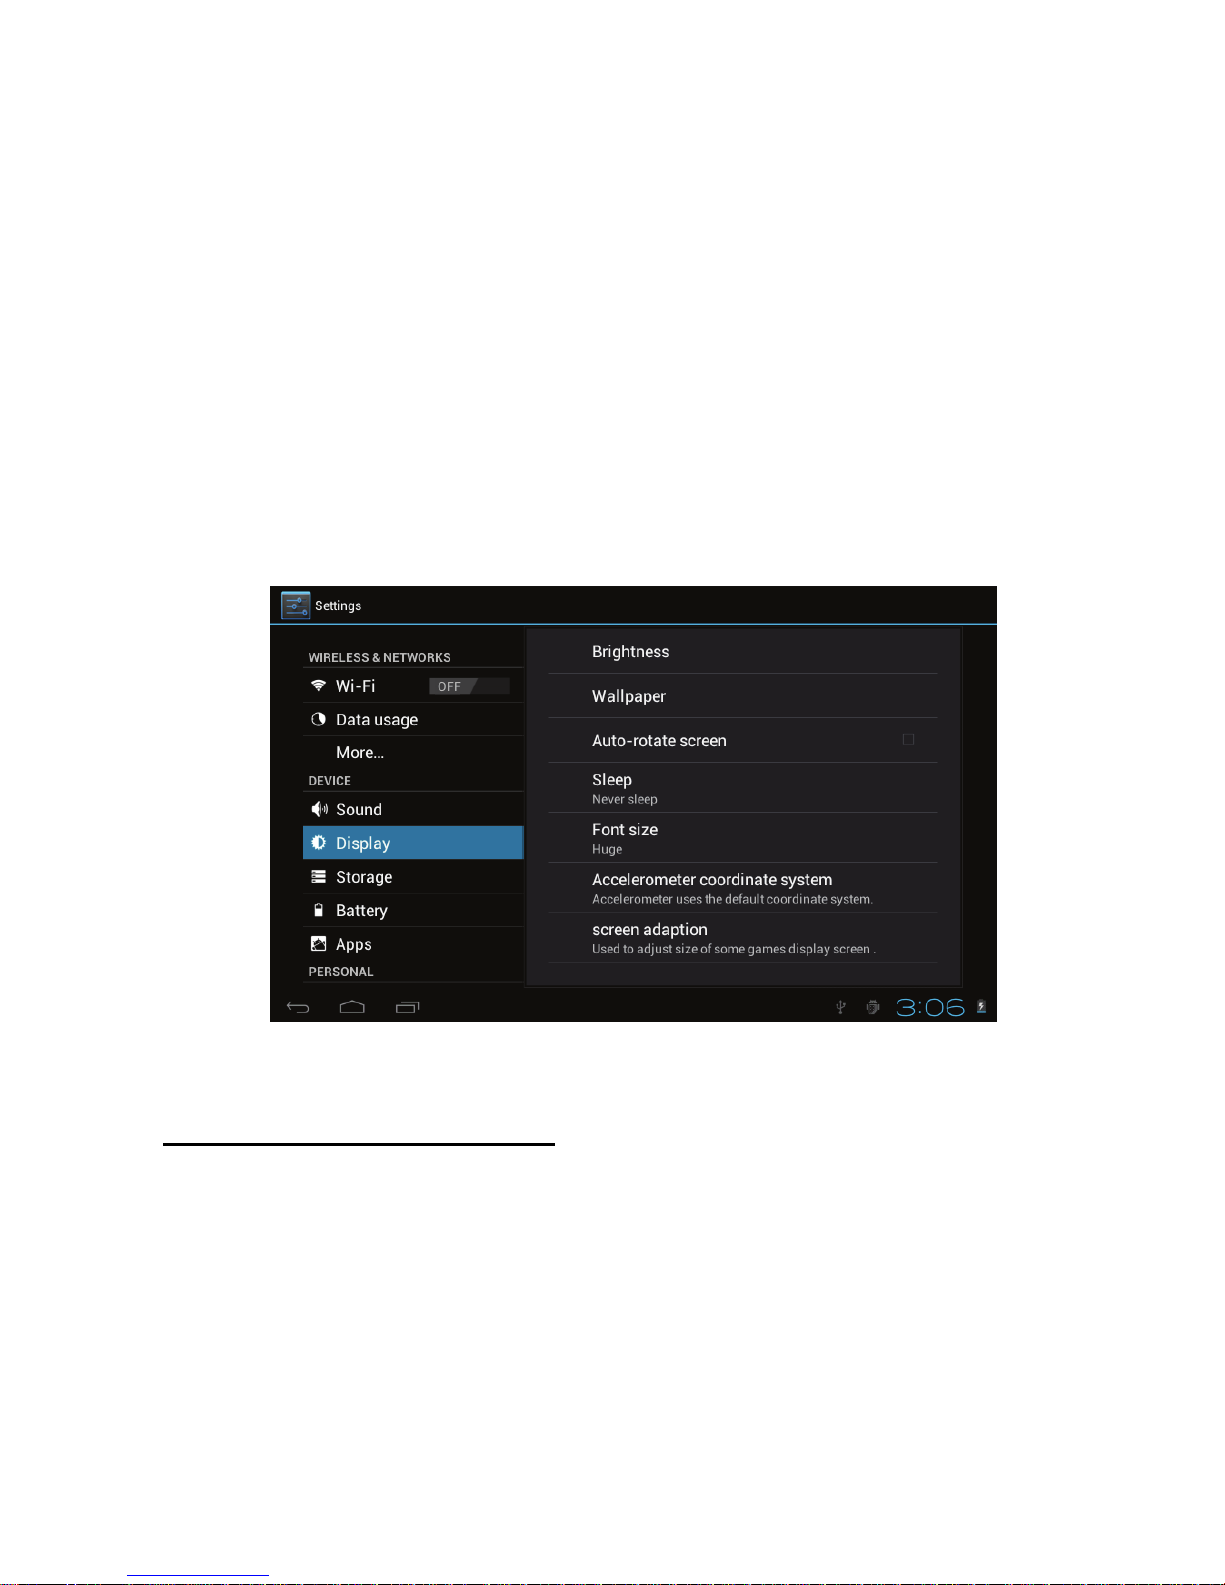
2. Display setting
A. Adjust the bightness of your screen
1. Tap the Setting icon.
2. Tap DisplayTap brightness and a slidebar will open. Slide
this bar to the right to increase brightness, and to the left to
decrease brightness.
3. Tap “OK”..
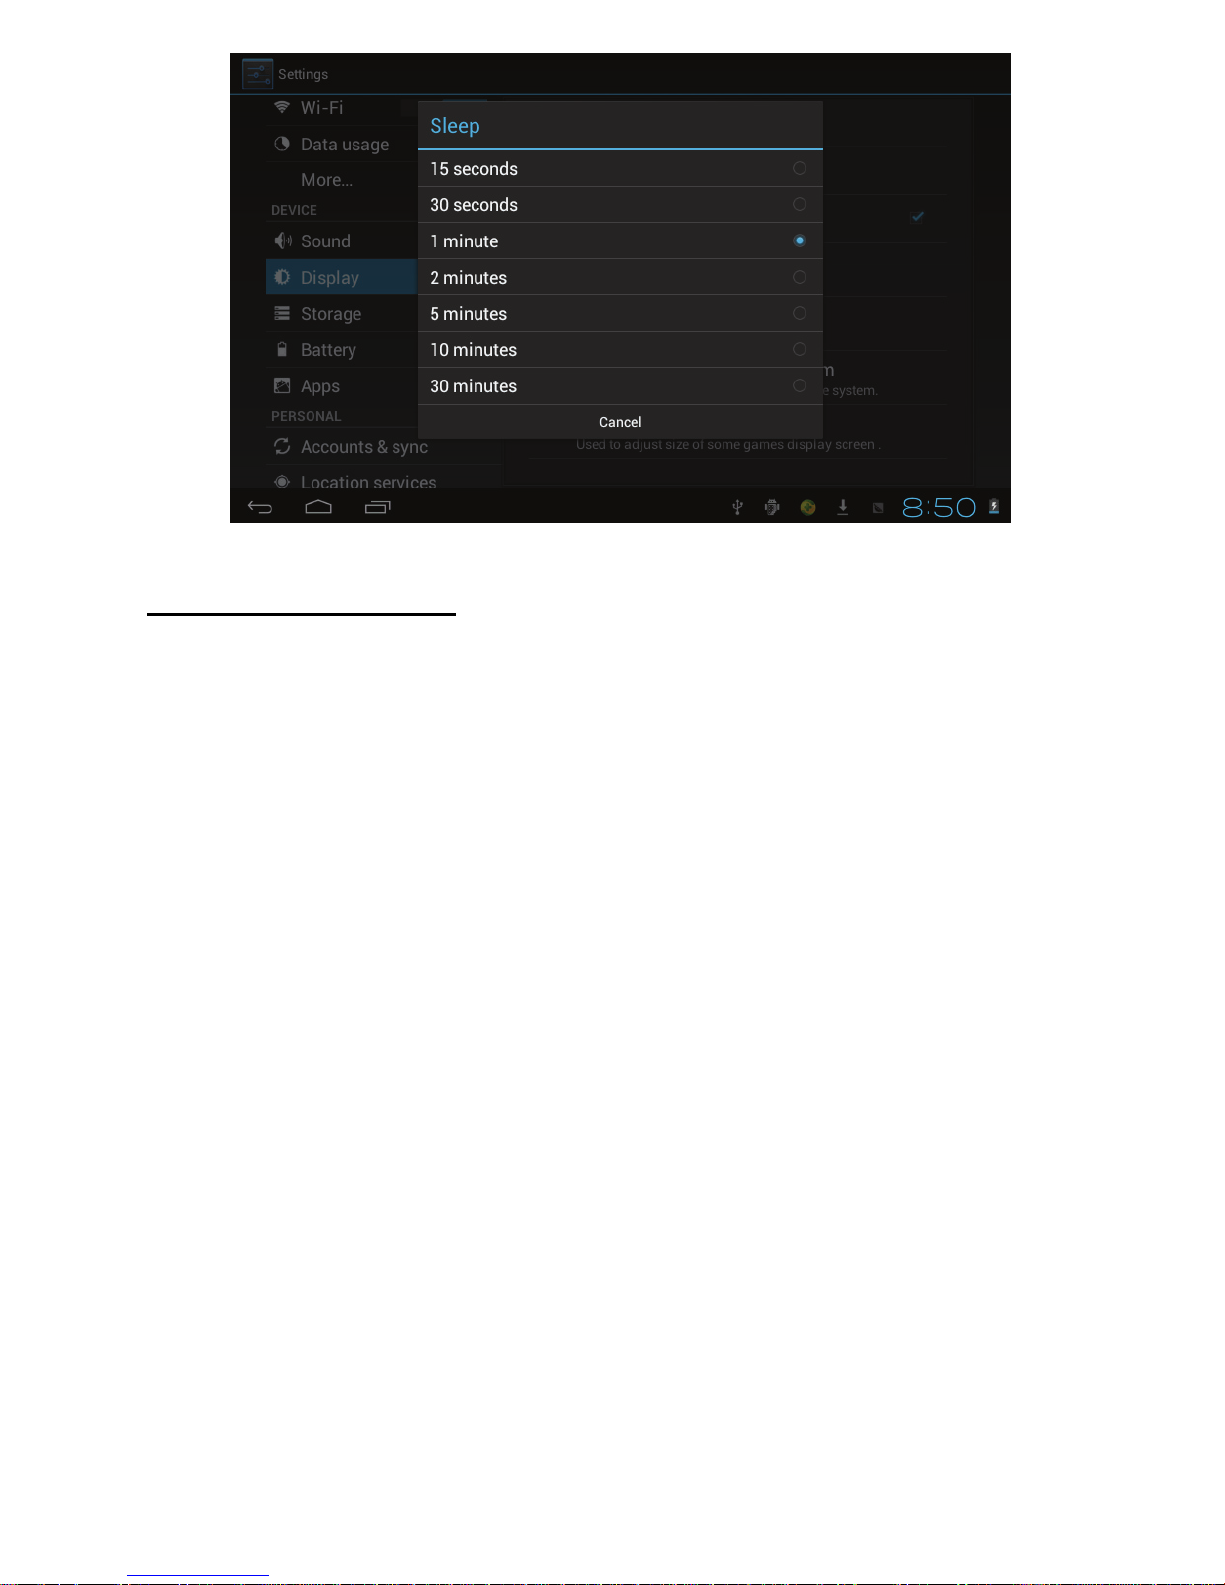
Adjust screen standby time
1.Tap the setting icon.
2.Tap display->Tap “Sleep” and select the amount of idle time
you want to pass before the device enters standby mode to
conserve power.
Page 13
12
Setting a screen lock.
NOTE- If you set a password, PIN, or Pattern, and later forget this
item, you will be LOCKED OUT of your device. For security
purposes, we can NOT recover a lost password, PIN, or Pattern
for you.
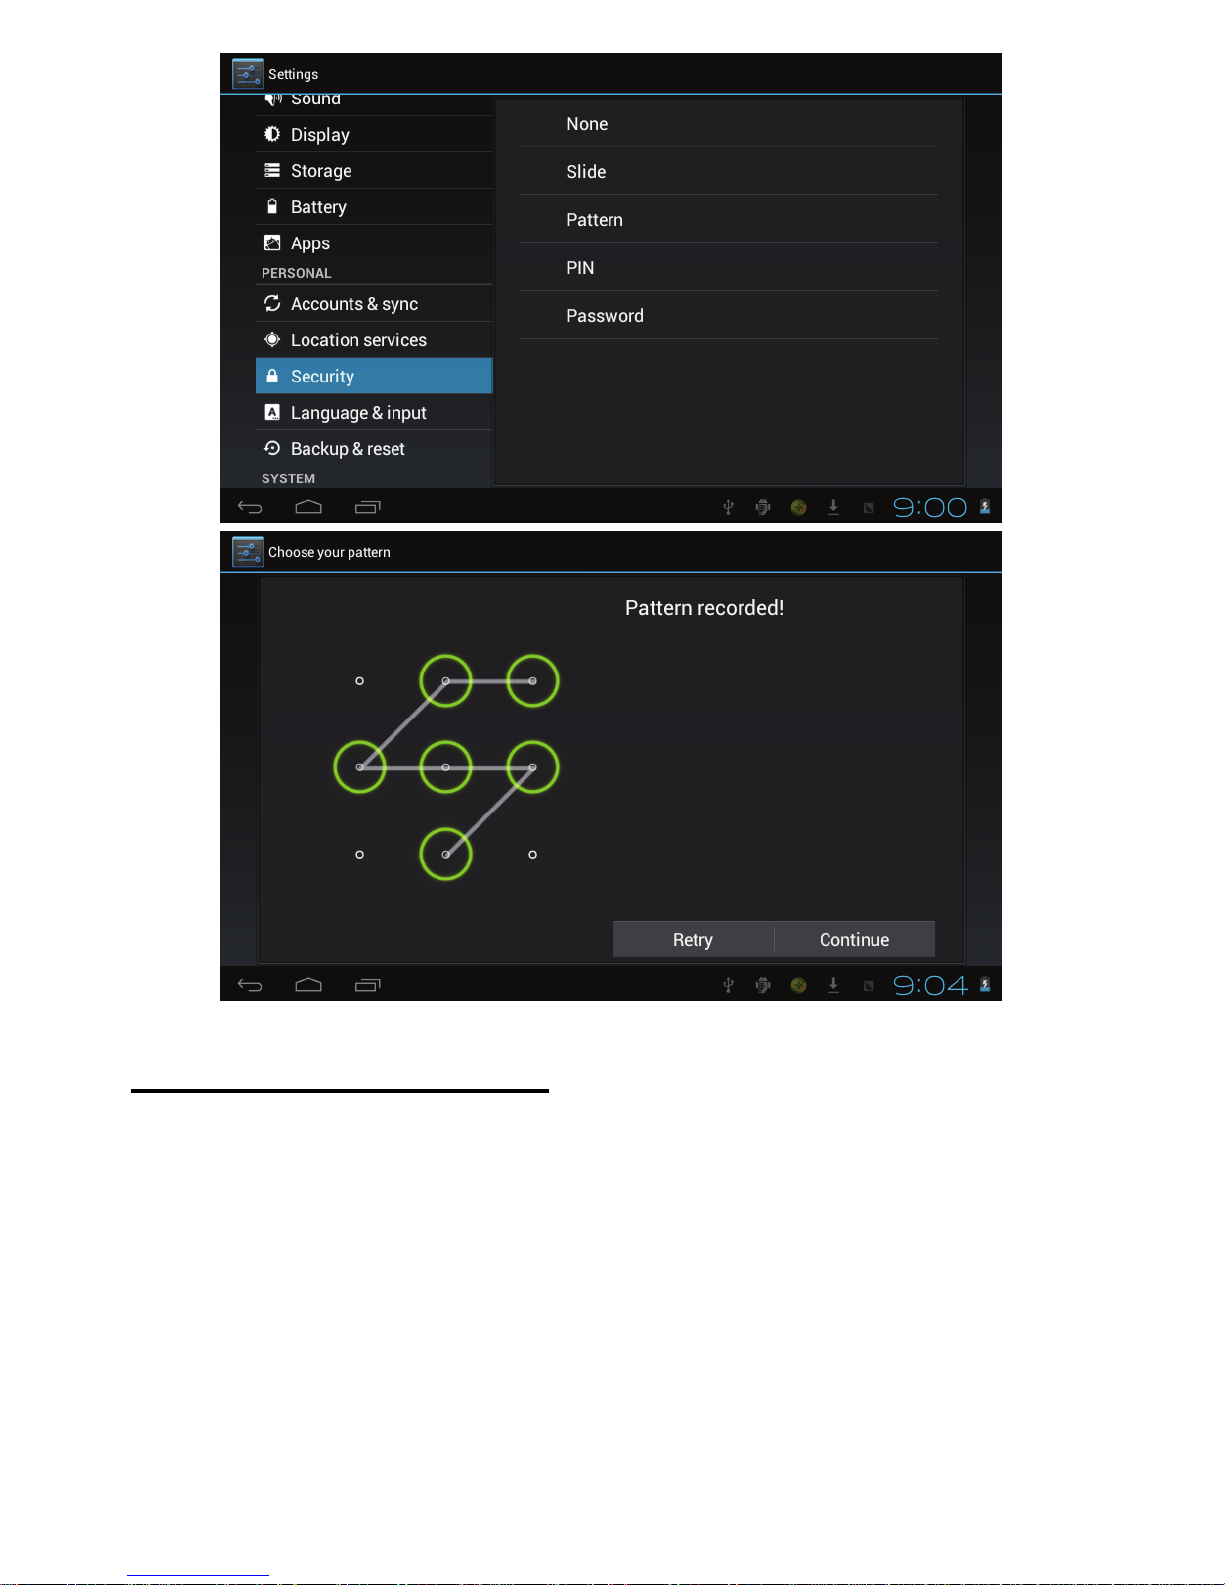
You can set a password, PIN, or pattern to secure your device from
unauthorized access and protect your privacy.
Note- Anytime the device enters standby mode (pressing the
power button briefly, or due to idle time) you must enter your
password, PIN, or pattern to unlock it, if you have one set.
1. Tap the setting icon.
2. Tap Security Screen lockThen chose the screen lock type
you want.
Page 14
13
SD card and Internal memory
1. View SD card and MID memory available space
1. Tap the setting icon.
2. Tap memory.
3. View the available space on the SD card.
4. View internal memory space.
Page 15
14
2. Safely remove the SD card
Please follow this procedure when removing the SD card to prevent
damage to your SD card and files.
1. Tap the setting icon.
2. Tap memory.
3. Tap remove SD card.
4. Pull out the SD card.
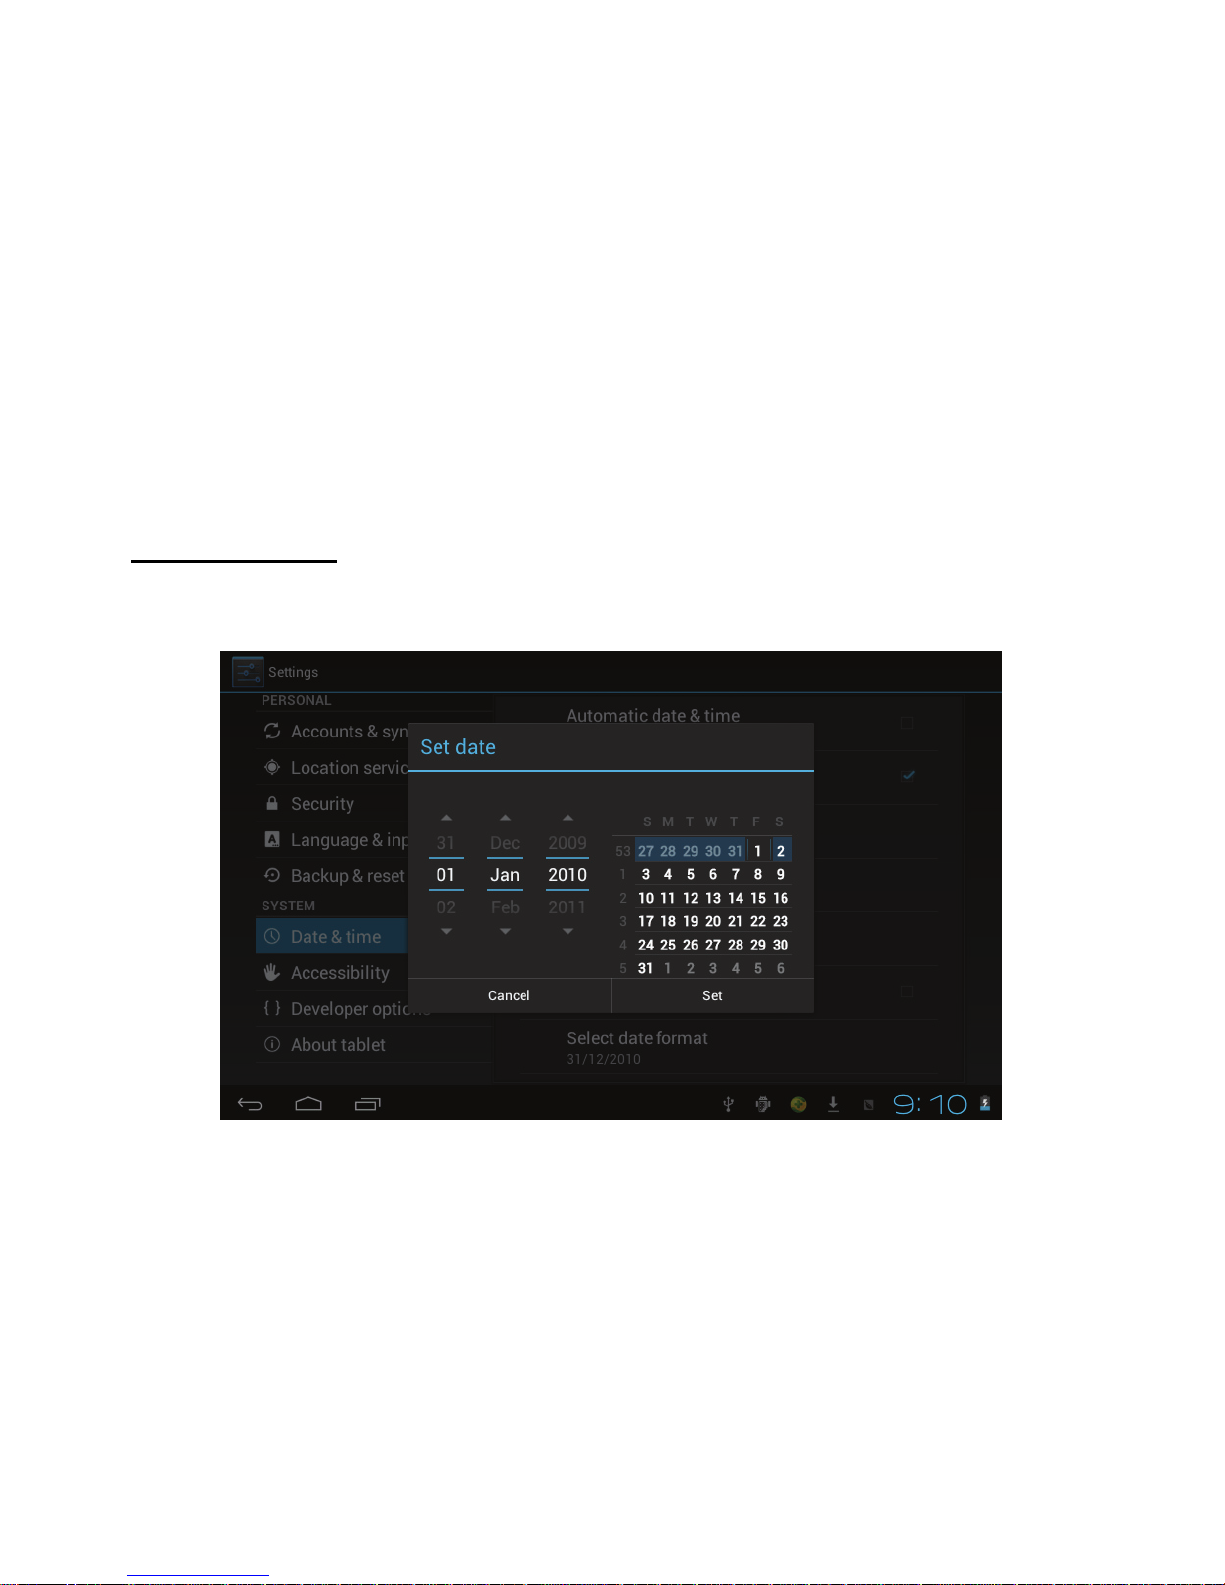
Date and Time
Manually adjust the date, time and time zone.
1. Tap the setting icon.
2. Scroll the screen down, and tap date and time.
3. Tap time zone, and choose your zone in the list. scroll down to view
more zone information.
4. Tap choose date formats, and tap the date formats in MID.
Page 16
15
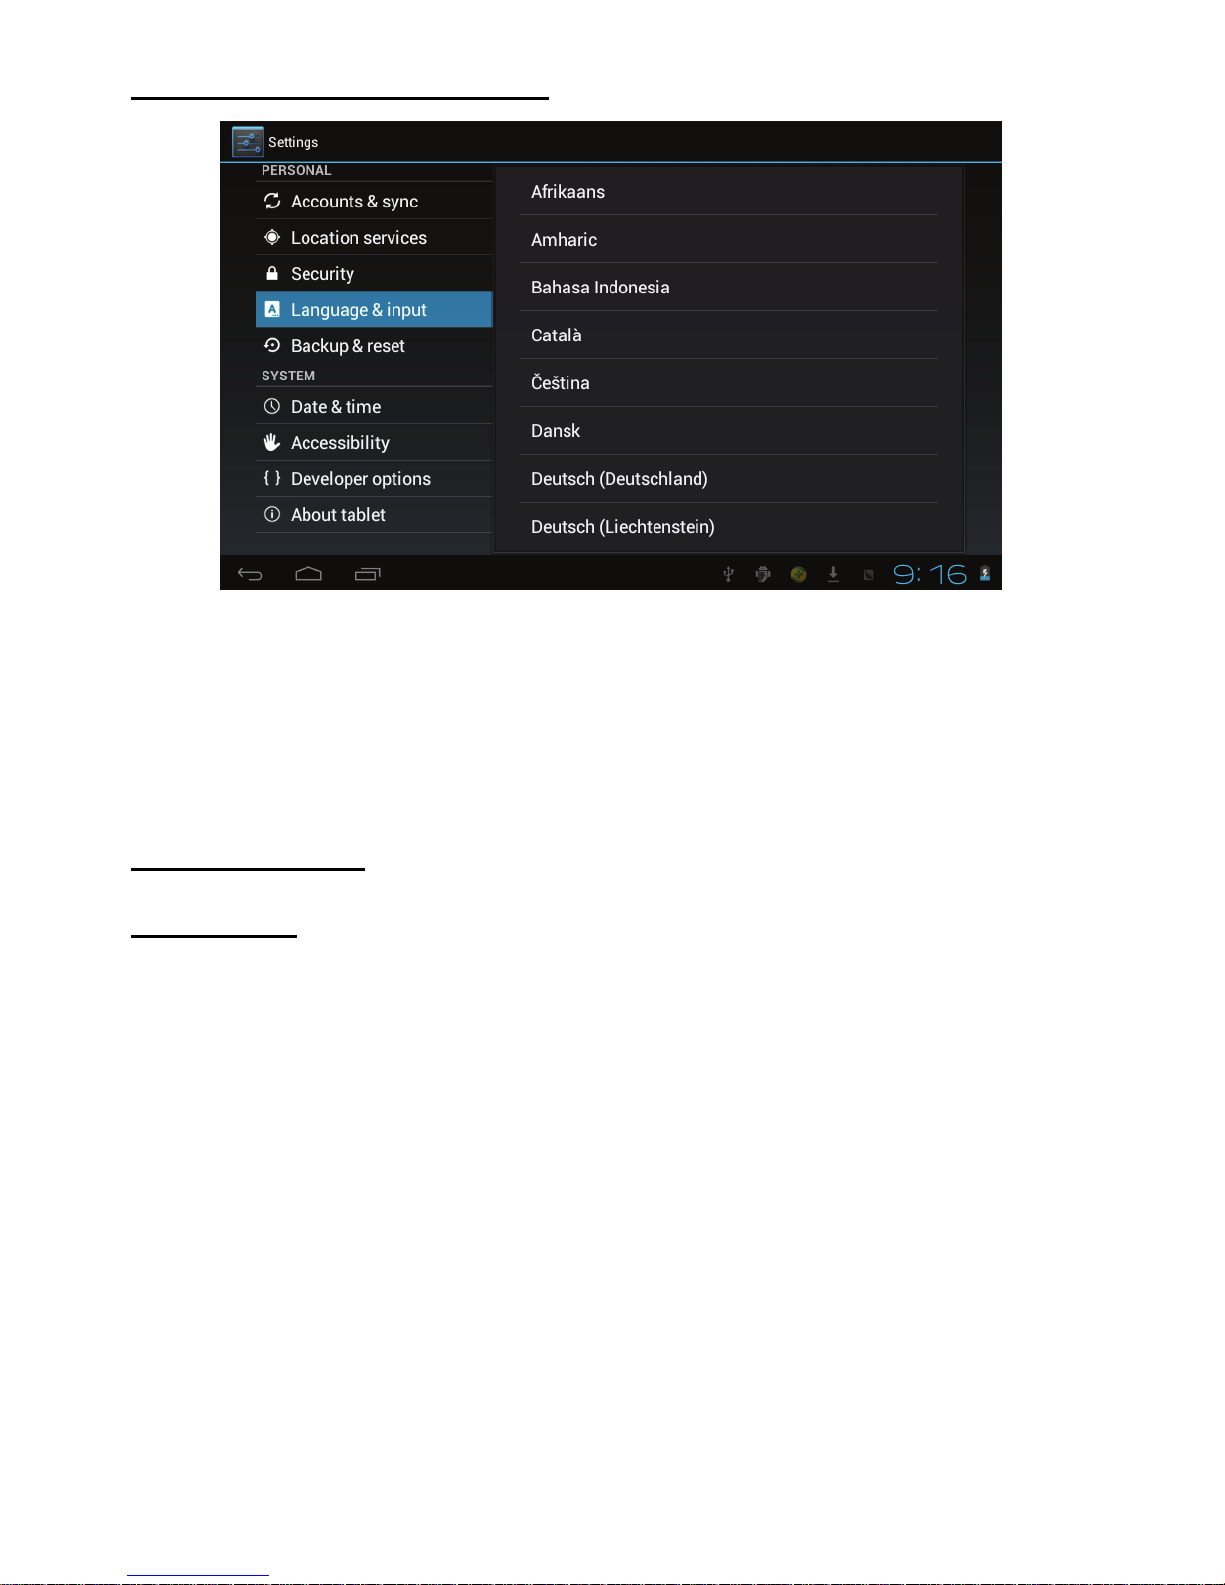
Setting the display Language
1. Tap the setting icon.
2. Tap language & input.
3. Tap language, and select the language you want. There are 60
languages to choose from.
About the Tablet
Multi-Media
Your device supports the following media formats
Audio file formats supported:
MP3,WMA(nonencrypted),MP2,OGG,AAC,M4A,MA4,FLAC,APE,3GP,WAV
Supported video formats:
AVI(H.264、DIVX、DIVX、XVID), rm,rmvb, MKV(H.264、DIVX、
DIVX、XVID),WMV (non encrypted) ,MOV,MP4(.H.264、MPEG、
DIVX、XVID),DAT(VCD),VOB(DVD),PMP, MPEG,MPG, FLV
(H.263,H.264),ASF ,TS, TP,3GP,MPG
Page 17
16
Supported image formats: JPEG (RGB), GIF, PNG, BMP
Music
Your music can be divided into four types: artists, album, all music,
and play list. Choose a type to view the list. If you enter one type,
continue to narrow your selection, until the music you want to play
appears. For example, if you choose artist type, you can see the artist
name from A to Z, if you choose one artist, a list will display the artists’
albums and album list.
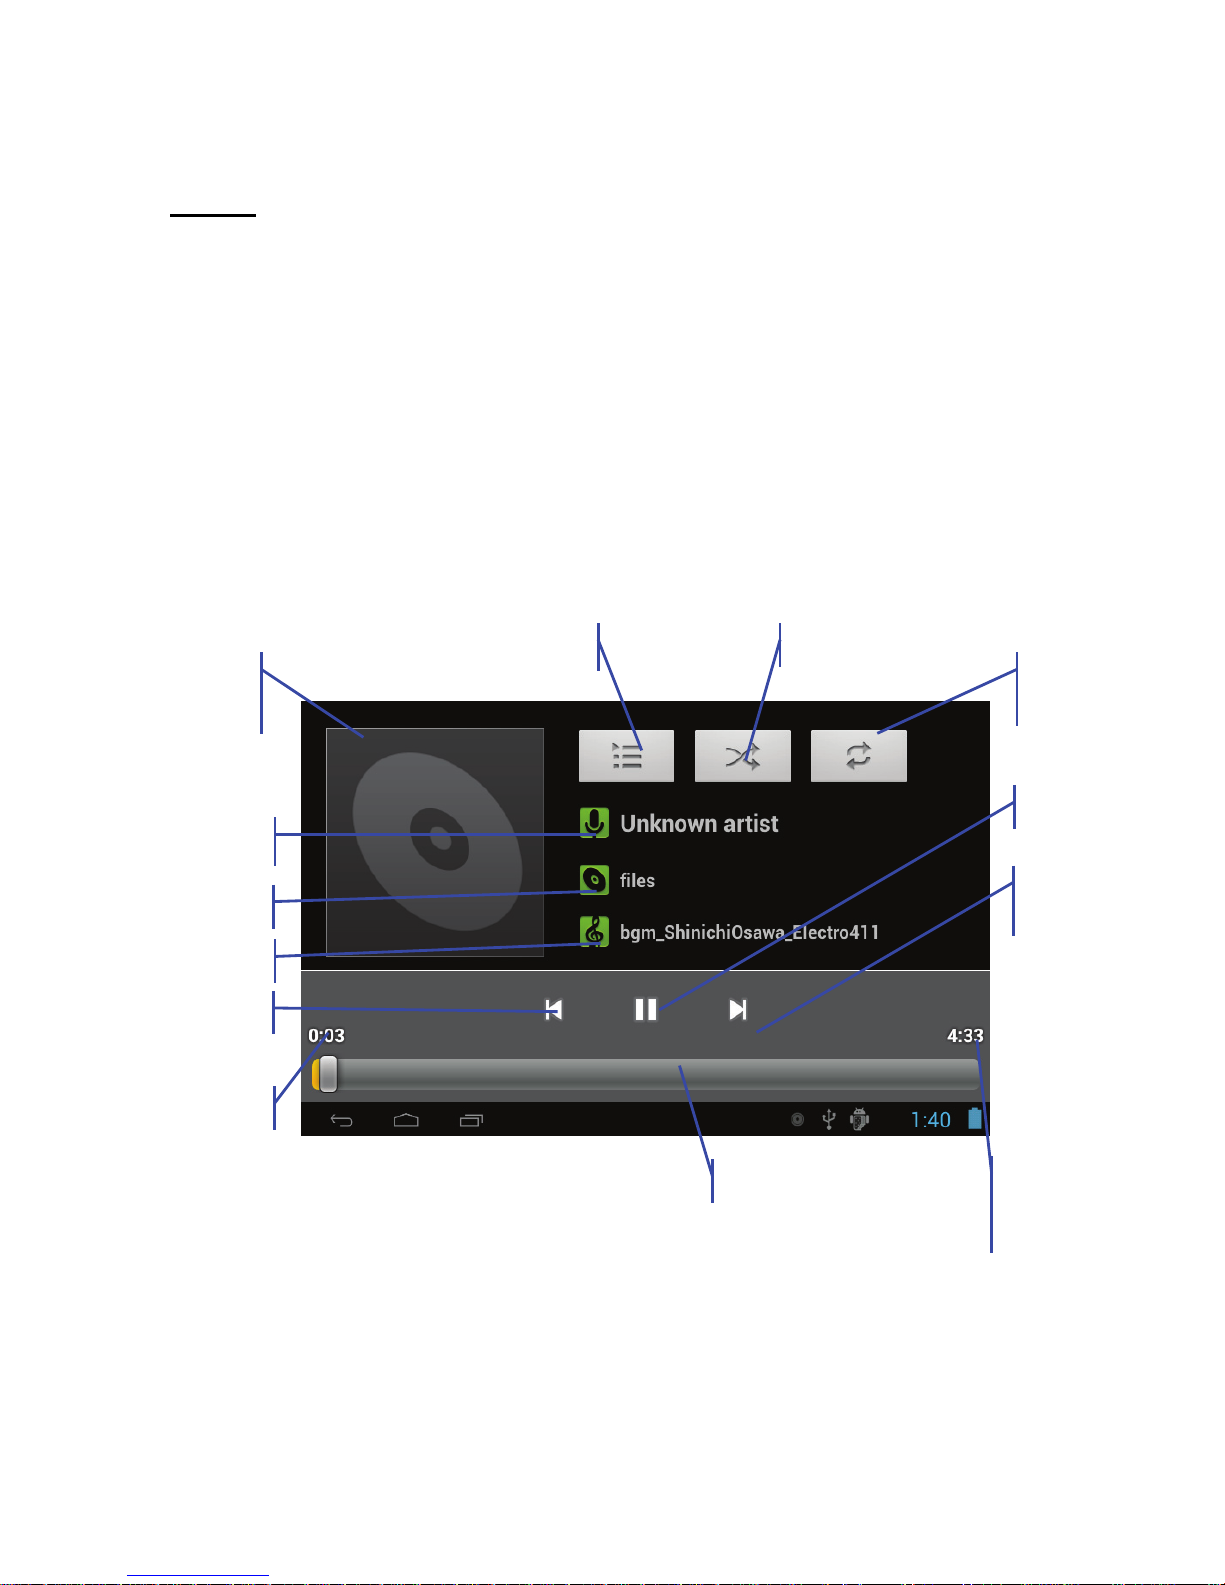
1.Find and play music
1. Tap the music application.
2. Tap artist, album or play list.
3. Select any music to play.
Cover of
album
Artist
Previous song
Music
Played time
View current play Random play
Repeat
time
Music
total time
Play progress bar
Album
Pause
Next
son
g
Page 18

17
2.Add music to a play list
1. Tap the music application.
2. Enter to select music.
3. Tap and hold the music you want to add.
4. Tap “Add to playlist “, and select the playlist you wish to add your
files to.
5. OR Tap “new”.
6. Input a name for your new play list.
7. Tap save.
3. Delete the music in a play list
1. Tap music.
2. Tap and hold the music you want delete from the play list.
3. In the pop up music setting menu, tap delete to finish.
Video
Enter video mode
1. Tap the video application.
2. Tap gallery or list selections.
3. The device will display all compatible video files.
4. Tap the file you want to play.
Images
View images
1. Tap the image gallery application.
2. This will bring up the image gallery, tap the file or folder you
Page 19

18
want to view.
3. Tap the image you want to view, and the system will view the
image in full screen.
4. When you view images, you can zoom in and out by pinching or
sliding two fingers apart.
Edit and setting images as a contact or desktop
After opening an image, tap the image again to bring up your menu
and delete
icons. Tapping the delete icon will allow you to delete
the image.Tapping the menu icon will bring up your image submenu.
Slideshow: Tap to enable slideshow mode
Edit: Tap to edit the image.
Rotate left/Rptate right: Tap to rotate the image.
Crop:Tap allows you to crop the image
Set picture as:Tap to set the picture as a “Contact image” or
“Wallpaper”
Detalis: Tap to display image details, such as file name, creation date,
dimensions, orientation, file size, path, etc.
Camera
Tap the camera icon
on the main screen or the app menu.
The controls for camera and digital recording modes are interchangeable
Page 20
19
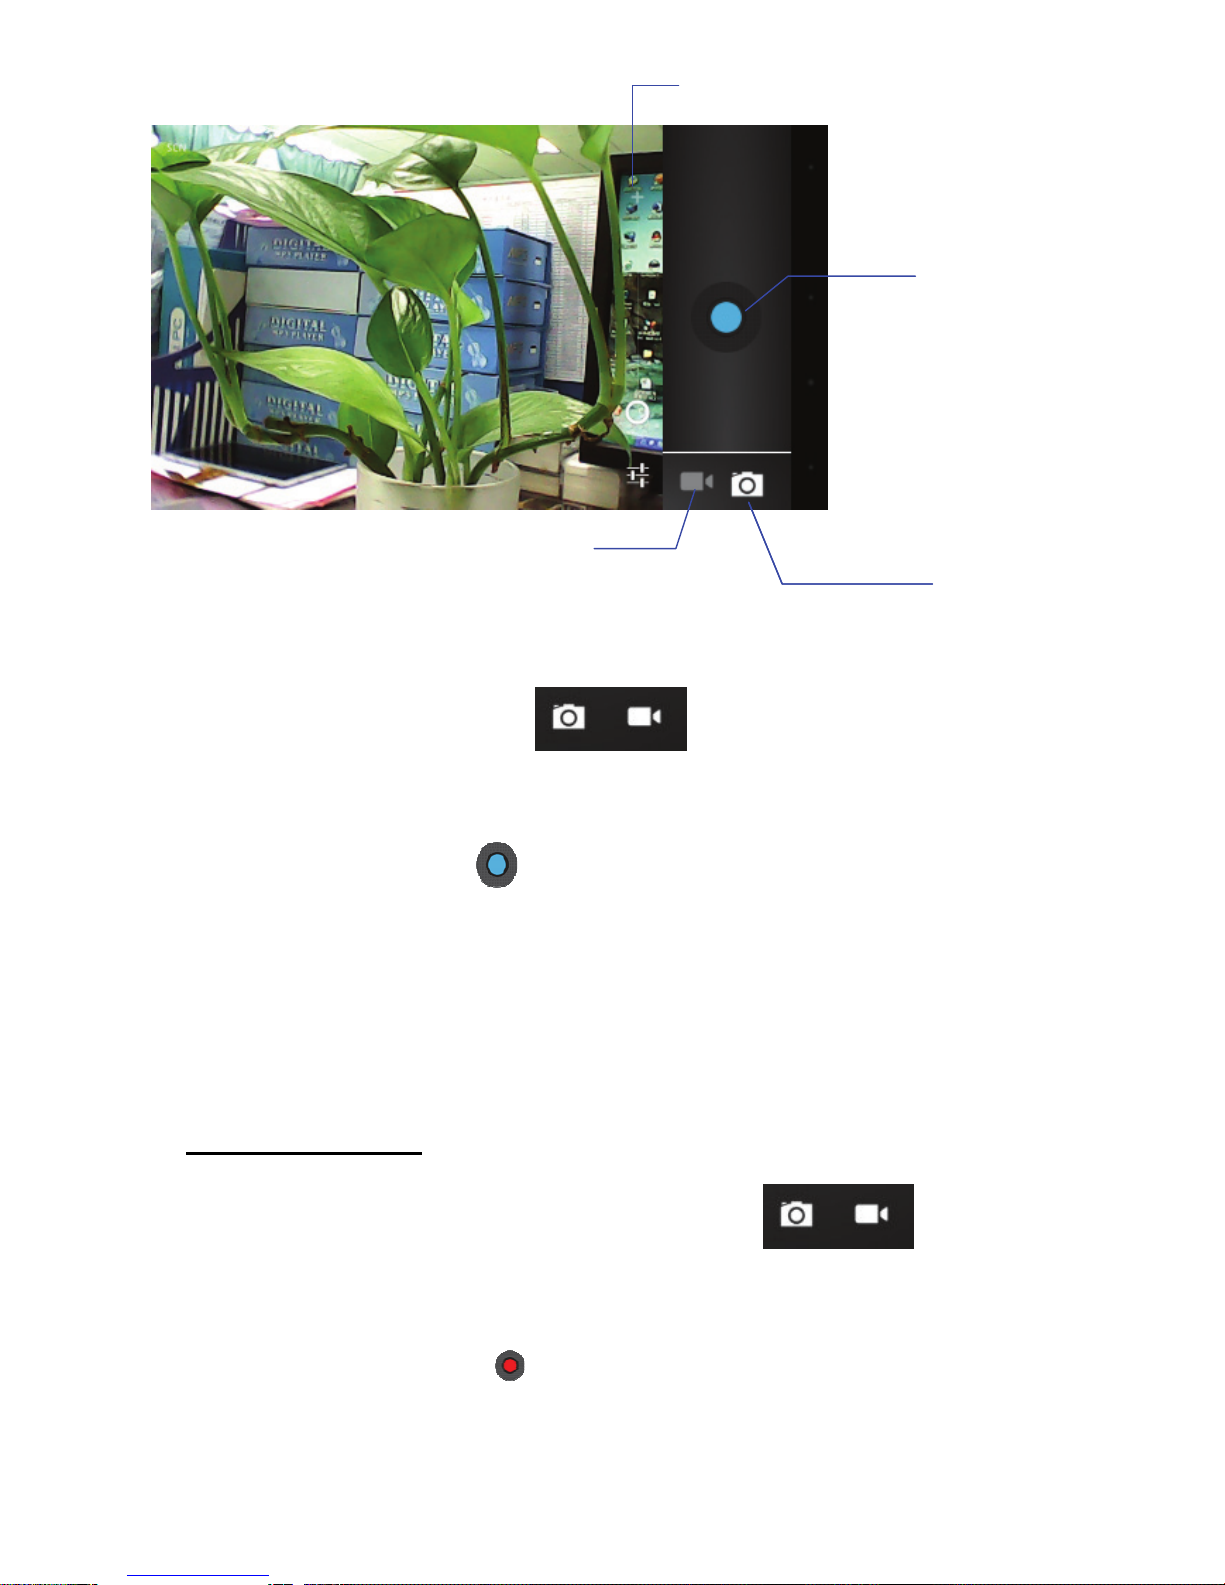
1.To take pictures, ensure that your device is in camera mode:
2. Aim at the target you want take pictures of.
3.Tap the blue button
to take images.
Note- To avoid blurring your images, make sure that you hold
the device steady and tap the blue button lightly.
Recording video
1. Enusure your device is in video mode:
2. Move the camera lens to the target you want to shoot.
3. Tap the red button
, the system starts to record video. While
recording, the red button will display a white diamond.
Camera
Tap to capture
image & video
Zoom
Camera mode
Video mode
Page 21
20
4. Touch the red button when finished recording. Reminder:
Images and videos will save automatically.
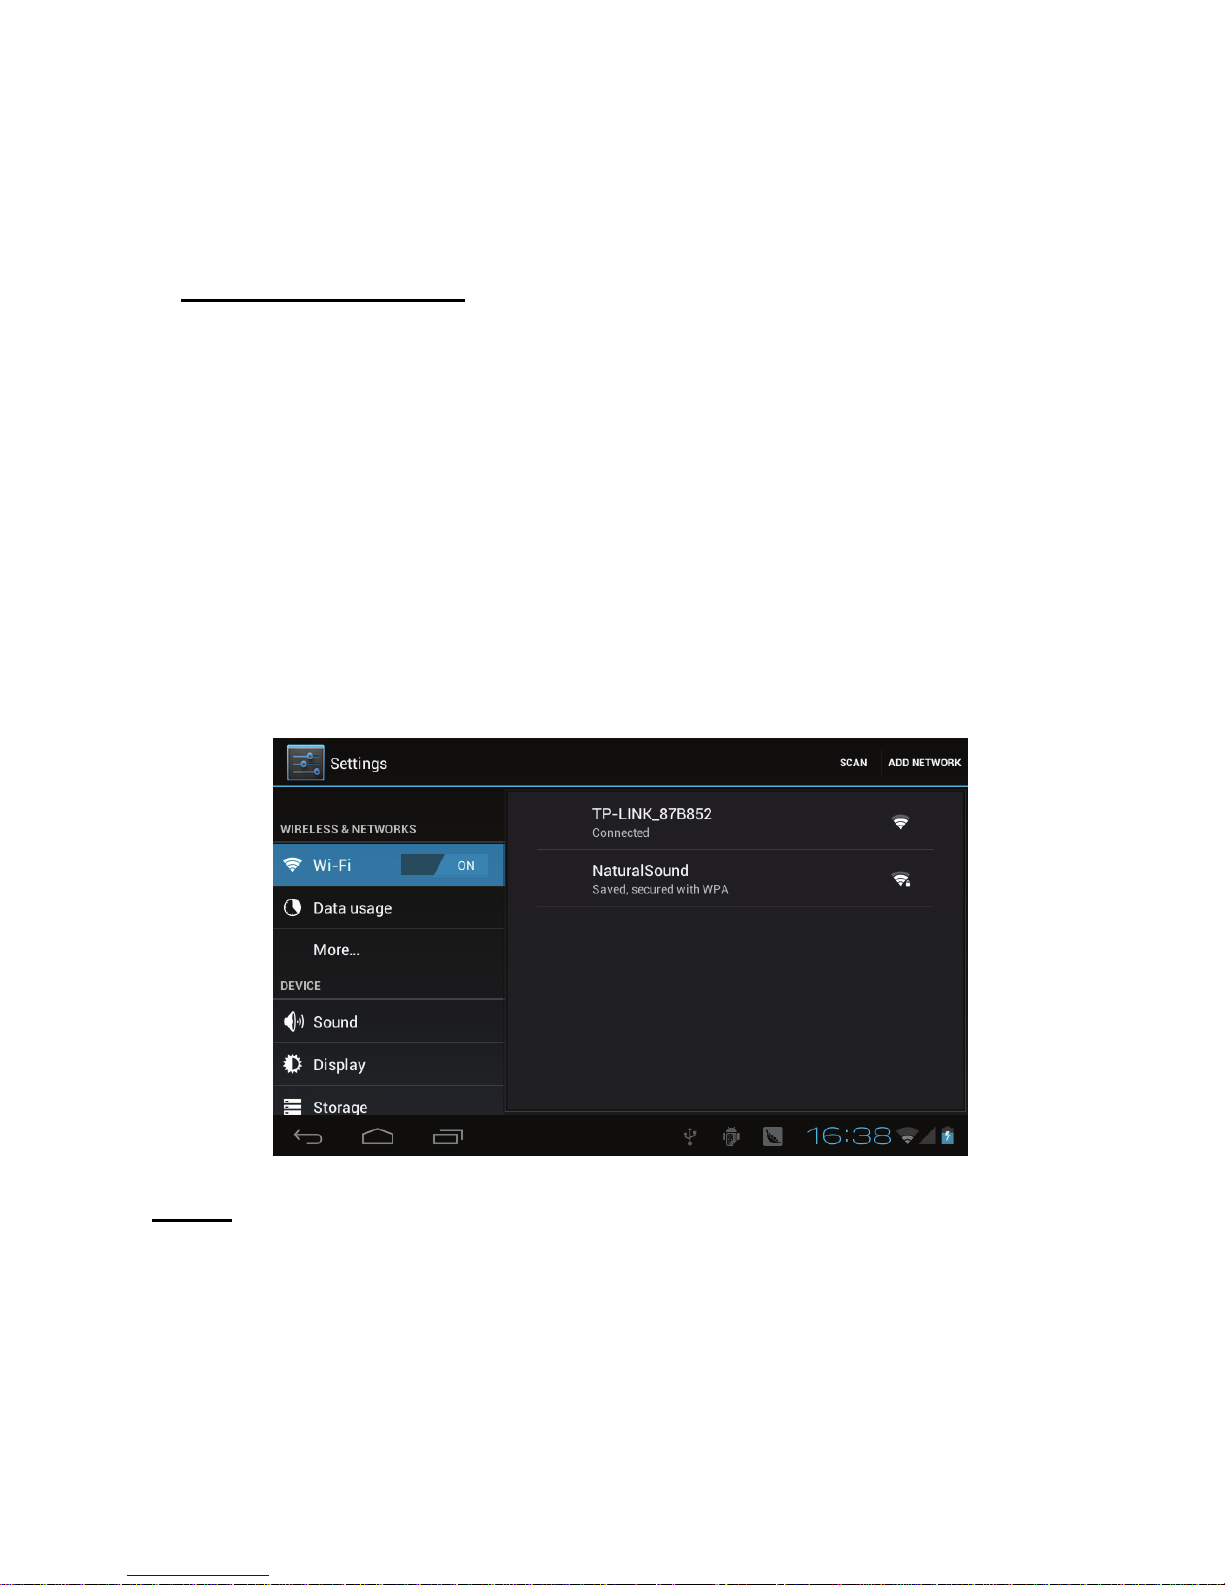
Connecting to Wi-Fi
Your device connects to the internet using a built in Wi-FI antenna
1. Tap the Settings icon.
2. Slide WI-FI to the “on” position.
3. The device will auto scan for available WI-FI internet connections.
4.Select the WI-FI connection you want to use; if the connection
requries a password, you will need to enter it.
Email
The Email application allows you to access an external POP3 or
IMAP email account provider such as Yahoo, Gmail and 163.
Note: Before setting up your Email, please ensure that you are
connected to wifi. If you do not already know your email
Page 22
21
settings (POP3, IMAP, etc) you can obtain them from your email
provider.
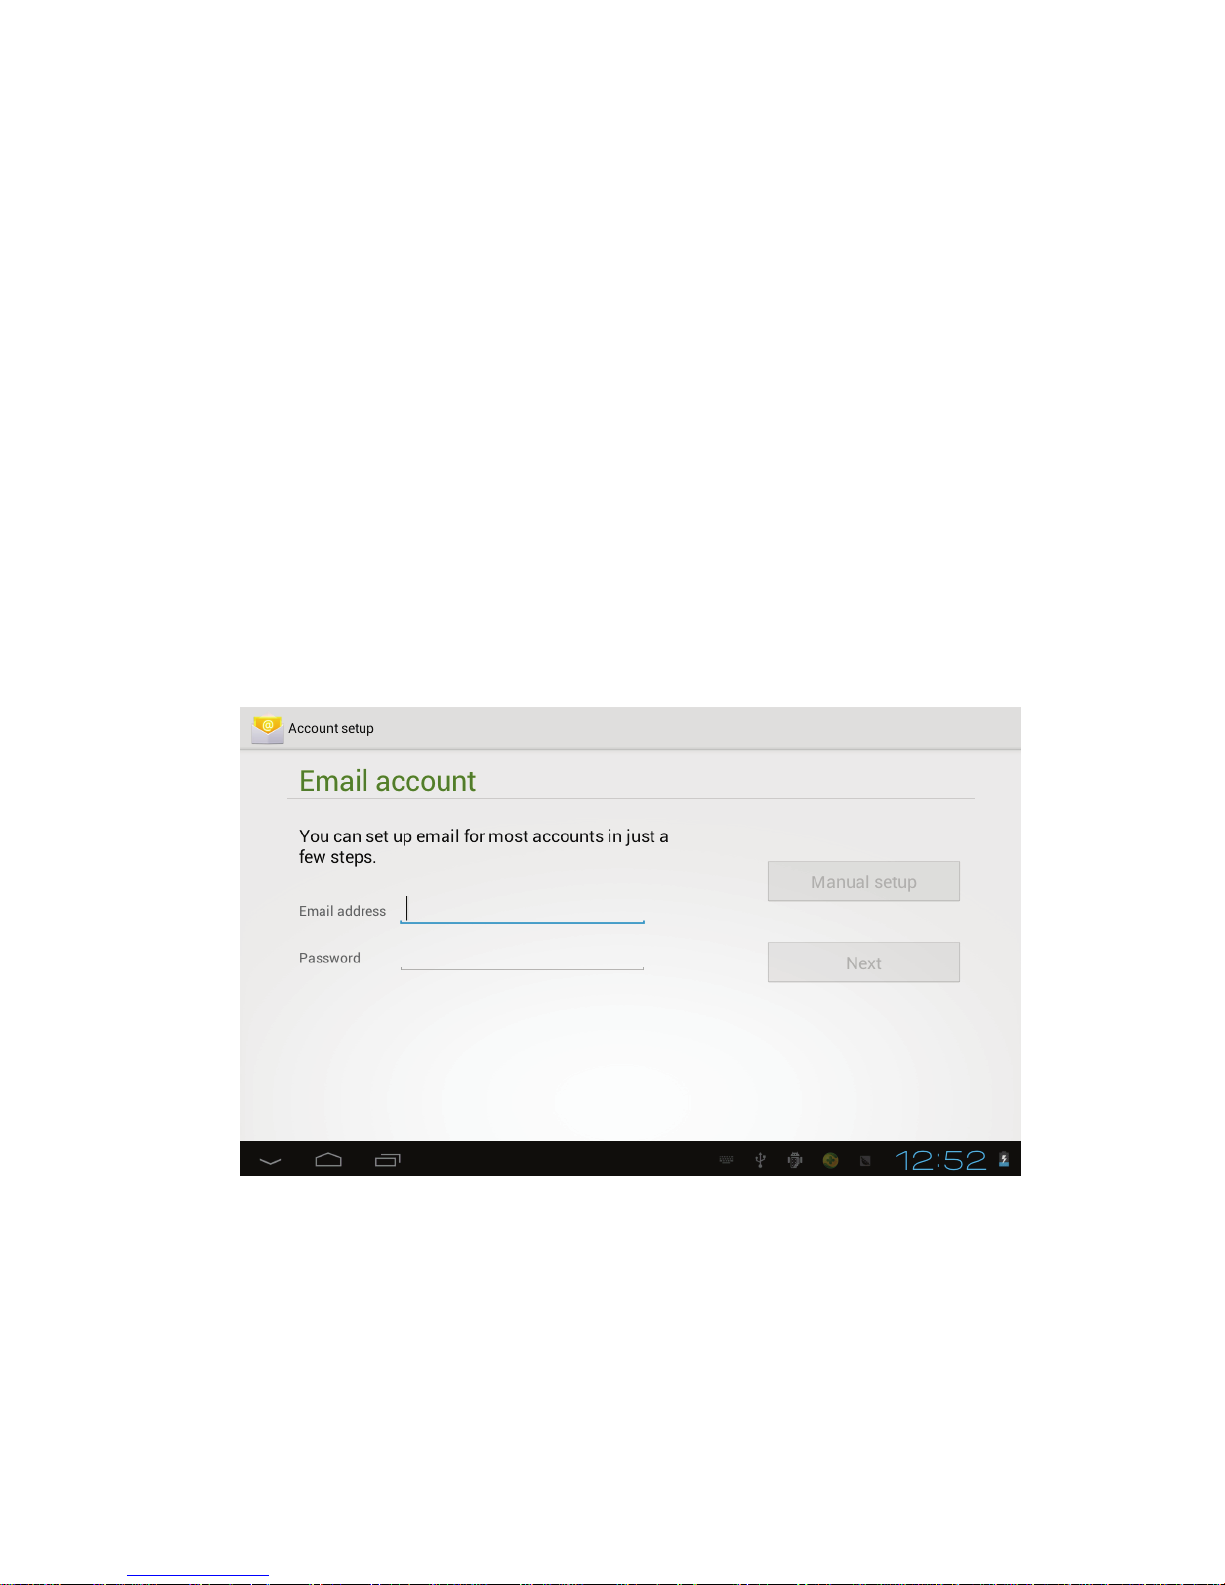
A. Set up Email Account
1. Tap the Email app.
2. An email setting guide will appear.
3. Enter your Email account address and paaword.
4. Tap the next button, choose your Email type; POP3 or IMAP.
5. Tap next button to check the Email settings.
6. Enter the account name and the Email sender’s (your) name,
tap finish.
7. If the mailbox is available, it will enter into your inbox.
B. Delete an Email account
You can delete the set POP3 or IMAP email account from your
device.
1. Tap Email.
Page 23
22
2. Enter your inbox.
3. Touch the menu button.
4. Tap setting.
5. Select the account you wish to remove.
6. It will pop-up a menu list, select delete account.
7. Tap “Ok” to delete.
C. Sending E-mail
1. Tap Email to display your mail box.
2. Tap the inbox, it will refresh the new emails automatically; tap
it to read new email.
Touch the
button at the top of screen.
Input the receiver’s Email address in the receiver column.
1. Input subject and Email content.
2. Tap add attachment, touch menu button, it will pop up a menu.
3. Tap add attachment.
4. Select the attachment you want to send (pictures, videos)
5. Tap send button
to send the email.
Internet
A. Browser
1. Opening and using the Browser
2. Tap the Browser icon
3. The Browser will open to the last page you visited. If you
have not opened the Browser yet, it will go
Page 24
23
to your Homepage
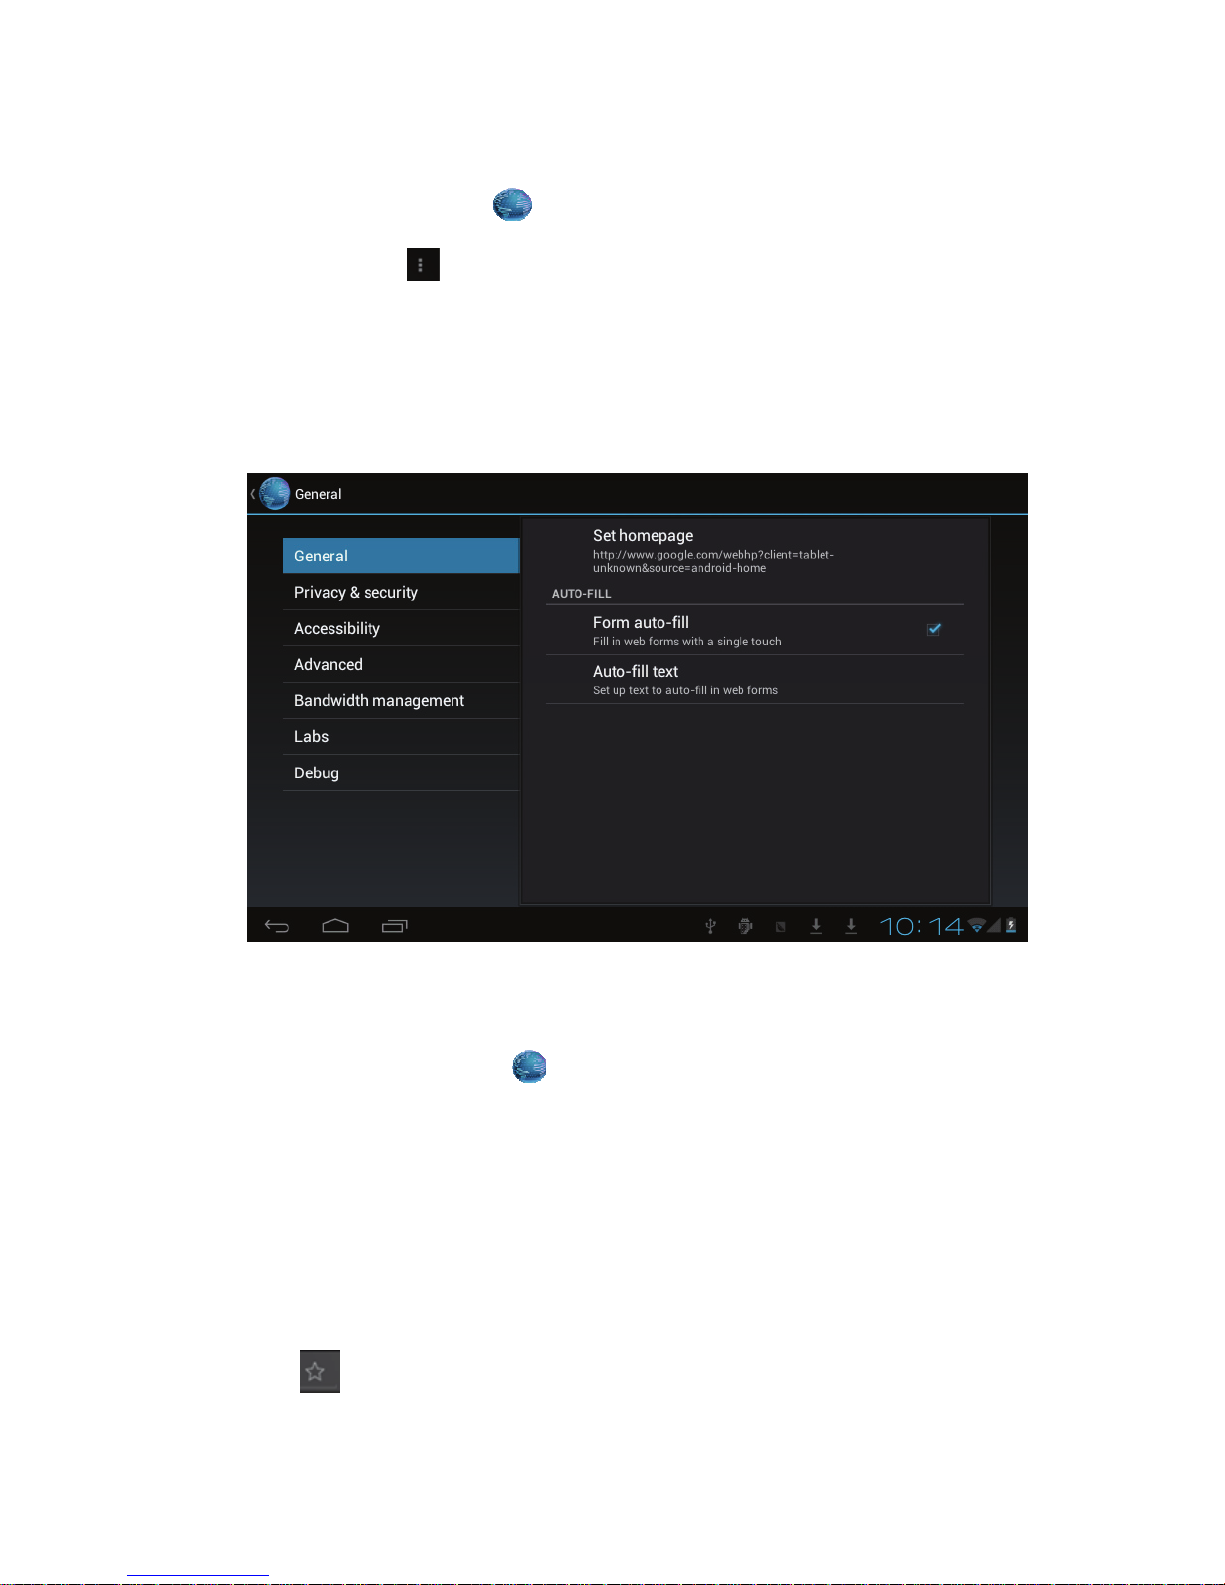
B. Set the Homepage.
1. Tap the Browser icon
.
2. Tap the menu
icon on the top right corner.
3. Tap the setting menu.
4. Tap General
5. Tap Set homepage
C. Visit Webpage
1. Touch Browser icon
2. Input the website you want to search on the keyboard.
3. Tap finish to go to the website.
D. Setting Webpage bookmark
1. Go to any webpage.
2. Tap
and select “OK” to add this website to your bookmarks.
Page 25
24
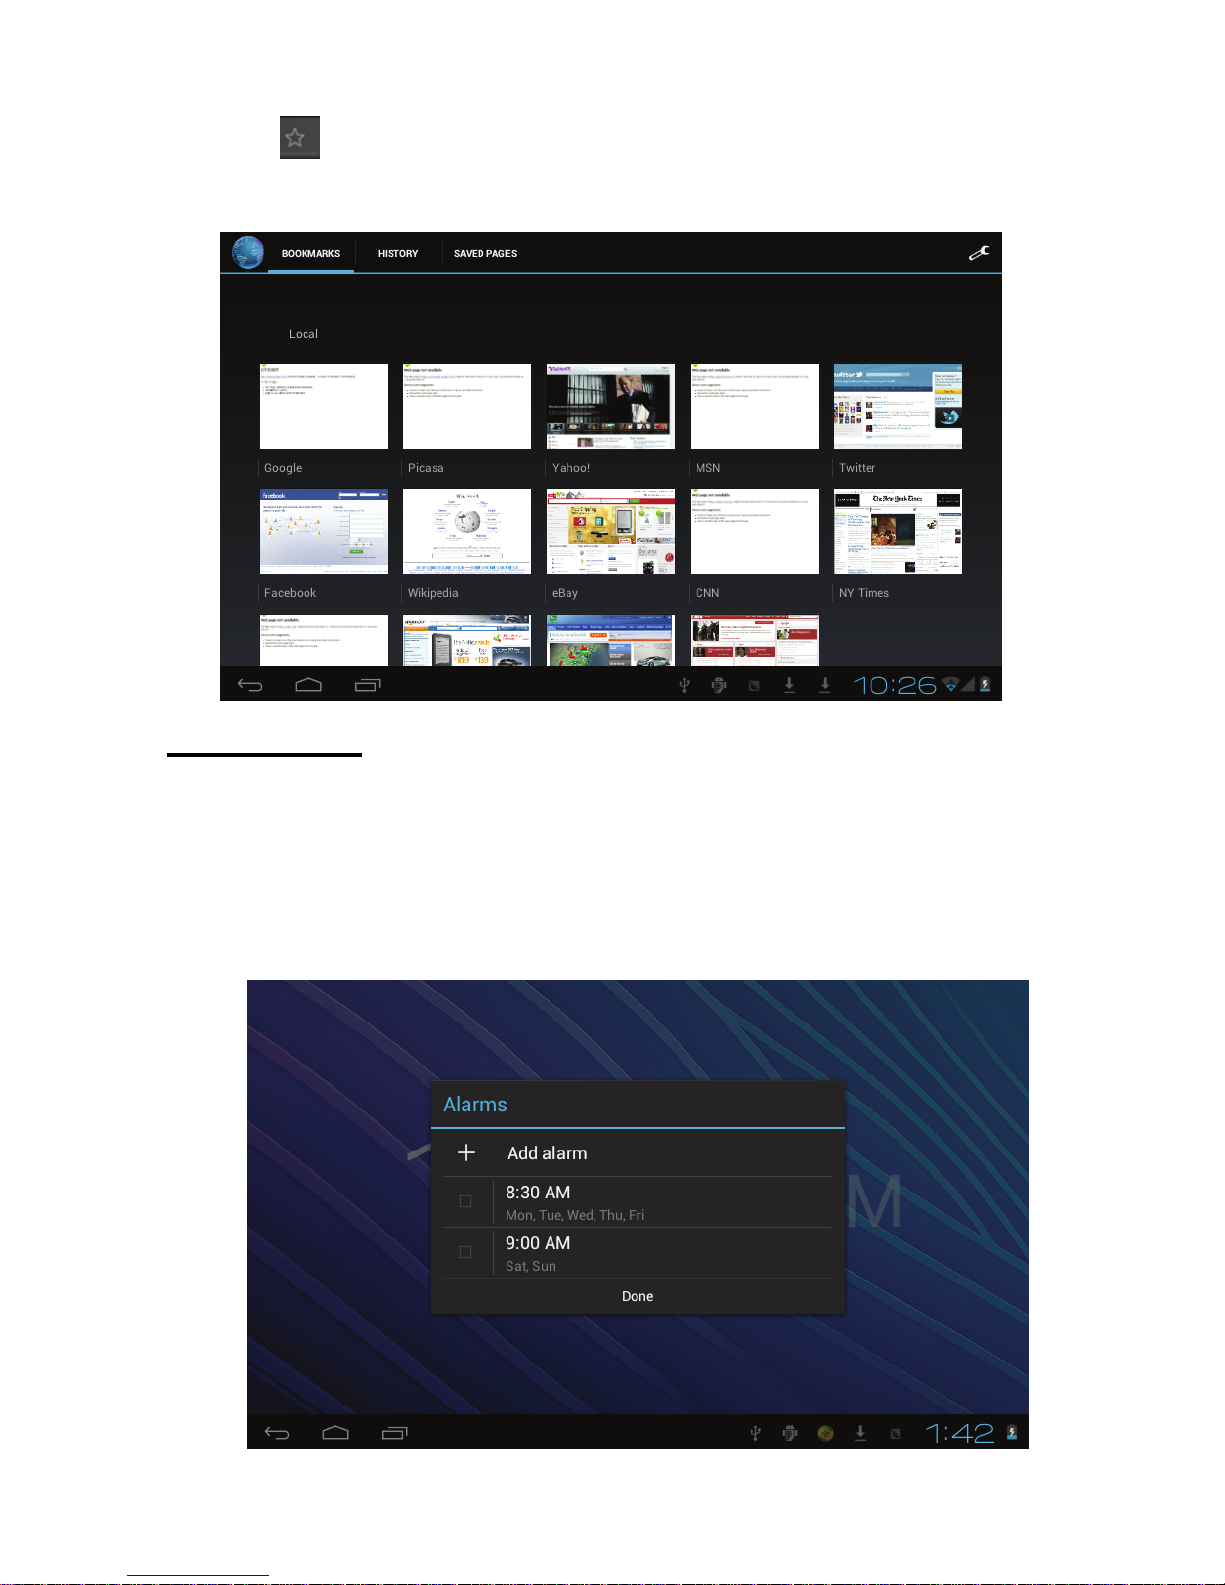
E. Opening a bookmark
1. Tap
, and it will show bookmark list in the Browser.
2. Tap the bookmark you want to open that webpage.
Alarm Setting
1. Enter the app menu.
2. Tap the clock application.
3. Tap “Set alarm”.
Page 26

25
File Management
You can use file manager to open, edit, and delete files and folders.
1. On the app menu, tap the file manager button
2. Tapping a file will pop up a list of applications you can use to open
the file. Press and hold the item to copy, move, or delete the file.
Installation Applications
A. Installation
Install the third part application procedure
While the main method of loading applications involves
using an appstore, if you have an individual APK file, you
can use that to install the app.
Save the APK file to your device. We recommend saving APK files to
the Downloads folder for ease in finding them.
1. Tap file manager; choose the application you wish to install.
2. Tap install APK.
3. Follow the installation instructions listed on the screen.
Uninstall an app
1. Tap the settings icon.
2. Tap Application.
3. Select the application you want to uninstall, tap uninstall.
4. Tap OK to finish uninstalling the app.
Page 27

26
Troubleshooting
1. It takes a long time to power up when I power on for the first
time.
The first time you power the device on, or after updating the device,
it may take as long as three minutes to power on as it intitallizes
files. Subsequent power sequences should take less than a minute.
2. Sometimes, the device feels warm to the touch.
When charging, or after a long period of use, it is common for the
device to feel slightly warm. This is normal as the battery charges or
discharges and is not a cause for concern.
3. My device will not connect to Wifi.
Ensure that you are in an area with a strong WIFI signal.
Please make sure the password you are using is correct.
4. Cannot surf the Internet
Please make sure the distance between the device and the
wireless router is within 50 yards.
Please re-connect the WIFI.
5. Sometimes, the device runs slowly.
The more apps you have open and running, the slower the
device will run. You can enter your application setting to
disable or “kill” applications to free up processor and memory
resources. In addition, there are many “Task Killer”
applications which can do this
Page 28

27
If at any point, you have questions about your player or experience an
issue with your player, please feel free to contact our technicians at
or by phone at 580- 272- 0035.
Limited Manufacturer’s Warranty
1. MACH SPEED products carry a one year from date of purchase
warranty. This warranty is nontransferable.
2. Mach-Speed Technologies warrants to the original registered
end-user purchaser that Mach Speed products will be free from
defects in materials and workmanship for one year from the date of
new purchase. During the warranty period and upon proof of
purchase the product will be repaired or replaced (with the same or a
similar model, which may be a refurbished model) at Mach Speed
Technologies option, without charge for either parts or labor. This
warranty shall not apply if the product is modified, tampered with,
misused, physically damaged, or subjected to abnormal working
conditions (including, but not limited to, electrical, fire, and water
damage).
THIS WARRANTY DOES NOT GUARANTEE YOU
UNINTERRUPTED SERVICE. REPAIR OR REPLACEMENT AS
PROVIDED UNDER THIS LIMITED WARRANTY IS THE
EXCLUSIVE REMEDY OF THE PURCHASER.
Page 29

28
To obtain service under this warranty, you must contact our
Technical department at (580) 272-0035 to obtain an RMA number.
Mach Speed Technologies will only replace or repair products that
are sent to us with an authorized RMA number.
Return Merchandise Authorization (RMA):
1. Customers will be charged additional costs for testing and
repackaging when returned “bad” items are found to have no problems
or defects.
2. Items found to be out-of-warranty or not belonging to Mach Speed
Technologies will not be replaced. Instead, they will be returned back to
the customer freight-collect.
3. RMA’s will be shipped back to customer via UPS ground delivery.
Express shipping will be at additional costs to the customer.
4. All RMA’s must be accompanied with a copy of original receipt or
invoice with name, return address and phone number of customer.
Exchanges:
1. Items will not be cross-shipped for any reason.
2. The original receipt or invoice must accompany all exchanges.
3. All exchanges must be shipped freight pre-paid by the customer and
include a pre-paid shipping label for shipment back to the customer.
Furthermore, the customer is expected to insure all items being shipped
Page 30

29
back. Mach Speed Technologies is not responsible for any losses or
damages for such equipment.
4. All sales are final. Mach Speed Technologies will not accept any
returns for credit or refund.
Discrepancy & Shipping Damage:
1. For wrong items, missing items, shipping damage, or other
discrepancy; customer should report to RMA department on the day in
which the items were received. Any claims after one business day of
receipt will not be honored.
2. For any shipping damage, customer must file a claim with their carrier
immediately. All items are shipped insured, thus must be reported for
coverage.
3. Customer is responsible for paying any freight charge caused by
refused shipment or unclaimed goods.
4. Mach Speed Technologies will make every reasonable effort to
deliver on time however; Mach Speed Technologies will not be liable for
late or lost shipments.
Consequential Damages and Limitations:
1. Mach Speed Technologies shall not be liable for any failure to perform
or delay in performing any of its obligations when such failure or delay is
due to circumstances beyond its reasonable control, including, without
Page 31

30
limitation, any act of God, war, strike, riot, fire, flood, earthquake,
lock-out, late or non-delivery by suppliers, shortage or unavailability of
materials, components or transportation facilities, or any act, refusal to
act, regulation, order or intervention of any governmental authority.
2. Under no circumstances shall Mach Speed Technologies be liable for
any special, indirect, incidental or consequential damages of any kind or
nature whatsoever, including, without limitation; lost goodwill, lost resale
profits, loss of data or software, work stoppage or impairment of other
goods, and whether arising out of breach of any express or implied
warranty, breach of contract, tort (including negligence), strict product
liability or otherwise, even if advised of the possibility of such damage or
if such damage could have been reasonably foreseen.
Page 32

 Loading...