

Page 1

Wireless Transceiver System (TPRF-900) Manual
1. Getting Started
. Introduction:
This equipment has been manufactured and tested under strict quality control conditions. This
Wireless Transceiver System has been tested within a 1000 feet radius. The receiving chips use a
Super Heterodyne method, while the Base and Hand sets use and coincides with a Digital Coded method.
In case of frequencies overlapping with other waves, up to 40 different channels can be selected for
clearer reception by manually using the Channel Switch button
. Equipments:
a. Base Set – 1 unit
b. Hand Set – 1 unit
c. Headset (optional) – 2 units
d. Microphone – 1 unit
e. Rechargeable Battery – 1 pack
f. User’s Manual - 1 book
* Accessories parts are subject to change without any notice for functional improvements.
. Cautions:
a. Use only the given antenna with the Base Set
b. Do not immerse in water or keep in humid areas
c. Do not place near TV, speakers, or other electronic devices
d. Before installation, check power supply and voltage to avoid hazards
e. Do not apply force or shock to the unit
f. Do not disassemble the unit
.
Page 2
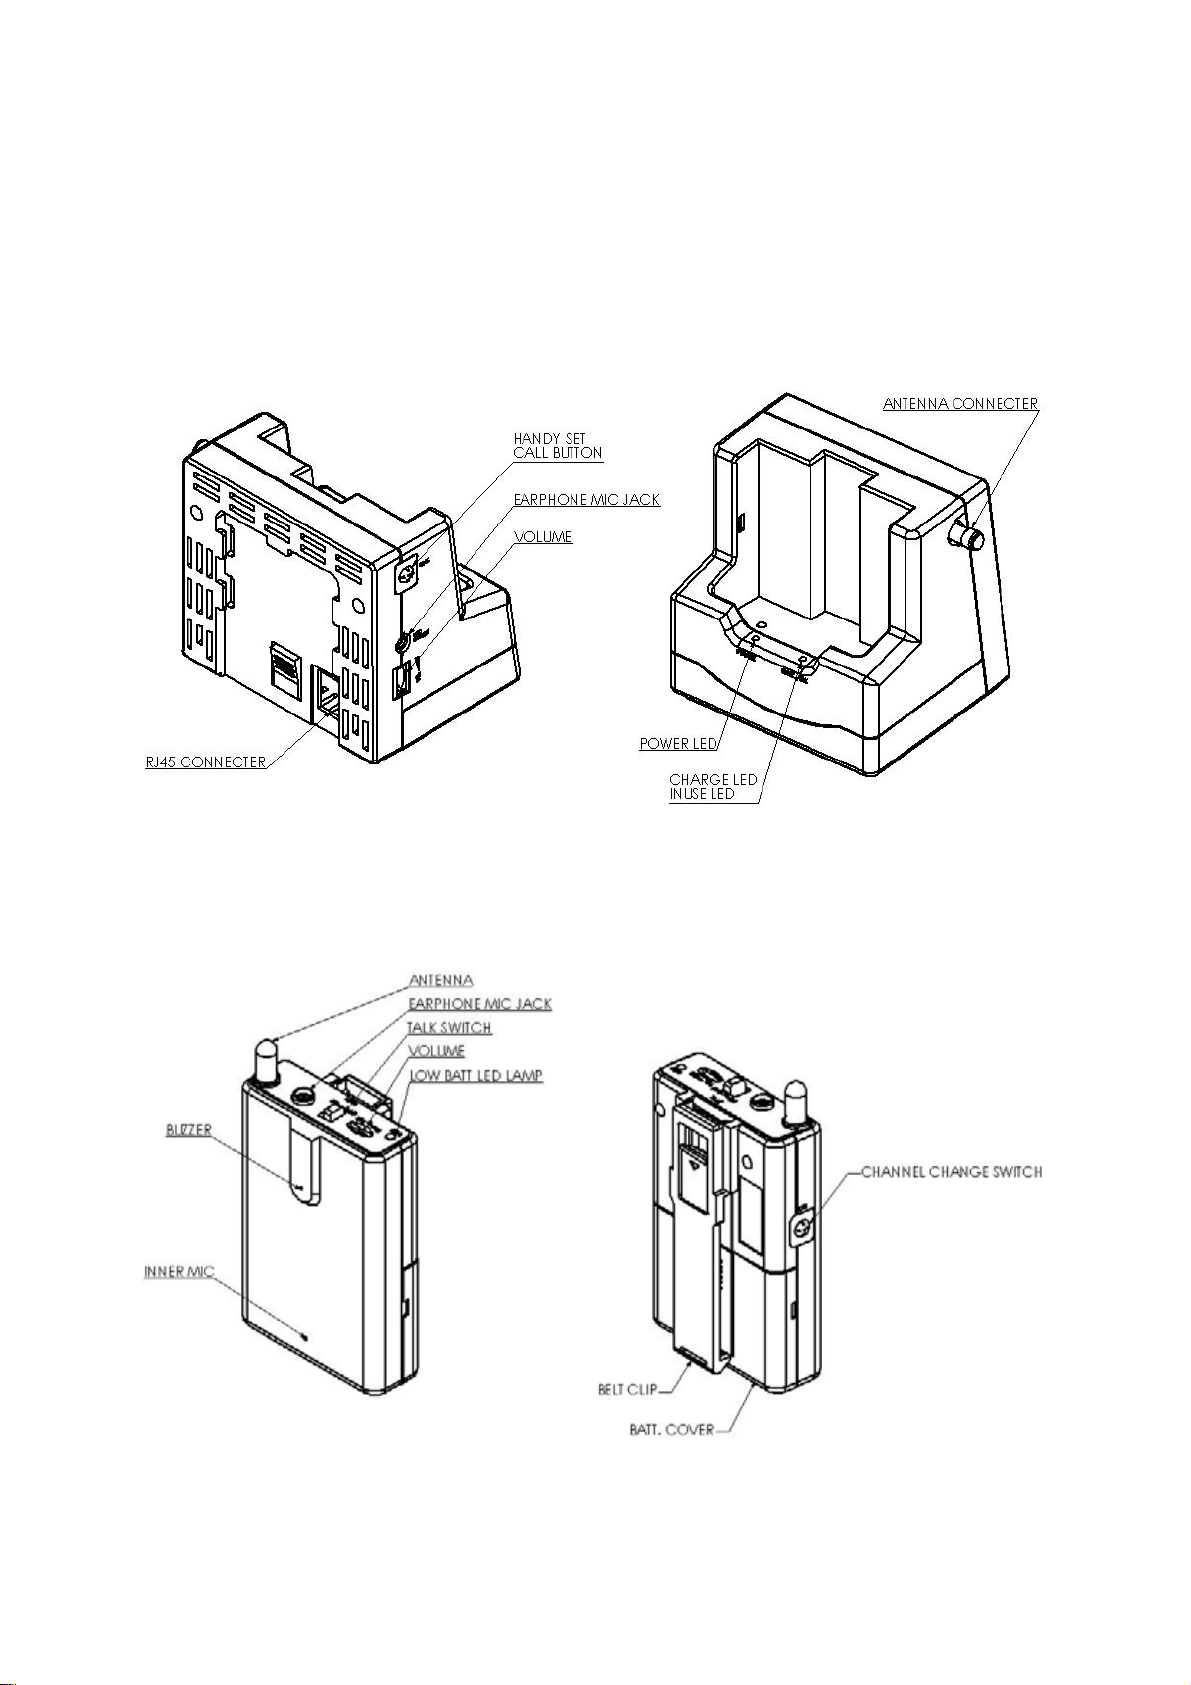
Parts Description:
Base Set:
Hand Set:
Page 3

2. Functions:
This Wireless Transceiver System can automatically search, find, and memorize the best reception
within 40 channels. Therefore, top of the line clarity and communication is guaranteed.
a. Hand Set:
The Talk ON/OFF switch, can activate the Base unit.
b. Base Set:
The RJ-45 #6 pin is used for controlling the communication. If a LOW (TTL:”L”) signal is
received, the communication is enabled regardless the Hand Set is ON or OFF. If a HIGH
(TTL:"L") signal is received, the communication is disconnected.
c. Channel Surfing:
If reception becomes unclear, press the Channel Switch button once.
d. Security:
The CPU and EEPROM can choose from one million different passwords to prevent
eavesdropping.
e. Paging:
The Base Set can page the Hand Set for communication.
f. Standby:
While charging, the Hand Set is in standby mode.
g. Communication Range:
When the Hand Set goes out of range, a warning beep will sound on the Hand Set.
h. Low Battery:
When the Hand Set is low on battery, a warning beep will sound and a warning light will appear.
Page 4

3. Base and Hand Set Installation
Base Set
a. Connect the RJ-45 connector to the Base Set
b. Connect the Microphone (optional Headset) to the Base Set
Hand Set
a. The battery pack is not built-in the Hand Set for safety reasons. Connect the battery pack
to the Hand Set and then turn the power switch ON (located in the battery storage area)
b. Prior to use, charge the unit by placing the Hand Set in the Base Set for at least 3~5 hours
c. Connect the Microphone (optional Headset) to the Hand Set
RJ-45 Connector Pin Description
① VCC : DC power (10V ~ 16V DC)
② GND : DC power GND
③ RX Audio : RX Audio signal + TX Audio signal
④ GND :
Beep Tone
⑤ TX Audio(AUX) : TX Audio
⑥ RF module ON : (TTL : “L”)
⑦ RF Loop ON : Hand, Base Set Loop ON signal (TTL : “L”)
⑧ MIC/Headset ON : MIC/Headset ON signal (TTL : “L”)
Power ON/OFF---------------------------Æ Beep
Low Battery ----------------------------Æ Bee- Beep
Connection Established --------------------Æ Beep~
Hand and Base Set Recognition --------------Æ Beep~
Charging Mode ---------------------------Æ Beep~
Paging from Base Set----------------------Æ Beep~ Beep ~ Beep (continuously)
Out of Communication Range-----------------Æ Bee-Bee-Beep
Disconnection----------------------------Æ Beep
Page 5

4. Rechargeable Battery Pack
It is recommended that before using, charge the unit by placing the Hand Set in the Base Set for at least
3~5 hours.
Replacing the Battery Pack
a. Remove the battery cover on the Hand Set
b. Turn the power switch OFF (located in the battery storage area)
c. Detach the battery pack cable from Hand Set
d. Connect the new battery pack to the Hand Set and then turn the power switch ON (located in
the battery storage area)
e. Close the battery cover
5. Recommendations
a. Prior to use, charge the unit by placing the Hand Set in the Base Set for at least 3~5 hours
b. The LED on the Base Set indicates Charging Mode. If LED light does not turn on, call the
A/S center
c. If the Hand Set is not in use for long periods, turn the power switch OFF (located in the
battery storage area).
d. Check the LED on Hand Set for Low Battery status
e. Charge Hand Set when not in use for short periods
6. Troubleshooting
Problems Check Points
No reception
- check the battery status
- check the connection and cables
- check the communication range
- change the location of Base Set
Poor reception, static, noise
- check the communication range
- check to see if placed near TV, speakers, or other electronic devices
Page 6

t
e
r
y
FCC COMPLIANCE STATEMENT
THIS DEVICE COMPLIES WITH PART 15 OF THE FCC RULES.
Operation is subject to the following two conditions; (1) this device may no
cause harmful interference, and (2) this device must accept any interferenc
received, including interference that may cause undesired operation.
CAUTION:
1) Changes or modifications not expressly approved by the party responsible fo
compliance could void the user’s authority to operate the equipment.
2) This device and its antenna must not be co-located or operating in conjunction with an
other antenna or transmitter.
 Loading...