

Page 1
FCC RF Radiation Exposure Statement
This receiver complies with FCC RF radiation exposure limits set
forth for an uncontrolled environment. This equipment should be
installed and operated with a minimum distance of 20 centimeters
between the radiator and your body. This receiver must not be colocated or operated in conjunction with any other antenna or
transmitter.
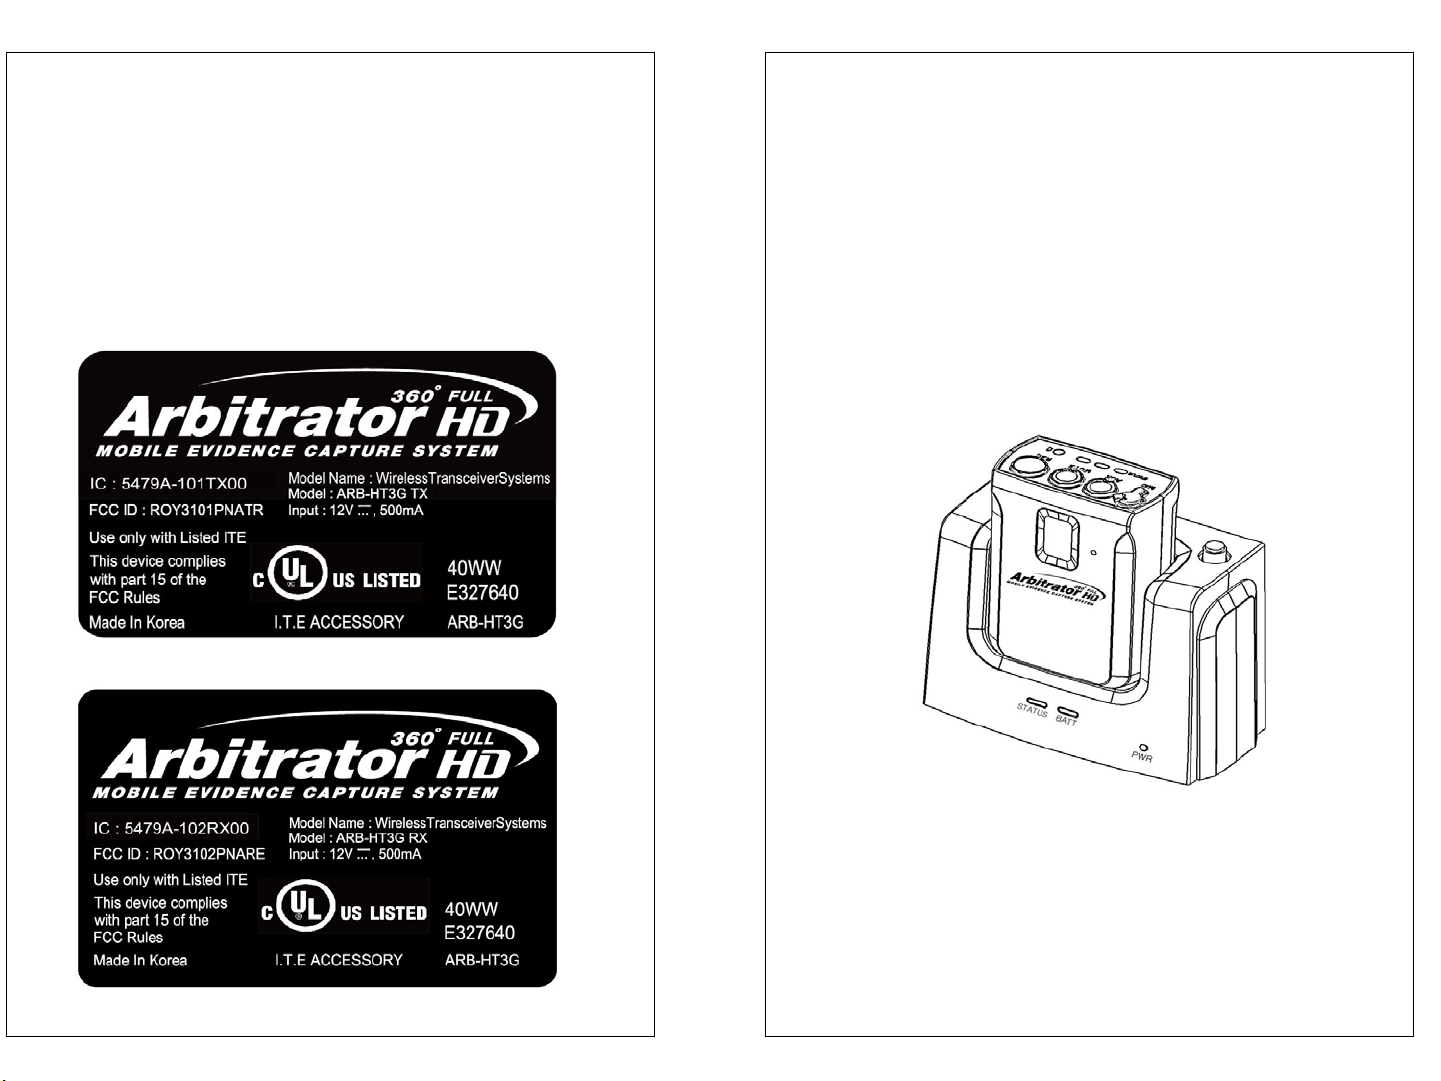
T oughb ook Arbitrator
WIRELESS TRANSCEIVER SYSTEM
ARB-HT3G
User Guide
Version 3.00
--------------------------------------------------------------------------------------Read this user guide carefully for safe operation and proper use of
the product.
Features and specifications are subject to change without
notification.
Page 2
CAUTION
1. When Using the Battery
Danger
(1) Misusing the battery may cause the battery to get hot , explode,
or ignite and cause serious injury. Be sure to follow the safety r ules
listed below:
- Do not place the battery in fire or heat the battery.
- Do not install the battery backwards so that the polarity is rev er sed.
- Do not connect the positive terminal and the negative terminal of the
battery to each other with any metal object (such as a wire).
- Do not carry or store the batteries together with necklaces, hairpins,
or other metal objects.
- Do not pierce the battery with nails, strike the battery with a hammer,
step on the battery, or otherwise subject it to strong impacts or shocks.
- Do not solder directly onto the battery.
- Do not expose the battery to water or salt water, or allow the battery
to get wet.
(2) Do not disassemble or modify the battery. T he battery contains
safety and protection devices which, if damaged, may cause the
battery to generate heat, ex plode or ignite.
(3) Do not place the battery on or near fire, stoves, or other high
temperature locations. Do not place the battery in direct sunlight,
use or store the battery inside cars in hot weather. D oing so may
cause the battery to generate heat, explode, or ignite.
Using the battery in this manner may also result in a loss of
performance and a shortened life expectancy.
(4) Do not insert the battery into equipment designed to be hermetically
sealed. In some cases hydrogen or oxygen may be discharged from
the cell which may result in rupture, fire or ex plosion.
This device complies with Part 15 and RSS-GEN of the FCC and IC rules.
Operation is subject to the following conditions;
(1) This device may not cause harmful interference.
(2) This device must accept any interference received, including
interference that may cause undesired operation.
CAUTION : Changes or modifications not expressly approved by the party
responsible for compliance could Void the user’s authority to operate this
device.
This equipment complies with FCC radiation exposure limits set forth for an
uncontrolled environment and meets the FCC radio frequency (RF) Exposure
Guidelines in Supplement C to OET65. The belt clip is only applied to the TX.
The use of belt-clips, holsters and similar accessories should not contain
metallic components in its assembly. The use of accessories that do not
satisfy these requirements may not comply with FCC RF exposure
requirements, and should be avoided..
CAUTION : Risk of explosion if battery is replaced by an incorrect type.
Dispose of used batteries according to the instructions.
(Please refer to instruction for safe disposal of lithium
polymer battery at page#3)
1 2
Page 3
SPECIFICATIONS
Power DC 12V ~ 24V for RX
Frequency (MHz) 900MHz FHSS with 902.5 ~ 927.5MHz
Number of Channel 51 Channels
Channel Space 500KHz
Speech Coder 8kHz Mono
Type of Modulation GFSK MODULATION / DEMODULATION
Receiver Sensitivity
Power
Consumption
RX Power Levels Max Peck Power. 26dBm
Temperature Range
Dimensions
(L x W x H)
Typical -94dBm
Maximum when charging: 670mA
Maximum when Rec(RX): 140mA
Operating: 14℉ ~ 122℉ ( -10°C ~ 50°C )
Storage: -4℉ ~ 140℉ ( -20℃ ~ 60℃ )
RX: 94mm x 43mm x 73.7mm
(3.7” x 1.69” x 2.9”)
CAUTION
Warning
Do not continue charging the battery if it does not charge within the specified
charging time. Doing so may cause the battery to become hot, explode, or
ignite. There is a risk of explosion if the battery is replaced by an incorrect
type.
Dispose of used batteries according to the instructions.
(Please refer to below instruction for safe disposal of lithium polymer battery)
2. While Charging
Caution
The temperature range over which the battery can be charged is
10°C to 45°C. Charging the battery at temperatures outside of this range
may cause the battery to become hot or to break. Charging the bat tery
outside of this temperature range may also harm t he perfor mance of the
battery or reduce the battery’s life expectancy.
3. When Discharging the Battery
Danger
Do not discharge the battery using any device except for the specified device.
When the battery is used in devices aside from the specified dev ice it may
damage the performance of the battery or r educe its life expectancy, and if
the device causes an abnormal current to flow , it may cause the battery to
become hot, explode, or ignite and cause serious injury.
Caution
The temperature range over which the battery can be discharged is
-10°C to 45°C. Use of the battery outside of this temperature range may
damage the performance of the battery or may reduce its life expectancy.
Safe Disposal of Lithium Polymer Battery
1) Battery cells be fully discharged before disposal.
2) If physically damaged, it is not recommended to discharge battery cells
before disposal.
3) Battery must also be cool before proceeding disposal.
4) Submerge the battery i nt o a bucket or tub of salt water. This container
should have a lid but it does not need to be air-tight. Allow the battery to
remain in the tub of slat water for at least 2 weeks.
5) Remove the battery from t he salt water and dispose of as hazardous waste.
1 2
Page 4
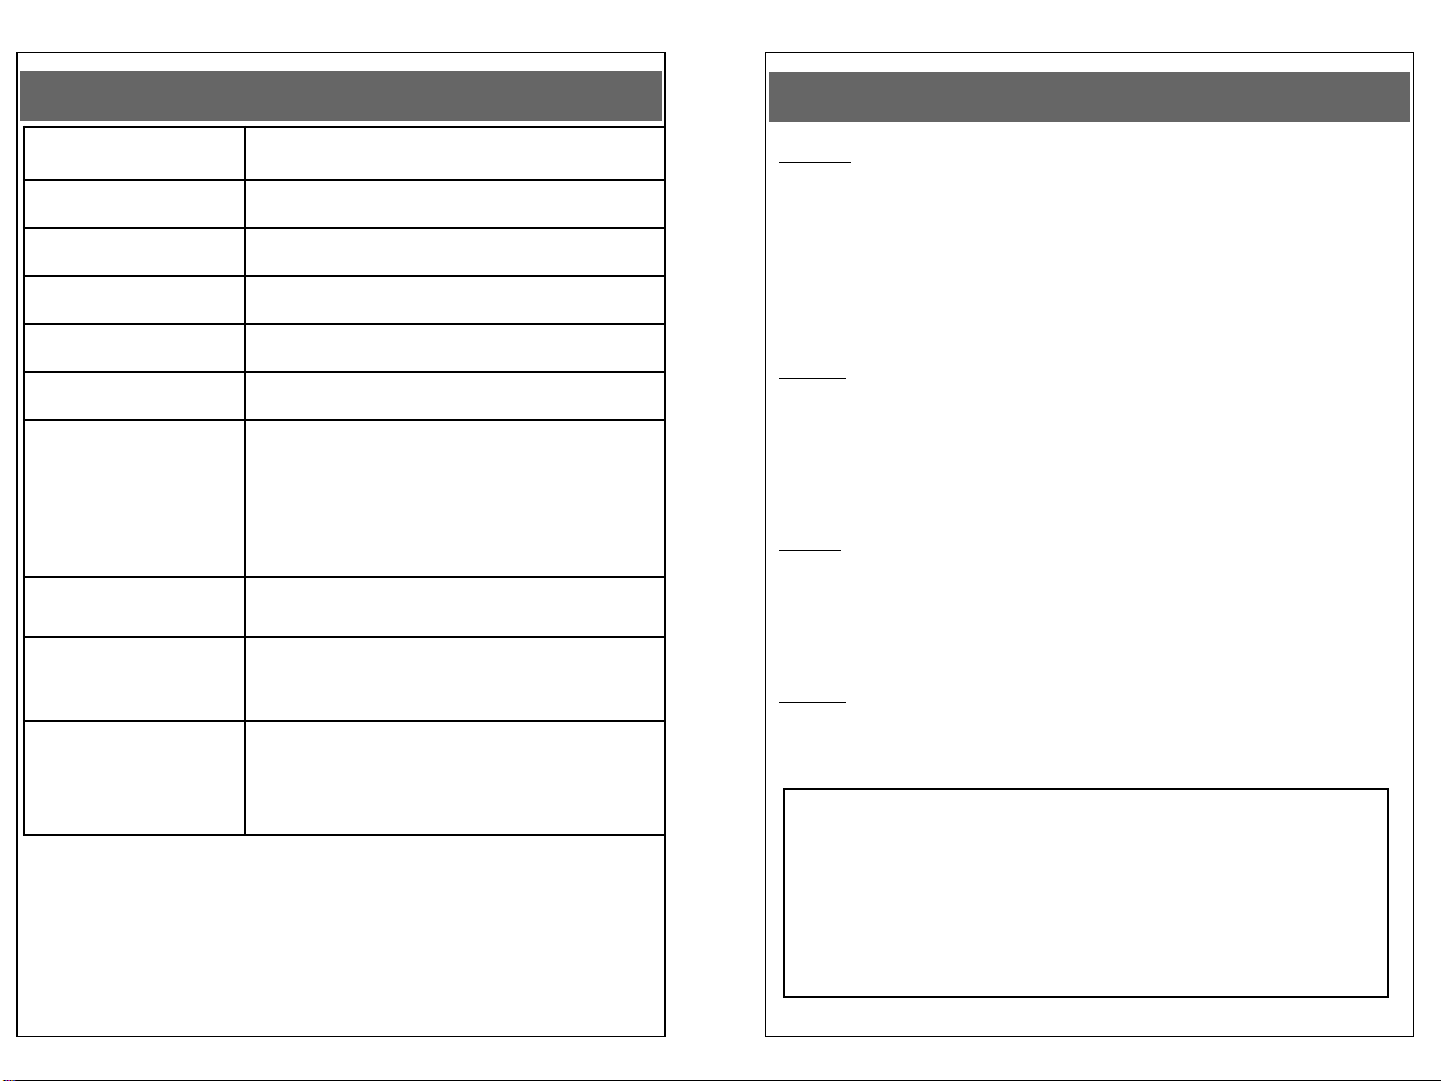
LED Indication on TX and RX
Battery LED on RX:
RED ON when the battery is charging
GREEN ON when the battery is fully charged
TIP 1: How to undock TX from RX and Desktop Charger
To prevent units from being broken, undock
the TX from the RX as shown in the image to
the right.
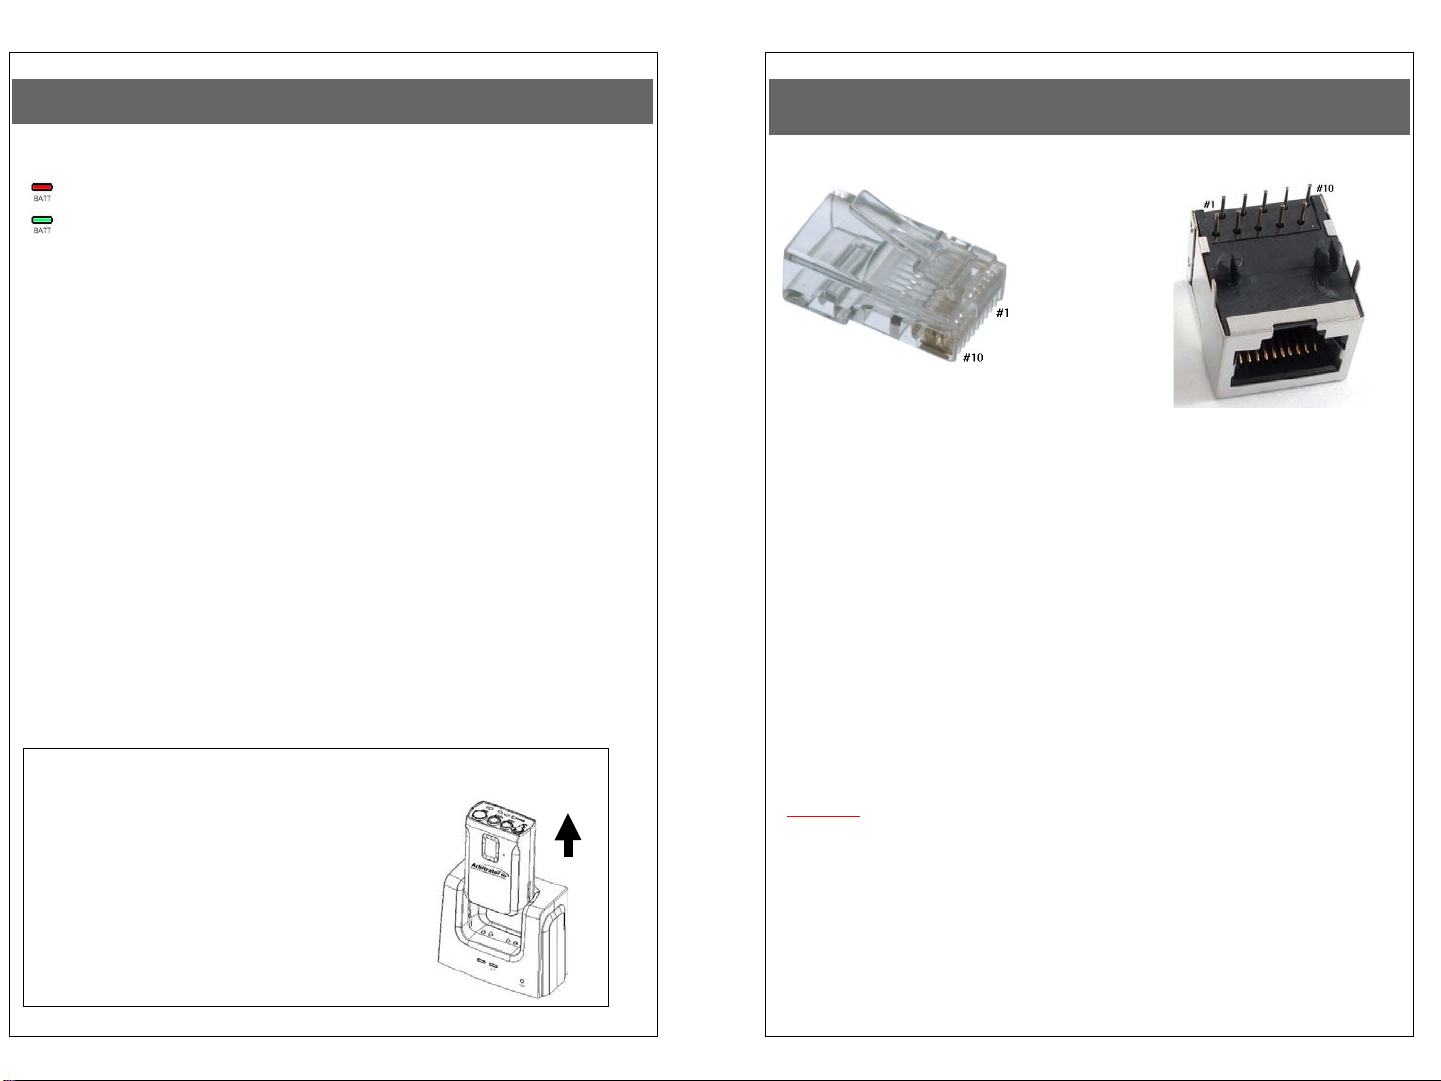
DESCRIPTION – RX Main Cable
RJ-45 Plug Pin Description
1. Power In +: Connects to the engine battery
2. Power In –: Connects to the engine battery(GND)
3. Audio Out: Connects to “Audio In” port in the back of the
recorder
4. Audio Out GND: Connects to “Audio In” port in the back of the
recorder
5. AUX Status: Connects to GPIO cable
6. Sync Status: Connects to GPIO cable
7. Reserved
8. VPU’s REC Command: Connects to GPIO cable
9. REC Status: Connects to GPIO cable
10. MUTE Status: Connects to GPIO cable
Caution:
Please do not attempt to use ARB-HT3G wiring harness or equipment
in combination with CCR24PNA wiring harness or equipment. They are
not intended to be combined and each has their own specification.
Improper installation will result in equipment malfunction
3 4
Page 5
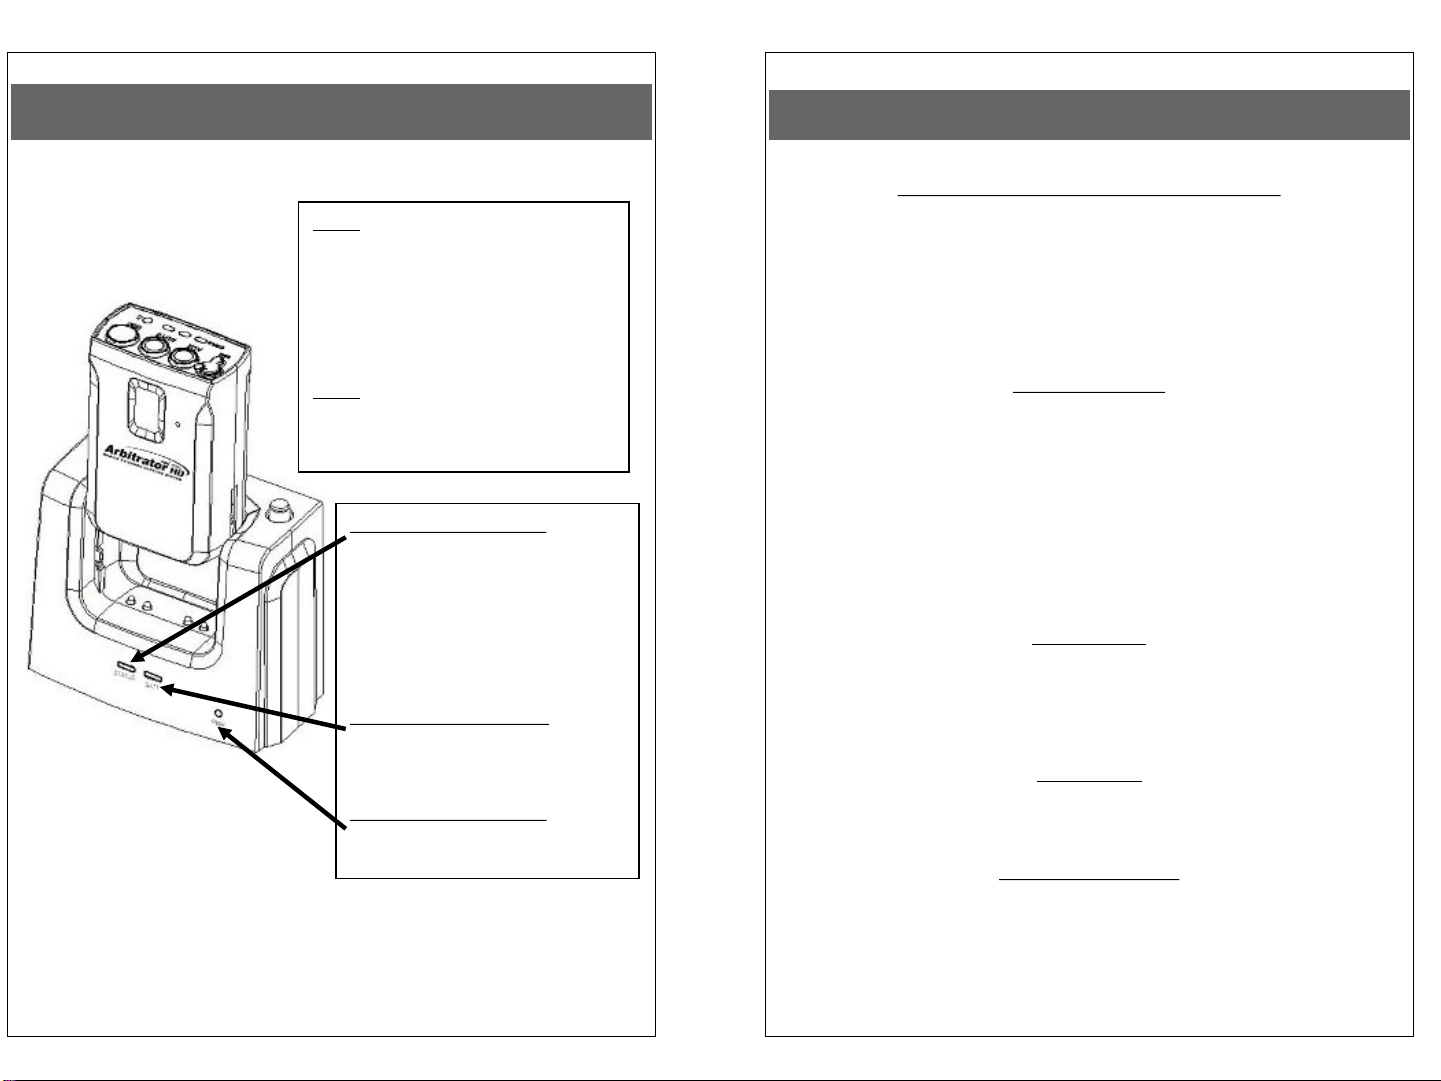
DESCRIPTION – Receiver (RX) LED’s
Quick Set up and Operation
Note: When the TX is docked in
the RX, the GREEN status LED
will flash once. If it continues to
flash, please refer to the
troubleshooting section for more
details.
Note: When fully charged, the TX
stops drawing current from the
battery to prevent overcharging.
Status Indication LED:
1) GREEN blink during ID
setting,
2) GREEN blink during
recording
3) GREEN steady on when in
sync.
Battery Charging LED:
RED = Charging
GREEN = Fully charged
Power Indication LED:
RED = Power ON
The synchronization only needs to be performed the first time a system is
Synchronization of Transmitter and Receiver
used, or another transmitter is used with a receiver previously sync ed.
Do not perform the sync operation multiple times; it only needs to be done once
successfully.
1) Turn the transmitter power switch to ON and select the operation mode with
MODE switch and place the transmitter into the receiver.
2) When synchronization is completed, then STATUS LED will stop flashing. If
vibration mode is enabled, then it will vibrate once.
Normal Operation
1) With the transmitter synced, remove it from the receiver, plug in the lapel
microphone (if used) and place the transmitter into the leather pouch on user’s
belt.
2) When user removes transmi t ter from the receiver, STATUS LED for each
transmitter and receiver will light constant green. To start recording, press the
REC button and the LED beneath REC button will blink red.
3) If the recording command from VPU is received, recording will start and the LED
beneath REC button will f l ash red. If the record command was not received and
a recording was NOT STARTED, the REC button will NOT flash red.
4) If the stop command from VPU is received, recording will end and the LED
beneath REC button will be of f.
Out of Range
1) The transmitter will alert user by flas hi ng the RED LED of STATUS.
2) The transmitter needs to move closer to the receiver and the l i nk will be re-
established without physically “re-syncing” t he T X with RX when user returns to
normal range. STATUS LED will light constant green when link is back to
normal range.
Mute Button
1) Mute button can be us ed to mute the user’s audio s t ream when needed.
2) In recording mode; press mute button on the transmit ter, then ORANGE LED of
STATUS will flash.
Low Battery Warning
1) If low battery indicator (RED) start s flashing, return the transm i tter to the
receiver to be fully charged.
2) The charge LED indicator will light constant green when the unit is fully charged.
5 6
Page 6

DESCRIPTION – Receiver (RX)
INSTALLATION & OPE RATION
Installation must only be conducted by a qualified technician.
This device complies with Part 15 of the FCC Rules. Operat ion is
subject to the following two conditions: (1) This device may not cause
harmful interference, and (2) T his device must accept any interfer ence
received, including interference that may cause undesired operation.
Installation:
1) Install the mounting bracket by using the screws
2) Slide the RX set onto the bracket
3) Connect the main cable to the RX
4) Connect external antenna to the RX
Antenna Location:
1) Place external antenna on the windshield at the point
(Horizontal or Vertical) as shown in the following picture:
Operation:
1) Charge TX for at least 3 hours
2) Switch the power on (located on the bottom of the TX)
3) Place TX into RX to synchronize
Note: Disconnect the battery or turn off the device w hen the T X is not in use
for long period of time.
7 8
Page 7

P A CKAGE CONTENTS for ARB-HT3G
TROUBLESHOOTING
- Transmitter (TX)
- Receiver (RX)
- Plug-in Microphone (MONO)
- Mounting Bracket for Receiv er w ith Screw s
- Rechargeable Li -Ion Battery
- Leather Pouch
- External Antenna
- Desktop Charger for Transmitter
- Charger Stand for D esk top C har g er
- RF Main Cable
- In-car Microphone (MIC)
- User Guide
P A CKAGE CONTENTS for ARB-HT3N (option)
- Transmitter (TX)
- Plug-in Microphone (MONO)
- Rechargeable Li -Ion Battery
- Leather Pouch
- Desktop Charger for Transmitter
- Charger Stand for D esk top Charger
- User Guide
Problem Check points
No reception
Poor reception,
static, noise
Unit does not
respond
Flash continuously
GREEN STATUS
LED on TX and
Flash continuously
STATUS LED on
RX (when TX is
docked in RX)
TIP 2: Preserving the Batteries
To maintain optimum capacity of the pack, the unit has to be fully
discharged every 6 months. This can be accomplished by leaving the
unit on. Then recharge the battery to full capacity again.
- Check the battery status
- Check the connection and cables
- Check the communication range
- Change the location of the RX
- Check the communication range
- Check to see if unit is placed near
TV, speakers, or other electronic devices
- Check the battery status
- Check the power switch on the bottom of
the unit
- Check the connection and cables
- If the problem persists, please contact
technical support
- Remove and re-insert the RF Main Cable
to restart the unit.
- If the problem persists, please contact
technical support
9 10
Page 8

CAUTION
Warning
(1) Immediately discontinue use of the batter y if, while using, charging, or
storing the battery, the battery emits an unusual smell, feels hot,
changes color, changes shape or appears abnor mal in any other way.
Contact your authorized reseller or Panasonic if any of these
problems are observed.
(2) Do not place the batteries in microwave ovens, high-pressu re containe
rs, or on induction cookware.
(3) In the event that the battery leaks and the fluid gets into one’s ey e, do
not rub the eye. Rinse well with water and immediately seek medical c
are.
If left untreated the battery fluid could cause damage to t he ey e.
Caution
(1) If the device is to be used by small children, an adult should explain th
e contents of the user’s manual to the children. The person should
provide adequate supervision to insure that the dev ice is being used
as explained in the user’s manual.
(2) When the battery is worn out, insulate the terminals with adhesive tape
or similar materials before disposal.
Danger
Be sure to follow the rules listed below while charging the batter y . Failure t
o do so may cause the battery to become hot, explode, or ignite and
cause serious injury.
· When charging the battery, either use a specified battery charger or
otherwise insure that the battery charging conditions specified by
Panasonic are met.
· Do not attach the batteries to a power supply plug or directly to a v ehicle’
s cigarette lighter.
· Do not place the batteries in or near fire, or into direct sunlight. When the
battery becomes hot, the built-in safety equipment is activated,
preventing the battery from charging fur ther, and overheating the
battery, which would destroy the safety equipment and can cause
additional heating, breaking, or ignition of the batt ery .
11 12
Installation status in the vehicle
Page 9

État exposition aux radiations FCC RF
Cet équipement est conforme aux limites d'exposition FCC RF aux
rayonnements définies pour un environnement non contrôlé. Cet
équipement doit être installé et utilisé à une distance minimale de 20
centimètres entre le radiateur et votre corps. Cet émetteur ne doit
pas être co-implantés ou exploités conjointement avec une autre
antenne ou émetteur.
T oughb ook Arbitrator
SYSTÈME ÉMETTEUR-RÉCEPTEUR
SANS FIL
ARB-HT3G
Guide de l'utilisate ur
Version 3.00
--------------------------------------------------------------------------------------Lire attentivement ce manuel pour le fonctionnement et le bon
usage du produit.
Les caractéristiques et spécifications sont sujets à changement
sans préavis.
Page 10

ATTENTION
1. Lors de l'utilisation de la batterie
Danger
(1)Lors d’une mauvaise utilisation de la batterie, la batterie risque de se
chauffer, s’exploser, ou s'enflammer et causer des blessures graves.
Assurez-vous de suivre les règles de sécurité indiquées ci-dessous:
- Ne placez pas la batterie au feu ou chauffer la batterie.
-Ne pas installer la batterie vers l'arrière de sorte que la polar ité est
inversée.
- Ne pas brancher la borne positive et la borne négativ e de la batterie
à l'autre avec un objet métallique (comme un fil).
-Ne pas transporter ou stocker les piles avec des colliers, des
épingles à cheveux, ou d'autres objets métallique s.
-Ne pas percer la batterie avec des clous, ne la frappez pas av ec un
marteau, marcher sur la batterie, ne l'exposez pas à des chocs violents.
- Ne pas souder directement sur la batterie.
-Ne pas exposer la batterie à l'eau ou de l'eau salée, ou laisser la
batterie de se mouiller.
(2) Ne pas démonter ou modifier la batterie. La batterie contient des
dispositifs de sécurité et de protection qui, si il est endommagé, peut
entraîner la batterie à générer de la chaleur, exploser ou s'enflammer.
(3) Ne placez pas la batterie sur le feu ou à proximité des poêles, ou
d'autres endroits à haute température. N e placez pas la batterie en
plein soleil, d'utiliser ou de stocker la batterie à l'intérieur des voitures
Quand le temps fait chaud. Cela peut causer la batterie à générer de la
chaleur, s’exploser ou s'enflammer.
L’utilisation de la batterie de cette manière peut aussi entraîner une
perte de performance et une espérance de v ie réduite.
(4) Ne pas insérer la batterie dans des équipements destinés à être
fermé hermétiquement. Dans certains cas, l'hydrogène ou de l'oxy gène
peuvent être évacués de la cellule, ce qui peut entraîner la rupture, le
feu ou l'explosion.
CARACTÉRISTIQUES
Puissance 12V ~ 24V c.c. pour RX
Fréquence (MHz) 900MHz FHSS avec 902 ~ 928MHz
Nombre de canaux 51 canaux
Espace du Canal 500KHz
Discours codeur 8kHz Mono
Type de modulation GFSK MODULATION /
DEMODULATION
Sensibilité du
récepteur
Puissance de
consommation
Niveaux de puissance
TX
Plage de
températures
Dimensions
(L x P x H)
Typical -94 dBm
Maximum lors du chargement: 670mA
Maximum lors de l’enregistrement (RX):
140mA
Max. 26dBm
En fonctionnement: 14℉ ~ 122℉ ( -
10°C ~ 50°C )
En stockage: -4℉ ~ 140℉ ( -20℃ ~
60℃ )
RX: 94mm x 43mm x 73,7mm
(3,7 po x 1,69 po x 2,9 po)
ATTENTION : Risque d'explosion si la batterie est remplacée par un
type incorrect. Jetez les piles usagées selon les
instructions.
Page 11

ATTENTION
Avertissement
Ne pas continuer à charger la bat terie si elle ne se charge pas dans le temps
de charge spécifié. Cela peut causer l'échauffem ent de la batterie, de
s’exploser ou de s'enflammer. Il existe un risque d'explosion si la batterie est
remplacée par un type incorrect.
Jetez les piles usagées selon les instructions.
(Consultez les directives ci-dessous pour la mise au rebut sécuritaire des batteries au
lithium-ion-polymère)
2. Pendant le chargement
Attention
La plage de températures dans laquelle la batterie peut êt re chargée est de
10°C à 45°C. Le chargement de la batterie à des tem pératures en dehors
de cette plage peut causer que la batterie devient chaude ou être briser.
Le chargement de la batteri e en dehors de cette plage de température peut
également nuire à la performance de la batterie ou de réduire l'espérance de
vie de la batterie.
3. Lors de la décharge de la batterie
Danger
Ne pas décharger la batterie en utilisant n'importe quel apparei l sauf pour le
périphérique spécifié. Lorsque la batterie est ut i l i sée dans les appareils mis
à part le périphérique spécifié, il peut dégrader les performances de la
batterie ou de réduire son espérance de vie, et si le dispositif provoque un
passage de courant anormal, il peut causer que la batterie devient chaude,
s’exploser ou s'enflammer et causer des blessures graves.
Attention
La plage de températures dans laquelle la batterie peut êt re déchargée est de -10°C
à 45°C. L'utilisation de la batterie en dehors de cette plage de températ ure peut
dégrader les performances de la batterie ou peut réduire sa durée de vie.
Mise au rebut sécuritaire des batteries au lithium-ion-polymère
1) Les cellules de la batterie doi vent être entièrement déc hargées lors de leur
mise au rebut.
2) Si la batterie a été physiquement endommagée, la décharge des cellules
de la batterie n’est pas recommandée.
3) La batterie doit également être froide avant s a mise au rebut.
4) Submerger la batterie dans un seau ou bac avec de l ’ eau s al ée. Ce
récipient doit comporter un couvercle, sans nécessairement être
hermétique. Laisser tremper la batterie dans l’eau salée pendant au moins
2 semaines.
5) Retirer la batterie de l’eau salée et s’en défaire en tant que déchet
dangereux.
Voyants à DEL sur TX et RX
DEL de la batterie sur RX:
ALLUMÉ ROUGE lors de la recharge de la batterie
ALLUMÉ VERT lorsque la batterie est complètement
chargée
CONSEIL 1: Comment détacher TX de RX et chargeur de
bureau
Pour empêcher les unités d'être cassé,
déconnectez-le TX du RX comme indiqué dans
l'image à droite.
Page 12

DESCRIPTION – Câble principal RX
RJ45 Description Prise Pin
1. Courant en +: Connexion à la batterie du moteur
2. Courant en -: Connexion à la batterie du moteur (GND)
3. Sortie audio: Connexion au port "Audio In" à l'arrière de
l'enregistreur
4. Sortie Audio GND: Connexion au port "Audio In" à l'arrière de
l'enregistreur
5. Statut AUX: Connexion à câble GPIO
6. État de la synchronisation: Connexion au câble GPIO
7. Réservé
8. Commande REC (ENR.) du VPU: Connexion au câble GPIO
9. Statut REC (Enregistrement): Connexion au câble GPIO
10. Statut MUTE (Muet): Connexion au câble GPIO
Mise en garde :
Veuillez ne pas utili ser le faisceau de câbles ou l’app areil ARB-HT3G
simultanément avec le faisceau de câbles ou l’appareil CCR24PNA. Ils n’ont
pas été conçus pour être utilisés ensem b le et ils ont les propres spécifications.
DESCRIPTION – DEL du récepteur (RX)
Remarque: Lorsque le TX est inséré
dans le RX, la voyant d’état à DEL
VERT clignote une fois. S’il continue à
clignoter, veuillez se référer à la
section de dépannage pour plus de
détails.
Remarque: Lorsqu‘il est
complètement chargé, le TX cesse de
tirer du courant de la batterie pour
éviter la surcharge.
Voyant d’état à DEL:
1) Clignote en VERT
pendant le réglage de ID.
2) Clignote en VERT lors
de l'enregistrement.
3) S’allume en VERT
pendant la
synchronisation.
DEL de charge de la batterie:
ROUGE = en charge
VERT= complètement chargée
Voyant à DEL de puissance:
ROUGE = sous tension
Une installation non conforme peut entraîner un mauvais fonctionnement.
Page 13

Configuration rapide et fonctionnement
Synchronisation de l'émetteur et le récep teur
La synchronisation n'a besoin d'être effect uée que quand un sys tèm e est utilisé pour la
première fois, ou un autre émetteur est utilisé avec un récepteur précédemment
synchronisé.
Ne pas effectuer l'opération de synchronisation à plusieurs reprises, elle ne doit être
effectuée qu'une seule fois.
1) Tourner le commutateur d'alimentation de l'émett eur sur ON et sélectionner le mode
de fonctionnement avec l e commutateur de MODE et placer l'émetteur dans le
récepteur.
2) Lorsque la synchronisation est terminée, le voyant d’ état à DEL arrête de clignot er. Si
le mode de vibration est activé, il se met à vibrer une fois.
Fonctionnement normal
1) Avec l'émetteur synchronisé, l e ret i rer du récepteur, brancher le mi cro-boutonnière (le
cas échéant) et placer l'émetteur dans la pochette en cuir à la ceinture de l'utili sateur.
2) Lorsque l'utilisateur retire l’émetteur du récepteur, le voyant à DEL pour chaque
émetteur et récepteur s'allume en vert constamment . Pour commencer l'enregistrem ent,
appuyez sur le bouton RE C et l e DEL s ous l a touche REC clignote en rouge.
3) Si la commande d'enregistrem ent de VPU est reçue, l'enregistrement démarre et la
DEL sous la touche REC clignote en rouge. Si la commande d’enregistrement n’a pas
été reçue et que l’enregistrement N’A PAS DÉMARRÉ, la touche REC ne clignotera pas
en rouge.
4) Si la commande d'arrêt du VPU est reçue, l'enregistrement s'arrête et la DEL sous la
touche REC s'éteint.
Hors de portée
1) L'émetteur va alerter l'uti l i sateur en faisant clignoter le voyant d’ ét at rouge à DEL.
2) L'émetteur doit se rapprocher du récepteur et le lien sera rétabl i l orsque l'utilisateur
revient à la bonne portée. Le voyant d’état à DE L s 'allume en vert constant lorsque l a
liaison est de retour à la norm al e.
Bouton Mute (Muet)
1) Le bouton Mute peut être utilisé pour couper le flux audio de l'utilisateur en cas de
besoin.
2) En mode d'enregistrement, appuyez sur le bouton muet sur l'émetteur, puis le voyant
d’état orange à DEL c l i gnot e.
Avertissement de batterie faibl e
1) Si le voyant de batterie f ai bl e (Rouge) commence à clignoter, ret ourner l'émetteur au
récepteur pour qu’il soit entièrement chargé.
2) Le voyant de charge s' al l ume en vert constamment lorsque l'appareil est
complètement chargé.
DESCRIPTION - Récepteur
1 Connexion de l'antenne 5 Voyant de puissance â DEL
2 Borne de charge / ID de
reconnaissance
3 Voyant d’état â DEL 7 Connexion du câble principal
4 Voyant de charge â DEL 8 Étiquette FCC, UL, IC
6 Étiquette de numéro de série
Page 14

INSTALLATION ET UTILISATION
Cet appareil est conforme à la Partie 15 et RSS-GEN des règles de l a FCC et
IC. Son fonctionnem ent est soumis aux deux conditions suivantes: (1) Ce
dispositif ne doit pas causer d'interférences nuisibl es, et (2) Cet appareil doit
accepter toute interférence reçue, y compris les interférences qui peuvent
provoquer un fonct i onnement indésirable.
Le clip ceinture est appliqué uniquement à la TX.
L'utilisation de pinces de ceinture, étuis et autres acces soi res similaires ne doit
pas contenir de com posants métalliques dans son ensemble. L'utilisation
d'accessoires qui ne sati sfont pas à ces exigences peut ne pas se conformer
aux exigences de la FCC, et doit être évitée.
Installation:
1) Installez le support de montage en utilisant les vis
2) Faites glisser le RX fixé sur le support
3) Branchez le câble principal au RX
4) Connectez l'antenne externe au RX
Emplacement de l'antenne:
1)Placez l'antenne externe sur le pare-brise au point (horizontale
ou verticale), comme indiqué dans le diagramme suivant:
CONTENU DE L'EMBALLAGE
- Émetteur (TX)
- Récepteur (RX)
- Microphone enfichab le (MON O)
- Support de fixation pour le récepteur av ec les vis
- Batterie rechargeable Li -Ion
- Pochette en cuir
- Antenne exter ne
- Chargeur de bureau pour l 'émetteu r
- Support chargeur pour c hargeur de bureau
- Câble principal RF
- Microphone pour voitur e (MIC)
- Guide de l'utilisateur
Fonctionnement:
1) Chargez le TX pendant au moins 3 heures
2) Mettez sous tension (ON) (situé sous le TX)
3) Placez le TX dans le RX pour synchroniser
Remarque: Débranchez la batterie ou mettez l'appareil hors tension lorsque
le TX n'est pas utilisé pendant une longue période de temps.
Page 15

DÉPANNAGE
Problème Les points de contrôle
Pas de réception
Mauvaise
réception, statique,
bruit
L'unité ne répond
pas
Clignotement en
Vert en continu du
voyant à DEL sur
TX et
Clignotement en
continu du voyant
à DEL du RX
(quand TX est
inséré dans RX)
CONSEIL 2: Prolongation des batteries
Pour maintenir la capacité optimale de la batter ie, l' appareil doit être
entièrement déchargé tous les 6 mois. Ceci peut être accompli en
laissant l'appareil sous tension. Puis rechargez la batterie à pleine
capacité.
- Vérifiez l'état de la batterie
- Vérifiez la connexion et câbles
- Vérifier la portée de communication
- Modification de l'emplacement du RX
- Vérifier la portée de communication
- Vérifiez si l'appareil est placé près du
téléviseur, haut-parleurs ou d'autres
appareils électroniques
- Vérifiez l'état de la batterie
- Vérifier l'interrupteur d'alimentation sur le
dessous de l'unité
- Vérifiez la connexion et câbles - Si le
problème persiste, s'il vous plaît contacter
le support technique
- Retirez et réinsérez le câble RF principal
pour redémarrer l'appareil.
- Si le problème persiste, s'il vous plaît
contactez le support technique
ATTENTION
Avertissement
(1) Cessez immédiatement d'utiliser la batterie si, lors de l'utilisation, la
charge ou l’entreposage de la batterie, la batterie émet une odeur
inhabituelle, est chaude, change de couleur, se déforme ou semble
anormale d'une autre manière.
Contactez votre revendeur agréé ou P anasonic si l'un de ces problèmes
est observé.
(2) Ne placez pas les batteries dans les fours à micro-ondes, des conteneurs
à haute pression, ou sur une batterie de cuisine à induction.
(3) Dans le cas où la batterie coule et le fluide pénètre dans l'œ il, ne pas
frotter les yeux. Bien rincer avec de l'eau et consulter un médecin
immédiatement.
En cas du non traitement le liquide de batterie peut causer des dommages
à l'œil.
Attention
(1) Si l'appareil doit être utilisé par des jeunes enfants, un adulte doit
expliquer le contenu du manuel de l'utilisateur pour les enfants. La per sonne
doit assurer une surveillance adéquate pour s'assurer que le dispositif
est utilisé comme expliqué dans le manuel de l' utilisateur.
(2) Lorsque la batterie est épuisée, isoler les bornes av ec du ruban adhésif
ou des matériaux similaires avant de les jeter.
Danger
Assurez-vous de suivre les règles énumérées ci-dessous pendant le
chargement de la batterie. Ne pas le faire peut rendre la batter ie chaude,
s’exploser ou s'enflammer et causer des blessures graves.
· Lorsque vous rechargez la batterie, soit utilisez un chargeur de batterie
spécifié ou assurez vous que les conditions de chargement de la batterie
spécifiées par Panasonic sont remplies.
· Ne fixez pas les batteries à une prise d'alimentation ou directement à
l’allume-cigare d'un véhicule.
· Ne placez pas les batteries au feu ou à proximité, ou en plein soleil.
Lorsque la batterie devient chaude, l'équipement de sécurité intégré
est activé, le dispositif de sécurité intégré est activ é ce qui prév ient à
la batterie de se charger encore plus, et la surchauffe de la batter ie,
ce qui détruirait l'équipement de sécurité et peut pr ov oquer un
échauffement supplémentaire, la rupture, ou inflammation de la batterie.
Page 16

Les véhicules équipés d'état
 Loading...