

Page 1
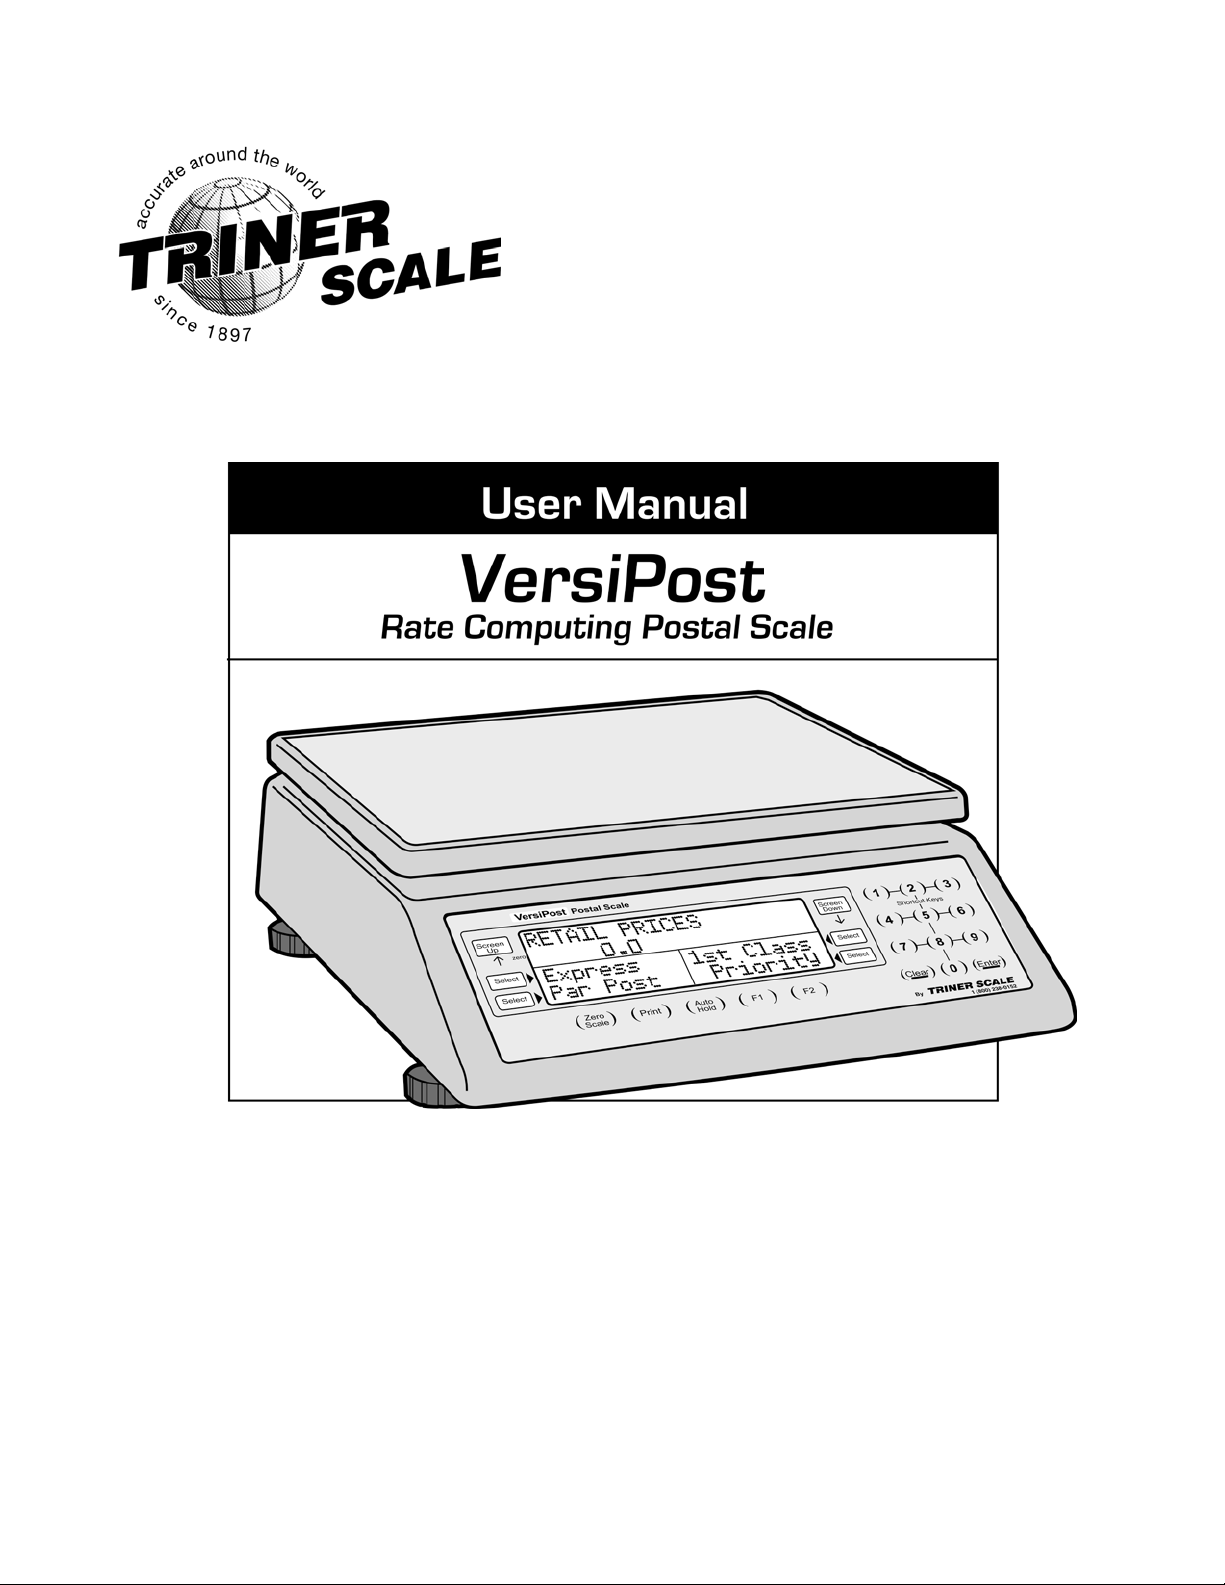
TM
Model VP-70
Revision 1.1
8/13/2010
Page 2

©Triner Scale & Mfg. Co, Inc. 2009. All rights reserved.
The information contained herein is the property of Triner Scale and is supplied without
liability for errors or omissions. No part may be reproduced or used except as authorized
by contract or other written permission. The copyright and the foregoing restriction on
reproduction and use extend to all media in which the information may be embodied.
Contents subject to change without notice.
THIS EQUIPMENT CONTAINS NO USER SERVICEABLE COMPONENTS.
Servicing of the equipment must only be carried out by trained and authorized
personnel.
Use only the AC adapter supplied with the scale. Other adapters may cause
damage.
Routine maintenance
Harsh abrasives, solvents, scouring cleaners and alkaline cleaning solutions
should not
The outside of the product may be wiped down with a clean cloth, moistened
with water containing a small amount of soap.
General Guidelines
- Ensure that the scale is placed securely on a flat, firm and level surface.
- Avoid installing the scale in areas of direct sunlight and high humidity. Also avoid
drafts, vibrations and dusty conditions.
- To extend the life of your digital scale, do not drop items to be weighed onto the
platform or overload the scale beyond its rated capacity.
be used; especially on the display window.
Federal Communications Commission (FCC) Statement
This equipment has been tested and found to comply with the limits for a Class A digital
device, pursuant to Part 15 of the FCC Rules. These limits are designed to provide
reasonable protection against harmful interference in a residential installation. This
equipment generates, uses and can radiate radio frequency energy and, if not installed
and used in accordance with the instructions, may cause harmful interference to radio
communications. However, there is no guarantee that interference will not occur in a
particular installation. If this equipment does cause harmful interference to radio or
television reception, which can be determined by turning the equipment off and on, the
user is encouraged to try to correct the interference by one or more of the following
measures:
- Reorient or relocate the receiving antenna.
- Increase the separation between the equipment and receiver.
- Connect the equipment into an outlet on a circuit different from that to which the
receiver is connected.
- Consult the dealer or an experienced radio / TV technician for help.
Page 3

TABLE OF CONTENTS
Page
Chapter 1: Introduction.................................................................................................................. 1-1
1.1 Unpacking and Verifying Contents................................................................................ 1-1
Chapter 2: Getting Started............................................................................................................ 2-1
Chapter 3: Basics of Operation.................................................................................................... 3-1
3.1 Display........................................................................................................................... 3-1
3.2 Keyboard ....................................................................................................................... 3-2
3.3 General Scale Operation............................................................................................... 3-4
3.2.1 Soft Keys .......................................................................................................... 3-2
3.2.2 Operator Keys .................................................................................................. 3-2
3.2.3 Numeric and Shortcut Keys ............................................................................. 3-3
3.3.1 System Prompts ............................................................................................... 3-4
3.3.2 Mailing or Shipping an Item.............................................................................. 3-4
3.3.3 Advanced Country Code Operation ................................................................. 3-4
Chapter 4: Examples of Operation .............................................................................................. 4-1
4.1 Sending a First Class Mail Letter with Certified and Return Receipt............................ 4-1
4.2 Sending a First Class Mail Package with Delivery Confirmation and Insurance .......... 4-1
4.3 Sending a Priority Mail Flat Rate Envelope with Signature Confirmation ..................... 4-2
4.4 Sending an Express Mail Parcel ................................................................................... 4-2
4.5 Sending a Large Priority Mail Package Using Auto-Hold and the DIM Function.......... 4-3
4.6 Sending a First Class International Letter..................................................................... 4-4
Chapter 5: Advanced Features and Operation.......................................................................... 5-1
5.1 Programmable Shortcut Keys ....................................................................................... 5-1
5.2 Country Favorites List ................................................................................................... 5-3
5.3 Auto Hold....................................................................................................................... 5-3
5.4 Piece Counting .............................................................................................................. 5-4
5.5 Manual Weight Entry..................................................................................................... 5-4
5.6 Change Destination Zip/Country................................................................................... 5-5
5.1.1 How to Program Shortcuts ............................................................................... 5-1
5.1.2 How to Run a Shortcut ..................................................................................... 5-2
5.1.3 How to delete a Shortcut.................................................................................. 5-3
5.2.1 How to add countries to the Favorites List....................................................... 5-3
5.2.2 How to delete countries from the Favorites List............................................... 5-3
5.3.1 How to use Auto Hold ...................................................................................... 5-3
5.5.1 How to use Manual Weight Entry..................................................................... 5-4
Page 4

5.7 USPS Price Categories (Retail and Commercial)......................................................... 5-5
5.8 Adjust Price Feature...................................................................................................... 5-6
5.9 Manual Meter Setting .................................................................................................... 5-7
5.6.1 How to Change the Destination ZIP or Country............................................... 5-5
5.7.1 How to Change between USPS Price Categories ........................................... 5-5
5.8.1 How to ADD a Fee to the Displayed Rate........................................................ 5-6
5.8.2 How to SUBTRACT an amount from the Displayed Rate................................ 5-6
Chapter 6: Setup Operations........................................................................................................ 6-1
6.1 Configure Menu............................................................................................................. 6-1
6.2 Service Menu (For Qualified Service Technicians Only
Chapter 7: Bulk Mailing and Counting Mode ............................................................................. 7-1
7.1 Display Screen .............................................................................................................. 7-1
7.2 Soft Key Descriptions .................................................................................................... 7-1
7.3 General Operation......................................................................................................... 7-2
6.1.1 How to change the Origination ZIP Code ........................................................ 6-1
6.1.2 How to configure the F2 key menus ................................................................ 6-1
6.1.3 How to configure the Beeper............................................................................ 6-2
6.1.4 How to set up the Time and Date..................................................................... 6-2
6.1.5
6.1.6
6.1.7 Latitude Zone (Factory Use Only).................................................................... 6-3
6.1.8 Load Rate Function (Future Use) .................................................................... 6-3
6.2.1 How to perform an Analog to Digital Conversion (A/D) Test ........................... 6-4
6.2.2 How to perform a LCD Test ............................................................................. 6-4
6.2.3 How to perform a Keyboard Test ..................................................................... 6-4
6.2.4 How to Enable the Postage Meter Interface .................................................... 6-5
6.2.5 How to perform a Postage Meter Test ............................................................. 6-5
6.2.6 How to set the Meter Type ............................................................................... 6-6
6.2.7 How to set the Meter Mode .............................................................................. 6-6
6.2.8 How to change the Scale Capacity / Resolution.............................................. 6-6
6.2.9 How to reset the Factory Defaults.................................................................... 6-7
6.2.10 How to clear the Favorites List......................................................................... 6-7
6.2.11 How to perform Scale Calibration (Call Triner Scale First!
7.3.1 Sample – How To Sample Pieces ................................................................... 7-2
7.3.2 Tare – How to Tare a Container ...................................................................... 7-2
7.3.2.1 Simple Tare......................................................................................... 7-3
How to configure Home Screen Default .................................................... 6-2
How to view System Information................................................................. 6-3
) .............................................. 6-4
) ............................. 6-8
7.3.2.2 Keyboard Tare .................................................................................... 7-3
Page 5

7.3.3 Mode – How to Change the Weighing Units .................................................... 7-3
7.3.4 Add – Memory Accumulator............................................................................. 7-4
7.3.5 Info – Weigh Session Information .................................................................... 7-4
7.3.6 Unit Weight – Entering a Unit Weight .............................................................. 7-4
7.3.7 Exit – Exit the Bulk Mailing and Counting Mode .............................................. 7-5
7.3.2.2 Removing a Tare Weight .................................................................... 7-3
Appendix A: Specifications .............................................................................................................. A-1
Appendix B: Supported Rates and Special Services .................................................................. B-1
Appendix C: Rate and Special Service Abbreviations................................................................. C-1
C.1 USPS Retail .................................................................................................................. C-1
C.2 USPS Commercial ........................................................................................................ C-2
C.3 Special Services............................................................................................................ C-2
Appendix D: Country Code and Abbreviation Chart .................................................................... D-1
Appendix E: Rate Change Information .......................................................................................... E-1
E.1 Rate Card Updates ....................................................................................................... E-1
Appendix F: Error Messages .......................................................................................................... F-1
Appendix G: Latitude Zone Guide .................................................................................................. G-1
G.1 Locating your Latitude Zone.......................................................................................... G-1
Warranty Page
Page 6

1.0 INTRODUCTION
The Triner Model VP-70 Digital Postal Computing Scale is designed for USPS retail and
mailroom shipping applications. It is equipped with many helpful features that guide the
operator through the day-to-day mailing activities. It provides speedy, user-friendly
operation, and is fully updateable to future postal rates and zone changes. The scale
has a maximum weighing capacity of 70 pounds and is factory calibrated.
Prior to using the scale, please read this user’s guide carefully and completely. Store
the manual in a safe and convenient place so it will be available if you have questions
concerning the operation of the scale.
1.1. UNPACKING AND VERIFYING CONTENTS
The VP-70 is a sophisticated electronic instrument, designed specifically to meet
USPS requirements for accuracy in operation. When unpacking, be sure to guard
against dropping the scale.
Carefully unpack and inspect the carton contents:
• VP-70 Scale
• Weighing Platform
• AC adapter
• USB Computer Cable
• Operation Manual
• Warranty Registration Card
• Meter Interface Cable (If purchased separately)
PREPARING THE SCALE FOR OPERATION
After verifying and inspecting the carton contents, the
simple steps described in Section 2, “Getting Started”
must be followed
the scale.
Not following the specified steps can result in
INNACURATE WEIGHING AND RATING.
in order to assure proper operation of
Page 1-1
Page 7
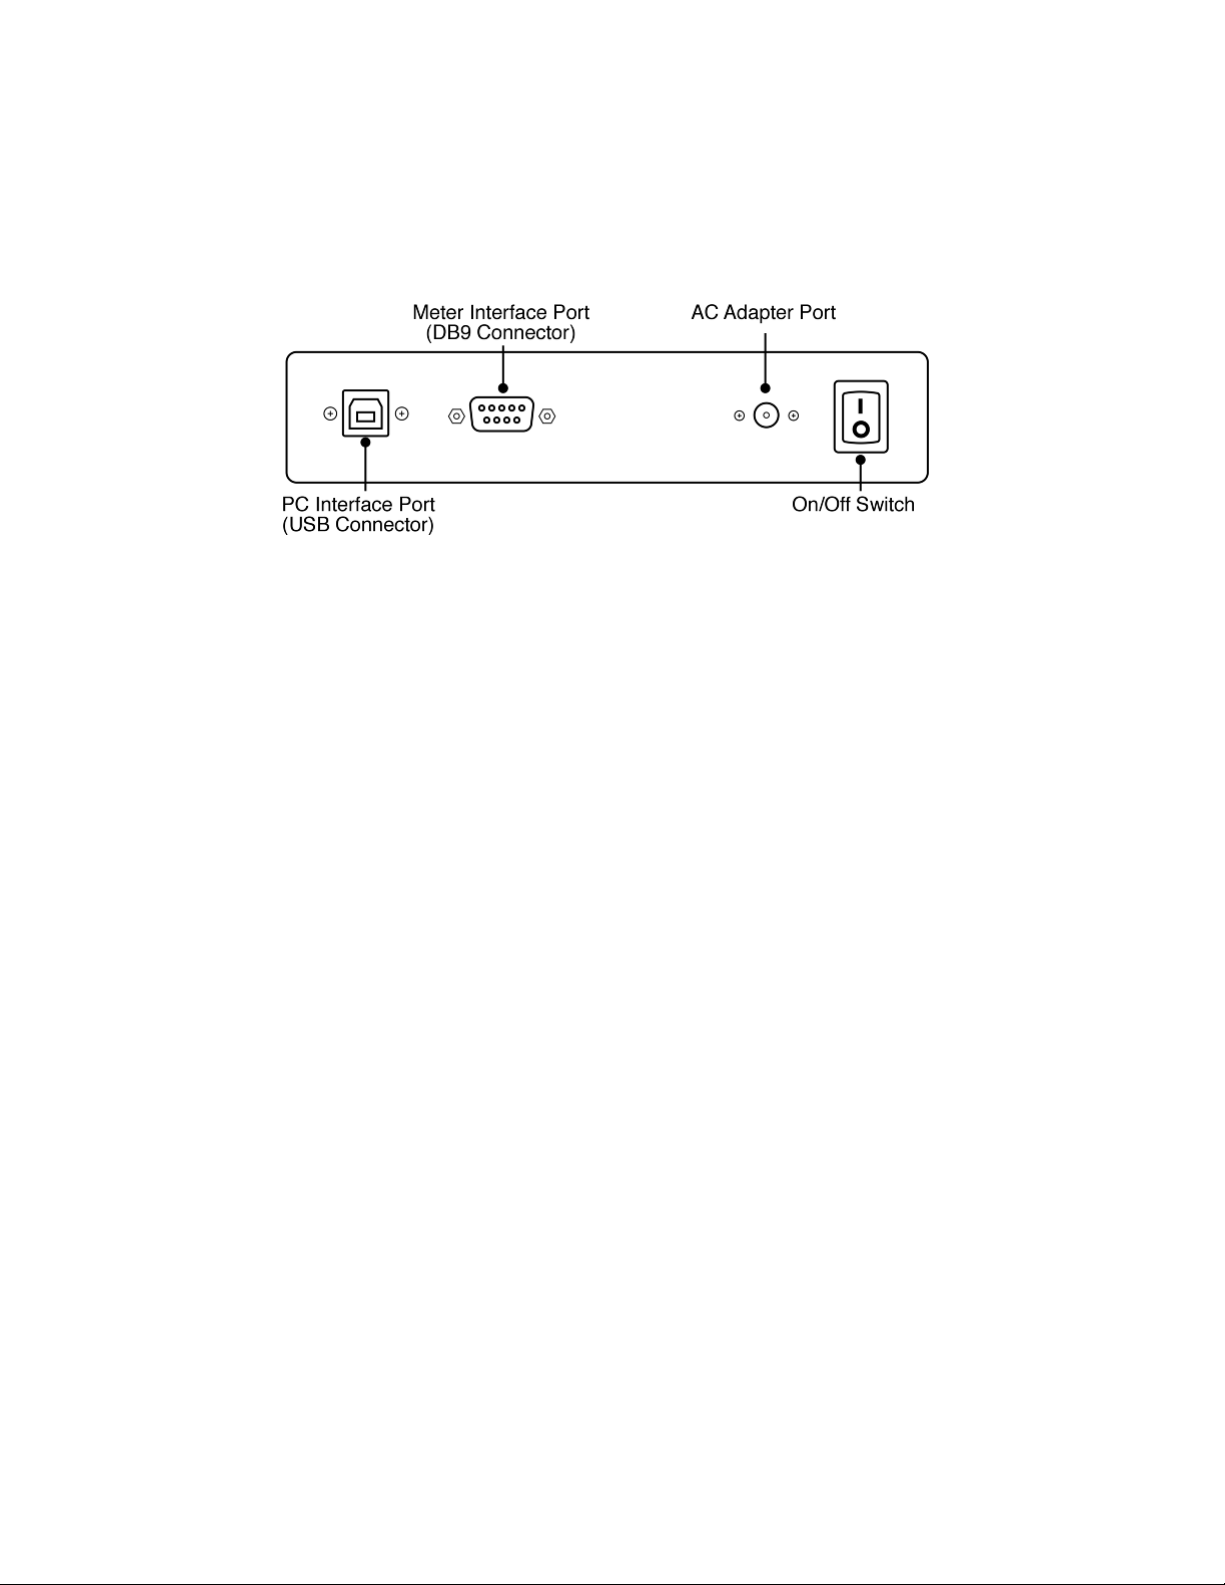
2.0 GETTING STARTED
After unpacking the scale, a small amount of preparation is required before the scale can be
used for mailing or shipping. Please refer to Figure 2-1 below as needed.
Figure 2-1: VP-70 Rear Panel
Step 1. Lift the stainless steel platform off the scale and discard the shipping cardboard.
Place the platform back onto the scale.
Step 2. Position the scale in its area of intended use. Observe the following guidelines
for suitable location.
1. Choose a firm and stable table, counter, or other surface.
2. Do not share an AC outlet with electrical noise producing equipment, such as
refrigeration units. This includes products with electrical motors and/or relays.
3. Do not place the scale in an area with changing ambient temperature and/or high
humidity.
4. Do not place the scale in an area prone to exposure to direct sunlight, wind, or dust.
5. Do not place the scale in an area with vibrating equipment.
Step 3. Install the AC Adapter.
1. After placing the scale in its area of use, locate the Model A41408 AC Adapter.
2. Connect the female end of the AC Adapter to the connector on the rear of scale,
and then plug the adapter into an AC outlet.
Step 4. Adjust the leveling feet so that the scale is level and not “rocking” corner to
Step 5. Turn the scale ON to begin the initialization.
corner.
Step 6. Initialization - The first time the scale is turned on you will be required to enter
your origination ZIP Code.
1. When the AC power switch is placed “ON” position, the scale prompts for your
“Origin ZIP Code”.
2. Enter the first three digits of the ZIP Code from which all items will be mailed. There
is no need to press the ENTER key.
2-1
Page 8
3.0 BASICS OF OPERATION
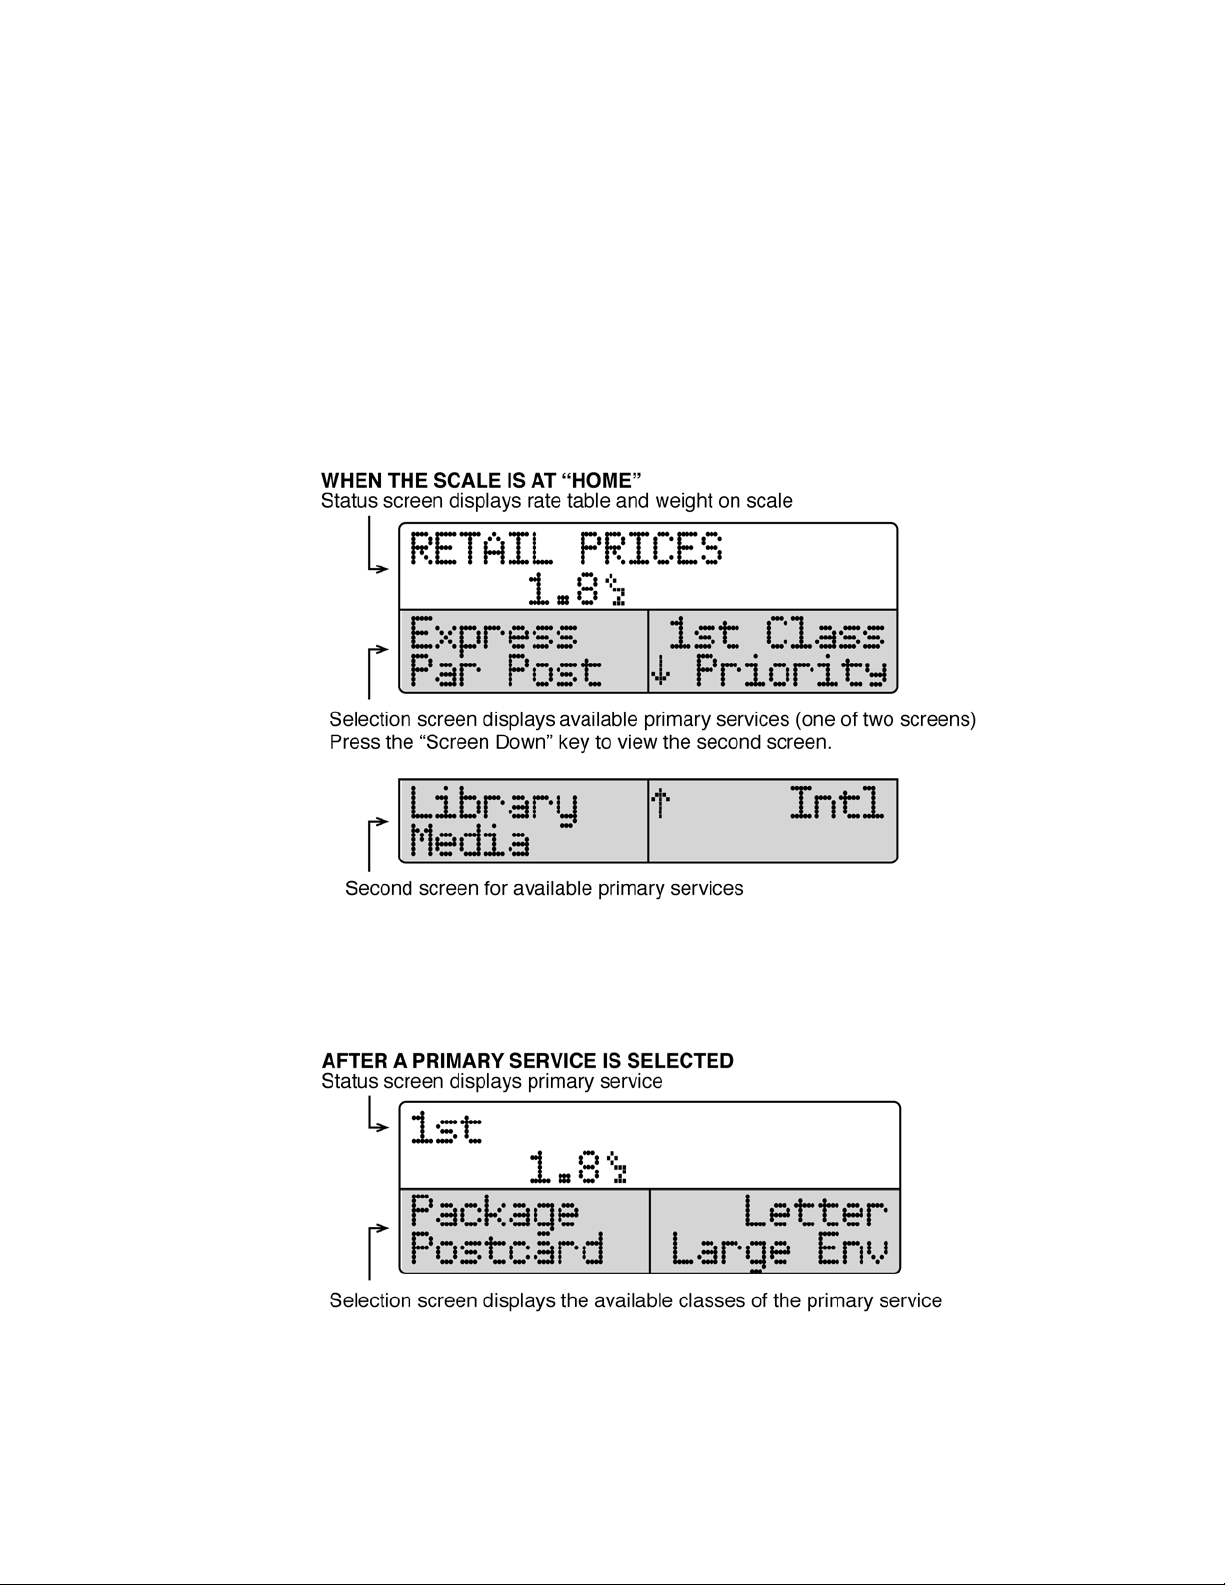
3.1 DISPLAY
The LCD display is divided into two main sections. The upper half is the status screen,
and the lower half is the selection screen.
When the scale is at “Home”, the status screen displays the rate table (Retail or
Commercial) and the weight on the scale. The selections screen displays the available
primary services. There are two screens for available primary services. See Figure 3-1
below.
Figure 3-1: Home Screen
After a primary service has been selected, the status screen then displays the primary
service along with the weight. The selection screen displays the available classes of the
primary service. See Fig 3-2 below.
Figure 3-2
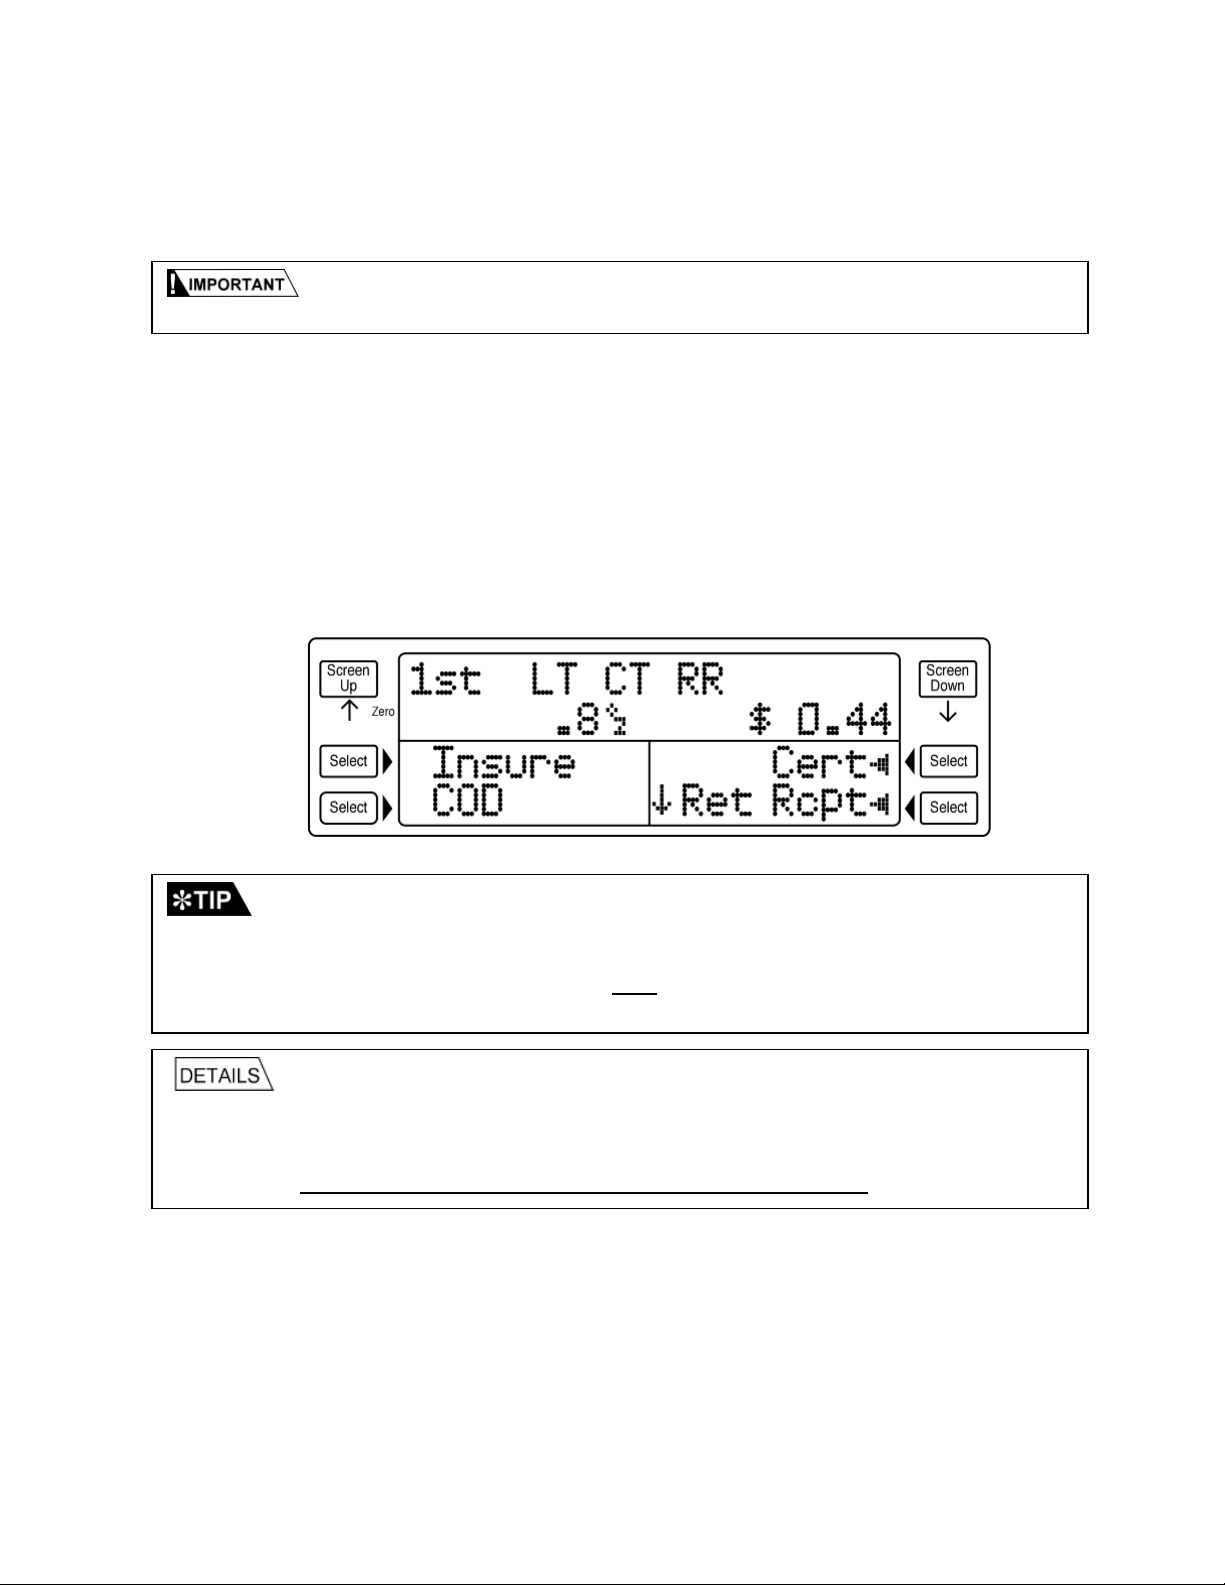
After the class of mail has been selected, the status screen displays the class of mail,
the weight and the price. The selection screen displays the available special services.
See Figure 3-3 for details.
Page 3-1
Page 9
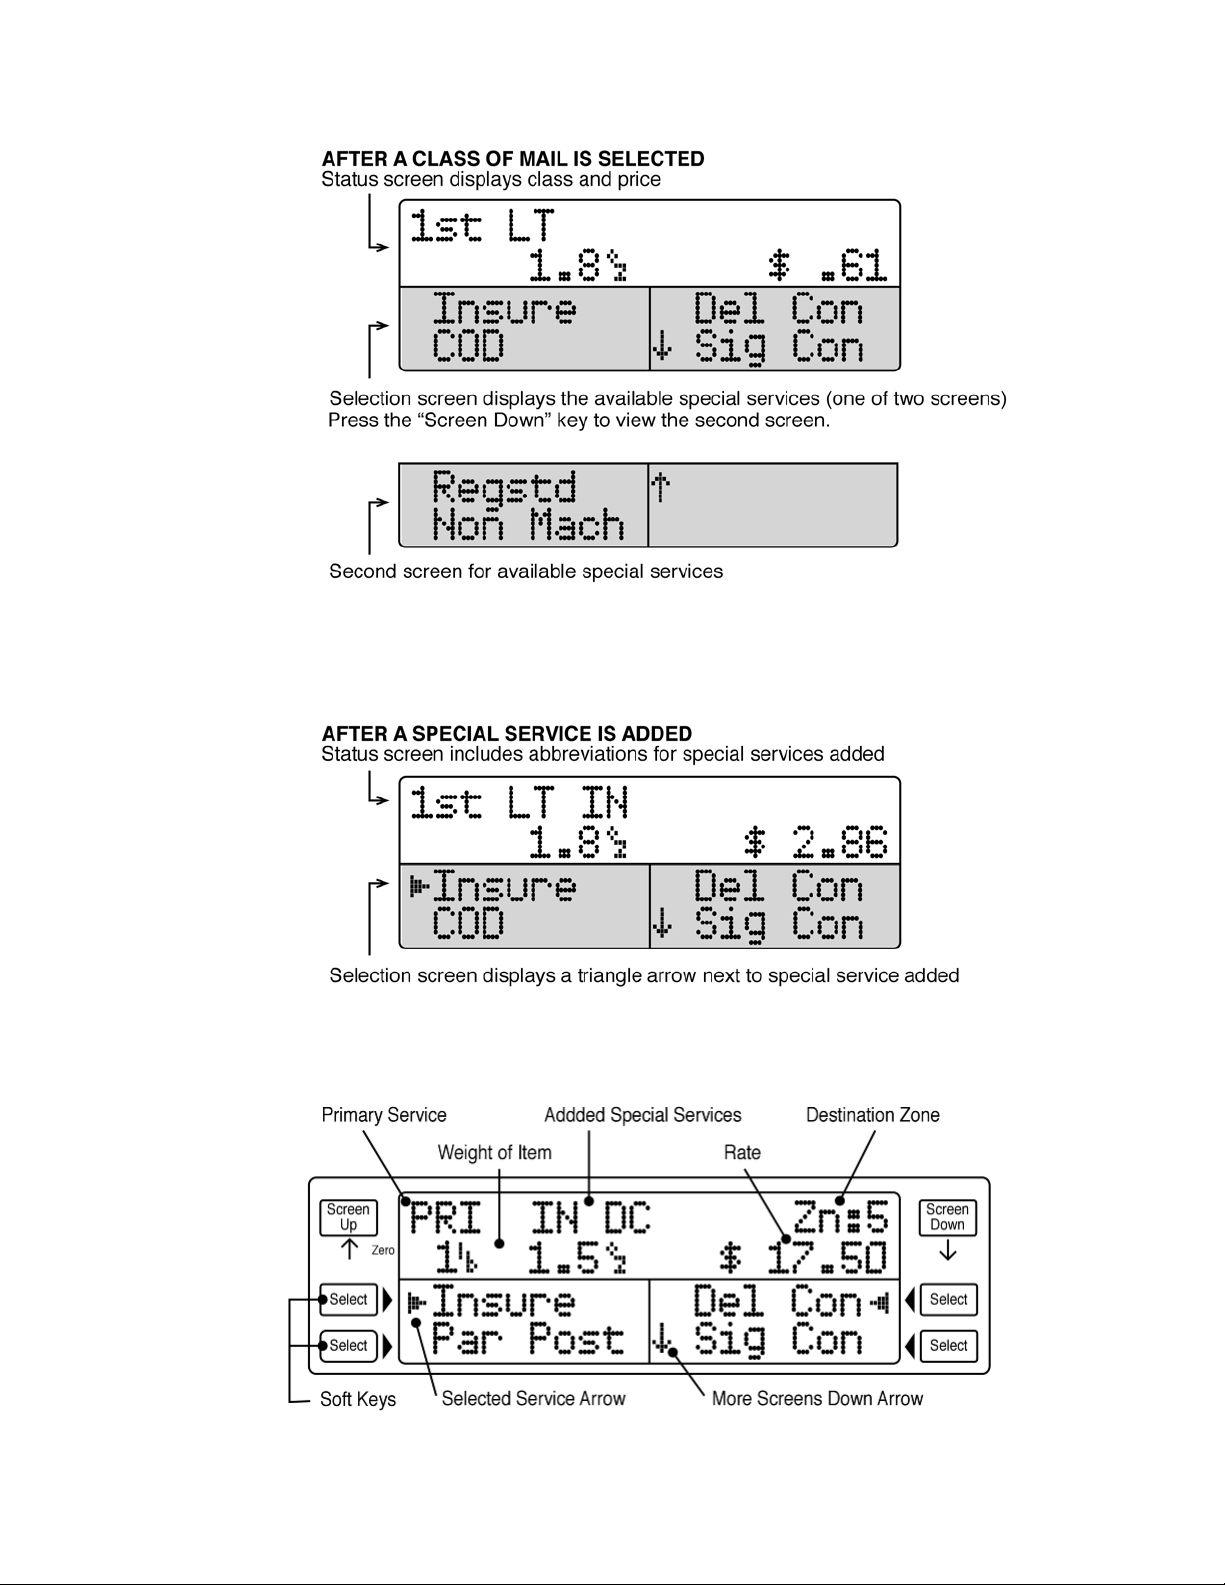
Figure 3-3
After a special service has been added, a triangle arrow displays next to it, and its
abbreviation displays in the status screen. See Figure 3-4 below.
Figure 3-4
Figure 3-5 below identifies the soft keys and the elements of the display.
Figure 3-5
Page 3-2
Page 10
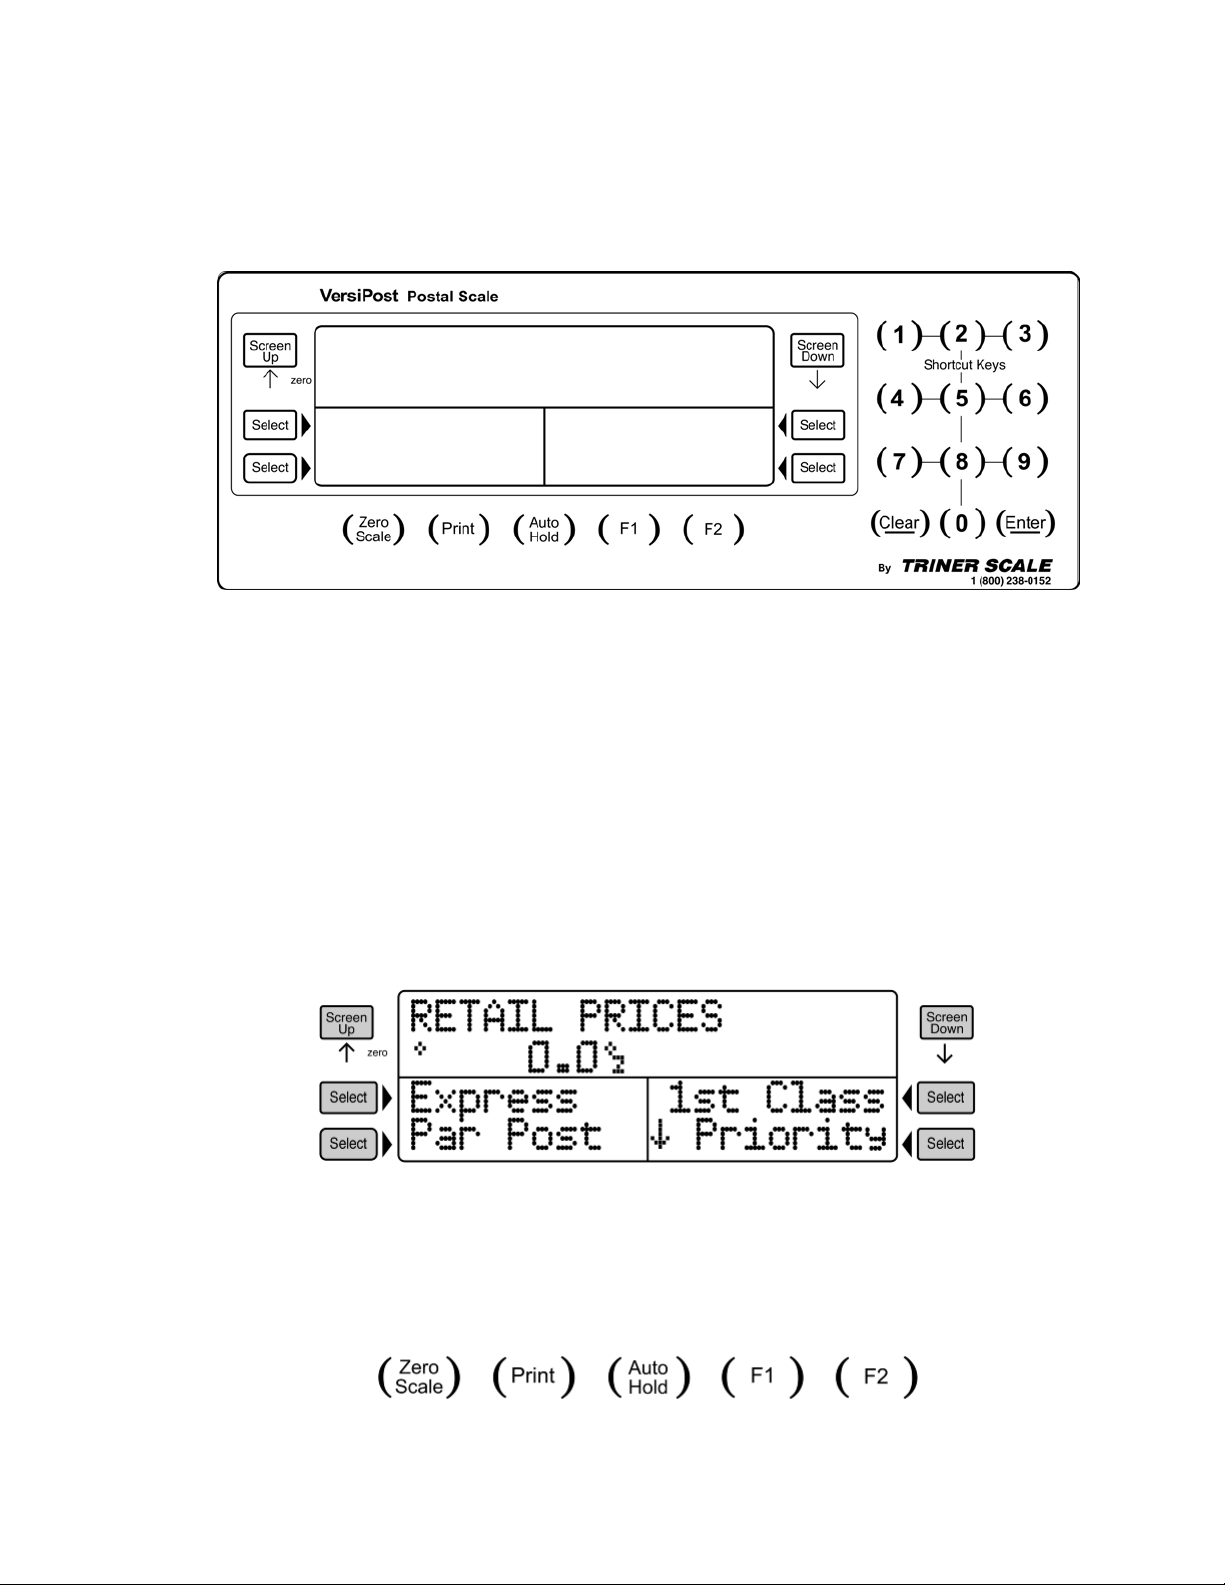
3.2 KEYBOARD
The keyboard is composed of soft keys, operator keys, numeric keys and shortcut keys.
For more information on shortcut keys see section 5.1.
FIGURE 3-6: VP-70 Front Panel and Keyboard
3.2.1 SOFT KEYS
The LCD and the six bright green keys located next to the LCD make up the Soft
Keys. The soft keys are used to navigate through the menus and make
selections.
• Use the SCREEN DOWN key to scroll the selection page down. If more
screens are available a down arrow () will appear in the lower middle of
the screen.
• Use the SCREEN UP key to scroll the selection page up. If more screens
are available an up arrow () will appear in the lower middle of the screen.
• Use the SELECT keys to make your selection.
FIGURE 3-7: Soft Keys Layout
3.2.2 OPERATOR KEYS
The operator keys access certain scale functions. Pressing an operator key will
activate the chosen function or access additional functions.
FIGURE 3-8: Operator Keys Layout
Page 3-3
Page 11

Zero Scale - This key is used to zero out the weight display.
Print - This key is used to send weight information out to the serial port. It is also
used to print and dispense a postage label when connected to a compatible
Postage Meter.
Auto Hold - This key is used to enable or disable the automatic weight hold
mode.
F1 – This key allows you to access the following functions:
• System Information
• Rate Table Information
• Price Categories (USPS Retail or Commercial). To change price categories
see section 5.7.
• Scale Configuration Menu
• Scale Service Menu
F2 - This key allows you to access the following functions:
• Manual Meter Value Entry (Used in conjunction with a postage meter)
• Adjust Price (rate) Entry
• Zip Code or Country Code Edit
• Manual Weight Entry
• Piece Counting Mode
• Remote Scale
3.2.3 NUMERIC AND SHORTCUT KEYS
The numeric keys are used to enter information into the scale when prompted.
They are also used as programmable Shortcut keys to save keystrokes (see section 5.1 for more information on creating and using Shortcuts).
FIGURE 3-9: Numeric Keys Layout
The CLEAR key performs many useful and intuitive functions.
• Press and Hold the CLEAR key at any time to return to the Home Screen.
• Use the CLEAR key to return to the previous soft key screen level
• When entering data, use the CLEAR key to clear the current entry
• Use the CLEAR key to clear all special services selected at once
The ENTER key is used to accept and confirm a selection or entered data.
Page 3-4
Page 12

3.3 GENERAL SCALE OPERATION
3.3.1 SYSTEMS PROMPTS
The VP-70 scale prompts for information in two ways.
1. Numeric Entry - This type of prompt appears as an “Enter Value” message.
Use the numeric keys to enter the requested data and press the ENTER key
to complete the entry. If you make a mistake during the entry, press the
CLEAR key to start over.
2. ZIP Code/ Country Code Entry - This type of prompt appears as a mes-
sage with three dash marks. Use the numeric keys to enter the requested
data. There is no need to press the ENTER key to complete the entry. If you
make a mistake during the entry, press the CLEAR key to start over.
3.3.2 MAILING OR SHIPPING AN ITEM
There are three basic steps to shipping a letter or package. Refer to the next section for detailed examples.
1. Weigh the item you wish to mail
Remove all items from the platter, press the ZERO SCALE key and then
place the item on the weighing platter.
2. Select the desired mailing service by using the soft keys.
Use the soft keys to select a class of mail, making additional selections as
necessary. If the method of shipment and/or the weight of the item require a
ZIP Code or Country Code, the scale prompts for a three-digit code. Use the
numeric keys to enter the destination Zip Code or Country Code.
3. If desired, use the soft keys to select a special service (i.e. Insurance,
C.O.D., etc.).
When a value must be entered to determine the special service fee (e.g.
COD, Registered, and Insurance), the scale prompts for a numeric entry. After the amount is entered, press the ENTER key to accept the input.
3.3.3 ADVANCED COUNTRY CODE OPERATION
If you don’t know the country code, there are two options:
1. List All – This selection lists all countries on the screen in alphabetical order.
Press the SCREEN UP or SCREEN DOWN key to page up or down thru the
list. Press and Hold
the SCREEN UP or SCREEN DOWN key to quickly scroll
through the entire list. Press a soft key to select the desired country.
Page 3-5
Page 13

Figure 3-10: Country Code Entry
2. Favorites – This selection displays an alphabetical user created list of
countries. The user may add up to 32 countries to this list. See section 5.2 for
more information on programming the Favorite Country List.
Press the SCREEN UP or SCREEN DOWN key to page up or down through
the list. Press and Hold
the SCREEN UP or SCREEN DOWN key to quickly
scroll through the entire list. Press a soft key to select the desired country.
Page 3-6
Page 14
4.0 EXAMPLES OF OPERATION
p
Calculating postal rates with the VP-70 is fast and easy. Follow the examples below to
become familiar with the process of weighing and rating an item.
on the
4.1 Sending a First Class Mail Letter with Certified and Return Receipt
1. Place item on scale platform (3.5 oz or less).
2. Press the 1
3. Press the LETTER soft key.
4. Press the CERT soft key. Certified is added and the selected arrow (
5. Press the RET RCPT soft key. Return Receipt is added and the selected arrow (
6. The postage rate is displayed on the right middle side of the screen.
Always make sure the scale weight display reads zero before placing an item
latform. If the scale does not read zero press the ZERO SCALE key.
st
CLASS soft key.
to Cert.
appears next to Ret Rcpt.
W) appears next
W)
• To remove a single Special Service: Press the corresponding soft key.
• To remove all Special Services: Press the CLEAR key
• To return to the Home Screen: Press and Hold
beeps or remove the item from scale.
the CLEAR key until the scale double
• If Return Receipt is selected before Certified the scale will display an “Invalid
• Likewise, if Certified is deselected before Return Receipt an “Invalid Sequence” error
Sequence” error. This is because Return Receipt is not valid without Certified.
will occur and both special services will be automatically deselected.
4.2 Sending a First Class Mail Package with Delivery Confirmation and
Insurance
1. Place item on scale platform (13 oz or less).
2. Press the 1
st
CLASS soft key.
3. Press the PACKAGE soft key.
4. Press the DEL CON soft key. Delivery Confirmation is added and the selected arrow
(
W) appears next to Del Con.
5. Press the INSURE soft key and the scale will prompt for the insurance value.
Page 4-1
Page 15
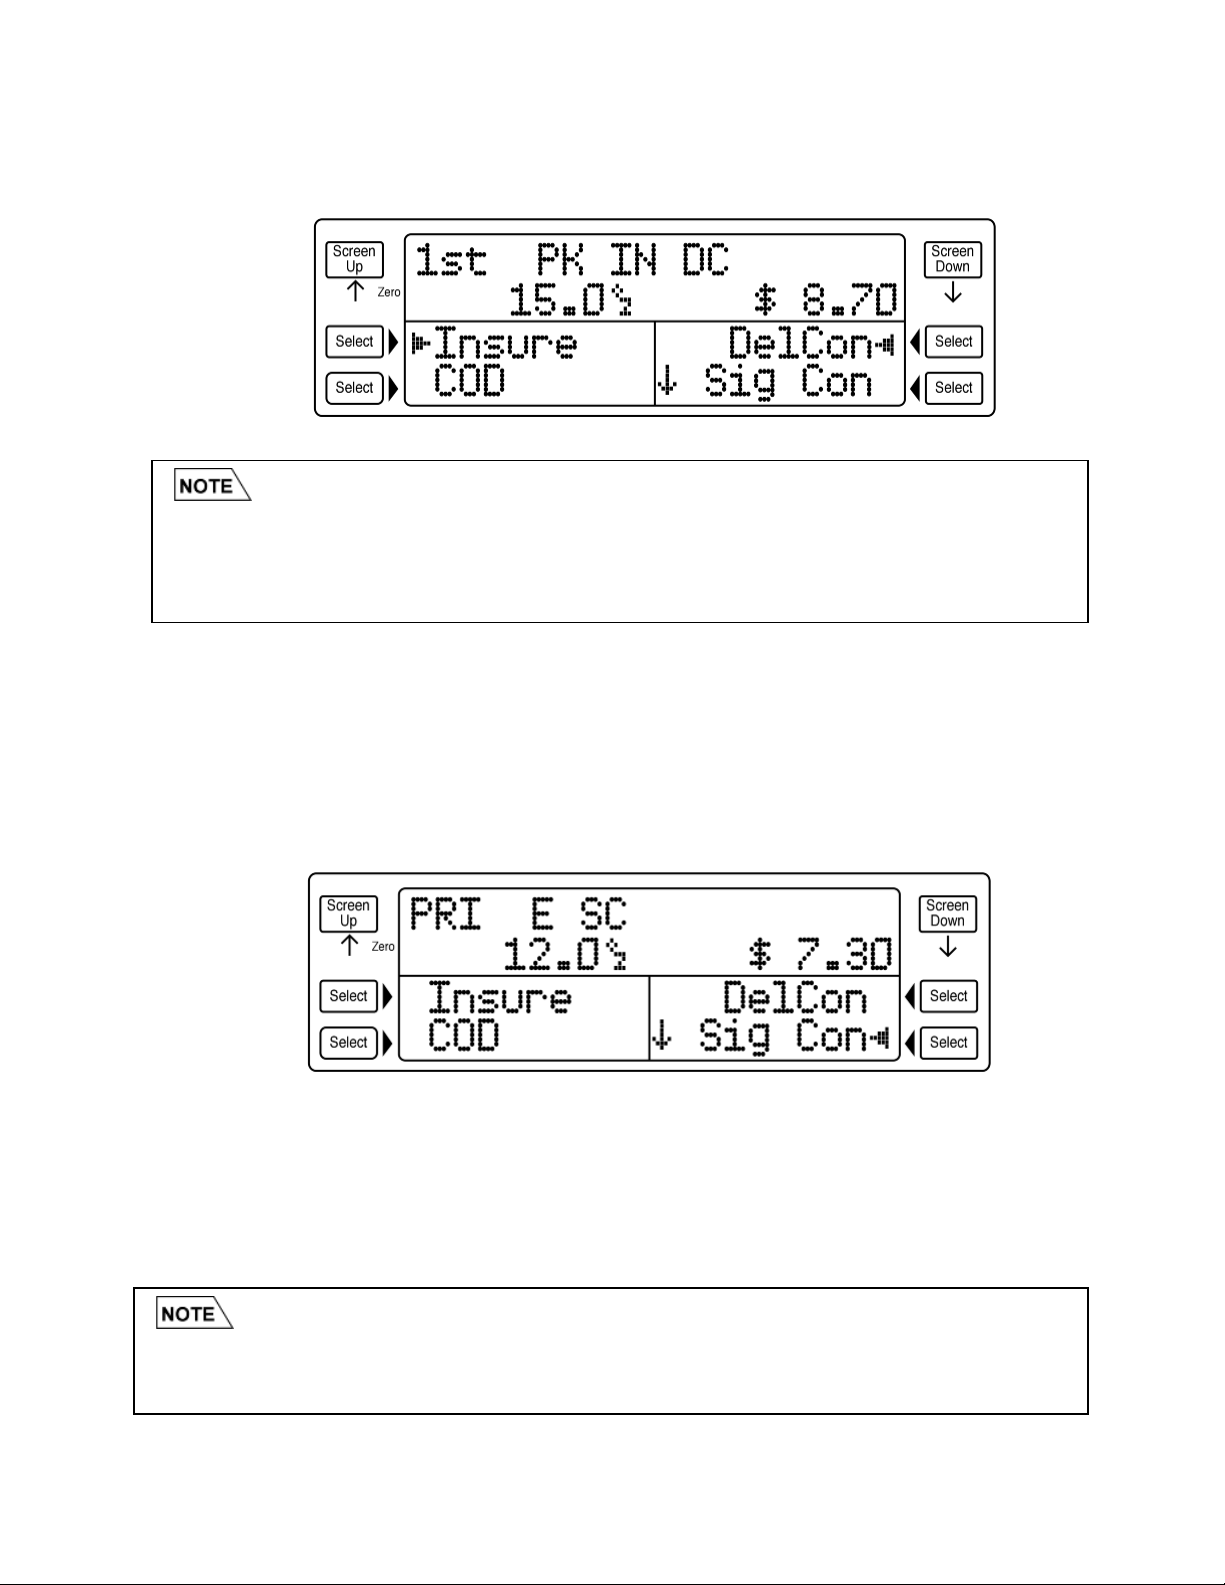
6. Input the value of insurance desired and press the ENTER key. Insurance is added
y
and the selected arrow (
W) appears next to Insure.
• If a mistake is made when entering an Insurance value press the CLEAR key to erase
the value.
• If a different Insurance value is desired, press the INSURE soft key to deselect
Insurance. Press the INSURE soft key again to prompt for a new Insurance value.
4.3 Sending a Priority Mail Flat Rate Envelope with Signature Confirmation
1. Place item on scale platform.
2. Press the PRIORITY soft key.
3. Press the SCREEN DOWN key.
4. Press the FLT ENV soft key.
5. Press the SIG CON. Signature Confirmation is added the selected arrow (
W)
appears next to Sig Con.
4.4 Sending an Express Mail Parcel
1. Place item on scale platform.
2. Press the EXPRESS soft key.
3. Press the PARCEL soft key.
4. Input the first three digits of the Destination Zip Code and the Express Mail rate is
displayed.
• If a mistake is made when entering a Zip Code press the CLEAR key to erase the entry.
• To change the Destination Zip Code or Country Code press the F2 key, then press the
ZIP/CNTRY soft ke
.
Page 4-2
Page 16

4.5 Sending a Large Priority Mail Package Using Auto-Hold and the DIM
Function
eligibility for:
The DIM function allows the user to enter dimensions of an item to determine its
• Dimensional Weight
• Balloon
• Oversized
- Priority Mail or Parcel Post
- Parcel Post
- Priority Mail
screen.
Use the handy Auto Hold feature whenever a large package covers the display
1. Press the AUTO HOLD key. The message “Auto Hold Enabled” will briefly display
along with an “h” icon.
2. Place item on scale platform (20 lbs or less). After about 2 seconds the scale will
“Beep”. This indicates the weight is frozen.
3. Remove item from scale.
4. Press the PRIORITY soft key.
5. Press the PARCEL soft key.
6. Input in the first three digits of the Destination Zip Code.
7. Press the SCREEN DOWN key two times and then press the DIMS soft key.
8. Input the Length of the item in inches then press ENTER. Do the same for the Width
and Height. In this example lets use 20x 20 x 20.
9. The Destination Zone (Zn) is displayed in the upper right corner of the screen.
a. If the Zone is 1-4 go to step 12.
b. If the Zone is 5-8 go to step 10.
10. After entering the dimensions the scale will ask if the item is “Square/Rectangular”,
if it is press the YES soft key. If the item is odd shaped press the NO soft key.
11. Priority Dimensional weight rate will be calculated and the selected arrow (
W)
appears next to Dims.
12. Priority Balloon weight rate will be calculated and the selected arrow (
W) appears
next to Dims.
13. Press the AUTO HOLD key to disable the hold and return the scale to zero.
• To change the Dimensions entered, press the DIMS soft key to deselect Dimensions.
• Dimensional weight only applies to packages mailing to destination zones 5-8. Items sent
Press the DIMS soft key again and the scale will prompt for the new dimensions.
to destination zones 1-4 will be charged the Balloon rate.
Page 4-3
Page 17

• When an item is too large to be mailed the message “Item Too Large” is displayed.
• When an item is too small the message “No Surcharge” is displayed.
4.6 Sending a First Class International Letter
1. Place item on scale platform (3.5 oz or less).
2. Press the SCREEN DOWN soft key.
3. Press the INTL soft key.
4. Press the 1
ST
CLASS soft key.
5. Press the LETTER soft key.
6. The scale will prompt for the three-digit country code. There are three ways to enter
a country code:
a. Input the three-digit numeric country code using the table in Appendix D.
b. Use the LIST ALL function to view all countries in alphabetical order and
select from the list.
c. Use the FAVORITES function to view the user created list of countries and
select from the list.
7. In this example press the FAVORITES soft key then select the CANADA soft key.
8. The First Class Int’l to Canada rate is displayed.
• For more information on programming the Favorites List see chapter 5.2.
Page 4-4
Page 18

5.0 ADVANCED FEATURES AND OPERATION
5.1 PROGRAMMABLE SHORTCUT KEYS
The scale contains 10 programmable shortcut keys, which are very powerful macros that
can be used to save keystrokes and valuable time. The shortcuts are stored and
retrieved by using the numeric keys 0-9.
All 10 shortcuts must be shared between the two USPS Price Categories (Retail and
Commercial). Therefore, a shortcut key programmed for a Priority Retail Package will
not apply for a Priority Commercial Package.
To use a shortcut, the user must first switch to the price category in which it was
originally created.
Out of the box there are six (6) preprogrammed factory shortcuts for USPS Retail
shortcuts can be changed, modified or deleted to suit your application.
Key Number Shortcut Description
1 First Class Letter
2 First Class Large Envelope
3 First Class Parcel
4 Priority Parcel
5 Express Package
6 Parcel Post
7 <OPEN>
8 <OPEN>
9 <OPEN>
0 <OPEN>
Factory Default USPS Retail Shortcuts
time and are easy to program on the fly. To create a shortcut, simply place a letter on the
scale, navigate to the service then press and Hold
beeps and displays “Shortcut Saved”, you are done.
You can then run a shortcut at anytime by pressing a single number key!
The most important thing to remember about shortcuts is that they will save you
5.1.1 How to Program Shortcuts
1. Place a letter on the scale platform.
2. Select the class of mail and (if desired) special services.
3. Press and Hold
a numeric key (0-9) of your choice.
4. When you hear the double beep and the screen says "Shortcut Saved" you
may release the numeric key
a number key. When the scale double-
. These
Page 5-1
Page 19

Example #1: Create a shortcut for a First Class Mail International Letter
1. Place a letter on the scale platform.
2. Press the SCREEN DOWN key.
3. Press the INTL soft key.
4. Press the 1
ST
CLASS soft key.
5. Press the LETTER soft key.
6. Input country code 337 (Canada).
When the shortcut is run the scale will prompt for a new country code.
7. Press and Hold
the number “0” key until the screen says "Shortcut Saved"
then release the key.
Example #2: Create a shortcut for a First Class Letter with Certified and
Return Receipt
1. Place a letter on the scale platform.
2. Press the 1
ST
CLASS soft key.
3. Press the LETTER soft key.
4. Press the CERT soft key.
5. Press the RET RCPT soft key.
8. Press and Hold
the number “0” key until the screen says "Shortcut Saved"
then release the key.
5.1.2 How to Run a Shortcut
Generally a shortcut can be run at any time by pressing the number key assigned
to that shortcut. The procedure is as follows:
1. Place item on scale platform.
2. Press the NUMBER (0-9) key of the shortcut to execute.
3. Shortcut runs then proceed with the weighing and rating session.
Below are some notes and tips for running shortcuts:
• To use a shortcut, make sure to switch to the price category (Retail or Commercial) in
which it was originally created.
• When a shortcut is run the scale will prompt for any additional information as needed (i.e.
Zip Code, Country Code, Insurance Value, etc).
• With the factory default shortcuts on keys 1,2, and 3 you can quickly switch between 1
• With the factory default shortcuts on keys 4,5,and 6 you can quickly rate shop between
Class Letters, Large Envelopes, and Packages.
Priority, Express and Parcel Post.
ST
Page 5-2
Page 20

5.1.3 How to delete a Shortcut
In most cases there is no need to delete a shortcut. If you wish to change a
shortcut simply create a new one and the old one will be overwritten. However if
you wish to totally remove a shortcut follow the steps below.
1. Press and Hold
the CLEAR key until a double beep is heard to get to the
Home Screen.
2. Press and Hold
the numeric key corresponding to the shortcut you wish to
erase until the screen says "Shortcut Saved".
5.2 COUNTRY FAVORITES LIST
The scale has a programmable Favorites List for destination countries used most often.
Save time by using the Favorites List to select a country instead of listing all the
countries.
5.2.1 How to add countries to the Favorites List
1. Place an item on the scale and select an International class of mail.
2. Press the LIST ALL soft key.
3. Press the SCREEN DOWN or SCREEN UP arrow keys to scroll to the page
that lists the destination country to be added.
4. Press and Hold
the soft key next to the country to be added until the scale
displays “Country Saved”.
5. To view the newly added country, press the CLEAR key then press the
FAVORITES soft key.
5.2.2 How to delete countries from the Favorites List
1. Place an item on the scale and select an International class of mail.
2. Press the FAVORITES soft key.
3. Press the SCREEN DOWN or SCREEN UP arrow keys to scroll to the page
that lists the country to be deleted.
4. Press and Hold
the soft key next to the country to be deleted until the scale
displays “Country Deleted”.
5.3 AUTO HOLD
This handy function is used to help rate an oversized item which, when placed onto the
scale, would block the display. This feature will not work for items weighing less than 5
oz.
5.3.1 How to use Auto Hold
1. Remove all items from the scale platform.
2. Press the AUTO HOLD key. The message “Auto Hold Enabled” will briefly
display along with an “h” icon.
3. Place oversized item on scale platform. After about 2 seconds the scale will
“Beep”.
4. Remove item from scale and the weight will be frozen.
5. Continue the normal rating process.
6. There are two ways to disable
Auto Hold:
Page 5-3
Page 21

a. Press the AUTO HOLD key anytime.
b. Press the CLEAR key while at the home screen.
5.4 PIECE COUNTING
See Chapter 7 for details on Bulk Mailing and Piece Counting.
5.5 MANUAL WEIGHT ENTRY
Manual Weight is used when the weight of an item is known. Simply enter the weight of
the item into the scale and then perform any weighing and rating operations. This feature
is very handy especially when the item to be weighed is not available.
5.5.1 How to use Manual Weight Entry
1. Remove all items from the scale and if necessary press the ZERO SCALE
key.
2. Press the F2 key.
3. Press the MAN WT soft key
4. When the scale prompts “Enter Pounds:” key in the items weight in pounds
and press ENTER. (If the item is less than one pound, press ENTER for zero
pounds).
5. When the scale prompts “Enter Ounces:” key in the items weight in ounces
and press ENTER.
6. Continue the normal rating process.
7. To disable Manual Weight press the CLEAR key while at the Home Screen.
• An “M” icon will be displayed to indicate Manual Weight mode is activated.
• The weight display MUST read zero before activating the Manual Weight mode. If it is not
• If over 70 lbs is entered the scale will display the message “Maximum 70 lbs!!”
• If over 15.9 oz is entered the scale will display “Maximum 15.9 oz!”
the scale will display the message “Scale not empty”. Press the ZERO SCALE key.
5.6 CHANGE DESTINATION ZIP/COUNTRY
This function is used to change the destination ZIP Code or Country without having to
remove the item from the scale.
5.6.1 How to Change the Destination ZIP or Country
1. At any time, press the F2 key.
2. Press the ZIP/CTNRY soft key.
If you have selected a domestic class of mail, the scale prompts for the new
destination ZIP code
If you have selected an international class of mail, the scale prompts for the
new destination country code
3. Key-in the new ZIP code or country code
Page 5-4
Page 22

Scale displays the rate based on the new destination information
5.7 USPS PRICE CATEGORIES
The VP-70 calculates USPS Retail and USPS Commercial rates.
5.7.1 How to Change between USPS Price Categories
1. Press the F1 key.
2. Press the PRICES soft key.
3. Press either the RETAIL or COMMERCIAL soft key. An arrow will appear
next to the selected price category.
4. Press the ENTER key to accept the selection.
5. Press the CLEAR key to return to normal operation.
• The scale will always display the text “Retail Prices” or “Commercial Prices” at the Home
Screen so the user always knows what price category is in use.
5.8 ADJUST PRICE FEATURE
The Adjust Price feature is used to add or subtract fees from the displayed rate.
5.8.1 How to ADD a Fee to the Displayed Rate
The ADD Postage feature is used to manually add a fee to the displayed rate.
This feature can be used to add a handling fee or add a fee for an unsupported
special service (Certificate of Mailing for example).
1. Place an item on the scale and select the desired class of mail.
2. When the rate is displayed, press the F2 key.
3. Press the ADJ PRICE soft key.
4. Press the ADD soft key.
5. When prompted key in the amount to be added and press the ENTER
key.
6. The amount will be added to the rate and AP will be displayed indicating
postage has been added.
5.8.2 How to SUBTRACT an amount from the Displayed Rate
The SUBTRACT Postage feature is used to manually subtract an amount from
the displayed rate.
For example: If a customer already has postage on the item but it is not enough
to be mailed the SUBTRACT Postage can be used to calculate the remaining
postage that needs to be added to the item.
1. Place an item on the scale and select the desired class of mail.
2. When the rate is displayed, press the F2 key.
3. Press the ADJ PRICE soft key.
Page 5-5
Page 23

4. Press the SUBTRACT soft key.
5. When prompted key in the amount to be subtracted and press the
ENTER key.
6. The amount will be subtracted from the rate and SP will be displayed
indicating postage has been subtracted.
• A postage rate must be displayed before using the ADD/SUBTRACT postage function. If
• If the amount to be subtracted is greater than the base rate, the message “Postage over
the rate is not displayed before using the function the message “Adjust Postage not
Available” will be displayed.
rate” message will be displayed.
5.9 MANUAL METER SETTING
The manual meter feature is used to set a postage meter to a value determined by the
user. This feature will only work if a postage meter is attached to the scale.
1. Remove any items from the scale and make sure the weight displays Zero. If
it doe not read Zero, press the ZERO SCALE key.
2. Press the F2 key.
3. Press the MAN METER soft key.
4. When prompted key in the postage amount and press the ENTER key.
5. The scale will send the amount to the postage meter.
• If the scale is not on Zero before Manual Price is selected, the scale will display the
• If there is not a postage meter attached to the scale when Manual Price is selected, the
message “Scale not empty”.
scale will display the message “Meter Unavailable”.
Page 5-6
Page 24

6.0 SETUP OPERATIONS
The system setup consists of three areas: Configuration, System Information and
Service.
6.1 CONFIGURE MENU
The Configure Menu is used to access or set up the following functions:
• Origination ZIP code
• Program F2 Key
• Beeper Setup
• Time / Date Setup
• Home Screen Default
• Latitude Zone
• Load Rate
6.1.1 How to change the Origination ZIP Code
In order to calculate the proper postage rates, the scale needs to know the ZIP
Code from which the item will be mailed or shipped; this is called the Origination
Zip Code. It should have been programmed when you first received the scale,
however it can be changed if needed.
1. Press the F1 key.
2. Press the CONFIGURE soft key.
wrong Origination Zip Code is entered into the scale, it will not properly calculate the zip-tozone. This can result in incorrect postage rates.
3. Press the ORIG ZIP soft key.
Scale displays the current origination ZIP code and prompts you to enter in
the new one
4. Key-in the first three digits of the new origination ZIP code
Scale reverts back to Configure screen; press the CLEAR key to return to
normal operating mode
The correct Origination Zip Code must be programmed into the scale. If the
6.1.2 How to configure the F2 key menus
The F2 key can contain up to six (6) functions, which will appear on the soft key
menu. The user can program the functions to be used. Out of the box five
functions already appear:
• Piece Counting (Counting)
• Manual Weight Entry (Man Wt)
• Change ZIP/Country (Zip/Cntry)
• Manual Price (Man Price)
• Adjust Price (Adj Price)
Page 6-1
Page 25

1. Press the F1 key.
2. Press the CONFIGURE soft key.
3. Press the F2 SETUP soft key.
Scale displays the available functions along with the status, i.e. ON or OFF.
For example, ManWt – ON means that the Manual Weight function is turned
ON.
4. Press the soft key next to the function you wish to turn ON or OFF
The status of the function changes from ON to OFF or from OFF to ON
5. Press the CLEAR key to exit and save the changes.
6.1.3 How to configure the Beeper
The audible beeper beeps each time a key is pressed and is very useful for sale
operation; however it can be disabled.
1. Press the F1 key.
2. Press the CONFIGURE soft key.
3. Press the BEEPER soft key.
4. Press the ON or OFF soft key then press ENTER.
5. Scale reverts back to Configure screen; press the CLEAR key to return to
normal operating mode.
6.1.4 How to set up the Time and Date
The VP-70 includes an internal clock. Follow the instructions below to set the
time and date.
1. Press the F1 key.
2. Press the CONFIGURE soft key.
3. Press the TIME/DATE soft key.
4. Key in the current date (Day, Month, Year).
5. Key in the current time (Hours, Minutes, Seconds).
6. Press ENTER to accept and save the changes.
To view the current time and date use the System Information Function.
6.1.5 How to configure Home Screen Default
The scale is factory set up to automatically return to the Home Screen each time
an item is removed from the scale. This can be changed to remain on the last
Class of Mail used when an item is removed.
1. Press the F1 key.
2. Press the CONFIGURE soft key.
3. Press the SET HOME soft key.
4. The scale will display the question “Home Screen Default?”
a. To make the scale automatically return to the home screen, press
YES.
b. To make the scale remain on the last Class of Mail used, press NO.
5. Press the CLEAR key to exit and save the changes.
Page 6-2
Page 26

6.1.6 How to view System Information
The system information function is used to display general information about the
scale and its settings. The information displayed is as follows:
• Scale Model Number
• Serial Number
• Capacity
• Origination Zip Code
• Time
• Date
1. Press the F1 key.
2. Press the SYS INFO key.
3. The scale will display information about the scale.
4. Press the SCREEN DOWN key to view the current time and date.
5. Press CLEAR key to exit.
6.1.7 Latitude Zone (Factory Use Only)
The Latitude Zone adjustment allows for Gravity Compensation when the scale is
set in a High Resolution Mode. By default this feature is turned off at the factory.
To enable gravity compensation the scale must be re-calibrated.
6.1.8 Load Rate Function (Future Use)
The Load Rate function is used to make the scale ready to accept a PC
download of new postal rates.
Page 6-3
Page 27

6.2 SERVICE MENU
The Service Menu is used to configure the system, run diagnostics and perform scale
calibration. The service menu is password protected.
DO NOT
one of their authorized distributors. If you have any questions about the Service Menu call
Triner Scale at 1-800-238-0152.
The Service Menu is only for qualified scale service technicians.
attempt to enter the service mode unless you have been instructed by Triner Scale or
6.2.1 How to perform an Analog to Digital Conversion (A/D) Test
The Analog to Digital Conversion (A/D) Test can be used to troubleshoot a
damaged load cell, a bad connection or a faulty internal component.
1. Press the F1 key.
2. Press the SCREEN DOWN key.
3. Press the SERVICE soft key.
4. At the password prompt key in (336699) then press ENTER.
5. Press the A/D TEST soft key.
Scale displays system information as follows:
A/D Index
A/D Count
=> a/d counter indicates buffer size
=> internal A/D converter counts
6. Press the ZERO SCALE key to zero the A/D Count.
7. Press the CLEAR key to exit the test
6.2.2 How to perform a LCD Test
The LCD Test can be used to troubleshoot a damaged display.
1. Press the F1 key.
2. Press the SCREEN DOWN key.
3. Press the SERVICE soft key.
4. At the password prompt key in (336699) then press ENTER.
5. Press the LCD TEST soft key
Scale displays various characters on all four lines of the screen for about three
seconds followed by a blank screen for about three seconds; sequence is
repeated twice more before scale automatically reverts back to the Service
screen
6.2.3 How to perform a Keyboard Test
The Keyboard Test can be used to troubleshoot an inoperative key.
1. Press the F1 key.
2. Press the SCREEN DOWN key.
3. Press the SERVICE soft key.
4. At the password prompt key in (336699) then press ENTER.
Page 6-4
Page 28

5. Press the KEY TEST soft key.
Press any key except CLEAR to see the key code; see table below for the
proper key code.
6. Press the CLEAR key to exit the test.
Scale reverts back to Service screen; press the CLEAR key to return to
normal operating mode.
Key Key Code Key Key Code
Screen Up 12 0 0
S1 14 1 1
S2 15 2 2
Screen Down 13 3 3
S3 16 4 4
S4 17 5 5
F2 22 6 6
Auto Hold 20 7 7
F1 21 8 8
Print 19 9 9
Zero Scale 18 Enter 11
6.2.4 How to Enable the Postage Meter Interface
The VP-70 can interface to select Francotyp Postallia postage meters. By default
the postage meter interface is turned off. To enable the meter interface you must
contact the factory
to obtain a unique 10-digit setting code. Only scales used by
the United States Postal Service are eligible to obtain a setting code.
1. Press the F1 key.
2. Press the SCREEN DOWN key.
3. Press the SERVICE soft key.
4. At the password prompt key in (336699) then press ENTER.
5. Press the SCREEN DOWN key two times.
6. Press the MTR ENABLE soft key.
7. Press the ON soft key.
8. At the prompt key in the 10-digit setting code then press ENTER.
9. Press the CLEAR key to save and exit.
6.2.5 How to perform a Postage Meter Test
The Meter Test can be used to troubleshoot or check the postage meter
connection.
1. Press the F1 key.
2. Press the SCREEN DOWN key.
3. Press the SERVICE soft key.
4. At the password prompt key in (336699) then press ENTER.
5. Press the MTR TEST soft key.
6. The scale will set the meter for a $1.20 value.
Page 6-5
Page 29

6.2.6 How to set the Meter Type
The VP-70 can interface to select Francotyp Postallia postage meters. The scale
will attempt to automatically set the meter type, however use the steps below to
manually set the meter type.
1. Press the F1 key.
2. Press the SCREEN DOWN key.
3. Press the SERVICE soft key.
4. At the password prompt key in (336699) then press ENTER.
5. Press the MTR TYPE soft key.
6. Press the appropriate soft key that corresponds to the type of meter
connected to the scale.
7. Press ENTER to save and exit.
6.2.7 How to set the Meter Mode
The VP-70 by default sets the meter automatically when a rate is displayed. If
desired the meter can be set manually when a rate is displayed by pressing the
ENTER key.
1. Press the F1 key.
2. Press the SCREEN DOWN key.
3. Press the SERVICE soft key.
4. At the password prompt key in (336699) then press ENTER.
5. Press the SCREEN DOWN key.
6. Press the MTR MODE soft key.
7. Select either AUTO or MANUAL by pressing the corresponding soft key.
8. Press CLEAR to save and exit.
6.2.8 How to change the Scale Capacity / Resolution
The scale can be configured to operate with several different resolution settings.
Below is a list of the different settings.
• 0-7 lb x 0.1 oz, 7-70 lb x 0.5 oz (Factory Default Setting)
• 0-7 lb x 0.1 oz, 7-70 lb x 0.2 oz
• 0-7 lb x 0.05 oz, 7-70 lb x 0.2 oz
• 0-7 lb x 0.01 oz, 7-70 lb x 0.1 oz (Special Rate Test Mode Only)
1. Press the F1 key.
2. Press the SCREEN DOWN key.
3. Press the SERVICE soft key.
4. At the password prompt key in (336699) then press ENTER.
5. Press the SCREEN DOWN key.
6. Press the CAPACITY soft key.
7. Press the soft key that corresponds to the capacity / resolution desired.
8. Press the ENTER key to save and exit.
Page 6-6
Page 30

6.2.9 How to reset the Factory Defaults
To reset the VP-70 to its factory defaults follow the steps below.
1. Press the F1 key.
2. Press the SCREEN DOWN key.
3. Press the SERVICE soft key.
4. At the password prompt key in (336699) then press ENTER.
5. Press the SCREEN DOWN key two times.
6. Press the DEFAULTS soft key.
7. Select YES or NO.
8. Confirm the reset to factory defaults by pressing YES if not press NO.
9. The scale will reset all scale parameters to the factory default.
10. Turn the scale off then on to finalize the changes.
6.2.10 How to clear the Favorites List
All of the countries in the favorites list can be cleared at once by following the
instructions below.
1. Press the F1 key.
2. Press the SCREEN DOWN key.
3. Press the SERVICE soft key.
4. At the password prompt key in (336699) then press ENTER.
5. Press the SCREEN DOWN key two times.
6. Press the CLEARFAV soft key.
7. Select YES or NO.
8. Confirm the clearing of the favorites list by pressing YES.
9. The scale will clear out all the countries in the favorites list.
10. Turn the scale off the on to finalize the changes.
Page 6-7
Page 31

6.2.11 How to perform Scale Calibration
f
to calibrate the scale!
DO NOT
their authorized distributors. If you have any questions about the calibration call Triner Scale at
1-800-238-0152.
Your VP-70 postal scale is FACTORY CALIBRATED. There is no need
attempt to calibrate the scale unless you have been instructed by Triner Scale or one o
1. Press the F1 key.
2. Press the SCREEN DOWN key.
3. Press the SERVICE soft key.
4. At the password prompt key in (336699) then press ENTER.
5. Press the SCREEN DOWN key.
6. Press the CALIBRATE soft key.
The scale will prompt for the “Latitude Zone”
7. Key in “99” then press ENTER.
Scale prompts to remove all items from the platter
8. Make sure the platform is clear then press the ENTER key.
Scale prompts to place 7 pounds onto the scale
9. Place 7 pounds of precision test weights on the scale platform then press the
ENTER key.
Scale displays “Please Wait” briefly and then prompts you to place 50 pounds
onto the scale
10. Place 50 pounds of precision test weights on the scale platform then press
the ENTER key.
Scale displays “Please Wait” briefly and then indicates “Calibration Saved” if
successful.
Page 6-8
Page 32

7.0 BULK MAILING AND COUNTING MODE
The VP-70 has special Bulk Mailing and Counting Functions. It is an easy to use, highresolution counting mode featuring keyboard tare and unit weight entry. In counting
mode, the scales capacity is limited to 25 lbs.
To enter the Bulk Mailing and Counting Mode press the F2 Key. If necessary, press the
SCREEN DOWN soft key to scroll to the next page, then select the COUNTING soft key.
7.1 Display Screen
The diagram below represents Home and Screen Down screen.
Pieces Display
Weight Display
HOME SCREEN
Pcs 000 Uwt 0.0000
-00.000 MEM 00 00.00
Mode
Alternate Unit (mode)
Unit Wt
Sample
Tare
Tare Icon
Unit Weight Display
Special Message Area
Item Memory
Indicatior
Soft Keys
Tare Icon
Pieces Display
Weight Display
00 00.00
Alternate Unit (mode)
SCREEN DOWN
Pcs 000 Uwt 0.0000
-00.000 MEM
EXIT
Add
INFO
Soft Keys
Unit Weight Display
Special Message Area
Item Memory
Indicatior
7.2 Soft key Descriptions
There are seven primary soft key function selections.
• Sample
• Tare
– Used to start a new piece sample.
– Allows for two methods of tare entry. Keyboard tare (pre-tare) or Manual
tare (place empty container on scale).
• Mode
• Unit Wt
– Switches between LB and LB/OZ weight units.
– Allows manual unit weight entry. If the unit weight of the piece is
known, enter the value. The scale will accurately count pieces based on the unit
weight entered.
• Add
• Info
• Exit
– Adds current displayed piece data to the accumulator memory.
– Displays the accumulator stats, pieces per pound, and other information.
– Exits the Bulk Mailing and Counting Mode
Page 7-1
Page 33

7.3 General Operation
7.3.1 Sample - How to Sample Pieces
Use the following procedure to sample pieces. Note: All pieces MUST be of
identical weight.
1. Make sure the scale is on zero by pressing the ZERO SCALE key.
2. Place at least 10 samples on the scale (the more items sampled, the
greater the accuracy) and press the SAMPLE soft key.
3. The enter sample size screen is displayed.
Weight of
Samples
Enter Sample Size
0.062
10
20
SAMPLE ENTRY
Sample size
entry prompt
50
100
Pre-set samples
4. Select a soft key corresponding to the sample size or key in the amount of
sample pieces with the numeric keypad and press ENTER.
5. If the input is accepted the scale will revert to the Home Screen. The top half
of the screen will be updated with the necessary information.
6. Add more pieces to the scale platform to count the entire batch of items.
When the current counting session is completed simply re-sample a new batch of
items or exit the counting mode by pressing the EXIT soft key.
To maintain the count accuracy, the following guidelines should be followed:
• All items placed on the scale must
be of uniform weight.
• The more pieces sampled the greater the accuracy. For example, a sample of
50 pieces will result in a MUCH more accurate count than a sample of 10
pieces.
• Always make sure the scale weight display reads zero prior to sampling.
• The minimum sample count is 10 pieces but always try to sample more pieces
especially with light items.
• The minimum weight per piece should be 0.1 ounces or greater.
• The total weight of the items sampled must be 1 ounce or greater.
7.3.2 TARE - How To Tare a Container
There are two ways to Tare a Container.
1. Simple Tare (place empty container on scale)
2. Keyboard Tare (pre-tare)
Page 7-2
Page 34

7.3.2.1 Simple Tare
1. Make sure the scale is on zero.
2. Place empty container on scale.
3. Press the TARE soft key.
4. The scale will zero itself and place the Tare icon in the special
message area of the screen.
5. The scale is ready for weighing or sampling.
7.3.2.2 Keyboard Tare (pre-tare)
1. Make sure the scale is on zero.
2. Press the TARE soft key while the scale is on zero and empty.
3. You will be prompted to enter the Tare weight of the Container. See
screen below:
TARE ENTRY
Enter Tare Weight
In Pounds
4. Key in the tare weight in pounds. Use the DECIMAL soft key to enter
a decimal point. Press enter to accept the entry. Press clear to erase
entry.
5. When the input is accepted, the scale is ready for weighing or
sampling.
7.3.2.3 Removing a Tare Weight
To clear a Tare Weight, remove the container and all items from the
scale. Press the TARE soft key. The scale will be reset and the “T” icon
will be removed from the display.
7.3.3 MODE – How to change the weighing units
Press the MODE soft key to change the weighing units from pounds to
pounds/ounces.
Pieces Display
Weight Display
Pcs 000 Uwt 0.0000
00 00.00 MEM
Mode
Unit Wt
Decimal .
HOME SCREEN
In Lb/Oz
mode
Sample
Tare
Tare Weight
entry prompt
Decimal
point
soft key
Tare Icon
Unit Weight Display
Special Message Area
Item Memory
Indicatior
Soft Keys
Page 7-3
Page 35

7.3.4 ADD - Memory Accumulator
The ADD function is used to accumulate multiple batches of items placed on the
scale. Press the ADD soft key to accumulate weight and piece data for each
batch.
When items are added to the accumulator MEM will be displayed on the screen
to indicate there are items in memory.
7.3.5 INFO - Weigh Session Information
Press the INFO soft key to get information about a weigh session.
Number of
Entries
Pieces per
Pound
Accumulated
Pieces
# 001 Uwt 0.0000
Total WT:
PCS / lb:
Accum PCS:
• To exit the Information screen press the CLEAR key.
• To reset the data on the Information screen, press and Hold the CLEAR
key until the scale double beeps. Note: This will clear the following:
o Number of Entries
o Total Weight
o Accumulated Pieces
7.3.6 UNIT WT - Entering a Unit Weight
Allows manual unit weight entry. If the unit weight of the piece is known, enter the
value. The scale will accurately count pieces based on the unit weight entered.
1. Make sure the scale is on zero.
2. Press the UNIT WT soft key while the scale is on zero and empty.
3. You will be prompted to enter the Unit Weight of the item to be
counted. See screen below:
INFORMATION
000.0000
16.1234
0000
Unit Weight
Total Weight
UNIT WEIGHT ENTRY
Enter Unit Weight
Unit Weight
entry prompt
In Pounds
Decimal .
Decimal
point
soft key
4. Key in the unit weight in pounds. Use the DECIMAL soft key to enter a
decimal point. Press enter to accept the entry. Press clear to erase
entry.
5. When the input is accepted, the scale is ready for counting.
Page 7-4
Page 36

7.3.7 EXIT - Exit the Bulk Mailing and Counting Mode
Press the EXIT soft key to escape from Bulk Mailing and Counting Mode and
return to normal weighing and rating.
Page 7-5
Page 37

APPENDIX A: SPECIFICATIONS
Dimensions:
Capacity/Division:
Power Source:
Operating Temp:
Display:
Keys:
Platform Size:
Ports:
Shipping Weight:
Net Weight:
PHYSICAL DIMENSIONS:
10.5 in. x 4.25 in. x 13.25 in.
266 mm x 108 mm x 336 mm
0-7 lb x 0.1 oz, 7-70 lb x 0.5oz
12 VDC, 800 mA AC adapter
32 to 104°F (0 to 40°C)
20 x 4 alphanumeric LCD with LED backlight
6 soft, 17 hard including 0-9 numeric
10 in. x 9 in. (254 mm x 229 mm)
1 x RS-232C & 1 x USB
14.4 lbs (6.5 kg)
11.5 lbs (5.2 kg)
A-1
Page 38

APPENDIX B: SUPPORTED RATES AND SPECIAL SERVICES
USPS - Retail USPS - Commercial
First Class Letter First Class 5-Digit Letter
First Class Flat First Class 3-Digit Letter
First Class Package First Class AADC Letter
First Class Postcard First Class Mixed AADC Letter
First Class Presorted Letter
Priority Mail First Class 5-Digit Flat
Priority Mail Flat-rate Small Box First Class 3-Digit Flat
Priority Mail Flat-rate Regular Box First Class ADC Flat
Priority Mail Flat-rate Large Box First Class Mixed ADC Flat
Priority Mail Flat-rate Envelope First Class Presorted Flat
First Class 5-Digit Parcel
Express Mail First Class 3-Digit Parcel
Express Mail Flat-rate Envelope First Class ADC Parcel
Parcel Post Priority Mail
Priority Mail Flat-rate Small Box
Library Mail Priority Mail Flat-rate Regular Box
Priority Mail Flat-rate Large Box
Media Mail Priority Mail Flat-rate Envelope
First Class Intl Flat Express Mail
First Class Intl Letter Express Mail Flat-rate Envelope
First Class Intl Package
First Class Intl Postcard Bound Printed Matter - Flats
Bound Printed Matter - Parcels
Priority Mail Intl
Priority Mail Intl Flat-rate Small Box Library Mail
Priority Mail Intl Flat-rate Regular Box
Priority Mail Intl Flat-rate Large Box Media Mail
Priority Mail Intl Flat-rate Envelope
Express Mail Intl
Express Mail Intl Flat-rate Envelope
Global Express Guaranteed
Special Services
Certified Return Receipt for Merchandise
Return Receipt Non-machineable Surcharge (letters)
COD Sunday/Holiday Surcharge
Signature Confirmation Dimension Entry
Delivery Confirmation
Insurance
Registered (international)
Registered (no insurance)
Registered (w/insurance)
B-1
Page 39

APPENDIX C: RATE AND SPECIAL SERVICE ABBREVIATIONS
C.1 USPS RETAIL
Class of Mail Displayed Text
First Class Letter 1st LT
First Class Flat 1st LE
First Class Package 1st PK
First Class Postcard 1st PC
Prioity Mail PRI
Priority Mail Flat-rate Small Box PRI SB
Priority Mail Flat-rate Regular Box PRI RB
Priority Mail Flat-rate Large Box PRI LB
Priority Mail Flat-rate Envelope PRI E
Express Mail EXP
Express Mail Flat-rate Envelope EXP E
Parcel Post PP
Library Mail LIB
Media Mail MED
First Class Intl Flat INT 1st LT
First Class Intl Letter INT 1st LE
First Class Intl Package INT 1st PK
First Class Intl Postcard INT 1st PC
Prioity Mail Intl INT PRI
Prioity Mail Intl Flat-rate Small Box INT PRI SB
Prioity Mail Intl Flat-rate Regular Box INT PRI RB
Prioity Mail Intl Flat-rate Large Box INT PRI LB
Prioity Mail Intl Flat-rate Envelope INT PRI E
Express Mail Intl INT EXP
Express Mail Intl Flat-rate Envelope INT EXP E
Global Express Guaranteed INT GXG
C-1
Page 40

C.2 USPS COMMERCIAL
Class of Mail Displayed Text
First Class 5-Digit Letter AUT L 5DG
First Class 3-Digit Letter AUT L 3DG
First Class AADC Letter AUT L AAD
First Class Mixed AADC Letter AUT L MIX
First Class Presorted Letter AUT L PRE
First Class 5-Digit Flat AUT F 5DG
First Class 3-Digit Flat AUT F 3DG
First Class ADC Flat AUT F ADC
First Class Mixed ADC Flat AUT F MIX
First Class Presorted Flat AUT F PRE
First Class 5-Digit Parcel AUT P 5DG
First Class 3-Digit Parcel AUT P 3DG
First Class ADC Parcel AUT P ADC
Prioity Mail PRI
Priority Mail Flat-rate Small Box PRI SB
Priority Mail Flat-rate Regular Box PRI RB
Priority Mail Flat-rate Large Box PRI LB
Priority Mail Flat-rate Envelope PRI E
Express Mail EXP
Express Mail Flat-rate Envelope EXP E
Bound Printed Matter - Flats BPM F
Bound Printed Matter - Parcels BPM P
Library Mail LIB
Media Mail MED
C.3 Special Services
Extra Service Displayed Text
Dim Wt, Balloon, or PP Oversized DM
Certified CT
COD CO
Delivery Confirmation DC
Insurance IN
Registered RG
Return Receipt RR
Return Receipt for Merchandise RM
Signature Confirmation SC
Nonmachinable Surcharge (letters) NM
Sunday/Holiday Surcharge DS
Postage Add AP
Postage Subtract SP
C-2
Page 41

APPENDIX D: COUNTRY CODE AND ABBREVIATION CHART
Country Abbreviation Code
Afghanistan AFGHANIS 300
Albania ALBANIA 301
Algeria ALGERIA 302
Andorra ANDORRA 303
Angola ANGOLA 304
Anguilla ANGUILLA 305
Antigua and Barbuda ANTIGUA 306
Argentina ARGENTIN 307
Armenia ARMENIA 308
Aruba ARUBA 309
Ascension ASCENSIO 310
Australia AUSTRALI 311
Austria AUSTRIA 312
Azerbaijan AZERBAIJ 313
Bahamas BAHAMAS 315
Bahrain BAHRAIN 316
Bangladesh BANGLADE 317
Barbados BARBADOS 318
Belarus BELARUS 319
Belgium BELGIUM 320
Belize BELIZE 321
Benin BENIN 322
Bermuda BERMUDA 323
Bhutan BHUTAN 324
Bolivia BOLIVIA 325
Bosnia-Herzegovina BOSNIA-H 326
Botswana BOTSWANA 327
Brazil BRAZIL 328
British Virgin Islands VIRGIN I 329
Brunei Darussalam BRUNEI D 330
Bulgaria BULGARIA 331
Burkina Faso BURKINA 332
Burma BURMA 333
Burundi BURUNDI 334
Cambodia CAMBODIA 335
Cameroon CAMEROON 336
Canada CANADA 337
Cape Verde CAPE VER 338
Cayman Islands CAYMAN I 339
Central African Republic CENT AFR 340
Chad CHAD 341
Chile CHILE 342
China CHINA 343
Colombia COLOMBIA 344
D-1
Page 42

Country Abbreviation Code
Comoros COMOROS 345
Congo (Brazzaville), Republic of the CONGO RE 346
Congo, Democratic Republic of the CONGO DE 513
Costa Rica COSTA RI 348
Cote d'Ivoire (Ivory Coast) COTE D'L 349
Croatia CROATIA 350
Cuba CUBA 351
Cyprus CYPRUS 352
Czech Republic CZECH RE 353
Denmark DENMARK 354
Djibouti DJIBOUTI 355
Dominica DOMINICA 356
Dominican Republic DOM REP 357
Ecuador ECUADOR 358
Egypt EGYPT 359
El Salvador EL SALVA 360
Equatorial Guinea EQUATORI 361
Eritrea ERITREA 362
Estonia ESTONIA 363
Ethiopia ETHIOPIA 364
Falkland Islands FALKLAND 365
Faroe Islands FAROE IS 366
Fiji FIJI 367
Finland FINLAND 368
France FRANCE 369
French Guiana FRENCH G 370
French Polynesia FRENCH P 371
Gabon GABON 372
Gambia GAMBIA 373
Georgia, Republic of GEORGIA 374
Germany GERMANY 375
Ghana GHANA 376
Gibraltar GIBRALTA 377
Great Britain and Northern Ireland GREAT BR 378
Greece GREECE 379
Greenland GREENLAN 380
Grenada GRENADA 381
Guadeloupe GUADELOU 382
Guatemala GUATEMAL 383
Guinea GUINEA 384
Guinea-Bissau GUINEA-B 385
Guyana GUYANA 386
Haiti HAITI 387
Honduras HONDURAS 388
Hong Kong HONG KON 389
D-2
Page 43

Country Abbreviation Code
Hungary HUNGARY 390
Iceland ICELAND 391
India INDIA 392
Indonesia INDONESI 393
Iran IRAN 394
Iraq IRAQ 395
Ireland IRELAND 396
Israel ISRAEL 397
Italy ITALY 398
Jamaica JAMAICA 399
Japan JAPAN 400
Jordan JORDAN 401
Kazakhstan KAZAKHST 402
Kenya KENYA 403
Kiribati KIRIBATI 404
Korea, Democratic People's Republic of KOREA DE 405
Korea, Republic of KOREA RE 406
Kuwait KUWAIT 407
Kyrgyzstan KYRGYZST 408
Laos LAOS 409
Latvia LATVIA 410
Lebanon LEBANON 411
Lesotho LESOTHO 412
Liberia LIBERIA 413
Libya LIBYA 414
Liechtenstein LIECHTEN 415
Lithuania LITHUANI 416
Luxembourg LUXEMBOU 417
Macao MACAO 418
Macedonia MACEDONIA 419
Madagascar MADAGASC 420
Malawi MALAWI 422
Malaysia MALAYSIA 423
Maldives MALDIVES 424
Mali MALI 425
Malta MALTA 426
Martinique MARTINIQ 427
Mauritania MAURITAN 428
Mauritius MAURITIU 429
Mexico MEXICO 430
Moldova MOLDOVA 431
Mongolia MONGOLIA 432
Montserrat MONTSERR 433
Morocco MOROCCO 434
Mozambique MOZAMBIQ 435
D-3
Page 44

Country Abbreviation Code
Namibia NAMIBIA 436
Nauru NAURU 437
Nepal NEPAL 438
Netherlands NETHERLA 439
Netherlands Antilles NET ANTI 440
New Caledonia NEW CALE 441
New Zealand NEW ZEAL 442
Nicaragua NICARAGU 443
Niger NIGER 444
Nigeria NIGERIA 445
Norway NORWAY 446
Oman OMAN 447
Pakistan PAKISTAN 448
Panama PANAMA 449
Papua New Guinea PAPUA NE 450
Paraguay PARAGUAY 451
Peru PERU 452
Philippines PHILIPPI 453
Pitcairn Island PITCAIRN 454
Poland POLAND 455
Portugal PORTUGAL 456
Qatar QATAR 457
Reunion REUNION 458
Romania ROMANIA 459
Russia RUSSIA 460
Rwanda RWANDA 461
Saint Christopher and Nevis ST. CHRI 462
Saint Helena SAINT HE 463
Saint Lucia SAINT LU 464
Saint Pierre and Miquelon SAINT PI 465
Saint Vincent and the Grenadines SAINT VI 466
San Marino SAN MARI 467
Sao Tome and Principe SAO TOME 468
Saudi Arabia SAUDI AR 469
Senegal SENEGAL 470
Serbia-Montenegro [Yugoslavia] SERBIA-M 471
Seychelles SEYCHELL 472
Sierra Leone SIERRA L 473
Singapore SINGAPOR 474
Slovak Republic SLOVAK R 475
Slovenia SLOVENIA 476
Solomon Islands SOLOMON 477
Somalia SOMALIA 478
South Africa SOUTH AF 479
Spain SPAIN 480
D-4
Page 45

Country Abbreviation Code
Sri Lanka SRI LANK 481
Sudan SUDAN 482
Suriname SURINAME 483
Swaziland SWAZILAN 484
Sweden SWEDEN 485
Switzerland SWITZERL 486
Syrian Arab Republic SYRIA 487
Taiwan TAIWAN 488
Tajikistan TAJIKIST 489
Tanzania TANZANIA 490
Thailand THAILAND 491
Togo TOGO 492
Tonga TONGA 493
Trinidad and Tobago TRINIDAD 494
Tristan da Cunha TRISTAN 495
Tunisia TUNISIA 496
Turkey TURKEY 497
Turkmenistan TURKMENI 498
Turks and Caicos Islands TURKS & 499
Tuvalu TUVALU 500
Uganda UGANDA 501
Ukraine UKRAINE 502
United Arab Emirates UNITED A 503
Uruguay URUGUAY 504
Uzbekistan UZBEKIST 505
Vanuatu VANUATU 506
Vatican City VATICAN 507
Venezuela VENEZUEL 508
Vietnam VIETNAM 509
Wallis and Futuna Islands WALLIS & 510
Western Samoa W. SAMOA 511
Yemen YEMEN 512
Zambia ZAMBIA 514
Zimbabwe ZIMBABWE 515
D-5
Page 46

APPENDIX E: RATE CHANGE INFORMATION
E.1 RATE CARD UPDATES
When the USPS postage rates change, Triner Scale updates the software. The updates
make sure your scale is current. The rates and operating system reside on the Rate Card,
which is removable from the scale.
To change the rate card, follow the instructions below:
1. Turn the scale’s power switch to the off position.
2. Unplug the A/C adapter power cord from the wall outlet then from the back of the
scale.
3. Carefully remove the rate card compartment cover from the right side of the scale. Use
the groove at the top with a small key or flathead screwdriver to “pop” it open.
4. Remove the rate card. Grasp the rate card with the thumb and forefinger, wiggle side
to side, while puling the card towards you.
5. Install the new Rate Card with the chip side of the module facing the Bottom
scale. Make sure the card is pushed in all the way until it stops.
6. Replace the rate card cover.
7. Plug the A/C Adapter into the wall outlet then into the back of the scale.
8. Turn the scale power on and follow the on screen prompts.
of the
E-1
Page 47

APPENDIX F: ERROR MESSAGES
ERROR MESSAGES
If the scale encounters an error condition, it will display a message alerting the operator.
Most error messages are self-explanatory. Below is a list of typical messages and their
meaning.
Message Meaning
OverWt
Under Weight
Maximum 70 lbs!!
Over Weight Limit
Invalid Zip Code
Invalid Ctry Code
Service Unavailable
Invalid Combination
Invalid Sequence
Indicates that the weight for the class of service selected has
been exceeded.
Indicates that the weight reading is less than zero (negative).
The scale will automatically attempt to re-zero itself.
Indicates more than 70 lbs was entered in manual weight mode.
Indicates that the weighing capacity of the scale has been
exceeded.
Indicates that an invalid ZIP code was entered.
Indicates that an invalid country code was entered.
Indicates that the special service is not valid for the class of mail
selected.
Indicates that the special service is not valid with the current
special service(s) selected.
Indicates the special service is available but another special
service must be selected first. (e.g. Return Receipt selected
prior to Certified)
Value Under Limit
Value Over Limit
Meter Unavailable
Indicates that the value entered for insurance, registered mail or
COD is under the limit.
Indicates that the value entered for insurance, registered mail or
COD is over the limit.
Indicates a postage meter is not connected or communication
has been disrupted.
F-1
Page 48

APPENDIX G: LATITUDE ZONE GUIDE
G.1 Locating your Latitude Zone
To obtain your local Latitude Zone number, refer to the following Latitude Zone
Maps.
G-1
Page 49

G-2
Page 50

TRINER SCALE & MFG. CO, INC.
LIMITED WARRANTY
What is Covered: Triner Scale & Mfg. Co. Inc. warrants to the first end user customer of the Triner Scale
product enclosed with this limited warranty statement that the product, if purchased and used in the United
States, conforms to the manufacturer’s specifications and will be free from defects in workmanship and
materials for a period of two (2) years from the date of original purchase.
What Triner Scale Will Do to Correct Problems: Should your Triner Scale product prove defective during
the warranty period, please call Triner Scale at (800) 238-0152 for warranty repair instructions and return
authorization. Triner Scale will, at its option, repair or replace on an exchange basis the defective unit as
follows:
PARTS
New or comparable rebuilt parts in exchange for defective parts for two (2) years after original purchase.
LABOR
Carry-In or mail in service for six (6) months from the date of original purchase. Labor and shipping cost after
the six-month period will be charged to you.
If you are authorized by Triner Scale to ship the product to Triner Scale for repair, it is your responsibility to
securely package the product in its original container or an equivalent and provide proof of the date of
original purchase. You will be responsible for shipping costs to Triner Scale repair facility. When warranty
service involves the exchange of the product or a part, the exchanged product may be new or previously
repaired to the Triner Scale standard of quality. Exchange or replacement products or parts assume the
remaining warranty period of the product covered by this limited warranty.
What this Warranty Does Not Cover: This warranty covers only consumer use in the United States. Triner
Scale is not responsible for warranty service should the Triner Scale label or logo or the serial number be
removed or the product fail to be properly maintained or fail to function properly as a result of misuse, abuse,
improper installation, neglect, improper shipping, damage caused by disasters such as fire, flood, and
lightning, improper electrical current, interaction with non-Triner Scale products, or service other than a
Triner Scale Authorized Service. Packaging and shipping costs incurred in presenting your Triner Scale
product for warranty service are your responsibility. If a claimed defect cannot be identified or reproduced in
service, you will be held responsible for costs incurred.
THE WARRANTY AND REMEDY PROVIDED ABOVE ARE EXCLUSIVE AND IN LIEU OF ALL OTHER
EXPRESS OR IMPLIED WARRANTIES INCLUDING, BUT NOT LIMITED TO, THE IMPLIED WARRANTIES
OF MERCHANTABILITY OR FITNESS FOR A PARTICULAR PURPOSE. SOME LAWS DO NOT ALLOW
THE EXCLUSION OF IMPLIED WARRANTIES. IF THESE LAWS APPLY, THEN ALL EXPRESS AND
IMPLIED WARRANTIES ARE LIMITED TO THE WARRANTY PERIOD IDENTIFIED ABOVE. UNLESS
STATED HEREIN, ANY STATEMENTS OR REPRESENTATIONS MADE BY ANY OTHER PERSON OR
FIRM ARE VOID. EXPECT AS PROVIDED IN THIS WRITTEN WARRANTY, NEITHER TRINER SCALE &
MFG. CO. INC. NOR ITS AFFILIATES SHALL BE LIABLE FOR ANY LOSS, INCONVENIENCE, OR
DAMAGE, INCLUDING DIRECT, SPECIAL, INCIDENTAL OR CONSEQUENTIAL DAMAGES, RESULTING
FROM THE USE OR INABILITY TO USE THE TRINER SCALE PRODUCT, WHETHER RESULTING
FROM BREACH OF WARRANTY OR ANY OTHER LEGAL THEORY.
No terms, condition, understanding, or agreements, purporting to modify the terms of this warranty shall
have any legal effect unless made in writing and signed by a corporate officer of the seller. This warranty
gives you specific legal rights, and you my have other rights which vary from jurisdiction to jurisdiction.
TRINER SCALE & MANUFACTURING COMPANY INC.
8411 Hacks Cross Road
Olive Branch, MS 38654-4010
Tel (662) 890-2385 • Fax (662) 890-2386
Page 51

 Loading...