

Page 1
ASSEMBLY GUIDE
TS60-1010 Platform Scale
Series 2
V 2.0
Page 2

Assembly Guide TS60-1010 Platform Scale
1
TABLE OF CONTENTS
OVERVIEW
General Specifications ................................................................................................................1
Cautions and Disclaimers...........................................................................................................1
Contents of Kit ............................................................................................................................1
Tools Required For Assembly....................................................................................................2
Time Required to Assemble .......................................................................................................2
ASSEMBLING THE SCALE
1) Attach the Six Feet to the Load Cells ..................................................................................3
2) Place Side Rails Onto Wood Blocks and Position as Required ........................................3
3) Loosely Bolt the First Weighing Deck Onto the Side Rails...............................................3
4) Route the Six Load Cell Cables Out the Left Side Rail Cable Exit Hole.........................4
5) Loosely Bolt the Second Weighing Deck Onto the Side Rails...........................................4
6) Securely Bolt Down the Entire Weighing Deck/Side Rails Assembly..............................4
7) Attach and Securely Fasten the Two Guard Rails.............................................................5
8) Connect All Load Cell Cables Into the Junction Box Terminals .....................................5
9) Connect the Digital Indicator Cable Lead Into the Junction Box Terminal...................5
10) Mount the Junction Box.......................................................................................................5
11) Attach the Ramps to the Weighing Base ............................................................................6
12) Adjust the Load Cell Feet to Assure the Weighing Deck is Level and Stable.................6
13) Connect the Digital Indicator and Check Operation of Scale ..........................................6
14) Bolt Down Both Ramps to the Concrete Floor ..................................................................7
15) Bolt Down the Four Deck Top Access Panels ....................................................................7
16) Bolt Down the Indicator Stand to the Concrete Floor ......................................................7
© Triner Scale & Mfg. Co., Inc. All rights reserved.
Cannot be copied in whole or part without permission.
Page 3

Assembly Guide TS60-1010 Platform Scale
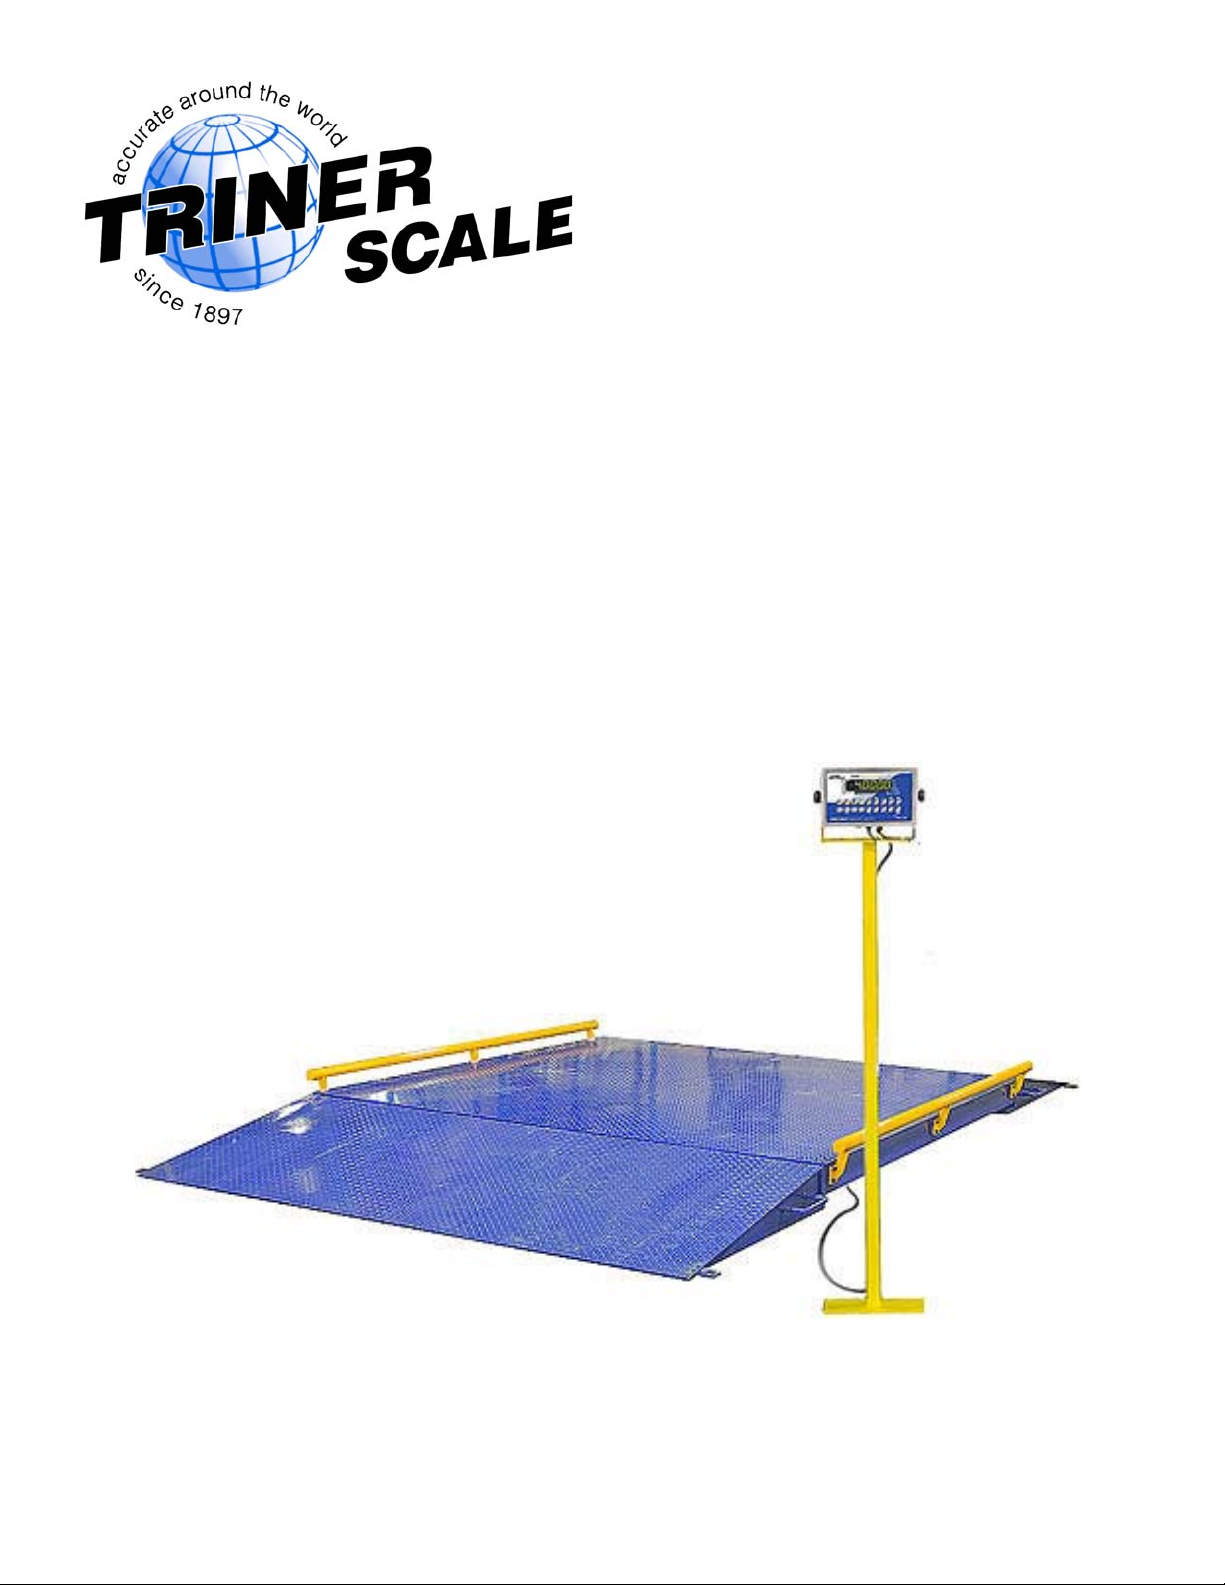
Triner Scale Model TS60-1010 Series 2 Platform Scale
OVERVIEW
General Specifications
• Platform Size:
10' (L) x 10' (W) x 8.5" (H)
• Ramps: 49" (L) x 10' (W) x 8.5" (H)
• Capacity: 60,000 lb x 20 lb
• Six Premium Alloy Steel Nickel Plated Loadcells
• Loadcells Are Rated IP67, Suitable for Typical Outdoor Environments
• Loadcell Capacity is 2 times the Scale Capacity
• Built in Overload Protection
• NEMA 4x Stainless Steel Watertight Junction Box
Cautions and Disclaimers
Heavy Components:
Use caution when handling heavy components, as they can cause injury.
Forklift Safety:
Use of a forklift is required during scale assembly. It is the user’s responsibility to observe and
practice forklift safety rules.
Electrical Safety:
Wiring connections are required during assembly. It is the user’s responsibility to observe and
practice electrical safety rules.
Not Responsible For Any Personal or Property Damage:
Correct assembly and correct use of the scale is the user’s responsibility. Triner Scale is not
responsible for any personal or property damage incurred during assembly of the scale, or during
use of the scale.
Contents of Kit
2) Side Rail Beams
6) Load Cell Feet
2) Weighing Deck Modules
4) Top Deck Access Panels
2) Ramps
1) Indicator Stand
1) Digital Indicator
1) Junction Box
1) Connecting Cable for Digital Indicator
4) ¾” Concrete Bolts
4) ½” Concrete Bolts
Assembly Bolts
Misc. Wooden Blocks
Page 4

Assembly Guide TS60-1010 Platform Scale
Tools Required For Assembly
Forklift
Impact Wrench
19mm Socket Wrench
30mm Socket Wrench
5 lb Rubber Mallet
Long pry bar
5/16” Allen wrench
Standard Size Flat Head Screw Driver
Small Flat Head Screw Driver
Hammer Drill: ¾” bit & ½” bit
Adjustable Wrench or 27mm Wrench
Time Required to Assemble
4-5 hours
Page 5

Assembly Guide TS60-1010 Platform Scale
ASSEMBLING THE SCALE
1) Attach the Six Feet to the Load Cells
Locate the 2 Side Rails and the 6 load cell feet. Screw the feet into each of the 6 load cell
locations on the underside of the Side Rails. Do not screw the feet all the way in; leave
approx. 1” of exposed thread. Screw in the middle foot of each rail further than the two
end feet, leaving approx. ¼” or less of exposed threads.
NOTE: After the scale assembly is complete, the 4 corner feet are adjusted first, then the
2 middle feet are adjusted down as needed to solidly contact the floor.
2) Place Side Rails Onto Wood Blocks and Position as Required
SYNOPSIS:
The Left Side Rail and Right Side Rail are forklifted into position, resting temporarily on
the wooden blocks that shipped with the palletized components. The weighing platforms
will also rest on the wooden blocks during the assembly process.
Place four wooden blocks into position where each side rail will be placed. Forklift the
side rails into position, resting it on top of the blocks. Position the side rails parallel to
each other. Space the rails 10’ 4” apart, allowing room for the two 10 ft. wide weighing
platforms to be placed between the rails.
Center the rails on the blocks to assure that the rails will be stable and that the weighing
decks will also be well supported by the blocks during assembly.
NOTE: The side rails are not interchangeable. Be sure to position them correctly.
Refer to Fig. 1b for placement guidance.
3) Loosely Bolt the First Weighing Deck Onto the Side Rails
SYNOPSIS:
The first of the two weighing decks is forklifted into position and loosely bolted into
place.
IMPORTANT!
Before beginning with assembly of the scale, thoroughly read and
understand this Assembly Guide.
Review the illustration Figures 1a and 1b in the Appendix section.
Become familiar with the basic configuration of the weighing deck and
the identifying markings on the components.
All figures containing the supporting illustrations and photos are
located in the Appendix section in the back of this guide.
Page 6

Assembly Guide TS60-1010 Platform Scale
Forklift Weighing Deck #1 into position between the rails, and gently lower the deck
down onto the wooden blocks. Be sure to accurately line up the front edge of the deck to
the front edge of both side rails.
Loosely bolt the weighing deck to the side rails.
NOTE: Only use short bolts when bolting next to a load cell!
Refer to Fig. 1c.
4) Route the Six Load Cell Cables Out the Left Side Rail Cable Exit Hole
SYNOPSIS:
Load cell cables in the Left Side Rail are fed out the cable exit hole. Load cell cables in
the Right Side Rail are routed across the rear beam of the first weighing deck, and fed
out through the Left Side Rail able exit hole.
a) Route the Cables in Left Side Rail Out the Cable Exit Hole
Unbundle the three load cell cables in the rail. Route the cables under the rail’s top plates
and feed the cables out the exit hole located in the center of the rail’s outside wall.
b) Route the Cables in the Right Side Rail Over to, and Through the Left Side Rail
Cable Exit Hole
Unbundle the three load cell cables in the rail. Route the cables under the rail’s top plates
and out the cable exit hole, then across the rear beam of the first weighing deck, being
sure to feed the cables through the three cable guides on the beam.
Feed all six cables out the cable exit hole on the outside wall of the Left Side Rail.
NOTE: All cables need to have a 20” to 30” length protruding from the exit hole to allow
for making connections into the junction box.
5) Loosely Bolt the Second Weighing Deck Onto the Side Rails
SYNOPSIS:
The second weighing deck is forklifted into position and loosely bolted into place
Forklift the second weighing deck into position, with the top deck slightly overlapping
the rear beam of the first weighing deck in order to mate up the bolt holes.
Loosely bolt the weighing deck onto the side rails.
NOTE: Only use short bolts when bolting next to a load cell!
Refer to Fig. 1c.
6) Securely Bolt Down the Entire Weighing Deck/Side Rails Assembly
Tighten down all bolts connecting the side rails to the weighing decks. Before fully
tightening any bolts, lightly tighten the bolts located at far ends of the rails, and work
Page 7

Assembly Guide TS60-1010 Platform Scale
around the scale, alternating from side to side in order to gradually bring all components
together in a proper fit.
Before final tightening, loosely bolt down the top plate, then fully tighten after the
rail/platform bolts have been secured.
7) Attach and Securely Fasten the Two Guard Rails
Attach both guard rails using the bolts provided. Securely tighten all bolts.
8) Connect All Load Cell Cables Into the Junction Box Terminals
SYNOPSIS:
All load cell cables are numbered near the loose wire end of the cable. All terminal
blocks in the junction box are numbered. Each cable connects to the corresponding
terminal block.
a) Feed Load Cell Cable #1 Into the Junction Box and Connect Wires to the #1
Terminal Block
Feed the load cell wires through strain relief for the #1 terminal block. Following the
wiring diagram in Fig. 7, connect the five wire leads to the terminal block. Securely
tighten the strain relief collar to lock the cable into position.
b) Feed Load Cell Cables 2 – 6 Into the Junction Box and Connect All Wires to the
Terminal Blocks
Following the procedure outlined above, connect all load cell cable wires to the junction
box.
9) Connect the Digital Indicator Cable Lead Into the Junction Box Terminal
SYNOPSIS:
The digital indicator cable has loose wires on one end for connecting into the junction
box. The other end of the cable has a threaded connector that mates to the short cable
attached to the digital indicator.
Feed the digital indicator cable wires through the strain relief for the terminal block.
Following the wiring diagram in Fig. 7, connect the five wire leads to the terminal block.
Securely tighten the strain relief collar to lock the cable into position.
10) Mount the Junction Box
Using the provided screws, mount the junction box to Side Rail #1 as shown in Fig. 8.
Push all excess slack cable back into the exit hole as shown in Fig. 8.
Using the provided screws, securely fasten the junction box cover onto the box.
Page 8

Assembly Guide TS60-1010 Platform Scale
11) Attach the Ramps to the Weighing Base
SYNOPSIS:
The ramps are placed into position at the end of the weighing deck, then the weighing
deck is lowered to the floor, one corner at a time. The two load cell feet at the end of the
weighing deck fit into holes in the ramp tabs, as shown in Fig. 9.
a) ALIGN THE FIRST RAMP: Using a forklift, position the ramp near the weighing
deck so that the large tabs are aligned with the feet located at the end of the weighing
deck, as shown in Fig. 10.
b) LOWER ONE CORNER OF THE WEIGHING DECK INTO THE LOAD CELL
FOOT HOLE: Using a 5 lb rubber mallet, strike the handle of the ramp to move the ramp
into position directly under the load cell foot (alternatively, a long pry bar may be used to
move the ramp into final position). Using a forklift, lift the end of the weighing deck
enough to remove the end block(s), then slowly lower the deck into position, making sure
the load cell foot fits into the foot hole in the ramp tab.
NOTE: If required, rearrange the blocks in a way so as each corner of the weighing deck
can be individually lowered into the ramp tab foot holes.
c) LOWER THE OTHER CORNER OF THE WEIGHING DECK INTO THE
REMAINING LOAD CELL FOOT HOLE OF THE SAME RAMP: Follow the
instructions in Step b above to complete the attachment of the ramp to the weighing deck.
d) FOLLOW STEPS A THROUGH C ABOVE TO ATTACH THE SECOND RAMP
TO THE WEIGHING DECK. After both ramps are attached, the weighing deck will be
fully lowered to the floor.
12) Adjust the Load Cell Feet to Assure the Weighing Deck is Level and Stable
a) ADJUST THE FOUR CORNER FEET: Using a 27 mm wrench, adjust the corner feet
as needed to obtain a level weighing deck. Be sure the weighing deck does not rock or tilt
from corner to corner.
b) ADJUST THE TWO MIDDLE FEET: Using a 27 mm wrench, adjust the two middle
feet downward until a solid contact is made with the floor.
13) Connect the Digital Indicator and Check Scale Operation
a) MOUNT THE INDICATOR BRACKET TO THE INDICATOR STAND: Using the
provided bolts, bolt the indicator bracket to the indicator stand. Place the stand in the
desired location of use.
b) CONNECT THE DIGITAL INDICATOR TO THE WEIGHING DECK: Connect the
digital indicator cable lead from the junction box to the short cable lead from the digital
indicator. Plug the digital indicator in to 110VAC. Check operation of the scale and
digital indicator.
Page 9

Assembly Guide TS60-1010 Platform Scale
14) Bolt Down Both Ramps to the Concrete Floor
Using a hammer drill, drill 3/4” holes into the concrete for anchoring the floor mounting
tabs to the floor. Use the provided concrete anchors and securely fasten all four ramps
tabs to the floor.
15) Bolt Down the Four Deck Top Access Panels
Securely bolt down the access panels, lightly tightening the four corner bolts on the
panel, then working from side to side tightening the other bolts. Secrely tighten all bolts.
16) Bolt Down the Indicator Stand to the Concrete Floor
Using a hammer drill, drill four 1/2” holes into the concrete for anchoring the indicator
stand to the floor. Use the provided concrete anchors and securely fasten the indicator
stand to the floor.
Assembly of the scale is now complete, as shown in Fig. 11.
Page 10

Assembly Guide TS60-1010 Platform Scale
Appendix
i
Figure 1a
COMPLETE ASSEMBLY
Page 11

Assembly Guide TS60-1010 Platform Scale
Appendix
ii
Figure 1b
WEIGHING DECK ASSEMBLY
Page 12

Assembly Guide TS60-1010 Platform Scale
Appendix
iii
Figure 1c
RAMP MOUNTING TABS AND HANDLING PRECAUTIONS
Page 13

Assembly Guide TS60-1010 Platform Scale
Appendix
iv
Figure 2
PLACE SIDE RAILS ONTO WOOD BLOCKS
Figure 3
PLACE THE FIRST DECK INTO POSITION AND LOOSELY BOLT TO SIDE RAILS
Page 14

Assembly Guide TS60-1010 Platform Scale
Appendix
v
Figure 4
ONLY USE SHORT BOLTS NEXT TO LOAD CELLS
Figure 5
ROUTING THE LOAD CELL CABLES
Page 15

Assembly Guide TS60-1010 Platform Scale
Appendix
vi
Figure 6
PLACE THE SECOND DECK INTO POSITION AND LOOSELY BOLT TO
SIDE RAILS
Page 16

Assembly Guide TS60-1010 Platform Scale
Appendix
vii
Figure 7
JUNCTION BOX, Wiring Diagram
Page 17

Assembly Guide TS60-1010 Platform Scale
Appendix
viii
Figure 8
JUNCTION BOX, Attached at Side Rail #1
Figure 9
ALIGN RAMP TAB TO WEIGHING DECK LOAD CELL FOOT
Page 18

Assembly Guide TS60-1010 Platform Scale
Appendix
ix
Figure 10
MOVE RAMP INTO POSITION UNDER WEIGHING DECK LOAD CELL FOOT
Figure 11
FULLY ASSEMBLED SCALE
Page 19

TRINER SCALE & MFG. CO.
LIMITED WARRANTY
What is Covered: Triner Scale & Mfg. Co. Inc. warrants to the first end user customer of the Triner Scale product
enclosed with this limited warranty statement that the product, if purchased and used in the United States,
conforms to the manufacturer’s specifications and will be free from defects in workmanship and materials for a
period of two (2) years from the date of original purchase.
What Triner Scale Will Do to Correct Problems: Should your Triner Scale product prove defective during the
warranty period, please call Triner Scale at (800) 238-0152 for warranty repair instructions and return
authorization. Triner Scale will, at its option, repair or replace on an exchange basis the defective unit as follows:
PARTS
New or comparable rebuilt parts in exchange for defective parts for one (1) year after the date of original
purchase.
LABOR
Carry-In or mail in service for six (6) months from the date of original purchase. Labor and shipping cost after the
six-month period will be charged to you.
If you are authorized by Triner Scale to ship the product to Triner Scale for repair, it is your responsibility to
securely package the product in its original container or an equivalent and provide proof of the date of original
purchase. You will be responsible for shipping costs to Triner Scale repair facility. When warranty service involves
the exchange of the product or a part, the exchanged product may be new or previously repaired to the Triner
Scale standard of quality. Exchange or replacement products or parts assume the remaining warranty period of
the product covered by this limited warranty.
What this Warranty Does Not Cover: This warranty covers only consumer use in the United States. Triner Scale
is not responsible for warranty service should the Triner Scale label or logo or the serial number be removed or
the product fail to be properly maintained or fail to function properly as a result of misuse, abuse, improper
installation, neglect, improper shipping, damage caused by disasters such as fire, flood, and lightning, improper
electrical current, interaction with non-Triner Scale products, or service other than a Triner Scale Authorized
Service. Packaging and shipping costs incurred in presenting your Triner Scale product for warranty service are
your responsibility. If a claimed defect cannot be identified or reproduced in service, you will be held responsible
for costs incurred.
ANY MODIFICATION OF ANY COMPONENT OTHER THAN FACTORY PERFORMED OR FACTORY
APPROVED WILL RENDER THIS WARRANTY NULL AND VOID.
THE WARRANTY AND REMEDY PROVIDED ABOVE ARE EXCLUSIVE AND IN LIEU OF ALL OTHER
EXPRESS OR IMPLIED WARRANTIES INCLUDING, BUT NOT LIMITED TO, THE IMPLIED WARRANTIES OF
MERCHANTABILITY OR FITNESS FOR A PARTICULAR PURPOSE. SOME LAWS DO NOT ALLOW THE
EXCLUSION OF IMPLIED WARRANTIES. IF THESE LAWS APPLY, THEN ALL EXPRESS AND IMPLIED
WARRANTIES ARE LIMITED TO THE WARRANTY PERIOD IDENTIFIED ABOVE. UNLESS STATED HEREIN,
ANY STATEMENTS OR REPRESENTATIONS MADE BY ANY OTHER PERSON OR FIRM ARE VOID.
EXPECT AS PROVIDED IN THIS WRITTEN WARRANTY, NEITHER TRINER SCALE & MFG. CO. INC. NOR
ITS AFFILIATES SHALL BE LIABLE FOR ANY LOSS, INCONVENIENCE, OR DAMAGE, INCLUDING DIRECT,
SPECIAL, INCIDENTAL OR CONSEQUENTIAL DAMAGES, RESULTING FROM THE USE OR INABILITY TO
USE THE TRINER SCALE PRODUCT, WHETHER RESULTING FROM BREACH OF WARRANTY OR ANY
OTHER LEGAL THEORY.
No terms, condition, understanding, or agreements, purporting to modify the terms of this warranty shall have any
legal effect unless made in writing and signed by a corporate officer of the seller. This warranty gives you specific
legal rights, and you my have other rights which vary from jurisdiction to jurisdiction.
TRINER SCALE & MANUFACTURING COMPANY INC.
8411 Hacks Cross Road
Olive Branch, MS 38654-4010
Tel (662) 890-2385 • Fax (662) 890-2386
Page 20

 Loading...