

Page 1

PC DataLog
Software
User’s Guide
10/12/2011
Revision 1.0
Page 2

©Triner Scale & Mfg. Co, Inc. 2011. All rights reserved.
The information contained herein is the property of Triner Scale and is supplied without
liability for errors or omissions. No part may be reproduced or used except as authorized
by contract or other written permission. The copyright and the foregoing restriction on
reproduction and use extend to all media in which the information may be embodied.
Contents subject to change without notice.
Triner Scale & Mfg. Co, Inc.
8411 Hacks Cross Rd
Olive Branch, MS 38654
Phone: 1-800-238-0152
Email: info@trinerscale.com
Page 3

TABLE OF CONTENTS
Page
Chapter 1: Introduction.................................................................................................................. 1-1
1.1 System Requirements................................................................................................... 1-2
1.2 Package and CD Contents............................................................................................ 1-2
1.3 Software Installation ...................................................................................................... 1-2
1.4 Indicator Preparation..................................................................................................... 1-2
1.5 Connecting The Digital Indicator To The Computer ..................................................... 1-3
1.5.1 Connecting TS-700 MS To The Computer ...................................................... 1-3
1.5.2 Connecting TS-700 WB To The Computer ...................................................... 1-3
1.5.3 Connecting TS-700 SS To The Computer ....................................................... 1-3
Chapter 2: Using The Software.................................................................................................... 2-1
2.1 Setting Up The COM Port ............................................................................................. 2-1
2.2 Controlling The Indicator With DataLog Software......................................................... 2-2
2.3 Selecting or Creating a File........................................................................................... 2-2
2.3.1 Creating a File .................................................................................................. 2-2
2.3.1 Selecting a File................................................................................................. 2-2
2.4 Changing Column Headers........................................................................................... 2-2
2.5 Logging Weigh Data...................................................................................................... 2-2
2.5.1 Delete a Row in DataLog Window ................................................................... 2-3
2.6 Printing the DataLog Window........................................................................................ 2-3
2.7 Calibration # .................................................................................................................. 2-3
2.8 Opening Logged Data Files With Excel ........................................................................ 2-3
Appendix A: Troubleshooting
A.1 Troubleshooting Guide.................................................................................................. A-1
.......................................................................................................... A-1
Page 4
Page 1-1
1.0 INTRODUCTION
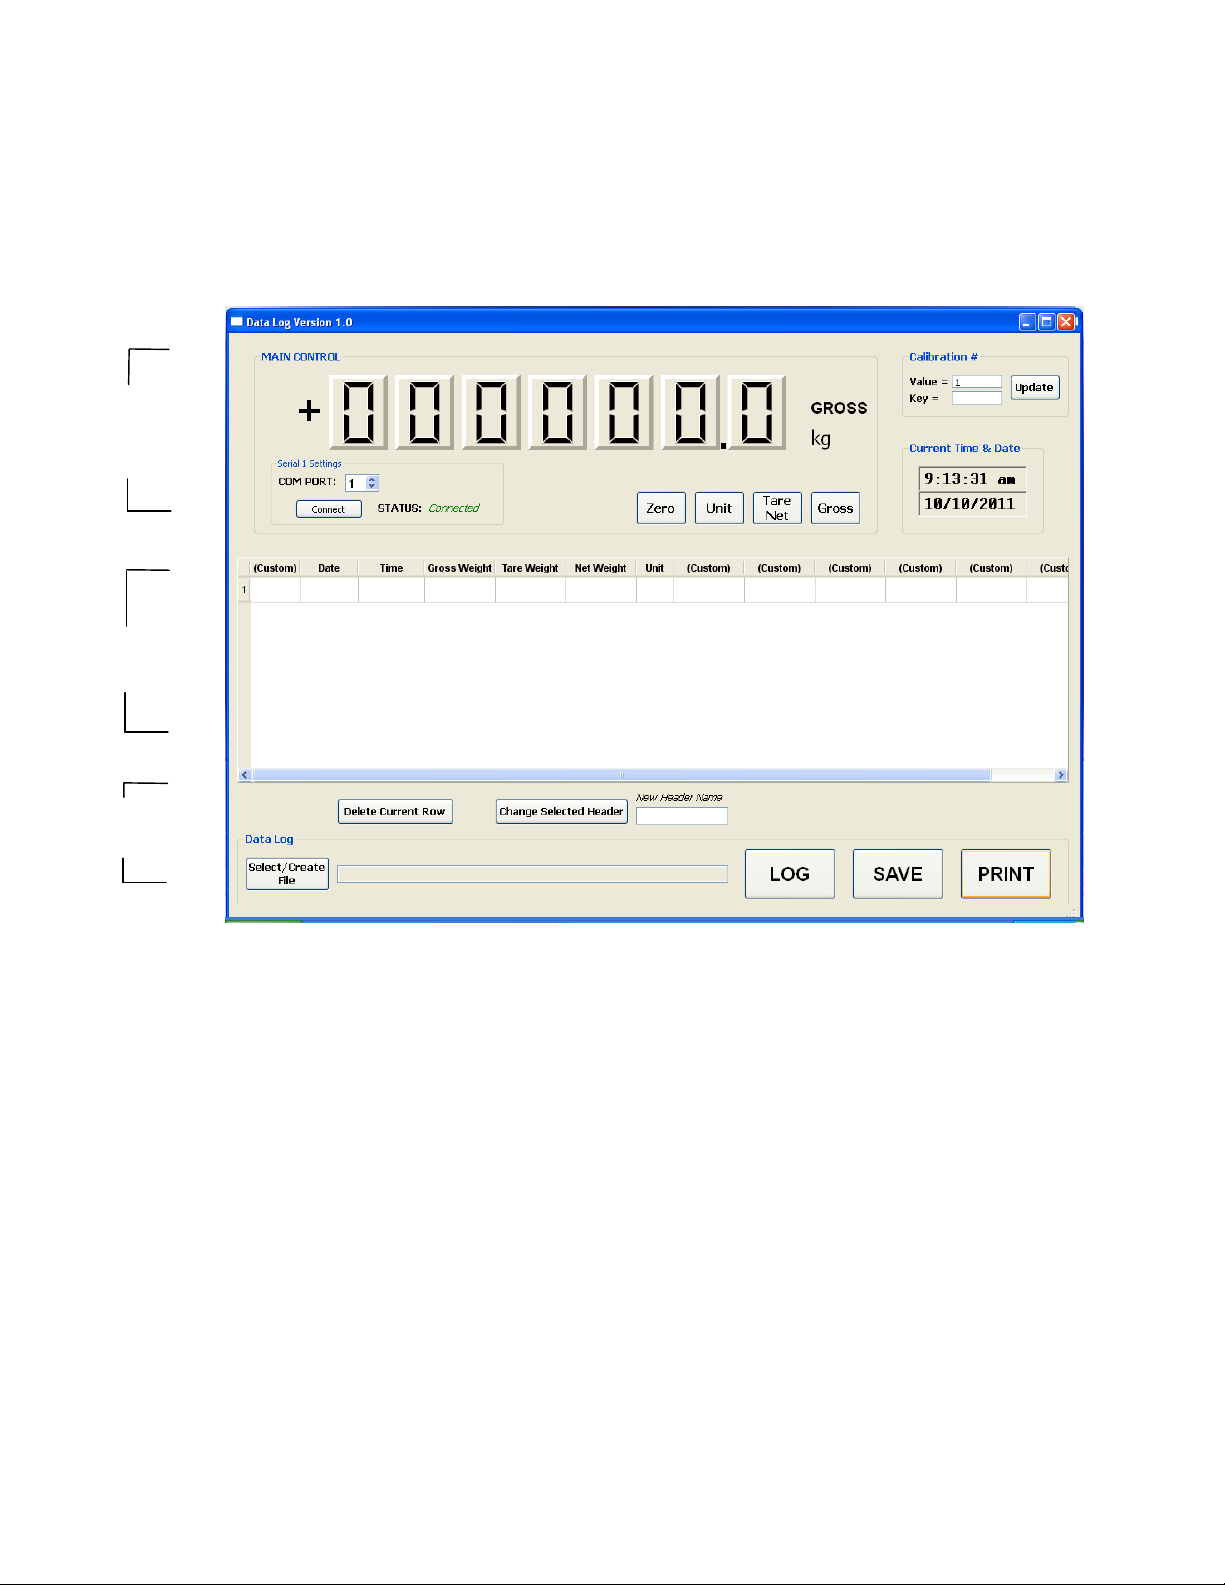
Thank you for using PC DataLog software for your indicator. The software is designed to
be easy for anyone to set up and use quickly. The software integrates all functions on
one main screen as shown below.
Here are the major functions the software provides:
• Easy to use single screen software interface
• Weight window displays the scale weight on your computer screen
• Ability to control your scale functions from within the computer software (Zero,
Unit, Tare, Gross)
• Log, save, and print weight readings with a click of a button
• Simple spreadsheet embedded in the software
• Log data in the embedded spreadsheet can be saved and retrieved
• Up to seven column headings can be customized to suit your individual
requirements
• Saved log data can be easily imported into another spreadsheet program such
as Microsoft Excel
Weight Display
and
Main Controls
Logged Data
Window
Logging and
Saving Data
Page 5

Page 1-2
1.1. System Requirements
Below is a list of system requirements needed to be able to use the DataLog
Software:
• PC running Windows 7, Windows Vista or Windows XP
• 250 MB of free disk space
• 128MB of RAM
• One RS-232 Serial Adapter Port on the PC, Standard 9 pin male or a 1 Port
USB to Serial Adapter
• One PC to Indicator RS-232 Cable (Supplied with the software package)
• One of the following compatible Digital Indicators:
o TS-700 MS
o TS-700 SS
o TS-700 WB
1.2. Package and CD Contents
• DatalogSetup: Setup program used to install the DataLog software
• License agreement
• User Manual
• Computer Interface Cable
1.3. Software Installation
1. Insert the CD into the computer CD drive.
2. The setup program will automatically run.
3. Follow the on screen instructions to complete the installation.
Note: The software can be uninstalled by running Uninstall DataLog in the
program folder.
1.4. Indicator Preparation
The digital indicator parameters need to be configured properly to work with the
DataLog software. Refer to the indicator User’s Guide that came with your scale for
instructions on how to configure the parameters.
The two parameters that need to be set are shown in the table below.
Parameter
Function
Option
C18
Communication Setting
Set this parameter to 3.
(Command request method;
connect to computer).
C19
Baud Rate
Set this parameter to 3 (9600).
1.5. Connecting The Digital Indicator To The Computer
Page 6

Page 1-3
The digital indicator must be connected to the computer’s RS-232 Serial Adapter
Port using the supplied interface cable.
1.5.1. Connecting TS-700 MS To The Computer
When connecting the TS-700 MS to the PC, use the cable included with your
software package.
1. With the power off, connect the male end of the cable to the female port
on the digital indicator.
2. Connect the female end of the cable to the male RS-232 Serial Adapter
Port on the computer.
3. Tighten the thumb screws on both ends of the cable to secure the
connection.
1.5.2. Connecting TS-700 WB To The Computer
When connecting the TS-700 WB to the PC, use the cable included with your
software package.
1. With the power off, connect the circular end of the cable to the three-pin
port on the digital indicator. Tighten the round collar to secure the
connection.
2. Connect the female end of the cable to the male RS-232 Serial Adapter
Port on the computer.
3. Tighten the thumb screws to secure the connection.
1.5.3. Connecting TS-700 SS To The Computer
When connecting the TS-700 SS to the PC, use the cable included with your
software package. The cable has three labeled leads on one end. The three
leads need to be connected to the wiring block mounted inside the digital
indicator enclosure.
1. Make sure the power cord is disconnected from the indicator and that the
unit is turned off.
2. To gain access to the inside of the indicator, remove the screws that
secure the back panel to the indicator enclosure.
3. Carefully open the back panel to gain access to the main board. Note:
There may be wires attached to the battery so be careful not to pull on
these wires.
4. Loosen the cable fitting nut and feed the RS-232 cable through as shown
in figure 1.
5. Using a small flat head screwdriver loosen the three screws on the wiring
block.
6. Match the labeled wires to the corresponding terminal as shown in figure
1.
Page 7

Page 1-4
7. Insert each wire into the corresponding terminal and tighten each screw
to secure the wire. Note: When connecting the wires, make sure the bare
ends of the wires are connected to the terminals.
8. Tighten the cable fitting nut to secure the cable in place.
9. Replace the back panel being careful not to pinch any wires between the
back panel and the enclosure.
10. Connect the female end of the cable to the male RS-232 Serial Adapter
Port on the computer.
11. Tighten the thumb screws to secure the connection.
Supplied RS-232 Cable Wiring Block Located Inside TS-700 SS
FIGURE 1
Page 8

2.0 USING THE SOFTWARE
2.1 Setting Up The COM Port
In order for the computer to communicate with the digital indicator the proper COM port
must be selected in the DataLog software. Follow the steps below.
1. Make sure the digital indicator is turned on and connected to your PC.
2. Open the DataLog software. (Start > All Programs > DataLog)
3. Click the “Connect” button on the DataLog screen.
4. If the status says “Connected” (in green) then the connection was successful and
the software is ready to use.
5. If the status says “Not Connected” (in red) then the connection was unsuccessful.
Try changing the COM port to the next number in the drop down menu then go
back to step 3 above.
Note: If you are having trouble, use the Device Manager in Windows to find valid COM
port(s). Below is an example for Windows XP.
1. Click on My Computer.
2. Select “View System Information”
3. Select the “Hardware” tab.
4. Select the “Device Manager”.
5. In the Device Manager click on Ports (Com & LPT).
6. Under Ports you should see all valid Communications Ports as shown below.
Page 2-1
Page 9

2.2 Controlling the Indicator With DataLog Software
Once connection status says “Connected” in green, the software is ready to use. The
indicator can be controlled within the DataLog software. Below are the functions that can
be controlled from within the software.
Button Button Function
Zero Sets the weight to zero.
Unit Changes the weighing units from pounds (Lbs) to kilograms (Kg).
Tare
Net
Tares the weight on the scale and sets the indicator to NET mode.
Gross Changes the indicator back to GROSS mode and removes the tare weight.
2.3 Selecting or Creating a File
Before weigh data can be logged, a file must be selected or created.
2.3.1 Creating a File
To create a file, click the “Select/Create File” button. The Select or Create a File
dialog box will open. Navigate to the folder where you want your file saved or
create a new folder. Type the new file name then click the “Open” button.
2.3.2 Selecting a File
To select a file, click the “Select/Create File” button. The Select or Create a File
dialog box will open. Select an existing file then click the “Open” button.
2.4 Changing Column Headers
There are seven configurable column headers that you can change to give you more
flexibility when logging information. The following headers cannot be changed: Date,
Time, Gross Weight, Tare Weight, Net Weight, and Units.
Use the following procedure to change the desired column headers:
1. Type a new header name in the “New Header Name” box.
2. Select the column in which to change.
3. Click the “Change Selected Header” button.
4. The change header dialog box will appear. Click “Yes” to change the selected
header or “No” to cancel.
5. Repeat the process to change any other column headers.
2.5 Logging Weigh Data
Once connection status says “Connected” in green, and you have either selected or
created a file, you can begin to log data into the built in spreadsheet. Below are the
steps for logging data.
Page 2-2
Page 10

1. Load the scale with the weight.
2. Click on the “Log” button on the main screen.
3. The weight data will appear in the first row of the DataLog window. The weigh
data includes Date, Time, Gross Weight, Tare Weight, Net Weight, and Units.
4. If desired, manually input any other data you would like in the remaining cells.
5. Press the “Save” button to save your data.
The data along with the current headers is saved in the form of a text file with a comma
delimiter.
2.5.1 Delete a Row in DataLog Window
To delete a row in the spreadsheet, select the row to be deleted and press the
“Delete Current Row” button. The Delete Row dialog box is displayed; press the
“Yes” button to delete the selected row. Press the “No” button to cancel.
2.6 Printing the DataLog Window
Press the “Print” button to print a snapshot of the DataLog window to your default printer.
Note: The software will only print what is visible on the screen at the time the “Print”
button is clicked.
2.7 Calibration #
The calibration number can be used to “software adjust” the reading from the indicator.
For example, if the indicator displays 100.0 lbs, and if the calibration # value is set to .99,
then the software will register 100.0 x 0.99= 99.0. The password for changing the
calibration is 12345. The default calibration # value should be set to 1.
NOTE: Only let authorized personnel change this number.
2.8 Opening Logged Data Files With Excel
For more robust printing and reporting it is recommended that you open the file with
Excel. When opening the file in Excel, under file types, select Text Files. Excel will
prompt that the file type is delimited. Select comma as the delimiter then follow the Excel
prompts to open the file.
Page 2-3
Page 11

APPENDIX A: TROUBLESHOOTING
A.1 Troubleshooting Guide
Problem
The weight reading is not
functioning on my PC.
The weight reading on
my PC does not match
the indicator weight
reading.
Connection status
changes from
“connected” to
“disconnected” after a
period of time.
Corrective Action
• Make sure the COM port number is set correctly
• Press the Connect button
• Check all cable connections
• Make sure a compatible indicator is being used
• Make sure the indicator’s configuration is setup correctly
• Use the cable provided with your CD from Triner Scale
• Make sure the Calibration # value is set to 1.0.
• Make sure the indicator did not get turned off
• The auto shutoff feature may be enabled on the
indicator. Turn the indicator on and click the connect
button in DataLog software.
A-1
 Loading...