

Page 1
d
n
t
u
h
o
e
r
a
e
t
a
r
u
c
c
a
s
i
n
c
e
1
w
o
r
l
d
8
7
9
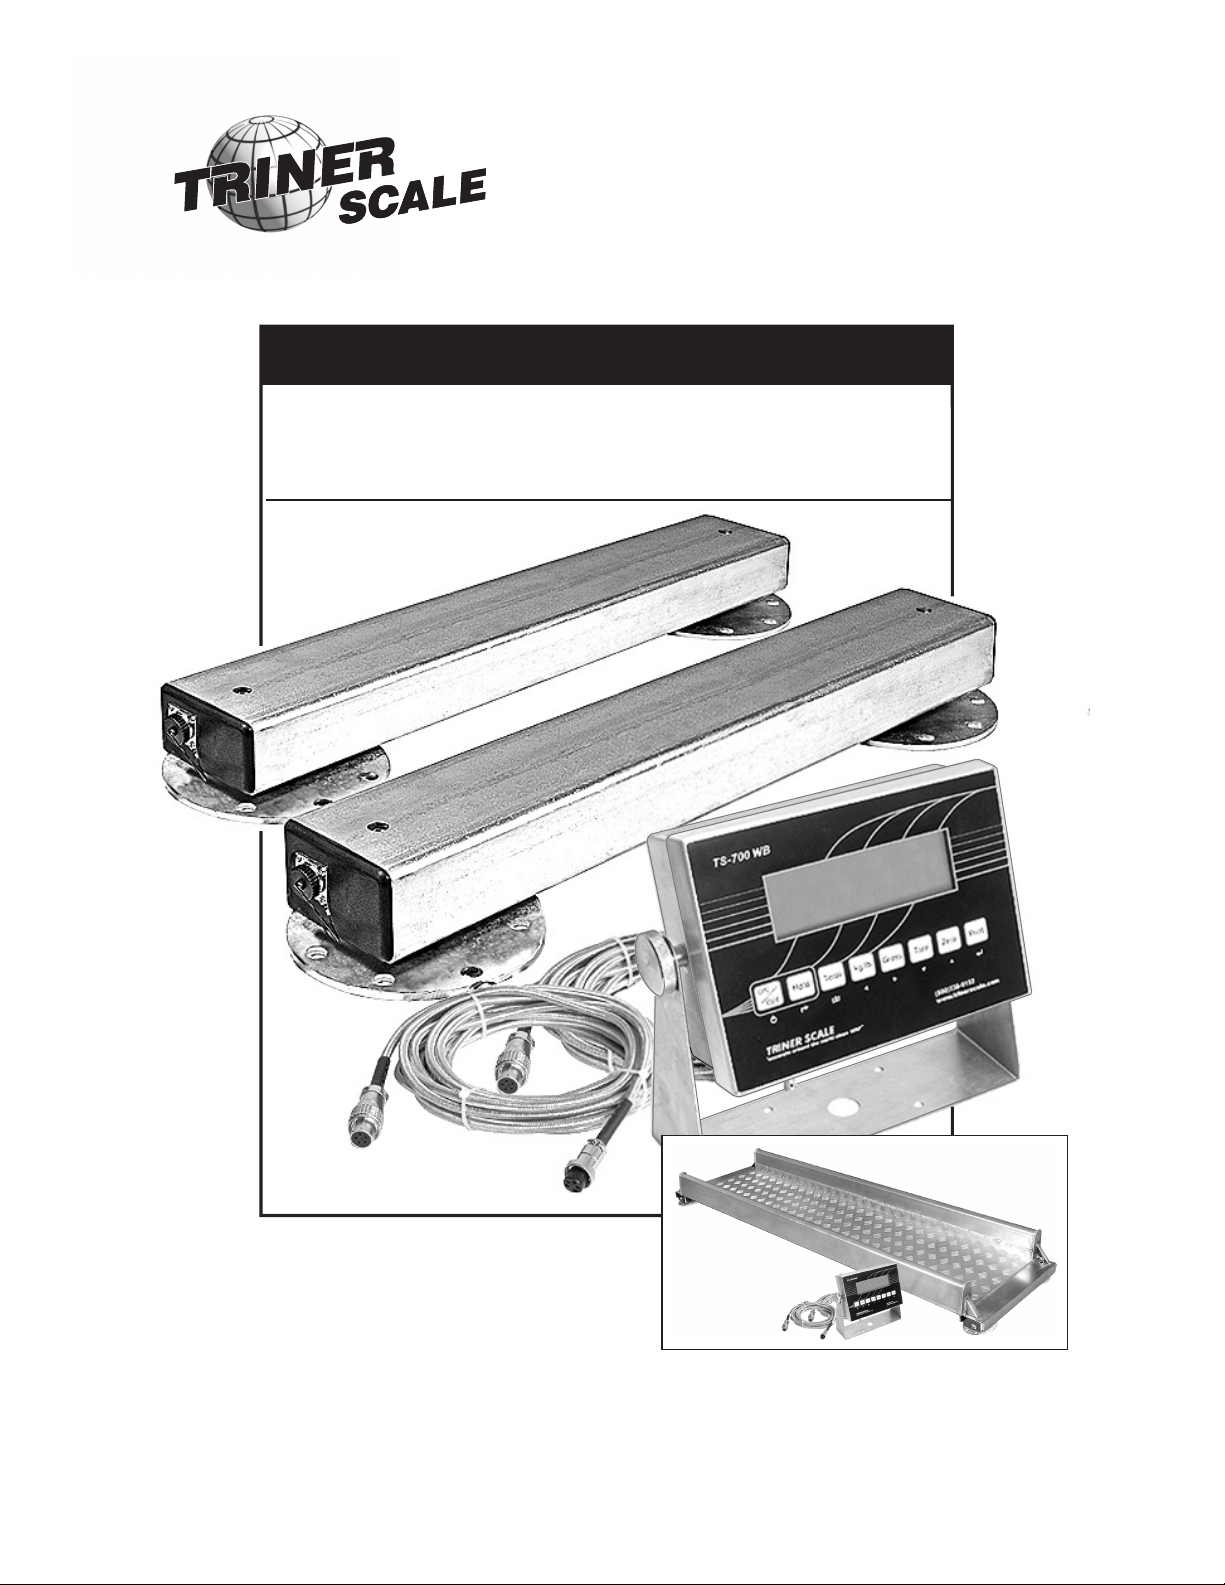
User’s Guide
Alley-Bar™ Livestock Scale
WEIGH BARS AND DIGITAL INDICATOR
WB-24 Weigh Bars
TS-700 WB Digital Indicator
Guide version 1.3
Fits Triner and other popular model aluminum alleyways.
Page 2

Page 3

Alley-Bar™
Livestock Weighing System
Table of Contents
Digital Indicator Model TS-700 WB .................................................... 1
Overview ....................................................................................... 1
Digital Display/Readout................................................................. 1
Keypad Keys and Functions ......................................................... 1
Weigh Bars Model WB-24................................................................... 2
Overview....................................................................................... 2
Leveling Feet................................................................................. 2
Cables ........................................................................................... 2
Connect and Test the System ............................................................. 3
Digital Indicator Connections........................................................ 3
Connect and Test the Components............................................... 3
Connecting the Weigh Bars to the Digital Indicator ............. 3
Setting Up and Using the Scale.......................................................... 4
Setting Up the Weigh Bars............................................................ 4
Setting Up the Digital Indicator ..................................................... 4
Using the Scale............................................................................. 4
Battery Charging and Battery Operation ...................................... 4
USER’S GUIDE
Specifications...................................................................................... 5
System........................................................................................... 5
Weigh Bars ................................................................................... 5
Digital Indicator ............................................................................. 5
Dimensions ......................................................................................... 6
Trouble Shooting ................................................................................. 7
Warranty.............................................................................................. 8
© 2010 Triner Scale and Manufacturing Co., Inc.
Specifications subject to change without notice.
Page 4

Page 5
Alley-Bar™
Livestock Weighing System
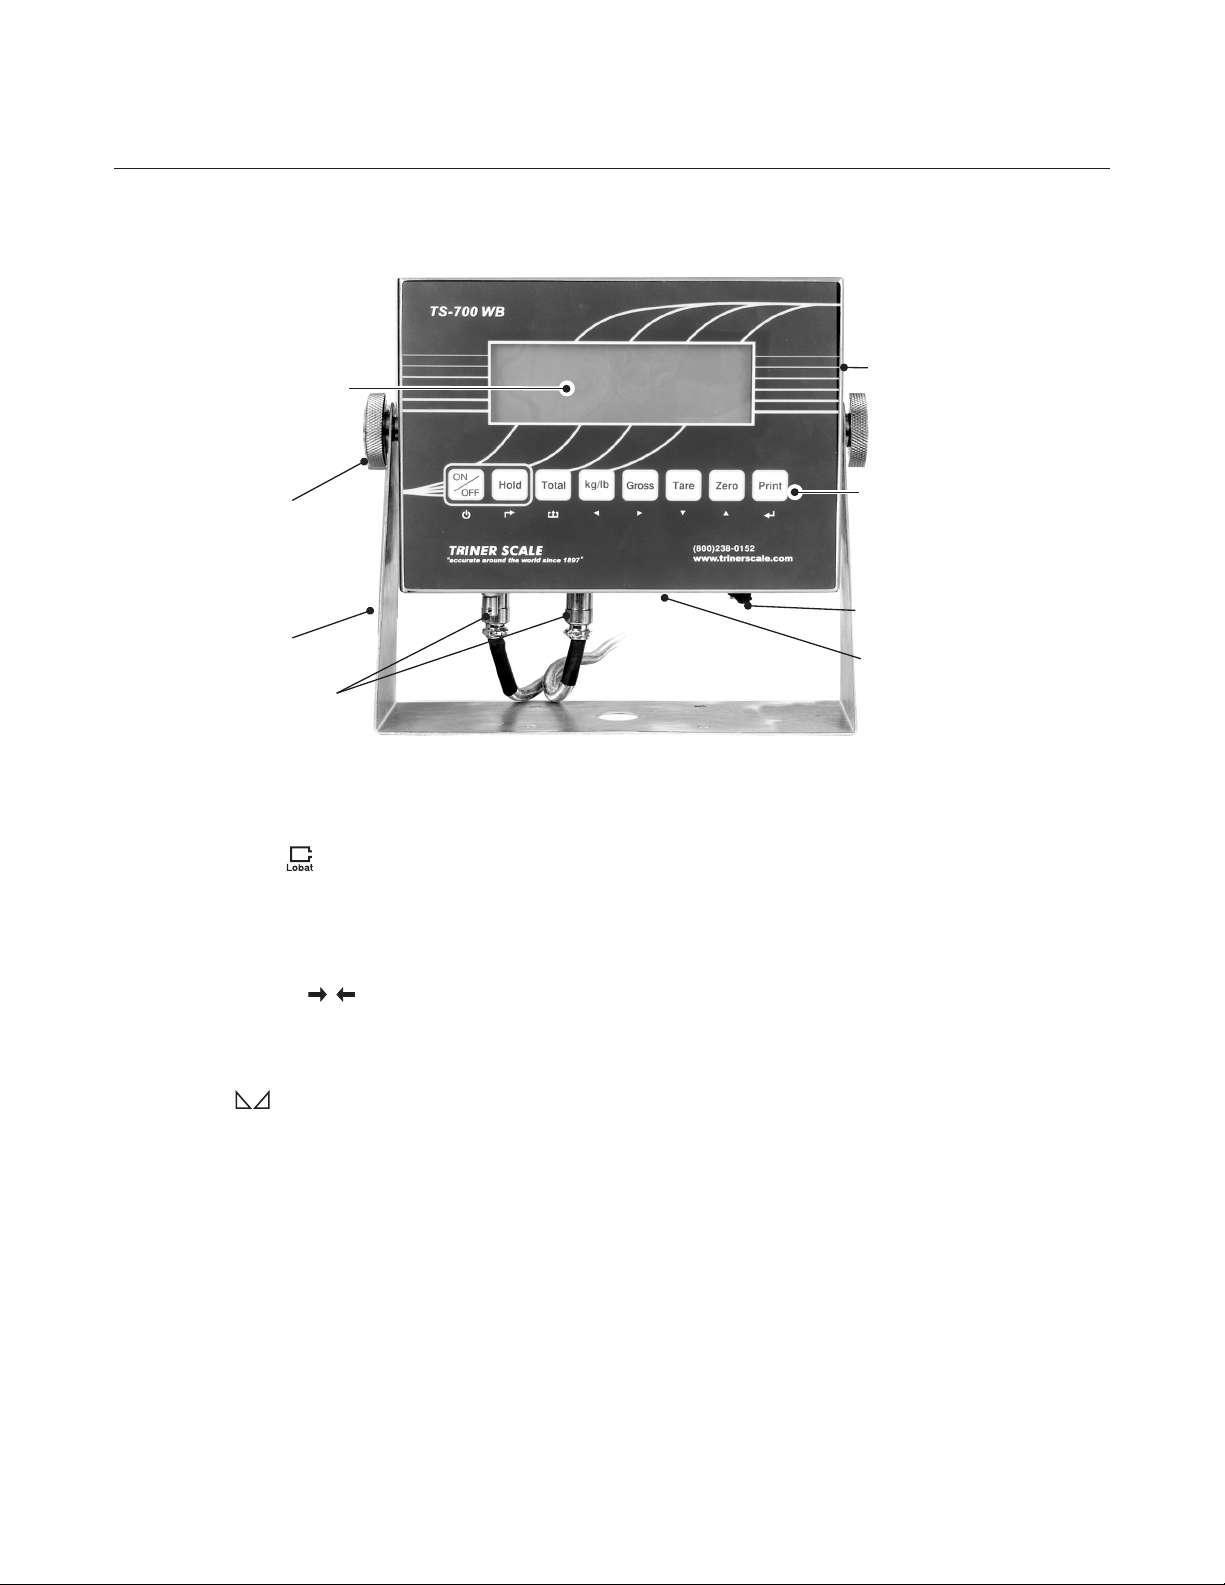
Digital Indicator
Backlit LCD
Digital Display/Readout
USER’S GUIDE
1
Stainless Steel Enclosure
NEMA 4X Washdown Rated
Lock Down Knob
Mounting Bracket
Weigh Bar Connections
Digital Display/Readout
Low Battery Icon ( )
Flashes to indicate the battery power is low.
After approximately 20 hours of continuous batterypowered operation, the low battery icon will flash for
several minutes before the scale powers off.
0
Center of Zero Icon (
Displays when the scale is on zero.
Indicates there is no weight being registered in the
scale’s electronics.
Stable Icon (
)
Displays when the scale is stable.
Indicates the scale is not fluctuating or drifting.
Gross, Net, Tare
Gross: Indicates gross weight display mode.
Indicates the scale is displaying gross weight.
Net: Indicates net weight display mode.
Indicates a TARE weight has been established and
the weight being displayed is the net weight (gross
weight minus TARE weight)
Ta re: Indicates TARE weight mode.
Indicates a TARE weight has been established in the
scale’s memory.
)
Keypad Keys
AC Adapter Connection
Connection for
Optional Printer &
PC Interface
Keypad Keys and Functions
ON/OFF
Press and hold to power on & power off the unit.
HOLD
Default Setting: automatic animal weight hold
The Automatic Animal Weight Hold setting will hold
any unstable/fluctuating weight for a period of 5
seconds. After that, if the weight on the scale fluctuates
more than 5 lbs (on a 5,000 lb capacity scale), the
hold feature will automatically restart, then re-hold the
new weight. This process will repeat if the weight on
the scale continues to fluctuate more than 5 lbs.
NOTE: automatic animal weight hold deactivates the
Hold key on the keypad.
Total
Adds multiple weighings
With weight on the scale, press the Total key. Press
the Total key after each new weight is on the scale.
To view total weight and count, press the Print and
Total key at the same time, To return to normal operation,
press the Total key. To clear the Totals, press the Zero
key, then the Print key.
kg/lb
Selects lb or kg Weighing Units
Press the key to change weighing units.
Page 6

Alley-Bar™
Livestock Weighing System
2
Keypad Keys and Functions (cont’d)
Gross
Displays gross weight when tare weight has been
added
Press to momentarily display gross weight.
Tare
Enters a tare weight
To display the net weight in a container, place the
empty container on the scale, and press the Tare key.
Place the container and contents on the scale. Net
weight will display.
Weigh Bars
Hot-dip Galvanized
Carbon Steel Tubing
USER’S GUIDE
Zero
Zeros out the indicated weight
Press to return the scale to no (zero) indicated weight.
Print
- Prints ticket (requires optional printer)
- Transmits ticket data to PC ( requires optional
software & interface cable)
Press to print or transmit weigh ticket data.
Sealed Polyurethane
End Caps
Internally Mounted
Nuts For Bolting To
Brackets
Connectors
With Attached
Protective Cover Caps
Leveling Feet
The WB-24 weigh bars feature adjustable feet at each
end of the bar. This enables side to side and front to
back adjustment when setting up the system.
NOTE
Be sure that the feet are not screwed all the way
into the bar, as this will result in inaccurate
weighing.
Protective Cover Caps
When the cables are disconnected from the weigh
bars, be sure to replace the protective cover caps to
cover the weigh bar cable sockets.
Height-adjustable Feet
With Mounting Holes
Detachable 20 ft. Cables
Cables
Each weigh bar is equipped with a 20’ cable for
connecting to the TS-700 WB digital indicator.
The cables have quick-connect plugs for connecting
to the weigh bars and digital indicator.
CAUTION
The following situations can result in damage to
the cables, connections, and/or digital indicator:
• Animals stepping on or pulling cables
• Animals biting cables
• Workers stepping on or pulling cables
• Equipment dropping on cables.
Arrange the cables in a way as to avoid these
types of situations and resulting damages to the
system.
Page 7

Alley-Bar™
Livestock Weighing System
Digital Indicator Connections
Digital Indicator
USER’S GUIDE
3
Weigh Bar
Cable Sockets
Connect & Test the Components
Before fully installing the scale, test the system to assure
that no damage occurred during shipping.
CONNECT THE COMPONENTS
1) Place all the components near to each other. Place the
weigh bars close together so that weight can be placed
on both bars at the same time.
2) Connect the AC adapter jack to the digital indicator,
then plug into a 110 VAC outlet.
3) Connect the weigh bar cables to the weigh bars.
4) Connect the weigh bar cables to the digital indicator.
The cables can be connected to either of the two sockets.
RS-232 Port
- Optional Printer
- Optional PC Interface
AC Adapter Socket
with Cover Cap
POWER UP THE SCALE
Press and hold the ON key located on the front of the
digital indicator.
NOTE
Keep the indicator plugged in to 110 VAC unless
operating with the battery. The indicator must be
plugged in to 110 VAC for 18+ hours to fully charge
the battery.
TEST THE SCALE
With the bars close together, stand on both bars and
confirm that the weight displayed is accurate.
Stand on each bar individually and confirm that the weight
displayed is accurate.
After testing, disconnect the system and proceed with
installation in the desired location.
Page 8

Alley-Bar™
Livestock Weighing System
4
USER’S GUIDE
Setting Up the Weigh Bars
FOUNDATION
The weigh bars require a flat, solid foundation on
which to sit. Typically, a concrete pad is preferable.
ALLEYWAY APPLICATIONS
Be sure that no equipment or objects prevent
downward movement of the weigh bars.
Do not drop equipment on the load bars, as this may
damage the load cells.
1) Place the weigh bars in the desired location.
2) Bolt the aluminum alleyway/platform to the weigh
bars.
3) Adjust the levelling feet as needed, making sure
that the set up is stable, and does not rock from corner
to corner.
4) If desired, anchor the weigh bar feet to the
flooring/concrete pad.
CAUTION
Never weld any installation attached to the load
!
bars. Damage to the scale’s electronics can result.
WEIGH BAR CABLES
It is important to route the weigh bar cables in a way
that protects them from damage, and from being
pulled accidentally by animals or workers.
Care should be taken to assure that there is slack in
the cables where connections are made to the digital
indicator.
Setting Up the Digital Indicator
The indicator should be secured by bolting the
mounting bracket to a post or panel. It should not be
located near the ground where it can be kicked by an
animal or worker.
Using the Scale
110 VAC POWER
When not operating on battery power, it is
recommended that the indicator be plugged into
110 VAC to maintain a full charge in the battery.
NOTE
Avoid connecting to 110 VAC with an overly long
extension cord, as it will result in inconsistent
voltage to the scale.
BATTERY OPERATION
The built in rechargeable battery will provide 20+
hours of continuous operation when fully charged.
The battery must be charged for 18+ hours in order
to be fully charged.
AUTO OFF
To conserve power, the digital indicator automatically
powers off after 10 minutes of non-use.
AUTOMATIC ZEROING
The scale will automatically zero out any weight that
is on the weigh bars when the scale powers on.
AUTOMATIC ANIMAL WEIGHT HOLD
By factory default, the Hold feature on the TS-700 WB
indicator is set for animal weight hold.
NOTE
See the “Keypad Keys and Functions” section on
page 1 for additional information on the scale’s
operation.
CARE AND MAINTENANCE
Care should be taken to remove any obstructions that
may prevent downward movement of the weigh bars,
such as rocks, accumulated dirt, or even ice build up.
If necessary, the scale can be cleaned using gently
flowing water and mild soap.
NOTE
Do not pressure wash the weigh bars or digital
indicator, as doing so can damage the scale’s
electronics.
NOTE
Never expose an uncovered electrical connection
to water, as doing so can damage the scale’s
electronics.
During periods of non-use, the indicator should be
kept in a cool, dry location. If necessary, detach the
indicator from the weigh bars and move it to such a
location. Place protective cover caps over the weigh
bar cable connector sockets.
Page 9

Alley-Bar™
Livestock Weighing System
SPECIFICATIONS
5
System Specifications
STANDARD CAPACITY
5,000 lb x 1 lb
NOTE
If specified by the purchaser, the scale’s capacity
and divisions may be different than the standard
configuration, i.e., 2,500 lb x 0.5 lb
MAIN COMPONENTS
- TS-700 WB digital indicator and AC adapter
- Two WB-24 weigh bars
- Two 20’ connecting cables
WB-24 Weigh Bar Specifications
CONSTRUCTION
- Carbon steel tube
- High grade hot-dip galvanized finish
LOAD CELLS
- 350 ohm, two per weigh bar
- Overload protection 200%
- Operating temperature 14˚F to 104˚F
- NTEP approved
TS-700 WB Digital Indicator
Specifications
GENERAL
- NEMA 4X washdown stainless steel enclosure
- Operating temperature 14˚F to 104˚F
- Connection port for optional printer
- AC adapter included, 12 VDC 800 mA
- Tilt adjustable bracket included
- NTEP approved for 5,000 divisions
KEYS
- ON/OFF
- Hold
- Total
- kg/lb
- Gross
- Tare
- Zero
- Print
BATTERY
- 6 volt
- Built in
- Rechargeable
- 20+ continuous hours of operation on full charge
under typical operating conditions
DISPLAY
- Back lit LCD
- 6 digits
- Low battery (
- Tare
- Gross
- Net
- Center of zero (
- Stable (
- lb
- kg
)
0
)
)
Page 10

Alley-Bar™
Livestock Weighing System
DIMENSIONS
6
WB-24 Weigh Bar Dimensions TS-700 WB Digital Indicator Dimensions
End View
3 1/2” to
4 1/4”
Top View
4”
2 3/8”
6 1/4”
6 1/4” diameter
height-adjustable feet
Internally mounted
3/8” nut, #13 thread
Front View
8 1/2”
Side View
ON
Hold Total kg/lb Gross
OFF
7 7/8”
5 3/4”
Tare Zero Print
www.trinerscale.com
2 1/4”
24.25”
22”
1 1/2”
Feet have easily accessed mounting holes.
Cable length is 20 ft.
2 3/4”
Page 11

Alley-Bar™
Livestock Weighing System
TROUBLE SHOOTING
Issue Recommendations
Recharge the battery. Plug the indicator into 110 VAC for 18+
Low battery icon (
) flashes.
hours (using the included AC adapter). When not operating under
battery power, it is recommended that the indicator remains
plugged in to 110 VAC. This will keep a full charge in the battery.
7
Indicator displays a weight after the animal
has left the scale.
Weight reads out lower at one end of the
weighing platform than the other end.
Indicator displays six small “u” characters. Scale is overloaded. Remove weight from scale.
Indicator displays six small “n” characters. Scale is underloaded. Power off, then power on the scale.
Displayed weight continually drifts. Inspect the weigh bar cables for damage, such as flat spot(s),
Check for mechanical binding in the overall equipment set up,
such as restraining chains on squeeze chute, platform rubbing
against walls, or similar.
Check weighing platform area for build up of mud or manure.
Press the Zero key to zero out the scale.
Check for any type of mechanical binding or impingement of the
weigh bar that is displaying the lower weight. Check underneath
the weigh bar for any obstructions. Make sure that the weigh bar
feet are not screwed in so far as to restrict downward movement
of the weigh bar.
Inspect the weigh bar cables for damage, such as flat spot(s),
split outer sheath, sharp kinks, looseness of cable connections,
etc. If damaged, the cable must be replaced.
If the problem persists, contact Triner Scale Tech Support.
split outer sheath, sharp kinks, looseness at weigh bar connection,
etc. If damaged, the cable must be replaced.
If the problem persists, contact Triner Scale Tech Support.
Scale turns off on its own. The indicator has a power conservation feature, set to automatically
power off the scale after 10 minutes of non-use. If your needs
require a different setting, call Triner Tech Support.
Display is erratic. The battery may be fully depleted. If so, this condition can cause
erratic displays even if the digital indicator is plugged into 110
VAC.
Power off the indicator and fully charge the battery for 18+ hours.
Inspect the weigh bar cables for damage, such as flat spot(s),
split outer sheath, sharp kinks, looseness at weigh bar connection,
etc. If damaged, the cable must be replaced.
If the problem persists, contact Triner Scale Tech Support.
Triner Scale Toll-free Tech Support: (800) 238-0152
Page 12

Alley-Bar™
Livestock Weighing System
8
TRINER SCALE & MFG. CO.
WARRANTY
LIMITED WARRANTY
What is Covered
Scale product enclosed with this limited warranty statement that the product, if purchased and
used in the United States, conforms to the manufacturer’s specifications and will be free from
defects in workmanship and materials for a period of one (1) year from the date of original purchase.
What Triner Scale Will Do to Correct Problems:
during the warranty period, please call Triner Scale at (800) 238-0152 for warranty repair instructions
and return authorization. Triner Scale will, at its option, repair or replace on an exchange basis the
defective unit as follows:
PARTS
New or comparable rebuilt parts in exchange for defective parts for one (1) year after original
purchase.
LABOR
Carry-In or mail in service for 90 days from the date of original purchase. Labor and shipping cost
after the 90 day period will be charged to you.
If you are authorized by Triner Scale to ship the product to Triner Scale for repair, it is your
responsibility to securely package the product in its original container or an equivalent and provide
proof of the date of original purchase. You will be responsible for shipping costs to Triner Scale
repair facility. When warranty service involves the exchange of the product or a part, the exchanged
product may be new or previously repaired to the Triner Scale standard of quality. Exchange or
replacement products or parts assume the remaining warranty period of the product covered by
this limited warranty.
What this Warranty Does Not Cover
Triner Scale is not responsible for warranty service should the Triner Scale label or logo or the serial
number be removed or the product fail to be properly maintained or fail to function properly as a
result of misuse, abuse, improper installation, neglect, improper shipping, damage caused by
disasters such as fire, flood, and lightning, improper electrical current, interaction with non-Triner
Scale products, or service other than a Triner Scale Authorized Service. Packaging and shipping
costs incurred in presenting your Triner Scale product for warranty service are your responsibility.
If a claimed defect cannot be identified or reproduced in service, you will be held responsible for
costs incurred.
: Triner Scale & Mfg. Co. Inc. warrants to the first end user customer of the Triner
Should your Triner Scale product prove defective
: This warranty covers only consumer use in the United States.
THE WARRANTY AND REMEDY PROVIDED ABOVE ARE EXCLUSIVE AND IN LIEU OF ALL OTHER
EXPRESS OR IMPLIED WARRANTIES INCLUDING, BUT NOT LIMITED TO, THE IMPLIED
WARRANTIES OF MERCHANTABILITY OR FITNESS FOR A PARTICULAR PURPOSE. SOME LAWS
DO NOT ALLOW THE EXCLUSION OF IMPLIED WARRANTIES. IF THESE LAWS APPLY, THEN ALL
EXPRESS AND IMPLIED WARRANTIES ARE LIMITED TO THE WARRANTY PERIOD IDENTIFIED
ABOVE. UNLESS STATED HEREIN, ANY STATEMENTS OR REPRESENTATIONS MADE BY ANY
OTHER PERSON OR FIRM ARE VOID. EXPECT AS PROVIDED IN THIS WRITTEN WARRANTY,
NEITHER TRINER SCALE & MFG. CO. INC. NOR ITS AFFILIATES SHALL BE LIABLE FOR ANY
LOSS, INCONVENIENCE, OR DAMAGE, INCLUDING DIRECT, SPECIAL, INCIDENTAL OR
CONSEQUENTIAL DAMAGES, RESULTING FROM THE USE OR INABILITY TO USE THE TRINER
SCALE PRODUCT, WHETHER RESULTING FROM BREACH OF WARRANTY OR ANY OTHER
LEGAL THEORY.
No terms, condition, understanding, or agreements, purporting to modify the terms of this warranty
shall have any legal effect unless made in writing and signed by a corporate officer of the seller.
This warranty gives you specific legal rights, and you my have other rights which vary from
jurisdiction to jurisdiction.
Triner Scale & Manufacturing Company Inc.
8411 Hacks Cross Road
Olive Branch, MS 38654-4010
Tel (662) 890-2385 Fax (662) 890-2386
Page 13

Page 14

Triner Scale and Manufacturing Company, Inc.
8411 Hacks Cross Road Olive Branch, MS 38654
Tel: (662) 890-2385 Fax: (662) 890-2386
Toll Free: (800) 238-0152
Email: info@trinerscale.com
www.trinerscale.com
“Accurate Around the World Since 1897”
 Loading...