

Page 1
INC.
EZ-Tray
Installation Instructions
Introducing EZ-Tray the latest innovation from Trim-Tex.
EZ-Tray is a
three-inch wide chamfer edged white vinyl layering bead specifically
designed to make tray ceilings. The beads low profile design extends
only two inches below the ceiling while dramatically enhancing and
enlargingthelookofanyroom.
Now,anyonecanconvertastandardroom into an elegant showplace.
EZ-Tray is very easy to install, and extremely affordable which can
boost your profits andappeal. Use inconjunction with Trim-TexCrown
MoldingsandDecorativeLBeads to makethatultimateupgrade.
STOCK # PCS/BOX
LENGTH
10'
10EZ-10
INSTALLATION
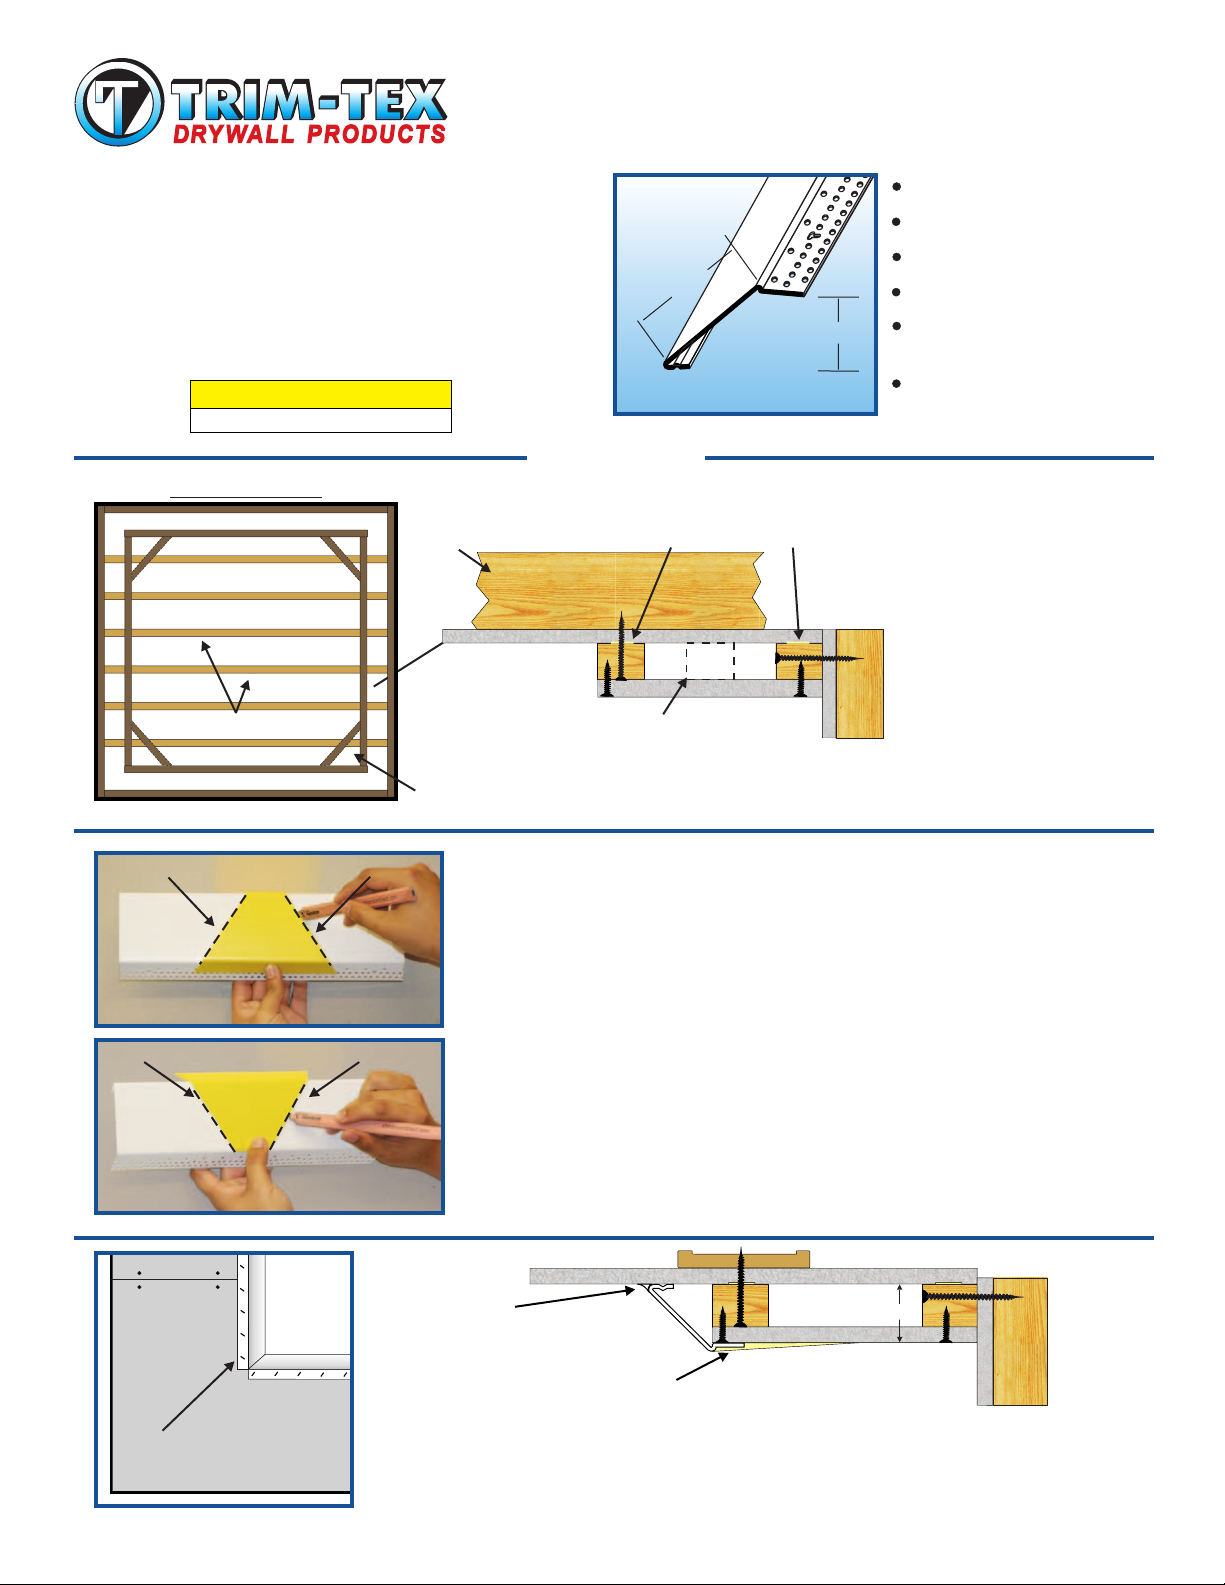
1)
Top view of room
Ceiling/Floor Joists
Ceiling/Floor Joists
Note: For tray width greater than
24" additional blocking is required
3"
2"
Minimum ceiling height loss
Construction Adhesive
1/2" Drywall
Affordable Luxury
Increase Your Profits
Quick & Easy to Install
Gives that Custom Look
Can be used with other
Trim-Tex Beads
Great for New Construction
or Remodeling
Usinga high quality Construction
Adhesive, and Screws, secure
2x2 plus ½"drywall to the
's
ceiling/floor joist or wall studs as
shown. Install ½" drywall to the
2x2's as shown, and your ready
toinstallEZ-Tray.
2)
Left Outside Corner
Figure A.
Left Inside Corner
Figure B.
3)
90º
or 135º
90º
or 135º
Right Outside Corner
Right Inside Corner
Trim-Tex 710 Caulk
Optional Clips
#
Miter Marker Instructions
Includedin everyboxofEZ-Tray,aretwo free mitermarkers,onefor marking 90ºcorners
andoneformarking135ºcorners.
MarktheEZ-Trayas shownabove.
penciland yellow aviation snips. For outside corners refer to .For inside corners flip
themitermarkerover .
asshownin
Snip to the marks you have made and snip back the mud legs. Do not completely cut
awaythe pencillineor thepartsmay comeouttoo short.Everyonemeasures, marksand
cutsdifferentlysoyoumayhavetomakeafewpracticecuts.
Toproperlyusethe MiterMarkeryouwillneedasharp
Fig.A
Fig.B
"
2
1/2" Drywall
Drywall Compound
Cut and dry fit the EZ-Tray. Use the miter marker (included in the box) for your miters as detailed
Staple every 6", using
1
2
/ " divergent staples
above.Installthe EZ-Tray using ½ "divergentstaples(every6"),and/orTrim-Tex847Spray adhesive.
Use Trim-Tex #710 Caulk along the front edge of the bead as shown. Finish the installation by
mudding,sanding andpaintingthebead asyounormallywould anyotherbead.
3700 W. PrattAve. Lincolnwood, IL 60712-2508 (847) 679-3000 1-800 874-2333 Fax: (847) 679-3017 www.trim-tex.com
Page 2

INC.
EZ-Tray
Instrucciones de Instalación
unesquinero devinilocon unestilochaflán de3”de ancho.Estaespecialmente
diseñado para hacer techos artesonados. Los esquineros de bajo perfil se
extienden solamente 2 pulgadas por debajo del techo original mejorado y
agrandadoelaspectode unahabitación dramáticamente.
elegante espacio. EZ-Tray es muy fácil de instalar, y con un precio muy
accesible que puede aumentar sus ganancias. Puede usarlo con las Molduras
Decorativasde Trim-Tex ylos esquineros DecorativosL paracrear unos techos
artesonadossensacionales porel deprecio delos métodostradicionales.
IntroduciendoEZ-Tray,la nueva innovación deTrim-Tex. EZ-Trayes
Ahora todo el mundo puede convertir una habitación normal en un
STOCK # PCS/BOX
LENGTH
10'
10EZ-10
Instalación
1)
Vista Superior de la Habitación
Vigas
Vigas
Nota: para un tray mas ancho de 24", bloques
adicionales seran requeridos
3"
2"
Minima Perdida de Techo
Pegamento
1/2" Drywall
Lujos Accesibles
Aumente sus Ganancias
Rápido & Fácil de Instalar
Puede ser Usado con otros
Esquineros de Trim-Tex
Perfecto para Nueva
Construcción o Remodelados
Usando un pegamento de
construcción de alta calidad y
tornillos, asegure los 2x2’s mas
latabla roca de ½” alasvigasdel
techo/pared o a los montantes
de paredes como se indica.
Instale la tabla roca de ½” a los
2x2’s como se indica, y ya esta
listopara instalarelEZ-Tray.
2)
Esquina Exterior Izquierda
Figura A.
Esquina Interior Izquierda
Figura B.
3)
90º
or 135º
90º
or 135º
Esquina Exterior Derecha
Esquina Interior Derecha
Recortos opcionales
Instrucciones del Miter Marker
Incluido en cada caja del EZ-Tray, dos miter markers gratuitos, uno para marcar
ángulosde 90°yotropara ángulosde135°.
Marque el EZ-Tray como se indica al lado. Para poder usar el Miter Marker
apropiadamente, necesitara un lápiz y unas tijeras para metal. Para esquinas
exteriores refiérase a la Para esquinas interiores, voltee el miter marker
comose indicaenla
Corte a lo largo de las marcas y recorte en las extremidades. No corte
completamentela línea marcadaconellápiz o lapartepuedesalir muy corta.Todos
miden,marcan ycortandiferenteasí quetalvezdeberá practicarenalgunaspiezas
#
Silicon 710
FiguraA.
FiguraB.
½ " tablaroca
"
2
Compuesto
Corte y pruebe el EZ-Tray. Use un miter marker (incluido en la caja) para hacer sus cortes como se
Engrape cada 6" usando
grapas de ½ "
indique arriba. Instale el EZ-Tray usando grapas de ½” (cada 6”), y pegamento en aerosol 847 de
Trim-Tex. Use Silicón 710 de Trim-Tex a lo largo del borde delantero como se indica. Acabe la
instalación rellenando con compuesto de tabla roca, lijando y pintando como lo haría con cualquier
otroesquinero.
3700 W. PrattAve. Lincolnwood, IL 60712-2508 (847) 679-3000 1-800 874-2333 Fax: (847) 679-3017 www.trim-tex.com
 Loading...