

Page 1
INC.
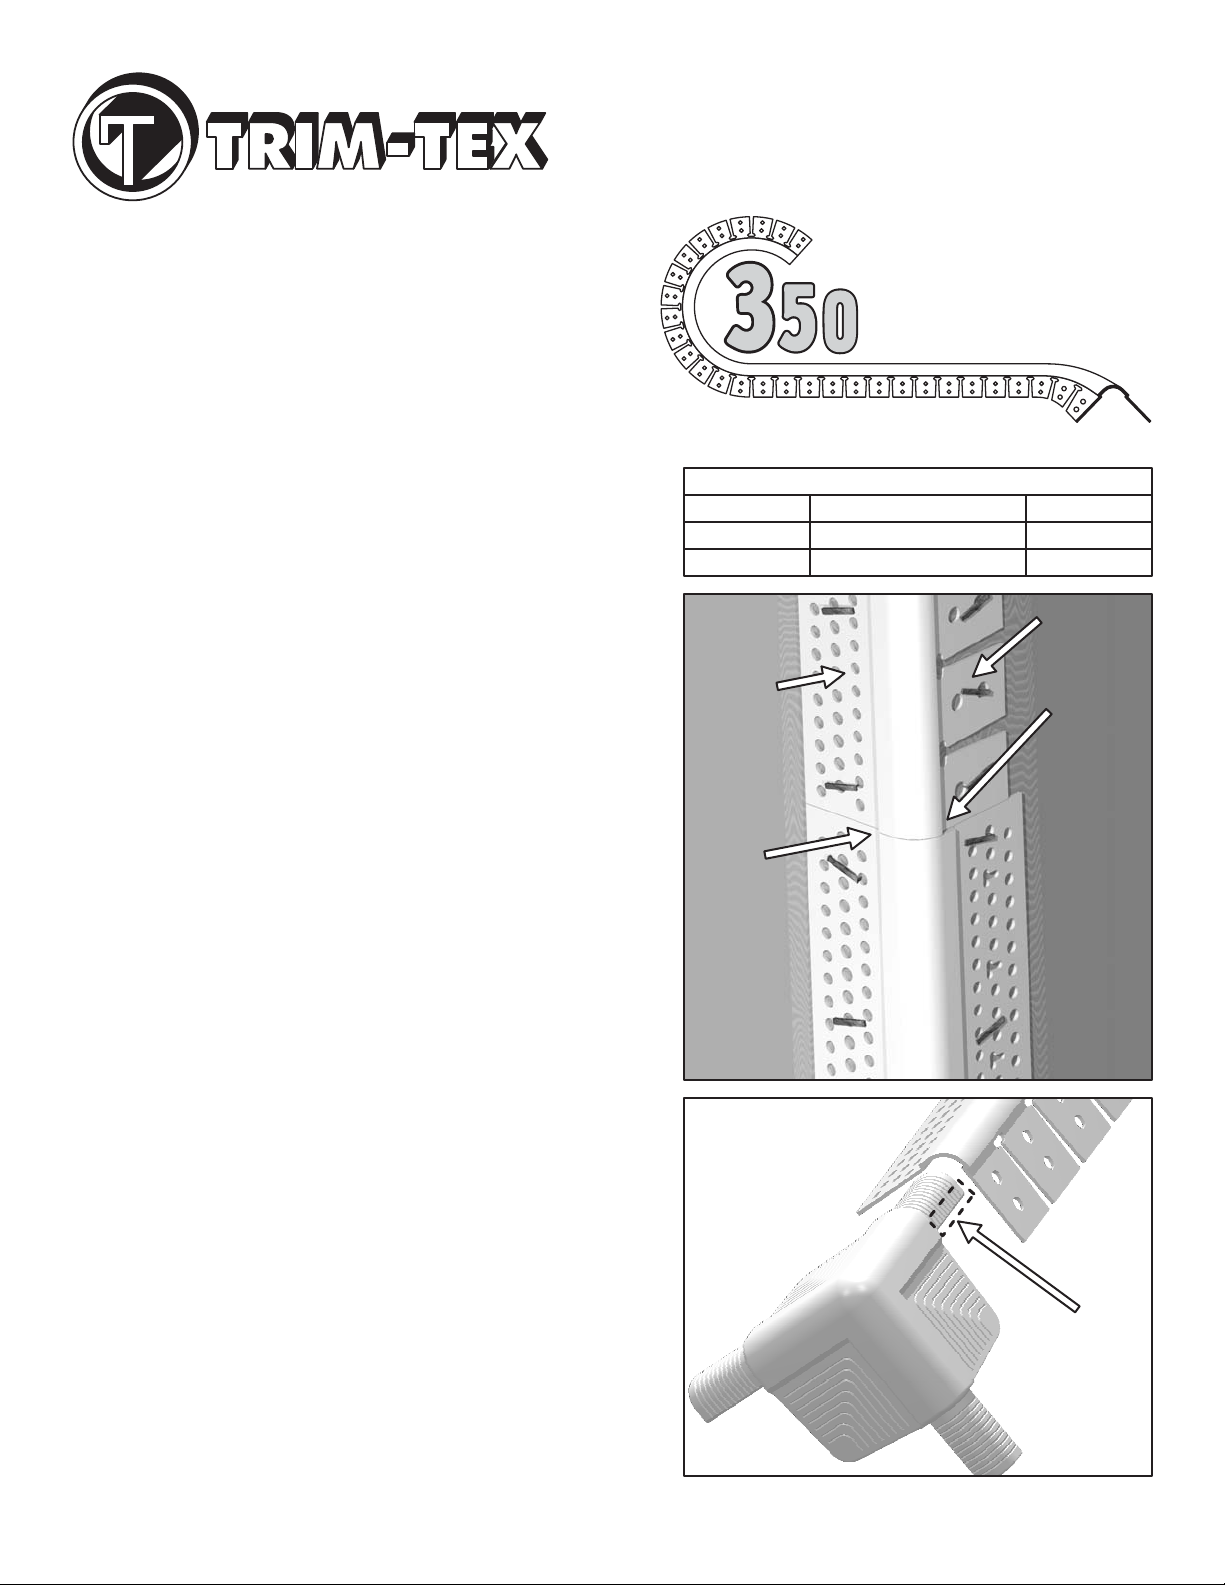
Figure 2
Figure 1
Mud
Leg
DRYWALL PRODUCTS
Product Overview
Trim-Tex 350 Bull Arch is the ultimate bead for finishing
archways and the perfect complement to "The Worlds
Strongest Bead" our 350 Bull. Unique coextruded design
eliminates notches in the exposed area of the bead and
allows 350 Bull Arch to finish archways ranging from a
15" inside to a 24" outside radius. Be sure to check the
Trim-Tex catalog and www.trim-tex.com for all our
innovative products.
350 Bull Arch
Installation Instructions
Bull Arch
Available Sizes & Lengths
Stock #
35028
35020
Length
8'
10'
Pcs/box
25
25
Installation Instructions
1. Please read the entire instructions before beginning.
When matching up 350 Bull Arch to our 350 Bull Bead,
align the 2 beads as shown in Figure 1. It is important that
edge A lines up on the 350 Bull Arch and the 350 Bull.
Don't worry about the apparent void by edge B. This area is
flat on the 350 Bull and will blend together when you apply
joint compound. The 350 Bull Arch had to be designed
narrower at this point so it flexes into an arch more easily.
2. If 350 Bull Arch will be joining directly into an 0921 or
0923 3 Way, the tab on the 3 Way will need to be snipped
as shown in Figure 2, C.
3. To install , dry fit the bead. Then apply 2
coats of Trim-Tex 847 Spray Adhesive to the drywall.
Immediately apply the to the drywall while
the spray is still wet. This will allow you to reposition the
bead. If the adhesive dries and there is no tack to it, you
will need to respray the drywall. Once in position, use the
Trim-Tex Installation Tool or the handle of your taping
knife to pressure the mud leg and the tabs to the drywall.
(A FREE tool is included with every purchase of 847 Spray
Adhesive.) Staple the mud legs every 6" and staple the tabs
minimum every 4”. We recommend stapling every tab for
the ultimate adhesion. After stapling, apply pressure to the
mud leg and tabs once more.
4. Mud as usual. Be sure to use All-Purpose or MultiPurpose Compound. Do not use Fast Setting Compounds.
Be careful not to oversand the final coat of mud. Prime and
paint as usual.
350 Bull Arch
350 Bull Arch
Mud
Leg
A
Tabs
B
Figure 1
C
Figure 2
TT-206A
Page 2

Figure 2
DRYWALL PRODUCTS
Figure 1
Mud
Leg
Vista General
INC.
Instrucciones para
350 Bull Arch
Trim-Tex es lo maximo en esquinas para el
terminado de arcos y el complemento perfecto para “la
esquina mas duradera del mundo” nuestro 350 Bull. Con
su diseno co-extruido se eliminan los cortes en la parte
expuesta del arco y le permite trabajar con arcos de un
radio interior de 15" hasta 24" de radio exterior. Asegurese
revisar el catalogo de Trim-Tex y www.trim-tex.com para
ver todos nuestros inovativos productos.
Instrucciones para su Instalacion
1. Favor de leer las instrucciones antes de comenzar. Para
unir el con el 350 Bull, alinie las dos
esquinas como se muestra en la figura 1. Es importante que
la linea A se alinie con el y el 350 Bull. No
se preocupe por la desalineacion de la linea B. Esta area es
plana en el 350 Bull y quedara pareja cuando aplique el
compuesto para el terminado de drywall. Fue necesario
diseòar el de esta manera para que se
formara el arco mas facilmente.
2. Si el tiene que ser unido a una esquina de
tres direcciones (0921 o 0923) la extremidad de la esquina
tendra que cortarse como se indica en la figura 2C.
3. Para la instalacion del , corte a la longitud
deseada y pruebe en seco. Despues aplique 2 capas del
pegamento 847 al drywall. Inmediatamente aplique el
Bull Arch
Esto le permitira ajustar el . Si el pegamento
seca y no se siente pegajoso, necesitara aplicar mas
pegamento al drywall. Cuando se encuentre en buena
posicion, use la herramiente para instalacion Trim-Tex o el
mango de su espatula para presionar las extremidades sobre
el drywall (Una herramienta para instalacion se incluye con
cada compra de pegamento 847). Engrape las extremidades
de 6-8” y las orejetas o “patitas” como sea necesario.
Recomendamos engrapar cada orejeta para una adhesion
perfecta. Despues del engrapado aplique presion
nuevamente a las extremidades.
4. Aplique el compuesto para el acabado de drywall como
acostumbra. Use All-Purpose o Multipurpose. No use
materiales de secado rapido. Cuidado de no lijar de mas la
ultima capa. Pintese como se acostumbra.
350 Bull Arch
350 Bull Arch
350 Bull Arch
350 Bull Arch
350 Bull Arch
350 Bull Arch
a la pared antes de que el pegamento se seque.
350 Bull Arch
350
Stock #
35028
35020
Mud
Leg
A
Bull Arch
Available Sizes & Lengths
Length
8'
10'
Figure 1
Figure 2
Pcs/box
25
25
Tabs
B
C
TT-206A
 Loading...