

Page 1
TT
TT
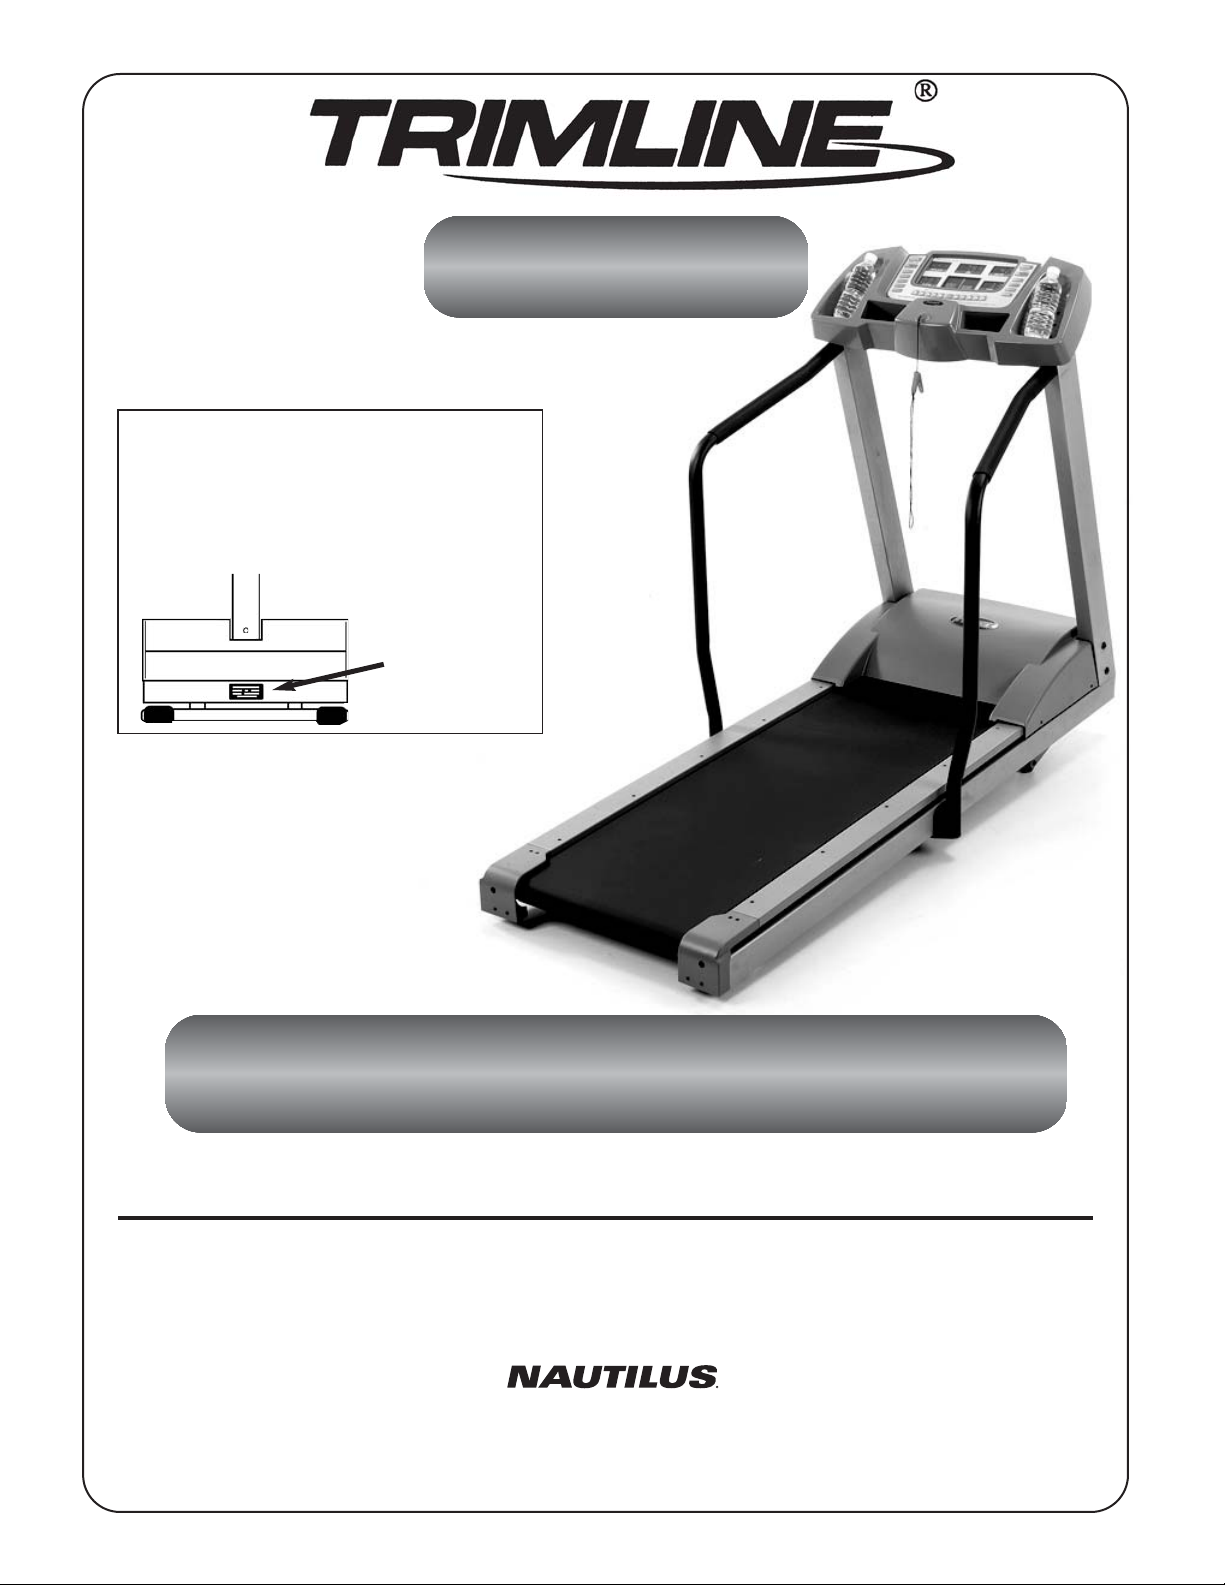
SERIAL NO:_________________________
DATE OF PURCHASE: ______________
Write the serial number in the
space above for reference.
SERIAL
NUMBER
DECAL
55
55
22
22
33
33
OO
WW
OO
WW
ASSEMBLY • OPERATION • MAINTENANCE
CAUTION:
undertaken without first consulting a physician. No specific health claims are made or implied as they
relate to the equipment.
IMPORTANT:
for future reference.
Rev. A
Exercise of a strenuous nature, as is customarily done on this equipment, should not be
Read all instructions carefully before using this product. Retain this owner’s manual
World Headquarters • 16400 S.E. Nautilus Drive • Vancouver, WA 98683 • USA
Manufacturing Facility • 12032 Hwy. 155 N. • Tyler, TX 75708 • USA
NN
WARRANTY • PART ORDERING
www.nautilusinc.com cstech@nautilus.com
EE
NN
(800) NAUTILUS • FAX (877) 686-6466
EE
RR’’’’
RR
SS
SS
MM
MM
AA
AA
NN
NN
UU
UU
AALLLL
AA
001-8678
Page 2

MMAAAANNNNUUUUFFFFAAAACCCCTTTTUUUURRRREEEERRRR’’’’SSSS LLLLIIII
MM
WHAT DOES THIS WARRANTY COVER?
This warranty covers your fitness product against defect in material and workmanship when used for the
purpose intended, under normal conditions provided it receives proper care. The warranty is extended only
to the original owner and is not transferable.
HOW LONG DOES THE COVERAGE LAST?
MMIIIITTTTEEEEDDDD
MM
WWAAAARRRRRRRRAAAANNNNTTTTYYYY
WW
• 30 YEARS ON DRIVE MOTOR AND FRAME
• 2 YEARS ON ALL OTHER PARTS
• 1 YEAR ON LABOR
WHAT DOES THIS WARRANTY NOT COVER?
This product is designed for home use. This warranty does not cover fitness products which are (1) used in a
commercial environment; or (2) subject to misuse, neglect, accident, or unauthorized repairs and alterations;
or (3) running belt and drive belt adjustments; and (4) normal maintenance functions. Some states do not
allow the exclusion or limitation of incidental or consequential damages, so the above limitation or exclusion
may not apply to you.
WARRANTY REGISTRATION (FOR THE US AND CANADA ONLY)
1. Complete the enclosed warranty card and send via US mail or Canada Post or
2. Register online at http://www.nautilus.com and click on “contact us”.
RRRREEEEPPPPAAAAIIIIRRRR PPPPAAAARRRRTTTTSSSS &&&& SSSSEEEERRRRVVVVIIIICCCCEE
All of the parts for this treadmill can be ordered from your local dealer. Dealers also have
trained service personnel who can assist you with any service questions you may have.
If you would like to speak to a factory representative and live in the U.S. or Canada, please call:
(800) NAUTILUS or email cstech@nautilus.com or fax (877) 686-6466.
If you purchased your machine outside the U.S. or Canada and need to locate a distributor in your area for
service, please email cstech@nautilus.com.
EE
2
Page 3
MMPPPPOOOORRRRTTTTAAAANNNNTTTT SSSSAAAAFFFFEEEETTTTYYYY PPPPRRRREEEECCCCAAAAUUUUTTTTIIIIOOOONNNNSSSS
W A R N I N G
IIIIMM
THIS UNIT IS INTENDED FOR HOUSEHOLD USE ONLY.
READ ALL INSTRUCTIONS BEFORE USING THIS TREADMILL.
WARNING
1. Before starting any exercise program, it is recommended that you consult your physician. Stop exercising if you
feel any unusual pain or dizziness.
2. To reduce the risk of electric shock, always unplug the treadmill from the electrical outlet immediately after using
and before cleaning.
3. To reduce the risk of burns, fire, electrical shock or injury to persons:
Plug the power cord of the treadmill directly into a dedicated grounded circuit carrying 15 amps (110 Volt model)
or 7 amps (220 Volt model). We recommend the use of a surge protector.
Grounding Instructions
This product must be grounded. If it should malfunction or breakdown, grounding provides a path of
least resistance for electric current to reduce the risk of electric shock. This product is equipped with a cord having
an equipment-grounding conductor and a grounding plug. The plug must be plugged into an appropriate outlet
that is properly installed and grounded in accordance with all local codes and ordinances.
DIAGRAM - GROUNDING METHOD FOR
110 VOLT, UNITED STATES
GROUNDED
OUTLET
ADAPTER
4. Position the treadmill on a clear, level surface. Do not place the treadmill on thick carpet as it may interfere with
proper ventilation. Also, do not place the treadmill near water or outdoors. Treadmill mats can usually be
purchased from your treadmill dealer. If the power cord is damaged, it must be replaced by a power cord from
Nautilus, Inc. Please contact your dealer or Nautilus.
5. The minimum “clear” distance around the treadmill is 20 inches (.5 meters) on each side and 79 inches (2 meters)
behind the machine
6. Position treadmill so that the wall plug is visible and accessible.
7. Inspect the treadmill prior to each use for worn or loose components and then correct, replace, or tighten prior to
use. Do not use the treadmill if any area is found to be in need of service.
8. Read, understand, and test the Emergency Stop Procedures on Page 4 before use.
9. Read, understand, and carefully follow all warnings, instructions, and procedures on the treadmill and in the
owner’s manual before using the treadmill.
GROUNDING
PIN
(A)
GROUNDED
OUTLET BOX
(B)
METAL
SCREW
TAB FOR
GROUNDING SCREW
(C)
10. Wear appropriate clothing when exercising on the treadmill. Do not wear long, loose fitting clothing that could
become caught in the treadmill. Always wear running or aerobic shoes with rubber soles.
11. Always attach the safety key rope to your clothing when using the treadmill. If the treadmill should suddenly
increase in speed due to an electronics failure or the speed being inadvertently increased, the treadmill will come
to a sudden stop when the key is disengaged from the console.
3
Page 4
MMPPPPOOOORRRRTTTTAAAANNNNTTTT SSSSAAAAFFFFEEEETTTTYYYY PPPPRRRREEEECCCCAAAAUUUUTTTTIIIIOOOONNNNSSSS
W A R N I N G
IIIIMM
12. Always hold the handrails when initially walking or running on the treadmill, until you are comfortable with the use
of the treadmill.
13. Never start the treadmill while you are standing on the walking belt. After turning the power on and
adjusting the speed control, there may be a pause before the walking belt begins to move. Always stand on the
foot rails on the sides of the frame until the belt is moving. Care should be used when mounting or dismounting
the treadmill.
14. This treadmill is for home use only. The T523 has a maximum user weight limit of 325 lbs. (147 kgs.).
Do not exceed the maximum user weight limits.
15. Keep children away from the treadmill during operation.
16. Keep the top surface of the walking belt clean.
17. Always unplug the power cord before removing the treadmill motor cover.
18. When the treadmill is not being used, the power cord should be unplugged and the safety key removed
EMERGENCY STOP PROCEDURES
WARNING
IF THE SAFETY KEY IS REMOVED FROM THE TREADMILL WHILE IT IS IN USE, THE
TREADMILL WILL STOP IMMEDIATELY.
This feature is meant to prevent serious harm and, when used properly, is an excellent way to protect your safety during
your workout.
Your treadmill is equipped with a SAFETY KEY that can protect you from serious injury and inhibit children from playing with and/or being injured on the treadmill. If the Safety Key is not fully inserted, the treadmill will NOT power up.
ALWAYS CLIP THE SAFETY KEY CLIP TO YOUR CLOTHING DURING YOUR WORKOUT.
It is strongly advised that you remove the Safety Key from the treadmill when not in use to prevent children or other
persons from using the treadmill unsupervised.
Key when walking / running on the walking belt while in motion.
NORMAL STOP PROCEDURES
1. Step off belt onto the plastic side rails.
2. Press START/STOP. The walking belt will stop.
NOTE: For an immediate stop, STEP OFF BELT and press START/STOP key or remove the safety
key.
WARNING: THE BELT WILL STOP ABRUPTLY.
Unless there is an emergency, do not remove the Safety
4
Page 5

AAAASSSSSSSSEEEEMM
MMBBBBLLLLYYYY IIIINNNNSSSSTTTTRRRRUUUUCCCCTTTTIIIIOOOONNNNSSSS
TOOLS REQUIRED
9
⁄16˝ Wrench • 1⁄2˝ Wrench • Phillips Screwdriver • 3⁄16˝ Hex Key (provided)
LOCATE THE HARDW
Part # Description. Qty.
HH2102 Button Head Bolt 5/16” X 1” 8
MM2105 Nylon Shoulder Washer 4
HH2168 Hex Head Bolt 5/16” X 1 1/2” 2
HH2154 Black Flat Washer 12
HH2095 3/8 Star Washer 4
HH2153 Hex Head Bolt 5/16” X 5” 2
HH2001 Hex Key Wrench 1
MM0087 Hex Key Clip 1
HH2217 Phillips Head screw 7
CAUTION: DO NOT PLUG IN POWER CORD UNTIL
FINAL ASSEMBLY IS COMPLETE AND MOTOR COVER IS INSTALLED.
ARE BAG SA2023 CONTAINING:
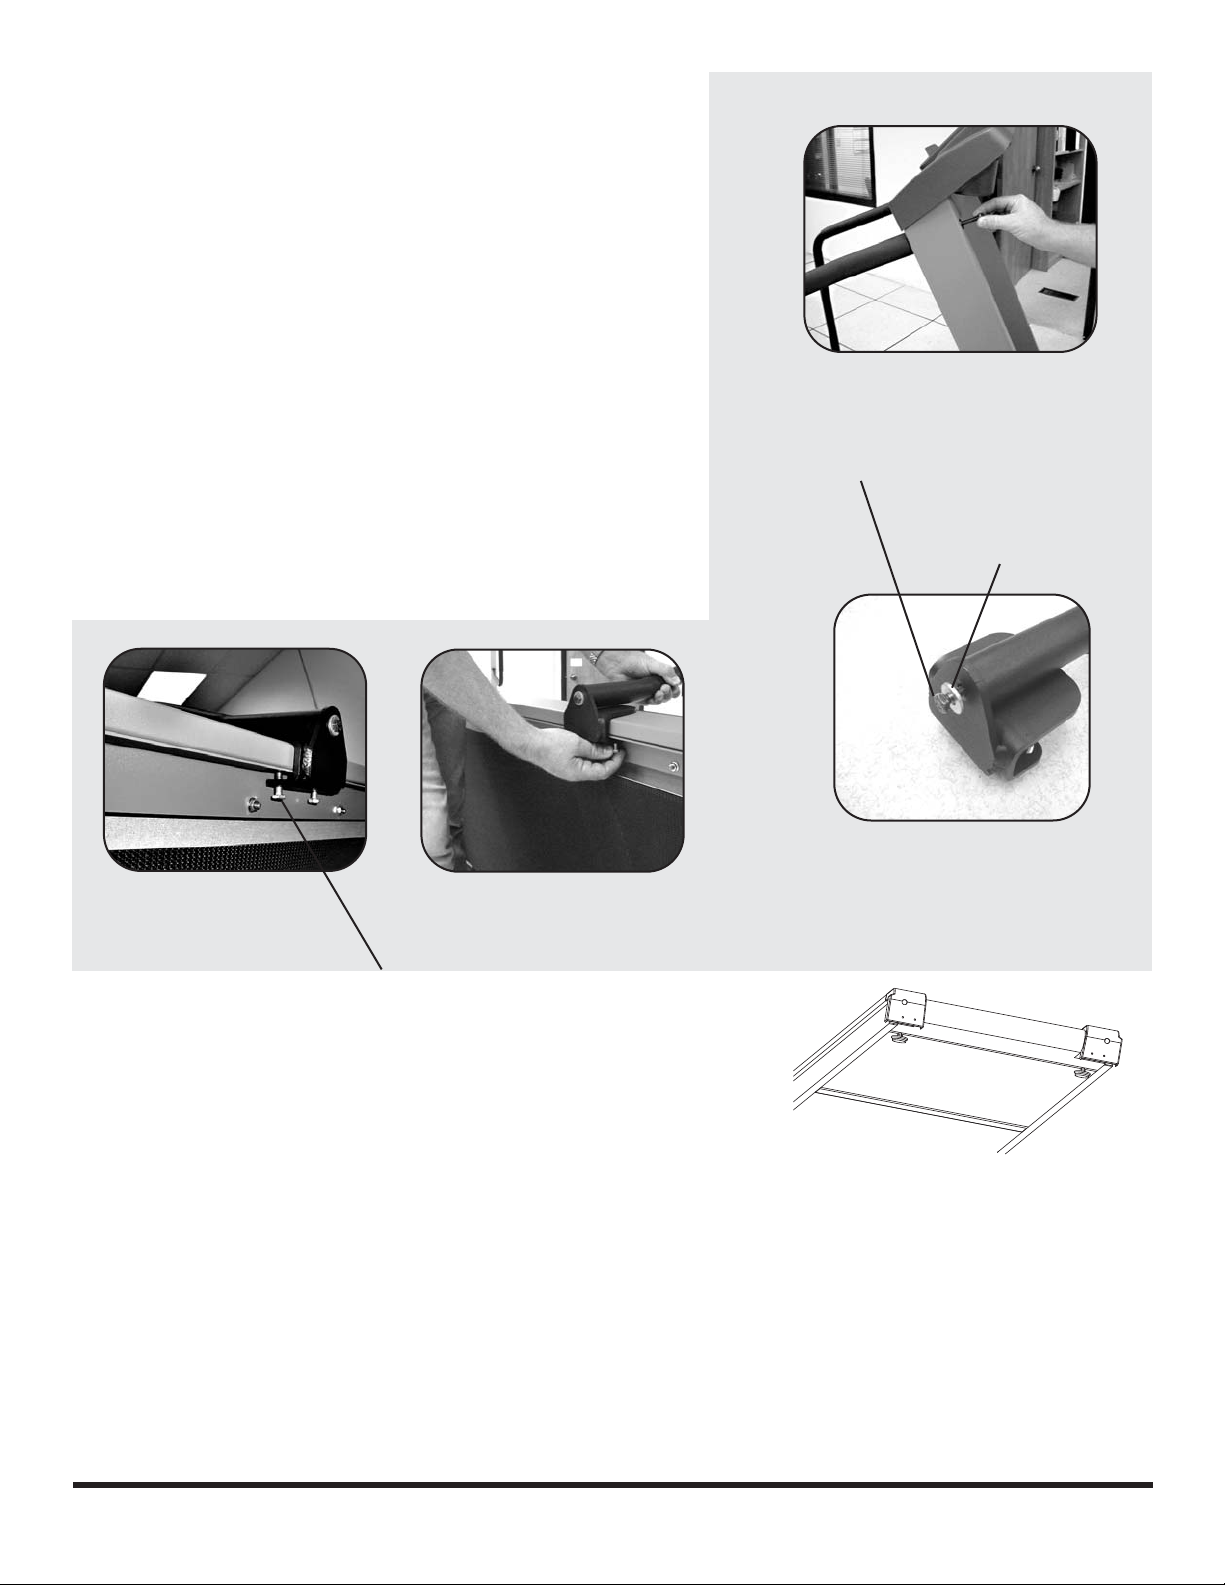
STEP 1
Remove contents from box: (1) upright assembly, (2)
handrails, (1) hardware bag, (1) main base.
STEP 2
Remove motor cover to expose the motor (see Figure 1).
STEP 3
Install the upright assembly onto the upright brackets
on the treadmill frame (see Figure 2). Caution: Use care
not to damage the wires in the right upright.
STEP 4
Please note: the left upright is attached to the frame
differently then the right upright. If you stand on the
treadmill as if you were walking on it, your left hand
is on the left side of the treadmill, your right hand is on
the right side of the treadmill.
The left side is attached with clear nylon shoulder
washers. The right side is attached with metal star
washers.
FIGURE 1
FIGURE 3
Black Flatwasher
1” Button head
FIGURE 2
*Make sure that shoulder washers are
seated into holes on upright tubes before
tightening.
Shoulder washer
Left Upright
5
Page 6
AAAASSSSSSSSEEEEMM
LEFT SIDE – Install (4) 5/16" x 1" button head bolts with (4)
black flat washers and (4) NYLON SHOULDER WASHERS
into the left side of the upright (see Figure 3). Install bolts and
washers by hand. Make sure shoulder washers are seated
properly in the holes of the upright before tightening.
RIGHT SIDE – Install (4) 5/16" x 1" button head bolts with (4)
black flat washers and (4) STAR WASHERS into the right side
of the upright (see Figure 4). Install bolts and washers by hand.
Now tighten all bolts with the provided hex key. Tighten outside bolts first, then the bolts on the front of the unit.
MMBBBBLLLLYYYY IIIINNNNSSSSTTTTRRRRUUUUCCCCTTTTIIIIOOOONNNNSSSS
STEP 5
Cut rubber band on the right upright leg to access the cable
wires (see Figure 5). Insert cable wire connectors into their
respective sockets on the power supply board (see Figure 6).
STEP 6
Fold up slack in the exposed cable wires and insert loose wires
into the provided wire clips (see Figure 7). CAUTION: make
sure when routing wires that they cannot come into contact
with moving parts.
FIGURE 4
Black Flatwasher
1” Button head
Star washer
STEP 7
Reinstall motor cover using the (7) Phillips head screws.
STEP 8
Attach the top of the right handrail (marked with an “R”) to the
right side of the upright using the 5/16 x 5” long hex head bolt
and flat washer. Hand tighten only. (see figure 8).
Right Upright
FIGURE 7
FIGURE 6
FIGURE 5
6
Page 7
STEP 9
Attach handrail clamp to the bottom of the handrail using 5/16
x 1 1/2” hex head bolt and flat washer. (See Figure 9) Hand
tighten only.
STEP 10
Tilt the unit on its side. With the treadmill on its side, position
the handrail clamp to the frame rail. Secure hand rail clamp to
the frame rail using (2) 5/16” x 1 1/2” hex head bolts, then
tighten the bolts to the frame rail. Now tighten all bolts. (See
Figure 10 & 11)
STEP 11
Repeat steps 8-10 for the left side handrail.
STEP 12
Remove protective backing from the hex key clip and place
wherever you feel is convenient. We suggest on the end cap by
the rear roller. Refer to “Taking Care of Your Treadmill” for hex
key use.
FIGURE 8
5/16 x 1 1/2”
Hex Head Bolt
5/16” Flat Washer
FIGURE 9
FIGURE 11
5/16” x 1 1/2”
Hex Head Bolt
FIGURE 10
STEP 13
ADJUSTMENT OF REAR FEET
If your treadmill sits unevenly you can adjust the rear feet
with 9/16 wrench to make the treadmill stable on your
floor.
Rear Feet
CAUTION
• Treadmills are heavy pieces of exercise equipment and should be used with caution.
• Children should not be allowed to play on treadmill
If you have any questions about assembling or using this treadmill, please contact the store where
you purchased the treadmill or telephone 800-NAUTILUS or (800) 628-8458 or fax (877) 686-6466 or
e-mail cstech@nautilus.com
7
Page 8

UUUUSSSSIIIINNNNGGGG YYYYOOOOUUUURRRR TTTTRRRREEEEAAAADDDDMM
MMIIIILLLLLLLL
A BEGINNER’S GUIDE
Getting Started
If you are over 45, or have had health problems, and this is your first step towards fitness, check with your physician
first.
Before you even get on your treadmill, stand along side it, and get used to the controls- raise and lower the speed and
incline, and get a good feel for the controls. Then get on, straddling the belt with both hands on the handrails. Turn the
machine on and set the speed at 1 or 2 MPH. Stand tall, look forward, and "paw" with just one foot several times. Then
step onto the belt, and begin walking. After you feel comfortable, slowly increase the speed to 2 or 3 MPH. Stay at that
speed for 10 minutes. Slowly bring the machine to a stop and step off.
Going Forward
Walk a mile at a steady pace, and record your time. It will probably take between 15 and 25 minutes. At 3 MPH, a mile
will take about 20 minutes. After you can do this a few times fairly easily, you can gradually increase your speed and
grade so you are getting a good workout that lasts 30 minutes. To begin a walking program, keep in mind that you are
in no big hurry. This is for lifetime health, not overnight magic.
How Often?
• The goal- three to five times a week, for 15 to 60 minutes.
• Schedule workouts in advance; workout even when you don’t want to.
• Control intensity of workout by speed and/or by incline.
• Start off with no elevation at first. As you want to increase workout intensity, begin to elevate the machine; it
is very effective.
Suggested Workouts
The Quickie-
• 15 to 20 minute workout to get the most bang for the time.
• Warm up for 2 minutes at 3 MPH.
• Increase speed to 3.3 MPH then to 3.6 MPH (2 minutes each).
• Add 0.2 MPH of speed every 2 minutes until you reach a speed where you’re breathing hard, but not panting.
Maintain this speed for as much time as you have, slowing by 0.2 MPH increments if you get out of breath.
Leave 4 minutes at the end to slow down to 3 MPH for a cool down.
• If you have a hard time reaching the breathe-hard intensity through speed increases, increase the machine’s
incline slightly. A small increase in incline will raise the intensity of your workout.
The Calorie Burner-
• This more intense workout helps you burn more calories.
• Warm up for 5 minutes at 2.5 or 3 MPH.
• Increase 0.2 MPH every 2 minutes until you find a challenging pace that you can maintain for 45 minutes.
• To boost your workout, walk for the duration of an hour long TV show.
• Increase the speed 0.2 MPH during every commercial break.
• Go back to your regular speed until the next break.
• This helps you increase the calorie burn during the ad and while your heart rate is elevated afterward.
• Leave 4 minutes at the end to walk at 3 MPH for cooling down.
8
Page 9

What to Wear
All you really need are a good pair of shoes. Running shoes are not very good for walkers; choose walking shoes with
a firm heel counter- the hard piece at the back of the shoe that holds the heel in place- and plenty of room for toes so
they can spread out as they push off. Wear loose, comfortable clothes.
Stretching
At any level of walking, a stretching session is a good idea. Warm muscles respond better to stretches than cold ones, so
walk for five or ten minutes until you’re warm. Then stop for the stretches listed below- fives times, 10 or more seconds
each, for each leg. Repeat at the end of the walk.
• Achilles Tendon and Calf- With both hands against a wall, place one foot behind you. Keeping the rear leg
straight and its heel on the ground, lean in toward the wall. Repeat for the other leg.
• Quadriceps- Put your left hand on a wall or table for balance. Then reach your right hand behind your back and
grasp your right ankle, pulling it gently towards your buttocks until you feel tension along the front of your thigh.
Repeat on other side.
•Hamstring- Stand on one leg and prop the other leg parallel to the ground on a table or cabinet top. Slide both
hands toward the propped-up ankle as far as they’ll go. Repeat on other side.
Walking and Running Resources
If you wish to obtain more information about starting a walking or a running program, please refer to the following
websites:
• Walking Websites-
• The Walking Site- http://www.thewalkingsite.com
This site has some useful information for beginning walkers. The "Beginner" section has a detailed walking
plan to get you started.
• Running Websites-
• Runner’s World- http://www.runnersworld.com
This website has many useful links that give information such as "Beginning," "Training," and "Nutrition."
This site has information for runners of all levels- from beginners to experts.
• American Running Association- http://www.americanrunning.org
The above websites are just the beginning of the vast amount of fitness related information you can find on the internet.
If you don’t have access to the internet, your local library will have fitness books. In addition, hiring a personal trainer
can be beneficial because they are able to assemble a custom walking or running workout program for you.
Good luck in achieving your fitness goals! The best time to start is NOW!
9
Page 10
BBBBeeeeggggiiiinnnnnnnneeeerrrr’’’’ssss GGGGuuuuiiiiddddeeee TTTToooo UUUUssssiiiinnnngggg HHHHeeeeaaaarrrrtttt RRRRaaaattttee
HOW TO USE YOUR CHEST STRAP
CHEST STRAP
Using your chest strap, you can monitor your heart rate at any time during your workout or you can use a pre-programmed heart rate program.
How to use the chest strap:
ee
• The chest strap will send your heart rate to the treadmill’s receiver and your pulse will be displayed within a
matter of several seconds.
• If your treadmill is equipped with heart rate programs, you will find an explanation of the heart rate programs
on the following pages in this user’s manual.
10
Page 11

OOOOPPPPEEEERRRRAAAATTTTIIIIOOOONNNN GGGGUUUUIIIIDDDDEE
EE
Increases &
decreases incline,
weight, age, workout
time, & target heart
rate. Raises and
lowers target heart
rate during heart
rate program.
Displays incline and
workout distance.
User profile
keys
Press this key and a
value on the keypad
followed by ENTER to
incline the treadmill to
the desired level.
Displays course
profile & scrolling
messages.
Displays actual or target
heart rate (beats/min) &
% of maximum heart
This keypad can be used to input weight, age, workout time, & target heart rate. You may also use the
keypad to enter preferred workout speed or incline (press FAST INCLINE first). Press ENTER after a
BEFORE STARTING
rate.
Displays time of workout. Also
displays pace (minutes per mile
or km) when speed is changed.
Press after entering weight, age, program,
target heart rate, and workout time.
fast speed or incline entry.
Displays calories burned during
workout or current calories per
minute being burned.
Increases & decreases
speed, weight, age &
workout time.
Turns Display On or
Off
Press to start belt at
0.5 mph or 0.8 kph.
Press again to stop/
pause during workout.
Press to select one
of the programs.
Press at the end of
your workout to cool
down (incline returns to
zero & speed is gradu-
ally reduced).
Displays speed in
mph or kph.
Straddle the belt and stand on the plastic side rails. Insert the safety key and attach the rope to your clothing. Do not
stand on the walking belt while starting or stopping the treadmill. If you are a new user, begin walking at a slow
speed and hold on to the handrails until you become comfortable.
LUBRICATE BELT MESSAGE
A lubricate belt message will be displayed for each 250 miles of belt travel. The message “Lub bELt’ will be shown in
the heart rate and time displays when the treadmill is turned on. Press any button to clear the message. Refer to
“Taking Care of Your Treadmill” for belt lubrication. After lubrication, turn the power back on and your treadmill is
ready for use.
QUICK START
1. Press POWER.
2. Adjust weight using ARROW (+ or -) keys or Numeric Keypad.
3. Press START/STOP. Walking belt begins to move at minimum speed. Time counts up.
4. Adjust speed and incline using the ARROW (+ or -) keys.
PROGRAM 1 – MANUAL MODE
1. Press POWER.
2. Adjust weight using ARROW (+ or -) keys or Numeric Keypad. Press ENTER.
3. Enter age using ARROW (+ or -) keys or Numeric Keypad. Press ENTER.
4. Press PROGRAM key once to choose program 1 (P1).
5. Press START/STOP. Walking belt begins to move at minimum speed. Time counts up.
6. Adjust speed and incline using the ARROW (+ or -) keys.
7. End your workout by following the "TO STOP" section.
11
Page 12

OOOOPPPPEEEERRRRAAAATTTTIIIIOOOONNNN GGGGUUUUIIIIDDDDEEEE
NUMERIC KEYPAD
The treadmill is equipped with a numeric keypad. This keypad may be used to enter weight, age, workout time, and
target heart rate. After entering any of these values, press ENTER to confirm and move to the next prompt. This keypad also enables you to enter speed and incline values during a manual (P1 - MANUAL) or user program (P12-14). See
“Fast Speed Entry” and “Fast Incline Entry” sections for more information.
Fast Speed Entry (Manual Mode, HRC, and User Programs ONLY)
During a manual program, heart rate control program, or user program, you may enter a speed on the numeric keypad.
You must press ENTER to confirm the new speed. You may enter values up to 11 MPH. Valid speeds are one to three
digits (to the tenth of a mile/hour). If you enter a speed that is not within this range, you will hear a reject tone and the
treadmill will remain at the same speed.
Example: During your workout, if you press 5 ENTER, the treadmill will run at 0.5MPH. If you press 72 ENTER, the
treadmill will run at 7.2MPH. If you press 103 ENTER, the treadmill will run at 10.3MPH.
CAUTION: The treadmill will adjust to the new speed when the ENTER key is pressed.
Fast Incline Entry (Manual Mode and User Programs ONLY)
Fast incline entries will work in manual or user programs. During your workout, you may press FAST INCLINE and
use the numeric keypad to enter an incline value. After pressing the desired incline level, you must press ENTER to
confirm the new incline level. You may enter values up to 12%. Valid incline levels are one to three digits and should be
entered in multiples of 0.5% (to the half of a percent). If you enter an incline level that is not within the range, you will
hear a reject tone and the treadmill will remain at the same incline level.
Example: During your workout, if you press FAST INCLINE 5 ENTER, the treadmill will adjust the incline level to
0.5%. If you press FAST INCLINE 15 ENTER, the treadmill will adjust the incline level to 1.5%. If you press FAST
INCLINE 105 ENTER, the treadmill will adjust the incline level to 10.5%. If you press FAST INCLINE 50 ENTER, the
treadmill will adjust the incline level to 5.0%.
CAUTION: The treadmill will adjust to the new incline when the ENTER key is pressed.
TO STOP
1. Step off belt onto the plastic side rails.
2. Press START/STOP. The walking belt stops. The display enters the RESULTS MODE.
3. Press POWER to turn off the treadmill.
NOTE: For an immediate stop, STEP OFF BELT and press POWER key or remove the
safety key.
CAUTION: THE BELT WILL STOP ABRUPTLY.
PROGRAMS 2-8 - PRESET PROGRAMS
1. Press POWER.
2. Adjust weight using ARROW (+ or -) keys or Numeric Keypad. Press ENTER.
3. Enter age using ARROW (+ or -) keys or Numeric Keypad. Press ENTER.
4. Press PROGRAM key to choose program 2, 3, 4, 5, 6, 7, or 8 (P2-P8). Press ENTER.
5. Adjust program time (10-99 minutes) using ARROW (+ or -) keys or Numeric Keypad.. Press ENTER.
6. Press START/STOP. Walking belt begins to move at minimum speed. Time counts up. (See charts)
Programs 2, 5, 7, and 8 are divided into 10 segments. Divide the program time by 10 to compute the length of each segment. For example, if you choose a program time of 20 minutes, each segment will be 2 minutes long. The display gives
a visual and an audible warning before each segment change if there is a change in speed or elevation. The segments of
each program have a variety of speeds and inclines (See charts). To review your workout results, press START/STOP.
The program repeats until you choose to end the workout by following the "TO STOP" section.
12
Page 13

OOOOPPPPEEEERRRRAAAATTTTIIIIOOOONNNN GGGGUUUUIIIIDDDDEEEE
Programs 3, 4, and 6 are divided into 9 segments. Divide the program time by 9 to compute the length of each segment.
For example, if you choose a program time of 18 minutes, each segment will be 2 minutes long. The display gives a
visual and an audible warning before each segment change if there is a change of speed or elevation. The segments of
each program have a variety of speeds and inclines (See charts). To review your workout results, press START/STOP.
The program repeats until you choose to end the workout by following the "TO STOP" section.
You may override the speed or incline of any segment by using the ARROW (+ or -) keys. The change lasts for your current workout. The next time you run the program, it returns to the original settings. If you make a change in speed or
incline during your present workout, the same change is made to every other segment in the program. For example, if
you are in Segment 3 and override the speed by increasing it 2mph (or kph) the speed in all other segments is increased
2mph (or kph).
13
Page 14

OOOOPPPPEEEERRRRAAAATTTTIIIIOOOONNNN GGGGUUUUIIIIDDDDEEEE
10
8
Grade
6
4
Speed
2
Speed and Incline (mph & %)
0
1 2 3 4 5 6 7 8 9 10
10
8
Grade
6
4
Speed
2
Speed and Incline (mph & %)
0
1 2 3 4 5 6 7 8 9 10
Program P2-Speed Interval Walker
Interval
Program P4-Speed Interval Trainer
Interval
10
8
Grade
6
4
Speed
2
Speed and Incline (mph & %)
0
1 2 3 4 5 6 7 8 9 10
10
8
Grade
6
4
Speed
2
Speed and Incline (mph & %)
0
1 2 3 4 5 6 7 8 9 10
Program P3-Speed Interval Jogger
Interval
Program P5-Hill Repeat
Interval
10
8
Grade
6
4
Speed
2
Speed and Incline (mph & %)
0
1 2 3 4 5 6 7 8 9 10
10
8
Grade
6
4
Speed
2
Speed and Incline (mph & %)
0
1 2 3 4 5 6 7 8 9 10
Program P6-Hill Repeat - Fat Burn
Interval
Program P8-Mountain
Interval
10
8
Grade
6
4
Speed
2
Speed and Incline (mph & %)
0
1 2 3 4 5 6 7 8 9 10
Interval
The program profiles on this page
are in % when referencing incline
and mph when referencing speed.
To convert mph to kph, use the
chart.
Program P7-Rolling Hills
Charts are in %
and mph
To convert:
1.0
2.0
3.0
4.0
5.0
6.0
7.0
8.0
9.0
kph
1.6
3.2
4.8
6.4
8.0
9.7
11.3
12.9
14.5
16.1
mph
10.0
14
Page 15

OOOOPPPPEEEERRRRAAAATTTTIIIIOOOONNNN GGGGUUUUIIIIDDDDEE
EE
PROGRAMS 9-10 – HEART RATE PROGRAMS
(HEART RATE CHEST STRAP MUST BE WORN)
1. Press POWER.
2. Adjust weight using ARROW (+ or -) keys or
Numeric Keypad. Press ENTER.
3. Enter age using ARROW (+ or -) keys or
Numeric Keypad. Press ENTER.
4. Press PROGRAM key to choose program
9 or 10 (P9 – P10). Press ENTER.
5. A suggested target heart is displayed in the
TIME/PACE window. You may change the
target heart rate by using the ARROW
(+ or -) keys or Numeric Keypad.
6. Press START/STOP. Walking belt begins to
move at minimum speed. Time counts up.
7. Adjust the speed using the SPEED ARROW
(+ or -) keys.
8. You may adjust the target heart rate at any
time during the workout. Press the
INCLINE ARROWS (+ or -).
9. End your workout by following the “TO
STOP” section.
10. Program 9 (P9- Weight Loss HRC program)
adjusts the treadmill’s incline to help you
reach and maintain your heart rate. Program
10 (P10- Cardiovascular HRC program)
controls both incline and speed to keep you near your target heart rate. Please review the information below for
exact details on how P9 and P10 control your heart rate.
200
180
160
140
120
Heart Rate - Beats per Minute
100
80
Age: 20 25 30 35 40 45 50 55 60 65+
EXERCISE TARGET ZONE CHART
Aerobic Zone
Fat Burning Zone
Warm Up/Cool Down
65% to 85%
55% to 65%
55% or less
HEART RATE CONDITIONING USING THE HEART RATE PROGRAMS
Here’s a simple way to get into heart rate conditioning. What is your primary exercise goal?
WEIGHT LOSS PROGRAM - Use Program 9 (P9)
CARDIOVASCULAR PROGRAM – Use Program 10 (P10)
These programs calculate suggested target heart rate values and are designed to aid you in reaching your fitness goals.
However, before starting any exercise program, you should consult with your physician or health professional. He or
she can help establish the exercise frequency, intensity (target heart rate zone), and time appropriate for your particular
age and condition.
WEIGHT LOSS PROGRAM (P9)
This program is for those whose primary fitness goal is weight loss or fat reduction. The target heart rate is computed
as:
(220-age) x 65%
For example, the weight loss target heart rate for a 45-year old person is (220-45) x 65%. This equals a target heart rate of
114 beats per minute.
We recommend this program for a first time user. If the workout is too strenuous, lower the target heart rate by pressing
the INCLINE DOWN ARROW during the workout.
The weight loss program keeps you at your target heart rate by doing the following:
• There is an initial adjustment in incline when you begin the workout. The amount of adjustment is based on your
target heart rate value.
15
Page 16

OOOOPPPPEEEERRRRAAAATTTTIIIIOOOONNNN GGGGUUUUIIIIDDDDEE
• If your heart rate is 26 beats per minute (bpm) or more below the target, there is no additional adjustment in incline.
This allows for a warm-up period. Raise your speed to increase your heart rate.
• If your heart rate is 3 to 25 bpm below the target, the incline increases. When you are below the target zone, a green
heart flashes on the dot matrix display. This reminds you that you are below your target zone.
• If your heart rate is within 2 bpm of the target, there is no adjustment in incline. When you are within 3 bpm of the
target, an orange heart
• If your heart rate is 3 or more bpm above the target, the incline decreases. If the treadmill reaches minimum incline
and your heart rate is still above the target, a “decrease speed” message scrolls across the display. When you are
above the target zone, a red heart
your target zone.
NOTE: The treadmill gives a visual and an audible warning before a change is made to your incline.
CARDIOVASCULAR PROGRAM (P10)
This program is for those whose primary fitness goal is to improve their aerobic fitness level and to improve sports performance. The target heart rate is computed as:
For example, the cardiovascular target heart rate for a 45 -year old person is (220-45) x 80%. This equals a target heart
rate of 140 beats per minute.
flashes on the dot matrix display. This reminds you that you are in your target zone.
flashes on the dot matrix display. This reminds you that you are above
(220-age) x 80%
EE
If the workout is too strenuous, lower the target heart rate by pressing the INCLINE DOWN ARROW during the work-
out.
The cardiovascular program keeps you at your target heart rate by doing the following:
• You will control your speed until you reach your target heart rate zone, which is + or – 3 beats per minute (bpm) of
your target heart rate. When you are below the target zone, a green heart
This reminds you that you are below your target zone.
• Once the target zone of + or – 3 bpm of the target heart rate has been reached or exceeded, the heart rate control
algorithm begins to control both your speed and your incline.
• If your heart rate is within 2 bpm of the target, there are no speed or incline adjustments made. When you are within
2 bpm of the target, an orange heart
This reminds you that you are in your target zone.
• If your heart rate falls below the target zone, a green heart flashes on the dot matrix display. Your speed is
automatically increased by 0.2 MPH every 15 seconds until you have reached your target zone.
• If the treadmill has increased your speed by 1 MPH* and you are still not within 2 bpm of your target, the treadmill
begins to raise the incline by 1% every 15 seconds.
• If your heart rate is 3 or more bpm above the target, the speed decreases by 0.2 MPH every 15 seconds until you reach
your target zone. When you are above the target zone, a red heart
This reminds you that you are above your target zone
• If the treadmill has decreased your speed by 1 MPH* and you are still not within 2 bpm of your target, the treadmill
begins to decrease in incline by 1% every 15 seconds. If you are still above your target zone, lower your speed.
NOTE: The treadmill gives a visual and an audible warning before a change is made to your incline.
* The treadmill will only adjust your speed by 1 MPH maximum.
flashes on the dot matrix display.
flashes on the dot matrix display.
.
flashes on the dot matrix display.
16
Page 17

OOOOPPPPEEEERRRRAAAATTTTIIIIOOOONNNN GGGGUUUUIIIIDDDDEE
EE
FITNESS TEST (P11)
The Fitness Test program measures the user’s baseline cardiopulmonary fitness level. Upon completion of the fitness
test, the user’s fitness scores will be given. This score can be used to compare the user’s fitness level progression as performance improves.
To use the program, the user must wear the included heart rate transmitter strap. It is important that the user enter their
correct age. The user’s age is used to calculate the target heart rate during the fitness test according to the following formula:
PROGRAM INSTRUCTIONS
1. Press POWER.
2. Adjust weight using ARROW (+ or -) keys or Numeric Keypad. Press ENTER.
3. Enter age using ARROW (+ or -) keys or Numeric Keypad. Press ENTER.
4. Select FITNESS TEST program 11 (P11) using PROGRAM or ARROW (+ or -) keys. Press ENTER.
5. The Target Heart Rate will be displayed in the HEART RATE window.
6. Set speed using SPEED ARROW (+ or -) keys.*
7. Press START/STOP.
8. The test begins when your Target Heart Rate is achieved, and will continue for three minutes.
9. At the conclusion of the test, read your Fitness Score in main display window.
10. Reference Table 1 to determine your fitness level.
* If you are an experienced treadmill user, pick the speed at which you normally walk or run for an
extended period of time.
TARGET HEART RATE = (220-age) *0.6*1.15
After you begin, you have a one-minute warm-up. The program then adjusts the incline level of the treadmill in a
similar fashion as used in the Heart Rate Control programs. Once the user reaches their target heart rate +/-5 bpm, the
TIME window starts a countdown from three minutes. During the three-minute period, measurements of incline, speed
and heart rate are used to calculate the user’s fitness score. The test is concluded at the end of the three-minute period
and the user’s score is displayed, along with total elapsed time for the test, heart rate, speed and incline at the conclusion of the test. Using the displayed fitness score, reference Table 1 to determine your fitness level.
Note - different user’s fitness scores cannot be directly compared without the use of Table 1.
If inexperienced or unsure of the most comfortable speed for the test, please refer to the following guidelines for suggested speed:
0 - 1.9 mph – deconditioned individual
2.0 - 2.9 mph – sedentary or new to exercise
3.0 - 3.9 mph – average walker
4.0 - 4.9 mph – accelerated walker
5.0 - 5.9 mph – easy paced jogger
6.0 - 7.9 mph – moderate paced jogger
8.0 - 9.9 mph – experienced runner
10.0 -11.0 mph – elite runner
It is important for the test that walkers use
*
speeds of 4.9 mph or less and runners use
speeds of 5.0 mph or more.
17
Page 18

OOOOPPPPEEEERRRRAAAATTTTIIIIOOOONNNN GGGGUUUUIIIIDDDDEE
TABLE 1 FITNESS LEVELS
WOMEN
Age Low Fair Average Good High Athletic Olympic
20-29 <28 29-34 35-43 44-48 49-53 54-59 60+
30-39 <27 28-33 34-41 42-47 48-52 53-58 59+
40-49 <25 26-31 32-40 41-45 46-50 51-56 57+
50-65 <21 22-28 29-36 37-41 42-45 46-49 50+
MEN
Age Low Fair Average Good High Athletic Olympic
20-29 <38 39-43 44-51 52-56 57-62 63-69 70+
EE
RESULTS
30-39 <34 35-39 40-47 48-51 52-57 58-64 65+
40-49 <30 31-35 36-43 44-47 48-53 54-60 61+
50-65 <25 26-31 32-39 40-43 44-48 49-55 56+
60-69 <21 22-26 27-35 36-39 40-44 45-49 50+
FITNESS SAFEGUARDS
Before starting any exercise program, consult with your physician or health professional. He or she can help establish the exercise frequency, intensity (target heart rate zone) and time appropriate for your particular age and condition. If you have any pain or
tightness in your chest, an irregular heartbeat, shortness of breath,
feel faint or have any discomfort while you exercise, STOP!
Consult your physician before continuing.
18
Page 19

OOOOPPPPEEEERRRRAAAATTTTIIIIOOOONNNN GGGGUUUUIIIIDDDDEE
EE
USER PROFILES 1-4
Your treadmill is equipped with four user profiles. Using this feature offers the following benefits to a user:
• Quicker entry into programs- Each user profile stores previously entered values. User weight and age are always
remembered. In the preset programs, the treadmill remembers your workout time.
• Storage of cumulative workout data- Many users are interested in their fitness progress. Your treadmill displays the
following cumulative values for each user in a user profile: Total elevation gain, distance, calories burned, and workout
time.
• Storage of 3 personal programs- Each user profile contains three Personal Programs P12, P13, and P14. These cus-
tom programs remember your preferred speed and incline settings for 10 segments. Each user (1, 2, 3 and 4) may store
up to three unique programs in their profile.
USING PROFILES 1-4
1. Press POWER.
2. Press USER 1, USER 2, USER 3, or USER 4 key to select user 1, 2, 3, or 4.
3. Adjust weight using ARROW (+ or -) keys or Numeric Keypad. Press ENTER.
4. Enter age using ARROW (+ or -) keys or Numeric Keypad. Press ENTER.
5. Select any program using the PROGRAM key.
6. At this point, the manual program, preset programs, heart rate programs, and fitness test work as described earlier.
7. The next time you use a user profile, the treadmill remembers previously entered values such as weight, age, and
workout time (preset and personal programs). You may change the stored weight, age, and workout time values
using the ARROW (+ or -) keys or Numeric Keypad. However, if you wish to confirm the current values, you may
press START/STOP after selecting your desired program.
8. To view workout and user data, press START/STOP during your workout. The dot matrix lists the following
information:
• Workout elevation gain (how many feet or meters you have climbed during your workout based on your incline
settings)
• Total treadmill odometer (cumulative treadmill miles or kilometers)
• Total user elevation gain (in feet or meters)
• Total user distance traveled (in miles or kilometers)
• Total user calories burned
• Total user workout time (in hours and minutes)
9. End your workout as described in the “TO STOP” section.
Any of the user profiles may be completely reset. To reset a profile, press and hold the desired user key for 5 seconds
while “ENTER WEIGHT OR SELECT USER PROFILE” is scrolling across the dot matrix (just after powering on the
treadmill). When the user profile has been reset, the treadmill will give an audible confirmation. Please note that if a
user profile is reset, all cumulative data is reset and workout preferences are restored back to factory default values.
Please note that Manual Mode (P1), Preset Programs (P2-P8), Heart Rate Programs (P9-P10), and the Fitness Test (P11)
may all be used as described with out logging into a user profile. However, Personal Programs P12-P14 may not be
accessed unless a user is logged into a user profile.
19
Page 20

OOOOPPPPEEEERRRRAAAATTTTIIIIOOOONNNN GGGGUUUUIIIIDDDDEE
EE
PROGRAMS 12-14 – USER PERSONAL PROGRAMS
You must be logged into a user profile (see above) to use a personal program. A personal program allows the user to
design their own program with their choice of speed and incline for each of 10 segments.
To preprogram the custom programs:
1. Press POWER.
2. Press USER 1, USER 2, USER 3, or USER 4 key to select user 1, 2, 3, or 4.
3. Adjust weight using ARROW (+ or -) keys or Numeric Keypad. Press ENTER.
4. Enter age using ARROW (+ or -) keys or Numeric Keypad. Press ENTER.
5. Press PROGRAM key to choose program 12, 13, or 14 (P12-P14). Press ENTER.
6. Adjust program time (10-99 minutes) using ARROW (+ or -) keys or Numeric Keypad. Press ENTER.
7. Set the incline and speed for segment one (S1) using ARROW (+ or -) keys. Press ENTER.
8. Set the incline and speed for segment two (S2) in the same way. Press ENTER. Continue this process for each
of the remaining segments (there are 10 segments total).
9. Press START/STOP to save the program. To immediately use this program, see step 7 in the “
preprogrammed personal program
To use your preprogrammed personal program:
1. Press POWER.
2. Press USER 1, USER 2, USER 3, or USER 4 key to select user 1, 2, 3, or 4.
3. Adjust weight using ARROW (+ or -) keys or Numeric Keypad. Press ENTER.
4. Enter age using ARROW (+ or -) keys or Numeric Keypad. Press ENTER.
5. Press PROGRAM key to choose program 12, 13, or 14 (P12-P14). Press ENTER.
6. Adjust program time (10-99 minutes) using ARROW (+ or -) keys or Numeric Keypad. Press ENTER.
7. Press START/STOP. The treadmill begins at the speed and elevation of segment one. The program time you choose
is divided equally between the 10 segments. For example, if you chose 20 minutes for your program time, then each
segment is 2 minutes long. This display gives a visual and an audible warning before each segment change.
8. The program continues to repeat until you choose to end the workout by following the “TO STOP” section.
” section below.
To use your
You may revise your custom program by:
1. Repeating the steps to preprogram a personal program
OR,
2. While using a personal program, you may change the incline and speed as you go along. At the end of your workout,
press the START/STOP key and these new settings are saved for the next time you use this program.
20
Page 21

OOOOPPPPEEEERRRRAAAATTTTIIIIOOOONNNN GGGGUUUUIIIIDDDDEE
EE
RESULTS MODE/PAUSE
You may pause your workout for up to four minutes during your workout. During your pause, the treadmill’s display
enters RESULTS MODE. RESULTS MODE works in manual mode and in any program or user profile. To pause your
workout, step off the walking belt and onto the side rails. Press START/STOP. The walking belt stops. You may
review your workout data during the four minute pause. If you wait more than four minutes, the treadmill shuts off
automatically. During the pause, you may end the workout by pressing POWER.
Not lo
gged into a user profile- If your workout exceeded one minute, the display shows your workout results:
TOTAL WORKOUT TIME- This is shown in the TIME/PACE window.
AVERAGE HEART RATE- This is shown in the HEART RATE/% MAX HEART RATE window.
AVERAGE SPEED- This is shown in the SPEED window.
TOTAL DISTANCE- This is shown in the DISTANCE/INCLINE window.
WORKOUT ELEVATION GAIN- This is shown in the dot matrix display. Elevation gain is how many feet/meters you
climbed during your workout. You will have no elevation gain if you workout at 0% incline.
TOTAL TREADMILL ODOMETER- This shows how many miles or kilometers have been placed on the treadmill.
This is shown in the dot matrix display along with your workout elevation gain.
Lo
gged into a user profile- If your workout exceeded one minute, the display shows your workout results as listed
above. In addition, the dot matrix display scrolls the following cumulative user 1, 2, 3, or 4 statistics:
USER ELEVATION GAIN, USER DISTANCE, USER CALORIES, and USER WORKOUT TIME.
These values continue to accumulate for each user and may be reset (see “USING PROFILES 1-4”).
COOL DOWN
You may use the COOL DOWN feature at any time during your workout. When you press the COOL DOWN key, the
treadmill exits the current program and the incline returns to zero. The speed is reduced to 80% of the current speed
every minute, for three minutes. This slowly reduces your speed to half of what it was during the workout. The treadmill continues at this speed until you choose to end our workout by following the “TO STOP” section.
This treadmill is compatible with most major chest strap brands, including brands that employ coded chest strap technology. Consult your dealer for additional information.
21
Page 22

EEEEXXXXPPPPLLLLOOOODDDDEEEEDDDD VVVVIIIIEEEEWW
1
5
6
8
WW
2
3
4
7
16
13
19
11
12
9
10
14
17
15
18
18
22
Page 23

20
EEEEXXXXPPPPLLLLOOOODDDDEEEEDDDD VVVVIIIIEEEEWW
21
WW
22
40
39
38
37
35
36
35
34
33
32
23
30
24
25
26
Pivot Point
28
29
27
31
23
41
Page 24

MAIN ASSEMBLY PARTS
PPPPAAAARRRRTTTTSSSS LLLLIIIISSSSTT
TT
Key # Part # Description
1 KK2834 Safety Key Magnetic w/36” Cord
2 MM2290 Overlay
3 MM2291 Membrane
4 KK2836 Console Top
5 QQ2288 Electronic Board
6 MM2293 Rubber Pad Right
7 MM2292 Rubber Pad Left
8 KK2837 Console Bottom
9 QQ2198 Heart Rate Chest Strap
10 QQ2005 Heart Rate Transmitter
11 502297 Console Plate
12 QQ2289 Kill Switch
13 JJ2018 Rubber Grip
14 502171 Upright Assembly
15 KK2835 Motor Cover
16 372148 Handrail, Left
17 372147 Handrail, Right
18 372154 Handrail Clamp
19 QQ2277 Cable
20 KK2575 Belt, Walking
Key # Part # Description
21 KK2572 Roller, Front
22 KK2511 Motor, Elevation
23 KK2838 Side Rail
24 KK2678 Motor, Drive
25 KK2134 Belt, Drive
26 HH2065 Circuit Breaker
27 QQ2245 Combo Board
28 502124 Elevation Assembly
29 MM2037 Wheel
30 LL2002 Belt Guide
31 QQ1513 Speed Pickup
32 MM2219 Isolator, Tall
33 MM2220 Isolator, Short
34 502133 Frame Assembly
35 HH2191 Rear Feet
36 KK2496 Board
37 KK2596 Deck
38 KK2840 End Cap, Right
39 KK2839 End Cap, Left
40 KK2573 Roller, Rear
41 HH2067 Power Cord
24
Page 25

PPPPAAAARRRRTTTTSSSS LLLLIIIISSSSTT
TT
COMMON ASSEMBLY PARTS
Part #
348177 Reinforcement Bracket
FF2969 Owner's Manual
HH0032 Screw #8 x 3/4
HH2549 Phil Truss Screw # 8 x 3/4
HH0239BK Screw Drill Quick #8 x 5/8
HH1206 Nylock Nut 1/4-20
HH1267 Flange Lock Nut 5/16
HH1318 Hex Head Bolt 3/8x2 3/4
HH1380 Tension Spring
HH1996 Flange Lock Nut 1/4-20
HH2035 SMS Black #10 x 5/8
HH2041 Jumper 16'' 1/4 F x 1/4 F
HH2049 Ground Jumper 10''
HH2054 Hex Head Bolt 5/16 18 x 1
HH2066 Hi-Lo Screw #4 x 1/4
HH2075 Shoulder Washer
HH2084 Washer Stainless Steel
HH2091 Hex Head Bolt
HH2095 Star Washer 3/8
HH2125 T-Nut 1/4-20 x 9/16
HH2129 Button Head Bolt 5/16-18 x 3
HH2138 Actuator Pin
HH2148 E-Clip
HH2150 Hex Head Bolt 1/4-20 x 1
HH2151 Cage Nut 5/16
HH2154 Washer 5/16
HH2160 Phil Truss Screw # 8 x 1 1/4
HH2167 Screw Truss #8 x 1 1/2
HH2168 Hex Head Bolt 5/16 x 1 1/2
HH2169 Nylock Nut 3/8
HH2200 Nut 3/8-16
HH2318 Nylock Nut 5/16
HH2362 Hex Head Screw #10 x 3/4
HH2584 Eyebolt 1/4 - 20 x 5"
HH2387 Clevis Pin
HH2388 Clevis Clip
HH2429 Bushing
HH2524 Screw #6 x 1/2”
HH2549 Screw #8 x 3/4
HH2584 Eye Bolt 1/4 - 20 x 6
HH2602 Washer 1/4”
LL2051 End Cap Bracket
LL2053 Cord Bracket
Description
5/16-18 x 2 1/4
COMMON ASSEMBLY PARTS
Part #
LL2260 Speed Bullet Bracket
MM1528 Cable Clip
MM2058 Grommet
MM2099 Belt Guide Spacer 1/2''
MM2107 Lexan Strips
MM2204 Plug 1 x 3
MM6501 Strain Relief
QQ2014 Elevation Jumper
QQ2026 Speed Jumper
QQ2073 Heart Rate Receiver
QQ2296 Wire 3/16 F Red/Black
QQ0031 Replacement Potentiometer for
QQ2150 Replacement Potentiometer for
Description
Hubbell Elevation Motor
Jaeger Elevation Motor
25
Page 26

TTTTAAAAKKKKIIIINNNNGGGG CCCCAAAARRRREEEE OOOOFFFF YYYYOOOOUUUURRRR TTTTRRRREEEEAAAADDDDMM
1/2 TURNS
THEN RECHECK TENSION OF THE BELT
UNTIL BELT IS CENTERED
1/2 TURNS
THEN RECHECK TENSION OF THE BELT
UNTIL BELT IS CENTERED
MMIIIILLLLLLLL
Just like changing the oil in your car or replacing a filter in your home’s heating and cooling system, a little
preventive maintenance will insure your treadmill will operate smoothly and quietly for years to come.
WALKING BELT TENSION
As walking belts tend to stretch slightly with use, the walking belt may occasionally need to be tightened. If
the walking belt is too loose, you may find the belt stops while running or walking, while the motor continues to run. DO NOT OVERTIGHTEN THE BELT. This will cause reduced motor performance and roller
damage.
When properly tensioned, you should be able to lift the side of the belt about
2-3 inches (5-7.5 centimeters). A quick test for belt tension: you should be
able to fit three fingers under the edge of the belt.
To tighten belt:
Use the hex key provided with the treadmill (or a 3/16 inch hex wrench).
Place the hex key in the hole in left end cap and into the socket of the
adjustment screw. Turn key one full turn clockwise. Then place hex key in
hole in right end cap and turn key one full turn clockwise. Check the tension of the belt. Continue back and forth until belt is at the correct tension.
Make sure to adjust both sides equally to ensure correct belt alignment.
WALKING BELT CENTERING
The walking belt may occasionally need to be centered.
First be certain that belt is tensioned properly (see above).
Run the treadmill at about 3.5 mph (6 kph)
Place the hex key through the hole in the left end cap and into the socket of the adjustment screw.
If belt has moved to the right:
Turn the right adjustment screw 1/2 turn clockwise, then turn the left adjustment screw 1/2 turn
counterclockwise.
If belt does not move, repeat until belt is centered.
Then recheck tension of the belt (see above).
If the belt has moved to the left:
Turn the right adjustment screw 1/2 turn counterclockwise, then turn the left adjustment screw 1/2
turn clockwise.
If belt does not move, repeat until belt is centered.
26
Page 27

TTTTAAAAKKKKIIIINNNNGGGG CCCCAAAARRRREEEE OOOOFFFF YYYYOOOOUUUURRRR TTTTRRRREEEEAAAADDDDMM
W A R N I N G
MMIIIILLLLLLLL
WARNING
ALWAYS UNPLUG THE TREADMILL FROM THE ELECTRICAL OUTLET
BEFORE CLEANING, LUBRICATING, OR SERVICING THE UNIT.
CLEANING
General cleaning of the treadmill will prolong the life of the treadmill and improve performance.
Keep the unit clean by dusting regularly. Be sure to dust the exposed part of the deck on either side of the
walking belt and also the side rails.
For best performance, we recommend your treadmill be placed on a treadmill mat. Along with reducing
noise, a treadmill mat will help to keep dust debris away from your treadmill’s critical components.
Clean the top of the belt with a wet, soapy cloth. Be careful to keep liquid away from inside the motorized
treadmill frame or underneath the belt.
Dust and lint can accumulate under the motor cover and should be vacuumed out at least once a year. To do
so, FIRST UNPLUG THE UNIT. Then, remove the motor cover and carefully vacuum under the cover and
around the machinery. REPLACE THE COVER BEFORE PLUGGING THE UNIT BACK INTO THE
OUTLET.
WALKING BELT AND DECK LUBRICATION
This treadmill is equipped with a pre-lubricated deck and belt system. The deck and belt friction may affect
the function and life of your treadmill; we recommend periodic lubrication. We also recommend a periodic
inspection of the deck surface under the walking belt. If the deck appears worn, contact our
service department at
Use the following timetable as a guide to lubricate the deck:
• Light user (less than 3 hours/week) annually
• Medium user (3-5 hours/week) every six months
• Heavy user (more than 5 hours/week) every three months
We recommend that you use the following:
• Lube-N-Walk™ Treadmill Lubrication Kit, available from JAD Fitness, Inc. (
www.jadfitness.com) or your local specialty fitness dealer
• NAPA®8300 Silicone Spray, available at most NAPA®Auto Parts stores
800-NAUTILUS (800-628-8458) or e-mail cstech@nautilus.com.
800-877-3486 or
27
Page 28

TTTTRRRROOOOUUUUBBBBLLLLEEEESSSSHHHHOOOOOOOOTTTTIIIINNNNGGGG GGGGUUUUIIIIDDDDEE
EE
PROBLEM
Treadmill will not start 1. Not plugged in.
2. Safety pull pin not inserted.
3. Treadmill circuit breaker tripped.
Elevation not accurate
Speed not accurate.
Walking belt slips
Walking belt not centered.
1. Out of calibration.
1. Out of calibration.
2. Set in wrong units (kilometers or
miles)
1. Walking belt loose.
1. Walking belt tension not
centered across the rear roller.
CAUSE
CORRECTION
1. Plug into three prong grounded
outlet.
2. Insert safety pull pin.
3. Reset circuit breaker
1. Recalibrate unit (See
Calibration Instructions).
1. Recalibrate unit (See Calibration
Instructions)
2. Change units (See Calibration
Instructions)
1. Adjust walking belt tension
(See "Taking Care of Your
Treadmill")
1. Adjust walking belt tension
(See "Taking Care of Your
Treadmill")
Heart rate not displayed
(using chest strap)
Treadmill squeaks
1. Transmitter not making good
contact with skin.
2. Electromagnetic interference.
1. Pivot points need lubrication.
LOCATING THE CIRCUIT BREAKER ON YOUR TREADMILL
near the front of the treadmill, near the power cord
possible circuit breaker
locations
frame
power cord
power cord
Not tripped
1. Moisten skin contact area on the
chest strap, or turn chest strap
upside down.
2. Turn off any television,
microwave, or computer within
6 feet (2 meters) of treadmill
1. Lubricate pivot points.
(See Exploded View)
Tripped
28
Page 29

CCCCAAAALLLLIIIIBBBBRRRRAAAATTTTIIIIOOOONNNN PPPPRRRROOOOCCCCEEEEDDDDUUUURRRREE
WARNING: DURING THE ENTIRE CALIBRATION PROCESS, STAND ON THE PLASTIC SIDE RAILS ONLY!
DO NOT STAND ON TREADMILL WALKING BELT!
CALIBRATION
1. Turn off treadmill.
2. Simultaneously press PROGRAM, ENTER, and START/STOP for about 3 seconds.
3. Maximum speed will be shown in the TIME/PACE display followed by an “E” for English units or an “N” for metric
units. Press START/STOP to change from English units to metric units.
4. Press ENTER.
5. Press START/STOP. Incline and speed will calibrate simultaneously.
6. When successfully completed, TIME/PACE display will show CAL PASS.
7. Press POWER. Your treadmill is ready for use.
CONVERSION TO METRIC
In order to convert to miles or kilometers, do the following:
1. Press and hold the ENTER key for 5 seconds or until “SI“ is displayed in TIME/PACE window.
2. Release ENTER key.
3. Repeat steps 1 - 2 to convert miles per hour.
4. If the treadmill is in kilometers per hour mode, you will see a “SI” in the TIME/PACE window when you press and
hold the ENTER key.
5. If the treadmill is in miles per hour mode, you will see a “ENG” in the TIME/PACE window when you press and hold
the ENTER key.
EE
29
Page 30

MMPPPPOOOORRRRTTTTAAAANNNNTTTT CCCCOOOONNNNTTTTAAAACCCCTTTT NNNNUUUU
IIIIMM
If you need assistance, please have both the serial number of your machine and the
date of purchase available when you contact the appropriate Nautilus office listed below.
OFFICES IN THE UNITED STATES: INTERNATIONAL OFFICES:
For technical assistance and a list of
E-mail: cstech@nautilus.com distributors in your area, please call or
fax one of the following numbers.
MMBBBBEEEERRRRSSSS
MM
•TECHNICAL/CUSTOMER SERVICE •INTERNATIONAL CUSTOMER SERVICE
Nautilus, Inc. NORTH AMERICA OFFICE
World Headquarters Nautilus, Inc.
16400 SE Nautilus Drive World Headquarters
Vancouver, Washington, USA 98683 16400 SE Nautilus Drive
Phone: 800-NAUTILUS (800-628-8458) Vancouver, Washington, USA 98683
Fax: (877) 686-6466 Phone: 800-NAUTILUS (800-628-8458)
Fax: (877) 686-6466
E-mail: customerservice@nautilus.com
.
•GERMANY OFFICE
Nautilus GmbH
Tel: 02204 61027
Fax: 02204 62890
•ITALY OFFICE
Nautilus Italy s.r.l.
Tel: 031 51 10 86
Fax: 031 34 24 97
•SWISS OFFICE
Nautilus International S.A.
Rue Jean Prouve 6
1762 Givisiez / Switzerland
Tel: + 41 26 460 77 77
Fax: + 41 26 460 77 70
•UNITED KINGDOM OFFICE
Nautilus UK Ltd
Tel: 01 908 267 345
Fax: 01 908 267 346
30
Page 31

© 2006. Nautilus, Inc. All Rights Reserved. Nautilus and Trimline are registered trademarks of
Nautilus, Inc. All other trademarks are owned by their respective companies.
 Loading...