

Page 1
XCN-1050 Display System
Quick Reference Card
The XCN-1050™ display is a touchscreen platform for precision agriculture.
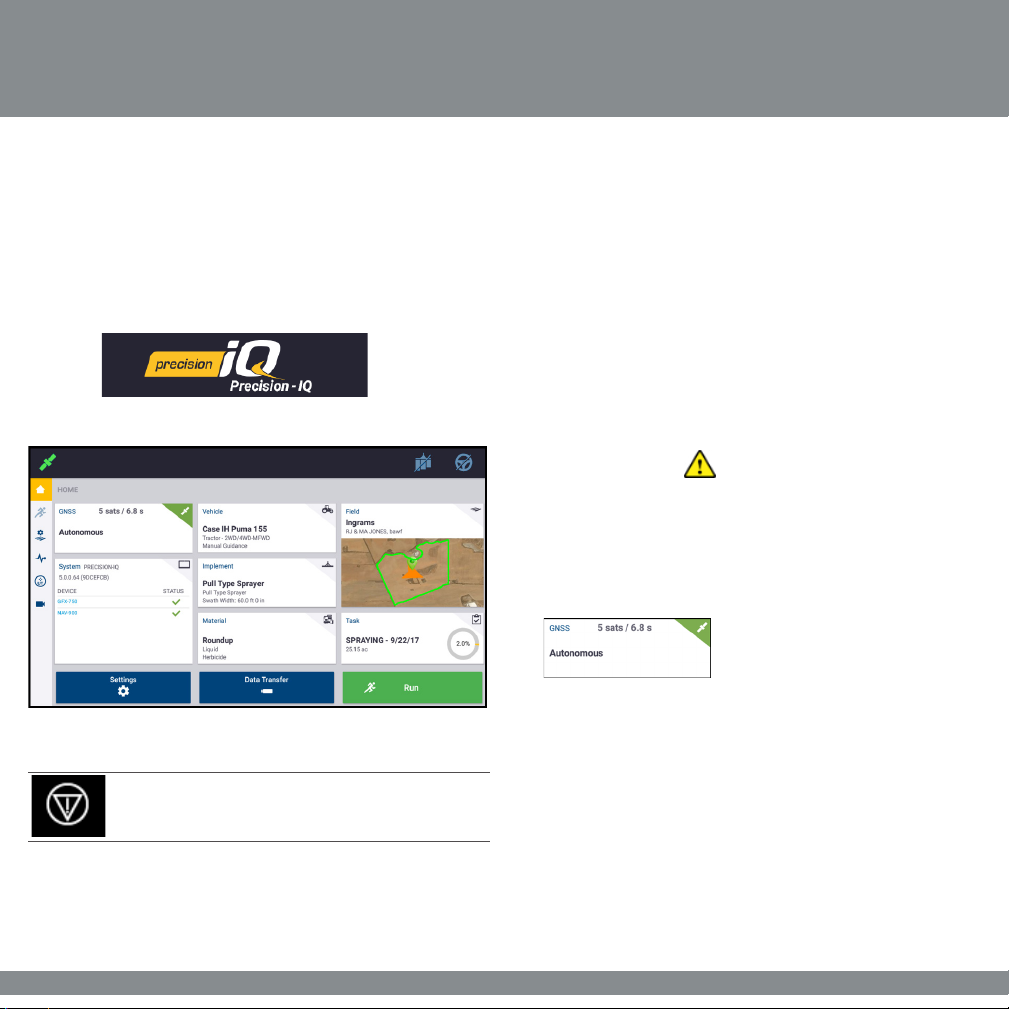
THE PRECISION-IQ HOME SCREEN
Tap the Precision-IQ™ icon to launch the application:
The Home screen displays by default:
Emergency Stop - Tap the Emergency Stop icon
from any screen to stop all activities controlled by the
display.
BEFORE YOU BEGIN - SETUP PROCEDURES
Check the System details to ensure all equipment you have
connected appears in the list and with a green check. Before you
enter the Run screen to complete any work, these items must be
set up:
• GNSS
• Vehicle
Note: A warning symbol next to an entry eld means the value
is missing or incorrect. Make a valid entry to clear the warning.
GNSS Setup
To congure your GNSS setup:
1. From the Home screen, tap the GNSS tile:
By default, GNSS is set up for Autonomous correction.
2. Tap Edit to set options for Corrections, CAN Messaging, and
NMEA Messaging. Your selections are automatically saved.
3. When you are satised with your changes, tap Home or the
Android Back button to return to the Home screen.
• Implement
• Material
• Field
• Task
Page 2
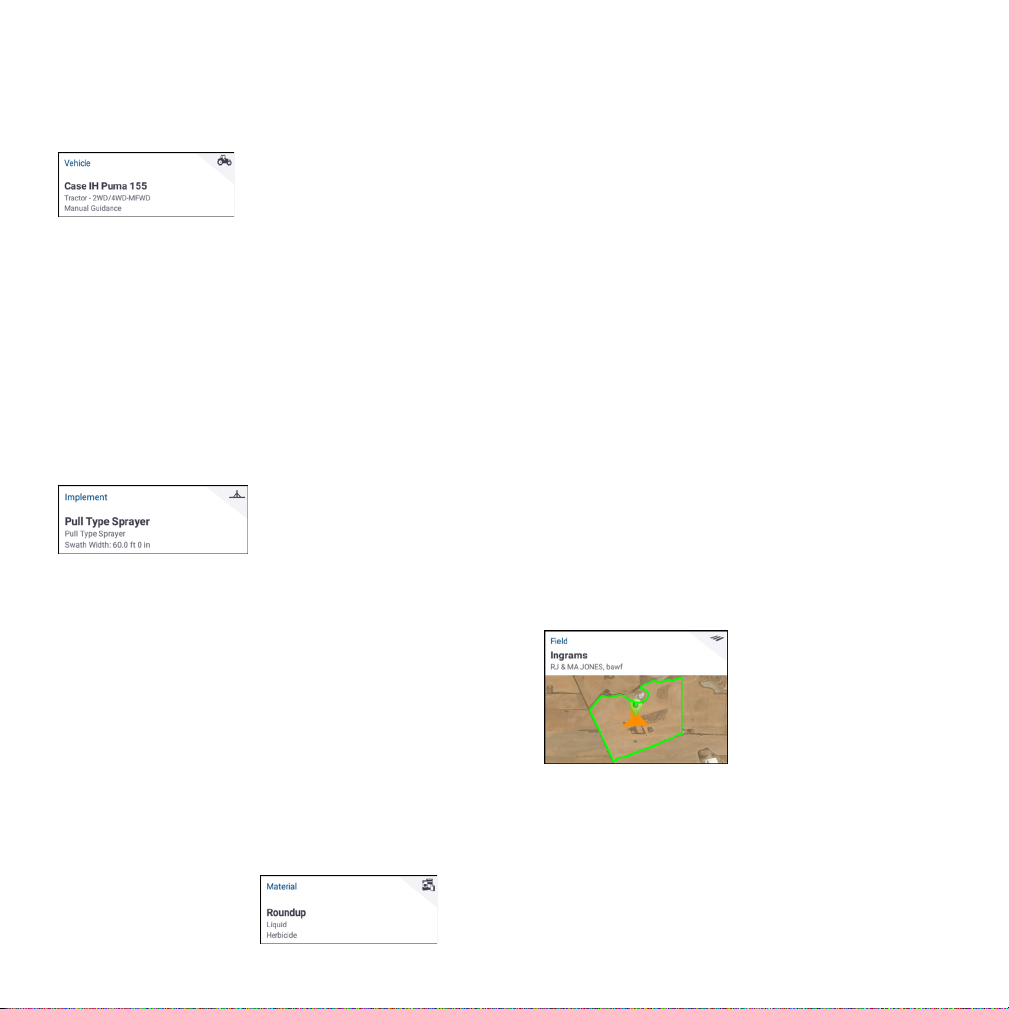
Vehicle Setup
To congure a vehicle:
1. From the Home screen, tap the Vehicle tile:
2. Tap New to launch the vehicle creation wizard. From here, you
can select a vehicle type, the vehicle make and model, and a
variety of available guidance options.
3. When you have completed the vehicle conguration, tap
the Save icon to save your vehicle and return to the Vehicle
selection screen.
4. Tap Home or the Android Back button to return to the Home
screen.
Implement Setup
To congure an implement:
1. From the Home screen, tap the Implement tile:
2. Tap New to launch the implement creation wizard. From here,
you can select from a variety of implement types.
3. Tap an implement icon to select an implement.
4. Some implements (Planting, Seeding, Spraying), apply
materials (seed, fertilizer, pesticide, etc.). For these implements,
tap Next to set the Application Control type and number of
channels.
5. When you have completed the implement conguration,
tap the Save icon to save your implement and return to the
Implement Selection screen.
6. Tap Home or the Android Back button to return to the Home
screen.
Material Setup
To congure a material:
1. From the Home screen, tap
the Material tile:
2. Tap New to launch the material creation wizard.
3. Complete the form for the material:
• Create a unique name for the material.
• Select a category (Anhydrous, Granular Seed, etc.).
• Depending on the category, select the material type
associated with the category. For example, if you select
Granular Seed as the category, then select a seed type,
such as Barley, Corn, Oats, Peanuts, etc.
• Select the distribution type for the material. For example,
the amount of a material (pound, liters, gallons) per area
(acre, hectare).
• Set values for the distribution rates.
• (Optional) Tap Material Details to enter values for the
material's product number and manufacture.
4. Tap the Save icon to complete the material creation and return
to the Materials screen.
5. Tap Home or the Android Back button to return to the Home
screen.
Note - Any material you create must correspond to the
appropriate implement. A material will only be available for
selection only for those implements that can apply it.
Field Setup
To create a eld:
1. From the Home screen, tap the Field tile:
2. Tap New.
3. In the Create New Field pop-up window, enter a unique Field
Name. From the Android keyboard, tap Done.
4. Verify that the eld name is correct, and tap OK.
Alternatively, you can transfer existing eld data les directly to the
XCN-1050 display:
1. Insert a USB drive into the USB port of the XCN-1050 display.
2
Page 3
2. On the Home screen, tap Data Transfer.
3. On the Data Transfer screen
• The left side of the screen (labeled Internal) shows the
data les currently available on the XCN-1050 display.
• The right side of the screen (labeled USB) shows the data
les of the USB drive.
4. From the USB region, tap Fields to expand the menu and
display all available elds.
5. Tap the select box for the Fields category to transfer all elds or
tap the select box for each eld to transfer individually. Then
tap the left transfer icon in the center of the screen to
complete the transfer.
6. Tap Home or the Android Back button to return to the Home
screen.
Caution - Take care when setting up these details. The
values you set in these steps are critical for the data
integrity recorded for the Run screen.
BEFORE YOU BEGIN - SELECTION PROCESS
Before you can enter the Run screen, you must select the items
that have been previously set up and select a valid task.
Note - The GNSS is already selected for this process.
Select an Implement
To select an implement:
1. From the Home screen, tap the Implement tile:
2. Tap an implement from the list of implements that have been
previously set up. The Implement screen will update to show
details about the selected implement.
3. Tap Home or the Android Back button to return to the Home
screen.
Note - You must select an implement before you can select a
material or task.
Select a Material
To select a material:
1. From the Home screen, tap the Material tile:
Select a Vehicle
By default, the last vehicle added is selected. If you need to select a
dierent vehicle:
1. From the Home screen, tap the
Vehicle tile:
2. Tap a vehicle from the selection list.
The Vehicle screen will update to
show the relevant details about the vehicle.
3. Tap Select Vehicle:
Allow up to 45 seconds for the vehicle prole to be updated.
During this time, some functions will be disabled.
4. Tap Home or the Android Back button to return to the Home
screen.
Note - If the selected implement does not apply a material (for
example, tilling or subsurface drainage implements), then no
material will appear on the Materials screen. For these types of
implements, you can skip this section.
2. From the list of available channels, Channel 1 is selected by
default.
3. From the list of available materials, tap a material to select it.
The Materials screen will update to show details about the
selected material.
4. Tap Home or the Android Back button to return to the Home
screen.
3
Page 4

Select a Field
To select a eld:
1. From the Home screen, tap the Field tile:
2. From the list of available elds, tap a eld to select it.
Alternatively, you can tap the Search eld to search for a
specic eld or tap a eld marker on the interactive map.
3. Tap Home or the Android Back button to return to the Home
screen.
THE RUN SCREEN
Once all items have been set up and selected, review your
selections on the Home screen. Tap the green Run button to enter
the Run screen and start your task.
The Run screen is where you perform
all eld activities.
While in the Run screen,
Precision-IQ records all eld activity (vehicle performance,
material application, eld coverage, etc.). Data collected can be
transferred to your oce where your farm is managed.
Select a Task
A task is generated based on previously selected details. To create
a task:
1. From the Home screen, tap the Task tile:
2. Tap New. A Create New Task pop-up window will display with
a valid task with the current date (for example, SPRAYING -
9/22/17).
3. If necessary, you can edit the task name and date. Tap OK.
4. Tap Home or the Android Back button to return to the Home
screen.
Note - You must select a eld before a task can be assigned.
Change Vehicle Perspective
Tap the vehicle icon in the center of the Run screen to display the
vehicle perspective section list.
Tap the icons to:
• Toggle to rotate to an overhead
view or a perspective view.
• Toggle to orient the map to always point north.
• Zoom back to the vehicle.
Ending a Run
Once you have completed your eld run, tap the Stop button on
the Home screen to stop the current operation task:
4
Page 5

GUIDANCE MAPPING
The following sections show some common guidance mapping
procedures. For a full list of guidance options, see the reference
manual.
Auto Close
To use auto close for boundaries and headlands:
1. On the Home screen, tap Settings and then tap Patterns.
2. At the Boundaries and Headlands sections, turn on auto close.
You can also set the auto close distance in these sections.
Create a Boundary
This pattern lets you dene the boundary of the eld, which can
contain a variety of guidance lines within it.
1. In the Run screen tool bar, tap .
2. Tap .
3. When you are ready to begin recording the boundary, tap .
4. Drive the boundary of your eld.
5. To complete the boundary:
• Drive within auto-close distance. The system
automatically closes the area if you have auto-close
turned on.
• Drive to the end of the boundary and tap if you do not
have auto-close turned on.
Create a Headland
Use the Headland pattern to complete the ineld and to give you
room to turn.
1. In the Run screen tool bar, tap .
2. Tap . A popup displays indicating circuit and inll options.
3. Set or accept the number of circuits you want.
4. Optionally, indicate the type of guidance line you want for inll.
5. Tap to begin recording the headland.
If you are creating an inll pattern, refer to the AB, A+ or curved
line sections.
6. To close the headland area:
• Drive within auto-close distance. The system
automatically closes the area if you have auto-close
turned on.
• Drive to the ending boundary of the headland and tap
if you do not have auto-close turned on.
Create a Pivot
Use the Pivot pattern on elds that are irrigated using a center
pivot. With this pattern, you can drive concentric circles around the
center pivot.
1. Tap .
2. When you are ready to begin recording the pivot, tap .
3. Drive the boundary of your pivot area.
4. Tap .
Create an AB Guidance Line
The simplest form of line, use it when you do not need to dene
headlands and you want to drive the eld in parallel straight lines.
1. Tap .
2. When you are ready to begin recording the line, tap and
begin driving.
3. When you are at the end of the line, tap to stop recording.
4. Tap to save the line.
Create an A+ Directional Guidance Line
Similar to the AB guidance line. Useful for when you need guidance
exactly parallel to the last AB line (for example, driving adjacent
elds, skipping and access road in a eld).
1. Tap .
2. To set the direction of the line, you can do any of the following:
• Lock the vehicle's current direction by tapping .
• Enter degrees for the direction.
• Tap a direction on the compass .
3. When the direction you want is set, tap .
5
Page 6

Create a Curved Line
Use the Curve pattern when you want to work the eld with gentle
curves.
1. Tap .
2. When you are ready to begin recording the line, tap
3. When you are at the end of the line, tap to stop recording.
Create a Landmark Line
Use this line to identify continuous elements of your eld to be
avoided, such as a fence, ditch, access road, etc.
1. Tap .
2. When you are ready to begin recording the line, tap .
3. When you are at the end of the line, tap to stop recording.
Create a Landmark Point
A Landmark Point identies singular elements of your eld to be
avoided, such a tree, rock, etc.
When you are driving and want to create a landmark point, tap
.
Create a Landmark Area
(productive or non-productive)
The Landmark Area allows you to identify an entire region to be
avoided, such as a pond, marsh, or area that does not need to be
worked again.
1. For a productive area, tap ;
for a non-productive area, tap
2. Tap to begin recording the area.
3. Drive to the ending boundary of the area and then tap .
COMMON PRECISION-IQ ICONS
Activity Bar Icons Run Screen Icons
Home Run
Guidance Pattern Boundaries, Patterns, and Lines Icons Landmark Icons
Boundary Headland Pivot AB Line A+ Line Curve Point Line Area
Recording Buttons
Record Set A Set B Complete Pause Cancel
Field
Manager
Diagnostics
Universal
Terminal
Camera
Widgets
Menu
Use current
heading
Layers Boundaries Landmarks
Compass
controls
6
Non-productive
area
Page 7

DATA TRANSFER
All data collected by Precision-IQ can be transferred to the
desktop software. After you have completed your run, PrecisionIQ has collected a variety of details that need to be transferred
to your back oce. This data is used to eciently and eectively
manage your farm.
You can transfer this collected data automatically using a cellular
or Wi-Fi connection or manually using a USB drive.
Note - For complete details about Data Transfer, see the reference
manual.
Manual Data Transfer
If your Precision-IQ hardware conguration does not include
a wireless modem or hot spot or if you have opted to disable
Oce Sync, then you will need to transfer the collected data les
manually.
1. After you have completed your run, insert a USB drive into an
available USB port on the XCN-1050 display.
2. On the Precision-IQ Home screen, tap the Data Transfer
button:
Automatic Data Transfer
If your Precision-IQ hardware conguration includes a wireless
modem, then you can transfer the data les automatically.
1. On the Android Launcher screen, tap Settings:
2. On the Android Settings screen, tap Wi-Fi to display an
available list of wireless networks. Tap the appropriate network
(you may need to enter a user name and password). Tap
Connect. Verify that you are connected to the network.
3. From the Precision-IQ Home screen, tap the Settings button:
4. On the Settings screen, tap Oce Sync. Then tap the On
switch to enable the wireless transfer feature.
5. By default, Precision-IQ checks the connectivity to your
wireless network every 10 minutes, and can send any collected
data to your oce every hour. You can modify these settings
on this settings screen.
6. Tap the Android Back button to return to the Home screen.
Once enabled, Precision-IQ automatically sends the collected
data les to your farm oce.
3. On the Data Transfer screen, you have a variety of data types
to transfer:
4. Tap an item to expand to select individual components (for
example, select one or more vehicles). Or tap the selection box
for the item to select all of the individual components of the
item.
5. Once you have made your selections,
tap the blue transfer button:
6. The selected les are transferred to your connected USB drive.
7. Once the transfer is complete, tap the Android Back button to
return to the Home screen.
7
Page 8

ADVANCED SETTINGS: VEHICLE AUTO
GUIDANCE
With the appropriate licenses unlocked and installed, you can
congure a vehicle to use an auto guidance system. When you
set up a vehicle, Manual Guidance is selected by default. On the
Guidance step of the vehicle setup, tap the Selection eld, then
tap Autopilot in the Selection pop-up window.
The Guidance screen will update for you to congure the Autopilot
details:
Tap the appropriate eld to change or enter the guidance value.
Tap Next to complete each Guidance option.
Note - These guidance options will vary depending on the auto
guidance license you have installed.
If you need to change the auto guidance options, tap Vehicles on
the Home screen, tap the vehicle you want to update, and then
tap Edit. Tap Guidance and update the necessary auto guidance
values.
QUICK ACCESS
Swipe down from the top of the screen
for notications, warnings, available
updates, etc., as well as:
• Brightness
• Wi-Fi status
• USB status
• Android settings
USING APP CENTRAL
From the Launcher screen, tap the App Central
icon to open the App Central Marketplace:
From here, you can browse available applications
and updates, check licenses, and check for
automatic software updates or manually update software.
On the App Central screen, tap the menu icon in the upper lefthand corner to display the App Central menu, where you can:
1. Tap My Apps to view your installed
apps and to congure update
notications.
2. Tap Browse Apps to view all
available apps that you can install.
3. Tap Licenses for a list of active
licenses for the XCN-1050 display.
Tap the NAV-900 button for a list
of active licenses for the NAV-900
module.
4. Tap Support to retrieve log les to
save to a USB drive. You can also
send feedback to your support
service and include current system
information.
8
Page 9

XCN-1050 DISPLAY SYSTEM
Description Use to ...
Power button Turn the display on or o.
c
Expansion Port
d
(5-pin B code)
Main Power
e
connector
Power/Ethernet Port
f
(4-pin D code)
USB sockets
g
Power/Ethernet Port
h
(4-pin D code).
Connect to various inputs
and outputs.
Powers display system
(including the NAV-900).
Connects to NAV-900
Guidance controller
(power/GNSS).
Connect a USB memory
stick to the display to
transfer data to and from
the unit.
Connects to XCN-1050
(power/GNSS)
❶
❺
❹
❻
❼
❽
❷
❸
Caution! Some connectors may appear similar, but are coded
dierently to ensure correct component mating. Check that
you have the correct cable before connecting, and do not use
excessive force or damage may result.
Main Port- 12 pin
i
DTM.
RTK Radio Port
j
(5-pin A code).
Description
XCN-1050 Display
c
XCN-1050 Display to NAV-900 Guidance Controller
d
cable
NAV-900 Guidance Controller
e
XCN-1050 System Power and CAN (1) Display cable
f
XCN-1050 System Power (Battery Cable)
g
P2 CAN Port. Uses adapters to connect to CAN
h
implement devices (ISO and Field-IQ Basic)
Connects to various Auto
Guidance systems.
Connects to various RTK
radios.
❶
❸
❷
❹
❺
❻
9
Page 10

© 2017. Trimble Inc. All rights reserved. Trimble and the Globe and Triangle logo are
trademarks of Trimble Inc, registered in the United States and in other countries. Autopilot,
Field-IQ and xFill are trademarks of Trimble Inc.
Version 1.00, Rev A (November 2017).
 Loading...