

Page 1

Copyright © 2004, Trilogy Touch Technology, Inc. All rights reserved
The information contained in the document is subject to change without notice. Nor
does the contained information constitute a warranty, either expressed or implied or
as an obligation by Trilogy Touch Technology.
Trilogy Touch Technology shall not be liable for the accuracy of the information,
fitness for purpose or direct or indirec t consequential damages.
Patents, patents under application, trademarks, copyrights and other intellectual
property rights may cover the information in this document.
Manufacturers or products mentioned in this document have their own respective
trademarks.
Touch Monitor Users Guide
GETTING STARTED
Introduction..............................................................................................1
Features
.....................................................................................................1
Unpacking and Checking of the Package Contents..............................1
Accessories Included
System Requirements..............................................................................2
Mounting
..................................................................................................2
Using Touch Input ...................................................................................2
INSTALLING THE TOUCH MONITOR.......................................3
Connecting the Monitor
...........................................................................1
................................................................................1
..........................................................................3
OPERATING THE MONITOR
.........................................................4
Adjusting the Viewing Angle ..................................................................4
Operating Procedure
...............................................................................5
Additional information about the On-Screen-Display .........................6
Menu Table
FOR YOUR SAFETY
SPECIAL NOTES ON LCD TOUCH MONITORS
...............................................................................................7
..........................................................................8
.................9
Cleaning ....................................................................................................9
Power Management
.................................................................................9
Supported Timing..................................................................................10
Troubleshooting Procedures
CONFORMITY AND COMPLIANCE
i
.................................................................10
.........................................11
ii
Page 2

PRODUCT SERVICE AND SUPPORT.................................... 12
Cable
Cord
Cable
Manual
RS232 cable
Contact Information:
Warranty ................................................................................................13
.............................................................................12
GETTING STARTED
WARNING: Do not operate the LCD Touch Monitor with an unknown utility power
voltage so urce. Usage of incorrect voltage may cause malfunctions and could cause
fire or electric shock.
Introduction
Thank your for your selection of this product. Bright and sharp images of text and graphics are what you will
find with your Trilogy LCD Touch Monitor. This product provides multiple resolutions with a flicker-free, sharp,
and vibrant color display, without the radiated emission and hazards of CRT monitors.
Features
Touch panel control functions
Support for XGA resolution of 10 24x768 pixels
Wide viewing angle
Wide tilting angle
VESA DPMS power saving feature: powers off the monitor after a defined period of inactivity.
Digital Character Smoothing
Automatic Set-Up
Windows 95/98/2000/XP Plug & Play Compliant
Versatile , functional & Use r friendly OSD
Plug & Play: Conforms to the VESA standards and support DDC1/2B specification
Meets Energy Star guidelines for power management
iii
Unpacking and Checking of the Package Contents
Before unpacking your LCD Touch Monitor, prepare a stable, lev el, and clean surface near a wall outlet.
Set the LCD Touch Monitor box in an upright position and open from the top of the box before removing
the right/left cushions.
It is highly recommended that all packaging materials be retained in the
event that service is required.
Accessories Included
1 pc
VGA
Driver CD
1 pc
1 pc
Power
1 pc
Audio
1 pc
User’s
1 pcs
USB or
1
Page 3
NOTE
System Requirements
The following are basic requirements for using the Touch Monitor. Please check the specifications and
Supported Video Timing section of this Users Guide for specifics.
• This touch monitor requires connection to a personal computer. Both industry standard
architecture and Macintosh hardware is supported.
• Various Operating System versions are supported for touch input operation. Please check
the product features and specifications to insure that the OS you intend to use is supported.
The included software installation disc contains the proper drivers for supported Operating
Systems and devices.
• An analog, VESA standard video card for the PC is required. This touch monitor complies
with DPMS and Plug & Play (DDC) standards.
• The personal computer will require either a standard 9 pin serial COM port or USB port,
depending on the product version of the touch monitor. If the serial COM port is a 25 pin,
D-connector, then an adaptor to 9-pin male is required. In addition, consideration should be
given to system IRQ assignments for serial operation, as the touch controller cannot share an
IRQ.
• There should be enough electrical outlets to support the system installation. This would
include the calculation of total current requirements. Although not a strict requirement, a
surge protected power source is recommended.
Mounting
The Touch Monitor may be used on any work surface by placing it on its supplied stand.
In addition, this product is provided with permanent mounting capabilities. The rear of the main display
body has mounting holes configured to conform to the VESA mounting standard. Typically, this
mounting pattern allows the Touch Monitor to be installed on movable arms and specialized mobile
equipment.
Alternatively, there are slotted mounting holes on the bottom of the product pedestal which will facilitate
permanent installation of this product to walls, countertops and custom installations. Typically, this
mounting pattern is used to attach the Touch Monitor to a counter in a permanent position. This
mounting scheme may provide the most secure and stable mounting environment.
Using any mounting method, consideration should be given to placement relative to cable length, power
sources and cable routing.
Using Touch Input
The surface of this LCD Touch Monitor is a touch sensor. Some degree of caution is required to insure
the effectiveness and long life as an input device. Avoid using sharp objects such as pens, pencils,
scissors or screwdrivers as a pointing stylus. After installation of the driver software, a calibration should
be performed. This action insures that the graphic coordinates match the touch coordinates, sometimes
called mapping.
Different software applications may require speci fic “mouse click” parameters. The touch control panel
will allow selection of multiple types of mouse button actions.
2
INSTALLING THE TOUCH MONITOR
l DO NOT install the monitor in areas where sudden temperature changes may occur, or in humid,
dusty, or smoky environments as it may cause fire, electric shock or damage.
l DO NOT expose this product to rain, water, moisture, or sunlight
l MAINTAIN good ventilation; covering of ventilation slots or holes may cause a fire
l PLACE the monitor at least 4” (or 10 cm) way from the walls
l SAFE storage temperature of the LCD Touch Monitor is in a range of -20 to +65
l INSTALL the software drivers via the supplied CD following standard operating system procedures
NOTE
Remember that the connection of USB devices is done after the software drivers are
loaded. Further instructions are provided during software installat ion and through the
Help files on the driver CD.
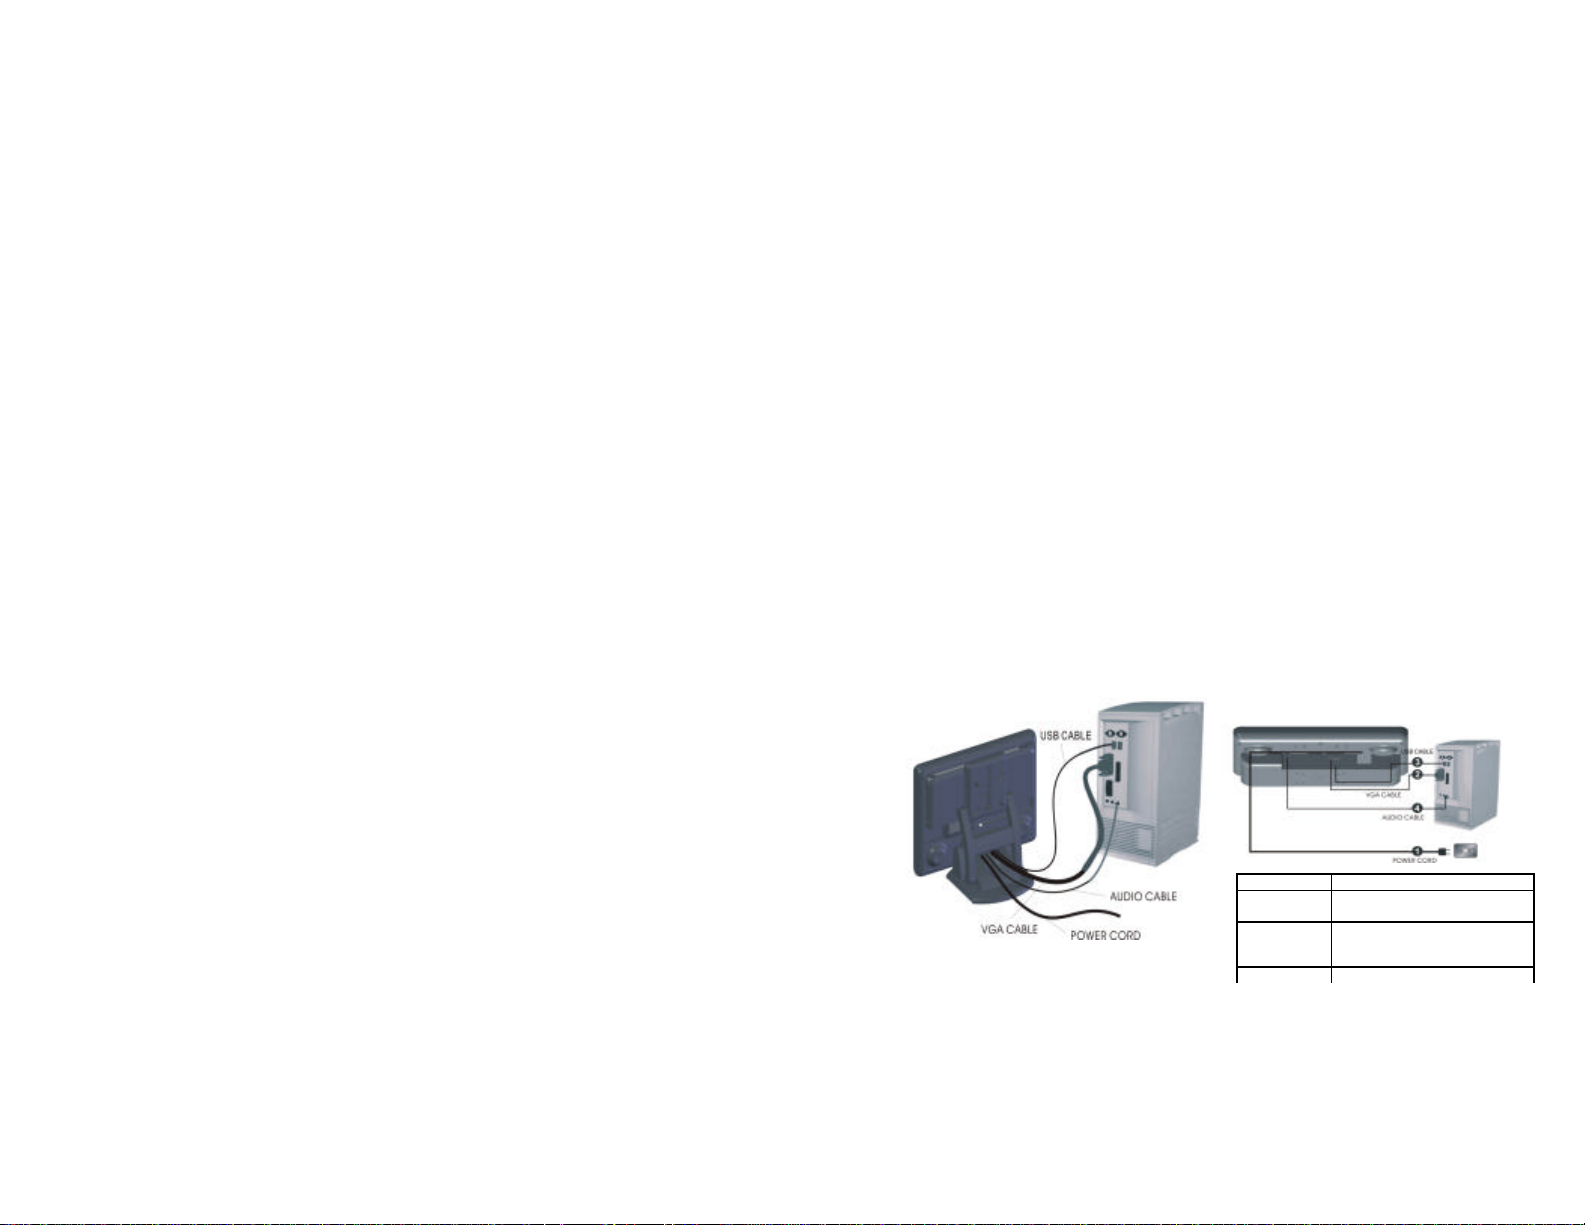
Connecting the Monitor
1. Turn off the PC and the LCD Touch Monitor before making any connections.
2. Use the supplied VGA cable to connect the VGA connector of the LCD Touch Monitor to the VGA
port of the PC system.
3. Use the supplied audio cable to connect the “Audio in” jack on your LCD Touch Monitor and the
PC sound card’s “Audio out ” or speaker jack.
4. Connect the male end of the power cord into a wall socket and the female end to the Touch Monitor.
5. If your Touch Monitor has a USB interface, use the supplied USB cable to connect the USB
connector of LCD Touch Monitor to the USB port of the PC system. Remember to follow proper
software driver installation.
6. If your Touch Monitor has a RS232 serial interface, unplug the PC keyboard and reconnect it to the
supplied serial cable power adaptor. Connect the other end of the adaptor to the keyboard
connector on the PC. Connect the serial D-connector to and standard PC serial comport.
Connect the other end or the serial interface cable to the Touch Monitor.
7. Turn on your computer, and then turn on your LCD Touch Monitor.
uPower Plug the power cord in.
vInput 1
wInput 2
For added protection, it is recommended to use a Surge Protection device plugged
between the AC Adapter and the electrical wall outlet to prevent the effects of sudden
current variat ions from reaching the LCD Touch Monitor. Sudden peaks of electricity may
cause damage to the Monitor.
(Touch
Function)
xAudio In Connect with PC sound card.
Connect with detachable VGA
cable.
Connect to USB/RS232 cable
3
Page 4
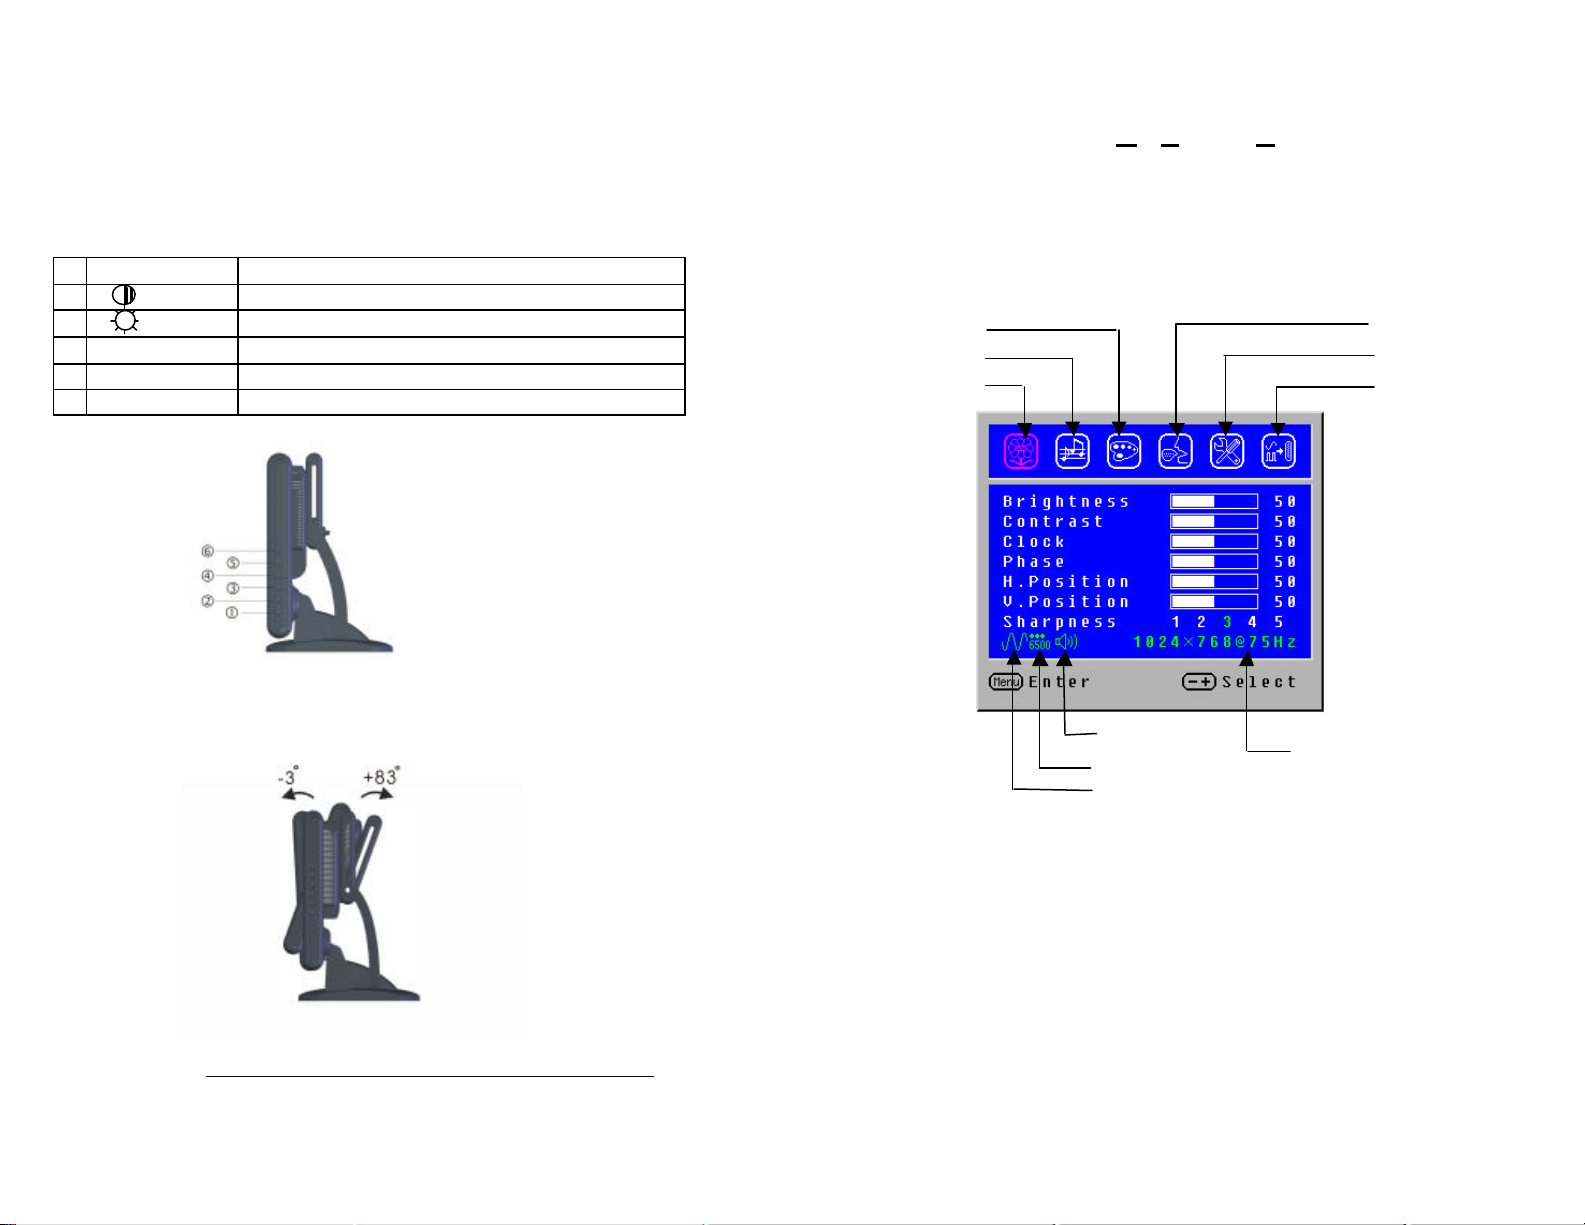
The tilt mechanism has a locking knob on the rear of the display portion of the Touch
Monitor. There is a legend on the lock to indicate the locked or unlocked position of the
locking knob. Do not force the display to tilt without unlocking the mechanism first.
Source Resolution & Frequency
Image Adjustment
OPERATING THE MONITOR
How to Use the OSD (On Screen Display)
Users can adjust the picture to the desired brightness and sharpness by following these instructions.
The adjustment buttons utilize a security feature that required the use of a paper clip or pin to activate
each selection. This is accomplished through pinholes in each button except the power on/off.
1
Menu Enter OSD/Access sub -menu & selection
2 /
3 /
4 Exit/ X
5
Auto Automatically optimize positions, phase & clock when OSD is not shown
6
Power Switch Power On/Off
Adjustment when OSD is shown/Quick contrast adjustment
Selection or adjustment when OSD is shown/Q uick brightness adjustment
Exit the OSD menu when OSD is shown
Adjusting the Viewing Angle
Your LCD Touch Monitor is designed to allow you to adjust to an optimal viewing angle.
The OSD function allows the user to easily adjust the display to the desired requirements. The OSD
menu includes a main menu and sub-menus.
Operating Procedure
Use the buttons on the right side control panel to adjust the OSD (see Operating the Monitor).
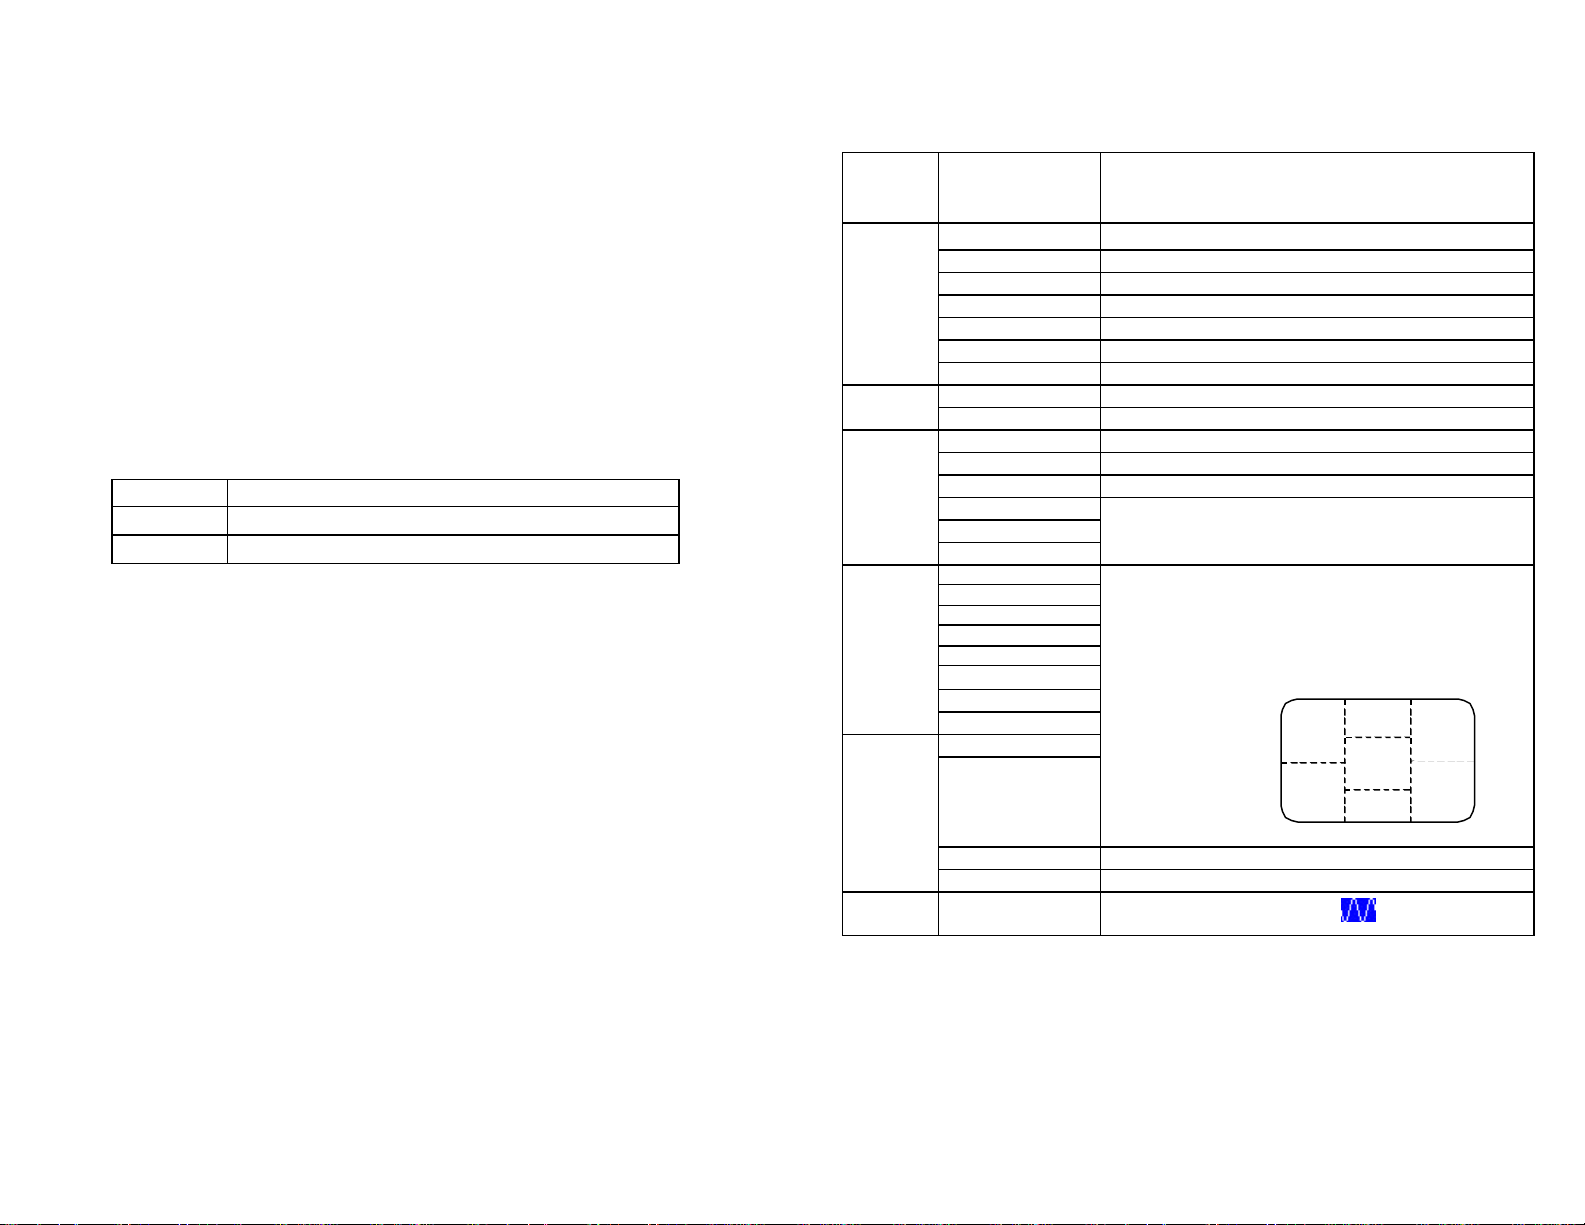
Volume Adjustment
Current Audio Status
Color Temp. Status
Input Source Status
Status
Language
Settings
Input Source Selection
NOTE
4
To make OSD adjustments:
1. Power on the LCD Touch Monitor.
2. Press “MENU” button to pop up the OSD menu.
3. Press “+” or “-” button to select menu item.
4. Press “MENU” button to select sub-menu.
5. Press “+” or “-” button to select sub -menu item.
6. Press “EXIT” button when finished adjusting and accept the user setting.
7. Press “AUTO ” button to process auto tune function.
5
Page 5
to any one of the following 5
Ad ditional information about the On-Screen-Display
Menu Table
The OSD disappears (times-out) several seconds after you stop pressing the buttons while performing
an adjustment. This function can be adjusted up to 60 seconds allowing the user more time. This
adjustment is made in the “Settings” submenu.
Any changes made are automatically saved in the Touch Monitor memory when the OSD disappears.
Turning off the power should be avoided while using the OSD, as this may not allow changes to be
saved.
Adjustments for clock, phase and positions are saved for each signal timing or screen resolution.
Except for these adjustments, all other adjustments have only one setting that applies to all signal
timing.
The submenu color will change from white to pink when the function is selected.
You can skip the OSD menu and display commonly used adjustment scales directly by using the
following button operations (refer to previous diagram for button locations):
Brightness Press the Brightness Button (3) when the Menu is not displayed.
Contrast: Press the Contrast Button (2) when the Menu is not displayed.
Auto Setting: Press the Auto Button (5) when the Menu is not displayed.
The Auto Adjust process may take as much as 10 consecutive seconds. The display image will make
noticeable changes as the Auto Adjust function completes.
Self-Test Check:
This product provides a self-test ability, through which you can check whether the LCD monitor
functions are working properly.
If your LCD monitor is properly connected, but there is no image showing and the power indicator light
on the Touch Monitor displays orange, please follow the steps below:
1. Turn off both the computer and LCD monitor.
2. Unplug the video signal connector from the back of the computer.
3. Turn the LCD monitor on.
4. The monitor should display “No Signal Input” on the screen and the power LED indicator should be
orange. If no display is observed, there may be a problem with the Touch Monitor.
5. Turn off the LCD monitor and reconnect the signal cable. Then turn the computer and LCD monitor
on. As the computer boots, there should be a video display and the power LED should now be
green. If the LED of the monitor is an orange color after completing the steps above, please check
your VGA card and computer system.
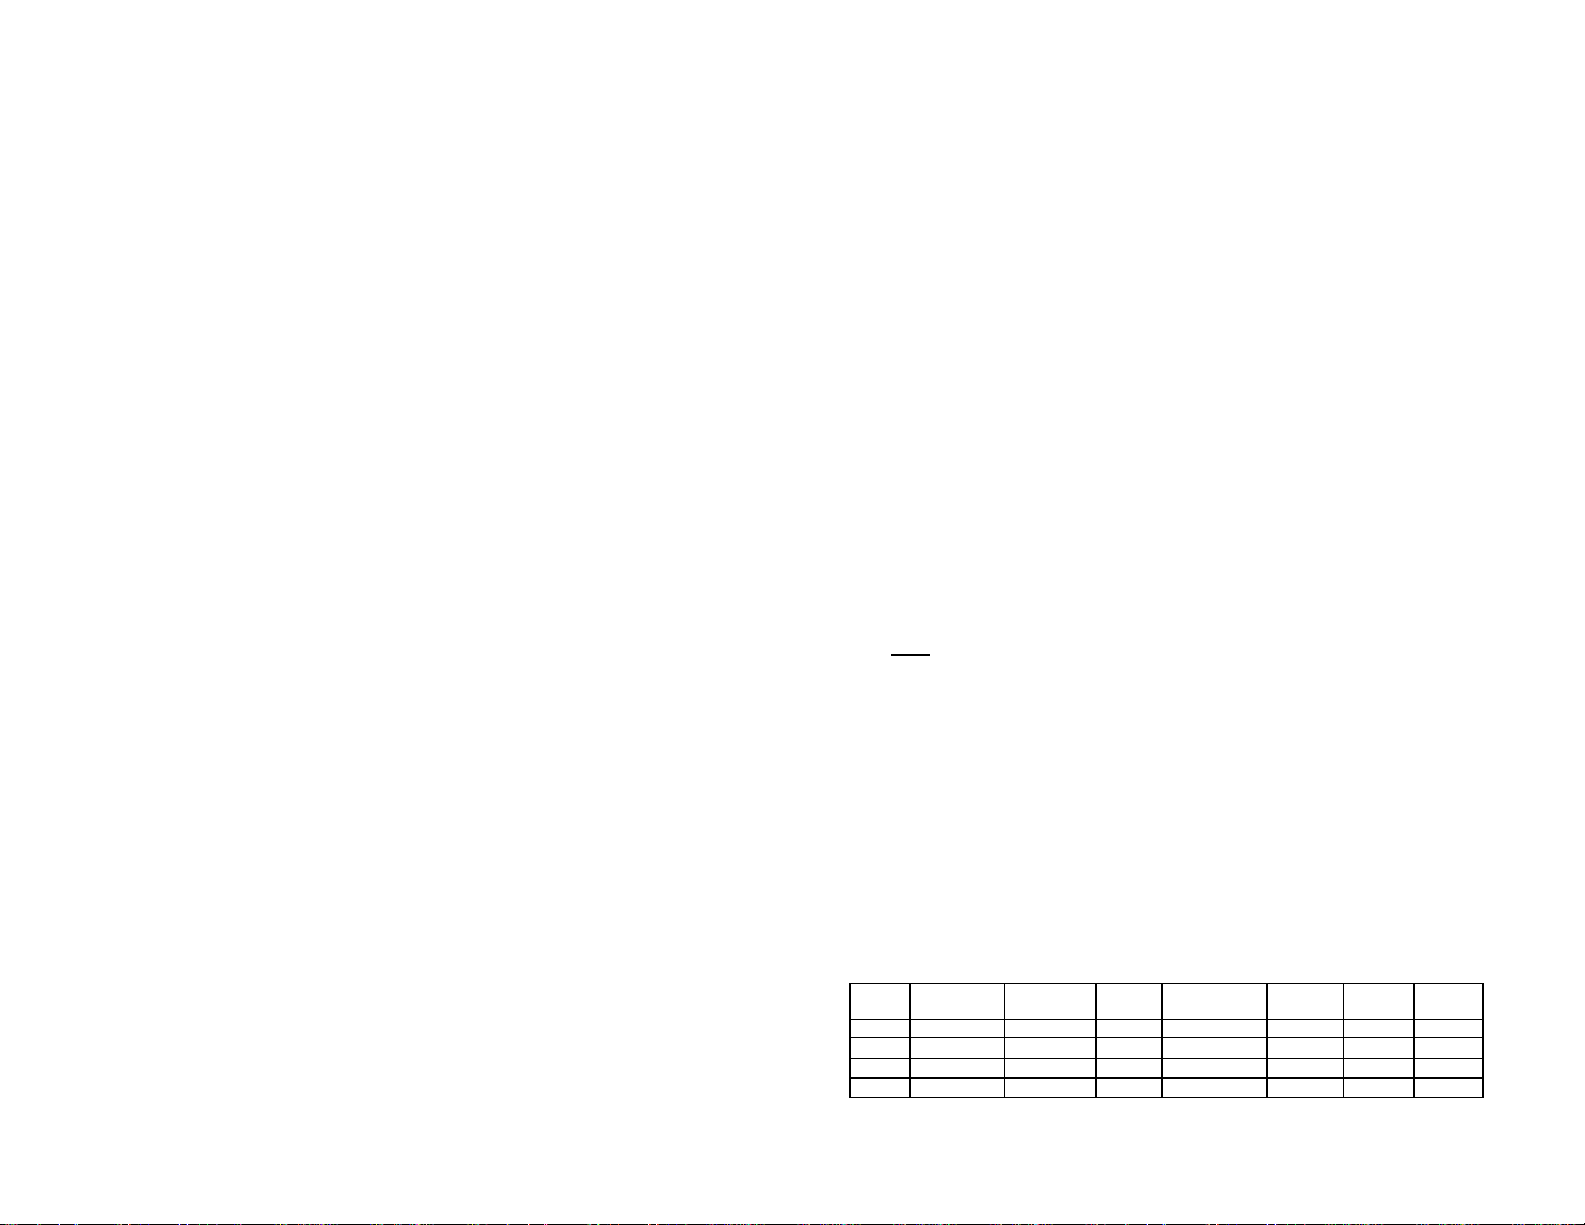
Primary
Directory
Image Brightness
Contrast
Clock
Phase
H. Position
V. Position
Secondary
Directory
Description
Adjust the brightness of the screen.
Adjust the contrast of the image.
Adjust the clock pulse of the image.
Adjust the focus of the image.
Move the image left and right on the screen.
Move the image up and down on the screen.
Sharpness Adjust the picture sharpness of lower resolutions.
Audio
Volume Adjust the volume of the audio.
Mute Set the audio mute to be on or off
Color 9300K Set the color temp. to 9300K white color.
7500K
Set the color temp. to 7500K white color.
6500K Set the color temp. to 6500K white color.
User/Red
User/Green
Adjust red/green/blue gain.
User/Blue
Select the OSD language.
Adjust OSD display time setting.
Move OSD display position
positions within the overall screen.
1
2
3
4
5
Language English
Français
Italiano
Deutsch
Español
Settings OSD Timeout
OSD Position
Auto Setting Set up to adjust clock, phase and positions automatically.
Recall
Input
Analog
Source
Restore to factory settings
Select Analog input source:
6
7
Page 6
FOR YOUR SAFETY
ARNING
W
ALWAYS OPERATE UNDER KNOWN POWER SUPPLY
PROTECT AND CORRECTLY USE THE SIGNAL CABLES
IMMEDIATELY STOP OPERATING THE MONITOR WHEN YOU DETECT ANY
ABNORMAL OCCURRENCES
DO NOT REMOVE THE CABINET
DO NOT PUT ANY FOREIGN OBJECT INSIDE THE MONITOR
DO NOT USE THE MONITOR NEAR WATER
BAD WEATHER CONDITIONS
AUTION
C
DISCONNECT CABLES WHEN MOVING THE MONITOR
DO NOT TOUCH THE ELECTRICAL CONNECTIONS WITH WET HANDS
HOLD THE PLUG WHEN DISCONNECTING
OTHER CONSIDERATIONS
Ergonomics Recommendations
Do not operate the monitor in a dark room or against a bright background. For optimal viewi ng comfort,
the monitor should be just below eye level and 30-60 cm (16-24 inches) away from your eyes. When
using the monitor over a prolonged period of time, a ten-minute-break per hour is recommended.
• Usage of incorrect voltage will cause malfunctions and may cause fire or electric shock.
• Do not pull or bend the power cable and signal cable or place the monitor or any heavy
objects on the cables. If the cables are damaged, they may cause fire or electric shock.
• If you notice any abnormal phenomenon such as strange noise, smoke or smells, unplug the
monitor and contact your dealer or the nearest service center immediately.
• Removing the cabinet may expose you to the danger of fire or electric shock. Opening the
product will void the warranty.
• Modification of this product may result in improper operation as well as voiding the warranty.
• Operating the monitor in close proximity to water where the water may enter the device may
cause fire or electric shock.
• It is advisable not to operate the monitor during heavy thunderstorm s as intermittent breaks in
power may cause malfunctions. Do not touch the plug under these circumstances as it may
cause electric shock.
• When moving the monitor, always turn off the power, unplug the monitor, and disconnect the
signal cables.
• Pulling or inserting the plug with wet hands may cause electric shock.
• To disconnect the power cable or signal cables, always pull the cables by the plug. Never pull
on the cable as this may cause fire or electric shock.
SPECIAL NOTES ON LCD TOUCH MONITORS
The following are normal with LCD Touch Monitors and do not indicate a problem.
l When the LCD Touch Monitor is first powered on, the picture may not fit in the display area. This
is because of the type of computer graphics system that is used. In such case, adjust the picture
position to a desired image (See Operating the Monitor).
l The screen may flicker during initial use. Turn off the power and then turn it on again the
flickering should disappear.
l Users may notice some uneven brightness on the screen depending on the desktop resolution
they use. It is normal for LCD Touch Monitors to show uneven brightness.
l Due to the nature of the LCD displays, images displayed on the screen for long periods of time may
still appear after the screen content has been changed. This phenomenon can be corrected, over
time, by switching display content or leaving the monitor off for a number of hours.
l If the screen becomes dark, flickers, or does not light- up, contact your dealer or the nearest
service center for a backlight replacement. Do not attempt to replace it yourself.
Cleaning
W
ARNING
l If you drop ped any material or liquid such as water onto the monitor when cleaning, unplug the
C
AUTION
l For safety reasons, turn-off the power switch and unplug the monitor before cleaning.
l
l
Cabinet
l Remove dirt with a lightly moistened cloth and a mild solvent detergent. Then wipe the cabinet
DISPLAY AREA (TOUCH SENSOR)
l Periodic cleaning with a soft dry cloth is recommended. Non- abrasive household window-type
l Do not use tissue to clean the display area. It may scratch or dull the LCD screen.
Power Management
This LCD Touch Monitor complies with the VESA DPMS (version 1.0p) power management specification.
DPMS provides four types of power saving modes by detecting the horizontal or vertical sync signal. As
well, the computer graphic card also needs to be DPMS compliant to utilize these modes.
Item DPMS Mode Display
1 On Normal Green Normal --- On On
2 Stand By No Display Amber
3 Suspend No Display Amber
4 Off No Display Amber
power cable immediately and contact your dealer or the nearest service center. Always make
sure your hands are dry when unplugging the power cable.
Do not scratch or rub the screen with a hard object.
Never use any of the following solvents on the LCD Touch Monitor. Such harsh chemicals may
cause damage to the cabinet and the touch sensor.
Thinner Spray-type cleaner, Benzene, Wax, Abrasive cleaner, Acid or Alkaline solvent
with a soft dry cloth.
cleaners are recommended.
Power
LED
Power
Consumption
5W
5W
5W
Recovery
Time
3 sec < 10 KHz On
3 sec On < 10 Hz
3 sec < 10 KHz < 10 Hz
H -sync V-sync
8
9
Page 7
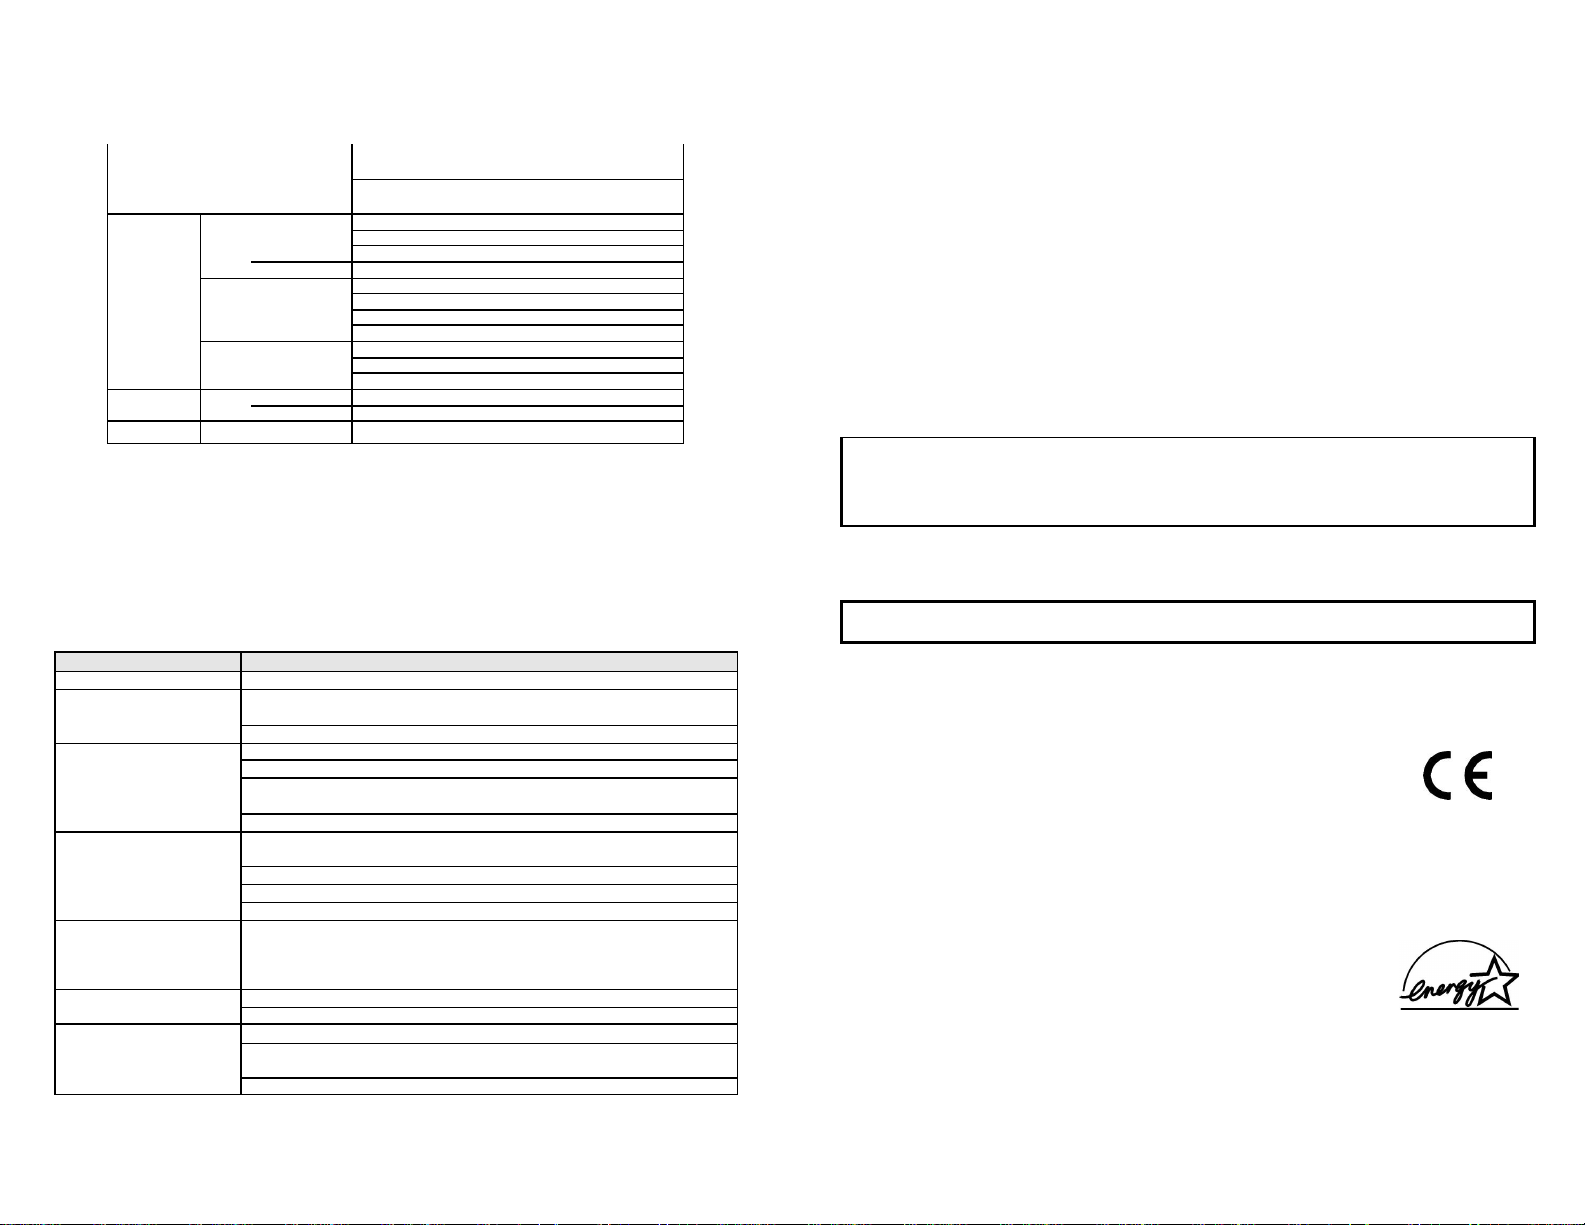
a) Power indicator does not
Display is too dark or too
Supported Timing
Display Mode
Horizontal Frequency Vertical Frequency
640 x 480
720 x 400 31.5 KHz 70.1 Hz
800 x 600
1024 x 768
640 x 480 35.0 KHz 66.7 Hz
832 x 624 49.7 KHz 74.6 Hz
640 x 350 31.5 KHz 70.1 Hz
VESA
Macintosh
MS- DOS
VGA
SVGA
XGA
VGA
Troubleshooting Procedures
If the LCD Touch Monitor fails to function correctly, please follow these steps for a possible solution.
1. Perform the adjustments according to Operating the Monitor section.
2. Refer to the following troubleshooting chart if you cannot resolve the problem from other sections
of this Users Guide.
3. If the problem is not described below or you cannot correct the problem, stop using the monitor
and contact your dealer or the nearest service center for further assistance.
31.5 KHz 60.0 Hz
37.5 KHz 75.0 Hz
37.8 KHz 72.8 Hz
35.2 KHz 56.3 Hz
37.9 KHz 60.3 Hz
46.9 KHz 75.0 Hz
48.1 KHz 72.0 Hz
48.4 KHz 60.0 Hz
56.5 KHz 70.1 Hz
60.0 KHz 75.0 Hz
PROBLEM CHECK TO SEE:
No Display.
light up.
b) Power indicator is green.
c) Power indicator is
amber.
bright.
Display is not in the
center.
Display is shaking.
Display is not
synchronized.
If the power cord is firmly plugged in the socket.
If the power switch is turned on.
If the AC outlet is OK. Please check using another piece of equipment.
If a blank screen saver is active, use the keyboard or mouse to activate.
If increasing the CONTRAST and/or BRIGHTNESS displays an image.
If the computer is ON.
If the signal cable is properly connected at both ends.
If the signal timing of the computer is within the spec of the monitor.
If the power management mode is activated, use the keyboard or mouse
to activate.
If the computer is ON.
If the signal cable is properly connected at both ends.
If the signal timing of the computer is within the spec.
If the video output level of the computer is within the spec; assuming the
CONTRAST and BRIGHTNESS controls have not effect.
If the signal timing of the computer is within the spec. Some graphic
cards have their own positioning controls.
If the power voltage is within the spec.
If the signal timing of the computer is within the spec.
If the signal cable is properly connected at both ends.
If the signal timing of the computer is within the spec, or there is a graphic
card failure
If the video output level of the computer is within the spec.
Analog
CONFORMITY AND COMPLIANCE
FCC Compliance Statement
This equipment has been tested and found to comply with the limits for a Class B digital device,
pursuant to Part 15 of the FCC Rules. These limits are designed to provide reasonable protection
against harmful interference when the equipment is operated in a residential installation. This device
generates, uses, and can radiate radio frequency energy and, if not installed and used in accordance
with the instructions, may cause harmful interference to radio communications. However, there is no
guarantee that interference will not occur in a particular installation. If this device does cause harmful
interference to radio or television reception (this can be determined by turning, the device off and on),
you are encouraged to try to correct the interference by one or more of the following measures:
Caution:
To comply with the limits for an FCC Class B computing device, you should use the shielded signal cord
and shielded power cord supplied with this unit. The Federal Communication Commission warns that
changes or modifications of the unit not expressly approved by the party responsible for compliance
could void the user’s authority to operate the equipment.
Radio Frequency Interference Statement
Warning:
This is a Class B product. In a domestic environment this product may cause radio interference in which
case the user may be required to take adequate measures.
Canadian DOC Notice
For Class B Computing Devices
This digital apparatus does not exceed the Class B limits for radio noise emissions from digital
apparatus as set out in the Radio Interference Regulation of the Canadian Department of
Communications.
CE Marking Declaration Of Conformity
This LCD Touch Monitor complies with the requirements of related European standards, which include:
l
l Immunity: EN 50082 -1
l Safety: EN 60950 [Low-Voltage Directive (73/23/EEC)
ENERGY STAR
This product meet s the Energy Star guidelines for energy efficiency.
*Reorient or relocate the receiving antenna.
*Increase the separation between the equipment and the receiver.
*Connect the equipment into an outlet on a circuit different from that to which the receiver is
connected.
*Consult the dealer or an experienced radio/TV technician for help.
Emission: EN 55022, EN 61 000 -3-2, EN-61000-3-3
10
11
Page 8

PRODUCT SERVICE AND SUPPORT
Should this product fail or require service, please contact your Dealer or Distributor for service or
support. The Dealer or Distributor may have specific programs for support of this product, or may
provide specific services outside the scope of the manufacturer’s original warranty.
Should support from the manufacturer become necessary, please use the contact information listed
below. Be prepared to provide the following information, which is required.
• The product model and serial number, found of the rear sticker of the touch monitor itself.
• Your name, company name and telephone number. As well, a shipping address may be
necessary which cannot be a post office box.
• The name of the dealer or distributor from which the product was purchased.
• The ability to provide specific failure details.
In addition, it may be helpful for troubleshooting purposes to have a telephone close to the product.
Support is limited to the touch monitor. Application software issues, Operating System operation or
installation, PC troubleshooting or software program development is beyond the scope of available
technical support.
Contact Information:
Mailing Address: Trilogy Touch Technologies
One New Hampshire Avenue, Suite 125
Portsmouth, NH 03801
Telephone Number: 800 360-9019
Technical Support FAX: 866 398-3601
Technical Support Email [email protected]
Product Registration
Trilogy products may be registered at our website. Doing so insures that any information, updates or
revisions concerning the product are sent. Be prepared to supply the model number, serial number and
purchase vendor, as well as contact information.
Warranty
Trilogy Touch Technology
TOUCH MONITOR LIMITED WARRANTY
A. Limited Warranty
Trilogy Touch Technology, Inc. (“Trilogy”) warrants the TFT-LCD touch monitor(s) (“the Monitor”) or
(“product”) you have purchased from Trilogy or from a Trilogy Authorized Reseller, to be free from
defects in materials and workmanship under normal use for a period of three (3) years. The warranty
period begins on the date of purchase. Your original purchase invoice (sales receipt) is your proof of
purchase. If you cannot provide the original purchase invoice (sales receipt), the warranty period will be
based on the manufacture date- code shown on the monitor. A Monitor that has been exchanged is
warranted starting at the original date of purchase. The burden of warranty entitlement is solely on the
customer.
Should a defective product meet the warranty terms, Trilogy may provide an advance replacement
product, shipped within 24 business hours, at the customer’s request. Monetary security for the
replacement is required.
This warranty extends only to the original purchaser; it is not transferable to anyone who subsequently
purchases, leases, or otherwise obtains the Monitor. It excludes expendable parts. During the warranty
period, Trilogy will repair or replace defective hardware with new or equal to new parts and products. All
exchanged parts and monitors replaced under this warranty will become the property of Trilogy. During
the warranty period, there will be no charge for labor or parts. Freight costs to return products to Trilogy
will be the customer’s responsibility. If, after repeated efforts, Trilogy is unable to repair the Monitor to
good working order, the product may be replaced with an equal product, solely at Trilogy’s discretion.
Customers must notify Trilogy Technical Support, in writing within 30 days of a service incident. If
Trilogy determines that the product does not meet the warranty entitlements, then Trilogy’s sole
responsibility will be to offer a billable repair.
12
13
Page 9

B. Warranty Limitation; Exclusion; Exclusive Remedies
This Limited Warranty does not extend to any Monitor that has been damaged; a) during or as a result
of use other than for its normal intended purpose, failure to use the monitor in accordance with the
User’s Manual which accompanies it, misuse, abuse, or negligence; (b) by the use of parts not
manufactured or sold by Trilogy; (c) modifications of t he Monitor; (d) as a result of services by anyone
other than Trilogy or freight damage when returning the monitor to Trilogy or Trilogy’s Service Center; (f)
due to unusual physical or electrical stress or interference, failure or fluctuation of electrical power,
lighting, static electricity, fire, floods, or any acts of God.
THIS WARRANTY IS MADE IN LIEU OF ALL OTHER WARRANTIES, RIGHTS OR CONDITIONS,
EXPRESSLY OR IMPLIED, STATUTORY OR OTHERWISE, INCLUDING, BUT NOT LIMITED TO,
ANY IMPLIED WARRANTY OF MERCH ANTABILITY, FITNESS FOR A PARTICULAR PURPOSE
AND CIRCUMSTANCES ARISING FOR DEALING, CUSTOM OR THE USAGE OF TRADE. THE
BUYER IS RESPONSIBLE FOR DETERMINING IF THE PRODUCT IS SUITABLE FOR A SPECIFIC
PURPOSE AND/OR MEETS THE BUYER’S PRODUCTION REQUIREMENTS. TRILOGY SHALL
NOT BE HELD LIABLE FOR ANY DAMAGES, INCIDENTAL OR CONSEQUENTIAL, ARISING
FROM OR IN CONNECTION TO THE USE OF THEIR PRODUCTS WHETHER OR NOT IT IS
CONSISTENT WITH ANY OTHER STATEMENT MADE IN THE WARRANTY DOCUMENT.
THIS LIMITED WARRANTY GIVES THE BUYER SPECIFIC LEGAL RIGHTS. THERE MAY ALSO BE
OTHER RIGHTS THAT VARY FROM STATE TO STA TE. BUYERS ARE ADVISED TO CONS ULT
APPLICABLE STATE OR PROVINCIAL LAWS FOR FULL DETERMINATION O F RIGHTS.
14
C. Trilogy Service Policies
Product service is subject to the following terms and conditions. Customers may contact their dealer or
distributor for their respective service entitlement and policies.
1. Service is available for Monitors purchased and located in the continental United States, Canada,
Alaska, Hawaii and Puerto Rico. Shipments to customers cannot be made to PO Boxes.
Material returned to the Trilogy Service Center may not come via USPS, as not all locations have
parcel delivery.
2. Prior to obtaining service you must contact the Technical Support group. Please have the model
number, serial number, and date of purchase, ready when you call. The serial number (S/N) and
model number are located on the back of the monitor.
3. Products must be out of specification for service. Trilogy Touch Technology is the sole judge.
4. Trilogy Technical Support will attempt to help you resolve your problem over the telephone. During
problem resolution, Trilogy will require your assistance in performing routine diagnostic procedures.
If appropriate, Trilogy will then issue you a Return Materials Authorizations (RMA) number to be
used as a means of identifying the Monitor. NO PRODUCT MAY BE RETURNED FOR ANY
REASON WITHOUT A RMA. FAILURE TO DO SO WILL RESULT IN REFUSED SHIPMENTS.
5. Service must take place by returning the monitor to the designated Trilogy Service Center. The
proper address will be supplied at the time the RMA is issued. DO NOT RETURN PRODUCTS
FOR SERVICE TO THE CORPORATE ADDRESS. You must prepay any shipping charges, export
taxes, custom duties and taxes or any othe r charges associated with transporting the Monitor. In
addition, you are responsible for insuring the Monitor during shipment. You assume the risk of loss
during shipment. Use the original shipping and packing materials and include a description of the
symptoms of the problem. If the original shipping and Packing materials and boxes are not
available, please make sure the monitor is properly packaged and secured inside a shipping
container. THE RETURN MATERIALS AUTHORIZATION (RMA) NUMBER MUST BE PLACED
ON THE EXTERIOR OF THE SHIPPING CONTAINER. PHYSICAL DAMAGE THAT OCCURRED
DURING SHIPMENT IS NOT WARRANTED.
6. RMAs EXPIRE IN 30 DAYS OF ISSUE DEFECTIVE PRODUCTS THAT HAVE A RMA MUST BE
RETURNED WITHIN THAT TIME.
7. Trilogy is not responsible for a monitor shipped to the Authorized Service Center. Products that
arrive physically or cosmetically damaged or scratched, including but not limited to, scratches on
the Monitor, the panel, or bezel, or damage beyond normal usage, will not be eligible for
replacement. In this event, remedial service will be repair and return. PRODUCTS THAT
ARRIVE WITH COSMETIC OR PHYSICAL DAMAGE AT THE AUTHORIZED SERVICE CENTER
FROM AN ADVANCED REPLACEMENT, WILL BE ASSESSED A REPAIR CHAR GE.
8. Advance Replacement : Customers that need a replacement monitor as soon as possible to
decrease down time, can arrange for cross shipping using a Credit Card as collateral. The value of
the monitor will be authorized on the customer’s credit card and held as collateral upon the
shipment of the replacement monitor from the Trilogy Service Center. The amount authorized will
be cancelled upon receipt of the defective monitor back from the customer. Shipment will be made
via the most economical ground service. Standard policy terms apply to Advance Replacement
products. Please see above.
15
 Loading...