

Trigon Electronics Miniguard IID, Miniguard II, Miniguard 100BD, Miniguard 100B, Miniguard 4D Programming Manual
...Page 1

Uni-2010
Quickstart Keypad
Programming Guide
July 2010
Revision 1.1
Miniguard II
Miniguard IID
Miniguard 4D
Miniguard 100B
Miniguard 100BD
Minipak
Minipak WG
Minipak 2000
Minipak Pro
www.TrigonElectronics.com
100% Made in Corona, CA
Page 2

Page 2
Table of Contents
To Access Programming Mode————————————- Page 2
Changing Program access code——————————- Page 2
Operational Enable TED on/off—————————— Page 3
Dialer mode———————————————————————————— Page 4
New resident with phone number————————- Page 5
Input or Edit Resident Names——————————- Page 5
Basic text editing————————————————————- Page 6
Creating Entry Codes——————————————————- Page 7
Creating Card Codes———————————————————- Page 7
Programming system clock——————————————- Page 8
View the clock———————————————————- Page 8
Set the clock————————————————————- Page 8
Reset Tone Functions——————————————————- Page 9
Default door settings for resident————- Page 10
Wiring instructions———————————————————- Page 11
Complete Programming Overview———————————Page 12
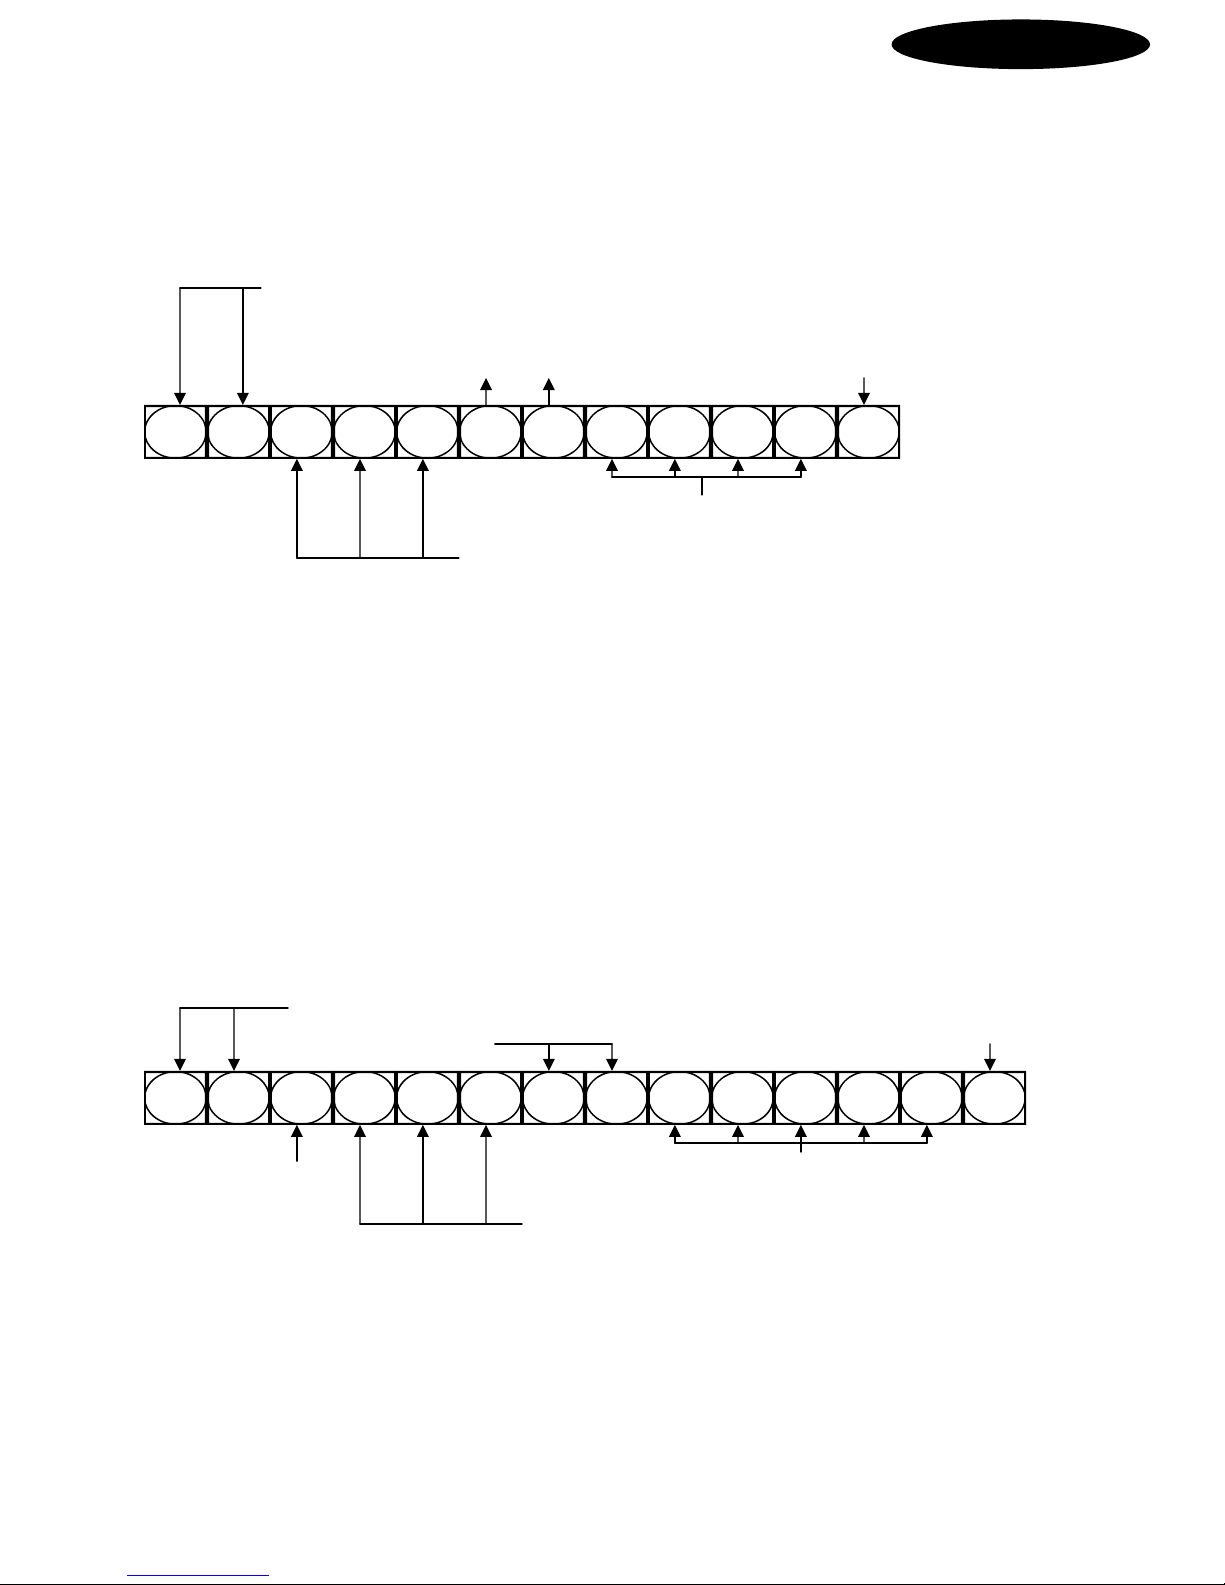
Access Programming Mode
Push Call Button at the Unit's Front Panel. You should hear a false Dial Tone.
Or you may call the Unit and wait for the Unit's Answer Tones.
Enter the Programming Mode using key sequence: *2468.
You should hear two "ACK" tones and the panel display, if available, shows "Program Mode".
Initial key stroke for entering programming mode
*
NOTE Enter: ## Exits Programming Mode.
2 4 6 8
Default programming code for new universal board
Change Program Access Code
Command to set: 3nnnn Where "nnnn" is the new 4 digit programming access code.
Programming Number
3 2 4 6 8
New Program access Code
This command sets a 4 digit code that is used at the keypad, or remotely via touch tone,
to place this unit into programming mode. This is a very important number, for without it
you will not be able to program your unit except via Modem. To program this unit via keypad this code is entered as "*2468". Since all units will have this code number as the
factory default, it is strongly suggested that you change this code soon after initial installation. Anyone with the knowledge of this code can put your unit into programming mode
and erase everything with one command. Be absolutely sure to write down the new replacement code or you will lock yourself out from future programming changes. If you lose this
code you may call Trigon and we can call the unit and send a special command to restore
this code to factory default of 2468.
Page 3

Page 3
Trigon Electronic Doorman (T.E.D.)
The Trigon Electronic Doorman (patent pending) is a telephone entry unit that allows the resident to determine the
name or business of the visitor without actually talking to the visitor. The door unit, through a sophisticated combination of microprocessors and voice processors becomes a virtual doorman intermediary between the visitor and the
resident as follows:
–Once the resident code is determined and entered, T.E.D answers with one of three greetings as follows:
–“Hello, I’m TED The Electronic Doorman, please state your name or your business and I will
contact your party for entry approval.”
–The visitor is given 6 seconds to record name or business then T.E.D. responds with:
–“Please stand by while I contact your party for entry approval.”
–T.E.D. then places a call to the resident and announces the following:
–“This is your Electronic Doorman, you have the following visitor.”–The entry unit then plays back
the visitor recording.
–The Resident has the following three choices:
–Pressing a zero “0” (programmable) activates the #1 relay in T.E.D. and grants entry.
–T.E.D. responds with:
–“I have received entry approval, please enter.”
–Pressing a seven “7” (programmable) rejects entry and generates the following response from T.E.D.:
–“I was unable to receive entry approval, please try again later, thank you.”
–Pressing a four “4” (programmable) opens the telephone communication line between Resident and Visitor which
then can result in an entry granted “0” or an entry rejected “7” and the corresponding responses from T.E.D.
Second and third relays can be actuated by the resident to open express shipment closet, or operate multiple
entrees or cameras.
All T.E.D instructions are also displayed on the directory.
Note
Units shipped with TED enabled are shipped with TED turned off,
because the unit is quicker to program and test with TED turned
off. After programming use the following to turn TED on.
Operational Enable TED on/off
Enter programming mode.
Operational Enable: (Defaults to 0) (Normal TED operation n=4)
Command to set: 4#n Where "n" is the selection of modes enabled.
Options (0 to 7)
4 # n
Programming Number
Page 4

Page 4
Options are:
n=0 Push Button Mode, No Dial Looping, No TED
n=1 Handset Mode, No Dial Looping, No TED
n=2 Push Button Mode, Yes Dial Looping, No TED
n=3 Handset Mode, Yes Dial Looping, No TED
n=4 Push Button Mode, No Dial Looping, Yes TED
n=5 Handset Mode, No Dial Looping, Yes TED
n=6 Push Button Mode, Yes Dial Looping, Yes TED
n=7 Handset Mode, Yes Dial Looping, Yes TED
Handset Mode:
Select this mode if your unit employs a Handset Hookswitch else use Push Button Mode.
Dialer Looping:
Use "Yes Dial Looping" if you dial from a list of several numbers and want to be able
to start again with the first number listed. A "No" to looping disables restarting a
phone list and all dialing attempts quit after failing to connect after the last number on the list has been tried.
TED Mode:
You must use the "Yes TED" options if the automated doorman feature is desired.
See page 7 in manual for more details about the TED option.
Note: These modes are individually broken down into "Y" or "N" enables when viewed
via the display or remotely accessed via a Modem.
Note: Dialer Mode (Page 12 in manual) must be set to
“call progress on” when either TED is enabled on and/
or more than one phone number is entered per resident
code.
Dialer Modes: (Defaults to 1)
Command to set: 6n Where "n" is the method the unit employs for dialing functions.
Programming Number
6 n
` Dialer Mode Option
Options are:
n=0 with call progress, false dial=off, verify dialtone=off
n=1 without call progress, false dial=off, verify dialtone=off
n=2 with call progress, false dial=on, verify dialtone=off
n=3 without call progress, false dial=on, verify dialtone=off
n=4 with call progress, false dial=off, verify dialtone=on
n=5 without call progress, false dial=off, verify dialtone=on
n=6 with call progress, false dial=on, verify dialtone=on
n=7 without call progress, false dial=on, verify dialtone=on
Call Progress must be allowed (with) if the unit is expected to respond to a Busy
Signal, Ring Signals or Voice detection for the purposes of redialing another number
on Busy detection or Voice Detection as required for the electronic doorman (TED) operation.
Without Call Progress being enabled, the unit reverts to a simple single number dialer and TED will not function as desired.
False Dial On forces the unit to create the impression to the visitor that it has dialed a number. It makes random Touch Tone sounds to the speaker as if speed dialing.
This gives the visitor a sense that the unit is working and pre-empts their inclination to pump the dial button, as if that will speed the process up like is mistakenly
believed with elevators and traffic lights.
False Dial Off results in a voice that declares that the dialing process is in action
by playing system message #2 "Dialing in progress, please stand by" to the visitor.
If message #2 is diverted to another function or disabled, then it's a good idea to
enable false dialing.
Page 5

Creating a New Resident with a Phone Number Assignment
Format: #0 123*5551212# (Beep-Beep)
Programming Number
Page 5
Separator
# 0 1 2 3
Where:
#0 is the command to Create or Modify a Resident's data.
123 defines the Resident's Code. (This is the Code a Visitor dials to call a Resident)
The * key separates the Resident Code from their Home Phone Number.
5551212 is their specific Home Phone Number up to 16 digits.
The # key terminates this Command.
(Beep-Beep) means the Command was accepted or "Long-Tone" means Command was rejected.
Obviously, replace the 123 and the 5551212 above with the correct desired numbers.
New! Resident Codes may now be variable length of 1 to 4 digits mixed.
New! Multiple phone numbers may be allowed per Resident on special request.
Enter: #0 123*5551212# Assigns or replaces Resident 123’s 1st Phone Number.
Enter: #0 123*2*5551212# Assigns or replaces Resident 123’s 2nd Phone Number.
Enter: #0 123*3*5551212# Assigns or replaces Resident 123’s 3rd Phone Number.
Enter: #0 123*3*# Deletes Resident 123’s 3rd Phone Number.
Enter: #0 123# Deletes Resident 123 entirely from System.
*
Resident Code
5 5 5 1 2 1 2 #
Resident telephone number
Programming terminator
Input or Edit Resident Names
To Input or Edit Names on Units with an Electronic Directory use Command "#9":
Enter: #9# Edit 1st Residents Name for Directory Display.
Enter: #9 123# Edit Resident 123's Name for Directory Display.
Programming Number
# 9 1 2 3 #
Resident Code
The "1" key once
to produce a Blank Space.
E N T E R N A M E
Note: You cannot access lower case letters via keypad programming.
Page 6

Page 6
Basic Text Editing
This page describes the method for Entering Text, such as people's names, into the
units database for Directory, Visitor Greeting or Custom Prompts.
Note: For those that have programmed previous Trigon Products, this new method replaces
the old method of entering text information!
The "*" key moves the cursor up one line.
The "#" key moves the cursor down one line.
The "0" key moves the cursor right one position.
To obtain a letter, just tap the key with the letter desired. The first letter on the
key is the first letter displayed. Tap the same key again for the next letter and again
for the 3rd letter. A 4th tap will produce the numerical value of the key.
Note: The "1" key has a few extra taps enabled. These are for letters not found on a
standard keypad and some punctuation that may prove useful.
The "1" key:
1st push produces Blank Space.
2nd tap produces letter "Q"
3rd tap produces letter "Z"
4th tap produces number "1"
5th tap produces period character "."
6th tap produces minus character "-"
7th tap produces slash character "/"
8th tap produces colon character ":"
Then this pattern sequence repeats.
Note: You cannot remotely edit text via touch tones. Allowing this has resulted in too
many errors in past products because the person programming is basically working blind.
To move the cursor left, you must use the "0" key and move the cursor right until it
wraps back to the the start of the line. In most cases, it may be faster to jump up or
down one line then return to the desired line. Generally, when you progress to another
line, the cursor is homed on the left side of the next line. So the sequence: "*#" or
"#*" is the 2 key stroke equal of a cursor home to left command.
Note: When entering names in the directory, do not include a string of periods to connect the name with the code as this is now done automatically by the unit during directory browsing by a visitor.
Note: You do not need to place the Resident Name in any alphabetical order as this is
done automatically for you, after you exit the programming mode.
To EXIT the text editor: Hold down the "*" key for several seconds until the ack-tones
are heard. This method always saves your current editing efforts.
You may also hang up via handset or by pushing the call button. However this method
doesn't promise to retain changes made on the current line or the whole screen.
Alternative programming via Modem, Lan or direct PC connection allows the full font and
all punctuation characters to be accessed in a much more comfortable manner. And the
support software is free from Trigon. It's called TriCom Professional Revision 4.0.
Page 7
Page 7
Entry Codes assigned to Specific Residents
New! Entry Codes are now mixed variable length of 1 to 6 digits per.
Enter: #1 123**2468# Assigns Resident 123's 1st Blank Position with Entry Code of 2468.
Programming number
Separators Programming Terminator
# 1 1 2 3
New! Multiple Entry Codes and Card Codes are allowed per Resident on special request.
Enter: #1 123*1*1357# Assigns Resident 123's 1st Entry Code as 1357.
Enter: #1 123*2*2468# Assigns Resident 123's 2nd Entry Code as 2468.
Enter: #2 123*1# Deletes Resident 123's 1st Entry Code.
Enter: #2 123# Deletes all of Resident 123's Entry Codes.
* *
Resident Code
2 4 6 8 #
Entry Code
Card Codes assigned to Specific Residents
Enter: #1 *123**13579# Assigns Resident 123's 1st Blank Position with Card Code of
13579.
Programming Number
Separators Programming Terminator
# 1
Defines as
Card Code
Enter: #1 *123*1*13579# Assigns Resident 123's 1st Card Code as 13579.
Enter: #1 *123*2*24680# Assigns Resident 123's 2nd Card Code as 24680.
Enter: #1 *123**44444# Assigns Card Code of 44444 to 1st Blank Card Code position.
Enter: #2 *123*1# Deletes Resident 123's 1st Card Code.
Enter: #2 *123# Deletes all of Resident 123's Card Codes.
.
*
1 2 3
* *
Resident Code
1 3 5 7 9 #
Card Code
Page 8

Page 8
Detail Programming System Clock
This unit employs an accurate digital clock that includes Year, Month, Date and Day
of the week. As per ISO-8601 standards, the 1st day of the week is Monday. This plays
a key roll if you have time zone restrictions enabled, as one can then restrict access based on the day of the week. The clock will continue accurate time keeping
without system power for about 4 days. After that, the clock will need to be set.
This unit doesn't use clock batteries as they eventually fail someday and are expensive. The clock itself employs 24 hour military standard time keeping. This eliminates confusion regarding AM and PM settings.
The day begins at midnight at 00:00 (Hours:Minutes) rather than 12:00 AM.
The day ends before midnight at 23:59 (Hours:Minutes) rather than 11:59 PM.
00:00 is midnight (12:00 AM)
02:00 is two o'clock (2:00 AM)
12:00 is noon (12:00 PM)
18:00 is six o'clock (6:00 PM)
View the Clock via unit display by going into programming mode and use command:
*#3 Display current time as Year/Month/Date, Hours:Minutes, Day-week, Seconds
Set the Clock using this command while in programming mode:
#3 YY*MM*DD*HH*mm*D# As Year/Month/Date, Hours:minutes, Day-week, Terminate command.
#3 10*01*02*23*30*1# As Year=10, Month=Jan, Date=2nd, Hours=23, Minutes=30, Day=Monday
Programming
Number
# 3 1 0
Leap year is automatically adjusted for and Daylight Savings time is computed and automatically adjusted for if Time Zones are enabled. Time Zones 98 and 99 are dedicated to Daylight Savings Time.
This DST is calculated when the year changes. The DST rules observed are based on the previous
years rules deduced from the settings in the Time Zone database. If the rules change then set Time
Zones 98 and 99 to match the new rules and the new rules will be applied automatically from then
on. See Time Zoning for greater details.
Separator Separator Separator Separator
*
Year Hours
0 1
*
Month Programming terminator
0 2
*
Date Day
2 3
*
3 0
*
Minutes
1 #
Page 9

Page 9
Detail Programming Tone Functions
This unit has a new feature that allows you to decide what touch tones are used to
perform different functions. For example, all our previous units granted access using
tone zero "0" issued from the resident or security desk when they received a call
from the unit.
This is now done via a table with functions assigned various touch tones as follows:
Unit Dials Resident:
Function: Tone:
CYCLE-1 & HANGUP 0=>9: 0
SET SWITCH-1 0=>9: 1
SET SWITCH-2 0=>9: 2
SET SWITCH-3 0=>9: 3
ENABLE VOICE 0=>9: 4
ENGAGE RELAY 2 0=>9: 5
ENGAGE RELAY 3 0=>9: 6
FORCED HANGUP 0=>9: 7
CYCLE-2 & HANGUP 0=>9: 8
CYCLE-3 & HANGUP 0=>9: 9
* FOR SITE ID MESSAGE
# FOR SITE ID OR REPLAY TED MESSAGE
These are the Factory Default settings unless specified otherwise on the purchase order.
"Cycle-n and hang up" refers to doing a gate access granted cycle on relay 1,2, or 3.
"Set Switch-n" refers to Macro Usage where the Switch can be defined to other functions.
"Engage Relay" simply sets the relay active until the end of the call.
"Enable Voice" is for modes such as "TED" that usually maintain silence at the speaker.
"Latch-n" Toggles Relay (n=1,2,3) into latch mode and holds forever until toggled off.
The "*" and "#" tones usually control audio/message playing with the exception of when
a call is placed to the unit, the "*2468" is used for placing the unit into program
mode.
Unit is Called by the Resident:
Function: Tone:
CYCLE-1 & HANGUP 0=>9: 0
SET SWITCH-1 0=>9: 1
SET SWITCH-2 0=>9: 2
SET SWITCH-3 0=>9: 3
LATCH-1 TOGGLE 0=>9: 4 (1 BEEP=ON, 2 BEEPS=OFF)
LATCH-2 TOGGLE 0=>9: 5 (1 BEEP=ON, 2 BEEPS=OFF)
LATCH-3 TOGGLE 0=>9: 6 (1 BEEP=ON, 2 BEEPS=OFF)
FORCED HANGUP 0=>9: 7
CYCLE-2 & HANGUP 0=>9: 8
CYCLE-3 & HANGUP 0=>9: 9
*NNNN => FOR ENTERING PROGRAMMING MODE NNNN
*(PAUSE) => FOR SITE ID
# MICROPHONE AND SPEAKER SET ACTIVE
Note: The unit has slightly different behaviors dependent on if the unit was
called or did the dialing itself (dialed out status).
You can assign a different tone control scheme to these functions. You must also remember that the functions are processed in the order shown. This means that if you use the
tone zero "0" to Cycle Gate-1, then tone zero "0" can't be used for any function beyond
that point. This is actually rather useful because you can then define all other functions as tone zero "0" and the program will never get to process those functions. This
effectively masks those functions that you want disabled. This did however create a minor issue that was resolved by processing the "Forced Hangup" first.
Put simply: Define a tone for "Forced Hangup" such as the default seven "7" tone and
use it for every function you want disabled.
Page 10

Page 10
Why disable a function? Some folks have Caller ID and may see the source phone number
of the line the unit is attached to. They may call the unit. They may latch a gate
open. So put a Seven everywhere that you want a function disabled. A better option is
to specify that the line attached to the unit has "Caller Id Blocked" set active for
that line on all calls placed by the unit. That way the owners or managers may still
call the unit, because they know the private phone number, and latch or unlatch the
gate, or do special functions without the worry of having residents fooling around with
their gate controls, etc.
As always, you must be in programming mode to issue programming commands.
Assign a Function to a Tone using command 9: (out going calls placed from the unit)
9ft Set function f (0 to 9) to tone t (0 to 9) for out going calls from unit.
Function (0 to 9)
Tone (0 to 9)
9 n n
Programming number
Ie: 905 Sets function "0" (Cycle Gate-1 & Hangup) to Tone 5.
Assign a Function to a Tone using command 9#: (incoming calls answered by the unit)
9#ft Set function f (0 to 9) to tone t (0 to 9) for calls answered by the
unit.
Ie: 9#05 Sets function "0" (Cycle Gate-1 & Hangup) to Tone 5.
Function (0 to 9)
Tone (0 to 9)
9 # n n
Programming number
Default “door” settings for resident.
“0” key grants entry to visitor.
“7” key denies entry to visitor.
“4” key allows resident to talk to visitor when T.E.D. is activated.
“#” key replays TED message if desired.
All of these are programmable using the “Detail Programming Tone Functions” on page 9.
Page 11

Page 11
Page 12

Page 12
Complete List of Program Codes and Manual Page Numbers
0n Play recorded message n where n = 1 to 8. (Page-30)
0#n Record message n where n = 1 to 8. Max = 14 seconds per message. (Page-30)
0*n Delete message n where n = 1 to 8. (Page-30)
1nnnn Set site ID code. (Default = 1234) (Page-14)
1#n-n Add a Keypad Entry Code to pool memory. (Page-21)
1*n-n Delete a Keypad Entry Code from pool memory. (Page-21)
2n Set a Phone Number in List-A. (Page-23)
2#n Set the Volume Level Control. (Default = 0 = Automatic) (Page-13)
2*n Set the Ring Rollover Limit on placed calls. (Default = 6) (Page-12)
3nnnn Set the Programming Access Code. (Default = 2468) (Page-14)
3#n-n Add a Card Code to pool memory. (Batch loading is allowed) (Page-22)
3*n-n Delete a Card Code from pool memory. (Page-22)
4n Set Automatic Message Options. (Default = 2) (Page-16)
4#n Set TED, Dial Looping and Button Modes. (Default = 2) (Page-14)
4*n Set Code Range Functions. (Default as all disabled) (Page-29)
5n Set Rings Counted before unit Auto Answers. (Default = 3) (Page-11)
5#nn Set Modem Extension Code. (Default = 99) (Page-13)
5*nn Set Touch Tone Extension Code. (Default = 00) (Page-13)
6n Set Dialout Modes. (Default = 0) (Page-12)
6#n Set Keypad Options. (Default = 0) (Page-15)
6*n Set Security Mode. (Default = 0) (Page-12)
7n Set Gate1 Cycle Interval in 5 second periods. (Default = 3) (Page-10)
7#n Set Gate2 Cycle Interval in 5 second periods. (Default = 3) (Page-10)
7*n Set Gate3 Cycle Interval in 5 second periods. (Default = 3) (Page-10)
7n Set Phone Number in List-B. (in TA3 mode only) (Page-23)
8nnn Set Call Length Limit in seconds. (Default = 180) (Page-13)
8#n Set Alarm Interval in 5 second periods. (Default = 3) (Page-10)
8*n Set MG3/HF3/TA3 & Passback options. (Default = 0) (Page-15)
9nn Assign a Tone to a Function for when unit dials out normally. (Page-24)
9#nn Assign a Tone to a Function for when unit has been called remotely. (Page-24)
9* Activate Tone Echo Test if unit called. (use # tone to exit this test) (Page-34)
9* Force unit into a Standard Touch Tone Phone test mode. (Page-34)
*n View a Phone Number in List-A. (Page-23)
**n View a Phone Number in List-B. (Page-24)
*#0 View Setup Assignments. (Page-16)
*#1 View Database Structure and Capacities. (Page-16)
*#2n# View Residence Data. (n = Resident Code to start at or omit n = 1st) (Page-17)
*#3 View the System Clock. (Page-20)
*#4n# View Pooled Entry Codes. (n = Entry Code to start at or omit n = 1st) (Page-21)
*#5n# View Pooled Card Codes. (n = Card Code to start at or omit n = 1st) (Page-22)
*#6 View all active Code Ranges. (Page-29)
*#7n# View Time Zone Tables. (n = Zone Code to start at or omit n = 1st) (Page-28)
*#8 View Macro Code Tables. (Page-32)
*#9 View Function Tone Assignments. (Page-24)
*#* View Greeting Screens 1 and 2. (Page-26)
*## View Custom Prompt Lines 1 to 8. (Page-26)
*** View Embedded Programming Guide. (this page embedded) (Page-34)
#0 Set Residence Phone Numbers. (Page-17)
#1 Set Residence Entry Codes and Card Codes. (Page-18,19)
#2 Delete Residence Entry Code and Card Codes. (Page-18,19)
#3 Set System Clock. (Page-20)
#4 Set Time Zones. (Page-27)
#5 Set Macro Commands. (Page-33)
#6 Edit Custom Greeting Screen 1. (if enabled and local only) (Page-26,9)
#7 Edit Custom Greeting Screen 2. (if enabled and local only) (Page-26,9)
#8 Edit Prompting Messages. (if enabled and local only) (Page-26,9)
#9 Edit Residence Names. (if enabled and local only) (Page-3,9)
#*n Master Erase Commands. (use extreme caution here) (Page-34)
## Exit Programming Mode.
Page 13
 Loading...