


3
Dear User,
Congratulations on purchasing the Trigger Scootercar!
Please read this user manual carefully to familiarize yourself with safe and effective usage
procedures.
We would like to inform you that our scootercar is produced under a strict quality
control system. The Trigger must undergo all periodic maintenance and services.
Besides, original spare parts must be used. In case of a structural or production defect,
assistance is offered free of charge under valid warranty. The guarantee mentioned above
is not valid under the following conditions:
The designated lubricating oil is not used.
Maintenance or repair is not carried out in the appropriate manner.
Non-original parts are utilized and or modifications to the original design are
carried out.
The instructions in the owner’s manual are not properly followed.
Parts subject to normal wear such as the seats, spark plugs, light bulbs and
cables... etc., are not covered by the guarantee.
This manual is a guide for the operation, inspection and basic maintenance of this
scootercar. Please retain this manual for future reference.
If you have any further questions please contact your Trigger dealer, who will be ready
to help you at all times.
!
ATTENTION
We advise you to use a helmet and seatbelt (when installed) when riding the
Trigger, even when it’s not required by law.
!
CAUTION
Please be especially cautious when riding in the vicinity of tram rails or any metal
surface because riding on top of them can make the vehicle skid. Always keep in
mind that the rear wheel is located in the middle!
!
WARNING
Please use SAE JASO FC grade lubricant oil to refill the engine. Otherwise, the
above mentioned guarantee is not valid.

4
Contents
1 Trigger Specifications................................................................. 5
2 Identification Numbers .............................................................. 6
3 Trigger Part Overview ............................................................... 7
4 User’s Guide ................................................................................ 9
4.1 Main switch.......................................................................................................................... 9
4.2 Important Before Starting...............................................................................................10
4.3 Kick Start and Air Filter.................................................................................................. 11
4.3.1 Kick start.................................................................................................................11
4.3.2 Air filter ................................................................................................................... 11
4.4 Switches and Controls ....................................................................................................12
4.4.1 Dashboard............................................................................................................... 12
4.4.2 Left Handle Bar Switch.........................................................................................13
4.4.3 Right Handle Bar Switch ......................................................................................13
4.5 Brake System Instructions..............................................................................................14
4.5.1 Inspection of Brake Fluid .....................................................................................15
4.6 Fuel Tank............................................................................................................................16
4.7 Oil Tank.............................................................................................................................. 16
4.8 Tire......................................................................................................................................17
4.9 Charging the battery........................................................................................................ 17
4.10 Alarm and Radio Preparation.........................................................................................17
5 Maintenance & Inspection........................................................ 18
5.1 Gear Oil Replacement.....................................................................................................18
5.2 Brake Fluid Replacement ................................................................................................18
5.3 Inspection of Spark Plug..................................................................................................18
5.4 Light Bulb Replacement................................................................................................... 19
5.4.1 Head Lights (12V 15W x 2) ................................................................................ 19
5.4.2 Front Signal Lights (12V 10W) ...........................................................................20
5.4.3 Rear Lights .............................................................................................................. 20
5.5 Battery and Fuse Replacement ...................................................................................... 21
5.6 Pre-operation Check.......................................................................................................21
5.7 Summary of Instructions for Lubrication ....................................................................22
5.8 Running in Your New Scootercar ................................................................................ 22
6 Technical Instructions .............................................................. 23
6.1 Disassembling Front Body Part......................................................................................23
6.2 Assembling Left Front Wheel ........................................................................................ 23
7 Reporting Safety Defects .........................................................24
8 Safe Riding Tips......................................................................... 25
8.1 Important Note ................................................................................................................ 25

5
1 Trigger Specifications
Table 1: Specifications
Engine GE5 50 c.c. TGB
Overall Length mm 2350
Overall Height mm 1240
Dry Weight kg 170
Displacement c.c. 49.3
Spark Plug BPR6HS, BPR7HS, BP6HS
0,6~0,7 mm
Battery V-AH 12V / 4AH – 7AH
Fuel unleaded gasoline (octane 92 and up) or
premium gasoline
Fuel Tank Capacity Liter 5,3
Gear Oil SAE 90#
Gear Oil Capacity Liter 0.09
Brake System front: disc, rear: drum
Head Lights 12V 15Wx2
Rear Light 12V 5W
Brake Light 12V 18 W
Light Bulbs
Signal Lights 12V 10W
Pressure front: 2,1 kgf / cm², rear: 2,5 kgf / cm² Tire and
Wheel
Dimensions front: 120/70-12, rear: 12”: 120/70
13”: 120/60

6
2 Identification Numbers
Figure 1
The frame number is located under the
dashboard, as shown in the figure on the
left.
This number is important when applying
for an insurance policy.
The number is also engraved into the
chassis, behind the right front wheel.

7
3 Trigger Part Overview
Figure 2
Figure 3

8
Trigger Part Overview
continued
Table 2
Figure 2 12. back mirror
1. muffler 13. headlight
2. brake light 14. front turn signal light
3. luggage compartment lock Figure 3
4. luggage rack 15. speedometer
5. roll bar 16. left handle bar switch
6. side support 17. left handle bar
7. main switch 18. rear brake lever
8. steering lock 19. kick start
9. front brake lever 20. rear light
10. throttle grip 21. rear turn signal light
11. right handle bar switch
v

9
4 User’s Guide
4.1 Main switch
Figure 4
The “À” position (between ON and OFF) is for
checking the lubricant oil warning light.
When the key is positioned at “À”the oil warning light
should flash once. If it doesn’t light, please contact your
dealer for a replacement.
Please refill the oil when it lights continuously.
Table 3: Main switch position
Position Function Can the key
be taken out
ON When riding and starting the engine. no
À
Checking the lubricant oil warning light. no
OFF Shutting down the engine, no power to
the electrical system.
yes
LOCK Operating the steering lock: turn the
handlebar to the far right side, then
turn the key to the left.
yes

10
4.2 Important Before Starting
Make sure the fuel tank is filled up.
Check the oil level (as shown in paragraph 4.7).
Make sure the key is in the “ON” position.
Hold the brake lever and push the electric starter button or kick start. When
starting after a long period of not using the vehicle, please use the kick start for
3 or 4 times or use the electric start button for 3 or 4 times. If the engine still
won’t start, wait a few minutes and follow the normal procedure.
If the electric starter can’t start the engine in one go, release the button for a
few seconds and try again. Every attempt shouldn’t last more than 5 seconds in
order to avoid unnecessary battery consumption.
The Trigger uses an automatic choke. This means that no throttle is necessary
when starting the engine.
If the Trigger keeps failing to start, take the scootercar to the dealer for repair.
To protect the engine, please avoid sudden acceleration or full speed riding.
When you push the electric starter button and the oil warning light flashes,
please take the vehicle to the dealer for detailed examination.
!
WARNING
Don’t start the engine in a hermetically closed room. The exhaust fumes are toxic
and cause people to lose conscience within a very short time. Therefore, it is
necessary to start the engine in the open air.

11
4.3 Kick Start and Air Filter
4.3.1 Kick start
When the electric starter does not work, please use the kick start instead.
When the engine has started, relocate the kick start to the original position.
4.3.2 Air filter
The air filter must be cleaned or replaced by the dealer every 5.000 kilometers or six
months.
!
CAUTION
When the air filter is incorrectly or incompletely assembled, dust will be sucked
directly into the cylinder and causes abnormal abrasion of the engine.
Figure 5

12
4.4 Switches and Controls
4.4.1 Dashboard
Figure 6
1. oil warning light (red)
Turn the main switch to the “À” position between “ON” and “OFF”. The oil
warning light should flash once.
2. turn signal light (green)
When the turn signal is switched on, the light will flash and a beep will sound.
3. fuel level meter
4. speedometer
5. odometer
!
WARNING
Please use SAE JASO FC grade lubricant oil to refill the engine. Otherwise the
guarantee is not valid.
Figure 6
13
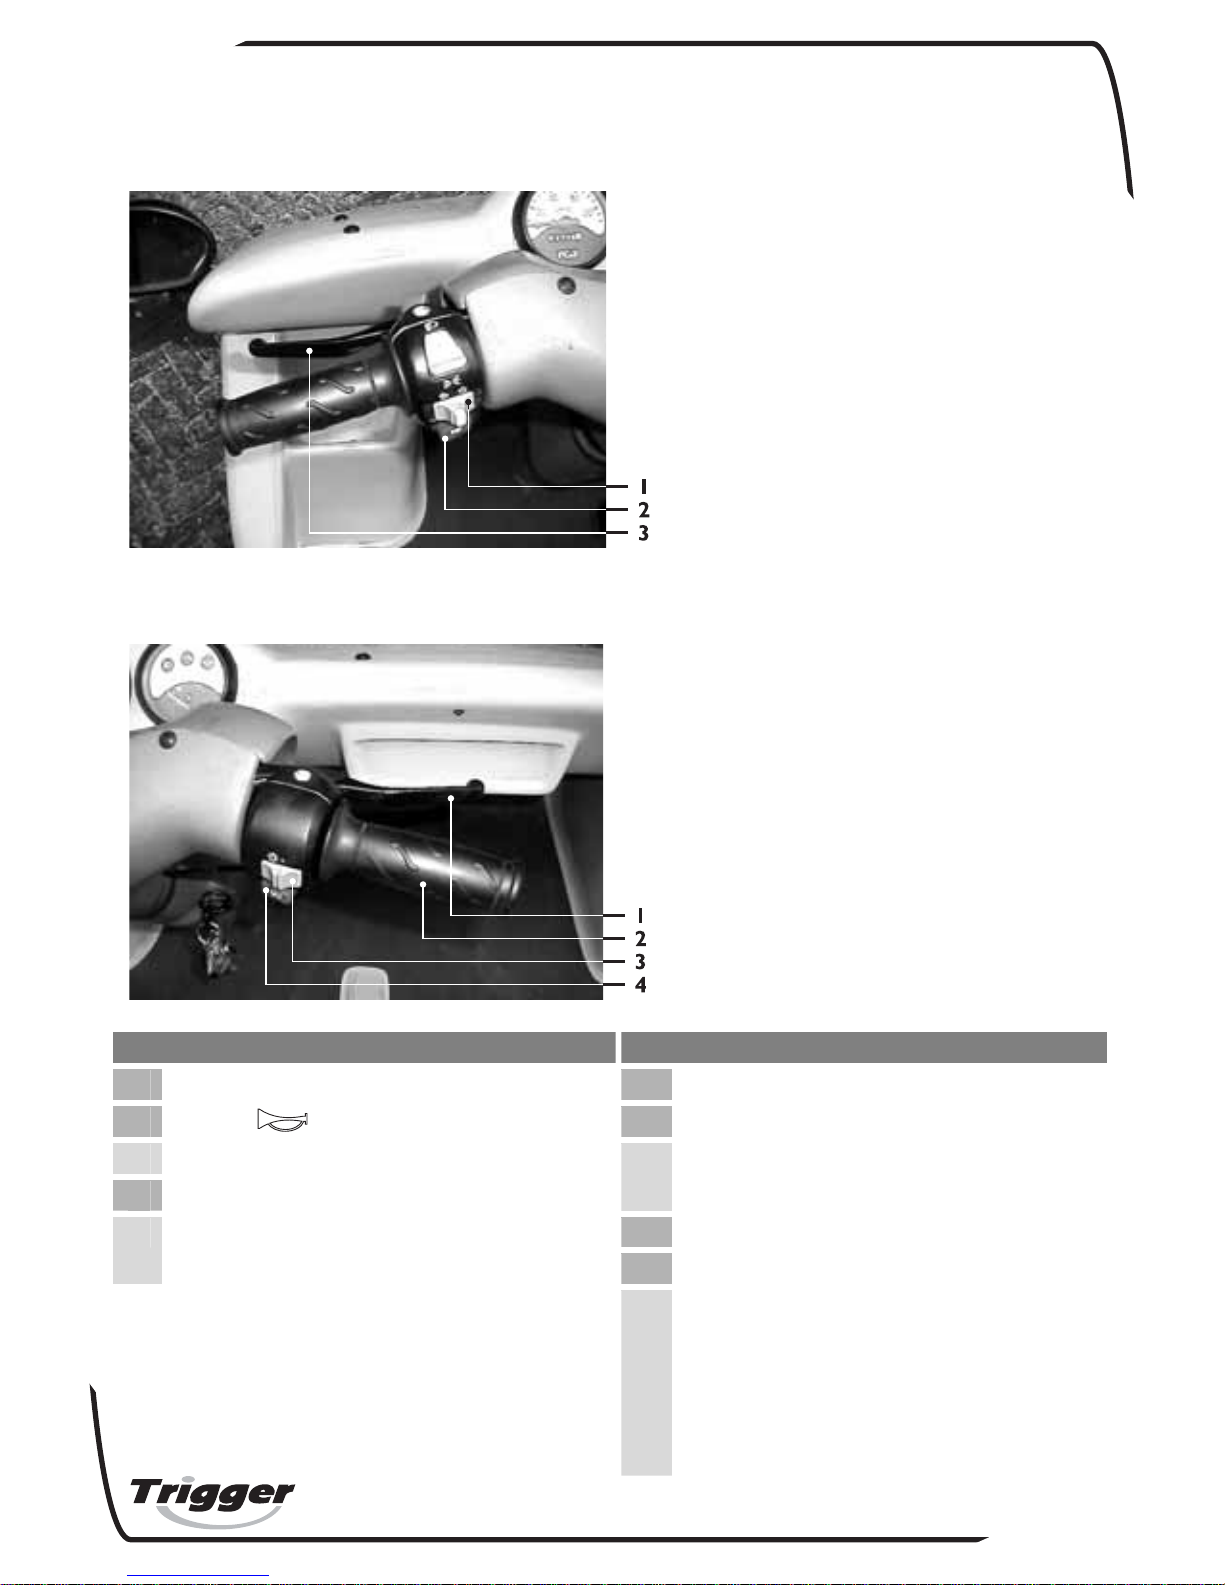
4.4.2 Left Handle Bar Switch
4.4.3 Right Handle Bar Switch
Figure 7 Figure 8
1. signal light switch Õ / Ö 1. front brake lever
2. horn 2. throttle grip
The horn will sound when pushed.
3. rear brake lever
To increase throttle, turn towards
you.
3. head light switch
4. electric start
To start the engine, the rear brake
lever must be operated.
Switch the key to “ON”, keep the
brake lever pressed and then push
the button. Do not push the electric
start button when the engine is
running. This can easily damage the
starting mechanism.
Figure 7
Figure 8

14
4.5 Brake System Instructions
Figure 9
Release the throttle before braking and apply the front and rear brakes
simultaneously and gradually.
To avoid skidding or loosing control, try to avoid sudden braking.
Braking can be extremely difficult when riding on metal surfaces, construction
sites, manhole covers, tram rails and wet roads. Please slow down and pay
special attention while braking under these conditions.
When riding up- or downhill, it may be difficult to apply the brakes. Please
reduce speed accordingly.
Figure 10
Check the clearance of the front and rear lever
as shown in figure 9. The left lever clearance
(rear brake and parking brake) should be
between 30 and 35 mm. The right hand lever
(front brake) should be 40 and 45 mm. If the
clearance of the right lever is incorrect, the front
brake (disc) must be adjusted by an authorized
dealer. The rear break (drum) can be adjusted
(tightened) by turning the nut near the rear
wheel clockwise. See figure 10.
If pulling the break levers responds with little or no braking, it means that
something is wrong with the system. Please take the vehicle to the dealer for
detailed inspection immediately.
15
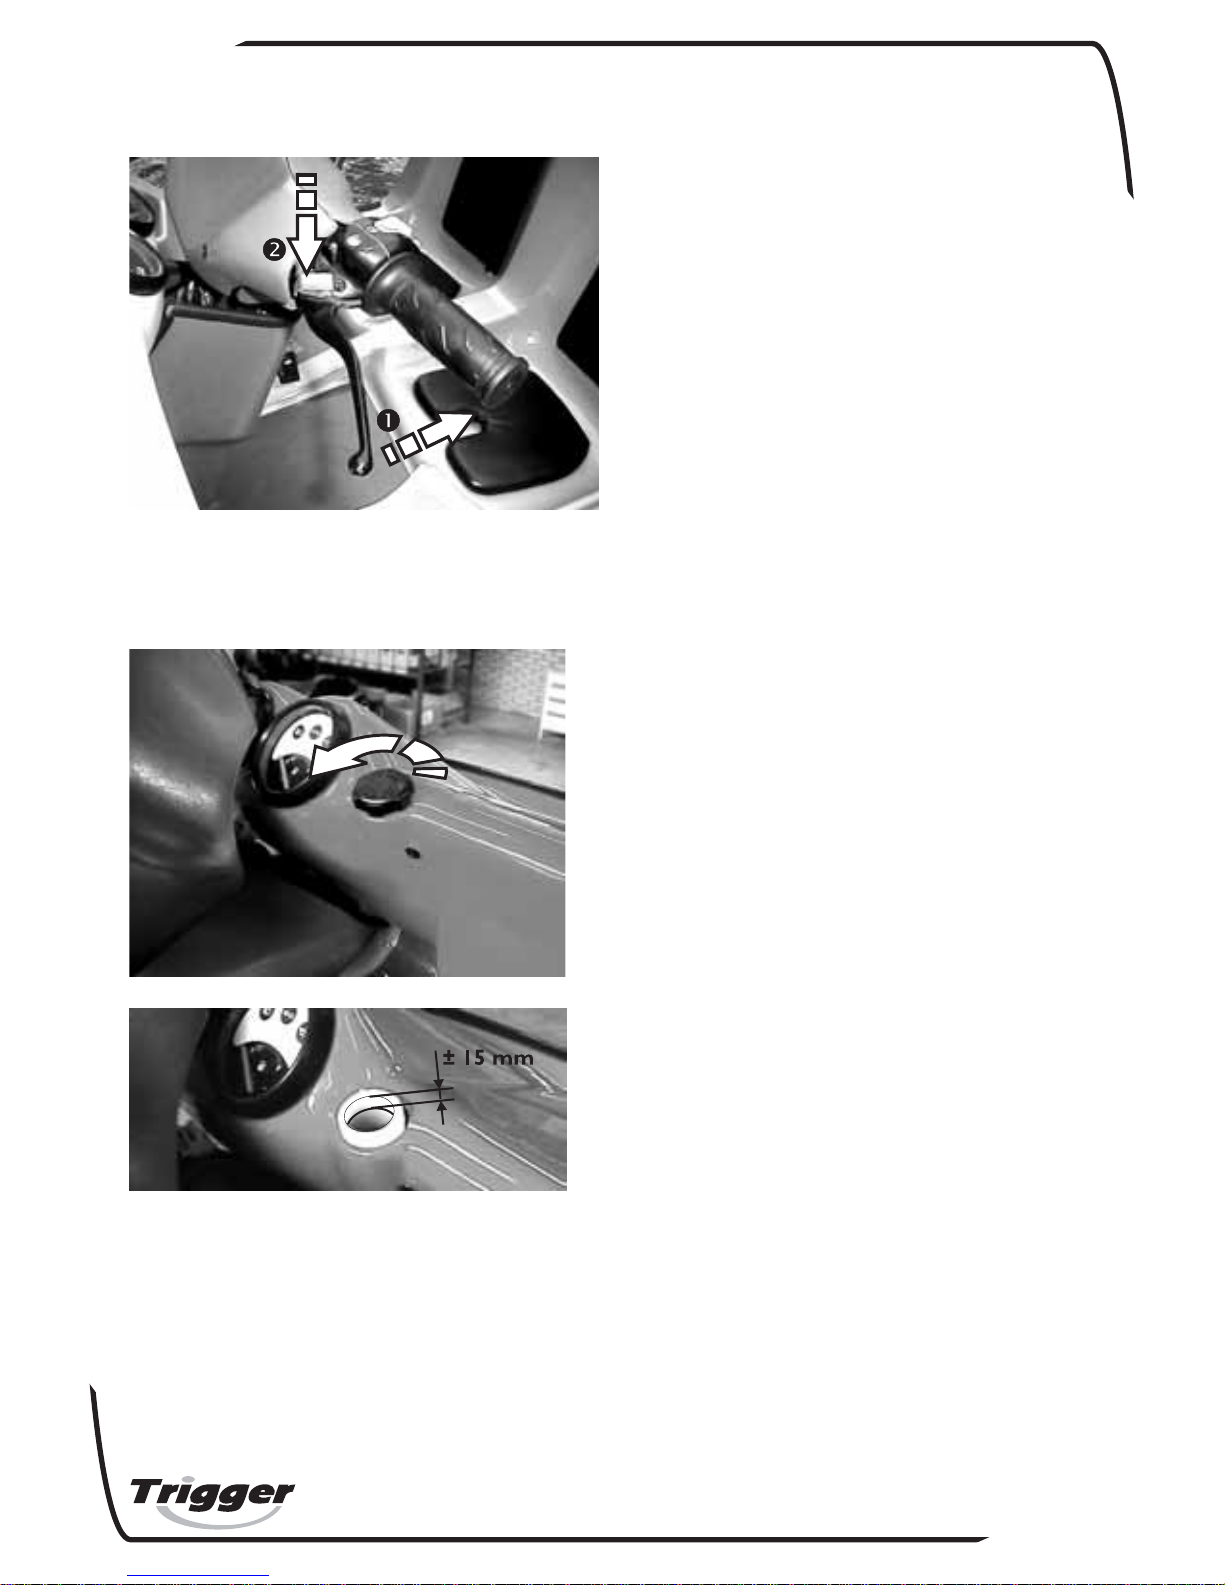
Figure 11
To use the parking brake, push the
small lever Y down while pulling the
left break lever X.
4.5.1 Inspection of Brake Fluid
Figure 12
Please check the brake fluid level
regularly. It should be approximately 15
mm from the top (as shown in figure 12
on the left). Please refill immediately
when the oil is below this level.
Always use DOT #4 brake fluid.
The brake may not function when the
fluid level is below the normal level.
If undesignated brake fluid is used, the
brake may fail due to different chemical
reactions resulting from other brand
products.
To avoid corrosion of the plastics parts,
please clean spilled brake fluid with a
dry cloth.
When refilling the brake fluid, be careful not to allow water to get mixed with
the fluid. Otherwise air bubbles may be formed which cause the brakes to
malfunction.
!
ATTENTION
Please make sure the brake fluid is replaced by your dealer every two years.

16
4.6 Fuel Tank
Figure 13
When the fuel indicator is on “E”
position, you may have to refill the
tank immediately.
The fuel inlet is located next to the
passenger seat.
Always use premium or unleaded
gasoline (euro 95).
Don’t overflow the fuel tank.
!
WARNING
Since gasoline is inflammable, please do not smoke or get in the vicinity of fire.
Turn off the engine even when you pump gasoline in an airy space. If you inhale too
much gas or swallow gasoline, seek medical attention immediately.
4.7 Oil Tank
Figure 14
If the oil warning light (figure 6,1) in
the dashboard is on when riding, it
is a warning sign that the oil is about
to run out. Refill the tank with
JASO FC CLASS 2-stroke classified
oil as soon as possible.
Don’t let the oil tank become
empty or the engine will easily be
damaged.
Always use designated two stroke oil or the same classification as JASO FC
CLASS 2-stroke oil
!
WARNING
Application of the wrong oil can result in the engine operating at low efficiency,
reduced horsepower or damage to the engine.

17
4.8 Tire
Figure 15: Partial cross-section of tire and rim
Tire pressure affects riding performance,
appropriate pressure will make riding smoother.
When the groove depth is less than 1.6 mm, please
change the tire as soon as possible, or riding will be
slippery on wet or bumpy roads.
Front tire pressure: 2,10 kg/cm²
Rear tire pressure: 2,50 kg/cm²
Since the scootercar is fitted with tubeless tires,
please repair the tire surface directly when pierced
by sharp thorns, nails etc.
4.9 Charging the battery
Figure 16
The battery can be charged by means
of a connector in the storage space of
the Trigger.
Use the charger (optional) that came
with the scootercar or a model with
equal power output (12V - 400 mAH).
4.10 Alarm and Radio Preparation
Figure 17
Please note that the electrical system
of the Trigger is prepared for alarm X
and radio Y. The connectors are
located in the dashboard, as shown in
figure 17.
When the Trigger is fitted with a
radio, we advise to use a battery with
more capacity, 12V / 7AH instead of 4
AH.

18
5 Maintenance & Inspection
5.1 Gear Oil Replacement
Change of gear oil should be carried out after the first 1000 km. After that, oil
should be changed every 5.000km.
Gear lubricant code SAE 85W-90.
The gear lubricant inlet is located at the left hand side of the rear wheel on top
of the crankcase.
Change of the gear oil should be carried out by the dealer.
5.2 Brake Fluid Replacement
Replacement of brake fluid should be carried out every two years.
Always use DOT #4 brake fluid.
The brake fluid inlet is located under the right handlebar (paragraph 4.5.1).
Change of the brake fluid should be carried out by the dealer.
5.3 Inspection of Spark Plug
Figure 18
Disconnect the H.T. cable from the spark plug cap and turn counterclockwise.
When reassembling, make sure that the thread of the spark plug aligns with the
one in the engine.
Standard spark plug: NGK BPR6HS or BPR7HS.
The spark plug must be periodically cleaned in order to keep a proper ignition.

19
Before installing the spark plug, check the electrode gap with a gauge and
modify if necessary to measure 0.6-0.7 mm (figure 16).
When reinstalling the spark plug, clean the gasket surface and utilize a new
gasket. Tighten the plug with a torque of 20N/M (2.0 kg/M).
5.4 Light Bulb Replacement
5.4.1 Head Lights (12V 15W x 2)
Figure 19
Disassembling the headlight.
Unfasten both screws that hold the
headlight Y (18A) from the inside of
the body.
Disconnect the power plug Z (18B).
Take the entire headlight out (18B).
To remove the bulb, turn the contact
spring away from the rear of the bulb
(18C).
Only replace the outer bulb with a 12 Volt 15 Watt one (the inner bulbs are
not used).
When reassembling the headlight, adjust the light beam by turning screw X if
necessary.

20
5.4.2 Front Signal Lights (12V 10W)
Figure 20
Disassembling the light bulb socket.
Turn the bayonet catch counter
clockwise from the inside of the body.
Replace with a 12 Volt 10 Watt bulb.
5.4.3 Rear Lights
Figure 21
Disassembling the rear light reflector.
Unfasten both screws at the top to take off the outer reflector.
To remove a bulb turn it counter clockwise.
X rear light: 12 Volt 5 Watt bulb
Y signal light: 12 Volt 10 Watt bulb
Z brake light: 12 Volt 18 Watt bulb

21
5.5 Battery and Fuse Replacement
Figure 22
Disassemble the right skirt by unfastening the parkers X.
This part is hinged to the underside of the chassis.
The battery Y is clamped to the chassis and can be replaced by unfastening both
nuts.
The 10A fuse Z is located in a separate container that can be unscrewed for
replacement.
5.6 Pre-operation Check
Table 4: Before operating the scootercar, the following points must be
checked:
inspection items description
front brake
rear brake
Check whether brakes function within normal
parameters.
tires Check whether tire pressure is sufficient.
Check whether tires are damaged or cracked.
light Check whether brake light functions normally.
Check whether signal lights function normally.
Check whether all the lights are clean.
back mirror Check whether reflecting images are clear.
Check whether glass is clean.

22
5.7 Summary of Instructions for Lubrication
Table 5: periodical lubrication instructions
item 1st time 2nd time etc. lubricant
rear brake nut (Figure 10) 3.000 KM Grease
speedometer gear box 3.000 KM 4.000 KM Grease
bearing. (front and rear
wheel)
6.000 KM 3.000 KM Grease
bearing. (handle bar) 6.000 KM Grease
brake and throttle cable 3.000 KM Grease
gear box reduction 300 KM 5.000 KM Oil
5.8 Running in Your New Scootercar
Take good care of your new vehicle within the first 1.000 KM and operate it
smoothly in order to maintain every part in proper condition. Try not to
accelerate with full throttle.
When a cylinder, piston, or crankshaft is replaced, please avoid full speed riding
within the first 1.000 KM.
Avoid full acceleration when the scootercar is not in optimal condition.

23
6 Technical Instructions
!
DISCLAIMER
The information on this page is for technical reference purposes only. The
instructions / maintenance should only be carried out by your Trigger dealer.
Trigger Technics is not responsible for any damage resulting from improper use.
6.1 Disassembling Front Body Part
Figure 23
To disassemble the front body part (to
reach the radio / alarm preparation):
Remove the mirror from its
socket. Then remove the socket
itself. X
Remove parker to separate from
mid-section. Y
Unfasten two parkers at the
bottom. Z
6.2 Assembling Left Front Wheel
Figure 24
To assemble the left
front wheel, make sure
the speedometer sensor
(
Õ
) fits together with
the wheel rim as shown
in figure 23 on the left.

24
7 Reporting Safety Defects
For United States customers only.
Trigger Technics BV
Oosterkerkstraat 18
2312 SN Leiden
The Netherlands
Reporting Safety Defects
If you believe that your vehicle has a defect which could cause a crash or could cause
injury or death, you should immediately inform the National Highway Traffic Safety
Administration (NHTSA) in addition to notifying Trigger Technics BV.
If NHTSA receives similar complaints, it may open an investigation, and if it finds that a
safety defect exists in a group of vehicles, it may order a recall and remedy campaign.
However, NHTSA cannot become involved in any individual problems between you,
your dealer, or Trigger Technics BV.
To contact NHTSA you may either call the Auto Safety Hotline toll-free at 1-800-4249393 (366-0123 in Washington, DC area) or write to:
NHTSA
U.S. DEPARTMENT of TRANSPORTATION
400 7
th
Street SW, (NSA-11)
Washington, DC 20590
You can also obtain other information about motor vehicle safety from the Hotline.

25
8 Safe Riding Tips
When riding the Trigger, we advise you to use a helmet and seatbelt (when
installed), even when it’s not required by law.
Always keep in mind that the Trigger is a three wheeled vehicle. If one of the
front wheels lifts when making a sharp turn, the rear brake can be used to
stabilize the vehicle.
Braking may be difficult on wet roads, so please avoid sudden braking, or the
scootercar may skid.
Always slow down when approaching a turn.
When passing by a car, be aware of doors opening unexpectedly. Always keep
alert.
Always ride carefully when passing tram rails or construction sites covered with
metal surfaces.
Immediately after washing, the brake lining may still be wet. Therefore inspect
the brake effectiveness before riding.
Always be aware of local safety regulations.
!
ATTENTION
After having operated the vehicle for a while, the exhaust becomes very hot. Please
park the scootercar properly and maintain a safe distance from pedestrians and
children to avoid contact with the muffler.
8.1 Important Note
Herewith we advise the user that whatever modification to the engine or to the parts
with the purpose of increasing either the speed or the horsepower, is strictly prohibited
by law.
Please always consult the professionals at the dealer’s station about any modification to
the engine or parts.
Before utilizing the scootercar, make sure you have a valid driver’s license and the
scootercar has been homologated by the local transportation authority.
Before going on the road inspect all critical parts (paragraph 5.6).
Furthermore, we would like to inform the user that any modification to the scootercar
without authorization may affect the validity of your insurance policies or your license
may be suspended. If the user has any questions with regard to a part or the scootercar
as a whole, please consult our distributor or agent for more details.
We wish you many happy kilometers with the Trigger!
 Loading...