

Page 1
USER MANUAL
FOOD WASTE DISPOSER
MODEL NO.:EM200
CGMD-65
QSD-38
MCD17-T7
PLEA SE READ THIS MANU AL CAREF ULLY BEFO RE USE
THE CO MPANY RES ERVE S TH E RIGHT TO INTER PRET THE MANUAL
THE ACT UAL PROD UCT APPEARANCE S HALL PRE VAIL.
PLEA SE KEEP IT TOGETHE R WITH THE INVOIC E AFTER READIN G.
THE PR ODUCT TE CHNOLOGY OR SOF TWARE MAY BE UNGRAD ED WITHOUT PRIO R NOTICE
NOTE : This has been d esigned t o operate on 110-1 20 Volt, 50/60 H z exclusi vely. Using any ot her
volt age or Hz wil l adversely a ff ec t perform ance.
IMPO RTANT: Re ad all inst ructions th oroughl y. Keep t his guide f or future ref erence.
WARNI NG: Be sure to re view safe ty instruct ions pert aining to a ris k of fire, el ectrical sh ock
or inj ury to person s before us ing disposa l.
WARNING:WHEN USING ELECTRIC
APPLIANCES, BASIC PRECAUTIONS ARE
ALWAYS TO BE FOLLOWED, INCLUDING
Please read the manual before use, children shall
operate this product under the guidance of adults,
do not allow children to play with this product.
Do not disassemble, modify or repair the waste
processor
When using, please open the tap first, and then the
disposer; after food waste is grinded, rinse it with
water continuously, so that food waste and
corrosive detergents will not remain in the disposer.
The continuous load operation shall not exceed 10
minutes, and the interval between each use shall be
greater than 30 minutes.
This product is designed to dispose of normal
household food waste;inserting materials other
than food waste into disposer could cause personal
injury and/or property damage.
To reduce the risk of injury and/or property damage,
do not use the sink containing the disposer for
purposes other than food preparation (such as baby
bathing or washing hair).
Tur n off the machine and tap only after the food
waste has been grinded and the machine and
running water have been heard.
When not operating a disposer, leave the stopper in
place to reduce the risk of objects falling into the
disposer.
If the supply cord is damaged, it must be replaced
by the manufacturer, its service agent or similarly
qualified-persons in order to avoid a hazard.
Do not store or use gasoline or other flammable
vapors and liquids in vicinity of disposer.
Please do not put your hands in the disposer.
LEAK HAZARD: Regularly inspect disposer and
plumbing fittings for leaks, which can cause proper
ty damage and could result in personal injury.
It can handle:Leftovers, vegetables, egg shells,
livestock small bones,tea leaves Fruit skins,small
fruit pits,cooked meat, small corncobs,cereal and
other food waste.
Do not put the following into a disposer: High-
fiber foods,hair, hemp rope, big pork bones,clam or
oyster shells, caustic drain cleaners or similar
products, glass, china, or plastic, metal (such as
bottle caps, steel shot, tin cans, or utensils), hot
grease or other hot liquids.
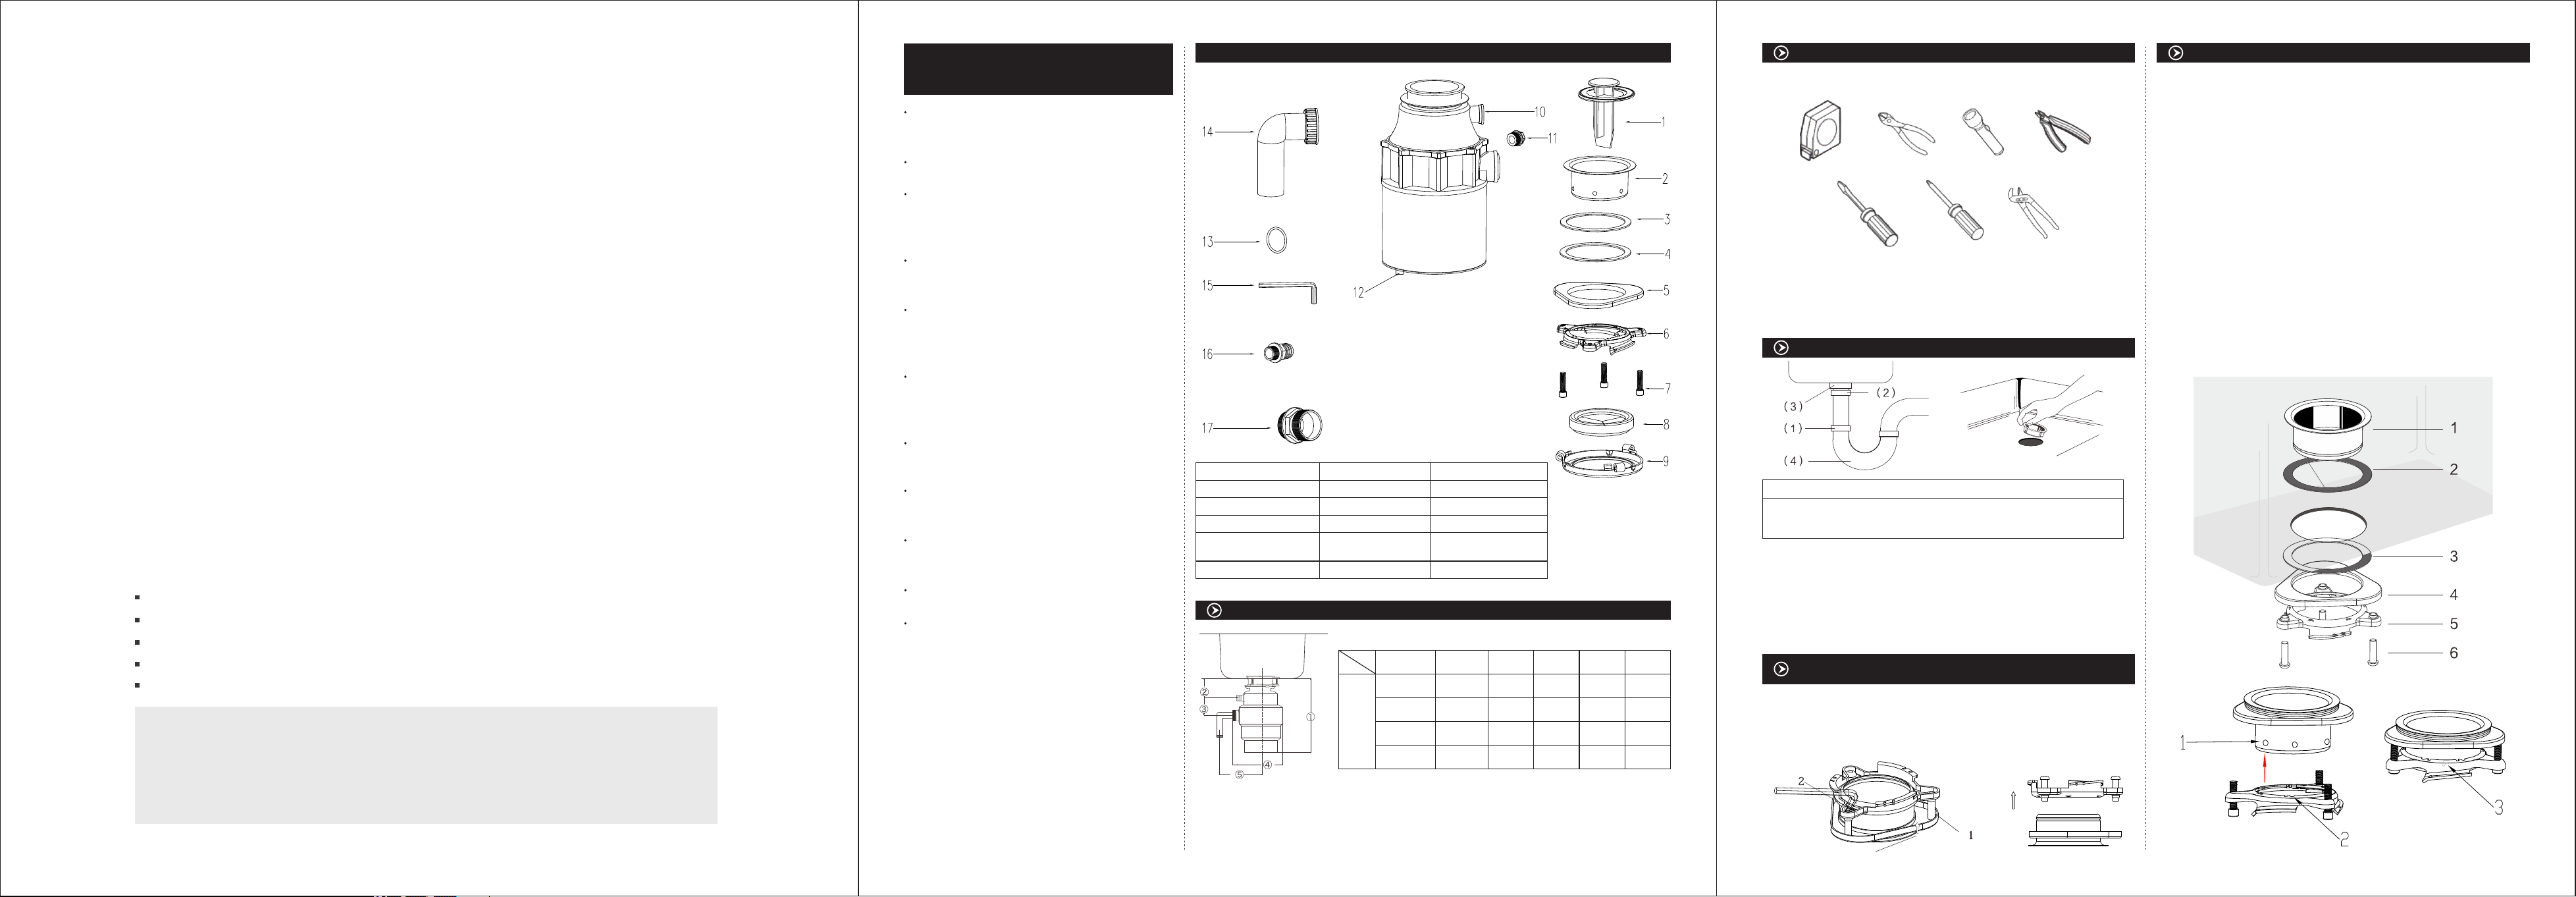
MOUN TING ASS EMBLY
1.Sin k Pl ug
2.Sta in le ss Stee l Fl ange
3.Flange Waterproof Rubber
4.Foa m Ga sk et
5.Sin k Fl an ge
6.Bac ku p Ri ng
7.Scr ew s (3 )
8.Spl as h Gu ard
9.Mou nt in g Ring
10.Dish wa sher In le t
11.D is hwasher Va lve
(With R ub be r Gaske t)
12.Rese t Bu tton
13.Water Out le t Gaske t
14.Drai n Pi pe
15.Hex Wrench
16.Dishwasher Connecting
17.Drain Pipe Connecti ng
(With Rubbe r Gasket)
1.IN STALL ATI ON INSTRUCT IONS
1.Dimensions
Model
EM200
CGMD- 65
Size
QSD-3 8
MCD17-T 7
Note: to prevent water accumulation in the disposer, the water pipe inserted into the wall/
floor drain must be lower than the disposer outlet.
① ② ③ ④ ⑤
12.913i n.
13.385i n.
12.795i n.
13.779i n.
3.47in.
3.47in.
3.47in.
3.47in.
3.248in .
3.248in .
3.248in .
3.248in .
4.921in .
5.551in .
4.921in .
5.905in .
7.677in .
7.677in .
7.677in .
7.677in ..
-1- -2-
2.HE LPFUL TO OLS
For safety and ease of garbage disposal installation, we recommends
the use of these helpful tools
1 2 3
5 6 7
1.Tape measure
2.Wire cutters
3.flashlight
4.wire strippers
5.flathead screwdriver
6.Phillips screwdriver
7.Adjustable pliers
4
3.DI SCONNECT SI NK DRAIN
CAUTI ON
Wea ri ng safety g la sses is r ec ommende d
during th e in stall at ion of th e fo od w aste di sp oser.
1. Loosen nut (1) at top of trap (4) with pipe wrench .
2. Loosen nut (2) at top of extension pipe. Remove extension pipe..
3. Loosen nut (3) at base of sink flange4.
4. Push sink flange up through sink hole and remove it
5. Clean sink flange area of any putty or other debris.
PERSO NA L INJ URY
4.SEPARATE COMPONENTS BEFORE CONNECTION OF
DISPOSER AND SINK
Remove flange mounting assembly from machine,turn mounting
assembly over,Use Hex wrench to loosen three mounting screws ,
Mounting assembly will now come apart.
Note: the diameter of the disposer flange (GB) is 4.331in.
5.CO NNECT FLANG E MOUNTIN G ASSEMB LY TO SINK
① Ensure there is no debris around the sink drain hole, mount the upper
seal ring on the flange, and put the flange into the sink drain hole. You
may need to place a heavy object in the sink or hold it down by hand to
keep the flange in place (place a towel under the object to prevent
scratching).
② Under the sink, mount the lower seal ring and upper buckle (flat side
up) on the flange in order.
③ Put the upper buckle of the lower seal ring in place, and mount the
middle buckle on the flange to hold the upper buckle.
④ When the upper and middle buckle of lower seal ting hold the sink
bottom tightly, tighten the three hex socket screws at the same time
until the mounting component is firmly installed on the sink, improper
operation will cause water leakage
Note: the flange is designed with convex points. When the flange is
connected with the middle buckle, the convex points shall be stuck in the
middle of the middle buckle to prevent the equipment from falling due to
vibration.
Page 2
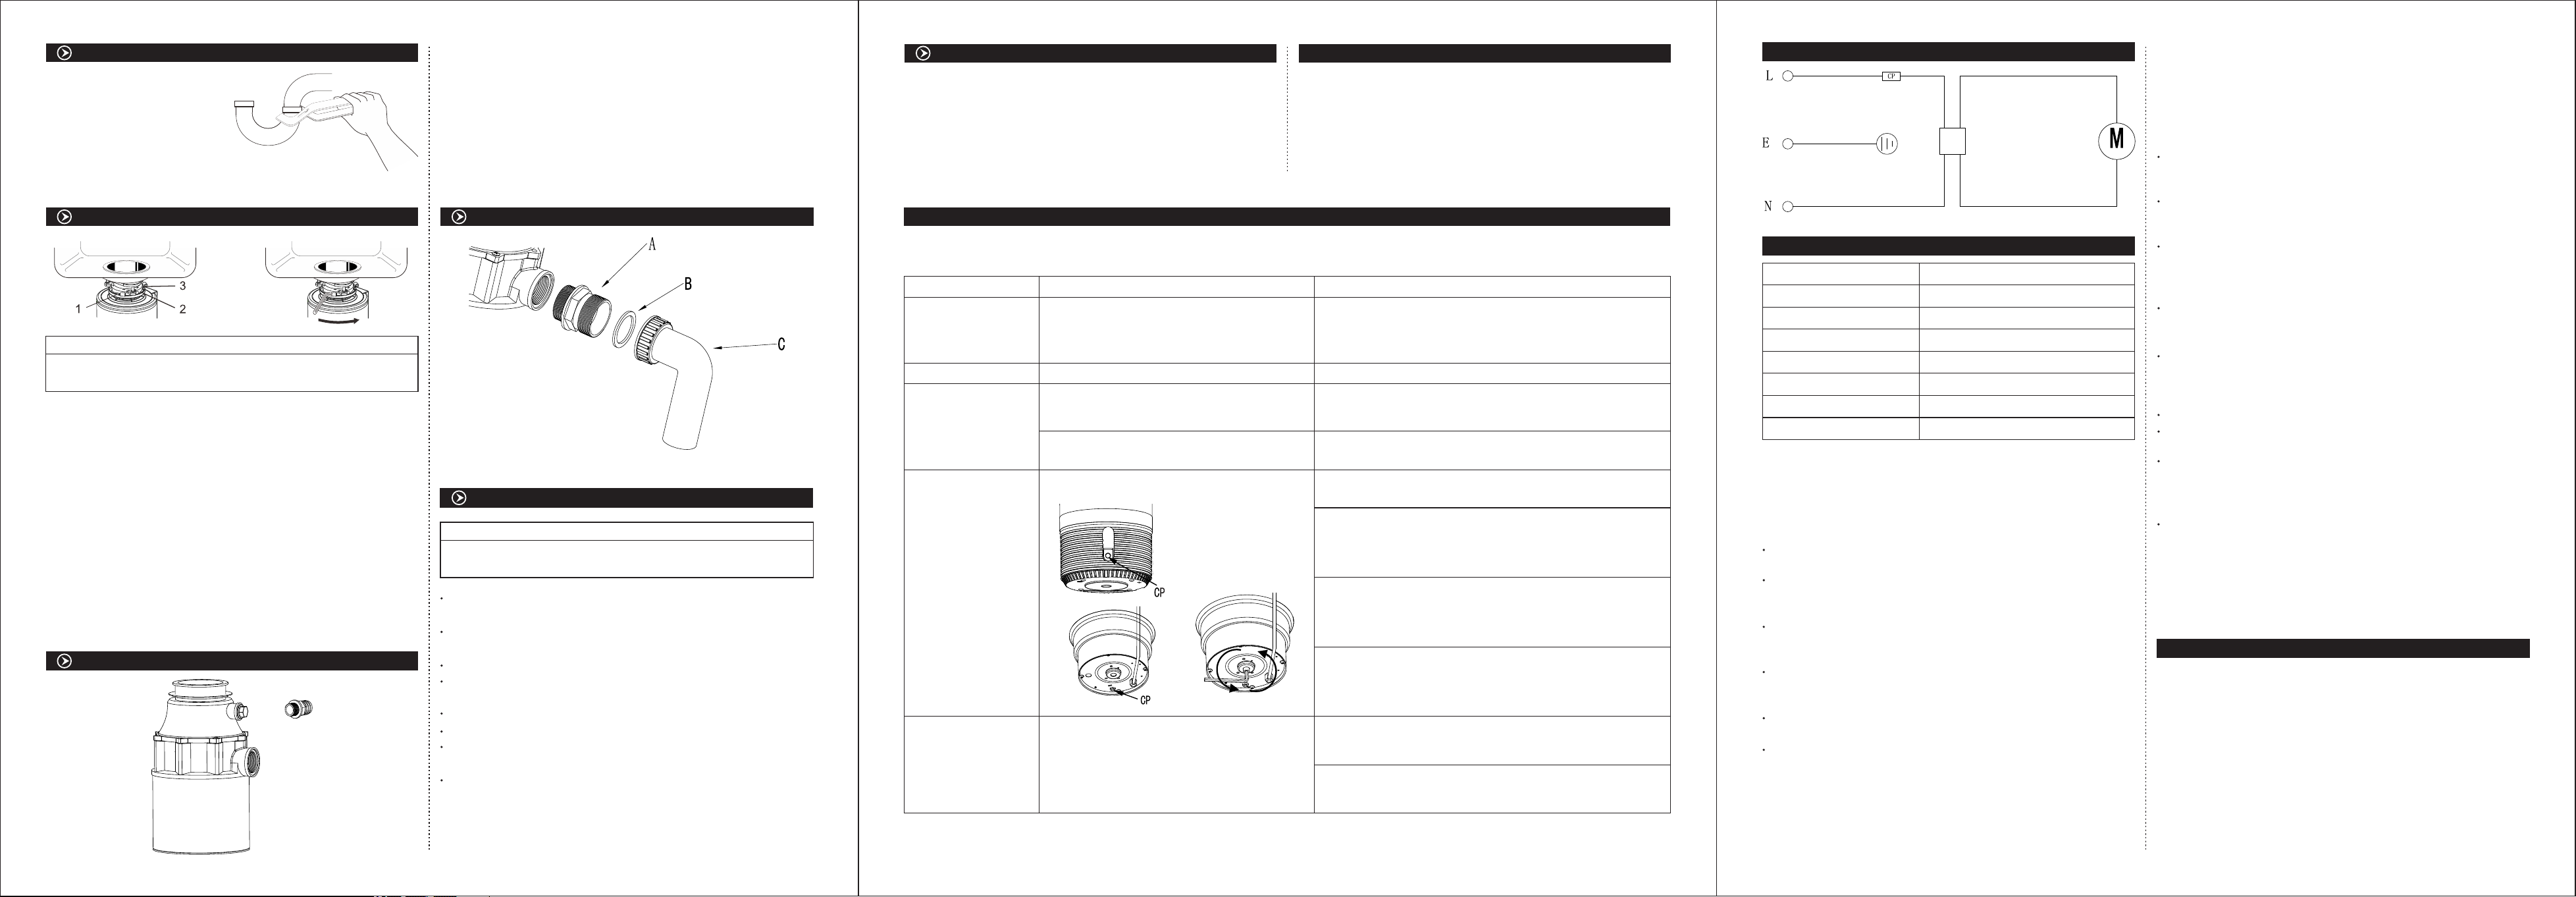
6.CL EAN SINK WASTE P IPE
Failure to clean sink waste pipe line
may result in waste pipe blockage.
1. Remove trap.
2. With drain auger, clear away all
hardened waste material in
horizontal drain line running from
drain trap to main pipe.
7.CO NNECT DISPO SER TO MOUNTING ASSEMBLY
CAUTI ON
To avoid pers on al inju ry, do not p os ition you r he ad or bod y un der
dispose r; t he unit c ou ld fall d ur in g insta ll ation .
PERSO NA L INJ URY
Clear any objects from inside the disposer grind chamber before
mounting the disposer to the sink.
1. Position disposer with three mounting tabs(1) aligned in position to
slideover mounting tracks (2).
2.Lift disposer, insert top end (mounting gasket) into mounting assembly,
and turn lower mounting ring to right (with wrenchette or adjustable
pliers)until mounting tabs lock over ridges (3) on mounting ring
tracks.Make sure all three mounting tabs are locked over ridges.
Disposer will now hang by itself.
3. Run water into sink, then check for leaks.
4. When installing this product, please make sure the reset switch can be
easily touched, and there is no object block which may affect the later
operation
8.DI SHWASHER CON NECTION
B
A
NOTE: If the dishwasher connection is made without removing the plug.
the dishwasher may overflow. (Connections must comply with local plum
bing codes.)
① Remove the connecting plug(A) of dish washer, and replace the
dishwasher connecting(B).
② Connect the dish washer drain pipe to the dishwasher connecting
If you have a sink overflow, it should be connected to the overflow
inlet on the tailpipe .
9.ATTACH DISCH ARGE TUBE TO WASTE D RAIN PIPE
Install the drain pipe connecting(A) on
to the disposer,put the rubber
gasket(B) into the drain pipe(C). After
that, install the discharge tube on to
the drain pipe connecting(A).
10.C ONNECT DISP OSER TO ELECTRI CAL SUPPLY
DANGER
To avoid elec tr ical sh oc k, disc on ne ct powe r be fore in st al ling or s er vicin g
If you are not thoroughly familiar with electric power,contact a qualified
electrician to connect disposer to electrical circuit.
If three-prong, earth (grounded)plug is used,plug must be inserted into
three-hole, earth (grounded) receptacle.
Do not modify plug provided with unit (if applicable).
Improper connection of equipment earth (grounded) conductor can
result in electric shock.
All wiring must comply with local electrical codes.
Do not attach earth wire (ground wire) to gas supply pipe.
Do not reconnect electrical current at main service panel until proper
earth (grounded) outlets are installed.
If the supply cord is damaged, it must be replaced by the
manufacturer, its service agent or similarly qualified-persons in order to
avoid a hazard.
ELECTRI CA L SHO CK
dispose r.
11.CH ECKING
First cover the sink plug, open the tap and fill half of the sink, then
remove the plug, wipe the body, flange assembly, pi pe c on ne ct io ns w it h
paper towels, if there is leakage, please timely adjust and reinstall.
NOTE:You m us t ha ve a cc es s to a n ea rt h (g ro un de d) w al l so ck et .A ny
additional socket should be fitted by a qualified electrician and properly
earthed(grounded).The disposer is fitted with a molded plug and cable.
OPER ATING I NSTRUCT IONS
1. Remove stopper from sink opening and run cold water.
2. Turn on wall switch to start disposer.
3. Slowly insert food waste into disposer. WAR NI NG ! Po si ti on s to pp er t o
minimize possible ejection of material while grinding.
4. After grinding is complete, turn disposer off and run water for a few
seconds to flush drain line.
TROU BLE SHOOTIN G TIPS
In the daily use of waste disposer, the following problems may occur. You can quickly solve them with the corresponding methods. Enjoy the
cleanliness and convenience brought by waste disposer:
Probl em
Loud nois es
Slow se wa ge d ischa rg e
Dispose r wa ter lea ka ge
Motor s to ps w hen the
dispose r is w orkin g
The mot or d oe s not wor k
Possi bl e Ca uses
Silverw ar e, bott le c ap or oth er
forei gn o bj ect has f al len int o th e
Part pf t he d ra in pipe i s bl ocked
The sin k an d di spose r fl ange ar e no t co nnect ed i n place ;
the mid dl e bu ckle sc re w is not ti gh te ned;r ub ber sea l ri ng
is not in st al led in pl ac e
If the wa te r le aks fro m th e dispo se r ou tlet, t he s crews m ay
be loose or t he w ater pi pe m ay be bro ke n
Forei gn b od ies fal l in , block t he m ac hine an d ov erhea ti ng
prote ct io n is enab le d
The plug co nt act is po or
Disconn ec t the pow er a nd wate r fl ow s witch o f th e dispo se r fi rst, an d wa it for
the dispo se r to stop w or king, ch ec k fo r an obje ct l odged b et we en the
turnt ab le a nd the gr in d ring. D is lo dge the o bj ect by mo vi ng t he turn ta ble wit h
a broom han dl e. Th en r emove t he o bject.
A solution i s to u se a plum be r or a spec ia l el astic r od t ape to be c le ar ed.
Check whe th er the ru bb er seal r in g is i nstal le d in plac e an d ti ghten t he t hree
faste ni ng s crews o n th e buckl e at t he s ame tim e or r eplac e th e rubber se al
ring.
Check whe th er the ou tl et is nor ma l, t ighte n th e screw s or r eplace th e dr ain
pipe.
Remove th e di spose r pl ug
Check the g ri nding c ha mber, ta ke o ut t he fore ig n bodie s wi th l ong cli p or
tweez er s
Inser t th e pr ovide d in terna l he x wr ench in to t he base p la te a xis hol e, r otate
clockwi se a nd anti -c lockw is e 36 0°
Tur n on the rese t sw itch, c on nect the po we r, and the d is poser can w or k
norma ll y.
Remove th e po wer plu g, c heck wh et he r the plu g an d power c ab le a re in
good cond it ion, if a ny d amage , pl ea se repl ac e in time
If the mo to r st ill doe s no t work, p le ase conta ct t he main te nance dep ar tment
designa te d by the ma nu factu re r.
What To Do
SCHE MATIC C IRCUIT DI AGRAM
WARRA NTY CARD
NAME OF D EA LE R
BILL NO: & DATE
PRODU CT & MODEL NAME
CUSTO MER'S NAM E
ADDRESS & TEL NO S
DEALER' S ADD RESS & STA MP
INSTAL LED BY NA ME
INSTAL LED DATE & R EG . NO
FROM TH E DATE OF OR IG INAL PURCH AS E, SUBJEC T TO THE FOL LO WING
TERMS AN D CO ND ITION S.
WARRANTY TERMS
Thi s warranty i s for a period o f 3 years agai nst manufa cturing de fects
fro m the date of or iginal pur chase, Sub ject to the fo llowing te rms and
conditions
The Wa rranty card is to be completed, signed by the dealer immediately
on purchase.
The C ustomer sh all carry th e Waste disposer to the nearest Company
Regional Service Centre or Authorized Service Centre or purchased
Dealer point as his/her own cost and risk.
The c ompany sha ll make all endeavors/ attempts to c arry out the
service/rep lacement u nder this wa rranty at th e earliest , but shall no t be
obliged to do so within any specified time.
The w arranty wi ll continu e and remain in force only for the unexp ired
period of the ori ginal warranty, in re gards to the R epair/Re placemen t of
parts of the Waste Disposer.
The Wa ste Disposer shall be used strictly for domestic purpose in
accordance with the user' s manual.
The C ompany shall not be held liable for any accident,loss or
damage(director indirect)
To person or property cause d by reason of:
Ove rloading/Misuse/abuse and negligence on the part of th e person
using the Waste Disposer. Defects causes by improper/reckless fittings
and usages. Use of chemical s, spuriou s spares or ol d, non-gen uine
spares .
Fai lure to comp any with any s afety prec aution or ma intenanc e tip
suggested by th e company Or iginal ser ial number is deleted/defected o r
altered.
In ca se the warra nty is void du e to any of the re asons list ed above, th e
customer shal l be liable to pay the cost of a ll the spare s and servic e
charges.
The w arranty do es not cover d amages due t o negligen ce
mishandling,breakage of glass/Abs body,d ents of body a nd
breakage/fu se of lighti ng parts.
The c ompany sha ll not be resp onsible for any special consequential
damages or loss arising directly or indirectly fo r any delay in t he
performance o f this warra nty.
The c ompany res erves the ri ght to retai n any part or co mponent at t he
regional service centre/branches or authori zed servic e centre or at i ts
workshop and shall effect repa irs/ repla cement of pa rts or compo nents
at it s sole discr etion.
Thi s warranty s hall not in an y case exten t towards pa yment or any
monetary cons ideratio n whatsoever, and shall be limited to the pr oduct
replacement only.
Electrical ap pliances are prone to vo ltage fluc tuation ri sks,ther efore
precaution should be taken before every use. Comp any shall not be
responsible for any damage to electrical parts vi z.coil, mo tor etc.ar ising
out of this probl em.
The d ecision of the company i s final in all c ases of comp laints.
The c ompany will not be responsible for delay in service of the app liance
or co mplaint resolution if it is due to rea sons beyon d its contro l.
The se products are not for us e by childre n. Th e company is n ot liable fo r
any damages or physical injury arising out of improper use, mod ificatio n
or alteration of the produc t or due to unau thorized s pares use an d poor
maintenance of this product.
Wha t we will char ged or not cov ered durin g warranty p eriod:
Inc idental or consequential damage caused by possible defects with th is
appliance.
Fai lure of the pr oduct if it is a bused. mis used. or use d for other th an the
intended purpose or used commercially.
Pro duct not acc essible to p rovide req uired serv ice.
DISP OSER LEAKS
If the leak is at the top, it may be caused by:
1. Improper seating of sink flange (gasket choice, putty or tightening).
2. Support ring not tightened properly.
3. Defective cushion mount.
If the leak is at the discharge elbow,leak may be caused by improper
tightening of elbow flange screws.
-4--3- -5-
 Loading...