

Trieste TRD-WQP8-9239H SS User Manual [nl]
TRD-WQP8-9239H S/S
With each wash cycle.
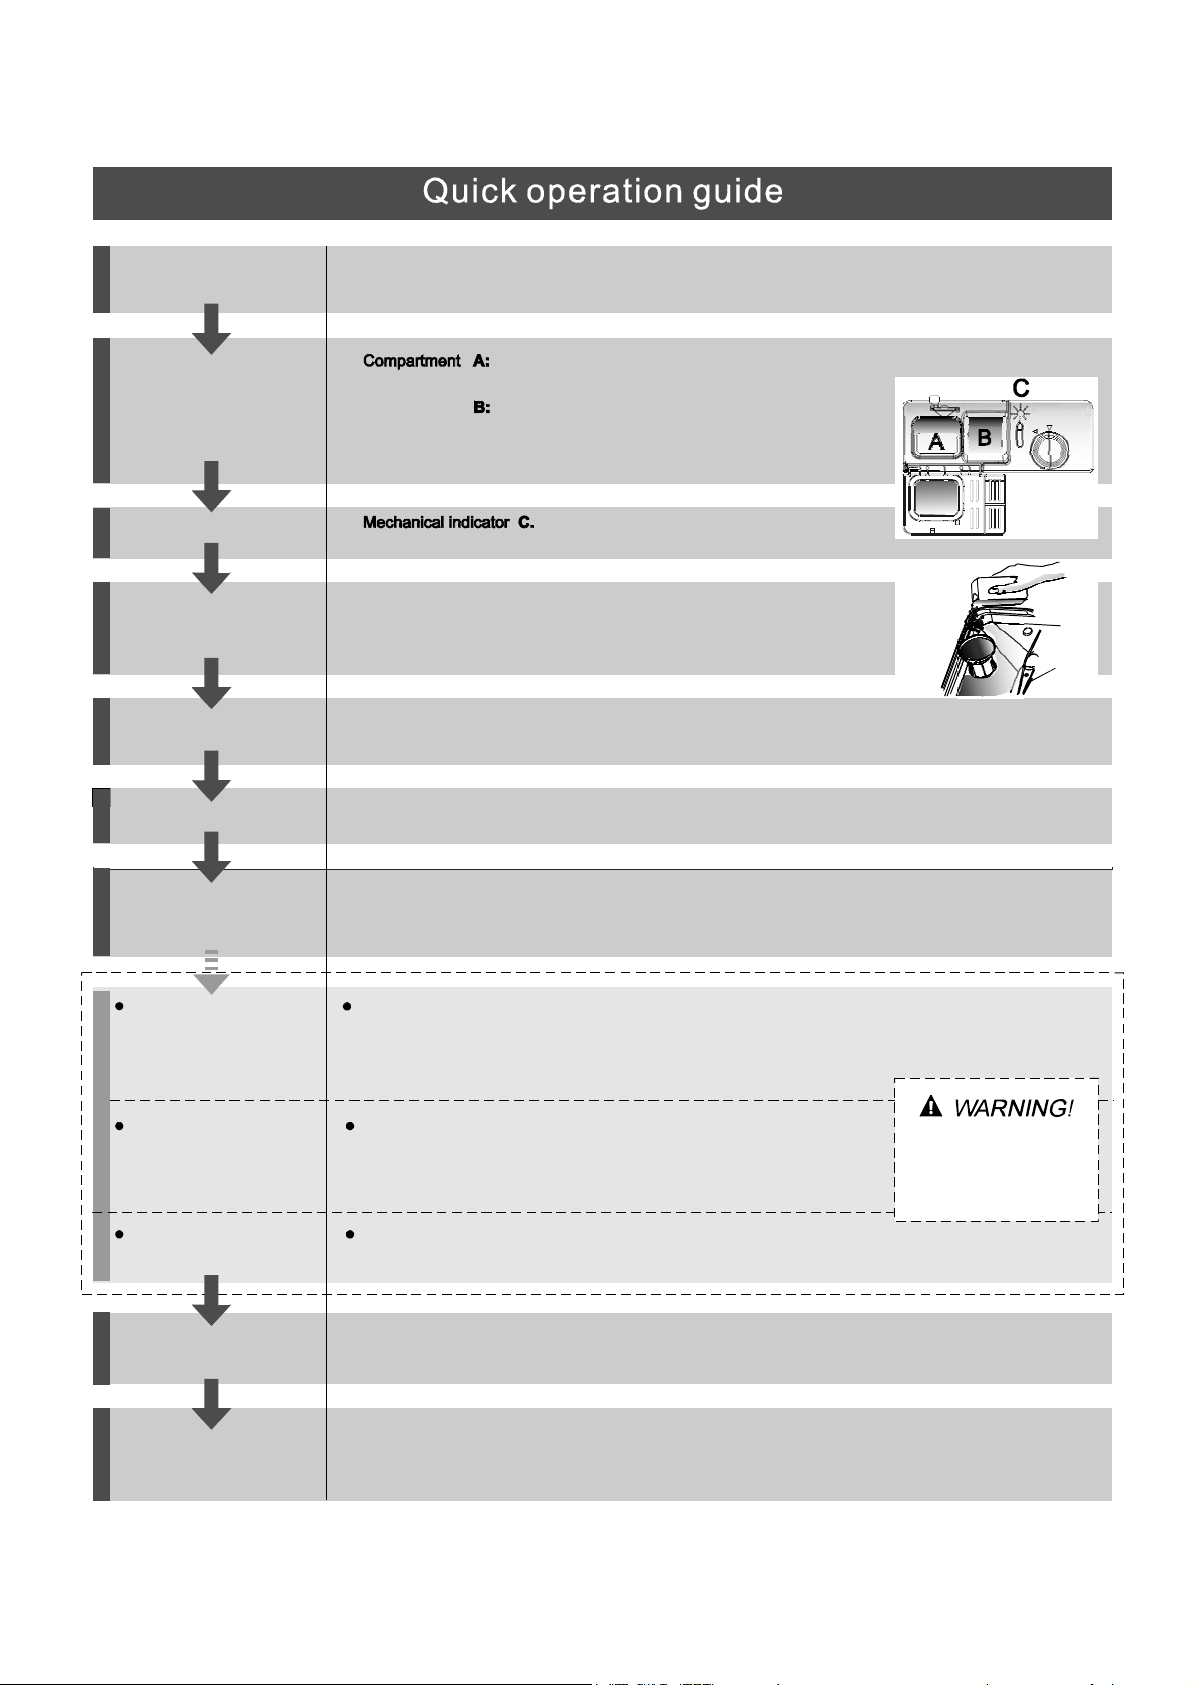
Compartment
For programmes with pre-wash only.
(Follow the u ser instructions!)
Electric indicator on control panel (if provided).
Check the rinse aid level
(On models with water softener system only.)
Electric indicator on control panel (if provided).
If there is no salt warning light in the control panel
(for some models), you can estimate when to fill the salt into
the softener by the number of cycles the dishwasher has run.
Check the regeneration
salt level
Load the baskets
Select a programme
Close the door, t urn on the water tap and press the Start/Pause button. T he machine will start working
after about 10 seconds.
Running the dishwasher
Switch off the appliance
Tu r n o f f t h e w a t e r t a p ,
unload the baskets
Fill the detergent dispenser
Wa r n i n g : w a i t a f e w mi n u t e s ( a b o ut 1 5 m inu t e s ) be f o r e u n l o adi n g t h e di s hwa s he r to a v o i d h a n d li n g
the dishes and utensils while th ey are still hot and more su sceptible to break.
They will also dry better.Unload the appliance , star tin g from the lower basket .
Changing the programme
Add forgotten dishes in the
dishwashe r.
Scrape off any large amount of leftover food. Soften remnants of burnt food in pans,
then load the baskets. Refer to the dishwasher loading instructions.
Press t he Programme button until the selected programme lights up.
(Seethe sectionentitled Operationginstruction )“”
When the working cycle has finished, the buzzer of the
dishwashe r will sound 8 times, then stop.
Tur n o ff the appl i an ce us ing the ON/O FF bu tto n.
If the appliance is switched
off during a wash cycle.
Open the door carefully.
Hot st eam m ay escape
when the door is opened!
If the appliance is switched off during a wash cycle , when switch ed
on ag ain, please re-select the washing cycle a nd operate the dis hwashe r
according to the original Powe r-on sta te ).
Switch on the appliance Press the On/Off button to switch on the appliance, Open the door.
1.Open the door a little to stop the dishwasher.
2.After the spray a rms stop wor king, you can open th e door completely.
3.Add the forgotten dishes.
4.Close the door, the dis hwasher will start run ning again after 10 seconds.
For de tailed o perating method read the corresponding content on t he instruction man ual.
1. A ru nning cyc le can only be modified if it has bee n run ning for a short time. Otherwise the deterg ent
may have already been releas ed and the wa te r already drained. I f thi s is the case, the det er gent
disp enser must be refille d.
2. Press th e Sta rt/Reset button for more tha n 3 seconds to cance l the running programm e.
3. Select a new program me.
4. Restart th e dishwasher.
To re vi e w t h e se c t i o n o n t r o u b l e s h o o t i n g Ti p s
will help you t o solve some common pro ble m s
by your s e lf .
Dear Customer ,
Please carefully read this manual before using the
dishwasher, it will help you t o use and maintain the
dishwasher properly.
Pass it on to any s ubsequent owner of the appliance.
This manual con tain s sect ion s on safety Instru ct ion s,
Ope rat ing Ins tr uct io ns, Insta l l atio n Inst ruc ti on s and
Trou b les hoo ting Tip s , et c .
The manufactu re r, fol lo wing a p ol icy of co ns tant
development a nd u pdat ing of the product, may
make modifications without giving prior notice.
Dishw as h er Feat ure s.... .. .. .. .. . ... ... .. .. . ... . ... .. . .. ...2
AWaterSoftener.........................................3、 ..
Attention before or after loading the Dishwasher
Baskets..........................................................8
Filtering System.............................................13
Caring for the Dishwash er..... .. ... . .... .. ... . . .. . ... ..14.
BLoadingtheSaltintotheSoftener.................4、
CFilltheRinseAidDispenser.........................4、
DFunctionofDetergent.................................5
、
Loading th e upper ............. ...... ........ ....9Basket
Loading t he Lower ..... ...... ..... .... ...... ... ..9Basket
Cutlery Basket........................................... ...10
Was h Cycl e Table. ....... ..... ................ ..... . ..... ...11
Turnin g on th e Ap pliance ... .... .. . .. . ... .... ...... ... ... 1 2
Chan ge the Programm e. .......... ... ...... . ..... .... 12....
At the Ene of the Wash Cycle... .. .... ... ... ... ... ..... .12
Positioning the Appliance................... ..........15..
Water Connec t i on. . . ... . . ..... . ..... .... .. .... .... . .. . . . ..16.
About P ower C onnection........................ .......15.
Start of dis hwa sher... . ...... . ..... ... . ....... . . . .. ..... . 17..
Befor e call ing for servi ce.... .... ...... . .... .... ... . ..... 18.
Error c odes.................................... ..............19.
Tec h n ic a l in f o rm a t i o n . .. . . . . . . . . . . .. . ... . . . . . . .. . .. . . . . . 2 0..
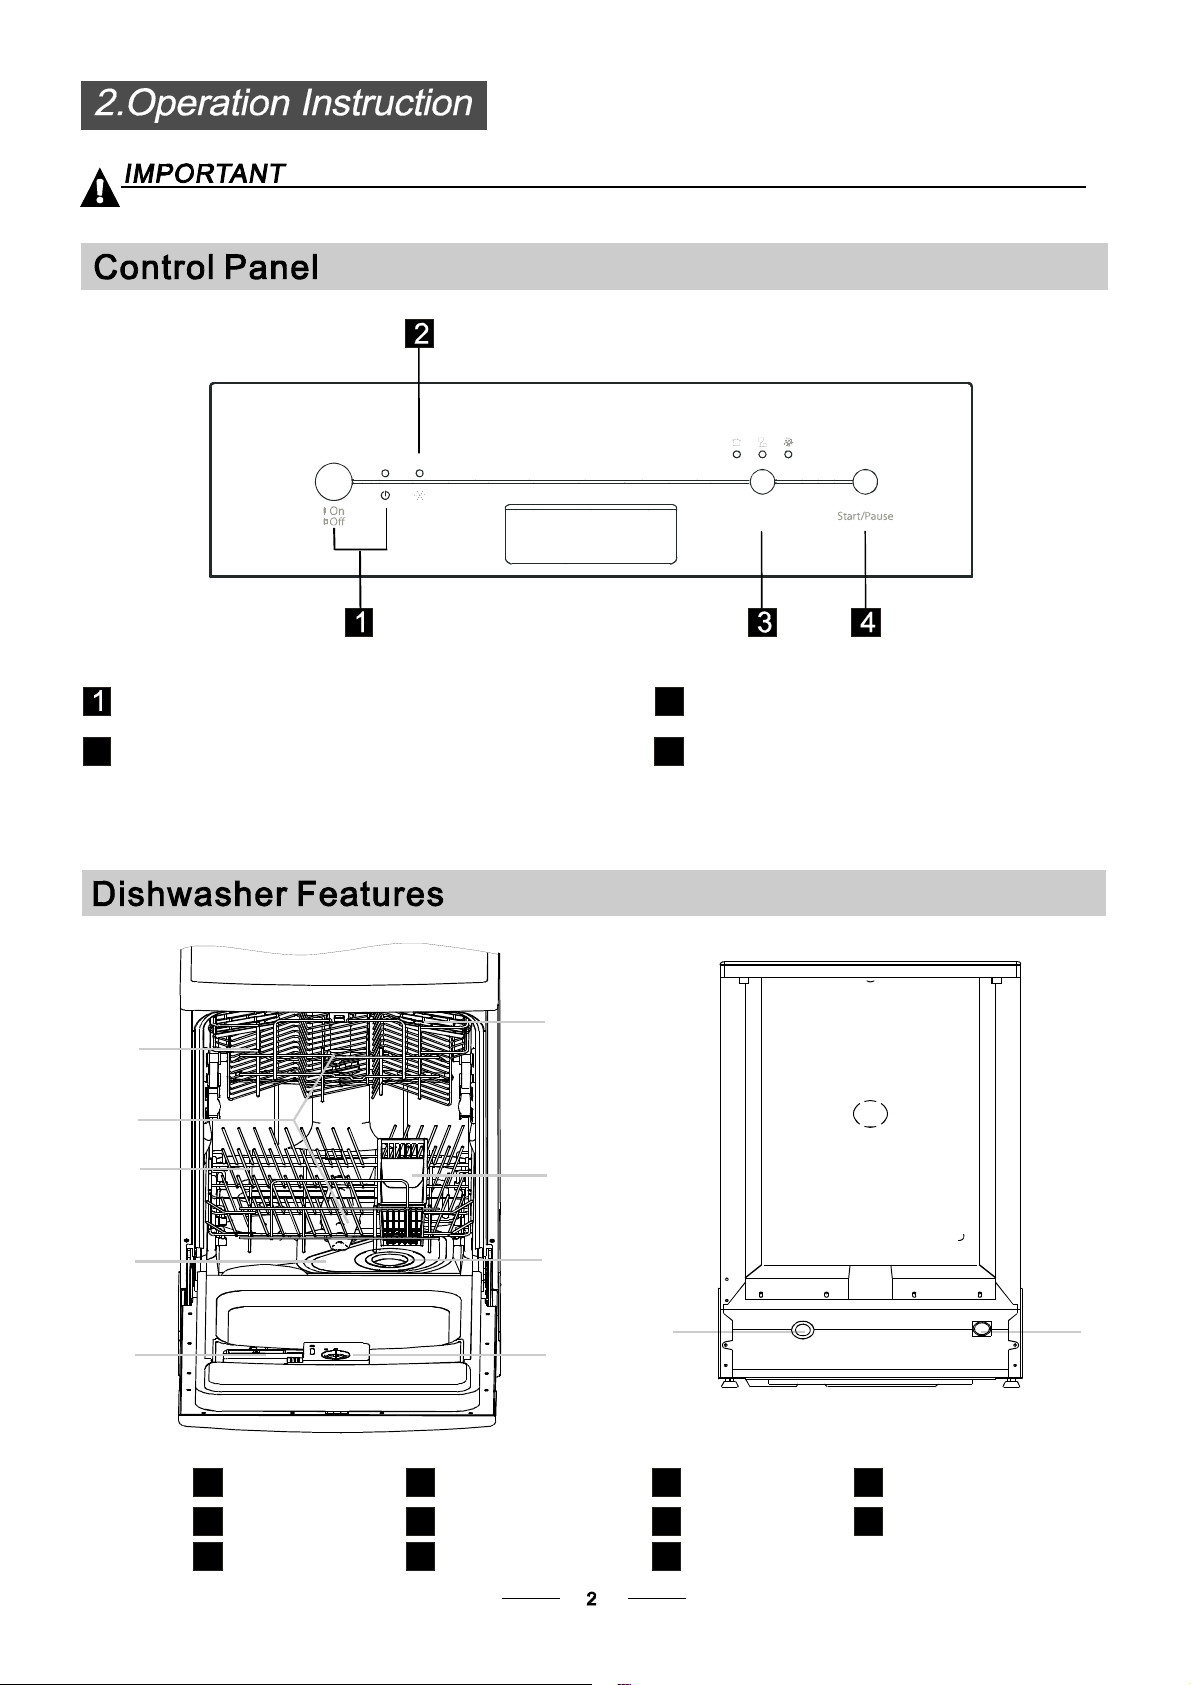
Control Panel...................................................2
Keep it to refer to it at a later date.
If you can not solve the problems by yourself ,
plea se ask fo r the hel p of p ro fes s i ona l te c hnicia ns.
This appliance must be grounded. In the event of a
malfunction or breakdown, grounding will reduce
the risk of anelectric shock by providing a path of
least resistance of electric current. This appliance
is equipped with a cord having an equipmentgrounding conductor and a grounding plug.
The plug must be plugged into an appropriate outlet
that is installed and grounded in accordance with
all local codes and ordinances.
Improper connection of the equipment-grounding
conductor can result in the risk of an electric shock.
Check with a qualified electrician or service
representative if you are in doubt whether the
appliance is properly grounded. Do not modify the
plug provided with the appliance; If it does not fit
the outlet. Have a proper outlet installed by a
qualified electrician.
Kee p ch ildren away fr om detergent and rinse aid, keep
child away from the open door of the dishwash er,
there could still be some de tergent left inside.
ren
Do not abuse, sit on, or stand on the door or dish
rack of the dishwasher.
Do not touch the heating element during or
immediately after use.
(This instruction is only applicable to machines
with a visual heating element.)
Do not wash plastic items unless they are marked
dishwasher safe or the equivalent. For plastic items
n
ot so marked, check the manufacturer's
recommendations.
Use only detergent and rinse additives
designed for an automatic dishwash er.
Never use soap, laundry de tergent, or hand
washing detergent in your dishwasher. Keep
these products out of th e reach of children.
During inst a llat i o n, the power suppl y must not
be exce ssi v ely o r dangerou sly be nt or fl atten e d.
Do not t amper wi th control s.
Do not operate your dishwasher unless all
enclosure panels are properly in place. Open
the door very carefully if the dishwasher is
operating, there is a risk of water squirting out.
Do not place any heavy objects the
door when it is open. The appliance could tip
forward.
on or stand on
When lo adi ng ite ms to be wa shed:
1) L oc ate sh ar p i t em s so tha t th ey are not li k e l y
to damage the door seal;
2Warning:Knivesandotherutensilswith
sharp points must be loaded in the basket
with their points down or placed in a
horizontal position.
)
When using your dishwasher, you should
prevent plastic items from com ing i nto contact
with the heating element.(This instruction is only
applicable to machines with a visual heat ing
element.)
If the supply cord is damaged, it must be replaced
by the manufacturer or it s se rvice agent or a
similarly quali fied person in orde r t o avoid a
hazard.
Pl eas e dispos e of pack ing mat eria l s prop er ly.
Use the dishwasher only for i ts intended func tion.
Rem ove the d oor to the wa shing co mpartment wh en
removing an old dishwasher from s ervice or discarding it.
Dishwasher deterge nts a re stron gly alkaline, they
can be extrem e l y d a nge rous if swall ow e d. Av oi d
con t a c t wit h ski n an d eye s and kee p ch ildre n aw a y
from th e di sh was her when the door is open.
Check that the detergent comparment is empty
after com pletio n of the wash cycle.
The app lian c e is to b e conn e cted to t he wat er
mai ns usin g new hose sets and th at old hose - set s
sho ul d no t be re u sed.
The ma xi m u m nu mber of pla c e settings t o be
washed is 8.
The ma xi m u m pe rmissib le in le t water pre ss u re is
1Mp a .
The min i mum pe rm i ss ib le in let wa ter pressu r e is
0.0 4 M pa.
Child ren sho uld b e su pervised to en sure tha t they do
not play with the appliance.
This appliance is not intended for use by persons
(includin g children with reduced physical, sensor y or
mental capabilitie s, or lack of e xperience and
knowledge ,unles s they have been given supervision
or instru ction concerning use of the appliance by a
pers on responsible for their saf ety.
)
When using your dishwashe r, fo l low the precautions listed below:
The do or s h ou ld not be lef t open,
since this co ul d inc r ea s e the ris k of trip p i ng.
before usin g it for the first tim e.
To g e t t he b e st p e rfo r m an c e f r om y o ur di sh w as he r , re a d all o per at i n g i ns t r uct i o n s
42
Progra m in dica t or lights and button: To s ele c t
one of the three a n d show t he washing program.
3
Start an d Pause button: To start the selected
washing program or reset the washing program
when the machine is working.
Rinse aid warning lights: To s how when the
rinse aid dispenser n eed to be refilled
Power indicator light and swit ch: To t ur n on/off
and sho w the power supply.
P
10 11
Back View
Front view
Main Filter
Detergent Dispenser
Cup Shelf
CutleryBasket
Coarse Filter
Rinse Aid Dispenser
Inlet pipe connector
Drain pipe connector
Lower Basket
Spray Arms
Upper Basket
1
5
6
7
8
9
10
11
3
2
4
1
2
3
4
5
6
7
8
9
Befo re u sing yo u r dishwa sh e r for the first tim e:
The wat er so f t e n er mu s t be s et m an u ally, usin g the wa t e r ha r d ne s s dial.
The wat er so f t ene r is des ig ned to remov e mi nerals an d salts fr o m the wat e r, which wo u l d hav e
adetrimentaloradverseeffectontheoperationoftheappliance.Thehigherthe
con t e n t of these mine r a l s an d salts, the ha r d er your wat e r is . The softe ne r sh o uld be
adju ste d ac c o rd ing to the ha r dne ss o f the water in you r are a . Your loca l Water Aut h o rity
can adv i se y ou o n th e har dn ess of the wat e r in yo u r ar ea .
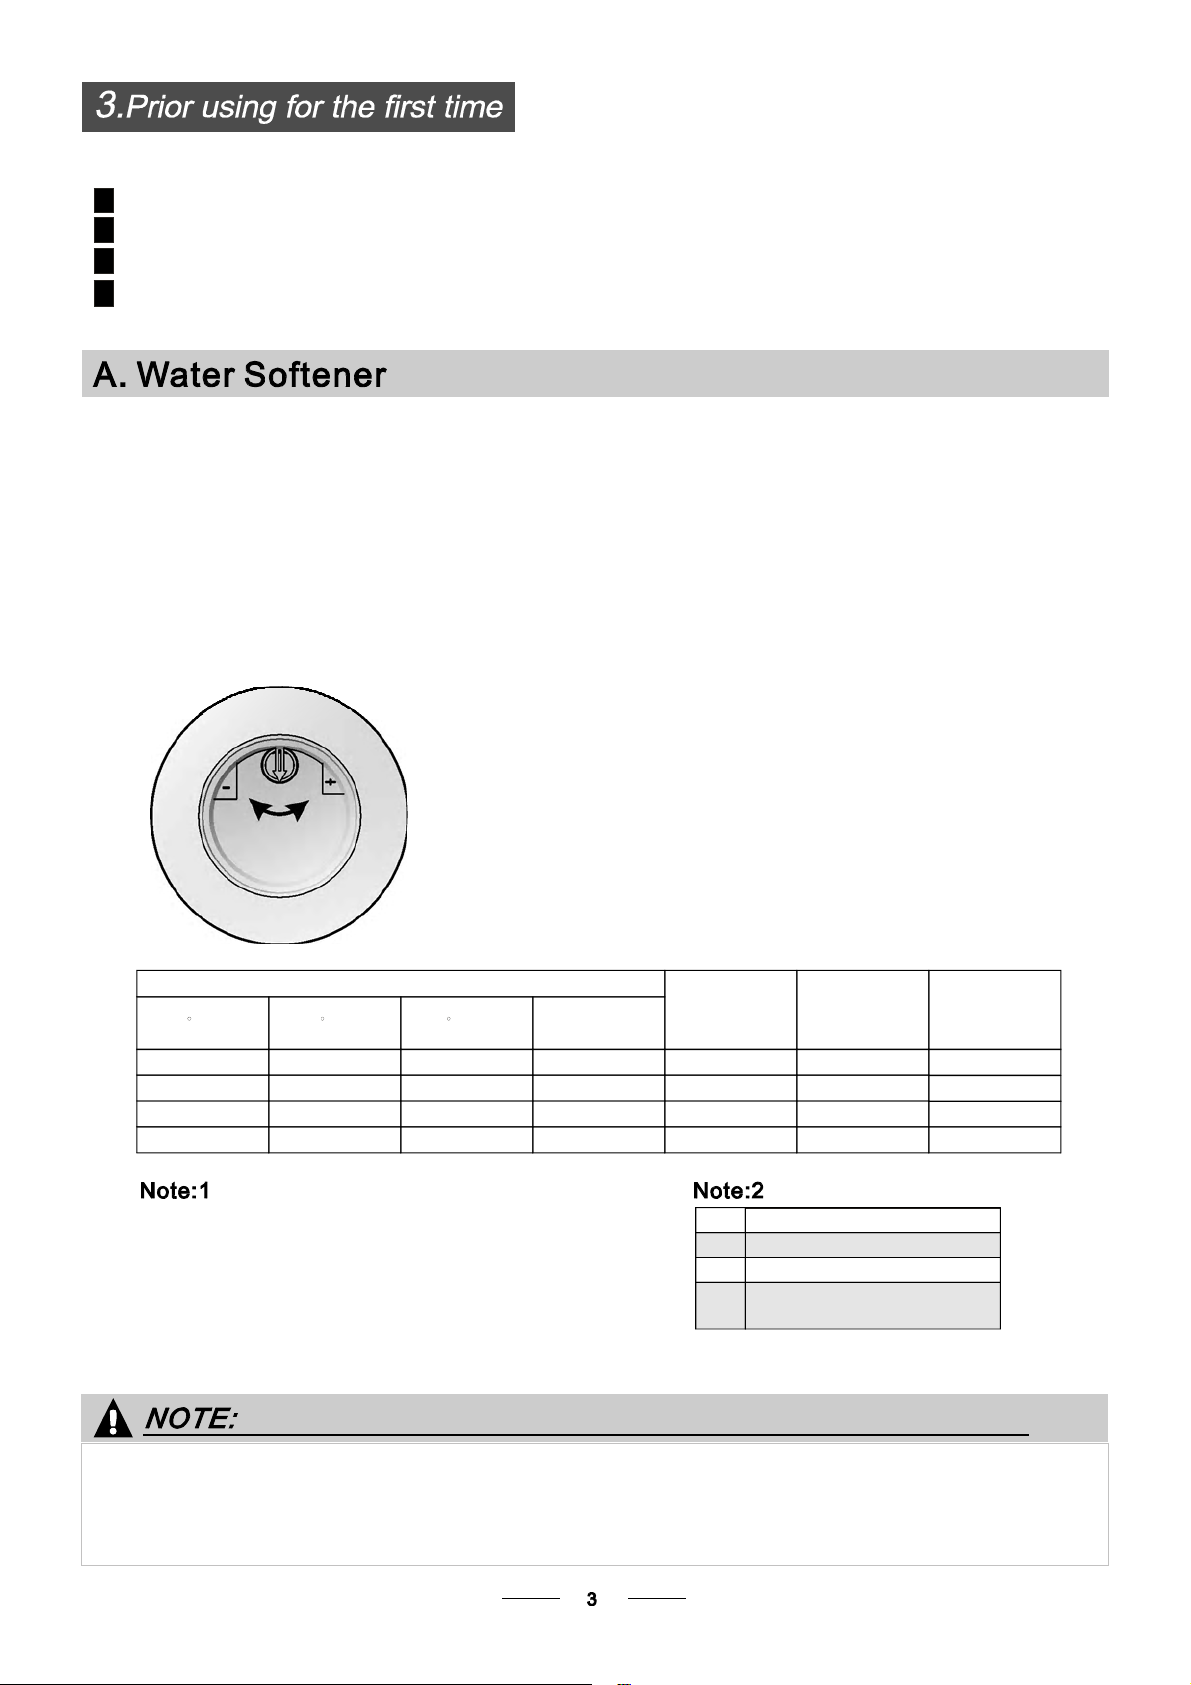
Adjusting Salt Consumption
The dishw a she r is de s i gned t o al low for a djus t ment in th e am o un t of sa lt co nsum e d ba s ed on the ha rd n ess of
the water u sed. This is in ten d ed to op timis e and c us tomi se the l eve l o f salt consum ptio n.
1. Un s crew the cap fro m th e sa l t co ntainer.
2. There is a r ing on the con taine r wi th an arr ow o n it (see figu r e
on th e side) , if necessary, rotate the ri ng in the anticlockwise
direction from the "-" Setting toward the "+" s ign, based o n the
hardness o f the water being used.
It is reco mm ende d t ha t adjust men ts should be m ade in
accordance with the following sc heme:
WATER SOFTENER
The ha rdness of the water varies fro m pl a c e t o pla c e. If ha rd wate r i s us ed in t he dishwasher, de po sits w ill
form on the dish es a nd uten sils .
The ap p l i an ce i s eq uipp e d wi t h a sp e c ial so ften er that us e s a salt contai n e r sp e ci fic ally des igned to el imin a te
lime a nd minera ls from the wate r.
Contact your local water board for information on the hardness of your water supply.
dH
mmol/l
0~140~8 0~1.4
/
0
/
14~398~22 1.4~ 3.9 - 20 50
39~8022~45 3.9~8 Mid 40 25
+
60 16
fH
0~10
10~28
28~56
Clarke
WATER HARDNESS
Select o r P o sitio n
Salt consumption
(gra m/c yc le)
Auto n o my
(cycles/1kgs)
Please follow the steps below for adjustment in salt consumption.
""/
"-"
"+"
"Mid "
Se t tin g tow ard the"+ " si gn
Se t tin g tow ard the"-" sign
Se t tin g tow ard betwe e n
the "-" sign and "+" sign
No salt n eed added
45~60 80~107 56~75 8~11
If your model does not have any wat er softener, you may s kip thi s section.
A. Set t h e water so f t ener
B. Pour 1 2 l i t r e of wa ter inside the sal t co ntainer and the n fill with dishwas h e r sa lt
/
C. Fill the ri nse aid dis p en s e r
D. Fill in d e t e r gent
°
Clark: British degree
°
fH: French degree
°
DH: German degree
dH=1. 2 5 Clark e = 1 .7 8 fH=0 .1 78mm o l/ l
°°°
1
norm al f o r a sm al l am o un t of wa te r to com e out of the s a l t c o nta iner.It is
1. The sal t co ntaine r mu s t only be r e filled whe n t h e sa lt warning li g ht in the con tro l panel comes on.
Depending on how well the s alt dissolves, the s alt warning light may still be on even though the
salt contai ner is filled.
If there is no s a lt war ni ng lig ht in the contro l pane l (fo r some Mode ls) , yo u can estimate when to fill
the salt into the soft ener by th e cycl es tha t the dishw a she r has run.
2. If ther e ar e sp ills o f the sa l t , a s o ak or a r a pid pro gra m s h o u ld be run to rem ove the ex c essi ve salt.
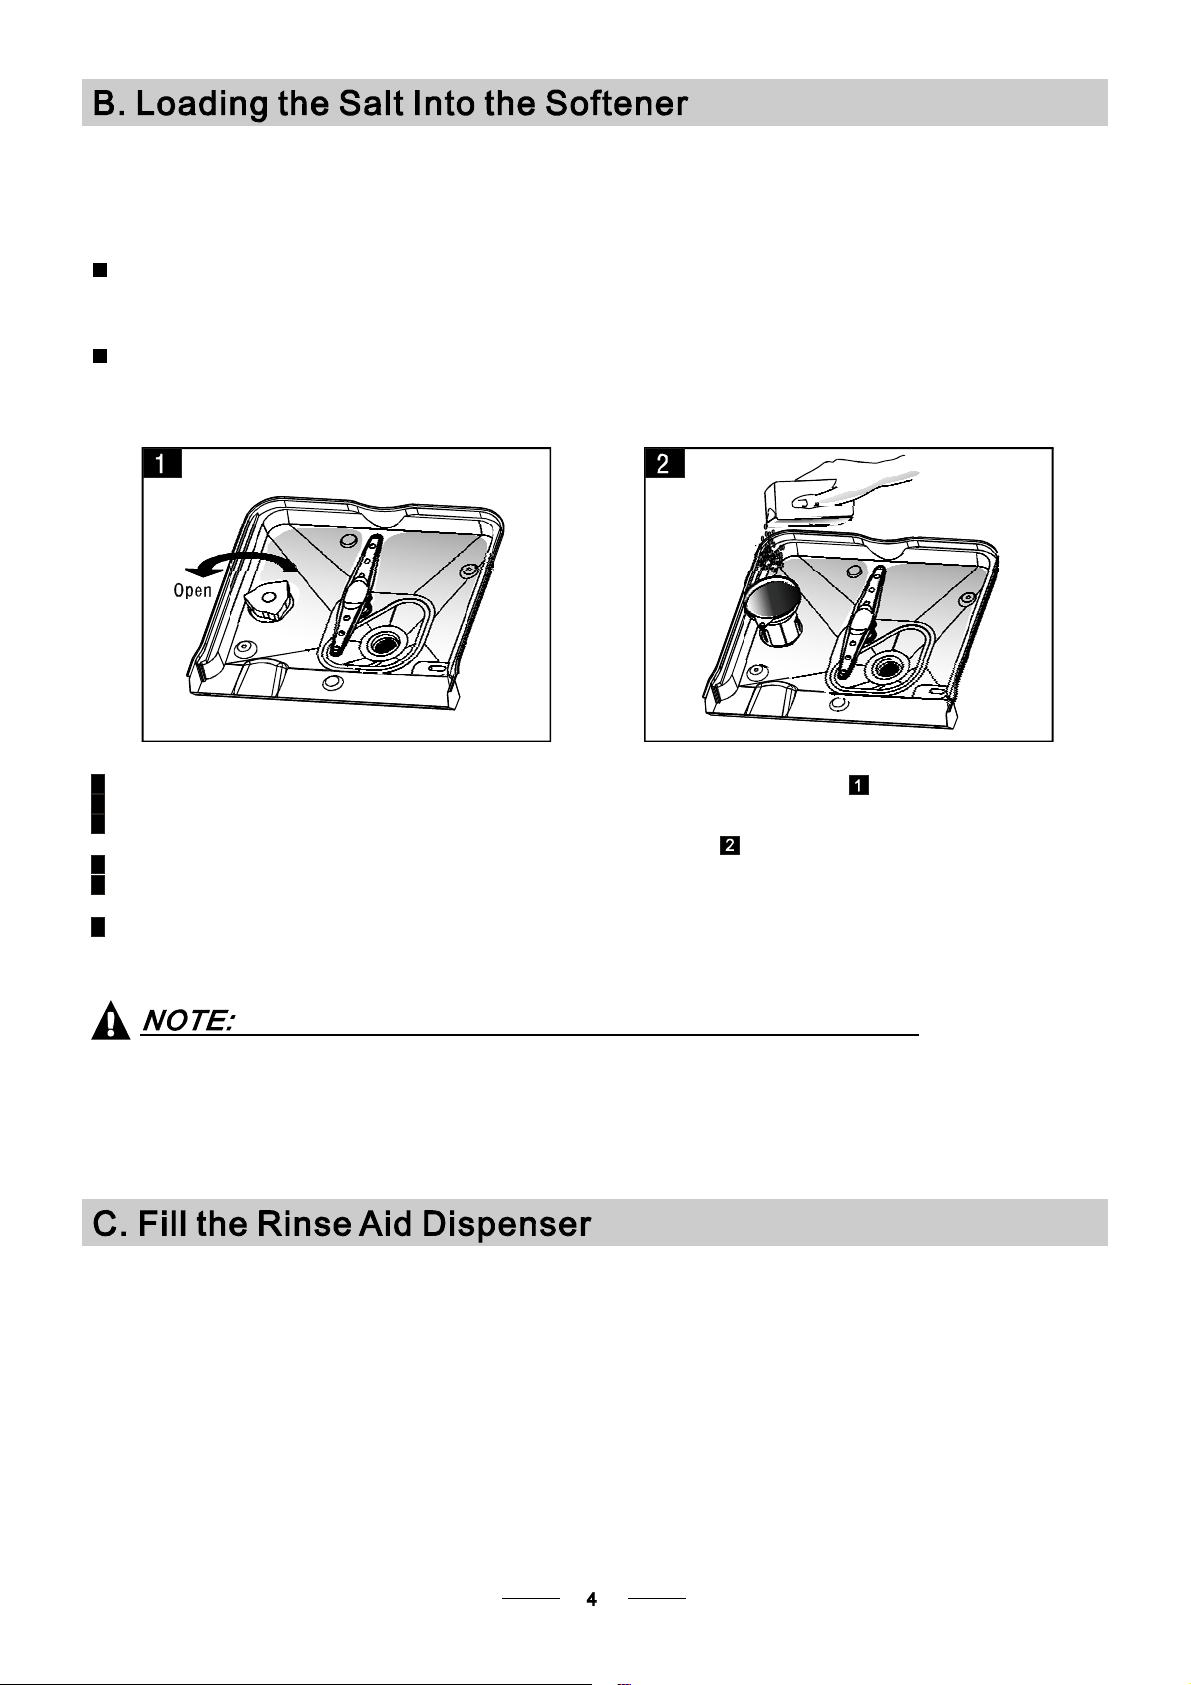
Always use the sal t intende d for u se with dishwashe r.
The sa lt c ontain er is located beneath the lower basket and should be filled as e xplained
in the following:
Attention!
Only use salt specifically designed for the use i n dishwashers! Every other type of
salt no t specifically de signed for the u se in a d ishwas her, espe cially tab le salt, will
damage t he w ater softener. In case of d ama ges caused by the use of unsuitab le
salt t he manufacturer doe s not give any warranty nor is liable for any damages cau sed.
Only fill with salt just before starting one of the complete washing programs.
This will prevent any grains of sa lt or salty water, w hi ch may have been spilled,
remaining on the bottom of the machine for any pe riod of time, which may cause
corrosion.
The r inse aid is relea sed during the final rin se to pr event water from forming droplets on your dishe s, w hich can
leave spots and streaks. It also improves drying by allowing water to r oll off t he dishes. Your dishwasher i s
designed to u se l iquid rinse aids. The rinse a id dispenser is located i nside t he doo r next to the detergent di spenser.
To f i l l the d i spe n s e r , o p e n the c a p a n d po u r t h e r i n s e a i d in t o th e disp e ns e r u n t il th e l e v e l i ndi c a t o r tu r n s c om p l e te l y
black. The volume of t he rinse aid c ontainer is about 110ml.
Rinse Aid D ispenser
Function of R inse Ai d
Rinse aid is au t oma t icall y added duri ng the last rinse, ensu r ing thor oug h rinsi ng , and spot and s t reak free dryi ng.
Atten tion!
Only use br an d ed rinse aid for dishwash er. N ever fill the rinse aid dispens er with any other substa nc es
(e.g. Di shw ash er cle an in g agen t, liqu id dete rg e nt) . This would damag e the app lian ce .
A Re move t h e lowe r ba s ket and t h en u nscre w an d re move the c ap fro m th e sa lt co ntai n er.
B Befo re t h e first wash , fil l 1l t . of water in the salt con t a ine r of your machine.
C Place the end of the f unnel (supplied) into the hole and introd uce about 1kg of salt.
D Af te r fil li ng th e cont ainer , screw the cap tig h tl y back clockwise.
E Usually, the salt warning light will stop being il lum in at ed within 2-6 days after th e salt c o nt ainer has been filled with
salt.
F Immediat ely after fillin g the s alt into the salt c on tain er, a washin g progra m should be started
program Otherw ise the filter system, pump or other important parts of the machine m ay be damaged
by salty water. This is out of warranty.
(We su ggest to use t he
soak or rapid ).
 Loading...