

Page 1
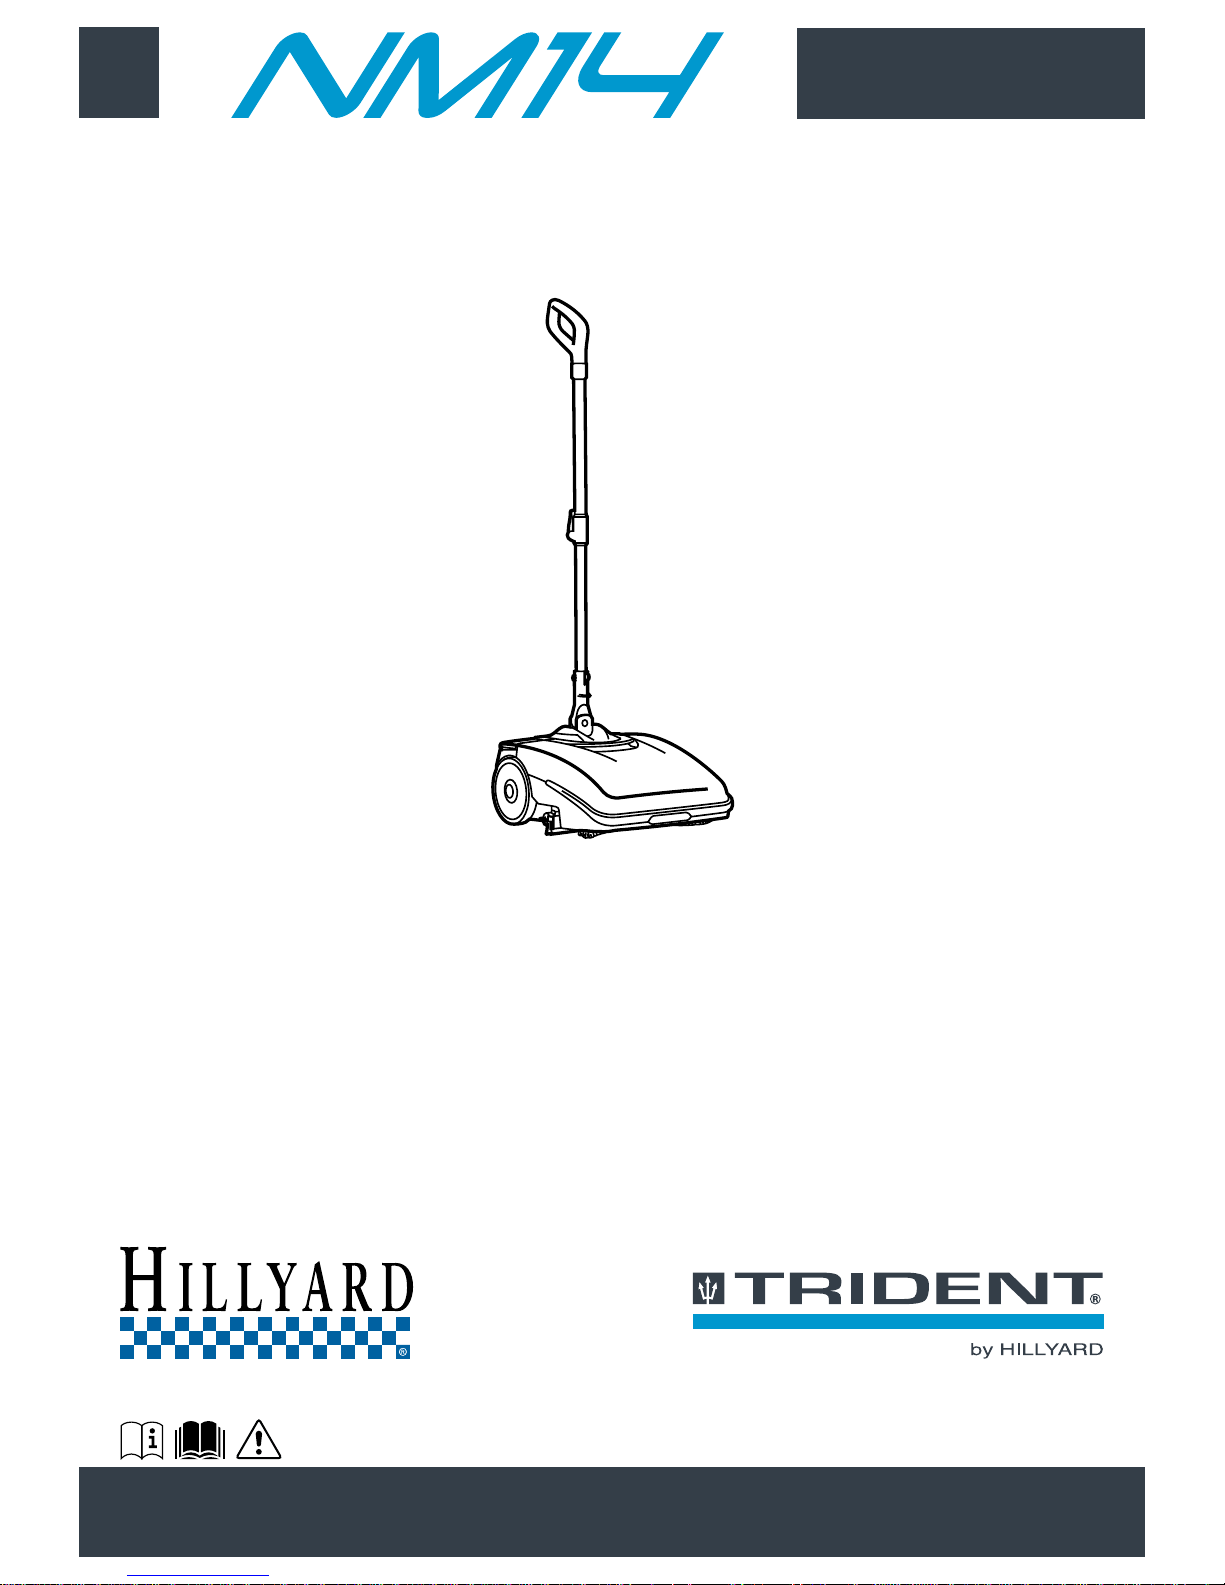
Scrubbing machine
ORIGINAL INSTRUCTIONS DOC. 10075414 - Ver. AA - 11-2017
Use and Maintenance manual
Page 2

Page 3
CONTENTS
The following symbols are used to indicate
any potentially hazardous situations. Always
read this information carefully and take the
necessary precautions to protect any people
and/or objects that may be present.
Operator cooperation is paramount for accident
prevention. No accident prevention programme
can be eective without the full cooperation
of the person directly responsible for the
machine's operation. Most accidents that occur
at the workplace, during work activities, or while
in transit, are caused by the failure to respect
the most basic safety regulations. An attentive,
careful operator is most eective guarantee
against accidents and is fundamental in order
to implement any prevention programme.
DANGER: Indicates an imminent danger
that could cause serious injury or death.
WARNING: Indicates a probable
dangerous situation that could cause
serious injury or death.
CAUTION: Indicates a probable
dangerous situation that could cause
minor injuries.
ATTENTION: Indicates a probable
dangerous situation that could damage
objects.
N.B.: Indicates a note regarding essential
or useful functions.
CONSULTATION: Indicates the need
to consult the Operator's Manual before
performing any operation.
GENERAL SAFETY
REGULATIONS
CONTENTS ................................................................................3
GENERAL SAFETY REGULATIONS ........................................3
RECHARGING THE BATTERIES....................................................4
USING THE MACHINE ....................................................................... 4
DEACTIVATION OF THE MACHINE ...................................................6
MAINTENANCE .................................................................................. 6
TRANSPORT ...................................................................................... 7
DISPOSAL........................................................................................... 7
SYMBOLS USED IN THE MANUAL .........................................8
SYMBOLS USED ON THE MACHINE ......................................8
PURPOSE AND CONTENT OF THE MANUAL ........................8
TARGET GROUP .......................................................................8
PRESERVATION OF THE USER ..............................................8
ON CONSIGNMENT OF THE MACHINE ..................................8
INTRODUCTORY COMMENT ...................................................8
IDENTIFICATION DATA .............................................................8
TECHNICAL DESCRIPTION .....................................................8
TECHNICAL DESCRIPTION .....................................................8
SAFETY .....................................................................................8
SERIAL NUMBER PLATE .........................................................8
SPARE PARTS...........................................................................9
HANDLING THE PACKAGED MACHINE .................................9
HOW TO UNPACK THE MACHINE ...........................................9
HOW TO MOVE THE MACHINE ...............................................9
BATTERY TYPE.........................................................................9
RECHARGING THE BATTERY .................................................9
MACHINE PREPARATION ......................................................10
PREPARING TO WORK ..........................................................10
WORK ......................................................................................11
AT THE END OF THE WORK ..................................................11
MAINTENANCE .......................................................................12
TROUBLESHOOTING .............................................................13
DISPOSAL ...............................................................................14
EC DECLARATION OF CONFORMITY ..................................14
3
Page 4

DANGER:
• If the battery charger power cable is damaged or broken, it should be replaced by the
manufacturer, by authorised service personnel or else by a qualied person, in order to protect
against hazards.
• Keep sparks, ames, and incandescent materials at a safe distance from the batteries.
• Before charging check that the electric cable that connects the battery charger to the batteries
is not damaged, and if it is damaged do not use it and contact technical assistance.
• Before using the battery charger, check that the electric socket that connects the battery
charger to the mains is not damaged, and if it is do not use it and contact an authorised
service technician or another qualied person, in order to avoid and hazardous situations.
• Do not disconnect the battery charger cable from the machine socket when the battery charger
is operating. This is necessary to prevent electric arcs forming. To disconnect the battery
charger when charging, rst disconnect the power cable from the mains socket.
WARNING:
• Do not use incompatible battery chargers since they could damage the batteries and potentially
cause a re. To charge the battery only use the detachable power pack provided with this
machine.
• Keep the battery charger's cable at a safe distance from any hot surfaces.
• Carefully read the user manual of the battery charger you want to use before recharging.
• Do not disconnect the battery charger from the mains socket with wet hands.
RECHARGING THE BATTERIES
DANGER:
• In the event of danger, quickly press the machine's main switch and remove the battery from
the battery compartment.
• Never collect gases, explosive/inammable liquids or powders, nor acids and solvents! These
include gasoline, paint thinners and fuel oil (which, when mixed with the vacuum air, can form
explosive vapours or mixtures), and also non-diluted acids and solvents, acetones, aluminium
and magnesium powders. These substances may also corrode the materials used to construct
the machine.
• If the machine is used in dangerous areas (e.g. petrol stations), the relative safety standards
must be observed. It is forbidden to use the machine in environments with a potentially
explosive atmosphere.
WARNING:
• The machine must be exclusively used by authorised, trained personnel.
• Do not use the machine on surfaces with a slope greater than the one indicated on the serial
number plate.
• The machine is not suitable for cleaning rough or uneven oors. Do not use the machine on
slopes.
• In the event of a re, use a powder extinguisher. Do not use water.
• Adapt the speed to the adhesion conditions.
• In order to prevent the unauthorised use of the machine, the power supply must be interrupted,
switch the machine o using the main switch, remove the battery from the battery compartment.
USING THE MACHINE
4
Page 5

• Do not use the machine without the requisite knowledge and authorisations.
• Do not use the machine if you have not read and understood the following user manual.
• Do not use the machine under the inuence of alcohol or drugs.
• Do not use the machine when using a mobile phone or other types of electronic devices.
• Do not use the machine if it is not working correctly.
• Do not use the machine in areas where there are inammable vapours or liquids or combustible
powders.
• Do not use the machine in areas that are too dark to see the controls or operate the machine
safely, unless the work lights or the front headlights are on.
CAUTION:
• This machine must not be used by people (including children) with reduced physical, sensorial
and mental capabilities, or by people without any experience or knowledge, unless they have
been controlled and instructed in the use of the machine by those responsible for their safety.
Children must be supervised to ensure they do not play with the machine.
• During the working of the machine, pay attention to other people and especially to children.
• The machine must only be powered with a voltage equal to that shown on the serial number
plate.
• Read the labels on the machine carefully. Do not cover them for any reason, and replace them
immediately if they become damaged.
• The machine must only be used and stored in an enclosed or covered environment.
• The machine must not be used or stored outdoors in damp conditions or directly exposed to
rain.
• The machine does not cause harmful vibrations.
• Use the machine only in the manner described in this manual.
• Do not collect inammable or steaming refuse, like cigarettes, matches and hot embers.
• Always follow the instructions on the containers for mixing, using and disposing of chemical
substances.
ATTENTION:
• Always take appropriate measures to protect any individuals and/or objects that may be
present while using this machine.
• Be careful to avoid collisions with shelving or scaolding, above all if there is a risk of objects
falling from heights.
• Do not place any liquid containers on the machine.
• The machine must only be used under temperature conditions ranging from 32°F to +104°F.
• When using detergents to clean the ooring, always follow the instructions and respect the
warnings indicated on the containers' labels.
• Always use appropriate gloves and protective equipment when handling the detergents used
to clean the oor.
• Avoid working with the brushes when the machine is standing still, so as to avoid damage to
the oor.
• Do not allow any objects to penetrate into the machine's openings. Do not use the machine is
the openings are obstructed.
• Keep the machine's openings free of any dust, lint, hairs, or any other foreign materials that
could reduce the airow.
• Do not remove or alter any labels axed to the machine.
5
Page 6

• Use only the brush supplied with the machine or those specied in the following manual.
Using other brushes compromises the safety of the machine and its operator.
• Before starting work check that there are no leaks.
• Before starting work check that all the safety devices have been installed and are working
correctly.
• Take all due precautions so that hair, jewellery, loose clothing do not get entangled in the
machine's moving parts.
• Only use the machine in well-lit areas.
WARNING:
• Always protect the machine against sunlight, rain, and other atmospheric agents, both while it
is stationary and while it is in function. Store the machine in a dry, sheltered place: this machine
is only designed for use under dry conditions, and must not be used or stored outdoors under
humid conditions.
• Do not park the machine near combustible materials, powders, gases or liquids.
• Stop the machine on at ground.
• Switch o the machine and remove the battery from the battery compartment.
• If the machine is left unattended, it must be protected from any accidental movements
CAUTION:
• In order to prevent the unauthorised use of the machine, the power supply must be interrupted,
switch the machine o using the main switch, remove the battery from the battery compartment.
ATTENTION:
• The machine must only be stored under temperature conditions ranging from 32°F to +104°F.
The humidity level must be between 30% and 95%.
DEACTIVATION OF THE MACHINE
DANGER:
• In order to avoid short-circuits when working in the vicinity of electrical components, do the
following: avoid the use of non-insulated tools; do not place or allow metallic objects to fall
upon the electrically powered components; remove any rings, watches and/or clothing with
metallic parts that might come into contact with the electrically powered components.
WARNING:
• Read all the relevant instructions carefully before performing any maintenance/repair
operations.
• If the machine does not work properly, check this is not caused by failure to carry out routine
maintenance. Otherwise, ask for intervention of the authorised technical assistance centre.
MAINTENANCE
The machine must not be transported or parked in its rest position
when the solution tank and recovery tank are full.
6
Page 7

• Restore all electrical connections after any maintenance interventions.
CAUTION:
• For any maintenance work, switch the machine o using the main switch, remove the battery
from the battery compartment.
• Avoid contact with moving parts. Do not wear loose clothing or jewellery and tie up long hair.
ATTENTION:
• Never tamper with the machine's protection devices for any reason; always follow the supplied
routine maintenance instructions scrupulously.
• If any issues are encountered while using the machine, check to make sure that these are
not due to a lack of proper maintenance. Otherwise, request the intervention of authorized
personnel or an Authorized service centre.
• When replacing parts, ask for ORIGINAL spare parts from a Dealer or an authorised retailer.
• In order to ensure the machine is safe to use and operates properly, carry out the maintenance
work specied in this manual.
• Do not clean the machine with direct or pressurized jets of water, or with corrosive substances.
• Have the machine checked by an authorised technical assistance centre every year.
• When disposing of consumable materials, observe the laws and regulations in force. Once
the machine has reached the end of its service life, the materials contained within it must be
disposed of in an appropriate manner, keeping in mind that the machine itself has been built
using fully recyclable materials.
• All repairs should be carried out by qualied personnel.
• Do not physically modify the machine's design features.
• Use spare parts provided by authorised service centres.
• Wear personal protective equipment as required and as recommended in the manual.
WARNING:
• Drain both tanks before transport.
• Move the squeegee to the rest position.
• Remove the battery from the battery compartment.
TRANSPORT
ATTENTION:
• The machine should not be abandoned at the end of its working life because of the presence
of toxic-harmful substances in it, which are subject to regulations that regulate their disposal
in special centres.
DISPOSAL
7
Page 8

Protective gloves symbol:
Always wear protective gloves, to avoid the risk of serious injury to your hands.
Warning symbol:
Carefully read the sections marked with this symbol and observe the indications, for the safety
of the operator and the machine.
Covered place symbol:
The operations preceded by this symbol must always be carried out in a dry, covered area.
Symbol for squeegee movement to “work position”:
Indicates the rotation direction of the squeegee control knob in order to bring the squeegee
rubbers into contact with the oor.
Symbol of the open book with i:
Indicates the need to consult the instruction manual.
Main switch symbol:
Used on the central rear of the machine to indicate the main switch.
Recycling symbol:
Tells the operator to carry out the operations in compliance with environmental regulations in
force in the place where the machine is being used.
Tank drainage symbol:
Informs the operator that the recovery tank must be emptied every time the solution tank is
lled.
Recycling symbol:
Carefully read the sections marked with this symbol in order to ll the solution tank correctly.
Tool symbol:
Indicates the need to use tools not included in the supply.
Lifting point symbol:
Used to indicate the location of the elements for lifting the machine or else moving the mobile
parts of the machine.
“OPEN” symbol:
Used on the upper part of the appliance to indicate the position of the handle for opening the
front carter.
Warning symbol not to rotate the machine:
indicates that the machine must not be rotated when the tanks are full.
Explosion risk symbol:
Indicates that the battery may explode in certain conditions, if not handled in accordance with
the directives indicated in the manufacturer's manual.
The descriptions contained in this document are not binding. The company therefore reserves the
right to make any modications at any time to elements, details, or accessory supply, as considered
necessary for reasons of improvement or manufacturing/commercial requirements. The reproduction,
even partial, of the text and drawings contained in this document is prohibited by law.
The company reserves the right to make any technical and/or supply modications. The images
are shown as reference only and are not binding as to the actual design and/or equipment.
Symbol of the open book:
used to tell the operator to read the manual before using the machine.
Solenoid valve switch symbol:
Used on the rear of the machine to indicate the solenoid valve control switch.
Disposal symbol:
Carefully read the sections marked with this symbol for machine disposal.
Symbol for squeegee movement to “idle position”:
Indicates the rotation direction of the squeegee control knob in order to raise the squeegee
rubbers o the oor.
SYMBOLS USED IN THE MANUAL
SYMBOLS USED ON THE MACHINE
PURPOSE AND CONTENT OF THE MANUAL
The aim of this manual is to provide customers with all the information needed to use the machine
in the safest, most appropriate and most autonomous way. This includes information concerning
technical aspects, safety, operation, downtime, maintenance, spare parts and scrapping. The operators
and qualied technicians must carefully read the instructions in this manual before carrying out any
operations on the machine. If in doubt about the correct interpretation of instructions, contact your
nearest Customer Service Centre to obtain the necessary clarications.
TARGET GROUP
This manual is written both for operators and for qualied machine maintenance technicians. Operators
must not perform operations that should be carried out by qualied technicians. The manufacturer is not
liable for damages resulting from failure to comply with this prohibition.
PRESERVATION OF THE USER
The following document must be stored in its special pouch close to the machine, protected from liquids
and anything else that could compromise its legibility.
ON CONSIGNMENT OF THE MACHINE
When the machine is consigned to the customer, an immediate check must be performed to ensure all
the material mentioned in the shipping documents has been received, and also to check the machine
has not suered damage during transportation. If this is the case, the carrier must ascertain the extent
of the damage at once, informing our customer service oce. It is only by prompt action of this type that
the missing material can be obtained, and compensation for damage successfully claimed.
INTRODUCTORY COMMENT
Any machine can only work properly and eectively if used correctly and kept in full working order
by carrying out the maintenance operations described in the attached documentation. We therefore
suggest you read this instruction booklet carefully and read it again whenever diculties arise while
using the machine. If necessary, remember that our assistance service (organised in collaboration with
our dealers) is always available for advice or direct intervention.
IDENTIFICATION DATA
For technical assistance or to request replacement parts, always give the model, the version and the
serial number (written on the relevant plate).
TECHNICAL DESCRIPTION
The TRIDENT NM14 is a oor scrubbing machine that cleans a wide range of ooring and dirt types
by means of the mechanical action of a cylindrical brush and the chemical action of a water-detergent
solution, collecting the dirt as it moves forward that has been removed and the detergent solution that
has not been absorbed by the oor. The machine must only be used for this purpose.
TECHNICAL DESCRIPTION
This machine was designed and built for the cleaning (scrubbing and drying) of smooth, compact
ooring in the commercial, residential and industrial sectors by a qualied operator in proven safety
conditions. The machine is not suitable for cleaning rugs or carpets. The machine is only suitable for
use in closed (or at least covered) places.
WARNING: The machine is not suitable for use in the rain, or under jets of water.
IT IS FORBIDDEN to use the machine for picking up dangerous dusts or inammable liquids in places
with an explosive atmosphere. In addition, it is not suitable as a means of transport for people or
objects.
SAFETY
Operator cooperation is paramount for accident prevention. No accident prevention programme can
be eective without the full cooperation of the person directly responsible for machine operation. The
majority of occupational accidents that happen either in the workplace or whilst moving are caused by
failure to respect the most basic safety rules. An attentive, careful operator is most eective guarantee
against accidents and is fundamental in order to implement any prevention programme.
SERIAL NUMBER PLATE
The serial number plate is located in the power supply battery
compartment on the rear part of the machine, indicating its general
characteristics, and in particular the serial number. The serial
number is a very important piece of information and should always
be provided together with any request for assistance or when
purchasing spare parts.
8
TECHNICAL DATA U/M TRIDENT
NM14
Total power W 150
Working width IN 13,4
Working capacity, up to ft
2
/h 7320
Central brush (number / (diameter x length)) No. /(Øin x in) 1 / (4,3 x 13,4)
Brush motor (rated) V/W 24 / 50
Vacuum motor (rated) V/W 24 /100
Maximum gradient % 2
Solution tank capacity gal 0,32
Recovery tank capacity gal 0,26
Machine body length in 17
Machine body height in 8,5
Overall dimensions in standby position (L x h x w) in 15,5x51x17,5
Overall dimensions in idle position (L x h x w) in 15,5x36x14,4
Rated battery voltage V / mAh 25.55 / 5200
Battery weight lb 2,2
Machine weight when empty (machine + brush + squeegee) lb 20
Machine weight in transport (machine + battery + brush +
squeegee)
lb 22
Machine weight ready to use (machine + battery + detergent
solution + brush + squeegee)
lb 25
Sound pressure level (ISO 11201) - L
pa
dB (A) <70
Uncertainty K
pa
dB (A) 1.5
Hand vibration level (ISO 5349) m/s
2
< 2.5
Vibration measurement uncertainty 4%
Page 9

SPARE PARTS
HANDLING THE PACKAGED MACHINE
The machine is contained in specic packaging, and since
the packaging elements (plastic bags, staples, etc.) are
a potential source of danger, they should not be left within
the reach of children, disabled persons, etc. The machine's
overall weight including packaging is 18 Kg.
The packaging dimensions are as follows:
U/M TRIDENT NM14
A in 10,6
B in 19,2
C in 27,5
HOW TO UNPACK THE MACHINE
The procedure for unpacking the machine is as follows:
1. Place the lower part of the outer packaging in contact with the oor.
CAUTION: Use the pictograms printed on the box as reference.
2. Open the outer box.
3. Remove the accessories from the box and carefully lay them on the ground.
4. Take the machine out of the box.
ATTENTION: it is recommended that all the packaging components be kept for any future
machine transportation.
CAUTION: these operations must be carried out using protective gloves to avoid any possible
contact with the edges or tips of metal objects.
HOW TO MOVE THE MACHINE
The procedure for the safe transportation of the machine is the following:
1. If the machine is running, switch it o by pressing the main switch (1) (Fig.1).
2. Make sure the recovery tank is empty. If it isn't, empty it completely.
3. Make sure the solution tank is empty, otherwise empty it completely.
4. Remove the battery (2) from the battery compartment; to free the battery, shift the stop lever (3) in
the direction of the arrow (Fig.2). Remove the battery from the machine using the handle moulded
on it (Fig.3).
The machine must not be transported or parked in its
rest position when the solution tank and recovery
tank are full.
5. Block the handlebar in the horizontal position. Rest your foot on the body of the machine to prevent
it from tilting, then push the handle away from you until it snaps into the horizontal position (Fig.4).
CAUTION: do not rest your foot on the main switch.
6. Rotate the stop lever of the command handlebar (4) in the direction of the arrow (Fig.5).
7. Close the command handlebar, pushing the handle (5) towards the body of the machine (Fig.6).
8. Rotate the stop lever of the command handlebar (4) in the direction of the arrow (Fig.7).
9. To lift the machine o the oor, use the handle (6) on its rear (Fig.8)
CAUTION: When transporting on vehicles, secure it rmly in place in compliance with the
directives in force so that it cannot slide or tip over.
CAUTION: these operations must be carried out using protective gloves to avoid any possible
contact with the edges or tips of metal objects.
BATTERY TYPE
To power the appliance, use only the battery supplied in the packaging or one supplied by a specialised
technician. OTHER BATTERY TYPES CANNOT BE USED. The machine is powered by a lithium-ion
battery. The battery compartment can accommodate a single battery slot at 25.55V.
WARNING: for the maintenance and disposal of the battery, refer to the document supplied by
the battery manufacturer.
RECHARGING THE BATTERY
The battery must be charged prior to the rst use, and when it doesn't provide enough power for tasks
that could formerly be performed without diculty. To recharge the battery, proceed as follows:
1. Take the machine to the designated place for charging the battery.
WARNING: the place for charging the battery should be suitably ventilated.
2. If the machine is running, switch it o by pressing the main switch (1) (Fig.1).
3. Block the handlebar in the vertical position.
CAUTION: during this operation, do not rest your foot on the machine.
4. Read the battery charger manual that comes with the machine for inserting the power plug (2) into
the power pack (3) (Fig.2).
CAUTION: before connecting the battery charger to the socket, make sure the characteristics of
the mains supply correspond to those of the battery charger.
WARNING: the battery charger must only be used in a covered place.
5. Connect the power plug (2) to the mains supply.
WARNING: make sure the green LED (4) on the battery charger lights up when you enable the
battery charger base circuit (Fig.3). This LED indicates that the battery charger circuit is
correctly powered.
6. Remove the cap (5) covering the battery power socket (Fig.4).
7. Insert the battery charger power cable plug (6) in the socket (7) on the battery (Fig.5).
WARNING: make sure the green LED (4) on the battery charger lights up when you enable the
charger (Fig.3). This LED indicates that the battery charger circuit is correctly powered.
9
6
4
10
5
2
1
8
7
9
3
1
1
OFF
2
2 3
3
4
5
4
6
5
6
8
7
4
1
1
OFF
4
3
32
2
POS. CODE QTY DESCRIPTION
1 440974 1 BATTERY
2 441033 1 BATTERY CHARGER
3 439888 1 DETERGENT SOLUTION FILTER
4 441025 2 ANTI-DUST FILTER
5 224800 1 SQUEEGEE RUBBER KIT
6 224615 1 CONTROL HANDLEBAR
7 441023 1 TUBE-CLEANING BRUSH
8 227332 1 RECOVERY TANK
9 224619 1 SOLUTION TANK
10
440905 1 SOFT BRUSH
440904 1 HARD BRUSH
Page 10

PREPARING TO WORK
CAUTION: before inserting the plug (6) in the socket (7), make sure the battery charger housing
compartment is not dirty (dust, condensation or other types of liquid).
CAUTION: make sure the red LED (4) on the battery charger lights up when you insert the plug
(6) in the socket (7). This LED indicates that the battery is recharging.
8. Perform a complete battery charging cycle.
ATTENTION: the red LED (4) remains on until the battery is fully charged. When the recharging
cycle has ended, the red LED goes o and the green LED comes on.
ATTENTION: The charger and the battery can be left connected to the power outlet. The red
LED (4) lights up when the charger occasionally tops up the battery.
ATTENTION: the red charge status LED (4) does not provide any indication of the battery
charge level.
ATTENTION: during the charging phase, the battery may overheat. This is normal and does not
mean there is any problem with the battery.
ATTENTION: if the battery used in this machine is over-charged, this may cause a risk of re,
explosion or chemical burns.
9. Once the charging cycle is completed, remove the plug (2) on the battery charger from the mains
socket.
ATTENTION: To prevent damaging to the mains socket, disconnect the plug from the mains
socket by directly pulling the plug and not the power cable.
10. Take the power cable plug (6) out of the socket (7) on the battery.
11. Insert the cap (5) that covers the battery power socket.
MACHINE PREPARATION
1. Take the package to the dedicated maintenance area.
2. Remove the machine and all the accessories from the box.
3. Insert the lower tube (1) of the control handlebar in the hole on the joint (2) (Fig.1).
4. Fix the handlebar to the joint using the screw and nut (3), making sure the hole on the handlebar
coincides with the hole on the joint (Fig.2).
N.B: the screwdriver is not supplied.
5. Block the handlebar in the horizontal position. Rest your foot on the body of the machine to prevent
it from tilting, then push the handle away from you until it snaps into the horizontal position (Fig.3).
CAUTION: do not rest your foot on the main switch.
6. Rotate the stop lever of the handlebar (4) in the direction of the arrow (Fig.4).
7. Close the command handlebar again, pushing the handle (5) towards the body of the machine
(Fig.5).
8. Rotate the stop lever of the handlebar (4) in the direction of the arrow (Fig.6).
9. Insert the battery (6) in the battery compartment (7) in the rear of the machine (Fig.7). Push the
battery until the uncoupling lever (8) locks into place.
Before beginning to work, it is necessary to:
N.B.: before beginning the rst work cycle, fully recharge the battery (read “RECHARGING THE
BATTERY”).
1. Before using the machine, make sure it is in a good, safe working condition. If everything is not in
order, the machine must not be used.
2. Rotate the handlebar so it is vertical.
CAUTION: During this operation, do not rest your foot on the machine.
3. Start the machine using the main switch (1) (Fig.1).
N.B.: If the LED of the main switch (1) (Fig.1) is lit up, this means there is electrical continuity.
4. Check the battery charge level. There are four LEDs (2) on the battery to show the charge
percentage (Fig.2). If all the LEDs are lit up, the battery is fully charged; if they are all switched o,
the battery is completely run down.
5. Switch o the machine using the main switch (1) (Fig.3).
6. Remove the battery (3) from the battery compartment; to free the battery, shift the stop lever (4) in
the direction of the arrow (Fig.4).
7. Remove the battery from the battery compartment using the handle moulded on it (Fig.5).
8. Make sure the condition of the squeegee rubbers is suitable for the work you want to carry out. If it
isn't, perform the necessary maintenance (read “MAINTENANCE”).
9. Make sure the condition of the brush is suitable for the work you want to carry out. If it isn't, perform
the necessary maintenance (read “MAINTENANCE”).
10. Rotate the front carter (5) as far as it will go - do this with the aid of the handle (6) (Fig.6).
CAUTION: these operations must be carried out using protective gloves to avoid any possible
contact with the edges or tips of metal objects.
11. Remove the solution tank from the machine (Fig.7). Carefully place it on the oor.
12. Remove the detergent solution lling cap (7) from its seat on the solution tank (Fig.8).
13. Fill with clean water, at a temperature no higher than 50°C and no lower than 10°C.
14. Add the liquid detergent to the solution tank in the concentration and manner indicated on the
detergent manufacturer's label.
N.B.: The formation of excess foam could damage the vacuum motor, so use only the minimum
amount of detergent that is necessary.
N.B.: always use detergents whose manufacturer's label indicates their suitability for scrubbing
machines. Do not use acid or alkaline products or solvents without this indication. Acid or
alkaline maintenance detergents can be used, as long as they have pH values between four and
ten, and do not contain : oxidising agents, chlorine or bromine, formaldehyde, mineral solvents.
CAUTION: protective gloves should always be worn before handling detergents or acidic or
alkaline solutions, to avoid serious injury to the hands.
N.B.: always use low-foam detergent. To avoid the production of foam, put a minimum quantity
of anti-foam liquid in the recovery tank before starting to clean. Do not use pure acids.
15. Replace the detergent solution lling cap (7) in its seat on the solution tank (Fig.9).
N.B.: it is good practice to empty the recovery tank every time you top up the solution tank level.
16. Insert the solution tank in the machine (Fig.10).
17. Rotate the front carter (5) as far as the work position - do this with the aid of the handle (6) (Fig.11).
18. Insert the battery in the battery compartment in the rear of the machine.
10
5
4
7
6
5
1
3
2
3
1 2 3
6
4
7
6
7
8
4 5
4
5
7
87
11 2
31 2
OFFON
6
5
6
3
4 5
3
7
9
Page 11

WORK
AT THE END OF THE WORK
Before beginning to work, it is necessary to:
1. Carry out the operations described in the “PREPARING TO WORK” chapter.
2. Check that the squeegee body is in contact with the surface to be cleaned. If it isn't, turn the knob
(1) in the direction of the arrow (Fig.1).
N.B.: Fig.1 shows the left side of the device. Rotate the knob on the right-hand side in the
opposite direction.
3. Release the handlebar from its vertical position and rotate it towards you.
CAUTION: During this operation, do not rest your foot on the machine.
4. Adjust the control handlebar.
5. Start the machine using the main switch (2) (Fig.2).
N.B.: if the LED of the main switch (2) (Fig.2) is lit up, this means there is electrical continuity.
N.B.: As soon as the machine starts, the front LEDs will light up and both the brush motor and
the vacuum motor will start working.
6. Activate the detergent solution supply by pressing the electric pump control switch (3) (Fig.3).
N.B.: if the LED of the electric pump control switch (3) (Fig.3) is active, this means the pump will
supply detergent solution.
7. The machine will now begin to work with full eciency until the battery runs down or until the
detergent solution has nished.
N.B.: The joint on the body of the machine provides greater manageability. To make a left-hand
turn, rotate the handle to the left (Fig.4); rotate it to the right when you want to turn right.
N.B.: If you need to turn back while you are working, just rotate the machine by 180° by turning
the control handle.
N.B.: if the handlebar is placed in the idle position (vertical) during use, the brush motor and
electric pump will stop working. After a few seconds, the vacuum motor will switch o as well.
N.B.: if the charge level reaches a certain value during use, the brush motor and the electric
pump will stop working. After a few seconds, the vacuum motor will switch o automatically as
well. Both the LED of the main switch and that of the electric pump control switch will remain ON.
At the end of the work, and before carrying out any type of maintenance, perform the following
operations:
1. Switch o the machine using the main switch (1) (Fig.1).
2. Rotate the handlebar so it is vertical.
CAUTION: During this operation, do not rest your foot on the machine.
3. Raise the squeegee body o the oor and rotate the knob (2) in the direction of the arrow (Fig.2).
N.B.: Fig.2 shows the left side of the machine . Rotate the knob on the right-hand side in the
opposite direction.
4. Take the machine to the designated place for draining o the dirty water.
ATTENTION: the place designated for this operation must comply with current environmental
protection regulations.
5. Remove the battery (3) from the battery compartment; to free the battery, shift the stop lever (4) in
the direction of the arrow (Fig.3).
6. Remove the battery from the battery compartment using the handle moulded on it (Fig.4).
7. Rotate the front carter (5) as far as it will go - do this with the aid of the handle (6) (Fig.5).
CAUTION: these operations must be carried out using protective gloves to avoid any possible
contact with the edges or tips of metal objects.
8. Remove the recovery tank (7) from the machine (Fig.6).
9. Remove the drain plug (8) on the recovery tank from its seat (Fig.7).
ATTENTION: protective gloves should always be worn before handling detergents or acidic or
alkaline solutions, to avoid serious injury to the hands.
10. Empty the tank.
11. Insert the solution drain plug (8) into its seat on the solution tank (Fig.8).
12. Remove the solution tank from the machine (Fig.9).
13. Remove the lling cap (9) from its seat on the detergent solution tank (Fig.10).
14. Empty the tank.
15. Rinse the inside of the tank with a jet of water.
16. Replace the lling cap (9) in its seat on the detergent solution tank (Fig.11).
17. Insert the two tanks in the machine, positioning rst the solution tank and then the recovery tank.
18. Rotate the front carter (5) as far as the work position; do this with the aid of the handle (6) (Fig.12).
19. Block the handlebar in the horizontal position (Fig.13).
CAUTION: During this operation, do not rest your foot on the machine.
20. Turn the stop lever of the command handlebar (10) in the direction of the arrow (Fig.14).
21. Close the command handlebar again, pushing the handle (11) towards the body of the machine
(Fig.15).
22. Turn the stop lever of the command handlebar (10) in the direction of the arrow (Fig.16).
23. Take the machine to the designated machine storage place.
24. Position the machine with its rear part in contact with the oor (Fig.17).
WARNING: Park the machine in an enclosed place, on a at surface; near the machine there
must be no objects that could either damage it, or be damaged through contact with it.
11
6
5
1110
4
2 3
1
2 31
ON
1
1
OFF
32
2
4
3
4
6
5
7
5
6
8 8
7 7 9
6
5
12
9 9
10 11
14
15
10
11
13
Page 12

MAINTENANCE
At the end of the work, and before carrying out any type of maintenance, perform the following
operations:
1. Switch o the machine using the main switch (1) (Fig.1).
2. Rotate the handlebar so it is vertical.
CAUTION: During this operation, do not rest your foot on the machine.
3. Take the machine to the designated maintenance area.
N.B: the place designated for this operation must comply with current environmental protection
regulations.
4. Remove the battery (2) from the battery compartment; to free the battery, shift the stop lever (3) in
the direction of the arrow (Fig.2).
5. Remove the battery from the battery compartment using the handle moulded on it (Fig.3).
6. Rotate the front carter (4) as far as it will go - do this with the aid of the handle (5) (Fig.4).
CAUTION: these operations must be carried out using protective gloves to avoid any possible
contact with the edges or tips of metal objects.
7. Remove the tunnel cover (6) and shift the stop levers (7) as indicated by the arrows (Fig.5).
8. Remove the brush (8) from the machine (Fig.6).
ATTENTION: During this operation, keep the control handlebar still, in order to prevent the
machine from moving accidentally.
9. Clean the brush under running water and remove any impurities present in the bristles of the brush.
Check that the bristles are not worn; in the event of excessive wear, replace the brush (the bristles
should be at least 10 mm long).
10. Fit the brush (8) on the pin in the brush motor (the brush can only be inserted in one direction)
(Fig.7).
11. Replace the tunnel cover (6) and shift the stop levers (7) as indicated by the arrows (Fig.8)
12. Remove the recovery tank (9) from the machine (Fig.9).
13. Remove the drain plug (10) on the recovery tank from its seat (Fig.10).
ATTENTION: protective gloves should always be worn before handling detergents or acidic or
alkaline solutions, to avoid serious injury to the hands.
14. Clean with a jet of air the vacuum motor air channel chamber, the chamber inlet hole is marked
with the letter (A) (Fig.11).
15. Clean with a jet of air the dirty water channel chamber, the chamber inlet hole is marked with the
letter (B) (Fig.12).
16. Rinse the inside of the tank with a jet of water.
17. Insert the drain cap (10) in its seat on the detergent solution tank (Fig.13).
18. Remove the solution tank from the machine (Fig.14).
19. Remove the lling cap (11) from its seat on the solution tank (Fig.15).
20. Rinse the inside of the tank with a jet of water.
21. Replace the lling cap (11) in its seat on the detergent solution tank ( Fig.16).
22. Remove the lter cartridge (12) and clean it under a jet of water to remove any impurities that might
be attached. If necessary, replace it (Fig.17).
23. Insert the lter cartridge into its seat in the frame (12) (Fig.18).
ATTENTION: Put the lter cartridge in its seat as shown in gure 19, the valve activation pin
(13) should be facing up.
24. Insert the two tanks in the machine, positioning rst the solution tank and then the recovery tank.
25. Remove the vacuum duct cleaning brush (14) from its support (Fig.20).
26. Clean the inside of the vacuum duct (15) with the brush (14) (Fig.21).
27. Put the vacuum duct cleaning brush (14) in its support (Fig.22).
28. Rotate the front carter (4) as far as the work position; do this with the aid of the handle (5) (Fig.23).
29. Block the handlebar in the horizontal position (Fig.24).
ATTENTION: During this operation, do not rest your foot on the machine.
30. Turn the stop lever of the command handlebar (16) in the direction of the arrow (Fig.22).
31. Close the command handlebar again, pushing the handle (17) towards the body of the machine
(Fig.23).
32. Turn the stop lever of the command handlebar (16) in the direction of the arrow (Fig.24).
33. Position the machine with its rear in contact with the oor (Fig.25).
12
10
10 11 12
17
16
10
10
13 14
11
15
1
1
OFF
3
2
2 3
5
4
4
8
6
6
5
7
9
9
8
6
7
8
7
11
16
17 18
12 12
19
13
20 21
14
15
5
4
23
14
22
24
22
16
23
17
24
16
25
Page 13

34. Make sure the squeegee body is in the work position. If it isn't, turn the knob (18) in the direction
of the arrow (Fig.26).
ATTENTION: Fig.26 shows the left side of the machine. Rotate the knob also on the right-hand
side.
35. Move the squeegee coupling to the maintenance position, and move the knob (18) outwards
(Fig.27). Rotate the squeegee coupling towards you (Fig.28).
ATTENTION: carry out this operation for both the left-hand knob and the right-hand knob.
36. Use a damp cloth to thoroughly clean the vacuum nozzle duct (19) (Fig.29).
ATTENTION: Be careful not to lose or damage the seal (20) above the vacuum nozzle (Fig.29).
37. Use a damp cloth to thoroughly clean the vacuum chamber of the squeegee (21) (Fig.30).
38. Use a damp cloth to thoroughly clean the front rubber (22) of the squeegee (Fig.31). Check the
condition of the front rubber blade of the squeegee body; if the edge that is in contact with the oor
is worn, replace it.
39. Use a damp cloth to thoroughly clean the rear rubber (23) of the squeegee (Fig.32). Check the
condition of the rear rubber blade of the squeegee body; if the edge that is in contact with the oor
is worn, replace it.
Careful maintenance of the squeegee rubbers guarantees better cleaning and drying of the
oor, as well as a longer vacuum motor life. To replace the squeegee rubber blades, proceed
as follows:
• Turn the wing nuts (24) xing the squeegee body by 90° (Fig.33).
• Remove the squeegee body from the slots on the squeegee connector, taking care not to
lose the seal on the vacuum nozzle (Fig.34).
• Replace the worn/damaged rubber.
• Repeat the operations in reverse order to reassemble all the parts.
40. Bring the squeegee coupling to the rest position and move the squeegee body towards the machine
(Fig.35).
41. Fix the squeegee connection in the rest position, push the knob (18) towards the inside of the
machine (Fig.36) and then turn it in the direction of the arrow (Fig.37).
ATTENTION: Fig.37 shows the left side of the device. Rotate the knob on the right side in the
opposite direction.
42. Remove the exhaust air lter support (25) from the machine, press the fastening tab (26) in the
direction of the arrow (Fig.38).
43. Clean the lter cartridges (27) with a jet of air (Fig.39), from a distance of at least 20 cm.
Careful maintenance of the exhaust air lters guarantees a longer vacuum motor life. To replace
the lter cartridges, proceed as follows:
• Remove the lter cartridge supports (28) from the lter support (Fig.40).
• Remove the used lter cartridge (29) from the lter cartridge support (28) and replace it with
the new one (Fig.41).
• Repeat the operations in reverse order to reassemble all the parts.
44. Insert the exhaust air lter support (25) in the machine (Fig.42).
45. Rotate the machine to its work position (Fig.43).
46. Block the handlebar in the vertical position; to release the handlebar move the latch (30) in the
direction of the arrow (Fig.44).
47. Rotate the front carter (4) as far as it will go - do this with the aid of the handle (5) (Fig.45).
48. Insert the two tanks and the detergent solution lter cartridge in the machine, positioning rst the
detergent solution lter cartridge, then the solution tank, and nally the recovery tank.
49. Rotate the front carter (4) as far as the work position - do this with the aid of the handle (5) (Fig.46).
50. Insert the battery in the battery compartment in the rear of the machine (Fig.47).
51. Position the machine with its rear in contact with the oor (Fig.48).
ATTENTION: Park the machine in an enclosed place, on a at surface; near the machine there
must be no objects that could either damage it, or be damaged through contact with it.
This chapter lists the most common problems linked with the use of the machine. If you are unable to
resolve the problems with the information given here, please contact your nearest assistance centre.
TROUBLESHOOTING
13
18
26
18
27 28
21
30
31
22
29
20
20
19
32
23
24
33
34
18
3635
18
37
25
26
38
27
27
28
4039
29
28
25
41 42
43
5
4
44
5
4
45
5
4
46
47
48
PROBLEM POSSIBLE CAUSE SOLUTION
THE MACHINE DOES NOT
START
The main switch is OFF. Press the main switch.
Check that the battery is
correctly inserted in the
machine.
Insert the battery correctly in
the machine.
Check the battery charge
level, view the LED on the
rear of the machine.
If the battery charge level is
critical, perform a complete
recharge cycle.
THE BATTERY HAS
NOT BEEN CHARGED
CORRECTLY
The power supply cable plug
is not correctly inserted in the
battery charger base socket.
Check that the plug on the
battery charger power cable
is connected to the socket on
the battery charger base.
The power supply cable plug
is not correctly inserted in the
mains socket.
Check that the battery charger
power supply cable plug
is connected to the mains
socket.
The characteristics of the
mains power supply do not
correspond to those required
by the battery charger.
Check that the characteristics
in the battery charger plate
are the same as those of the
mains supply.
The LED on the battery
charger base ashes
repeatedly.
Referring to the battery
charger use and maintenance
manual, check the meaning
of the ashing signals that the
battery charger emits dung
the battery recharge stage.
THE MACHINE HAS A VERY
LOW WORK AUTONOMY
Check the battery charge level
and check the symbol on the
control display.
If the battery charge level is
critical, perform a complete
recharge cycle.
NOT ENOUGH DETERGENT
SOLUTION ON THE BRUSH
The quantity of detergent
solution in the water system
is not sucient for the work to
be carried out.
Fill the solution tank with
detergent.
Detergent solution lter
obstructed.
Remove the obstructions from
the detergent solution lter
(read “MAINTENANCE”).
Page 14

DISPOSAL
To dispose of the machine, take it to a demolition centre or an
authorised collection centre.
Before scrapping the machine, it is necessary to remove and separate
out the following materials, then send them to the appropriate collection
centres in accordance with the environmental hygiene regulations
currently in force:
• Brush
• Electric and electronic parts*
• Battery
• Plastic parts
• Metallic parts
(*) In particular, contact your distributor when scrapping electric and
electronic parts.
14
PROBLEM POSSIBLE CAUSE SOLUTION
THE MACHINE DOES NOT
CLEAN CORRECTLY
The machine does not start.
Read the section “THE
MACHINE DOES NOT
START”.
Not enough detergent solution
comes out.
Read the section “NOT
ENOUGH DETERGENT
SOLUTION ON THE
BRUSH”.
The brush is not correctly
inserted in the machine.
Insert the brush correctly in
the machine.
The brush bristles are subject
to excessive wear
Check the condition of
the brush, and replace
it if necessary (read
“MAINTENANCE”).
THE SQUEEGEE DOES NOT
DRY PERFECTLY
The vacuum device is
obstructed
Remove the obstructions from
the squeegee body (read
“MAINTENANCE”).
Remove the obstructions
from the vacuum duct (read
“MAINTENANCE”).
Remove the obstructions from
the recovery tank cover (read
“MAINTENANCE”).
EXCESSIVE FOAM
PRODUCTION
The detergent being used is
not suitable.
Check that a low foam
detergent has been used.
The oor is not very dirty.
Dilute even more the
detergent inside the solution
tank.
THE DEVICE DOES NOT
VACUUM CORRECTLY
The recovery tank is full
Empty the recovery tank (read
the chapter “AT THE END OF
THE WORK”).
The vacuum device is
obstructed
Read the section "THE
SQUEEGEE DOES NOT DRY
PERFECTLY".
Page 15

Page 16

HILLYARD INDUSTRIES - PO Box 909 - St.Joseph, Missouri 64502-0909 U.S.A. - Telephone: 816-233-1321 - www.hillyard.com
 Loading...