

Page 1
TRANSLATED FROM ORIGINAL INSTRUCTIONS DOC. 10075111 - Ver. AA - 10-2017
Single disc machine - Monocepillos - Monobrosses
Use and Maintenance manual
Manual de uso y mantenimiento
Manuel d’utilisation et d’entretien
Page 2

Page 3

ENGLISH ........................................................... 4
ESPAÑOL .......................................................20
FRANÇAIS ...................................................... 36
ENESFR
33
3
Page 4

EN
CONTENTS
ENGLISH
CONTENTS .......................................................................................................................4
SYMBOLS USED IN THE MANUAL ................................................................................5
PURPOSE AND CONTENT OF THE MANUAL ...............................................................5
TARGET GROUP ..............................................................................................................5
STORING THE USE AND MAINTENANCE MANUAL .....................................................5
ON DELIVERY OF THE APPLIANCE ..............................................................................5
INTRODUCTORY COMMENT ..........................................................................................5
IDENTIFICATION DATA ....................................................................................................6
TECHNICAL DESCRIPTION ............................................................................................6
INTENDED USE ................................................................................................................6
SAFETY ............................................................................................................................6
SERIAL NUMBER PLATE ................................................................................................6
TECHNICAL DATA............................................................................................................6
GENERAL SAFETY REGULATIONS ...............................................................................7
SYMBOLS USED ON THE APPLIANCE........................................................................10
GETTING TO KNOW THE APPLIANCE ........................................................................10
HANDLING THE PACKED APPLIANCE ....................................................................10
HOW TO UNPACK THE APPLIANCE .......................................................................10
HOW TO TRANSPORT THE APPLIANCE ................................................................11
MAIN COMPONENTS OF THE APPLIANCE ............................................................11
MAIN COMPONENTS OF THE CONTROL HANDLEBAR........................................11
MAIN COMPONENTS OF THE COLUMN ................................................................12
PREPARATION OF THE APPLIANCE ...........................................................................12
INSERTING THE PAD HOLDER ...............................................................................12
INSERTING THE SOLUTION TANK (OPTIONAL) ....................................................14
INSERTING THE DETERGENT SOLUTION (OPTIONAL) .......................................14
WORK .............................................................................................................................15
AT THE END OF WORK .................................................................................................16
MAINTENANCE ..............................................................................................................16
RECOMMENDED MAINTENANCE OPERATIONS ..................................................16
CHECKING AND CLEANING THE PAD HOLDER ....................................................17
CHECKING AND CLEANING THE SOLUTION TANK (OPTIONAL) .........................18
DISPOSAL ......................................................................................................................18
TROUBLESHOOTING ....................................................................................................19
44
4
Page 5
EN
Warning symbol:
Carefully read the sections marked with this symbol and observe the indications, for the safety of the operator and the
appliance.
Explosion risk symbol:
indicates that the battery may explode in certain conditions, if not handled in accordance with the directives indicated in
the manufacturer's manual.
Covered place symbol:
the operations preceded by this symbol must always be carried out in a dry, covered area.
Warning symbol that the carriage is moving:
Indicates that the packed product should be handled with suitable lifting means that comply with the legal requirements.
Open book symbol with an “i”:
Indicates the need to consult the instruction manual.
The descriptions contained in this document are not binding. The company therefore reserves the right to make any modications at any time
to elements, details, or accessory supply, as considered necessary for reasons of improvement or manufacturing/commercial requirements.
The reproduction, even partial, of the text and drawings contained in this document is prohibited by law.
The company reserves the right to make any technical and/or supply modications. The images are shown as a reference only, and
are not binding as to the actual design and/or equipment.
Open book symbol:
Tells the operator to read the manual before using the appliance.
Protective gloves symbol:
Always wear protective gloves, to avoid the risk of serious injury to your hands.
SYMBOLS USED IN THE MANUAL
PURPOSE AND CONTENT OF THE MANUAL
TARGET GROUP
STORING THE USE AND MAINTENANCE MANUAL
ON DELIVERY OF THE APPLIANCE
INTRODUCTORY COMMENT
The aim of this manual is to provide customers with all the information
needed to use the appliance in the safest, most appropriate and
most autonomous way. It includes information concerning technical
aspects, safety, operation, appliance downtime, maintenance, spare
parts and scrapping. Operators and qualied technicians must read
This manual is aimed at operators and qualied technicians
responsible for appliance maintenance. Operators must not perform
operations that should be carried out by qualied technicians. Cannot
The Use and Maintenance Manual must be stored in its special
pouch close to the appliance, protected from liquids and anything
When the machine is delivered to the customer, an immediate
check must be performed to ensure all the material mentioned in
the shipping documents has been received, in addition to verifying
that the equipment has not been damaged during transportation. If
Any type of equipment can only work properly and effectively if used
correctly and kept in full working order by performing the maintenance
operations described in the attached documentation. You should
therefore read this instruction manual carefully, consulting it again
if difculties should arise while using the machine. If necessary,
the instructions in this manual carefully before carrying out any
operation on the appliance. If in doubt about the correct interpretation
of instructions, contact your nearest Customer Service Centre to
obtain the necessary clarications.
be held liable for damages resulting from failure to comply with this
prohibition.
else that could compromise its legibility.
this is the case, the carrier must ascertain the extent of the damage
at once, informing our customer service ofce. It is only by prompt
action of this type that the missing material can be obtained, and
compensation for damage successfully claimed.
remember that our assistance service (organised in collaboration
with our dealers) is always available for advice or direct intervention.
55
5
Page 6
EN
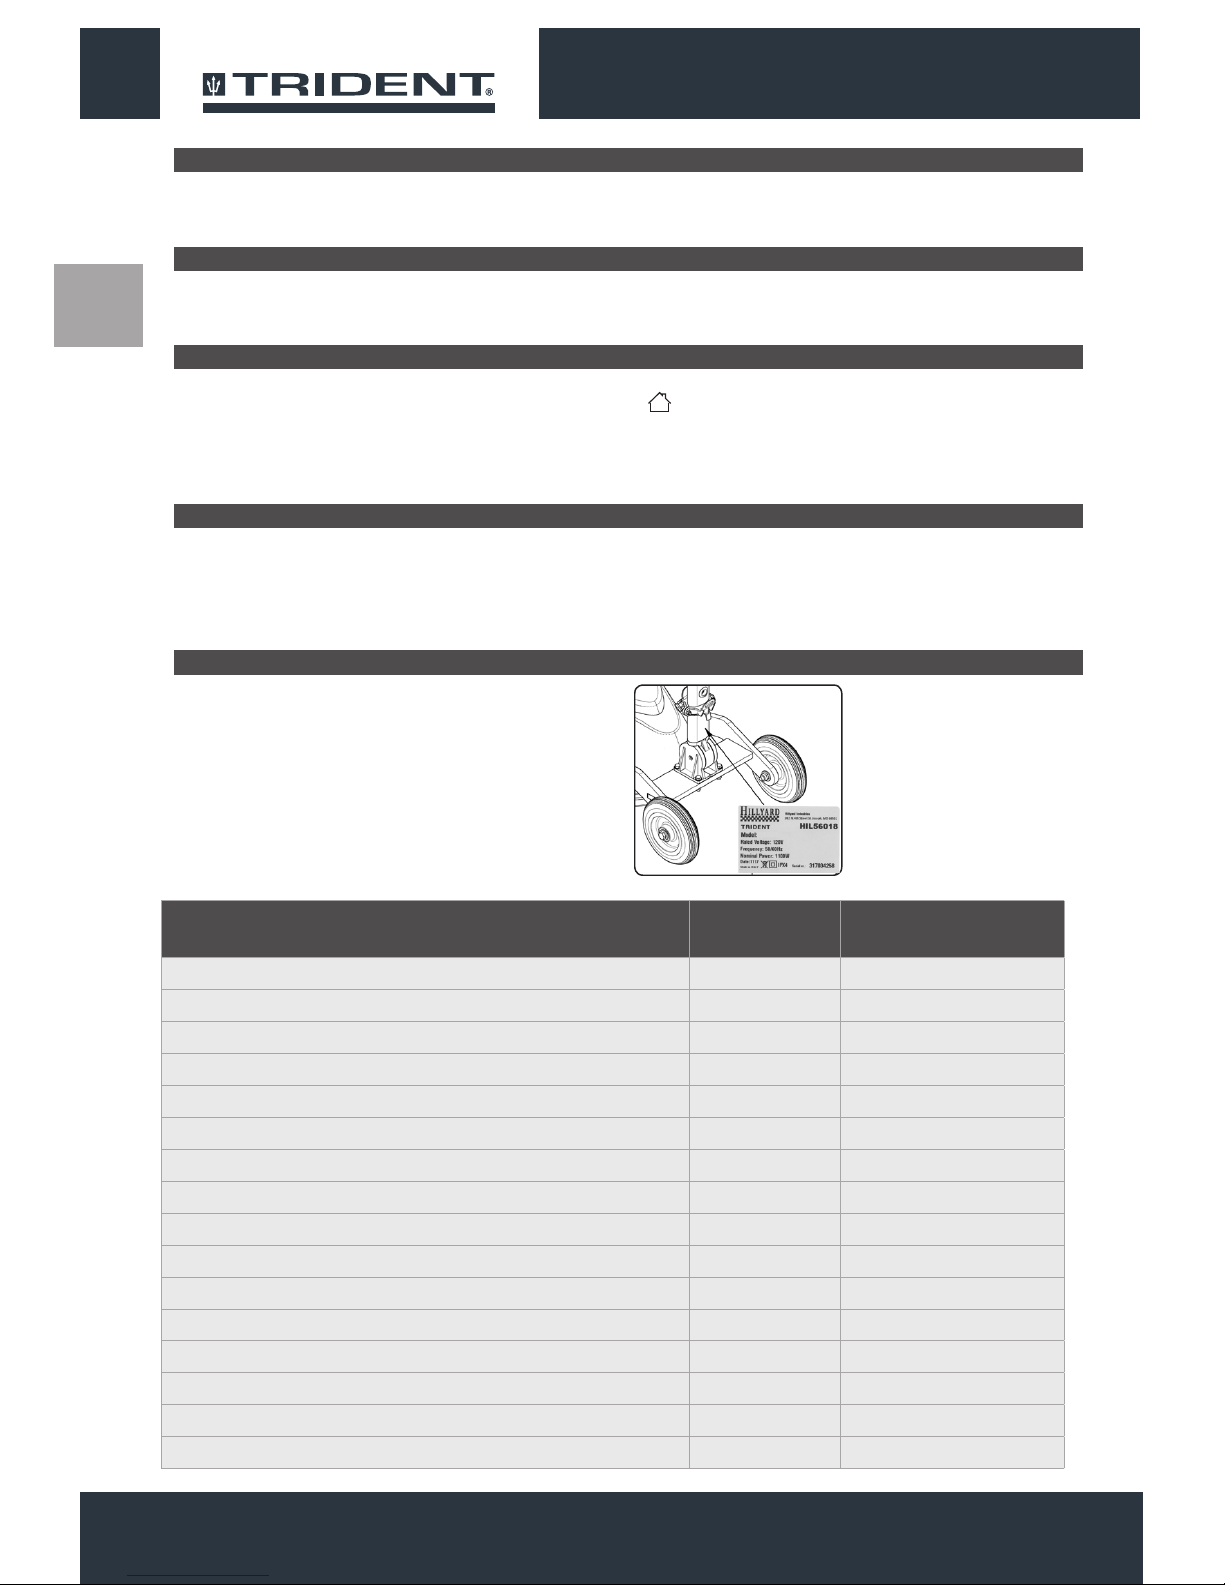
IDENTIFICATION DATA
For technical assistance or to request replacement parts, always give the model, the version and serial number written on the serial number
plate.
TECHNICAL DESCRIPTION
INTENDED USE
SAFETY
SERIAL NUMBER PLATE
This appliance has been built for the professional cleaning of indoor hard vinyl oors, to be carried out by following the instructions. The
appliance must only be used for this purpose.
This appliance was designed and built to be used by a qualied
operator to clean smooth, compact ooring in the commercial,
residential and industrial sectors, in proven safety conditions. The
machine is suitable for carpet oor cleaning if used with proper
accessories. The appliance is only suitable for use in indoor - or at
least covered - areas.
Operator cooperation is paramount for accident prevention. No
accident prevention programme can be effective without the full
co-operation of the operator who is directly responsible for machine
operation. The majority of occupational accidents that happen both
in the workplace or whilst moving are caused by failure to respect
The serial number plate is located at the rear of the handlebar, and
indicates the general characteristics of the appliance, in particular
the appliance's serial number. The serial number is a very important
piece of information and should always be provided together with any
request for assistance or when purchasing spare parts.
ATTENTION: The appliance is not suitable for use in the rain,
or under jets of water.
the most basic safety rules. An attentive, careful operator is most
effective guarantee against accidents and is fundamental in order to
implement any prevention programme.
66
6
TECHNICAL DATA U/M TRIDENT FMD20
ORBITAL
Working width in 20
Pad holder diameter in 20
Engine speed Rot./min. 1400
Number of orbits dragging disc Orb./min. 1400
Brush head motor rated power W 1100
Brush head motor nominal voltage V 120
Brush head motor frequency Hz 50 / 60
Maximum gradient with full load % 2
Solution tank capacity (optional) gal 3,96
Rear wheels (diameter / width) in 7.9 - 1.8
Appliance length in 30,1
height of the appliance to the brush head carter in 12,6
Height of the appliance to the shaft in 48
Appliance width in 21,25
Appliance service weight (without solution tank) Lb 154,3
Length of power supply cable yd 16,4
Page 7

EN
The regulations below must be carefully followed in order to avoid
harm to the operator and damage to the appliance.
WARNING:
• This appliance should not be used by people (including children)
with reduced physical, sensorial and mental capabilities, or by
people without any experience or knowledge, unless they have
been controlled and instructed in the use of the appliance by
people responsible for their safety. Children must be supervised
to ensure they do not play with the appliance.
• Carefully read the labels on the appliance. Do not cover them
for any reason and replace them immediately if they become
damaged.
• The appliance must always be stored and used in a closed
place.
• The appliance must be only used by authorised, trained
personnel.
• Do not use the appliance on surfaces with an inclination greater
than the one shown on the serial number plate.
• Always make sure that the work surfaces, oors and ramps, are
able to withstand the weight of the appliance.
• The appliance is not suitable for cleaning rough or uneven
oors. Do not use the appliance on slopes.
• In the event of danger, quickly remove the power cable plug
from the mains socket.
• For all maintenance interventions, switch off the machine and
disconnect the power cable from the socket.
• To prevent unauthorised use of the machine, the power supply
should be interrupted, switch off the appliance and pull out the
power cable from the socket.
• Children must be supervised to ensure they do not play with the
device.
GENERAL SAFETY REGULATIONS
77
7
Page 8

EN
• When using the appliance, pay attention to other people and especially
to children.
• The appliance must only be powered with a voltage and a frequency
equal to that shown on the serial number plate.
• When left unattended, the appliance must be protected from
unintentional movements.
• Do not approach the machine with clothes that can get entangled,
AVOID the use of scarves, shawls, wraps and loose clothing.
• Avoid working over pieces of rope, wire, cables: these can be caught
in the brush and create friction.
WARNING:
• The appliance must not be used or kept outdoors, in damp conditions
or directly exposed to rain.
• The appliance must be stored in a closed area with a temperature
between -13°F and +131°F.
• Conditions of use: room temperature between 32°F and 104°F, with
relative humidity between 30 and 95%.
• The machine is suitable for carpet oor cleaning if used with proper
accessories.
• Polishing operations should only be carried out in areas where the
passage of unauthorised persons is prohibited. Signal the presence
of work areas with suitable signs.
• The socket for the machine power cable must have a prescribed earth
connection.
• Avoid damaging the machine power cable by crushing or bending it,
or by applying stress.
• Attention: do not let the power cable come into contact with the
rotating brush.
• The appliance does not cause harmful vibrations.
• If the appliance is used in dangerous areas (for example, gas
stations), the relative safety norms should be observed. The appliance
must never be used in environments with a potentially explosive
88
8
Page 9

EN
atmosphere.
• In the event of a re, use a powder extinguisher. Do not use water.
• Avoid using the brushes while the appliance is at a standstill, so as
not to damage the oor.
• Do not knock against shelving or scaffolding, where there is a danger
of falling objects. The operator must always be equipped with the
appropriate safety devices (gloves, shoes, helmet, goggles, etc.).
• If the appliance does not work properly, check this is not caused
by failure to carry out routine maintenance. Otherwise, ask for
intervention of the authorised technical assistance centre.
• If you need to replace any components, request the ORIGINAL spare
parts from an Authorised dealer and/or Retailer.
• Restore all electrical connections after any maintenance interventions.
• Have the appliance checked by an authorised technical assistance
centre every year.
• When disposing of consumable materials, observe the laws and
regulations in force. When, after years of valuable work, your
appliance needs to be nally decommissioned, dispose of the
materials contained in it appropriately, bearing in mind that the
appliance is made of fully recyclable materials.
• If the power supply cable gets damaged, the appliance must be
stopped if it is operating. Disconnect the plug from the power supply,
and have the cable replaced immediately by an authorised service
centre.
• Before using the appliance, check that all the hatches and covers are
positioned as shown in this Use and Maintenance Manual.
• Only use the discs supplied with the device, or those specied in the
Instruction Manual. The use of other discs could compromise safety
levels.
• Before connecting the appliance to the power outlet, check that
the electrical data on the nameplate corresponds to those of the
power supply. The appliance must only be powered by alternating
99
9
Page 10

EN
current and with a voltage equal to that indicated on the
serial number plate.
Appliance's earth symbol:
Indicates the earth connection point of the appliance's electric system.
Maximum gradient symbol:
Indicates the maximum gradient.
SYMBOLS USED ON THE APPLIANCE
GETTING TO KNOW THE APPLIANCE
HANDLING THE PACKED APPLIANCE
HOW TO UNPACK THE APPLIANCE
Since the packaging elements (plastic bags, staples, etc.) are a
potential source of danger, they should not be left within the reach of
children, disabled persons, etc.
The overall weight of the appliance with packaging is 169,7 lb (weight
of empty machine plus packaging).
The dimensions of the package are as follows:
The appliance is contained in specic packaging; to remove the
appliance from the packaging proceed as follows:
1. Place the lower part of the outer packaging in contact with the
oor.
ATTENTION: Indicates that the packed product should be
handled with suitable lifting devices that comply with the legal
requirements
ATTENTION: Use the pictograms printed on the box as
reference.
2. Remove the holding straps.
3. Open the outer packaging.
ATTENTION: You are advised to always wear protective
gloves, to avoid the risk of serious injury to your hands.
4. Remove the optional accessories contained in the packing.
5. Pull the outside box upwards.
6. Remove the machine's holding straps.
7. Using a chute, bring the device down from the pallet, pushing it
backwards.
ATTENTION: During this operation, check there are no
people or objects near the machine.
ATTENTION: Do not mount the pad holder before unloading
the machine, in order to avoid brush head being violently hit.
ATTENTION: To remove the appliance from the box do not
use the control handlebar since it could be damaged.
ATTENTION: it is recommended that all the packaging
components be kept for any future transportation of the
appliance.
1010
10
X%
1
U/M TRIDENT FMD20
ORBITAL
A in 24.7
B in 53.9
C in 32.3
Page 11
EN
HOW TO TRANSPORT THE APPLIANCE
To safely transport the appliance, proceed as follows:
1. Take all necessary steps to ensure that the device is in a safe
condition (see “MACHINE SAFETY”).
2. Using a chute, bring the appliance up onto the pallet, pushing
it backwards.
3. Lay the brush head on top of the pallet.
4. Using the straps, x the appliance to the pallet.
5. Now the appliance can be transported safely.
ATTENTION: You are advised to always wear protective
gloves, to avoid the risk of serious injury to your hands.
ATTENTION: When transporting the appliance on vehicles,
secure it according to the directives in force so that it cannot
slide or tip over.
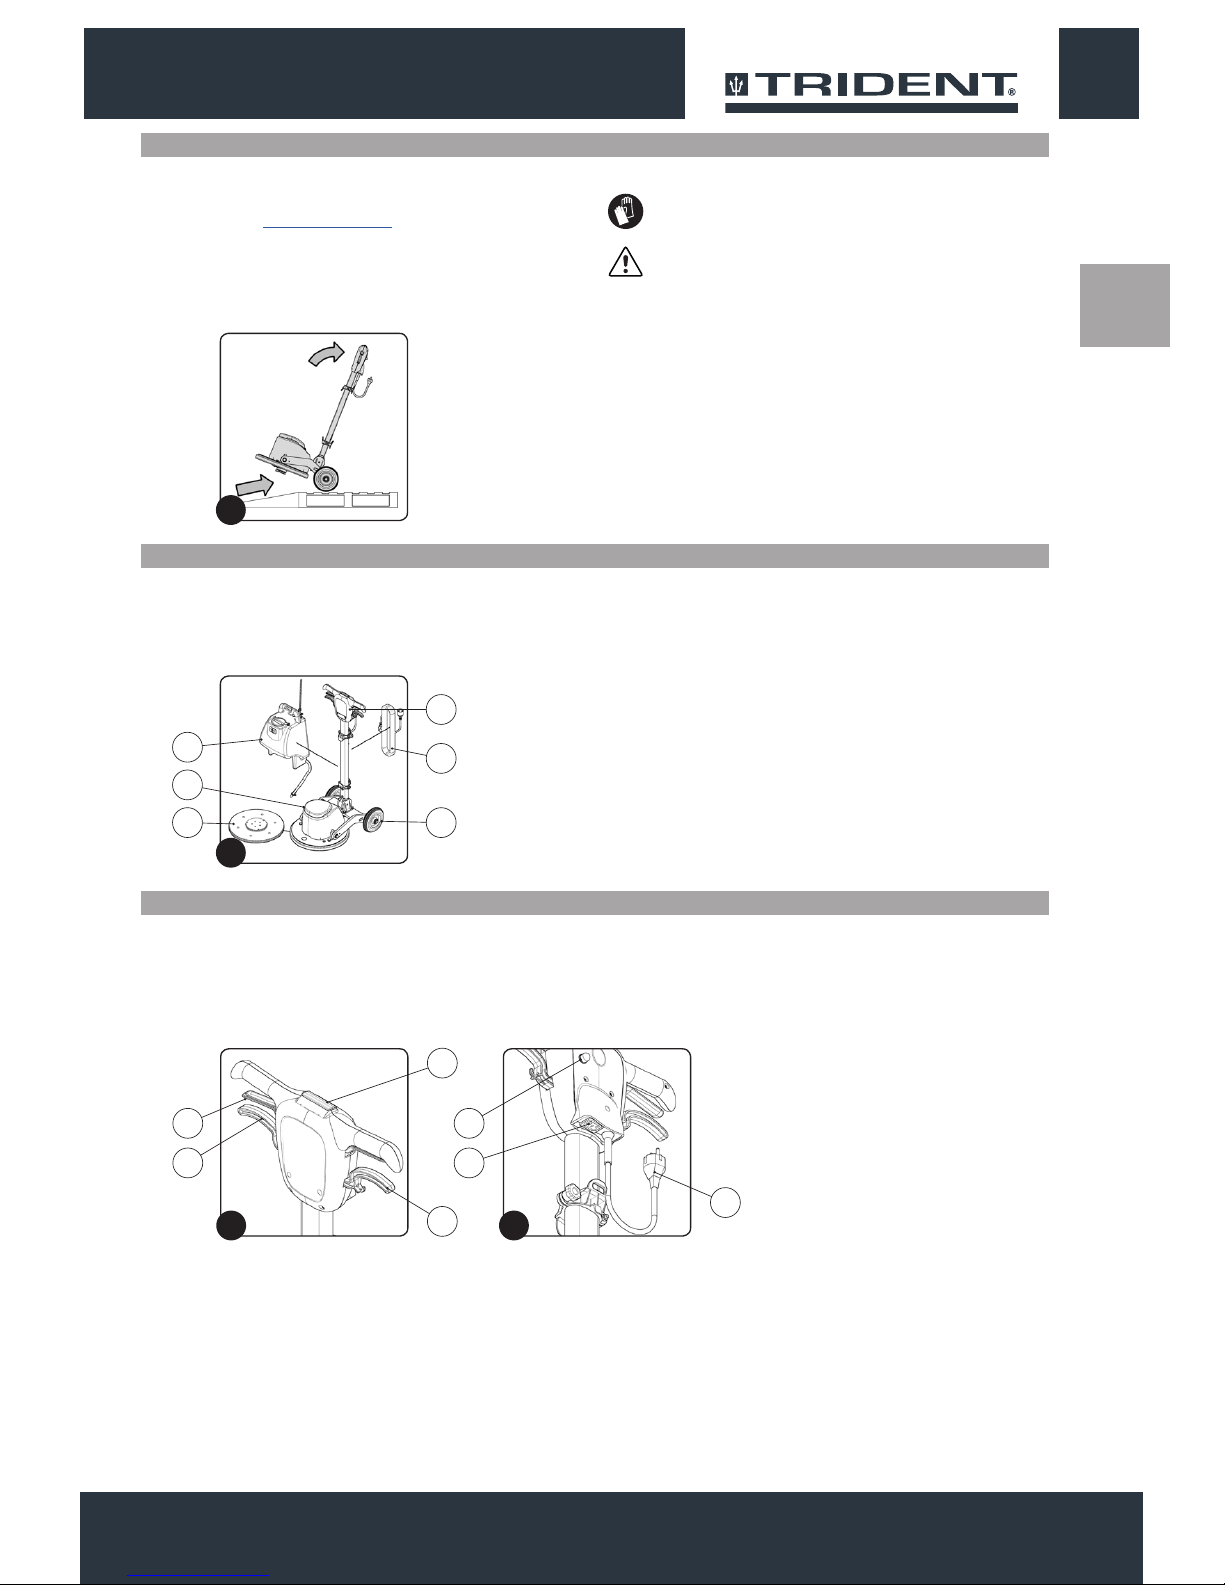
MAIN COMPONENTS OF THE APPLIANCE
MAIN COMPONENTS OF THE CONTROL HANDLEBAR
The basic components of the appliance are as follows:
1. Control handlebar.
2. Frame.
3. Brush head.
The handlebar components are identied as follows:
1. dead man's lever.
2. Control lever main switch (positioned under the grip of the
handlebar).
3. Handlebar tilt adjustment lever.
4. Detergent distribution valve control lever.
5. Brush head motor thermal circuit breaker.
6. Power cable.
7. Socket for electric tool.
4. Brush head carter.
5. Pad holder.
6. Power cable 16,4Yd.
7. Solution tank kit.
1111
11
1
6
3-4
7
25
4
1
6
3 7
2 5
1
1 2
1
Page 12
EN
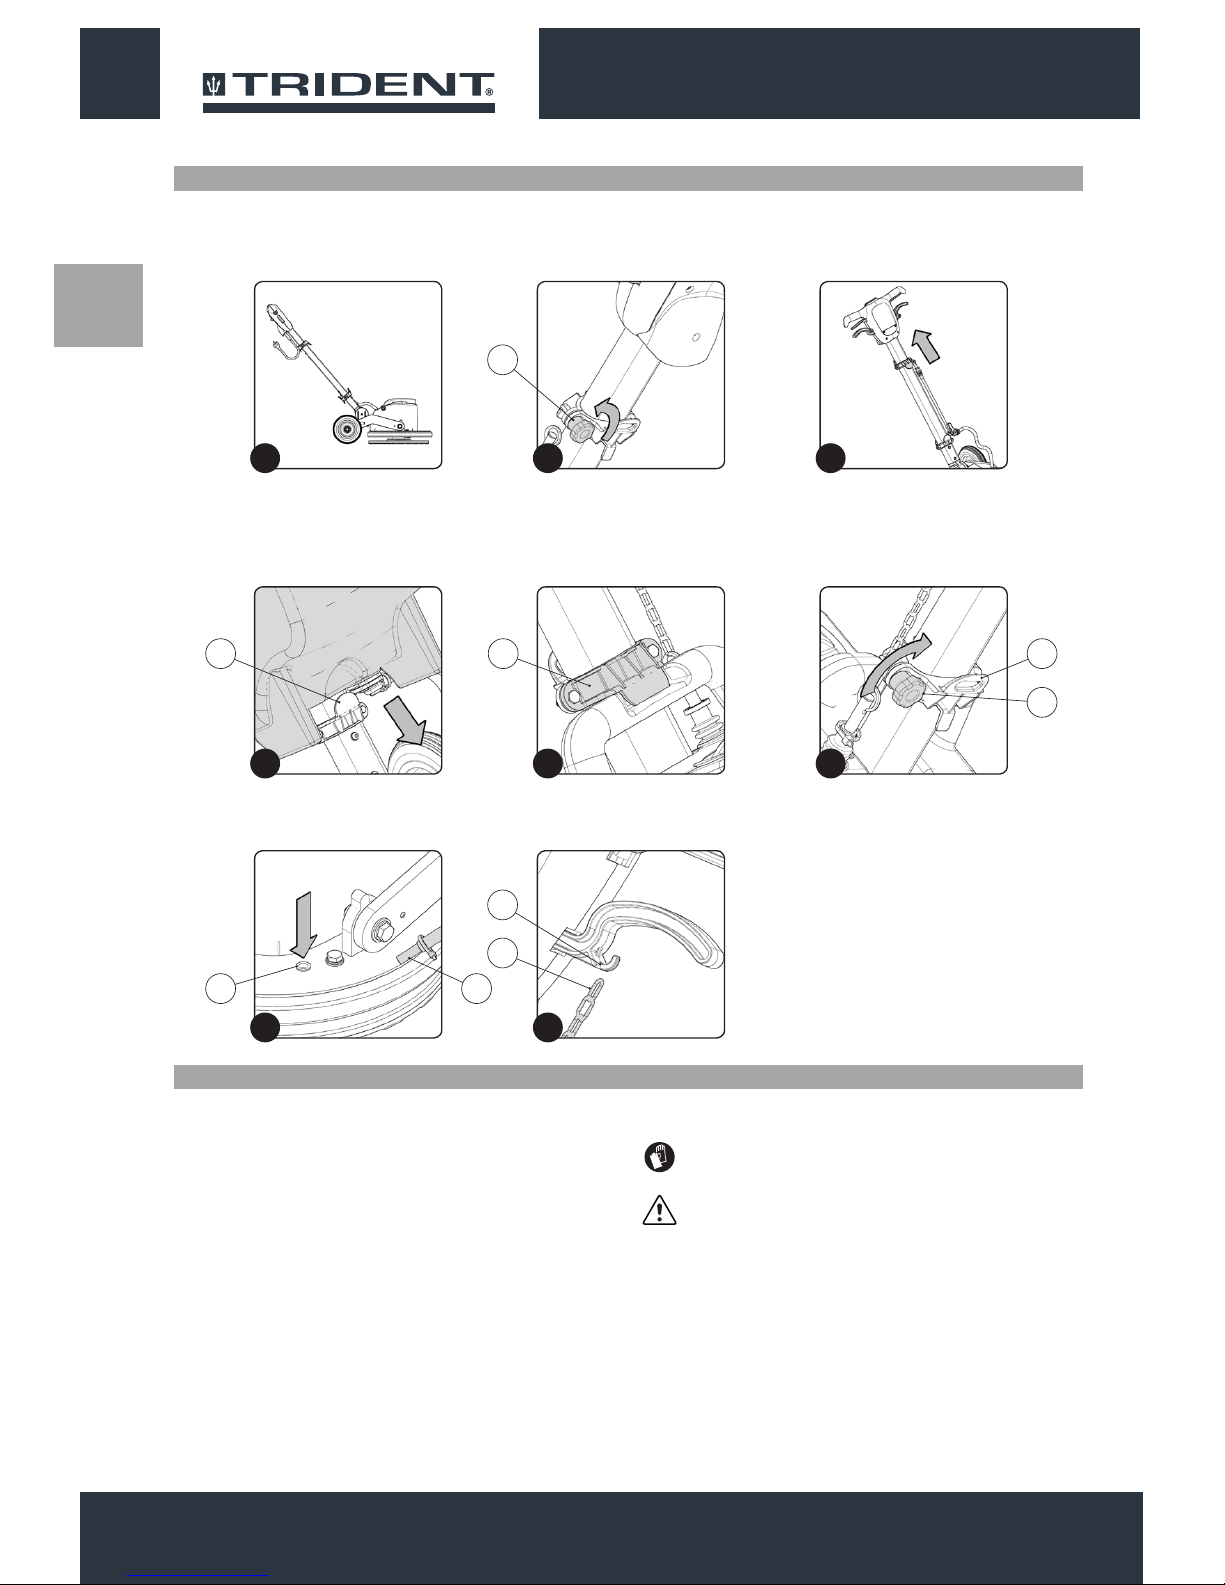
MAIN COMPONENTS OF THE COLUMN
The handlebar components are identied as follows:
1. Upper support optional solution tank kit.
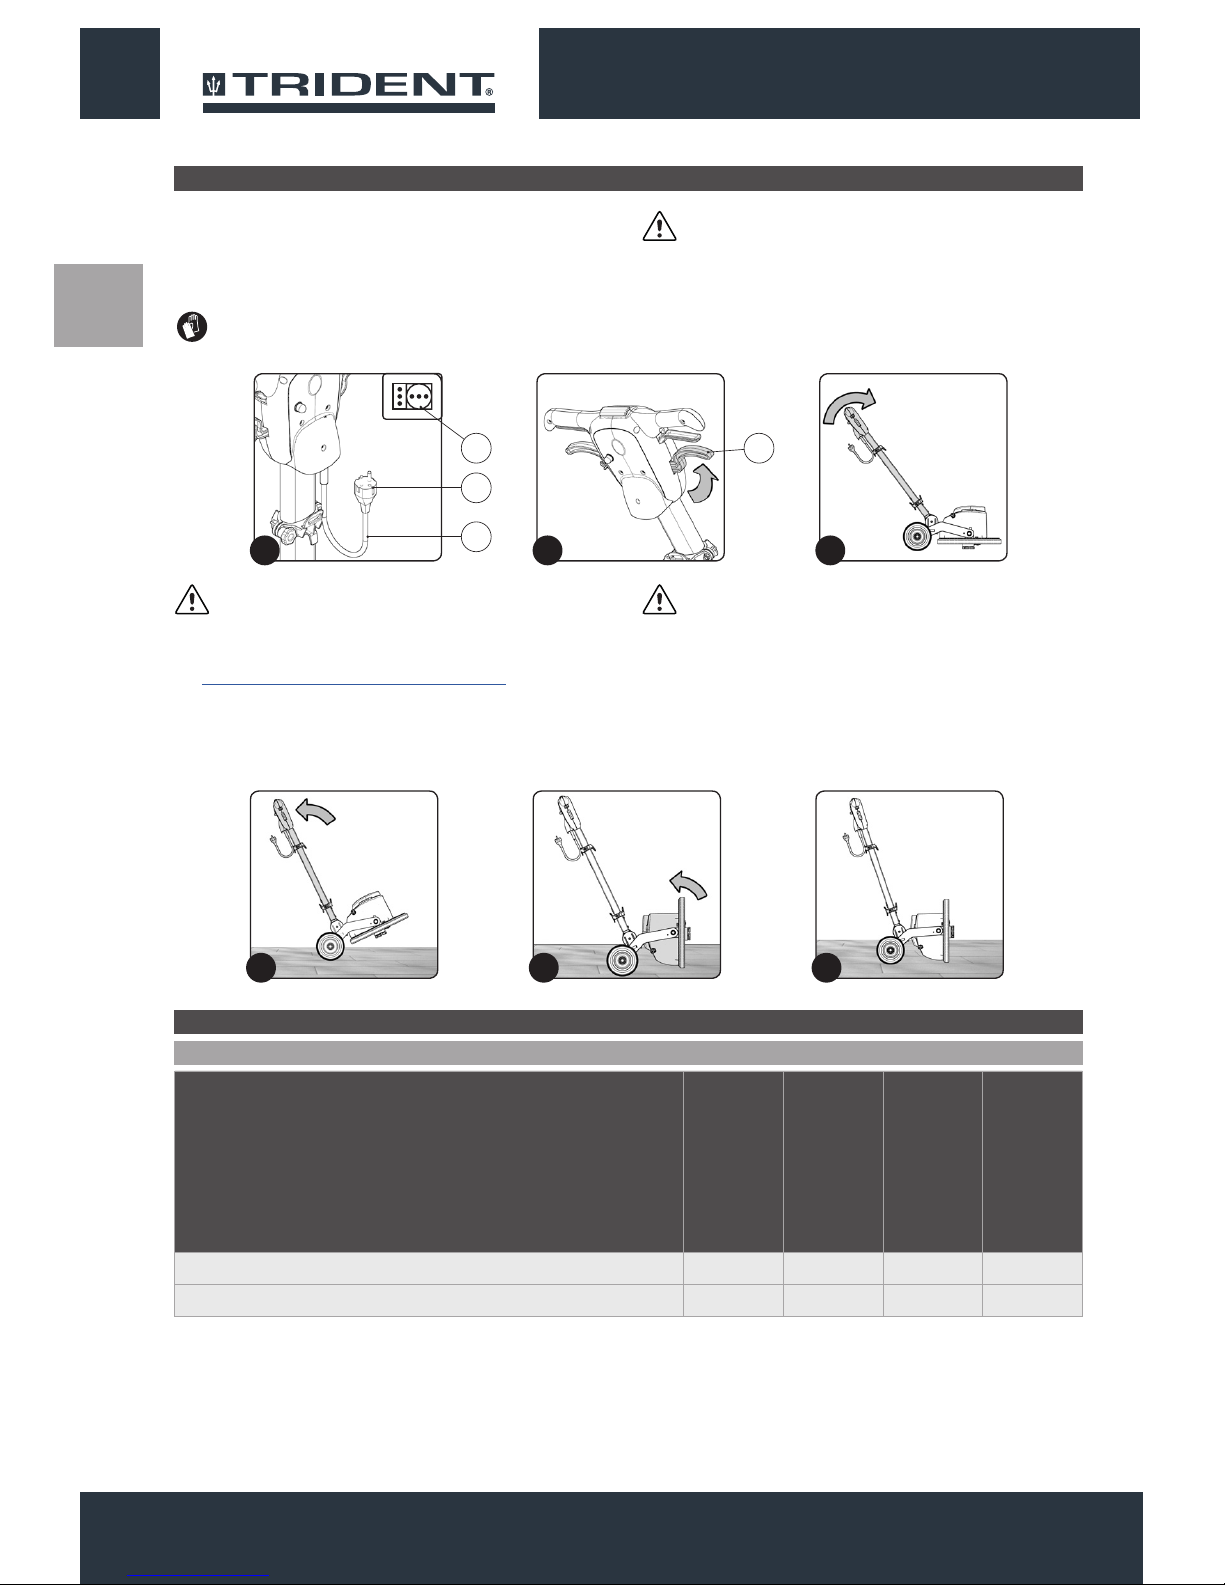
To insert the pad holder into the brush head body of the appliance,
proceed as follows:
1. Check that the plug (1) on the power cable (2) has been taken out
of the socket (3) of the mains supply(Fig.1), and if not, disconnect
it.
ATTENTION: You are advised to always wear protective
gloves, to avoid the risk of serious injury to your hands.
2. Lower support optional solution tank kit.
3. Upper cable tidy.
4. Lower cable tidy.
ATTENTION: To prevent damaging the power cable,
disconnect the plug from the mains socket by directly pulling
the plug and not the cable.
2. Check that the handlebar is in the vertical position, if not, press
the uncoupling lever (4) (Fig.2) and turn the handlebar to the
vertical position (Fig.3). When the handlebar is vertical, release
the uncoupling lever (4).
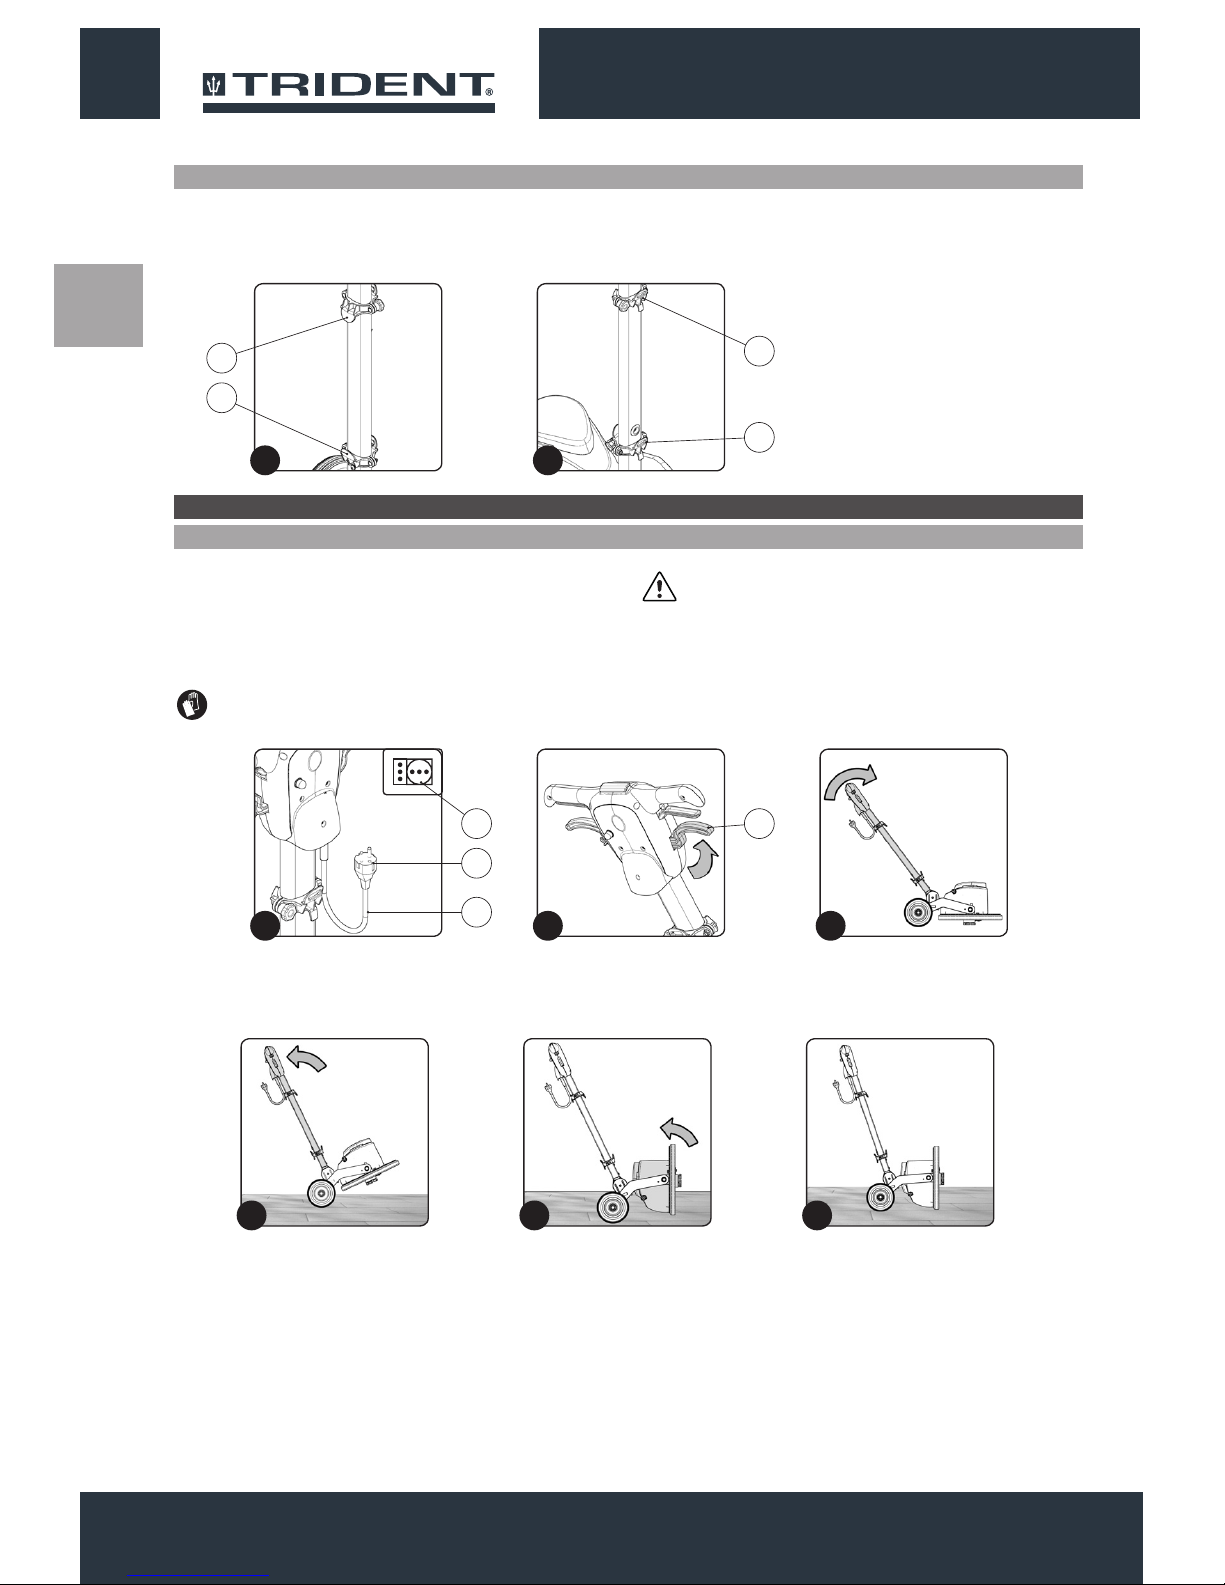
PREPARATION OF THE APPLIANCE
INSERTING THE PAD HOLDER
3. Lightly tip the machine back (Fig.4), block one of the rear wheels
and shift the control column backwards.
4. Turn the brush head into the vertical position (Fig.5).
5. Bring the rotated brush head into contact with the oor (Fig.6).
1212
12
4
3
2
1
2
1
3 4
1
1 2 3
2
4 5 6
Page 13
EN
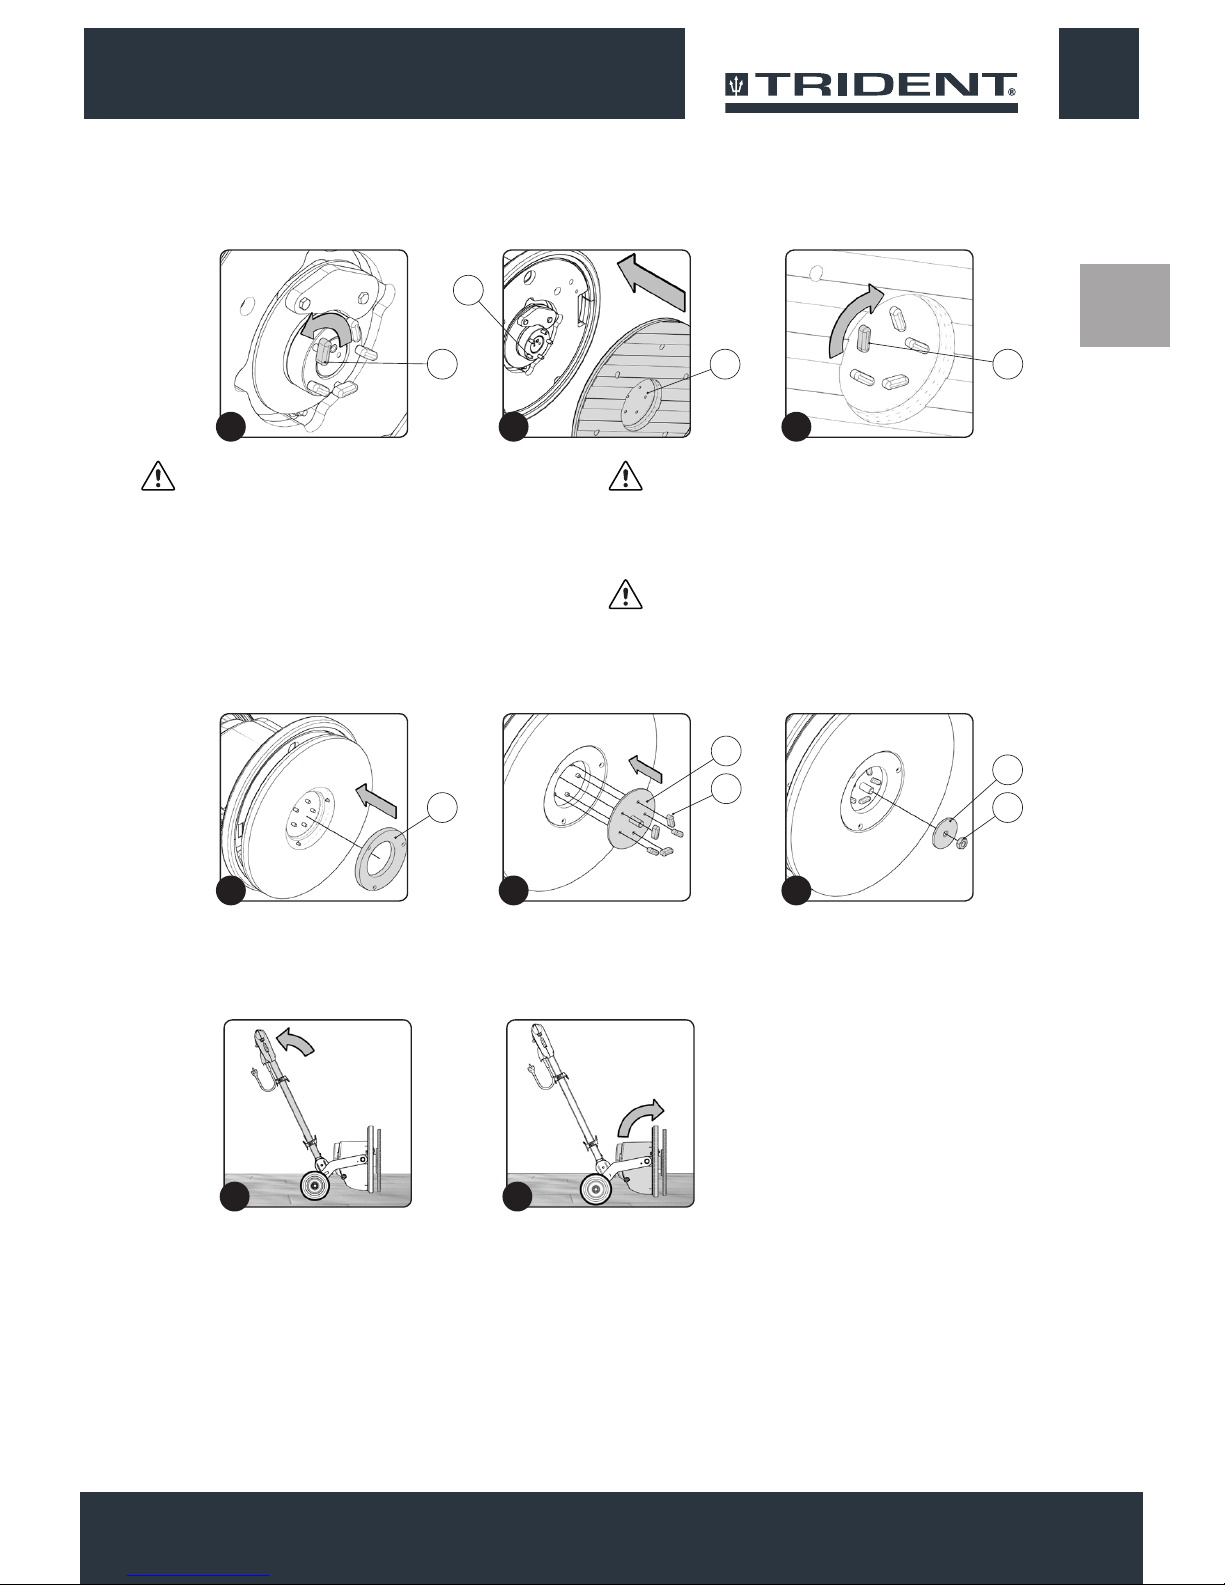
6. Unscrew and remove the tightening keys (5) (Fig.7).
7. Insert the pad holder, being careful to centre the xing pins (6) in
the appliance with the holes (7) in the pad holder (Fig.8).
8. Screw in the tightening keys (5) (Fig.9)
ATTENTION: To tighten the keys correctly use a tightening
clamp.
If the pad holder is used for emery paper, proceed as follows:
• Unscrew and remove the tightening keys (5) (Fig.7).
• Insert the pad holder, being careful to centre the xing pins (6) in
the appliance with the holes (7) in the pad holder (Fig.8).
• Insert the centring ange (8) (Fig.10).
• Insert the threaded grab (9), making sure to centre the xing pins
in the appliance with the holes in the threaded grab (Fig.11).
Screw in the tightening keys (5).
ATTENTION: To tighten the keys correctly use a tightening
clamp.
• Insert the emery paper disc above the pad holder.
• Fix the emery paper to the pad holder using the nut (10)
remembering to also insert the washer (11) (Fig.12).
ATTENTION: To correctly tighten the nut, use a suitable tool.
9. Lightly tip the machine back (Fig.13), block one of the rear
wheels and shift the control column backwards.
10. Turn the brush head into the work position (Fig.13).
1313
13
5
8
8
11
5
10
7 5
6
7
11 1210
8 9
1413
Page 14
EN
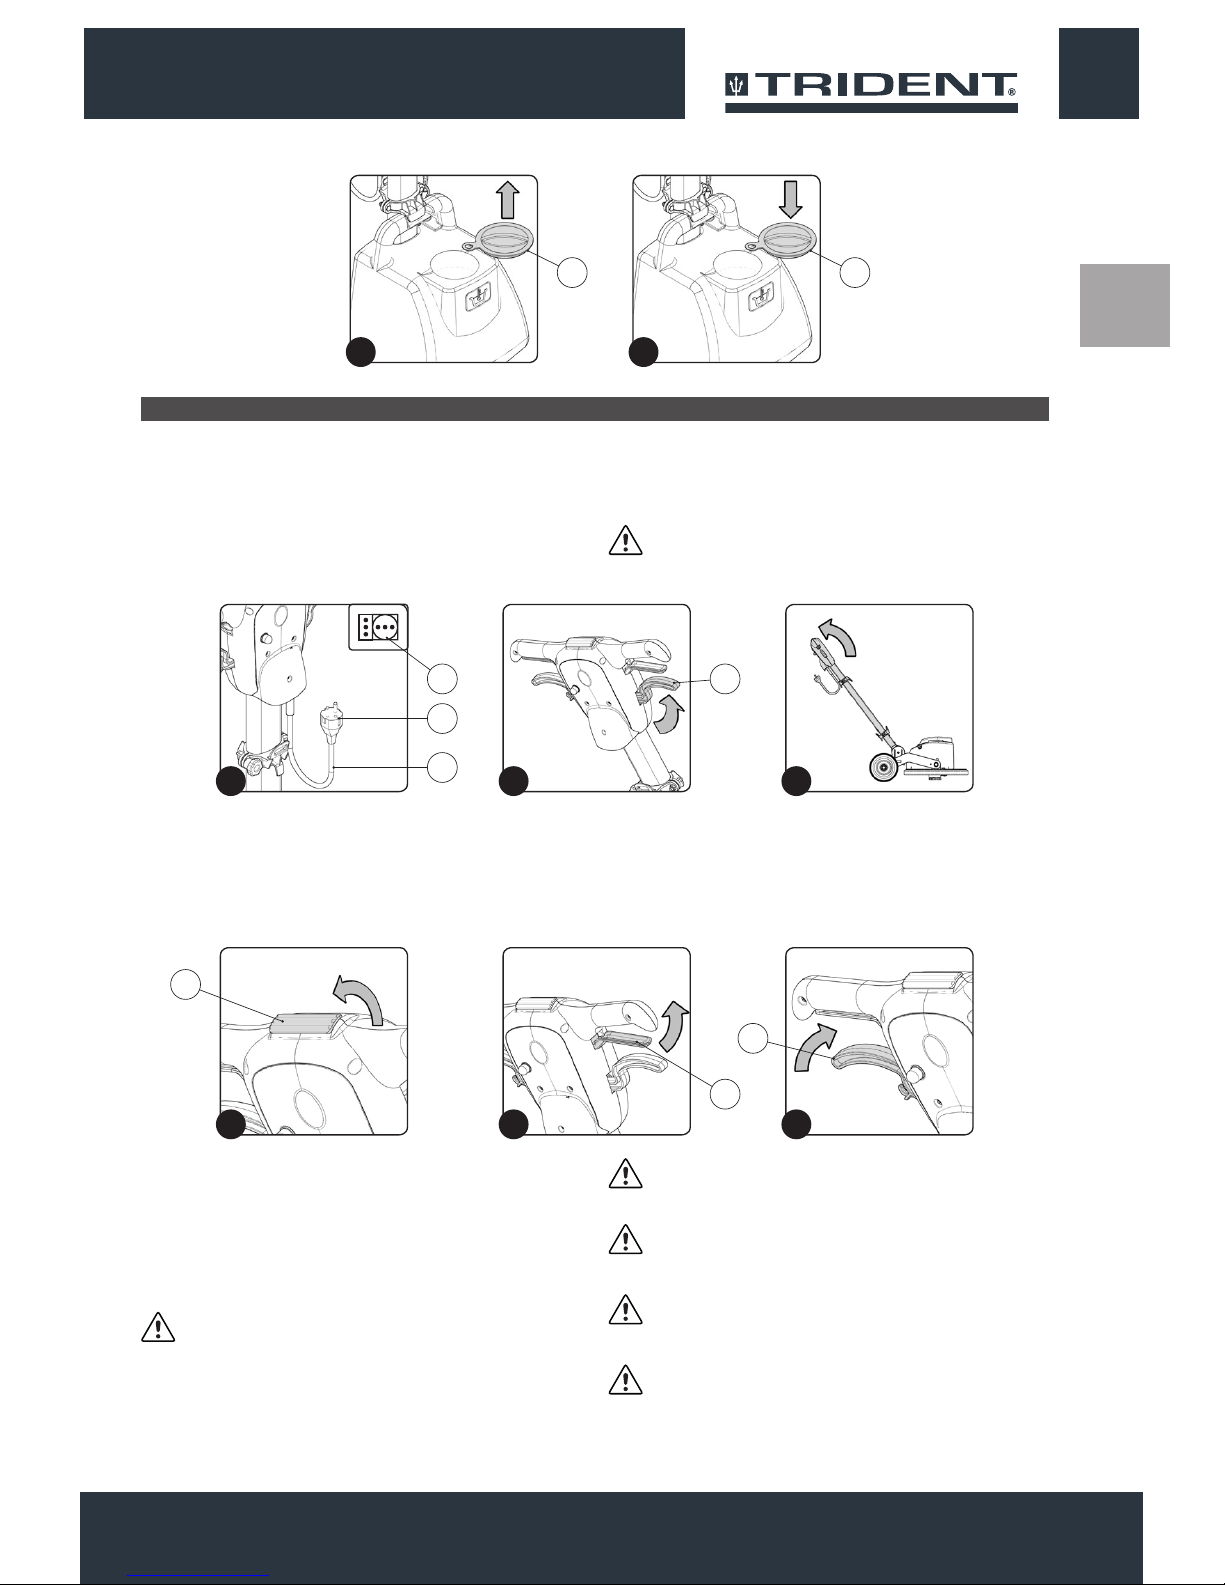
To insert the solution tank onto the handlebars, proceed as follows:
1. Secure the handlebar in a position at about 45° with respect to
the ground (Fig.1).
Fill the solution tank only when the column is in vertical position, by
proceeding as follows:
1. Remove the solution tank cap (1) (Fig.1).
2. Fill with clean water, at a temperature no higher than 50°C.
3. Add the liquid detergent to the tank in the concentration and
manner indicated on the detergent manufacturer's label. The
formation of excess foam could damage the internal components
of the machine, so only use the minimum amount of detergent
needed.
2. Unscrewing the closing knob (1) (Fig.2) position the upper
brackets beyond half of the column (Fig.3) (if it has not already
been positioned).
4. Insert the solution tank cap (1) (Fig.2).
ATTENTION: You are advised to always wear protective
gloves, to avoid the risk of serious injury to your hands.
ATTENTION: We recommend that you vacuum at intervals
the dirt-loaded foam with a vacuum cleaner for liquids.
INSERTING THE SOLUTION TANK (OPTIONAL)
INSERTING THE DETERGENT SOLUTION (OPTIONAL)
3. Put the solution tank on the column, so that the bottom of the tank
is anchored to the xed bracket (2) on the column itself (Fig.4).
4. Holding the tank with one hand, move the mobile bracket (3)
down until the solution tank is locked to the column (Fig.5).
5. Lock the position of the mobile bracket (3) by tightening the
closing knob (1) (Fig.6).
6. Insert the water distribution pipe (4) in the hole on the brush head
(5) (Fig.7).
7. Insert the solution tank tap tie chain (6) in the coupling in the tap
control handle (7) (Fig.8).
1414
14
1
4
7
2
5
8
3
6
1
2
5 4
6
7
3 3
1
Page 15
EN
Before beginning to work, it is necessary to:
1. Before using, the appliance must be in order and safe to use
with the work equipment, especially the power cable and the
extension cable. If everything is not in order, the appliance must
not be used.
2. Insert the plug (1) of the power supply cable (2) in the mains
supply socket (3) (Fig.1).
3. Release the control handlebar from the vertical position. Press
the control column stop lever (4) in the direction indicated by
the arrow (Fig.2) and turn the control column towards yourself
(Fig.3).
ATTENTION: During this operation, do not rest your foot on
the appliance.
WORK
4. Turn the control column towards you until you nd the best
position, this position should be comfortable when using the
appliance.
5. Once the ideal position has been found, release the control
column stop lever (4) to lock the handlebar.
6. Turn the dead man's handle towards you (5) (Fig.4).
7. Press the control levers main switch (6), located under the grips
on the handlebar (Fig.5).
8. The appliance will now start to move.
9. Apply a small amount of detergent solution to the oor by
pressing the lever (7) (Fig.6), until the brush is saturated with
foam (optional solution tank kit).
10. Push the machine with the brush rotating from left to right or vice
versa.
11. Immediately afterwards, push the machine in the same way but
in the opposite direction, so that about one quarter of the working
width overlaps the previous one.
12. We recommend that you vacuum up the dirt-loaded foam at
intervals with the aid of a vacuum cleaner for liquids (optional
solution tank kit).
ATTENTION: The rst time an operator uses the machine, he/
she should become familiar with the movements to be
imparted to the shaft in order to be condent enough with the
directionality of movement of the machine, and should
therefore not operate the machine near people or obstacles.
ATTENTION: Work in slow movements to the right and left,
possibly moving back so that the operator always stands on
an area of the oor yet to be cleaned up.
ATTENTION: Keep the power supply cable behind the
operator, taking care not to operate the machine in its vicinity
in order not to damage it.
ATTENTION: Do not insist too much on the same area so as
to avoid damaging the oor, also in function of the type of
brush or abrasive oor pad chosen.
ATTENTION: If you need to work in tight spaces you can turn
the control column to the vertical position.
1515
15
1 2
1 1
1
2
3
5
4
7
6
1
4
2
5
3
6
Page 16
EN
At the end of the work, and before carrying out any type of
maintenance, perform the following operations:
1. Disconnect the plug (1) of the power supply cable (2) in the mains
supply socket (3) (Fig.1).
ATTENTION: You are advised to always wear protective
gloves, to avoid the risk of serious injury to your hands.
ATTENTION: To prevent damaging the power cable,
disconnect the plug from the mains socket by directly pulling
the plug and not the cable.
2. Turn the handlebar to the vertical position, press the uncoupling
lever (4) (Fig.2) and turn the handlebar to the vertical position
(Fig.3). When the handlebar is vertical, release the uncoupling
lever (4).
AT THE END OF WORK
ATTENTION: During this operation, do not rest your foot on
the appliance.
3. Tip back the machine and take the appliance to the place where it
is maintained and carry out all the procedures listed in the section
“RECOMMENDED PERIODIC MAINTENANCE” indicated in the
column “AT THE END OF THE WORK”.
4. Once the maintenance work is nished take the appliance to the
designated machine storage place.
ATTENTION: Park the machine in an enclosed place, on a at
surface; near the machine there must be no objects that could
either damage it, or be damaged through contact with it.
5. Lightly tip the machine back (Fig.4), block one of the rear wheels
and shift the control column backwards.
6. Turn the brush head into the vertical position (Fig.5).
7. Bring the rotated brush head into contact with the oor (Fig.6).
RECOMMENDED MAINTENANCE OPERATIONS
MAINTENANCE
1616
16
1
2
3 4
1 2 3
4 5 6
TYPE OF MAINTENANCE
AT THE END OF
WORK
WEEKLY
BEFORE A LONG
PERIOD WHEN
IT WILL NOT BE
USED
TRANSPORTING
Checking and cleaning the pad holder X X X
Checking and cleaning the solution tank (optional) X X X
Page 17

EN
Careful cleaning of the pad holder guarantees better cleaning of the
oor as well as a longer brush motor life. To clean the pad holder,
proceed as follows:
1. Take the appliance to the dedicated dirty water drainage area.
ATTENTION: The place this operation is carried out should
comply with current environmental protection regulations.
2. Check that the plug (1) on the power cable (2) has been taken out
of the socket (3) of the mains supply(Fig.1), and if not, disconnect
it.
ATTENTION: You are advised to always wear protective
gloves, to avoid the risk of serious injury to your hands.
ATTENTION: To prevent damaging the power cable,
disconnect the plug from the mains socket by directly pulling
the plug and not the cable.
3. Check that the handlebar is in the vertical position, if not, press
the uncoupling lever (4) (Fig.2) and turn the handlebar to the
vertical position (Fig.3). When the handlebar is vertical, release
the uncoupling lever (4).
CHECKING AND CLEANING THE PAD HOLDER
4. Lightly tip the machine back (Fig.4), block one of the rear wheels
and shift the control column backwards.
5. Turn the brush head into the vertical position (Fig.5).
6. Bring the rotated brush head into contact with the oor (Fig.6).
7. Unscrew and remove the tightening keys (5) (Fig.7).
8. Remove the pad holder, remove the impurities in it.
9. Repeat the operations in reverse order to reassemble all the
parts.
ATTENTION: To tighten the keys correctly use a tightening
clamp.
1717
17
1
2
3 4
1 2 3
5
7
4 5 6
Page 18

EN
Carefully cleaning the solution tank ensures the oor is cleaned
properly. Proceed as follows to clean the solution tank:
1. Take the appliance to the dedicated dirty water drainage area.
ATTENTION: The place this operation is carried out should
comply with current environmental protection regulations.
2. Check that the plug (1) on the power cable (2) has been taken out
of the socket (3) of the mains supply(Fig.1), and if not, disconnect
it.
ATTENTION: You are advised to always wear protective
gloves, to avoid the risk of serious injury to your hands.
ATTENTION: To prevent damaging the power cable,
disconnect the plug from the mains socket by directly pulling
the plug and not the cable.
3. Fix the handlebar in a position of about 45° to the ground, press
the uncoupling lever (4) (Fig.2) and turn the handlebar into
position (Fig.3). When the handlebar is in position, release the
uncoupling lever (4).
CHECKING AND CLEANING THE SOLUTION TANK (OPTIONAL)
4. Uncouple the solution tank tap tie chain (5) in the coupling in the
tap control handle (6) (Fig.4).
5. Remove the water distribution pipe (7) in the hole on the brush
head (8) (Fig.5).
6. Loosen the closing knob (9) (Fig.6) and position the top brackets
more than halfway up the column.
7. Remove the solution tank from the control column.
8. Remove the solution tank cap (10) (Fig.7).
9. Rinse the inside with a jet of water, if necessary use a spatula
to remove the sludge that has accumulated at the bottom of the
tank.
10. Repeat the operations in reverse order to reassemble all the
parts.
TROUBLESHOOTING
This chapter lists the most common problems linked with the use of the appliance. If you are unable to resolve the problems with
the information given here, please contact your nearest assistance centre.
DISPOSAL
To dispose of the appliance, take it to a demolition centre or an authorised
collection centre.
Before scrapping the appliance, it is necessary to remove and separate out
the following materials, then send them to the appropriate collection centres in
accordance with applicable environmental hygiene regulations:
• Pad holders or brushes
• Electric and electronic parts*
• Plastic parts
• Metallic parts
(*) In particular, contact your distributor when scrapping electric and electronic
parts.
1818
18
1
2
3 4
1 2 3
4
5
6
10
7
5
8
6
7
9
Page 19

EN
TROUBLESHOOTING
1919
19
PROBLEM POSSIBLE CAUSE SOLUTION
THE APPLIANCE DOES NOT SWITCH ON
The power cable extension is not connected
to the mains socket.
Check that the plug on the extension cable
has been inserted into the mains supply
socket.
The power cable extension is not connected
to the appliance's power cable.
Check that the plug on the cable of the
appliance has been inserted into the socket
on the extension cable.
The electrical specications of the appliance
should correspond to the electrical
specications of the power supply network.
Make sure that the electrical specications
of the appliance correspond to the electrical
specications of the power supply network,
check the technical information on the serial
number plate.
Extension cable damaged.
Check the extension cable is not damaged,
and if it is, replace it.
Overheating of the brush head motor.
Make sure that the thermal breaker on the
back of the handlebar has not tripped. If it
has, wait a few minutes until it has cooled
down, then press the specic circuit breaker
button to reactivate the power supply and
motor operation
INSUFFICIENT DETERGENT SOLUTION
ON THE PAD HOLDER
The amount of detergent in the solution tank
is insufcient for the work that needs doing.
Make sure that the amount of detergent
solution in the solution tank is sufcient for
the work to be carried out, and if necessary
ll the solution tank.
POS. COMPONENT
1 CONTACT BREAKER 16A
2 SWITCH 20A
3 START RELAY
4 START CONDENSER
5 WORK CONDENSER
6 MOTOR 1100W 100/115V 50/60HZ
8 PLUG
BK BLACK
BU BLUE
BN BROWN
RD RED
WH WHITE
GNYE YELLOW/GREEN
ELECTRICAL DIAGRAM
Page 20

ES
ÍNDICE
ESPAÑOL
ÍNDICE ............................................................................................................................20
SIMBOLOGÍA UTILIZADA EN EL MANUAL ..................................................................21
OBJETIVO Y CONTENIDO DEL MANUAL ....................................................................21
DESTINATARIOS ............................................................................................................21
CONSERVACIÓN DEL MANUAL DE USO Y MANTENIMIENTO .................................21
RECEPCIÓN DE LA MÁQUINA .....................................................................................21
ADVERTENCIA PREVIA.................................................................................................21
DATOS DE IDENTIFICACIÓN ........................................................................................22
DESCRIPCIÓN TÉCNICA ...............................................................................................22
USO INDICADO - USO PREVISTO ................................................................................22
SEGURIDAD ...................................................................................................................22
PLACA DE LA MATRÍCULA ...........................................................................................22
DATOS TÉCNICOS .........................................................................................................22
NORMAS GENERALES DE SEGURIDAD .....................................................................23
SIMBOLOGÍA UTILIZADA EN LA MÁQUINA ................................................................26
CONOCIMIENTO DE LA MÁQUINA...............................................................................26
DESPLAZAMIENTO DE LA MÁQUINA EMBALADA .................................................26
DESEMBALAJE DE LA MÁQUINA ............................................................................26
TRANSPORTE DE LA MÁQUINA..............................................................................27
COMPONENTES PRINCIPALES DE LA MÁQUINA .................................................27
COMPONENTES PRINCIPALES DEL MANILLAR DE MANDO ...............................27
COMPONENTES PRINCIPALES DE LA COLUMNA ................................................28
PREPARACIÓN DE LA MÁQUINA.................................................................................28
MONTAJE DEL DISCO DE ARRASTRE ...................................................................28
MONTAJE DEL TANQUE DE SOLUCIÓN (OPCIONAL) ...........................................30
LLENADO DE SOLUCIÓN DETERGENTE (OPCIONAL) .........................................31
USO .................................................................................................................................31
AL FINALIZAR EL TRABAJO ........................................................................................32
MANTENIMIENTO ..........................................................................................................32
INTERVENCIONES DE MANTENIMIENTO ACONSEJADO ....................................33
CONTROL Y LIMPIEZA DEL DISCO DE ARRASTRE ..............................................33
CONTROL Y LIMPIEZA DEL TANQUE DE SOLUCIÓN (OPCIONAL) .....................34
DESGUACE ....................................................................................................................34
RESOLUCIÓN DE AVERÍAS ..........................................................................................35
2020
20
Page 21

ES
Símbolo de advertencia:
Leer atentamente las secciones precedidas por este símbolo respetando estrictamente lo que indican, para la seguridad
del operador y de la máquina.
Símbolo de peligro de explosión:
Indica que la batería, si no es tratada según las directivas indicadas en el manual de fabricante, puede explotar en
determinadas condiciones.
Símbolo de lugar cubierto:
Los procedimientos precedidos del siguiente símbolo deben ser realizados rigurosamente en un lugar cubierto y seco.
Símbolo de advertencia carros en movimiento:
Indica desplazamiento del producto embalado con carros de transporte adecuados conformes con las disposiciones
legales.
Símbolo del libro abierto con la i:
Indica que se deben consultar las instrucciones de uso.
Las descripciones contenidas en esta publicación no se consideran vinculantes. Por tanto, la empresa se reserva el derecho de aportar en
cualquier momento las eventuales modicaciones en órganos, detalles, suministros de accesorios, que considere conveniente para una
mejora o debido a cualquier exigencia de carácter constructivo o comercial. La reproducción, incluso parcial, de los textos y de los diseños
contenidos en esta publicación está prohibida por la ley.
La empresa se reserva el derecho de aportar modicaciones de carácter técnico y/o de equipamiento. Las imágenes deben
considerarse una simple referencia y no son vinculantes en términos de diseño y equipamiento.
Símbolo de libro abierto:
Indica al operador que debe leer el manual de uso antes de utilizar la máquina.
Símbolo guantes de protección:
Indica al operador que siempre debe llevar guantes de protección para evitar lesiones graves en las manos.
SIMBOLOGÍA UTILIZADA EN EL MANUAL
OBJETIVO Y CONTENIDO DEL MANUAL
DESTINATARIOS
CONSERVACIÓN DEL MANUAL DE USO Y MANTENIMIENTO
RECEPCIÓN DE LA MÁQUINA
ADVERTENCIA PREVIA
Este manual tiene el objetivo de suministrar al cliente toda la
información necesaria para utilizar la máquina de la manera
más adecuada, autónoma y segura posible. El mismo contiene
información acerca de los aspectos técnicos, la seguridad, el
funcionamiento, el período de inactividad de la máquina, el
mantenimiento, las piezas de repuesto y el desguace. Antes de
Este manual está dirigido tanto al operador como a los técnicos
cualicados encargados del mantenimiento de la máquina. Los
operadores no deben realizar las operaciones reservadas a los
El Manual de Uso y Mantenimiento debe conservarse en un lugar
cercano a la máquina, dentro del sobre correspondiente, protegido
En el momento de la recepción de la máquina, es indispensable
asegurarse inmediatamente de haber recibido todo el material
indicado en los documentos de expedición y, además, de que
la máquina no haya sufrido daños durante el transporte. En la
Todas las máquinas pueden funcionar bien y trabajar
provechosamente tan solo con usarlas correctamente y manteniendo
su plena eciencia, que se obtiene siguiendo el mantenimiento
descrito en la documentación anexa. Por lo tanto solicitamos que
se lea cuidadosamente este manual de instrucciones y volver a
efectuar cualquier operación en la máquina, los operadores y los
técnicos cualicados deben leer atentamente las instrucciones
contenidas en el presente manual. En caso de dudas sobre la
interpretación correcta de las instrucciones, solicitar al centro de
asistencia más cercano las aclaraciones necesarias.
técnicos cualicados.No responderá por daños derivados de la
inobservancia de esta prohibición.
de líquidos y todo lo que puede afectar su legibilidad.
armativa, hágase constatar por el transportista el daño sufrido,
avisando al mismo tiempo nuestro departamento de asistencia
clientes. Sólo actuando tempestivamente será posible obtener el
material que falta y la indemnización del daño.
leerlo cada vez que durante el empleo de la máquina ocurriesen
dicultades. En caso de necesidad, recordamos que nuestro servicio
de asistencia, que está organizado en colaboración con nuestros
concesionarios, queda siempre a disposición para eventuales
consejos o intervenciones directas.
2121
21
Page 22

ES
DATOS DE IDENTIFICACIÓN
Para la asistencia técnica o para solicitar partes de recambio, citar siempre el modelo, la versión y el número de matrícula que se encuentra
en la correspondiente placa de matrícula.
DESCRIPCIÓN TÉCNICA
USO INDICADO - USO PREVISTO
SEGURIDAD
PLACA DE LA MATRÍCULA
Esta máquina ha sido construida para la limpieza profesional de pavimentos duros y vinílicos para supercies internas, que debe realizarse
siguiendo las instrucciones. La máquina debe usarse sólo para esta nalidad.
Esta máquina se ha diseñado y fabricado para la limpieza de
pavimentos lisos y compactos, en locales comerciales, civiles e
industriales, en condiciones de seguridad vericada, por parte de
un operador cualicado. La máquina se adecúa a la limpieza de
moquetas o suelos textiles, si se utiliza con accesorios especícos.
Para evitar accidentes, la colaboración del operador es esencial.
Ningún programa de prevención de accidentes puede ser ecaz sin
la colaboración total de la persona directamente responsable del
funcionamiento de la máquina. La mayor parte de los accidentes que
ocurren en una empresa, en el trabajo o en los traslados, se deben
La placa matrícula se encuentra en la parte trasera del manillar
de mando y contiene las características generales de la máquina,
especialmente su número de serie. El número de serie es una
información muy importante que se debe comunicar en cualquier
pedido de asistencia o compra de repuestos.
La máquina es apta para ser usada exclusivamente en ambientes
cerrados o cubiertos.
¡ATENCIÓN! La máquina no es apta para usar bajo la lluvia o
chorros de agua.
al incumplimiento de las reglas de prudencia más elementales.
Un operador atento y prudente es la mejor garantía contra los
accidentes y resulta indispensable para completar cualquier
programa de prevención.
2222
22
DATOS TÉCNICOS U/M TRIDENT FMD20
ORBITAL
Anchura de trabajo in 20
Diámetro del disco de arrastre in 20
Velocidad del motor Rot/min. 1400
Número de órbitas que arrastran el disco Orb./min. 1400
Potencia nominal del motor de bancada W 1100
Tensión nominal del motor de bancada V 120
Frecuencia del motor de bancada Hz 50 / 60
Declive superable con plena carga % 2
Capacidad tanque de solución (opcional) gal 3,96
Ruedas traseras (diámetro / anchura) in 7.9 - 1.8
Longitud de la máquina in 30,1
Altura de la máquina al cárter de la bancada in 12,6
Altura de la máquina al timón in 48
Ancho de la máquina in 21,25
Peso de la máquina en orden de marcha (sin tanque de solución) Lb 154,3
Longitud del cable de suministro de energía yd 16,4
Page 23

ES
Las normas abajo indicadas deben cumplirse estrictamente para
evitar daños al operador y a la máquina.
ADVERTENCIA:
• Esta máquina no debe ser utilizada por personas (niños
incluidos) con capacidades psíquicas, sensoriales o mentales
reducidas, o por personas sin experiencia y conocimientos,
excepto que no estén supervisados o capacitados para el uso
de la máquina por personas responsables de su seguridad. Los
niños deben ser vigilados para asegurarse de que no jueguen
con la máquina.
• Leer cuidadosamente las etiquetas presentes en la máquina,
no ocultarlas por ningún motivo y sustituirlas inmediatamente
en caso de que se dañen.
• La máquina debe usarse y colocarse en un lugar cerrado
exclusivamente.
• La máquina debe ser utilizada exclusivamente por personal
autorizado y capacitado para el uso.
• No emplear la máquina en supercies con inclinación superior
a la indicada en la placa matrícula.
• Asegurarse siempre de que los planos de trabajo, plataformas
y rampas, puedan soportar el peso de la máquina.
• La máquina no es apta para la limpieza de pavimentos irregulares
o con desniveles. No utilizar la máquina en pendientes.
• En caso de peligro, desconectar de inmediato la clavija presente
en el cable de alimentación de la toma de red.
• Para cada intervención de mantenimiento, apagar la máquina
y desconectar el cable de alimentación de la toma de corriente.
• Para evitar un empleo no permitido de la máquina, cortar la
alimentación, apagar la máquina y desconectar el cable de
alimentación de la toma de corriente.
• Los niños deben mantenerse bajo el cuidado de un adulto para
asegurarse de que no jueguen con la máquina.
NORMAS GENERALES DE SEGURIDAD
2323
23
Page 24

ES
• Durante el funcionamiento de la máquina, prestar atención a
las demás personas y especialmente a los niños.
• Se debe alimentar la máquina exclusivamente con una tensión
y una frecuencia iguales a las que guran en la placa matrícula.
• Si se deja la máquina sin custodia, debe estar protegida de
movimientos no intencionales.
• No acercarse a la máquina con indumentaria que pueda
engancharse, EVITAR el uso de bufandas, chalinas, pañuelos
y prendas amplias.
• Evitar trabajar sobre pedazos de cuerda, cables de hierro o
cables en general; estos podrían quedar atrapados en el cepillo
y generar fricción.
ATENCIÓN:
• La máquina no se debe usar ni dejar a la intemperie en caso de
humedad, ni exponerla directamente a la lluvia.
• La temperatura de almacenamiento debe estar comprendida
entre los -13 °F y los +131 °F y debe almacenarse sólo en
ambientes cerrados.
• Condiciones de uso: temperatura ambiente comprendida entre
32°F y 104°F con humedad relativa entre 30 y 95%.
• La máquina se adecúa a la limpieza de moquetas o suelos
textiles, si se utiliza con accesorios especícos.
• Las operaciones de pulido deben realizarse en zonas prohibidas
al paso de personal no encargado. Indicar las zonas de trabajo
con los correspondientes carteles señalizadores.
• La toma para el cable de alimentación de la máquina debe
tener la conexión a tierra reglamentaria.
• Evitar aplastar, plegar o esforzar el cable de alimentación de la
máquina para no dañarlo.
• Atención, no permitir que el cable de alimentación entre en
contacto con el cepillo giratorio.
• La máquina no provoca vibraciones perjudiciales.
• En caso de utilizar la máquina en zonas peligrosas (por ej.
distribuidores de combustible), deben respetarse las normas
2424
24
Page 25

ES
de seguridad correspondientes. Está prohibido el uso de la
máquina en ambientes con atmósfera potencialmente explosiva.
• En caso de incendio, emplear un extinguidor de polvo. No
emplear agua.
• Evitar que el cepillo o el disco de arrastre trabajen con la
máquina parada para no dañar el pavimento.
• No chocar contra estanterías o andamios donde haya peligro
de caída de objetos. El operador siempre debe estar equipado
con los equipos de seguridad adecuados (guantes, calzado,
casco, gafas de seguridad, etc.).
• Cuando se observen anomalías en el funcionamiento de la
máquina, asegurarse de que no sean causadas por la falta de
mantenimiento ordinario. De lo contrario, solicitar la intervención
del centro de asistencia autorizado.
• Si fuese necesario sustituir algunas piezas, solicitar repuestos
ORIGINALES a un concesionario y/o Revendedor Autorizado.
• Restablecer todas las conexiones eléctricas después de
cualquier intervención de mantenimiento.
• Hacer controlar la máquina en un centro de asistencia autorizado
todos los años.
• Realizar la eliminación de los materiales de consumo respetando
escrupulosamente las normas de ley vigentes. Si luego de años
de trabajo útil, se debe retirar su máquina del servicio, eliminar
adecuadamente los materiales que la componen, considerando
que la misma ha sido fabricada con el empleo de materiales
totalmente reciclables.
• Si se detectaran daños en el cable de alimentación, se debe
parar la máquina. Si se encuentra en fase de trabajo, quitar
la clavija de la red de alimentación y hacer sustituir el cable
inmediatamente en un centro de asistencia autorizado.
• Antes de usar la máquina, comprobar que todas las puertas y
cubiertas estén colocadas como se indica en este manual de
uso y mantenimiento.
• Usar sólo discos suministrados con la máquina o los
especicados en el manual de instrucciones. El uso de otros
2525
25
Page 26

ES
discos puede comprometer la seguridad.
• Antes de conectar el aparato a la toma de corriente, verique
que los datos eléctricos en la placa de identicación
correspondan a los de la fuente de alimentación. El aparato
solo debe alimentarse con corriente alterna y con un voltaje
igual al indicado en la placa del número de serie.
Símbolo de toma de tierra de la máquina:
Indica el punto de toma de tierra de la instalación eléctrica de la máquina.
Símbolo de inclinación máxima:
Indica la máxima pendiente superable.
SIMBOLOGÍA UTILIZADA EN LA MÁQUINA
CONOCIMIENTO DE LA MÁQUINA
DESPLAZAMIENTO DE LA MÁQUINA EMBALADA
DESEMBALAJE DE LA MÁQUINA
La máquina se entrega en un embalaje especíco, los elementos del
mismo (bolsas de plástico, grapas etc.) siendo una posible fuente de
peligro, no deben permanecer al alcance de niños, de minusválidos,
etc.
La masa total de la máquina con embalaje es de 169,7 lb (peso de
la máquina vacía más el embalaje).
Las dimensiones del embalaje son las siguientes:
La máquina se entrega en un embalaje especíco; para desembalarla
proceder del siguiente modo:
1. Apoyar la parte inferior del embalaje exterior en el suelo.
¡ATENCIÓN! Desplazar el producto embalado con medios de
elevación adecuados conformes con las disposiciones legales
¡ATENCIÓN! Tomar como referencia las imágenes impresas en
la caja.
2. Retirar los bloques de sujeción.
3. Abrir el embalaje exterior.
¡ATENCIÓN! Se recomienda utilizar siempre guantes de
protección para evitar lesiones graves en las manos.
4. Retirar los accesorios opcionales contenidos en el embalaje.
5. Extraer hacia arriba el cartón externo.
6. Retirar los bloques de sujeción de la máquina.
7. Sirviéndose de un plano inclinado, bajar la máquina del pallet
empujándola marcha atrás.
¡ATENCIÓN! Durante esta operación asegurarse de que no
haya objetos o personas cerca de la máquina.
¡ATENCIÓN! Non montar el disco de arrastre antes de
descargar la máquina y evitar golpear con violencia la
bancada.
¡ATENCIÓN! Para desembalar la máquina del cartón, no
utilizar el manillar de mando debido a que podría dañarse
durante la operación.
¡ATENCIÓN! se recomienda conservar todos los materiales
2626
26
X%
1
U/M TRIDENT FMD20
ORBITAL
A in 24.7
B in 53.9
C in 32.3
Page 27

ES
TRANSPORTE DE LA MÁQUINA
Para transportar la máquina en condiciones seguras, proceder del
siguiente modo:
1. Seguir las fases para poner la máquina en condiciones seguras
(leer el apartado “CONDICIONES DE SEGURIDAD DE LA
MÁQUINA”).
2. Utilizando un plano inclinado, subir la máquina al pallet
empujándola marcha atrás.
3. Colocar la bancada sobre el pallet.
4. Utilizando unos bloques, jar la máquina al pallet.
5. Ahora se puede transportar en condiciones seguras la máquina.
¡ATENCIÓN! Se recomienda utilizar siempre guantes de
protección para evitar lesiones graves en las manos.
¡ATENCIÓN! Para el transporte en vehículos, asegurar la
máquina según las directivas en vigor para que no se pueda
deslizar ni volcar.
COMPONENTES PRINCIPALES DE LA MÁQUINA
COMPONENTES PRINCIPALES DEL MANILLAR DE MANDO
Los componentes básicos de la máquina se identican del siguiente
modo:
1. Manillar de mando.
2. Chasis.
Los componentes del manillar se identican del siguiente modo:
1. Palanca presencia de operador.
2. Palanca de mando del interruptor general (situada bajo las
empuñaduras del manillar).
3. Palanca regulación inclinación manillar.
4. Palanca de mando de la válvula de distribución del detergente.
5. Disyuntor térmico de protección del motor de bancada.
6. Cable de alimentación.
7. Toma para electro-herramienta.
3. Bancada.
4. Cárter de la bancada.
5. Disco de arrastre
6. Cable de alimentación 16,4Yd
7. Kit tanque de solución
2727
27
1
6
3-4
7
25
4
1
6
3 7
2 5
1
1 2
1
Page 28

ES
COMPONENTES PRINCIPALES DE LA COLUMNA
Los componentes del manillar se identican del siguiente modo:
1. Soporte superior del kit opcional del tanque de solución.
Para montar el disco de arrastre en el cuerpo de bancada de la
máquina, proceder del siguiente modo:
1. Comprobar que la clavija (1) que se encuentra en el cable de
alimentación (2) esté desconectada de la toma (3) de la red de
alimentación (Fig. 1); en caso contrario, desconectarla.
¡ATENCIÓN! Se recomienda utilizar siempre guantes de
protección para evitar lesiones graves en las manos.
2. Soporte inferior del kit opcional del tanque de solución.
3. Enrollacable superior.
4. Enrollacable inferior.
¡ATENCIÓN! Para evitar daños en el cable de alimentación,
desconectar la clavija de la toma de red, tirando directamente
de la clavija y no del cable.
2. Comprobar que el manillar de mando se encuentre en posición
vertical; en caso contrario, presionar la palanca de desenganche
(4) (Fig.2) y girar el manillar llevándolo a la posición vertical
(Fig.3). Cuando el manillar alcanza la posición vertical, soltar la
PREPARACIÓN DE LA MÁQUINA
MONTAJE DEL DISCO DE ARRASTRE
palanca de desenganche (4).
3. Inclinar ligeramente hacia atrás la máquina (Fig.4), bloquear una
de las ruedas traseras y mover hacia atrás la columna de mando.
4. Girar la bancada llevándola a la posición vertical (Fig.5).
5. Llevar la bancada girada de este modo, en contacto con el
pavimento (Fig.6).
6. Desenroscar y retirar las llaves de apriete (5) (Fig.7).
2828
28
4
3
2
1
2
1
3 4
1
1 2 3
2
4 5 6
Page 29

ES
7. Colocar el disco de arrastre con cuidado para que los pernos de
jación (6) de la máquina coincidan con los oricios (7) del disco
de arrastre (Fig.8).
8. Enroscar las llaves de apriete (5) (Fig.9)
¡ATENCIÓN! Para apretar las llaves correctamente, utilizar
una pinza de apriete.
Si se utiliza el disco de arrastre para papel de lija, proceder del
siguiente modo:
• Desenroscar y retirar las llaves de apriete (5) (Fig.7).
• Colocar el disco de arrastre con cuidado para que los pernos de
jación (6) de la máquina coincidan con los oricios (7) del disco
de arrastre (Fig.8).
• Colocar la brida de centrado (8) (Fig.10).
• Colocar el sujetador roscado (9) con cuidado para que los pernos
de jación de la máquina coincidan con los oricios del sujetador
roscado (Fig.11). Enroscar las llaves de apriete (5).
¡ATENCIÓN! Para apretar las llaves correctamente, utilizar
una pinza de apriete.
• Colocar el disco de papel de lija sobre el disco de arrastre.
• Fijar el papel de lija al disco de arrastre utilizando la tuerca (10)
sin olvidar de colocar también la arandela (11) (Fig.12).
¡ATENCIÓN! Para apretar la tuerca correctamente, utilizar la
herramienta adecuada.
9. Inclinar ligeramente hacia atrás la máquina (Fig.13), bloquear
una de las ruedas traseras y mover hacia atrás la columna de
mando.
10. Girar la bancada llevándola a la posición de trabajo (Fig.13).
2929
29
5
8
8
11
5
10
7 5
6
7
11 1210
8 9
1413
Page 30

ES
Para colocar el tanque de solución en el manillar, proceder del
siguiente modo:
1. Fijar el manillar en una posición de unos 45° con respecto al
terreno (Fig.1).
Rellenar el tanque solución solo cuando la columna esté en posición
vertical, realizando lo siguiente:
1. Retirar el tapón del tanque de solución (1) (Fig.1).
2. Llenar con agua limpia a una temperatura que no supere los 50
°C.
3. Agregar el detergente líquido en el tanque respetando la
concentración y las modalidades indicadas en la etiqueta por
el fabricante del detergente. Para evitar la formación de una
cantidad excesiva de espuma que podría dañar los componentes
2. Desenroscando la manivela de cierre (1) (Fig.2) colocar los
estribos superiores por encima de la mitad de la columna (Fig.3)
(si no están ya colocados).
internos de la máquina, emplear el porcentaje mínimo de
detergente.
4. Montar el tapón del tanque de solución (1) (Fig.2).
¡ATENCIÓN! Se recomienda utilizar siempre guantes de
protección para evitar lesiones graves en las manos.
¡ATENCIÓN! Se aconseja aspirar en tramos la espuma
cargada de suciedad con un aspirador para líquidos.
MONTAJE DEL TANQUE DE SOLUCIÓN (OPCIONAL)
LLENADO DE SOLUCIÓN DETERGENTE (OPCIONAL)
3. Colocar el tanque de solución en la columna, haciendo que la
parte inferior del depósito se ancle en el estribo jo (2) que se
encuentra en la columna (Fig.4).
4. Manteniendo el tanque con una mano, hacer descender el estribo
móvil (3) hasta que el tanque de solución quede bloqueado en la
columna (Fig.5).
5. Bloquear la posición del estribo móvil (3) utilizando la manivela
de cierre (1) (Fig.6).
6. Introducir el tubo de distribución del agua (4) en el oricio de la
bancada (5) (Fig.7).
7. Enganchar la cadena tirante del grifo del tanque de solución (6)
al gancho que se encuentra en la manilla de mando del grifo
(7) (Fig.8).
3030
30
1
4
7
2
5
8
3
6
1
2
5 4
6
7
3 3
1
Page 31

ES
Antes de comenzar el trabajo respetar los pasos siguientes:
1. Antes de usar se debe controlar el estado y la seguridad de
servicio de la máquina con las herramientas de trabajo, en
especial del cable de alimentación y del cable de alargue. Si la
máquina no se encuentra en perfecto estado, se prohíbe su uso.
2. Conectar la clavija (1) del cable de alimentación (2) en la toma (3)
de la red de alimentación (Fig. 1) .
3. Desbloquear el manillar de mando de la posición vertical.
Presionar la palanca de retención (4) de la columna de mando
según la dirección de la echa (Fig.2) y girar la columna de
mando hacia sí mismo (Fig.3).
¡ATENCIÓN! Durante esta operación no apoyar el pie sobre
la máquina.
USO
4. Girar la columna de mando hacia sí mismo hasta alcanzar la
posición ideal que debe ofrecer una sensación de comodidad
durante el uso de la máquina.
5. Una vez alcanzada la posición ideal, soltar la palanca de
retención (4) de la columna de mando para bloquear el manillar.
6. Girar hacia sí mismo la palanca de presencia de operador (5)
(Fig.4).
7. Presionar las palancas de mando del interruptor general (6)
situadas bajo las empuñaduras del manillar (Fig.5).
8. Ahora la máquina comenzará a moverse.
9. Aplicar una pequeña dosis de solución detergente sobre el
pavimento presionando la palanca (7) (Fig.6), hasta que el cepillo
esté saturado de espuma (kit tanque de solución opcional).
10. Conducir la máquina con el cepillo girando de izquierda a
derecha o en sentido contrario.
11. Inmediatamente después, conducir la máquina de la misma forma
en sentido contrario, pero de manera que aproximadamente un
cuarto de la anchura de trabajo se superponga a la precedente.
12. Se aconseja aspirar por tramos la espuma llena de suciedad,
aspirándola con un aspirador para líquidos (kit tanque solución
opcional).
¡ATENCIÓN! La primera vez que un operador maneja la
máquina debe adquirir conanza con los movimientos que
debe transmitir al timón para obtener una seguridad suciente
sobre la dirección del movimiento de la máquina, por tanto, no
accionar la máquina cerca de personas u obstáculos.
¡ATENCIÓN! Trabajar realizando movimientos lentos a
derecha e izquierda, si es posible hacia atrás, de manera que
el operador se encuentre siempre sobre una zona de suelo
aún no limpiada.
¡ATENCIÓN! Mantener siempre el cable de alimentación
detrás del operador, prestando atención a no trabajar con la
máquina en las cercanías del mismo para no dañarlo.
¡ATENCIÓN! No insistir demasiado sobre la misma zona para
no correr el riesgo de arruinar el pavimento, también en
función del tipo de cepillo o de disco abrasivo escogido.
¡ATENCIÓN! Si es necesario trabajar en espacios reducidos,
es posible girar la columna de mando llevándola a la posición
vertical.
3131
31
1 2
1 1
1
2
3
5
4
7
6
1
4
2
5
3
6
Page 32

ES
Al nalizar el trabajo y antes de realizar cualquier tipo de
manutención, realizar las operaciones siguientes:
1. Desconectar la clavija (1) del cable de alimentación (2) de la
toma (3) de la red de alimentación (Fig. 1).
¡ATENCIÓN! Se recomienda utilizar siempre guantes de
protección para evitar lesiones graves en las manos.
¡ATENCIÓN! Para evitar daños en el cable de alimentación,
desconectar la clavija de la toma de red, tirando directamente
de la clavija y no del cable.
2. Comprobar que el manillar de mando se encuentre en posición
vertical; de lo contrario, presionar la palanca de desenganche (4)
(Fig.2) y girar el manillar llevándolo a la posición vertical (Fig.3).
Cuando el manillar alcanza la posición vertical, soltar la palanca
de desenganche (4).
AL FINALIZAR EL TRABAJO
¡ATENCIÓN! Durante esta operación no apoyar el pie sobre
la máquina.
3. Inclinar la máquina, llevarla al lugar especíco para el
mantenimiento y realizar todos los procedimientos listados
en el apartado “INTERVENCIONES DE MANTENIMIENTO
PERIÓDICO ACONSEJADO” en la columna “AL FINALIZAR EL
TRABAJO”.
4. Una vez nalizadas las intervenciones de mantenimiento, llevar
la máquina al lugar dispuesto para su reposo.
¡ATENCIÓN! Aparcar la máquina en un lugar cerrado, sobre
una supercie plana; cerca de la misma no debe haber
objetos que puedan dañar la máquina o dañarse al entrar en
contacto con la misma.
5. Inclinar ligeramente hacia atrás la máquina (Fig.4), bloquear una
de las ruedas traseras y mover hacia atrás la columna de mando.
6. Girar la bancada llevándola a la posición vertical (Fig.5).
7. Llevar la bancada girada de este modo, en contacto con el
pavimento (Fig.6).
INTERVENCIONES DE MANTENIMIENTO ACONSEJADO
MANTENIMIENTO
3232
32
1
2
3 4
1 2 3
4 5 6
TIPO DE MANTENIMIENTO
AL FINALIZAR EL
TRABAJO
SEMANAL
ANTES DE UN
LARGO PERÍODO
DE INACTIVIDAD
TRANSPORTE
Control y limpieza del disco de arrastre X X X
Control y limpieza del tanque de solución (opcional) X X X
Page 33

ES
Una esmerada limpieza del disco de arrastre garantiza una mejor
limpieza del pavimento y una mayor duración del motor del cepillo.
Para limpiar el disco de arrastre, proceder del siguiente modo:
1. Colocar la máquina en el lugar especíco para el vaciado de las
aguas residuales.
¡ATENCIÓN! El lugar especíco para esta operación debe
estar en conformidad con la normativa vigente de respeto al
medio ambiente.
2. Comprobar que la clavija (1) que se encuentra en el cable de
alimentación (2) esté desconectada de la toma (3) de la red de
alimentación (Fig. 1); en caso contrario, desconectarla.
¡ATENCIÓN! Se recomienda utilizar siempre guantes de
protección para evitar lesiones graves en las manos.
¡ATENCIÓN! Para evitar daños en el cable de alimentación,
desconectar la clavija de la toma de red, tirando directamente
de la clavija y no del cable.
3. Comprobar que el manillar de mando se encuentre en posición
vertical; en caso contrario, presionar la palanca de desenganche
(4) (Fig.2) y girar el manillar llevándolo a la posición vertical
(Fig.3). Cuando el manillar alcanza la posición vertical, soltar la
palanca de desenganche (4).
CONTROL Y LIMPIEZA DEL DISCO DE ARRASTRE
4. Inclinar ligeramente hacia atrás la máquina (Fig.4), bloquear una
de las ruedas traseras y mover hacia atrás la columna de mando.
5. Girar la bancada llevándola a la posición vertical (Fig.5).
6. Llevar la bancada girada de este modo, en contacto con el
pavimento (Fig.6).
7. Desenroscar y retirar las llaves de apriete (5) (Fig.7).
8. Retirar el disco de arrastre y eliminar las impurezas que se
encuentran en el mismo.
9. Para el montaje, repetir las operaciones indicadas para el
desmontaje, pero en sentido inverso.
¡ATENCIÓN! Para apretar las llaves correctamente, utilizar
una pinza de apriete.
3333
33
1
2
3 4
1 2 3
5
7
4 5 6
Page 34

ES
Una esmerada limpieza del tanque de solución garantiza una mejor
limpieza del pavimento. Para limpiar el tanque solución, realizar lo
siguiente:
1. Colocar la máquina en el lugar especíco para el vaciado de las
aguas residuales.
¡ATENCIÓN! El lugar especíco para esta operación debe
estar en conformidad con la normativa vigente de respeto al
medio ambiente.
2. Comprobar que la clavija (1) que se encuentra en el cable de
alimentación (2) esté desconectada de la toma (3) de la red de
alimentación (Fig. 1); en caso contrario, desconectarla.
¡ATENCIÓN! Se recomienda utilizar siempre guantes de
protección para evitar lesiones graves en las manos.
¡ATENCIÓN! Para evitar daños en el cable de alimentación,
desconectar la clavija de la toma de red, tirando directamente
de la clavija y no del cable.
3. Fijar el manillar en una posición de unos 45° con respecto al
terreno, presionar la palanca de desenganche (4) (Fig.2) y girar
el manillar llevándolo a la posición (Fig.3). Cuando el manillar
alcanza la posición, soltar la palanca de desenganche (4).
CONTROL Y LIMPIEZA DEL TANQUE DE SOLUCIÓN (OPCIONAL)
4. Desenganchar la cadena tirante del grifo del tanque de solución
(5) del gancho que se encuentra en la manilla de mando del grifo
(6) (Fig.4).
5. Extraer el tubo de distribución del agua (7) del oricio de la
bancada (8) (Fig.5).
6. Desenroscando la manivela de cierre (9) (Fig.6) colocar los
estribos superiores por encima de la mitad de la columna.
7. Retirar el tanque de solución de la columna de mando.
8. Retirar el tapón del tanque de solución (10) (Fig.7).
9. Enjuagar el interior con un chorro de agua, si es necesario
utilizar una espátula para quitar el lodo acumulado en el fondo
del tanque.
10. Para el montaje, repetir las operaciones indicadas para el
desmontaje, pero en sentido inverso.
RESOLUCIÓN DE AVERÍAS
En este capítulo se presentan los problemas más habituales relacionados con el uso de la máquina. En caso de no solucionar los problemas
con la siguiente información, contactar con el centro de asistencia más cercano.
DESGUACE
Proceder al desguace de la máquina en un centro de eliminación o de recogida
autorizado.
Antes de realizar el desguace de la máquina se deben quitar y separar los
siguientes materiales y enviarlos a los centros de recogida diferenciada, respetando
la normativa de higiene ambiental vigente:
• Discos de arrastre o cepillos
• Piezas eléctricas y electrónicas*
• Partes de plástico
• Partes metálicas
(*) En especial, para la eliminación de las piezas eléctricas y electrónicas, dirigirse
al distribuidor.
3434
34
1
2
3 4
1 2 3
4 5
6
10
7
5 8
6
7
9
Page 35

ES
TROUBLESHOOTING
3535
35
PROBLEMA POSIBLE CAUSA SOLUCIÓN
LA MÁQUINA NO SE ENCIENDE
El cable de alargue no está conectado a la
toma de red.
Comprobar que la clavija que se encuentra
en el cable de alargue esté conectada a la
toma de la red de alimentación.
El cable de alargue no está conectado al
cable de alimentación de la máquina.
Comprobar que la clavija que se encuentra
en el cable de alimentación de la máquina
esté conectada a la toma del cable de
alargue.
Las especicaciones eléctricas de la
máquina corresponden con las de la red de
alimentación.
Vericar que las especicaciones eléctricas
de la máquina correspondan con las de la
red de alimentación, controlar los datos
técnicos de la placa matrícula.
Cable de alargue dañado.
Comprobar que el cable de alargue no esté
dañado; si lo está, sustituirlo.
Sobrecalentamiento del motor de bancada.
Comprobar que la protección térmica
que se encuentra en la parte trasera
del manillar no se haya activado. En
caso de que se haya activado, aguardar
algunos minutos para que se enfríe y
luego presionar el pulsador del disyuntor
térmico para reactivar la alimentación y el
funcionamiento del motor
SOLUCIÓN DETERGENTE EN EL DISCO
DE ARRASTRE NO SUFICIENTE
La cantidad de solución detergente
contenida en el tanque de solución no es
adecuada para el trabajo que se desea
realizar.
Comprobar que la cantidad de solución
detergente contenida en el tanque de
solución sea adecuada para el trabajo que
debe realizarse; si es necesario, llenar el
tanque de solución.
POS. COMPONENT
1 CONTACTO ROMPE 16A
2 INTERRUPTOR 20A
3 INICIAR RELÉ
4 INICIAR CONDENSADOR
5 CONDENSADOR DE TRABAJO
6 MOTOR 1100W 100/115V 50/60HZ
8 ENCHUFE
BK NEGRO
BU AZUL
BN MARRÓN
RD ROJO
WH BLANCO
GNYE AMARILLO/VERDE
DIAGRAMA ELÉCTRICO
Page 36

FR
INDEX
FRANÇAIS
INDEX.............................................................................................................................36
SYMBOLES UTILISÉS DANS CE MODE D’EMPLOI....................................................37
OBJET ET CONTENU DU MANUEL..............................................................................37
DESTINATAIRES ............................................................................................................37
CONSERVATION DU MANUEL D'UTILISATION ET D'ENTRETIEN ............................37
PRISE EN CHARGE DE L'APPAREIL ...........................................................................37
AVANT-PROPOS ............................................................................................................37
DONNÉES POUR L'IDENTIFICATION ...........................................................................38
CARACTÉRISTIQUES TECHNIQUES ...........................................................................38
UTILISATION ENVISAGÉE – UTILISATION PRÉVUE ..................................................38
SÉCURITÉ ......................................................................................................................38
PLAQUE SIGNALÉTIQUE ..............................................................................................38
DONNÉES TECHNIQUES ..............................................................................................38
RÈGLES GÉNÉRALES DE SÉCURITÉ .........................................................................39
SYMBOLES UTILISÉS DANS L'APPAREIL ..................................................................42
CONNAISSANCE DE L'APPAREIL ...............................................................................42
MANUTENTION DE L'APPAREIL EMBALLÉ ............................................................42
DÉBALLAGE DE L'APPAREIL ...................................................................................42
TRANSPORT DE L'APPAREIL ..................................................................................43
COMPOSANTS PRINCIPAUX DE L'APPAREIL ........................................................43
COMPOSANTS PRINCIPAUX DU GUIDON DE COMMANDE .................................43
COMPOSANTS PRINCIPAUX DE LA COLONNE DE DIRECTION ..........................43
PRÉPARATION DE L'APPAREIL ...................................................................................44
INTRODUCTION DU DISQUE ENTRAÎNEUR ..........................................................46
INTRODUCTION DU RÉSERVOIR DE SOLUTION (EN OPTION) ..........................46
INTRODUCTION DE LA SOLUTION DÉTERGENTE (EN OPTION) ........................46
EMPLOI DE LA MACHINE .............................................................................................47
À LA FIN DU TRAVAIL ...................................................................................................48
ENTRETIEN ....................................................................................................................48
INTERVENTIONS D'ENTRETIEN CONSEILLÉ ........................................................48
CONTRÔLE ET NETTOYAGE DU DISQUE ENTRAÎNEUR .....................................49
CONTRÔLE ET NETTOYAGE DU RÉSERVOIR DE SOLUTION (EN OPTION)......50
ÉLIMINATION .................................................................................................................51
RÉSOLUTION PANNES .................................................................................................51
3636
36
Page 37

FR
Symbole d’avertissement :
Lire attentivement les sections précédées de ce symbole en respectant scrupuleusement ce qui y est indiqué, pour la
sécurité de l'opérateur et de l'appareil.
Symbole danger d'explosion :
Il indique que si la batterie n'est pas traitée conformément aux directives indiquées dans le manuel du constructeur, elle
risque d'exploser dans certaines conditions.
Symbole d'endroit à l'abri :
Les procédures précédées du symbole suivant doivent être effectuées rigoureusement dans un endroit à l'abri et sec.
Symbole d’avertissement de chariots en mouvement :
Indique qu'il faut manutentionner le produit emballé avec des chariots de manutention appropriés conformes aux
dispositions légales.
Symbole du livre ouvert avec le i :
Indique qu'il faut consulter le mode d'emploi.
Les descriptions contenues dans cette publication ne sont pas contraignantes. La société se réserve donc le droit d'apporter à tout moment
d'éventuelles modications aux organes, détails et fournitures d'accessoires qu'elle jugera opportunes pour des améliorations ou pour tout
autre exigence de caractère constructif ou commercial. La reproduction même partielle des textes et des dessins contenus dans cette
publication est interdite par la loi.
La société se réserve le droit d'apporter des modications à caractère technique et/ou relatives aux équipements. Les images sont
fournies à simple titre d'exemple et ne sont pas contraignantes pour le design et les équipements.
Symbole du livre ouvert :
Il indique à l'opérateur de lire le manuel d'utilisation et d'entretien avant d'utiliser l'appareil.
Symbole gants de protection :
Il indique que l’opérateur doit toujours porter des gants de protection pour éviter des lésions graves aux mains.
SYMBOLES UTILISÉS DANS CE MODE D'EMPLOI
OBJET ET CONTENU DU MANUEL
DESTINATAIRES
CONSERVATION DU MANUEL D'UTILISATION ET D'ENTRETIEN
PRISE EN CHARGE DE L'APPAREIL
AVANT-PROPOS
Ce manuel a l’objet de fournir au client toutes les informations
nécessaires pour utiliser l’appareil de la manière la plus appropriée,
autonome et sûre possible. Il comprend des informations concernant
l'aspect technique, la sécurité, le fonctionnement, l'arrêt de
l’appareil, l'entretien, les pièces de rechange et la mise au rebut.
Le manuel en question s'adresse à l'opérateur et aux techniciens
qualiés pour l'entretien de l’appareil. Les opérateurs ne doivent
pas effectuer d'opérations réservées aux techniciens qualiés. N'est
Le manuel d'utilisation et d'entretien doit être conservé à proximité
de l'appareil, dans sa pochette, à l'abri de liquides et de toute autre
Au moment de la livraison, contrôler immédiatement si on a reçu
toute la marchandise telle qu'elle est indiquée sur les documents
et que l'appareil n'a pas été endommagée au cours du transport.
Si c'est le cas, faire constater au transporteur l'importance du
Tout appareil peut fonctionner correctement et travailler avec prot
uniquement s'il est utilisé correctement et maintenu en pleine
efcacité en effectuant l'entretien décrit dans la documentation en
annexe. Nous vous prions de bien vouloir lire ce manuel d'utilisation
et d'entretien et de le relire chaque fois que, lors de l'utilisation de
Avant d'effectuer toute opération sur l’appareil, les opérateurs et
les techniciens qualiés, doivent lire attentivement les instructions
contenues dans ce manuel. En cas de doutes sur l'interprétation
correcte des instructions, consulter le service après-vente le plus
proche, pour obtenir les éclaircissements nécessaires.
pas responsable des dommages dérivant du non-respect de cette
interdiction.
substance pouvant compromettre sa lisibilité.
dommage subi et informer en même temps notre service de gestion
de la clientèle. Il sera possible d'obtenir le matériel manquant et
l'indemnisation des dommages uniquement en respectant cette
procédure dans les meilleurs délais.
l'appareil, des difcultés surgissent. En cas de besoin, nous vous
rappelons que notre service après-vente travaille en collaboration
étroite avec nos concessionnaires et reste à votre disposition pour
tout conseil et demande d'intervention directe.
3737
37
Page 38

FR
DONNÉES POUR L'IDENTIFICATION
Pour contacter le service après-vente technique ou pour demander des pièces de rechange, toujours signaler le modèle, la version et le
numéro de série indiqués sur la plaque signalétique.
CARACTÉRISTIQUES TECHNIQUES
UTILISATION ENVISAGÉE – UTILISATION PRÉVUE
SÉCURITÉ
PLAQUE SIGNALÉTIQUE
Cet appareil a été construit pour le nettoyage professionnel des sols durs et vinyliques en intérieur, à effectuer en suivant les instructions.
L’appareil doit être utilisé uniquement dans ce but.
Cet appareil a été conçu et fabriqué pour le nettoyage de sols lisses
et compacts, dans un environnement commercial, civil et industriel,
dans des conditions de sécurité vériée, par un opérateur qualié. La
machine est appropriée pour le nettoyage de moquettes à condition
d’utiliser les accessoires adaptés.
Pour éviter des accidents, la collaboration de l'opérateur est
essentielle. Aucun programme de prévention d'accidents ne peut
être efcace sans la collaboration totale de la personne directement
responsable du fonctionnement de l’appareil. La plupart des
accidents qui se produisent dans une entreprise, au travail ou
La plaque matricule est placée dans la partie arrière du guidon
de commande, elle présente les caractéristiques générales de
l'appareil, en particulier, son numéro de série. Le numéro de série
est une information très importante qui doit toujours être fournie en
même temps que toute demande d'assistance ou d'achat de pièces
de rechange.
L'appareil est apte à être utilisé exclusivement dans des locaux
fermés ou couverts.
ATTENTION : L'appareil n'est pas adapté à une utilisation
sous la pluie ou sous des jets d'eau.
pendant les déplacements, sont causés par le non-respect des
règles de prudence les plus élémentaires. Un opérateur attentif
et prudent est la meilleure garantie contre les accidents et il est
indispensable pour compléter tout programme de prévention.
3838
38
DONNÉES TECHNIQUES U/M TRIDENT FMD20
ORBITAL
Largeur de travail in 20
Diamètre du disque entraîneur in 20
Vitesse du moteur Rot/min. 1400
Glisser des orbites de disque Orb./min. 1400
Puissance nominale du moteur du carter W 1100
Tension nominale du moteur du carter V 120
Fréquence du moteur du carter Hz 50 / 60
Pente maximale à pleine charge % 2
Capacité du réservoir de solution (en option) gal 3,96
Roues arrière (diamètre/largeur) in 7.9 - 1.8
Longueur de la machine in 30,1
Hauteur de l’appareil au carter in 12,6
Hauteur de l’appareil au guidon in 48
Largeur de l'appareil in 21,25
Poids de l'appareil en ordre de marche (sans réservoir de solution) Lb 154,3
Longueur du câble d’alimentation yd 16,4
Page 39

FR
Les règles indiquées ci-dessous doivent être respectées scrupuleusement
pour éviter tout dommage à l'appareil et à l'opérateur.
AVERTISSEMENT :
• Cet appareil ne doit pas être utilisé par des personnes (enfants
compris) dotés de capacités psychiques, sensorielles ou
mentales réduites, ou bien par des personnes sans expérience et
connaissance, à moins qu'elles ne soient contrôlées ou formées
à l'utilisation de l'appareil par des personnes responsables de
leur sécurité. Les enfants doivent être surveillés pour s'assurer
qu'ils ne jouent pas avec l'appareil.
• Lire attentivement les étiquettes gurant sur l'appareil, ne
jamais les dissimuler et les remplacer immédiatement si elles
sont endommagées.
• L’appareil doit être utilisé et rangé exclusivement dans un
endroit fermé.
• L’appareil doit exclusivement être utilisé par des personnes
possédant l'autorisation et la formation adéquates.
• Ne pas utiliser l'appareil sur des surfaces ayant une inclinaison
supérieure à celle indiquée par la plaque matricule.
• Vérier toujours si les plans de travail, sols et rampes, sont en
mesure de supporter le poids de l'appareil.
• L'appareil n'est pas adapté au nettoyage de sols accidentés ou
irréguliers. Ne pas utiliser l'appareil sur des pentes.
• En cas de danger, débrancher immédiatement la che du câble
d'alimentation de la prise secteur.
• Pour toute intervention d'entretien, éteindre l'appareil et
débrancher le câble d'alimentation de la prise.
• Pour éviter une utilisation non admise de l’appareil, l’alimentation
doit être coupée, éteindre l’appareil et débrancher le câble
d'alimentation de la prise.
• Les enfants doivent rester sous surveillance an de veiller à ce
qu'ils ne jouent pas avec l'appareil.
RÈGLES GÉNÉRALES DE SÉCURITÉ
3939
39
Page 40

FR
• Pendant le fonctionnement de l'appareil, faire attention aux
personnes à proximité et en particulier aux enfants.
• L’appareil doit être alimenté exclusivement avec une tension et une
fréquence égales à celles indiquées sur la plaque matricule.
• L’appareil laissé sans surveillance doit être protégé de mouvements
imprévus.
• Ne pas s'approcher de la machine avec des vêtements qui pourraient
s'accrocher. ÉVITER de porter des écharpes, des châles, des
foulards et des vêtements larges.
• Éviter de passer sur des morceaux de corde, ls de fer, câbles : ils
pourraient s'entortiller dans la brosse et entraver le glissement.
ATTENTION :
• L’appareil ne doit pas être utilisé ou maintenu à l'extérieur en
conditions d'humidité ou exposé directement à la pluie.
• La température de stockage doit être comprise entre -13 °F et
+131 °F, l'appareil doit être emmagasiné uniquement dans des
endroits fermés.
• Conditions d'emploi : température ambiante comprise entre 32°F et
104°F avec une humidité relative comprise entre 30 et 95 %.
• La machine est appropriée pour le nettoyage de moquettes à
condition d’utiliser les accessoires adaptés.
• Les opérations de polissage devront être effectuées dans des zones
interdites au passage des personnes non autorisées. Signaler les
zones de travail avec des panneaux appropriés.
• La prise du cordon d'alimentation de la machine doit être pourvue
d'une mise à la terre réglementaire.
• Éviter d'endommager le cordon d'alimentation de la machine par
des écrasements, pliages ou contraintes.
• Attention : ne pas permettre au câble d'alimentation d'entrer en
contact avec la brosse tournante.
• L’appareil ne provoque pas de vibrations nocives.
• En cas d'utilisation de l'appareil dans des zones de danger (par
ex. distributeurs de carburant), il convient d'observer les normes
4040
40
Page 41

FR
de sécurité correspondantes. L'utilisation de l'appareil dans des
environnements à atmosphère potentiellement explosive est interdite.
• En cas d'incendie, utiliser un extincteur à poudre. Ne pas utiliser
d'eau.
• Éviter de faire fonctionner la brosse ou le disque entraîneur lorsque
l'appareil est à l'arrêt pour ne pas endommager le sol.
• Ne pas heurter les rayonnages ou les échafaudages lorsqu'il y
a des risques de chute d'objets. L'opérateur doit toujours adopter
des équipements de protection individuelle appropriés (gants,
chaussures, casque, lunettes de sécurité, etc.).
• En cas de défauts fonctionnement de l'appareil, vérier qu'il ne s'agit
pas d'une conséquence d'un manque d'entretien ordinaire. Dans le
cas contraire, demander l'intervention du service après-vente agréé.
• En cas de remplacement de pièces, demander des pièces de
rechange D'ORIGINE à un concessionnaire et/ou un revendeur
agréé.
• Rétablir tous les branchements électriques après un entretien.
• Chaque année, faire contrôler l'appareil par un centre d'assistance
agréé.
• Éliminer les consommables en suivant scrupuleusement les lois en
vigueur. Quand, après des années de précieux travail, votre appareil
doit être mis au repos, procéder à la mise au rebut appropriée des
matériaux qu'il contient, en tenant compte du fait que l'appareil a été
construit en utilisant des matériaux intégralement recyclables.
• Si le câble d'alimentation est endommagé, arrêter l'appareil (s'il est en
marche), le débrancher de la prise et faire remplacer immédiatement
le câble par un service après-vente agréé.
• Avant d'utiliser l'appareil, vérier si tous les volets et les capots sont
en place, comme indiqué dans ce manuel d'utilisation et d'entretien.
• N'utiliser que les disques fournis avec l'appareil ou ceux spéciés
dans le manuel d'instructions. L'emploi de disques différents peut
compromettre la sécurité de la machine.
• Avant de brancher l’appareil à la prise de courant, vériez que les
données électriques sur la plaque signalétique correspondent à
4141
41
Page 42

FR
celles de l’alimentation. L’appareil ne doit être alimenté qu’en
courant alternatif et avec une tension égale à celle indiquée sur
la plaque d’immatriculation.
Symbole de mise à la terre de l’appareil :
Il indique le point de mise à la terre de l’installation électrique de l'appareil.
Symbole de pente maximale :
Il indique la pente maximale.
SYMBOLES UTILISÉS DANS L'APPAREIL
CONNAISSANCE DE L'APPAREIL
MANUTENTION DE L'APPAREIL EMBALLÉ
DÉBALLAGE DE L'APPAREIL
L'appareil est contenu dans un emballage spécique, les éléments
d'emballage (sachets en plastique, agrafes, etc.) sont des sources
potentielles de danger et ne doivent pas être laissés à la portée des
enfants, des personnes handicapées, etc.
Le poids total de l'appareil avec l'emballage est de 169,7 lb (poids de
l'appareil à vide plus l'emballage).
Les dimensions de l'emballage sont les suivantes :
L’appareil est contenu dans un emballage spécique ; pour déposer
l’appareil de l’emballage, agir comme suit :
1. Positionner la partie basse de l'emballage extérieur au contact
du sol.
ATTENTION : Manipuler le produit emballé avec des moyens
de levage aptes et conformes aux dispositions légales.
ATTENTION : Utiliser comme référence les pictographies
imprimées sur le carton.
2. Déposer les feuillards.
3. Retirer l’emballage extérieur.
ATTENTION : Il est conseillé de toujours porter des gants de
protection pour éviter de se blesser gravement les mains.
4. Déposer les accessoires en option contenus dans l’emballage.
5. Extraire le carton extérieur vers le haut.
6. Déposer les feuillards de la machine.
7. En utilisant un plan incliné, faire descendre la machine de la
palette en la poussant en marche arrière.
ATTENTION : Au cours de cette opération, vérier l'absence
d'objets ou de personnes à proximité de la machine.
ATTENTION : Ne pas monter le disque entraîneur avant de
décharger la machine, éviter les coups violents sur le carter.
ATTENTION : Pour déposer l’appareil du carton, ne pas
utiliser le guidon de commande, il pourrait s'endommager
pendant l’opération.
ATTENTION : il est conseillé de garder tous les éléments
d'emballage pour un éventuel transport de l'appareil.
4242
42
X%
1
U/M TRIDENT FMD20
ORBITAL
A in 24.7
B in 53.9
C in 32.3
Page 43

FR
TRANSPORT DE L'APPAREIL
Pour transporter l’appareil en sécurité, agir comme suit :
1. Procéder à chacune des phases permettant de mettre l'appareil
en sécurité (lire paragraphe « MISE EN SÉCURITÉ DE
L'APPAREIL »).
2. En utilisant un plan incliné, faire monter l'appareil sur la palette en
la poussant en marche arrière.
3. Poser le carter sur la palette.
4. Fixer l'appareil à la palette à l'aide des feuillards.
5. Il est alors possible de transporter l’appareil en toute sécurité.
ATTENTION : Il est conseillé de toujours porter des gants de
protection pour éviter de se blesser gravement les mains.
ATTENTION : Pour le transport dans des véhicules, xer
l'appareil selon les directives en vigueur an qu'il ne puisse ni
glisser, ni se retourner.
COMPOSANTS PRINCIPAUX DE L'APPAREIL
COMPOSANTS PRINCIPAUX DU GUIDON DE COMMANDE
Les composants de base de l'appareil s'identient comme suit :
1. Guidon de commande.
2. Châssis.
3. Carter.
Les composants du guidon sont les suivants :
1. Levier de présence opérateur.
2. Levier de commande de l'interrupteur général (placé sous les
poignées du guidon).
3. Levier de réglage de l'inclinaison du guidon.
4. Levier de commande de la vanne de distribution du détergent.
5. Disjoncteur thermique de protection du moteur du carter.
6. Câble d'alimentation.
7. Prise pour outil électroportatif.
4. Carter.
5. Disque entraîneur
6. Câble d'alimentation de 16,4Yd
7. Kit réservoir de solution
4343
43
1
6
3-4
7
25
4
1
6
3 7
2 5
1
1 2
1
Page 44

FR
COMPOSANTS PRINCIPAUX DE LA COLONNE DE DIRECTION
Les composants du guidon sont les suivants :
1. Support supérieur kit en option réservoir de solution.
Pour introduire le disque entraîneur dans le corps du carter de
l’appareil, agir comme suit :
1. Vérier si la che (1) située sur le câble d'alimentation (2)
est débranchée de la prise (3) de secteur (Fig. 1), sinon la
débrancher.
ATTENTION : Il est conseillé de toujours porter des gants de
protection pour éviter de se blesser gravement les mains.
2. Support inférieur kit en option réservoir de solution.
3. Enrouleur supérieur du câble.
4. Enrouleur inférieur du câble.
ATTENTION : Pour éviter les dommages au câble
d'alimentation, débrancher la prise du secteur en tirant
directement la prise et non le câble.
2. Vérier si le guidon de commande est en position verticale, dans
le cas contraire appuyer sur le levier de décrochage (4) (Fig. 2) et
tourner le guidon en position verticale (Fig. 3). Lorsque le guidon
est en position verticale, relâcher le levier de décrochage (4).
PRÉPARATION DE L'APPAREIL
INTRODUCTION DU DISQUE ENTRAÎNEUR
3. Incliner légèrement vers l’arrière la machine (Fig. 4), bloquer une
des roues arrière et déplacer vers l’arrière la colonne de direction.
4. Tourner le carter en position verticale (Fig. 5).
5. Mettre le carter tourné en contact avec le sol (Fig. 6).
4444
44
4
3
2
1
2
1
3 4
1
1 2 3
2
4 5 6
Page 45

FR
6. Dévisser et déposer les clavettes de serrage (5) (Fig. 7).
7. Introduire le disque entraîneur, faire attention à centrer les
axes de xation (6) de l’appareil avec les trous (7) du disque
entraîneur (Fig. 8).
8. Visser les clavettes de serrage (5) (Fig. 9)
ATTENTION : Pour obtenir un bon serrage des clavettes,
utiliser une pince de serrage.
En cas d'utiliser le disque entraîneur pour papier émeri, agir comme
suit :
• Dévisser et déposer les clavettes de serrage (5) (Fig. 7).
• Introduire le disque entraîneur, faire attention à centrer les
axes de xation (6) de l’appareil avec les trous (7) du disque
entraîneur (Fig. 8).
• Introduire la bride de centrage (8) (Fig. 10).
• Introduire dispositif de retenue leté (9), faire attention à centrer
les axes de xation de l’appareil avec les trous du dispositif de
retenue leté (Fig. 11). Visser les clavettes de serrage (5).
ATTENTION : Pour obtenir un bon serrage des clavettes,
utiliser une pince de serrage.
• Introduire le disque en papier émeri sur le disque entraîneur.
• Fixer le papier émeri au disque entraîneur à l'aide de l'écrou (10),
ne pas oublier d'insérer aussi la rondelle (11) (Fig. 12).
ATTENTION : Pour obtenir un bon serrage de l'écrou, utiliser
l’outil adéquat.
9. Incliner légèrement vers l’arrière la machine (Fig. 13), bloquer
une des roues arrière et déplacer vers l’arrière la colonne de
direction.
10. Tourner le carter en position de travail (Fig. 13).
4545
45
5
8
8
11
5
10
7 5
6
7
11 1210
8 9
1413
Page 46

FR
Pour monter le réservoir de solution sur le guidon, agir comme suit :
1. Fixer le guidon à environ 45° par rapport au sol (Fig. 1).
Remplir le réservoir de solution seulement quand la colonne de
direction est en position verticale, en agissant comme suit :
1. Déposer le bouchon du réservoir de solution (1) (Fig. 1).
2. Remplir d'eau propre à une température inférieure à 50 ºC.
3. Ajouter dans le réservoir le liquide détergent dans la concentration
et selon les modalités indiquées sur l'étiquette du fabricant. Pour
éviter une production excessive de mousse dans le réservoir,
qui nuirait aux composants internes de la machine, utiliser un
pourcentage adéquat de détergent.
2. Dévisser la poignée de fermeture (1) (Fig. 2) pour placer
les brides supérieures au-delà de la moitié de la colonne de
direction (Fig. 3) (si elles ne sont pas encore en position).
4. Insérer le bouchon du réservoir de solution (1) (Fig. 2).
ATTENTION : Il est conseillé de toujours porter des gants de
protection pour éviter de se blesser gravement les mains.
ATTENTION : il est conseillé d'aspirer par moments la
mousse remplie de saleté au moyen d'un aspirateur pour
liquides.
INTRODUCTION DU RÉSERVOIR DE SOLUTION (EN OPTION)
INTRODUCTION DE LA SOLUTION DÉTERGENTE (EN OPTION)
3. Poser le réservoir de solution sur la colonne de direction, de
manière à ce que la partie inférieure du réservoir reste prise par
la bride xe (2) de la colonne de direction (Fig. 4).
4. En saisissant le réservoir avec une main, faire descendre avec
l'autre la bride mobile (3) jusqu'à ce que le réservoir de solution
resté bloqué sur la colonne de direction (Fig. 5).
5. Bloquer la position de la bride mobile (3) au moyen de la poignée
de fermeture (1) (Fig. 6).
6. Insérer le tuyau de distribution de l'eau (4) dans le trou du
carter (5) (Fig. 7).
7. Insérer la chaîne tirant le robinet du réservoir de solution (6) dans
le crochet de la poignée de commande du robinet (7) (Fig. 8).
4646
46
1
4
7
2
5
8
3
6
1
2
5 4
6
7
3 3
1
Page 47

FR
Avant de commencer à employer la machine, il faut effectuer ce qui
suit :
1. Avant l'utilisation, il faut contrôler l'état régulier et la sécurité
de service de l'appareil avec les équipements de travail, en
particulier le câble d'alimentation et le câble de rallonge. Si l'état
n'est pas parfait, l'utilisation de l'appareil est interdite.
2. Introduire la che (1) du câble d'alimentation (2) dans la prise (3)
de secteur (Fig. 1).
3. Débloquer le guidon de commande de la position verticale.
Appuyer sur le levier d'arrêt (4) de la colonne de direction selon
la direction indiquée par la èche (Fig. 2) et tourner la colonne de
direction vers soi (Fig. 3).
ATTENTION : Pendant cette opération, ne pas poser le pied
sur l'appareil.
EMPLOI DE LA MACHINE
4. Tourner vers soi la colonne de direction jusqu'à trouver la position
optimale, cette position doit être confortable pour l’utilisation de
l’appareil.
5. Une fois la position idéale d'utilisation trouvée, relâcher le levier
d'arrêt (4) de la colonne de direction pour bloquer le guidon.
6. Tourner vers soi le levier de présence opérateur (5) (Fig. 4).
7. Appuyer sur les leviers de commande de l'interrupteur
général (6), placés sous les poignées du guidon (Fig. 5).
8. L’appareil commencera alors à se déplacer.
9. Appliquer une petite dose de solution détergente sur le sol, en
appuyant sur le levier (7) (Fig. 6), jusqu'à ce que la brosse soit
remplie de mousse (kit de réservoir de solution en option).
10. Conduire la machine avec la brosse tournante de gauche à droite
ou en sens inverse.
11. Tout de suite après, conduire la machine en sens inverse de
manière à ce qu'environ un quart de la largeur de travail se
superpose à celle précédente.
12. Il est conseillé d'aspirer par moments la mousse remplie de
saleté au moyen d'un aspirateur pour liquides (kit de réservoir
de solution en option).
ATTENTION : La première fois qu'un opérateur utilise la
machine, il doit se familiariser avec les mouvements à réaliser
sur le guidon pour obtenir une maîtrise sufsante de la
manœuvrabilité de la machine. Il ne doit donc pas employer la
machine à proximité de personnes ou d'obstacles.
ATTENTION : Travailler en réalisant des mouvements lents à
droite et à gauche, et dans la mesure du possible à reculons
pour que l'opérateur se trouve toujours dans la zone du sol qui
n'a pas encore été nettoyée.
ATTENTION : Toujours maintenir le câble d'alimentation à
l'arrière de l'opérateur, en faisant attention à ne pas travailler
lorsque la machine se trouve près de celui-ci pour éviter de
l'endommager.
ATTENTION : Ne pas trop insister sur la même zone pour ne
pas risquer de détériorer le sol, notamment en fonction du
type de brosse ou de disque abrasif choisi.
ATTENTION : S'il est nécessaire de travailler dans des
espaces étroits, il est possible de tourner la colonne de
direction en position verticale.
4747
47
1 2
1 1
1
2
3
5
4
7
6
1
4
2
5
3
6
Page 48

FR
A la n du travail et avant tout type d’entretien, exécuter les
opérations suivantes :
1. Débrancher la che (1) du câble d'alimentation (2) de la prise (3)
de secteur (Fig. 1).
ATTENTION : Il est conseillé de toujours porter des gants de
protection pour éviter de se blesser gravement les mains.
ATTENTION : Pour éviter les dommages au câble
d'alimentation, débrancher la prise du secteur en tirant
directement la prise et non le câble.
2. Tourner le guidon de commande en position verticale, appuyer
sur le levier de décrochage (4) (Fig. 2) et tourner le guidon en
position verticale (Fig. 3). Lorsque le guidon est en position
verticale, relâcher le levier de décrochage (4).
À LA FIN DU TRAVAIL
ATTENTION : Pendant cette opération, ne pas poser le pied
sur l'appareil.
3. Incliner la machine et mettre l’appareil dans l'endroit destiné
à l'entretien et effectuer toutes les procédures énumérées au
paragraphe « INTERVENTIONS D'ENTRETIEN PÉRIODIQUE
CONSEILLÉ » indiquées dans la colonne « À LA FIN DU
TRAVAIL ».
4. Une fois les interventions d'entretien terminées, amener l'appareil
à l'endroit prévu pour le rangement.
ATTENTION : Stationner la machine en lieu fermé, sur une
surface plane et lisse. Ne pas placer d'objets pouvant
l'endommager à proximité ou s'endommager à son contact.
5. Incliner légèrement vers l’arrière la machine (Fig. 4), bloquer une
des roues arrière et déplacer vers l’arrière la colonne de direction.
6. Tourner le carter en position verticale (Fig. 5).
7. Mettre le carter tourné en contact avec le sol (Fig. 6).
INTERVENTIONS D'ENTRETIEN CONSEILLÉ
ENTRETIEN
4848
48
1
2
3 4
1 2 3
4 5 6
TYPE D'ENTRETIEN
À LA FIN DU
TRAVAIL
HEBDOMADAIRE
AVANT UNE
LONGUE
PÉRIODE DE
REPOS
TRANSPORT
Contrôle et nettoyage du disque entraîneur X X X
Contrôle et nettoyage du réservoir de solution (en option) X X X
Page 49

FR
Le nettoyage minutieux du disque entraîneur garantit un meilleur
nettoyage du sol ainsi qu'une plus longue durée du moteur des
brosses. Pour nettoyer le disque entraîneur, agir comme suit :
1. Amener l'appareil dans l'endroit prévu pour la vidange des eaux
sales.
ATTENTION : Le local destiné à cette opération doit être
conforme aux normes en vigueur en matière de respect de
l'environnement.
2. Vérier si la che (1) située sur le câble d'alimentation (2)
est débranchée de la prise (3) de secteur (Fig. 1), sinon la
débrancher.
ATTENTION : Il est conseillé de toujours porter des gants de
protection pour éviter de se blesser gravement les mains.
ATTENTION : Pour éviter les dommages au câble
d'alimentation, débrancher la prise du secteur en tirant
directement la prise et non le câble.
3. Vérier si le guidon de commande est en position verticale, dans
le cas contraire appuyer sur le levier de décrochage (4) (Fig. 2) et
tourner le guidon en position verticale (Fig. 3). Lorsque le guidon
est en position verticale, relâcher le levier de décrochage (4).
CONTRÔLE ET NETTOYAGE DU DISQUE ENTRAÎNEUR
4. Incliner légèrement vers l’arrière la machine (Fig. 4), bloquer une
des roues arrière et déplacer vers l’arrière la colonne de direction.
5. Tourner le carter en position verticale (Fig. 5).
6. Mettre le carter tourné en contact avec le sol (Fig. 6).
7. Dévisser et déposer les clavettes de serrage (5) (Fig. 7).
8. Déposer le disque entraîneur, enlever les impuretés présentes
sur celui-ci.
9. Répéter les opérations en sens inverse pour remonter le tout.
ATTENTION : Pour obtenir un bon serrage des clavettes,
utiliser une pince de serrage.
4949
49
1
2
3 4
1 2 3
5
7
4 5 6
Page 50

FR
Le nettoyage soigneux du réservoir de solution garantit un meilleur
nettoyage du sol. Pour nettoyer le réservoir de solution, procéder
comme suit :
1. Amener l'appareil dans l'endroit prévu pour la vidange des eaux
sales.
ATTENTION : Le local destiné à cette opération doit être
conforme aux normes en vigueur en matière de respect de
l'environnement.
2. Vérier si la che (1) située sur le câble d'alimentation (2)
est débranchée de la prise (3) de secteur (Fig. 1), sinon la
débrancher.
ATTENTION : Il est conseillé de toujours porter des gants de
protection pour éviter de se blesser gravement les mains.
ATTENTION : Pour éviter les dommages au câble
d'alimentation, débrancher la prise du secteur en tirant
directement la prise et non le câble.
3. Fixer le guidon à environ 45º par rapport au sol, appuyer sur
le levier de décrochage (4) (Fig. 2) et tourner le guidon en
position (Fig. 3). Lorsque le guidon est en position, relâcher le
levier de décrochage (4).
CONTRÔLE ET NETTOYAGE DU RÉSERVOIR DE SOLUTION (EN OPTION)
4. Décrocher la chaîne tirant le robinet du réservoir de solution (5)
du crochet de la poignée de commande du robinet (6) (Fig. 4).
5. Déposer le tuyau de distribution de l'eau (7) du trou du
carter (8) (Fig. 5).
6. Dévisser la poignée de fermeture (9) (Fig. 6) pour placer les
brides supérieures au-delà de la moitié de la colonne de direction.
7. Déposer le réservoir de solution de la colonne de direction.
8. Déposer le bouchon du réservoir de solution (10) (Fig. 7).
9. Rincer l'intérieur au jet d'eau, le cas échéant utiliser une spatule
pour éliminer la bourbe accumulée sur le fond su réservoir.
10. Répéter les opérations en sens inverse pour remonter le tout.
RÉSOLUTION PANNES
Ce chapitre reporte les problèmes les plus courants liés à l'utilisation de l’appareil. Dans le cas où les informations suivantes ne permettraient
pas de résoudre les problèmes, contacter le centre d'assistance le plus proche.
ÉLIMINATION
Procéder à la mise au rebut de l'appareil auprès d'un démolisseur ou
d'un centre de collecte agréé.
Avant d'éliminer l'appareil, retirer et séparer les matériaux suivants et
les envoyer aux centres de collecte et de tri en respectant les normes
en vigueur en matière d'hygiène environnementale :
• Disques entraîneurs ou brosses
• Parties électriques et électroniques*
• Pièces en plastique
• Pièces métalliques
(*) En particulier, pour la mise au rebut des pièces électriques et
électroniques, s'adresser au distributeur.
5050
50
1
2
3 4
1 2 3
4 5 6
10
7
5 8
6
7
9
Page 51

FR
TROUBLESHOOTING
5151
51
PROBLÈME CAUSE POSSIBLE SOLUTION
L’APPAREIL NE S'ALLUME PAS
La rallonge n'est pas branchée à la prise
de secteur.
Vérier si la che de la rallonge est branchée
à la prise du réseau d'alimentation.
La rallonge n'est pas branchée au câble
d'alimentation de l'appareil.
Vérier si la che du câble d'alimentation
de l'appareil est branchée à la prise de la
rallonge.
Les spécications électroniques de
l'appareil correspondent aux spécications
électroniques du réseau d'alimentation.
Vérier que les spécications électroniques
de l'appareil correspondent aux
spécications électroniques du réseau
d'alimentation, contrôler les données
techniques présentes sur la plaque
matricule.
Rallonge endommagée.
Vérier si la rallonge est endommagée, si
c'est le cas la remplacer.
Surchauffe du moteur du carter.
Vérier si la protection thermique, située
dans l'arrière du guidon, est activée. Si ce
n'est pas le cas, attendre quelques minutes
jusqu'à ce qu'elle refroidisse, puis appuyer
sur le bouton du disjoncteur thermique pour
réactiver l'alimentation et le fonctionnement
du moteur.
SOLUTION DÉTERGENTE
INSUFFISANTE SUR LE DISQUE
ENTRAÎNEUR
Quantité de solution détergente présente
dans le réservoir de solution inadéquate
pour le travail à réaliser.
Contrôler si la quantité de solution
détergente présente dans le réservoir
de solution est correcte pour le travail à
effectuer, si nécessaire remplir le réservoir
de solution.
POS. COMPONENT
1 CONTACT DISJONCTEUR 16A
2 INTERRUPTEUR 20A
3 START RELAY
4 DÉBUT CONDENSATEUR
5 CONDENSATEUR DE TRAVAIL
6 MOTOR 1100W 100/115V 50/60HZ
8 PLUG
BK NOIR
BU BLUE
BN MARRON
RD ROUGE
WH BLANC
GNYE JAUNE/VERT
ELECTRICAL DIAGRAM
Page 52

HILLYARD INDUSTRIES - PO Box 909 - St.Joseph, Missouri 64502-0909 U.S.A. - Telephone: 816-233-1321 - www.hillyard.com
 Loading...