

Page 1
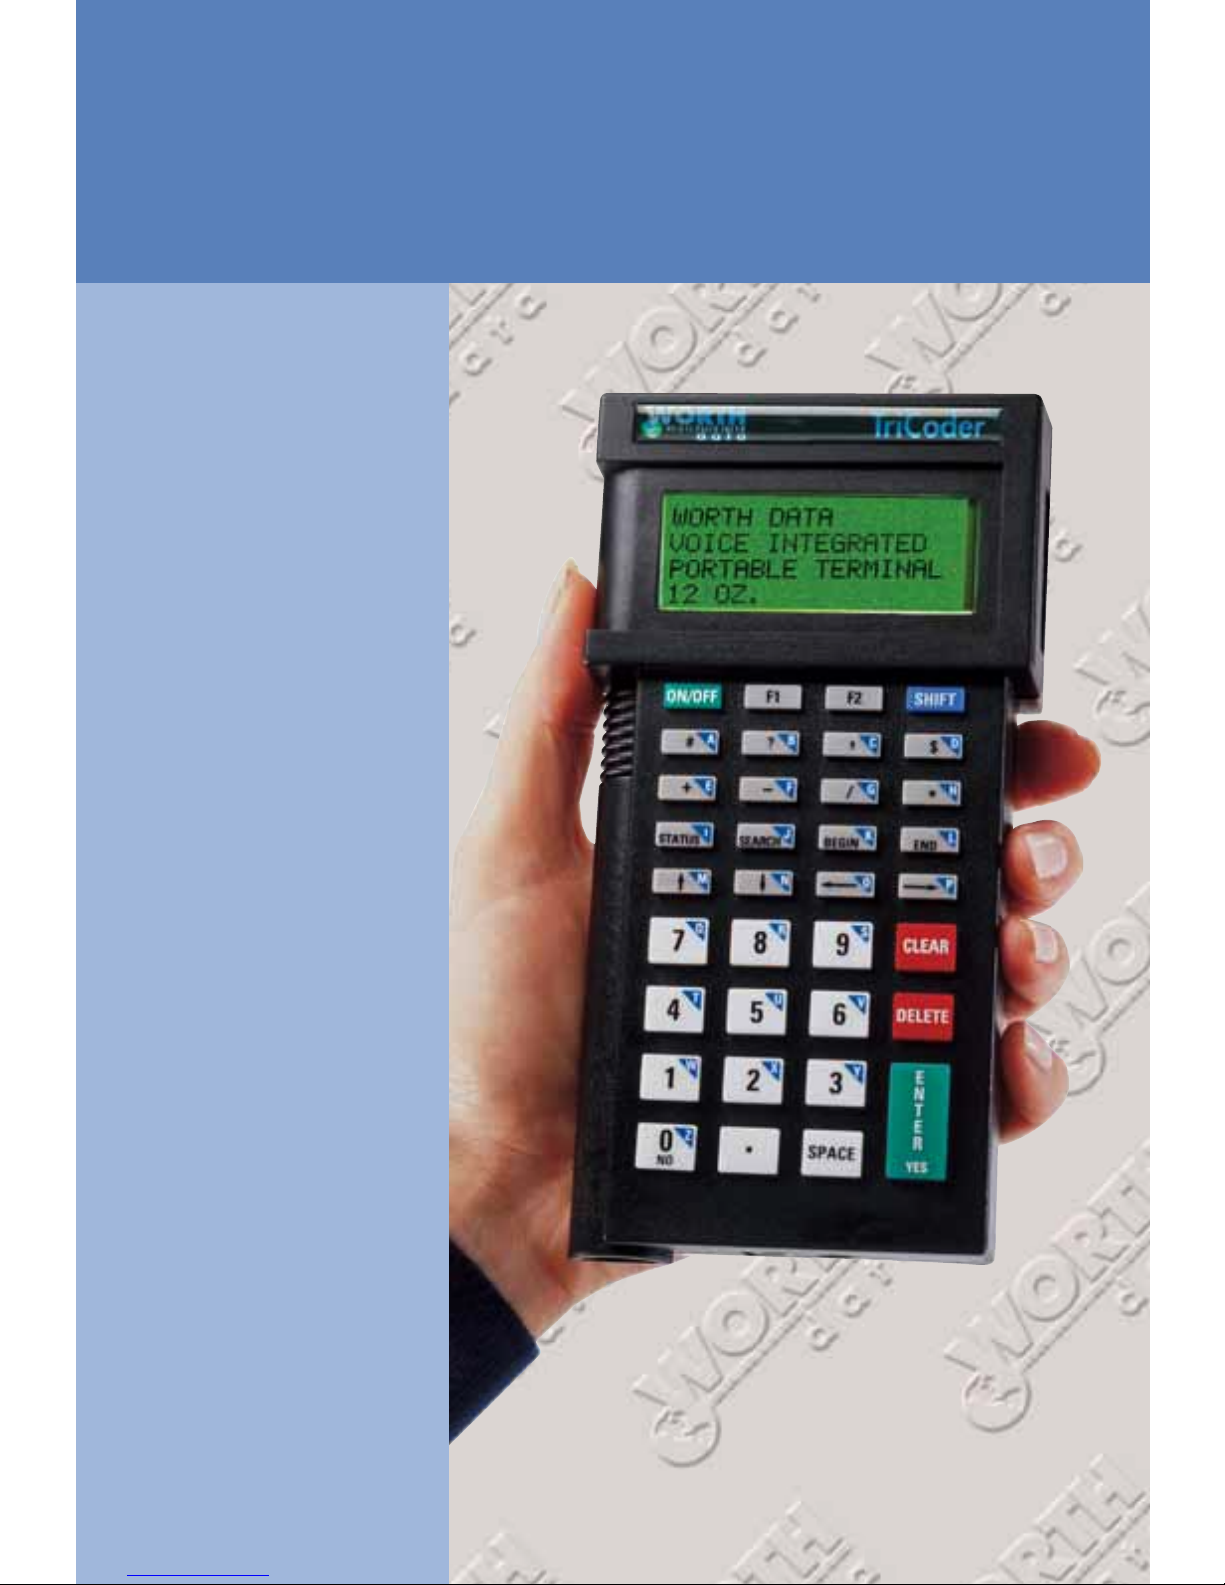
Owner’s Guide
™
A battery
operated
Portable Batch
Reader with
Voice Messages
for PC, Mac,
etc.
Portable Bar Code Reader
TriCoder
TM
Page 2
Warning: This equipment generates, uses and can radiate radio frequency
energy. If not installed and used in accordance with the instruction manual, it
may cause interference to radio communications. It has been tested and found to
comply with the limits for a Class A computing device pursuant to Subpart J of
Part 15 of FCC Rules, which are designed to provide reasonable protection
against such interference when operated in a commercial environment.
Operation of this equipment in a residential area is likely to cause interference in
which case the user, at his own expense, will be required to take whatever
measures may be required to correct the interference.
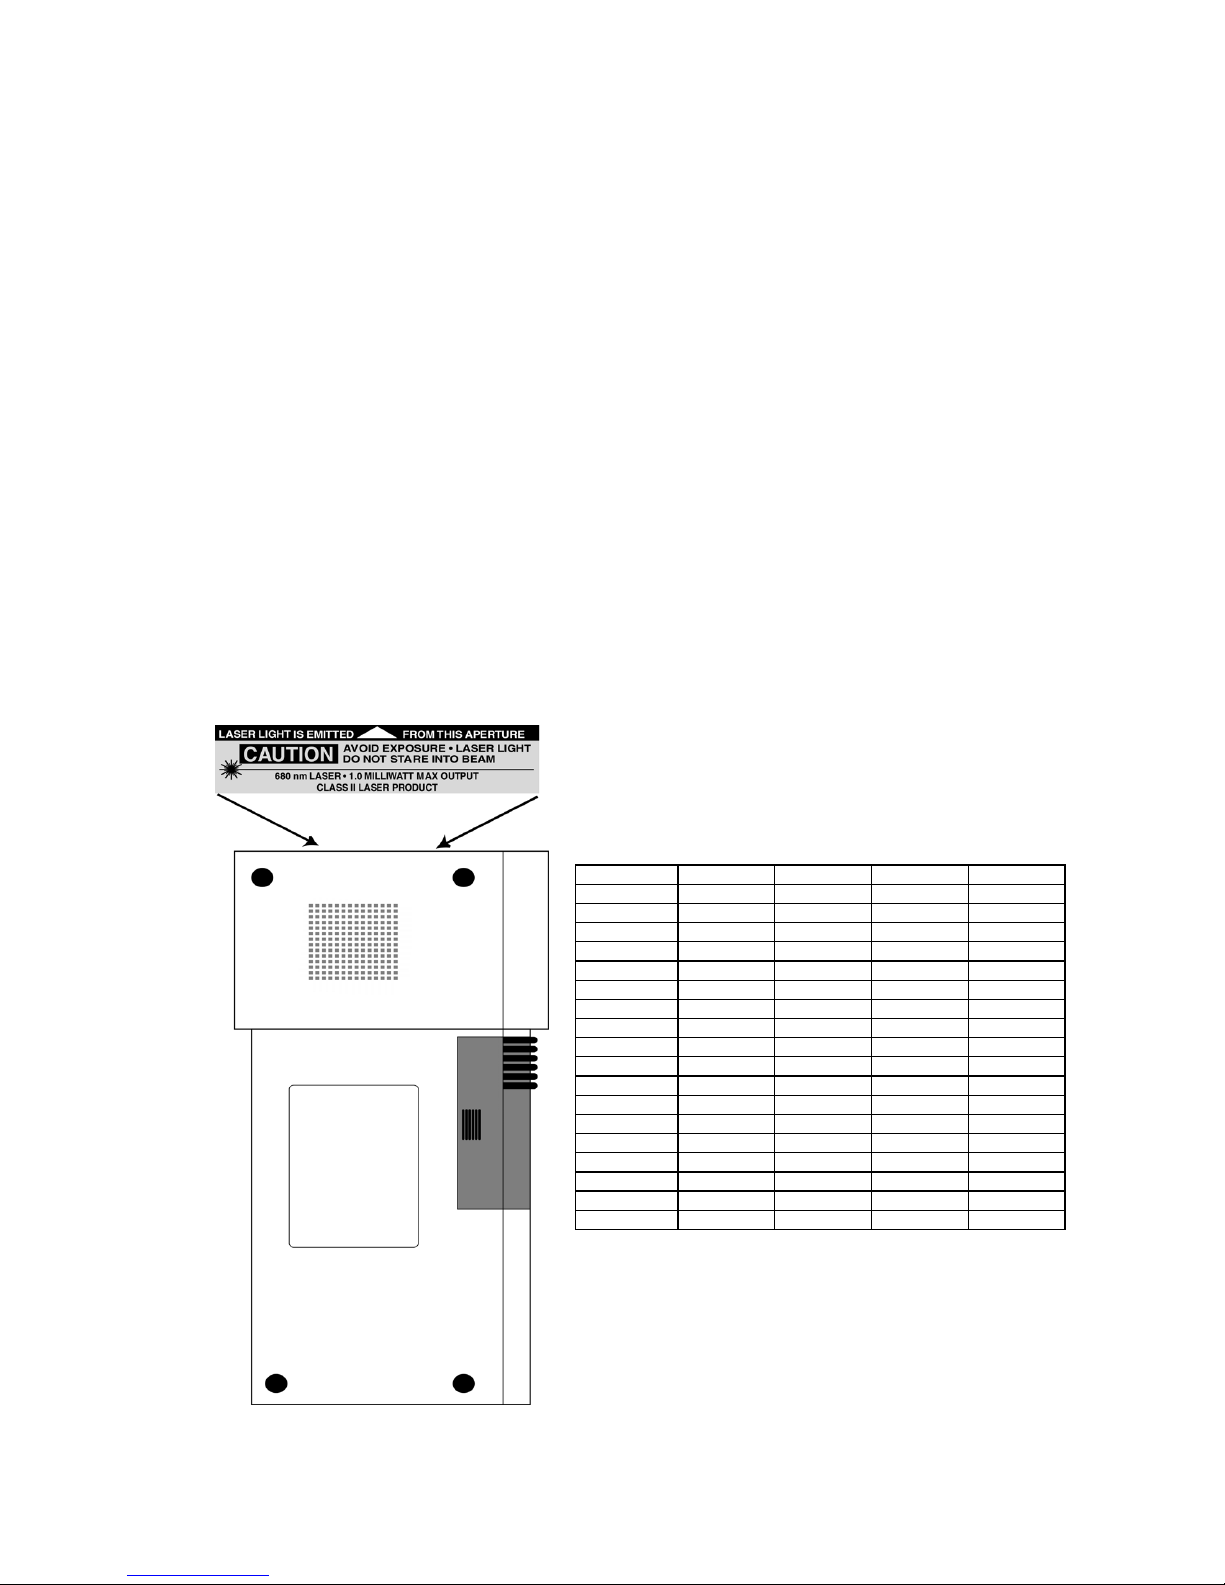
Certain models of this product have a laser scanner integrated with it as one unit.
The laser used is a Class II Laser Product and has a 1.0 Milliwatt Maximum
Output.
To operate the laser scanner, aim the top of the case at a bar code and press the
“Scan Key” on the keyboard of the TriCoder™. The light source will turn off once
a successful scan has occurred or 2.5 seconds has elapsed, whichever is first. Do
not look directly into the laser light source with the “Scan Key” depressed;
avoid direct eye contact with the laser light source.Warning labels to AVOID
DIRECT EYE EXPOSURE, DANGER are located according to the diagram
below:
The LT54 models of the TriCoder as well as
the LZ300 and LZ400 Laser Scanners are
covered by one or more of the following U.S.
Patents:
There are no user adjustments or maintenance
operations to be performed on the integrated
laser scanner.
Caution - use of controls or adjustments or performance of procedures
other than those specified herein may result in hazardous laser light
exposure.
Patent # 4,360,798 4,369,361 4,387,297 4,460,120
4,496,831 4,593,186 4,603,262 4,607,156 4,652,750
4673,805 4,736,095 4,758,717 4,816,660 4,845,350
4,896,026 4,897,532 4,923,281 4,933,538 4,992,717
5,015,833 5,017,765 5,021,641 5,029,183 5,047,617
5,103,461 5,113,445 5,140,144 5,142,550 5,149,950
5,157,687 5,168,148 5,168,149 5,180,904 5,229,591
5,230,088 5,235,167 5,243,655 5,247,162 5,250,791
5,250,792 5,262,627 5,280,163 5,280,164 5,280,498
5,304,786 5,304,788 5,321,246 5,377,361 5,367,151
5,373,148 5,378,882 5,396,053 5,396,055 5,399,646
5,408,081 5,410,139 5,410,140 5,412,198 5,418,812
4,420,411 5,436,440 5,444,231 5,449,891 5,449,893
5,468,949 5,479,000 5,479,002 5,479,441 5,504,322
5,528,621 5,532,469 5,543,610 5,545,889 5,552,592
5,578,810 5,589,680 5,612,531
Page 3

Table of Contents
How to Use this Manual........................................................................................ i
TriCoder Quickstart .............................................................................................ii
Chapter 1 Program #0 Quickstart.........................................................1-1
Getting into Data Collection Mode...................................... 1-1
Collecting Data ....................................................................1-2
Uploading Data.................................................................... 1-3
Chapter 2 Program #1 Quickstart.........................................................2-1
Collecting Data ....................................................................2-1
Reviewing and Editing Data................................................ 2-3
Uploading Data.................................................................... 2-5
Chapter 3 Non Portable Mode...............................................................3-1
Getting in and out of NON PORTABLE mode............ 3-1
Establishing communication in Non Portable Mode.... 3-2
USB Keyboard Interface and Keyboard Wedge.................. 3-2
Testing Fast USB Data Upload and PC Serial Interface...... 3-4
Chapter 4 Uploading Data.....................................................................4-1
Uploading into Excel ...........................................................4-1
Data Upload ......................................................................... 4-1
File Formats ......................................................................... 4-6
Chapter 5 TriCoder Connection............................................................5-1
USB Interface – PC and Mac............................................... 5-1
Serial Interface..................................................................... 5-3
Connecting the Hardware ............................................. 5-3
Serial Installation on a PC ............................................5-3
Configuring the TriCoder ............................................. 5-4
Testing Communication ............................................... 5-6
Keyboard Wedge Interface (not USB)................................. 5-6
Connecting the Hardware ............................................. 5-6
PC Keyboard Wedge Installation .................................5-7
Configuring the TriCoder for Keyboard Wedge .......... 5-7
Testing Communication................................................ 5-9
Chapter 6 TriCoder Setup......................................................................6-1
Using the bar code TriCoder Setup Menu ...........................6-1
Using the keypad to setup the TriCoder .............................. 6-1
Using the TriCoder Utilities and USB to change Setup ...... 6-3
Cloning from one TriCoder to another ................................6-4
TriCoder Setup Parameters.................................................. 6-8
Beep Tone..................................................................... 6-8
Speaker Volume............................................................ 6-8
Code 3 of 9 (Code 39) .................................................. 6-8
UPC/EAN ..................................................................... 6-9
Codabar....................................................................... 6-10
2 of 5 Code.................................................................. 6-11
2 of 5 Length............................................................... 6-11
MSI/Plessey ................................................................ 6-12
Page 4

Code 128..................................................................... 6-12
Code 93....................................................................... 6-13
RSS-14........................................................................ 6-13
Preamble and Postamble............................................. 6-13
Terminator Character.................................................. 6-15
Computer Interface ..................................................... 6-16
Intercharacter Delay.................................................... 6-18
Speaker / Batteries ...................................................... 6-18
Scanner Options.......................................................... 6-19
Aiming Dot Duration.................................................. 6-19
Keyboard Country ...................................................... 6-20
Operation Mode.......................................................... 6-21
Voice Messages .......................................................... 6-22
Set Date....................................................................... 6-22
Set Time...................................................................... 6-22
Alternative Date and Time formats ............................6-23
Single Cycle Transmit ................................................6-23
EOF String.................................................................. 6-23
Shut Down Time.........................................................6-24
Partitions..................................................................... 6-24
Characters ................................................................... 6-25
Data Security Features................................................ 6-25
Protocol....................................................................... 6-26
Baud Rate.................................................................... 6-28
Parity........................................................................... 6-28
Data Bits .....................................................................6-28
Stop Bits...................................................................... 6-29
Dialing String.............................................................. 6-29
Set ID Character ......................................................... 6-29
Host Response Delay.................................................. 6-30
Transmission Mode .................................................... 6-30
Modem Redial Delay.................................................. 6-30
Chapter 7 Using the TriCoder Utilities .................................................7-1
Installing the TriCoder Utilities........................................... 7-1
Running the TriCoder Utilities program.............................. 7-1
Using the Table Editor......................................................... 7-3
Uploading from TriCoder to your Computer....................... 7-4
Downloading from the computer to your TriCoder................. 7-8
Chapter 8 Creating a custom program..................................................8-1
If you are using KwikAsset™.............................................. 8-1
Program Statements ............................................................. 8-1
Program Name.............................................................. 8-3
Statement Entry Types.................................................. 8-3
Data............................................................................... 8-4
Branch........................................................................... 8-4
Question........................................................................ 8-5
Date and Time Stamp ...................................................8-6
Time Stamp................................................................... 8-6
Date Stamp.................................................................... 8-7
Xtra ............................................................................... 8-7
None.............................................................................. 8-8
Data AND Immediate Output....................................... 8-9
Compare........................................................................ 8-9
Printer Output .............................................................8-10
Page 5

Arithmatic................................................................... 8-10
Prompt Text ................................................................ 8-11
Voice Message Frequency.......................................... 8-12
Message Numbers....................................................... 8-12
Data ID........................................................................ 8-13
Data Type.................................................................... 8-16
Maximum Data Length............................................... 8-16
Minimum Data Length ............................................... 8-17
Input Device................................................................ 8-17
Yes/Next Statement .................................................... 8-17
No/End Statement....................................................... 8-18
Upload Prefix.............................................................. 8-19
Upload Suffix.............................................................. 8-22
Programming the TriCoder by scanning bar codes only .. 8-23
Finishing and checking your program ...............................8-24
Reviewing and Modifying programs ................................. 8-25
Chapter 9 Creating TriCoder Programs on your PC .........................9-1
Installing the Virtual TriCoder Utility ................................. 9-1
Starting the Virtual TriCoder Utility.................................... 9-1
The Virtual TriCoder Utility Screen.................................... 9-2
Creating a program .............................................................. 9-5
Chapter 10 Transmitting and Receiving Programs and Setup............10-1
Receiving a program on the TriCoder or host ................... 10-1
Cloning to or from older TriCoders................................... 10-2
Chapter 11 Partitioning memory for data files and tables...................11-1
Partitioning Memory.......................................................... 11-1
Using Multiple Data Files.................................................. 11-1
Partitioning memory for tables ..........................................11-4
Chapter 12 Tables and Pick Lists..........................................................12-1
Partitioning memory for table use...................................... 12-1
Data Validation using Tables.............................................12-1
Data Maintenance using tables ..........................................12-4
Downloading a table to the TriCoder................................. 12-7
Pick Lists............................................................................ 12-7
Chapter 13 Voice Messages...................................................................13-1
Why Use Voice Messages and Prompts? .......................... 13-1
Tips for Using Voice Prompts ...........................................13-1
TriCoder's Voice Message Mapping.................................. 13-2
Accessing Voice Message Operations............................... 13-3
Recording and Playback of Voice Messages..................... 13-4
Voice Message Options .....................................................13-5
Default Voice Messages ....................................................13-6
Cloning Voice Messages from TriCoder to TriCoder .......13-6
Chapter 14 Troubleshooting..................................................................14-1
Display and Error Messages ..............................................14-1
General Troubleshooting ................................................... 14-6
Poor read rates…................................................................ 14-8
USB troubleshooting (for Windows Users)....................... 14-9
Keyboard Wedge mode troubleshooting ........................... 14-9
Serial mode troubleshooting ............................................ 14-10
Program troubleshooting.................................................. 14-12
Page 6

Error messages for special consideration......................... 14-13
Fail-safe Re-initialization Procedure ...............................14-15
Planning for success…..................................................... 14-16
If you have a problem… .................................................. 14-17
Appendix A Powering the TriCoder ........................................................A-1
Turning the TriCoder ON and OFF .................................... A-1
Battery Power and Wall Power........................................... A-1
Storing the TriCoder ........................................................... A-4
Appendix B Firmware and Model Upgrades ..........................................B-1
Firmware Updates................................................................B-1
Model Changes ....................................................................B-3
Appendix C How to scan a bar code........................................................C-1
Laser Scanners .....................................................................C-1
CCD Scanners......................................................................C-2
Appendix D Cable Pin-outs......................................................................D-1
Appendix E Optional Features ................................................................E-1
Appendix F Jumpers, Switches, and Adjustments..................................F-7
Appendix G USB Driver Installation Recovery ......................................G-1
Appendix H Specifications for Code 39.................................................. H-1
Appendix I Code 128 Specifications........................................................ I-1
Appendix J Interleaved 2 of 5 Code.........................................................J-1
Appendix K UPC Specifications ..............................................................K-1
Appendix L Codabar Specifications........................................................ L-1
Appendix M MSI/Plessey Specifications................................................. M-1
Appendix N Code 93 Specifications.........................................................N-1
Appendix O ASCII Code Equivalent Table.............................................O-1
Appendix P RS-422 ..................................................................................P-1
Appendix Q Polling and how it works .....................................................Q-1
Appendix R Modem Uploads ...................................................................R-1
Appendix S Buffered Terminal Mode..................................................... S-1
Appendix T Using the TriCoder as a Time Clock................................... T-1
Index.........................................................................................1
Revised - July 11, 2008
Page 7

i
How to Use this Manual
The TriCoder™ is an extremely versatile bar code reader. It functions as both a
portable data collection device as well as a fixed on-line bar code reader.
Although the TriCoder can perform complex data collection functions, it's true
value is in its simplicity. With very little instruction, a user can collect data
using one of the built-in programs, upload it and process the data.
This manual is provided with the intention of acting as a guide or reference.
Sometimes the best way to learn to use the TriCoder is to simply turn it on and
start following the prompts. Other times, more guidance is desired, especially if
the user wants to get up and running quickly.
Two data collection tutorials are provided as well as detailed instruction on
using the TriCoder as a fixed reader using NON PORTABLE mode. The first
Quickstart Tutorial uses the built-in Program #0, a simple one prompt (ITEM)
data collection program that is useful for simple inventory applications. The
second Quickstart Tutorial demonstrates Program #1, an editable program that
by default prompts the operator for an item number, then a quantity. To get
started quickly, we suggest using one of the Quickstart Tutorials, then move on
to the PROGRAMMING section if you find that neither Program #0 nor
Program #1 offers exactly what you need.
Although most people use the TriCoder as a portable data collector, it is also
frequently used in NON PORTABLE mode as a fixed reader for library and
POS applications. Everyone should use NON PORTABLE mode for testing
communication before beginning data collection. Chapter 3, Using NON-
PORTABLE mode, covers all areas of fixed use.
USB support on the TriCoder is now so fast (40 times faster than serial, 1000
times faster than keyboard) it is the interface of choice. You can have very fast
data uploads, program transfers, and still have operate as a USB keyboard in
non-portable mode. USB is standard on all models of the TriCoder.
The remainder of the manual is a reference guide. Chapters 5, 6, and 7 of the
CONNECTION AND SETUP section provide details on configuring the
TriCoder as well as the actual hardware connections. Chapters 8 and 9 of the
PROGRAMMING section of the manual details usage of voice messages, Data
Identifiers for data editing, and default Qty 1 scanning. Chapters 10-14 of the
ADVANCED USAGE section describe Voice Messaging, Transmitting and
Receiving programs, Tables and Pick Lists and Memory partitioning.
The TROUBLESHOOTING section provides reference for error messages,
solving problems and details on how to reach Worth Data. The REFERENCE
section offers bar code specifications and other useful information.
Page 8

ii
TriCoder Quickstart
As powerful as the TriCoder is, its basic operation is quite simple. Many people
can use Program #0 or Program #1 to satisfy their data collection needs. This
Chapter helps you get started quickly using Program #0 or Program #1. It also
will refer you to the correct place if you want to customize or expand on
Program #1. We highly recommend going to Chapter 3; Non Portable Mode
and establishing communication between the TriCoder and the PC before you
continue with either of the tutorials. It is easier to establish communication with
one data item in the TriCoder rather than trying to do so during a massive batch
upload. The chapters in this section are:
• Program #0 Tutorial
Uses the fixed program #0 to collect and upload data for a single
ITEM prompt to your computer. If you need a program that prompts
for an item number and then a quantity, go to the Program #1 Tutorial.
If Program #0 works for you, except that you have trouble with the
wedge upload, switch to USB or see Program #2. It is identical to
program #0 but allows timing delays to be inserted in the Upload
Prefix and Suffix. See Chapter 8;Creating a custom program for
information on the Upload Prefix and Suffix.
• Program #1 Tutorial
Uses the editable program #1, which prompts for Item Number, then
Quantity. The tutorial includes collecting, reviewing, and uploading
data as well as providing outlines for different file formats and voice
messaging. Since Program #1 is editable, the tutorial also discusses
use of the following popular features:
− Data Security
Restricting user to Data Collection mode or to data collection
in one program only.
− Xtra Statement
Automatically enter a quantity of 1 without the user having to
input any data.
• Non Portable Mode
Provides details on Non Portable use and establishes communication
between TriCoder and host computer through the USB port, keyboard
and serial port. Includes installation instructions for the Windows
TriCoder Utilities program
• Uploading Data
Guides the user through the uploading of data through USB, the
keyboard and serial port for both tutorials described above.
Page 9

iii
Tips on choosing a program for Data Collection
The TriCoder comes with 3 programs pre-installed. Program #0 is a simple
un-editable program prompting repeatedly for an ITEM. Program #2 is
identical to Program #0 except that it allows for customization (i.e. the
Upload Prefix and Upload Suffix). See Chapter 8; Creating custom
programs for details on what the Upload Prefix and Upload Suffix can do
for you.
Program #1 differs from Program #0 and #2 in that it has two prompts "ENTER ITEM NO." and then "ENTER QUANTITY". Program #1 is
also fully editable and lends itself well to the use of several features in
particular.
The tutorial on Program #1 includes explanation of two safety features. The
first safety feature, Data Security, confines the user to data collection mode
ONLY. The user is not allowed into any mode other than DATA
COLLECTION mode. In addition to using Data Security to restrict the user
to DATA COLLECTION mode, you can use the second security feature,
Program Restriction, to confine the user to one particular program in the
TriCoder. For details on how to use these Data Security features, see
Chapter 6; TriCoder Setup.
Another useful programming feature explained in the tutorial is the Xtra
Statement, which works with the "ENTER QUANTITY" prompt by
automatically entering a quantity of “1” if the user enters another ITEM
number instead of a quantity. See Chapter 8, Creating a custom program
for details on the Xtra program statement.
Program #1 is extremely versatile. Use it if you can, making modifications
to fit your application. If you require a customized program, these are just a
few of the options and features offered by custom programming:
• Additional user prompts for other types of data
• Program timing delays to facilitate uploading directly into an
application
• Branching to different areas in the program, depending on the
input from the user
• Downloading tables of data to validate or edit into the
TriCoder
• Recording customized Voice Messages
If any of the above features (or anything not offered by Program #1)
appears to be something you are interested in, move on to the
PROGRAMMING section of the manual. The Chapters 8 and 9 in the
PROGRAMMING section cover all aspects of creating and maintaining
custom programs in the TriCoder.
Page 10

iv
Choosing an Interface
If you are a Windows® user with Windows Vista, XP, 2000, ME or 98SE,
we suggest that you use the high speed USB interface, which offers the
following advantages: (the first time you plug in your USB cable, you may
be asked to choose the type of USB interface you wish to use)
1) Forty times faster data uploads than serial data uploads.
2) The ability to update your firmware with all the improvements
available on the Website over the years or your TriCoder’s life at
speeds 40 times faster than serial, (its not even possible with the
keyboard wedge).
3) The ability to download tables, upload/download programs from
your PC at much faster speeds than serial, (not possible with
keyboard wedge interfaces). All communication is controlled by
the new TriCoder Utilities - you can even change your setup!
4) The ability to operate in Non-Portable Mode as a USB keyboard
without having to add a jumper block to a Y-Cable when the
TriCoder is removed from the Y-cable for portable data collection
5) The ability to use the Virtual TriCoder program for developing
custom programs on the TriCoder in a Windows environment.
If you are a Macintosh user, you should specify the PC and Mac USB
Keyboard.
Page 11
1-1
Chapter 1
Program #0 Quickstart
The default data collection program, Program #0, is a simple program, repeatedly
prompting the operator for data entry of the same type. This TriCoder program
works well for a simple inventory where each item is scanned. This chapter is in
the form of a tutorial. Even if you don’t intend to use Program #0, working
through the tutorial will prepare you for creating your own programs and learning
the basics of data collection.
Getting into Data Collection Mode
The first step involves turning on the TriCoder (make sure you
have good batteries), getting into DATA COLLECTION mode
and choosing Program #0.
Turn on the TriCoder by pressing the ON/OFF key. The TriCoder will
power up and display its opening screen:
The TriCoder starts with the following opening screen:
DMA TRICODER x20xx X
HIT ANY KEY_
Press any key on the TriCoder keypad. If the TriCoder was in NON
PORTABLE MODE when it was shut off earlier, it will automatically go
back into NON PORTABLE MODE now. If this is the case, press the F1
key to get to the DATA COLLECTION prompt. If the TriCoder was in any
other mode at shutoff, DATA COLLECTION is the first prompt you will
see after pressing any key at the opening screen.
DATA COLLECTION?
KEY [YES/NO]?_
At the DATA COLLECTION prompt, press the YES key on the TriCoder
keypad. Press “0” on the TriCoder keypad to select the default Program #0.
1. SAMPLE PROGRAM
2.
3.
PROGRAM NO. [0-3]?_
(If you had programs created in program #2 and #3, you would see their
program name in the spaces above for 2 and 3.)
Step
1
Page 12

1-2
Collecting Data
The second step involves collecting data in the TriCoder.
This is a good time to practice scanning. If you are not
familiar with scanning bar codes, see Appendix C; How to
scan a bar code for details and suggestions. If you don’t
intend on using bar codes later, you can just enter the same data from the
keypad.
Pressing “0” at the PROGRAM NO.? prompt begins the data collection
process by displaying this prompt for the operator:
ENTER DATA _
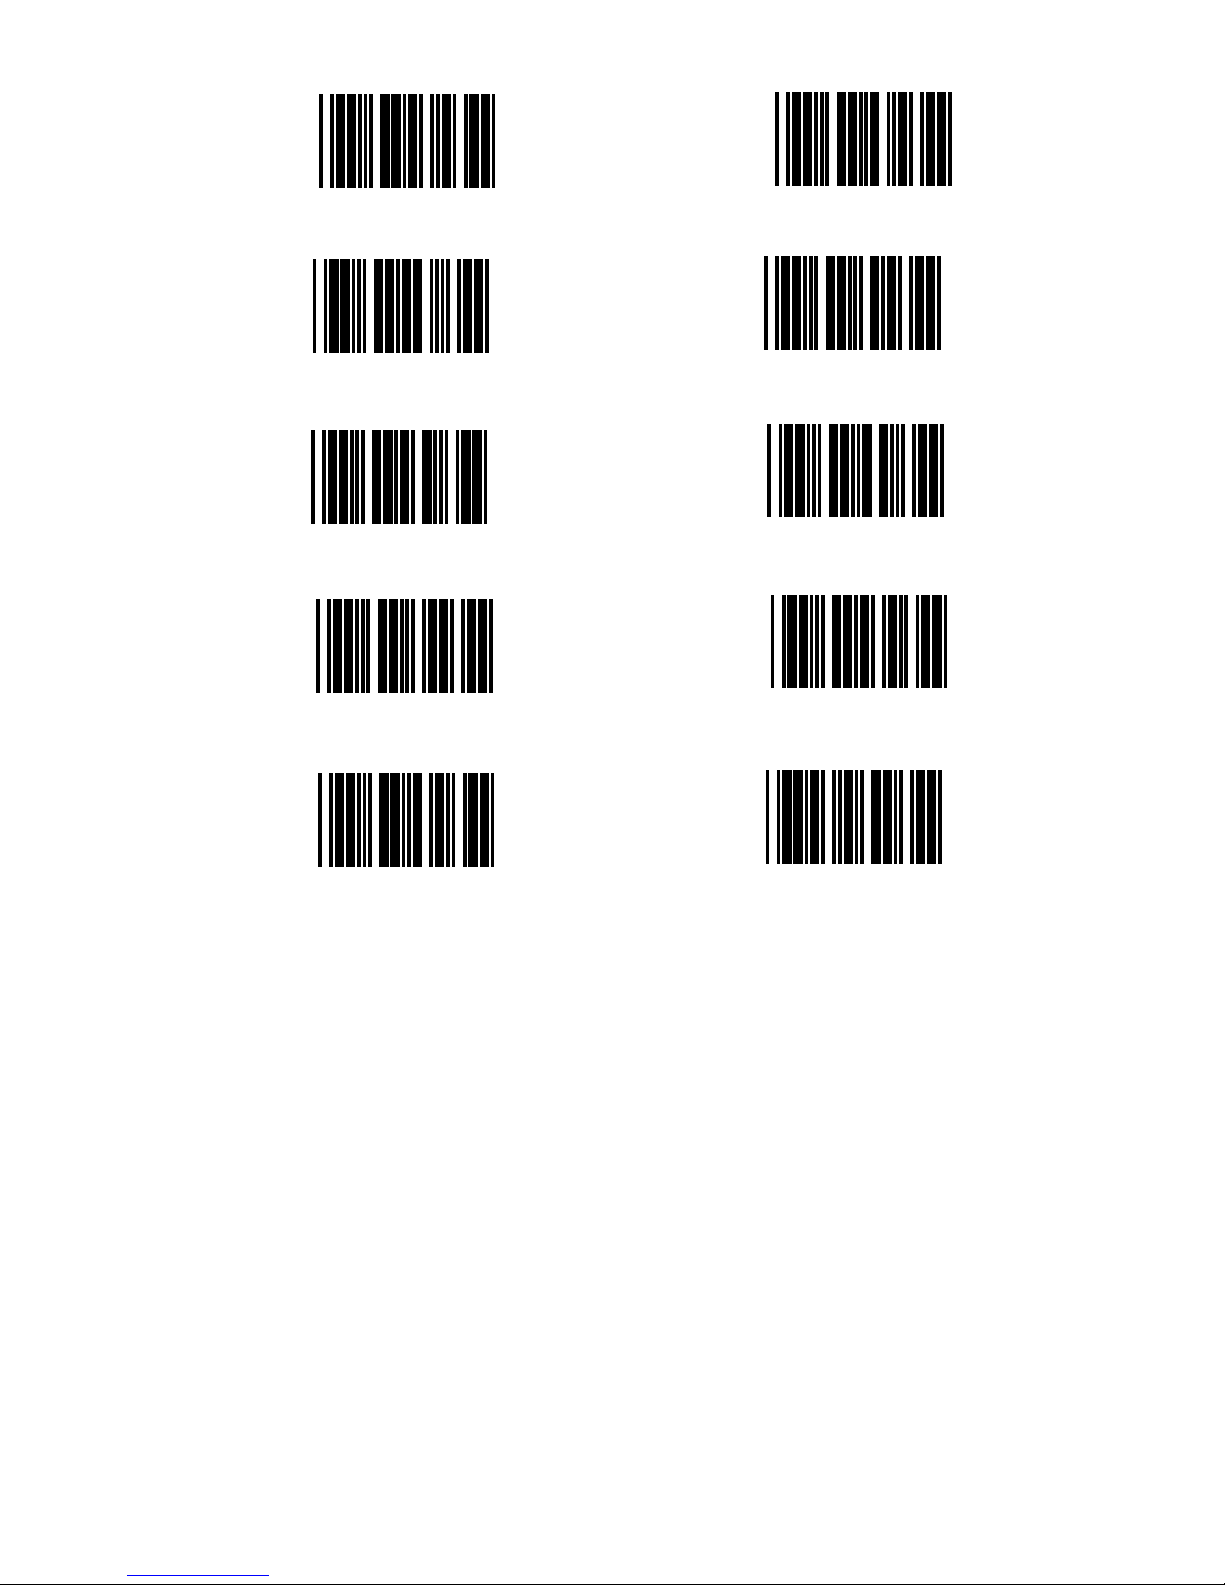
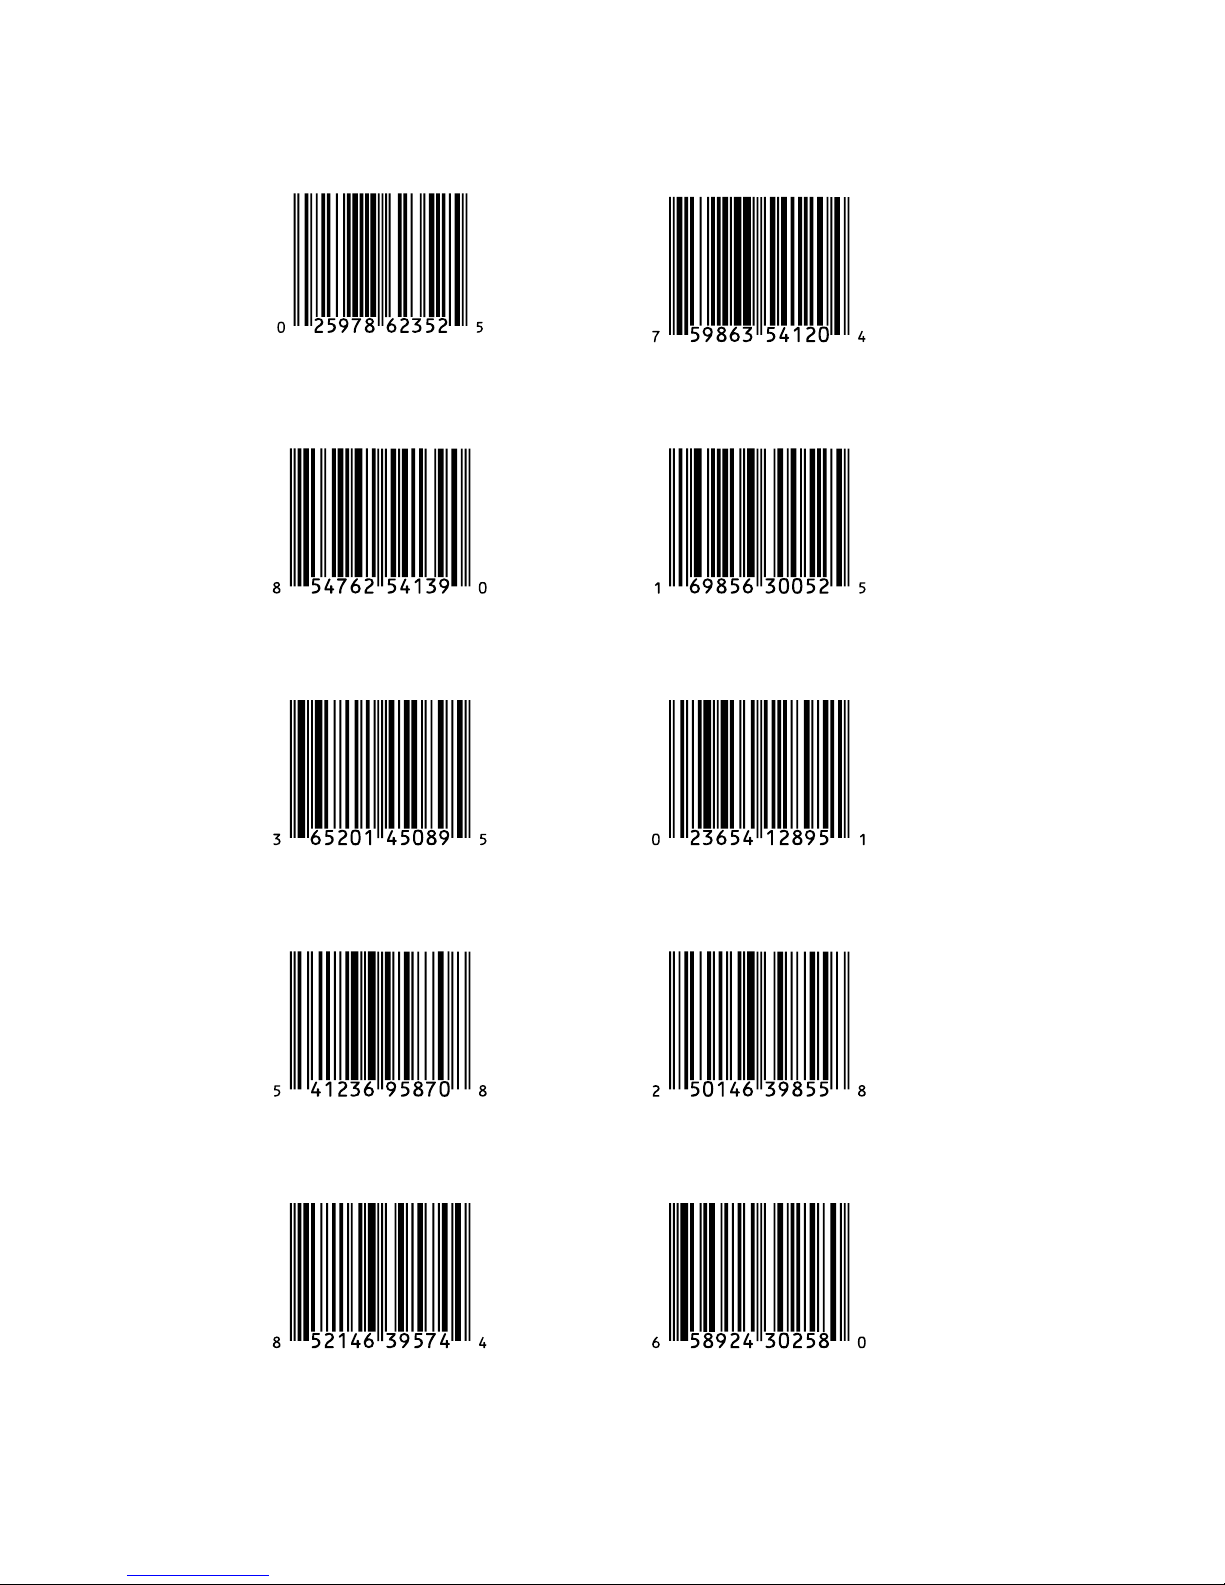
For the purposes of this tutorial, we will use the sample bar codes as our
data. Upon scanning, the TriCoder will beep once and display the
following:
ENTER DATA
(original prompt)
00001
(bar code #1)
ENTER DATA
(new data entry prompt)
After scanning, the TriCoder displays the original prompt, then the data just
entered, then the new data entry prompt. For the tutorial, our second piece
of data will be 00002. Go ahead and scan sample bar code #2 or key in
00002:
00001
(original data)
ENTER DATA (2
nd
data entry prompt)
00002 (2
nd
piece of data entered)
ENTER DATA
(new data entry prompt)
Continue to scan the sample bar codes or enter the data from the keypad.
The TriCoder display will scroll with each entry as shown immediately
above. As soon as you are finished entering all 10 bar codes, press the
END key to exit DATA COLLECTION.
Step
2
Page 13
1-3
Program #0 Sample Bar Codes
Uploading Data
Once you have collected your data in Program #0, uploading that data to the
computer is the final step. For the tutorial, we assume that you have
successfully established communication between the computer and the
TriCoder. If you have not, go to Chapter 3; Non Portable Mode, and
establish communication first. If you are ready to upload, go to Chapter 4;
Uploading Data and proceed with your upload.
01
02
03
04
05
06
07
08
09
10
Page 14

Page 15
2-1
Chapter 2
Program #1 Quickstart
Program #1 prompts the operator for "Item" and then "Quantity". What makes
this program different from program #0 (other than the additional "Quantity"
prompt) is that Program #1 is editable. It can be customized to allow for
additional prompts, voice messaging and file formatting. The tutorial for
Program #1 includes collecting data, reviewing and editing data, using popular
uploaded file formats and finally, uploading the data
Collecting Data
Collecting data in Program #1 requires two pieces of data; item
and quantity. By default, Program #1 is set up to accept data
from either the scanner or the keypad for the item, but only
from the keypad for the quantity.
Program #1 also features voice messaging. By default, Program #1 plays a
voice prompt of “Item” for the visual “ENTER ITEM NO.” prompt and a
voice prompt of “Quantity” for the visual “ENTER QUANTITY” prompt.
Program #1 only plays each voice message the first 5 times the prompt is
displayed. The TriCoder can be programmed to play the voice message
every time the visual prompt is displayed if desired. See Chapter 8;
Creating a custom program or Chapter 13; Voice Messaging for details.
To collect data in Program #1, answer no to all TriCoder prompts until you
see:
DATA COLLECTION?
KEY [YES/NO]?_
At the DATA COLLECTION prompt, press the YES key on the TriCoder
keypad. Press “1” on the TriCoder keypad to select the default Program #1.
1. SAMPLE PROGRAM
2.
3.
PROGRAM NO. [0-3]?_
(If you had programs created in program #2 and #3, you would see their
program name in the spaces above for 2 and 3.)
Using the bar code samples on the next page, scan an item number bar code,
then enter the quantity of “123” on the TriCoder keypad.
Step
1
Page 16
2-2
Continue to scan bar codes and enter quantities until you have at least 10
records. You can check to see how many times you have scanned an item
number by pressing the following keys while at the ENTER ITEM prompt:
Page 17
2-3
− Press SHIFT
− Press F1
− Press T
You can use the same key sequence to check the number of times you have
entered data for any prompt.
To end data collection in Program #1, simply press the END key. If you
forget to exit Data Collection and simply turn the TriCoder off, do not panic
– the TriCoder has saved your data. Pressing the F1 key while in Data
Collection also exits data collection and returns you to the Mode Menu.
Using the END key to end Data Collection is the preferred method.
Reviewing and Editing Data
During or after collecting data, it is possible to review and edit
the data while it is still in the TriCoder. You can also delete
data entirely. Data Review Mode is a handy tool – especially if
you know you’ve made a mistake and want to correct it before
you upload your data.
For the tutorial, lets say that we just wanted to take a break from collecting
data, exited DATA COLLECTION (by pressing the END key), turned off
the TriCoder and went to lunch. We’re back now and want to resume our
data collection. Turn the TriCoder back on and just as in step 1; get into
DATA COLLECTION mode. Since there is already data in the TriCoder,
instead of simply displaying the prompt, the TriCoder plays the “DATA
FILE EXISTS” voice message, and displays the same message on the
TriCoder screen:
DATA FILE EXISTS
HIT ANY KEY_
then immediately displays the ENTER DATA prompt.
Say we want to review the data already in the TriCoder - maybe
we made a mistake or think we missed some data. To review
data already in the TriCoder, press the “UP ARROW” key on
the TriCoder keypad. The TriCoder will beep – 2 low beeps then 2 high
beeps and display:
Data Review Request
Press <BEGIN> key to
Start or <F1> for
Data Collection_
If we just wanted to go into DATA COLLECTION, we would
simply press F1 and start scanning again, but we want to
review the data already collected so press the BEGIN key to
get into DATA REVIEW mode. Once in DATA REVIEW
mode, the TriCoder displays the last data collected. To get to the beginning
Step
3
Page 18
2-4
of your data file, press the BEGIN key. The TriCoder displays:
ENTER QUANTITY
XXX
(last quantity data entered)
BEGIN OF FILE
HIT ANY KEY_
Press any key on the TriCoder keypad. The TriCoder displays
the first record of data. To scroll through the data record by
record, press the RIGHT ARROW key.
To immediately go to the end of the data, press the END KEY.
At the END OF FILE prompt, hit any key to get to the last record
of data in the file.
To scroll backwards through the data record by record, press the
LEFT ARROW key. To edit individual characters in a data
record, use the right and left arrow keys to find the data you want
to edit.
If you know what data you are looking for (or want to look for
all data that has certain characters) you can use the SEARCH
key. After pressing the SEARCH key, the TriCoder displays the
SEARCH PATTERN prompt. Enter the data you want to search for (i.e.22)
then press ENTER. The TriCoder begins its search at the beginning of the
file and moves forward until a match is found. If using our example of 22,
the TriCoder would find all data that contains 22, regardless of its position
in the data (i.e.22345, 32245, 34522). To scroll through the data fields,
press the SEARCH key again.
Pressing the DELETE key deletes characters to the left. Replace
characters simply by pressing a key. To replace an entire data
entry, use the right and left arrow keys to find the data, then
press the CLEAR key to delete the entry. You can re-enter data
at this point by entering data from either the keypad or by
scanning. If you enter data from the keypad (when either editing
single characters or replacing an entire entry) you must press
ENTER on the keypad for the change to take place. If you
want to completely delete the data, after pressing CLEAR, the
TriCoder will prompt you with DELETE THIS FIELD? If you are sure
you want to delete the data, press ENTER.
You can use the STATUS key at any time during data collection
to check the amount of memory you have left as well as the
battery levels:
mm/dd/yy hh:mm:ss
xxxk BYTES FREE
AAaBAT-xx%
LI – BAT-xx%
Page 19
2-5
If during data collection, the TriCoder displays the following message:
WARNING 2K LEFT
HIT STATUS KEY_
it means that the TriCoder has only 2K of memory left to collect data. This
is a good time to go and upload your data. You can continue to collect data
but you will eventually get this message:
OUT OF MEMORY
HIT ANY KEY_
Pressing a key will take you out of Data Collection mode and
back to the Mode Menu. You will have to upload your data before you can
collect any more.
When you are ready to go back to collecting data, press the F1 key at any
time to begin appending data to the existing data file. The F1 key also backs
you out of any mode you are in; for example, if you are in Non Portable
mode, pressing F1 takes you back to the Data Collection prompt of the
Mode Menu.
Uploading Data
Once you have collected your data in Program #1, uploading that
data to the computer is the final step. For the tutorial, we assume
that you have successfully established communication between
the computer and the TriCoder. If you have not, go to Chapter
3; Non Portable Mode, and establish communication first. If you are ready to
upload, go to Chapter 4; Uploading Data and proceed with your upload.
Step
4
Page 20

Page 21

3-1
Chapter 3
Non Portable Mode
NON PORTABLE mode allows the user to transmit data directly from the
TriCoder to the host computer immediately without saving the data in the
TriCoder's memory. Once data is entered via scanning a bar code or using the
keypad, data is transmitted immediately by the TriCoder to the host. This mode
is primarily used with the USB interface and the keyboard wedge interface. It is
also used to test serial communication. NON PORTABLE mode is used to
enter data directly into an application. Common applications include library
check in/out, document tracking, and Point-Of-Sale. NON PORTABLE mode
should also be used to establish communication between the TriCoder and host
computer before serial or fast USB data uploads are attempted.
Getting in and out of NON PORTABLE mode
When you turn the TriCoder on, the first screen you see is the TriCoder version
screen. After the opening screen is the TriCoder Mode Menu. The Mode
Menu is your navigational tool for getting into an out of the different activities
in the TriCoder. The Mode Menu consists of the following prompts:
DATA COLLECTION?
KEY [YES/NO]?_
DATA UPLOAD?
KEY [YES/NO]?_
NON PORTABLE MODE
KEY [YES/NO]?_
PROGRAMMING MODE?
KEY [YES/NO]?_
PROGRAM TRANSMIT?
KEY [YES/NO]?_
PROGRAM RECEIVE?
KEY [YES/NO]?_
Answering NO to any prompt takes you to the next prompt. If you are
already in a particular mode (i.e. Non Portable Mode) and want to get back
to the Mode Menu, simply press the F1 key.
If you are in NON PORTABLE mode and turn the TriCoder off, when you
turn the TriCoder back on and press a key at the opening screen you are
automatically brought back into NON PORTABLE mode.
Page 22

3-2
If you are in any other mode, simply answer NO to all prompts until you see:
NONPORTABLE MODE
KEY [YES/NO]?_
Press YES to enter NON PORTABLE mode. If you have USB specified
as the interface and you do not have the TriCoder connected by USB to the
computer, you will get the message:
USB not Connected
Connect, Hit any Key
or F1 – Exit
or F2 – Display Only
If you simply want to view data on the TriCoder screen and NOT transmit
data to the computer, press F2. If you want to exit Non Portable Mode,
press F1. If you want to communicate to the computer, connect to your USB
port and press any key.
The TriCoder now displays:
NONPORTABLE MODE
and is ready and waiting for input.
If you want to leave NON PORTABLE mode, simply press the F1 key to
return to the beginning of the MODE MENU.
Typically, the TriCoder is used in NON PORTABLE mode while it's
connected to the host computer either by keyboard splitter Y-cable, USB
cable connection, or via serial connection with PortKey. See Chapter 5;
TriCoder Connection, for more information and diagrams to help you
correctly connect the TriCoder to your computer.
Establishing communication in Non Portable Mode
USB Keyboard Interface and Keyboard Wedge
To test communication as a keyboard (USB or traditional), all you need is a
program capable of accepting data from the keyboard – for example,
Windows Notepad. The key to testing communications is to keep it simple
– you don’t want to have to determine whether it’s your software or the
TriCoder causing a problem.
1. Plug the TriCoder interface cable into the TriCoder and into the proper
host computer port.
Page 23

3-3
First Time USB Use
As shipped from the factory the TriCoder’s Computer Interface Jumper is
set for RS-232 Serial (T54/LT54). YOU CAN ALWAYS USE USB. The
first time you connect a USB cable to a host computer running Windows®
or Mac OS, you will be asked to choose which USB interface you wish to
use with the TriCoder by the TriCoder displaying the following message:
Choose USB Interface
1 - PC USB High Speed
2 - PC OR MAC USB KYBD
If you have a Mac, you must choose 2. You are limited to Non-Portable
Mode and Data Upload only as 2 - PC OR Mac USB Keyboard.
If you are using Windows® (Vista, 2000, ME, XP, 98SE) and you wish to
upload your files directly into your application through the keyboard, you
must choose 2, (USB keyboards are still superior to keyboard wedge
because there are no timing delays and no jumper block is necessary). After
specifying 2, you will be asked to install the USB Keyboard HID driver,
which is probably on your hard disk, but if not, is on your original Windows
CD ROM; just keep clicking on NEXT until you are forced to supply the
original Windows CD ROM (if the driver installation is aborted, see
Appendix G; USB Driver Installation Recovery for more information).
Data uploads through the keyboard will be slower than high speed USB
but you can still use the
USB High Speed program uploads/downloads,
firmware upgrades, and table downloads by changing computer interface
to the high speed USB operation, however you will be required to install
another driver for high speed support, TRICODERUSB, which is supplied
on your Worth Data Utilities CD ROM, (also on our website,
www.barcodehq.com
under Downloads).
IMPORTANT: If you are installing the TriCoder in Windows® XP, you
may see a dialog box appear warning you that the installation may cause
your system to be unstable. The TriCoder installation WILL NOT harm
Windows® XP or make your system unstable – go ahead and complete the
installation.
If you are using Windows and you wish to use the TriCoder Utilities to
upload data to a file in high speed, choose 1. You will also be able to do
program uploads/downloads, firmware upgrades, and table downloads.
Once you have chosen this setting, you will be required to install the high
speed TRICODERUSB driver that is supplied on your TriCoder Utilities
CD ROM, (also on our website, www.barcodehq.com
under Downloads).
The first time you attempt to use Non-Portable Mode, you will be asked to
install the USB Keyboard HID driver, which is probably on your hard disk,
but if not, is also on your original Windows® CD ROM.
Page 24

3-4
Whatever decision you make, the TriCoder Setup parameter for Computer
Interface will be changed to reflect your choice. Your choice will remain until
you change the Computer Interface, (See Chapter 6; TriCoder Setup).
2. Start the software you are going to use to test the TriCoder. If it is a
text editor or word processor, make sure to start with a new document.
We suggest the use of the Notepad program (Windows or Mac).
Turn the TriCoder on. Press the NO key in response to all prompts
until you see the NON PORTABLE mode prompt. Press the YES key.
If you selected the PC High Speed USB in 1 above, and this is the first
time you have used the NON PORTABLE mode, you will now be
asked to install the USB Keyboard HID driver, which is probably on
your hard disk, but if not, is on your original Windows CD ROM.
3. Type several numbers on the TriCoder keypad, then press the ENTER
key. You should see the keyed data on the TriCoder screen AND on
your computer screen.
4. Traditional keyboard users - If you do NOT see your data displayed on
your computer screen, or you see partial data (letters or numbers
missing), indicating timing between the TriCoder and keyboard is not
quite right. Next try the “LEARNING” mode settings in Chapter 6;
Computer Interface, which allows the TriCoder to match the timing of
the keyboard. If “LEARNING” mode does not solve the problem, see
the Intercharacter Delay parameter for a possible solution. (Do not use
the "LEARNING" mode settings for USB.)
Using TriCoder Utilities to test Fast USB Data Upload and PC
Serial Interface
Testing communication between PC and a TriCoder with fast USB interface
or serial interface needs special software. Windows users should use the
Windows TriCoder Utilities program that is shipped with TriCoder on CD
ROM, (also on our website, www.barcodehq.com
under Downloads). If
using a Unix dumb ASCII terminal configuration, the testing is identical to
keyboard testing in the previous section. Serial and Fast USB Upload on a
Macintosh are not supported with programs from Worth Data.
Windows® Users
1. Install the Windows TriCoder Utilities program by inserting the CD
ROM; Windows should sense the CD ROM and offer you the
installation automatically. If not, click on Start, then choose Run.
Type in D:/Setup.exe (substitute your drive letter if not D) then click
on OK. Follow the directions on your screen to install the program.
2. After installing the Windows TriCoder Utilities program, make sure
your TriCoder is connected and turned on, then run the program by
clicking on the TriCoder Utilities icon.
Page 25
3-5
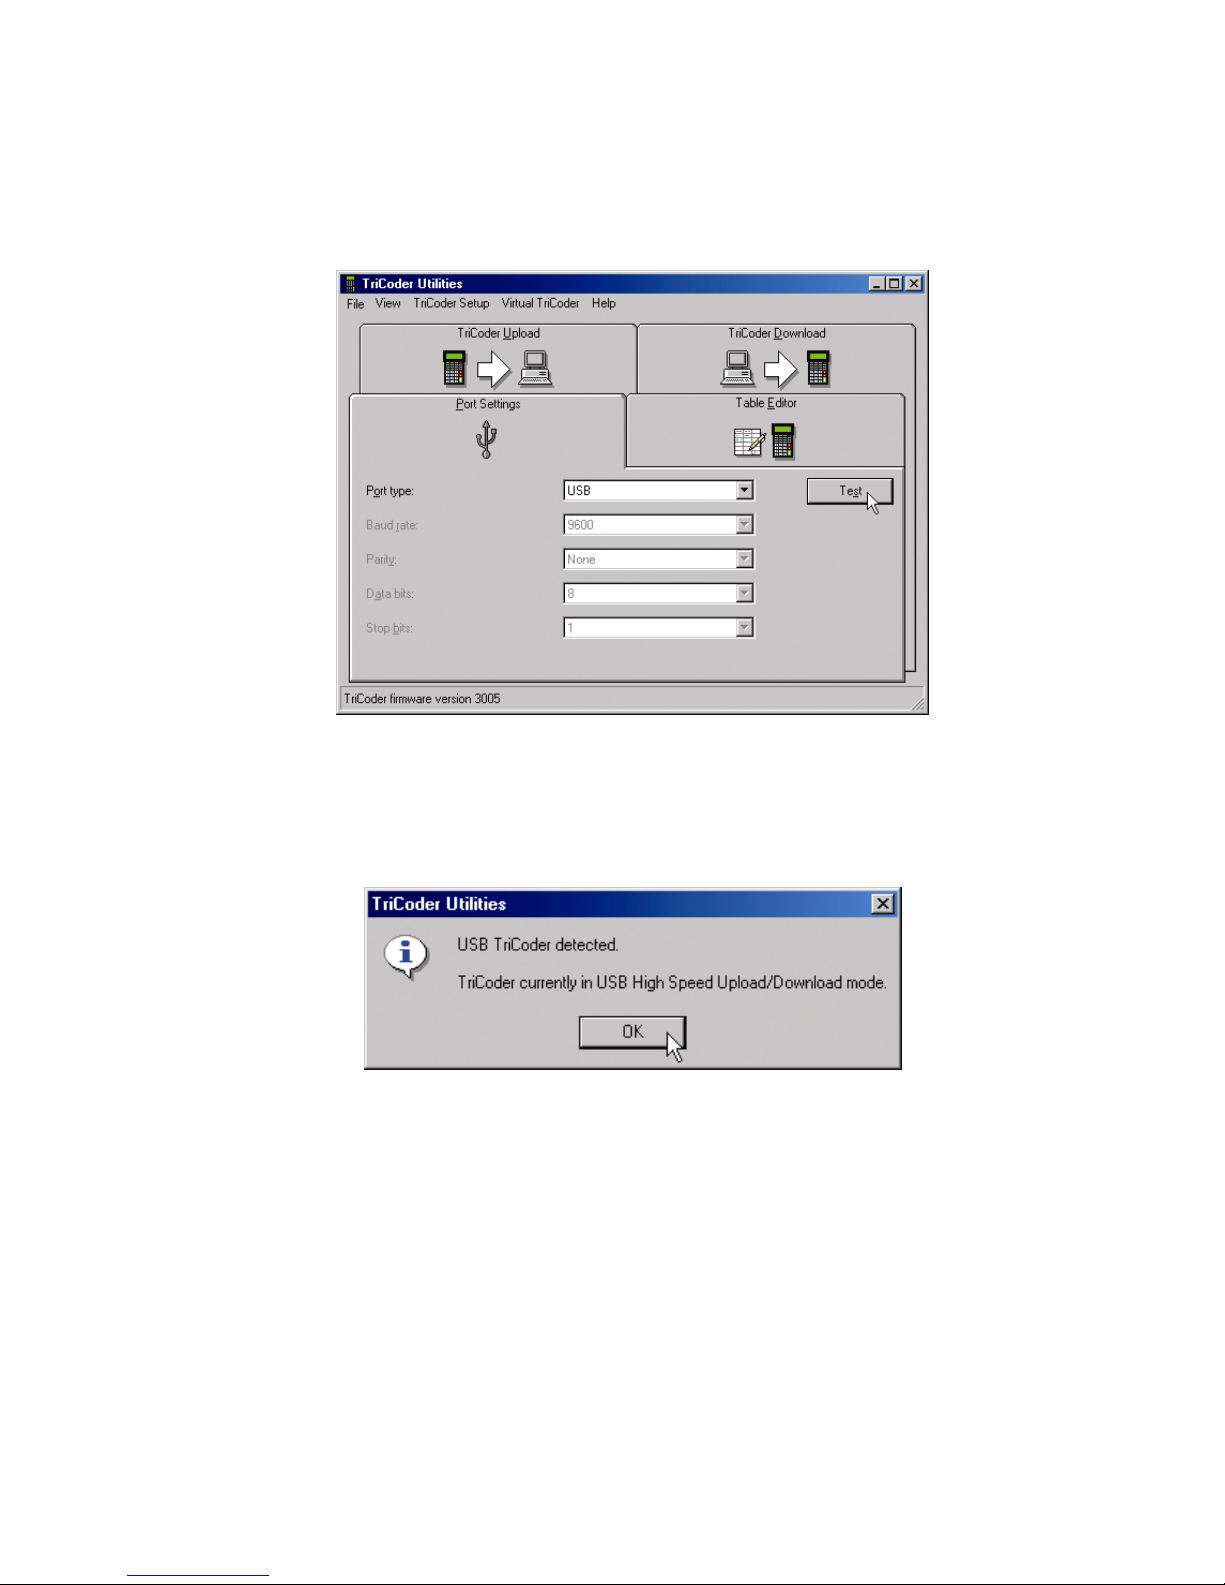
3. If you are connected to the USB port, TriCoder Utilities will detect the
USB and no other configuration parameters are required. If you are
connected to the serial port, you need to click the Port Settings tab,
choose the port type and then set the corresponding RS-232 settings for
your serial port.
Once you have selected the correct Port Type as shown above, you should test
your connection. If you are connected via USB, clicking on the Test button tells
the TriCoder Utilities to check to see if there is a TriCoder attached to one of the
host computer’s USB ports. If it is correctly attached, you will see the following
advisory message:
If your test was successful, you can now skip the remaining material in this
chapter and proceed directly to Chapter 4, Uploading Data.
Any of the following conditions will cause TriCoder Utilities to generate an
error message:
1. Your TriCoder is not attached or it does not have firmware DMA 2001
or above.
2. Your TriCoder is not properly cabled or attached.
3. Your TriCoder is not Setup with Computer Interface-6 (Fast USB
Upload).
Page 26
3-6
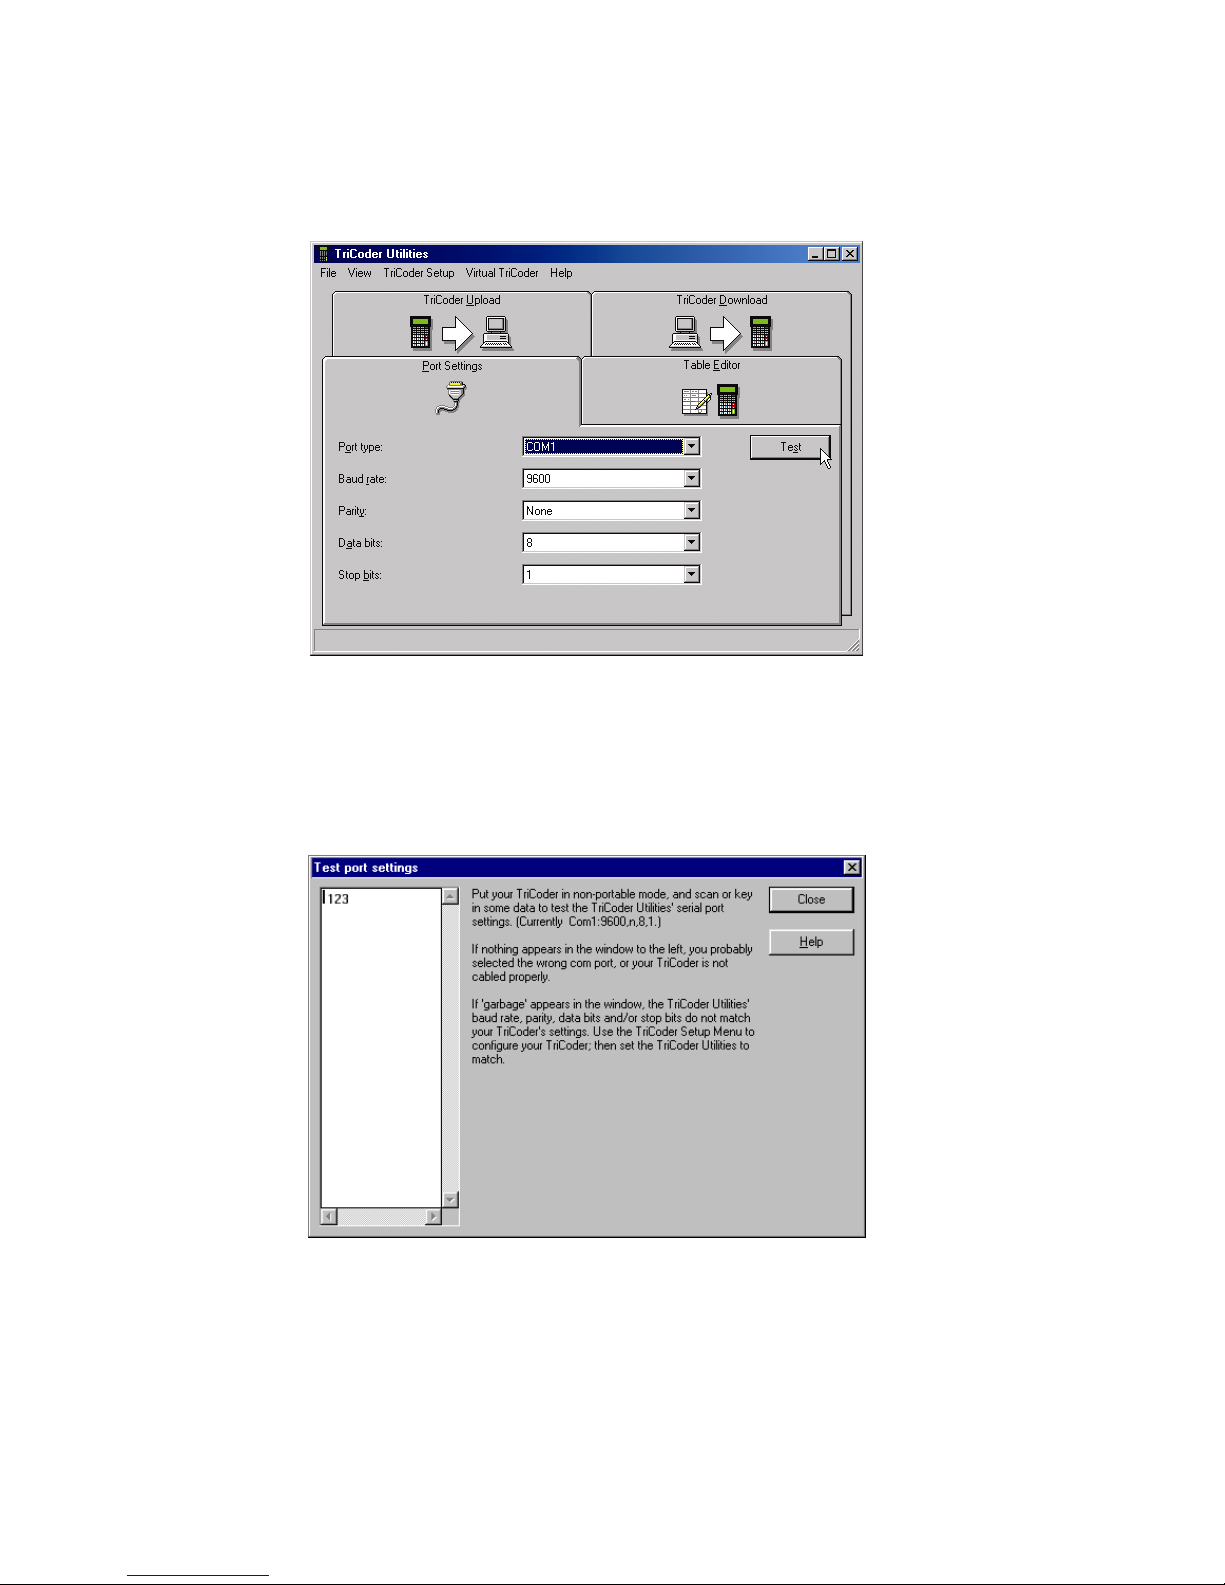
If you have specified a COM port, you will see the following screen where you
can change all the serial port parameters. (Since the TriCoder’s default serial
parameters are 9600,N, 8,1, you should probably not change the default
parameters on the screen.)
TriCoder Utilities Serial Port Settings
4. After specifying finishing the serial port configuration, click on the
"Test" button. Click on the test window so that a flashing cursor
appears. Scan the test label or, if you have no scanner, type 123 on the
TriCoder keypad, then press the TriCoder ENTER key.
TriCoder Utilities Test Screen
5. You should see the data displayed both on the TriCoder display and in
the test window on the PC. If you do not see the data displayed on
your PC, follow the TriCoder Utilities suggestions on the screen, check
your TriCoder Setup and try again. If you still have problems, go to the
Troubleshooting section of this manual. Otherwise, you are ready to
move on with your data collection or custom programming.
Page 27

4-1
Chapter 4
Uploading Data
If you are ready to upload data, we assume you have established correct
communication between your TriCoder and host and have collected some
sample data, preferably using the Program #0 or Program #1 Tutorials. By
default, the TriCoder uploads using a Carriage Return Separated format. For
many users, the default file format works fine, but others may require more
complex or even custom upload file formats. For different file formats, see the
last section in this chapter, File Formats.
Uploading into Excel®
If you are planning to upload your data into an Excel® worksheet, you may
want to consider using our KwikCount/EX program. KwikCount/EX is an
Excel add-in that makes updating worksheets faster and easier. If you are
trying to update several columns of data, need accumulation or subtraction
functions, or are using the TriCoder for physical inventory, you should
definitely look into using KwikCount/EX. You can find more information
on KwikCount/EX at http://www.barcodehq.com/kwikcountex.html
.
Data Upload
DATA UPLOAD mode is used to extract the data collected while in
DATA COLLECTION mode. DATA UPLOAD mode uses keyboard
upload (wedge and USB keyboard), or uploading through the TriCoder
Utilities (high speed USB and serial).
Before collecting and uploading large amounts of data,
1. test the TriCoder data communication in Non-Portable Mode detailed
in Chapter 3, Non-Portable Mode, and
2. try a small amount of data to make sure your upload works correctly.
Data can be uploaded either into a separate file that is then merged or
processed by your application or it can be uploaded into your application
directly. Before you upload directly into an application, back up any files
that will be altered by the upload – work only with copies, not with your
actual data, until you know your upload works correctly.
For this tutorial, first we will describe a keyboard/USB interface upload
using Windows® or the Mac, then a high speed USB or serial upload using
the TriCoder Utilities If you wish to do a Windows high speed USB or
serial upload to a file, turn to page 4-3.
Page 28

4-2
Uploading via USB or PC Keyboard
Keyboard uploads are usually required because an application program will
not accept file imports, hence you must upload directly into an application.
We will illustrate the USB/Keyboard Data Upload using Notepad in
Windows. If you want to use another text editor or Word Processor, the
specifics may vary but the basic upload will be the same.
To get to DATA UPLOAD mode on the TriCoder, answer NO to all
prompts until you see:
DATA UPLOAD?
KEY [YES/NO]?_
DO NOT press YES until you have your computer ready for the data upload
to begin. If you have chosen USB Computer Interface, and then press YES
to the Data Upload prompt and are not connected to the USB port on your
computer, you will get the following message:
USB not Connected
Connect, Hit any key
or F1 – Exit
or F2 – Delete File
If you really want to upload your data to the computer, connect to the USB
port and press any key. If you want to exit Data Upload mode, press F1. If
you want to delete the data file without transferring it to your computer,
press F2.
• Open Notepad (or program of your choice).
• If you have a USB cable, plug the USB cable between TriCoder
and your host computer’s USB port and turn on the TriCoder. If
this is the first time you have plugged in a USB cable, you may
be asked to choose the desired USB Interface and if running
Windows, you will be required to install a USB driver, (See
Chapter 3, First Time USB Users. If the Computer Interface is
set to 6, the Fast USB Upload, you will not be able to upload data
through the keyboard; Non-Portable mode operates exclusively
through the USB keyboard.
• If you are using a Y-cable with a legacy keyboard port (5 or 6 pin
din on the PC), make sure your T54/LT54 TriCoder is jumpered
correctly for legacy keyboard upload (Appendix F) - after attaching
the Y-cable to the PC, remove the jumper block from the end of the
Y-cable (the jumper block allows you to use your keyboard while
the TriCoder is not attached), turn on the TriCoder, and attach it to
the Y-cable. The jumper block has to be reattached to the Y-cable
when the TriCoder is removed.
Page 29

4-3
• By default, the TriCoder's Terminator Character is set to CR,
which means the TriCoder will insert a Carriage Return (like
pressing the ENTER key on your PC) after each record of data it
uploads. If you have changed the Terminator Character to a
setting other than the default and are uploading data collected in
the Tutorials, change it back to the default now.
• After verifying the setup of your TriCoder, follow the prompts
until you get to the DATA UPLOAD? prompt. If you are ready
to upload your data, press the YES key on the TriCoder. Watch
the computer screen to see your data appear - one piece of data
per line. When the TriCoder is done uploading your data it will
display the following message:
END OF TRANSMIT
DEL FILE [Y/N]?_
• If all of your data appears correct on the PC screen, first save the
file. Then you can press the YES key on the TriCoder to delete the
data in the TriCoder. If you need your data in a different format
(i.e. Comma delimited or Flat File formats) go to the end of this
chapter and read the section on File Formats. If deleting the data,
the TriCoder will display:
ARE YOU SURE?
KEY [YES/NO]_
• Press YES again to delete the file from the TriCoder. If your data
does not appear on the PC screen or is incorrect, press the NO key
on the TriCoder, check your TriCoder setup and try the upload
again. If you still have problems, consult the Troubleshooting
section of this manual.
DATA UPLOAD with the TriCoder Utilities
The Windows TriCoder Utilities program has the ability to upload the
TriCoder via USB or serial ports. (The USB upload is at forty times faster
than the serial upload.) If you are uploading via USB, the TriCoder Utilities
program will completely control the TriCoder, all you need to do is connect
it and turn it on. If connected via the serial port, there are additional steps
to follow.
High Speed USB upload
• Connect the TriCoder to the host computer with the USB cable and
turn the TriCoder on. If this is the first time you have plugged in a
USB cable to the TriCoder, you will asked to choose the desired
USB interface and install a USB driver on your computer, (See
Chapter 3, First Time USB Use for instructions).
Page 30
4-4
• After installing the TriCoder Utilities (see Chapter 3, Non
Portable Mode for installation instructions) run the program by
clicking on the TriCoder Utilities program icon. If you are
connected via USB, the TriCoder Utilities will sense it and no
other configuration is required.
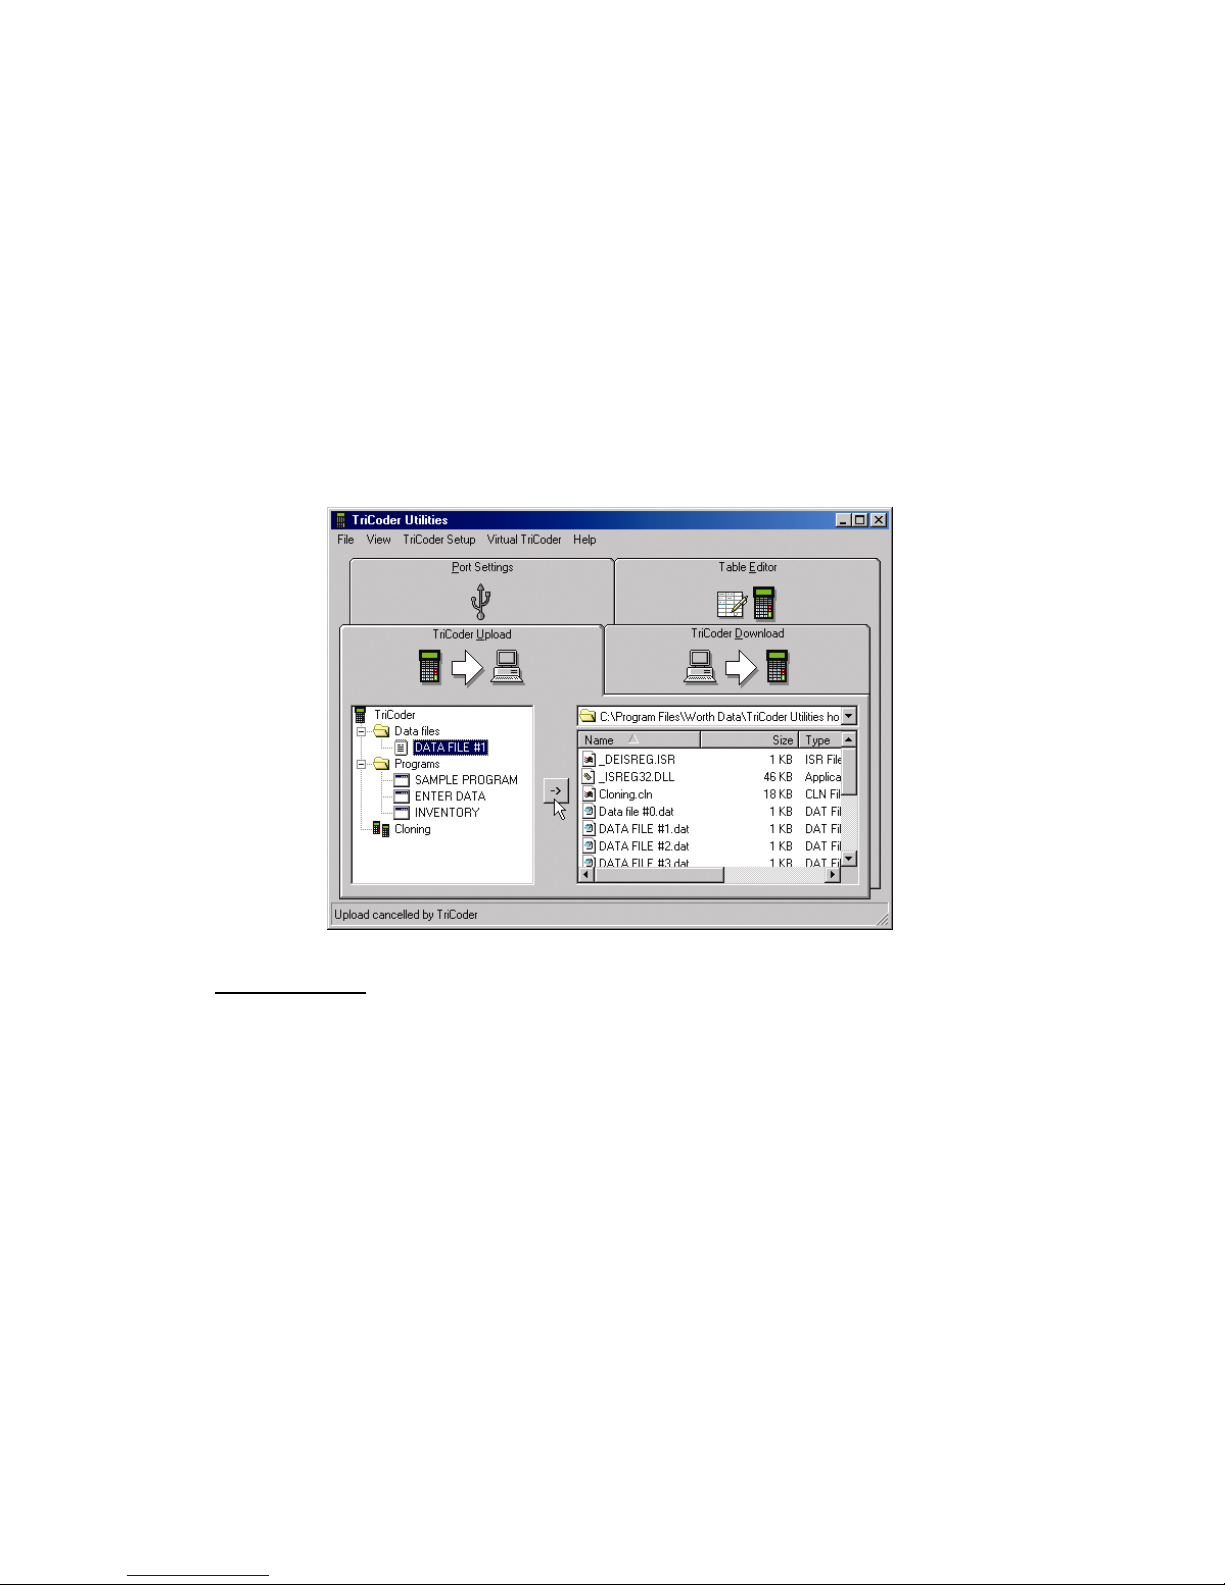
To upload your data, click on the TriCoder Upload tab, then click
on the Data files folder under the TriCoder and choose the file
you want to upload. You must then choose the folder on the right
side of the screen that you want the data file to be saved in. Once
you have chosen each, click the arrow button in the center to
transfer the file. After you have uploaded the file, you can rename
it or leave it as is.
Serial Upload
If you selected a COM port for serial uploading: (not USB)
• Make sure the serial port is configured the same as the TriCoder
defaults - baud 9600, parity none, data bits 8, stop bits 1. Verify
that you are choosing the correct COM port 1, 2, 3 or 4. For the
purposes of the tutorial, we assume you have tested the TriCoder
communications in NON PORTABLE mode. If you have not, go to
Chapter 3; Non Portable Mode, establish communications in NON
PORTABLE mode, and then continue with the tutorial.
• Click on the TRICODER UPLOAD tab. Choose Data File as the
“File Type”, then enter the name (and directory path if needed) of the
file you want to upload to or click Browse to select an existing file. If
you upload to an existing file, you will be asked whether you want to
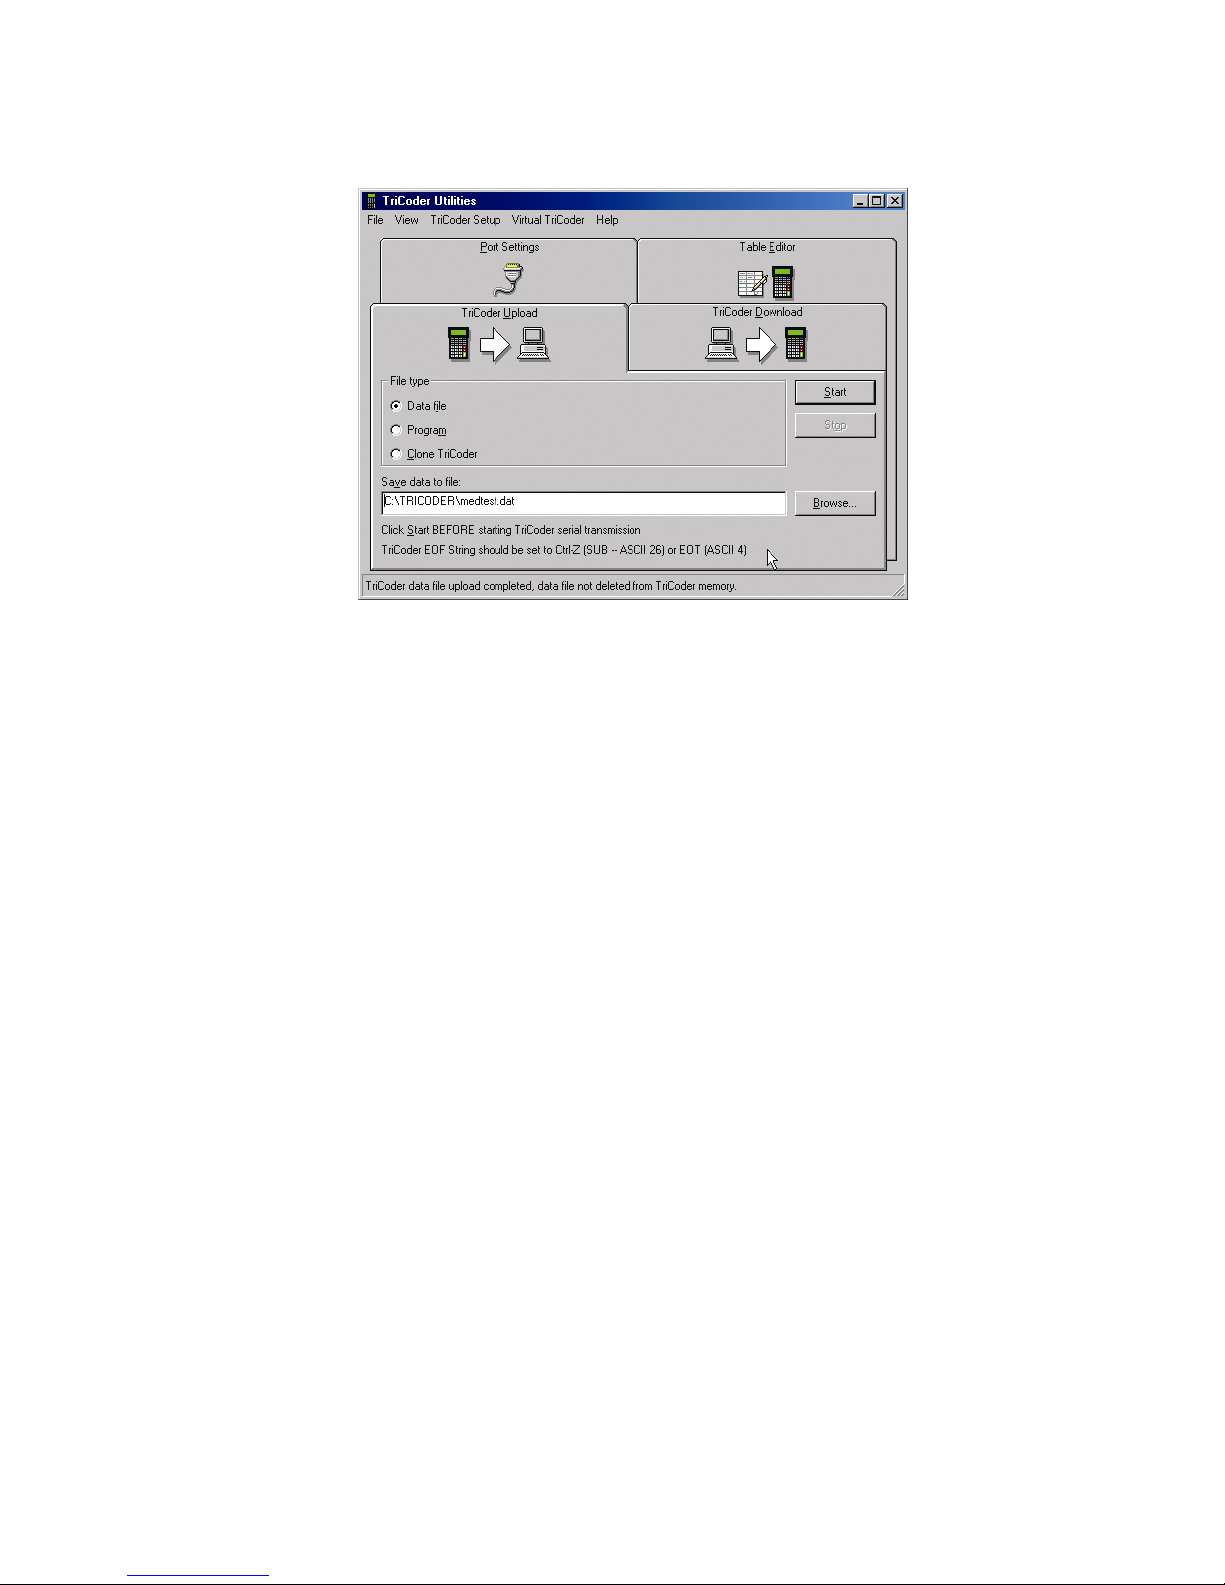
Add to the file (will not overwrite existing data in file) or Replace the
file (will completely replace the old file with the new data).
Page 31
4-5
• Click on the START button to start the program. You must start the
upload program before you start the TriCoder.
• Follow the prompts on the TriCoder until you see the following:
DATA UPLOAD?
KEY [YES/NO]?_
• Press the YES key to begin the upload on the TriCoder. Wait for the
TriCoder and the uploading program to indicate that the upload is
finished. Close the TriCoder Utilities program, then open Windows
Notepad and open the file you created. The TriCoder should be
displaying:
END OF TRANSMIT
DEL FILE [Y/N]?_
• If the data in Notepad is correct, press the YES key on the TriCoder
to delete the data in the TriCoder. If there is a problem with the data
in the file, press the NO key on the TriCoder, check the TriCoder
setup and try the upload again. If you still have a problem, go to the
TROUBLESHOOTING section of this manual.
You have now successfully collected, reviewed and uploaded data using the
TriCoder as a portable device. If Program #0 or Program #1 is sufficient for
your needs, you are ready to continue by collecting your own data and
doing a test run with your data and application. If your data collection
needs are more complex, Chapters 8 and 9 of the PROGRAMMING
section of this manual provide detailed information concerning the more
advanced programming features of the TriCoder. If you want a different file
format from CR-separated data items, refer to the below section.
Page 32

4-6
File Formats
By default, the TriCoder transmits its data in the following order:
ID + Prefix + data + Checksum chs + Suffix + Terminator
You should keep the above order in mind when determining how to upload
your data. Before we actually upload any data, lets discuss some of the most
common file formats.
The program you are using to process your data will determine what format
the uploaded file needs to use. There are several commonly used formats –
Carriage Return separated, Comma separated; Tab separated, and Flat File
formats. By default, the TriCoder uploads using the CR (Carriage Return)
separated format. We will cover each format in order of ease of use, with
the default uploading format first.
Carriage Return Separated Files
By default, the TriCoder uploads its data in the following format:
DATA(CR) 11111111
DATA(CR) data looks like: 22222222
DATA(CR) 33333333
This format is called Carriage Return separated. Each piece of data is
followed by a Carriage Return (or Carriage Return/ Line Feed if Serial
Interface), causing each piece of data to appear on a separate line. The
TriCoder does this by using the Terminator Character. The Terminator
Character is the character that follows each piece of data either when the
TriCoder is uploaded or when data is transmitted in NON PORTABLE
mode. The default Terminator Character for a keyboard wedge is CR
(carriage return) and CR/LF (carriage return/line feed) for a serial interface.
To upload the TriCoder with a Carriage Return delimited file, simply leave
the Terminator Character set to the default settings and upload the
TriCoder.
Comma Separated Files
Another common file format is a Comma Separated File. A TriCoder setup
to upload in this format uploads data like this:
“DATA”,”DATA”(CR) “111111”,”22”
“DATA”,”DATA”(CR) data looks like: “222222”,”33”
“DATA”,”DATA”(CR) “333333”,”44”
Each data item is surrounded by double quotes, creating a field. Fields of
data are separated by commas. The double quotes allow commas to be used
as actual data as well as separators (see the example below). At the end of
Page 33

4-7
all of the fields of data, a Carriage Return is added to create a complete
record. Modifying Program #1 as an example, the data uploaded would
look like this:
“ITEM NUMBER”, “QUANTITY” “0123456,12oz”, “15”
“ITEM NUMBER”, “QUANTITY” “889384,8oz”, “940”
“ITEM NUMBER”, “QUANTITY” “32834,20oz” , “7”
where ITEM NUMBER is the first field, QUANTITY is the second field,
and both fields together make a record.
To program the TriCoder to upload in this format, the first thing we must do
is set the Terminator Character to “None”. The idea is first, to stop the
TriCoder from automatically sending the same character after each field of
data, then second, customize the program in the TriCoder to transmit a
double quote before and after each data item, a comma after each field and a
carriage return after each record. To customize the program in the
TriCoder, we use the Upload Suffix to specify which character we want to
precede or follow each particular field. Using Program #1 as our example,
we will walk through the steps required to upload Program #1 in a Comma
delimited format:
1. Set the Terminator Character to NONE
Change the Terminator Character either by scanning the bar coded
setup menu , by TriCoder keypad in PROGRAMMING MODE, or if
you are using High Speed USB, you can change the TriCoder setup via
the TriCoder Utilities program. To change it using the bar coded
Setup Menu; scan these bar codes in the following order:
• Scan START SETUP
• Scan TERMINATOR CHARACTER
• Scan 2 (sets it to None)
• Scan END SETUP
Page 34
4-8
To change the Terminator Character using the keypad:
• get into PROGRAMMING MODE
• choose 5 for Change Setup
• choose 1 for Computer
• Press ENTER until you see TERMINATOR CHAR.
• Press 2
• Press F1
• Press F1 again to exit PROGRAMMING MODE
To change it using TriCoder Utilities and high speed USB:
• open TriCoder Utilities
• choose Tools, then TriCoder Setup from the menu.
• Click the Computer tab, then click the button that corresponds to
"no Terminator Character"
• Click OK
2. Program the Upload Prefix and Upload Suffix
After setting the Terminator Character to NONE, the next step is to
enter PROGRAMMING MODE and program the Upload Prefix and
Upload Suffix for each field of data. For Program #1, we will program
the Upload Prefix and Upload Suffix as follows:
Statement Prompt Upload Prefix Upload Suffix
ENTER ITEM NO. “ (double quote) “, (double quote comma)
ENTER QUANTITY “ (double quote) “CR (double quote carriage return)
• Put the TriCoder in PROGRAMMING MODE
• Press 1 at the Create Programs prompt (to edit program #1)
• Press YES at the EDIT PROGRAM #1? prompt
If you have no data collected in the TriCoder, press ENTER until you
see:
UPLOAD PREFIX 01
_
If you have data collected in the TriCoder (assuming you are following
the tutorial), you will see the Upload Prefix prompt immediately. This
is because the TriCoder will allow you to edit ONLY the Upload
Prefix and Upload Suffix if data is currently in memory. At the
Upload Prefix 01 prompt, scan the “double quote” bar code on the Full
ASCII Menu.
UPLOAD PREFIX 01
“_
Press the ENTER key to complete the change. Press the ENTER key
again until you see:
Page 35

4-9
UPLOAD SUFFIX 01
_
Scan the bar code for “double quote” then scan the bar code for the
“comma”.
UPLOAD SUFFIX 01
“,_
Press the ENTER key until you get to the UPLOAD PREFIX 02
prompt. At the prompt scan the “double quote” bar code.
UPLOAD PREFIX 02
“_
Press the ENTER key until you see the UPLOAD SUFFIX 02 prompt. Scan
the “double quote” bar code, then, scan the “CR” bar code if using the
TriCoder as a keyboard wedge, or the “CR” and the “LF” if using the
TriCoder as a Serial interface:
UPLOAD SUFFIX 02
“?_
Press ENTER to complete the change. If you do not press ENTER after
each change, the change will not be permanent. Press the F1 key to exit the
program, then F1 again to exit PROGRAMMING MODE. The TriCoder
is now programmed to upload its data in a comma separated file format.
Tab Separated Files
Occasionally it is necessary to have Tab Separated files. Some requirements
can be met by just changing the Terminator Character to Tab.
1. Set the Terminator Character to TAB
Change the Terminator Character either by scanning the bar coded
setup menu ,by TriCoder keypad in PROGRAMMING MODE or if
using high speed USB, via the TriCoder Utilities program. To change
it using the bar coded Setup Menu; scan these bar codes in the
following order:
• Scan START SETUP
• Scan TERMINATOR CHARACTER
• Scan
2 (sets it to TAB)
• Scan END SETUP
Page 36
4-10
To change the Terminator Character using the keypad:
• enter PROGRAMMING MODE
• choose 5 for Change Setup
• choose 1 for Computer
• Press ENTER until you see TERMINATOR CHAR.
• Press 2
• Press F1
• Press F1 again to exit PROGRAMMING MODE
To change the Terminator Character using TriCoder Utilities and high
speed USB:
• Start the TriCoder Utilities
• Click Tools then TriCoder Setup from the menu
• Click the Computer tab, then click the button for HT in the
Terminator Character section.
• Click OK
When uploading as a keyboard into an Excel spreadsheet, it is not quite as
simple. You will have to set the Terminator Character to None, and then
you will have to Upload Prefixes in each for each program data collection
step. Excel usually requires delays between moving to the next column.
Let’s assume we are going to upload data collected in the default Program
#1, Item and Quantity, into Excel. The suffixes in the default program are
none. We will change them to adapt to Excel.
2. Program the Upload Prefix and Upload Suffix
After setting the Terminator Character to NONE, the next step is to
enter PROGRAMMING MODE and program the Upload Suffix for
each field of data. For Program #1, we will program the Upload Suffix
as follows:
− Put the TriCoder in PROGRAMMING MODE
− Press 1 at the Create Programs prompt (to edit program #1)
− Press YES at the EDIT PROGRAM #1? prompt
If you have no data collected in the TriCoder, press ENTER until you
see:
UPLOAD SUFFIX 01
_
Scan the bar code on the Full ASCII Menu for TAB, the one labeled HT
(ASCII10). Then scan the bar code DEL (ASCII 127) on the Full ASCII
Statement Prompt Upload Suffix
ENTER ITEM NO. TAB (HT on the full ASCII menu) DEL (ASCII 127) 05
ENTER QUANTITY CR (Enter) •(Left Arrow, ASCII 19) DEL (ASCII 127) 05
Page 37

4-11
Menu, followed by 0 and 5; this puts a ½ (0.5) second delay after the TAB
key to give Excel time to reposition and update its files.
Press the ENTER key until you see the UPLOAD SUFFIX 02 prompt. Now we
are going to simulate the positioning of the cursor to the first column of the next
row. To get back, we would key ENTER followed by the Left Arrow key. To
make the bar code reader simulate those keystrokes, we will first scan the bar
code for CR (ASCII 13), followed by Left Arrow (ASCII 19), followed by DEL
(ASCII 127) and then 0 and 5 for a ½ (0.5) second delay.
Press ENTER to complete the change. If you do not press ENTER after
each change, the change will not be permanent. Press the F1 key to exit the
program, then F1 again to exit PROGRAMMING MODE. The TriCoder
is now programmed to do a keyboard data upload to an Excel spreadsheet.
Flat File Formats
Flat Files are the most complicated file format of the three we are covering
in the tutorial. The format of a Flat File is mostly dependent upon the host
program you will use to process the data you are uploading.
A Flat File uses what we call “Refer-backs”. Each record has at least one
field that remains constant while other fields may contain variable data.
“Refer-backs” allow the operator to enter the data for the constant fields
only once, letting the TriCoder append the data to each record as it uploads.
“Refer-backs” are specified in the Upload Prefix and Upload Suffix of each
field. We will use a program that prompts for operator name, item
number and finally a quantity to demonstrate how “Refer-backs” work.
Lets say that the data for the first field in every record must be the operators
initials (3 characters). The second field in each record must be an item
number and the third field is a quantity. It doesn’t make sense to require the
operator to enter their initials every time they scan an item number and
enter a quantity. The solution is to create a program that uses a “Refer-
back” to attach the data from prompt #1 (operator name) and the data for
prompt #2 (item number) to the data for prompt #3 (quantity) every time.
We do this by using the upload prefix or upload suffix.
Specifying these characters:
}xx
where xx is the number of the statement you want to take data from, in the
Upload Prefix or Upload Suffix of the statement you want to attach the
“Refer-back” data to. The following TriCoder Coding Form shows the
program we have described above (only the relevant entries on the form are
shown):
Page 38
5-7
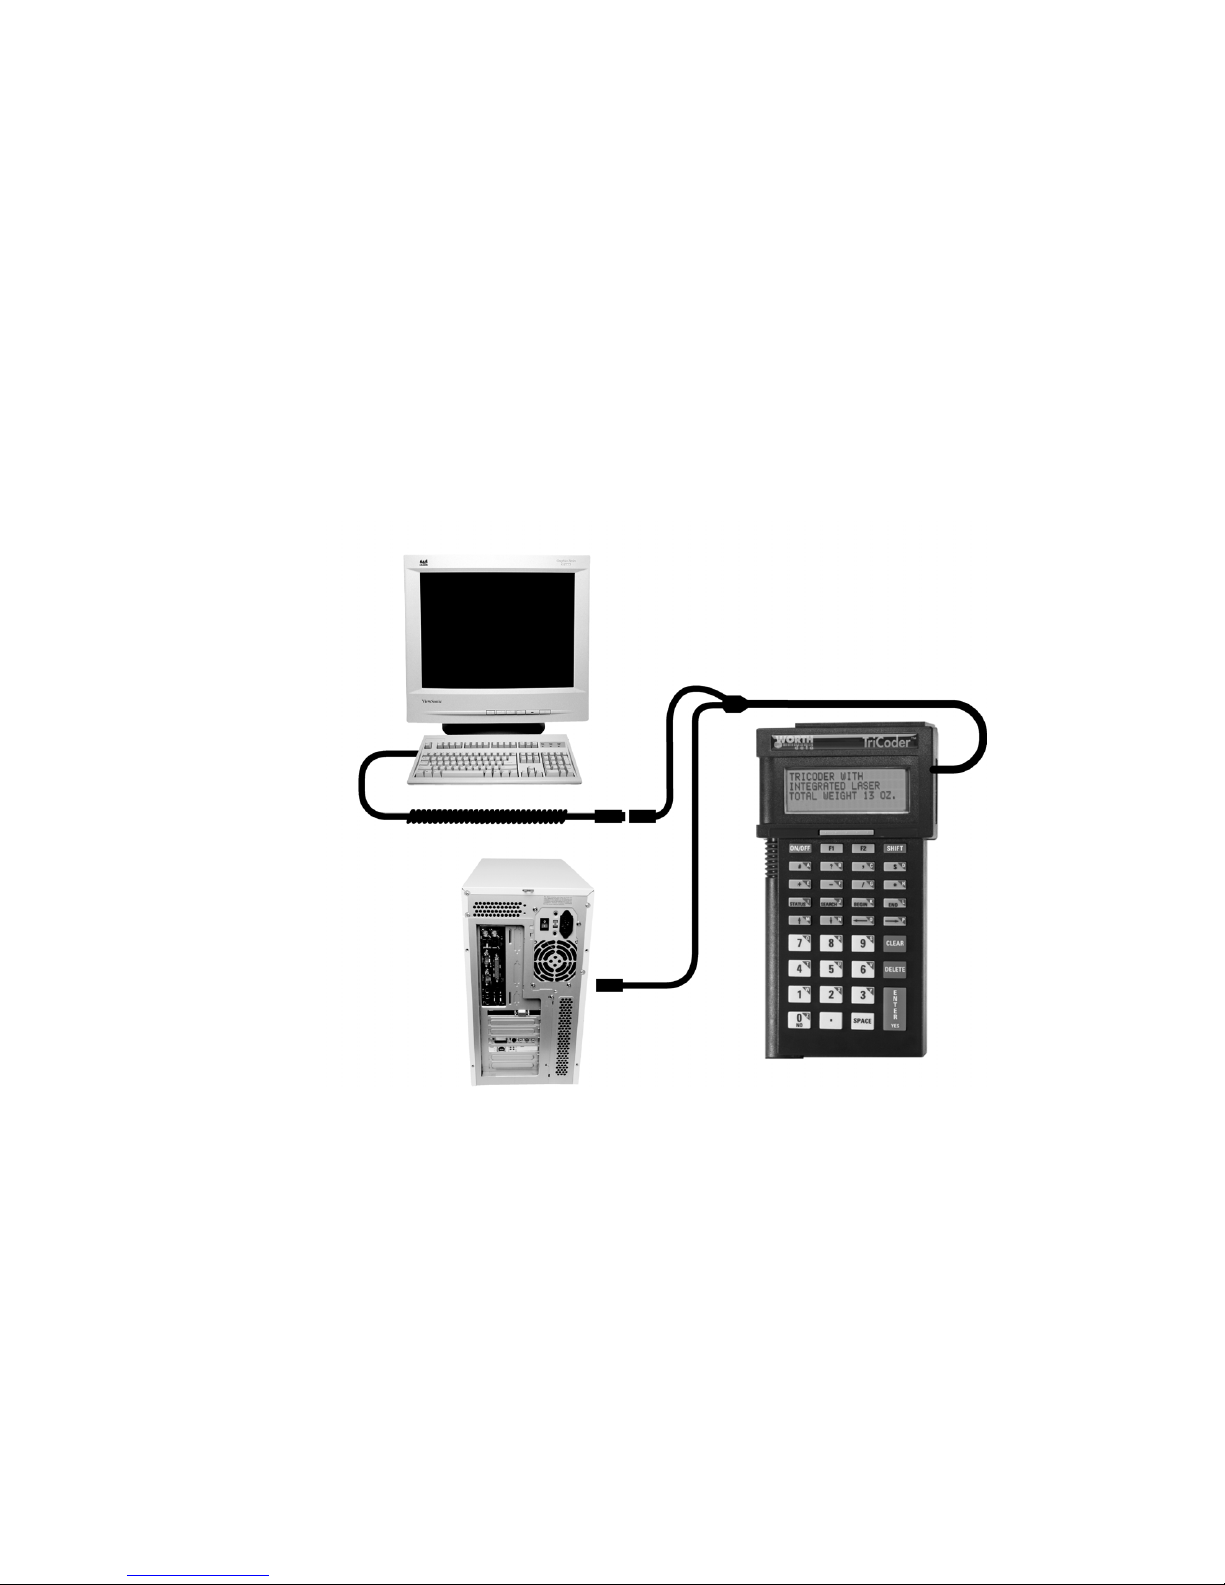
and the keyboard – do not plug the Splitter cable into a mouse port
or any port other than the keyboard port. Take the 3
rd
end of the
Splitter cable with the modular (telephone style) connector and
plug it into the port on the TriCoder labeled COMPUTER.
3. Plug the 5-volt power adapter (included with the TriCoder) into the
port labeled PWR at the bottom of the TriCoder. Turn the TriCoder
on by pressing the ON/OFF key. Now turn on the computer. The
TriCoder ships with a small black plastic block with a female
modular connector in it called a Jumper Block. When removing the
TriCoder from the cable for portable operation, place the Jumper
Block on the now free end of the Splitter cable. This allows your
keyboard to function even though the TriCoder is not attached.
PC Keyboard Wedge Installation
Configuring the TriCoder for Keyboard Wedge
Once the hardware is connected, the next step is to configure the TriCoder
and test your communication.
The TriCoder setup allows the user to configure the TriCoder for different
Computer Interfaces, and the reading of different bar code types, as well as
configuring some of the more advanced features of the TriCoder. If you
have a PC with a T64 or LT64 TriCoder, the default Computer Interface is
1- PC Keyboard. If you have a T54 or LT54 TriCoder you will need to do a
jumper change - See Appendix F, and change the Computer Interface to 1.
Page 39

5-1
Chapter 5
TriCoder Connection
Interfacing with the computer is possibly the most critical operation. Without
proper communication between the computer and TriCoder, all that data you
collected for hours and hours really isn’t doing you much good. Whether you
are using the USB interface, serial interface, or the keyboard wedge interface,
before you even begin collecting data you need to establish communication in
NON PORTABLE MODE, (See Chapter 3; Non-Portable Mode), and then
move on to uploading stored data. There are several steps involved in
establishing communication:
• Connecting the hardware
• Configuring the TriCoder
• Testing in NON-PORTABLE MODE
We will explain each of these steps for the USB, Serial Interface, and Keyboard
Wedge. If you are using your TriCoder with a USB connection, continue on
with the next section. For serial interface, go to page 5-3, and if you are using
your TriCoder as a Keyboard Wedge, turn to page 5-9 and begin th
ere.
USB Interface – PC and Mac
The TriCoder can be attached to a PC or Mac via a Universal Serial Bus
(USB) port. The USB connection offers several advantages, which are:
• A Jumper Block is not needed when TriCoder is removed from PC
as with a Keyboard Wedge,
• There are no “Timing” settings required as with Keyboard Wedges,
• In Windows®, you have the convenience of keyboard interface in
Non-Portable Mode, but you can still download new firmware
releases, upload/download programs, and download tables.
• The USB cable is less expensive than a PC Y Cable or serial cable.
You don’t have to use our USB cable–any USB A to B cable will
work, and
• With the high speed USB interface, data uploads and program
transfers are up to 40 times faster than serial and 1000 times faster
than keyboard. See Chapter 3; Non Portable Mode, First time
USB use regarding Windows XP and USB.
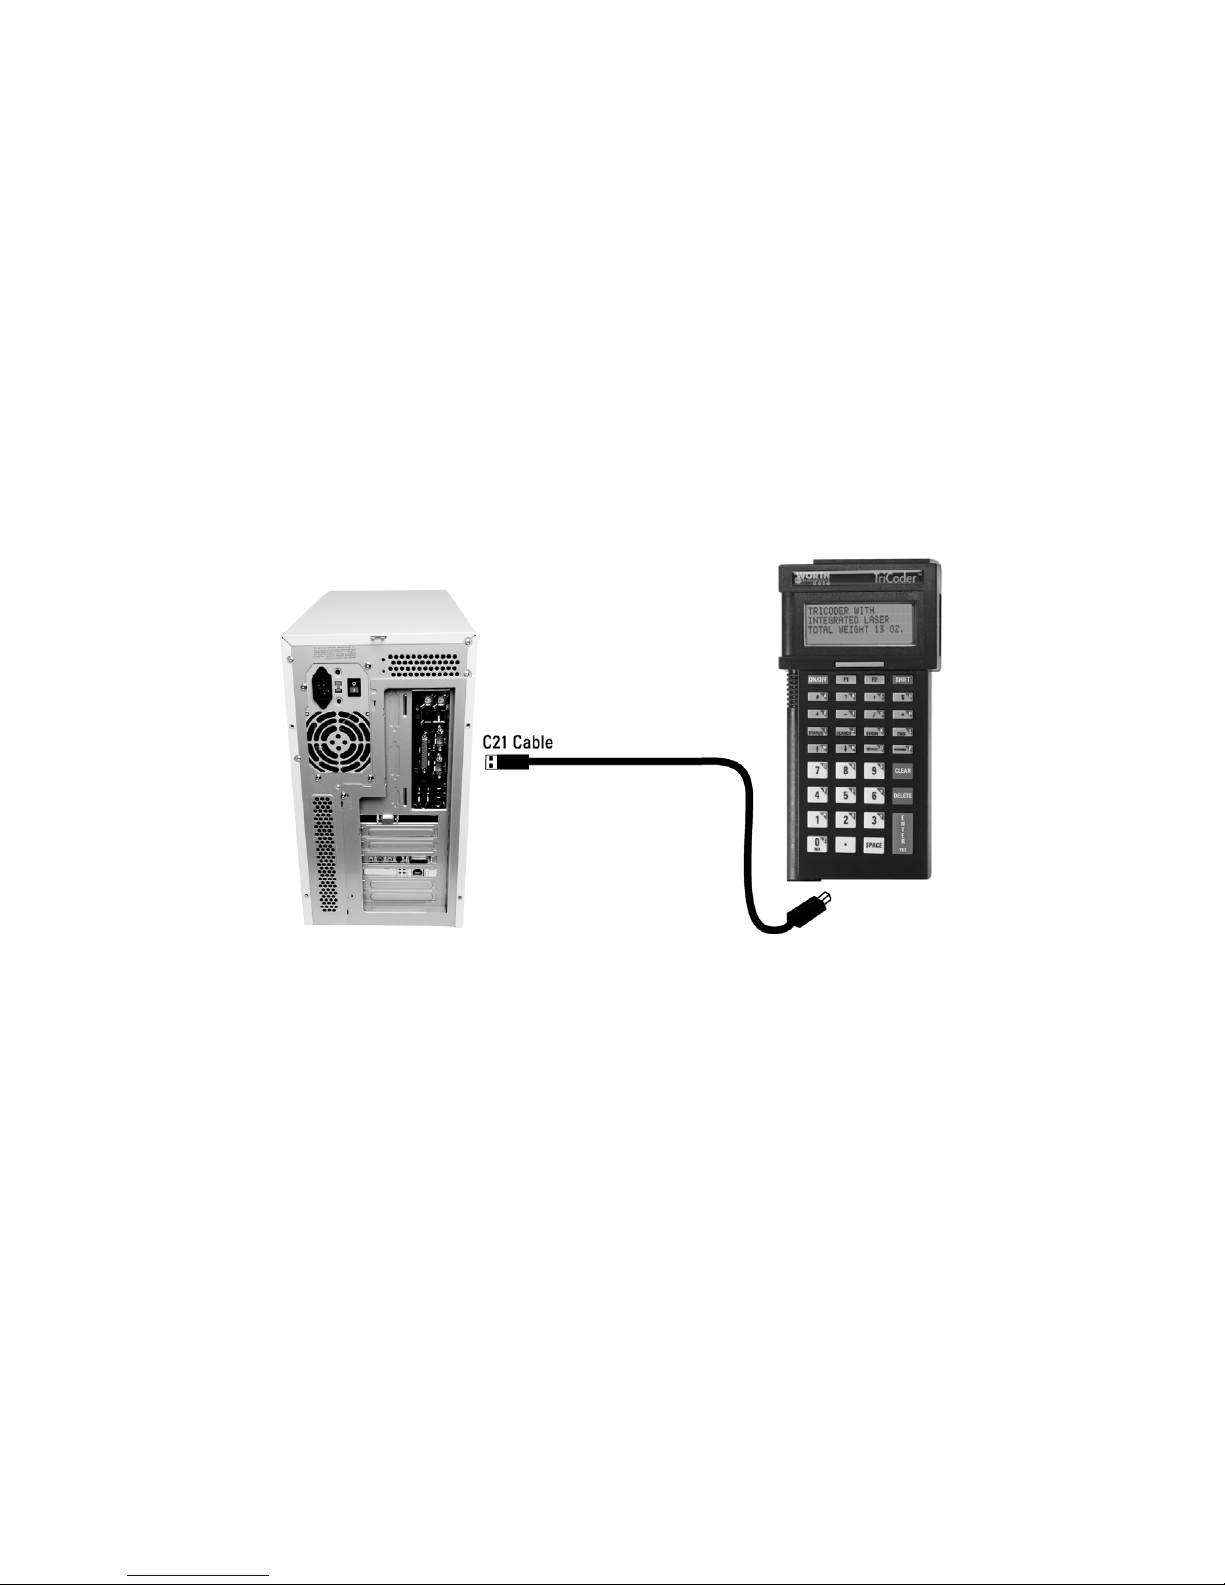
The C21 USB Cable is required to connect the TriCoder to a USB port. The
USB port does not power the TriCoder – it will operate on batteries or the
Worth Data 5V power supply.
Page 40
5-2
1. Plug the flat end of the C21 cable into the USB port located on the
back of the PC or Macintosh. Only one end of the cable fits. If you
don’t have Worth Data’s C21 cable, any USB cable will work.
2. Plug the other end of the C21 USB cable into the USB port on the
bottom of the TriCoder.
3. If this is the first time you have connected the TriCoder to a USB
cable, you could be asked to select the exact USB interface you
desire, and you will be asked to install Windows® USB driver(s).
See Chapter 3: Non Portable Mode, First Time USB Use,
especially if using Windows® Vista or XP.
Testing Communication using NON PORTABLE mode
To test communication as a keyboard wedge or USB, go to Chapter 3; Non
Portable Mode for detailed instruction on how to use NON PORTABLE
mode to establish communication between the TriCoder and the host
computer. The key to testing communications is to keep it simple – you
don’t want to have to determine whether it’s your software or the TriCoder
causing a problem.
Page 41

5-3
Serial Interface
Connecting the Hardware
The TriCoder can operate as a serial interface reader on a PC. To use the
serial interface, you must have software reading the serial port directly, or a
keyboard emulation program like PortKey, (allows a serial interface
TriCoder to look like it’s working as a keyboard wedge). The TriCoder
Utilities disk that is included with each TriCoder has Windows utilities that
are extremely useful on a PC serial port. Use the following procedures and
illustrations to connect the TriCoder to the PC serial port
Serial Installation on a PC
The RS-232 serial ports on a PC are commonly called COM ports and are
referred to as COM1, COM2, COM3, and COM4. Typically you will be
using COM1 or COM2.
1. If you ordered the TriCoder for serial upload and planned to use
it on a PC, you should have also ordered one of two cables, either
the 25 pin F34 cable or the 9 pin F36 cabl
e. The F34 25pin female
null modem cable is designed to work directly off of a 25 pin PC
serial port. The F36 9pin female straight cable is wired to connect
directly to a 9 pin PC serial port. Both cabl
es have a female 9 pin
or 25 pin end and a RJ-45 modular (telephone style) 8 pin end.
2. If the host port is female, it’s not serial port.
3. If you have the wrong cable (9 pin cable and you have a 25 pin
port, or vice versa) you can get a 9 to 25 or 25 to 9 adapter at your
computer store.
4. The easy part is the connection – simply plug the 25 pin or 9 pin
end of your cable into the open serial port in the back of your
computer. Plug the modular end of the cable into the port labeled
COMPUTER on the side of the TriCoder. If your serial ports are
labeled (COM1 or COM2), make a note of which port you are
plugged into – the software you use will need to know which COM
port you are using.
Page 42
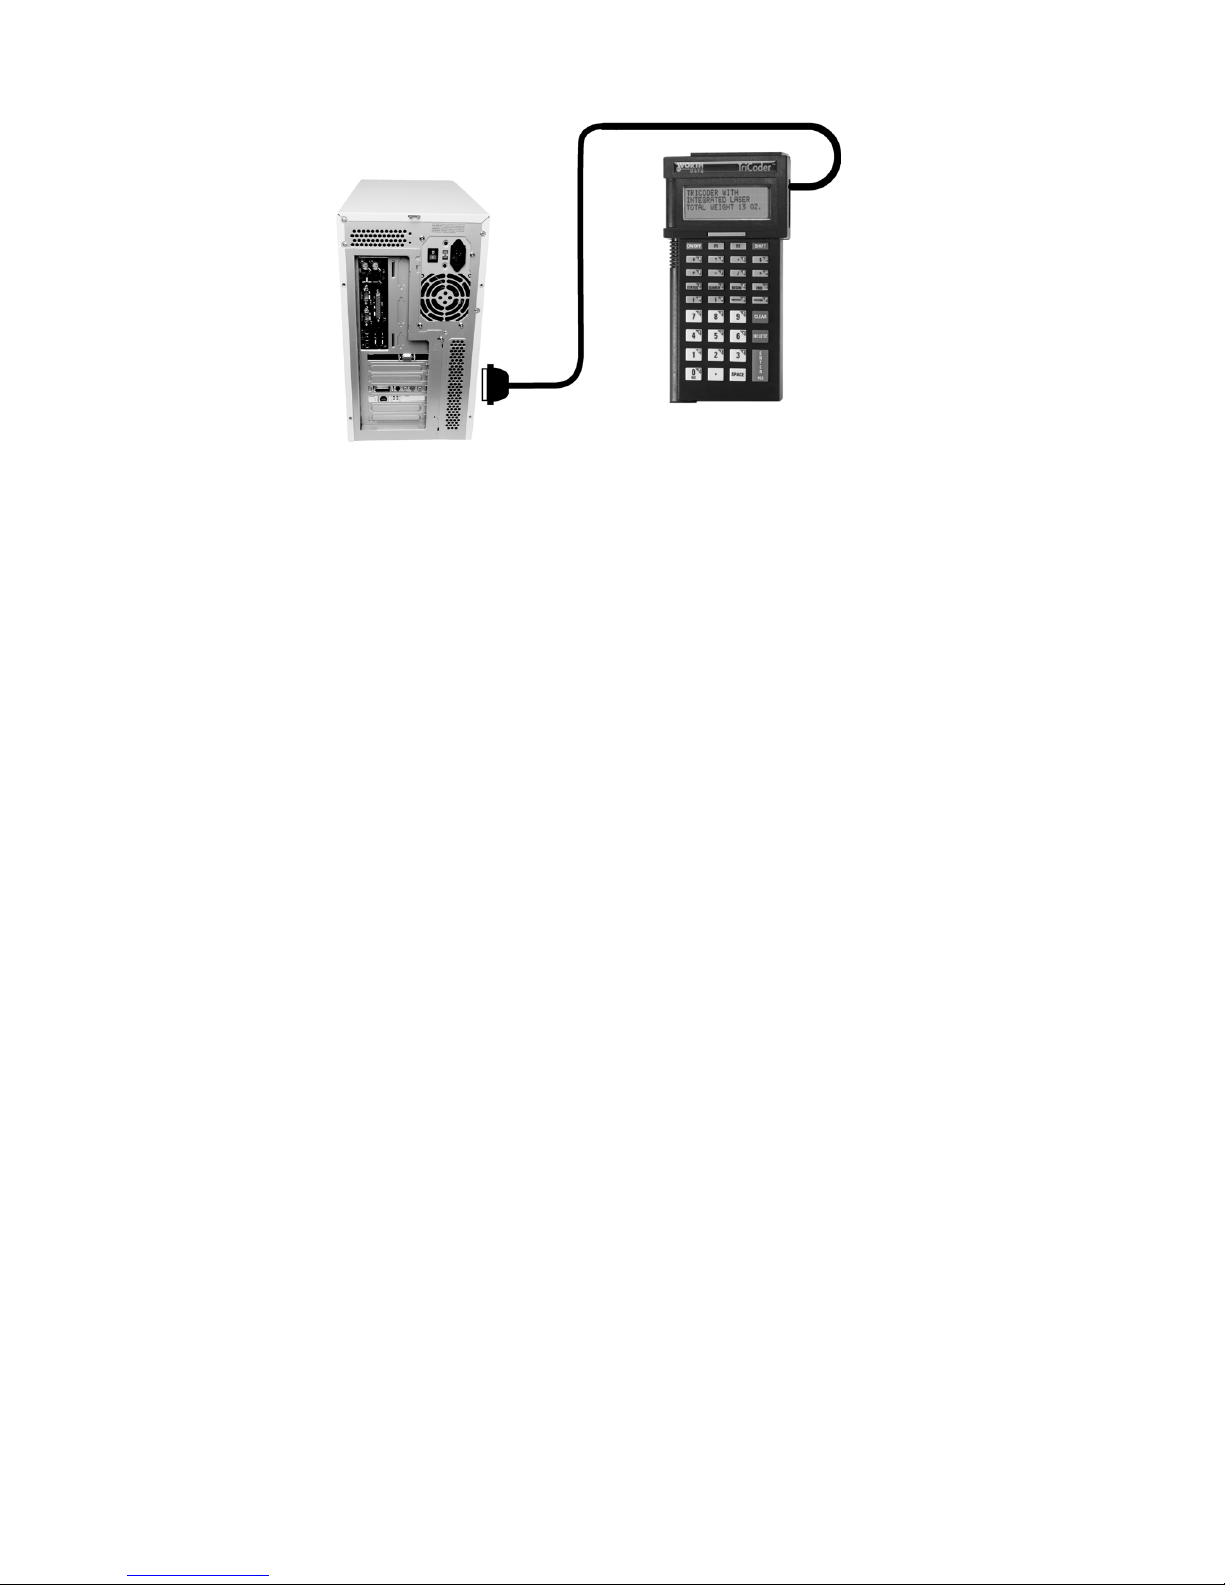
5-4
Serial Installation on PC
Serial Interface Communications Software
If you serially connect the TriCoder to a PC, software is required to
communicate with the serial port. Some applications read the serial port
directly; no additional software is required.
If you want to connect to the serial port yet emulate the keyboard, use our
PortKey software. PortKey takes data coming from the serial port and redirects it through the keyboard buffer, allowing you to emulate most keys
on your keyboard. PortKey has its own users manual. Follow the manual
for installation and setup instructions.
The TriCoder comes with the TriCoder Utilities for Windows that allows
you to configure your serial port, test your communications, upload data
and programs, download programs and tables and edit tables. The
Windows TriCoder Utilities is the easiest way to test communications.
If you are using a program other than the TriCoder Utilities, follow the
installation and setup instructions for that program.
Configuring the TriCoder
Once the hardware is connected, the next step is to configure the TriCoder
and test your communication. If you are using the serial interface, you
should have installed the serial communication software you want to use
(see the previous section).
The TriCoder setup allows the user to configure the TriCoder for different
computer interfaces, and reading of different types of bar codes, as well as
configuring some of the more advanced features of the TriCoder. The
TriCoder can be setup using the bar coded setup menu or by going into
PROGRAMMING MODE.
Page 43

5-5
Using the bar coded TriCoder Setup Menu
To use the bar coded TriCoder Setup Menu, scan these bar codes in this order:
• Start Setup
• Setup Parameter bar code ( i.e. “Beep Tone” )
• Bar code of number that corresponds to the
appropriate setting
( i.e. 3 to change the Beep Tone to “high” )
• End Setup
More than one Setup Parameter can be changed before you scan END
SETUP. For example, scan START SETUP, then “Beep Tone”, then 3,
then “Operation Mode”, then 0, then END SETUP. This series of scans
changes the beep tone to “high”, and puts the TriCoder into NON
PORTABLE mode. For details on TriCoder Setup Parameters, see Chapter
6; TriCoder Setup.
Using Programming Mode to change the TriCoder Setup
The same Setup Parameters can be changed using the TriCoder keypad (no
bar codes necessary) by going into PROGRAMMING MODE. Answer NO
to all of the prompts until you see:
PROGRAMMING MODE
KEY [YES/NO]?_
Press the YES key; then enter the password, WDTRI. At the menu prompt,
press the 5 key to CHANGE SETUP. Once in the TriCoder Setup, press
the number of the group you want to enter. Press ENTER until you see the
Setup Parameter you want to change (i.e. BEEP TONE), then enter the
number for the correct setting (i.e. 3 to change the BEEP TONE to “high”).
More than one Setup Parameter can be changed before you exit the setup.
Pressing F1 while in a Setup Parameter will take you back to the Setup
Menu; from there choose a new group of settings. Pressing F1 again at the
Setup Menu will exit PROGRAMMING MODE.
PC Serial Interface
The Serial Interface requires certain setup parameters. To set up the
TriCoder, you need to know some basic information about the serial port
you will be using, as well as the software you will use to test the TriCoder.
If possible, use the TriCoder at its default settings. Whether or not you
can do this often depends upon the software you are using. If using
PortKey or the TriCoder Utilities, use the default settings. If your software
requires you to set your own baud rate, parity, data bits and stop bits;
simply set them to match the TriCoders default settings. See Chapter 6;
TriCoder Setup for details on changing the serial parameters using the bar
coded setup menu or by the keypad in PROGRAMMING MODE. The
serial default settings on the TriCoder are:
Page 44

5-6
Setup Parameter Setting Description
Computer Interface
3 Default setting on all T54/LT54s. RS-232 ASCII Data Format
Baud Rate
5 9600
Parity
0 None
Data Bits
1 8 bits
Stop Bits
0 1 bit
Protocol
0 None
Default Serial Parameters
Only the default settings for each Setup Parameter are shown above. See
Chapter 6; TriCoder Setup for detailed information.
Testing Communication using NON PORTABLE mode
Testing communication between a serial interface TriCoder and a PC needs
some kind of software to read the serial port. If using a dumb terminal/host
configuration, the testing is almost identical to that of a PC keyboard
wedge. To establish communication between a serial TriCoder and its host,
go to Chapter 3; Non Portable Mode for detailed instructions. The key to
testing communications is to keep it simple – you don’t want to have to
determine whether it’s your software or the TriCoder causing a problem.
Keyboard Wedge Interface (not USB)
Connecting the Hardware
The TriCoder can operate as a legacy keyboard wedge on both a PC and a
Macintosh using a keyboard Y-cable plus a jumper change (see Appendix F).
PC Keyboard Installation (does not apply to USB)
To install the TriCoder as a keyboard wedge, use a Splitter cable, F30/1 for
the PC. Use the following procedure and the diagram on the following page
to install the TriCoder between the keyboard and computer:
1. Before unplugging or plugging in anything, the computer must be
turned OFF. With the power OFF, locate the cable coming out of
the keyboard and follow it to the back of the computer where it
plugs in. Unplug the keyboard cable, look at the connector and
note whether it is large and has 5 pins or small with 6 pins. Take
the F30-1 Y cable and check whether the female end of the cable
matches (5 pin or 6 pin) the male end of the keyboard cable. If it
does not, remove the adapter from the Splitter cable (it may be on
either end), flip it over and place it on the correct end. You should
now have the two ends of the Splitter cable and the keyboard cable
all with the same size connector.
2. Take the end of the keyboard cable you unplugged from the back
of the computer and plug it into the female end of the F30-1
Splitter cable. Take the male end of the F30-1 Splitter cable and
plug it in to the back of the computer where the keyboard had been
plugged in. The Splitter cable must sit in between the computer
Page 45
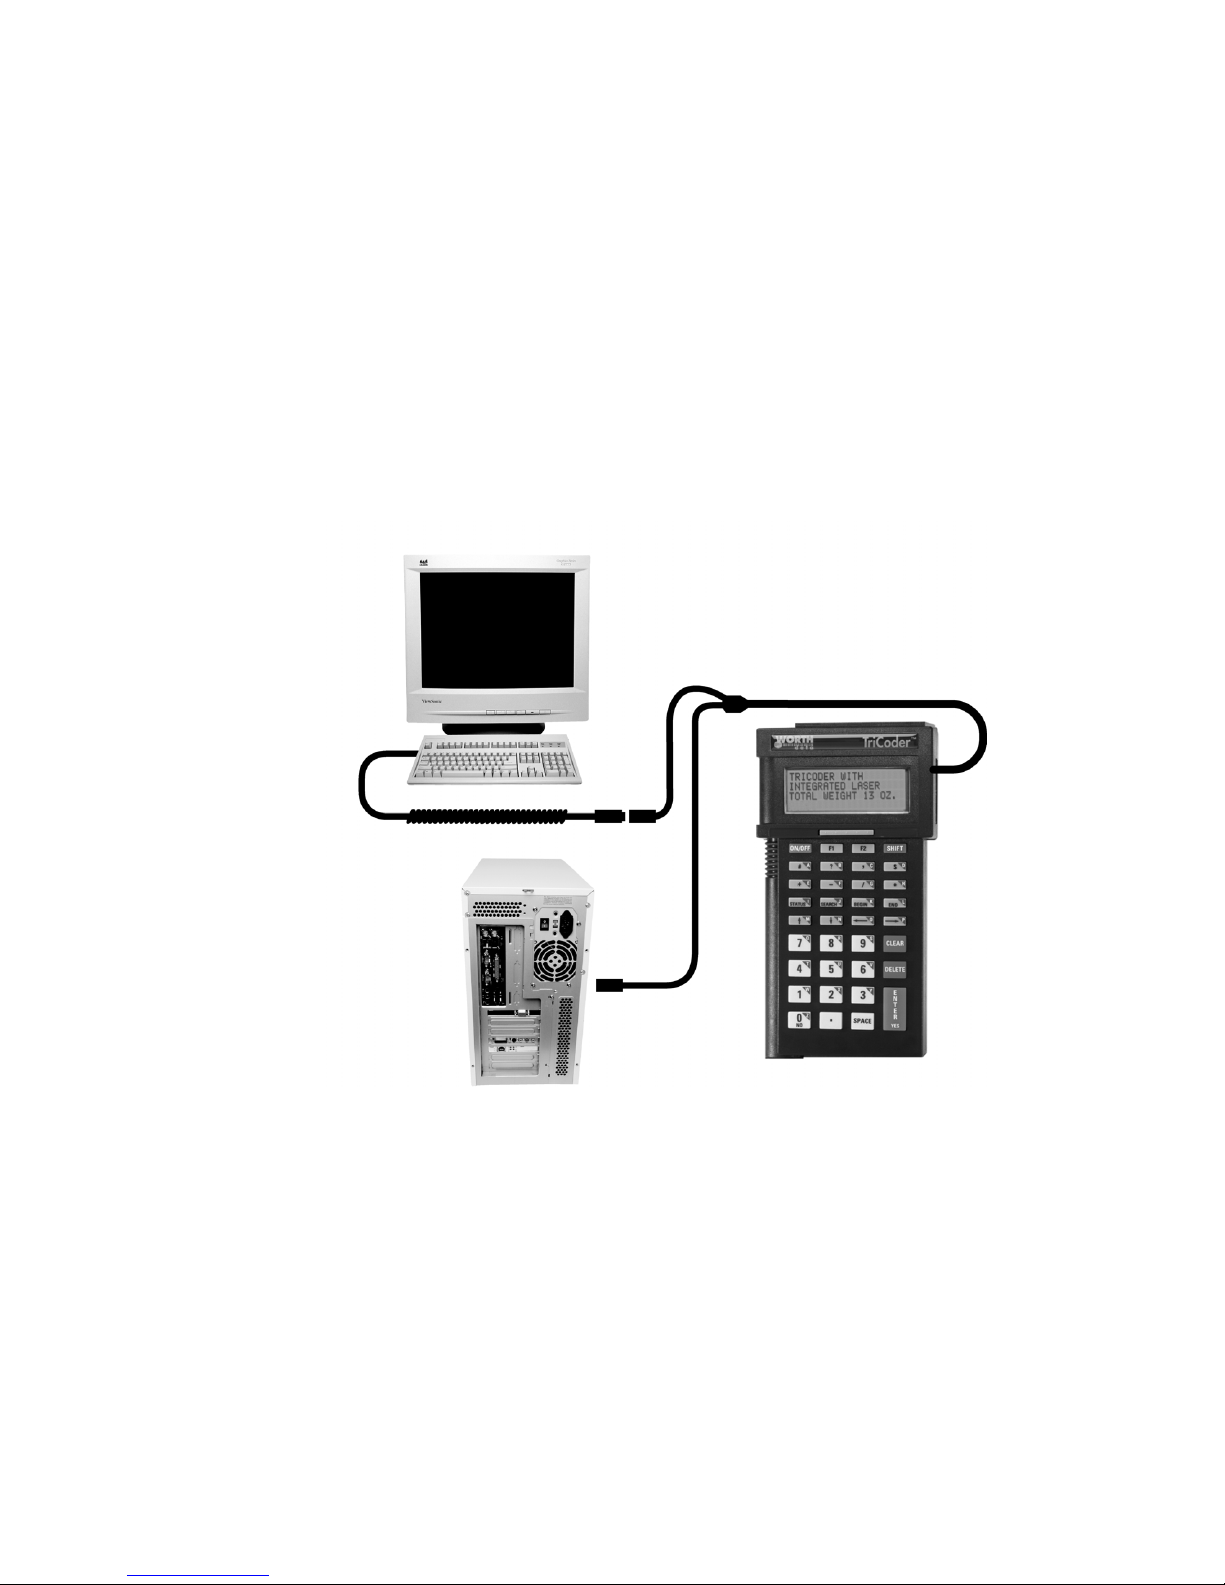
5-7
and the keyboard – do not plug the Splitter cable into a mouse port
or any port other than the keyboard port. Take the 3
rd
end of the
Splitter cable with the modular (telephone style) connector and
plug it into the port on the TriCoder labeled COMPUTER.
3. Plug the 5-volt power adapter (included with the TriCoder) into the
port labeled PWR at the bottom of the TriCoder. Turn the TriCoder
on by pressing the ON/OFF key. Now turn on the computer. The
TriCoder ships with a small black plastic block with a female
modular connector in it called a Jumper Block. When removing the
TriCoder from the cable for portable operation, place the Jumper
Block on the now free end of the Splitter cable. This allows your
keyboard to function even though the TriCoder is not attached.
PC Keyboard Wedge Installation
Configuring the TriCoder for Keyboard Wedge
Once the hardware is connected, the next step is to configure the TriCoder
and test your communication.
The TriCoder setup allows the user to configure the TriCoder for different
Computer Interfaces, and the reading of different bar code types, as well as
configuring some of the more advanced features of the TriCoder. If you
have a PC with a T64 or LT64 TriCoder, the default Computer Interface is
1- PC Keyboard. If you have a T54 or LT54 TriCoder you will need to
change a jumper change to convert the computer port to Keyboard Output
See Appendix F for more information.
Page 46

5-8
Using the bar coded TriCoder Setup Menu
To use the bar coded TriCoder Setup Menu, scan these bar codes in this order:
• Start Setup
• Setup Parameter bar code ( i.e. “Beep Tone” )
• Number bar code that corresponds to the appropriate setting
( i.e. “3” to change the Beep Tone to “high” )
• End Setup
More than one Setup Parameter can be changed before you scan END
SETUP. For example, scan START SETUP, then “Beep Tone”, then 3,
then “Operation Mode”, then 0, then END SETUP. This series of scans
changes the beep tone to “high”, and puts the TriCoder into NON
PORTABLE mode. For details on TriCoder Setup Parameters, see Chapter
6; TriCoder Setup.
If you are using a Laser Scanner to setup the TriCoder, the beam will often
cover more than one bar code. Cover any adjacent bar codes before scanning.
Check the TriCoder display to make sure the correct setting was entered.
Using Programming Mode to change the TriCoder Setup
The same Setup Parameters can be changed using the TriCoder keypad (no
bar codes necessary) by going into PROGRAMMING MODE. Answer NO
to all of the prompts until you see:
PROGRAMMING MODE
KEY [YES/NO]?_
Press the YES key, and then enter the password, WDTRI. At the menu
prompt, press 5 to CHANGE SETUP. Once in the TriCoder Setup, press the
number of the group you want to enter. Then press ENTER until you see the
Setup Parameter you want to change (i.e. BEEP TONE), and then enter the
number for the correct setting (i.e. 3 to change the BEEP TONE to “high”).
To enter an alpha character (i.e. “A”), press the SHIFT key, and then press the
corresponding alpha key (the alpha character is in the upper right corner of
each key). You will know if the TriCoder is in “shifted” mode by the cursor –
it will be a black square when shifted, a straight line when a narrow underline.
More than one Setup Parameter can be changed before you exit the setup.
Pressing F1 while in a Setup Parameter will take you back to the Setup
Menu; from there choose a new group of settings. Pressing F1 again at the
Setup Menu will exit PROGRAMMING MODE.
Legacy Keyboard Interface Configuration
To change a T54/LT54 from Serial Upload to a Legacy Keyboard using a
keyboard Y-Cable you will need to change a jumper inside the unit (see
Appendix F), then set the Computer Interface to 1. Test scans with garbled
or incomplete data are not the result of the wrong interface, but rather
Page 47
5-9
are keyboard BIOS timing sensitivities. If you have garbled or incomplete
data, try the “Learning” mode setting #8. “Learning” mode will make the
correct adjustments for keyboard timing problems; see Chapter 6;
TriCoder Setup: Computer Interface for details.
To use the TriCoder as a Keyboard Interface, use the following chart to
determine what the correct setup parameters are for the type of computer
you are using:
Computer Interface Setting Description
PCs and Compatibles 1
Default Setting on T64/LT64. Used with all IBM PCs and
compatibles unless you are choose a USB setting.
PC Learned
timing
8
If you power the TriCoder with external power supply, you can
use LEARNING mode. On the setup menu, scan START
SETUP, Computer Interface, and then scan the 8. Press any
key on the PC keyboard. (the TriCoder should beep once)
then scan END SETUP. The TriCoder then watched the key
codes coming from the PC and “learns” the timing, setting it in
the EEPROM until you change it.
Testing Communication using NON PORTABLE mode
To test communication as a keyboard wedge, go to Chapter 3; Non
Portable Mode for detailed instruction on how to use NON PORTABLE
mode to establish communication between the TriCoder and the host
computer. The key to testing communications is to keep it simple – you
don’t want to have to determine whether it’s your software or the TriCoder
causing a problem.
Page 48

Page 49

6-1
Chapter 6
TriCoder Setup
Most, but not all of the Setup Parameters can be changed by either using the
TriCoder keypad in Programming Mode or scanning the appropriate bar codes
on the TriCoder Setup Menu. You can also "clone" your setup from one
TriCoder to another if you have the appropriate cables and if you are using high
speed USB you can change your setup parameters using the TriCoder Utilities
program.
Using the bar code TriCoder Setup Menu
To access the Setup using the bar coded TriCoder Setup Menu, scan the
START SETUP bar code in the upper left hand corner of the bar coded
TriCoder Setup Menu. You should hear two beeps from the TriCoder upon
scanning START SETUP and the words START SETUP should appear on
the TriCoder display. At this point you are ready to scan and change as
many parameters as you wish, following this order:
1. Scan the bar code for the parameter you want to change
2. Scan the number on the Barpad Table (to the right) that
corresponds to the setting you want to choose.
3. If the parameter requires it, scan the SET bar code. SET is
normally used to terminate a setup parameter that can have
variable input, i.e. Preamble or Postamble.
4. If you want to make more changes, go back and start at step 1
5. If you are finished, scan the END SETUP bar code in the upper
right hand corner. You should hear 3 beeps at END SETUP.
6. To reset the TriCoder back to the default settings at any time, scan
START SETUP, RESET, then END SETUP. Resetting the
TriCoder will lose any changes you have made and set the
TriCoder to the default settings (indicated by a * on the bar coded
setup menu).
Using the keypad to setup the TriCoder
To use the keypad to setup the TriCoder, you must first get into
PROGRAMMING MODE. To do this, answer NO to all Mode Menu
prompts until you see:
PROGRAMMING MODE
KEY [YES/NO]?_
Press the YES key. A password is required to proceed into
PROGRAMMING MODE:
PROGRAMMING MODE
PASSWORD?_
Page 50
6-2
Enter the password, WDTRI using the TriCoder keypad, then press
ENTER. The TriCoder now displays the PROGRAM FUNCTION menu:
Create Programs->1-3
Voice -> 4 Setup -> 5
Automation ---------->7
Data File Names---->6
Press the 5 key to select Change Setup. The keypad setup menu is now
displayed:
BarCodes-->0 DateTime->4
Computer->1 Speaker--->5
RS-232------>2 Other------->6
Security---->3 Exit-------->F1
The setup parameters are distributed in the groups as follows:
Menu
Selection
Setup
Parameters
Menu
Selection
Setup
Parameters
BAR CODES Code 3 of 9 DATE TIME Set Time
“0” UPC & EAN “4” Set Date
Code 25 / I 25 Date Format
2 of 5 Length Display of Year
Code 128
Codabar
MSI/Plessey
Code 93
COMPUTER Computer Interface SPEAKER Speaker /Batteries
“1” Intercharacter Delay “5” Beep Tone
Terminator Character Speaker Volume
Beep Tone
Single Cycle Transmit
Country Code
RS232 Baud Rate OTHER Shut Down Time
“2” Protocol “6” Preamble
Dialing String Postamble
Parity EOF String
Data Bits Partitions
Stop Bits Voice Messages
Set ID Character Scanner Options
Host Response Delay Aiming Dot Duration
Modem Redial Delay
Transmit Mode
SECURITY Data Security
“3”
To select a particular category, press the corresponding number key on the
TriCoder keypad. Once you are in a category, pressing ENTER will scroll
through the parameters in the order shown above. When you get to the one
you want to change, enter the new character (see the Parameter details later
on), then press ENTER. Some changes must be made by scanning bar
codes from the FULL ASCII MENU. You can set a parameter back to the
default settings by pressing the CLEAR key. You can use the arrow keys to
Page 51
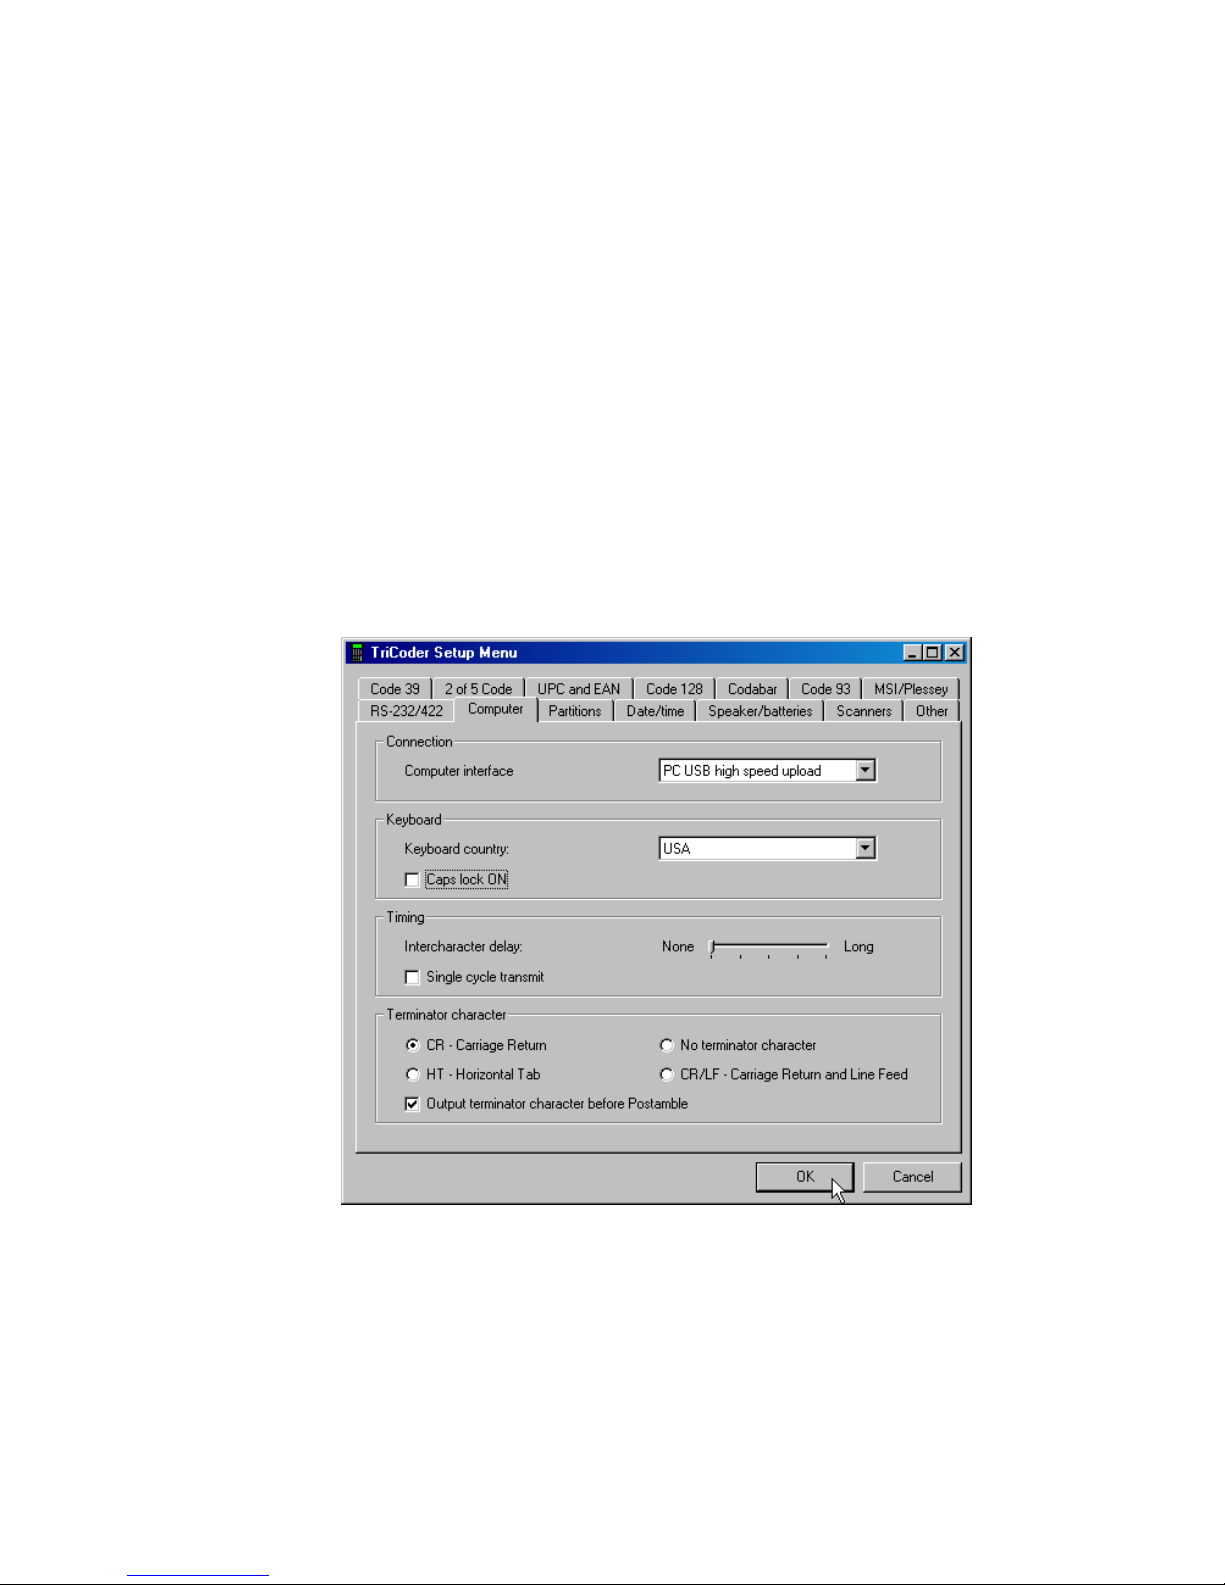
6-3
help you navigate the menu:
Up Arrow moves to beginning of category
Down Arrow moves to end of category
Left Arrow moves up one in the category
Right Arrow moves down one in the category
Press the F1 key to go back to the category selection screen.
Using the TriCoder Utilities and USB to change
Setup Parameters
If you are using the High Speed USB interface, you can use the TriCoder
Utilities program to change your setup parameters.
To use the TriCoder Utilities, you must make sure your TriCoder is turned
on, plugged into the USB cable and is set for High Speed USB interface. In
the TriCoder Utilities program, choose Tools from the pull-down menu, and
then choose TriCoder Setup.
Click on any of the tabs to change settings for that section. Once you have
made your changes, click OK and the changes are automatically made in
your TriCoder.
Cloning from one TriCoder to another
If your programs, tables and setup are complex or large, transmitting them
from TriCoder to TriCoder is faster and easier than manually entering all of
the information every time. Transmitting programs and setup to a host
Page 52

6-4
computer allows you to store a back-up copy (excluding Voice Messages)
available for download if anything happens to your TriCoder.
Transferring programs, tables and setup directly from one TriCoder to
another is called Cloning. Cloning also allows you to copy voice messages
from one TriCoder to another (transferring programs and setup to the host
computer does not allow you to do this).
There are several things you need to do before receiving programs or setup
from another TriCoder:
• Receiving and transmitting programs from one TriCoder to another
requires the correct cables. The TriCoder Data Cloning Cable
(F38) is needed to clone or transmit/receive programs, tables and
setup information. The TriCoder Voice Cloning Cable (T15) is
required to "clone" or transmit and receive voice messages. Voice
messages can only be transmitted or received from TriCoder to
TriCoder. They cannot be transmitted via host computer. The
Data Cloning Cable is attached to each TriCoders Computer port.
The connector on the Voice Cloning Cable that has two black
rings on the tip plugs into the auxiliary jack on the bottom of the
receiving TriCoder. The tip with the single ring plugs into the
transmitting TriCoder.
• Make sure all data is uploaded and deleted from the receiving
TriCoder. The TriCoder will not allow you to receive data unless
the TriCoders data files are empty.
• Plug in the 5-volt power adapter(s). You want to make sure you
don’t have a low-battery situation in the middle of a transfer.
• For serial and keyboard cloning, always start the receiving
TriCoder first. For USB cloning to a host computer, follow the
instructions on the TriCoder’s display.
• When transmitting between two TriCoders, both TriCoders must
be configured to use the same Computer Interface. If configured
as serial interface, the serial parameters must be the same on both
TriCoders; baud rate, parity, data bits and stop bits must match.
Two USB TriCoders cannot be cloned together.
Page 53

6-5
Starting the Receiving TriCoder
Make sure all cables are attached correctly and the 5-volt power adapter is
plugged in. To start the receiving TriCoder, answer NO to all prompts until
you see:
PROGRAM RECEIVE?
KEY [YES/NO]?_
Press YES to get to the RECEIVE PROGRAM menu:
RECEIVE PROGRAM KEY
------------------------------ -------Programs [1-3]?---------->1 - 3
Clone TriCoder?----------> 0
Press 0 to Clone the entire TriCoder. Cloning receives the programs, tables,
Setup, and voice messages (if using a voice cloning cable T15) from
another TriCoder.
Press 1, 2 or 3 to receive a program only. Pressing 1, 2 or 3 determines
which program number you are assigning - it does not have to correspond
to the program number being transmitted from the other TriCoder or host.
After making a selection, the TriCoder displays:
RECEIVING PROGRAM
PLEASE WAIT➔
Once the transmission is complete, the receiving TriCoder displays:
END OF PGM. RECV
HIT ANY KEY_
Press any key to return to the Mode Menu.
If the TriCoder has a problem during the transmission, the transfer will end
and the TriCoder will display the following error message:
DATA XMIT ERROR
CYCLE POWER
If you receive this message while receiving a program, the program transfer
is incomplete and the transmit/receive session will have to be restarted. To
avoid any problems, do not press any keys on the TriCoder once the
transmission has started.
Page 54

6-6
Starting the Transmitting TriCoder
At this point, you can start the transmitting TriCoder. To start transmitting
programs or setup from a TriCoder, answer NO to all prompts until you see:
PROGRAM TRANSMIT?
KEY [YES/NO]?_
Press YES to get to the TRANSMIT PROGRAM menu:
TRANSMIT PROGRAM KEY
-------------------------------- -----Programs [1-3]?------------>1 - 3
Clone TriCoder?------------> 0
Press 0 to Clone the entire TriCoder. Cloning transmits the programs,
tables, Setup and voice messages (if using a voice cloning cable T15) to
another TriCoder.
Press 1, 2 or 3 to transmit a program only. Pressing 1, 2 or 3 determines
which program number you are transmitting - it does not have to correspond
to the program number chosen by the receiving TriCoder or host.
After making a selection, the TriCoder displays:
SENDING PROGRAM
PLEASE WAIT➔
Once the transmission is complete, the transmitting TriCoder displays:
END OF PGM. XMIT
HIT ANY KEY_
Press any key to return to the Mode Menu.
The serial protocol for program transmission is different than that for data
transmission. During serial program transmission, the TriCoder transmits
each character one at a time, expecting the receiving TriCoder to echo the
character back. If the characters match, then the transmitting TriCoder
sends the next character. If the characters don’t match, the transmitting
TriCoder sends a NAK to the receiving unit. At that point, the transmitter
re-sends the last character. If the transmitter ends up sending 10 NAKS, it
will abort the transmission (there is obviously something wrong) by sending
EOT (ASCII 4) and display the following error message:
DATA XMIT ERROR
CYCLE POWER
Page 55

6-7
If all data is echoed back correctly, the last character sent to the receiving
unit is ASCII 128.
If you see this message while transmitting a program, the program transfer
is incomplete and the transmit/receive session will have to be restarted. To
avoid any problems, do not press any keys on the TriCoder once the
transmission has started.
Page 56

6-8
TriCoder Setup Parameters
Default settings are shown in bold print. The number or letter associated with
the setting is the same whether configuring the TriCoder using the bar coded
Setup Menu or via the keypad in PROGRAMMING MODE. Some parameters
are set only by the bar code setup menu or only by the TriCoder keypad.
Beep Tone
Lowest 0
Low 1
Medium 2
High 3
Highest 4
No Beep, No LED on tethered scanner 5
No Beep, but LED on tethered scanner shows good
read
6
The TriCoder allows five different beep pitches or no beep at all.
Speaker Volume
Speaker and beeper volume are also controlled by keyboard Setup in
PROGRAMMING MODE. The default is 5, a medium setting. If you want it
louder, enter a larger number. If you want it less loud, enter a lower number.
Code 3 of 9 (Code 39)
Enable Code 3 of 9 0
Disable Code 3 of 9 1
Enable Full ASCII Code 39 2
Disable Full ASCII Code 39 3
Enable Code 39 Accumulate Mode 4
Disable Code 39 Accumulate Mode 5
Enable Start/Stop character transmission 6
Disable Start/Stop character transmission 7
Enable Mod 43 Check Digit 8
Disable Mod43 Check Digit 9
Enable Check Digit transmission A
Disable Check Digit transmission B
Caps Lock ON C
Caps Lock OFF D
• The Start and Stop character for Code 39 is the * character. Settings 6
and 7 determine whether or not those characters are transmitted to the
computer along with the data. For example, at setting 6, the data of
1234 would be transmitted as *1234*. Transmitting the start and stop
Page 57

6-9
characters can be useful if you need to differentiate between data that
comes from a bar code versus data coming from the keyboard.
• Enabling use of the Mod 43 check character requires that the last character
of your bar code conform to the Mod 43 check character specifications.
See Appendix H; Code 39 for more information. Enable transmission
(A) will send the check digit data along with the rest of the bar code data to
your computer. To use A, you must also be using 8.
• Caps Lock ON causes lower case letters read as data to be transmitted
to the computer as UPPER CASE, and upper case letters to be
transmitted as LOWER CASE. Numbers, punctuation and control
characters are not affected. This setting applies to all bar code types.
UPC/EAN
Enable UPC/EAN 0
Disable UPC/EAN 1
Enable UPC/EAN Supplements 2
Disable UPC/EAN Supplements 3
Enable transmission of UPC-A NSC or EAN 2 Flags 4
Disable transmission of UPC-A NSC or EAN 2 Flags 5
Enable transmission of UPC-A and EAN-13 check digit 6
Disable transmission of UPC-A and EAN-13 check digit 7
Enable transmission of UPC-E NSC and EAN-8 Flag character 8
Disable transmission of UPC-E and EAN-8 Flag ch. 9
Enable transmission of UPC-E and EAN-8 Check digit A
Disable transmission of UPC-E and EAN-8 check digit B
UPC-E Compressed C
UPC-E Expanded D
EAN-8 observing 9&A E
EAN-8 forced to transmit 8 digits always F
• Use setting 2 to enable reading of the 2 and 5 digit UPC/EAN
supplements commonly found on magazines and paperback books.
Using this setting forces left to right reading of UPC codes to assure
that the supplement code is not missed. This setting also allows for
reading of the UCC/EAN 128 Extended Coupon Code. The Extended
Coupon Code consists of a UPC code with a NSC of 5 or and EAN
code with a country code of 99 along with a C0de 128 supplemental
code to the right. This setting allows you to read the Code 128
supplement with the UPC/EAN, providing the UPC has a NSC of 5 or
the EAN code has a country code of 99. Without the correct NSC or
country code, the Code 128 portion will be ignored; UPC code with an
NSC of 5 or EAN codes with country code of 99 will not be read unless
there is a readable Code 128 supplemental code read also.
Page 58

6-10
• ISBN (International Standard Book Numbering) bar codes are EAN-13
with a 5-digit supplement. If the “Bookland” bar code uses 978
(books) or 977 (periodicals) as the first three digits, then it can be
transmitted by the TriCoder in the ISBN format. The settings for this
can be found under the Terminator Character parameter. For details
on ISBN, see Appendix K; UPC/EAN.
• Use setting 4 and 9 to enable transmission of the NSC character to your
computer. The Number System Character is the leading character in
the bar code. For details, see Appendix K; UPC/EAN.
• Use setting 6 and A to enable transmission of the check digit character
to your computer. The check digit is the last character and is based
upon a calculation performed on the other characters.
• Setting C transmits UPC-E0 bar codes as is; setting D transmits them
with inserted zero’s to make them the same length as a UPC-A bar
code. A NSC of 0 is assumed. It is possible to read UPC-E1 bar codes;
by default this option is disabled. Do not enable UPC-E1 if you plan
on reading EAN-13 bar codes; you may experience partial reads when
reading EAN-13. The UPC-E1 option is set in the 2 of 5 Code
parameter. To enable UPC-E1 reading, set the 2 of 5 Code parameter
to 8. To turn off UPC-E1 reading, set it back to the default of 9.
• If you prefer to transmit UPC-E bar codes in a 6 digit format while EAN-8
is transmitted in its original 8 digit format, use setting F. This will allow
you to use settings 9 and A and still transmit EAN-8 as 8 digits.
• UPC-A can be transmitted in EAN-13 format by adding a leading 0
(USA county code) to the UPC-A data. This setting is found in the
Terminator Character parameter.
Codabar
Enable Codabar 0
Disable Codabar 1
Enable CLSI Codabar 2
Disable CLSI Codabar 3
Disable Start/Stop character transmission 4
Enable Start/Stop character transmission 5
• CLSI is a form of Codabar often used by libraries.
• Setting 5 will transmit the Codabar start and stop characters with the
bar code data to your computer. If you are varying the start and stop
characters to differentiate between different labels, transmitting the
start and stop can be helpful. See Appendix L; Codabar for more
information.
Page 59

6-11
2 of 5 Code
Enable Interleaved 2 of 5 0
Disable Interleaved 2 of 5 1
Enable Interleaved 2 of 5 check digit 2
Disable Interleaved 2 of 5 check digit 3
Enable check digit transmission 4
Disable check digit transmission 5
Enable Standard 2 of 5 6
Disable Standard 2 of 5 7
Enable UPC- E1 8
Disable UPC- E1 9
• Setting 2 requires that the last digit in your bar code conform to the
specifications for the 2 of 5 check digit calculation. See Appendix J; 2
of 5 Code for more information.
• Transmission of the check digit (5) requires the use of setting 2 and will
transmit the check digit along with the bar code data to the computer.
• Settings 8 and 9 enable and disable the reading of UPC-E1 codes. See
the UPC/EAN setup parameter for more information.
2 of 5 Length
Default setting 06
Valid entries 00-98
To read variable length 2 of 5 codes (temporarily ONLY!) 00
• 2 of 5 codes are so susceptible to partial misreads that only one length
of code should be read, and that should be checked by the TriCoder.
• The default setting of 06 causes the TriCoder to read only 2 of 5 codes
that are 6 digits in length. To set the TriCoder to read a different
length, scan any two digit number from the bar pad table. For example,
to change the TriCoder to accept an 8-digit bar code, scan 0 then 8 from
the bar pad table. 2 of 5 code must always be an even number of digits
so the length setting must always be an even number.
• If you have to read variable length Interleaved 2 of 5 codes, specify a 2
of 5 length of 00, however, you will want to use other checking features
(Data ID, etc.) when creating a program for data collection. Reading
variable length I 2of5 or 2 of 5 codes is to be avoided if at all possible.
The 00 setting is supplied for the purposes of reading codes of
unknown length, counting the digits, and setting the length to the
proper number.
Page 60

6-12
MSI/Plessey
Disable MSI & Plessey bar codes 0
Enable MSI, 1 Mod 10 check digit 1
Enable MSI, 2 Mod 10 check digits 2
Enable MSI, 1 Mod 11/ Mod 10 check digit 3
Transmit no check digits 4
Transmit 1 check digit 5
Transmit 2 check digits 6
Enable Plessey bar code (mutually exclusive with MSI) 7
Enable LabelCode5 (mutually exclusive with MSI & Plessey) 8
Enable LabelCode4 (mutually exclusive with all above codes) 9
• LabelCode 5 and LabelCode 4 are proprietary bar code types used by
Follet.
• For more information regarding MSI or Plessey Code, see Appendix
M; MSI Plessey Code.
Code 128
Disable Code 128 0
Enable Code 128 1
Disable UCC/EAN-128 2
Enable UCC/EAN-128 3
Enable Storage Tek Tape Label Code (TriOptic Code 39) C
Disable Storage Tek Tape Label Code (TriOptic Code 39) D
Bar Code ID’s transmitted E
Bar Code ID’s not transmitted F
• UCC/EAN-128 is a subset of Code 128 that follows certain
specifications regarding character content, length and check digits.
Enabling UCC/EAN-128 (2) causes the TriCoder to look for a Code
128 bar code that begins with the Code 128 F1 (Function 1) character.
See Appendix I; Code 128 for more details.
• The StorageTek Tape Label code (also called TriOptic Code 39) is a
proprietary variation of Code 39 code used for the storage of computer
data tapes. Enabling the tape label code (C) does not disable reading of
Code 128 bar codes.
• Bar Code ID’s are characters assigned to each bar code type to identify
that particular type of code. These Bar Code ID’s can be used to identify
what type of bar code you are using when you are not sure or you want
your application to differentiate between the different types. This applies
only when the TriCoder is used in NON PORTABLE mode.
Page 61
6-13
The Bar Code ID’s are assigned as follows:
Bar Code ID Bar Code ID
Codabar a Code 39 b
UPC-A c EAN-13 d
I 2of5 e 2 of 5 f
Code 128 g Code 93 i
MSI j UPC-E(0) n
UPC-E (1) o EAN-8 p
RSS-14 r StorageTek s
Plessey x LabelCode 4 y
LabelCode 5 z
The ID character is transmitted in front of the bar code data.
Code 93
Enable Code 93 0
Disable Code 93 1
Enable Full ASCII Code 93 2
Disable Full ASCII Code 93 3
• Code 93 is similar in character set to Code 39. See Appendix N: Code
93 for more information. Code 93 is not a commonly used bar code
symbology.
RSS-14
Disable RSS-14 0
Enable Standard 14 digits 1
Enable 14 plus Identifiers 2
Enable 14 plus UCC 128 Emulation 3
• By default, standard RSS-14 is disabled, scan 1 to enable. Options 3
and 4 enable the alternate RSS-14 formats. For more information on
RSS-14, see the AIM website at:
http://www.aimglobal.org/standards/symbinfo/rss_overview.asp
Preamble and Postamble
The Preamble and Postamble apply to data entered in NON-PORTABLE
MODE only. Upload Prefixes are used in programs for portable data
collection.
• Preambles are user-defined data that is transmitted at the beginning of data
(bar code or keyed) that is entered in the TriCoder in NON PORTABLE
mode. For example, if you set a preamble of @@ and scanned bar code
data of 12345, @@12345 would be transmitted to the computer.
• Postambles are user-defined data that is transmitted at the end of data (bar
code or keyed) that is entered in the TriCoder in NON PORTABLE mode.
For example, if you set a preamble of @@ and scanned bar code data of
Page 62

6-14
12345, 12345@@ would be transmitted to the computer.
• By default, the TriCoder has no preambles or postambles configured.
Preambles and Postambles can each contain up to 15 characters scanned
from the bar coded FULL ASCII Menu. To set a preamble or postamble:
1. Scan the Preamble or Postamble bar code or select
Preamble or Postamble from the keypad menu.
2. Scan the desired characters (up to 15) from the FULL ASCII Menu.
3. Scan the SET bar code, or if using the keypad, press ENTER.
4. To clear the Preamble or Postamble and return to the default
(no Preambles or Postambles defined), scan CLEAR at step
#2, then continue with your setup.
• You can use the Preamble or Postamble to trim characters from
the data you are entering into the TriCoder in NON PORTABLE
mode. The Upload Prefix and Suffix is used to trim data in
portable mode (data collection). You can trim from 1-15
characters from the data by creating a preamble or postamble of:
~x
where ~ is ASCII 126 and x is a single hex digit 1-F
(corresponding to 1-15). Data that is shorter than the trim amount
are transmitted without trimming. Preambles trim data from the
front; Postambles trim characters from the end.
Here are some examples, with and without trimming included:
Data Scanned Preamble Value Data Transmitted
123 XYZ XYZ123
12345678 ~3XYZ XYZ45678
12345678 ~9 12345678
12345678901 ~A 1
123456 ~5 6
Preamble affects leading (high order) characters
Data Scanned Postamble Value Data Transmitted
123 XYZ 123XYZ
12345678 ~3XYZ 12345XYZ
12345678 ~9 12345678
12345678901 ~A 1
123456 ~5 1
Postamble affects trailing (low order) characters
• Using the Bar Code ID feature and the Preamble or Postamble,
you can trim data selectively, trimming characters only on the bar
code type specified. To use selective trimming, enter:
~bx
where b is the Bar Code ID character (see the Code 128 setup
parameter) and x is the number of characters to trim from the
Page 63

6-15
front of the data. For example, ~b2~c1 says “trim 2 characters
from Code 39 data and 1 character from UPC-A data”.
Remember that the Preamble trims leading data and the
Postamble trims trailing data.
• The Preamble and Postamble can also be used to create “line
feeds” on the TriCoder display before the data is displayed. To
enter “line feeds” before or after your data enter:
}x
where x is 1-3, depending on how may lines you want to scroll.
For example, it you wanted skip 3 lines, you would enter }3.
• Lastly, the Preamble and Postamble can be used to check a
minimum and maximum character length for data entered in NON
PORTABLE mode. In portable data collection, min and max
character lengths are set using the Max Data Len and the Min
Data Len in the programming statements. To check for length in
the Preamble or Postamble, enter:
|nnmm
where | is ASCII 124, nn is the two-digit minimum and mm is the
two-digit maximum. |0210 would check for a minimum of 2
characters and a maximum of 10.
Terminator Character
CR - Carriage Return 0
HT - Horizontal Tab 1
None 2
CR/LF - Carriage Return/Line Feed 3
Do not transmit EAN-13 data with 5 digit supplement as ISBN C
Transmit EAN-13 data with 5 digit supplement as ISBN format D
No country code transmitted for UPC-A E
Transmit UPC-A in EAN-13 format (Country Code 0) F
• The Terminator Character is the character sent at the end of each
data entry in NON PORTABLE mode and at the end of each field when
uploading after data collection (Portable use). Your application will
determine what Terminator Character (if any) you use.
• In Keyboard Wedge mode, CR (0) is the default. For Serial Interface,
CR/LF (3) is the default.
• Settings C, D, E and F correspond to settings for UPC bar codes only.
See the UPC/EAN section for details.
Page 64

6-16
Computer Interface
PC USB Keyboard Upload 0
PC compatibles Keyboard Wedge 1
RS-232 ASCII Data Format 3
RS-422 ASCII Data Format 5
PC USB High Speed Upload 6
If setting 1 or setting 2 and Non-Dedicated Server 7
Learning Mode for Timing with PC Keyboard Wedge 8
Macintosh USB Keyboard 9
T64/LT64s are shipped with the Computer Interface set to 1. T54s/LT54s
are shipped with the Computer Interface set to 3. All models of the
TriCoder have a built-in USB port.
USB Selections
If you have a Mac, you must choose 9. You are limited to Non-Portable
Mode and Data Upload as a Mac USB Keyboard.
If you are using Windows-98 or later (2000, ME, XP, etc.) and you wish to
upload your files directly into your application through the keyboard, you
must choose 0, (USB keyboards are still superior to keyboard wedge
because there are no timing delays and no jumper block is necessary). After
specifying 2, the first time you plug in a USB cable to the TriCoder and
host, you will be asked to install the USB Keyboard HID driver, which is
probably on your hard disk, but if not, is on your original Windows CD
ROM; just keep clicking on NEXT until you are forced to supply the
original Windows CD ROM. Data uploads through the keyboard will be
slower than serial and high speed USB, but you will still be able to use the
High Speed program uploads/downloads, firmware upgrades, and table
downloads; the first time you attempt a high speed USB operation, you will
be required to install another driver for high speed support,
TRICODERUSB, which is supplied on your TriCoder Utilities CD ROM,
(also on our website, www.barcodehq.com
under Downloads).
If you are using Windows and you wish to use the TriCoder Utilities to
upload data to a file in high speed, choose 6. You will also be able to do
program uploads/downloads, firmware upgrades, and table downloads. The
first time you plug in a USB cable between the TriCoder and a host, you will
be required to install the high speed TRICODERUSB driver that is supplied
on your TriCoder Utilities CD ROM, (also on our website,
www.barcodehq.com
under Downloads). The first time you attempt to use
Non-Portable Mode, you will be asked to install the USB Keyboard HID
driver, which is probably on your hard disk, but if not, is on your original
Windows CD ROM.
Page 65

6-17
Other Interfaces
Depending upon the setting of the Interface Jumper (see pages K-2 and K-
3), the TriCoders Computer Interface is set to either RS-232 or PC
compatible Legacy Keyboard Wedge.
• The easy way to select an interface if using Keyboard Wedge mode
(not USB) is to use Learning Mode (8). Follow these instructions:
1. Scan Start Setup
2. Scan Computer Interface
3. Scan 8
4. Press any key on your PC keyboard
5. Scan End Setup
The TriCoder watches the key codes coming from the computer,
“learns” the keyboard timing, and beeps to signify it has captured the
timing; it then sets it in the EEPROM until you change it.
• RS-422 is for use with RS-422 boards only. If your computer is using
a RS-422 board, you must order the 422 option at the same time you
order your TriCoder, as this feature is not field-installable. RS-422
also requires special cables. RS-422 and RS-232 are mutually
exclusive; only one or the other is available.
• If you are a Windows® with Window Vista, XP, ME, 2000 or 98SE,
we suggest that you use the high speed USB interface, which offers the
following advantages: (the first time you plug in your USB cable, you
may be asked to choose the type of USB interface you wish to use)
1) Data uploads at speeds 40 times faster than a serial upload.
2)
The ability to update your firmware at speeds 40 times faster than
serial interface (its not even possible with the keyboard wedge). This
includes all improvements available on our Website for the life of
your TriCoder.
3) The ability to download tables and upload/download programs
from your PC at much faster speeds than serial, (not possible with
keyboard wedge interfaces) and use the TriCoder Utilities to
quickly change your TriCoder Setup.
4) The ability to operate in Non-Portable Mode as a USB keyboard
without having to add a jumper block to a Y-Cable when the
TriCoder is removed from t
he Y-cable for portable data collection.
Page 66

6-18
Intercharacter Delay
None 0
Short Delay 1
Medium-short Delay 2
Medium-long Delay 3
Long Delay 4
(This does not apply to USB. It rarely applies to serial.)
• Use Computer Interface setting 8 for Learning Mode whenever
possible. This allows the TriCoder to figure out the timing on its own
and set it in the EEPROM for you. Don’t try this parameter unless
Learning Mode fails.
• Intercharacter Delay is a setting that allows the TriCoder to match the
keyboard timing on your PC. Most computers work fine with no delay
at all, but due to the variety of BIOS and clock speeds, some PC’s may
need a timing delay.
• The best way to determine whether you need to program a delay or not
is to start at setting 0 (None). Try reading a bar code in NON
PORTABLE mode while connected to your computer. If your data
transmits with no problems, leave your delay at 0. If you have garbled
or missing data, try each delay starting with 1 until you have complete
and correct data. Between setting changes, try typing on your keyboard
to make sure you still have correct characters coming from your
keyboard. In some instances, you may need to re-boot the computer
between delay setting changes.
• Intercharacter Delay settings are generally for Keyboard Wedge mode
but will work in Serial Mode (usually only if using PortKey and
emulating keyboard data). Garbled data in Serial Mode is usually
the result of the wrong Baud Rate or Parity setting. Check these
first before you start changing the Intercharacter Delay.
Speaker / Batteries
Speaker ON 0
Speaker OFF 1
Alkaline Batteries or Alkaline Rechargeables 2
Nickel Metal Hydride or NiCad Rechargeable Batteries 3
• If you are using the headphones in a noisy environment, you can conserve
battery power by turning the Speaker OFF (1). You control the volume of
the headphones by adjusting a variable resistor inside the TriCoder’s case.
See Appendix F: Jumpers, Switches, and Adjustments.
Page 67

6-19
• For the TriCoder to know when to tell you to change batteries, you must
select the correct battery type. The default is Alkaline (2). If you start
using rechargeable batteries and fail change 2 to 3, your TriCoder will
probably start acting very strange, (beeping, black bars on the display, no
laser beam, etc.) as the batteries run down. Rechargeable batteries don’t
have the instant reserve power that alkalines do; therefore, without
warning or indication they can be depleted unless the TriCoder knows to
look for rechargeable batteries.
Battery Status can be displayed by pressing the STATUS key on the
TriCoder keypad while in NON PORTABLE mode or while collecting
data (portable).
Scanner Options
Switch Wand (no longer available) 7
Non-switched Wand (for NON PORTABLE mode only) 8
If using a "switch" wand (no longer available), you must set the decode
light switch to "W", (See Appendix F). A “non-switched” wand can be
used, but only with the 5v power supply and the decode light switch (see
TriCoder diagram in Appendix F) must also be set to "L", (the default at
shipping).
Aiming Dot Duration
If you have a DMA TriCoder with firmware version of DMA2018 or
higher, board level F or greater, and an internal laser or the external LZ200D scanner, you can get a aiming dot to project before the laser beam spreads
over the bar code. This is useful when trying to read in direct sunlight
(because the dot is brighter than the line), when trying to read at a distance,
and when trying to read one of many bar codes on a page.
By setting the time in 1/10ths of a second that the aiming dot stays on after
pulling the trigger and before the beam spreads, the bright dot can be used to
position in the middle of the bar code. This feature is accessible only through
the keyboard setup under OTHER. The default is set to 00, no aiming dot.
You can enter any number from 01 to 99 (99 gives 9.9 seconds). Typically
you will want 1 (10) or 2 (20) seconds of aiming dot. You also must make
sure the decode light switch (see diagram on page M-3) is set to L.
To check your firmware version and board level, power up your TriCoder
and note the opening screen display:
DMA TRICODER Xxxxx B
HIT ANY KEY_
Page 68

6-20
X is W for a TriCoder jumpered for Keyboard Interface or
R for a TriCoder jumpered for Serial Interface or
K for USB Keyboard upload or
H for USB High Speed upload
xxxx is the firmware version (i.e. 2018) and
B is the board level( i.e. F).
Keyboard Country
US 00
French 01
German 02
Belgian 03
French Canadian 04
Danish 05
Dutch 06
Italian 07
Latin American 08
Norwegian 09
Portuguese 10
Spanish 11
Swedish 12
Swiss German 13
United Kingdom 14
• This does not apply to USB or Serial. In addition to keyboard wedge
country emulation, it also controls the display of French, German, or
English messages.
• This parameter applies only to TriCoders operating in Keyboard
Wedge mode. The default setting is US (00) and requires a two-digit
entry for all settings.
• Setting 01 (French) and 02 (German) also apply to the displayed
messages on the TriCoder. Displayed messages will appear on the
TriCoder in the language chosen. If you want to use a US keyboard
and display messages in French or German, scan 51 for French or 52
for German.
Page 69

6-21
Operation Mode
Non Portable Mode 0
Programming Mode 1
Data Collection Mode 2
Data Upload Mode 3
Program Transmit Mode 4
Program Receive Mode 5
Buffered Terminal Mode 6
• Non Portable Mode is used to read data directly into the Computer
from the TriCoder, both in Keyboard Wedge, USB and Serial modes.
If using the TriCoder as a serial interface, setting Protocol to Host
Response Accepted can turn the TriCoder into a dumb terminal,
displaying prompts from the host and transmitting data back.
• Programming Mode is used to create or modify a program, record and
test voice prompts and to change the Setup using the TriCoder keypad.
The TriCoder requires entry of a password before you are allowed to
access Programming Mode. The password, WDTRI, is the same for
all TriCoders.
• Data Collection Mode is a portable mode used to collect data using
one of the TriCoder's four available programs. Program #0 and
Program #1 are pre-programmed into the TriCoder when you receive it.
Program #0 is a fixed program while Program #1 is a simple inventory
program that is user-editable. Programs #2 and #3 are not set and are
available for custom programming. See Chapter 1 and Chapter 2 for
data collection tutorials using Program #0 and #1.
• Data Upload Mode is used to transfer data collected in the TriCoder to
the host computer for Keyboard Wedge, USB and Serial mode.
• Program Transmit Mode is used to transmit a TriCoder program,
setup or voice messages to another TriCoder or to a host computer.
Voice messages can only be transferred from TriCoder to TriCoder.
“Cloning” (copying the entire setup and programs) is handy when
setting up multiple TriCoders.
• Program Receive Mode is used to receive a TriCoder program, setup
or voice messages from another TriCoder or host computer. Voice
messages can only be received from another TriCoder.
• Buffered Terminal Mode allows the TriCoder to function as an online
intelligent buffered terminal using Program #1 and uploading upon
request by a host computer polling with ACK/NAK protocol. This
mode requires programming at the computer end.
Page 70

6-22
Voice Messages
This parameter partitions the total amount of voice messages into different
message lengths. The default setting is:
303015
xx yy zz
where:
xx is number of ½ second messages
yy is the number of 1 second messages
zz is the number of 2 second messages
The total time allotted must not exceed 75 seconds. To change the
partitions, scan 6 digits total; 2 for the number of ½ second messages, 2 for
the number of 1 second messages and 2 for the number of 2 second
messages. See the default setting as an example.
WARNING: changing this parameter after you have recorded messages
could result in having to re-record some of them; they would still be there
but longer messages may get cut up and shorter ones combined.
Set Date
Using the barpad table, scan a 6-digit date in the mmddyy format. For
example, to set a date of 1/1/99, you would scan 010199. Press the STATUS
key to view the current date and time in both NON PORTABLE mode and
during data collection. To set the time in the TriCoder from a host computer,
see Appendix U; Using the TriCoder as a Time Clock for details.
There are alternative date formats available for the TriCoder. See the
Protocol parameter for details. Changing the date format requires resetting
the actual date in that format also.
If you setup the TriCoder using the keypad in PROGRAMMING MODE,
you can choose to have the TriCoder display the year in a 4-digit format
instead of a 2-digit format. This setting will help you comply with Y2K
requirements.
Set Time
Using the barpad table, scan a 4-digit time in the military hhmm format.
For example, to enter a time of 3:35 p.m., scan 1535. Press the STATUS
key in NON PORTABLE mode or during data collection to view the
current time. The time can also be set from a host computer; see Appendix
T; Using the TriCoder as a Time Clock for details.
Batteries maintain the real-time clock. Fresh batteries will keep your realtime clock as accurate as possible.
Page 71

6-23
Alternative Date and Time formats
See the Protocol parameter for details on how to set the TriCoder to use
alternative Date and Time formats. The default formats use mmddyy and
hhmm. Formats include:
• A - short format - no separators between characters
• B - long format - date uses / separators, time uses: separator
• C - US format - mmddyy, hhmm
• D - European Format- ddmmyy, hhmm
Combinations are AC, AD, BC and BD. To use the European format, first
change the format in the Protocol parameter, then reset the date and time,
entering the digits in the correct order. Follow the same procedure to set it
back to the US format.
Single Cycle Transmit
Single Cycle Transmit OFF
0
Single Cycle Transmit ON 1
• Single Cycle Transmit allows the TriCoder to upload one field at a
time to the host, controlled by the pressing of any key (except F1) on
the TriCoder each time the operator wants to transmit a field.
• Single Cycle Transmit is used to test complex upload prefix and suffix
sequences. This is typically used when a TriCoder is used in Keyboard
Wedge mode and you are uploading directly into an application.
Single Cycle Transmit allows you to test key sequences and delays
before you collect a lot of data and try an upload. Pressing F1
terminates the upload session.
EOF String
The EOF String setting allows you to choose up to 8 characters to be
transmitted at the end of a TriCoder file upload. It is typically used to
signal to the receiving host program that the TriCoder is done uploading its
data and has transferred its last piece of data. The characters chosen are
often characters not available on the TriCoder keypad; they are scanned
from the FULL ASCII MENU. To program an EOF String:
• Scan EOF String
• Scan up to 8 characters from the FULL ASCII MENU
• Scan the SET bar code
If you do not program an EOF String, the TriCoder sends a Ctrl Z (ASCII
26). Undisplayable characters are displayed on the TriCoder as ?. To view
the ASCII equivalent (so you know what characters are there) press the F2
key while in the EOF String parameter.
Page 72

6-24
Shut Down Time
By default, if the TriCoder is inactive for more than 5 minutes, it will shut
itself down in order to conserve batteries. To resume operation, you must
turn the TriCoder back on using the ON/OFF key. To change the amount of
time the TriCoder waits before shutting down:
• Scan Shut Down Time
• Scan two digits - the default is 05 (5 minutes)- to correspond to the
length of time in minutes. For example, 01 would be 1 minute.
If you want to prevent the TriCoder from shutting off automatically at all,
set the Shut Down Time to 00.
Partitions
The Partitions setting is where you specify how you want to divide the
memory in the TriCoder. Memory can be allocated for data files (up to 3)
and tables (up to 3). Memory is partitioned in 64K size pages. The
TriCoder has 512k, or 8 pages, of memory to allocate. Partitions are
specified using a six-digit number:
abcxyz
where:
a
is the number of pages of memory allocated to Data File #1.
b
is the number of pages of memory allocated to Data File #2
c
is the number of pages of memory allocated to Data File #3
x
is the number of pages of memory allocated to Table #1
y
is the number of pages of memory allocated to Table #2
z
is the number of pages of memory allocated to Table #3
• The default is for all memory to be allocated to Data File #1.
• The total amount of memory partitioned must equal the total amount of
memory available. You must specify 8 pages (in whatever
combination) for the TriCoder.
• The Partitions cannot be changed while there is data collected in the
TriCoder. You must upload and delete the data first.
• All downloaded tables currently in the TriCoder will be lost when the
Partitions are changed. You will have to re-download the tables once
the change is complete.
Page 73

6-25
Characters
This setting allows the TriCoder to output chosen ASCII characters in place
of the actual characters entered. For example, if you scanned the number 1
(hex 31) and wanted the TriCoder to output hex 92 instead, you would enter
3192 for the Characters parameter. This would re-assign the output
characters, with the TriCoder outputting hex 92 every time it sees hex 31.
To re-assign characters:
• Scan Characters
• Scan up to seven 4-digit pairings where the first 2 digits represent the
hex number to replace and the second 2 digits represent the hex number
to insert. You can have up to seven character re-assignments.
• Scan SET
You can eliminate the output of a character by using FF as the hex number
to insert. For example, if you wanted to eliminate all $, following the above
instructions, enter 24FF.
Data Security Features
The TriCoder has two features that are there it ensure the integrity of your
data. The first feature is Data Security, which is found in the Protocol
setup parameter. Turning Data Security on prevents the operator from
editing data as well as not allowing them to exit Data Collection mode.
There is another security feature called Program Restriction that restricts
the user to one data collection program only. Program Restriction is set
only by keypad – at the
NON PORTABLE MODE
KEY [YES/NO]?_
prompt, press the following keys on the TriCoder keypad:
F1
remember to press and release the key before pressing the next key
SHIFT D
remember to press and release SHIFT before pressing D or P
SHIFT P you will see the prompt: ENTER PROGRAM # [0-3]_
0,1,2, OR 3 press the number of the program you want to restrict the user to
F1
To reset the program restriction back to all programs, simply press the
ENTER key at the “ENTER PROGRAM # [0-3]” prompt.
Page 74

6-26
Protocol
Settings 0 - 6 apply only to Serial Interface TriCoders only.
None 0
XON / XOFF 1
ACK/ NAK without Polling 2
Polled - No ACK / NAK* 3
Polled - with ACK / NAK* 4
Host Response Accepted* 5
Host Response Ignored 6
Data Security ON 7
Data Security OFF 8
XMODEM 9
Date Format mmddyyhhmm A
Date Format mm/dd/yy hh:mm B
US Date Format mm/dd/yy C
European Date Format dd/mm/yy D
*Requires the 5V Power Supply to be plugged into TriCoder.
None means that the TriCoder will transmit to the host computer without
waiting for a request or a response. Unless you are using multiple
TriCoders on one port (multi-dropping), None is the setting you will
probably want to use.
XON / XOFF is a protocol where the host sends an XOFF (Ctrl S / ASCII
19) character to the TriCoder when it is busy, and an XON (Ctrl Q / ASCII
17) when it is ready to receive data again from the TriCoder. This allows
the host to perform other tasks without missing data coming from the
TriCoder. XON / XOFF should not used with Linux or Unix terminals,
even if they have XON/XOFF specified; if you do, the TriCoder will
probably get hung.
ACK / NAK without polling adds the ACK / NAK protocol for data
accuracy. This protocol causes the TriCoder to add 2 checksum characters
to its data - calculated from all data (data ID + prefix + data + suffix) except
the Terminator Character. The host compares calculated checksums to the
checksums transmitted by the TriCoder. If they match, the host sends an
ACK; if they do not match, it sends a NAK. If you need to use a protocol
for data accuracy, we recommend using XMODEM instead of ACK /
NAK whenever possible.
Polled - No ACK /NAK puts the TriCoder in a “polling” mode, waiting for
the host to send the TriCoders ID character before the TriCoder sends its data.
Polled - with ACK /NAK adds ACK /NAK protocol to the “polling” mode
described above. You can change the length of time the TriCoder will wait
for a response by using the Host Response Delay setting.
Page 75

6-27
Host Response Accepted causes the TriCoder to act upon data received
from the host. Data received from the host can cause the TriCoder to beep,
display data or output a voice message. These are the controls for this
protocol:
Data from Host Response by TriCoder
Ctrl G (“BEL” - ASCII 7)
one short beep
Ctrl R (“DC2” - ASCII 18)
two long beeps
nnDC4
nnENQ
-nn is the two-digit voice message
-DC4 is ASCII 20
-ENQ is ASCII 05, used to send a voice
message without data entry as the next step.
xxxxxxxxxxCR -xxxxxxxxx is variable-length data for display
as a prompt on the TriCoder
-CR is ASCII 13 - used to terminate the data
prompt.
Selecting Host Response Accepted allows the TriCoder and host to operate
interactively with prompts and error messages from the host. Host
Response Accepted works with the other Protocol settings of None, ACK
/ NAK, and both Polling settings.
If your TriCoder is connected between a dumb terminal and host, select
Host Response Ignored to prevent data intended for the Terminal from
causing continual beeping on the TriCoder.
There are restrictions on the use of Host Response Accepted:
1. To prevent conflict between TriCoder ID characters (used to identify
individual TriCoders for polling) and data characters, the displayable
data characters are limited to ASCII 32 - 95. In other words, no lower
case characters are allowed. TriCoder ID characters must be ASCII 96127 only.
2. A displayable prompt must be terminated by a CR (carriage return)
unless terminated by one of the other controls - BEL, DC2, nnDC4 or
nnENQ. A prompt can also be a single character of CR, BEL, DC2,
nnDC4 or nnENQ.
3. With Host Response Accepted, before data can be entered on the
TriCoder, a valid prompt must have been received from the host. In
order to keep from missing a message from the host, the TriCoder locks
out keyboard or scanner input until it receives the prompt from the
host. While the TriCoder is waiting for the host prompt it displays:
WAITING ON PMPT_
If you want to enter data without receiving the expected prompt from
the host, press the CLEAR key.
Host Response Ignored tells the TriCoder to ignore all data received from
Page 76

6-28
the host, except ACK/NAK and XON/XOFF if configured to use those
protocols.
Data Security OFF allows the operator full access to all TriCoder functions.
Data Security ON prevents the operator from editing any data or leaving
DATA COLLECTION mode. To exit DATA COLLECTION mode, Data
Security must be turned off either by scanning the bar coded Setup Menu or
by using the keypad - press F1, then SHIFT, then D.
XMODEM is a file transfer communications protocol widely supported and used
by programs including Windows HyperTerminal and Procomm. XMODEM has
significant data error-checking, making it reliable for data transmission over
phone lines. XMODEM is the protocol of choice for file transfers.
The Date and Time Formats allow you to change the display and output
formats of the date and time. When changing the TriCoder to use the
European format, remember to change the format first, then go to the SET
DATE parameter and enter the date using the European DD/MM/YY
format. See Alternative Date Formats for details.
Baud Rate
Set the Baud Rate to match your terminal or serial port.
300 0
600 1
1200 2
2400 3
4800 4
9600 5
19,200 6
38,400 7
Parity
None 0
Even 1
Odd 2
The Parity should match the parity setting of your Terminal. Parity can
vary on a PC serial port - None is usually used in conjunction with the 8
data bits setting, while Even or Odd is associated with 7 data bits.
Data Bits
7 bits 0
8 bits 1
Page 77

6-29
Set the Data Bits to match the setting used by your terminal or serial port.
Stop Bits
1 bit 0
2 bits 1
Set the Stop Bits to match the setting used by your terminal or serial port.
Dialing String
This parameter allows you to program an automatic dialing string for use
with a modem. The Dialing String can contain up to 24 characters scanned
from the FULL ASCII MENU. To program the Dialing String:
• Scan Dialing String
• Scan up to 24 characters from the FULL ASCII MENU
• Scan the SET bar code
Typical Dialing String characters are modem control characters such as
ATDT1nnnnnnnnnn; where nnnnnnnnnn is the phone number to be dialed.
The last character should not be a CR (carriage return). The Dialing String
is transmitted by pressing the F2 key in response to the
DATA UPLOAD?
KEY [YES/NO]?_
prompt. When in SETUP MODE, you can display the three-digit ASCII
value for any characters entered for the Dialing String. See Appendix S;
Modem Protocol for details on TriCoder/ Modem communications.
Set ID Character
The ID Character is used with the polling functions only. It allows you to
assign each TriCoder a unique ASCII character used by the host to poll the
TriCoders. The TriCoder will not transmit its data until it has been polled
with its ID Character by the host.
ID Characters are limited to ASCII characters 96-127. These characters
are the lower case letters found in the last two columns of bar codes on the
FULL ASCII MENU. To set the ID Character, simply scan the desired
character from the FULL ASCII MENU (scan “a” to assign an ID Character
of “a”). If polling, all TriCoders must be assigned an ID Character.
The order of the data transmitted in Non Portable mode is:
ID+Preamble+DATA+Postamble+Chksum chs+Terminator
Page 78

6-30
Host Response Delay
This setting is used only with ACK/ NAK protocol and Buffered Terminal
Mode. It is used to set a time-out for the TriCoder while it is waiting for a
response from the host. The default is infinite delay - it will wait forever for
the host to respond. If you want the TriCoder to time-out rather than waiting
forever, set the number of seconds you want to wait as a two-digit number.
For example, to set a 5 second delay, enter 05. Setting the delay to 00 sets an
infinite delay.
Transmission Mode
The Transmission Mode setting is used only with a Terminal/Host
configuration using a F45 or F45-1 Serial Y Cable.
Full Duplex 0
Half Duplex 1
Using the default setting (0), data is transmitted from the female DB25 end
of the cable only. Using half duplex (1) causes data to be transmitted out
of both ends of the cable. It is typically used for dumb terminal (Unix and
Linux) troubleshooting transmission problems only.
Modem Redial Delay
Automatically, the TriCoder resets the modem before the first dialing attempt
and between dialing attempts. You can vary the length of the delay between
dialing attempts (Retry Delay) from the standard default of 30 seconds to
anything from 01-99 seconds. You cannot make this change by scanning the
bar coded TriCoder setup menu; it can only be made through the keyboard
setup on the TriCoder.
Page 79

7-1
Chapter 7
Using the TriCoder Utilities
The TriCoder Utilities for Windows program is a versatile application that gives
you the ability to:
• Test communication (serial and USB High Speed)
• Upload data from TriCoder to computer
• Download programs and tables from the computer to the TriCoder
• Change TriCoder Setup parameters (High Speed USB only)
• Edit and Download tables
• Edit and download programs (Virtual TriCoder required for editing)
The TriCoder Utilities for Windows CD comes with every TriCoder. If you did not
receive a disk or need the latest version of the TriCoder Utilities, visit our website at
http://www.barcodehq.com/downloads.html to download the latest version.
Installing the TriCoder Utilities
The TriCoder Utilities is for Windows ONLY. There is no version for any
other operating system.
To install the TriCoder Utilities for Windows, insert the CD into your CD
drive. If you have autoplay enabled, the installation should begin
automatically. If it does not, or you have autoplay disabled, click on the
Windows Start button, and then click Run. Click Browse to find your CD
drive, then find the file named setup.exe. Click Open, then click OK and
follow the installation instructions.
Running the TriCoder Utilities program
The first time you start the TriCoder Utilities, it will ask you whether you
are connected to the Serial port or to a USB port. This should only show up
the first time you run the program.
If you are physically connecting the TriCoder to the USB port for the very
first time, see Chapter 5; TriCoder Connection for details on Windows
USB driver installation.
If you are connected to the serial port, click on the Port Settings tab and
verify that the correct port name (COM1, etc.), baud rate, etc. are chosen.
Page 80
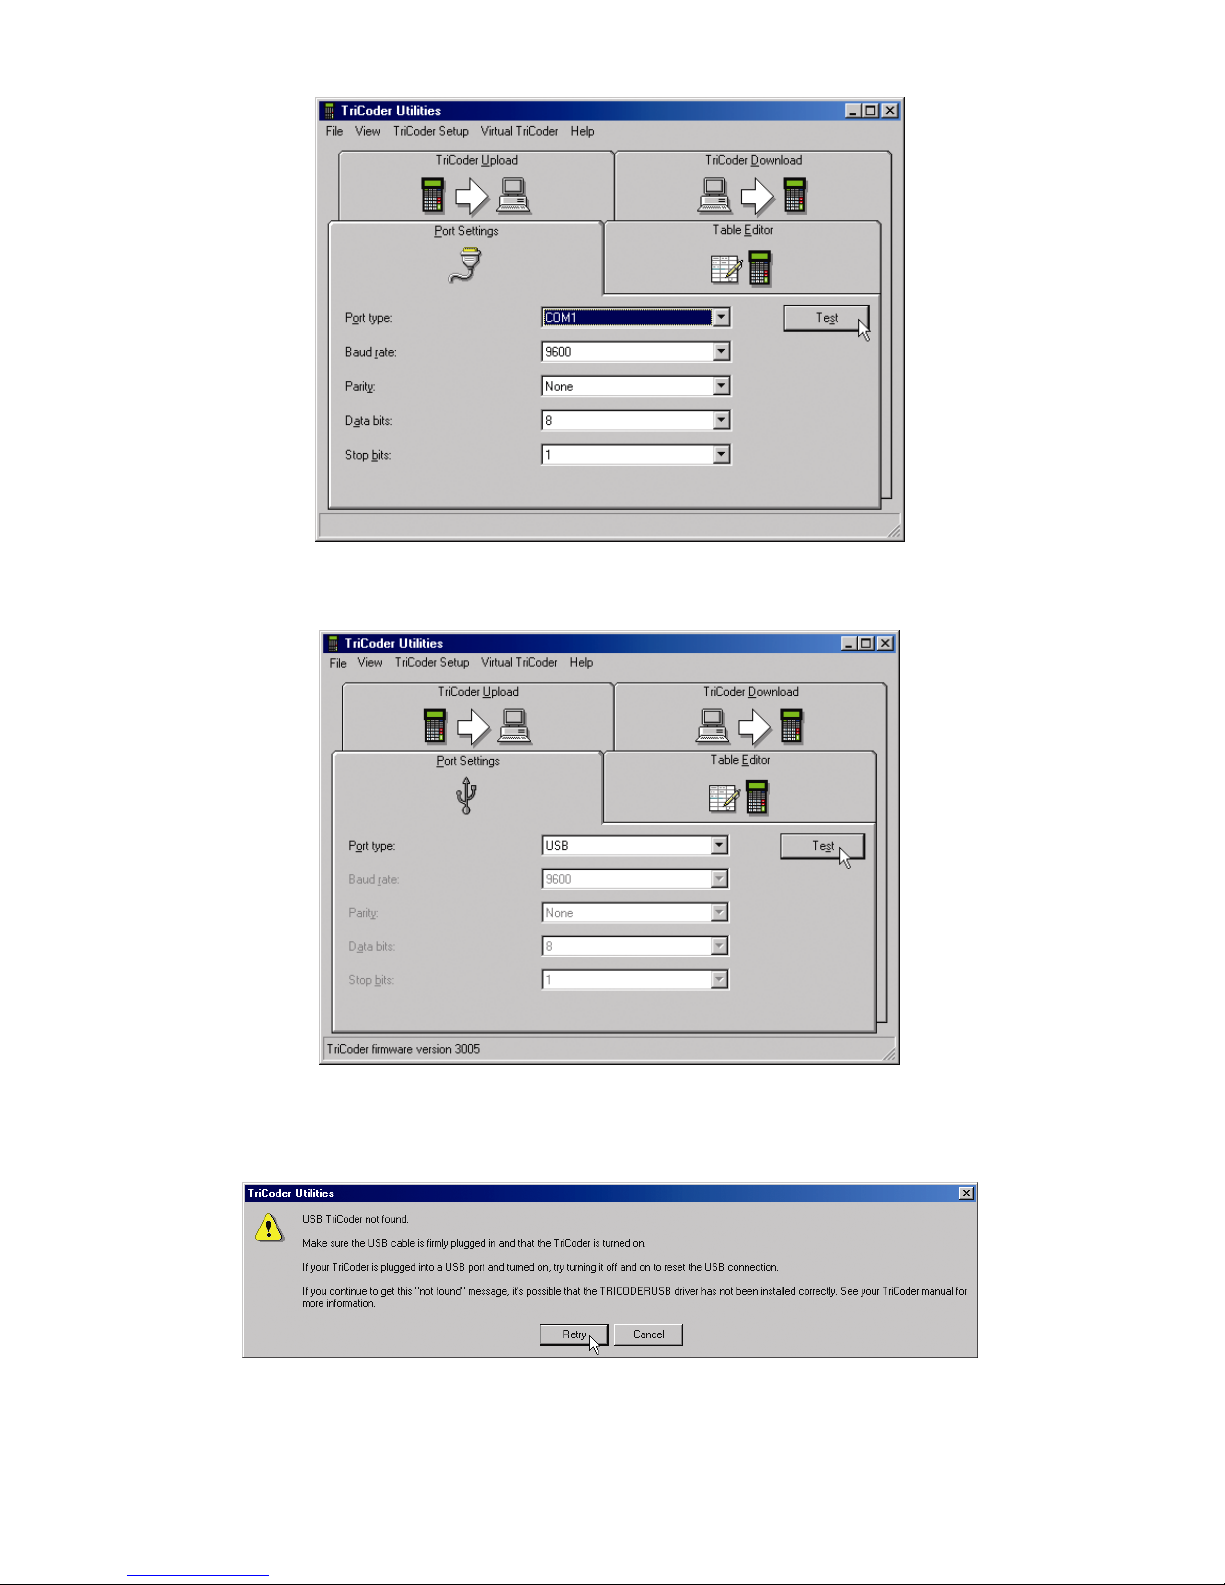
7-2
If you are connected via USB, you should see USB chosen as the port type:
If you do not have your TriCoder turned on, or the USB driver is installed
incorrectly, you will see this error message:
You can either turn your TriCoder on and click Retry, or click Cancel to
exit the error message dialog box. If you click Cancel, and still want to
work in TriCoder Utilities without having your USB TriCoder attached, just
Page 81
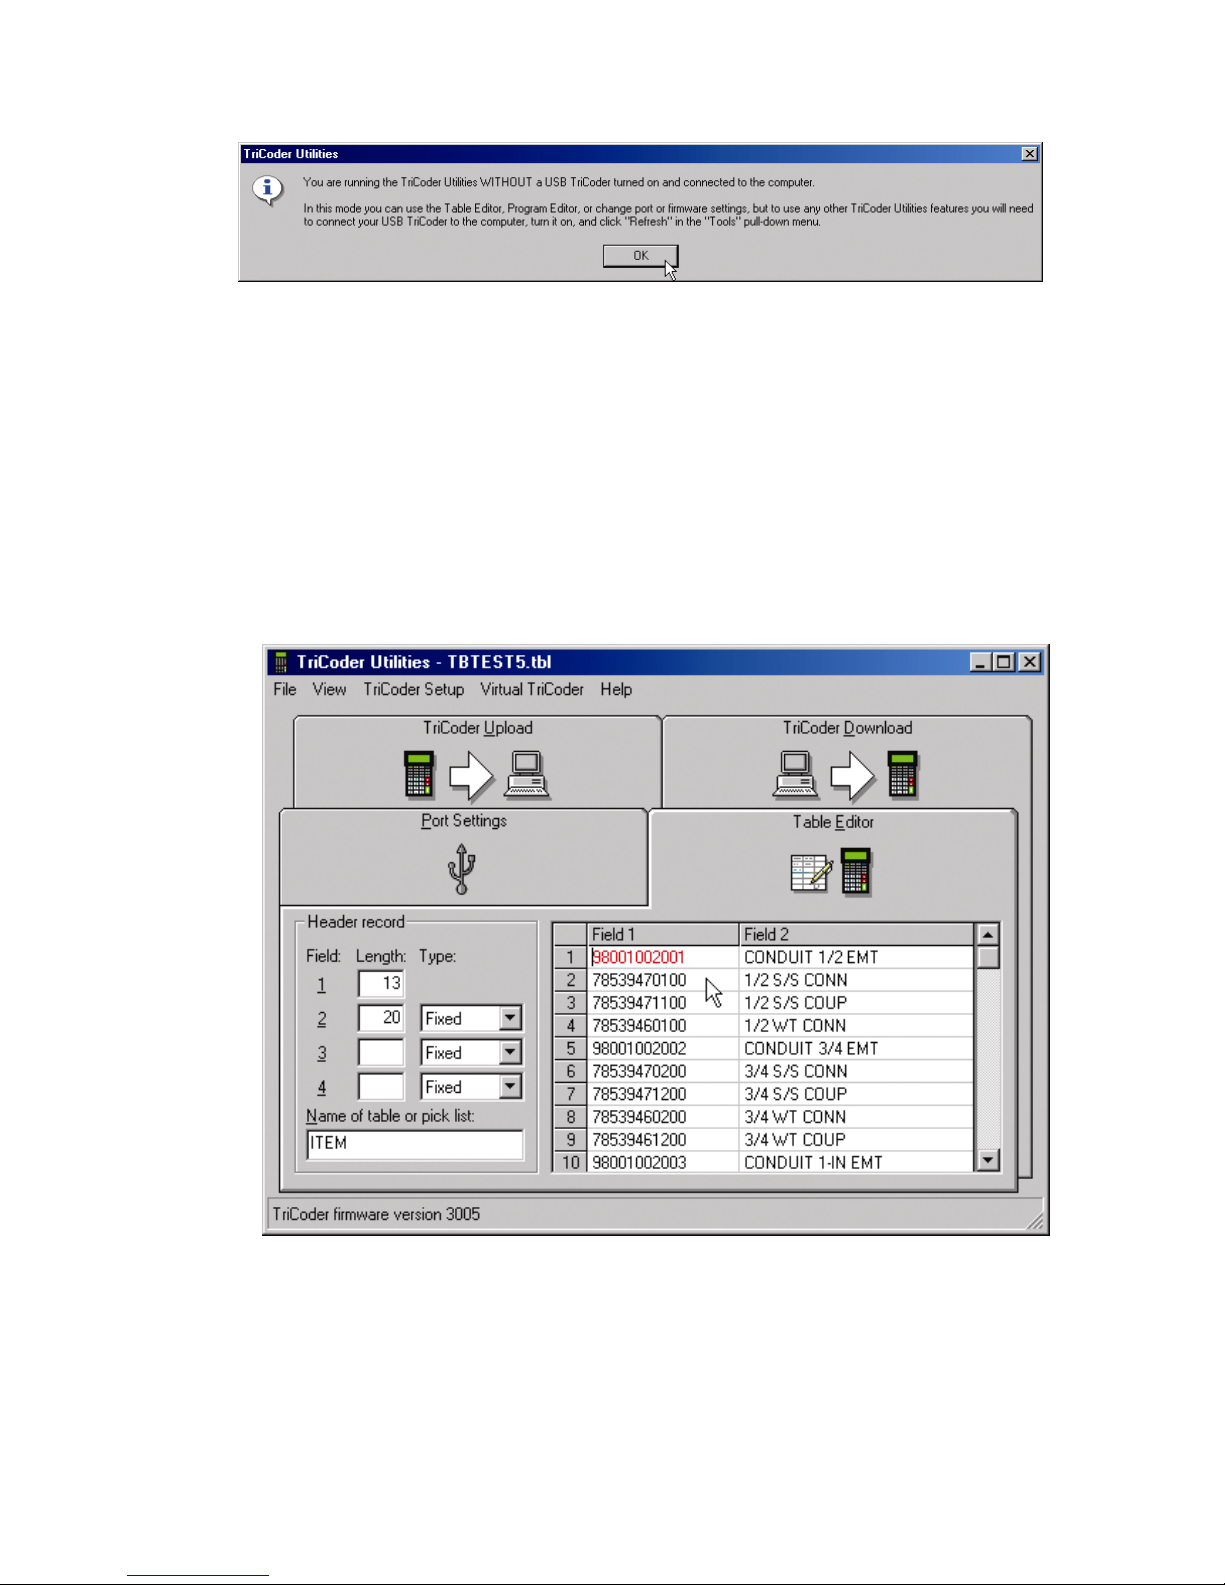
7-3
click OK when you see this message:
Using the Table Editor
The Table Editor allows you to:
• load and edit existing tables that are on your computer and download
them into your TriCoder and
• create new tables and download them to your TriCoder
Once you have the table open in the Table Editor, you can change any of the
parameters and fields and then download the table back into your TriCoder.
For more information on using Tables, see Chapter 12; Tables and
Picklists. One thing to remember when using tables is that your TriCoder
memory must be partitioned before you can download the table to your
TriCoder. For more information on partitions, see Chapter 11; Partitioning
Memory for Data Files and Tables.
Page 82
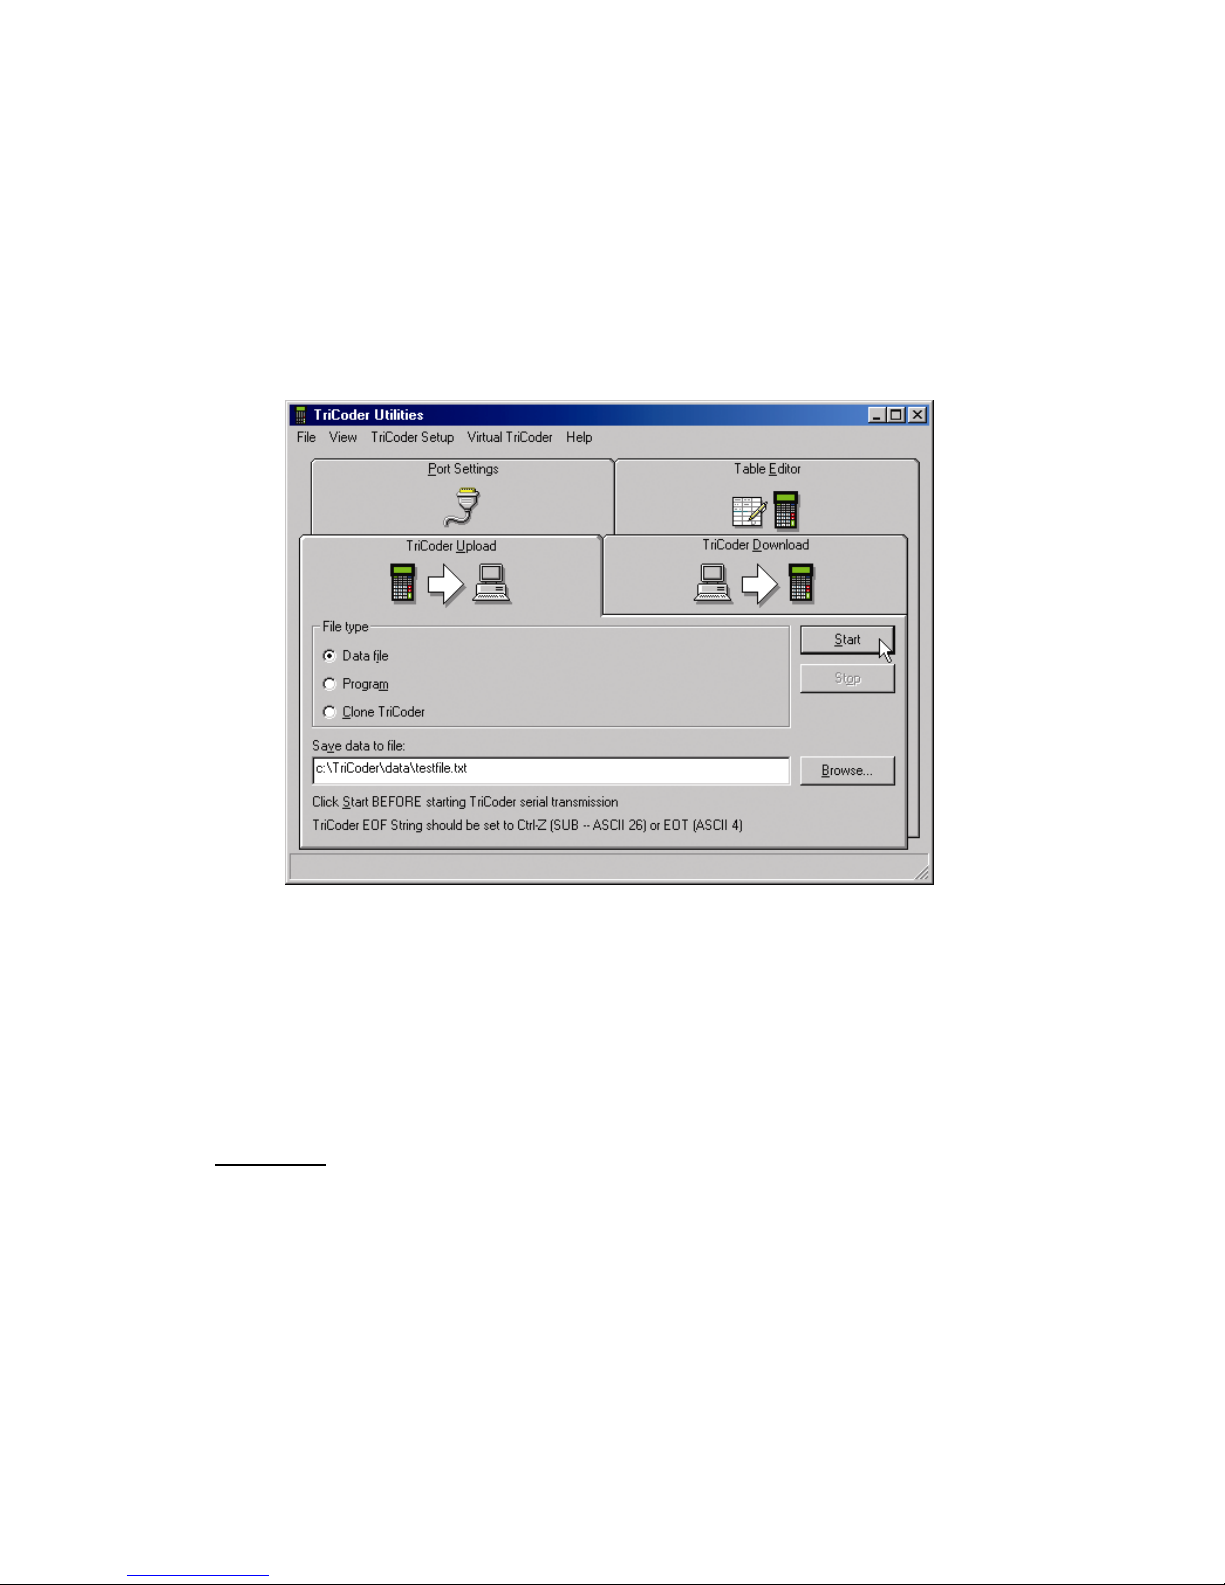
7-4
Uploading from TriCoder to your Computer
You can upload programs, data and cloned setup information to your
computer from your TriCoder by either the serial port or the USB port.
Serial Uploading
If you are uploading your TriCoder from the Serial port, make sure your
port settings are correct before you begin your upload. It is usually a good
idea to check your port settings and test in Non-Portable mode before
uploading information from your TriCoder.
• Make sure your TriCoder is connected and communicating.
• Select the type of file you will be uploading - Data file (collected data),
a Program or a TriCoder Clone file (complete setup information
including setup parameters and programs).
• Select the name for your file. We suggest using different file extensions
for different types of files, for example, .dat for data files, .pgm for
program files and .cln for clone files.
Data Files
1. On the TriCoder, press NO until you see the prompt
DATA UPLOAD
KEY [YES/NO]?_
2. Select Data File as the file type, then enter the name of the file (we
recommend the extension .dat for data files)
3. Click the START button in the TriCoder Utilities.
Page 83

7-5
4. At the DATA UPLOAD prompt on the TriCoder, press YES.
5. When the data is finished uploading, TriCoder Utilities will let you
know it is finished. The TriCoder will display the message
END OF TRANSMIT,
DEL FILE Y/N?_
We suggest before you delete the data file from the TriCoder that
you open the data file in Notepad to confirm the upload. If all is
correct, you can press YES to delete the data file from the
TriCoder. If your upload is not correct, press NO and try your
upload again.
Program Files
1. On the TriCoder, press NO until you see the prompt
PROGRAM TRANSMIT
KEY [YES/NO]?_
then press YES.
2. In the TriCoder Utilities, choose Program as the File type, then
specify the name of the file (we suggest the extension .pgm for
program files)
3. Click the START button in the TriCoder Utilities.
4. On the TriCoder, press the number of the program you want to
upload at the TRANSMIT PROGRAM KEY prompt. Remember
that you cannot transmit program 0, you must choose 1, 2 or 3.
Pressing 0 will clone your TriCoder.
5. TriCoder Utilities will let you know when your transmission is
finished. The TriCoder will display the message
END OF PGM,XMIT
HIT ANY KEY_
Cloning the TriCoder
1. On the TriCoder, press NO until you see the prompt
PROGRAM TRANSMIT
KEY [YES/NO]?_
then press YES.
2. In the TriCoder Utilities, choose Clone TriCoder as the File type,
then specify the name of the file (we recommend using the
extension .cln for clone files)
3. Click the START button in the TriCoder Utilities.
Page 84
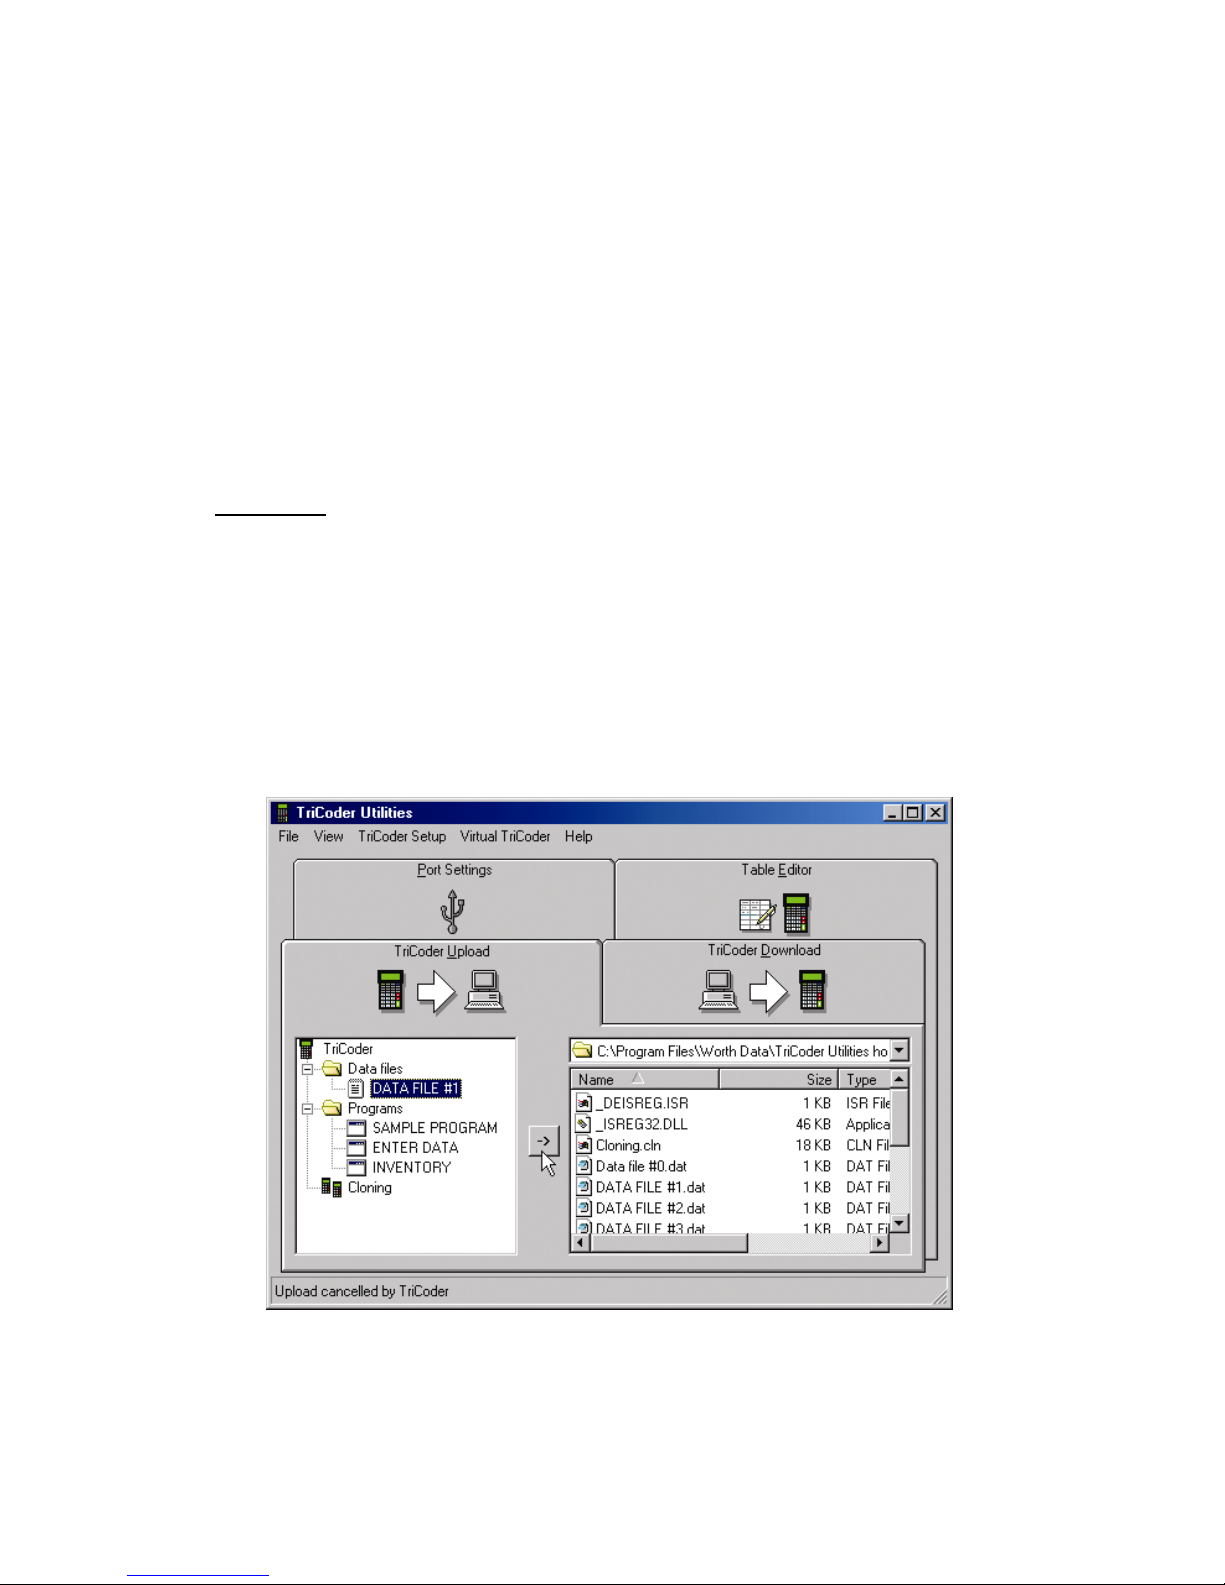
7-6
4. On the TriCoder, press 0 at the TRANSMIT PROGRAM KEY
prompt.
6. TriCoder Utilities will let you know when your transmission is
finished. The TriCoder will display the message
END OF PGM,XMIT
HIT ANY KEY_
High Speed USB Uploading
If you are uploading information from your TriCoder via High Speed USB
interface, you will be absolutely amazed at how easy it is! The TriCoder
Utilities takes care of it all, your TriCoder just has to be turned on.
Data Files
1. Make sure you are connected to the USB cable then turn on your
TriCoder.
2. Start the TriCoder Utilities program
3. Click the TriCoder Upload tab
In the left panel, you will see what is currently in your TriCoder. The right
panel will determine where your uploaded file will go. Make sure you are in
the directory where you want to keep your file.
A unique feature of the USB interface is the ability to change the name of
the data file in the TriCoder while in TriCoder Utilities. Renaming the data
file is as simple as clicking the file name, typing in a new one and pressing
ENTER. The example above shows the data file in the TriCoder named
DATA FILE #1. In the next example, we have changed the data file name
Page 85
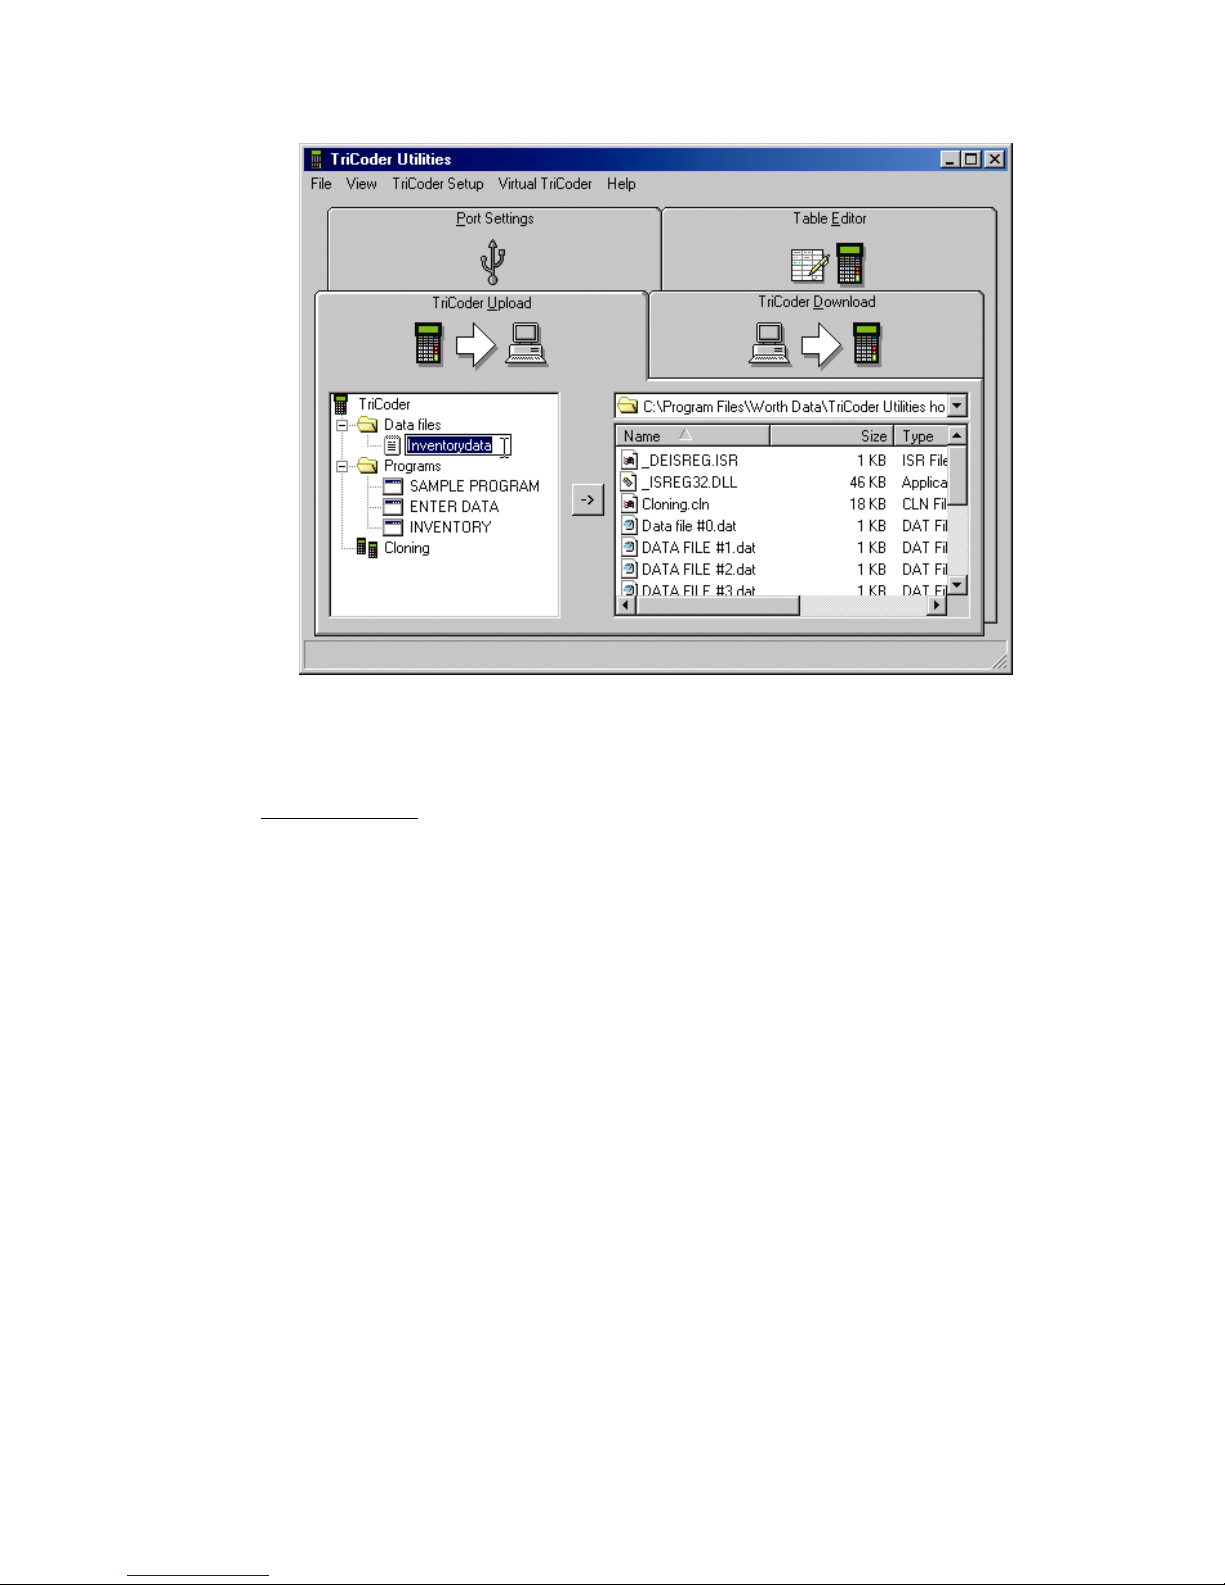
7-7
to Inventorydata.
4. Finally, to upload the file, click on the file you want to upload, and
then click on the arrow button between the two panels. That's it!
You don't have to do anything on the TriCoder!
Program Files
1. Again, make sure you are connected to the USB cable and that
your TriCoder is on.
2. Start TriCoder Utilities if it isn't already running.
3. Click the TriCoder Upload tab
4. Highlight the program name you want to upload in the left panel
5. Choose the directory or folder you want to upload your file to in
the right panel
6. Click on the arrow between the panels. That's it
Page 86
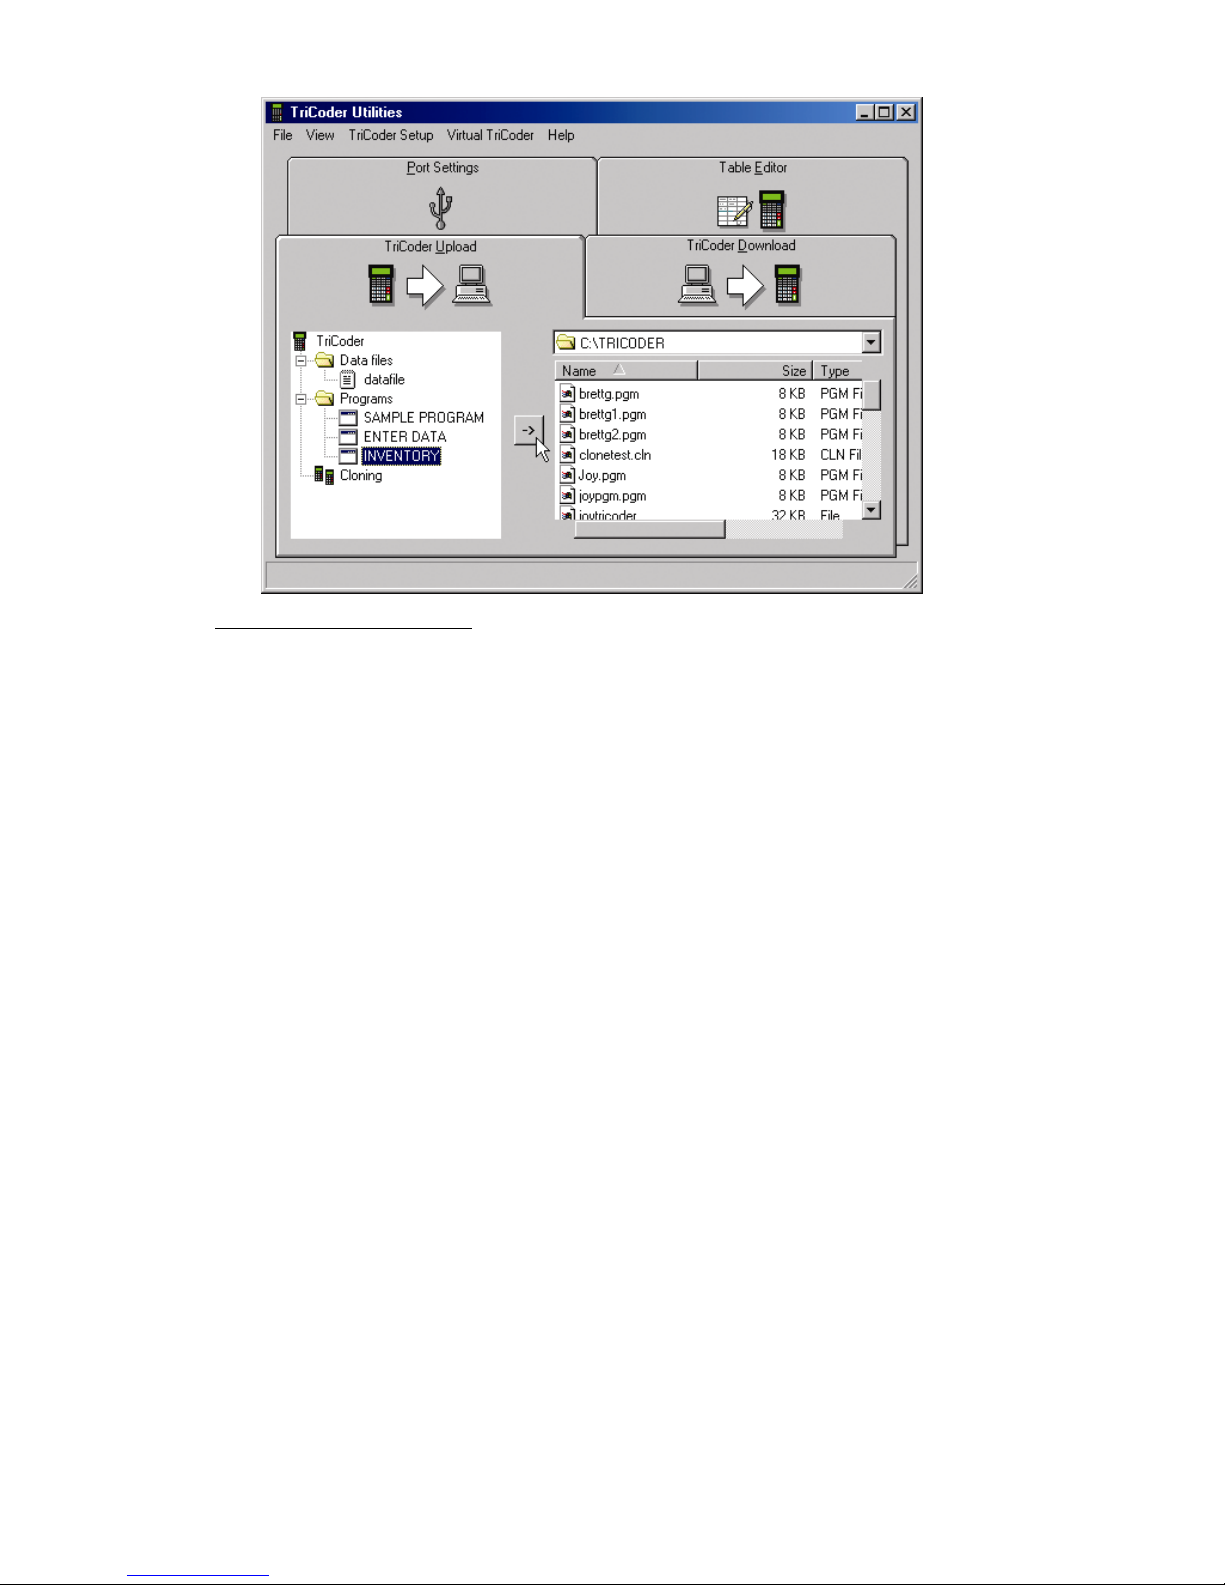
7-8
Cloning your TriCoder
1. Make sure you are connected to the USB cable and that your
TriCoder is turned on.
2. Start the TriCoder Utilities if it isn't already running.
3. Click on the TriCoder Upload tab
4. Highlight Cloning in the left panel.
5. Select the directory or folder you want to upload your cloning file
to in the right panel.
6. Click the arrow between the panels. The file is saved as
"cloning.cln" and you are finished!
Downloading from the computer to your TriCoder
You can download saved files on your computer back into your TriCoder
using the TriCoder Utilities in either serial or high-speed USB mode. The
files must be valid TriCoder programs, tables or clone files. TriCoder
programs can be created on your computer using the Virtual TriCoder or
created on the TriCoder itself. Tables must conform to the table format
required by the TriCoder (see Chapter 12: Tables and Pick Lists) and your
TriCoder memory must be partitioned before it can accept any tables.
Also, you will not be allowed to download anything to your TriCoder if
there is currently data stored in your TriCoder. Before you download
anything to your TriCoder, make sure you upload any data files and delete
them from your TriCoder. If there is data in your TriCoder and you try to
download a file to it, you will see the message:
NOT ALLOWED TO RCV
HIT ANY KEY_
Page 87
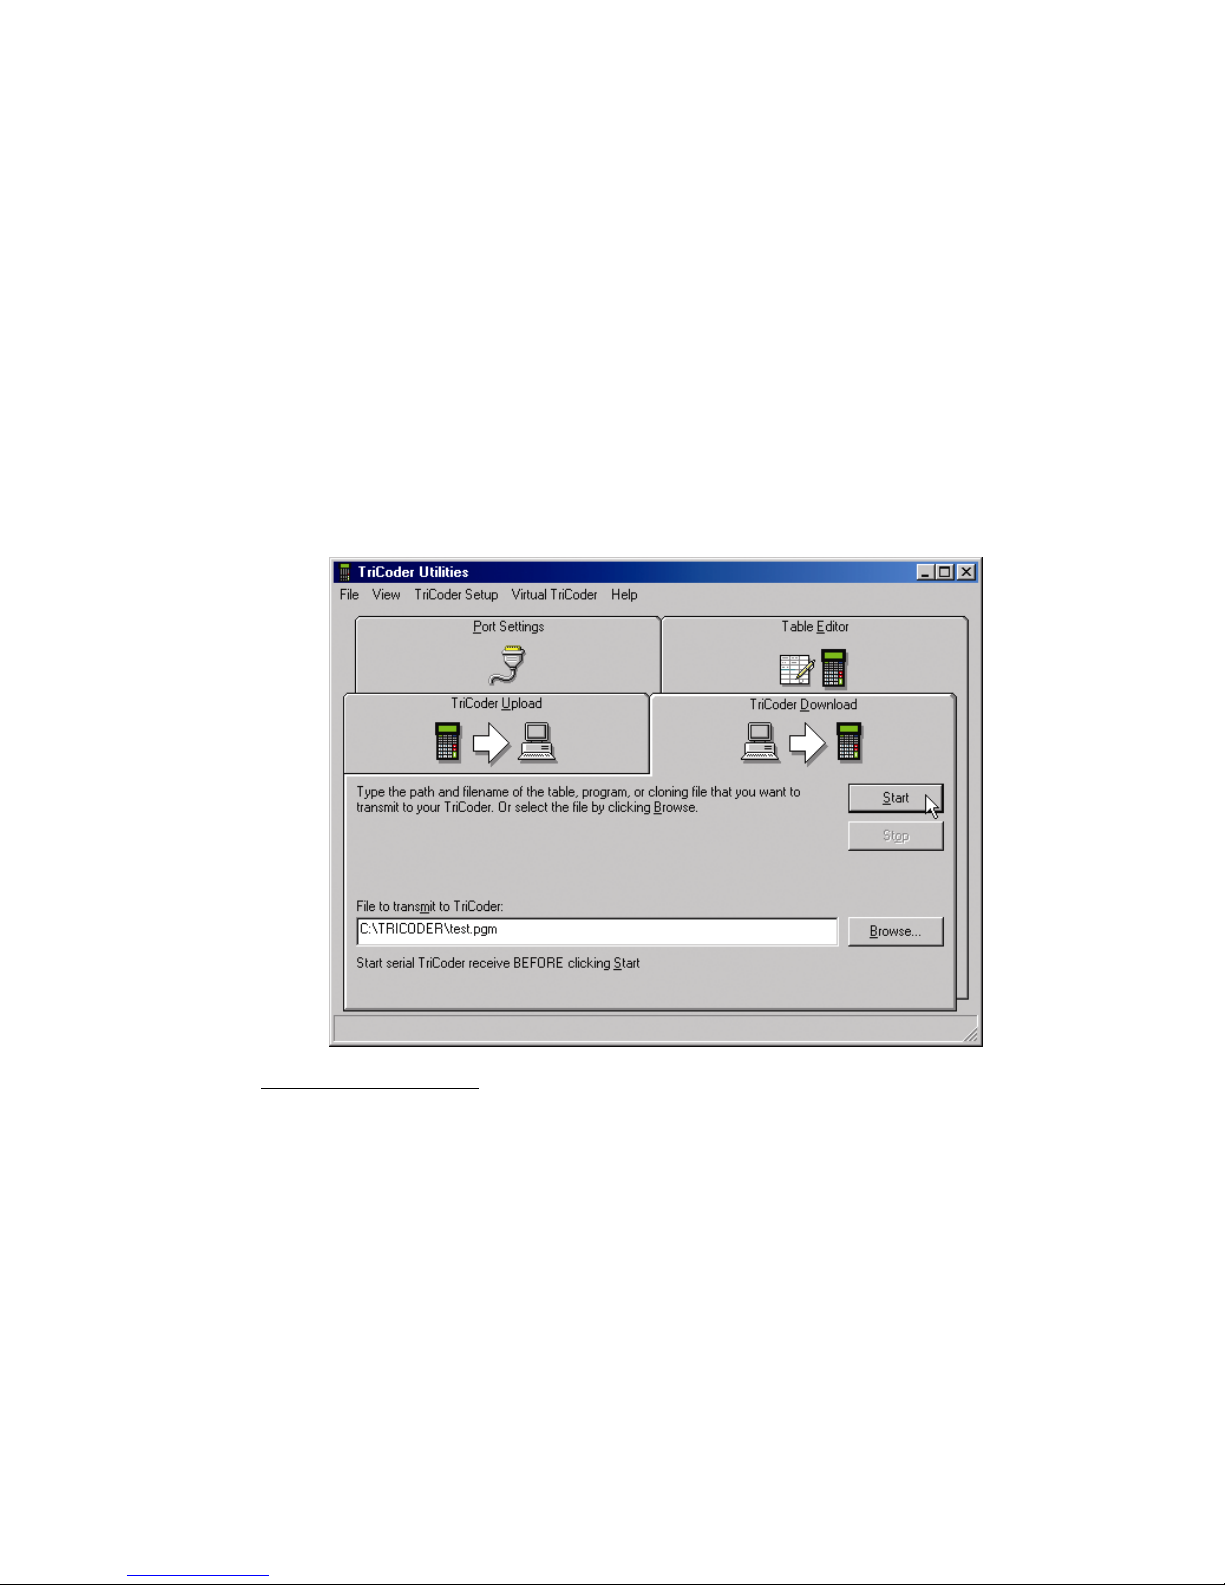
7-9
Serial Downloads
If you are downloading to your TriCoder from the Serial port, make sure
your port settings are correct before you begin your download. It is usually
a good idea to check your port settings and test in Non-Portable mode
before downloading information into your TriCoder.
• Make sure your TriCoder is connected and communicating.
• Select the type of file you will be downloading - a Program (for
collecting data), a TriCoder Clone file (complete setup information
including setup parameters and programs) or a Table (for reference
while collecting data).
• Select the file you want to download. We suggest using different file
extensions for different types of files, for example, .pgm for program
files, .cln for clone files and .tbl for table files. The TriCoder Utilities
uses these file extensions by default.
Program Download
1. On the TriCoder, press NO until you see the prompt
PROGRAM RECEIVE
KEY [YES/NO]?_
then press YES.
2. In the TriCoder Utilities, specify the location and name of the file
(we suggest the extension .pgm for program files)
3. Click the START button in the TriCoder Utilities.
4. On the TriCoder, press the number of the program you want to
download to at the PROGRAM RECIEVE KEY prompt.
Page 88

7-10
Remember that you cannot download into program 0; you must
choose 1, 2 or 3. Pressing 0 will clone your TriCoder.
5. TriCoder Utilities will let you know when your transmission is
finished. The TriCoder will display the message
END OF PGM RCV
HIT ANY KEY_
Table Download
1. On the TriCoder, press NO until you see the prompt
TABLE DOWNLOAD
KEY [YES/NO]?_
then press YES. If you have not partitioned your TriCoder
memory, you will not see the Table Download prompt. Go back
and partition your memory, then try again.
2. In the TriCoder Utilities, specify the location and name of the file
(we suggest the extension .tbl for table files)
3. Click the START button in the TriCoder Utilities.
4. On the TriCoder, press the number of the program you want to
download to at the PROGRAM RECIEVE KEY prompt.
Remember that you cannot download into program 0; you must
choose 1, 2 or 3. Pressing 0 will clone your TriCoder.
5. TriCoder Utilities will let you know when your transmission is
finished. The TriCoder will display the message
END OF PGM RCV
HIT ANY KEY_
Cloning File Download
1. On the TriCoder, press NO until you see the prompt
PROGRAM RECEIVE?
KEY [YES/NO]?_
then press YES. If you currently have collected data still in the
TriCoder you will not be allowed to receive. You must delete the
data file from the TriCoder before you can accept a clone file.
2. In the TriCoder Utilities, specify the location and name of the file
(we suggest using the extension .cln for cloning files.
3. Click the START button in the TriCoder Utilities.
Page 89
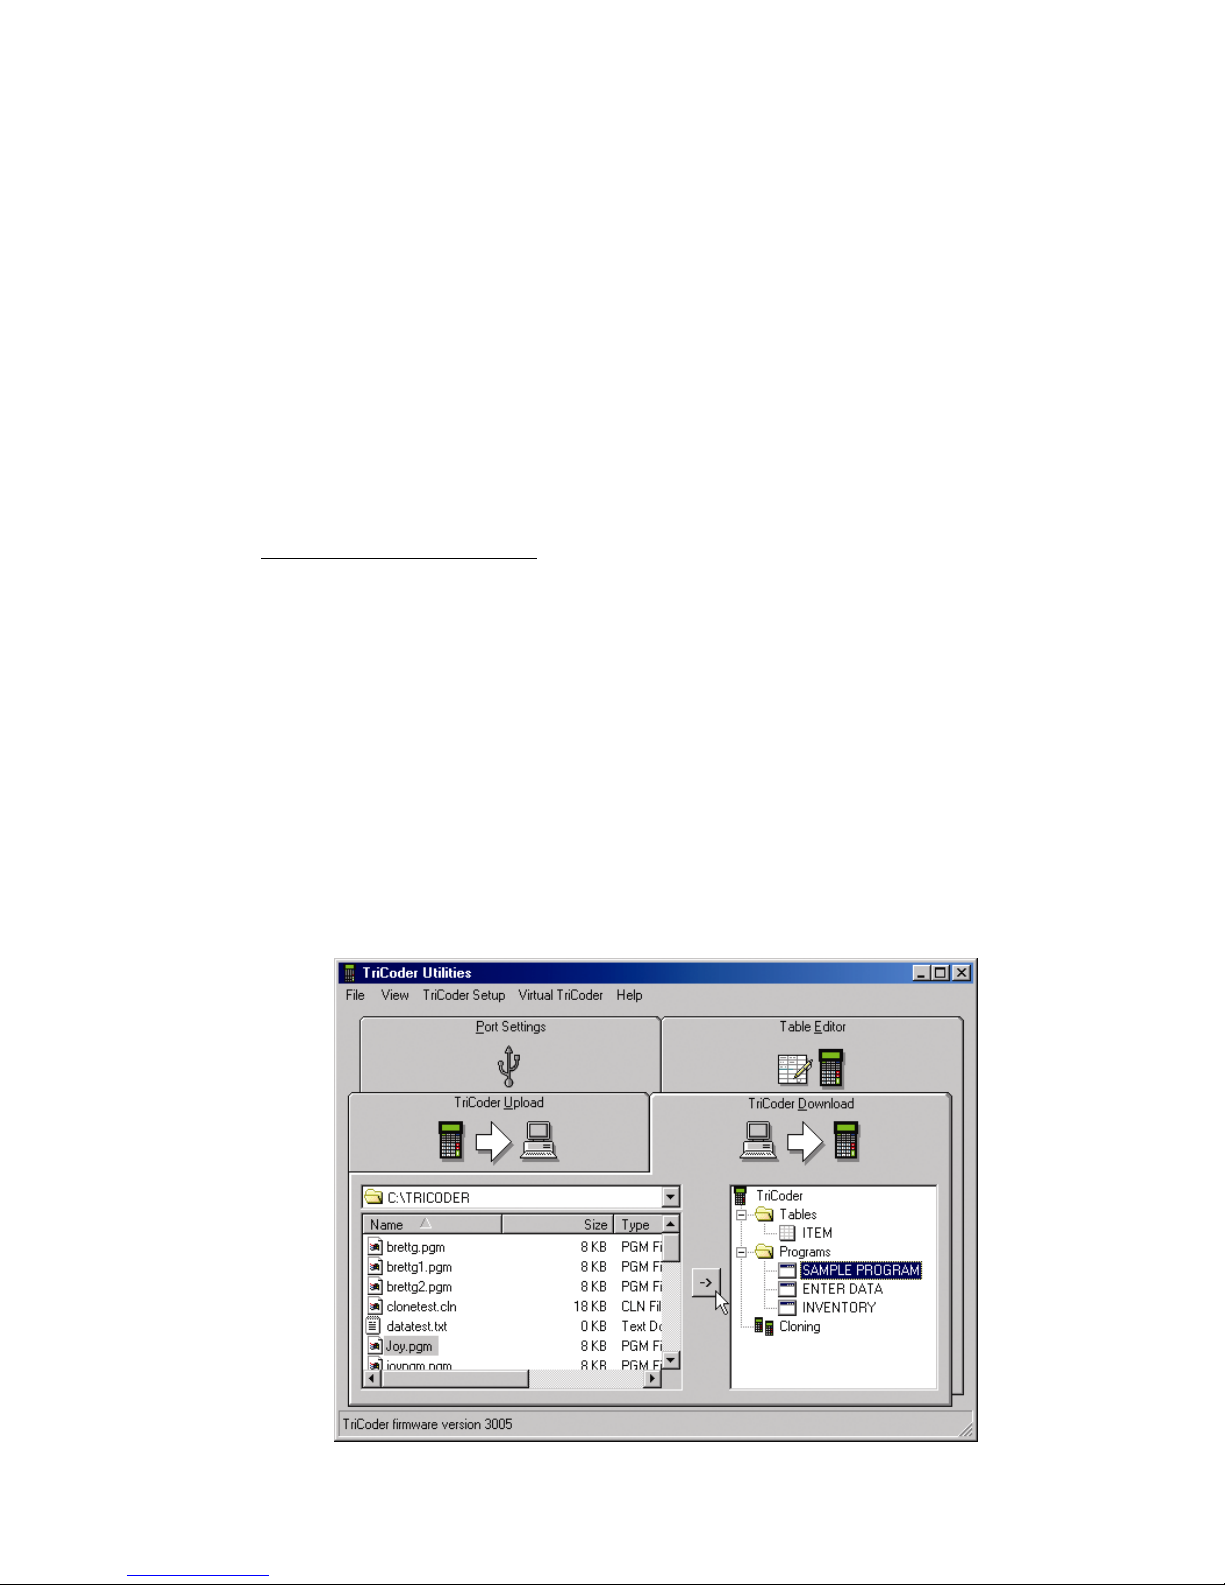
7-11
4. On the TriCoder, press the 0 key to accept a clone file.
5. TriCoder Utilities will let you know when your transmission is
finished. The TriCoder will display the message
END OF PGM RCV
HIT ANY KEY_
High Speed USB Downloads
If you are downloading from your computer to your TriCoder via the High
Speed USB interface, the only thing you need to do on your TriCoder is
make sure it is set for High Speed USB and turn it on! The TriCoder
Utilities program will take care of the rest!
Program File Downloads
1. Make sure you are connected to the USB cable and that your
TriCoder is on.
2. Start TriCoder Utilities if it isn't already running.
3. Click the TriCoder Download tab
4. The left panel is showing you your computer files. Find the folder
and file name of the program you want to download in the left
panel and click to highlight it.
5. Choose the program file in the right panel (these are the programs
already in your TriCoder) that you want to replace
6. Click on the arrow between the panels. That's it!
Page 90

7-12
Table Downloads
1. Again, make sure you are connected to the USB cable and that
your TriCoder is turned on.
2. Start the TriCoder Utilities if it isn't already running.
3. Your TriCoder memory must already be partitioned to accept a
table file. If it is not, click on Tools, then TriCoder Setup. Click
the Partitions tab, set the partitions and then click OK.
4. Click the TriCoder Download tab.
5. The left panel is showing you the files on your computer. Find the
folder and file name of the table you want to download in the left
panel and click to highlight it (we recommend using the file
extension .tbl for table files).
6. Click on the table in the right panel that you want to download to
(if you partitioned for just one table, you will only see one choice).
7. Click on the arrow between the panels and you are done!
Page 91

8-1
Chapter 8
Creating a custom program
You can create a program in the TriCoder to prompt the operator for anything.
You can tell the operator what to do next, notify them of errors, date and time
stamp the data or review and edit previous data. The TriCoder has room for 4
programs; program #0 is fixed and cannot be changed or deleted, program #1 is
editable and prompts for item and quantity, program #2 is based on Program #0
but with some editing allowed and #3 is not pre-set and can be programmed by
the user as desired.
Programs are constructed of statements, with each program capable of containing up to 97 statements. Statements determine what happens at each step of
the program - one statement might prompt the user to enter data, another statement may add a date stamp. Statements in turn are constructed of fields, each
one determining certain properties of the statement.
Programs can be created on the TriCoder itself or created on your computer (if
you have Windows) and downloaded to the TriCoder via serial or USB. The
remainder of this chapter is directed towards programming the TriCoder itself; if
after completing this chapter you decide you want to create programs on your
PC, go to Chapter 9; Creating programs on your computer for details.
We have provided a form to help you chart out programs before they are entered
into the TriCoder. TriCoder Coding Forms can be found at the very back of the
manual. We will also use sections of the TriCoder Coding Form to illustrate
coding of certain features. You may find it helpful to have a TriCoder Coding
Form in front of you while using this section of the manual.
If you are using KwikAsset™...
If you are using the KwikAsset™ program, do NOT program your TriCoder
according to the instructions here. The KwikAsset™ program itself will generate
your program and download it to your TriCoder. See the KwikAsset™ manual
for more information.
Program Statements
The following information is provided in the order in which it is referenced
in the TriCoder when creating a program. To create a program in the
TriCoder, the first thing that has to happen is to get the TriCoder into
PROGRAMMING mode. After turning on the TriCoder, press NO in
response to all of the prompts until you see:
PROGRAMMING MODE?
KEY [YES/NO]?_
If you were in NON PORTABLE mode when you turned on the TriCoder,
press F1, then answer NO to all prompts until you see the
PROGRAMMING MODE? prompt.
Page 92

8-2
Press YES at the PROGRAMMING MODE? prompt, then enter the
password, WDTRI to get to the Programming Menu. Entering the
password incorrectly generates the message:
INCORRECT PASSWORD
HIT ANY KEY_
Entering the password incorrectly 2 times generates the following message:
ACCESS DENIED
HIT ANY KEY_
At this point, you will be returned to the Mode Menu to start again. If you have
entered the password correctly, you see the PROGRAM FUNCTION menu:
Create Programs ------>1-3
Voice --> 4 Setup --> 5
Automation --
------------> 7
Data File Names--------> 6
Press the number of the program you wish to create; 1,2, or 3. The TriCoder
then displays:
EDIT PROGRAM x?
(x is 1, 2, or 3)
KEY [YES/NO]
Press YES. If you press NO, the TriCoder asks if you want to delete the
program. Use this to delete an existing program and create a new one in its
place. After answering YES to the EDIT PROGRAM prompt, the TriCoder
is ready to create a program.
Parts of the TriCoder programming screen
Before you start programming the TriCoder, it helps to know what the
TriCoder is asking you at each step. The text below is an example of what
you see on the TriCoder screen when creating a program.
PROMPT 01
_
The word PROMPT describes what field in the program statement you are
working on; in the example above we are at the Prompt Text field.
The 01 tells us what statement number we are working on. In the example,
we are working on statement #01. If we were working on statement #03,
the text would look like this:
PROMPT 03
_
The cursor beneath the word PROMPT is waiting for input. In our
example above, we would then type the text we want to use for our user
prompt for statement #03.
Page 93

8-3
The remainder of this chapter will explain each step in creating program
statements. They are described in the order that they appear when
programming the TriCoder.
• Program Name
The first prompt the TriCoder displays when creating a program is the
PROGRAM NAME prompt. The PROGRAM NAME entered at this
prompt will be used to identify the program in the DATA COLLECTION
menu. The PROGRAM NAME can consist of alphanumeric data and can be
up to 20 characters.
The PROGRAM NAME prompt has another function besides simply naming
the program. When collecting data, programs usually start with statement #1,
or if data has already been collected, it starts at the statement number where
the user left off. You can force the TriCoder to ALWAYS start at a particular
statement number whether starting a new data file or resuming collection in
an existing one. This is done using the first 3 characters in the PROGRAM
NAME prompt. The first character must be ~, followed by the two digit
statement number you want to start with. You can then follow with an actual
program name if you want to. This feature can cause partial data records
since resuming data collection after some data has been collected may start at
a statement number other than where you left off. Because of possible partial
records, the host program that processes this data needs to handle the partial
records in a special way or ignore them completely. The following example
shows a program named INVENTORY that always starts at statement #4:
PROGRAM NAME?
~04INVENTORY
This example shows a program named RECEIVING:
PROGRAM NAME?
RECEIVING
This program starts with statement #1 if the data file is empty. If you are
resuming a previous data collection and you still have data present (you didn’t
upload and delete your data file), the program will resume at the statement
number following the statement at which the user last entered data.
• Statement Entry Types
The next prompt in the program process is the ENTRY TYPE prompt. This
prompt determines what type of data is entered for this statement. This is
the most important prompt as it deter-mines exactly what happens at this
step in the program. After entering a name at the PROGRAM NAME
prompt, you see:
ENTRY TYPE 01
_
Page 94

8-4
These are the Statement Entry types available:
Statement Entry Type Code used for TriCoder Coding Form
Data D
Branch B
Question Q
Date and Time Stamp S
Time Stamp only T
Date Stamp only Y
Xtra X
None N
Data AND Immediate Output O
Compare C
Printer Output P
Arithmetic A
Details on each Statement Entry Type are as follows:
Data
Data entry prompts are program statements that prompt the operator to
enter data for storage in memory. A typical Data Statement would be
prompting the operator for an Item Number or a Quantity. This is the most
commonly used statement type.
A program statement used to enter data looks like this:
ENTRY TYPE 01
D_
The previous example indicates a Statement Entry Type of Data for
statement #01.
Branch
A branch statement allows the program to jump to anywhere between 1 and
15 different statements depending on the character entered at the branch
prompt. The data entered at a branch statement is not saved to memory; it
simply acts as a pointer, directing the program to the appropriate statement.
When creating a branch statement, the programmer will only see 3 program
statement fields; ENTRY TYPE, PROMPT and STMT TO BRANCH.
The ENTRY TYPE for a branch statement should look like this:
ENTRY TYPE 01
B_
The next field is the PROMPT field. This field is the prompt text that the
user will see when executing the branch statement. This is an example of a
PROMPT field for a branch statement:
Page 95

8-5
PROMPT 01
TRANSACTION?_
The final field for a branch statement is the STMT TO BRANCH field.
This field tells the program what statements to go to when particular
characters are entered. At this point you can enter up to 15 groups of 3 digit
codes for a total of 45 characters.
• The first character in each 3 digit code is the conditional character;
this is the character that determines the branch when entered. The *
character is used to mean any character other than the conditional
characters already specified.
• The next 2 characters in the 3 digit code determine which
statement to go to when the conditional character is entered.
For example, lets say you wanted the following branches to happen:
Go to statement 18 if an R is keyed/scanned
Go to statement 34 if a 5 is keyed/scanned
Go to statement 02 if anything else is keyed/scanned
The STMT TO BRANCH field would look like this:
STMT TO BRANCH 01
R18534*02_
Question
A question statement creates a program prompt that the user answers YES
or NO to. Data is not stored to memory for this type of statement; a YES
answer directs the program to one statement number while a NO answer
directs the program to another statement number. The question statement is
answered by pressing the YES or NO key on the TriCoder keypad.
When creating a question statement, the programmer will only see 5
program statement fields; ENTRY TYPE, PROMPT, VOICE MESSAGES,
YES/NEXT STMT and NO/END STMT. The ENTRY TYPE prompt for a
question statement looks like this:
ENTRY TYPE 01
Q_
The PROMPT field determines what the user sees on the display screen for
this field. Here is an example of a PROMPT field for a question statement:
PROMPT 01
DAMAGED GOODS?_
The MESSAGE NUMBER field defines the voice messages you want to
play for this statement.
Page 96

8-6
MESSAGE NUMBERS 01
0200_
The next field prompt, the YES/NEXT STMT prompt, determines which
statement the YES key takes the program to. For example, if we wanted the
program to jump to statement #05 if we answer YES to statement #01, the
prompt should look like this:
YES/NEXT STMT 01
05_
The NO/END STMT prompt determines where the program goes if the
question is answered with the NO key. If we wanted the NO key to take us
to statement #03 in the example above, our NO/END STMT prompt should
look like this:
NO/END STMT 01
03_
Date and Time Stamp
The Date and Time Stamp statement requires no action from the user. By
specifying S as the statement ENTRY TYPE, the TriCoder accesses its
internal real-time clock and writes the current date and time information to
memory when the program statement is executed. By default, this
information is not displayed by the TriCoder when the statement is
executed, but it can be displayed simply by entering DIS in the DATA ID
field of the program statement.
The default format of the date and time stamp is
MMDDYYHHMM (if USA)
The format can be changed using the Alternative Date Formats setup
parameter.
If you want to add seconds to the time portion of the Date and Time stamp,
use s instead of S.
ENTRY TYPE 01
s_
The Date and Time Stamp statement uses only 3 programming
statement fields; ENTRY TYPE, DATA ID and YES/NEXT STMT.
Time Stamp
The Time Stamp statement type records only the time information to
memory in the HHMM format. Just as with the Date and Time Stamp
statement, using DIS in the DATA ID field will display the time
information on the TriCoder screen when the statement is executed. Use t
Page 97

8-7
instead of T to record seconds in addition to the hours and minutes:
ENTRY TYPE 01
t_
The Time Stamp statement uses the same program fields as the Date and
Time Stamp statement.
Date Stamp
The Date Stamp statement stores only the date information in a MMDDYY
format. As in the other Date/Time stamp statements, using DIS in the
DATA ID field will display the Date information on the TriCoder when the
statement is executed. The date format can be changed using the
Alternative Date Format settings in the TriCoder setup.
ENTRY TYPE 01
Y_
The Date Stamp statement uses the same program fields as the other Date
and Time Stamp statements.
Xtra
The Xtra Statement works with the "ENTER QUANTITY" prompt by
automatically entering a quantity of “1” if the user enters another Item
number instead of a quantity. The user has the option of entering an actual
quantity if it is more than “1”. Using this feature in Program #1 is a good
way to demonstrate its value. The XTRA Statement must be set before
you begin your data collection. To use the XTRA Statement, three things
must happen:
1. The statement type for the “ENTER QUANTITY” prompt must be
“X” (Xtra)
2. The maximum data length of the “ENTER QUANTITY”
statement must be less than the minimum data length for the next
statement to be executed - in program #1, the next statement to be
executed is the “ENTER ITEM NO.” statement.
3. The length of the data entered at the “ENTER QUANTITY”
prompt must be between the minimum data length and the
maximum data length of the next statement to be executed (ITEM
in program #1).
Using Program #1 as an example:
If the number of characters entered at the “ENTER QUANTITY” prompt is
less than the minimum data length of the “ENTER ITEM NO.” prompt,
then the data entered is stored as the quantity.
If the number of characters entered at the “ENTER QUANTITY” prompt is
between the maximum data length and the minimum data length for the
Page 98

8-8
“ENTER ITEM NO.” prompt, then a “1” is stored as the data for the
“ENTER QUANTITY” and the data entered at the “ENTER QUANTITY”
prompt is stored as the data for the “ENTER ITEM NO.” prompt. If it
seems confusing, use the following TriCoder Coding Form as an example:
Stmt # Entry Type Prompt Min Data Len Max Data Len Next Stmt
01 D
ENTER ITEM NO.
06 13 02
02 X
ENTER QUANTITY
01 04 01
While collecting data using the program shown above, if data between 6
and 12 digits in length is scanned or entered at the “ENTER QUANTITY”
prompt, data of "1" is automatically entered. In other words, if you
continually scan your item numbers (as long as they are all between 6 and
12 digits in length) you will automatically enter a quantity of 1 for each
item. To enter a quantity other than 1, simply enter the quantity by using
the keypad, making sure the length of the quantity data does not exceed the
maximum data length for the quantity field (4 digits). The very last
quantity entered at the end of data collection must be keyed in from the
TriCoder keypad, even if it is 1. Also, in order to either scan an item or
enter a quantity at this statement, you must change the “Input Type”
statement to be blank instead of K or W. This is especially important if you
are editing the default Program #1.
If you are using the “selective bar code trimming” feature with the XTRA
Statement, the trimming must be specified in both the “DATA Statement”
and the “XTRA Statement”. For example, if you wanted to eliminate the
leading character on all UPC codes, you would have to specify:
{c1
in both the upload prefix for the DATA Statement (Statement 1 on the
example above) and the upload prefix for the XTRA Statement (Statement 2
on the example above). If you do not specify the trimming in both upload
prefixes, the trimming will not happen correctly.
None
The None statement entry type is used as a “dummy” statement, recording
no data and transmitting only the Upload prefix and suffix. It is typically
used as a destination for a branch statement, allowing you to record what
action the operator took without recording any data. The program goes on
without any input from the operator.
To illustrate it’s use, lets say that a branch statement (statement #3) goes to
statement #04 (None statement) if the operator enters the letter A.
ENTRY TYPE 04
N_
Even though the operator enters the letter A at statement #3, the A will not
be written to memory and uploaded because branch statements record no
Page 99
8-9
data. What if your application requires the A as part of its data? By making
statement #04 a None statement and entering an A as the upload prefix or
suffix, an A will upload as the data for statement #04.
UPLOAD PREFIX 04
A_
The None statement can also be used to add more than 15 characters to an
upload prefix or upload suffix when using refer-backs – many times 15
characters is not enough. See Upload Prefix in this chapter for more
information on refer-back (appending data to another field) programming.
Data AND Immediate Output
The Data AND Immediate Output statement entry type is used when you
want to create a regular Data entry prompt (see Data) where the data is
stored in memory but also want the data to be output immediately (like
NON PORTABLE mode) as well. The TriCoder must be connected to the
computer for the Immediate Output portion of this statement type to work.
An example of using this type of statement would be if you want to collect
sales invoice data in the TriCoder (to later upload and update your
inventory) but want to also transmit data immediately to the computer to
create the actual invoice itself. You would be scanning directly into your
invoice software while saving the same data in the TriCoder to upload later
for inventory management.
Compare
The Compare statement will compare the data collected in that statement
against data collected in a previous statement and take you to a new statement
dependent upon whether the data in the two compared statements matched.
The statement to compare to is referenced in the Data ID field. For example,
you could enter data in statement 1, then in statement 2, enter new data. then
compare that data to the data in statement 1. If the data matches, you could
move on to statement 3; if it doesn't match, you could have it take you back to
statement 1. An example of an application might be a pharmacy - where you
would want to verify that the correct drug is being dispensed into the correct
customer vial. Coding for this statement might look like this:
Stmnt # Type
Prompt
Freq. Voice
Msg.
Data ID Min. Len Max Len. Yes/Next No/End
1 D Scan 1st Item A 41 02 09
2 C Scan 2nd Item A 42 01 01 03
3 D Not Equal, Press Enter A 62 00 01 01 00
According to the example, data scanned in statement 2 is compared to the
data scanned in statement 1. If the two items match, the operator is taken
back to statement 1 to scan the next item. If the items do not match, the
operator is taken to statement 3, where an voice error message is played and
the operator is instructed to press the ENTER key. Upon pressing the
ENTER key, the operator is taken back to statement 1 and it starts over.
Page 100
8-10
Even if compared data is wrong, it is still written to the data file for upload,
so an audit trail is available to see where errors occured.
Printer Output
The TriCoder supports output to the Zebra QL320 or Cameo portable label
printer using the P statement (
TriCoder must have board revision level H - level
G can be upgraded - contact Worth Data
). Using the LabelVista* software
included with the Zebra printer, design a label format, identify the fixed and
variable fields and download it to the QL320 or Cameo printer via USB
using the TriCoder Utilities program. The printer is capable of holding
several different label file formats, each one identified by filename.
The P statement is then used to:
a) reference by filename the label format file in the printer, and
b) provide data for the variable fields designated in the label format
file. The P statement is limited to 70 characters and refer-backs (see
page 4-11) can be used.
The P statement for a label using the filename "myfile" with 3 variable
fields would look as follows (the
(space) indicates an actual space character):
!
(space)UF(space)myfile.fmtCRLFdata1CRLFdata2CRLFdata3
CR and LF are scanned from the Full ASCII Menu and the filename must
end with ".fmt". No CRLF is required after the last data item. The TriCoder
will do it for you. Here is a program example using refer-backs
Stmnt # Type Prompt Min. Len. Max Len. Yes/Next No/End
1 D Scan Item Number 1 10 02 09
2 D Scan price 1 10 03 99
3 D Scan location 1 10 04 99
4 P
! UF myfile.fmtCRLR}1CRLF}2CRLF}3
01 99
* For details on creating label formats and specific commands for the printer, see the Zebra CD
that comes with the QL320 or Cameo printers. If you do not have a label format, you can
utilize line printing by leaving out the ! UF myfile.fmt portion of the command.
Arithmatic
The TriCoder has the ability to act as a simple calculator, performing
addition, subtraction and multiplication (no division). The "A" statement
allows the user to input data (numeric only), press +(add), -(subtract) or
*(multiply) and then input another piece of data (again, numeric only). The
sum is displayed and the user has two choices; press +, - or * again and
enter another number and get a new sum, or press the ENTER key to accept
the sum as the final result. Here is an example of data entry for someone
who is adding 2 numbers, subtracting a number and accepting a final result:
TriCoder Display User Action
ENTER QUANTITY (program prompt) press 5 + 8, then press ENTER
13 (intermediate sum) press - 4, then press ENTER
9 (final sum) if accepting result as final, press ENTER
 Loading...