

Page 1

S-Series
User Manual
ta 0.5
turntable
* Read the user manual
before operating.
Product #18395
Page 2

Page 3

safety
information
Before you start...
Warning of a hazard for the user, the unit or possible misuse. Important notice.
Thank you for buying a Tri-Art Audio product. Please read through this manual to
understand and operate this product correctly. Please keep this manual in a safe place so
that you may refer to it whenever necessary. Please ensure the product you are using is
rated for your country’s electrical system, or it will not be covered under our warranty.
Warning:
To prevent re or shock hazard, do not expose this product to rain or moisture.
Important Notice:
The serial number for this equipment is located on the bottom of this component. Please
write this serial number on the enclosed warranty card and follow the instructions to register
your product for our three (3) year limited warranty.
This equipment is designed for consumer use, such as home audio systems. It is not
designed to operate in a business environment or a mobile application. Mobile, pro or
commercial businesses such as restaurants will not be covered under warranty.
Caution:
To reduce the risk of electric shock, do not remove cover (or back). No user serviceable
parts inside. Refer servicing to qualied service personnel.
Page 4

safety
information
Safety Instructions
Read Instructions:
All the safety and operating instructions should be read before operating this equipment.
Retain Instructions:
The safety and operating instructions should be retained for future reference.
Heed All Warnings:
All warnings, set up procedures, and operating instructions should be strictly adhered to.
Follow all instructions carefully.
Water and Moisture:
Under no circumstances should this audio component be used near water.
It is not to be used in a bathroom, water closet, shower, kitchen, wet basement,
pool/spa/sauna area, or outside.
Page 5

safety
information
Safety Instructions
Ventilation:
Please ensure that the location of this equipment is such that in no way does it prevent adequate
ventilation. Do not enclose this in fabric or enclose in a cabinet where there is no adequate
ventilation. In no instance should the product be located where the ow of air is impeded or cannot
allow proper ventilation.
Heat:
This product should be located well away from all the heat sources such as but not limited to
heaters, forced air heat, radiators, stoves, and replaces.
Power Sources:
The Tri-Art component should be connected to a power supply as listed on the actual component
and manual.
Cleaning:
Your Tri-Art product was soaked in hemp oil and sealed in beeswax. Only use the Tri-Art Beeswax
and Hemp Oil in moderate amounts as per the instructions to freshen up the appearance from time
to time as needed. Do not use lacquers or aerosol wax products with this product. Do not pour
water on the surface at any time.
Heavy Objects:
Do not place heavy objects on this component.
Page 6
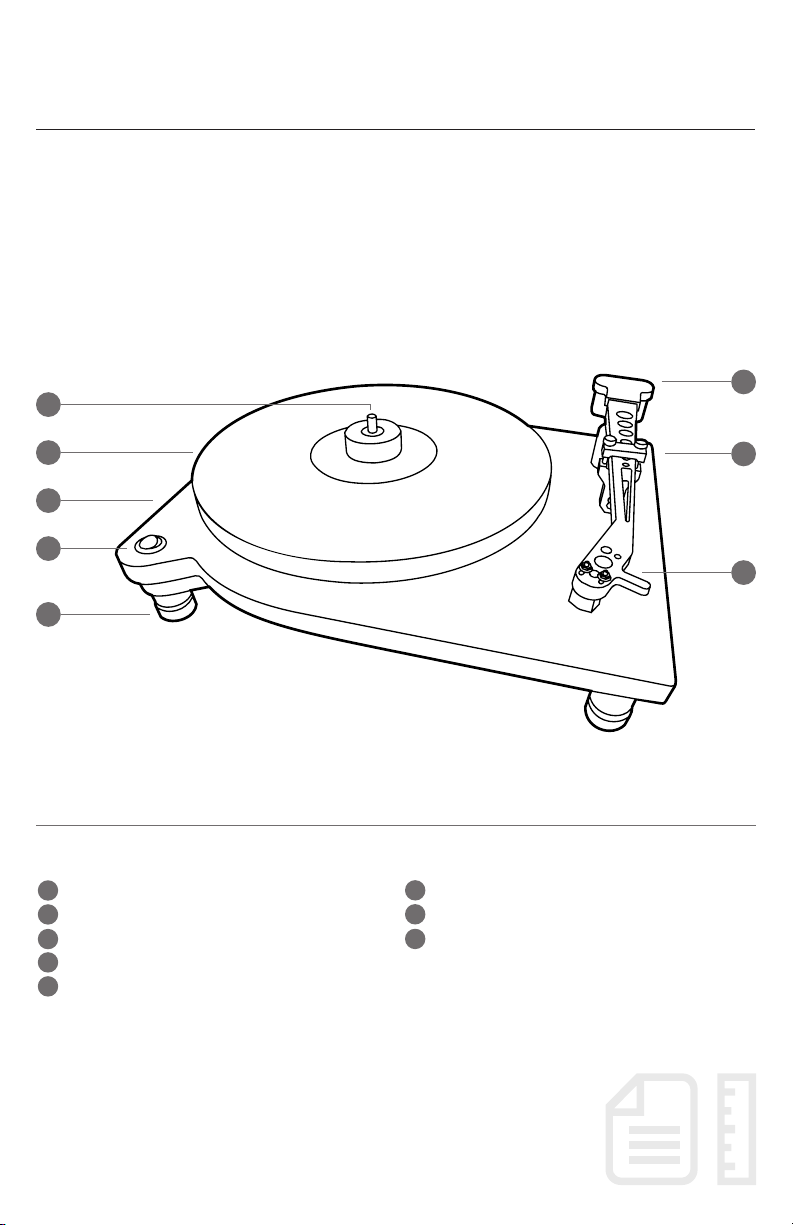
turntable front
1
6
2
3
4
5
Spindle
1
Platter
2
Plinth
3
Power Switch
4
Iso Feet with Sorbothane
5
Azimuth Adjustment Basket
6
7
Arm Clamp
Cartridge Mount
8
7
8
Page 7

turntable back
1
2
*Located under the Platter
3
4
5
6
7
1 6
Arm Base
2 7
Left and Right Output
3
Plinth
4
Power Switch
5
Sub Platter
Belt
Pulley
Page 8

turntable specs
Table Details:
Plinth: 3 Ply Bamboo laminate 19.05mm (3/4″)
Motor: Single 24 Pole Synchronous AC Motor
Pulley: Brass Pulley
Speed: 33.3 & 45 rpm
Drive: Belt Drive
Platter: 3-ply Bamboo Laminate 19.05mm (3/4″)
Sub Platter: Aluminum Sub Platter with Steel Shaft
Legs: Leveling Legs
Bearing: Bronze Collar Bearing with ABEC7 Carbonized Ceramic Ball Bearing
Dimensions: H 15.5cm x W 40.9cm x L 33.3cm / 8 1/4″ x 16″ x 32.39″
Arm Details:
Material: Three Ply Bamboo Laminate 12mm
Settings: VTA & Azimuth Adjustments
Anti-Skate Adjust: Passive Anti-Skate
Bearing Assembly: Bronze with Brass Collar Spike and Synthetic,
High Viscosity Grease Bearing
Arm Base: Bamboo Supports on Plinth
Wiring: Cardas Wire 33 AWG Uninterrupted from Headshell Clips to Brass
Female RCA with Silver Plated Cartridge Clips
Level: Micro Bubble Level Included
Arm Length: 9” / 222 mm
Tone Arm Mass: 10g
Crafted with bamboo and natural sheep’s wool.
Learn more at triartaudio.com
Page 9
use &
guidelines
Above
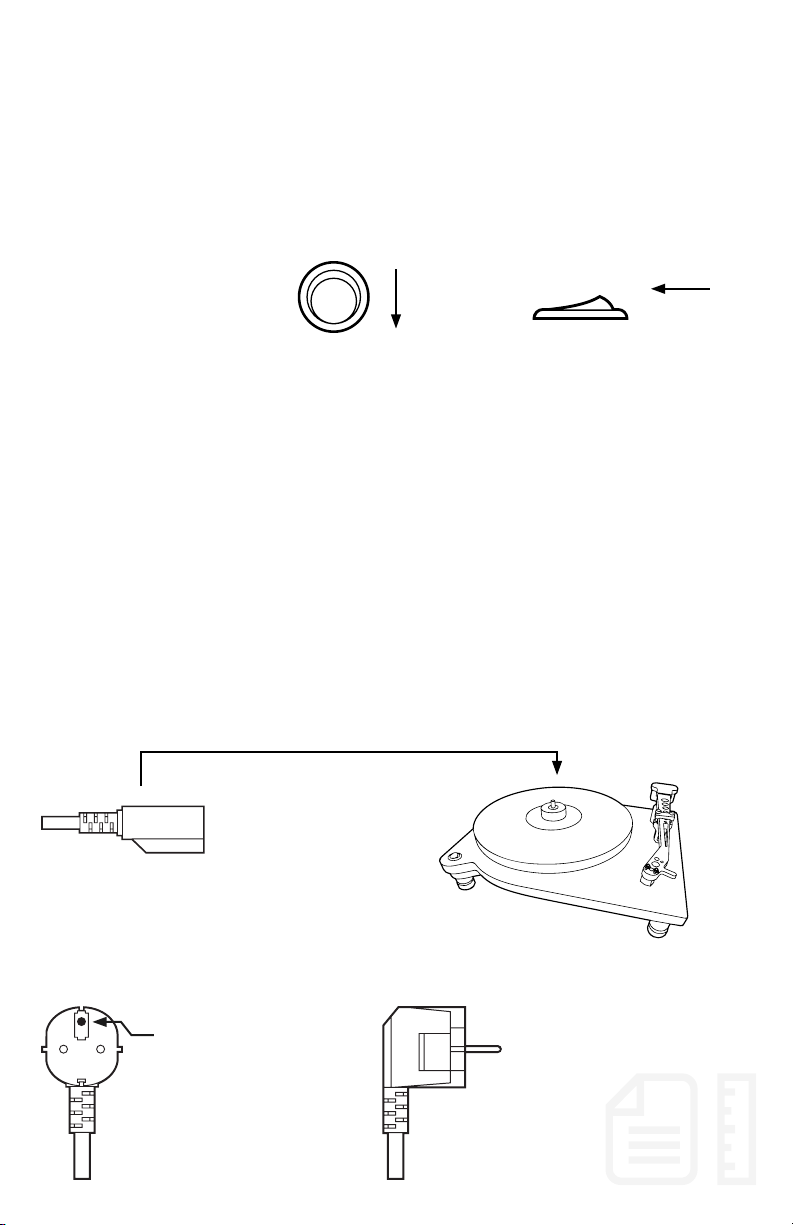
Power Switch:
The power switch is located on the far-left front of the turntable. It should be in the off
position as shown during set up. Please do not rapidly turn on and off the power switch.
The switch is connected to a safety circuit to ensure correct performance. The rapid cycling
of the switch bypasses the protection circuitry and is not recommended.
Off Position Off Position
Side
Power Cord:
Locate the power cord and plug the female connector to the male connector located under
the plinth. Plug the male side from the supplied cord into your wall electrical socket. For
best results please ensure you have the correct polarity with ground from your wall electrical
receptacle and ensure that the turntable cable is correctly installed.
NOTE: Incorrect polarity may result in the platter turning counter-clockwise or
humming of the motor(s).
underneath the plinth
The male side of the power cord must be plugged into an outlet with the
cord facing downwards.
Ground
Front view Side view
Page 10
use &
guidelines
Install the Interconnects:
Ensuring you have muted or turned off your sound system, locate the Interconnects (or use
your own interconnects) and connect them to the turntable ensuring the direction arrow for
the cables is owing away from the turntable. Then connect the turntable interconnects into
the input of your phono/pre-amplier ensuring you match the R and L inputs/outputs.
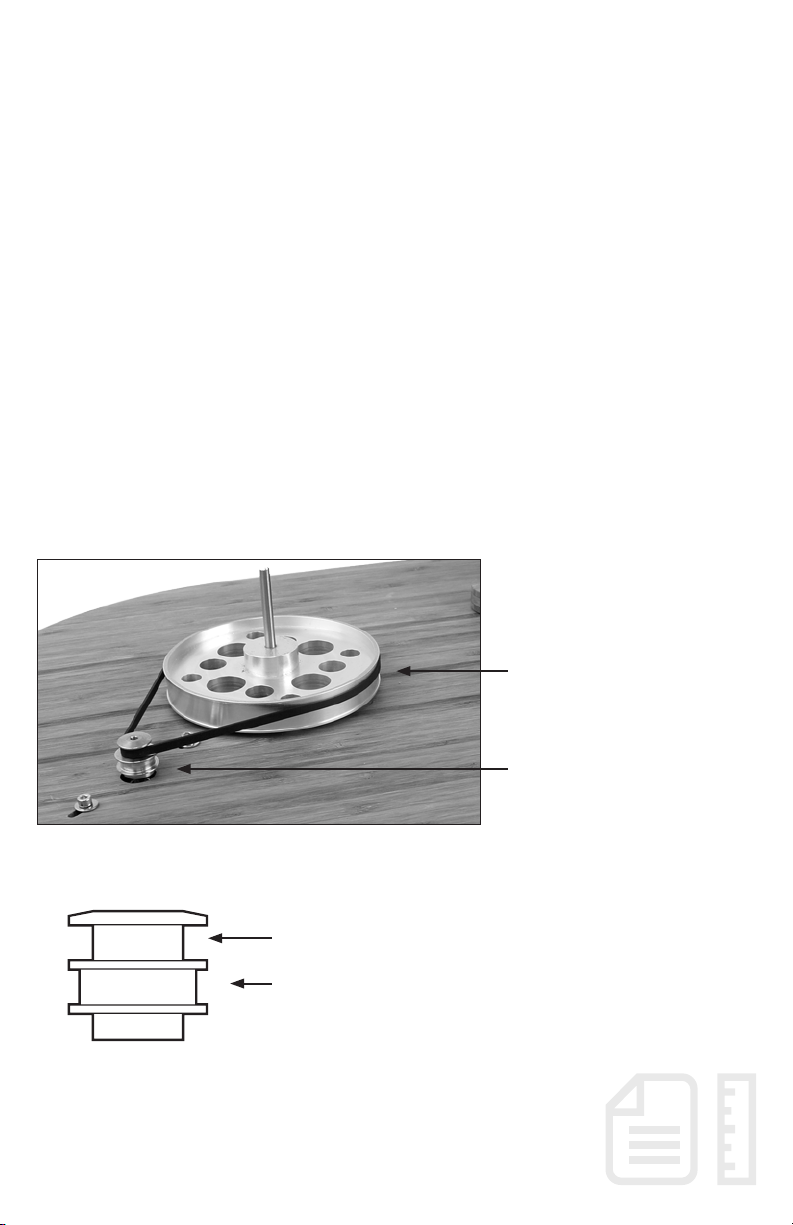
Install the Belt:
Locate the rubber belt and install it around the sub platter rst and then around the pulley.
Sub Platter
Pulley
The upper position of the pulley is for 33 rpm and the lower one is for 45 rpm.
Turn the power switch on and ensure that the
33 rpm
45 rpm
Locate the removable spindle cover and insert it over the spindle on the table.
The spindle cover is removable to further isolate the record and the Platter from
external vibrations.
pulley turns smoothly. Turn the turntable off
before moving on to the next step.
The platter is not installed on your TA-0.5 it is
packaged separately within your box. Locate
the platter and gently install it over the spindle.
Page 11
use &
guidelines
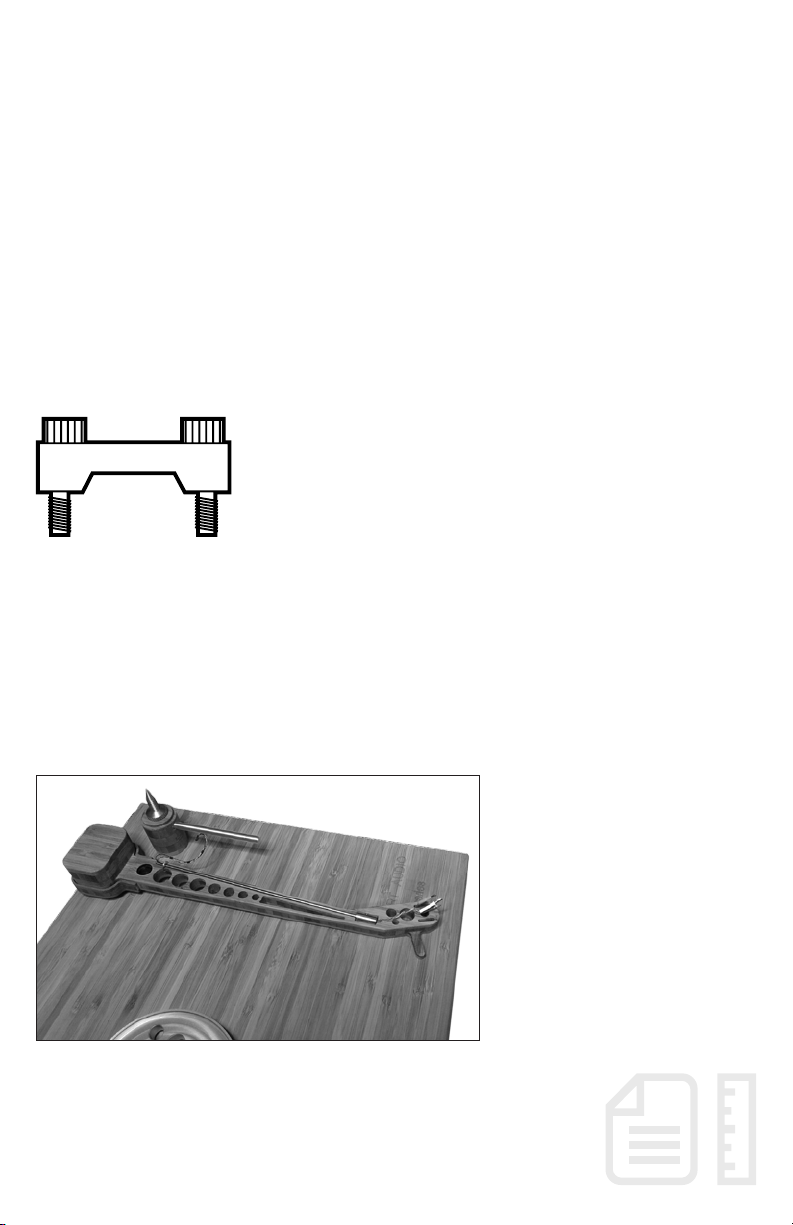
The Tone Arm is usually shipped secured by two (2) top mounted Turn Screws.
Remove them to release the tone arm from the clamp. Please note the arm is
direct wired for the best sound possible, so caution should be exercised not to
move the arm in a way that it may stretch the cable.
Uni-Pivot Tone Arm Set Up:
The tone-arm on the TA-05 is a Uni-pivot design. The tonearm has a coned cup with a small
seat to accept the bronze spike in the correct position. Gently move the tonearm until you
feel the spike t into the collar seat.
Page 12

use &
guidelines
Install your Cartridge:
The Tri-Art TA-05 is more than well matched with a ne cartridge and will extract exceptional
performance from a wide range of MM and MC cartridges. To install your cartridge, please
locate the packet with the cartridge screws (3 pairs of different sizes) as well as a set of
washers and brass nuts. Choose the appropriate length of screw and install your cartridge.
Setting the Azimuth (Tilt) &
Tracking Force:
To set your phono cartridge, it is rst necessary to begin to set the azimuth. Basically, this is
the angle between the plane of the turntable and the vertical axis of the phono cartridge.
The stylus must be perpendicular to the record, so as to prevent any imbalance between
the right and left channels of the groove. Locate the small spirit level – you will need this
tool to set the azimuth. You will also need the bottle of brass ball bearings, spoon and
tweezer supplied.
At the rear of the tonearm, please turn the top screw counter-clockwise until it releases and
then remove the cover. Removing the cover will reveal the basket which holds the brass
beads. Locate the bottle of brass beads and using the enclosed spoon ll the basket gently
and carefully with the beads.
Page 13

use &
guidelines
Setting the Azimuth (Tilt) &
Tracking Force:
Do not ll the basket yet perhaps bring it to almost full. Using one of the available stylus
gauges from numerous manufacturers set the tracking force to the recommended grams
from the manufacturer. After you have set the tracking force. Locate the spirit level and
place the level on the end of the tonearm where the cartridge would be. Adjust (as needed)
to balance the azimuth, by using the tweezers to ne tune the desired number of beads into each
basket until the tilt of the arm is balanced. The desired effect will be a strong center image.
Many of our users like the look of not replacing the azimuth cover and the simplication of
making simple adjustments. It will function perfectly with or without the cover!
Vertical Tracking Angle (VTA)
Vertical Tracking angle refers to the angle of the tonearm when viewed from the side.
Move the bronze spike upward or downward to adjust the angle of the tonearm. Locate
the enclosed spirit level and place it on the end of the tonearm (where the cartridge would
be underneath. Then rough-tuning up and down until you achieve a fairly level tonearm
position. It is then necessary to ne tune the adjustment to locate the very small range in
which the “sweet spot” is found. Your goal is to get the tonearm parallel with the record
surface. Close attention to this adjustment can bring immense satisfaction to the listening
experience and is worth the time investment.
Page 14
use &
guidelines
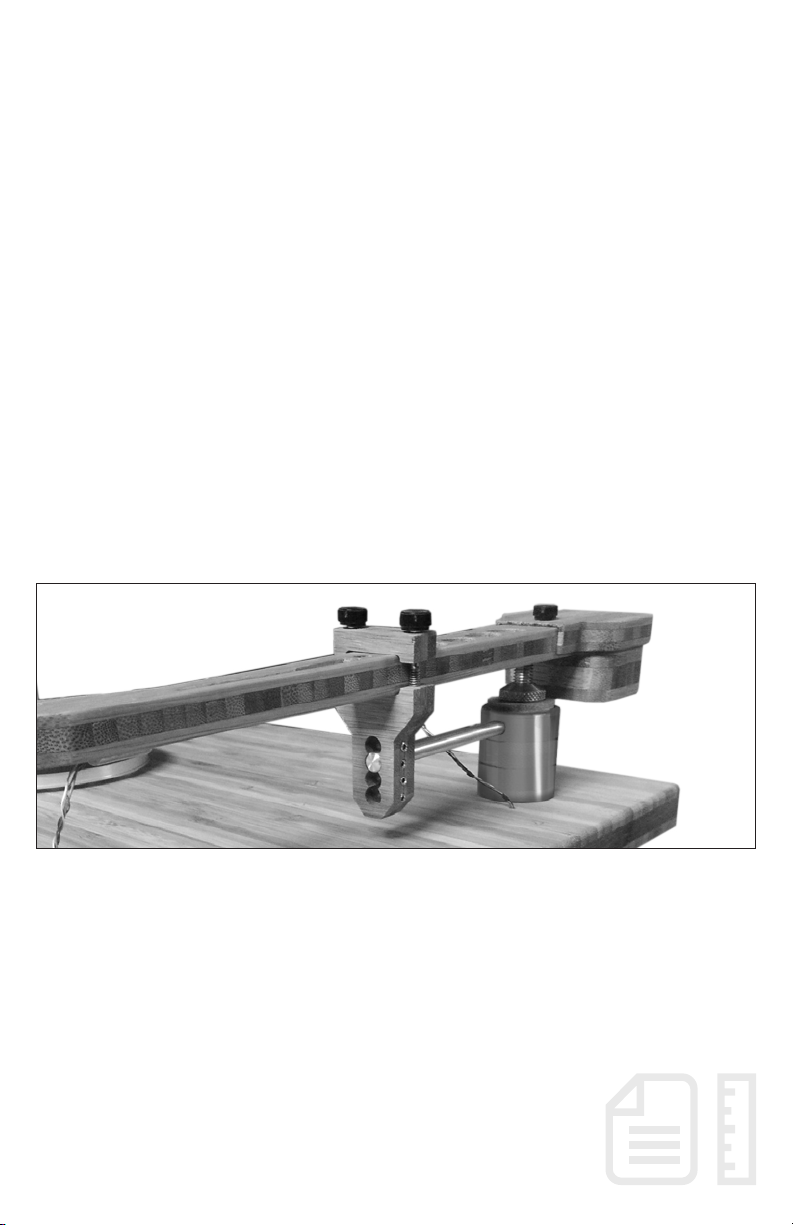
Adding the Grease:
Once you completed your initial measurements, located the wooden sticks and apply a ¼ of
the tip of grease into the coned cup and then place the tonearm back on the bronze spike
and get it to seat correctly. At this point check your tracking force, reset if necessary, your
VTA and ne tune your azimuth settings.
Once you have achieved your desired cartridge, Azimuth and VTA set, you can set the
nal resting position of your tonearm. There are four (4) Allen Screws on the side that can
be accessed with the enclosed Allen keys, remove one of the support screws and lower or
raise the bar to get the holder to a level position.
Turn the power switch on and watch the turntable platter begin to spin. Place a record
directly on the platter (do not add rubber or felt platter mats as apart from degrading the
wonderful sound of the bamboo platter, can change the settings you have just completed.
Carefully place the arm over and carefully manually lower (there is no cuing arm) the
cartridge on the record. When removing a record or placing one on we recommend not
turning off the table. Following these instructions will result in many years of exceptional
trouble-free performance.
Page 15

congratulations!
Your Tri-Art Audio turntable is operational
and fully set up.
Now, go play your favourite record!
Our Bamboo Design
We have selected bamboo to construct many of the
structural parts of our systems rather than metal or
plastic. In addition to being aesthetically pleasing, it
has a vital function.
The sonic virtues of bamboo are evident. We use
the latest CNC machinery to manufacture to precise
tolerances. Due to the nature of the material, there
may be slight variations that do not comprise the
sound. Every component is hand nished and then
inspected by the designer before it leaves the factory.
Crafted with bamboo and natural sheep’s wool.
Learn more at triartaudio.com
Page 16

included
in the box
• One (1) Cylinder tube with the following included:
• One (1) Package of Sorbothane Feet set of 4 (#21681)
• One (1) Packet of cartridge mounting screws (3 different lengths)
2 brass nuts and 2 spacers
• One (1) Bottle of Brass Beads
• One (1) Set of Tweezers for azimuth adjustment
• One (1) Spoon for loading brass ball bearings
• One (1) Packet Allen Key Set
• One (1) Bottle of Bearing Grease
• Two (2) Wooden Sticks
• One (1) Bottle of Platter Bearing oil
• One (1) SHIELDED Power Cord approximately 2 metres
• One (1) Stereo set of RCA interconnects
• One (1) Bamboo Platter
• One (1) TA-05 Turntable
• One (1) Removable Spindle Cover
Page 17

warranty
information
For Your Protection:
Completely and immediately mail the product registration card so that we may contact you
directly in the event a safety notication is issued in accordance with the 1972 Consumer
Safety Act, or for other reasons Tri-Art Audio may deem necessary.
Technical Support Hotline
1-877-541-0299
Our technical department will gladly answer any questions you may have about our
products. Monday through Thursday, 9am to 5pm and Friday, 9am to 3pm EST.
Manufacturer’s Limited Three
Year Warranty:
Tri-Art Audio warrants this unit to be free from defective material or workmanship and will
repair or replace this unit or any part thereof if it proves defective in normal use or service
within three (3) years from the date of original purchase.
Audio at the address below. This warranty will be considered void if the unit has been
tampered with, improperly serviced, subjected to abuse or misuse or if installed in a
commercial vehicle. This warranty does not cover accidental damage.
For all warranty information please see Tri-Art Audio’s warranty
information card included with your new equipment.
Page 18

thank you for
your purchase!
Page 19

Page 20

triartaudio.com
Designed . Fabricated . Assembled
In Canada
 Loading...