

Page 1
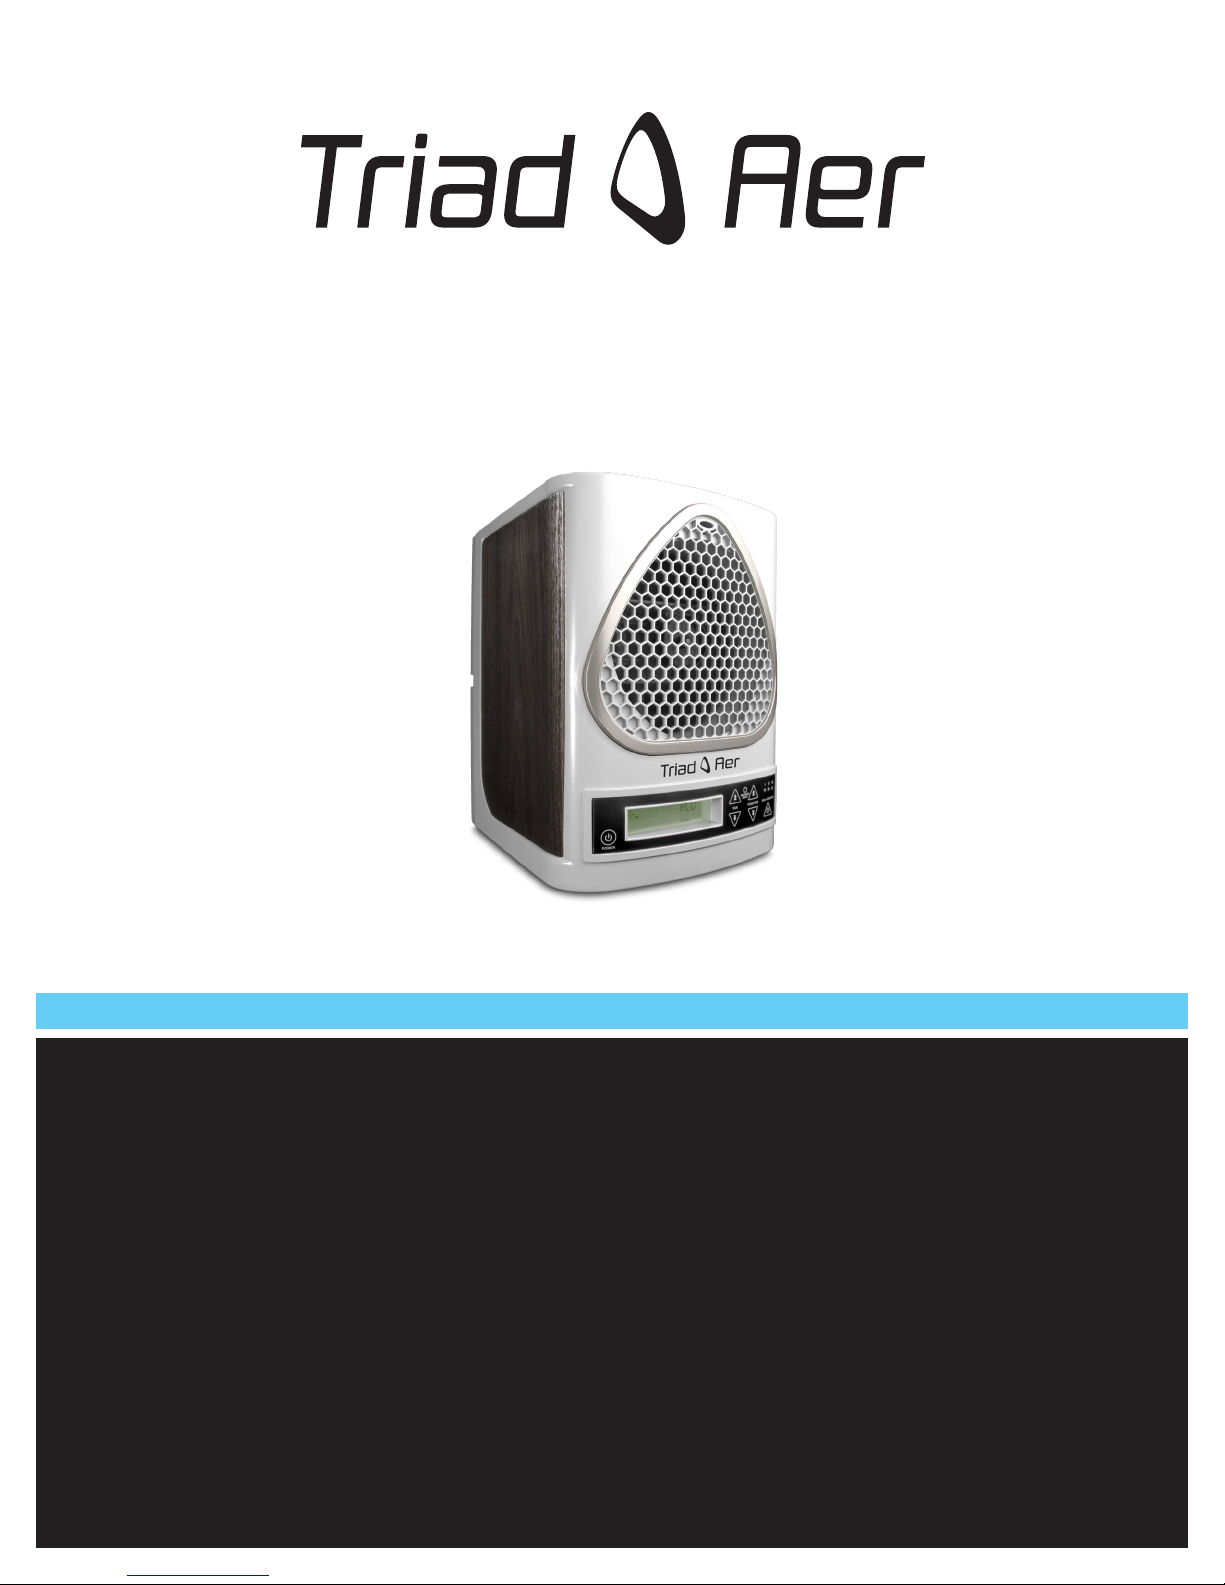
Owner’s Manual
Table of Contents
Welcome/Records. . . . . . . . . . . . . . . . . . . . . . . . . . . . . . . . . . . . . . . . . . . . . 2
Specications/Warnings . . . . . . . . . . . . . . . . . . . . . . . . . . . . . . . . . . . . . . . . . 3
Product Introduction . . . . . . . . . . . . . . . . . . . . . . . . . . . . . . . . . . . . . . . . . . . 4
Three Technologies. . . . . . . . . . . . . . . . . . . . . . . . . . . . . . . . . . . . . . . . . . . . 5
Diagrams . . . . . . . . . . . . . . . . . . . . . . . . . . . . . . . . . . . . . . . . . . . . . . . . . 6-7
Setup . . . . . . . . . . . . . . . . . . . . . . . . . . . . . . . . . . . . . . . . . . . . . . . . . . . . 8
Operations . . . . . . . . . . . . . . . . . . . . . . . . . . . . . . . . . . . . . . . . . . . . . . . . . 9
Dissassembly/Assembly. . . . . . . . . . . . . . . . . . . . . . . . . . . . . . . . . . . . . . . . 10-11
Cleaning . . . . . . . . . . . . . . . . . . . . . . . . . . . . . . . . . . . . . . . . . . . . . . . . . . 12
Troubleshooting. . . . . . . . . . . . . . . . . . . . . . . . . . . . . . . . . . . . . . . . . . . . . . 13
Page 2

Welcome/Records
Welcome to the joys of cleaner air and a healthier life. You are the owner of one of the most technologically-advanced
purication systems available—the Triad Aer.
The combination of three innovative technologies, Photo Catalytic Oxidation (PCO), Needlepoint Ionization, and Scalable
Purication, sets the Triad Aer apart from similar air puriers on the market. The Triad Aer uses these technologies to
reduce particles and inactivate microbes in the output radius creating a healthier living space with pristine air quality.
The Triad Aer is designed to provide years of trouble-free service when it is properly maintained. Keep this manual. It
will guide you through the steps to operate your machine and the maintenance procedures which will keep your Triad
Aer in tip-top shape for years to come. Even when properly cared for, some parts of the unit will need to be replaced
periodically. Replacement parts can be purchased from your authorized Triad Aer distributor.
We hope you enjoy your Triad Aer and the overall healthier living environment it creates.
Records
Purchase Date: _________________________
Model Number: ________________________
Serial Number: _________________________
Distributor Name: ______________________
Distributor Phone: ______________________
Warranty
Please visit www.triadaer.com/warranty to register your product and view your warranty information.
©Triad Aer 2012: All Rights Reserved
2
Page 3
Specications/Warnings
Specications
Unit
Size: 12” high x 9” wide x 10 3/4” deep
Weight: 8.8 lb.
Coverage: 250ft² to 3000ft² (23m² to 279m²) *
* Depending on variables such as the severity and frequency of pollution, ow of air in the environment, humidity and temperature.
Input: 120V/60Hz .63A
PCO Cell
Normal Mode Output: < 0.02 ppm ozone (ambient room concentration)
Purication Plate
High Mode Output: 25-360mg ozone per hour
Ionization Needle
24 to 30 KV, 20-30 Khz Ion Generation Pulsator
6 KV DC Needle Ion Generator
Warnings
Review this list before use and performing any maintenance or cleaning of your unit.
WARNING: Never operate unit near heat source, open ame or ammable/combustible uids.
WARNING: Do not operate unit unless all parts (including PCO Cell, Purication Plate, Rear Filter Assembly and Rear Cover)
are properly installed.
CAUTION: Directly viewing the lamp inside unit for an extended period (longer than 20 min.) may
result in eye damage.
CAUTION: Never adjust setting to exceed square footage of ventilated space being treated.
CAUTION: Do not use SANI+BOOSTER in occupied spaces. Short term exposure to ozone levels exceeding 0.5 ppm can cause
temporary adverse reactions.
CAUTION: Unit should be powered OFF and Power Cord should be disconnected when Cleaning/Disassembling/
Reassembling/Servicing.
3
Page 4

Product Introduction
Benets
The Triad Aer air purier system brings the most advanced air purication technology into the comfort of your space.
Unlike other air puriers, the Triad Aer does more than simply lter the air in your space. Incorporating technology like
photo catalytic oxidation, high level negative ionization, scalable purication and electrostatic ltration allows the air
purication system to provide tangible benets to your home or workspace by:
• Destroying pollution from the air, embedded in walls, ceilings, oors, carpets, furniture, etc.
• Reducing or eliminating odors such as cigarette smoke, mildew, food, etc.
• Contributing to the sanitization of all surfaces.
The whisper quiet ve-speed fan disguises the power encapsulated in the advanced air purication system. Having the
Triad Aer in your space will not only improve the quality of air, but, most importantly, it will improve the quality of life.
Ease of Use
The Triad Aer is your hassle-free provider for clean air and healthy living. With proper care and maintenance (see
“CLEANING” page 12), the Triad Aer will operate with the same robust power and eciency for several years beyond
the date of purchase. With the push of a button the Triad Aer starts working to eliminate the biological contaminates and
dangerous pathogens in your home or oce. Enhancing your overall quality of life has never been this easy.
Availability of Support
This Owner’s Manual will provide comprehensive information regarding all aspects of your Triad Aer. If you experience
any technical issues with your device, refer to the Troubleshooting section of this booklet. The solution for many of
the commonly reported problems is listed in detail in the Troubleshooting section (page 13). If the problem you are
experiencing is not listed in the Owner’s Manual and/or you need additional support, please feel free to email us at
©Triad Aer 2012: All Rights Reserved
4
Page 5
Three Technologies
Filtration
The washable pleated lter inside the Triad Aer is an essential component of the three purication technologies. The
washable pleated lter passively removes a wide range of particles from the breathing space and holds them until the
unit is cleaned. Besides removing particles from the air, the washable pleated lter also prevents them from being
deposited inside the machine which helps your Triad Aer last longer and perform at optimum eciency.
Needlepoint Ionization
The Triad Aer generates a continuous stream of millions of negative ions that circulate throughout the home. These ions
charge particles (such as dust, dander or bacteria) causing them to attract other particles and clump together. As more
and more particles come together, they become heavier, making them easier to pull into the home’s HVAC air lter or
just fall to the oor to be vacuumed up. Unlike HEPA lters that can only lter out particles of .5 microns or larger,
the ionizer in the Triad Aer can reduce ultra-ne, even nano particles, that are much more dangerous than the larger
particles you can actually see.
Advanced Photo Catalytic & Scalable Oxidation
Both the Advanced Photo Catalytic Oxidation (PCO) and Scalable Oxidation work to destroy biological contaminates
as well as odors, mold, bacteria and viruses. PCO Cells have been proven to reduce dangerous pathogens by more than
99% in less than 24 hours through a process called molecular disassociation which actually breaks down the molecules
instead of simply covering up the source. Scalable Oxidation ensures your Triad Aer will perform at the maximum
eciency specic to its environment at the time of use. In High Mode, the purication plate generates activated oxygen
to assist in breaking down contaminates which cause odors. For faster cleanup, Triad Aer can be set to Sani+Booster
which has a programmable auto-shuto timer feature. This allows the machine to generate maximum output when the
room or home is unoccupied.
5
Page 6
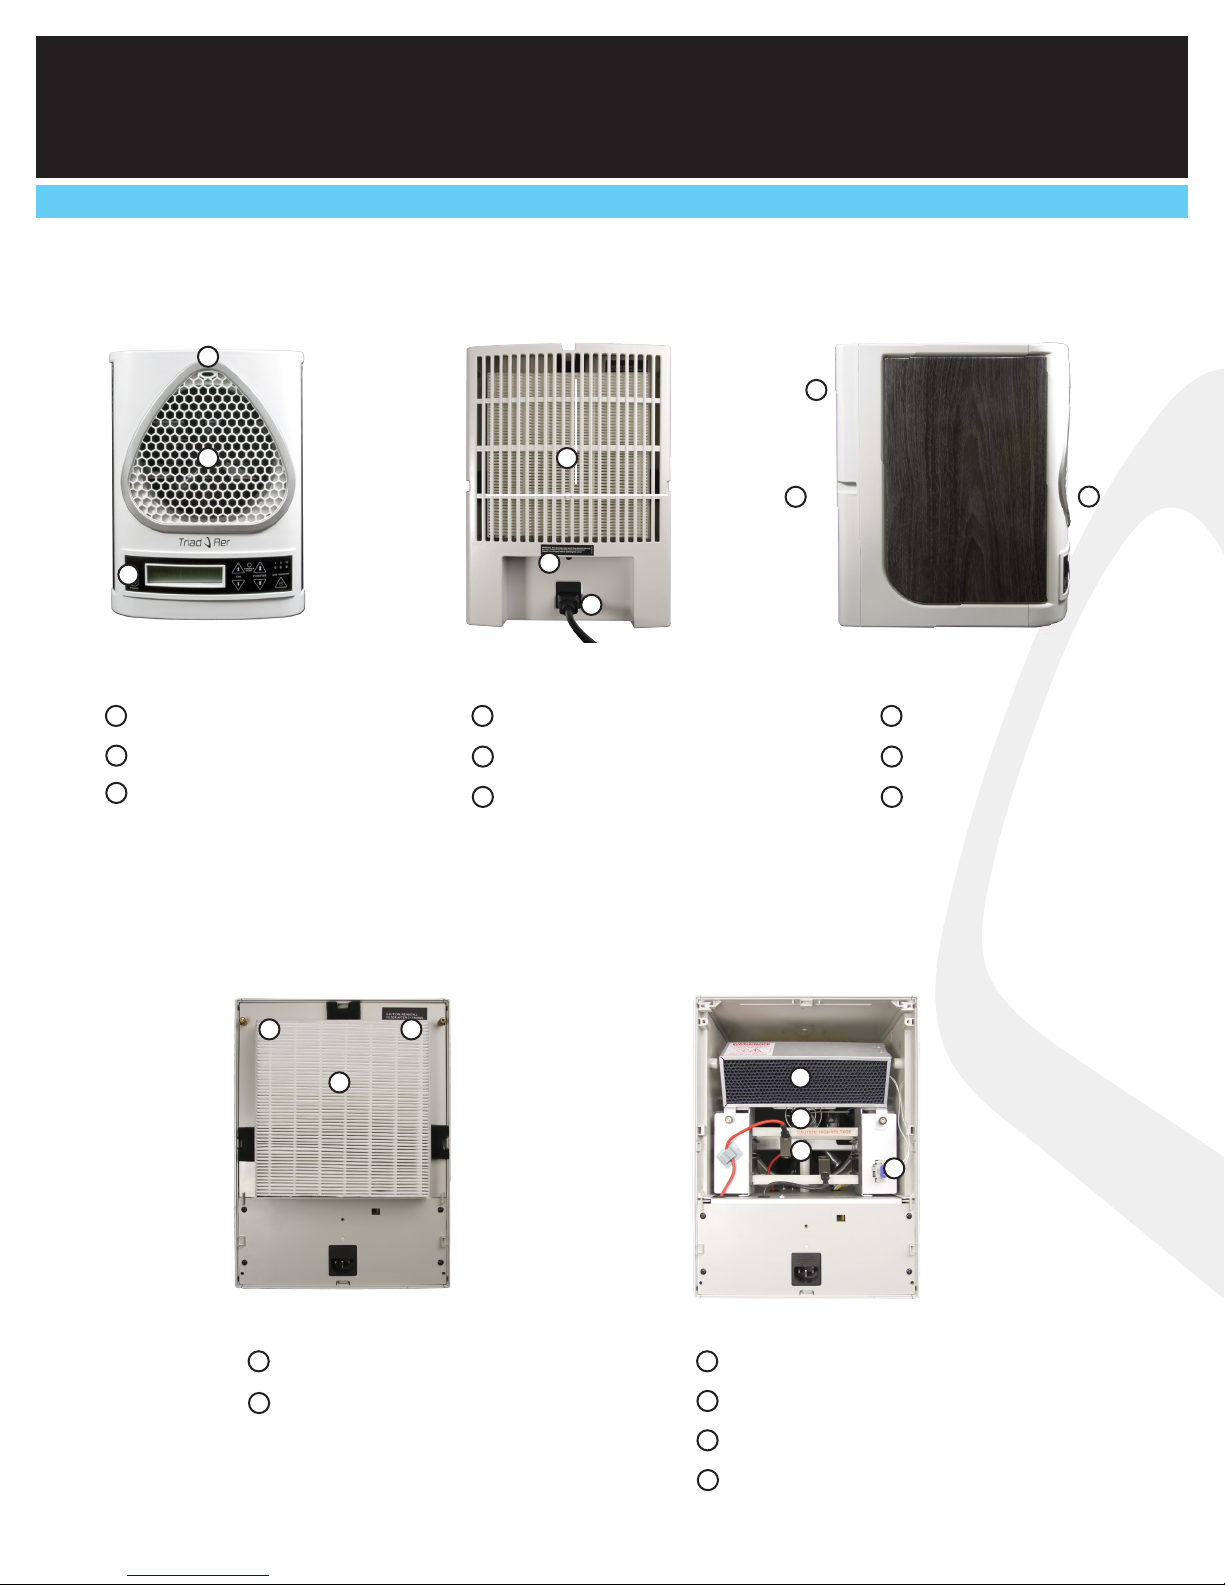
Diagrams (Unit)
Front of Unit Rear of unit Side of Unit
1
1
2
3
1 1 1
Ionization Needle
2
Front Grille
3
Control Panel
2 2
3
Rear of Unit
(Rear Cover Removed)
1 1
2
2
1
3
Rear Cover Screw
Rear Cover Clasps
Power Adapter Inlet
Rear of Unit
(Filter Assembly Removed)
Rear Cover
Unit Rear
3
Unit Front
3
2
1 1
Brass Thumbscrews
2
Filter Assembly
©Triad Aer 2012: All Rights Reserved
1
2
4
PCO Cell
2
PCO Cell Nuts
3
PCO Cell Connector
4
Purification Plate
6
3
Page 7
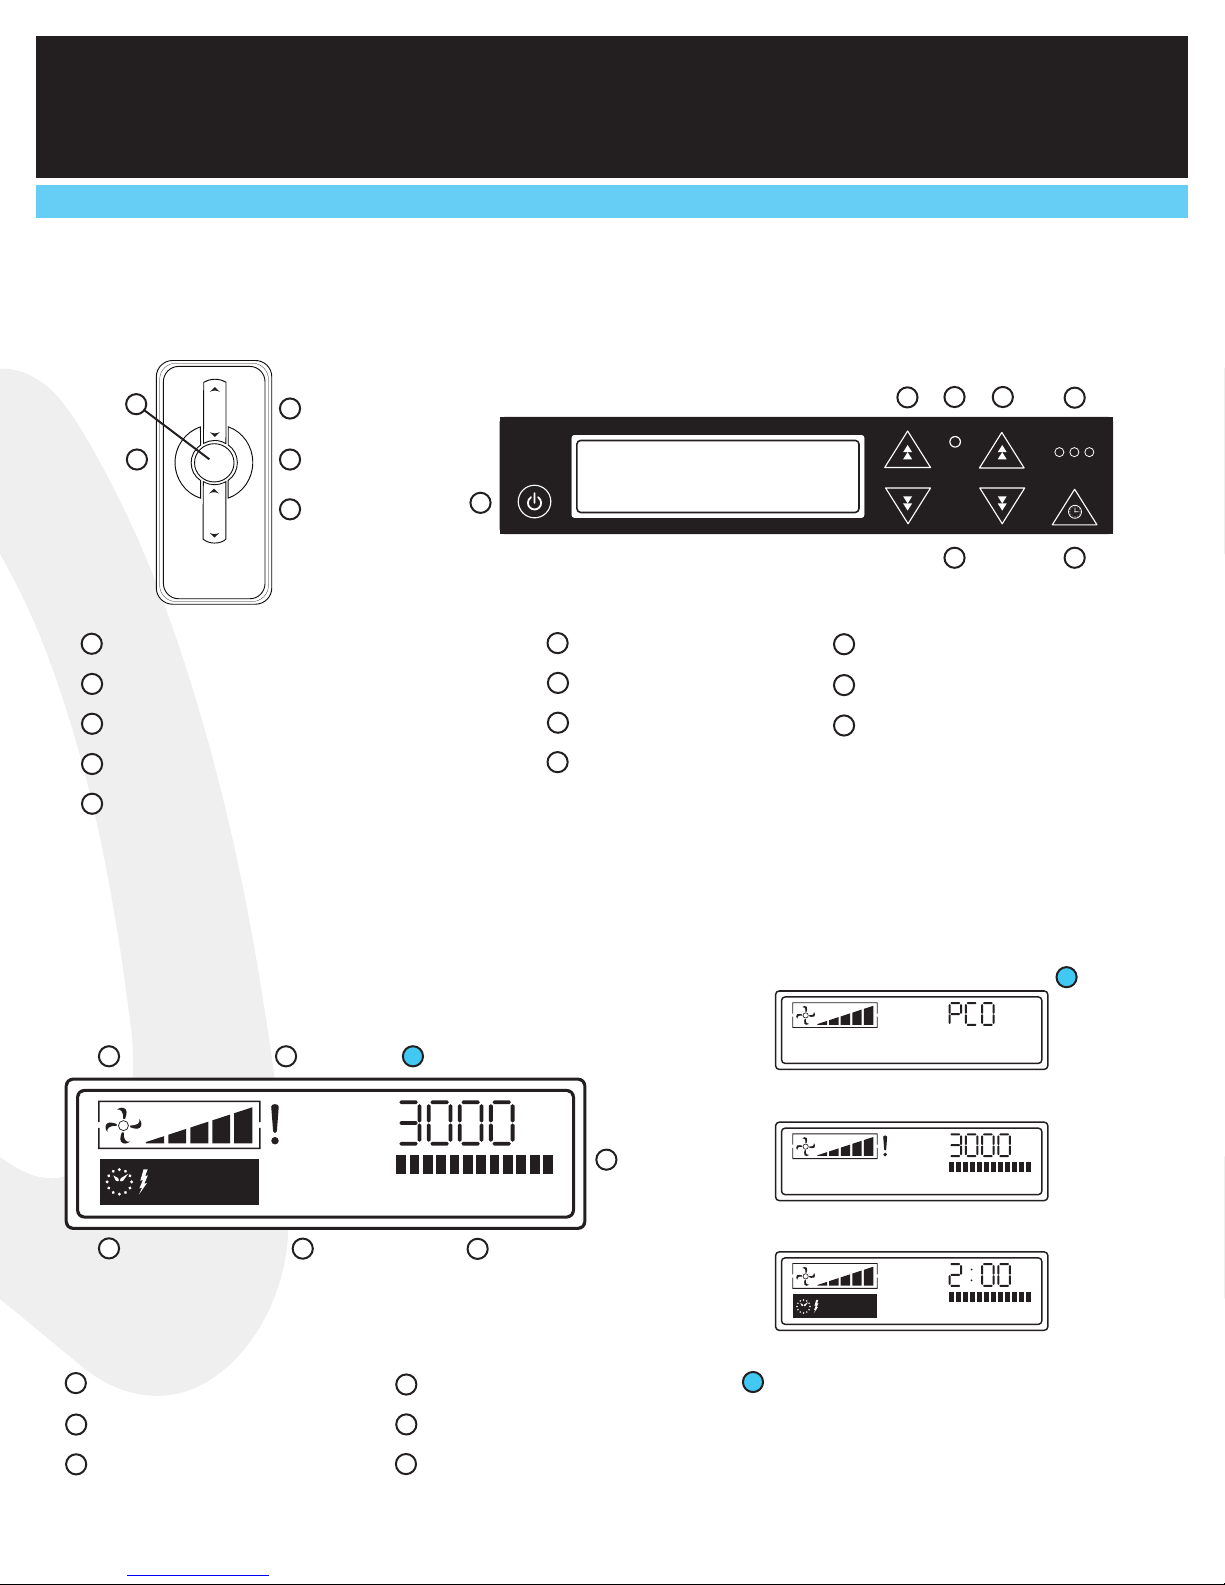
Diagrams (Controls)
Remote
1
2
3
4
5
RESET
FAN
FAN
POWER
PURIFIER
PURIFIER
BOOSTER
2
SANI+
3
4
1
5
Power Button
Fan Level Control
Sani + Booster Control
Purification Level Control
Reset Button
Control Panel
1
POWER
1
Power Button
3
Reminder Reset Button
5
Sani + Booster Level
7
Infrared Receiver
3
2
REMINDER
RESET
FAN
7
2
Fan Speed Control
Purifier Level Control
4
Sani + Booster Toggle
6
4
PURIFIER SANI + BOOSTER
5
I II III
6
Control Panel Screen
1
AREA MUST BE
UNOCCUPIED
7
1
Fan Speed Indicator
4
Mode Indicator
6
Purification Level Indicator
2
PURIFIER SETTING
MUST NOT EXCEED
SIZE OF AREA
REPLACE PLATE
REPLACE PCO CELL
PERFORM CLEANING
6
3
2
FT
NORMAL AWAY
HIGH
5
2
Maintenance Reminders
5
Purification Level Warning
7
Sani + Booster Warning
Mode Specic Display
3
Mode
Normal
4
High
Mode
Away
Mode
AREA MUST BE
UNOCCUPIED
3
Mode Specific Display
Normal - Technology Indicator (PCO)
High - Square Footage Indicator
Away - Mode Duration Indicator (hours:minutes)
PURIFIER SETTING
MUST NOT EXCEED
SIZE OF AREA
NORMAL
HIGH
FT
HRS
AWAY
2
7
Page 8

Setup
Ideal Placement
There are several important factors to consider when selecting a location for your Triad Aer:
• Make sure the location you choose is as far away from the HVAC air return duct as possible. This will ensure that the
purication produced by the Triad Aer is optimally circulated.
• Place the unit on top of something tall such as a bookcase, a shelf or a mounting bracket, leaving only 12 to 24 inches
between the unit and the ceiling.
• To ensure the unit works properly, there should be as much space as possible in front of your Triad Aer so that it can
eciently process the air in the area.
• Never place an operating unit on the oor.
Initial Setting
Before using the unit you will need to nd the area (or square footage) of the environment. To do this accurately, take
into account all connected rooms with open doorways (the purication does not ow readily through closed doors).
The Triad Aer can purify up to 3,000 square feet of space.
For example: Suppose you have a 2500 square foot house. The living room is attached to the kitchen, three bedrooms,
the den and a laundry room. The kitchen and three bedrooms’ doors remain open the majority of the time but the
laundry room and den usually remain closed o from the rest of the house. Together, the laundry room and den have a
combined area of 500 square feet. The area of the environment you would want to set your Triad Aer and purify would
be 2000 square feet.
Once you have determined an ideal location for your unit and calculated the area of the environment:
1. Connect the Power Cord into the unit.
2. Insert the Power Plug into the wall outlet.
3. Turn the unit on and set it to NORMAL mode (see CONTROLS: page 7)
4. Leave the unit on NORMAL mode for at least 24 hours to begin with.
5. After 24 hours, set the unit to HIGH mode and set the square footage to 250 square feet.
6. Gradually increase the square footage setting every 8-12 hours until you reach the accurate square footage of your
area which you calculated in the beginning steps). Note: Using the purier at a setting less than the square footage of
the area being treated is acceptable and may be desirable in an environment relatively free of pollutants.
©Triad Aer 2012: All Rights Reserved
8
Page 9

Operations
Operating the Unit
Turning the Unit On/O
Press the Power Button on the Control Panel or Remote
to turn the unit on. The unit will initially be set to
Normal Mode. Press the Power Button once more to
turn the power o.
Using Normal Mode
Press Normal/High button until “Normal” is shown in
the lower right of the Display.
• Square Footage not available in “Normal”
(see “INITIAL SETUP: Initial Settings” page 8).
• To control the fan speed: Use Fan Up/Down buttons.
Using High Mode
Press the Normal/High button and verify that “High” is
shown in the lower right of the Display.
• To set the square footage on the Display:
• Use Purier Up/Down buttons (see INITIAL SETUP:
Initial Settings” page 8).
• To control the fan speed: Use Fan Up/Down buttons.
CAUTION: Never adjust setting to exceed square
footage of ventilated space being treated.
Using Sani+Booster
Press the Sani+Booster button and verify that “Away”
is shown in the lower right of the Display.
• To set the Sani+Booster Timer: press the Sani+Booster
button. Each press of the Sani+Booster button
increases the running time of the Sani+Booster.
• Select 0:30, 1:00, or 2:00 hours.
Press Sani+Booster once more to switch the
unit back to Normal Mode.
LCD Reminders
Replace Plate
When “Replace Plate” appears, the Purication Plate has
reached the end of its useful life and must be replaced.
To order a replacement, contact your distributor. Once
a replacement has been obtained, follow the instructions
in “DISASSEMBLY/ASSEMBLY” (pages 10-11) to
replace your old Purication Plate with your new one.
Replace PCO Cell
When “Replace PCO Cell” appears, the PCO Cell
has reached the end of its useful life and must
be replaced. Contact your distributor to order a
replacement. Once a replacement has been obtained,
follow the instructions in “DISASSEMBLY/
ASSEMBLY” (pages 10-11) to replace your old
PCO Cell with your new one.
Perform Cleaning
“Perform Cleaning” will display once the 30 day
operation cycle between cleanings has passed and the unit
requires a complete cleaning. Follow the instructions in
“CLEANING” (page 12) then see “Resetting Reminders”
(below) to reset the reminders. The Perform Cleaning
reminder will appear again after 30 day of operation.
Resetting Reminders
After replacing the Purication Plate or the PCO Cell,
the corresponding reminders will reset themselves. After
performing a cleaning of the unit (see “CLEANING” page
12) you should reset the reminders by holding down the
Reminder Reset button on the Control Panel of the unit.
The reminder has been reset when Perform Cleaning no
longer appears.
9
Page 10

Dissassembly
Tools Required
You will need a #2 Phillips screwdriver.
Workspace Recommendations
A countertop or at surface is ideal for disassembling/
assembling your unit. You will need 2 ft. x 3ft. of clean,
accessible workspace. It is recommended to use a small
bowl or cup to hold any screws so they are not lost
during the disassembly/assembly process.
Disassembly Instructions
1. Turn the unit o.
2. Remove the Power Cord from the wall and rear
of the unit.
3. Clean exterior of unit if necessary (see “CLEANING:
Unit Exterior” page 12).
Removing the Rear Cover:
1. Using your screw driver, remove the Rear
Cover Screw from the Rear Cover (above the
Power Cord Port). Place the Rear Cover Screw
where you will nd it easily during reassembly.
Removing the Purication Plate:
Grasp the Purification Plate on the ceramic and gently
pull it out of the grooves on the sides. Clean (see
“CLEANING: Purification Plate” page 12) and set the
Purification Plate aside.
Removing the PCO Cell:
1. Locate the PCO Cell Power Connector on the right
of the rear of the unit (beside the Purication Plate
slot). Squeeze the tabs on the top and bottom of the
PCO Cell Power Connector and pull gently until
free from the PCO Cell Power Connector Outlet.
2. Remove the Thumb Nuts from the Screw Posts on the
right and left below the PCO Cell. Place the Thumb Nuts
where you will nd them easily during reassembly.
3. Gently slide the PCO Cell out of the unit. Clean
(see “CLEANING: PCO Cell” page 12) and set the
PCO Cell aside. Clean the interior of the unit (see
“CLEANING: Unit Interior” page 12).
2. Squeeze the tabs on both sides of the Rear Cover
(where the grooves are) until they release and tilt
the Rear Cover upwards until the top tab releases.
Clean with compressed air or a damp cloth.
Set the Rear Cover aside.
Removing the Filter Assembly:
1. Remove Brass Thumbscrews from the top corners
of the Filter Assembly. Place Brass Thumbscrews
where you will nd them easily during reassembly.
2. Grasp the top of the Filter Assembly and tilt away from
the unit. Clean if necessary (see “CLEANING: Filter
Assembly” page 12) and set the Filter Assembly aside.
©Triad Aer 2012: All Rights Reserved
10
Page 11

Assembly
Tools Required
You will need a #2 Phillips screwdriver.
Installing the PCO CELL:
1. Position the PCO Cell inside the unit so that the
two tabs are on the bottom (and interior side) of
the PCO Cell. Ensure the holes in the two tabs
t over the two Screw Posts. Screw the Thumb
Nuts onto the Screw Posts until they are snug.
2. Align the PCO Cell Power Connector to the PCO Cell
Power Connector Outlet and insert gently until the
tabs at the top and bottom of the PCO Cell Power
Connector snap into place, holding it in the PCO Cell
Power Connector Outlet.
Installing the PURIFICATION PLATE:
Holding the Purication Plate by the ceramic, slowly
insert it into the Purication Plate Slot, ensuring that the
Purication Plate is sliding into the grooves on either side.
NOTE: About halfway in, the Purication Plate Connectors
are parted. Continue sliding the Purication Plate into the
Purication Plate Slot until there is approximately one inch
of the Purication Plate remaining outside of the Purication
Plate Slot and signicant resistance is met. Be careful not
to force the Purication Plate further into the Purication
Plate Slot as this could seriously damage your unit.
Installing the FILTER ASSEMBLY:
1. Hold the Filter Assembly with the larger at side
facing the interior of the unit. A sticker reading,
“Caution: Reinstall Filter After Cleaning,” is located on
the opposite side of the Filter Assembly. This sticker
should be visible when you install the Filter Assembly.
2. Insert the bottom of the Filter Assembly into
the tabs on the rear of the unit and then seat the
Filter Assembly on the rear of the unit. (NOTE:
If the user fails to insert the Filter Assembly
into the tabs appropriately, disassembling the
unit in the future could be extremely dicult.)
3. Screw the two Brass Thumbscrews into their holes at the
top corners of the Filter Assembly.
Installing the Rear Cover:
1. Place the tab at the top of the Rear Cover into the hole
at the top of the Filter Assembly then lay the Rear
Cover at against the rear of the unit until the tabs on
the sides of the Rear Cover click into place on the unit.
2. Carefully insert the Rear Cover Screw into its hole
on the Rear Cover (above the Power Cord Port)
and tighten.
Installing the POWER CORD:
1. Insert the Power Adapter Plug into the rear of the unit.
2. Ensure the Power Cord is properly connected to the
Power Adapter.
3. Insert the Power Plug into a wall outlet.
Turning the unit on:
Press the power button.
Ensure that the unit’s settings are adjusted to suit the
environment (see “Operations” on page 9).
11
Page 12

Cleaning
Your unit should be cleaned monthly to be kept running at peak performance, but depending upon the
pollution or odor levels present during initial setup, it is advisable to clean the unit more frequently
(weekly or bi-weekly) until the environment has been treated.
Cleaning the Unit (Exterior):
Wipe down the exterior with a damp cloth or use compressed
air or a vacuum cleaner to remove dust. Use an alcoholbased cleaning product to clean the surfaces of your unit.
Cleaning the Filter Assembly
You may use clean water or compressed air to clean
your Filter Assembly once it has been disassembled (see
“Disassembly: Removing the Filter Assembly”).
Cleaning the Ionization Needle
Using a cotton applicator (Q-tip), apply a small amount
of clear alcohol-based cleaner (or rubbing alcohol) to
the Ionization Needle. You may also use compressed
air to blow o any dust that may accumulate near
the ionization needle.
Cleaning the PCO Cell
Using a compressed air or a vacuum cleaner, blow and/or
vacuum the dust out of the PCO Cell. Do not use any liquid
to clean the PCO Cell.
Cleaning the Purication Plate
Using a 50/50 mix of warm water and clear ammonia
(100% white vinegar can be used in place of water and
ammonia), soak the Purication Plate for 8-10 hours
but do not exceed 12 hours. Using a soft-bristle brush,
scrub the wire mesh to remove debris lodged inside the
mesh. Rinse thoroughly. Allow the purication plate to
dry completely before reinstalling. After reinstalling, use
a soft cloth and rubbing alcohol to clean the contacts on
the interior of the unit that touch the Purication Plate.
Cleaning the Unit (Interior)
Using a damp cloth, a clear alcohol-based cleaner, compressed air or a vacuum cleaner, carefully clean the walls and
components inside of the unit only after completing the Disassembly procedures.
©Triad Aer 2012: All Rights Reserved
12
Page 13

Troubleshooting
The Unit Fails to Turn On
1. Verify that the Power Plug is plugged into an operational wall outlet.
2. Ensure that the Power Adapter Plug is fully seated in the receptacle on the back of the unit.
3. Verify the Power Button has been activated on the Control Panel.
4. If the Power Button on the Control Panel fails, use the Power Button on the Remote Control. If the Control Panel fails, contact
your Triad Aer distributor.
The Unit is Operating in High Mode or Away Mode, but No Noticeable Purication is Being Produced
1. Ensure that the Purication Plate is clean (see “CLEANING: Purication Plate” page 12).
2. The Purication Plate may not be working because it needs to be replaced. Try installing a new Purication Plate.
3. Check the electrical contact arms which touch the plate to ensure that they are making proper contact with the metal weave on
the Purication Plate.
4. Ensure the electrical contact arms which touch the plate are clean. Clean them with a soft cloth and rubbing alcohol.
5. Turn the lights o in the room and look through the Front Grille at the Purication Plate. If it is operating properly, it will
produce a dim purple glow.
The Purication Plate Generates an Electrical Arc, an Arcing Noise or a Burning Odor
1. This means the Purication Plate is damaged and must be replaced. The unit may or may not display the Replace Plate LCD
reminder. To order a replacement, contact your Triad Aer distributor.
The PCO Cell is Not Lighting Up:
1. Ensure the PCO Cell Power Connector is properly seated in the PCO Cell Power Connector Outlet
(see “DISASSEMBLY/ASSEMBLY” pages 10-11).
2. If the PCO still fails to operate, it needs to be replaced. Contact your Triad Aer distributor.
The Ionization Needle Creates an Electrical Arc:
1. The Ionization Needle needs to be cleaned (see “CLEANING: Ionization Needle” page 12). Be sure to complete all of the cleaning
procedures (see “CLEANING” page 12) every 30 days of operation.
The Fan Does Not Operate Properly:
1. Try adjusting the fan speed using the Control Panel or Remote Control.
2. If the Fan continues to operate improperly or not at all, contact your Triad Aer distributor.
The Unit Makes a Rattling Noise When Taken Out of Packaging
1. Remove the back panel of the unit (see “DISASSEMBLY/ASSEMBLY” pages 10-11). Check to ensure the two brass Thumb
Screws holding the Filter Assembly are in their proper place. If they are properly installed, remove the Thumb Screws and
Filter Assembly (see “DISASSEMBLY/ASSEMBLY” pages 10-11) and check the PCO Cell to ensure the two brass Thumb Screws
securing the PCO Cell are installed properly.
13
Page 14

Notes
©Triad Aer 2012: All Rights Reserved
14
Page 15

Notes
15
Page 16

Copyright © Triad Aer - Triad Aer OM v1 (120118)
 Loading...