

Page 1
Menu Control:
Menu changes are temporary, do not change
from defaults.
Temporary volume adjustment default: 0 dB
Sub low pass filter default: 130 Hz
Sub low pass slope default: 24 dB/Octave
Preset selection default: Flat
Display Brightness default: Medium
TRIAD SPEAKERS
XXX DSP VER. XX
E
IR Input - For daisy chaining multiple amps only, using cables with 3.5
mm plugs. Plugged Input disables front panel IR eye.
Do NOT feed IR Input from IR distribution.
Triad DesignerSeries Products - Quick Start Guide
2014.03.18
Specifications: (Note: Frequency Response may vary with wall construction or finish)
Applicable Models Dimensions Frequency Response Sensitivity Max Power (Cont) Sub Crossover Freq Impedance
DSi-1 15-3/4x11-7/8x1-5/8in; 40x30x4cm 112 Hz - 20 kHz 83 dB 15 Watts per ch 125Hz 8 ohms
DSi-2dc (2ch) (Prelim) 15-3/4x11-7/8x1-5/8in; 40x30x4cm 112 Hz - 20 kHz 83 dB 2x15 Watts per panel 125Hz 8 ohms/ch
DSi-3 15-3/4x11-7/8x1-5/8in; 40x30x4cm 112 Hz - 20 kHz 84 dB 30 Watts per ch 125Hz 8 ohms
DS100se 17-3/4x13-5/8x1-5/8in; 45x35.5x4cm 105 Hz - 20 kHz 83 dB 15 Watts per ch 120Hz 8 ohms
DS100sen 17-3/4x7-7/8x1-5/8in; 45x35.5x4cm 130 Hz - 20 kHz 85 dB 15 Watts per ch 130Hz 8 ohms
DS200dc (2ch) 17-3/4x13-5/8x1-5/8in; 45x35.5x4cm 100 Hz - 20 kHz 85 dB 2x15 Watts per panel 120Hz 8 ohms/ch
DS300se 17-3/4x13-5/8x1-5/8in; 45x35.5x4cm 105 Hz - 20 kHz 85 dB 30 Watts per ch 110Hz 8 ohms
DS300sen 17-3/4x7-7/8x1-5/8in; 45x20.5x4cm 130 Hz - 20 kHz 85 dB 30 Watts per ch 130Hz 8 ohms
DS400dc (2ch) 17-3/4x13-5/8x1-5/8in; 45x35.5x4cm 100 Hz - 20 kHz 88 dB 2x30 Watts per panel 120Hz 8 ohms/ch
DS500se 17-3/4x13-5/8x1-5/8in; 45x35.5x4cm 105 Hz - 20 kHz 87 dB 50 Watts per ch 105Hz 4 ohms
Important Installation Information!
* DSB (Regular and Narrow) & DSi-B BackBoxes - provides some sound isolation to the adjoining area. While optional for stud walls, they are STRONGLY RECOMMENDED, especially for interior
walls. BackBoxes are NOT new construction brackets: All DesignerSeries speakers are designed to be installed after drywall is hung.
* DSSW & DSi-SW SolidWall BackBoxes (Regular and Narrow) - are required for solid structures. They do NOT isolate sound to adjoining living areas. See installation instructions packed with each BackBox.
For other installation types see complete product installation manual online at www.triadspeakers.com/support.html.
All DS Speakers Must Be Used with HPF-2 or HPF-8 High Pass Filter/Current Limiter located at the amplifier to protect the speaker and validate the warranty.
Before Installing DesignerSeries Speakers, ensure that the building is environmentally sealed, dehumidified, and at stable temperature between 61 degrees F (16 C) & 95 degrees F (35C). Use only
with quick drying drywall compound (hours, not days). Do not install when humidity is high or environment is moist.
North American Limited Warranty
Triad speakers are warranted to be free from defects in manufacturing and workmanship (10) years when operated under normal conditions and installed as recommended.
Should any such defects occur within the warranty period call Triad Service at 1-877-264-6315 for an RA (Return Authorization) number. Return the product in intact factory
packaging with RA number clearly visible on outside of box and proof & date of purchase inside to:
Triad Speakers Inc., 15835 NE Cameron Blvd., Portland, Oregon 97230 USA
Triad is not responsible for any shipping damage coming in to Triad. If you do not have intact factory packaging, contact your dealer or Triad Service for purchase. At our discretion
we will repair or replace the product and return it free of charge. International customers should contact their dealer for service. This limited warranty is extended only to Triad
products and is expressly in lieu of all other warranties expressed or implied.
Triad DesignerSeries Speakers
Triad's DesignerSeries speaker panels use revolutionary "Diffuse Source", Opti Damping", & "Opti Drive" technologies to create clear, clean, intelligible sound from invisible speakers. Unlike traditional cone speakers, DesignerSeries panels create sound using age-old musical instrument principles (think guitar). We replace the strings with a powerful electrical
tuning fork called an Exciter and the instrument body with a strong, light, aircraft grade honeycomb panel durable enough for walls & ceilings. The result? Incredibly natural sound.
Installed as instructed (see overleaf), DesignerSeries speakers are completely sealed and suitable for wet humid areas such as pools or bathrooms as long as the wall’s interior is
dry. They work especially well where uniform coverage and even volume levels are desired, such as surround channels and distributed audio. Installed vertically or horizontally,
their unique dispersion is perfect for locations where traditional speakers suffer, e.g. high on a wall well above listening or artwork heights or even in the ceiling. Built robust for the
long term, DesignerSeries speakers include an HPF-2 or 8 protection unit (depending on model & # of speakers) located at the amp to protect the panels from amplifier damage.
Triad DesignerSeries speakers offer Integrators & Designers a world class sounding speaker with no compromise to the interior design of any living space.
Built robust for the long term, DesignerSeries speakers include a protection unit, HPF-2 or 8 (depending on # of speakers used), located at the amp, for protection from amplifier
damage. Triad DesignerSeries speakers offer Integrators & Designers a world class sounding speaker with no compromise to the interior design of any living space.
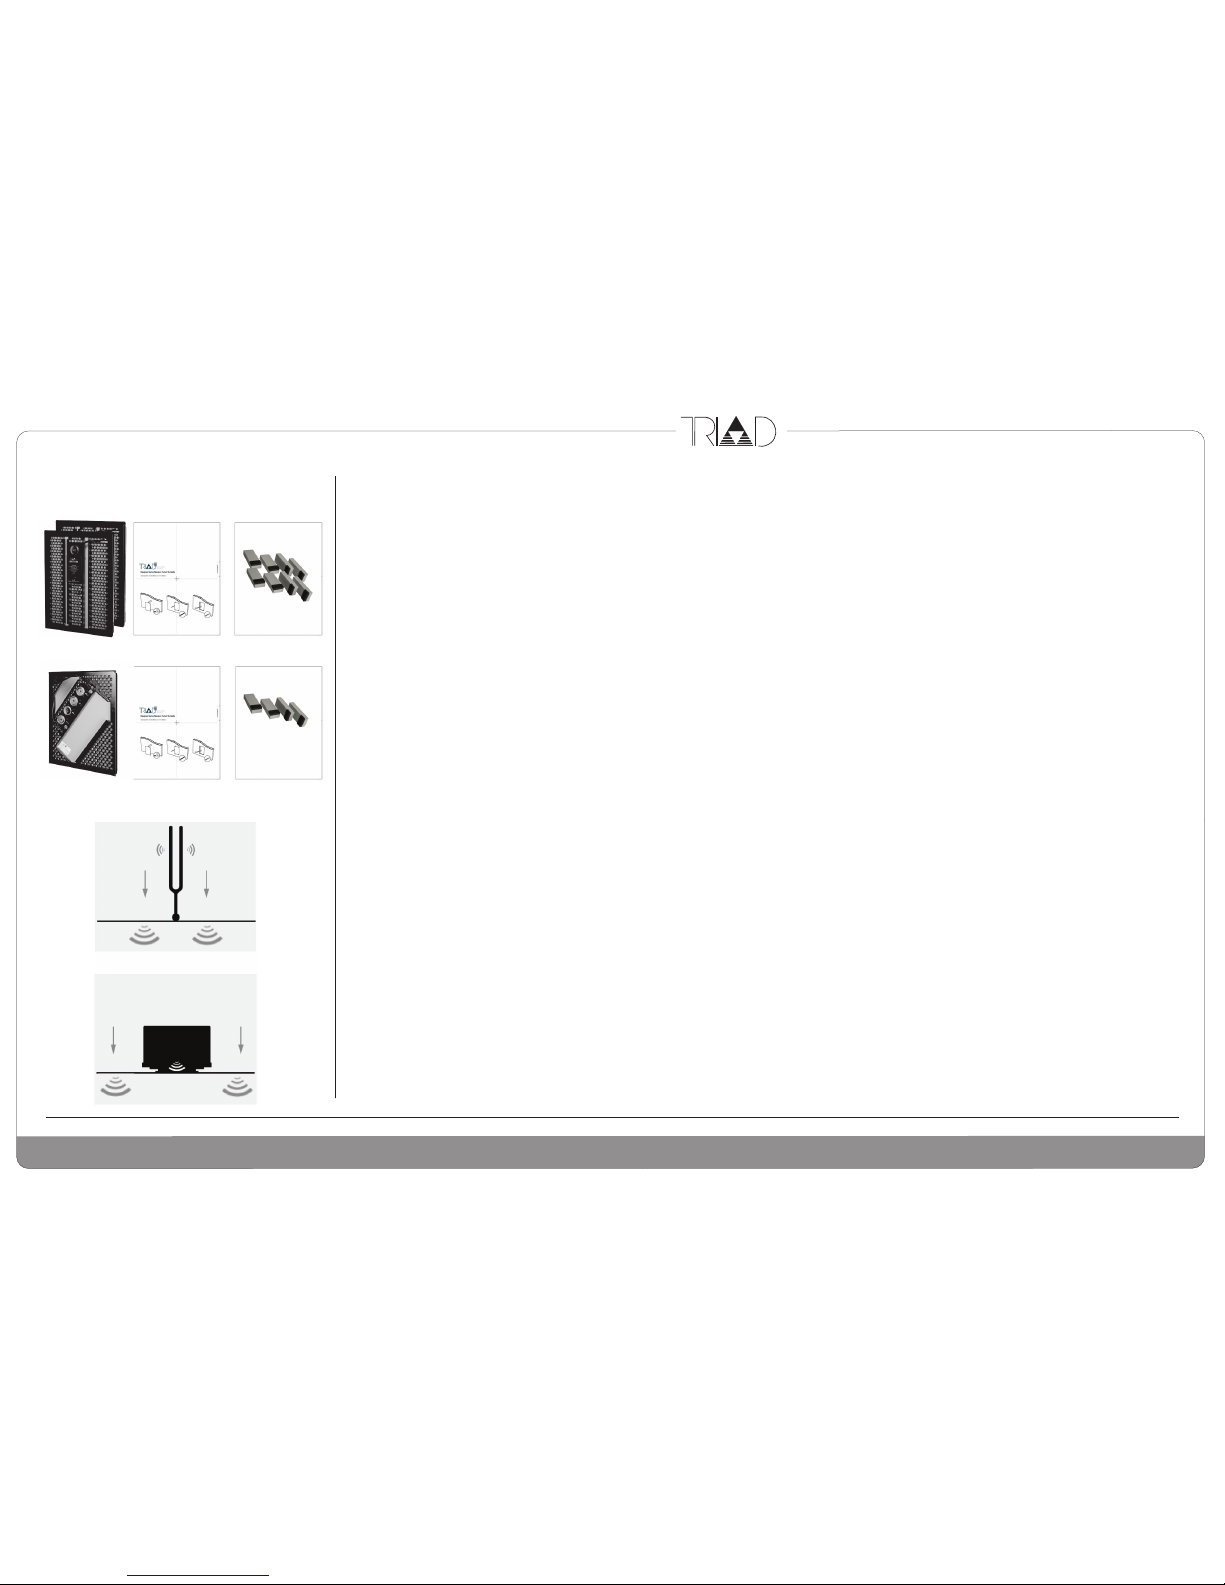
Unpacking / Contents
TriadSpeakers.com • Sales: 1800-666-6316
DesignerSeries
- Product Info & Warranty - Page 1
DSi-1, DSi-3, DS100se, DS300se, DS300sen, DS500se, speaker models
Speaker Panels Cutout Template Installation Lugs
DSi-2, DS200dc, DS400dc dual channel speaker models
Tuning Fork:
Triad DesignerSeries Exciter:
(For installs
without Backboxes)
Page 2
Menu Control:
Menu changes are temporary, do not change
from defaults.
Temporary volume adjustment default: 0 dB
Sub low pass filter default: 130 Hz
Sub low pass slope default: 24 dB/Octave
Preset selection default: Flat
Display Brightness default: Medium
TRIAD SPEAKERS
XXX DSP VER. XX
E
IR Input - For daisy chaining multiple amps only, using cables with 3.5
mm plugs. Plugged Input disables front panel IR eye.
Do NOT feed IR Input from IR distribution.
Triad DesignerSeries Products - Quick Start Guide
2014.03.18
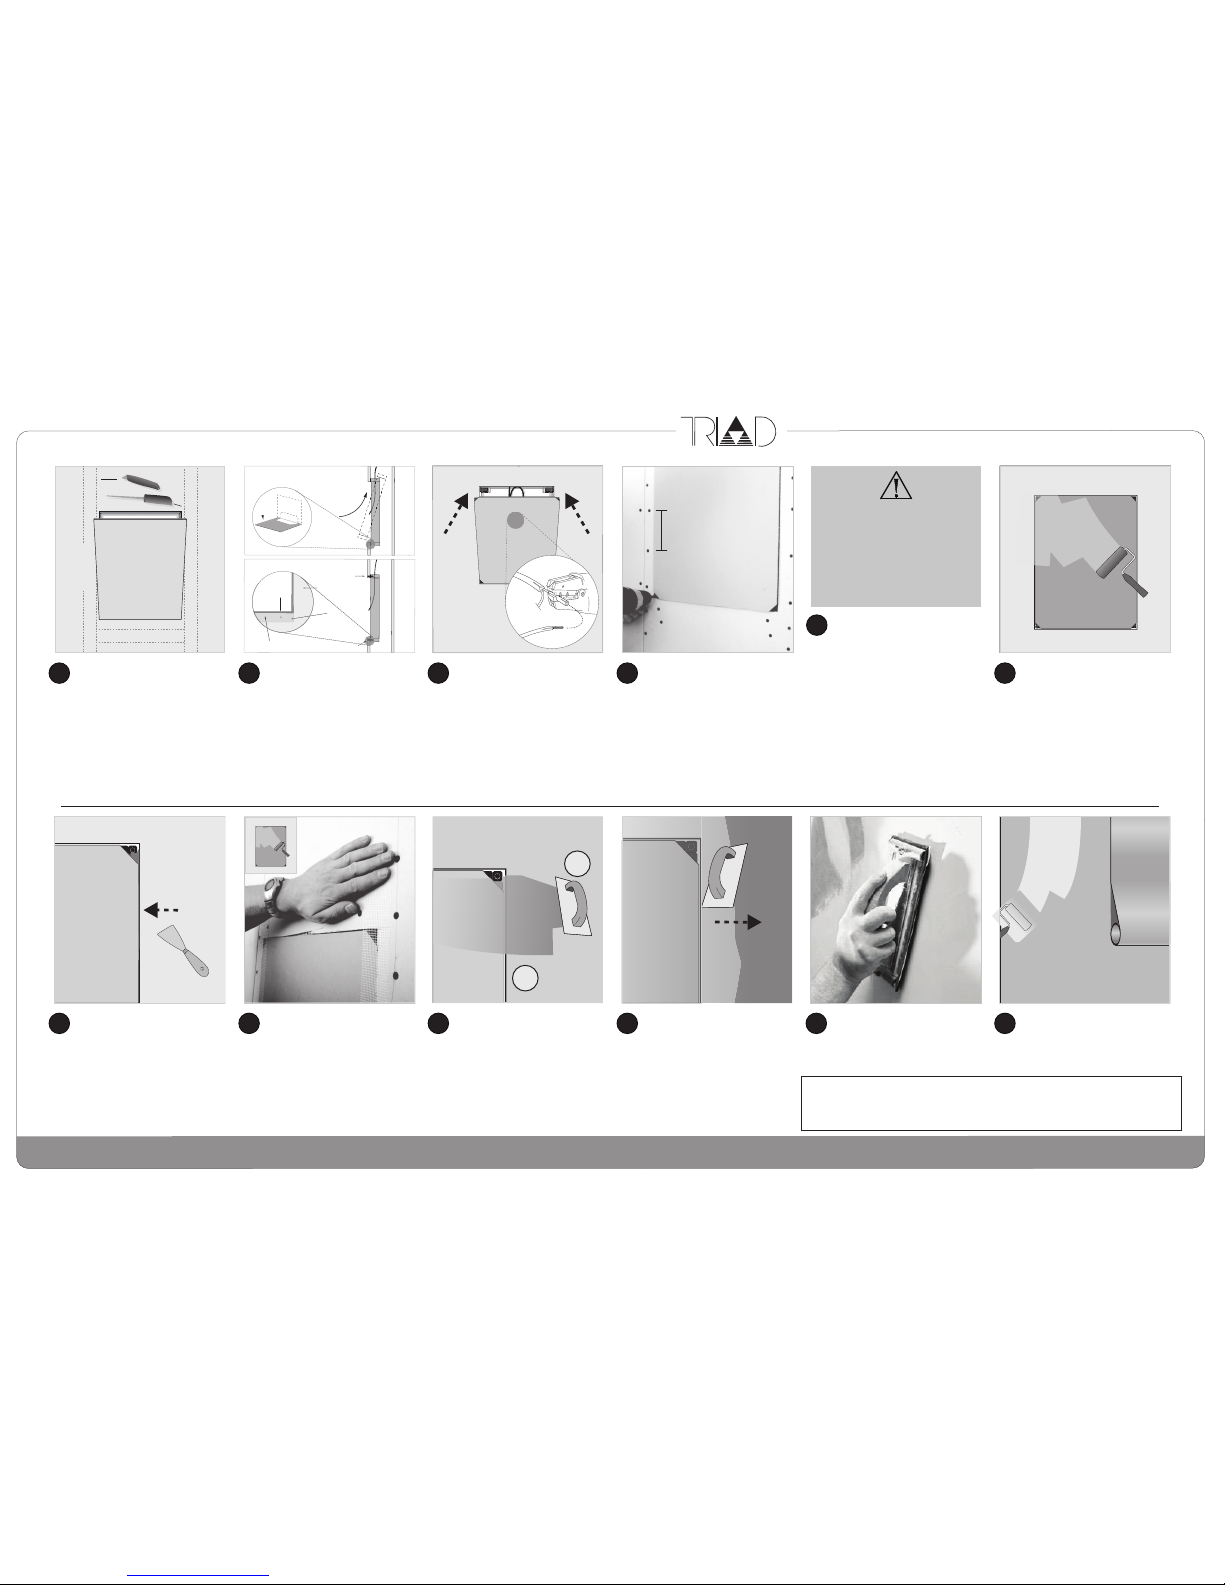
01) Pull speaker cable through grommet
at top of BackBox (BB). Slide BB top up
into cavity. Pull 2 tabs out to 90 degrees.
Sit bottom tab on drywall.
02) Securely fit BB to drywall with 4
drywall screws per end through drywall
into BB. Foam strips should be visible on
all 4 BB edges. For drywall less than1/2"
(12.5mm), adhere shims to BB’s top &
bottom metal facings.
A
C
B
D
E
F
DesignerSeries - Installation Instructions - Page 2
Confirm there is sufficient clearance
between studs. Using template
provided, cut hole with sharp knife or
sheetrock saw. Confirm that panel fits
hole, leaving a gap of 1/16" - 1/8"
(2 -3mm) all around.
With provided self-tapping screws secure
panel to BackBox through holes in each
corner. Adjust screw depth to ensure panel
is even and slightly recessed 1/16” to 5/64”
(1 to 2 mm) so there will be no more than
2mm total finish material on panel when
wall is completed. Use shims if necessary.
Add more screws to both studs flanking
the panel, with no more than 3” (76mm)
between screws.
Check panel fit. Crimp speaker cable to
speaker's blue butt splice crimp connectors (for 16-14 AWG speaker wire) with
quality crimping tool. Set speaker in
place, making sure cable does not touch
the back of the speaker (to avoid
buzzing).
Prime speaker surface with thin coat
of Drywall Primer containing PVA
(Polyvinyl Acetate) e.g. Glidden DryWall
Primer @ Home Depot, Sherwin
Williams ProMar 200 or 400 Wall Primer.
Test 1: With multimeter, check impedance of each speaker & cable at amp
end. If not 8 ohms or a bit higher
(4 ohms for 500se), check cable &
connections for shorts or breaks.
Test 2: Connect basic system: source,
HPF-2 or HPF-8 filter at the amp, & one
speaker at a time. At medium volume
(4-5Vrms), play tone sweep or music
with a wide bass range (Do not judge
speaker sound quality yet). If you hear
distortion, buzzing, or rattles, remove
panels, fix, & retest.
Apply 2nd thin coat of Drywall Primer
with PVA to panel & adjacent wall
surface to be refinished. While tacky,
place mesh or prewetted paper tape
overlapping gaps between speaker
panel and drywall.
G
I
H
J
L
With putty knife, fill the
1/16”-1/8” (2mm max) gap between
speaker and surrounding sheetrock with
joint compound. Let dry thoroughly –
overnight if possible.
With blade, apply final thin coat of compound,
skimming across the speaker and blending
with the drywall finish. Keep total of both
compound coats on the speaker under 5/64”
(2mm). Let dry. (The environment should
be dry enough to let the joint compound
dry within hours, not days).
1) While Drywall Primer is still tacky, with a
blade apply thin scratch coat (max 1/16”/1.5mm)
of quick-dry drywall compound over entire
panel, overlapping drywall.
2) When dry, sand or scrape any protruding
or uneven areas with 100 grit sanding
block or medium drywall screen.
Complete wall finish.
K
Sand smooth and feather using 120 grit sanding
block. A second skimcoat is needed when
retrofitting panels in an allready finished wall.
*DSB Stud Wall BackBox (BB) increases sound isolation for adjoining areas. While optional for stud walls,
it is STRONGLY RECOMMENDED, especially for interior walls adjoining living spaces. BB’s should always
be installed after drywall is hung; they are NOT new construction brackets. When BB’s are not used, use
included Installation Lugs. SolidWall BackBoxes are required for solid wall installs. They do NOT provide
sound isolation to adjoining living areas. See installation instructions packed with each BackBox.
** For other install types, see additional product installation manuals online at www.triadspeakers.com.
New Construction and Retrofit Installations Using Stud Wall BackBox*
sharp knife
sheetrock saw
IMPORTANT
TEST SYSTEM
NOW!
AT LOW TO MODERATE
VOLUME LEVELS
01)
02)
Fixing screw
Fixing screw
Side View
Side View
Plasterboard
Backbox
Mounting
Lip
Fixing screw
Front View
x2
Leave
1/16”-1/8”
gap all
around
panel!
Max 3 inches
1
2
 Loading...