

Page 1

STAR OCEAN™
TILL THE END OF TIME™
Twelve heroes thwarted the Ten Wise Men’s plot to destroy the universe. Four hundred years have
since passed…
The time is SD 772. The Pangalactic Federation is at the zenith of its might, with unparalleled power in
the universe. Having already explored one third of the Milky Way, the Federation continues research in
its insatiable quest for even more power.
The young Earthling Fayt Leingod and his family visit Hyda IV, a resort planet in the Kappa Sector. His
parents lead busy lives as premier authorities on symbological genetics. With their first extended
break in some time, they have decided to take a family trip. Fayt is far from enthusiastic, but his
childhood friend Sophia Esteed pesters him into going along. Despite his complaints, Fayt enjoys the
trip in his own way; it gives him the chance to escape his studies and play battle simulator games to
his heart’s content.
Fayt strolls around the hotel and plays the battle simulator with Sophia while his parents relax on the
beach. This tranquility is abruptly shattered when an unknown military space force attacks Hyda IV. The
assault leaves buildings destroyed and the resort’s natural surroundings in ruins. Amidst the chaos,
Fayt attempts to escape with Sophia and the other resort guests to an emergency shelter, joining his
parents along the way. But even their escape route falls under attack. Fayt manages to reach the
shelter, but he is separated from Robert and Ryoko, his parents…
Page 2
GETTING STARTED
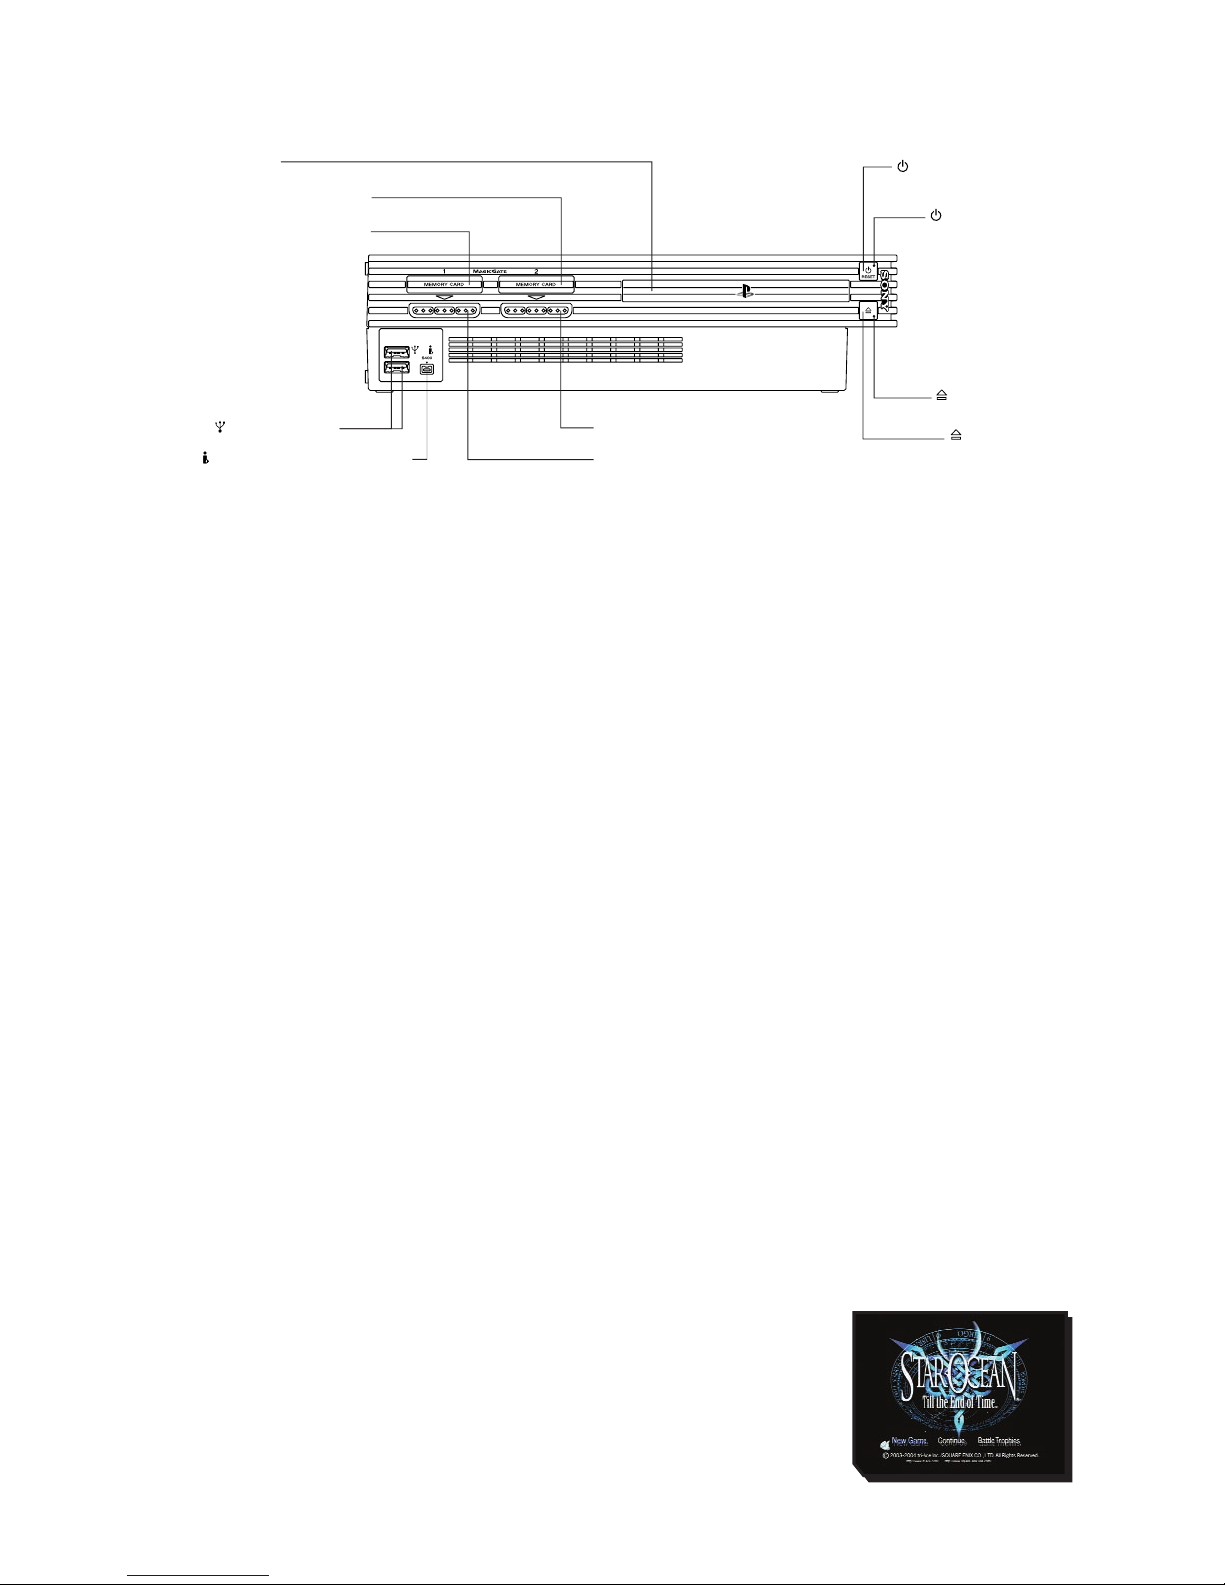
Set up your PlayStation®2 computer entertainment system according to the instructions in its
instruction manual. Make sure the MAIN POWER switch (located on the back of the console) is turned
off. BEFORE you switch your console on, connect an analog controller (DUALSHOCK®2) to controller
port 1, and other peripherals as appropriate. It is advised that you do not insert or remove peripherals
once the power is turned on.
Now turn the console ON at the MAIN POWER switch and press the 3/RESET button. When the
3
indicator lights up green, press the 4button and the disc tray will open. Place the STAR OCEAN
™
TILL THE END OF TIME™disc in the disc tray with the label side facing up. Press the 4button again
and the disc tray will close. Finally, press the 3/RESET button again before commencing play.
PLEASE NOTE: The information in this manual was correct at the time of going to print, but some
minor changes may have been made late in the game’s development and some screenshots might have
been taken from pre-completion screens that differ slightly from those in the finished game.
MEMORY CARD (8MB) (FOR PLAYSTATION®2)
PLEASE NOTE: Throughout this manual, the term "Memory Card" is used to describe the memory card
(8MB) (for PlayStation®2) - (SCPH-10020 E). Memory Cards (product code SCPH-1020 E) designed for
use with the PlayStation® format software are not compatible with this game.
To save/load game settings and progress, insert a memory card (8MB) (for PlayStation®2) into MEMORY
CARD slot 1 of your PlayStation®2 computer entertainment system. The player will need at least 175KB
of free space on a Memory Card to save the game data. You will need an additional 1,200KB of free
space to collect Battle Trophies.
START MENU
Getting Started and the Start Menu
The title screen and start menu will appear when the ÷button is pressed during the intro, or when
the intro has finished playing. Select an option with the left analog stick or directional buttons, then
press the Sbutton.
• If you are playing the game for the first time, please start from Disc 1. See
BEGINNING A GAME section for more information.
disc tray
controller port 1
controller port 2
MEMORY CARD slot 1
MEMORY CARD slot 2
/RESET button
indicator
indicator
USB connectors
i.LINK (IEEE1394) connector
button
Page 3
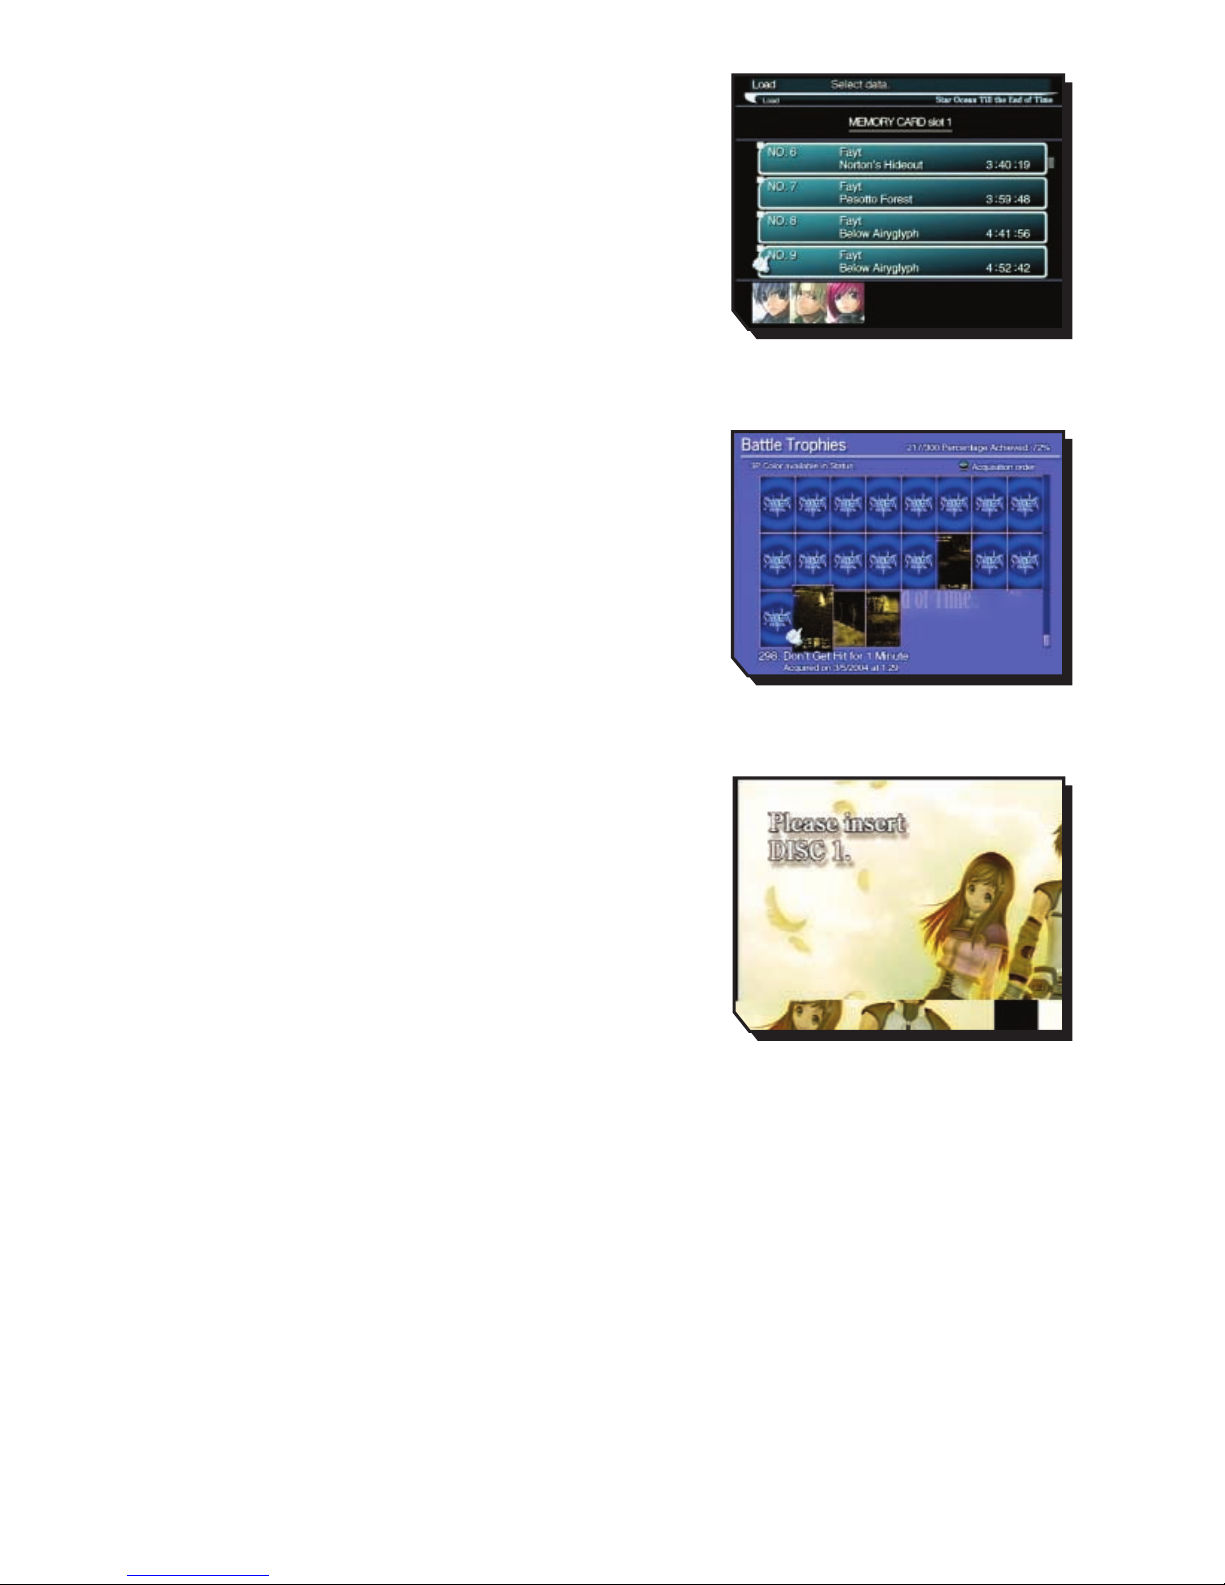
New Game / Continue
Select "New Game" to start the game from the beginning. The
game will begin after you have configured your initial settings.
To continue from where you left off, select "Continue". Select
the game data you want to load to resume your adventure.
Battle Trophies
After meeting certain conditions in the game, you can select
"Battle Trophies" from the start menu. When selecting
Alternative Player Colors, please load "Battle Trophies" first.
Save your game data if you wish to keep that Color.
Changing Discs
An image like the one shown on the right will appear when you
need to change discs during the game. Please follow the onscreen instructions when changing discs. Do not change discs
at any other time.
• Please do not insert any discs that are incompatible with the
PlayStation®2. Refer to your PlayStation®2 Instruction
Manual for more information on compatible discs.
Page 4
BASIC CONTROLS
ANALOG CONTROLLER (DUALSHOCK®2)
CONFIGURATIONS
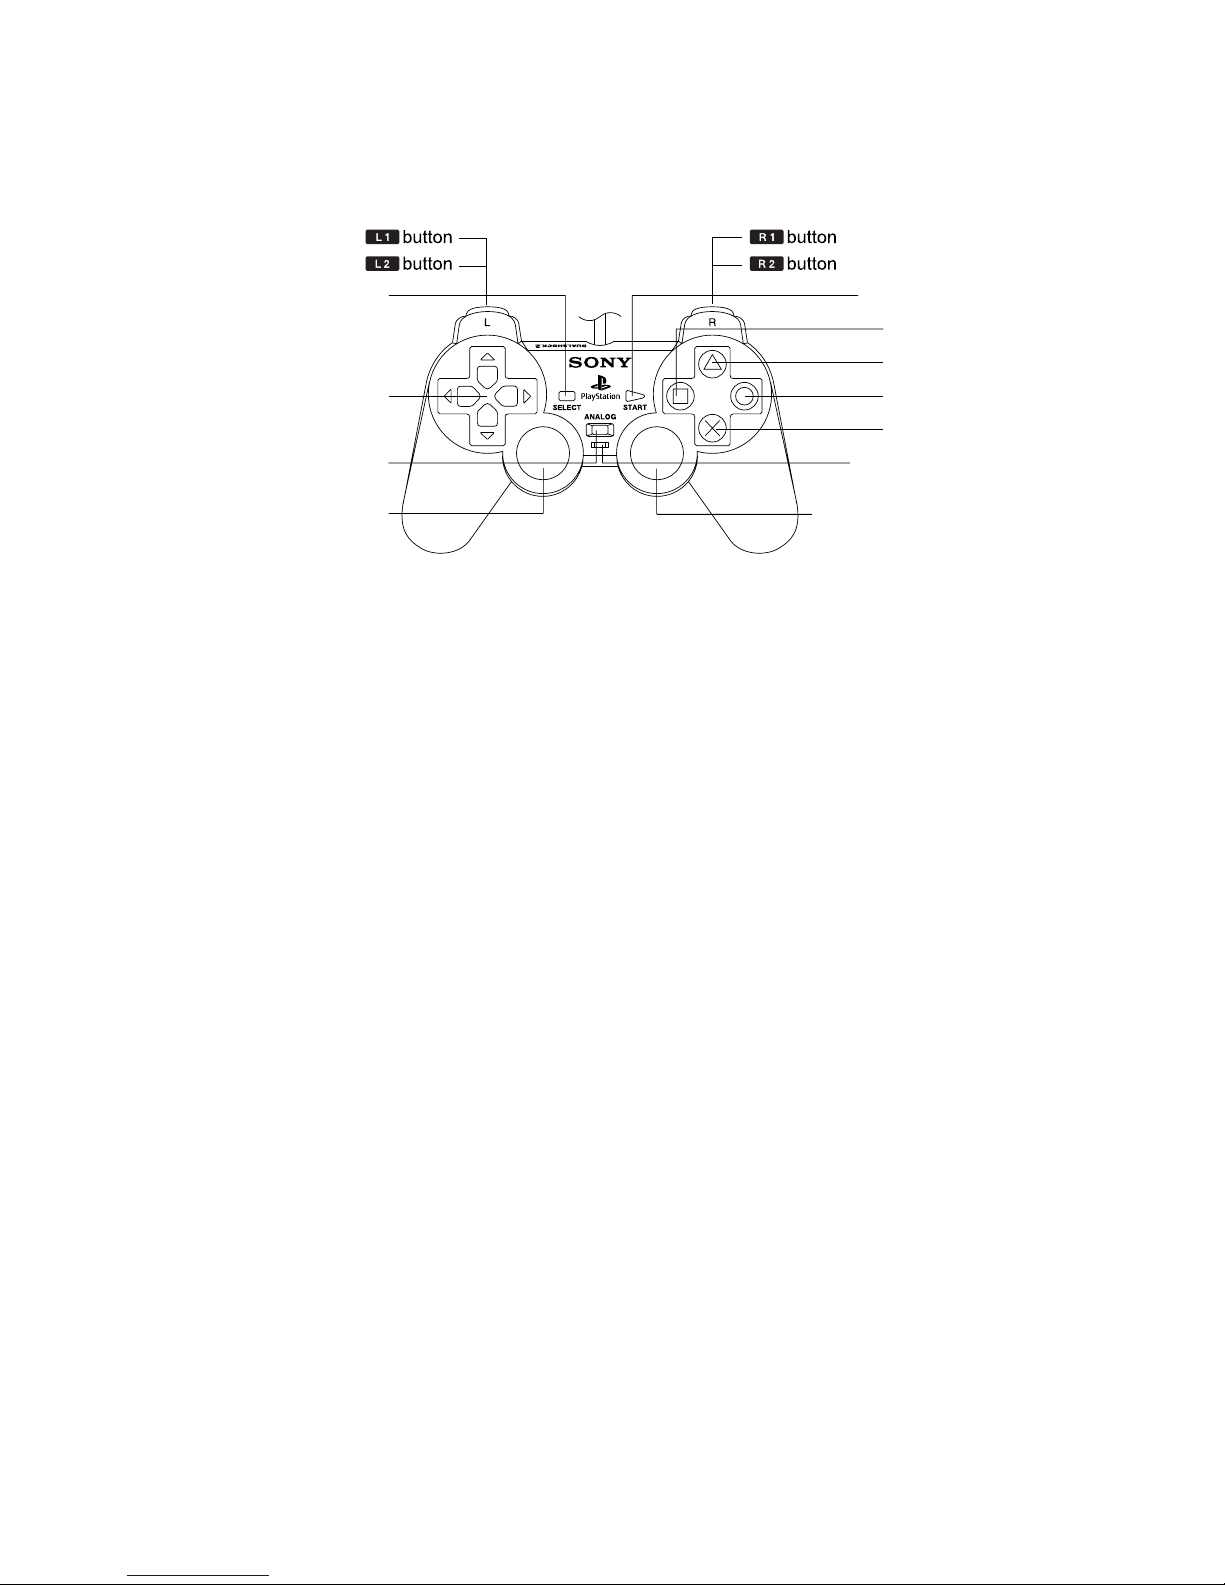
This software can only be used with the DUALSHOCK®2 analog controller. This section explains
controller components and basic controls. Controls will vary depending on whether you are in the
field/towns, in battle, or in the Main Menu (also referred to as Camp menu). Please see details below.
• To turn the vibration function on or off, select "Config" from the Main Menu or select "New Game" at
the title screen.
CONTROLS IN FIELDS/TOWNS/DUNGEONS
left analog stick Move character (run)
Directional buttons Move character (run)
button Examine / Talk
A
button Hold down while moving with the left analog stick or
directional buttons to walk
D
button Open Main Menu
F
button Used in conjunction with disintegrable objects -
Q
button Turn camera anti-clockwise
E
button Turn camera clockwise
W
button Not used
R
button Display, enlarge or hide map
÷
button Return camera to default angle
≥
button Not used
÷ button
≥ button
directional
buttons
D button
A button
S button
F button
ANALOG mode button
mode indicator
left analog stick
(L3 button when
pushed down)
Right analog stick
(R3 button when
pushed down)
Page 5

BATTLE CONTROLS
(SEE BATTLES SECTION FOR MORE DETAILS)
left analog stick Move character / Sidestep / Select command (in Battle Menu)
Directional buttons Move character / Sidestep / Select command (in Battle Menu)
S
button Execute minor attack / Confirm selection (in Battle Menu)
A
button Execute major attack / Cancel selection (in Battle Menu)
D
button Open Battle Menu
F
button Switch target in manual targeting mode
Q
button Switch characters
E
button Switch characters
W
button Hold down while moving with left analog stick to sidestep (only if selected
in the Config menu)
R
button Toggle between manual mode and auto mode
÷
button Not used
≥
button Not used
MAIN MENU CONTROLS
(SEE THE MAIN MENU SECTION FOR MORE DETAILS)
left analog stick Move cursor
Directional buttons Move cursor
S
button Confirm selection
A
button Cancel selection / Close Main Menu
D
button Display details on selected item
F
button Discard selected item / Turn Tactical Skills on or off
Q
button Scroll page
E
button Scroll page
W
button Switch characters (Skills / Equipment / Status)
R
button Switch characters (Skills / Equipment / Status)
÷
button Not used
≥
button Not used
Page 6
CHARACTERS
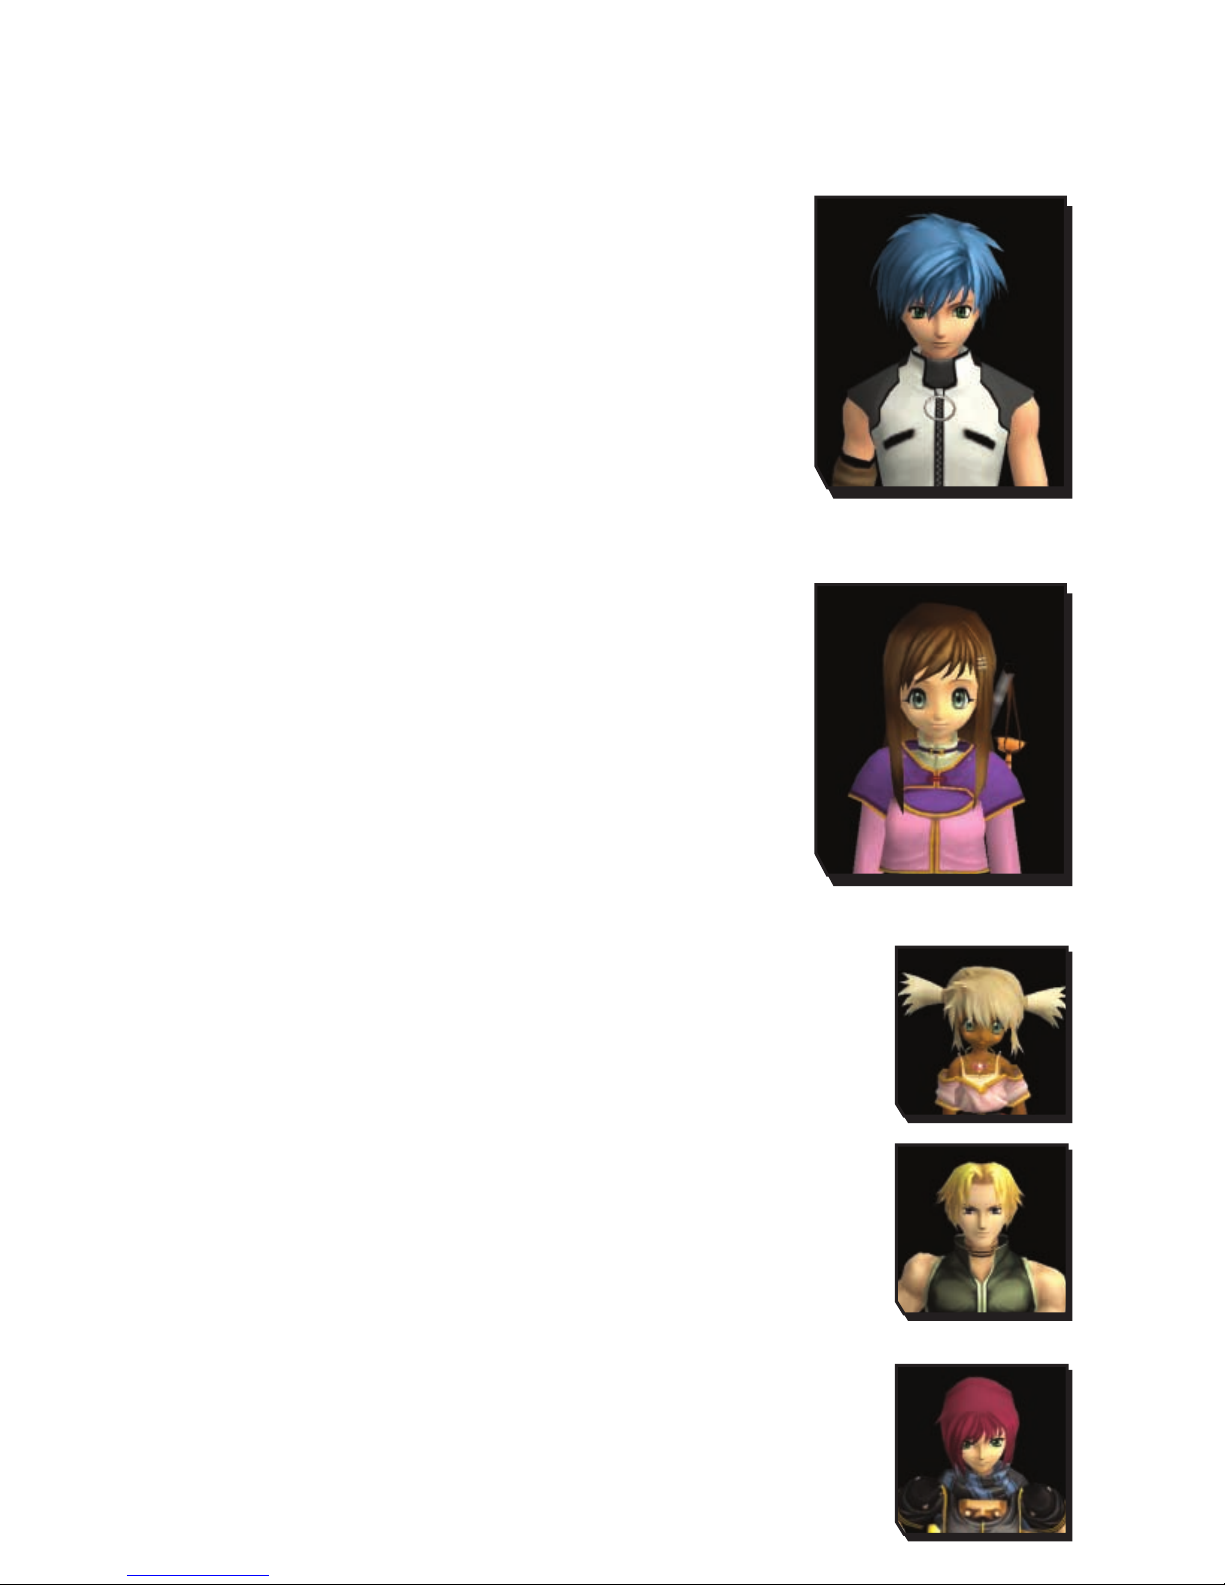
New characters will appear as you progress through the story. Here are some of the main characters
you’ll meet:
FAYT LEINGOD
"Sometimes, you're the only one that can make a difference."
Fayt is the son of leading authorities on symbological genetics, and he
himself is a serious student of the subject. He is an athlete who loves
games, his current favourite being the battle simulator. A young man of
integrity who can’t desert a person in trouble, he also has a stubborn
side.
Sex: Male / Age: 19
Height: 5’9" / Weight: 148 lbs
Race: Earthling / Weapon: Sword
SOPHIA ESTEED
"You just have to believe what you feel in your heart. Let's choose to
believe."
A childhood friend of Fayt’s, Sophia is an independent and caring girl who
looks up to Fayt as a big brother. She’s never afraid to speak her mind,
but her charming smile softens the hearts of everyone around her. She
seems to be an ordinary high school girl who likes cooking and shopping.
Sex: Female / Age: 17
Height: 5’3"
Weight: 108 lbs
Race: Earthling / Weapons: Staff & Symbology
PEPPITA ROSSETTI
"There's no use thinking about it! Let's just dive right in!"
Sex: Female / Age: 14
Height: 4’4" / Weight: 79 lbs
Race: Velbaysian / Weapon: Shoe/Capes
CLIFF FITTIR
"Wait a second. You mean 'we', right? You plannin' on going there alone?"
Sex: Male / Age: 36
Height: 6’2" / Weight: 212 lbs
Race: Klausian / Weapon: Gauntlets
NEL ZELPHER
"No thanks needed. I'm just doing my job."
Sex: Female / Age: 23
Height: 5’7" / Weight: 112 lbs
Race: Elicoorian / Weapon: Daggers & Runology
Page 7
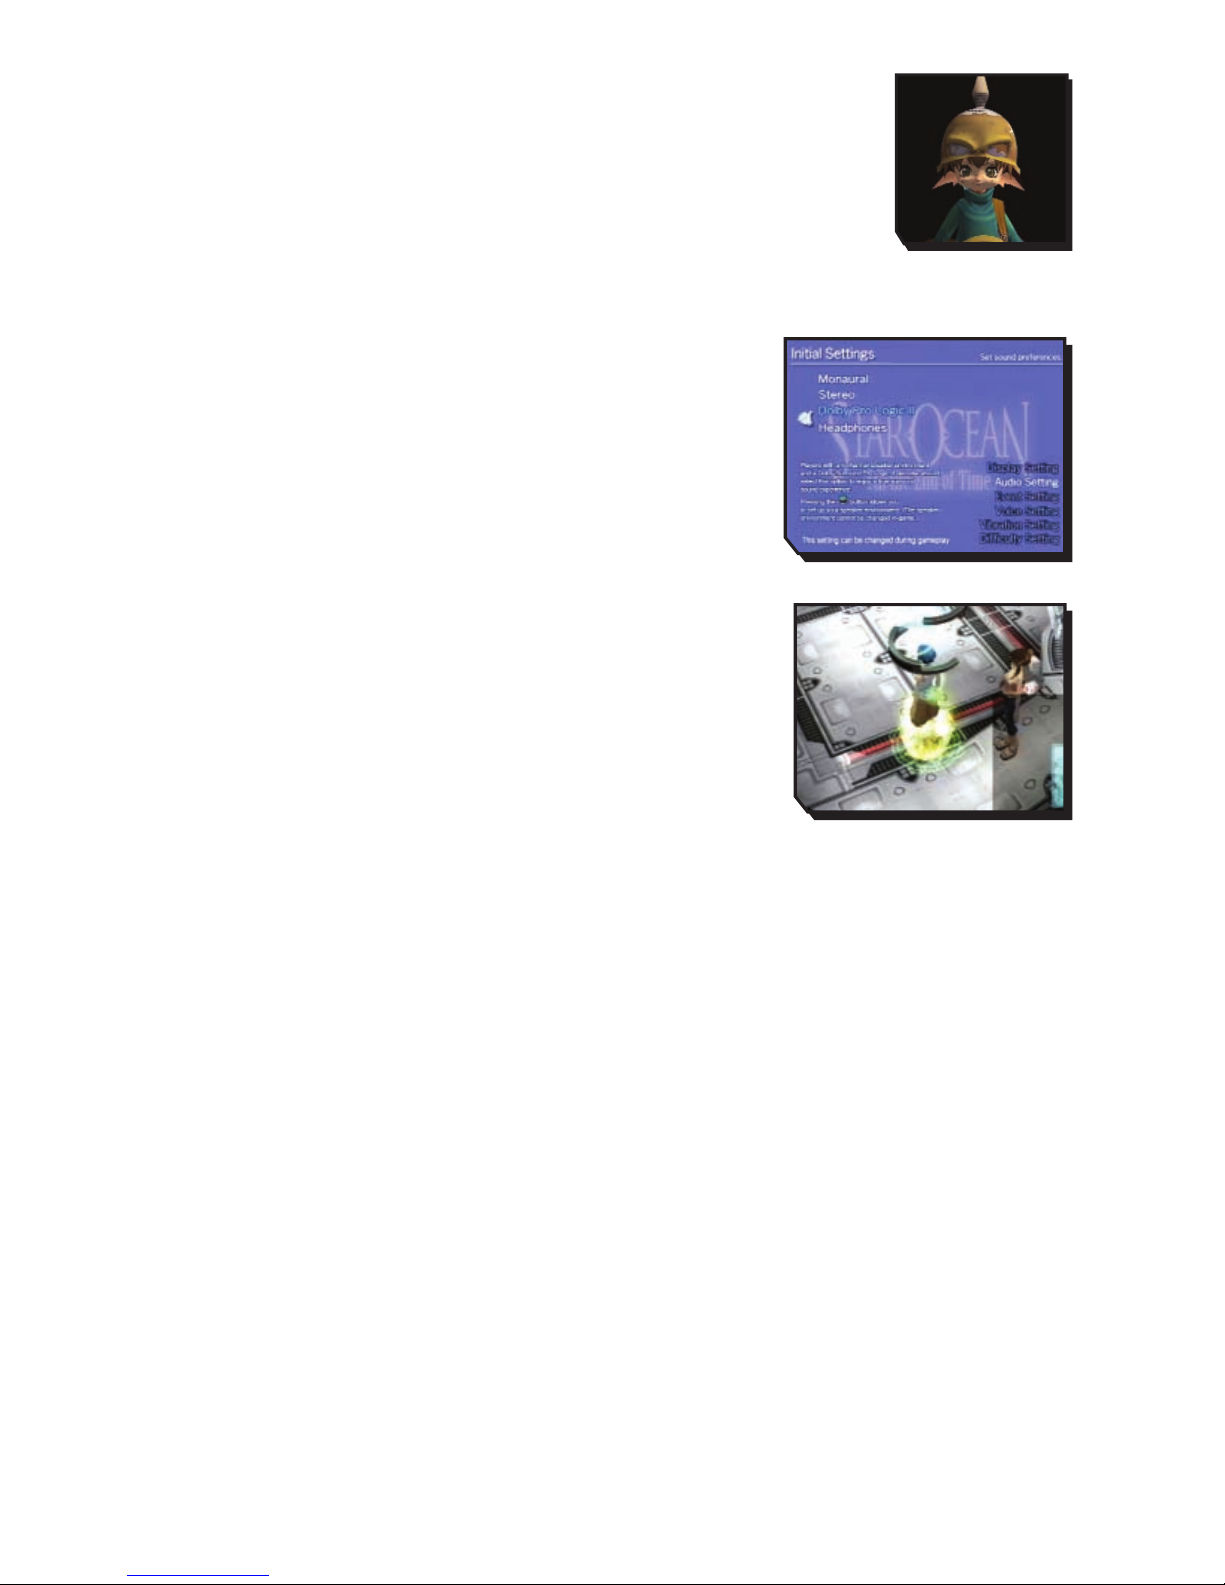
ROGER S. HUXLEY
"Sometimes a real man’s just gotta keep on goin’."
Sex: Male / Age: 12
Height: 3’1" / 66 lbs
Race: Elicoorian / Weapon: Axe
BEGINNING A GAME
INITIAL SETTINGS
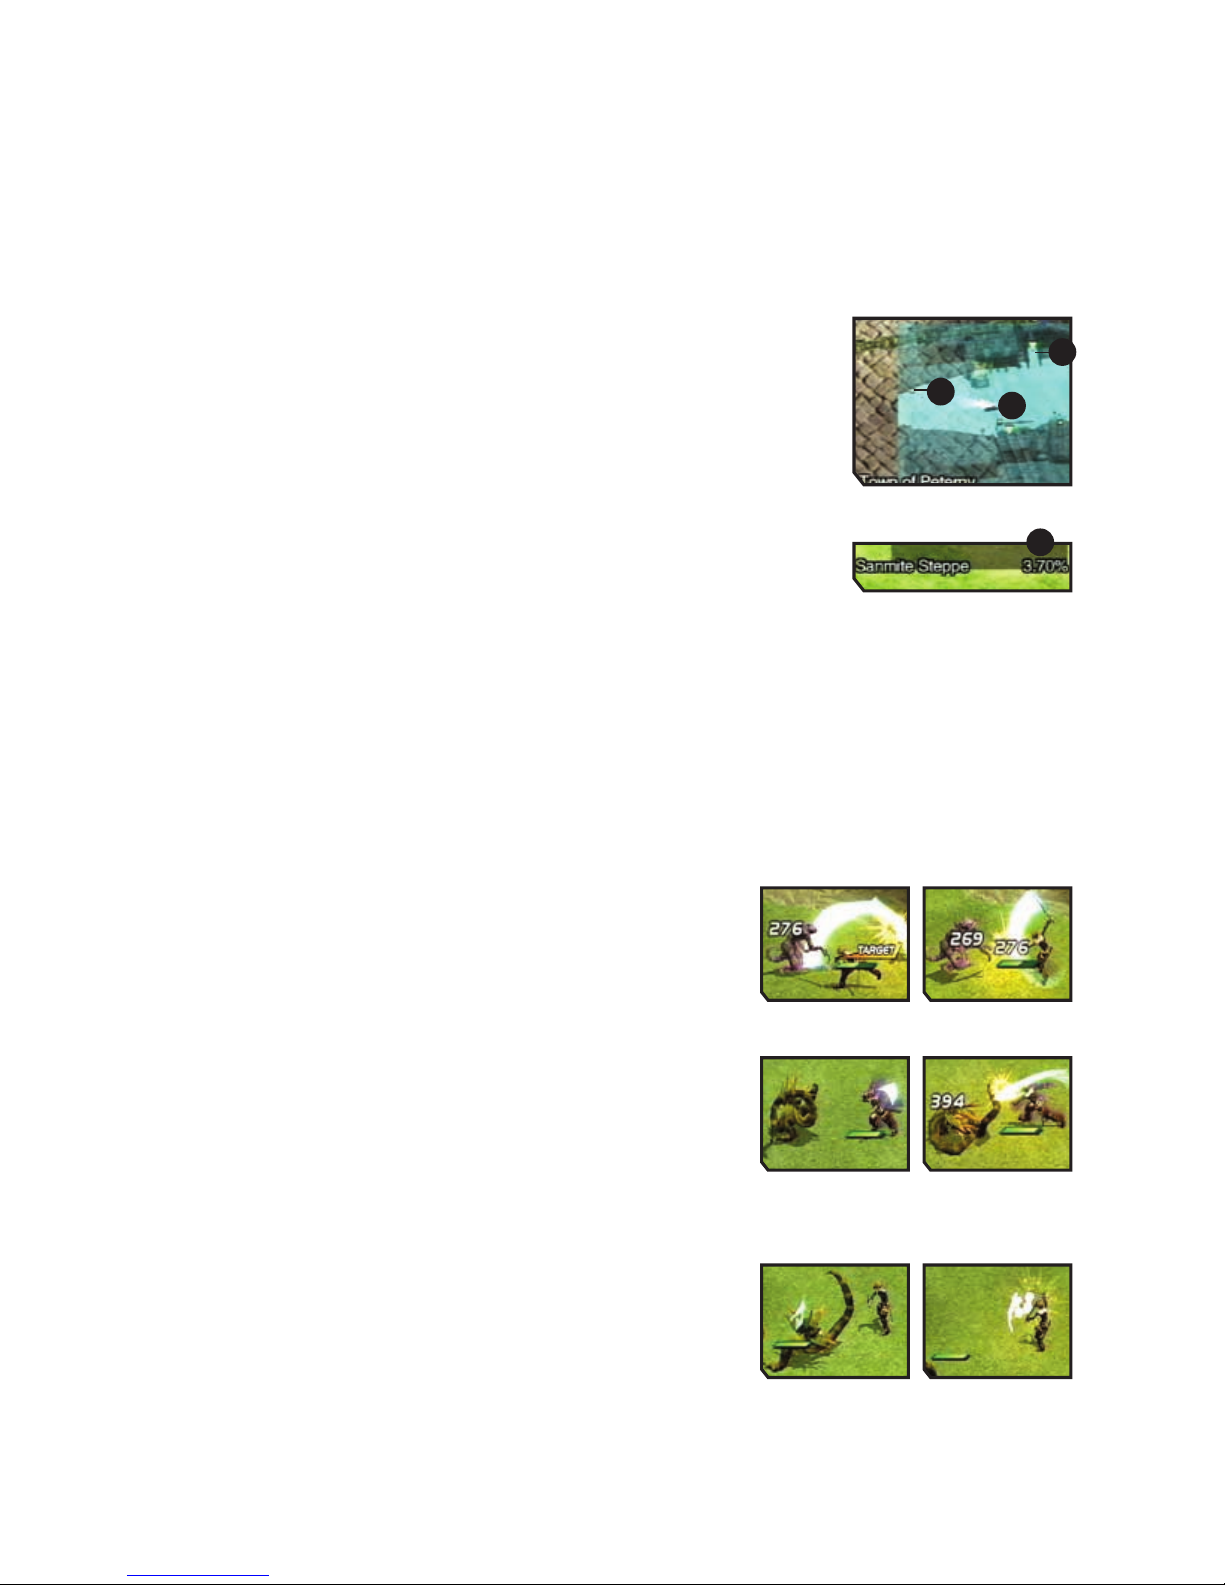
You must configure your initial settings before starting the game.
The Initial Settings screen will appear when you select "New Game".
Make your selections with the directional buttons and press the
S
button to confirm. Pressing the Abutton will take you back to
previous settings.
SAVING YOUR PROGRESS
Game data can be saved at any save point inside dungeons or at inns
in towns. You should save your progress frequently. Select "DATA "
from the Main Menu to save or load data.
Note: once you save or load game data, please do not remove or
insert the Memory Card from the MEMORY CARD slot until you are
ready to turn the game off. Doing so may prevent you from saving
game completion data after you have completed the game.
Ending the Game
Remember to save your game data before you turn off the game. You can then resume play from the
last point you saved. Please make sure that the disc tray is closed before turning the power off.
This game can be played using Dolby Pro Logic II. To enjoy the game in surround sound, connect the AV
MULTI OUT connector or the DIGITAL OUT (OPTICAL) connector on your PlayStation®2 computer
entertainment system to your home theatre system with a Dolby Pro Logic II or Dolby Pro Logic
decoder, then turn either function on. The Dolby Pro Logic II audio is also compatible with monaural or
stereo settings, so you can enjoy the game even without the PRO LOGIC II feature.
Page 8
GAME PROGRESSION
Reading the Map
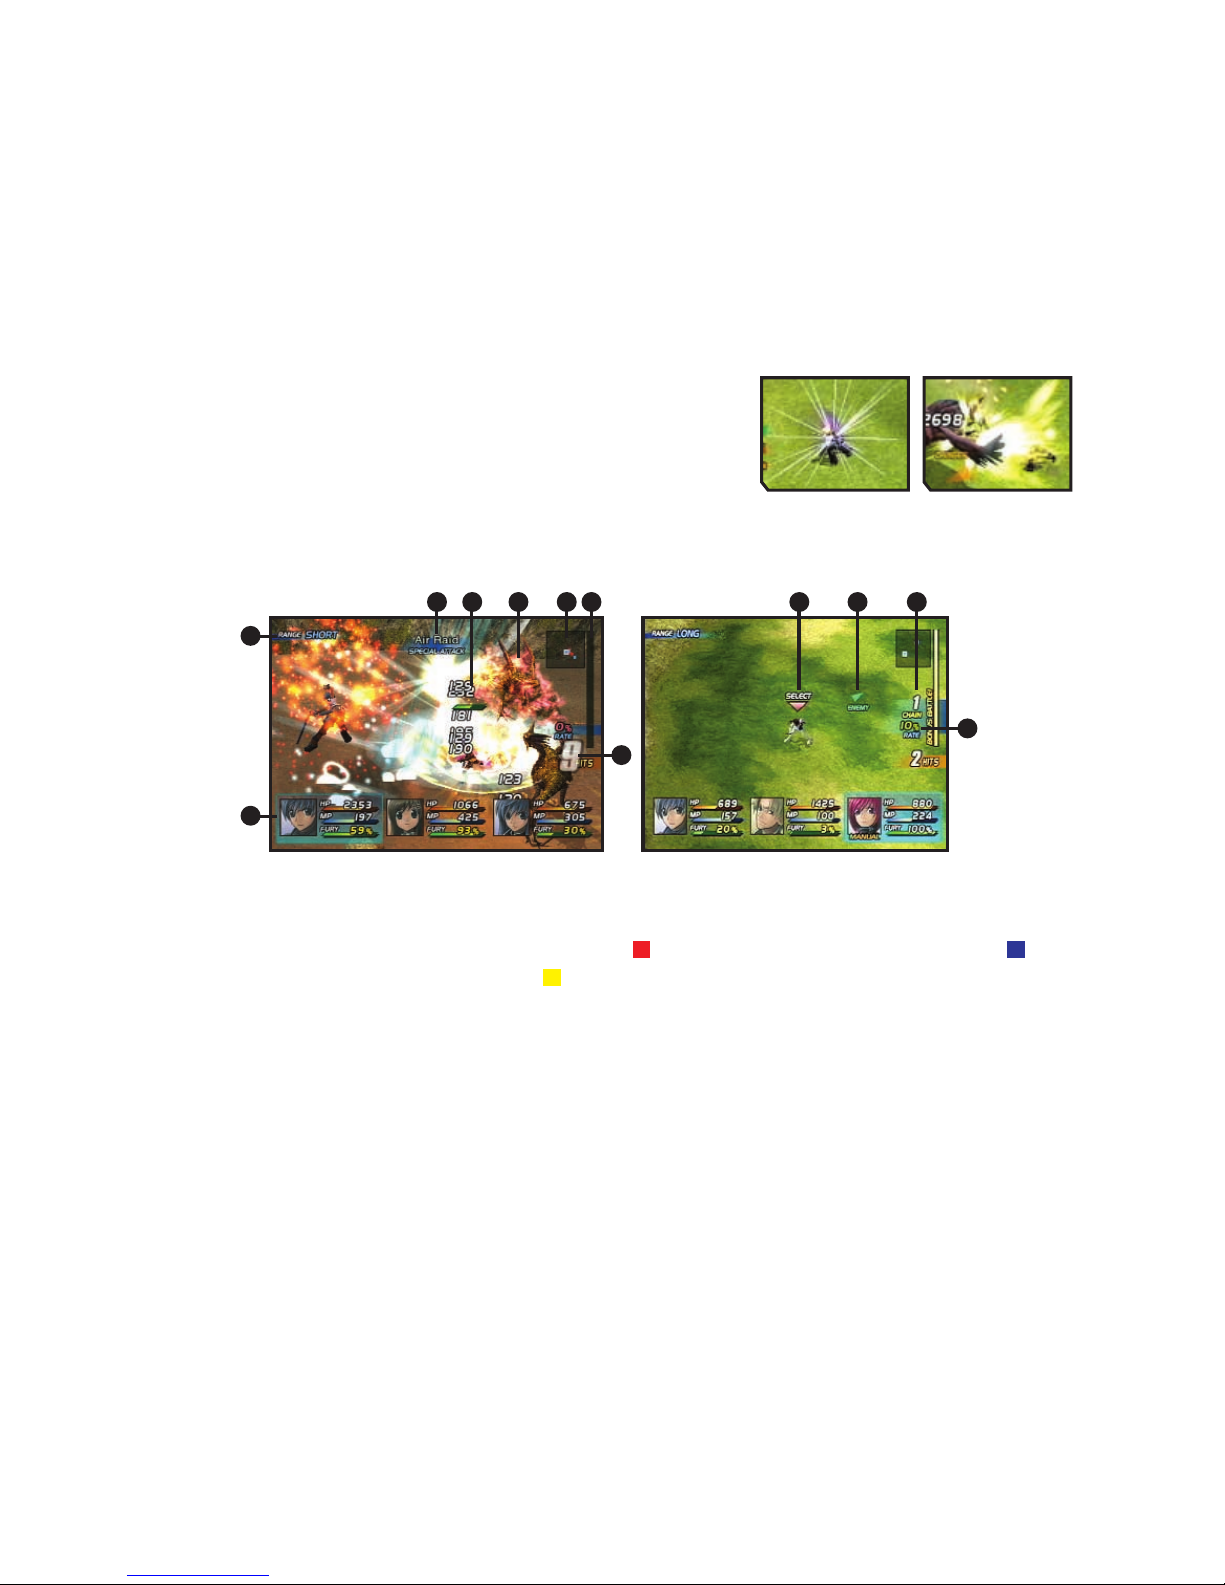
The map is displayed in the lower right corner of your screen at all times except during battles. Press
the
R
button to cycle through the display options bottom right", "full screen" and "hide. Details on
how to read the map are below.
1. Player cursor
This indicates your current location. The translucent light indicates the
camera direction.
2. Entrance cursors
These cursors indicate doors and entrances. The colour varies with what you
can find inside.
3. People cursors
These cursors indicate party members or townspeople.
4. Map coverage
This percentage indicates how much of the map you have explored.
BATTLES
BATTLE CONTROLS
Minor Attacks - Sbutton
Press the Sbutton to execute swift attacks with little motion.
The method and force of attack will vary depending on your
distance from the target.
Major Attacks - Abutton
Press the Abutton to execute slower attacks with greater force.
The method and force of attack will vary depending on your
distance from the target.
Guard – Stand Still (100% Fury)
When your Fury gauge is at 100%, Guard can protect you from
attacks.
1
4
2
3
Page 9
GUARD AND ANTI-ATTACK AURAS
Obtaining certain items will allow you to use Anti-Attack Auras. You can customise the effects of Anti
Attack Auras through the Skills menu (see THE MAIN MENU section for more details).
BATTLE SKILLS
Hold down the Sbutton or Abutton.
Hold down the Sbutton or Abutton to execute the Battle Skills you’ve assigned to each button.
Battle Skills can be set up through the Skills menu (see THE MAIN MENU section for more details).
See later in the BATTLES section for a list of Battle Skills.
THE BATTLE SCREEN
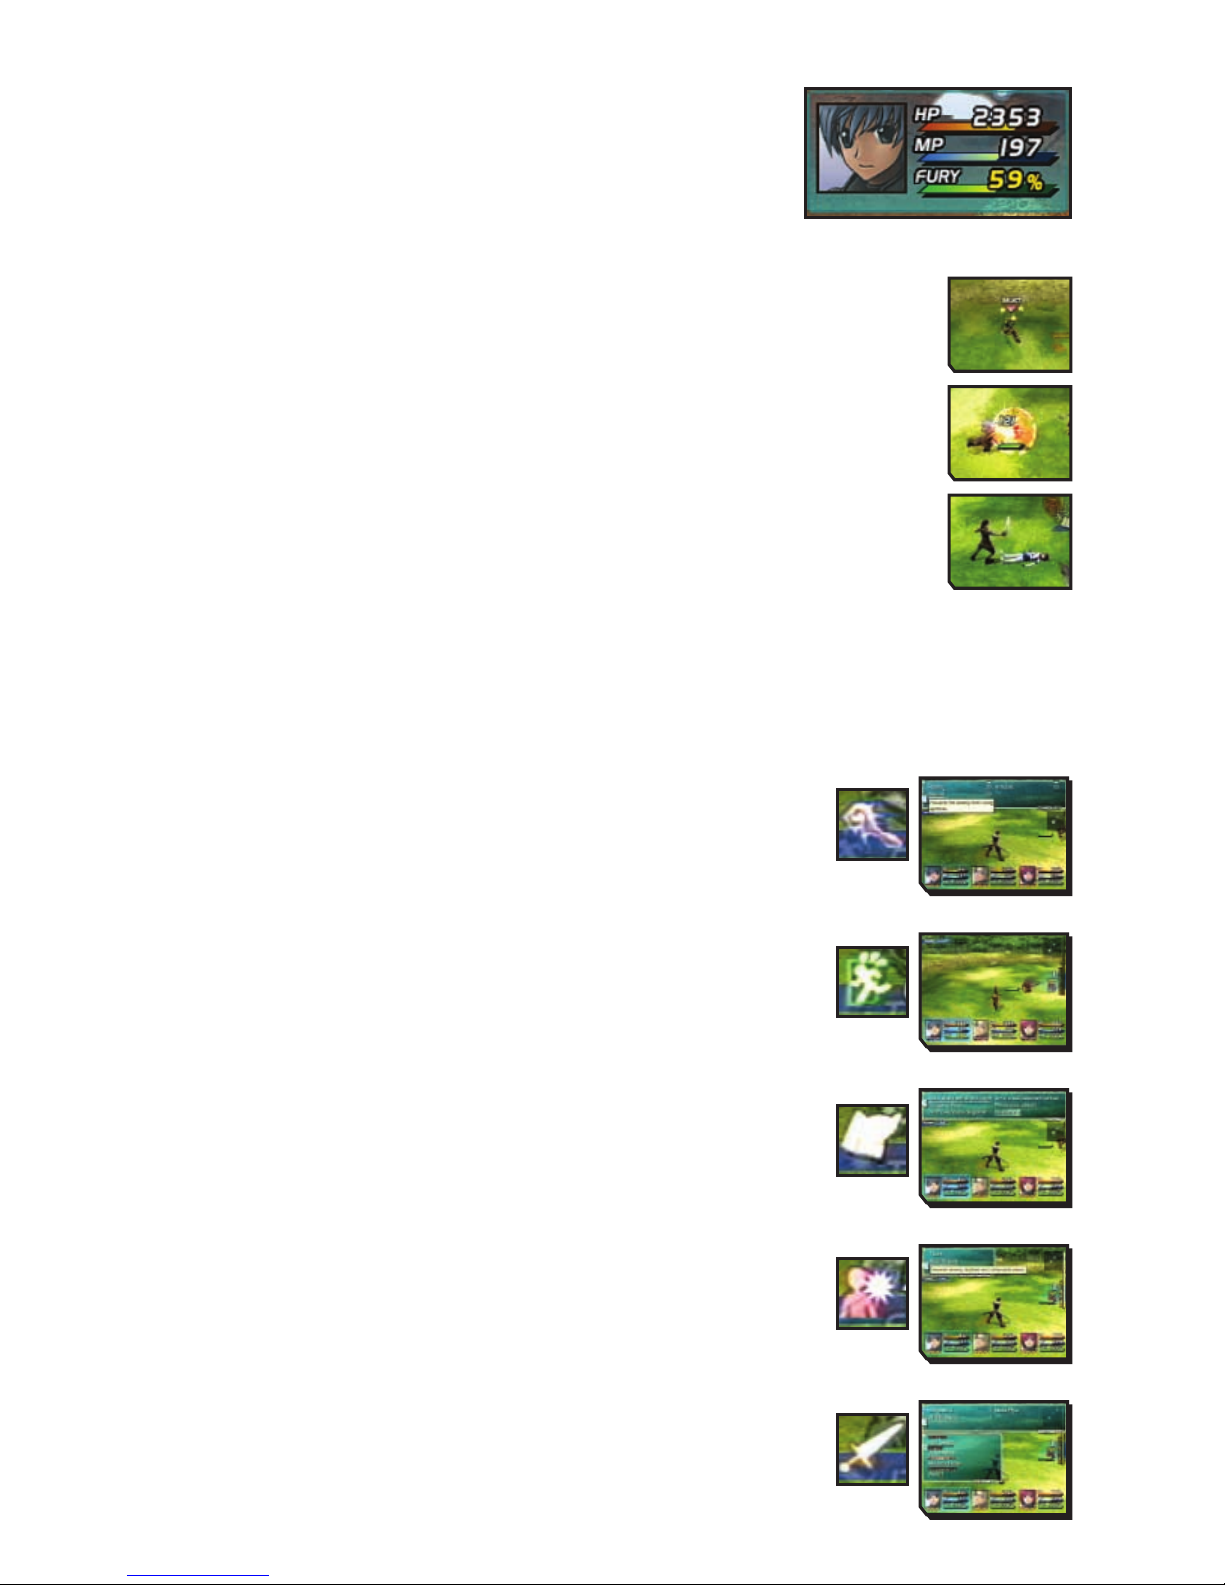
The battle screen displays a variety of information. You must
understand the meaning and importance of each part in order to
make quick decisions.
1) Range – Indicates the distance between you and the enemy (SHORT / LONG).
2) Battle Radar – A simple map of the battlefield. (Red squares) indicate enemies, while
(Blue squares) indicate party members. (Yellow square) indicate party members with low HP.
3) Monster – This is an example of a monster. The gauges next to monsters indicate their Fury levels.
4) Character Windows – These windows show the attributes of the characters in battle.
5) Damage – Shows the amount of damage inflicted when an attack hits.
6) Combo Hits – Shows the number of consecutive hits.
7) Bonus Battle Gauge – When full you enter a Bonus Battle.
8) Skills Used – Shows the skills being used by party members (blue) and enemies (red).
9) Controlled Character – Indicates the character you are currently controlling.
10) Enemy Cursor – Shows the direction of an enemy out of view.
11) CHAIN – Indicates the number of consecutive Bonus Battles.
12) RATE – Indicates the charge rate of the Bonus Battle Gauge.
1
4
6
12
2 78 35 9
10
11
Page 10
THE CHARACTER WINDOW
HP Current HP level. You will be unable to fight if this drops to 0.
MP Current MP level. You will be unable to fight if this drops to 0.
Fury Current Fury level. Fury is expended with every move, but is
recharged when you stand still.
SPECIAL CONDITIONS DURING BATTLE
Stun – Being struck by an Anti-Attack Aura or certain specific attacks will stun you. You
should recover and be able to move again soon afterwards.
Guard Broken – A Major Attack can break through Guard. Once Guard is broken, you will
be vulnerable even to Minor Attacks until you regain 100% Fury.
Down – Some attacks will knock you to the ground. Others may throw you up in the air,
unprotected, before you hit the ground.
THE BATTLE MENU
(ALSO REFERRED TO AS THE BATTLE CAMP)
Pressing the Dbutton during battle will open the Battle Menu. The Battle Menu can be used for
various purposes such as invoking Symbols or using items. Use the left analog stick or directional
buttons to make your selection from the menu, then press the Sbutton to confirm. Please note that
time stops while the Battle Menu is open. Also, pressing the Fbutton while the Battle Menu is open
will give you a bird’s-eye view of the battlefield.
SYMBOLOGY
Select this to use the Symbols you have learned. Some Symbols require
you to choose a target. Symbols are slow to activate because of the
invocation time required.
ESCAPE
To run from a battle, select "ESCAPE". Your characters will attempt to
flee, but a successful escape is not guaranteed.
TACTICS
Select this to set up action guidelines for your computer-controlled party
members. All characters except for the one you control will act according
to these tactics.
TACTICAL SKILLS
Select this to activate the Tactical Skills you have set up within "Skills
Setup". Some skills such as Taunt and Scan Enemy appear only in the
Tactical Skills section of the Battle Menu.
EQUIPMENT
If you want to change equipment such as weapons and armour, select
"EQUIPMENT", the piece of equipment you want to replace, and then the
new item. Equipment can also be changed from the Main Menu.
Page 11
ITEMS
To use an item in your possession, select "ITEMS" the item you want to use,
then the enemy or party member on which to use the item.
STATUS AILMENTS
Enemy attacks can inflict status ailments. Ailments are indicated by changes in a character’s
appearance as well as restrictions to his or her movement in battle. The following are some examples
of status ailments:
Poison
Poisoned characters turn green, and their HP slowly drains away.
Petrification
Characters turn brown when turned to stone. If all your party members are petrified, the
game is over.
Paralysis
Yellow bolts of lightning indicate that a character cannot move due to paralysis. Characters
are completely defenceless against enemy attacks while paralysed.
Freezing
Frozen characters turn blue and are immobilised for a short time. A single blow from the
enemy can incapacitate them.
BONUS BATTLES
The Bonus Battle Gauge on the right of the screen charges as your attacks hit the enemy. Once the
gauge is full, you enter a Bonus Battle. Winning Bonus Battles offers rewards like multiplying
experience points or the amount of fol acquired.
Charging the Battle Bonus Gauge:
1) Attack the Enemy
2) Bonus Battle Gauge Full
3) Bonus Battle
4) End of Battle
5) Get Bonuses!
The Bonus Battle Gauge charges as you attack, and once it reaches 100%, a Bonus Battle begins. Be
aware that the gauge will break and end the Bonus Battle if any of the conditions below are met.
The Bonus Battle Gauge returns to 0 if:
• the character you control takes a critical hit
• the character you control is incapacitated
• you escape from battle
Executing Chains
A winning streak with the Bonus Battle Gauge maintained at 100% produces
a Chain. Continuing the streak will yield a wider variety of bonuses.
Page 12
Cancel Attacks to Gain Bonuses
You can enter commands for attacks and then immediately cancel them to
increase the strength of the final blow. For example, try a Minor Attack
(normal attack) followed by a minor battle skill, then a major battle skill, and
end with a minor battle skill. Each time you cancel an attack, a damage bonus
is applied to the subsequent attack. Bonuses of up to 300% can be attained.
Game Over
If your HP or MP falls to 0 or you are petrified, you are no longer able to fight. If none
of your party members are able to fight anymore, the game is over. You can resume
play from the last point at which you saved your progress.
THE MAIN MENU
The Main Menu screen shows the following.
1. Submenu Headings - This consists of ten
menus. Select one to proceed to the next
screen
2. Time Elapsed - This displays the time that
has elapsed since you started the game
3. Money - This is the amount of money (fol)
you currently possess
4. Number of Battles - This displays the
number of battles you have fought
5. Menu Notes - This displays information on
the highlighted submenu
6. Character Status - This displays a
simplified view of your characters’ status
7. The character’s current level
8. Experience points needed to reach the next
level
9. Current HP / Maximum HP
10. Current MP / Maximum MP
There are ten submenus on the Main Menu screen that you can select.
USE SYMBOLOGY
You can use Symbols to heal characters here if you have enough MP. Attack Symbols are for
use in battle only and cannot be used from this menu.
Select a character with the left analog stick or directional buttons, then press the
F
button to confirm.
Sophia, Adray, Fayt, Maria and Nel will learn a variety of Symbols as they gain levels. However, some
Symbols (such as Common Attack Symbols and Common Support Symbols) can only be learnt from
Special Tomes. Apart from Sophia and Adray, party members will not acquire such Symbols automatically.
5
1
234
6
79
810
Page 13
SKILL SETUP
This is where you can allocate available SP (Skill Points) and set up Battle Skills and Tactical
Skills.
BATTLE – SETTING UP BATTLE SKILLS
Here you can set up special attacks and Symbology. The Battle Skills you set up
here will be available for use in battle.
STEP 1: Select a slot for the Battle Skill
First, select a slot with the left analog stick or directional buttons, then press the
S
button to confirm.
A maximum of six Battle Skills can be selected at one time. See below on how to view this screen.
STEP 2: Select a Battle Skill
Next, select a Battle Skill with the left analog stick or directional buttons, then press the
S
button to
confirm. Skills can be allocated to the Sbutton (short range / long range), the Abutton (short range
/ long range) and Support (two choices). Each skill has CP (capacity points); you cannot allocate more
than the maximum available CP for each character. Maximum CP will vary by character and level, but
the maximum CP for any character is 15.
• Common Support Symbols and Common Attack Symbols must be set up in the "Support" slots before
characters can use them in battle.
VIEWING THE BATTLE SKILLS SETUP SCREEN
Hold down the Minor Attack button to activate skill when near the enemy.
Hold down the Minor Attack button to activate skill when far from the enemy.
Hold down the Minor Attack button to activate skill when near the enemy.
Hold down the Minor Attack button to activate skill when far from the enemy.
Skills automatically activated (up to two).
1. The number on the left indicates the CP
currently used the number on the right indicates
the maximum CP available.
2. Your skill level for the selected Battle Skill.
3. Your mastery of the selected Battle Skill.
4. Experience points needed to reach the next level
for that Battle Skill.
5. Severity of damage to the enemy.
6. HP expended when the selected Battle Skill is
used.
7. Fury expended when the selected Battle Skill is
used.
8. CP needed to set up the selected Battle Skill.
1 2
5 6 7 8
43
Page 14
STATUS – ALLOCATE SKILL POINTS TO STATUS SKILLS
As you gain SP (skill points) with each level, you can allocate them to the four Status Skills.
These skills raise the level of a character’s attributes such as HP and MP.
STEP 1: Check your Skill Points
First, check your current SP, which is displayed at the bottom right of each character’s name. These
are the points you can allocate to increase the level of each Status Skill.
STEP 2: Select the skills to which you want to allocate SP
Next, choose the skill to which you want to allocate SP. Select a skill with the
left analog stick or directional buttons, then press the S button to confirm.
"LV" indicates the current skill level, while "NEXT" indicates the SP required to
reach the next level.
The Four Types Of Status Skill
HP Gives a character bonus HP. A higher skill level here increases the
character's HP.
MP Gives a character bonus MP. A higher skill level here increases the
character's MP.
Attack A higher skill level here enables more effective attacks against the enemy.
Defense A higher skill level here enables more effective defence against the enemy’s minor attacks.
TACTICAL – SET UP TACTICAL SKILLS
Here you set up Tactical Skills, which can greatly influence battles. You can update these settings
during battle through the Battle Menu for even more effective fighting. You can use some Tactical Skills
by selecting commands in the Battle Menu.
What are Tactical Skills?
Tactical Skills are skills such as Anti-Attack Auras and special skills that can change a character’s
condition during battle.
STEP 1:
Select the skill to be set up. Select a skill with the left analog stick or directional buttons. You can cycle
through characters by pressing the
W
and
R
buttons. Battle Skills Become More Powerful with
Use!
STEP 2: Set up the selected skill
Select a skill and press the
S
button to activate or deactivate it (deactivated skills are greyed out).
For some skills, pressing the Sbuttons will display another screen for detailed settings. See below for
a list of major Tactical Skills.
ITEMS
You can check what kind of items you have and use
them. Items are divided into nine categories. Select a
category to see a list of items within that category.
Select an item to see each available item of that type.
From this screen, you can also drop the item by pressing
the Fbutton, or view details of the item by pressing the
D
button.
VIEWING THE ITEMS SCREEN
1) List of item categories.
2) Explanation of the selected category.
3) List of items in the selected category.
1
2
3
Page 15
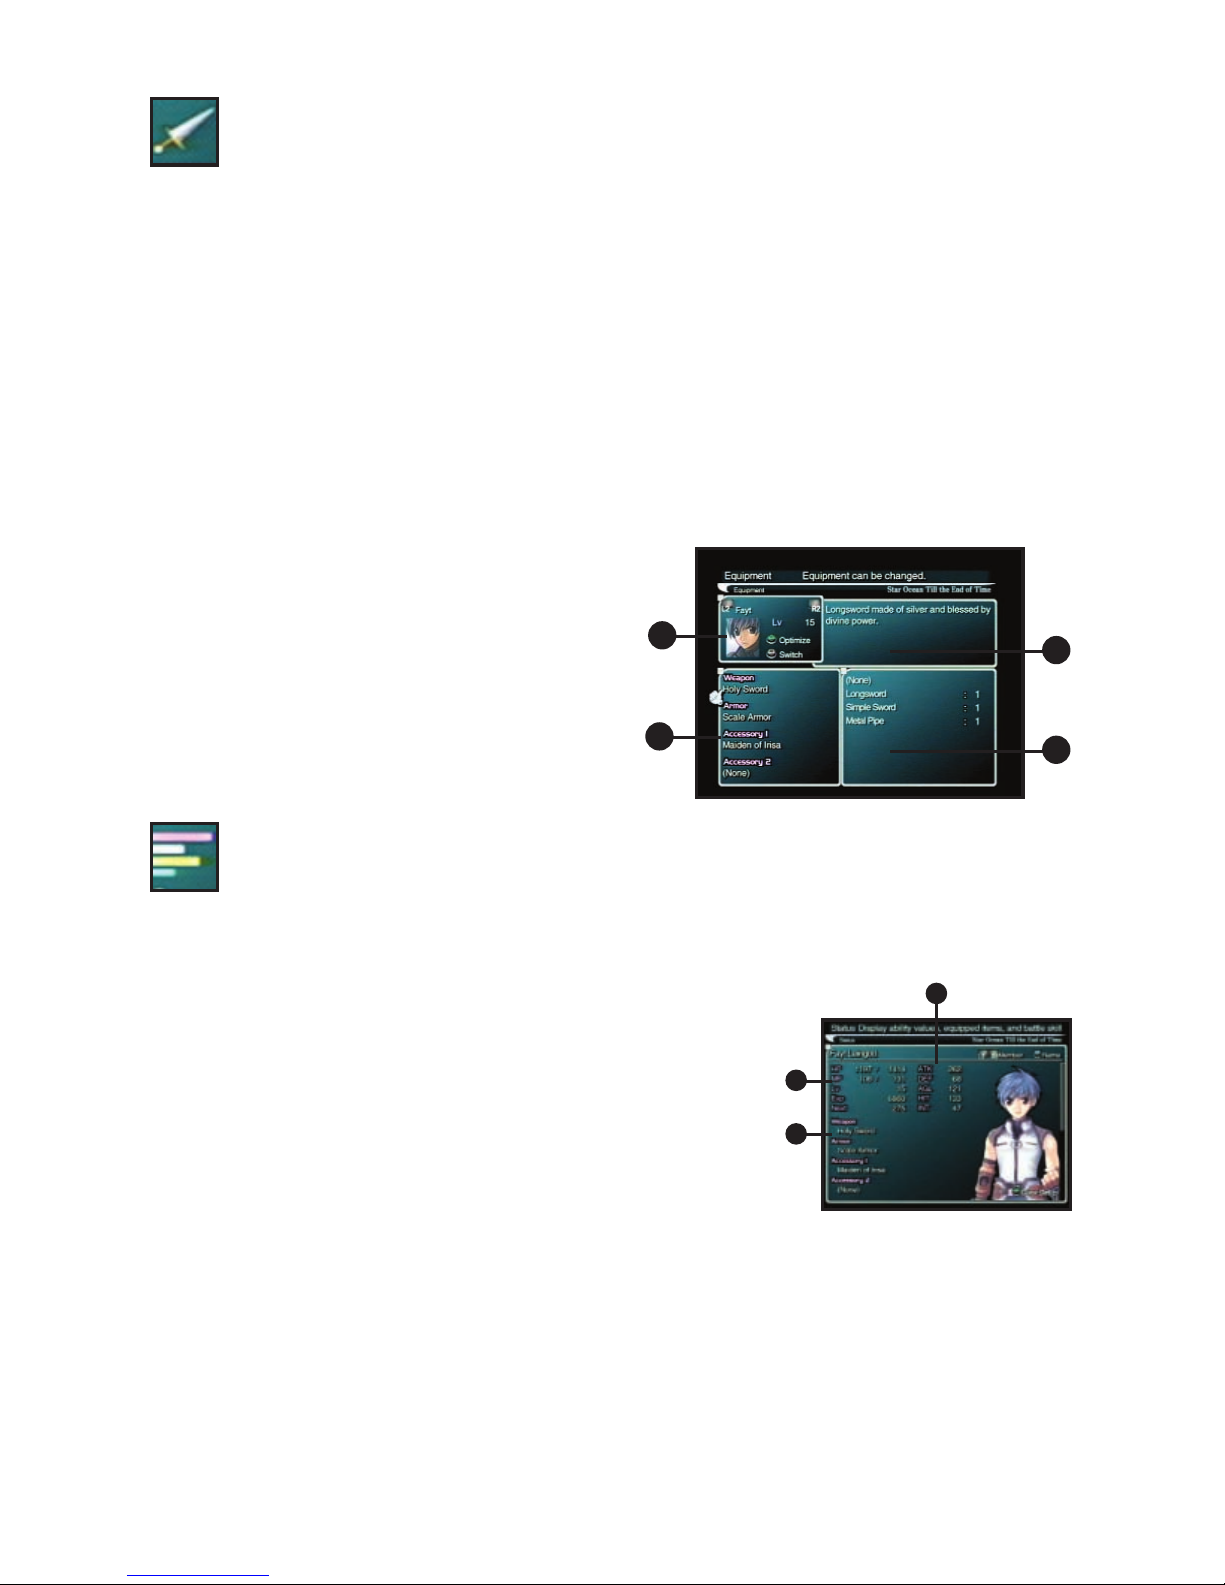
EQUIPMENT
You can equip your characters with weapons, armour and accessories in your possession.
Whenever you acquire a new weapon, use this command to equip it and try it out.
STEP 1: Select the character to equip
First, select a character with the left analog stick or directional buttons, then press the S button to confirm.
STEP 2: Select the type of equipment
A list of your equipment will appear. Select an item with the left analog stick or directional buttons,
then press the Sbutton to confirm. You can also press the Dbutton to automatically equip the
character with the optimal equipment available. You can cycle through characters by pressing the
Q
and
W
buttons.
STEP 3: Select the item to equip
Finally, choose the item to equip. Select one with the left analog stick or directional buttons, then press
the Sbutton to confirm.
Viewing the Equipment Screen
1) Currently selected character. “LV” signifies the
character’s level.
2) Current equipment.
3) Description of the selected item.
4) List of available equipment.
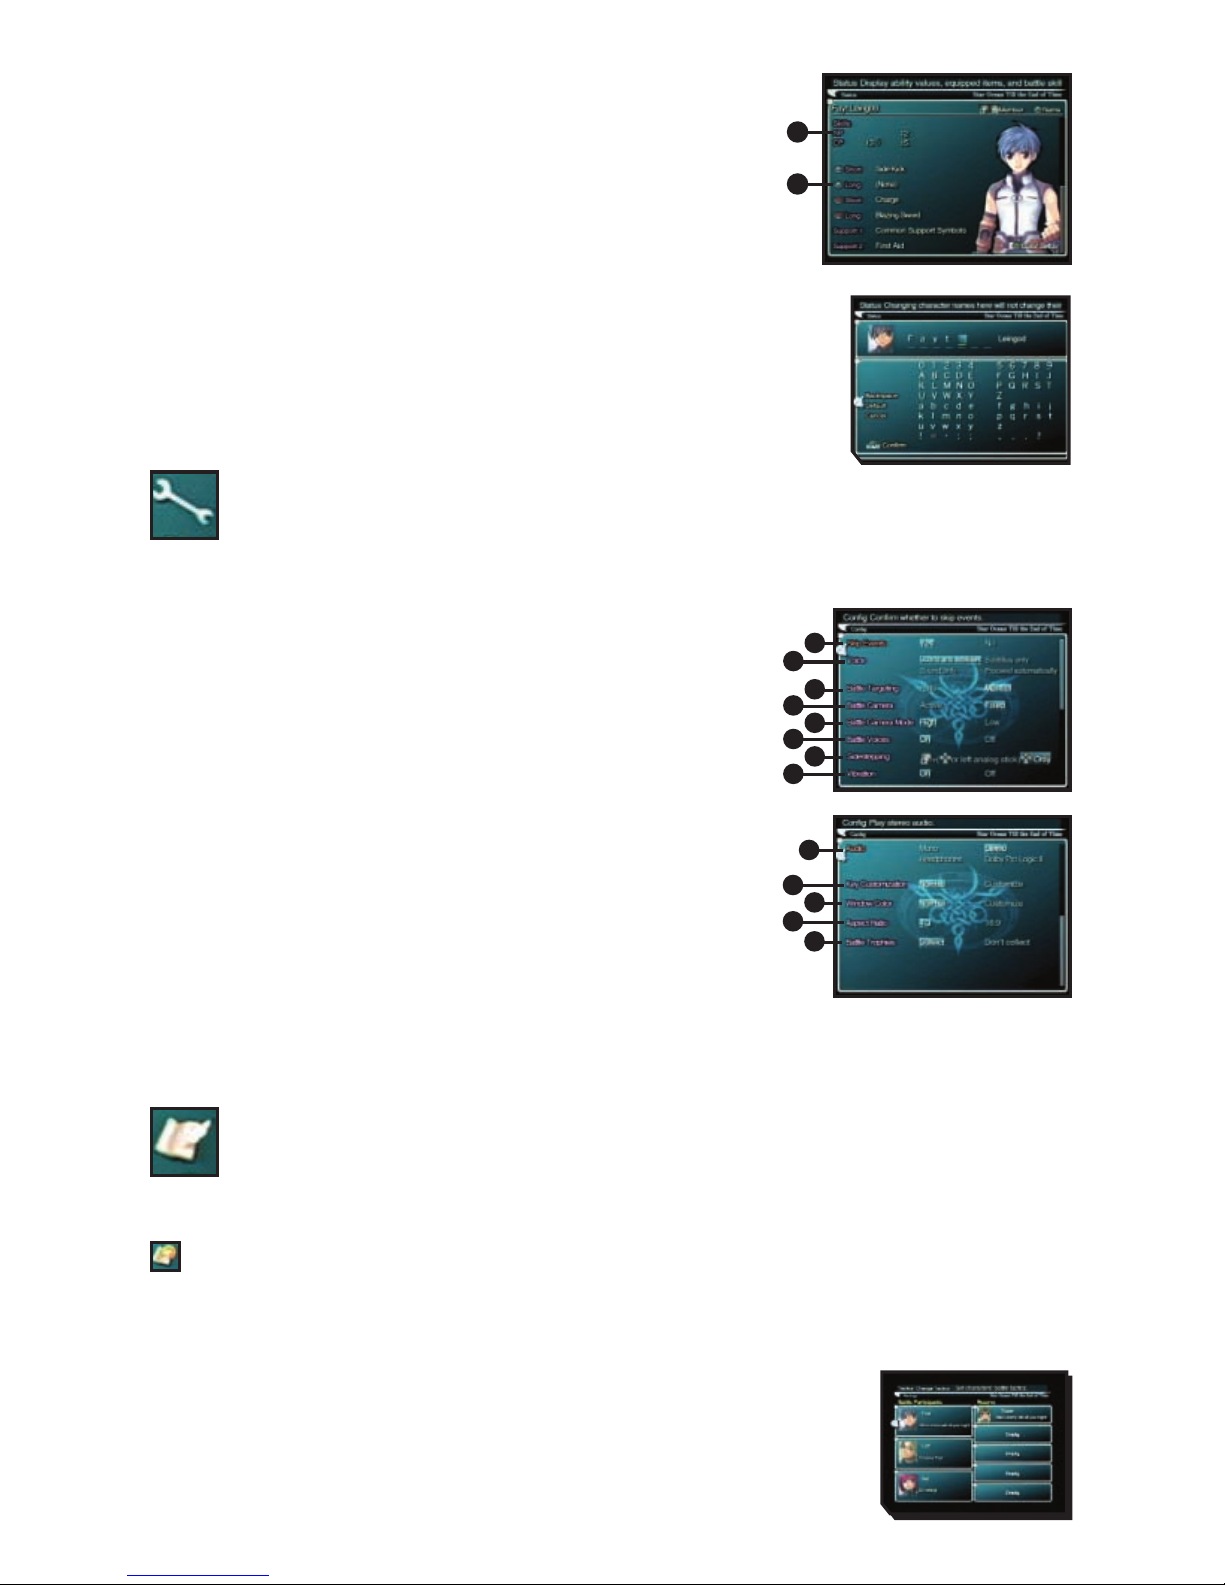
STATUS
Here you can view each character’s status, equipment, and skills. You can also change the
character’s name and Color.
• For details on changing a character’s costume, please refer to "ALTERNATIVE PLAYER COLORS"
section later in this manual.
VIEWING THE STATUS SCREEN (1)
1) Basic character information.
HP – Current HP / Maximum HP.
MP – Current MP / Maximum MP.
LV – Character’s level.
EXP – Experience points accumulated.
NEXT – Experience points needed to reach the next level.
2) Character’s ability values.
ATK – Value indicating strength of character’s attack.
DEF – Value indicating strength of character’s defence.
AGL – Value indicating character’s agility.
HIT – Value indicating character’s accuracy.
INT – Value indicating character’s intelligence.
3) Weapon, armour and accessories currently equipped.
1
4
3
1
3
2
2
Page 16
VIEWING THE STATUS SCREEN (2)
1) Skill status.
SP – Skill points currently available.
CP – Capacity points currently available for Battle Skills.
2) Battle Skills currently set up.
See BATTLE – SETTING UP BATTLE SKILLS section for details on
setting up Battle Skills.
Changing Character Names
Pressing the Sbutton while in the status screen will take you to the
Changing Names screen. Select letters or numbers using the left analog stick
or directional buttons and press the Sbutton to enter them. Once you’re
done, move the cursor to "Confirm" and press the Sbutton.
CONFIG
You can configure game settings such as your controller’s vibration function and button
assignments. Press the left analog stick or directional buttons up or down to select an
option, then press left or right to change your settings.
VIEWING THE CONFIG SCREEN
1) Skip Events - Enable or disable skipping of events.
2) Voice - Select subtitle and voice settings for events.
3) Battle Targeting - Select automatic or manual targeting in battle.
4) Battle Camera - Select the type of camera movement used in battle.
5) Battle Camera Mode – Choose the height of the camera in battle.
6) Battle Voices - Turn voices in battle on or off.
7) Sidestepping - Select the controls for sidestepping.
8) Vibration - Turn the controller’s vibration
function on or off.
9) Audio - Select the audio environment.
10) Button Customization - Customise controller button settings.
11) Window Color - Customise window color. Select "Customize" and
press the S button to display the window color customisation
screen.
12) Aspect Ratio - Select the screen size.
13) Battle Trophies - Select whether or not to collect Battle Trophies after battles.
TACTICS
Here you can switch members, change battle formation and select battle tactics. Select the
desired submenu with the left analog stick or directional buttons, then press the S button to
open the settings screen.
TACTICS – SETTING A BATTLE PLAN
You can direct characters to follow certain courses of action in battle. Choose tactics according to the
type and abilities of each character.
STEP 1: Select a character
First, select a character with the left analog stick or directional
buttons, then press the Sbutton to confirm.
1
3
5
2
4
7
6
8
9
11
10
13
12
1
2
Page 17
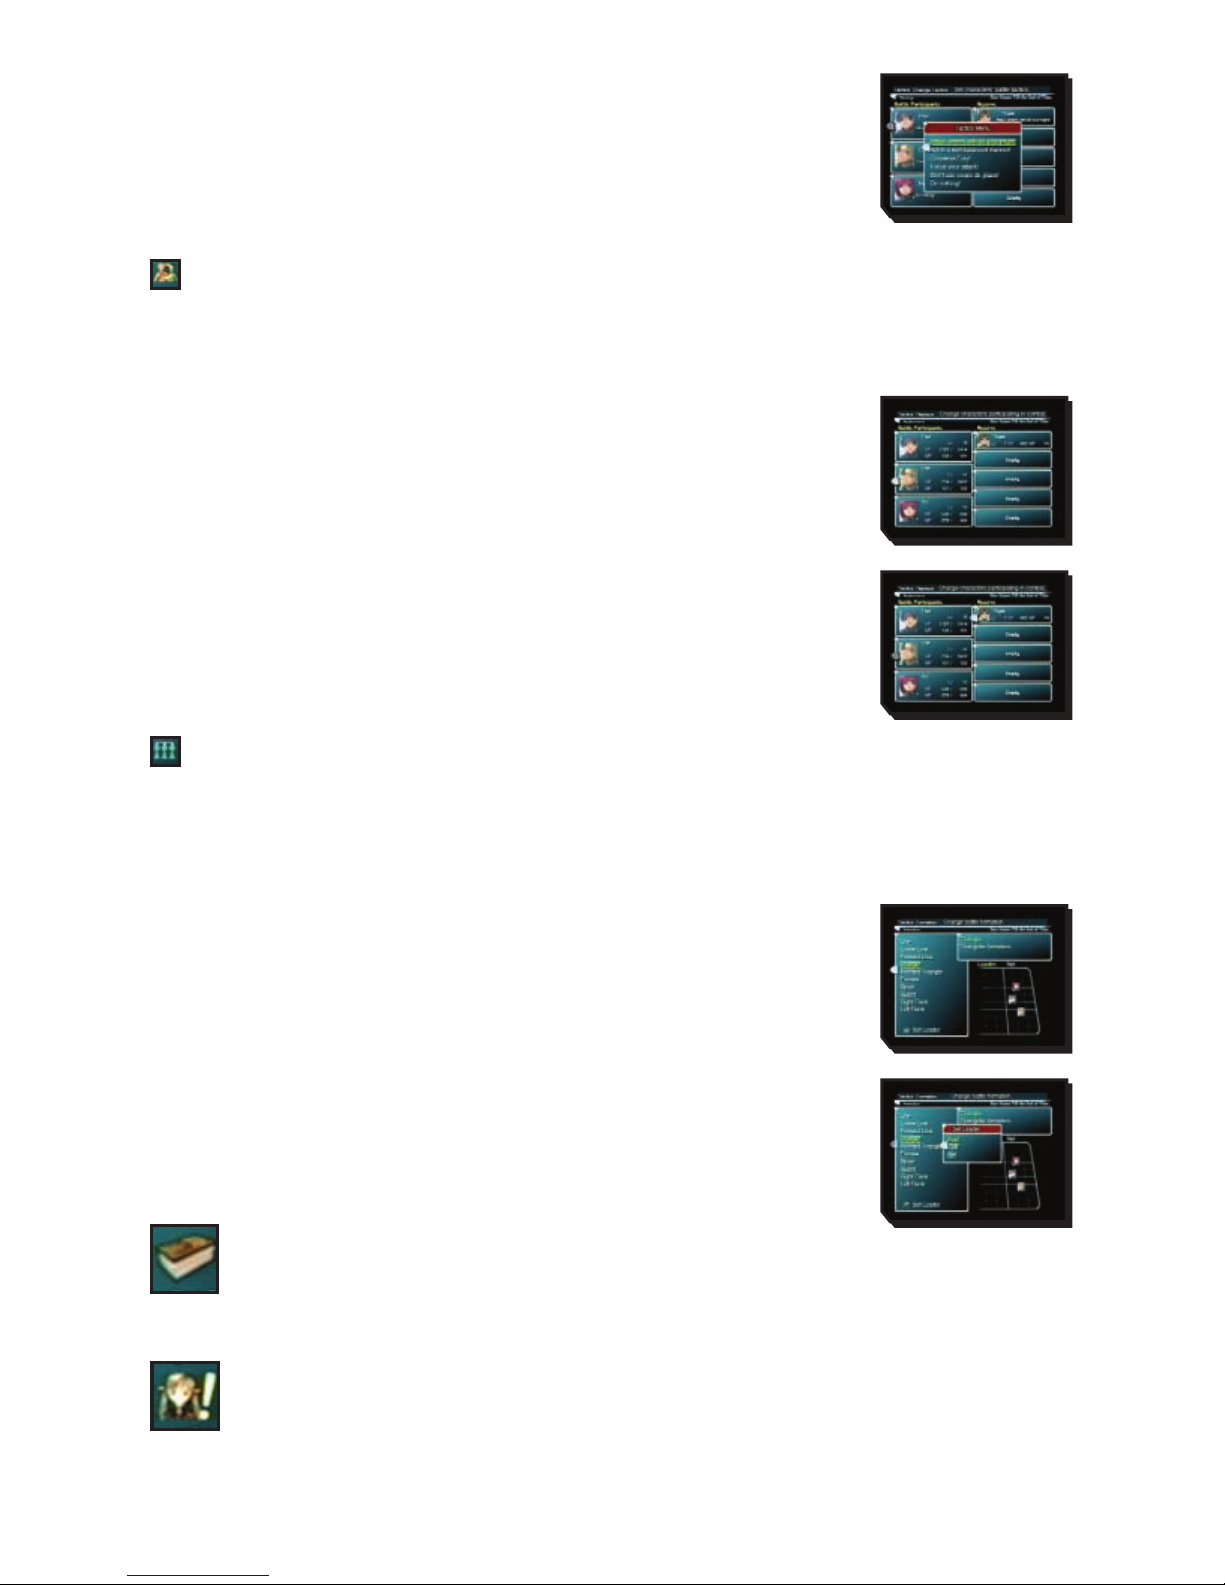
STEP 2: Select tactics
A menu listing six tactics will appear. Select one with the left
analog stick or directional buttons, then press the S button to
confirm.
REPLACE – REPLACE BATTLE PARTICIPANTS
You can switch out party members participating in battles. Up to three characters can be selected to
fight. Organise party members according to their condition and the type of enemy you face.
STEP 1: Select the character to be replaced
First, use the left analog stick or directional buttons to select
the character you want to replace, then press the S button to
confirm. Battle participants are listed on the left, while reserve
members (those not actively participating) are on the right.
STEP 2: Replace the character
Next, select a character to replace the one you chose in step 1.
Choose and confirm the character the same way you did in step 1.
FORMATION – DETERMINE BATTLE FORMATION
AND LEADER
Here you can assign battle formation and leader. You should adjust your formation according to the
characters taking part.
STEP 1: Select a formation
There are ten formations available. Select one with the left
analog stick or directional buttons, then press the S button to
confirm.
STEP 2: Select a leader
Press the
D button to display the leader selection window. Select the
character you want to designate as the leader with the left analog
stick or directional buttons, then press the S button to confirm.
DICTIONARY
You can look up notes on the various terms that appear in the game. Select a category of
words, then select a word to see the notes. The number of words will increase as the game
progresses.
INVENTION INFO
Get information regarding inventions and file for patents.
Once you obtain the "Compact Communicator" in the game, a submenu called "Invention Info"
will be added to the Camp menu. You can use "Invention Info" to get information on items available all
over Elicoor II, file for patents and give orders to inventors.
Page 18
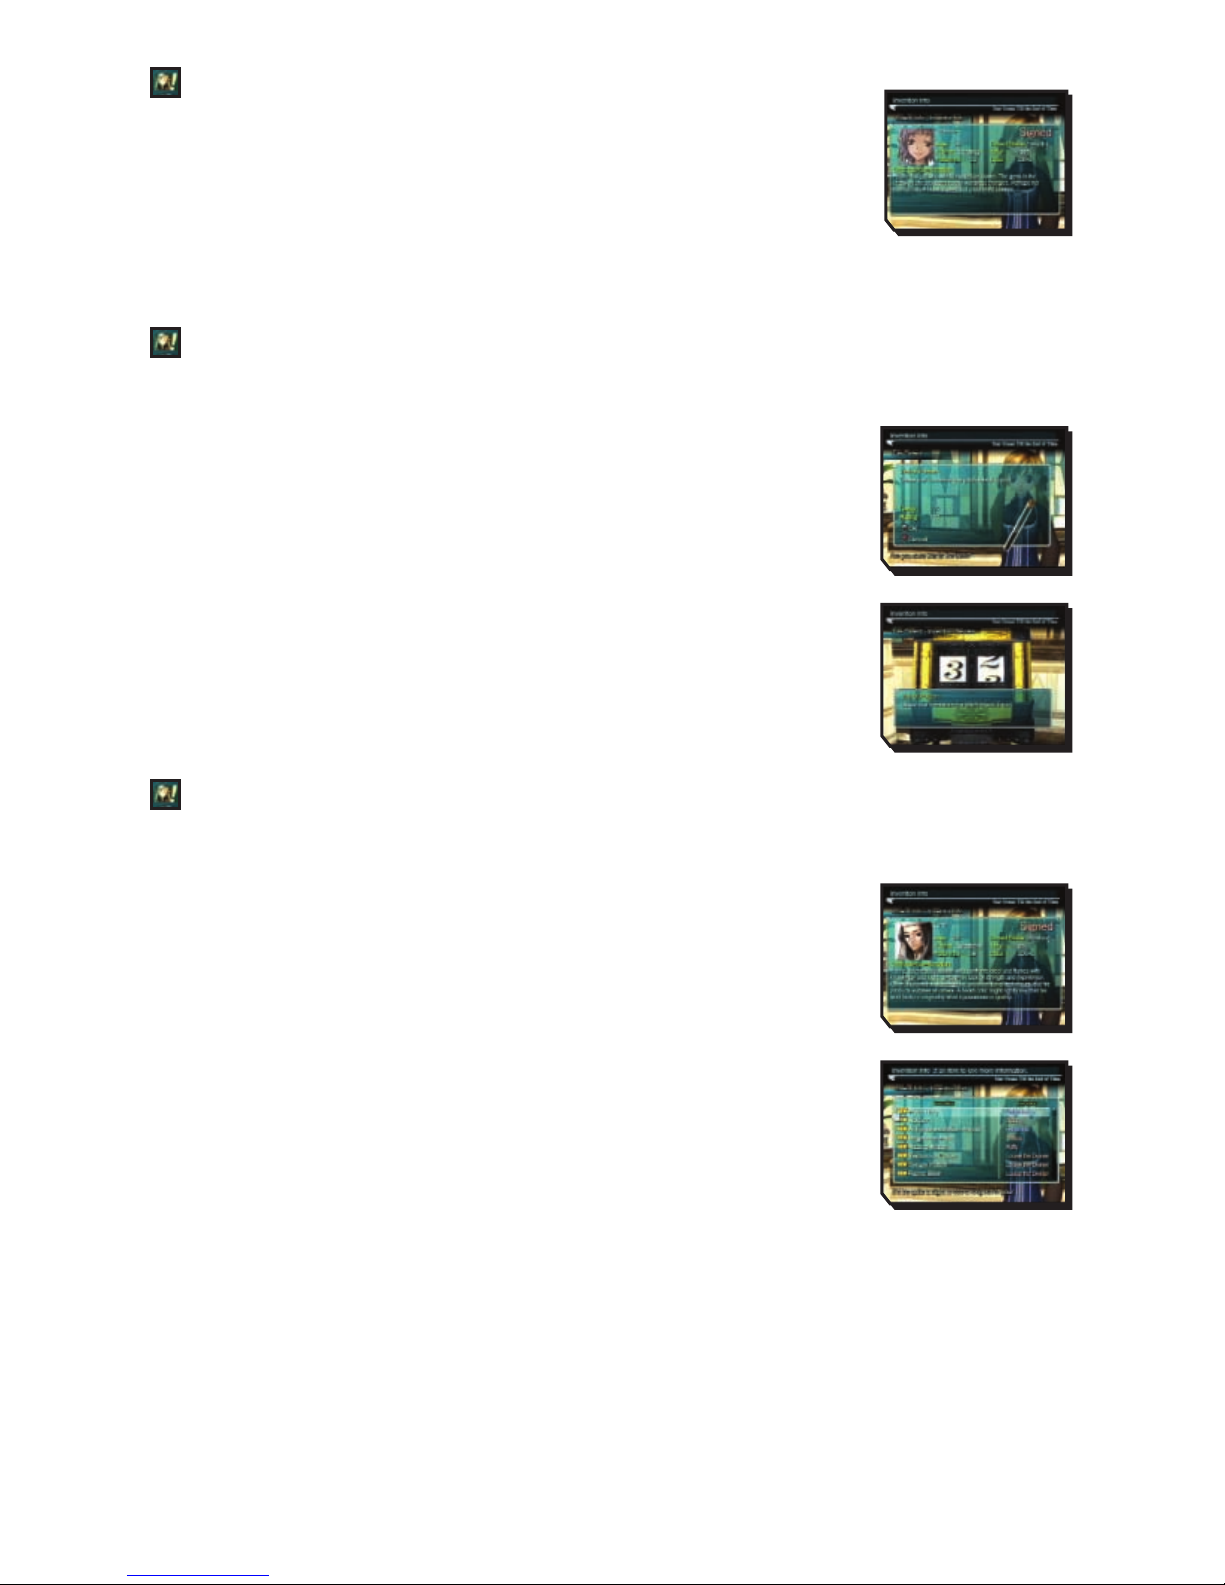
LATEST INFO - GET INFORMATION ON INVENTIONS
Here you can check on the activity of inventors and get information on the latest
inventions. You can choose from the three menu options listed below. Move the
cursor to the desired option and press the Sbutton to view detailed
information.
Options available in Latest Info:
1. Inventions 2. Items in store 3. Registered inventors
FILE PATENT – FILE A PATENT FOR YOUR INVENTIONS
When you invent a new item, you can file a patent for it.
STEP 1: Select the item you want to patent
When you select and confirm "File Patent", a list of eligible items will be
displayed. Select one with the left analog stick or directional buttons, then
press the Sbutton to confirm.
STEP 2: Have your invention reviewed
Next, a description of the invention will appear. If you want to file a patent for
the item, confirm by pressing the Sbutton. Your invention will then be
reviewed. After checking the evaluation results, press the Sbutton to finalise
the filing process. The more points you accumulate from these reviews, the
higher your ranking as an inventor will be, and the more money you will make.
CHECK INFO – VIEW INFORMATION ON INVENTORS AND SHOPS
You can view information on inventors and shops all over Elicoor II. Select the desired menu option with
the left analog stick or directional buttons, then press the Sbutton to confirm.
Inventor Info – Check information on inventors
You can check information on registered inventors. Choose an inventor from the
list with the left analog stick or directional buttons, then press the Sbutton to
confirm.
Invention List – Check items that have been created
Select an item with the left analog stick or directional buttons, then press the
S
button to display details on that item. Press the Sbutton again to display the
shops where the item is sold.
Shop Info – Check the items sold in each shop
You can check each shop to see what items it has for sale. Select a town from
the workshop map with the left analog stick or directional buttons, then press the
S
button to
confirm. Then select a shop to see the items available there.
Workshop Map – Check the locations of workshops and inventors
You can display the workshop map to check on the locations of workshops and inventors, and to see
the facilities available at each word shop. It can also come in handy for checking locations of towns and
dungeons in relation to each other.
Rankings – Check inventor rankings
You can check inventor rankings and view information on specific inventors.
Page 19
CHANGE ORDERS – TELL YOUR INVENTORS WHAT TO DO
You can change orders given to the inventors working for you. Please see the INVENTING ITEMS
section for more details on the orders you can issue.
ALERTS – SET UP ALERTS
When you set up alerts, an icon will appear on the screen whenever the specified conditions are met.
Listed below are the four alerts you can set up. Select an alert with the left analog stick or directional
buttons, then press the
S
button to turn it on or off.
• Someone files a patent • New product hits the stores
• Contracted inventor patents an item • New inventor enters the development race
DATA
Here you can save or load data using a Memory Card. Select a MEMORY CARD slot and file
with the left analog stick or directional buttons, then press the Sbutton to confirm.
SAVE – Save data
Save your progress in the game. You will need at least 175KB of free space to save game
data. You will need an additional 1,200KB of free space to collect Battle Trophies.
LOAD – Load data
Load data in order to resume the game from any of the saves on your Memory Card.
INVENTING ITEMS
“Inventing” is a system for modifying an existing item or creating a completely
new item. Besides weapons and armour, you can also invent such things as
food and accessories.
GETTING STARTED
In order to invent items, you must first register with
the Craftsmen’s Guild. There you will receive a Compact
Communicator, which you can use to send orders to inventors
you have contracted to work for you.
TWO WAYS OF INVENTING ITEMS:
1. Inventing items at workshops
At workshops, the player’s characters and inventors can form a team of one to three to invent items.
You can leave it up to the craftsmen’s inspiration through “Original Invention” or choose “Specify Plan”
to modify an item in your possession. Any item invented is immediately available for your use. If you
create a brand new item through Original Invention, you can file a patent for that invention.
2. Inventing items outside of workshops
You can send orders through the Compact Communicator to any inventor with whom you have signed a
contract. Instead of forming a team, you send orders to each individual inventor. You can have them
work on an “Original Invention” of their own or put them on “Standby” to await your orders. If a patent
is filed for an invention, the inventor may go up in the inventor rankings, resulting in bonus money for
you. Items invented in this way will not be immediately available, but will instead be distributed to the
shops.
Page 20
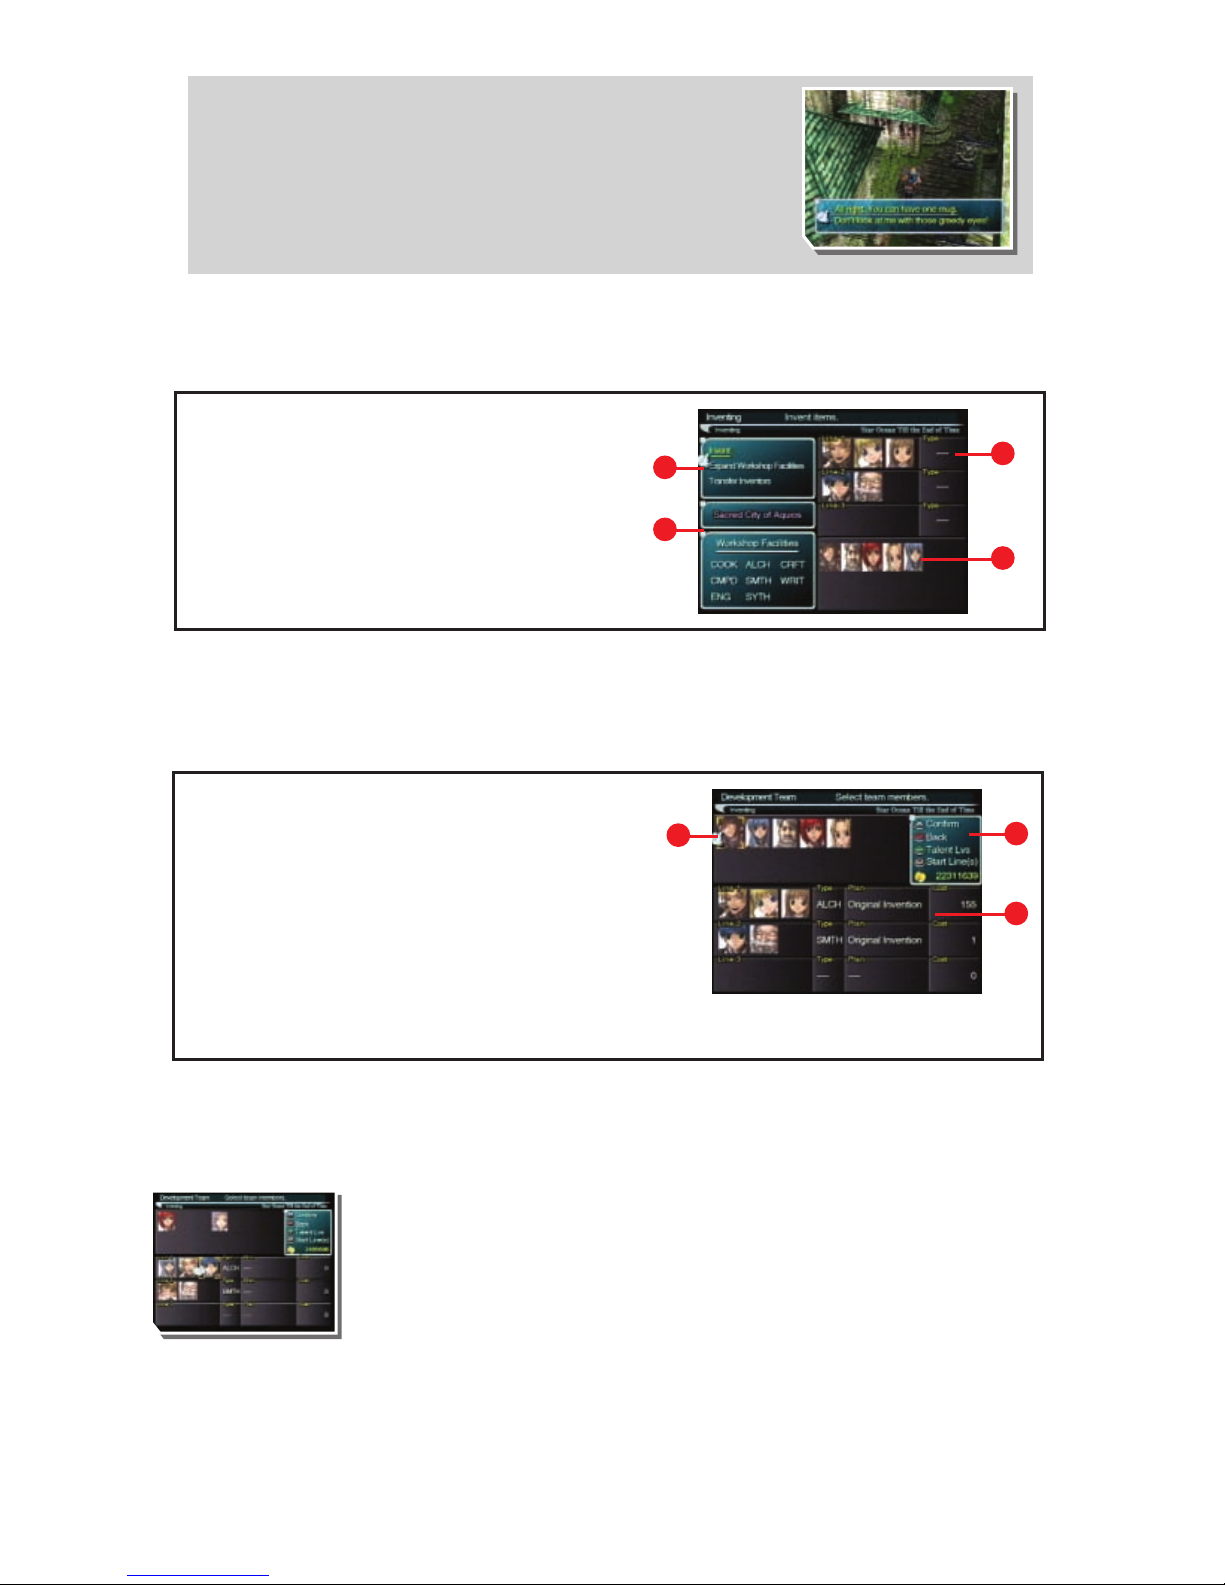
INVENTING ITEMS
You can begin setting up for invention inside a workshop by approaching the paper-laden desk. Besides
inventing items, you can also expand workshop facilities and transfer inventors to other workshops.
INVENT – CREATE AN ITEM
This command is for inventing an item inside a workshop. The following is an overview of the
invention process.
[1] SET UP THE LINES
STEP 1: Forming the Development Team
First, you must set up a team to work on an invention in the workshop. A team
can consist of one to three inventors who possess the same talent. You can
view the inventors’ abilities by pressing the çbutton.
Contracting Craftsmen
Craftsmen are scattered all over the continent. When you meet one, you
can contract him or her to work for you after negotiating and paying a
contract fee. You can even headhunt famous high-ranking craftsmen. You
should search every nook and cranny for inventors and sign them up. Some
may require certain items instead of money before they agree to a
contract.
VIEWING THE WORKSHOP SCREEN
1) Workshop Menu
2) Name of workshop and types of invention
possible there
3) Development lines set up
4) Craftsmen assigned
1
2
3
4
VIEWING THE DEVELOPMENT TEAM SCREEN
1) Inventors
These are the inventors and player’s characters who have
been assigned to the workshop.
2) Invention Menu
This displays the menu for invention and your current funds.
3) Lines
The more lines available, the more items you can invent
simultaneously.
1
2
3
Page 21
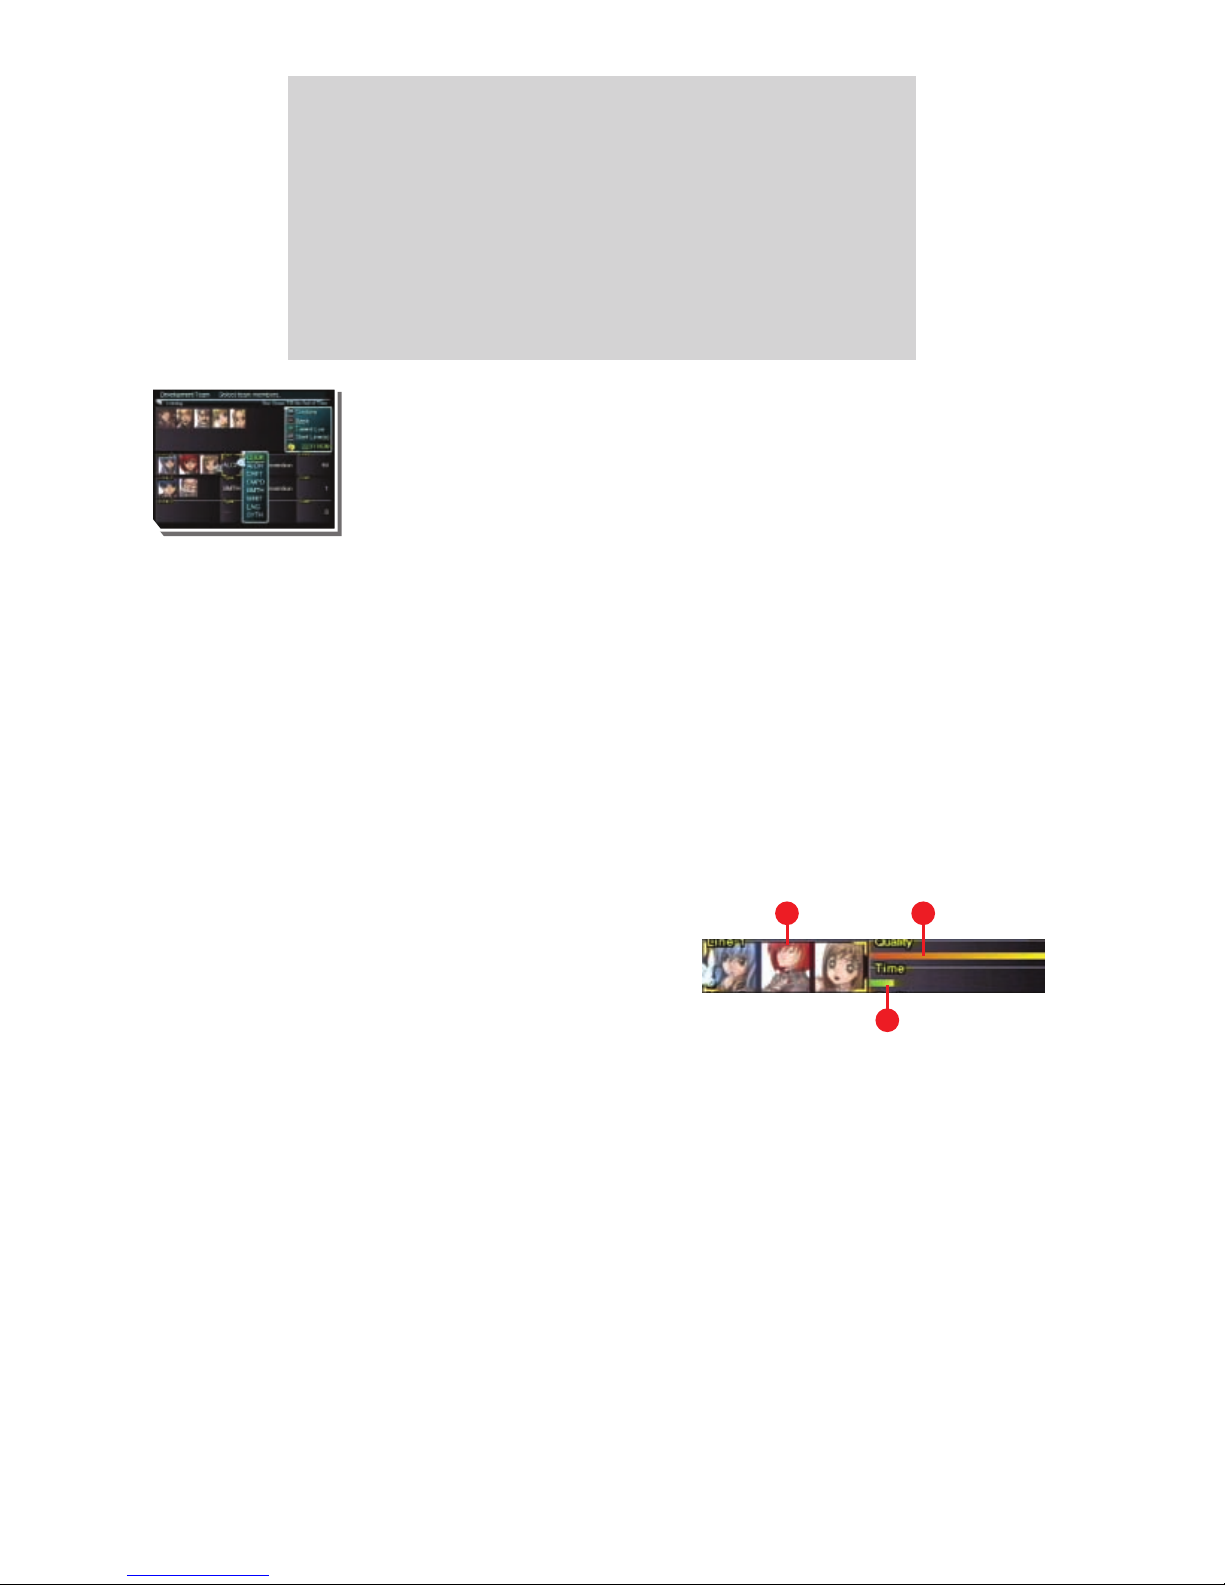
Next, choose the type of item you want to invent.
Text colors are explained below:
White – Invention possible in current workshop with current team.
Pink – Invention possible in current workshop, but not with current team.
Grey – Invention not possible in current workshop. You must expand workshop facilities.
After selecting the type of invention, you need to select either “Original Invention” or “Specify Plan”
(please see below). Re-selecting the same option will make the cost change, so you can keep doing this
until you are happy with the cost displayed. This concludes the line setup. If you want to set up another
line, follow the steps above on a different line.
• Original Invention – An item will be created. You might even invent a new item.
• Specify Plan – You can modify an item by combining it with other materials.
[2] BEGIN THE INVENTION PROCESS
After you have set up the lines, you can start the invention process by pressing the
√
button.
You can give commands for each line while invention is in progress.
Inventor Talents and Abilities:
COOK (Cooking) – Preparing food
CRFT (Crafting) – Making accessories
SMTH (Smithery) – Forging equipment like weapons and armor
ENG (Engineering) – Making guns and other machinery
ALCH (Alchemy) – Creating gems
CMPD (Compounding) – Developing medicine
WRIT (Writing) – Writing tomes and scrolls that teach new skills
SYTH (Synthesis) – Combining items with weapons
VIEWING THE INVENTION-IN-PROGRESS SCREEN
1) Characters participating in invention
You can determine the success or failure of an invention by
the facial expressions of the characters.
2) The QUALITY bar
This shows the success rate of the invention. The quality of
an invention decreases with time. The invention fails if this bar reaches zero.
3) The TIME bar
This shows the time it takes to try and make one unit of an item (one cycle). When the bar reaches the
right end, the first cycle ends and the second cycle automatically begins.
Things you can do while the line is moving:
Direction (
≈
button):
When you press the
≈
button, you will be asked if you want the item to be submitted. Select “Yes” to
submit it and to end the invention process. Select “No” to continue development.
Check Status (
ç
button):
You can check on what other inventors all over the continent are doing.
Abort (
Ω
button):
You can abort development and return to the workshop screen.
1 2
3
Page 22
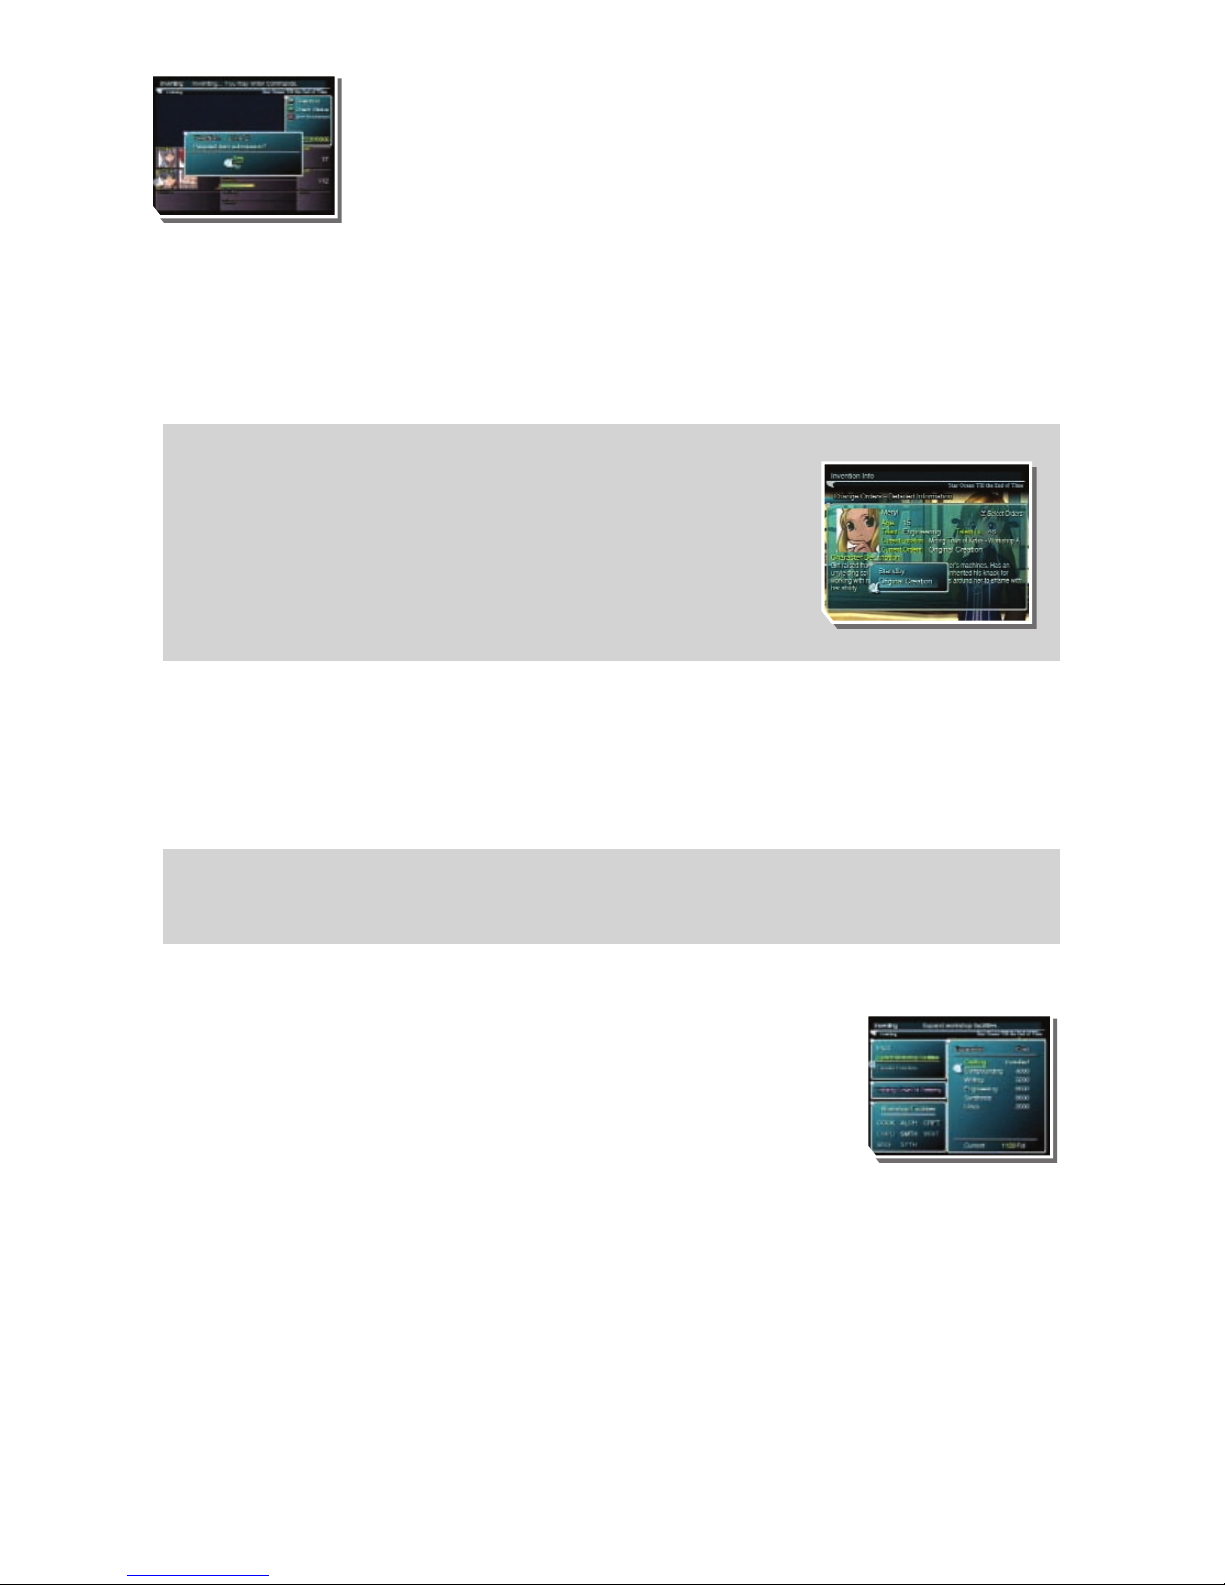
[3] INVENTION COMPLETE – OBTAIN ITEM
If you select “Direction” by pressing the ≈button during development, you will
be asked if you want the item to be submitted. Selecting “Yes” will end the
invention process, and if an item was successfully created, you can check its
details (see below).
• Type of item • Name of item • Quantity
• Factors • Description of item
If you succeed at inventing a new item, you can file a patent for it. Please refer to the INVENTION INFO
section for details on how to file a patent.
NOTE: If the item you invented already exists, you cannot file a patent for it.
EXPAND WORKSHOP FACILITIES
You can modify a workshop to increase the number of lines and the types of items that can be created
there. Be aware that expanding workshop facilities will cost money. No more than three lines can be
set up in any workshop.
TRANSFER INVENTORS
You can transfer craftsmen if, for example, you want to assign them to the
workshop in your current location. However, there is a limit to the number of
craftsmen you can assign to each workshop.
To transfer an inventor, select them from the workshop they are currently in,
and then select a space in the workshop you wish to transfer them to. You
can only transfer inventors to workshops in towns.
Giving Orders to Craftsmen
If you want items to be invented outside of workshops, you can order your
craftsmen to do it for you. Go to the Main Menu > Invention Info > Change
Orders, select a craftsman, and choose “Original Creation”.
• Original creation: The inventor will invent items on his or her own. When an
inventor is ordered to work on an original creation, the development costs will be
subtracted from your current funds.
• Standby: The inventor will not do anything.
The Cost of Inventing Items
Inventing one unit of an item will incur a certain cost, so be sure to keep an eye on your money. Also, be aware
that the chances of successful invention decrease as the QUALITY bar is expended.
Page 23
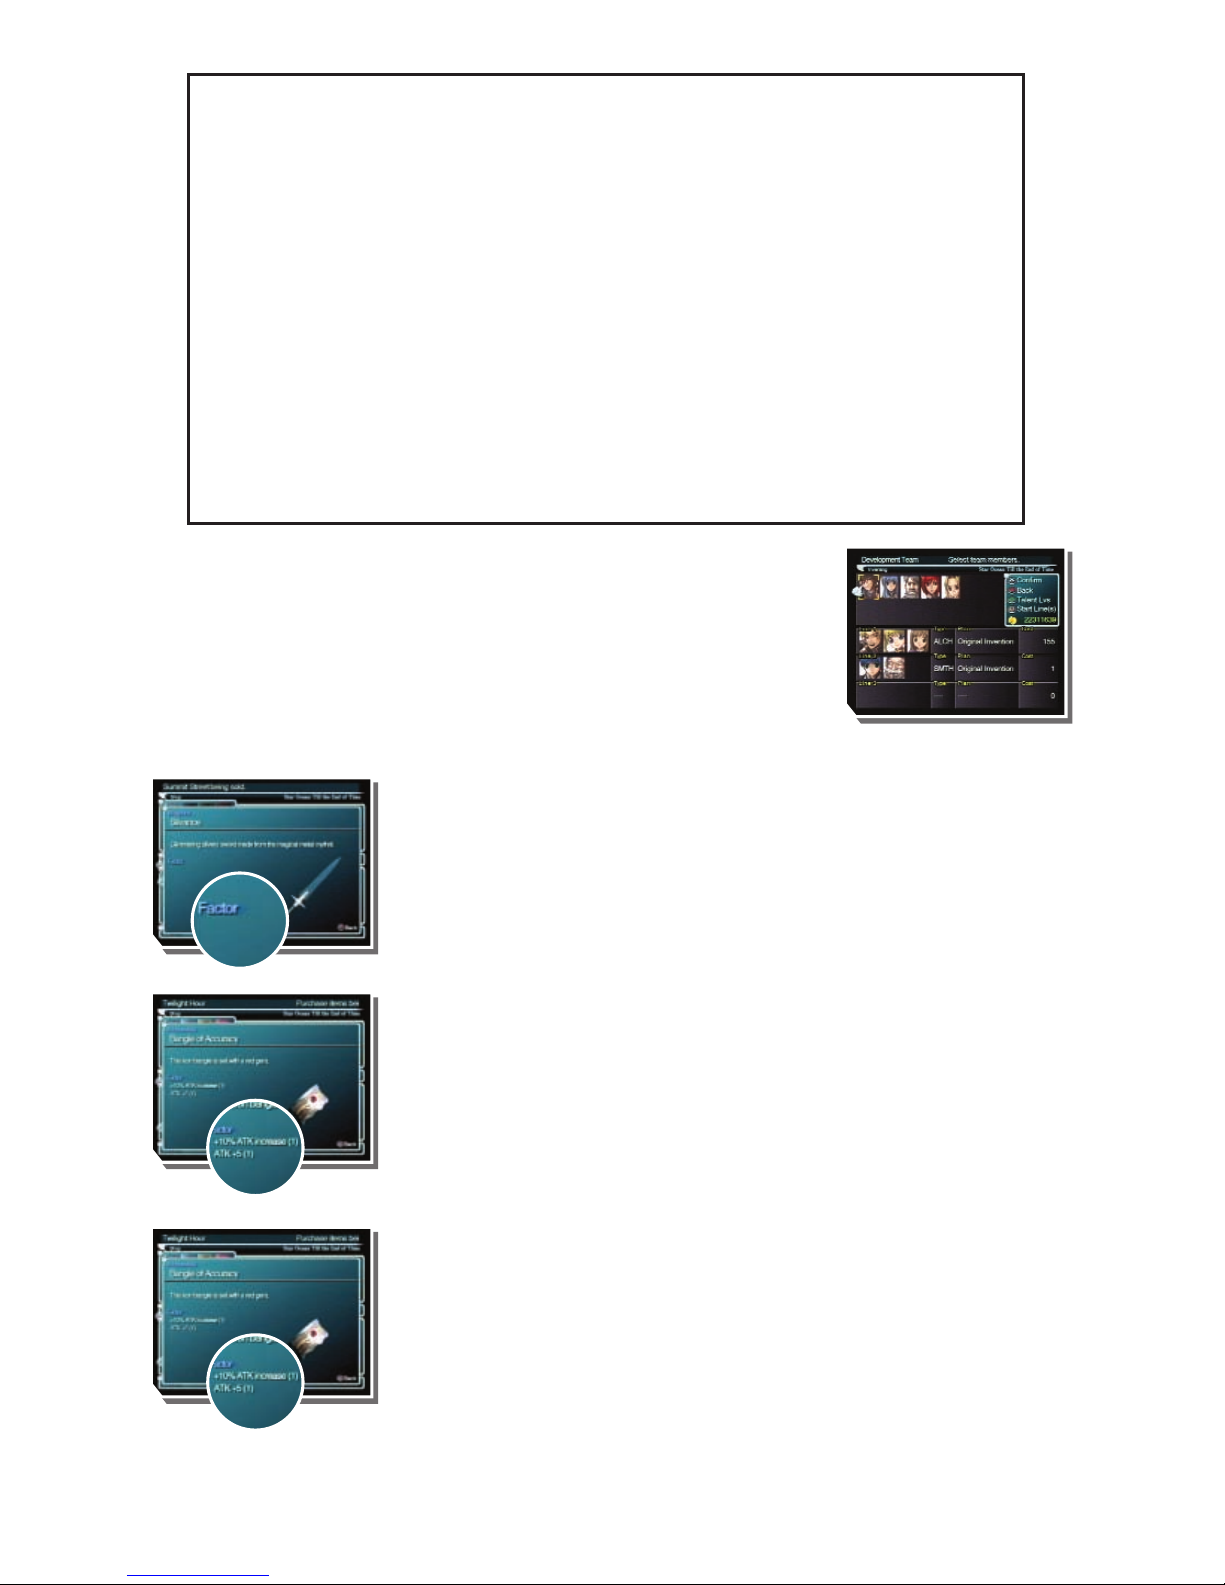
LET’S TRY INVENTING AN ITEM
Adding a factor to a weapon
You can add many effects to an item through certain types of invention like
Crafting and Synthesis. Below is an example of adding a factor to a weapon
through Synthesis. This should give you an idea of invention’s vast potential.
SAMPLE INVENTION FLOW:
Step 1: Make an accessory
A line is set in the workshop for “CRFT” (Crafting), “Original Invention” is
chosen, and the Bangle of Accuracy is made. The Bangle has the factor
“+10% ATK increase”.
Step 2: Enhance the accessory
The line for CRFT is kept, but now “Specify Plan” is selected in order to
enhance the Bangle of Accuracy invented in Step 1. Crafting materials are
necessary in order to execute this step. This enhancement can result in a
Bangle of Accuracy – R1, which raises the factor from “+10% ATK increase”
to “+30% ATK increase”.
Step 3: Synthesise the accessory and weapon
Finally, the accessory enhanced in Step 2 is synthesised to a weapon by
setting a line in the workshop for SYTH (Synthesis). Synthesis materials are
needed in order to execute this step. This will result in the reinvention of the
weapon with “+30% ATK increase”. The character using this new weapon
will have an increased ATK of 30% - in other words, 1.3 times the attack
that was possible with the original weapon.
INVENTING ITEMS Q&A
Here is some basic information you should know about inventing items. It should help you invent items
that will aid your adventure.
Q1: What happens when I file a patent?
A: The item will be distributed to various shops. When you file a patent, the item will be evaluated by
the Guild. Based on the evaluation, you can go up in the inventor rankings and earn ranking bonuses.
Q2: Why can I only make the same items?
A: You should try changing the members of your development team. The variety of items will increase
with two or three members instead of just one. Talent levels will also affect the types of items you can
invent. You should look for craftsmen with higher talent levels. Also, some items can only be created by
specific inventors.
Q3: What are the numbers in brackets after item descriptions?
A: The numbers in brackets show the number of possible outcomes when the item is refined using
“Specify Plan”. If an item has no bracketed numbers, it cannot be refined. You also cannot refine an
item without the appropriate materials.
Page 24
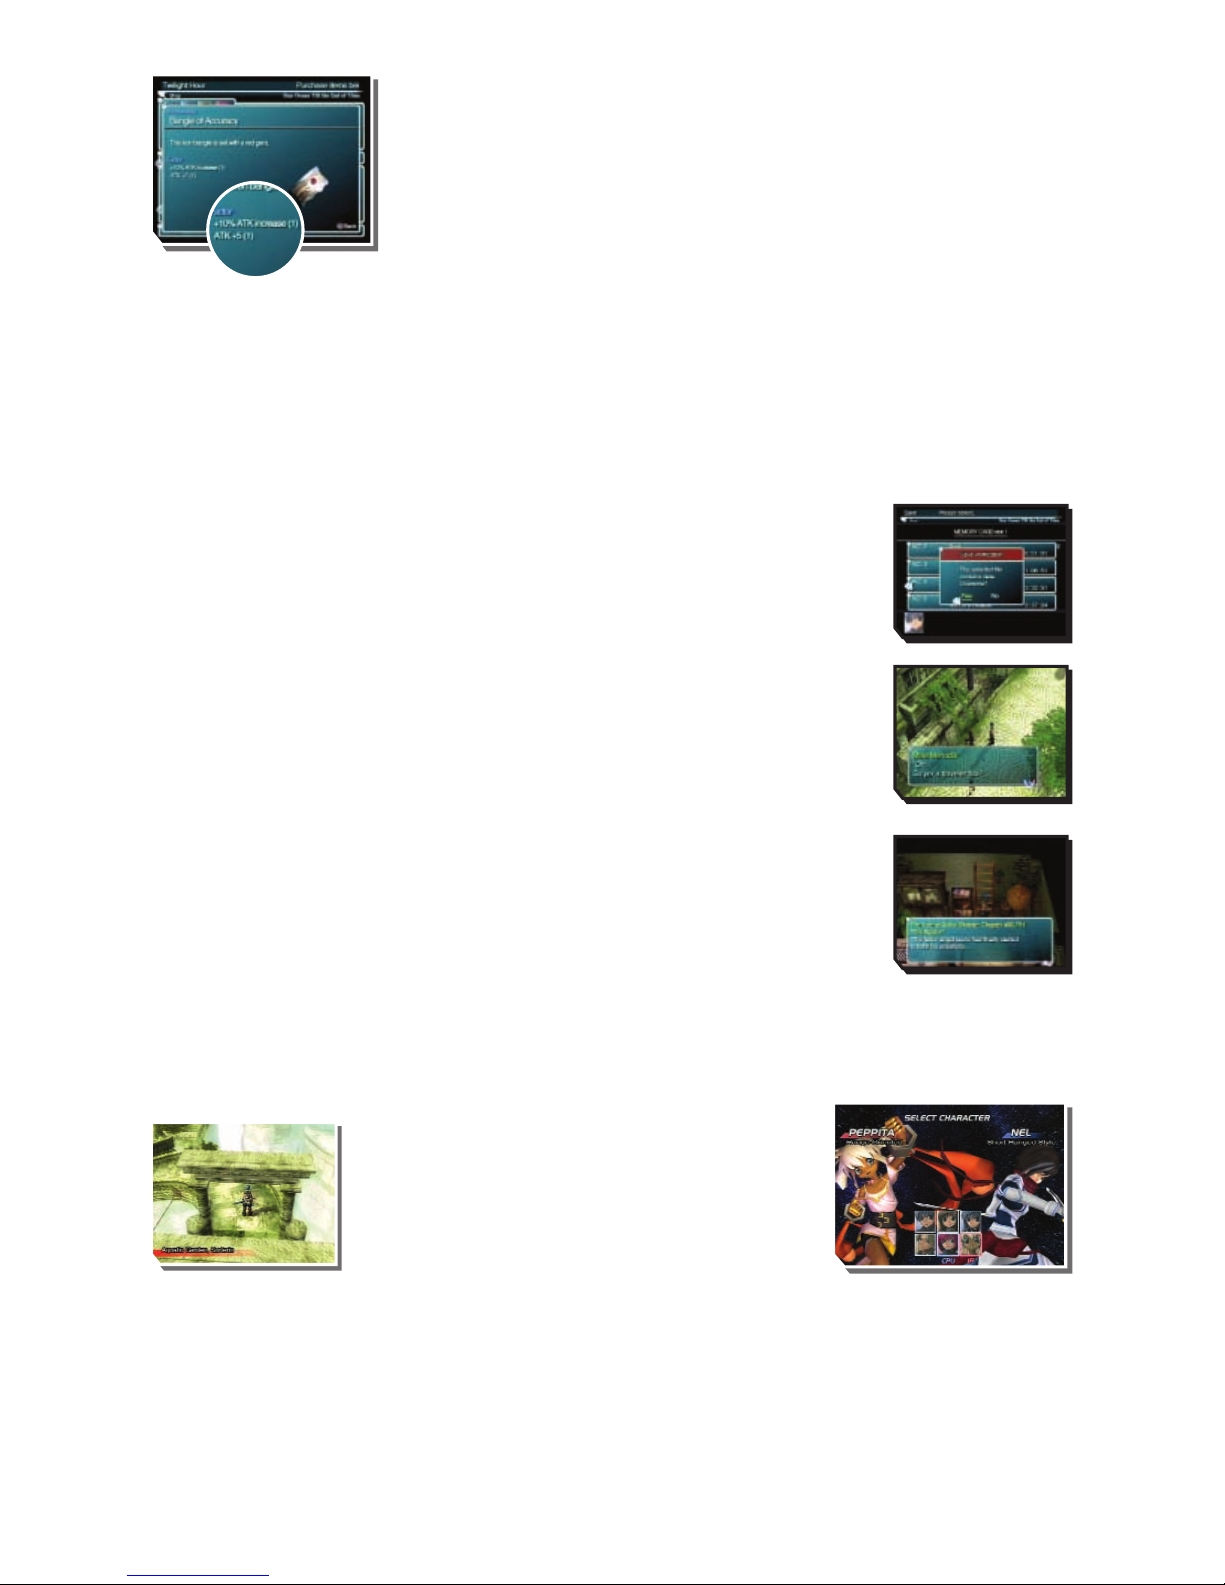
Step 4: Synthesize the accessory and weapon
Finally, we can synthesize the accessory you enhanced in Step 3 to the
weapon you selected in Step 1 by setting a line in the workshop for SYTH.
You must have synthesis materials in order to execute this step. This will
result in the reinvention of the weapon with “+30% ATK increase.” The
character using this new weapon will have an increased ATK of 30%--in
other words, 1.3 times the attack that was possible with the original
weapon.
Here are some hints for your journey. Keep them in mind as you set out into the vast universe.
ADVENTURE HINTS
Here are some hints for your journey. Keep them in mind as you set out into the vast universe.
01 – Save your progress often
There may be times during your long adventure when the unexpected happens or
when you encounter a seemingly unbeatable enemy. You should save your
progress frequently to be prepared for such circumstances.
02 – If the story won’t advance, talk to people
If it seems like the story is not progressing, try talking to townspeople or party
members. Sometimes you can talk to the same person several times and get
different responses each time. Use the map feature with the
R
button to find
out which buildings and rooms you can enter, and have conversations with as
many people as you can.
03 – Examine as many areas as possible
You can examine many things in the Star Ocean universe by pressing the
S
button. You may find the secret to entering a room on a control panel or even on
someone’s bed.
FIGHTING MODE
STAR OCEAN™TILL THE END OF TIME™features a mode where you can test your skills against party
members. Follow the steps below to play Fighting Mode:
1. Explore a particular dungeon
2. Retrieve the treasure in the dungeon
3. Show the treasure to a certain person
4. Go to the fighting arena
You will first have to make some progress in the story.
PLAYING FIGHTING MODE
In Fighting Mode, you can choose from several fighting formats, including one-on-ones and
battle royales.
Page 25
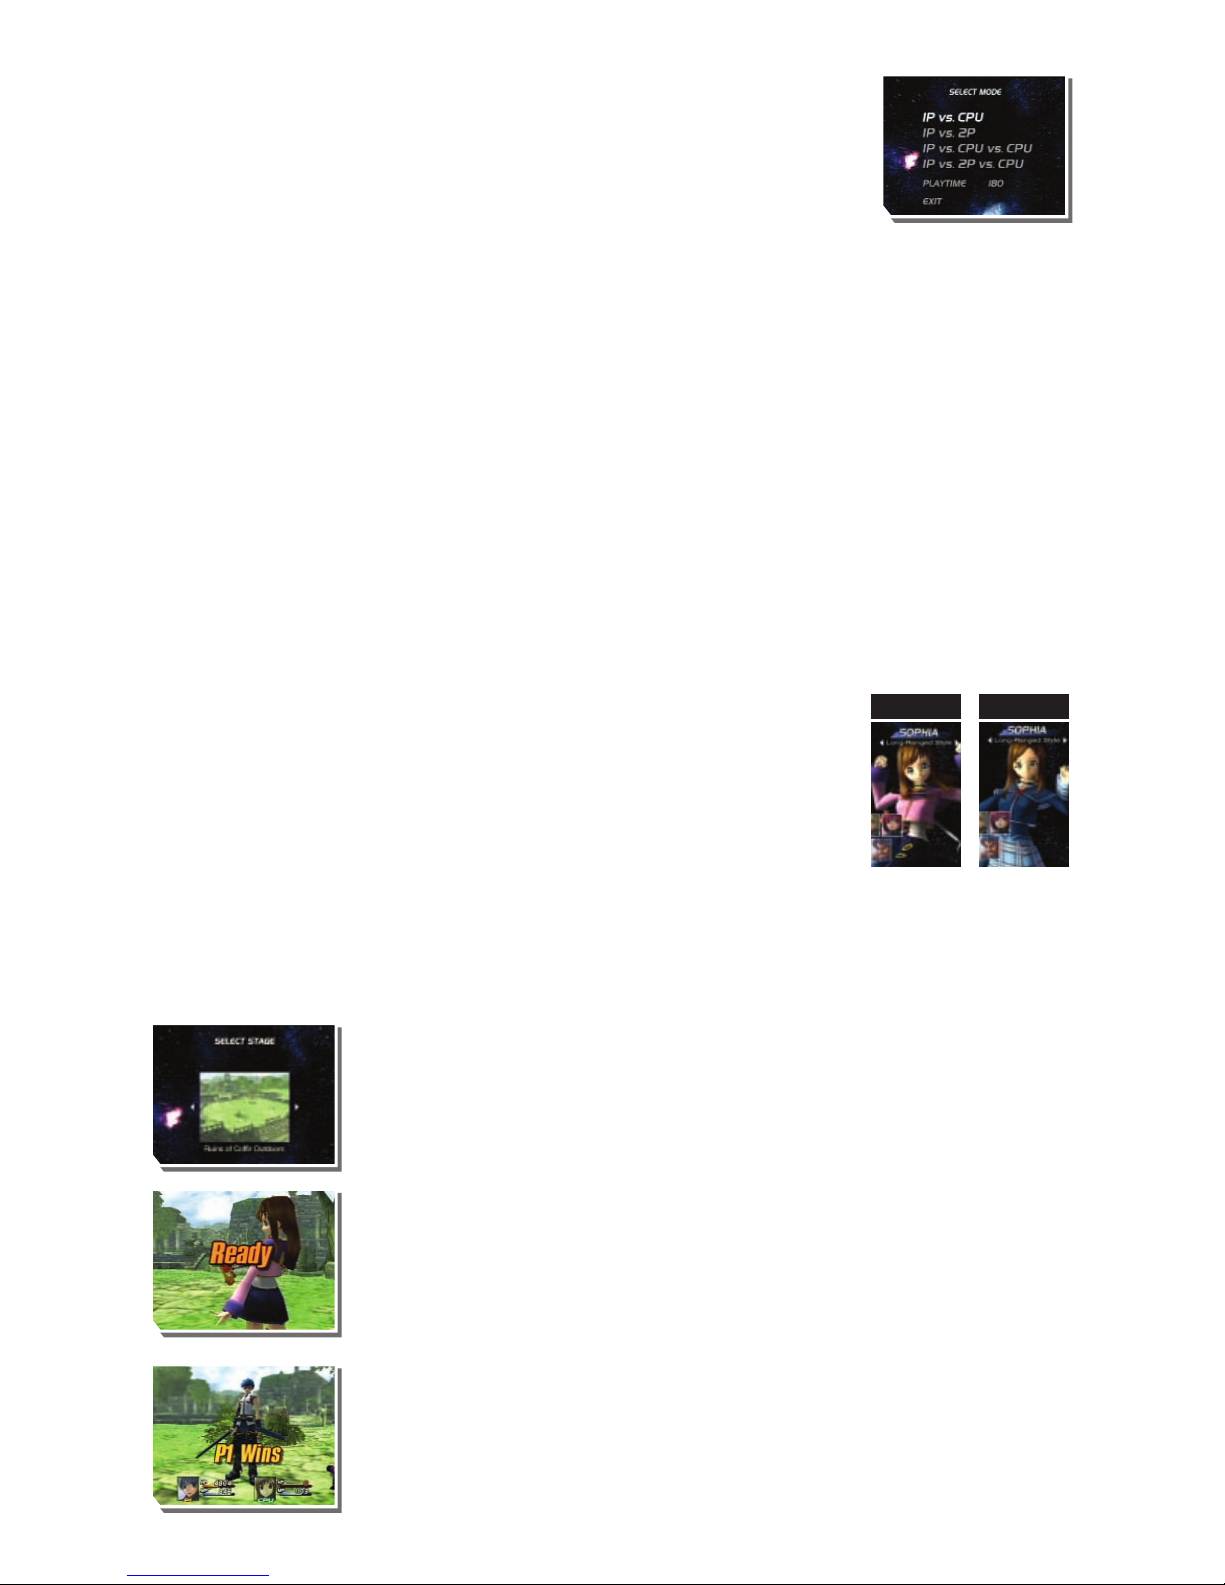
SELECT A TIME LIMIT
You can select a time limit of 90 seconds, 180 seconds, or unlimited (∞). Be
aware that if you select a fighting format without first setting a time limit, you
will be taken to the next screen. The default time limit is 180 seconds.
SELECT A FIGHTING FORMAT
You can choose from the four fighting formats below. Fight against the CPU to
hone your skills, or play with a friend for endless fun.
1P VS CPU
The player character battles a character controlled by the CPU
1P VS 2P
Two players control characters to battle each other
1P VS CPU VS CPU
The player character battles two characters controlled by the CPU
1P VS 2P VS CPU
A cut-throat battle between two player characters and a character controlled by the CPU
SELECT CHARACTERS
Next, select your character. You can choose from the ten playable characters in the main game
(including Fayt). They will become available in Fighting Mode once you obtain certain cards in the
main game.
Once you’ve selected a character, you can select his or her costume. The
costume will change according to the button you press to confirm your
character selection (see details below). Third and fourth costumes will become
available once you obtain certain cards in the main game. Some characters
may have even more than four outfits.
≈
button – 1P color çbutton – 2P color
√
button – 3P color R1 button – 4P color
Next, select a skill set for the character. You can choose from three skill sets for each character (see
the CHARACTER SKILL SET section for more details).
SELECT A STAGE
You can choose a stage after selecting your characters. Only certain locations
that have already appeared in the story will be available. Places which you
haven’t yet seen will be displayed as “???”.
STARTING A MATCH
Once you’ve selected a stage, the match begins. You cannot use the Battle
Menu. However, you can pause the fight by pressing the
ç
button. Hold down
the Ωbutton while the game is paused to return to the character selection
screen.
ENDING A MATCH
If you defeat your opponent within the time limit, victory is yours! If neither side
wins within the time limit, it’s a draw. You will return to the character selection
screen when the battle is over.
1P color 2P color
Page 26
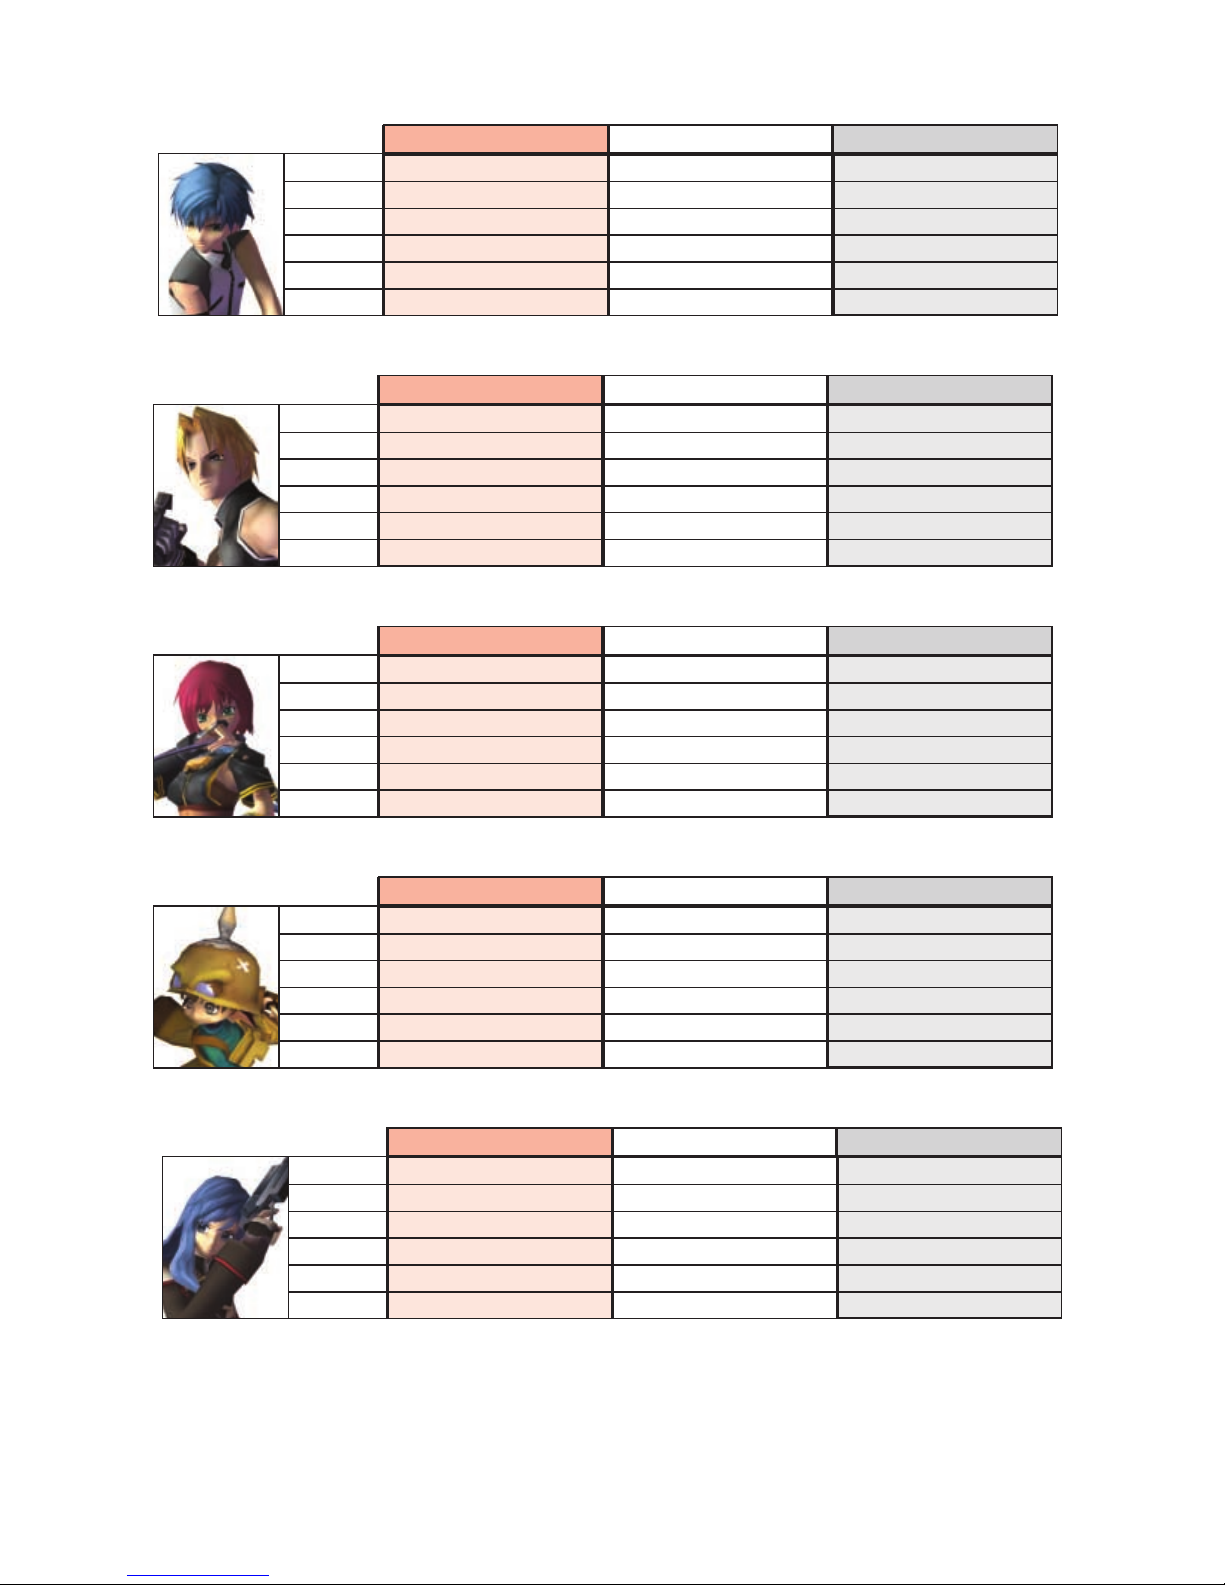
CHARACTER SKILL SETS
Emphasize Hit No. Balanced Style Agility-Oriented
Ω
S Blade of Fury Side Kick Blade of Fury
Ω
L ------ Shotgun Blast Dimension Door
≈
S Air Raid Charge Side Kick
≈
L Drain Ice Blade Stun
Support 1 Max Fury ------ Standby Healing
Support 2 ------ ------ ------
FAYT
Charging Style Emphasize Hit No. Balanced Style
Ω
S Aerial Assault Electric Fists Fists of Fury
Ω
L Fiery Tackle ------ Aerial Assault
≈
S Charge Acrobat Locus Hammer of Might
≈
L ------ ------ -----Support 1 ------ Max Fury -----Support 2 ------ ------ ------
CLIFF
Short-Range Style Mid-Range Style Long-Range Style
Ω
S Charge Lightning Chain Shadow Wave
Ω
L ------ Shadow Wave Lightning Chain
≈
S Divine Wrath Shockwave Shadow Wave
≈
L Whirlwind ------ Flying Guillotine
Support 1 ------ No Guard -----Support 2 ------ ------ ------
NEL
Short-Range Style Range-Oriented Long-Range Style
Ω
S Charge Raging Helmet Flying Torpedo
Ω
L Fiery Fury ------ Whirling Heat
≈
S Piercing Claw Fiery Fury ------
≈
L ------ ------ Bug Triad
Support 1 Max Fury No Guard Max Fury
Support 2 ------ ------ Standby Healing
ROGER
Short-Range Style Mid-Range Style Long-Range Style
Ω
S Crescent Locus Gravity Bullet Charge
Ω
L Pulse Blast Laser Blast Aiming Device
≈
S Triple Kick Charge Scatter Beam
≈
L ------ ------ Radiation Bots
Support 1 Max Fury ------ -----Support 2 ------ ------ ------
MARIA
Page 27
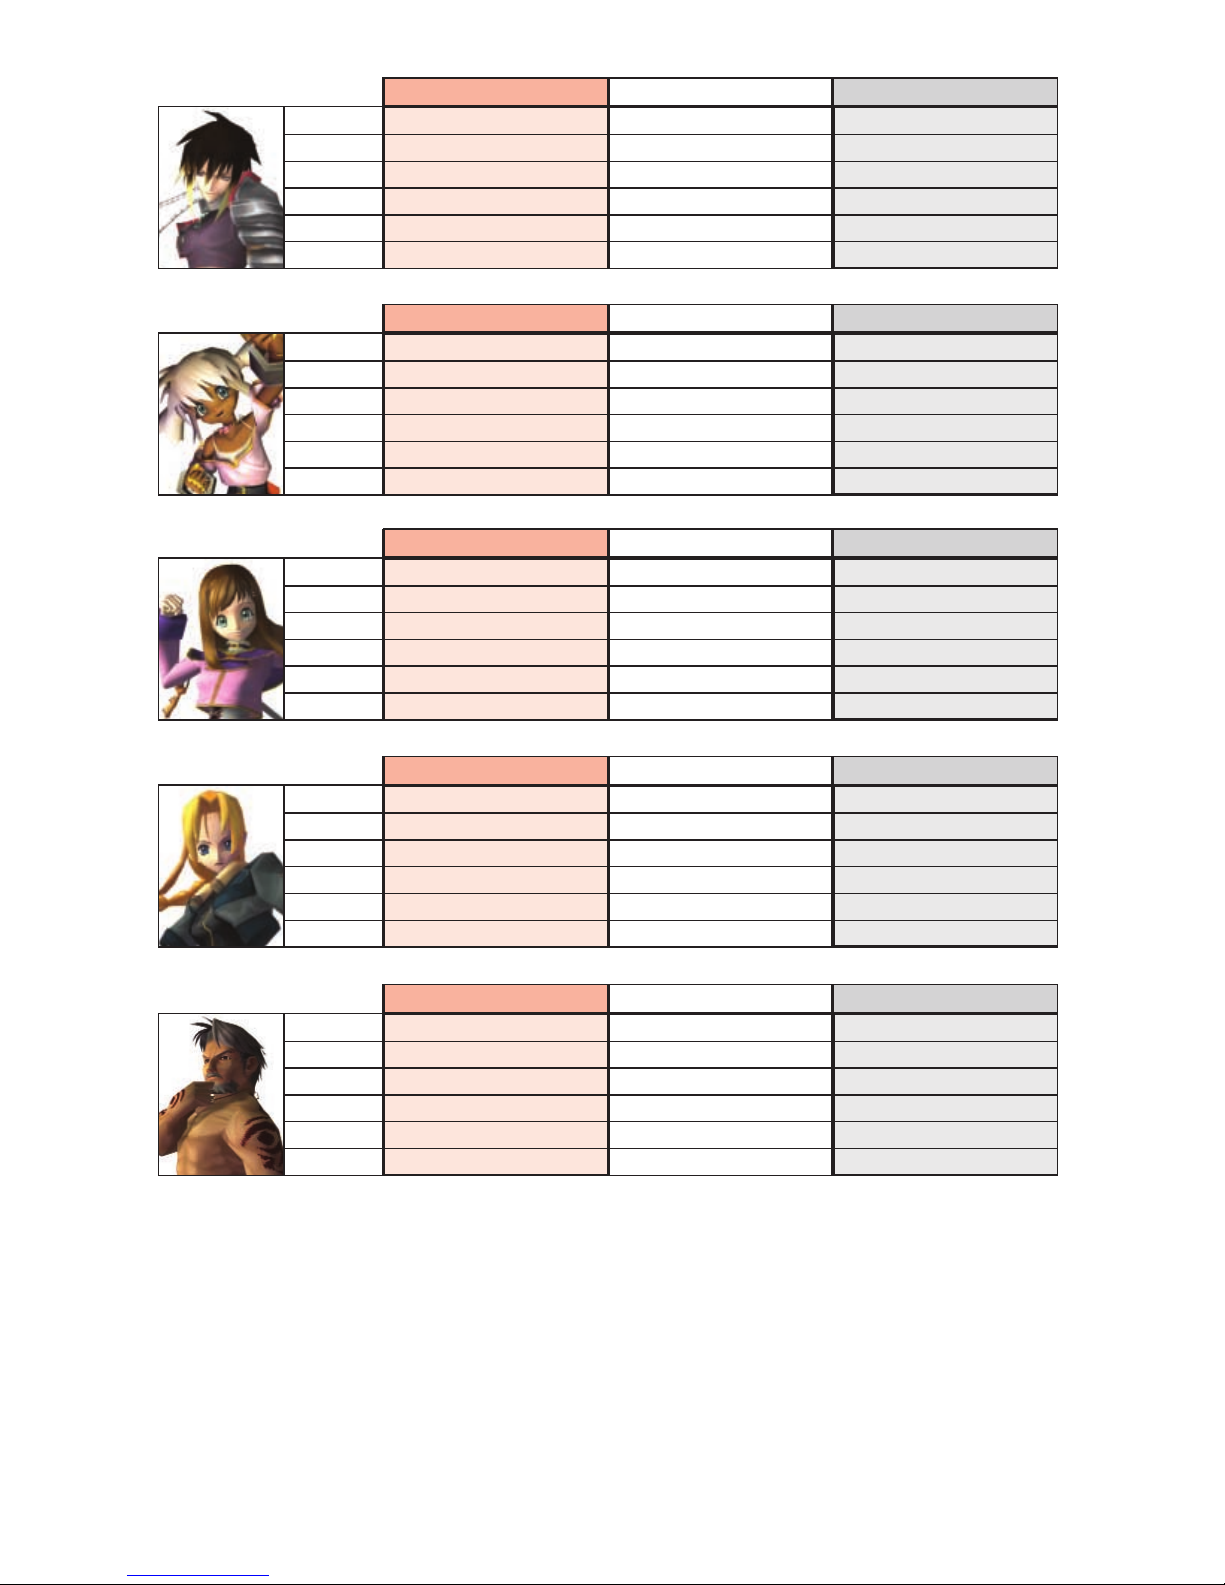
Balanced Style Simple Style Range-Oriented
Ω
S Kaboom Charge Stun
Ω
L Instant Blast Instanto Blast Magic Hook
≈
S Charge Aerial Faerie Friend
≈
L Magic Hook ------ -----Support 1 ------ Max Fury No Guard
Support 2 ------ Critical Hit HP ------
PEPPITA
Long-Range Style Short-Range Style Simple Style
Ω
S Earth Glaive Charge Charge
Ω
L Fire Bolt Drain Stun
≈
S Lightning Blast Efreet Critical Hit
≈
L Thunder Flare Fire Bolt ------
Support 1 Standby Healing Critical Hit HP No Guard
Support 2 Max Fury ------ Critical Hit HP
SOPHIA
Balanced Style MP-Attack-Oriented Simple Style
Ω
S Shockwave Swirl Aura Wall Aerial
Ω
L Air Slash Palm of Destruction Stun
≈
S Double Slash Hand of Doom Charge
≈
L Dragon Roar ------ Increase HP Damage
Support 1 ------ ------ Max Fury
Support 2 ------ ------ ------
ALBEL
Balanced Style Range-Oriented Charging Style
Ω
S Crescent Locus Sphere of Might Charge
Ω
L Aerial Assault Hammer of Might Stun
≈
S Electric Fists Triple Kick Avenger Charge
≈
L ------ ------ -----Support 1 ------ Max Fury Standby Healing
Support 2 ------ ------ ------
MIRAGE
Long-Range Style Simple Style Charging Style
Ω
S Lightning Blast Fire Bolt Chaos Tide
Ω
L Fire Bolt Fire Bolt Chaos Tide
≈
S Earth Glaive Titan Fist Charge
≈
L Sirocco ------ -----Support 1 ------ No Guard Standby Healing
Support 2 ------ ------ ------
ADRAY
Page 28
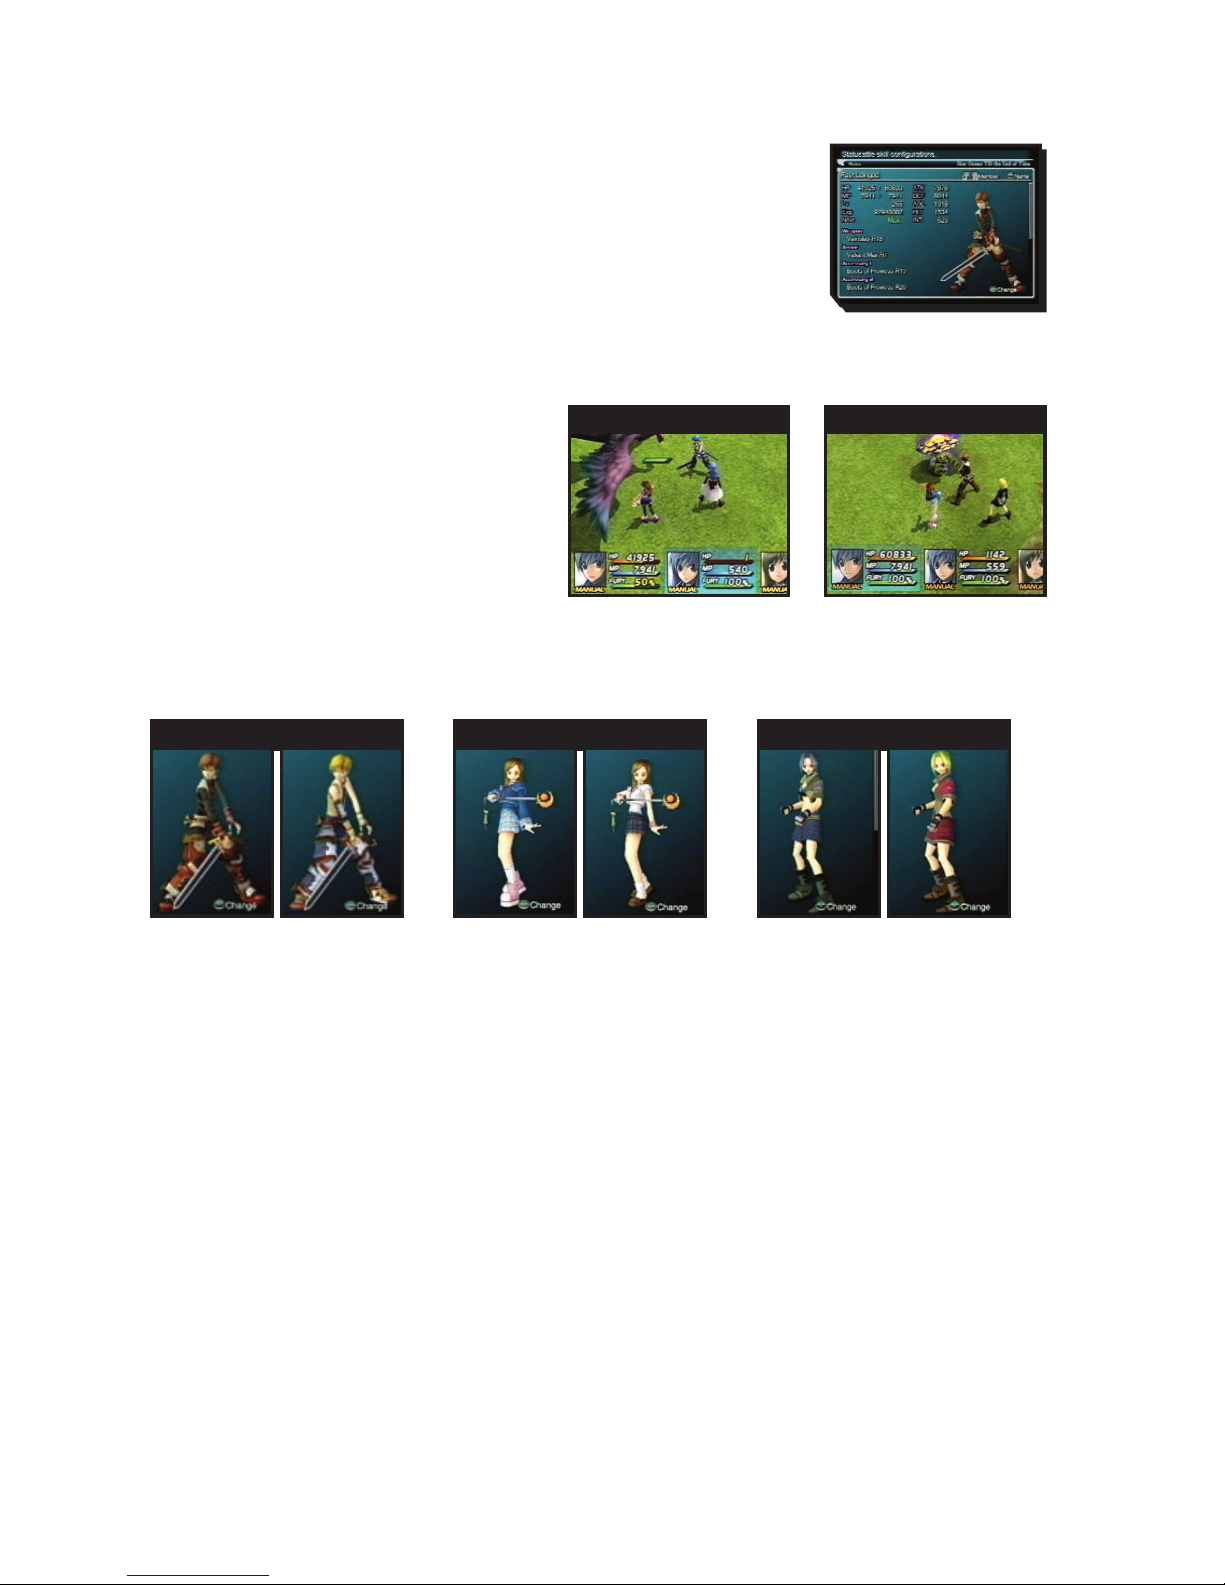
ALTERNATIVE PLAYER COLORS
ALTERNATIVE PLAYER COLORS
Alternative Player Colors* can be used in battles during the game. As you
collect specific percentages of Battle Trophies, 2P to 4P Colors will
become available in stages. After you have met the conditions for
obtaining Alternative Player Colors, go to the Main Menu > Status, then
press the Dbutton and set each character’s costume for battle.
* Alternative Player Colors are the different costumes available for each
playable character.
Conditions for obtaining Alternative
Player Colors
Characters will have only one costume at the
start of the game, but you can gain up
to four costumes as you collect certain
percentages of Battle Trophies.
Any time you wish to use the latest
Alternative Player Colors, you should check the Battle Trophies data before loading the game.
Alternative Player Color Samples
A Word about Alternative Player Colors
Even if you meet the requirements to use Alternative Player Colors, you will not be automatically
notified. Select "Battle Trophies" at the title screen to check. If you’ve qualified for the first set of extra
costumes, the message "2P Color available in Status" will flash at the top of the Battle Trophies
screen, and so on.
2P Color1P Color
Fayt
Sophia Mirage
Page 29

CREDITS
tri-Ace, Inc.
Game Designer Masaki Norimoto
Original Story/Technical Programmer/Director Yoshiharu Gotanda
Planning Director/Script Hiroshi Ogawa
Field Programmer Shigeru Ueki
Battle Programmer Yuichiro Kitao
Character Designer Jun Sato
Chief Character Designer Keiichi Asai
Chief Animation Designer Masaaki Yamashima
Chief Movie Designer Kenichi Kanekura
Chief Map Designer Koji Minagawa
Co-chief Map Designers Miyuki Yamamoto
Akiko Kojima
Atsuhiro Machida
Music Composer Motoi Sakuraba
Sound Director/Sound Programmer Hiroya Hatsushiba
System Programmer Shinji Hirachi
Battle Effect Programmer Yukihiro Yamaguchi
Main Menu Programmer Yukinori Yamaguchi
Event Tool Programmer Tetsuo Kashiwagi
Battle Monster Programmers Takaaki Hoshiyama
Natsuki Nishimura
Battle Support Programmer Tatsuya Shoji
Planner Masayasu Nishida
Map Designers Kentaro Kagami
Yuka Torigata
Hiroyuki Endo
Masato Suga
Daigo Saito
Map Support Designers Yasuko Sumiya
Takeshi Jono
Yasuhiro Akimoto
Naruhiro Kishimoto
Kunihiro Kaneda
Yutaka Shioya
Hideaki Ichihashi
Terumasa Aoyagi
Emi Noto
Saori Kurita
Character Designers Eiko Sawamura
Nana Kaneda
Masasi Nakagawa
Yutaka Watanabe
Kenichi Kaneko
Tatsuro Torikai
Animation Designers Naoyoshi Tachibana
Mariko Kamiya
Kumiko Yoshioka
Yasuhiko Shibuya
Page 30

Kaori Shibuya
Yasuko Yamauchi
Yasuo Tanaka
Yasuhito Shinchi
Movie Designers Ryoui Shirakawa
Yukinori Masuda
Kenichi Someya
Sound Design Director Yusaburo Shimojyo
Sound Designers Kohei Sagara
Etsuko Shimada
Planner Takashi Sato
System Administrators Chikaaki Tokuhiro
Takeshi Kitamura
Map Support Designers Masaki Ishiguro
Toshimitsu Hanafusa
Animation Designer Masateru Suzuki
MOTION CAPTURED BY STUDIO IBUKI
Technical Director Tetsue Kawano
Chief Motion Designer Sakura Munakata
Motion Designers Ken Hatsuumi
Takahiro Mashimo
Shintaro Seki
Kim Tae Yul
Tsuyoshi Azuma
AC FACTORY
Motion Actors Masanori Tomita
Hiromi Shinjo
Motion Actress Sawako Akimoto
Emiko Saito
Junko Kimura
Yuko Komori
Item Designers Yasuhiro Kato
Toru Murano
Takitaro Ishizawa
Hibiki Yoshizaki
Tomohiro Takada
Nozomu Kondo
Teruhisa Nemoto
Takashi Nishiyama
Souichiro Kugo
Kazuo Fujitsuka
Kenetsu Tsukamatsu
Atsuko Nozawa
Naoki Hayashi
Takeharu Sekiya
Page 31

MUSICIANS
Electric Bass Tomohito Aoki
Drums Toru Hasebe
Electric Guitar Jun Kajiwara
Tenor Saxophone Shigeo Fuchino
Hammond Organ, Piano Motoi Sakuraba
and Keyboards
Trumpets Masahiko Sugasaka
Toshio Araki
Hitoshi Yokoyama
Yuji Osada
Trombones Masanori Hirohara
Yoichi Murata
Kou Okumura
Junko Yamashiro
Horns Otohiko Fujita
Tetsuo Takano
Kensho Hagiwara
Flutes Hideyo Takakuwa
Akiko Fujita
Oboe Hiroshi Shibayama
Violins Takashi Kato
Genichiro Nakajima
Akihiro Iwamura
Ado Matsumoto
Tatsuo Ogura
Takayuki Oshigane
Nagisa Kiriyama
Koji Ootake
Aya Yokomizo
Takuya Mori
Akiko Kato
Kazuo Watanabe
Osamu Iyoku
Yuko Kajitani
Violas Aiko Hosokawa
Gentaro Sakaguchi
Yuji Yamada
Makoto Motoi
Cellos Masaki Horisawa
Makoto Oosawa
Hiroyasu Yamamoto
Tomoki Iwanaga
Contrabasses Jun Saito
Iwahisa Kuroki
Conductor Kazuo Nobuta
Music Producer/
Music Director Taku Kitahara
Musician Coordinator/
Music Director Kazuo Sudo
Recording & Mixing Masataka Ito
Masayoshi Ookawa
Page 32

Assistant Engineers Akira Kobayashi
Takehiko Naito
Recording & Mix Studios Sound Valley
Sound City
Mastering Kazuya Sato
Ikutoshi Miyata
Mastering Studios Memory Tech
Harion
THE LITTLE BIRD
(Star Ocean Version) by MISIA
Lyrics by MISIA
Music by Yudai Suzuki
Arranged by Satoru Shinoya
Time 5.09
Original track from album
”KISS IN THE SKY”
Voice Recording Studios MOVIE TELEVISION STUDIO
BEELINE STUDIO
Voice Production Manager Midori Shimazawa
Voice Production MOVIE TELEVISION INC.
SQUARE ENIX CO., LTD.
Localization Director Jin Kimura
Localization Coordinator Michiko Miyazaki
Localization Assistants Shin Kimishima
Noriko Iwahara
Localization Manager Akira Kashiwagi
Assistant Producer Hajime Kojima
Producer Yoshinori Yamagishi
Executive Producers Yukinobu Chida
Yosuke Saito
Publishers Keiji Honda
Yoichi Wada
BOWNE GLOBAL SOLUTIONS (TRANSLATION)
Director J. Patrick Riley
Business Development Planner Yuli Kim
Coordinator Steve Anderson
Engineer Naoki Matsumoto
Project Manager Yoko Muto
Translators Alexander O. Smith
Jason Franzman
Joel Sassone
QA Philip Soldini
Page 33

ZRO LIMIT PRODUCTIONS (U.S. RECORDING)
Producers Yutaka Maseba
Haruyo Kanesaku
Osamu Maseba
Director Kevin Seymour
Recording Facility Magnitude 8 Post
Digital Tracker Collin McQueen
Noriko Iwahara
Produced by ZRO Limit Productions in association with Animaze..iNC
SQUARE ENIX USA., INC.
Quality Assurance Manager David "Ribs" Carrillo
Senior Lead Product Analyst Mohammed A.C. Wright
Localization Manager Yutaka Sano
SQUARE ENIX EUROPE LTD.
President and CEO John Yamamoto
Senior Vice President Tomohiro Yoshikai
Vice President Marketing Hitoshi Isosu
and Sales
Marketing Communications Manager Stéphanie Journau
Assistant Manager, Abbass Hussain
Marketing / PR
Production Department Manager Katrin Darolle
Assistant Manager, Production Seb Ohsan Berthelsen
Assistant Manager IT & Technical Support Alex Moresby
Production and Localisation Coordinator Yuko Tomizawa
QA Team Oli Newton-Chance
Geneviève Marier Howard
André Woitczyk
Production Team Antonio Marfuggi
Nella Moscia
Rafael Ríos Pérez
Ricardo Robredo Quintana
Florence Reidenbach
Thorsten Schaefer
Special thanks to: Kumiko Kondo
Ikuyo Sanford
Nicolas Lochet
Yannick Spagna
 Loading...