

Page 1
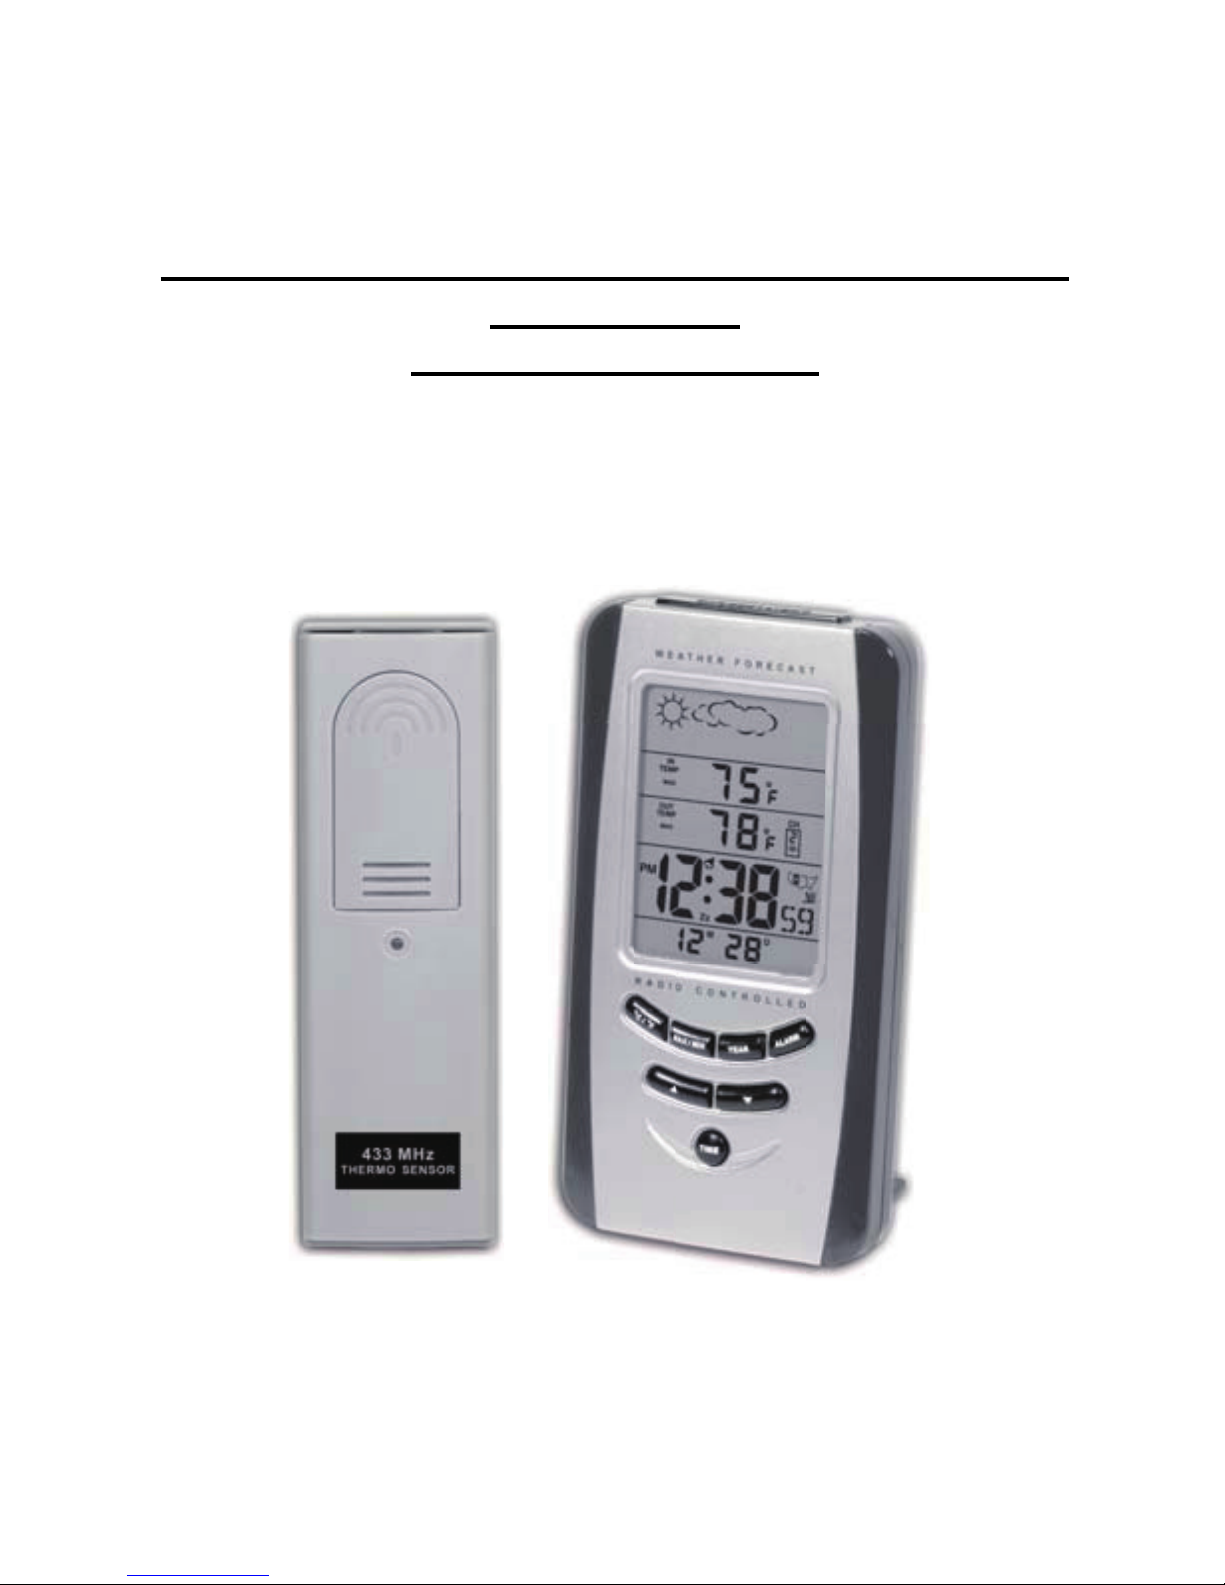
RADIO CONTROLLED WIRELESS WEATHER STATION
MODEL C8243
USER’S INSTRUCTIONS
Page 2

2
QUICK START GUIDE
1. Insert two AA batteries into the transmitter and three
AA batteries into the receiver
2. Place the transmitter in desired location to obtain
weather information. (Transmitter can be placed up to
98 feet away from the receiver.)
3. The receiver and transmitter will automatically
synchronize with the time signal, via satellite, displaying
indoor/outdoor temperatures, date, time and weather
forecast. (Synchronization can take several hours.)
4. Change the time zone by pressing the “ALARM” key
and toggling between zones by pressing the “DOWN”
key. (A map will display your selected time zone.)
5. Change the temperature unit to °C for Celsius or °F
for Fahrenheit by pressing the “°C/°F” key.
TO MANUALLY SET THE CLOCK/CALENDAR
1. Press and hold the “TIME” key for 2 seconds until the
HOUR digit ashes.
2. Press the “UP” or “DOWN” key to change the value of
the ashing HOUR digit.
3. Press the time key again to toggle between: Hour >
Minute > Second > 12/24 Hr > Year >Month > Date >
Day language.
4. After you complete all settings, press the “TIME” key
Page 3
3
to exit the setting mode, it will exit automatically in 30
seconds.
ALARM AND SNOOZE SETTING
1. Press the “ALARM” key to enter the alarm time mode.
2. In alarm time mode, press the “UP” key to turn on the
Alarm and Snooze with the bell icon [
] and snooze
icon [ ] displayed together on the LCD.
3. Press and hold the “ALARM” key for 2 seconds to
enter the alarm time setting mode until the HOUR digit
ashes.
4. Press the “UP” or “DOWN” key to change the value of
the ashing HOUR digit.
5. Press the “ALARM” key again to toggle from Hour to
Minutes.
6. After you complete all settings, press the “ALARM”
key to exit the setting mode, or it will exit automatically
in 30 seconds.
TO CHANGE YOUR TIME ZONE
1. In normal time mode, press the “ALARM” key to enter
the alarm time mode.
2. In alarm time mode, press the “DOWN” key to toggle
between time zones: P=Pacic M=Mountain C=Central
E=Eastern. (A map will display your selected time zone.)
Page 4

4
3. After you complete the setting, press the “TIME” key
to exit the setting mode, or it will exit automatically 30
seconds later without pressing any key.
TO CHANGE BATTERIES
WEATHER STATION TRANSMITTER
1. Remove the transmitter from the stand and open the
battery door.
2. Insert 2 AA size batteries into the battery
compartment.
3. Close the battery door.
WEATHER STATION RECEIVER
1. Remove the battery door and insert 3 AA batteries
into the battery compartment.
2. Close the battery door.
3. Press the “RESET” key located behind the table
stand with a small object (Pencil tip, paperclip, etc) to
re-start the clock. It will synchronize the channels of the
transmitter automatically.
Page 5

5
OWNER’S MANUAL
The Weather Station is equipped with a variety of functions
to provide comprehensive weather information. The receiver
unit has a clear, easy-to-read display that shows the
weather forecast, minimum/maximum indoor and outdoor
temperature and moon phase, as well as the time and date.
The Weather Station is able to receive and display readings
from remote sensors. The 433 MHz technology means
no wire installation is required and sensors can be placed
anywhere you like. With the radio controlled function, the
current time and date are automatically synchronized with
the time signal transmitted from Germany (DCF77) / UK
(MSF) / USA (WWVB). The signal can cover a distance of
about 932 miles (1500 km) from the related transmitter.
Features
• Back Light
• Moon Phase and Weather Indicator
• Indoor Temperature
• Outdoor Temperature
• Clock
• Alarm/Snooze
• Calendar
• ˚C/˚F Mode
• Wall Mount
Page 6
6
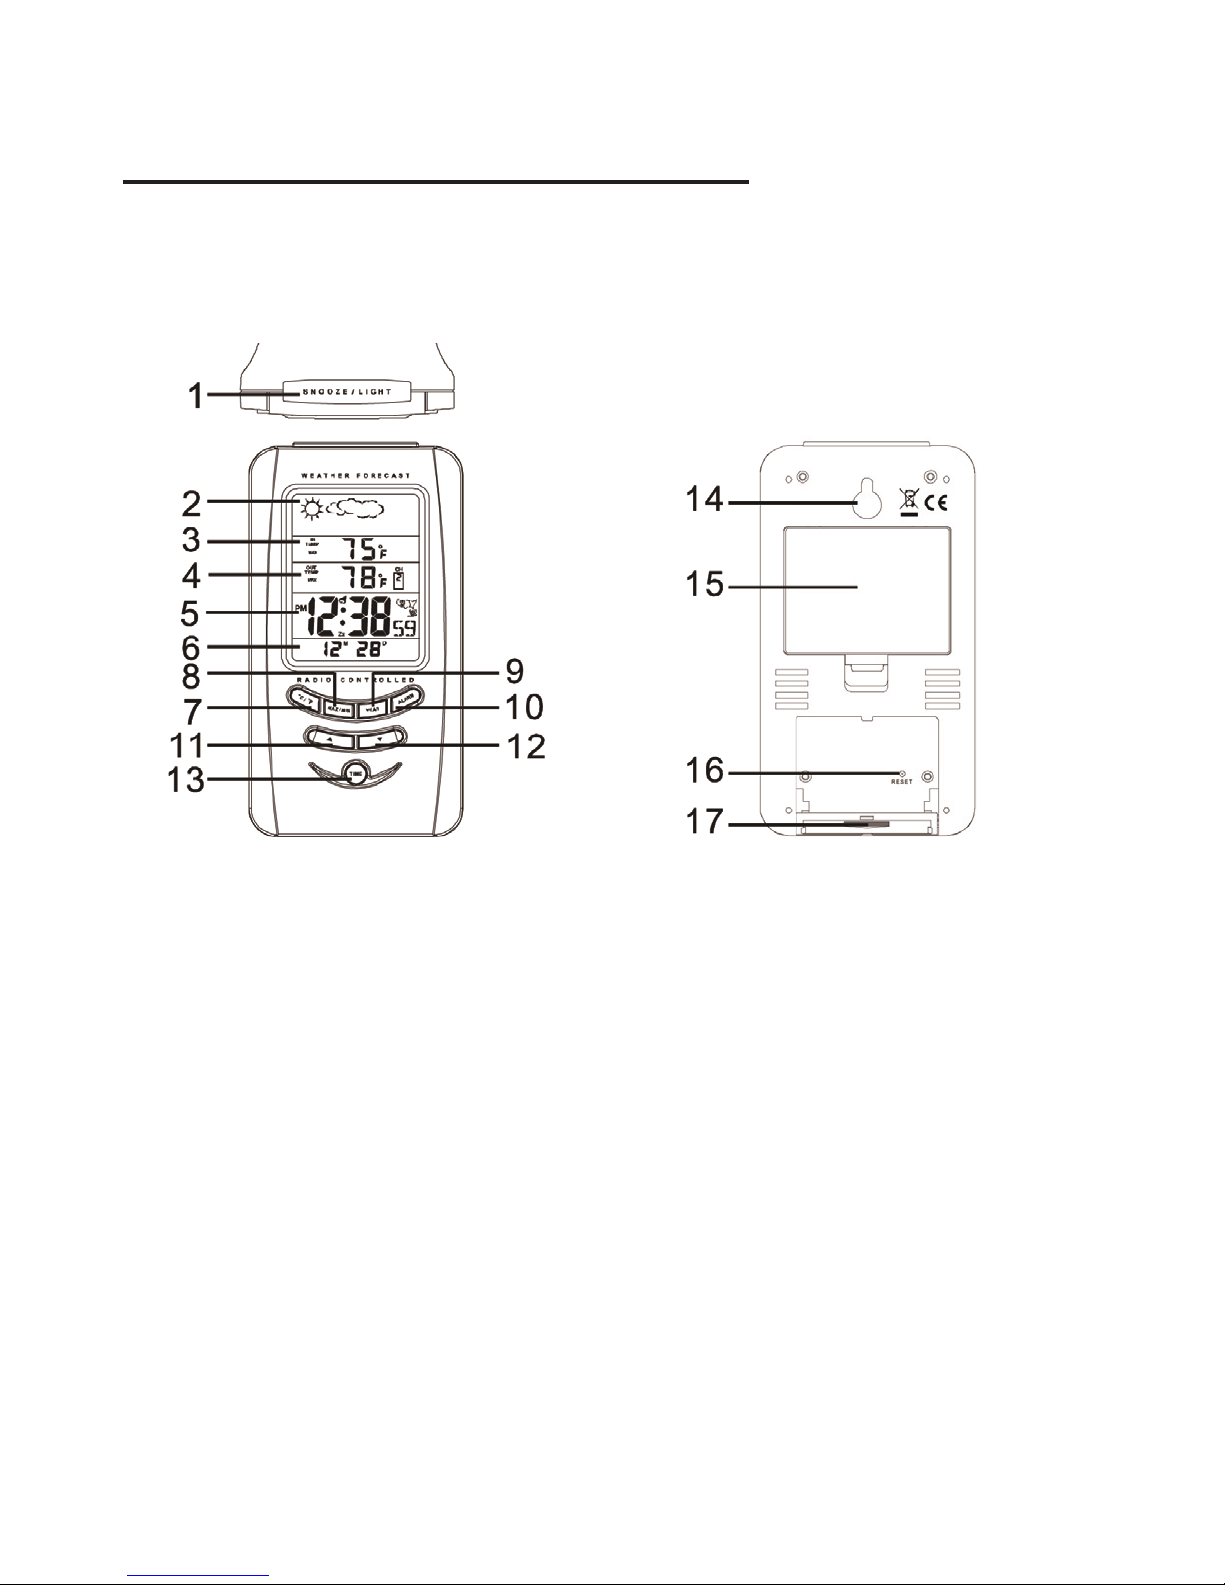
USING THE WEATHER STATION
1. SNOOZE/LIGHT
- Press once to turn on the back light for 5 seconds.
- Press to stop the alarm when it is sounding.
2. MOON PHASE AND WEATHER INDICATOR WINDOW
- Shows the phase of the moon and weather forecast indicators.
3. INDOOR TEMPERATURE DISPLAY
- Shows the current indoor temperature data and the
minimum and maximum recorded indoor temperatures.
WEATHER STATION RECEIVER
Page 7

7
4. OUTDOOR TEMPERATURE DISPLAY
- Shows the current outdoor temperature data and the mini-
mum and maximum recorded outdoor temperatures.
5. CLOCK DISPLAY
- Displays the time, day of the week, signal quality indicator
and daylight savings time (DST) indicator.
6. CALENDAR WINDOW
- Displays the month, date and year.
7. °C/°F KEY
- In normal time mode or alarm time mode, press it to switch
between Celsius and Fahrenheit.
- Press and hold it for 3 seconds to receive the RC signal for
reception testing.
8. MAX/MIN KEY
- Press it to check the minimum and maximum temperature
records.
- Press and hold it for 3 seconds to delete the minimum and
maximum temperature records.
9. YEAR KEY
- Press it to switch between date/month and year display.
Page 8
8
10. ALARM KEY
- Press it to stop the current alarm when the bell is ringing and
turn off the snooze function.
- Press it to switch between date/month and alarm time mode.
- In normal time mode, press it to enter the alarm time mode.
- Press and hold it for 2 seconds to enter the alarm
time setting mode.
11. TOGGLE UP KEY [ ]
- In setting mode, press it to increase the setting values.
- In normal time mode, press it to switch among channel 1, 2
and 3.
- In alarm time mode, press it to turn on/off the alarm
and snooze.
12. TOGGLE DOWN KEY [ ]
- In setting mode, press it to decrease the setting values.
- In normal time mode, press it to switch between second and
day of the week display.
- In alarm time mode, press it to select the time zone
(U.S. & Canadian version only).
13. TIME KEY
- In normal time mode or alarm time mode, press and hold it
for 2 seconds to enter the normal time setting mode.
14. WALL-MOUNTING HOLDER
- Use it to hang the main unit on the wall.
Page 9
9
15. BATTERY COMPARTMENT
16. RESET
- Press it to set all values to default values.
- In case of malfunction, the unit may be required to reset.
17. TABLE STAND
- Use it to stand the clock on the desktop.
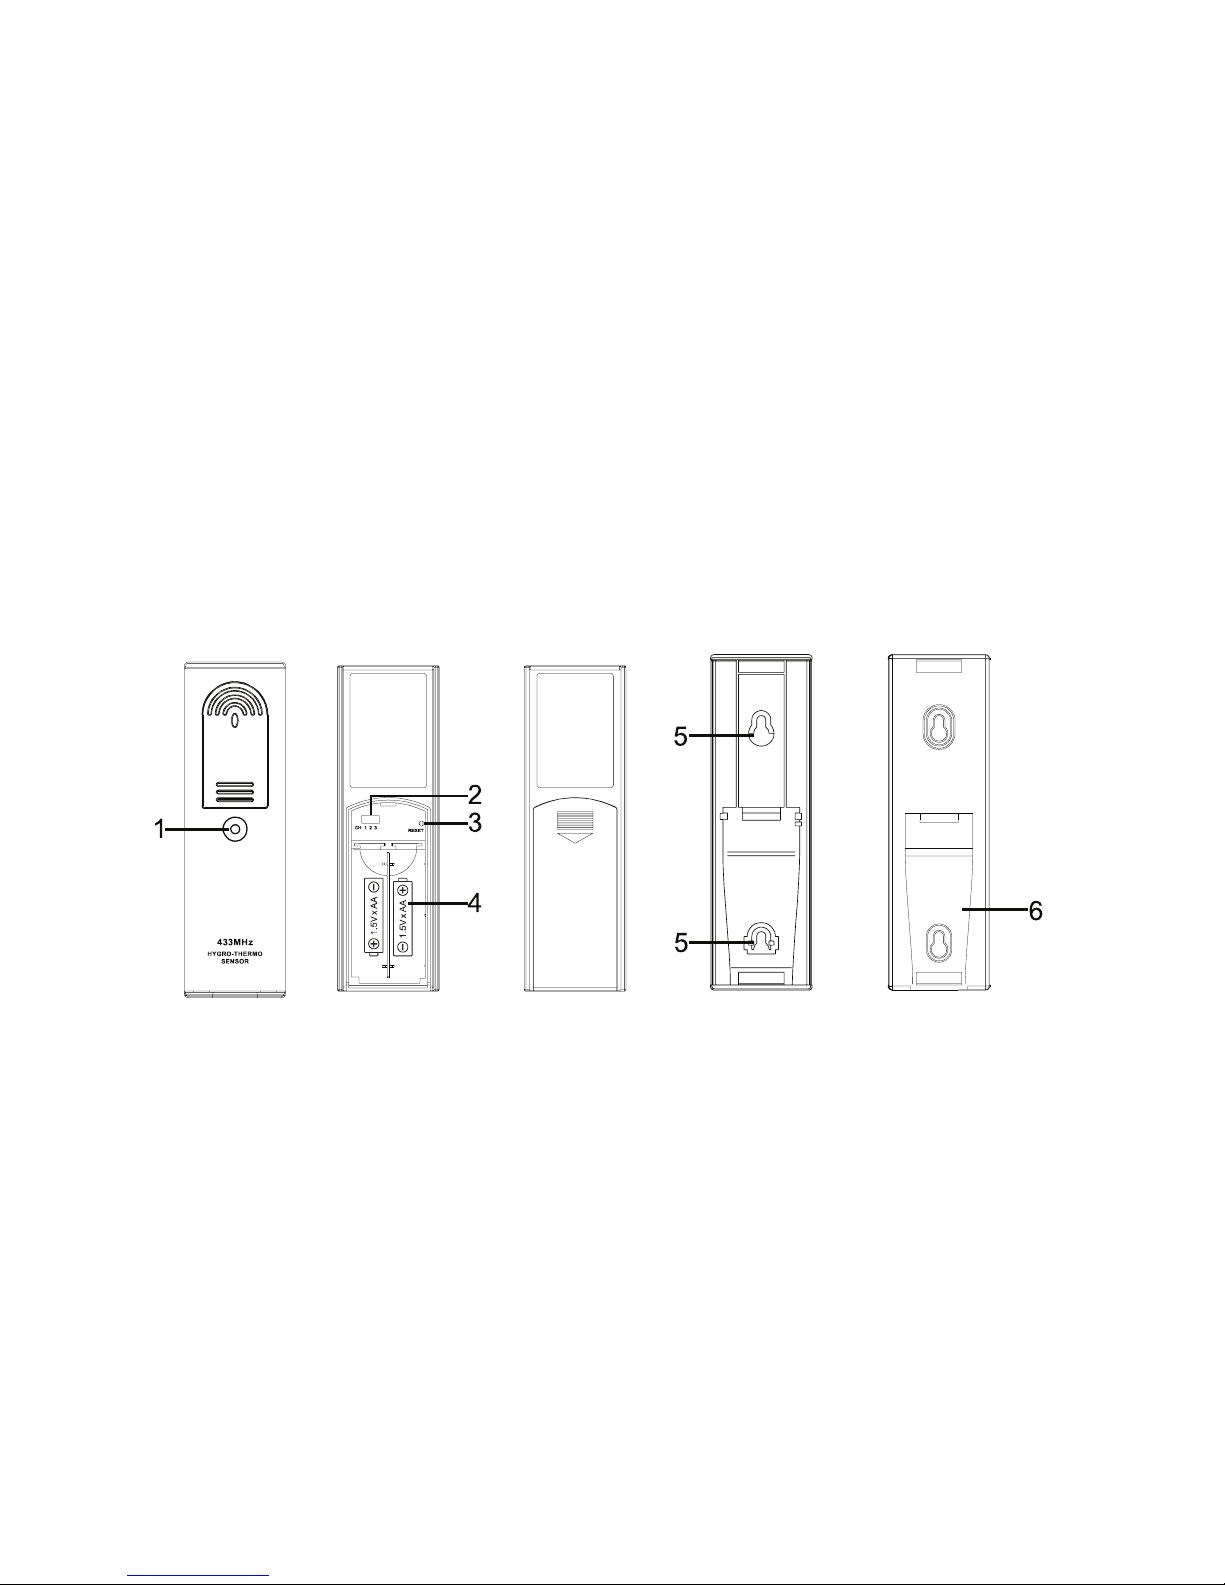
WEATHER STATION TRANSMITTER
1. SIGNAL QUALITY INDICATOR
- Flashes when the remote unit transmits a reading.
2. CHANNEL SLIDE SWITCH
- Assign the transmitter to channel 1, 2 or 3.
3. RESET
- Located behind the battery compartment.
- Press it to restart the transmitter.
Page 10
10
4. BATTERY COMPARTMENT
- Accommodates 2 AA size batteries.
5. WALL-MOUNTING HOLDER
- Use it to hang the transmitter on the wall.
6. TABLE STAND
- Use it to stand the transmitter on the desktop.
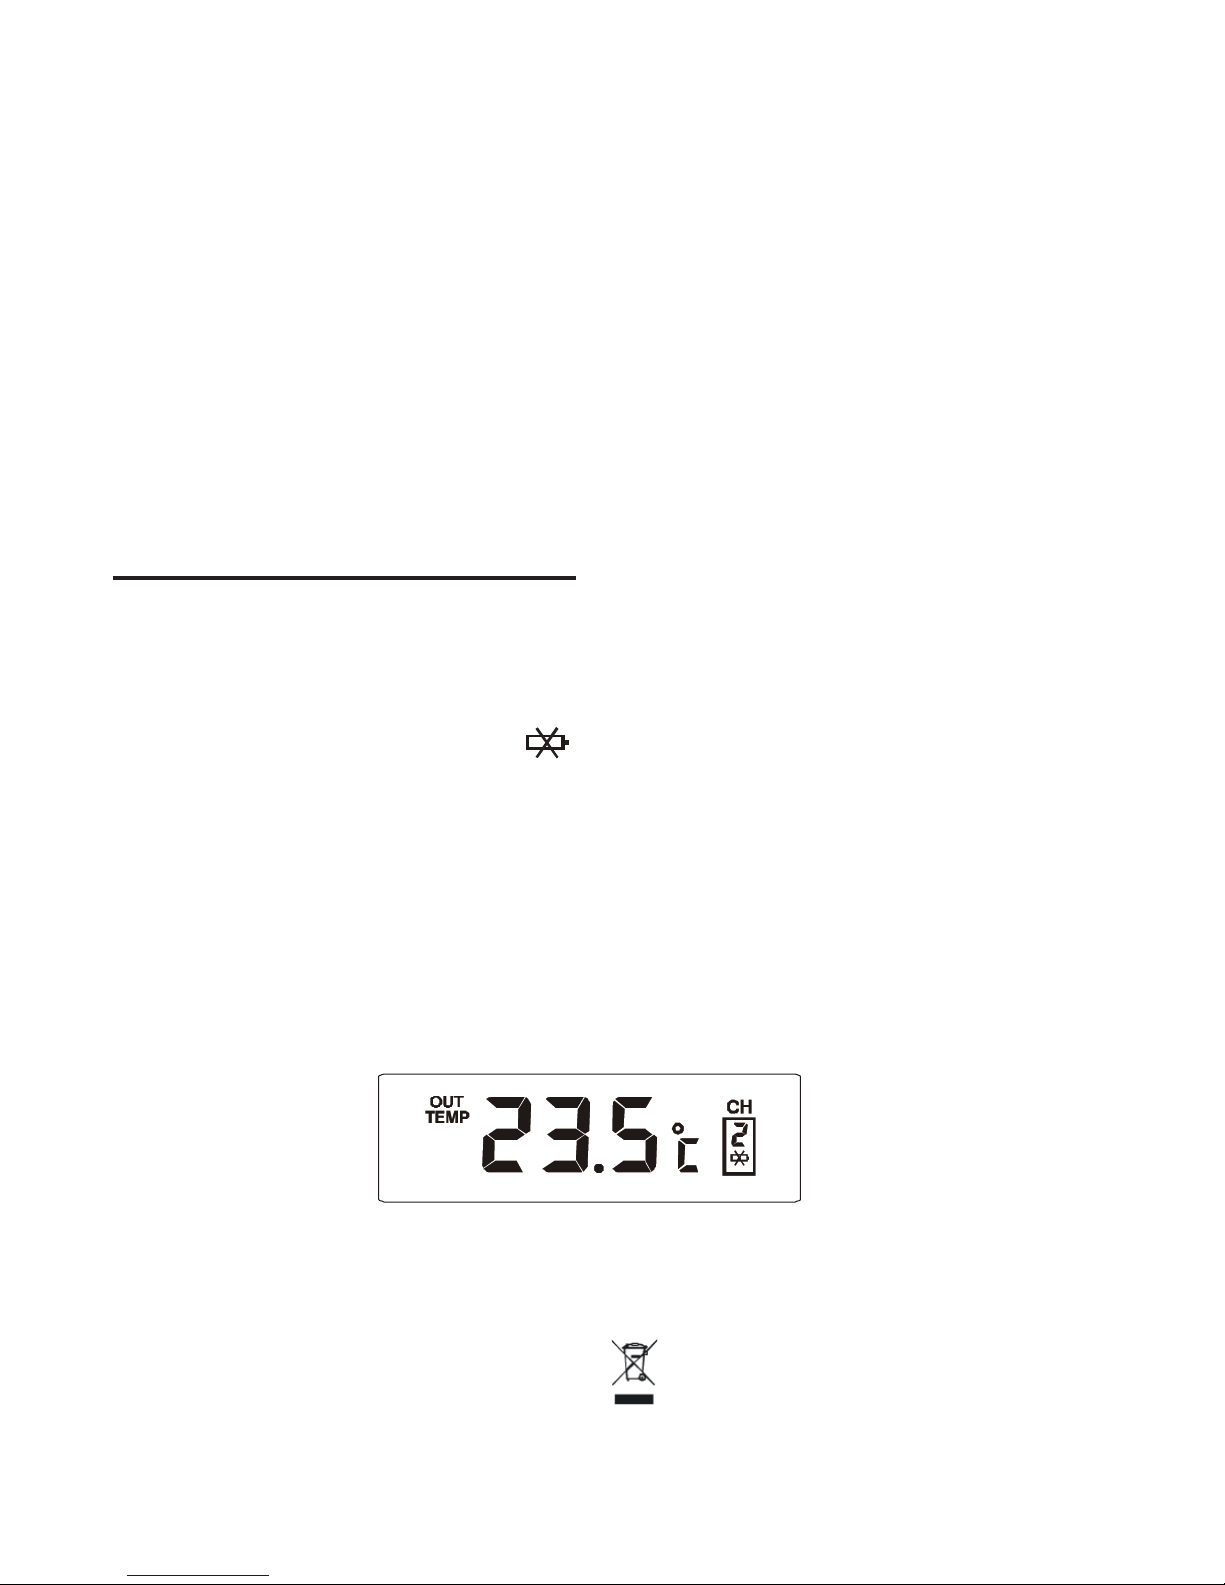
BATTERY REPLACEMENT
When the LCD on the receiver becomes dim, replace the
batteries in the receiver with 3 AA size batteries. When
the low battery indicator “ ” appears in the Outdoor
Temperature window, it indicates that the battery power of
the transmitter is low. Replace the batteries in the transmitter
with 2 AA size batteries.
NOTE:
Attention! Please dispose of used unit or batteries in an
environmentally safe manner.
T
ransmitter’s low battery indicator
(shows on the main unit)
Page 11

11
TO CHANGE THE BATTERIES
WEATHER STATION TRANSMITTER
Remove the transmitter from the stand and open the 1.
battery door.
Insert 2 AA size batteries into the battery compartment.2.
Make sure you insert them the right way according 3.
to the polarity information marked on the battery
compartment.
Close the battery door.4.
NOTE:
Once the channel is assigned to one transmitter, it can only
be changed by removing the batteries or resetting the unit.
Avoid placing the transmitter in direct sunlight, rain or snow.
WEATHER STATION RECEIVER
Remove the battery door and insert 3 AA batteries into 1.
the battery compartment. Make sure you insert the batteries the right way according to the polarity information
marked on the battery compartment.
Close the battery door.2.
Press the “RESET” key to re-start the clock and it 3.
will automatically synchronize to the channels of the
transmitter.
NOTE:
The building material and the position of the receiver and
transmitter affect the effective range. Try multiple locations
Page 12

12
to obtain the best result. Place the units away from metal
objects and electrical appliances to minimize the
interference. Position the receiver and transmitter within the
effective transmission range: 98 feet (30 meters) in usual
circumstances.
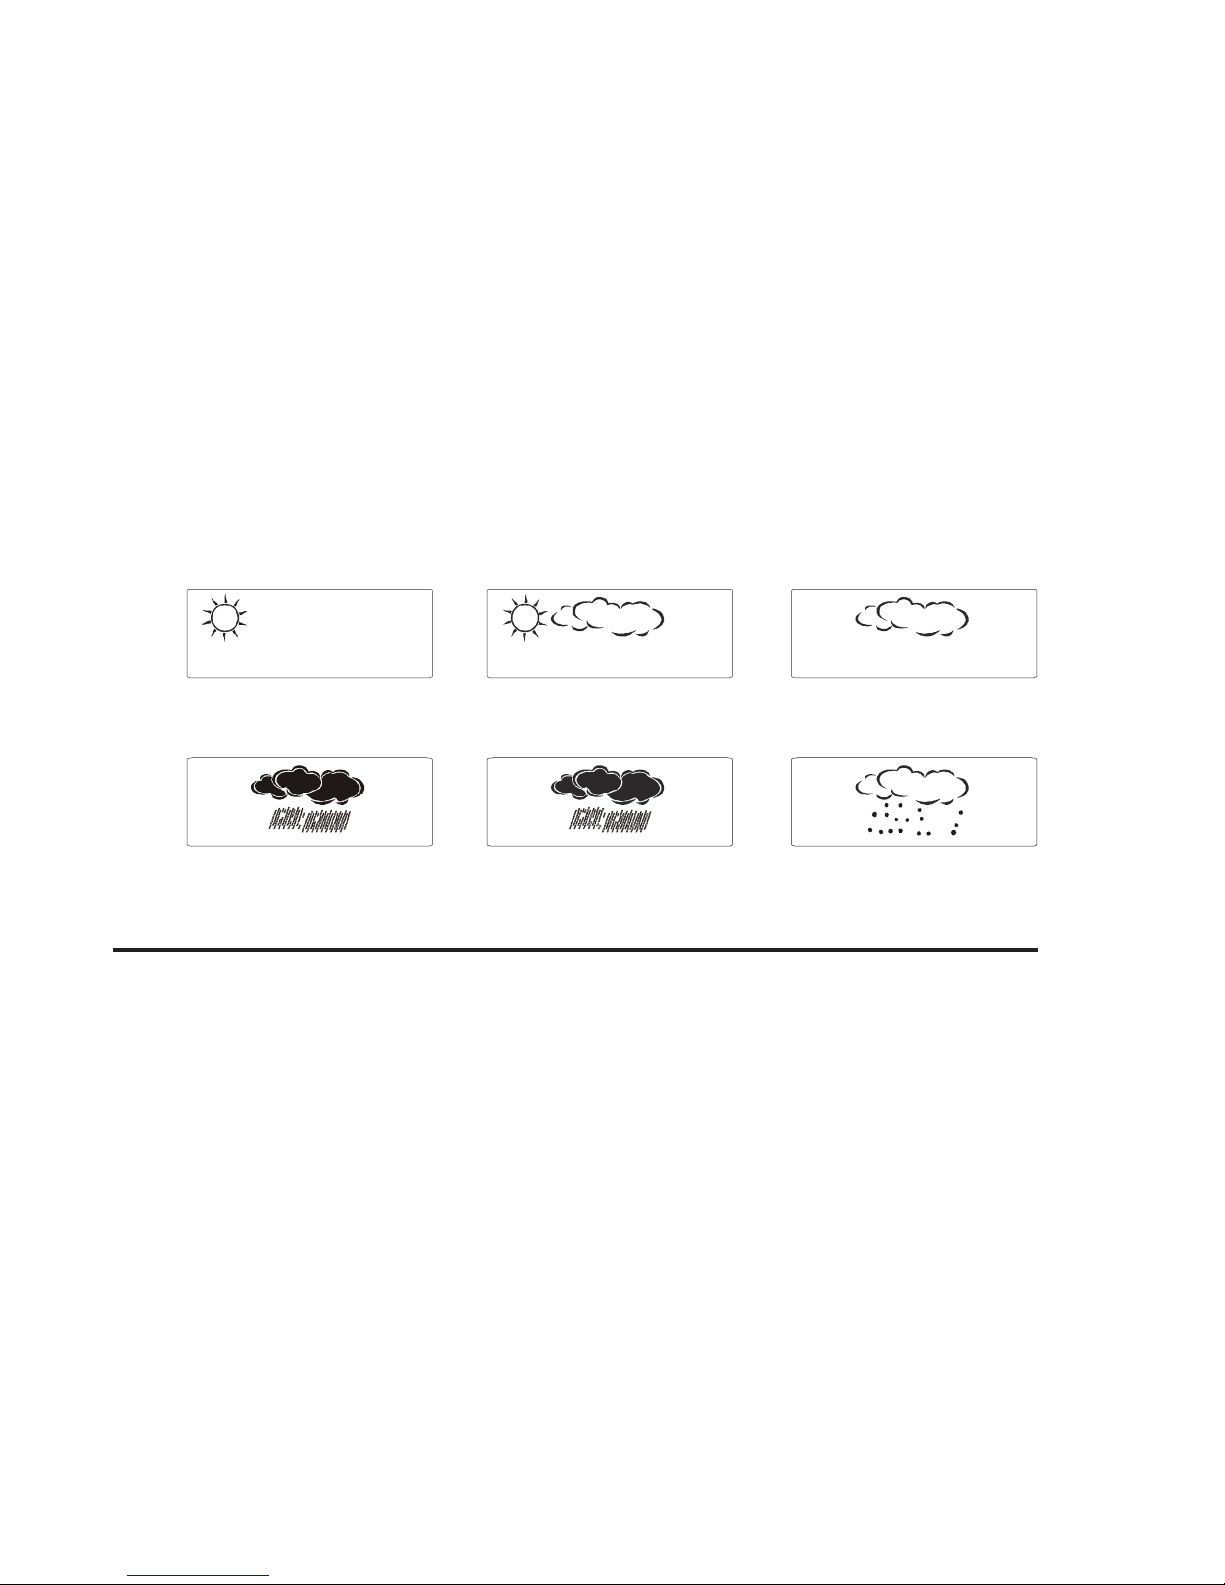
ABOUT THE WEATHER INDICATOR
The built-in barometer detects atmospheric pressure changes. Based on the data collected, it can predict the weather
conditions in the forthcoming 12-24 hours.
NOTE:
The accuracy of a general pressure-based weather •
forecast is about 70% to 75%.
The weather forecast is meant for next 12 to 24 hours. •
It may not necessarily reect the current situation.
The weather forecast becomes stable after powering up •
for 24 hours.
If the clock location is changed due to altitude change •
(e.g. from low altitudes to high altitudes or vice versa),
please use a pin to press the “RESET” key to reset the
main unit and outdoor sensor.
The “Sunny” icon can only appear from 6 AM to 8 PM. If •
the weather is Cloudy/Rainy/Stormy during this period,
the “Sunny” icon may not appear.
The “Moon phase & Star” icon can only appear from •
8 PM to 6 AM. If the weather is Cloudy/Rainy/Stormy
during this period, the “Moon phase & Star” icon may
Page 13
13
not appear.
The “Rainy” and “Stormy” icons differ only in the drop-•
ping frequency of the rain. The rain dropping frequency
in the “Stormy” icon is faster than that in the “Rainy”
icon.
The “Snowy” weather forecast is not based on the atmo-•
sphere pressure, but based on the outdoor temperature.
When the outdoor temperature is below 26˚F(-3°C), the
“Snowy” weather indicator will display on the LCD.
RECEPTION OF RADIO CONTROLLED TIME SIGNAL
The time and date are radio controlled. The current time and
date are automatically synchronized with the time signal
transmitted from Germany (DCF 77) / UK (MSF) / USA
(WWVB) provided the device is within about a 932 mile
(1500 km) range of the transmitter. A small map icon will be
displayed when the Weather Station is activated in America,
denoting the current time zone. Germany is indicated with a
“D” icon, UK is indicated with an “M” icon.
When used for the rst time (after inserting the batteries or
Sunny
Rainy
Stormy
Cloudy
Snowy
Slightly Cloudy
Page 14
14
NOTE:
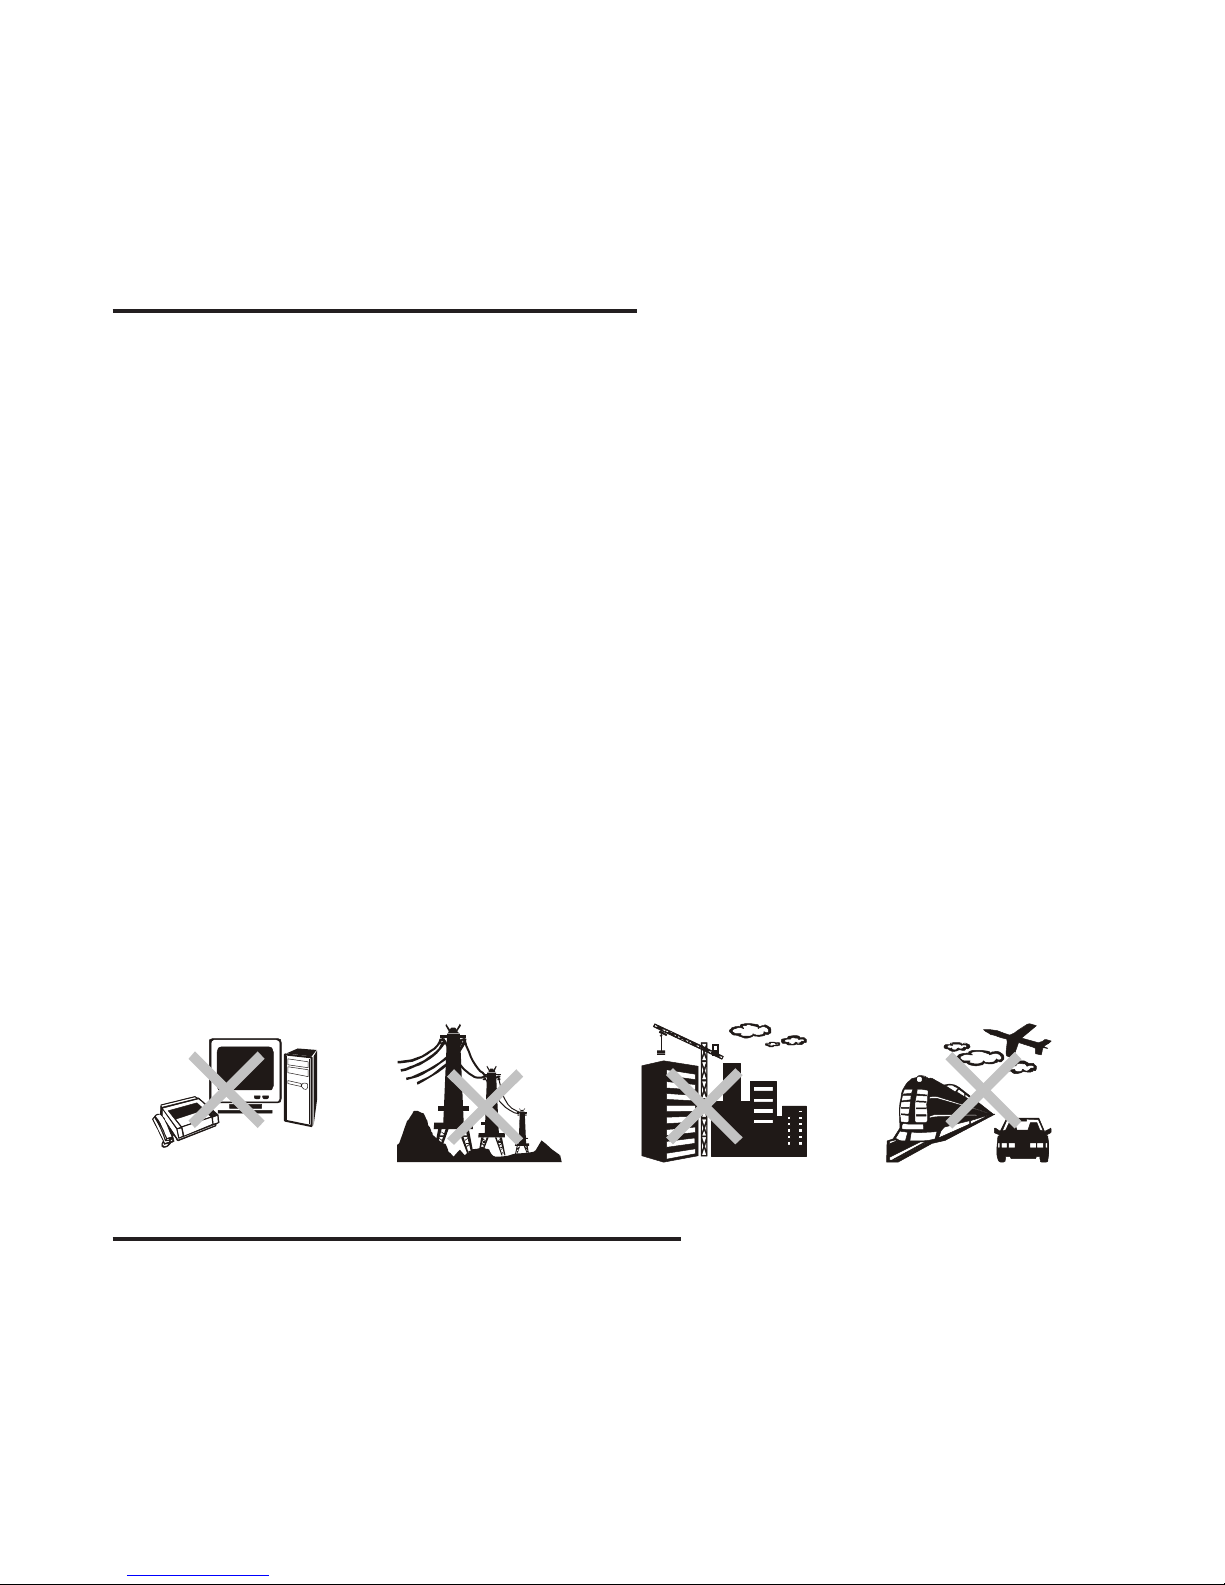
The unit will automatically search for the time signal at 1.
2:00 AM, 8:00 AM, 2:00 PM and 8:00 PM each day.
Always place the unit away from interfering sources 2.
such as a TV, computer, etc.
Avoid placing the unit on or next to metal plates.3.
Closed areas such as an airport, basement, tower block 4.
or factory are not recommended.
Do not start reception on moving articles such as 5.
vehicles or trains.
DAYLIGHT SAVINGS TIME (DST)
The clock has been programmed automatically to switch 1.
when the daylight savings time is in effect. Your clock
will show “DST” during the summer.
pressing the “RESET” key), the clock starts receiving the
time signals and the reception display ashes.
SIGNAL QUALITY INDICATOR
If the signal indicator on the transmitter ashes once in one
second, it indicates that the signal quality is poor. If the sig-
nal indicator ashes twice in one second, it means that the
signal quality is strong.
Page 15

15
TIME ZONE SETTING (U.S. & Canadian version only)
The default time zone is PACIFIC time zone. 1.
TO CHANGE YOUR TIME ZONE
In normal time mode, press the “ALARM” key to enter 1.
the alarm time mode.
In alarm time mode, press the “DOWN” key to select 2.
the proper time zone: P=Pacic M=Mountain C=Central
E=Eastern.
After you complete the setting, press the “TIME” key 3.
to exit the setting mode, or let it exit automatically 30
seconds later without pressing any key.
MANUAL TIME AND CALENDAR SETTING
If you are out of the reach of the radio controlled transmitter
or if the reception is not reachable, the time can be set
manually. As soon as the signal of transmitter is received
again, the clock will automatically synchronize with the exact
time.
In normal time mode, press and hold the “TIME” key for 1.
2 seconds until the hour digit ashes.
Press the “UP” or “DOWN” key to change the value of 2.
the ashing hour digit.
Repeat the above operation to set the time and 3.
Page 16
16
calendar in this order: Hour > Minute > Second > 12/24
Hr > Year >Month > Date > Day language.
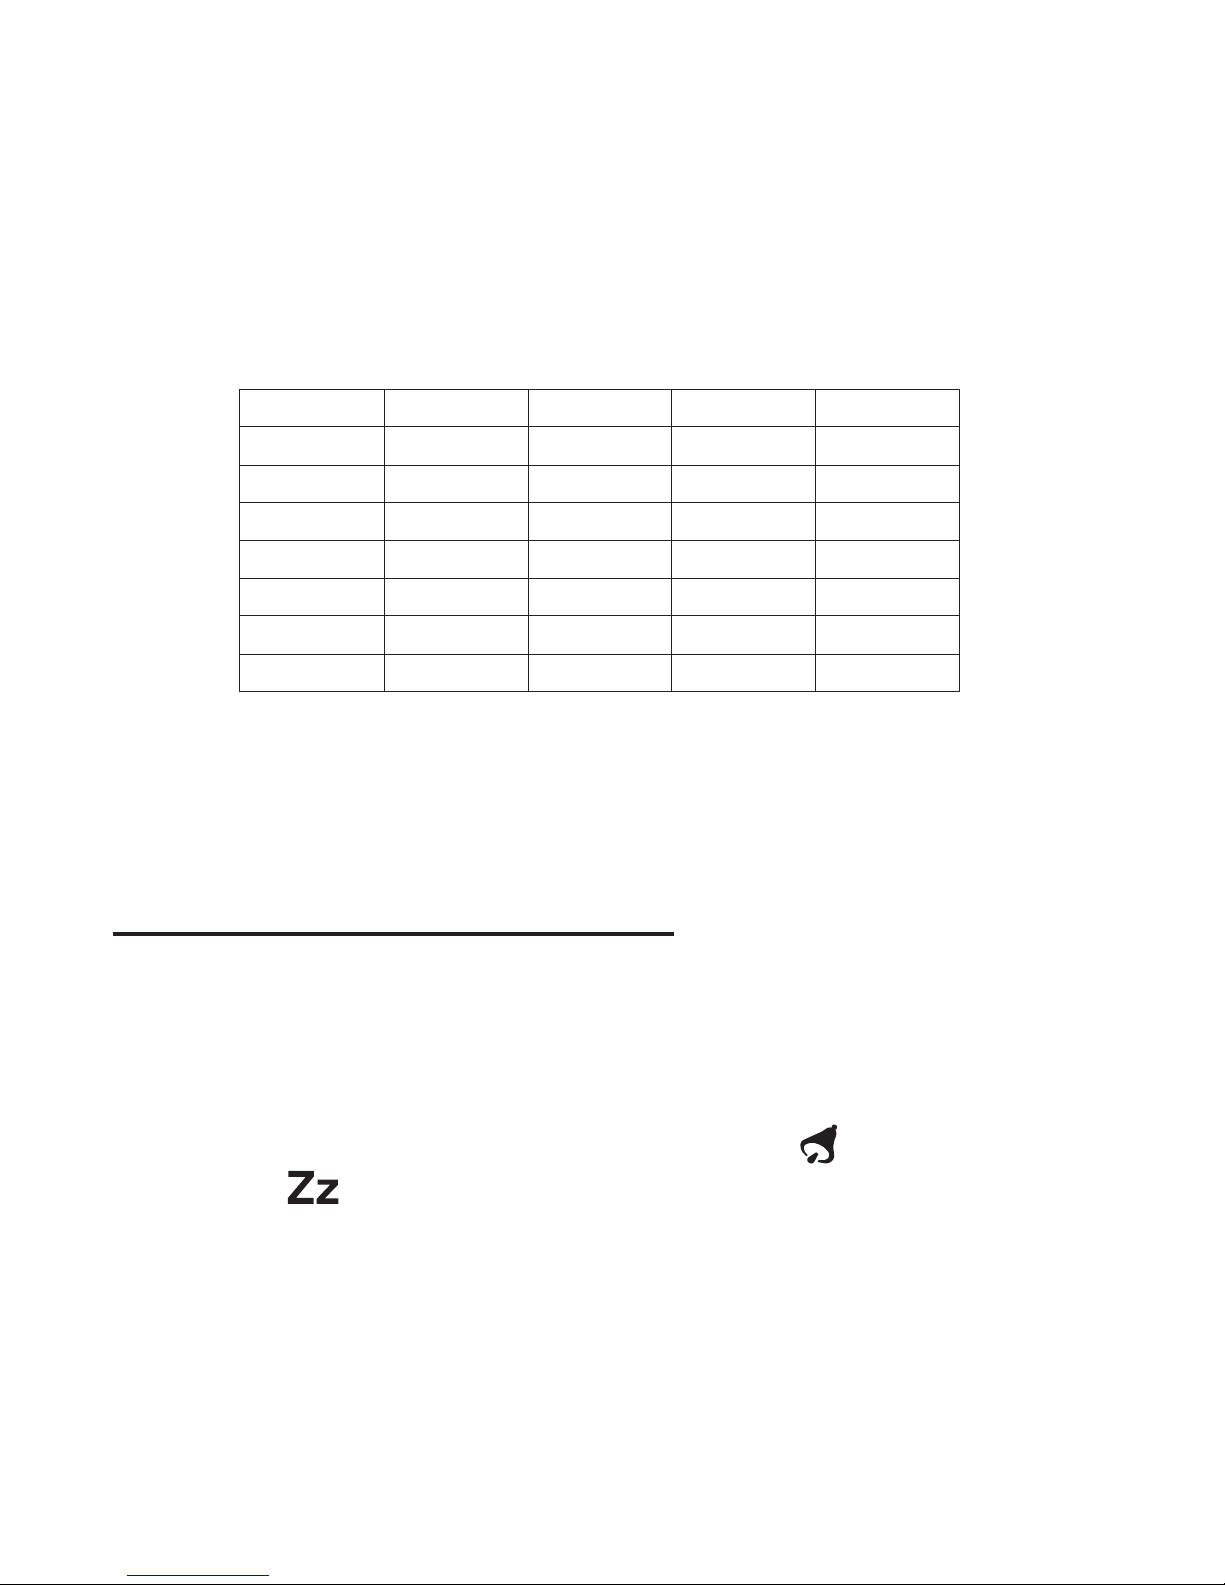
The weekday settings are represented by the following 4.
language abbreviations: GB=English, FR=French,
DE=German, ES=Spanish, IT=Italian.
After you complete all settings, press the “TIME” key 5.
to exit the setting mode, or let it exit automatically 30
seconds later without pressing any key.
ALARM AND SNOOZE SETTING
In normal time mode, press the “ALARM” key to enter 1.
the alarm time mode.
In alarm time mode, press the “UP” key to turn on the 2.
alarm and snooze with the bell icon [ ] and snooze
icon [ ] displayed together on the LCD.
In alarm time mode, press and hold the “ALARM” key 3.
for 2 seconds to enter the alarm time setting mode until
the hour digit ashes.
Press the “UP” or “DOWN” key to change the value of 4.
the ashing hour digit.
SON
MON
DIE
MIT
DON
FRE
SAM
DIM
LUN
MAR
MER
JEU
VEN
SAM
DOM
LUN
MAR
MIE
JUE
VIE
SAB
DOM
LUN
MAR
MER
GIO
VEN
SAB
EnglishGermany
French
Spanish
Italian
SUN
MON
TUE
WED
THU
FRI
SAT
Page 17

17
Repeat the above operation to set the alarm minute.5.
After you complete all settings, press the “ALARM” key 6.
to exit the setting mode, or let it exit automatically 30
seconds later without pressing any key.
NOTE:
The alarm will be automatically turned on when setting •
the alarm time.
Once the snooze is turned on, the 4-step crescendo •
alarm will sound 4 times in 5-minute intervals. The
alarm duration is 60 seconds.
When the alarm sounds, the backlight will be on for 5 •
seconds.
Pressing the “SNOOZE/LIGHT” key will stop the •
current alarm and enter the snooze mode. Pressing the
“ALARM” key will not only stop the alarm but also turn
off the snooze function.
VIEWING THE CHANNEL
The default channel is channel 1. In normal time mode,
press the “UP” key to change the channel from 1 to 2 or 3.
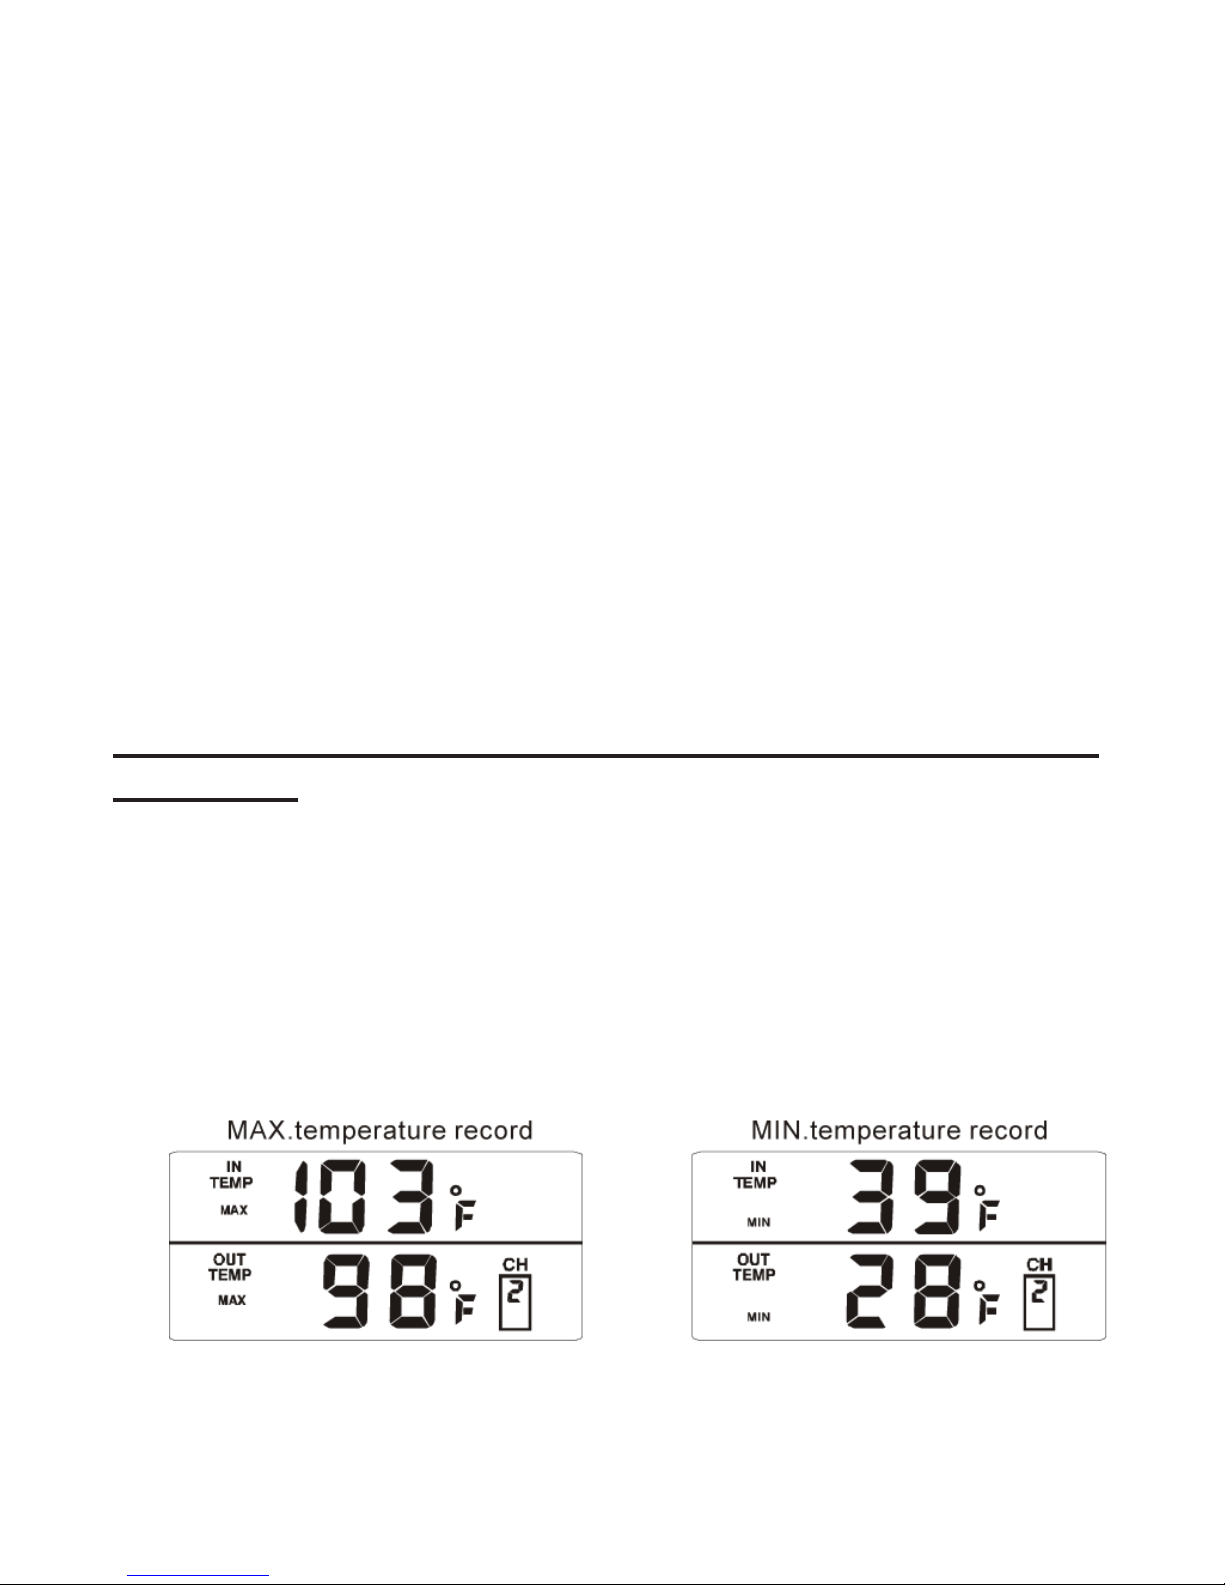
HOW TO READ INDOOR AND OUTDOOR
TEMPERATURE RECORDS
Change the temperature unit to °C for Celsius or °F for
Fahrenheit by pressing the “°C/°F” key.
Page 18
18
If the readings go above or below the operating range,
the receiver will keep showing the last record within the
operation range.
NOTE:
If no signals are received or the transmission is 1.
interfered, “---” will appear on the LCD.
Relocate the reciever or the transmitter in other positions 2.
and make sure the transmitter is within the effective
range of 99 feet (30 meters).
If the device is still not working, please reset the 3.
receiver.
CHECKING AND DELETING MAX. /MIN. TEMPERATURE
RECORDS
Press the “MAX/MIN” key once to check the maximum 1.
temperature record. Press it twice to check the minimum
record. Press it again to exit.
Press and hold the “MAX/MIN” key for 3 seconds to 2.
delete the maximum and minimum temperature records.
Page 19
19
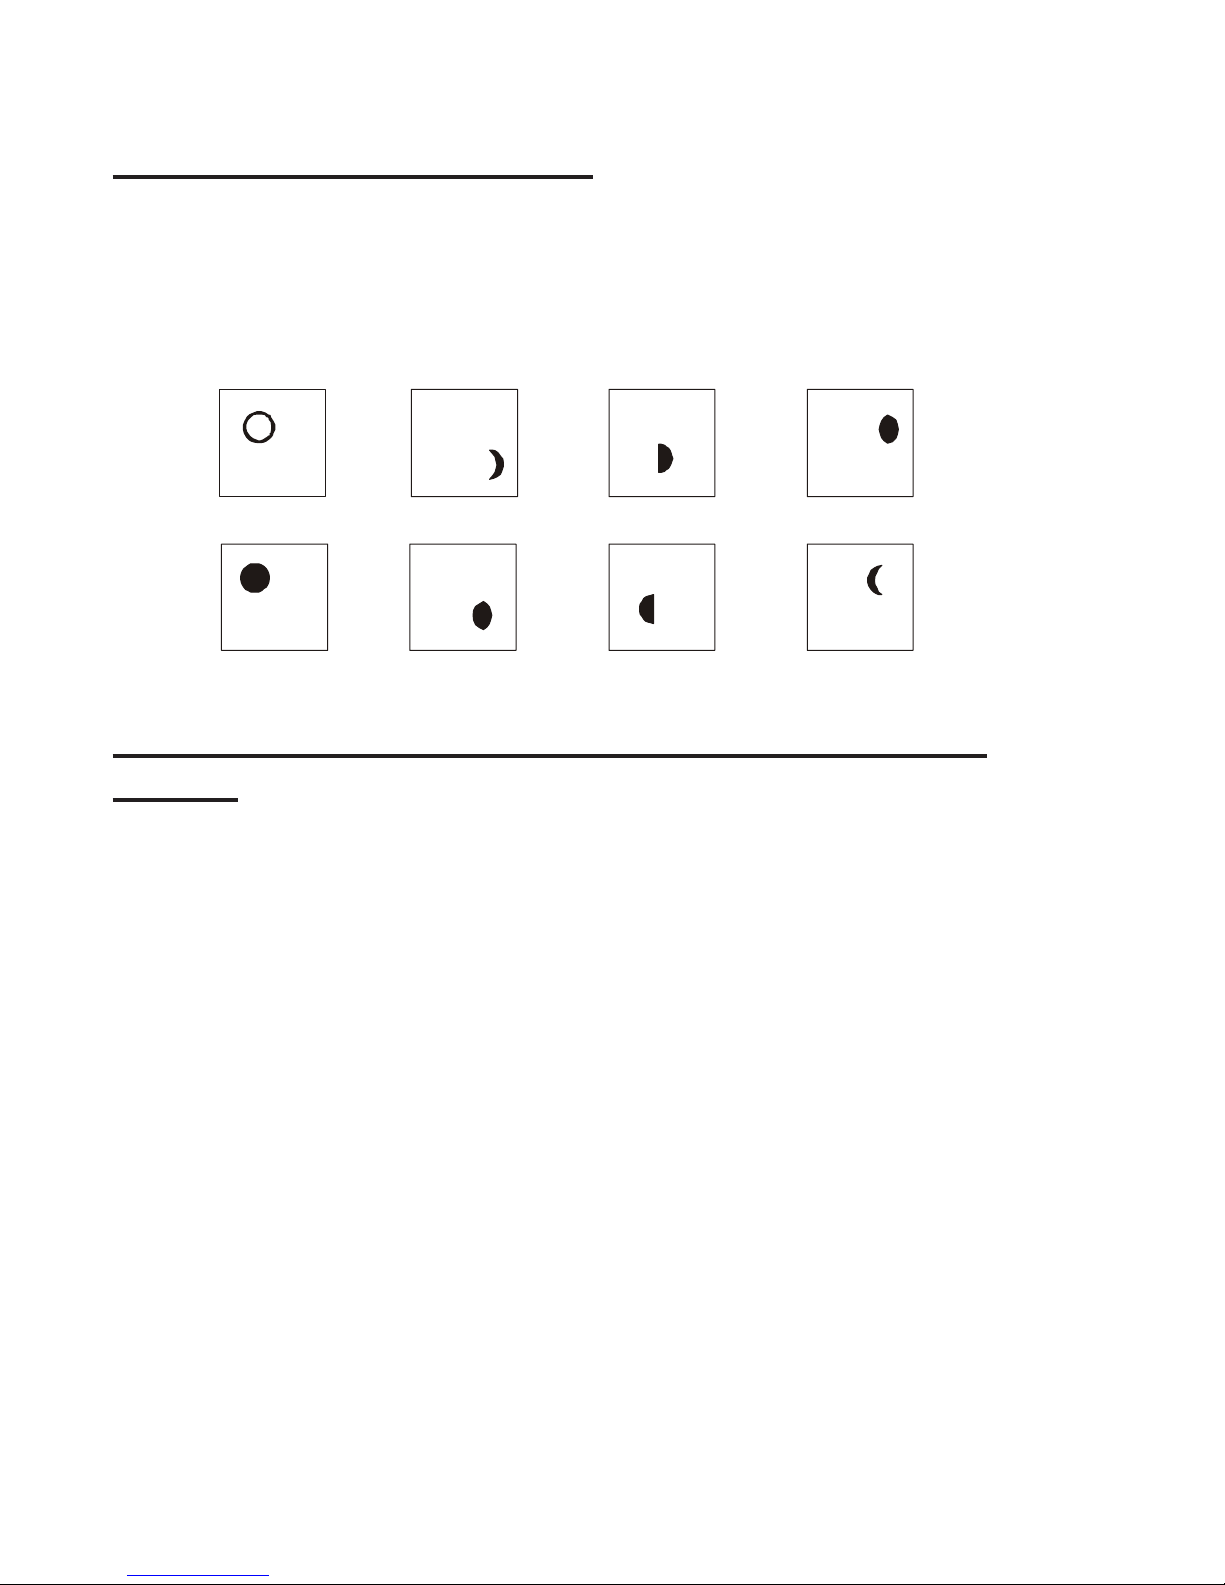
ABOUT THE MOON PHASE
The unit has 8 different moon phases. It will change
according to the lunar calendar.
USING THE TABLE STAND OR WALL-MOUNTING
STAND
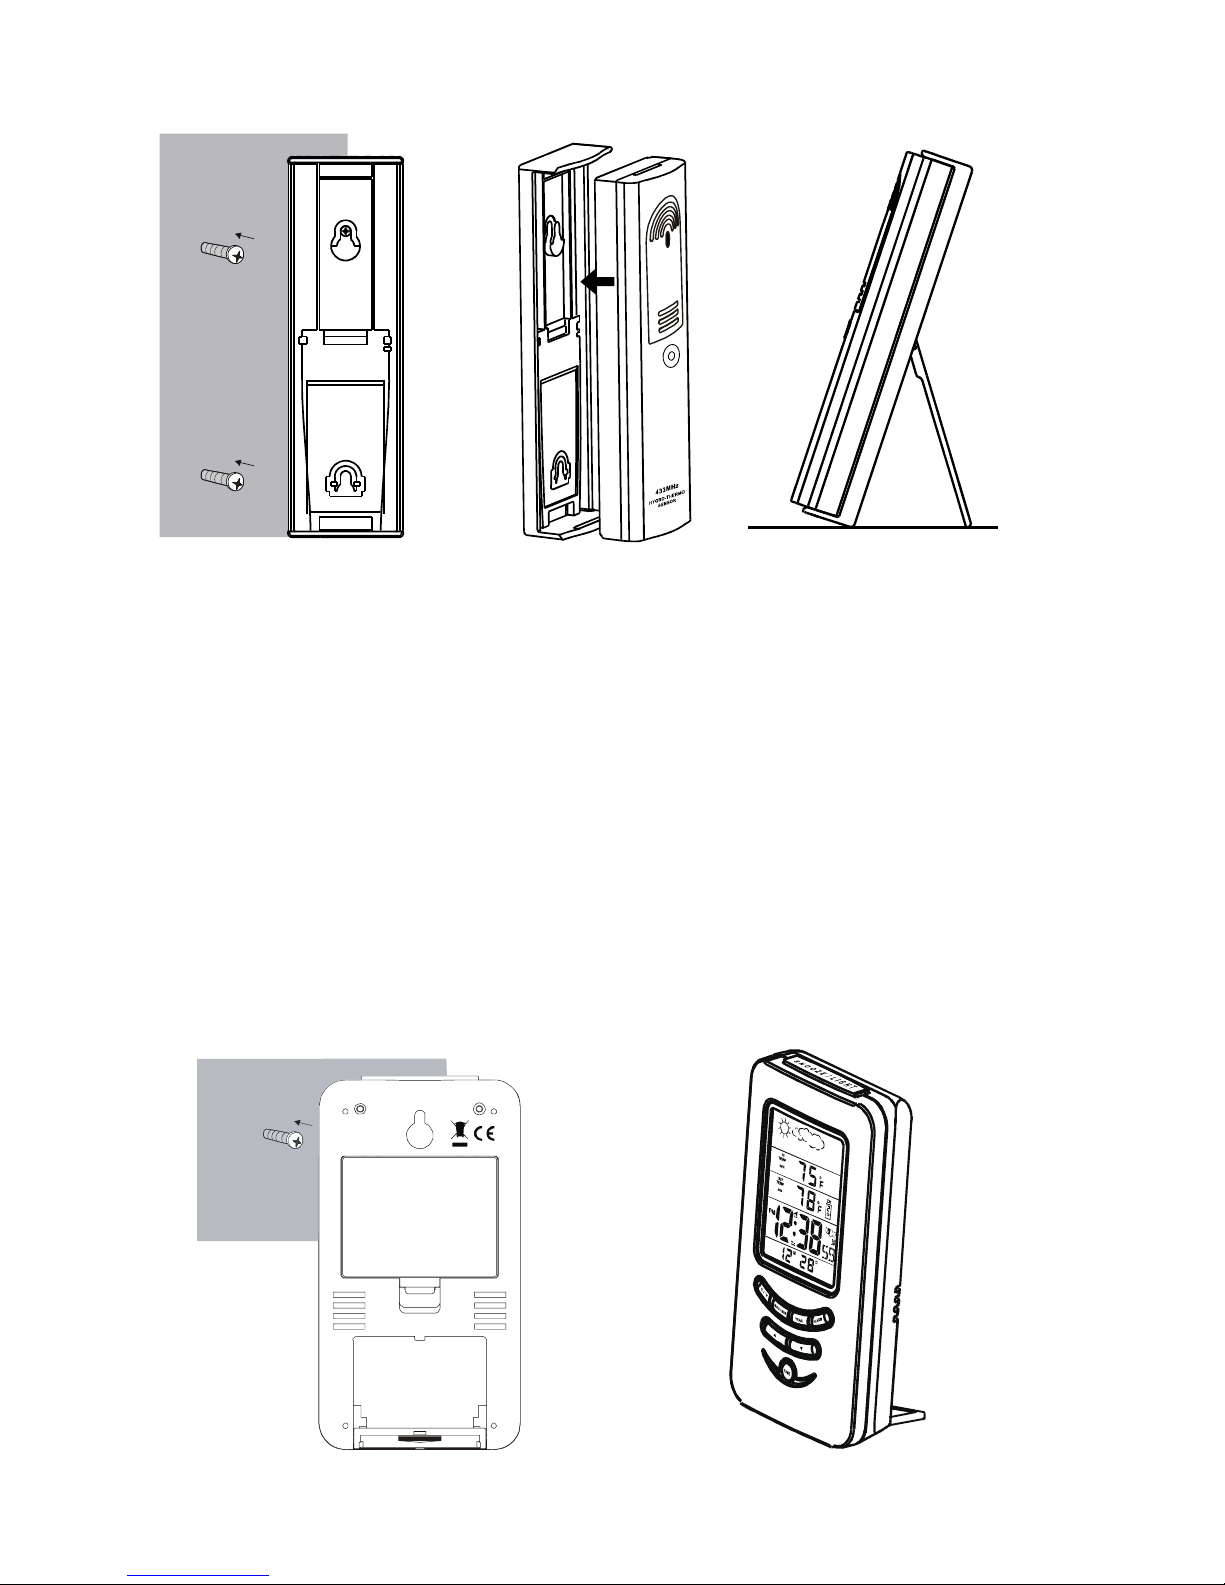
The transmitter and receiver have both the desktop and wallmount capabilities. For the transmitter, place the separate
wall-mounting stand outside in an area protected from
direct rain. Once the stand is mounted, place the transmitter
into the stand on the wall. If you prefer not to mount the
transmitter, you can simply place it on any at surface via
the table stand.
Waxing crescent New moon
F
irst quarterWaxing gibbous
Full moonWaning gibbous Last quarterWaning crescent
Page 20
20
For the receiver, place the screw on the desired wall and
hang the receiver by the recessed hole at the back of the
clock or simply place it on the desktop with the table stand.
To use the table stand:
Locate and slide the table stand downwards to separate 1.
it from the notch.
Pull the table stand away from the receiver and then 2.
position at a 90º angle.
Push the table stand inward toward the receiver and 3.
rmly lock into position.
Page 21

21
SPECIFICATIONS
WEATHER STATION RECEIVER
Recommended operating range: 0°C to 45°C, 32°F to 113°F
WEATHER STATION TRANSMITTER
Recommended operating range: -20°C to 55°C, -4°F to 131°F
RF transmission frequency: 433MHz
No. of remote units: up to 3
RF transmission range: maximum 99 feet (30 meters)
Temperature sensing cycle: around 60 ~ 64 seconds
Moon phase scanner range: from year 2000 to 2050
Radio controlled signal: WWVB/DCF/MSF
Page 22

22
Power
Receiver: 4.5V, use 3 x AA 1.5V battery
Transmitter: 3V, use 2 x AA 1.5V battery
Weight
Receiver: 0.67 lbs (148g) (without battery)
Transmitter: 0.27 lbs (60g) (without battery)
Page 23

23
Dimensions
Receiver: 3” w x 5.5” h x 1” d (76 w x 140 h x 25 d mm)
Transmitter: 1.625” w x 5.125” h x 1” d (41 w x 130 h x 25 d
mm)
This device complies with Part 15 of the FCC Rules.
Operations are subject to the following two conditions:
This device may not cause harmful interference, and1.
This device must accept any interference received, 2.
including interference that may cause undesired
operation.
Warning:
Changes or modications to this unit not expressly approved
by the party responsible for compliance could void the user’s
authority to operate the equipment.
Page 24

24
NOTE:
This equipment has been tested and found to comply with
the limits for a Class B digital device, pursuant to Part 15
of the FCC Rules. These limits are designed to provide
reasonable protection against harmful interference in a
residential installation. This equipment generates, uses
and can radiate radio frequency energy and, if not installed
and used in accordance with the instructions, may cause
harmful interference to radio communications. However,
there is no guarantee that interference will not occur in a
particular installation. If this equipment does cause harmful
interference to radio or television reception, which can be
determined by turning the equipment off and on, the user is
encouraged to try to correct the interference by one or more
of the following measures:
Reorient or relocate the receiving antenna.1.
Increase the separation between the equipment and 2.
receiver.
Connect the equipment into an outlet on a circuit 3.
different from that to which the receiver is connected.
Consult the dealer or an experienced radio/TV 4.
technician for help.
Trade Name: TRG
Model Number: 90210, 90211, 90212, 90213, 90214, 90215
TRG Group
2047 Westport Center Drive
St. Louis, Mo 63146, U.S.A.
Tel: 1-314-692-0717
Page 25

25
One-Year Limited Warranty
TRG warrants the Weather Station to be free from defects
in material and workmanship for a period of one year from
the date of original receipt. This warranty is extended only
to the original recipient of the product and does not include
any third party damage. This warranty does not apply to
any defects or failures of product due to neglect, misuse,
negligence, accident, abuse, mishandling, misapplication,
alteration, modication, power outage, unauthorized/
unreasonable use or any uncontrollable environmental
damage. This warranty gives you specic legal rights, and
you may also have other rights which vary from state to
state or country to country. In the unlikely event of a defect
or malfunction during the warranty period, we will repair or
replace merchandise with the same or similar product free
of charge if you return the product to our authorized repair
center, postage paid, together with a return authorization
number. To obtain a return authorization, please contact our
Customer Service Department at 1-877-293-6422 or
1-314-692-0717 or e-mail at [email protected].
Page 26

 Loading...