

Page 1
XF 470 KB
Guida d’uso / User Guide
ita
ALTOPARLANTE AMPLIFICATO con Bluetooth/Lettore MP3-USB-micro SD/Disco Light
eng
PORTABLE SPEAKER with Bluetooth/MP3-USB-Micro SD player/Disco Light
fra
HAUT-PARLEUR avec Bluetooth/Lecteur MP3-USB-Micro SD/Lumière Disco
deu
BEWEGLICHER LAUTSPRECHER mit Bluetooth/MP3-USB-Micro-SD player/Disco-Licht
esp
ALTAVOZ AMPLIFICADO con Bluetooth/MP3-USB-Micro SD/Luz de disco
BT
BLUETOOTH
CONNECTION
MICRO
SD/ USB
READER
AUX
DISCO
LIGHT
TWS
35W
MAX
* Per informazioni integrative e aggiornamenti di questo prodotto vedi: www.trevi.it
* For additional information and updates of this product: www.trevi.it
Page 2

Page 3

NOTE D'USO
Ascoltare a volume alto per lungo tempo, potrebbe danneggiare il vostro udito.
Questo apparecchio è uno strumento elettronico di alta precisione, evitate quindi
di utilizzarlo nei seguenti casi:
• Vicino a campi magnetici.
• Vicino a fonti di calore come caloriferi e stufe.
• In luoghi molto umidi come stanze da bagno, piscine, ecc...
• In luoghi molto polverosi.
• In luoghi soggetti a forti vibrazioni.
• Non avvicinare l’orecchio all’altoparlante durante le fasi di messa punto e regolazioni del volume, e in particolare di tenere il volume al minimo nella fase di
accensione.
• Posizionare l’apparecchio in modo che ai suoi lati ci sia sempre abbastanza spazio
per la libera circolazione di aria (almeno 5 cm).
• Se dei liquidi penetrano all’interno dell’apparecchio scollegare immediatamente la spina
dalla presa e portare l’apparecchio al più vicino centro assistenza autorizato TREVI.
• Controllare sempre prima di ricaricare l’apparecchio, che i cavi di alimentazione
e di collegamento siano installati correttamente.
• Nessuna sorgente di amma nuda,quali candele accese,dovrebbe essere posta
sull’apparecchio.
• L’apparecchio non deve essere esposto a stillicidio o a spruzzi d’acqua e nessun
oggetto pieno di liquido, quali vasi, deve essere posto sull’apparecchio.
• Prima di accendere l’apparecchio, vericare sempre che il cavo di alimentazione
e il cavo di collegamento siano installati correttamente.
• L’adattatore di corrente deve essere collegato a una presa vicina al dispositivo e
deve essere facilmente accessibile.
• Se si nota un calore eccessivo sul dispositivo o sull’adattatore di corrente, scollegare
immediatamente la spina dalla presa di corrente principale.
• Non tirare il cavo di alimentazione
• Conservare il presente manuale per futuri riferimenti.
CURA E MANUTENZIONE
Per la pulizia si consiglia l’uso di un panno morbido, leggermente inumidito. Evitate
solventi o sostanze abrasive.
ITALIANO
AVVERTENZA PER UN CORRETTO UTILIZZO DELLA BATTERIA
RICARICABILE
- Ricaricare la batteria a una temperatura ambiente compresa tra 5°C e 35°C.
- Non ricaricare più del periodo adeguato per prevenire il rischio di surriscaldamento
e scoppio.
- La ricarica della batteria per un periodo non adeguato o un lungo periodo di
inattività può ridurre la durata della batteria.
- La batteria ricaricabile è soggetta ad usura e le sue prestazioni si ridurranno
gradualmente.
XF 480 KB
3
Page 4
- Per prolungare la durata della batteria, utilizzarla quando è completamente carica
no alla scarica completa, quindi ricaricarla completamente prima di riutilizzarla.
Ricaricare una batteria non completamente consumata, si tradurrà in una durata
ridotta. In questo caso, ripetere più volte l’intero ciclo di carica/ scarica.
- Evitare di ricaricare la batteria per tutta la notte.
ITALIANO
IMPORTANTE
Questo dispositivo è progettato per uso domestico non professionale. La buona
costruzione di questo apparecchio ne garantisce per lungo tempo il perfetto funzionamento. Se tuttavia dovesse presentarsi qualche inconveniente, sarà opportuno
consultare il più vicino Centro Assistenza autorizzato TREVI.
TREVI persegue una politica di continua ricerca e sviluppo. Pertanto i prodotti possono presentare caratteristiche diverse da quelle descritte.
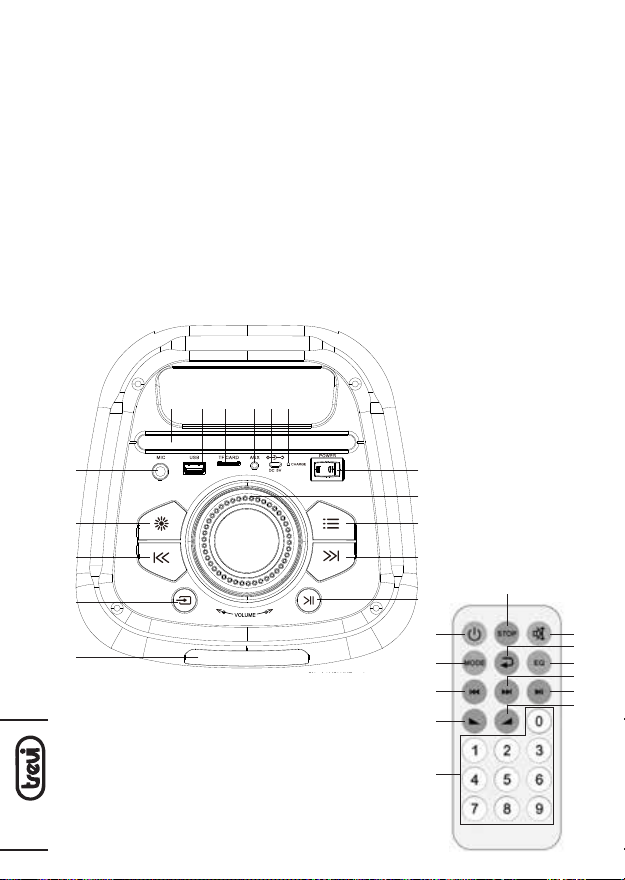
DESCRIZIONE COMANDI
1
2 3 4 5
7 16
8
6
15
14
9
10
11
XF 480 KB
4
13
12
17
18
19
20
21
28
27
26
25
24
23
22
Page 5
COMANDI UNITÀ
MUNE
1. Supporto smartphone/ Tablet
2. Presa USB
3. Slot memoria Micro SD
4. Ingresso AUX (3.5mm)
5. Presa Alimentazione 5V type-C
6. Indicatore Led di carica
7. Ingresso Microfono
8. Tasto
:
- Premere una volta per selezionare
l’effetto disco light.
- Tenere premuto per disattivare la
voce guida.
9. Tasto
10. Tasto
11. Display
12. Tasto
13. Tasto
14. Tasto
15. Manopola Volume
16. Tasto accensione/ spegnimento
, traccia precedente
, selezione modalità
, Play/Pausa + premere per 3
sec. per la funzione TWS
, traccia successiva
, premerlo ripetutamente
per regolare l’impostazione di Alti/
bassi/volume del microfono/alti del
microfono/bassi del microfono/eco.)
TELECOMANDO
17. Tasto
18. Tasto MODE, selezione modalità
19. Tasto , traccia precedente
20. Tasto , diminuzione volume
21. Tasti numerici, selezione diretta
22. Tasto , aumento volume
, Stand-by/ accensione
23. Tasto
, Play/Pausa
24. Tasto , traccia successiva
25.Tasto EQ, equalizzazioni predenite
26. Tasto
, ripetizione
27. Tasto , disattivazione audio (MUTE)
28. Tasto STOP
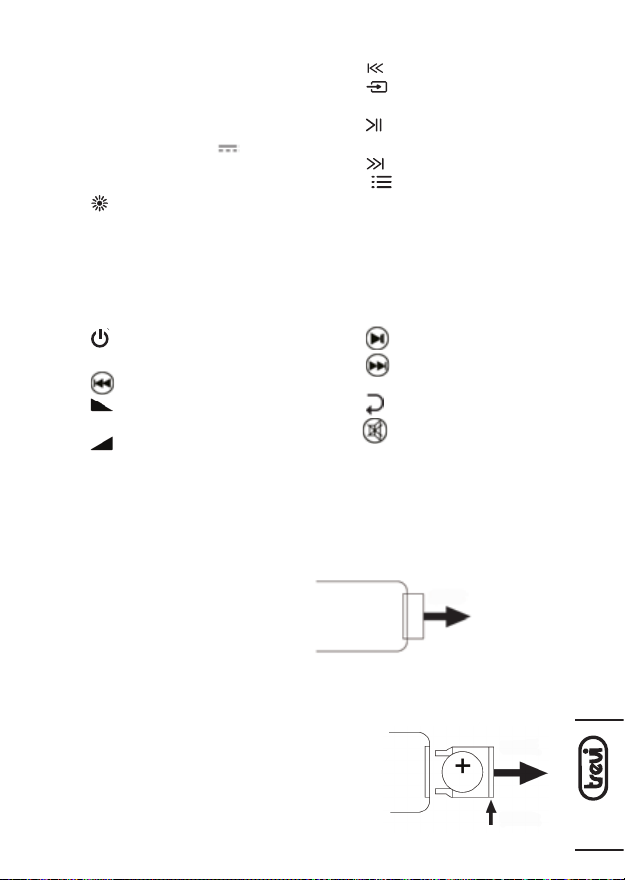
ATTIVAZIONE E SOSTITUZIONE BATTERIA DEL TELECOMANDO
Il telecomando utilizza una batteria tipo CR2025.
Per attivare la batteria del telecomando
(inclusa) togliere la linguetta plastica di
protezione.
TIRARE LA LINGUETTA
PLASTICA
ITALIANO
Per la sostituzione della batteria:
1. Spingere il fermo plastico dell’alloggiamento porta batteria verso destra;
2. Estrarre l’alloggiamento porta batteria;
3. Inserire una batteria nuova facendo attenzione
a rispettare le polarità;
TIRARE
4. Richiudere l’alloggiamento porta batteria.
SPINGERE
XF 480 KB
5
Page 6
IMPORTANTE
MUNE
- Smaltire le batterie usate nel rispetto delle normative sul riciclaggio nella
propria zona.
- Pericolo di esplosione se la batteria viene sostituita in modo errato.
ITALIANO
- Sostituire solo con lo stesso tipo o equivalente.
- Se il telecomando non viene utilizzato per lunghi periodi, la batteria può
perdere liquido e danneggiare il telecomando, sostituirlo con uno nuovo
se si dovesse vericare.
- NON cortocircuitare le batterie o gettarle nell’acqua, nella spazzatura
generale o nel fuoco.
RICARICA DELLA BATTERIA
1. Ad apparecchio spento, collegare il cavo in dotazione alla presa Type-C(5)
del dispositivo. Collegare il cavo ad un alimentatore (non in dotazione) da
5V 2A e quest’ultimo ad una presa di rete;
2. L’indicatore led rosso(6) si accenderà;
3. A carica ultimata l’indicatore led rosso(6) si spegnerà.
Con batteria in esaurimento, l’ultimo segmento dell’icona batteria presente sul
display lampeggerà per un certo tempo, poi l’apparecchio si spegnerà automaticamente.
Nota: Per una buona durata della batteria è consigliato tenere l’apparecchio spento
durante la fase di ricarica.
Se non diversamente specicato, i comandi descritti di seguito valgono sia per
l’unità che per il telecomando.
ACCENSIONE/SPEGNIMENTO
- Agire sull’interruttore di accensione/spegnimento(16) per accendere e
spegnere l’apparecchio (posizione “I” acceso, posizione “0” spento).
- Premere il tasto
by; premerlo nuovamente per riaccendere l’unità.
(17) sul telecomando per portare l’unità in modalità stand-
REGOLAZIONE VOLUME/ MUTE/ TONI/ VOLUME MIC/ ECHO/ EQ
1. Ruotare la manopola del Volume(15) in senso orario/ antiorario per aumentare/ diminuire il volume dell’apparecchio. Premere il tasto
XF 480 KB
telecomando per silenziare l’apparecchio, ripremerlo per tornare al normale
ascolto;
2. Premere il tasto
alti, bassi, volume microfono ed effetto echo;
3. Premere più volte il tasto EQ(25) del telecomando per variare la dinamica
audio scegliendo tra quelle preimpostate: POP, CLAS, COU, NOR, ROCK.
(14) e ruotare la manopola(15) per la regolazione dei toni
(27) del
6
Page 7
DISCO-LIGHT
Per variare gli effetti Disco-Light premere più volte il tasto
luminosi verranno distinti sul display con: Led1, Led2, Led3, Led4, Led5, Led6, OFF.
Selezionare “OFF” per disattivare completamente l’illuminazione Led frontale.
(8), i vari effetti
ATTIVAZIONE/ DISATTIVAZIONE VOCE GUIDA
Tenere premuto per qualche secondo il tasto
tivare la voce guida (in lingua Inglese).
(8) sull’unità per attivare/disat-
MODALITA’ RADIO FM (PRESENTE SOLO PER VERSIONI EXPORT)
1. Accendere l’apparecchio e premere il tasto
MODE(18) del telecomando, più volte no a quando sul display comparirà
l’indicazione della frequenza;
2. Premere
tivare la ricerca e memorizzazione automatica delle emittenti (la radio inizia
una ricerca automatica delle stazioni radio e le salva automaticamente in
memoria). Il numero delle stazioni memorizzate dipende dal segnale radio
nella vostra zona;
3. Una volta completata la scansione, utilizzare i tasti
opure i tasti
delle stazioni salvate.
Nota:
-
La ricezione in FM dipende molto dal luogo dove è posto l’apparecchio.
- La vicinanza di apparecchi TV, lampade al neon o altri elettrodomestici può
provocare disturbi nella ricezione di programmi radio, in questo caso allontanate
l’apparecchio.
il tasto
(12)
sull’unità, o il tasto (23) del telecomando,
(19)
e (24) del telecomando, per muoversi tra i preset
(10) sull’unità, o il tasto
per at-
(9) e
(13)
sull’unità,
FUNZIONAMENTO BLUETOOTH
ACCOPPIAMENTO AI DISPOSITIVI
1. Posizionare lo speaker vicino al dispositivo Bluetooth da accoppiare e accendere l’apparecchio;
2. Selezionare la funzione Bluetooth premendo più volte il tasto
o il tasto MODE(18) del telecomando; sul display comparirà la scritta “BLUE”
lampeggiante;
3. Seguire le istruzioni del vostro dispositivo esterno per ricercare lo speaker;
4. Ricercare lo speaker nominato “XF 480 KB” e inserire il PIN “0000” se richiesto;
5. Ad accoppiamento avvenuto la scritta“BLUE”sul display rimarrà ssa.
Note: L’altoparlante Bluetooth funziona solamente con una connessione alla volta.
La vicinanza di apparecchi TV, lampade al neon o altri elettrodomestici può
provocare disturbi nella ricezione, in questo caso allontanate l’apparecchio.
(10) sull’unità,
ITALIANO
XF 480 KB
7
Page 8
COMANDI DISPONIBILI IN MODALITÀ BLUETOOTH
- Avviare la riproduzione sonora dal proprio dispositivo;
(9) o
(19)
- Premere una volta il tasto
premere una volta il tasto
ITALIANO
- Premere il tasto
per riprendere la riproduzione.
(12)
(13) o (24) per passare alla traccia successiva.
o (23) per mettere in pausa; premerlo nuovamente
per passare alla traccia precedente,
COLLEGAMENTO TWS
La tecnologia TWS consente all’utente di effettuare una connessione wireless
tra due altoparlanti dello stesso modello e compatibili con la funzione TWS.
1. Disattivare la funzione bluetooth sul telefono o altro dispositivo Bluetooth;
2. Accendere entrambi i diffusori e selezionare su entrambi la modalità “Bluetooth”;
3. Premere per 3 secondi il tasto
“t-S” e il “BLUE” lampeggerà. Si sentirà quindi un segnale acustico diverso per
indicare che i due altoparlanti si sono collegati tramite Bluetooth;
4. Attivare il Bluetooth sul telefono o altro dispositivo, ricercare ed accoppiare
l’apparecchio esterno all’altoparlante “XF 480 KB”. Dopo la connessione sarà
possibile riprodurre musica con il sistema stereo-altoparlante TWS.
Le regolazioni sull’altoparlante principale verranno effettuate simultaneamente
anche sull’altro altoparlante. Ad esempio, selezione del brano precedente e
successivo, riproduzione e pausa.
Note:
- In caso di mancato accoppiamento tra i 2 altoparlanti, spegnere entrambi gli
apparecchi e ripetere i passi 1, 2 e 3.
- La funzione TWS funziona solamente tra diffusori uguali o con altri diffusori che
utilizzano lo stesso micro processore o soluzione.
(12)
in uno dei diffusori, il display mostrerà
MICRO SD CARD/ USB
1. Inserire una scheda Micro SD nello slot(3) o una chiavetta USB nella presa(2)
e accendere l’apparecchio;
2. La riproduzione partirà in automatico. In caso contrario premere più volte
il tasto
comparire sul display USB o SD;
3. Premere una volta il tasto
XF 480 KB
premere una volta il tasto
4. Premere il tasto
per riprendere la riproduzione;
5. Premere e tenere premuto il tasto
per retrocedere o avanzare velocemente nell’ascolto del brano, rilasciare il
tasto per tornare all’ascolto normale;
(10) sull’unità, o il tasto MODE(18) del telecomando no a far
(9) o
(19)
per passare al brano precedente,
(13) o (24) per passare al brano successivo;
(12)
o (23) per mettere in pausa, premerlo nuovamente
(9) o
(19)
o il tasto
(13) o (24)
8
Page 9

6. Tramite il tasto (26) del telecomando, è possibile attivare la funzione di
ripetizione del brano (ONE=ripete il singolo brano, ALL=ripete tutti i brani
presenti);
7. Utilizzare i tasti numerici(21) del telecomando per la selezione diretta di un
brano.
AUX
1. Collegare una qualsiasi unità provvista di uscita audio tramite apposito cavo
Jack da 3,5mm all’ingresso AUX(4), premere il tasto
MODE(18) del telecomando più volte no a quando sul display comparirà la
scritta “LINE”;
2. Regolare il dispositivo esterno dai propri comandi.
(10) sull’unità, o il tasto
UTILIZZO DEL MICROFONO
1. Collegare il microfono fornito nella presa MIC(7);
2. Accenderlo utilizzando l’interruttore posto sul suo corpo;
3. Regolare il volume e l’effetto ECHO del microfono tramite il tasto
ruotare la manopola(15).
(14) e
CARATTERISTICHE TECNICHE
Potenza Totale: ................................................35W
Banda di frequenza FM: ............................... 87,5MHz - 108MHz
Risposta in frequenza: ..................................60Hz - 16KHz
Rapporto segnale rumore: ..........................65dB
Sensibilità: .........................................................500mV
Impedenza: .......................................................3Ω
Potenza max di trasmis. Bluetooth:..........0,8mW
Frequenza di trasmissione Bluetooth: .... 2,4GHz
Alimentazione: ................................................Batteria al Lithio 3,7V
Dimensioni: .......................................................215(L) x 227(D) x 532(H) mm
Peso: ....................................................................3,6 Kg
3600mA
ITALIANO
XF 480 KB
9
Page 10
INFORMATIVA SULLA RIMOZIONE E LO SMALTIMENTO DELLE
BATTERIE
Attenzione: l’operazione di rimozione e smaltimento è riservata
esclusivamente al personale tecnico specializzato!
1. Rimuovere le viti che ssano il pannello superiore dei comandi;
ITALIANO
2. Sollevare il pannello superiore;
3. Individuare e rimuovere la batteria dal suo alloggiamento.
Qualunque sia il tipo di batteria esaurita,essa non deve essere gettata tra i riuti
domestici,nel fuoco o nell’acqua. Ogni tipo di batteria esaurita deve essere
riciclata oppure smaltita presso gli appositi centri raccolta dedicati.
INFORMAZIONI AGLI UTENTI ai sensi del Decreto Legislativo N°49
del 14 Marzo 2014 “Attuazione della Direttiva 2012/19/UE sui riuti di apparecchiature elettriche ed elettroniche (RAEE)”
Il simbolo del cassonetto barrato riportato sull’apparecchiatura indica che il
prodotto alla ne della propria vita utile deve essere raccolto separatamente
dagli altri riuti.L’utentedovrà, pertanto,conferirel’apparecchiaturaintegradei
componentiessenzialigiuntaanevita agli idonei centri di raccoltadifferenziata
dei riuti elettronici ed elettrotecnici,oppure riconsegnarla al rivenditore al mo-
mento dell’acquisto di nuova apparecchiatura di tipo equivalente, in ragione di
uno a uno, oppure 1 a zero per le apparecchiature aventi lato maggiore inferiore
a 25cm. L’adeguata raccolta differenziata per l’avvio successivo dell’apparecchiatura dimessa al riciclaggio, al trattamento e allo smaltimento ambientale
compatibile contribuisce ad evitare possibili effetti negativi sull’ambiente e sulla
salute e favorisce il riciclo dei materiali di cui è composta l’apparecchiatura. Lo
smaltimento abusivo del prodotto da parte dell’utente comporta l’applicazione
delle sanzioni amministrative di cui al D.Lgs n. Decreto Legislativo N°49 del 14
Marzo 2014.
XF 480 KB
10
Page 11

USE NOTES
Listening at high volumes for a long time may damage your hearing.
This appliance is a high precision electronic instrument, therefore avoid using it in
the following cases:
• Near magnetic elds.
• Near heat sources such as heaters and stoves.
• In very humid places such as bathrooms, swimming pools, etc...
• In very dusty places.
• In places subject to strong vibrations.
• Do not bring your ear close to the speaker during the adjustment and volume
adjustment phases, and in particular to keep the volume to a minimum in the
ignition phase.
• Position the appliance so that there is always enough space on its sides for the
free circulation of air (at least 5 cm).
• If liquids penetrate inside the appliance, immediately disconnect the plug from
the socket and take the appliance to the nearest authorized TREVI service center.
• Always check before recharging the appliance, that the power and connection
cables are installed correctly.
• Nonakedamesources,such as lightedcandles,shouldbeplacedon the appliance.
• The appliance must not be exposed to dripping or splashing water and no objects
lled with liquid,such as vases, must be placed on the appliance.
• Before turning on the appliance, always check that the power cable and the
connection cable are installed correctly.
• The power adapter must be connected to an outlet near the device and must be
easily accessible.
• If you notice excessive heat on the device or on the power adapter, immediately
disconnect the plug from the main power socket.
• Do not pull on the power cable.
• Keep this manual for future reference.
CARE AND MAINTENANCE
For cleaning, we recommend the use of a soft, slightly moistened cloth. Avoid
solvents or abrasive substances.
ENGLISH
WARNING FOR A CORRECT USE OF RECHARGEABLE BATTERY
- Recharge the battery in an ambient temperature between 5°C and 35°C.
- Don’t recharge more than the suitable period to prevent the risk of overheating
and burst.
- Recharging the battery over the suitable period or an extended period of inactivity
may reduce battery duration.
- Rechargeable battery is liable to wear and tear and its performance will reduce
gradually.
- To extend the duration of the battery use it when is completely charged up to
the complete discharging, then recharge it fully before use it again. Recharge a
XF 480 KB
11
Page 12
battery not completely consumed, will result a reduced duration. In this case,
repeat the full charging/discharging cycle many times.
- Avoid recharge the battery for the whole night.
IMPORTANT
ENGLISH
This device is designed for non-professional home use. The good construction of this
appliance guarantees perfect operation for a long time. However, should any inconvenience arise, it is advisable to consult the nearest TREVI Authorized Service Center.
TREVI pursues a policy of continuous research and development. Therefore the
products may have different characteristics from those described.
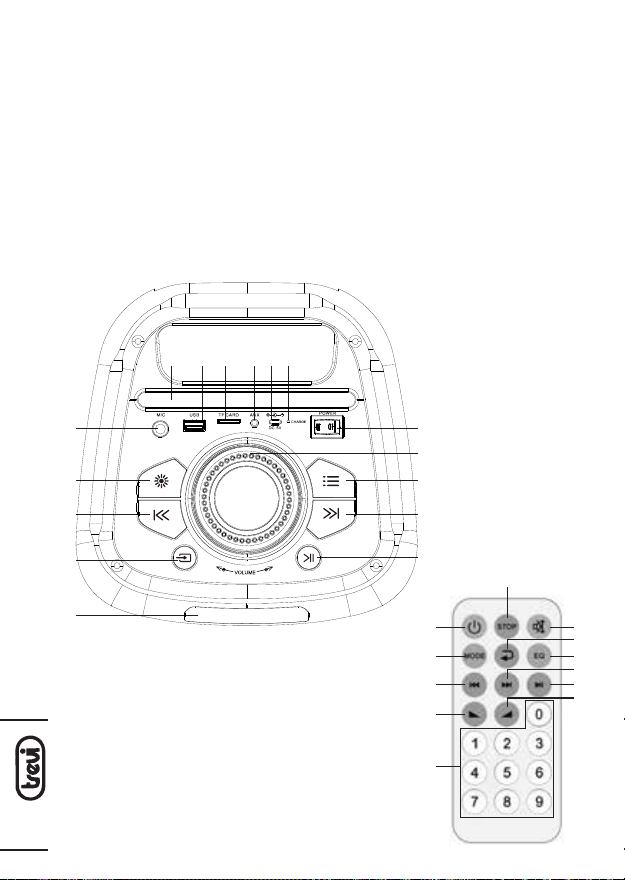
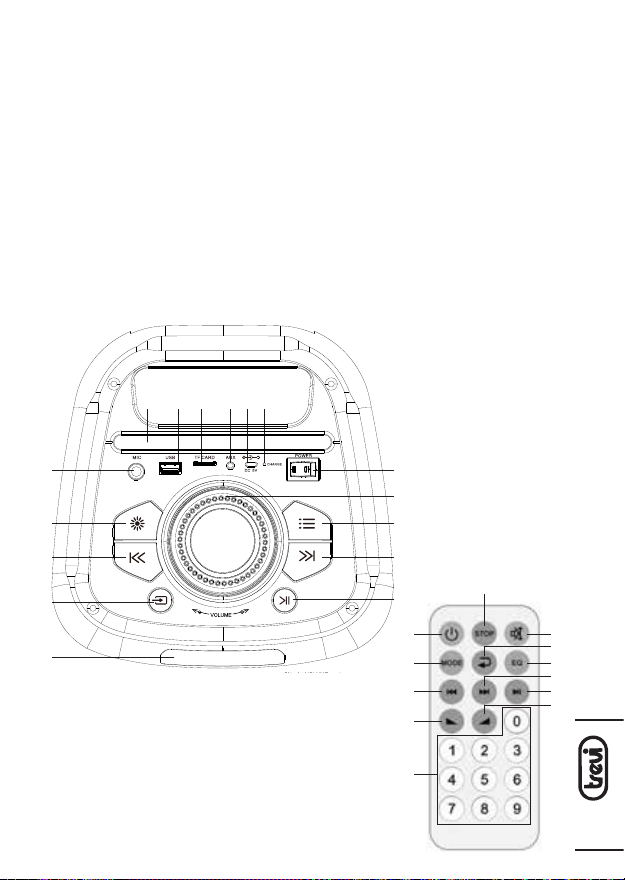
DESCRIPTION
1
2 3 4 5
7 16
8
6
15
14
9
10
11
XF 480 KB
12
13
12
28
17
18
19
20
21
27
26
25
24
23
22
Page 13
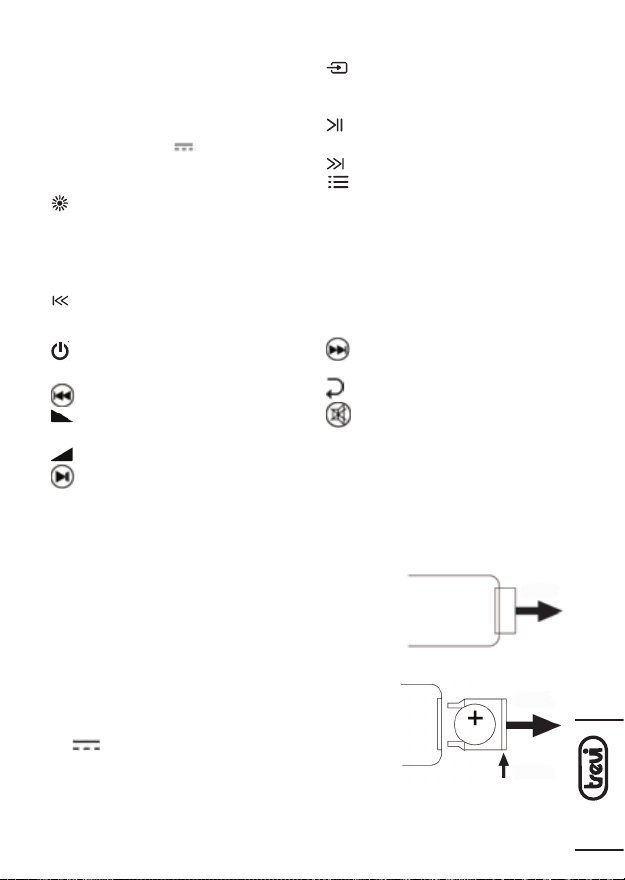
UNIT
MUNE
10.
1. Smartphone/Tablet support
2. USB port
3. TF card slot
4. AUX input (3.5mm)
5. Charging port 5V type-C
6. Charging Led indicator
7. Microphone input
button:
8.
- Press once to select the disco light
effect.
- Press and hold to turn off the voice
guidance.
9.
button, previous track
button, change to the different
mode
11. Display
12.
button, Play/ Pause + long press 3
seconds for TWS pairing
13.
button, next track
14.
button, press it repeatedly to
switch setting for Treble/bass/microphone volume/microphone treble/
microphone bass/echo.)
15. Volume knob
16. Power ON/OFF switch
REMOTE CONTROL
button, next track
17.
button, Stand-by/ ON switch
18. MODE button
19. button, previous track
20. button, to reduce volume
21. Numeric buttons
22. button, to increase volume
, Play/Pause
23.
24.
25. EQ button, to set equalizer variants
26.
button, repeat
27. button, Mute
28. STOP button
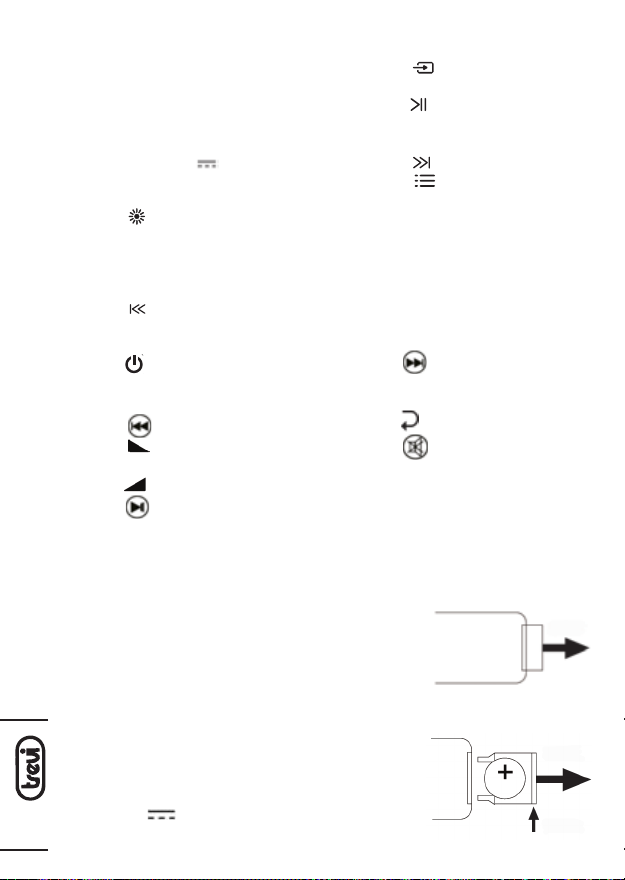
ACTIVATION AND REPLACEMENT OF REMOTE CONTROL BATTERY
The remote control has a cell battery already installed.
To activate the battery, remove the transparent tab
at the bottom of the remote control. The remote
control is now ready to use.
PULL
ENGLISH
How to replace battery:
1. Remove the battery compartment cover as per
the illustration shown on the right;
2. Observe the correct polarity and install a
3V
3. Close the cover.
lithium battery (CR2025);
PUSH
PULL
XF 480 KB
13
Page 14
MUNE
IMPORTANT
- Dispose of used batteries in accordance with the recycling regulations in
your area.
- Danger of explosion if battery is incorrectly replaced.
ENGLISH
- Replace only with the same or equivalent type.
- If the remote control is not used for a long time, the battery may leak and
damage the remote control, replace it with a new one if this occurs.
- DO NOT short-circuit the batteries or throw them into water, general garbage
or re.
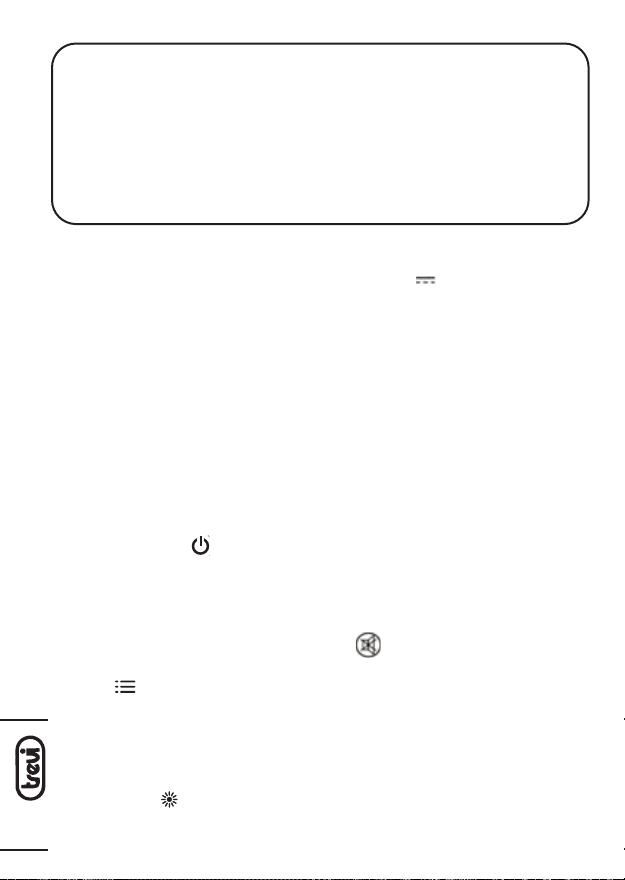
CHARGING THE BATTERY
1. With the appliance off, connect the power supply cable to the charging port
type-C(5) on the device. Connect the cable to a 5V 2A power supply (not
supplied) and the latter to a mains socket;
2. The red LED indicator(6) will light up;
3. Once charging is complete, the red LED indicator (6) will turn off.
With low battery, the last segment of the battery icon on the display will ash for
a certain time, then the device will switch off automatically.
Note: For a good battery life, it is recommended to keep the device off during the
charging.
Unless otherwise specied, the commands described below apply to both the
unit and the remote control.
ON/ OFF
- Use the On/Off switch(16) to turn the appliance On and Off (position “I” On,
position “0” Off ).
- Press the button
mode; press it again to switch On the unit.
(17) on the remote control to put the unit in stand-by
VOLUME/ MUTE/ TONE/ MIC VOLUME/ ECHO/ EQ ADJUSTMENT
1. Rotate the Volume knob (15) clock wise/counterclockwise to increase/decrease
the volume of the unit. Press the button
mute the device, press it again to return to normal listening;
2. Press
XF 480 KB
crophone volume and echo effect;
3. Press the EQ(25) button on the remote control several times to choose the
best audio dynamics from the preset ones: POP, CLAS, COU, NOR, ROCK.
(14) button and rotate the knob(15) to adjust the treble, bass, mi-
(27) on the remote control to
DISCO-LIGHT
Press the button
will be distinguished on the display with: Led1, Led2, Led3, Led4, Led5, Led6, OFF.
Select “OFF” to turn off the front Led lighting completely.
(8) several times, to change the Disco-Light lighting effects, they
14
Page 15
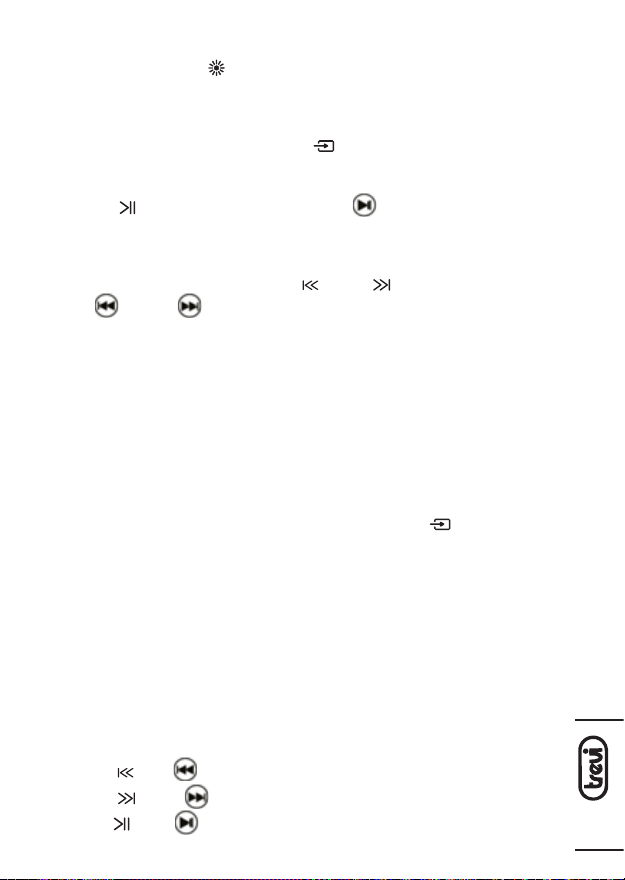
GUIDE VOICE ACTIVATION/DEACTIVATION
Press and hold the button
tivate the guide voice (only in English).
(8) on the unit for a few seconds to activate/deac-
RADIO MODE
1. Turn on the unit and press the button
button on the remote control, several times until the frequency indication
appears on the display;
2. Press the
control, to activate automatic station search and storage (the radio starts an
automatic search for radio stations and automatically saves them in memory).
The number of stored stations depends on the radio signal in your area
3. Once scanning is complete, use the
or the
the presets of saved stations.
Note:
-
FM reception depends very much on where the device is located.
- The proximity of TV sets, neon lamps or other household appliances can cause
disturbances in the reception of radio programs, in this case remove the appliance.
(12) button on the unit, or th
(19)
and (24) buttons on the remote control, to move through
(10) on the unit, or the MODE(18)
e (23) button on the remote
(9) and
(13)
buttons on the unit,
;
BLUETOOTH OPERATION
PAIRING TO DEVICES
1. Place the speaker near the Bluetooth device to be paired and turn on the
device;
2. Select the Bluetooth function by pressing the button
several times, or the MODE button(18) on the remote control; “BLUE” will
ash on the display;
3. Follow the instructions of your external device to search for the speaker;
4. Search for the speaker named “XF 480 KB” and enter PIN “0000” if prompted;
5. After successful pairing, “BLUE” on the display will remain steady.
Note:
- The Bluetooth speaker only works with one connection at a time.
- The proximity of TV sets, neon lamps or other appliances can cause
disturbances in reception, in this case move the appliance away.
CONTROLS AVAILABLE IN BLUETOOTH MODE
- Start sound playback from your device;
- Press the
press the
- Press the
(9) or
(13) or (24) button once to go to the next track.
(12)
(19) button once to go to the previous track
or (23) button to pause; press it again to resume playback.
(10) on the unit
, premere
ENGLISH
XF 480 KB
15
Page 16
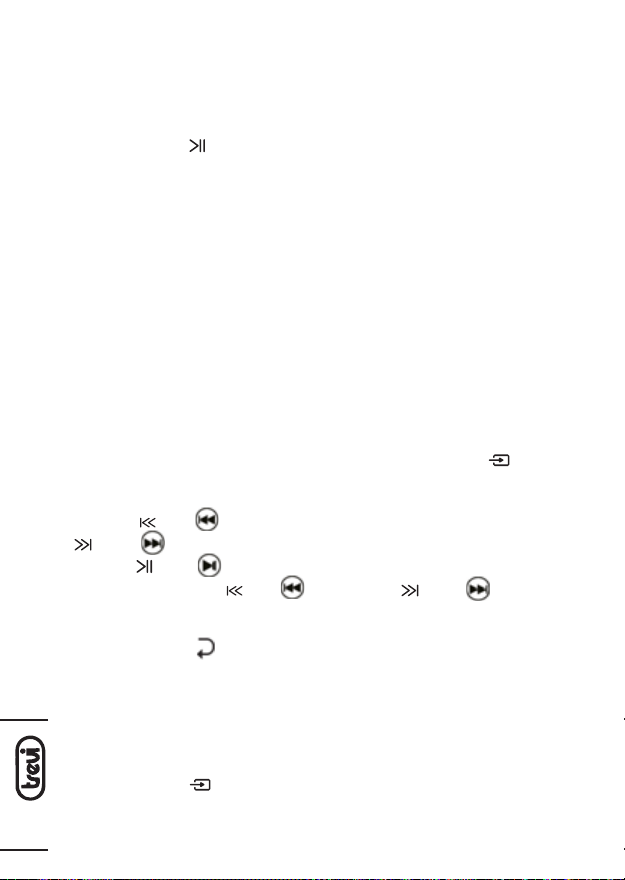
TWS CONNECTION
TWS technology allows the user to make a wireless connection between two
speakers of the same model and compatible with the TWS function.
1. Power On two speakers and enter Bluetooth mode;
2. Turn Off the Bluetooth function on your phone or other Bluetooth device;
ENGLISH
3. Press the button
show “t-S” and the “BLUE” will ash. A different beep will then be heard to
indicate that the two speakers have connected via Bluetooth;
4. Activate Bluetooth on your phone or other device, search and pair the external
device to the “XF 480 KB” speaker. After connection, you will be able to play
music with the TWS stereo-speaker system.
Adjustments on the main speaker will also be made simultaneously on the other
speaker. For example, selection of the previous and next track, play and pause.
Note:
- If the 2 speakers fail to pair, turn off both devices and repeat steps 1, 2 and 3.
- The TWS function only works between the same speakers or with other speakers
using the same IC or solution.
(12) in one of the speakers for 3 seconds, the display will
TF CARD/ USB
1. Insert a Micro SD card into the slot(3) or a USB ash drive into the socket(2)
and turn on the device;
2. Playback will start automatically. Otherwise press the button
unit several times, or the MODE button(18) on the remote control until USB
or SD appears on the display;
3. Press the
(13) or (24) button once to go to the next track;
4. Press the
5. Press and hold button
or fast forward in listening to the song, release the button to return to normal
listening;
6. Using the button
repeat function (ONE=repeat single track, ALL=repeat all tracks present);
7. Use the number buttons(21) on the remote control for direct selection of a track.
XF 480 KB
(9) or
(12)
(19)
button once to go to the previous track, press the
or (23) button to pause, press it again to resume playback;
(9) or
(19)
or button
(26) on the remote control, you can activate the track
(13) or (24) to rewind
(10) on the
AUX INPUT MODE
1. Connect any unit with audio output via appropriate 3.5mm Jack cable to
the AUX(4) input;
2. press the button
control several times until “LINE” appears on the display;
3. Use the controls of the connected device to select and play the audio.
(10) on the unit, or the MODE(18) button on the remote
16
Page 17
USE OF THE MICROPHONE
1. Plug the supplied microphone into the MIC(7) jack;
2. Turn it on using the switch located on its body;
3. Adjust the volume and ECHO effect of the microphone using the button
(14) and turn the knob(15).
TECHNICAL FEATURES
Total power: ...................................................... 35W
FM frequency band: ......................................87,5MHz - 108MHz
Frequency response: .....................................60Hz - 16KHz
S/N ratio: ............................................................ 65dB
Sensibility: ......................................................... 500mV
Impedance: .......................................................3Ω
Max Bluetooth transmission power: ....... 0.8mW
Bluetooth transmission frequency: ......... 2.4GHz
Power supply: .................................................. 3.7V
Dimensions: ......................................................215(L) x 227(D) x 532(H) mm
Weight: ...............................................................3.6 kg
3600mA lithium battery
BATTERY REMOVAL AND DISPOSAL POLICY
Warning: the removal and disposal operation is reserved exclusively for
specialized technical staff!
1. Remove the screws securing the upper control panel;
2. Lift up the top panel;
3. Locate and remove the battery from its housing.
Whatever type of spent battery, it should not be thrown in the household
waste,in the re or in the water. Any type of spent battery should be recycled
or disposed of at dedicated collection centers.
ENGLISH
Precautions for correct disposal of the product.
The symbol shown on the equipment indicates that waste must be disposed
of in “separate collection” and so the product must not be disposed of together with urban waste. The user must take the product to special “separate
waste collection centres” provided by local government, or deliver it to the
retailer against the purchase of a new product. Separate collection of waste
and subsequent treatment, recycling and disposal operations promotes the
production of equipment with recycled materials and limits negative effects on
the environment and on health caused by improper handling of waste. Illegal
disposal of the product leads to the enforcement of administrative penalties.
XF 480 KB
17
Page 18

NOTES D’UTILISATION
L’écoute à des volumes élevés pendant une longue période peut endommager
votre audition.
Cet appareil est un instrument électronique de haute précision, évitez donc de
l’utiliser dans les cas suivants:
• Près des champs magnétiques.
FRANÇAISE
• Près de sources de chaleur telles que des radiateurs et des poêles.
• Dans des endroits très humides tels que salles de bain, piscines, etc...
• Dans des endroits très poussiéreux.
• Dans des endroits soumis à de fortes vibrations.
• Ne rapprochez pas votre oreille du haut-parleur pendant les phases de réglage
et de réglage du volume, et notamment pour maintenir le volume au minimum
en phase d’allumage.
• Positionnez l’appareil de manière à ce qu’il y ait toujours sufsamment d’espace
sur ses côtés pour la libre circulation de l’air (au moins 5 cm).
• Si des liquides pénètrent à l’intérieur de l’appareil, débranchez immédiatement la
che de la prise et apportez l’appareil au centredeserviceTREVI agréé le plus proche.
• Vériez toujours avant de recharger l’appareil que les câbles d’alimentation et
de connexion sont correctement installés.
• Aucunesource de amme nue,tellequedesbougies allumées,ne doit êtreplacée
sur l’appareil.
• L’appareil ne doit pas être exposé à des gouttes ou des éclaboussures d’eau et aucun
objet rempli de liquide, comme des vases, ne doit être placé sur l’appareil.
• Avantd’allumerl’appareil,vériez toujours que le câble d’alimentation et le câble
de connexion sont correctement installés.
• L’adaptateur secteur doit être connecté à une prise près de l’appareil et doit être
facilement accessible.
• Si vous remarquez une chaleur excessive sur l’appareil ou sur l’adaptateur secteur,
débranchez immédiatement la che de la prise d’alimentation principale.
• Ne tirez pas sur le câble d’alimentation.
• Conservez ce manuel pour référence future.
ENTRETIEN ET MAINTENANCE
Pour le nettoyage, nous recommandons l’utilisation d’un chiffon doux légèrement
humide. Évitez les solvants ou les substances abrasives.
AVERTISSEMENT RELATIF À L’UTILISATION ADÉQUATE DE LA
XF 480 KB
BATTERIE RECHARGEABLE
- Rechargez la batterie à une température ambiante comprise entre 5°C et 35°C.
- Ne pas recharger plus que la période appropriée pour éviter les risques de sur-
chauffe et d’éclatement.
- La recharge de la batterie pendant une période appropriée ou une période
d’inactivité prolongée peut réduire la durée de la batterie.
- La batterie rechargeable est susceptible de s’user et ses performances diminueront
progressivement.
18
Page 19
- Pour prolonger la durée de la batterie, utilisez-la lorsqu’elle est complètement chargée
jusqu’à la décharge complète, puis rechargez-la complètement avant de la réutiliser.
Recharger une batterie pas complètement consommée, en résultera une durée
réduite. Dans ce cas, répétez plusieurs fois le cycle complet de charge/décharge.
- Evitez de recharger la batterie toute la nuit.
IMPORTANT
Cet appareil est conçu pour un usage domestique non professionnel. La bonne
construction de cet appareil garantit un fonctionnement parfait pendant longtemps.
Cependant, en cas de désagrément, il est conseillé de consulter le centre de service
agréé TREVI le plus proche.
TREVI poursuit une politique de recherche et développement continue. Par
conséquent, les produits peuvent avoir des caractéristiques différentes de celles
décrites.
PANNEAU DE COMMANDE
1
2 3 4 5
7 16
8
6
15
14
FRANÇAISE
10
11
9
13
12
17
18
19
20
21
28
27
26
25
24
23
22
XF 480 KB
19
Page 20
MUNE
UNITÉ
1. Prise en charge des smartphones et
des tablettes
2. Port USB
3. Emplacement pour carte TF
4. Entrée AUX (3,5 mm)
FRANÇAISE
5. Port de charge 5V
6. Indicateur LED de charge
7. Entrée microphone
8. Bouton
- Appuyez une fois pour sélectionner l’effet de lumière disco.
- Maintenez cette touche enfoncée
pour désactiver guidage vocal.
9. Bouton
:
, piste précédente
type-C
10. Bouton
11.Afchage
12. Bouton
longue de 3 secondes pour l’appairage TWS
13. Bouton
14. Bouton
pour changer de réglage (aigus/
basses/volume du microphone/
aigus du microphone/basses du
microphone/écho).
15. Bouton de volume
16. Interrupteur marche/arrêt
, changement de mode
, lecture/pause + pression
, piste suivante
, appuyez plusieurs fois
TÉLÉCOMMANDE
17. Bouton
18. Bouton MODE, pour basculer entre
les modes
19. Bouton , piste précédente
20. Bouton , pour réduire le volume
21. Boutons numériques
22. Bouton , pour augmenter le volume
23. Bouton
, interrupteur Stand-by/ ON
, Lecture/Pause
24. Bouton
25. BoutonEQ,pour dénir les variantes
de l’égaliseur
26. Bouton
27. Bouton , pour couper le son
28. Bouton STOP
, piste suivante
, répéter
ACTIVATION ET REMPLACEMENT DE LA BATTERIE DE LA
TÉLÉCOMMANDE
La télécommande est livrée avec une pile déjà installée.
Pour activer la batterie, retirez la languette
transparente située au bas de la télécommande.
La télécommande le contrôle est maintenant prêt à
être utilisé.
XF 480 KB
Pour remplacer par une nouvelle batterie:
1. Poussez la butée en plastique du support de pile
vers la droite;
2. Extrayez le boîtier du porte-piles;
3. Respectez la polarité et installez une pile au
lithium 3V
4. Fermez le boîtier du support de batterie.
20
(CR2025);
TIRER
TIRER
POUSSER
Page 21
MUNE
IMPORTANT
- Jetez les piles usagées conformément aux réglementations de recyclage
de votre région.
- Danger d’explosion si la pile n’est pas remplacée correctement.
- Remplacer uniquement par le même type ou un type équivalent.
- Si la télécommande n’est pas utilisée pendant une longue période, la pile
peut fuir et endommager la télécommande, remplacez-la par une neuve
si cela se produit.
- NE PAS court-circuiter les piles ni les jeter dans l’eau, les ordures ménagères
ou le feu.
CHARGE DE LA BATTERIE
1. Lorsque l’appareil est éteint, connectez le câble d’alimentation au port de
charge de type C(5) de l’appareil.Branchez le câble sur une alimentation 5V
2A (non fournie) et celle-ci sur une prise secteur;
2. L’indicateur LED rouge (6) s’allume;
3. Une fois la charge terminée, l’indicateur LED rouge (6) s’éteint.
Lorsque la batterie est faible, le dernier segment de l’icône de la batterie sur l’écran
clignote pendant un certain temps, puis l’appareil s’éteint automatiquement.
Remarque: Pour une bonne autonomie de la batterie, il est recommandé de garder
l’appareil éteint pendant la phase de charge.
Sauf indication contraire, les commandes décrites ci-dessous s’appliquent à la
fois à l’unité et à la télécommande.
ALLUMÉ/ ÉTEINT
- L’interrupteur On/Off(16) permet d’allumer et d’éteindre l’appareil (position
“I” On, position “0” Off;
- Appuyez sur la touche
mode veille; appuyez à nouveau sur cette touche pour allumer l’appareil.
(17) e la télécommande pour mettre l’appareil en
VOLUME/ MUTE/ TONE/ MIC VOLUME/ ECHO/ EQ ADJUSTMENT
1. Tournez le bouton Volume(15) ddans le sens des aiguilles d’une montre ou
dans le sens inverse pour augmenter ou diminuer le volume de l’appareil.
Appuyez sur la touche
en sourdine, appuyez à nouveau pour revenir à une écoute normale;
2. Appuyez sur la touche
les basses, le volume du microphone et l’effet d’écho;
3. Appuyer plusieurs fois sur la touche EQ(25) de la télécommande pour choisir
la meilleure dynamique audio parmi celles préréglées: POP, CLAS, COU, NOR,
ROCK.
(27) de la télécommande pour mettre l’appareil
(14) et tournez le bouton(15) pour régler les aigus,
FRANÇAISE
XF 480 KB
21
Page 22
DISCO-LIGHT
Appuyer plusieurs fois sur la touche
sco-Light, qui se distinguent sur l’écran par : Led1, Led2, Led3, Led4, Led5, Led6, OFF.
Sélectionnez “OFF” pour éteindre complètement l’éclairage LED frontal.
ACTIVATION/DÉSACTIVATION DE LA VOIX GUIDE
FRANÇAISE
Appuyez sur la touche
quelques secondes pour activer/désactiver la voix de guidage (uniquement
en anglais).
(8) de l’appareil et maintenez-la enfoncée pendant
(8)pourmodier leseffetslumineux de laDi-
RADIO
1. Allumez l’appareil et appuyez plusieurs fois sur la touche
ou sur la touche MODE(18) de la télécommande, jusqu’à ce que l’indication
de fréquence apparaisse sur l’écran;
2. Appuyez sur la touche
télécommande pour activer la recherche et la mémorisation automatiques
des stations (la radio lance une recherche automatique des stations de radio
et les enregistre automatiquement en mémoire). Le nombre de stations
mémorisées dépend du signal radio dans votre région
3. Une fois la recherche terminée, utilisez les touches
ou les touches
dans les présélections des stations mémorisées.
Remarque:
-
La réception FM dépend beaucoup de l’emplacement de l’appareil.
- La proximité d’appareils de télévision, de lampes au néon ou d’autres appareils ména-
gers peut perturber la réception des programmes radio. Dans ce cas, retirez l’appareil.
(12) de l’appareil ou sur la touche
(19)
et (24) de la télécommande, pour vous déplacer
;
(9) et
(10) de l’appareil,
(23) de la
(13)
de l’appareil,
FONCTIONNEMENT BLUETOOTH
APPAIRAGE AUX APPAREILS
1. Placez l’enceinte à proximité de l’appareil Bluetooth à appairer et allumez
l’appareil;
2. Sélectionnez la fonction Bluetooth en appuyant plusieurs fois sur la touche
(10) de l’appareil ou sur la touche MODE (18) de la télécommande; “BLUE”
clignote à l’écran;
XF 480 KB
3. Suivez les instructions de votre appareil externe pour rechercher l’enceinte;
4. Recherchez l’enceinte nommée “XF 480 KB” et entrez le code PIN “0000” si
vous y êtes invité;
5. Une fois l’appairage réussi, l’afchage “BLUE”reste xe.
Remarque:
- Le haut-parleur Bluetooth ne fonctionne qu’avec une seule connexion à la fois, la
connexion ne peut pas être interrompue pendant le fonctionnement normal.
22
Page 23
- La proximité de téléviseurs, de néons ou d’autres appareils peut perturber
la réception, dans ce cas, éloignez l’appareil.
COMMANDES DISPONIBLES EN MODE BLUETOOTH
- Lancez la lecture du son à partir de votre appareil;
- Appuyez une fois sur la touche
précédente, puis une fois sur la touche
piste suivante.
- Appuyez sur la touche
nouveau pour reprendre la lecture.
(12)
(9) ou
ou (23) pour faire une pause; appuyez à
(19) pour passer à la piste
(13) ou (24) pour passer à la
FONCTION TWS
La technologie TWS permet à l’utilisateur d’établir une connexion sans l entre
deux enceintes du même modèle et compatibles avec la fonction TWS.
1. Mettez les deux enceintes sous tension et passez en mode Bluetooth;
2. Désactivez la fonction Bluetooth de votre téléphone ou de tout autre appareil
Bluetooth;
3. Appuyez sur le bouton
l’écran afche “t-S”et le “BLUE”clignote. Un bip différent se fait alors entendre
pour indiquer que les deux enceintes sont connectées via Bluetooth;
4. Activez le Bluetooth sur votre téléphone ou autre appareil, recherchez et
associez l’appareil externe à l’enceinte “XF 480 KB”. Une fois la connexion
établie, vous pourrez écouter de la musique avec le système de haut-parleurs
stéréo TWS.
Les réglages effectués sur l’enceinte principale seront également effectués
simultanément sur l’autre enceinte. Par exemple, la sélection de la piste
précédente et suivante, la lecture et la pause.
Remarque:
- Si les 2 enceintes ne parviennent pas à se coupler, éteignez les deux appareils et
répétez les étapes 1, 2 et 3.
- La fonction TWS ne fonctionne qu’entre les mêmes enceintes ou avec d’autres
enceintes utilisant le même circuit intégré ou la même solution.
(12) de l’un des haut-parleurs pendant 3 secondes,
FRANÇAISE
CARTE TF/USB
1. Insérez une carte Micro SD dans la fente(3) ou une clé USB dans la prise(2)
et allumez l’appareil;
2. La lecture démarre automatiquement. Sinon, appuyez plusieurs fois sur la
touche
jusqu’à ce que USB ou SD apparaisse sur l’écran;
3. Appuyez une fois sur le bouton
précédente, appuyez une fois sur le bouton
(10) de l’appareil ou sur la touche MODE (18) de la télécommande
(9) ou
(19)
pour passer à la piste
(13) ou (24) pour passer
XF 480 KB
23
Page 24
à la piste suivante;
4. Appuyez sur la touche
nouveau pour reprendre la lecture;
5. Appuyez et maintenez enfoncé le bouton
(13) ou (24) pour reculer ou avancer rapidement pendant l’écoute de la
FRANÇAISE
chanson, relâchez le bouton pour revenir à l’écoute normale;
6. A l’aide de la touche
la fonction de répétition des pistes (ONE=répétition d’une seule piste,
ALL=répétition de toutes les pistes présentes);
7. Les touches numériques (21) de la télécommande permettent de sélectionner
directement une piste.
(12)
ou (23) pour faire une pause, appuyez à
(9) ou
(26) de la télécommande, vous pouvez activer
(19)
ou le bouton
MODE ENTRÉE AUXILIAIRE
1. Connectez un appareil avec sortie audio à l’entrée AUX(4) à l’aide d’un câble
jack 3,5 mm approprié;
2. Appuyez plusieurs fois sur la touche
MODE(18) de la télécommande jusqu’à ce que “LINE” apparaisse à l’écran;
3. Utilisez les commandes de l’appareil connecté pour sélectionner et lire l’audio.
(10) de l’appareil ou sur la touche
UTILISATION DU MICROPHONE
1. Branchez le microphone fourni dans la prise MIC(7);
2. Mettez-le en marche à l’aide de l’interrupteur situé sur le corps de l’appareil;
3. Régler le volume et l’effet ECHO du microphone à l’aide du bouton
tourner la molette (15).
(14) et
CARACTÉRISTIQUES TECHNIQUES
Puissance totale: .............................................35W
Bande de fréquence: .....................................87,5MHz - 108MHz
Réponse en fréquence: ................................ 60Hz - 16KHz
Rapport signal/bruit: .....................................65dB
Sensibilité: .........................................................500mV
Impédance: .......................................................3Ω
Puissance de transmission Bt max: ..........0,8 mW
Fréquence de transmission Bluetooth: ..2,4 GHz
XF 480 KB
Alimentation: ................................................... batterie au lithium 3.7V
Dimensions: ......................................................215(L) x 227(D) x 532(H) mm
Poids: ...................................................................3,6 kg
3600mA
24
Page 25
POLITIQUE DE RETRAIT ET DE MISE AU REBUT DE LA BATTERIE
Attention: l’opération d’enlèvement et d’élimination est réservée
exclusivement au personnel technique spécialisé!
1. Retirez les vis qui xent le panneau de commande supérieur;
2. Soulever le panneau supérieur;
3. Localisez la batterie et retirez-la de son logemen.
Quel que soit le type de batterie usagée, elle ne doit pas être jetée avec les
ordures ménagères, le feu ou l’eau. Chaque type de batterie usagée doit être
recyclé ou éliminé dans les centres de collecte dédiés appropriés.
Recommandations pour l’élimination correcte du produit.
Lesymbolegurantsurl’appareil indique que le produit faitl’objetd’une“collecte
séparée“. C’est pourquoi, le produit ne doit pas être éliminé avec les déchets
urbains. L’utilisateur doit remettre le produit auprès de “décharges spécialisées
de collecte séparée“ prévues par les autorités locales, ou bien le rendre au
revendeur quand il achètera un nouvel appareil équivalent.
La collecte séparée du produit et les opérations successives de traitement,
recyclage et élimination favorisent la production d’appareils composés par des
matériaux recyclés ainsi que permettent d’éviter des effets négatifs sur l’environnement et sur la santé des personnes suite à une gestion impropre du déchet.
Toute élimination abusive du produit entraîne l’application de sanctions administratives.
FRANÇAISE
XF 480 KB
25
Page 26

GEBRAUCHSHINWEISE
Wenn Sie längere Zeit mit hoher Lautstärke hören, kann dies Ihr Gehör schädigen.
Dieses Gerät ist ein hochpräzises elektronisches Instrument. Vermeiden Sie es daher
in den folgenden Fällen:
• In der Nähe von Magnetfeldern.
DEUTSCH
• In der Nähe von Wärmequellen wie Heizungen und Öfen.
• An sehr feuchten Orten wie Badezimmern, Schwimmbädern usw.
• An sehr staubigen Orten.
• An Orten, die starken Vibrationen ausgesetzt sind.
• Bringen Sie Ihr Ohr während der Einstell- und Lautstärkeregelungsphase nicht in
die Nähe des Lautsprechers, insbesondere um die Lautstärke in der Zündphase
auf ein Minimum zu beschränken.
• Stellen Sie das Gerät so auf, dass an den Seiten immer genügend Platz für die freie
Luftzirkulation vorhanden ist (mindestens 5cm).
• Wenn Flüssigkeiten in das Gerät eindringen, ziehen Sie sofort den Stecker aus
der Steckdose und bringen Sie das Gerät zum nächsten autorisierten TREVIServicecenter.
• Überprüfen Sie vor dem Auaden des Geräts immer, ob die Strom- und Verbin-
dungskabel korrekt installiert sind.
• Auf das Gerät dürfen keine offenen Flammenquellen wie brennende Kerzen
gestellt werden.
• Das Gerät darf keinem tropfenden oder spritzenden Wasser ausgesetzt werden,
und es dürfen keine mit Flüssigkeit gefüllten Gegenstände wie Vasen auf das
Gerät gestellt werden.
• Überprüfen Sie vor dem Einschalten des Geräts immer, ob das Netzkabel und das
Verbindungskabel richtig installiert sind.
• Das Netzteil muss an eine Steckdose in der Nähe des Geräts angeschlossen und
leicht zugänglich sein.
• Wenn Sie am Gerät oder am Netzteil übermäßige Hitze bemerken, ziehen Sie
sofort den Stecker aus der Hauptsteckdose.
• Ziehen Sie nicht am Netzkabel.
• Bewahren Sie dieses Handbuch zum späteren Nachschlagen auf.
PFLEGE UND WARTUNG
Für die Reinigung wird die VeSKIP-endung eines leicht angefeuchteten, weichen
Tuchs empfohlen. Der Einsatz von Lösungsmitteln oder scheuernden Substanzen
sollte vermieden werden.
XF 480 KB
HINWEISE FÜR DEN KORREKTEN GEBRAUCH DER AUFLADBAREN
BATTERIE
- Laden Sie den Akku bei einer Umgebungstemperatur zwischen 5°C und 35°C auf.
- Laden Sie nicht mehr als die angemessene Zeit auf, um die Gefahr von Überhitzung
und Platzen zu vermeiden.
- Das Auaden des Akkus über einen geeigneten Zeitraum oder eine längere
Inaktivität kann die Akkulaufzeit verkürzen.
26
Page 27
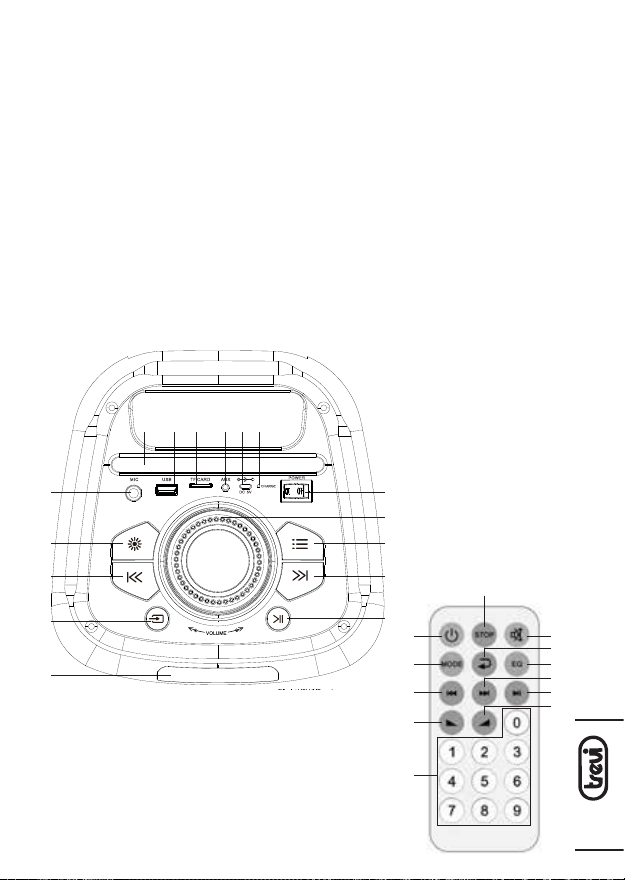
- WiederauadbareBatterienunterliegen einemVerschleißund ihreLeistungnimmt
allmählich ab.
- Um die Lebensdauer des Akkus zu verlängern, verwenden Sie ihn, wenn er
vollständig geladen ist, bis er vollständig entladen ist, und laden Sie ihn dann
vollständig auf, bevor Sie ihn erneut verwenden. Das Auaden eines nicht vollständig verbrauchten Akkus führt zu einer verkürzten Dauer. Wiederholen Sie in
diesem Fall den vollständigen Lade-/Entladezyklus mehrmals.
- Vermeiden Sie das Auaden des Akkus die ganze Nacht.
WICHTIG
Der fachgerechte Bau dieses Geräts gewährleistet langfristig einen einwandfreien
Betrieb. Sollten dennoch Betriebsstörungen auftreten, wenden Sie sich bitte an die
nächstgelegene autorisierte Kundendienststelle.
TREVI verfolgt eine Politik ständiger Forschung und Weiterentwicklung. Die Produkte
können daher andere als die beschriebenen Eigenschaften au SKIP+eisen.
BEFEHLE BESCHREIBUNG
1
2 3 4 5
7 16
8
9
10
11
6
15
14
13
28
12
17
18
19
20
27
26
25
24
23
22
DEUTSCH
XF 480 KB
21
27
Page 28
MUNE
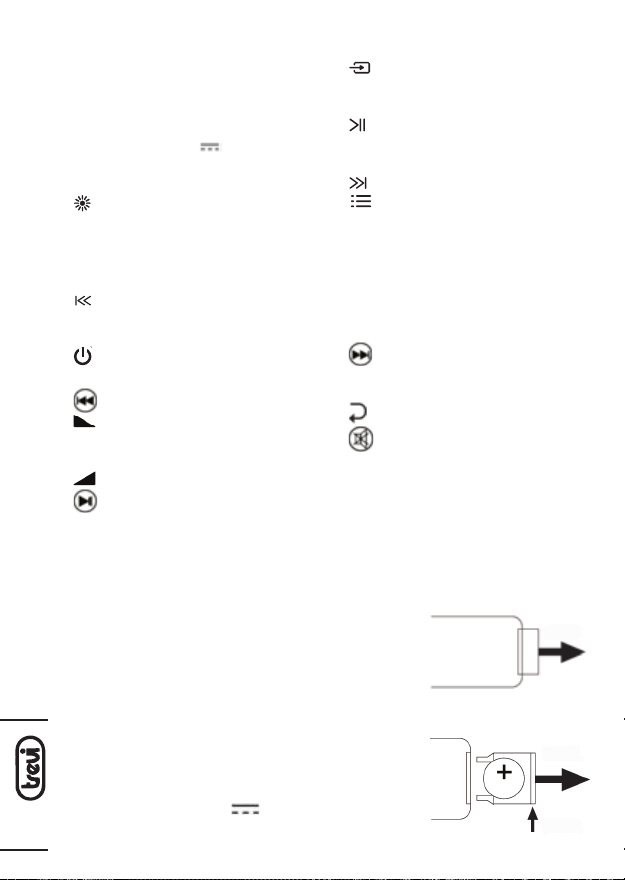
BESCHREIBUNG
1. Smartphone-/Tablet-Unterstützung
2. USB-Anschluss
3. TF-Kartensteckplatz
4. AUX-Eingang (3.5mm)
DEUTSCH
5. Ladeanschluss 5V typ-C
6. LED-Ladeanzeige
7. Mikrofon-Eingang
-Taste:
8.
- Einmal drücken, um den
Disco-Lichteffekt auszuwählen.
- Gedrückt halten, um die
Sprachführung auszuschalten.
9.
-Taste, vorheriger Titel
10.
-Taste, Wechsel in einen anderen
Modus
11. Anzeige
12.
-Taste, Wiedergabe/Pause + 3
Sekunden lang drücken für
TWS-Kopplung
13.
-Taste, nächster Titel
14.
-Taste, wiederholt drücken, um
die Einstellung für Höhen/Bässe/
Mikrofonlautstärke/Mikrofonhöhen/
Mikrofonbässe/Echo zu wechseln)
15. Lautstärkeknopf
16. Schalter ON/OFF
FERNBEDIENUNG
-Taste, Taste, nächster Titel
17.
-Taste, Stand-by/ON-Schalter
18. MODE-Taste
19. -Taste, vorheriger Titel
20. -Taste, zum Verringern der
Lautstärke
21. Zifferntasten
22. -Taste, zum Erhöhen der Lautstärke
-Taste, Wiedergabe/Pause
23.
24.
25. EQ-Taste, zum Einstellen der
Equalizer-Varianten
26.
-Taste, Wiederholung
27. -Taste, Stummschaltung
28. STOP-Taste
AKTIVIERUNG UND ERSATZ DER BATTERIE DER FERNBEDIENUNG
In die Fernbedienung ist bereits eine Zellenbatterie eingebaut. Um die Batterie
zu aktivieren, entfernen
Sie die transparente Lasche an der Unterseite der
Fernbedienung.
Die Fernbedienung ist jetzt einsatzbereit.
ZIEHEN
XF 480 KB
So ersetzen Sie die Batterie:
1. Entfernen Sie die Batteriefachabdeckung gemäß
der Abbildung rechts;
2. Achten Sie auf die richtige Polarität und
installieren Sie eine 3V
3. Schließen Sie die Abdeckung.
Lithiumbatterie (CR2025);
28
ZIEHEN
DRÜCKEN
Page 29
MUNE
WICHTIG
- Entsorgen Sie verbrauchte Batterien gemäß den Recyclingvorschriften Ihrer
Region.
- Explosionsgefahr bei falschem Batteriewechsel.
- Nur durch gleichen oder gleichwertigen Typ ersetzen.
- Wenn die Fernbedienung längere Zeit nicht benutzt wird, kann die Batterie
auslaufen und die Fernbedienung beschädigen, ersetzen Sie sie in diesem
Fall durch eine neue.
- Schließen Sie die Batterien NICHT kurz und werfen Sie sie NICHT in Wasser,
Hausmüll oder Feuer.
DIE BATTERIE AUFLADEN
1. Verbinden Sie bei ausgeschaltetem Gerät das Netzkabel mit dem Ladeanschluss Typ-C (5) am Gerät. Schließen Sie das Kabel an ein 5V 2A-Netzteil
(nicht im Lieferumfang enthalten) und dieses an eine Netzsteckdose an;
2. Die rote LED-Anzeige (6) leuchtet auf;
3. Sobald der Ladevorgang abgeschlossen ist, schaltet sich die rote LED-Anzeige
(6) aus.
Bei niedrigem Akkustand blinkt das letzte Segment des Batteriesymbols auf dem
Display eine gewisse Zeit lang, dann schaltet sich das Gerät automatisch aus.
Hinweis: Um die Lebensdauer der Batterie zu verlängern, wird empfohlen, das Gerät
während des Ladevorgangs auszuschalten.
Wenn nicht anders angegeben, gelten die unten beschriebenen Befehle sowohl
für das Gerät als auch für die Fernbedienung.
EIN/ AUS
- Schalten Sie das Gerät mit dem Ein/Aus-Schalter (16) ein und aus (Position “I”
Ein, Position “0” Aus).
- Drücken Sie die
Stand-by-Modus zu versetzen; drücken Sie sie erneut, um das Gerät einzuschalten.
Taste(17) auf der Fernbedienung, um das Gerät in den
DEUTSCH
LAUTSTÄRKE/ STUMMSCHALTUNG/ TON/
MIKROFONLAUTSTÄRKE/ ECHO/ EQ-EINSTELLUNG
1. Drehen Sie den Lautstärkeregler (15) im/gegen den Uhrzeigersinn, um die
Lautstärke des Geräts zu erhöhen/verringern. Drücken Sie die
auf der Fernbedienung, um das Gerät stummzuschalten, und drücken Sie
sie erneut, um zum normalen Hörbetrieb zurückzukehren;
2. Drücken Sie die
Bässe, Mikrofonlautstärke und den Echoeffekt einzustellen;
3. Drücken Sie mehrmals die Taste EQ(25) auf der Fernbedienung, um die beste
Taste(14) und drehen Sie den Regler (15), um die Höhen,
taste(27)
XF 480 KB
29
Page 30
Audiodynamik aus den voreingestellten auszuwählen: POP, CLAS, COU, NOR,
ROCK.
DISCO-LICHT
Drücken Sie mehrmals die
DEUTSCH
werden auf dem Display mit unterschieden: Led1, Led2, Led3, Led4, Led5, Led6, OFF.
Wählen Sie “OFF”, um die vordere Led-Beleuchtung vollständig auszuschalten.
Taste(8), um die Disco-Light Lichteffekte zu ändern, sie
GUIDE VOICE ACTIVATION/DEACTIVATION
Press and hold the button
tivate the guide voice (only in English).
(8) on the unit for a few seconds to activate/deac-
RADIOBETRIEB
1. Schalten Sie das Gerät ein und drücken Sie mehrmals die
Gerät oder die Taste MODE(18) auf der Fernbedienung, bis die Frequenzanzeige auf dem Display erscheint;
2. Drücken Sie die
dienung, um die automatische Sendersuche und -speicherung zu aktivieren
(das Radio startet eine automatische Suche nach Radiosendern und speichert sie automatisch ab). Die Anzahl der gespeicherten Sender hängt vom
Radiosignal in Ihrem Gebiet ab
3. Sobald der Suchlauf abgeschlossen ist, verwenden Sie die
Taste(13)
dienung, um durch die gespeicherten Sender zu gehen.
Hinweis:
-
Der UKW-Empfang hängt stark davon ab, wo sich das Gerät bendet.
- Die Nähe von Fernsehgeräten, Neonröhren oder anderen Haushaltsgeräten kann
den Empfang von Radioprogrammen stören. Entfernen Sie in diesem Fall das Gerät.
Taste(12) am Gerät oder die
;
am Gerät oder die Tasten (19)
taste(23) auf der Fernbe-
und (24) auf der Fernbe-
Taste(10) am
Taste(9) und
BLUETOOTH-BETRIEB
KOPPLUNG MIT GERÄTEN
1. Stellen Sie den Lautsprecher in die Nähe des zu koppelnden Bluetooth-Geräts
und schalten Sie das Gerät ein;
2. Wählen Sie die Bluetooth-Funktion durch mehrmaliges Drücken der
XF 480 KB
Tasten(10) am Gerät oder der MODE-Taste (18) auf der Fernbedienung; “BLUE”
blinkt auf dem Display;
3. Folgen Sie den Anweisungen Ihres externen Geräts, um den Lautsprecher
zu suchen;
4. Suchen Sie nach dem Lautsprecher mit der Bezeichnung “XF 480 KB” und
geben Sie die PIN “0000” ein, wenn Sie dazu aufgefordert werden;
5. Nach erfolgreichem Pairing bleibt die Anzeige “BLUE” auf dem Display konstant.
30
Page 31
Hinweis:
- Der Bluetooth-Lautsprecher funktioniert jeweils nur mit einer Verbindung. Die
Verbindung kann während des normalen Betriebs nicht unterbrochen werden.
- Die Nähe von Fernsehgeräten, Neonlampen oder anderen Geräten kann
zu Empfangsstörungen führen. Bewegen Sie in diesem Fall das Gerät weg.
BEDIENELEMENTE IM BLUETOOTH-MODUS VERFÜGBAR
- Starten Sie die Tonwiedergabe von Ihrem Gerät;
- Drücken Sie einmal auf die
Titel zu gehen, drücken Sie einmal auf die
nächsten Titel zu gehen.
- Drücken Sie die
chen; drücken Sie sie erneut, um die Wiedergabe fortzusetzen.
Taste(12)
Taste(9) oder
oder (23) um die Wiedergabe zu unterbre-
(19) um zum vorherigen
Taste(13) oder (24) um zum
TWS VERBINDUNG
Die TWS-Technologie ermöglicht es dem Benutzer, eine drahtlose Verbindung
zwischen zwei Lautsprechern desselben Modells herzustellen, die mit der TWSFunktion kompatibel sind.
1. Schalten Sie die beiden Lautsprecher ein und rufen Sie den Bluetooth-Modus
auf;
2. Schalten Sie die Bluetooth-Funktion auf Ihrem Telefon oder einem anderen
Bluetooth-Gerät aus;
3. Drücken Sie die
auf dem Display wird “t-S” angezeigt und die “BLUE” blinkt. Dann ertönt ein
anderer Piepton, der anzeigt, dass die beiden Lautsprecher über Bluetooth
verbunden sind;
4. Aktivieren Sie Bluetooth auf Ihrem Telefon oder einem anderen Gerät, suchen
und koppeln Sie das externe Gerät mit dem Lautsprecher “XF 480 KB”. Nach
der Verbindung können Sie mit dem TWS-Stereolautsprechersystem Musik
abspielen.
Einstellungen am Hauptlautsprecher werden gleichzeitig auch auf dem anderen
Lautsprecher vorgenommen. Zum Beispiel die Auswahl des vorherigen und
nächsten Titels, Play und Pause.
Hinweis:
- Wenn die 2 Lautsprecher nicht gekoppelt werden können, schalten Sie beide
Geräte aus und wiederholen Sie die Schritte 1, 2 und 3.
- Die TWS-Funktion funktioniert nur zwischen denselben Lautsprechern oder mit
anderen Lautsprechern, die denselben IC oder dieselbe Lösung verwenden.
Taste(12) an einem der Lautsprecher 3 Sekunden lang,
DEUTSCH
XF 480 KB
31
Page 32
TF-KARTE/USB
1. Stecken Sie eine Micro-SD-Karte in den Steckplatz(3) oder ein USB-Flash-
Laufwerk in die Buchse(2) und schalten Sie das Gerät ein;
2. Die Wiedergabe wird automatisch gestartet. Andernfalls drücken Sie meh-
rmals die
DEUTSCH
dienung, bis USB oder SD auf dem Display erscheint;
3. Drücken Sie einmal auf die
Titel zu gehen, drücken Sie einmal auf die
zum nächsten Titel zu gehen;
4. Drücken Sie die
chen, und drücken Sie sie erneut, um sie fortzusetzen;
5. Halten Sie die
gedrückt, um während der Wiedergabe eines Titels zurück- oder vorzuspulen,
und lassen Sie die Taste los, um zur normalen Wiedergabe zurückzukehren;
6. Mit der
aktivieren (ONE=einzelner Titel, ALL=alle vorhandenen Titel wiederholen);
7. Verwenden Sie die Zifferntasten (21) auf der Fernbedienung, um einen Titel
direkt auszuwählen.
Tasten(10) am Gerät oder die Taste MODE(18) auf der Fernbe-
Taste(9) oder
Taste(12)
Taste(9) oder
Taste(26) auf der Fernbedienung können Sie die Titelwiederholung
oder (23), um die Wiedergabe zu unterbre-
(19)
oder die
(19),
um zum vorherigen
Taste(13) oder (24), um
Taste(13) oder (24)
AUX-EINGANGSMODUS
1. Schließen Sie ein beliebiges Gerät mit Audioausgang über ein entsprechendes
3,5-mm-Klinkenkabel an den AUX(4)-Eingang an;
2. Drücken Sie die
Fernbedienung mehrmals, bis “LINE” auf dem Display erscheint;
3. Verwenden Sie die Bedienelemente des angeschlossenen Geräts, um den
Ton auszuwählen und abzuspielen.
Taste(10) am Gerät oder die Taste MODE(18) auf der
VERWENDUNG DES MIKROFONS
1. Schließen Sie das mitgelieferte Mikrofon an die Buchse MIC(7) an;
2. Schalten Sie es mit dem Schalter an seinem Gehäuse ein;
3. Stellen Sie die Lautstärke und den ECHO-Effekt des Mikrofons mit der Taste
(14) ein und drehen Sie den Drehknopf (15).
XF 480 KB
32
Page 33
TECHNISCHE MERKMALE
Gesamtleistung: ..............................................35W
UKW-Frequenzband: .....................................87,5MHz - 108MHz
Frequenzgang: ................................................60Hz - 16KHz
S/N-Verhältnis: .................................................65dB
Empfindlichkeit: ..............................................500mV
Impedanz: .........................................................3Ω
Maximale Bluetooth-Sendeleistung: ...... 0,8 mW
Bluetooth-Übertragungsfrequenz: ..........2,4 GHz
Stromversorgung:
Abmessungen: ................................................215(L) x 227(D) x 532(H) mm
Gewicht: .............................................................3,6 kg
..........................................3,7V
3600mA Lithiumbatterie
INFORMATIONEN ZUR ENTFERNUNG UND ENTSORGUNG VON
BATTERIEN
Achtung: Der Entnahme- und Entsorgungsvorgang ist ausschließlich
spezialisiertem Fachpersonal vorbehalten!
1. Entfernen Sie die Schrauben, mit denen das obere Bedienfeld befestigt ist;
2. Heben Sie das obere Bedienfeld an;
3. Suchen Sie die Batterie und nehmen Sie sie aus ihrem Gehäuse.
Unabhängig von der Art der verbrauchten Batterie darf sie nicht in den Hausmüll,
ins Feuer oder ins Wasser geworfen werden. Jede Art von verbrauchter Batterie
muss recycelt oder in den entsprechenden Sammelstellen entsorgt werden.
Hinweise zur ordnungsgemäßen Entsorgung des Produkts.
Das auf dem Gerät abgebildete Symbol weist darauf hin, dass Abfälle in
einer “getrennten Sammlung“ entsorgt werden müssen und das Produkt
daher nicht zusammen mit Siedlungsabfällen entsorgt werden darf. Der
Benutzer muss das Produkt zu speziellen “Sammelstellen für getrennte
Abfälle” bringen, die von der örtlichen Regierung bereitgestellt werden,
oder es beim Einzelhändler gegen den Kauf eines neuen Produkts abgeben.
Die getrennte Sammlung von Abfällen und die anschließende Behandlung, das
Recycling und die Entsorgung fördern die Herstellung von Geräten mit recycelten Materialien und begrenzen negative Auswirkungen auf die Umwelt und die
Gesundheit, die durch unsachgemäßen Umgang mit Abfällen verursacht werden.
Die illegale Entsorgung des Produkts führt zur Vollstreckung von Verwaltungsstrafen.
DEUTSCH
XF 480 KB
33
Page 34

NOTAS DE USO
Escuchar a altos volúmenes durante mucho tiempo puede dañar su audición.
Este aparato es un instrumento electrónico de alta precisión, por lo tanto, evite usarlo
en los siguientes casos:
• Cerca de campos magnéticos.
ESPAÑOL
• Cerca de fuentes de calor como calentadores y estufas.
• En lugares muy húmedos como baños, piscinas, etc.
• En lugares muy polvorientos.
• En lugares sujetos a fuertes vibraciones.
• No acerque su oído al altavoz durante las fases de ajuste y ajuste de volumen, y
en particular para mantener el volumen al mínimo en la fase de encendido.
• Coloque el aparato de manera que siempre haya suciente espacio en sus lados
para la libre circulación de aire (al menos 5 cm).
• Si los líquidos penetran dentro del aparato, desconecte inmediatamente el enchufe
de la toma de corriente y lleve el aparato al centro de servicio TREVI autorizado
más cercano.
• Antes de recargar el aparato, compruebe siempre que los cables de alimentación
y conexión estén instalados correctamente.
• No se deben colocar fuentes de llamas descubiertas, como velas encendidas,
sobre el aparato.
• El aparato no debe exponerse a goteos o salpicaduras de agua y no deben colo-
carse objetos llenos de líquido, como jarrones, sobre el aparato.
• Antes de encender el aparato, compruebe siempre que el cable de alimentación
y el cable de conexión estén instalados correctamente.
• El adaptador de corriente debe estar conectado a una toma de corriente cerca
del dispositivo y debe ser fácilmente accesible.
• Si nota calor excesivo en el dispositivo o en el adaptador de corriente, desconecte
inmediatamente el enchufe de la toma de corriente principal.
• No tire del cable de alimentación.
• Guarde este manual para referencia futura.
CUIDADO Y MANTENIMIENTO
Para efectuar la limpieza, se aconseja utilizar un paño suave y ligeramente humedecido.
Evite el uso de disolventes o sustancias abrasivas.
ADVERTENCIA PARA LA CORRECTA UTILIZACIÓN DE LA BATERÍA
RECARGABLE
XF 480 KB
- Recargue la batería a una temperatura de entre 5°C y 35°C.
- No cargue la batería más del tiempo indicado para evitar riesgos de explosión o
sobrecalentamiento.
- Un tiempo de recarga superior al tiempo indicado o un período prolongado de
inactividad pueden reducir la duración de la batería.
- La batería recargable está sujeta a desgaste y su capacidad disminuye gradualmente.
- Para prolongar la duración de la batería, utilícela cuando está totalmente cargada
34
Page 35
hasta agotarla por completo. Cárguela completamente de nuevo antes de volver
a utilizarla.
Si se carga una batería no completamente agotada, se reduce su duración. En ese
caso, repita el ciclo de carga/descarga completa más veces.
- Evite cargar la batería durante toda la noche.
IMPORTANTE
La buena construcción del aparato garantiza su perfecto funcionamiento durante
mucho tiempo. Si se presentase algún inconveniente, es oportuno consultar al Centro
de Asistencia autorizado más cercano.
TREVI cultiva una política de investigación y desarrollo continuos. Por consiguiente,
los productos pueden presentar características distintas a las descritas.
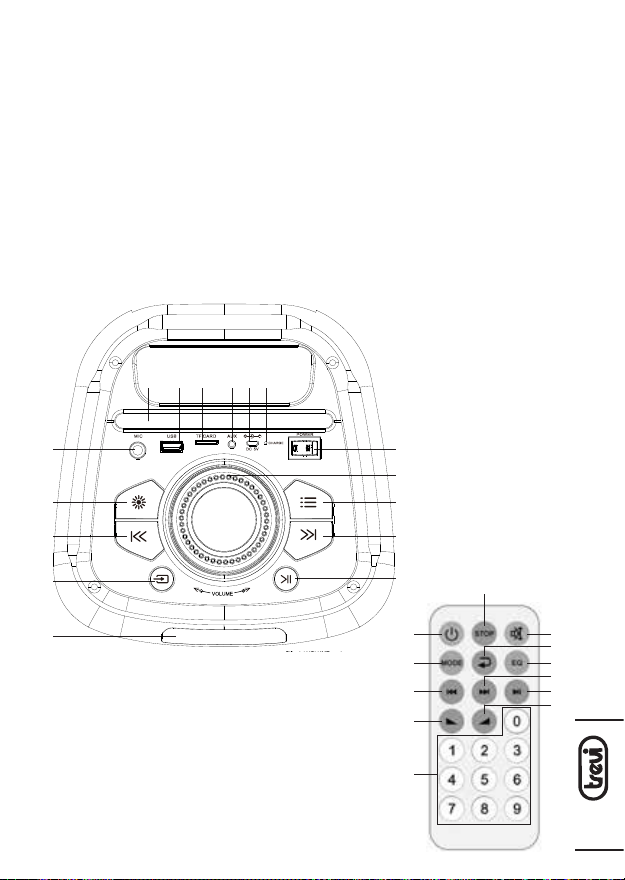
DESCRIPCIÓN DE LOS COMANDOS
1
2 3 4 5
7 16
8
6
15
14
ESPAÑOL
10
11
9
13
12
17
18
19
20
21
28
27
26
25
24
23
22
XF 480 KB
35
Page 36
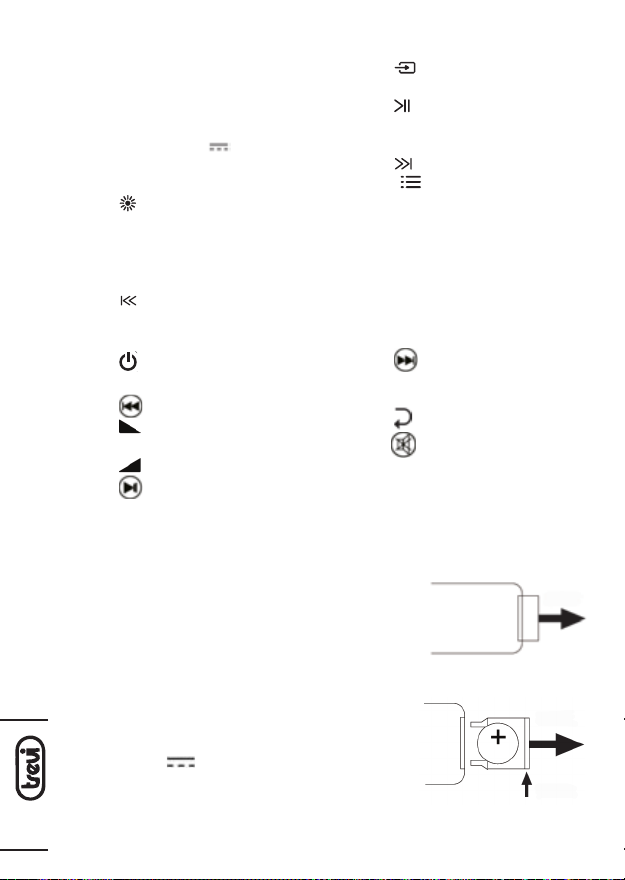
MUNE
DESCRIPCIÓN
1. Pedestal para smartphone/tablet
2. Puerto USB
3. Ranura para tarjetas TF
4. Entrada AUX (3,5mm)
ESPAÑOL
5. Puerto de carga 5V tipo-C
6. Indicador Led de carga
7. Entrada de micrófono
8. Botón
- Pulse una vez para seleccionar el
efecto.
- Manténgalo pulsado para desactivar
la de voz.
9. Botón
:
, pista anterior
10. Botón
11. Pantalla
12. Botón
ción larga 3 segundos para emparejamiento TWS
13. Botón
14. Botón
para cambiar el ajuste de Agudos/
graves/volumen del micrófono/
agudos del micrófono/graves del
micrófono/eco).
15. Botón de volumen
16. Interruptor de encendido/apagado
, para seleccionar el modo
, Reproducir/Pausa + pulsa-
, pista siguiente
, púlselo repetidamente
MANDO A DISTANCIA
17. Botón
18. Botón MODE
19. Botón , pista anterior
20. Botón , para reducir el volumen
21. Botones numéricos
22. Botón , para subir el volumen
23. Botón
, interruptor Stand-by/ ON
, Reproducir/Pausa
24. Botón
25. Botón EQ, para ajustar las variantes
del ecualizador
26. Botón
27. Botón , Mute
28. Botón, STOP
, pista siguiente
, Repetir
ACTIVACIÓN Y REEMPLAZO DE LA BATERÍA DE CONTROL REMOTO
El control remoto tiene una batería de celda ya instalada.
Para activar la batería, retire la pestaña transparente en
la parte inferior del control remoto. El control remoto
ahora está listo para usar.
Para reemplazar la batería:
1. Retire la tapa del compartimiento de la batería
XF 480 KB
como se muestra en la ilustración a la derecha;
2. Observe la polaridad correcta e instale una batería
de litio de 3V
3. Cierre la cubierta.
lithium battery (CR2025);
JALAR
JALAR
EMPUJAR
36
Page 37
MUNE
IMPORTANTE
- Deseche las baterías usadas de acuerdo con las normas de reciclaje de su área.
- Peligro de explosión si la batería es reemplazada incorrectamente.
- Reemplace sólo con el mismo tipo o equivalente.
- Si el control remoto no se usa durante mucho tiempo, la batería puede tener
fugas y dañar el control remoto, reemplácelo por uno nuevo si esto ocurre.
- NO cortocircuite las baterías ni las arroje al agua, a la basura en general o al
fuego.
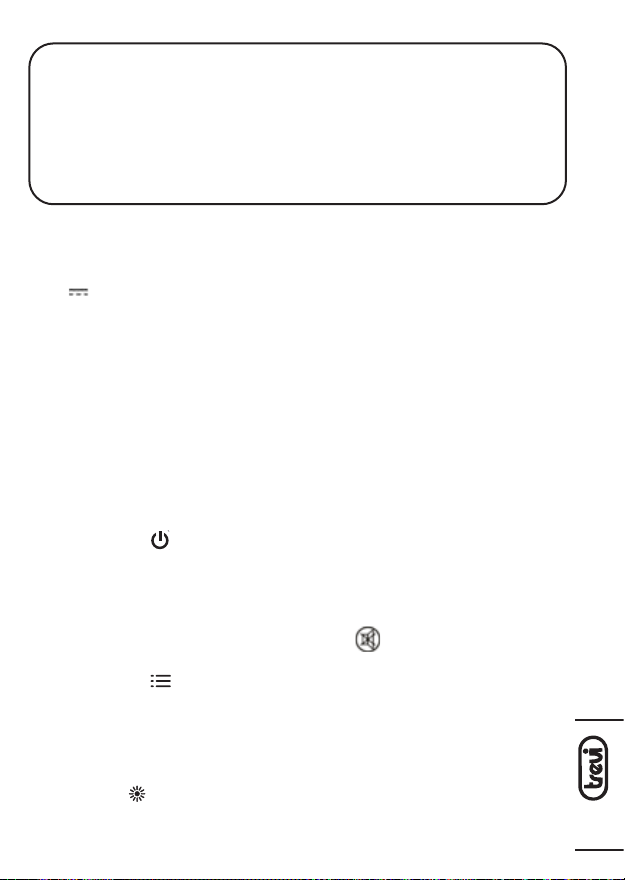
CARGANDO LA BATERÍA
1. Con el aparato apagado, conecte el cable de alimentación al puerto de carga
tipo-C(5) del dispositivo. Conectar el cable a una fuente de alimentación de
5V 2A (no incluida) y ésta a una toma de corriente;
2. El indicador LED rojo(6) se encenderá;
3. Una vez nalizada la carga, el indicador LED rojo (6) se apagará;
Con batería baja, el último segmento del icono de batería en la pantalla parpadeará durante un cierto tiempo, luego el dispositivo se apagará automáticamente.
Nota: Para una buena duración de la batería, se recomienda mantener el dispositivo
apagado durante la fase de carga.
A menos que se especique lo contrario, los comandos que se describen a
continuación se aplican tanto a la unidad como al control remoto.
ENCENDIDO/ APAGADO
- Utilice el interruptor de encendido/apagado(16) para encender y apagar el
aparato (posición “I” Encendido, posición “0” Apagado).
- Pulse el botón
de espera; púlselo de nuevo para encender el aparato.
(17) del mando a distancia para poner el aparato en modo
VOLUMEN/ MUTE/ TONE/ MIC VOLUME/ ECHO/ EQ ADJUSTMENT
1. Gire el botón de volumen (15) en sentido horario/antihorario para subir/
bajar el volumen del aparato. Pulse el botón
para silenciar el aparato, púlselo de nuevo para volver a la escucha normal;
2. Pulse el botón
el volumen del micrófono y el efecto eco;
3. Pulse varias veces el botón EQ(25) del mando a distancia para elegir la mejor
dinámica de audio entre las preestablecidas: POP, CLAS, COU, NOR, ROCK.
(14) y gire el mando(15) para ajustar los agudos, los graves,
(27) del mando a distancia
ESPAÑOL
XF 480 KB
DISCO-LUZ
Pulse el botón
Light, se distinguirán en la pantalla con: Led1, Led2, Led3, Led4, Led5, Led6, OFF.
Seleccione “OFF” para apagar completamente la iluminación Led frontal.
(8) varias veces, para cambiar los efectos de iluminación Disco-
37
Page 38
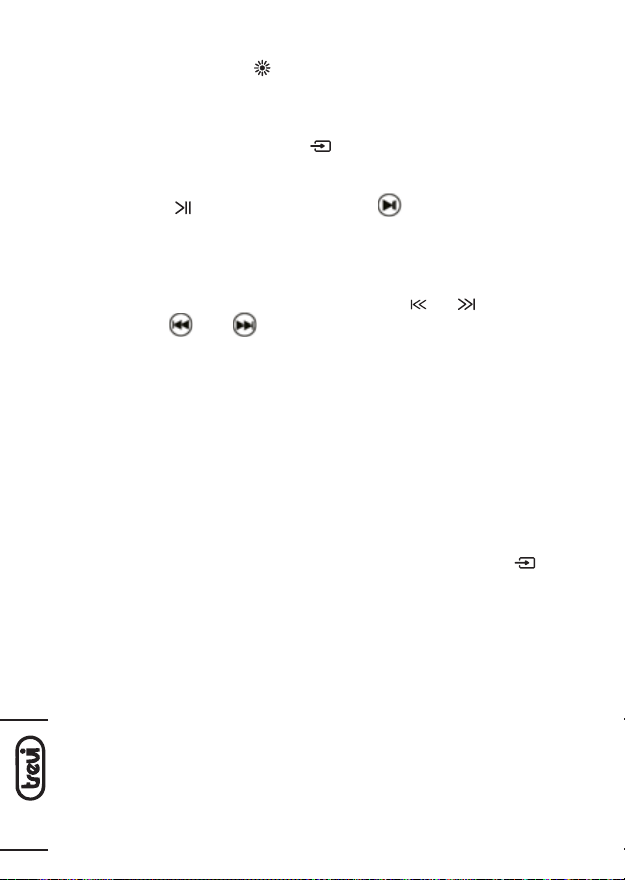
ACTIVACIÓN/DESACTIVACIÓN DE LA VOZ GUÍA
Mantenga pulsado el botón
activar/desactivar la voz guía (sólo en inglés).
MODO RADIO
ESPAÑOL
1. Encienda la unidad y pulse el botón
del mando a distancia, varias veces hasta que aparezca la indicación de
frecuencia en la pantalla;
2. Pulse el botón
para activar la búsqueda y memorización automática de emisoras (la radio
inicia una búsqueda automática de emisoras y las guarda automáticamente
en la memoria). El número de emisoras almacenadas depende de la señal
de radio de su zona
3. Unaveznalizada la búsqueda,utilicelosbotones
o los botones
las presintonías de las emisoras.
Nota:
-
La recepción de FM depende en gran medida de la ubicación del dispositivo.
- La proximidad de televisores, lámparas de neón u otros aparatos domésticos
puede causar problemas en la recepción de programas de radio, en este caso,
retire el aparato.
(12) del aparato, o el botón
;
(19)
(8) del aparato durante unos segundos para
(10) de la unidad, o el botón MODE(18)
(23) del mando a distancia,
(9) y
(13)
del aparato,
y (24) del mando a distancia, para desplazarse por
FUNCIONAMIENTO BLUETOOTH
EMPAREJAMIENTO CON DISPOSITIVOS
1. Coloca el altavoz cerca del dispositivo Bluetooth que quieras emparejar y
enciende el dispositivo;
2. Selecciona la función Bluetooth pulsando varias veces el botón
la unidad, o el botón MODE(18) del mando a distancia; “BLUE” parpadeará
en la pantalla;
3. Sigue las instrucciones de tu dispositivo externo para buscar el altavoz;
4. Busque el altavoz denominado “XF 480 KB” e introduzca el PIN “0000” si se
le solicita;
5. Cuando el emparejamiento se haya realizado correctamente, la indicación
“BLUE”de la pantalla permanecerá ja.
XF 480 KB
Nota:
- El altavoz Bluetooth solo funciona con una conexión a la vez, la conexión no se
puede interrumpir durante el funcionamiento normal.
- La proximidad de televisores, lámparas de neón u otros electrodomésticos
puede causar molestias en la recepción, en este caso aleje el electrodoméstico.
(10) de
38
Page 39
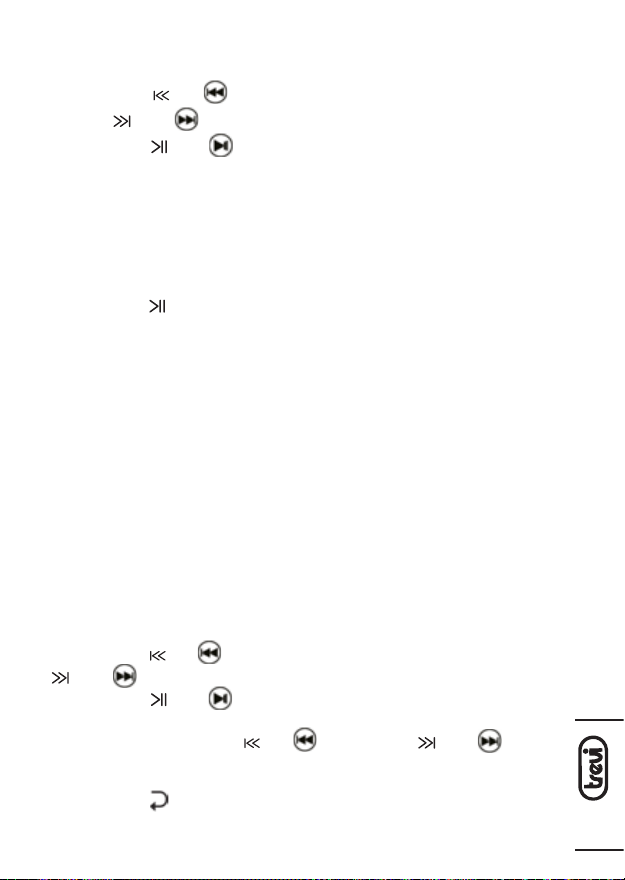
CONTROLES DISPONIBLES EN MODO BLUETOOTH
- Inicie la reproducción de sonido desde su dispositivo;
- Pulsa el botón
el botón
- Pulsa el botón
reanudar la reproducción.
(9) o
(19) una vez para ir a la pista anterior, antes pulsa
(13) o (24) una vez para ir a la pista siguiente.
(12)
o (23) para hacer una pausa; vuelve a pulsarlo para
CONEXIÓN TWS
La tecnología TWS permite al usuario realizar una conexión inalámbrica entre dos
altavoces del mismo modelo y compatibles con la función TWS.
1. Enciende los dos altavoces y entra en el modo Bluetooth;
2. Apague la función Bluetooth del teléfono u otro dispositivo Bluetooth;
3. Pulse el botón
mostrará “t-S” y el “BLUE” parpadeará. A continuación, se escuchará un pitido
diferente para indicar que los dos altavoces se han conectado a través de
Bluetooth;
4. Active Bluetooth en su teléfono u otro dispositivo, busque y empareje el
dispositivo externo con el altavoz “XF 480 KB”. Tras la conexión, podrá reproducir música con el sistema de altavoces estéreo TWS.
Nota:
- Si los 2 altavoces no se emparejan, apague ambos dispositivos y repita los pasos 1, 2 y 3.
- La función TWS solo funciona entre los mismos altavoces o con otros altavoces
que utilicen el mismo IC o solución.
(12) de uno de los altavoces durante 3 segundos, la pantalla
TARJETA MICRO SD/ USB
1. Inserte una tarjeta Micro SD en la ranura(3) o una unidad ash USB en la
toma(2) y encienda el dispositivo;
2. La reproducción se iniciará automáticamente. De lo contrario, pulse varias
veces el botón (10) de la unidad o el botón MODE(18) del mando a distancia
hasta que aparezca USB o SD en la pantalla;
(9) o
(19)
3. Pulse el botón
(13) o (24) una vez para ir a la pista siguiente;
4. Pulse el botón
reanudar la reproducción;
5. Mantenga pulsado el botón
rebobinar o avanzar rápidamente al escuchar la canción, suelte el botón para
volver a la escucha normal;
6. Con el botón
repetición de pista (ONE=repetir una sola pista, ALL=repetir todas las pistas
presentes);
(12)
(26) del mando a distancia, puede activar la función de
una vez para ir a la pista anterior, pulse el botón
o (23) para hacer una pausa, púlselo de nuevo para
(9) o
(19)
o el botón
(13) o (24) para
ESPAÑOL
XF 480 KB
39
Page 40

7. Utilice los botones numéricos (21) del mando a distancia para seleccionar
directamente una pista.
MODO DE ENTRADA AUX
1. Conecte cualquier unidad con salida de audio mediante un cable Jack de
ESPAÑOL
3,5 mm apropiado a la entrada AUX(4);
2. Pulse el botón
varias veces hasta que aparezca “LINE” en la pantalla;
3. Utilice los controles del dispositivo conectado para seleccionar y reproducir
el audio.
(10) de la unidad o el botón MODE(18) del mando a distancia
UTILIZACIÓN DEL MICRÓFONO
1. Enchufe el micrófono suministrado en la toma MIC(7);
2. Enciéndalo mediante el interruptor situado en su cuerpo;
3. Ajuste el volumen y el efecto ECHO del micrófono mediante el botón
(14) ay gire el mando(15).
CARACTERÍSTICAS TÉCNICAS
Potencia total: ..................................................35W
Banda de frecuencia: .....................................87,5MHz - 108MHz
Respuesta de frecuencia: .............................60Hz - 16KHz
Relación señal/ruido:
Sensibilidad: ..................................................... 500mV
Impedancia: ......................................................3Ω
Potencia máx de transmisión Bt: ..............0.8mW
Frecuencia de transmisión de Bt: .............2.4GHz
Fuente de alimentación: ..............................batería de litio de 3,7V
Dimensiones: ...................................................215(L) x 227(D) x 532(H) mm
Peso: ....................................................................3,6 kg
....................................65dB
3600mA
INFORMACIÓN SOBRE LA ELIMINACIÓN Y ELIMINACIÓN DE
BATERÍAS
Advertencia: la operación de eliminación y eliminación está reservada
XF 480 KB
exclusivamente para personal técnico especializado.
1. Quite los tornillos que sujetan el panel de control superior;
2. Levante el panel superior;
3. Localice y extraiga la batería de su alojamiento.
Independientemente del tipo de batería usada, no debe desecharse con la basura doméstica, el fuego o el agua. Cada tipo de batería usada debe reciclarse o
desecharse en los centros de recogida especícos correspondientes.
40
Page 41
Advertencias para la correcta eliminación del producto.
El símbolo que aparece en el aparato indica que el residuo debe ser objeto de
“recogida selectiva” por tanto el producto no se debe eliminar junto con residuos urbanos. El usuario deberá entregar el producto a los “centros de recogida
selectiva” creados por las administraciones municipales o bien al distribuidor
cuando adquiera un nuevo producto. La recogida selectiva del residuo y las
sucesivas operaciones de tratamiento, recuperación y eliminación favorecen la
fabricación de aparatos con materiales reciclados y limitan los efectos negativos
en el medio ambiente y la salud causados por una gestión incorrecta del residuo.
La eliminación abusiva del producto da lugar a la aplicación de sanciones
administrativas.
ESPAÑOL
XF 480 KB
41
Page 42
DICHIARAZIONE DI CONFORMITÀ UE SEMPLIFICATA
Il fabbricante TREVI dichiara che il tipo di apparecchiatura XF 480 KB è conforme alla
Il testo completo della dichiarazione di conformità EU è disponibile al seguente
https://www.trevi.it/dms/zidi/TREVI/DOCXF480KB.pdf
SIMPLIFIED EU DECLARATION OF CONFORMITY
Hereby TREVI Spa declares that the radio equipment type XF 480 KB is in compliance
The full text of the EU declaration of conformity is available at the following
https://www.trevi.it/dms/zidi/TREVI/DOCXF480KB.pdf
direttiva 2014/53/UE.
indirizzo Internet
with directive 2014/53/EU.
internet address
XF 480 KB
If you will not nd your language on the instruction manual, please go on our
website www.trevi.it to nd it
42
Page 43

Page 44
Trevi S.p.A.
Strada Consolare Rimini-San Marino, 62
47924 Rimini (Rn) Italia
Tel. 0541/756420 Fax 0541/756430 l www.trevi.it l e-mail: [email protected] l
Made in CHINA
 Loading...