

Page 1
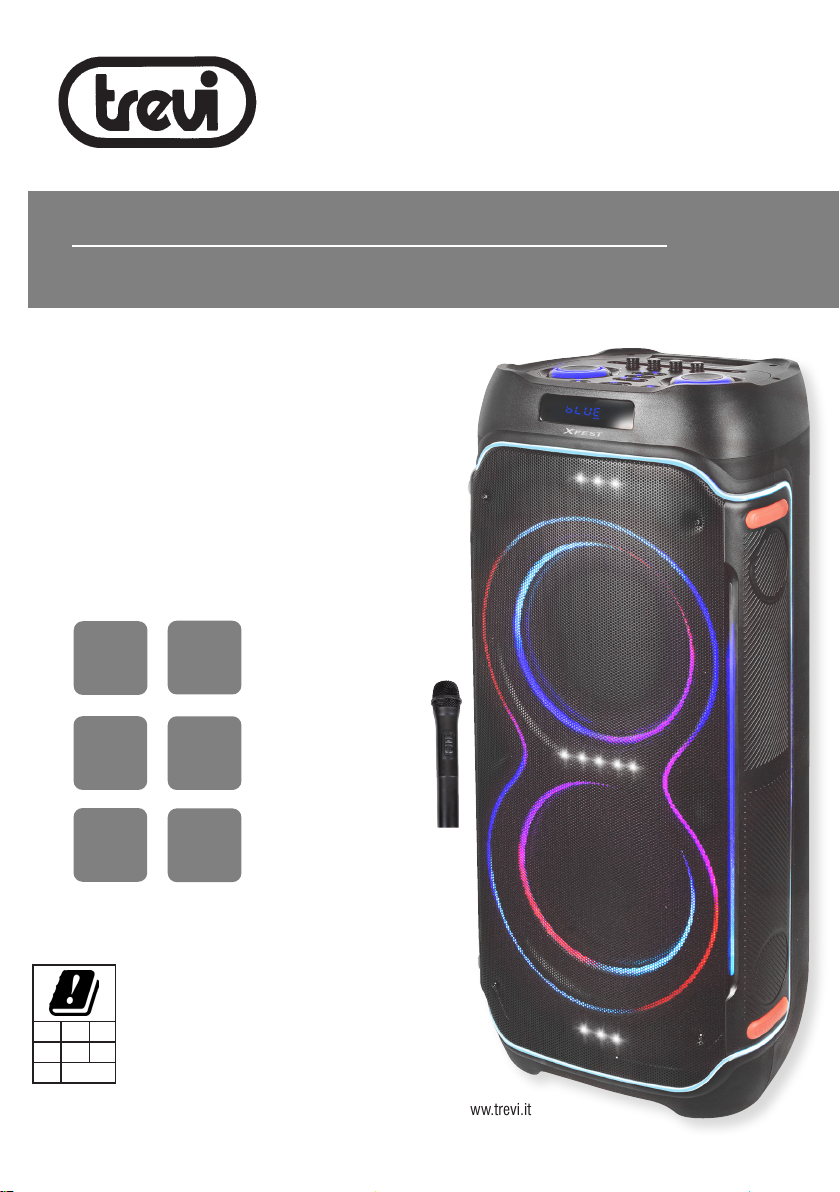
XF 3600 PRO
Guida d’uso
User guide
ALTOPARLANTE AMPLIFICATO ALTA POTENZA
Manuale d'uso e collegamento
HIGH POWER PORTABLE SPEAKER
Connection and Operation Manual
HAUT-PARLEUR PORTABLE AMPLIFIE
Mode d'emploi et branchement
BEWEGLICHER LAUTSPRECHER
Gebrauchs- und Anschlusshandbuch
ALTAVOZ AMPLIFICADO PORTATIL
Manual para el uso y la conexión
WIRELESS
CONNECTION
DISCO
LIGHT
200 W
MAX
Il microfono può essere utilizzato sul territorio Italiano.
Paesi Europei per i quali il prodotto ha restrizioni:
Estonia: LIMITED IMPLEMENTATION.
Finlandia: LIMITED IMPLEMENTATION.
Francia: LIMITED IMPLEMENTATION.
EE FI FR
EL LT PL
ES
Per informazioni integrative ed aggiornamenti su questo prodotto visita www.trevi.it
For additional information and updates of this product see www.trevi.it
Grecia: LIMITED IMPLEMENTATION.
Lituania: LIMITED IMPLEMENTATION.
Polonia: LIMITED IMPLEMENTATION.
Spagna: LIMITED IMPLEMENTATION.
USB/
Micro SD
PLAYER
LED
DISPLAY
TWS
Page 2

Page 3
WARNINGS
ATTENZIONE
RISCHIO DI SCOSSE
ELETTRICHE!
NON ESPORRE A PIOGGIA E
UMIDITÀ
ATTENZIONE: NON APRITE L'APPARECCHIO. ALL'INTERNO NON
VI SONO COMANDI MANIPOLABILI DALL'UTENTE NE PARTI DI
RICAMBIO. PER TUTTE LE OPERAZIONI DI SERVIZIO RIVOLGERSI
AD UN CENTRO DI ASSISTENZA AUTORIZZATO TREVI.
ATTENTION
RISQUE DE DECHARGES
ELECTRIQUES
NE PAS EXPOSER A LA PLUIE
ET A L’HUMIDITE
ATTENTION: NE PAS OUVRIR L’APPAREIL, A L’INTERIEUR IL N’Y A PAS
DE COMMANDES A MANIPULER PAR L’UTILISATEUR OU DE PIECES
DE RECHANGE. POUR TOUTES LES OPERATIONS DE SERVICE IL
FAUT S’ADRESSER A UN SERVICE D’ASSISTANCE AUTORISE TREVI.
ATENCION
PELIGRO DE CHOQUES
ELECTRICOS
NO EXPONER A LLUVIA Y
HUMEDAD
ATENCION: NO ABRIR EL APARATO, EN SU INTERIOR NO HAY MANDOS QUE PUEDAN SER MANIPULADOS POR EL USUARIO NI PARTES
DE REPUESTO. PARA TODAS LAS OPERACIONES DE SERVICIO
DIRIGIRSE A UN CENTRO DE ASISTENCIA AUTORIZADO TREVI.
WARNING!
DANGER OF ELECTRIC
SHOCK!
DO NOT EXPOSE TO
RAIN OR HUMIDITY
WARNING: DO NOT OPEN THE SET. NEITHER CONTROLS OR
SPARE PARTS TO BE USED BY THE USER ARE TO BE FOUND
INSIDE IT. APPLY TO AUTHORISED TREVI CENTERS FOR SERVICE
OPERATIONS.
ACHTUNG
GEFAHR ELEKTRISCHER
SCHLÄGE
NICHT DER FEUCHTIGKEIT UND
DEM REGEN AUSSETZEN
ACHTUNG: DAS GERÄT NICHT ÖFFNEN. IM INNERN BEFINDEN SICH
KEINE VOM BENUTZER SELBST INSTANDSETZBAREN TEILE UND AUCH
KEINE ERSATZTEILE. FÜR JEGLICHE SERVICEARBEITEN, WENDEN SIE
SICH BITTE AN EINE TREVI AUTORISIERTEN KUNDENDIENSTSTELLE.
UK PLUG ONLY
WIRES CONNECTIONS TO A UK THREE-PIN PLUG
The wires in this mains lead are coloured in accordance with
the following wiring codes:
Blue: .................................. Neutral
Brown: ...............................Live
The wires in this mains lead must be connected to the terminals
in the plug as follows:
Blue wire:...........................N or Black
Brown wire: ....................... L or Red
Neither wire is to be connected to the earth (E or W) terminal
of three-pin plug.
Should the fuse fail in the plug remove the plug form the wall
socket and replace the fuse with a 3 Amp. ASTA approved
BS 1362 fuse.
Page 4
ITALIANO
XF 3600 PRO
NOTE D'USO
Ascoltare a volume alto per lungo tempo, potrebbe danneggiare il vostro udito.
Evitare di posizionare il riproduttore:
• Vicino a campi magnetici.
• Vicino a fonti di calore come caloriferi e stufe.
• In luoghi molto umidi come stanze da bagno, piscine, ecc...
• In luoghi molto polverosi.
• In luoghi soggetti a forti vibrazioni.
• Non avvicinare l’orecchio all’altoparlante durante le fasi di messa punto e regolazioni del volume, e in particolare di tenere il
volume al minimo nella fase di accensione
• Posizionare l’apparecchio in modo che ai suoi lati ci sia sempre abbastanza spazio per la libera circolazione di aria (almeno 5 cm).
• Se dei liquidi penetrano all’interno dell’apparecchio scollegare immediatamente la spina dalla presa e portare l’apparecchio al
più vicino centro assistenza autorizato TREVI.
• Controllare sempre prima di ricaricare l’apparecchio, che i cavi di alimentazione e di collegamento siano installati correttamente.
• Nessuna sorgente di fiamma nuda, quali candele accese, dovrebbe essere posta sull’apparecchio.
• L’apparecchio non deve essere esposto a stillicidio o a spruzzi d’acqua e nessun oggetto pieno di liquido, quali vasi, deve
essere posto sull’apparecchio.
• L’adattatore di corrente deve essere collegato a una presa vicina al dispositivo e deve essere facilmente accessibile.
• Se si nota un calore eccessivo sul dispositivo o sull’adattatore di corrente, scollegare immediatamente la spina dalla presa di
corrente principale.
• Non tirare il cavo di alimentazione.
• Conservare il presente manuale per futuri riferimenti.
AVVERTENZA PER UN CORRETTO UTILIZZO DELLA BATTERIA RICARICABILE
- Ricaricare la batteria a una temperatura ambiente compresa tra 5°C e 35°C.
- Non ricaricare più del periodo adeguato per prevenire il rischio di surriscaldamento e scoppio.
- La ricarica della batteria per un periodo non adeguato o un lungo periodo di inattività può ridurre la durata della batteria.
- La batteria ricaricabile è soggetta ad usura e le sue prestazioni si ridurranno gradualmente.
- Evitare di ricaricare la batteria per tutta la notte.
CURA E MANUTENZIONE
Per la pulizia si consiglia l’uso di un panno morbido, leggermente inumidito. Evitate solventi o sostanze abrasive.
IMPORTANTE
Questo dispositivo e' progettato per uso domestico non professionale. La buona costruzione di questo apparecchio ne garantisce
per lungo tempo il perfetto funzionamento. Se tuttavia dovesse presentarsi qualche inconveniente, sarà opportuno consultare il
più vicino Centro Assistenza autorizzato TREVI.
TREVI persegue una politica di continua ricerca e sviluppo. Pertanto i prodotti possono presentare caratteristiche diverse da quelle
descritte.
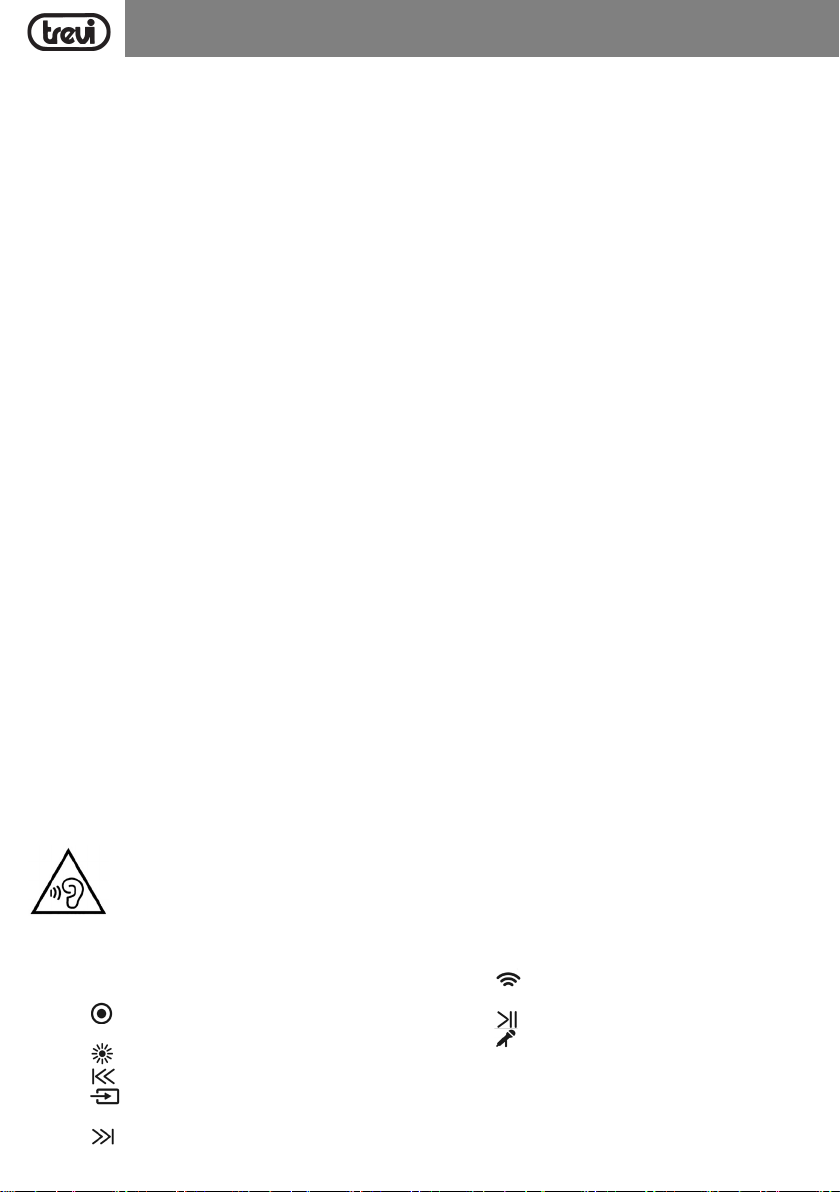
Per evitare possibili danni all’udito, limitare il tempo di ascolto a volumi elevati
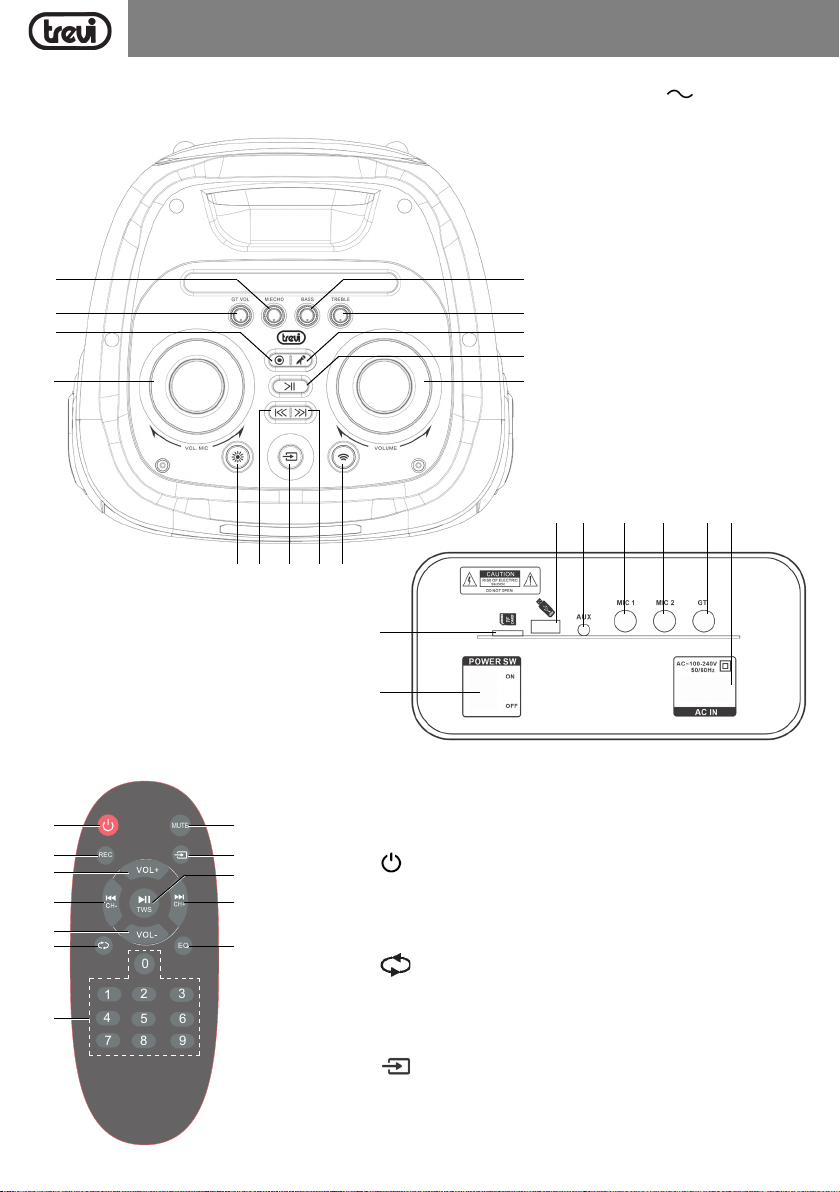
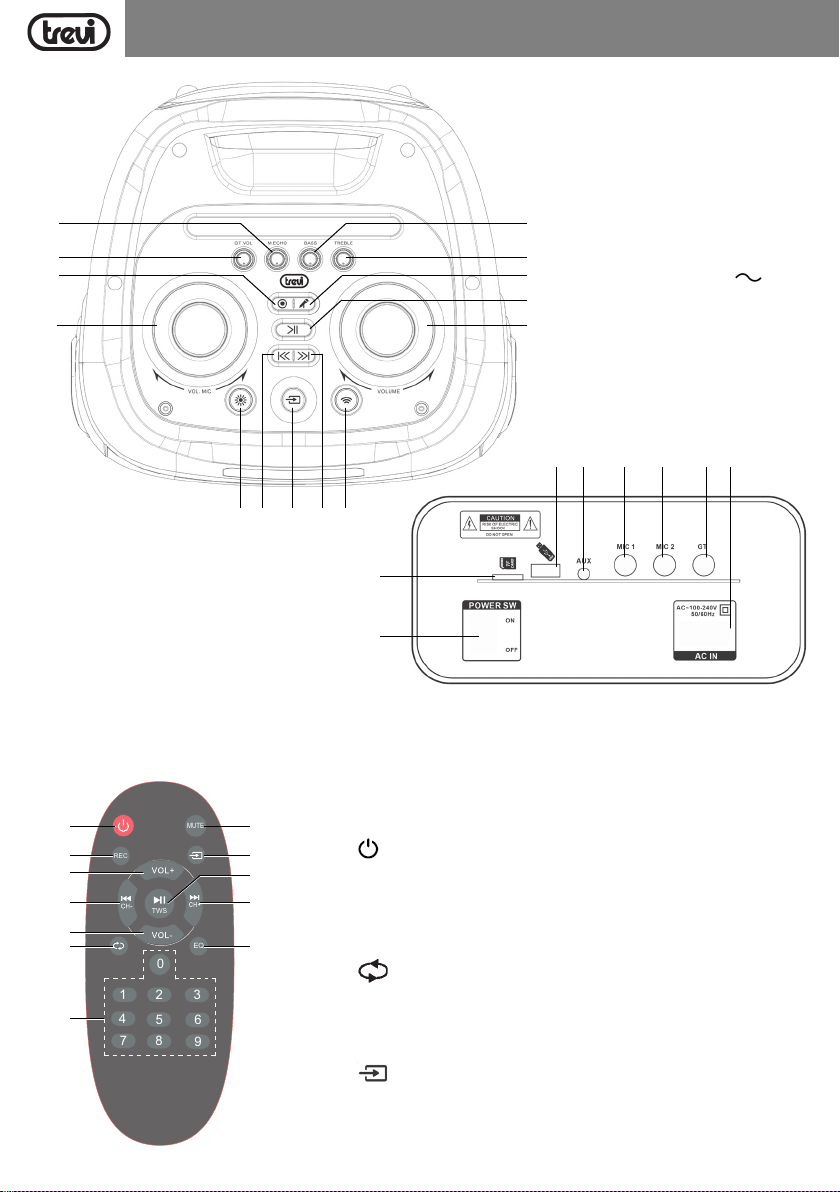
DESCRIZIONE COMANDI
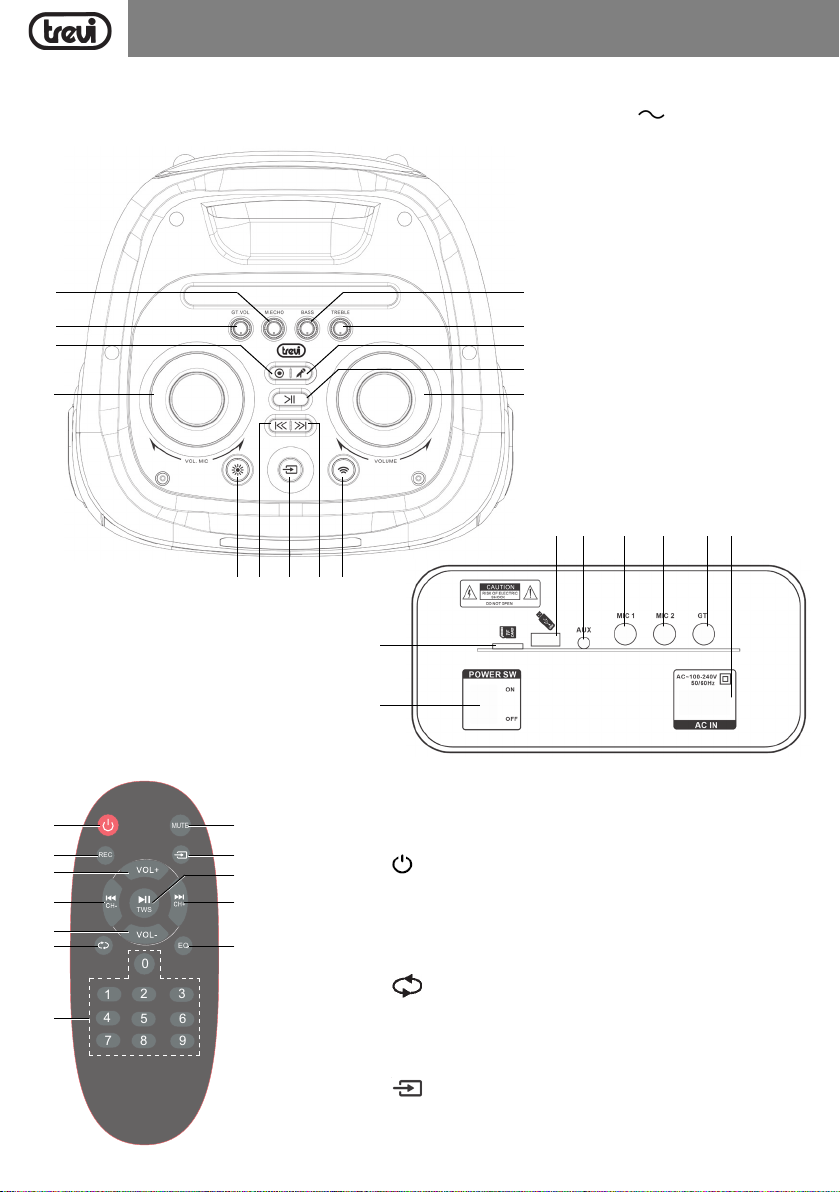
1. ECHO, regolazione ECHO su microfono
2. Regolazione volume ingresso Guitar
3. Tasto , funzione registrazione
4. MIC VOL, regolazione volume Microfono
5. Tasto , selezione effetto Disco Light
6. Tasto , traccia precedente
7. Tasto , selezione funzione + attivazione/disattivazione
voce guida
8. Tasto , traccia successiva
9. Tasto , attivazione collegamento Wireless
10. Regolazione Volume generale
11. Tasto , Play/Pausa
12. Tasto , attivazione/disattivazione priorità microfono
13. Regolazione TREBLE, toni alti
14. Regolazione BASS, toni bassi
15. Interruttore principale POWER, accensione/ spegnimento
16. Ingresso Micro SD Card
17. Ingresso USB
4
Page 5
XF 3600 PROITALIANO
MUTE
REC
EQ
0
1
2
3
4
5
6
7
8
9
TWS
18. AUX, ingresso audio
19. Ingresso MIC 1 per microfono con cavo
20. Ingresso MIC 2 per microfono con cavo
1
2
3
4
5106 7 8 9
21. GT, ingresso chitarra
22. Presa di alimentazione da rete 230V 50Hz.
14
13
12
11
17 18 19 20 21 22
16
TELECOMANDO
23
24
25
26
27
28
29
15
34
33
32
31
23. Tasto , Stand-by
24. Tasto REC, avvio/arresto registrazione
25. Tasto VOL+, incremento volume
26. Tasto 9/CH-, selezione traccia precedente
30
27. Tasto VOL-, diminuzione volume
28. Tasto (ripetizione singolo brano, ripetizione di tutti i brani)
29. Tasti numerici 0-9
30. Tasto EQ, equalizzazioni pre-impostate
31. Tasto :/CH+, selezione traccia successiva
32. Tasto/TWS, Play/Pausa, accoppiamento TWS
33. Tasto , selezione funzione, attivazione/disattivazione voce guida
34. Tasto MUTE
5
Page 6
ITALIANO
XF 3600 PRO
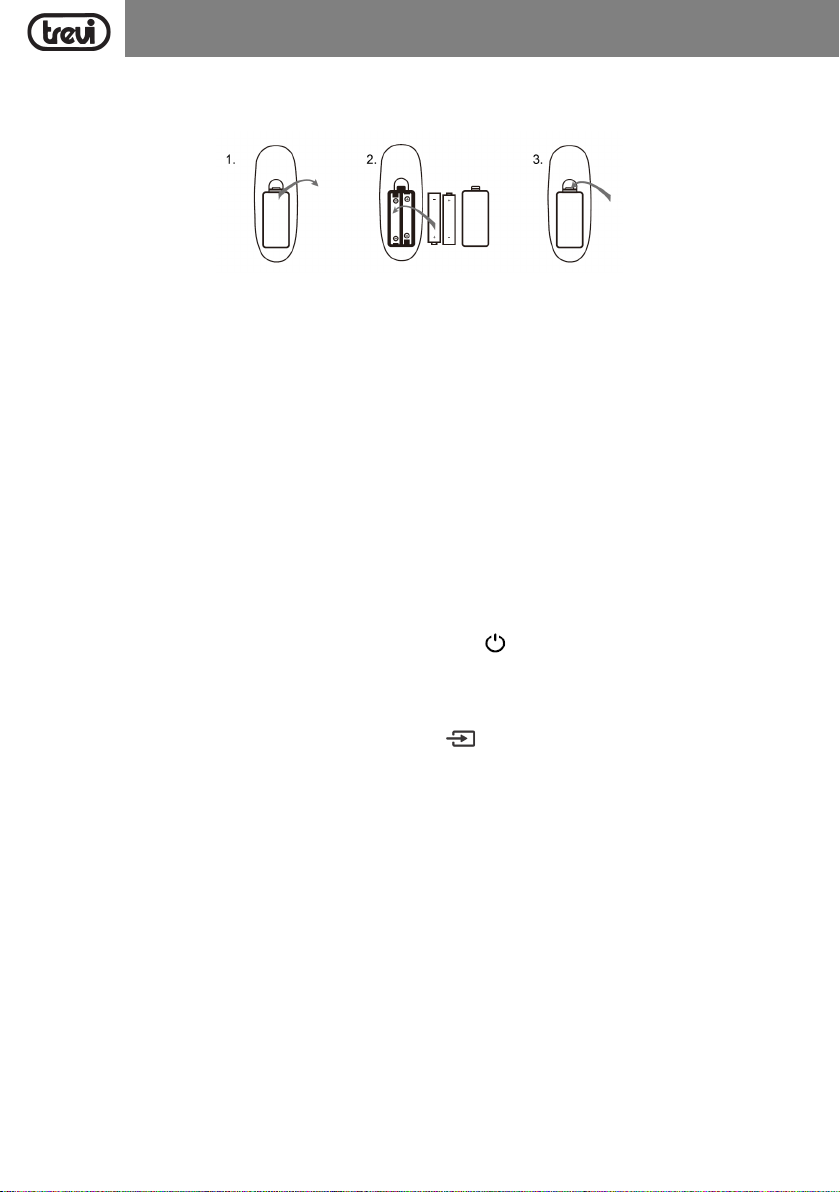
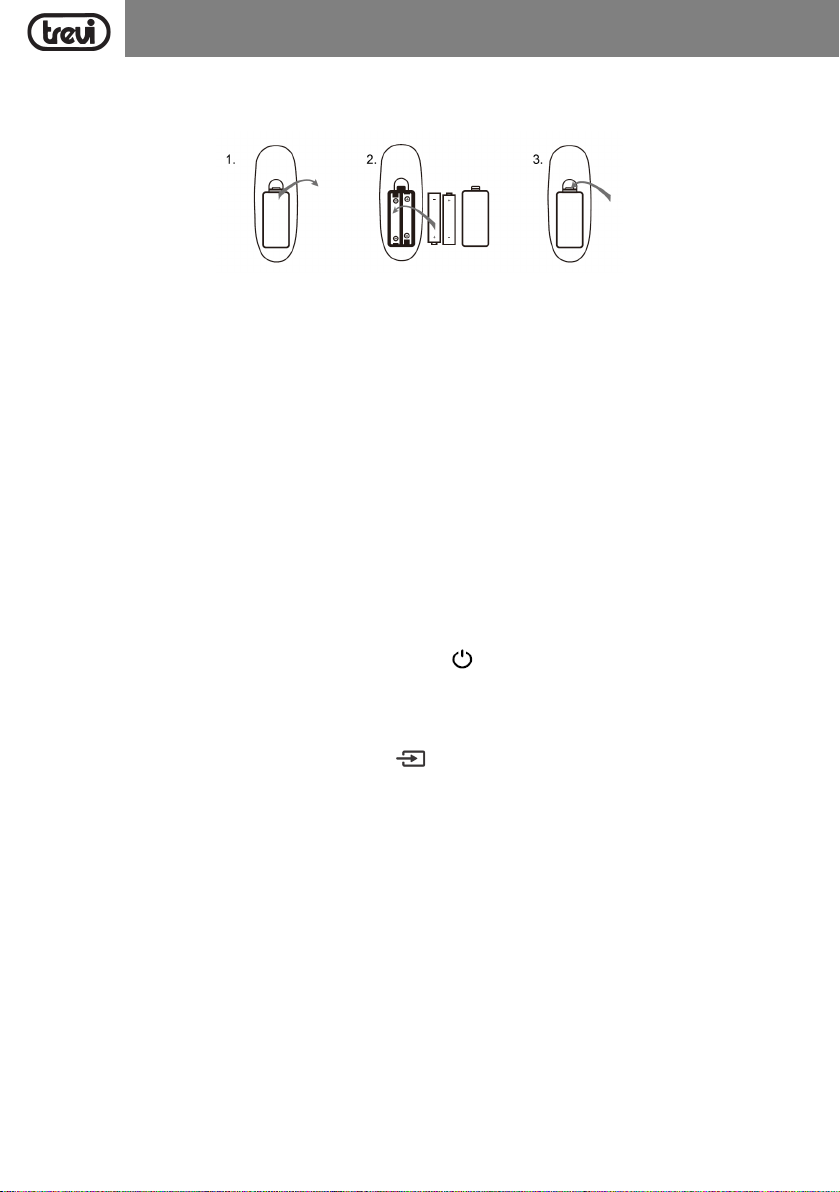
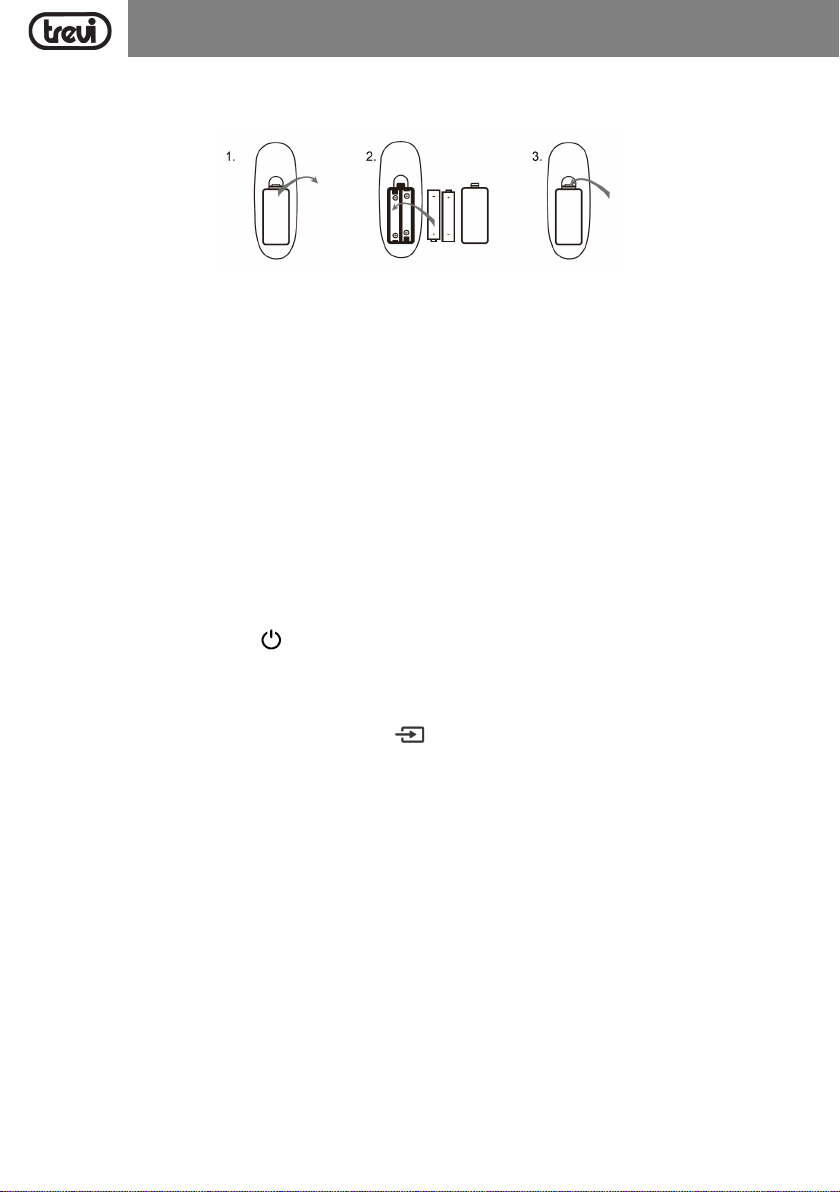
Installazione batterie:
Rimuovere il coperchio nella parte posteriore del Telecomando, inserire 2 batterie formato “AAA” facendo attenzione alla polarità
indicata e richiudere il coperchio.
TRASPORTO
Per il trasporto utilizzare la maniglia superiore, piegare leggermente l'apparecchio e sfruttare le due ruote posteriori.
FUNZIONI DI BASE
ACCENSIONE/SPEGNIMENTO
- Portare l'interruttore POWER (15) in posizione "1" (ON), per accendere e utilizzare l'apparecchio con la sua batteria interna.
- Portare l'interruttore POWER (15) in posizione "0" (OFF) per spegnere completamente l'apparecchio.
RICARICA BATTERIA
- Portare l'interruttore POWER (15) in posizione "0" (OFF) e collegare il cavo di alimentazione alla presa (22) per ricaricare la
batteria; i segmenti dell'icona batteria sul display cominceranno a lampeggiare.
- Attendere che tutti e tre i segmenti siano fissi prima di scollegare l'apparecchio.
Per una maggiore durata della batteria si consiglia di scollegare il cavo di rete dopo 15 ore max di ricarica.
Nota:
- Non collegare l'apparecchio a prese con tensione diversa da quella indicata.
- Per lunghi periodi di inattività è necessario ricaricare la batteria periodicamente (almeno 1 volta al mese).
STAND-BY
E' possibile portare l'apparecchio in modalità Stand-by utilizzando il tasto (23) del telecomando; due segmenti sul display
indicheranno l'attivazione della funzione Stand-by.
Premerlo nuovamente per riaccendere l'apparecchio.
SELEZIONE DELLA FUNZIONE
Per cambiare la modalità di funzionamento, premere piu' volte il tasto (7) sull'unità o dal telecomando per selezionare: Colle-
gamento Wireless (sul display compare "BLUE"), USB o SD (solo se sulla presa USB (17)/Micro SD Card (16) vi è collegata una
memoria, sul display compare "USB" o "Card" per qualche secondo), AUX- IN (sul display compare "AUX").
REGOLAZIONE DEI VOLUMI
1. Ruotare la manopola del VOLUME (10) per regolare il volume generale di riproduzione oppure utilizzare i tasti (27) e (25) del
telecomando;
2. Ruotare la manopola VOL- MIC (7) per regolare il volume del segnale sugli ingressi MIC1 e MIC2. La regolazione agisce sui
due ingressi contemporaneamente.
PRE EQUALIZZAZIONI
Questa unità ha un sistema di equalizzazioni audio pre impostate. Premere più volte il tasto EQ (30) del telecomando per selezionare
una delle 6 equalizzazioni audio disponibili e che meglio si adatta alla riproduzione sonora in corso.
REGOLAZIONE TONI ALTI E BASSI
Ruotare la manopola BASS (14) per regolare i toni bassi, fare riferimento ai segni + e - per aumentare o diminuire.
Ruotare la manopola TREBLE (13) per regolare i toni alti, fare riferimento ai segni + e - per aumentare o diminuire.
EFFETTO ECHO SU MICROFONO
Ruotare la manopola ECHO (1) per regolare l'effetto eco sul microfono, fare riferimento ai segni + e - per aumentare o diminuire.
Nota: l'effetto eco agisce unicamente sugli ingressi microfonici.
6
Page 7
ITALIANO
XF 3600 PRO
DISCO-LIGHT
Premere più volte il tasto (5) per selezionare l’effetto Moving Disco-Light, ad ogni pressione corrisponderà un effetto luminoso.
VOCE GUIDA
Tenere premuto per qualche secondo il tasto (7) sull'unità o dal telecomando, per attivare/disattivare la voce guida (in lingua
Inglese).
RADIO FM (PRESENTE SOLO IN VERSIONI EXPORT)
1. Accendere l'apparecchio e selezionare la funzione RADIO (sul display comparirà l'indicazione della frequenza);
2. Premere
Il numero delle stazioni memorizzate dipende dal segnale radio nella vostra zona;
3. Una volta completata la scansione, utilizzare i tasti (6) o (8) sull'unità, oppure i tasti 9/CH- (26) e :/CH+ (31)
Note:
-
- La vicinanza di apparecchi TV, lampade al neon o altri elettrodomestici può provocare disturbi nella ricezione di
il tasto
automatica delle emittenti (la radio inizia una ricerca automatica delle stazioni radio e le salva automaticamente in memoria).
(11) sull'unità oppure il tasto
del telecomando per muoversi tra i preset delle stazioni memorizzate.
La ricezione in FM dipende molto dal luogo dove è posto l’apparecchio.
programmi radio, in questo caso allontanate l'apparecchio.
/TWS
(32) del telecomando per avviare la ricerca e memorizzazione
FUNZIONAMENTO WIRELESS
1. Accendere l'apparecchio e premere il tasto (9) sull'unità oppure premere il tasto (30) del telecomando e selezionare
la funzione Wireless, sul display comparirà la scritta "BLUE";
2. La scritta "BLUE", sul display, comincerà a lampeggiare e il sistema entrerà automaticamente in modalità ricerca;
3. Attivare la funzione Wireless sul dispositivo esterno da accoppiare;
4. Avviare la ricerca dei dispositivi. Al termine selezionare il dispositivo "XF 3600 PRO";
5. Inserire la password "0000" se richiesto;
6. Premere il tasto
tasti (6) o (8) sull'unità, oppure i tasti 9/CH- (26) e :/CH+ (31) sul telecomando per selezionare i brani.
(11) sull'unità oppure il tasto
/TWS
(32) del telecomando
per avviare la riproduzione, utilizzare i
COLLEGAMENTO TWS (Tecnologia True Wireless Stereo)
La tecnologia TWS consente all'utente di effettuare una connessione wireless tra due altoparlanti dello stesso modello e compatibili
con la funzione TWS. Con la connessione TWS, due altoparlanti verranno automaticamente collegati (senza fili) per essere un unico
sistema stereo-altoparlante che emette il canale sinistro e destro.
COLLEGAMENTO
Avviso: I due altoparlanti devono essere dello stesso modello ed entrambi compatibili con la tecnologia TWS.
1. Disattivare la funzione Wireless sul telefono o altro dispositivo;
2. Accendere entrambi i diffusori e selezionare su entrambi la modalità "Wireless";
3. Tenere premuto per qualche secondo il tasto
"Slau" comincerà a lampeggiare), dopo pochi secondi i due altoparlanti saranno accoppiati (la scritta "Slau" rimarrà fissa);
4. Attivare il collegamento Wireless sul telefono o altro dispositivo; ricercare ed accoppiare l'apparecchio. Dopo la connessione
sarà possibile riprodurre musica con il sistema stereo-altoparlante TWS.
La regolazioni sull'altoparlante principale verranno effettuate simultaneamente anche sull'altro altoparlante. Ad esempio la regolazione
del volume, riproduzione e pausa.
Note:
- In caso di mancato accoppiamento tra i 2 altoparlanti, spegnere entrambi gli apparecchi e ripetere i passi 1, 2 e 3.
- La funzione TWS funziona solamente tra diffusori uguali o con altri diffusori che utilizzano lo stesso micro processore o soluzione.
(11)
sull'unità (attivazione dell’accoppiamento TWS, sul display la scritta
RIPRODUZIONE SU INGRESSO USB/SD
1. Accendere l'apparecchio;
2. Inserire una memoria USB o una scheda Micro SD nei corrispettivi ingressi (17 o 16). La riproduzione verrà avviata automa-
ticamente;
3. Per mettere in pausa la riproduzione, premere il tasto
display comparirà la scritta "PAUS"; premerlo nuovamente per riprendere la riproduzione;
4. Premere il tasto (8) sull'unità o il tasto :/CH+ (31) del telecomando, durante l’ascolto, per passare alla traccia successiva.
(11) sull'unità oppure il tasto
7
/TWS
(32) del telecomando
, sul
Page 8
ITALIANO
Premere il tasto (6) sull'unità o il tasto 9/CH- (26) del telecomando, per passare ai brani precedenti;
5. Utilizzando la tastiera numerica (29) del telecomando potete digitare direttamente il numero del brano musicale che volete riprodurre;
6. Premere una volta il tasto (28) del telecomando, sul display comparirà la scritta "ONE", per riprodurre continuamente la
stessa traccia; premerlo una seconda volta, sul display comparirà la scritta "ALL", per riprodurre continuamente tutti i brani
contenuti nel dispositivo USB/SD.
Nota:
- Il lettore potrebbe non supportare alcuni dispositivi USB, questo è dovuto all'incompatibilità di alcuni processori.
- Per evitare interferenze dannose, collegare sempre le periferiche USB direttamente all'unità, non utilizzare cavi di prolunga.
- Dal computer formattare le memorie USB/SD in FAT (16 o 32).
XF 3600 PRO
AUX-IN (INGRESSO AUDIO)
1. Premere il tasto (7) sull'unità o dal telecomando e selezionare la funzione "AUX";
2. Collegare una qualsiasi unità provvista di uscita audio, tramite l'apposito cavo Jack da 3,5mm, all'ingresso AUX (18);
3. Regolare il dispositivo esterno dai propri comandi.
MICROFONO WIRELESS (SENZA FILI)
FUNZIONAMENTO
1. Rimuovere il coperchio nella parte posteriore del Microfono, inserire 2 batterie formato “AA” facendo attenzione alla polarità
indicata e richiudere il coperchio;
2. Accendere il microfono spostando l'interruttore centrale verso l'alto;
3.
Regolare il volume
4. Se una volta acceso il microfono l'indicatore di accensione lampeggia, le batterie sono scariche, sostituirle immediatamente.
Note:
- La distanza di ricezione del microfono senza fili è di 15 metri circa senza ostacoli, non utilizzare a distanze superiori.
- Se nello stesso ambiente vengono utilizzati più microfoni wireless contemporaneamente, questi devono essere impostati su
frequenze diverse e devono essere tenuti lontani almeno a 30m.
- Non mettere il dispositivo troppo vicino a lettori DVD/CD/VCD in quanto hanno frequenze che potrebbero influire sul microfono
ruotando la manopola MIC VOL (4);
POSSIBILI LIMITAZIONI D’USO
- Questo apparecchio potrebbe operare su frequenze non autorizzate nella regione in cui si trova l’utilizzatore. Si suggerisce di
rivolgersi alle autorità competenti e richiedere le informazioni necessarie relative alle frequenze autorizzate nella propria regione
per i sistemi radiomicrofonici. In alcuni casi potrebbe essere necessaria una licenza ministeriale per l’uso di questo apparecchio. Per i possibili requisiti rivolgersi alle autorità competenti. L’utente si assume l’esclusiva responsabilità per l’acquisizione
della licenza per gli apparti radiomicrofonici e la licenziabilità dipende dalla classificazione e dall’applicazione dell’utente e
della frequenza selezionata. (D. Lgs. 269/2001 art.6 comma 3). Le frequenze utilizzate da questo prodotto sono autorizzate
solo sul territorio Italiano e potrebbero non essere utilizzabili in altri paesi. Si suggerisce di rivolgersi alle autorità competenti e
richiedere le relative informazioni.
Paesi Europei per i quali il prodotto ha restrizioni:
Estonia: LIMITED IMPLEMENTATION.
Finlandia: LIMITED IMPLEMENTATION.
Francia: LIMITED IMPLEMENTATION.
Grecia: LIMITED IMPLEMENTATION.
EE FI FR
Lituania: LIMITED IMPLEMENTATION.
Polonia: LIMITED IMPLEMENTATION.
EL LT PL
Spagna: LIMITED IMPLEMENTATION.
ES
REGISTRAZIONE
Questo apparecchio e' in grado di registrare sulla memoria USB o SD la parte vocale quando si utilizza il microfono in dotazione.
All'interno della memoria USB l'apparecchio creerà automaticamente una cartella chiamata "Record" dove memorizzerà tutti i file
di registrazione.
1. Accendere l'apparecchio;
2. Inserire una memoria USB o una scheda Micro SD nei corrispettivi ingressi;
3. Selezionare la funzione USB o SD tramite il tasto (7) sull'unità o dal telecomando;
8
Page 9
ITALIANO
4. Premere il tasto (3) dell'unità o il tasto REC (24) del telecomando per avviare la registrazione, sul display comparirà l'indi-
cazione del tempo;
5. Premere nuovamente il tasto (3) dell'unità o il tasto REC (24) del telecomando, per arrestare la registrazione.
Nota:
- E' possibile registrare solamente la voce.
- Quando si attiva la funzione "Registrazione" alcuni comandi dell'apparecchio vengono inibiti, compreso la regolazione del
volume dal telecomando, questi riprenderanno la loro normale funzione quando la registrazione verrà arrestata.
XF 3600 PRO
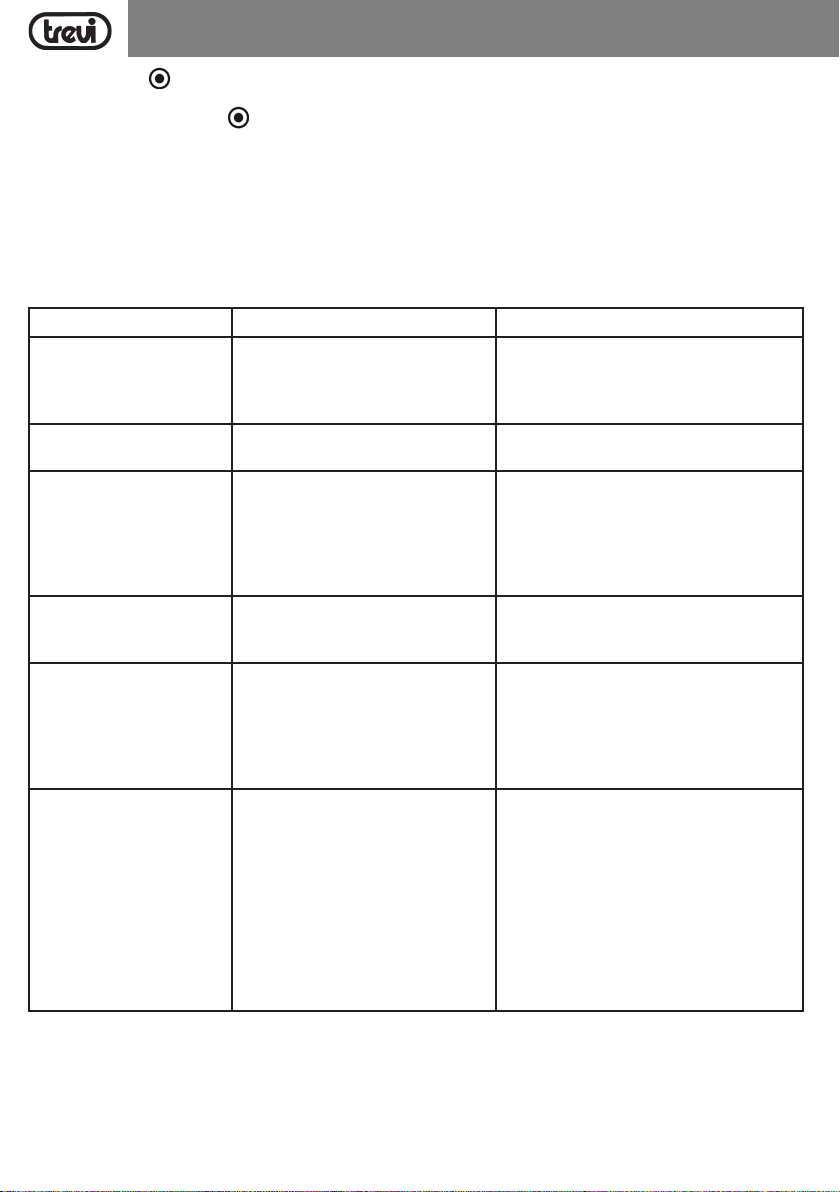
RISOLUZIONE DEI PROBLEMI
Se si verifica un problema, attenersi alla procedura descritta nella tabella seguente.
Se il problema non può essere risolto, contattare il rivenditore.
Problema Possibili cause Soluzione
Nessun suono quando l'apparecchio viene acceso.
Suono distorto. 1. Volume troppo alto.
Nessun suono dal microfono. 1. La presa del microfono può non
Nessun suono quando si inserisce un dispositivo USB/SD Card.
Impossibile caricare la batteria o
la batteria ha una durata breve.
Dagli altoparlanti si sentono
forti rumori.
1. Nessuna sorgente sonora in ingresso.
2. Manopola Volume a livello 0.
3. Voce guida disattivata.
4. Nessun dispositivo SD/USB collegato.
2. Errore file Audio.
essere collegata correttamente.
2. L'interrutore di accensione sul
microfono può essere in posizione
"spento".
3. Volume del microfono basso.
1. Formato file non supportato.
2. USB/SD card non collegate
correttamente.
1. Collegare il cavo di alimentazione per
ricaricare.
2. La batteria non è completamente
carica.
3. La batteria potrebbe aver terminato il
suo ciclo di vita.
1. Microfono acceso ma troppo vicino
all'altoparlante.
2. Microfono acceso ma non viene
utilizzato.
3. Volume del microfono potrebbe
essere troppo alto.
4. Un cellulare viene utilizzato troppo
vicino all'altoparlante.
5. Apparecchi senza fili possono essere
molto vicini a chi sta utilizzando il
microfono.
1. Collegare un dispositivo all'ingresso AUX-IN.
2. Regolare il volume.
3. Attivare la voce guida.
4. Collegare USB/SD card,riprodurre MP3.
1. Abbassare il volume.
2. Controllare e riprodurre altro file Audio.
1. Assicurarsi che il microfono sia collegato
correttamente alla presa.
2. Accendere il microfono.
3. Regolare correttamente il volume del
microfono.
1. Il formato dei file audio deve essere MP3.
2. Collegare l'apparecchio USB/SD card
correttamente.
1. Controllare se il cavo di alimentazione è
collegato in modo corretto.
2. Normalmente ci vogliono 10 ore per
ricaricare completamente la batteria.
3. Sostituire la vecchia batteria con una nuova
avente le stesse specifiche tecniche.
1. Tenere il microfono alla distanza di 2 metri
dal diffusore.
2. Spegnere il microfono se non utilizzato.
3. Abbassare il volume del microfono.
4. Tenere il cellulare lontano dall'altoparlante
mentre si effettua una chiamata.
5. Tenere il diffusore lontano da apparecchi
wireless.
9
Page 10
ITALIANO
XF 3600 PRO
INFORMATIVA SULLA RIMOZIONE E LO SMALTIMENTO DELLE BATTERIE
Qualunque sia il tipo di batteria esaurita, essa non deve essere gettata tra i rifiuti domestici,nel fuoco o nell’acqua. Tenere la batteria al
riparo da fonti di calore. Ogni tipo di batteria esaurita deve essere riciclata oppure smaltita presso gli appositi centri raccolta dedicati.
PROCEDURA PER LA RIMOZIONE DELLA BATTERIA DALL’ALTOPARLANTE AMPLIFICATO
Attenzione: Questa operazione è riservata esclusivamente al personale tecnico specializzato!
Operare esclusivamente in assenza di collegamento dell’apparecchio alla rete elettrica!
1. Rimuovere le viti che serrano il pannello dell'alloggiamento batteria (pannello metallico in basso);
2. Rimuovere il pannello metallico e individuare la batteria;
3. Scollegare la batteria e rimuoverla;
4. Sotituire la batteria con una di uguali caratteristiche e capacità.
INFORMAZIONI AGLI UTENTI
ai sensi del Decreto Legislativo N° 49 del 14 Marzo 2014 “Attuazione della Direttiva 2012/19/UE sui rifiuti di apparecchiature
elettriche ed elettroniche (RAEE)”
Il simbolo del cassonetto barrato riportato sull’apparecchiatura indica che il prodotto alla fine della propria vita utile deve essere
raccolto separatamente dagli altri rifiuti. L’utente dovrà, pertanto, conferire l’apparecchiatura integra dei componenti essenziali
giunta a fine vita agli idonei centri di raccolta differenziata dei rifiuti elettronici ed elettrotecnici, oppure riconsegnarla al rivenditore al
momento dell’acquisto di nuova apparecchiatura di tipo equivalente, in ragione di uno a uno, oppure 1 a zero per le apparecchiature
aventi lato maggiore inferiore a 25 cm. L’adeguata raccolta differenziata per l’avvio successivo dell’apparecchiatura dimessa al
riciclaggio, al trattamento e allo smaltimento ambientale compatibile contribuisce ad evitare possibili effetti negativi sull’ambiente
e sulla salute e favorisce il riciclo dei materiali di cui è composta l’apparecchiatura. Lo smaltimento abusivo del prodotto da parte
dell’utente comporta l’applicazione delle sanzioni amministrative di cui al D.Lgs n. Decreto Legislativo N° 49 del 14 Marzo 2014.
CARATTERISTICHE TECNICHE
GENERALI
Alimentazione: ........................................................ 100-240V 50/60Hz
batteria interna al litio ricaricabile 12,8V 8A
Consumo: ............................................................................ Max 100W
Potenza massima Audio: .................................................................................... 200W
Banda di frequenza FM: ............................................................... 87.5MHz - 108MHz
Temperatura di funzionamento: ............................................................................. 0° ~ 40°C
Risposta in frequenza: ........................................................................ 40Hz - 20KHz
Rapporto segnale rumore: ................................................................................. >68dB
Potenza max di trasmissione Wireless: ......................................................................... 0,8mW
Banda di trasmissione Wireless: .................................................................................. 2,4GHz
Frequenza microfono wireless: .............................................................................. 668,5MHz
Dimensioni: ................................................................ 380x 350x 860mm
Peso: ................................................................................. 18,5 Kg
10
Page 11
XF 3600 PROENGLISH
NOTES ON USE
This is a precision electronic appliance; avoid using it in the following cases:
• Listening to high volume for a long time could damage your hearing.
• Do not close the ear to the loudspeaker during step setting and volume adjustments, and in par ticular keep the volume down
at the ignition.
• Near strong heat sources, such as central heating plants or stoves.
• In very humid places such as bathrooms, swimming pools, etc.
• In very dusty places.
• In places subject to strong vibrations.
• Position the appliance in such a way that there is always enough room for free air circulation (at least 5 cm).
• Do not block the air inlets.
• If any liquid enters the appliance, unplug it immediately from the socket and take it to the nearest TREVI authorised service centre.
• Before switching on the appliance, always check that the power cable and the connection cable are properly installed.
• The apparatus shall not be exposed to dripping or splashing water. No objects filled with liquid, such as vases, should be placed
on the unit.
• No naked flame sources, such as lighted candles, should be placed on.
• Power adaptor must be connected to a socket close to the device and must be easily accessible.
• If you notice eccessive heat on the device or power adaptor, disconnect the plug from the main power socket immediately.
• Do not pull the power cord.
• Keep this manual.
WARNING FOR A CORRECT USE OF RECHARGEABLE BATTERY
- Recharge the battery in an ambient temperature between 5°C and 35°C.
- Do not recharge for more than the appropriate period to prevent the risk of overheating and bursting.
- Recharging the battery for an inadequate period or a long period of inactivity may shorten the battery life.
- The rechargeable battery is subject to wear and tear and its performance will gradually decrease.
- Avoid recharging the battery overnight.
CARE AND MAINTENANCE
Use a slightly damp soft cloth for cleaning. Do not use solvents and abrasive substances.
IMPORTANT
This device is designed for home use (not professional use). This appliance has been carefully built to ensure long-lasting perfect
performance. However, should any inconvenience occur, please contact your local authorised TREVI Service Centre.
TREVI follows a policy of ongoing research and development. Therefore products may have different features from those described.
To avoid possible hearing damage, limit the listening time to high volumes
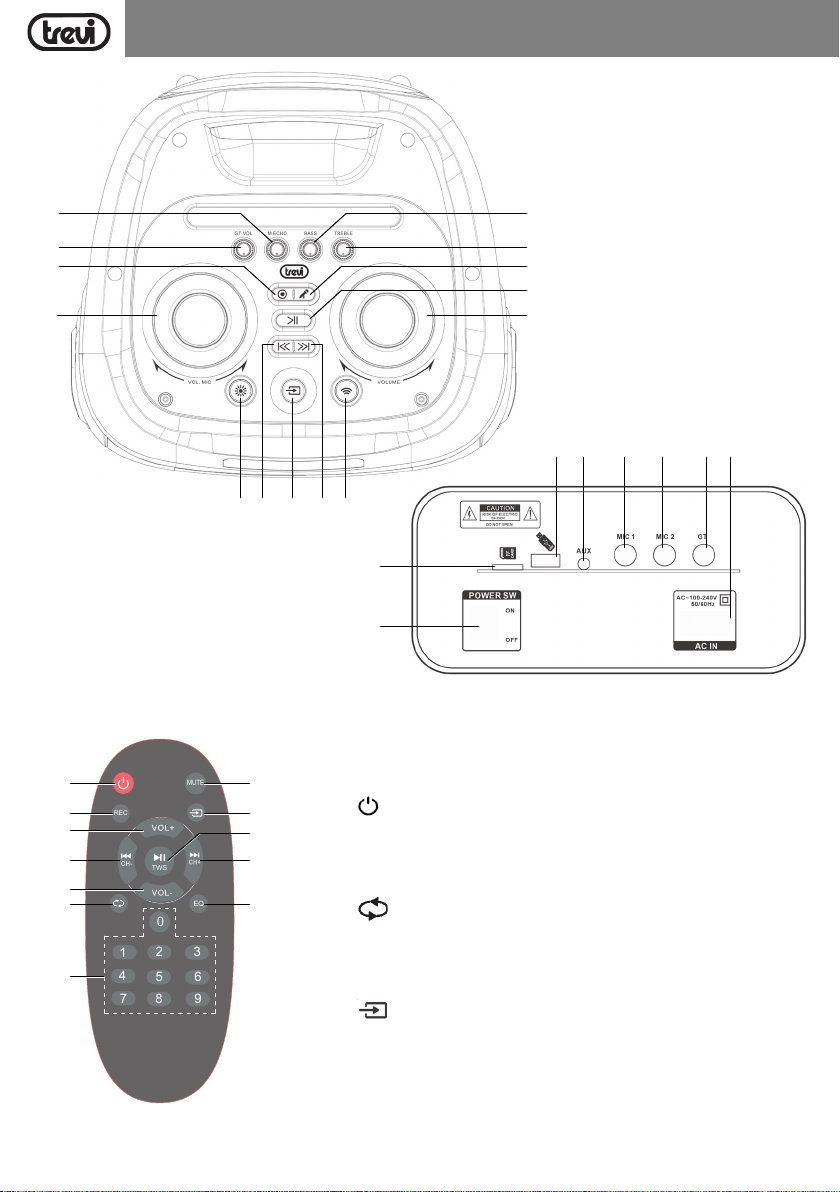
LOCATION OF CONTROL
1. Microphone Echo
2. Guitar VOLUME
3. button, REC function
4. Microphone VOLUME
5. button, LED light
6. button, PREV
7. button, MODE
8. button, NEXT
9. button, Wireless function
10. VOLUME control
11. button, PLAY(pause)/TWS
12. button, Microphone priority
13. TREBLE control
14. BASS control
15. POWER ON/OFF button
16. Micro SD slot
17. USB port
18. AUX IN jack
19. Microphone jack-1
20. Microphone jack-2
21. Guitar input
22. AC power outlet 230V 50Hz.
11
Page 12
ENGLISH
MUTE
REC
EQ
0
1
2
3
4
5
6
7
8
9
TWS
XF 3600 PRO
1
2
3
4
REMOTE CONTROL
23
24
25
26
27
28
29
5106 7 8 9
34
33
32
31
30
23. button, power ON/ Stand-by
24. REC button, (press to start recording. Press again to stop recording)
25. VOL+ button
26. 9/CH- button, Previous song/CH-
27. VOL- button
28. button, single Repeat/ Repeat All
29. Numeric buttons
30. EQ Sound Mode Key (POP/ ROCK/ JAZZ/ CLASSIC/ FLAT)
31. :/CH+ button, Next song/CH+
32. /TWS button, Play/Pause/TWS
33. button, mode function (select between AUX/USB/SD/Wireless)
34. MUTE button
14
13
12
11
17 18 19 20 21 22
16
15
12
Page 13
ENGLISH
XF 3600 PRO
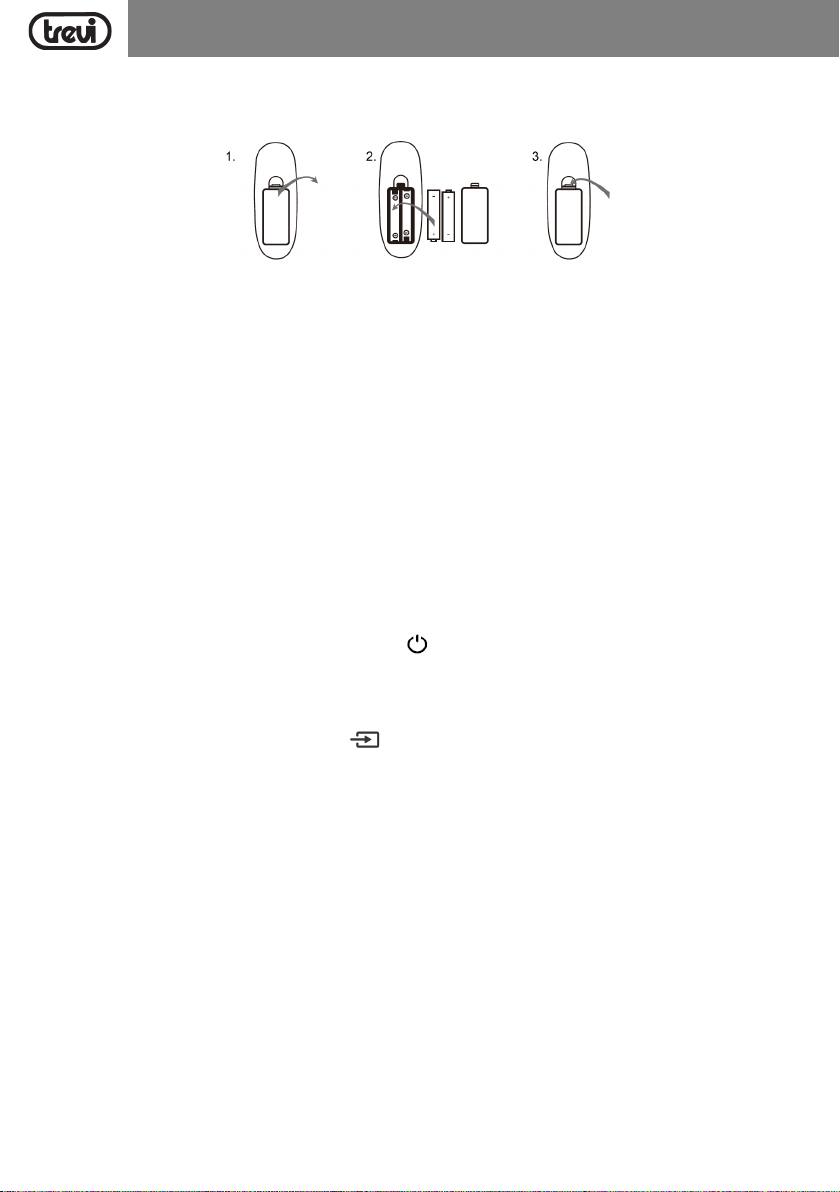
Installing the Batteries
Remove the battery cover from the Remote Control and put 2xAAA size batteries inside the compartment. The diagram inside the
Battery Compartment shows the correct way to install the batteries.
TRANSPORTATION
For transportation, use the upper handle, slightly fold the appliance and use the two rear wheels.
BASIC FUNCTIONS
POWER ON/OFF
- Turn the POWER switch (15) to position "1" (ON), to switch on and use the device with its internal battery.
- Turn the POWER switch (15) to position "0" (OFF) to switch the device off completely.
RECHARGING THE BATTERY
- Turn the POWER switch (15) to the "0" (OFF) position and connect the power cable to the socket (22) to recharge the battery;
the battery icon segments on the display will start to flash.
- Wait until all three segments are solid before disconnecting the unit.
For longer battery life, it is recommended to disconnect the mains cable after a maximum of 15 hours of charging.
Note:
- Do not connect the unit to sockets with a voltage different from that indicated.
- For long periods of inactivity it is necessary to recharge the battery periodically (at least once a month).
STAND-BY
You can switch the system to standby mode using the button (23) on remote control; two segments on the display indicate
the activation of the stand-by function.
Press it again to Switch On the unit.
MODE SETTING FUNCTION
To change the mode function, press more 'times the key (7) on the unit or from the remote control to select: Wireless (the
display show BLUE), USB/SD (only if the USB socket (17)/Micro SD (16) is connected to a memory, the display shows for a few
seconds "USB" or "SD"), AUX-IN (the display shows "AUX").
ADJUSTING THE VOLUME
1. Turn the VOLUME knob (10) to adjust the overall playback volume or use the buttons (27) and (25) on the remote control;
2. Turn the VOL- MIC knob (7) to adjust the signal volume on inputs MIC1 and MIC2. The adjustment acts on both inputs simul-
taneously.
PRE-EQUALIZER
This unit has a system of pre-set audio equalisations. Press the EQ button (30) on the remote control several times to select one
of the 6 available audio equalisations that best suits the current sound playback.
SETTING TONE TREBLE AND BASS
Turn the BASS knob (14) to adjust the bass tones, refer to the + and - signs to increase or decrease.
Turn the TREBLE knob (13) to adjust the high tones, refer to the + and - signs to increase or decrease.
MIC ECHO EFFECT
Turn the ECHO knob (1) to adjust the echo effect on the microphone, refer to the + and - signs to increase or decrease.
Note: the echo effect only acts on the microphone inputs.
13
Page 14
ENGLISH
XF 3600 PRO
DISCO-LIGHT EFFECTS
Press button (5) several times to select the Moving Disc-Light effect, each press will correspond to a light effect.
VOICE ANNOUNCEMENT
Press and hold button (7) on the unit or on the remote control for a few seconds to activate/deactivate the guide voice (in English).
FM RADIO
1. Switch on the device and select the RADIO function (the frequency indication will appear on the display);
2. Press button
storage (the radio starts an automatic search for radio stations and automatically stores them in the memory).
The number of stored stations depends on the radio signal in your area;
3. Once scanning is complete, use the (6) or (8) buttons on the unit, or the 9/CH- (26) and :/CH+ (31) buttons
on the remote control to move through the presets of stored stations.
Note:
-
FM reception depends a lot on the place where the device is placed.
- The proximity of TV sets, neon lamps or other electrical appliances can cause interference in the reception of radio
programs, in this case move the appliance away.
(11) on the unit or
/TWS
button (32) on the remote control to start the automatic station search and
WIRELESS FUNCTION
1. Switch on the unit and press button (9) on the unit or press button (30) on the remote control and select the wireless
function, "BLUE" will appear on the display;
2. The word "BLUE" will start flashing on the display and the system will automatically enter the search mode;
3. Activate the Wireless function on the external device to be paired;
4. Start the device search. When finished, select the device "XF 3600 PRO";
5. Enter the password "0000" if prompted;
6. Press the button
(8) buttons on the unit, or the 9/CH- (26) and :/CH+ (31) buttons on the remote control to select tracks.
(11) on the unit or
/TWS button
(32) on the remote control to start playback, use the
(6) or
TWS FUNCTION OPERATION (True wireless stereo technology)
TWS technology enables user to make wireless connection between two speakers which are same model and compatible with
TWS. In TWS connection, two speakers will be automatically grouped to be a Stereo- Speaker System which outputs the left and
right channel.
HOW TO ESTABLISH
Notice: Two speakers must be same model and both compatible with TWS.
1. Deactivate the wireless function on the phone or other device;
2. Turn on both speakers and select 'Wireless' mode on both;
3. Press and hold the button
display), after a few seconds the two loudspeakers will be paired (the 'Slau' message will remain steady);
4. Activate the wireless connection on your phone or other device; search for and pair the device. After connection, it will be
possible to play music with the TWS stereo speaker system.
Adjustments on the main speaker will also be made simultaneously on the other speaker. For example, adjusting volume, playback
and pause.
Note:
- If the 2 loudspeakers are not paired, switch off both devices and repeat steps 1, 2 and 3.
- The TWS function only works between equal speakers or with other speakers that use the same micro processor or solution.
(11)
on the unit for a few seconds (TWS pairing is activated, 'Slau' will start flashing on the
USB/SD INPUT
1. Switch on the unit;
2. Insert a USB memory or an Micro SD card into the USB or SD slot (17 or 16). Playback starts automatically;
3. To pause playback, press
"PAUS"; press it again to resume playback;
4. Press (8) button on unit or key :/CH+ (31) on remote control while listening to switch to the next track. Press (6)
button on unit or 9/CH- (26) button on remote to go to the previous tracks;
(11)
button on the unit or the key/TWS
14
(32)
on remote control, the display will show
Page 15
XF 3600 PROENGLISH
5. Using the numeric keypad (29) on remote control you can directly enter the number of the song you want to play;
6. Press once button (28) on the remote control, the display will show "ONE", to continually play the same track; press it a
second time, the display will show "ALL" to continuously play all songs in the USB/SD.
Note:
- The player may not support some USB/SD devices, this is due to the incompatibility of some processors.
- To avoid harmful interference, always connect USB devices directly to the unit, do not use extension cords.
- From the computer to format the USB memory/SD FAT (16 or 32).
AUX-IN
1. Press (7) button on the unit or from the remote controland select the "AUX" function;
2. Connect any unit equipped with audio output, through a cable 3.5mm jack to the AUX (18) input;
3. Use the external device from their commands.
USING THE WIRELESS MICROPHONE
1. Remove the cover at the back of the microphone, insert 2 "AA" size batteries paying attention to the polarity indicated and close the cover;
2. Turn on the microphone by switch upward.
3. Adjust the volume by turning the MIC VOL knob (4);
4. If the power indicator flashes when the microphone is turned on, the batteries are low, replace them immediately.
Note:
- The effective range of the wireless microphone is 15m. Do not use over that range.
- Do not use two microphones working on the same frequency or crosstalk and interference will occur.
- If you use more wireless microphones at the same time, they must be set to different frequencies and should be kept away
at least at 30m.
- Don’t put the device too close to a DVD/CD/VCD player as they have strong frequencies and might affect the microphone.
POSSIBLE LIMITATIONS USE
- This device may operate on unauthorized frequencies in the region where the user is located. We recommend that you contact
the competent authorities and request the necessary information relating to the frequencies authorized in your region for
wireless microphone systems. In some cases, a ministerial license may be required for the use of this appliance. For possible
requirements, contact the competent authorities. The user assumes exclusive responsibility for the acquisition of the license
for radio-microphones and licensability depends on the classification and application of the user and on the frequency selected.
(Legislative Decree 269/2001 art.6 paragraph 3). The frequencies used by this product are authorized only on Italian territory
and may not be usable in other countries. It is recommended to contact the competent authorities and request the relevant
information.
European countries which product has restrictions:
Estonia: LIMITED IMPLEMENTATION.
Finland: LIMITED IMPLEMENTATION.
France: LIMITED IMPLEMENTATION.
Greece: LIMITED IMPLEMENTATION.
EE FI FR
Lithuania: LIMITED IMPLEMENTATION.
Poland: LIMITED IMPLEMENTATION
EL LT PL
Spain: LIMITED IMPLEMENTATION.
ES
VOICE RECORDING
This unit is able to record on the USB or SD memory the voice part when using the supplied microphone. Within the USB memory,
the device will automatically create a folder called 'Record' where it will store all recording files.
1. Switch On the device;
2. Insert a USB memory or a SD Card into the socket;
3. Select USB or SD function via button (7) on the unit or from the remote control;
4. Press button (3) on the unit or the REC button (24) on the remote control to start recording, the time indication will appear
on the display;
5. Press button (3) on the unit or the REC button (24) on the remote control again to stop recording.
15
Page 16
ENGLISH
Note:
- You can record only the voice.
- When the "Recording" function is activated, some appliance controls are inhibited, they will resume their normal function
when the recording is stopped.
XF 3600 PRO
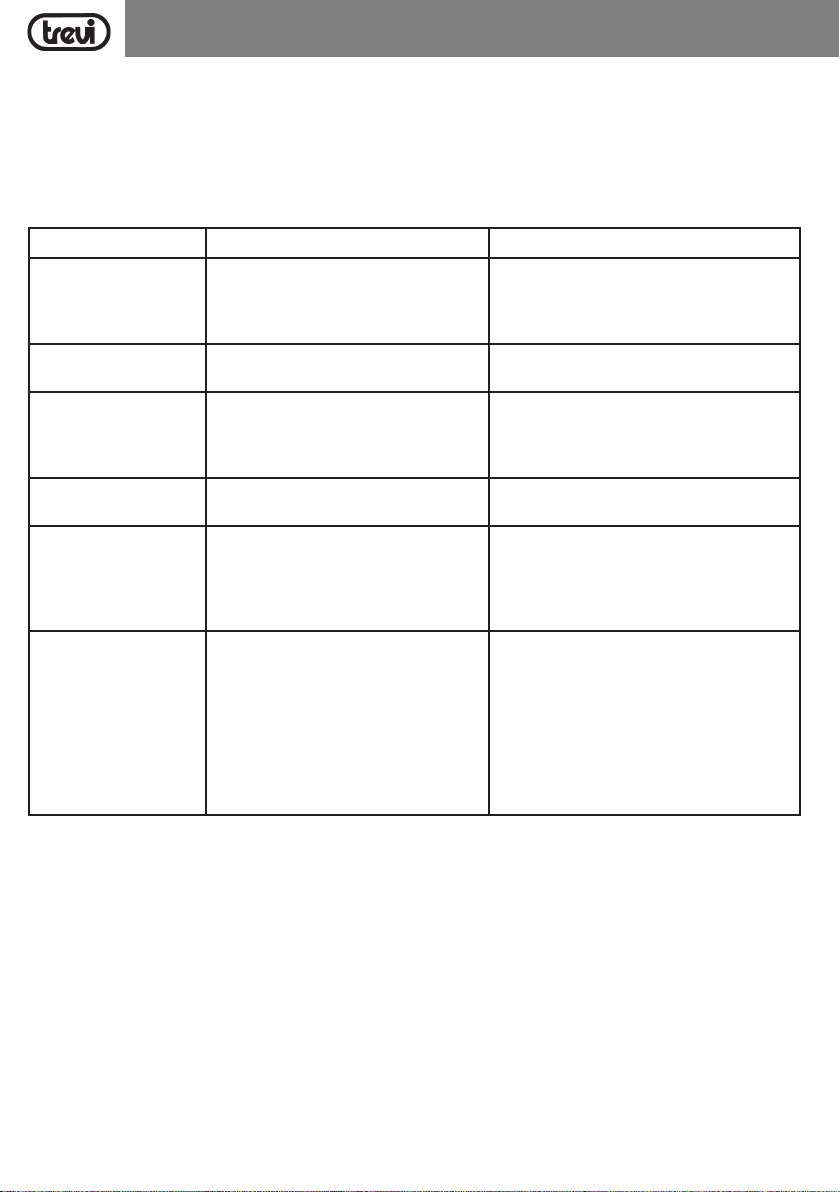
TROUBLESHOOTING
If a problem occurs, follow the steps in the table below.
If the problem still can’t be solved, please contact your retailer.
Problem Possible cause Solution
No sound when Power ON. 1. No input sound source comes.
Distorted sound. 1. Volume is too loud.
No sound from microphone. 1. Microphone socket may not be plugged
No sound comes after
inserting USB/SD Card.
Unable to charge or the
battery works only for shor t
duration.
If Speaker makes loud
noises.
2. Volume knob in the lowest position.
3. Voice switch off.
4. USB/SD card not plugged.
2. Audio file error.
properly.
2. Microphone switch may not be on.
3. Microphone volume is on lowest mode.
1. Incorrect file format.
2. USB/SD may not be plugged properly.
1. Connect with power cord to charge.
2. Battery not fully charged.
3. Battery life may have ended.
1. Microphone switched on but may too
close to the speaker.
2. Microphone switched on but is not being
used.
3. Microphone volume may be too loud.
4. Mobile phone is being used too close to
the speaker.
5. Other wireless equipment may be placed
very close to the speaker.
1. Input AUX signal.
2. Adjust volume.
3. Turn on voice switch.
4. Plug USB/SD card,play MP3.
1. Turn the volume down.
2. Check and change the audio file.
1. Ensure the microphone is correctly plugged
into the socket.
2. Turn on the microphone.
3. Adjust the microphone volume
1. File format should be MP3.
2. Plug USB/SD card correctly.
1. Check if power cord connected properly.
2. Extend charging time;normally it takes 6-8
hour to fully charge.
3. Replace old batteries with the same
specification as the old batteries.
1. Keep the microphone 2 meters away from
the speaker.
2. Turn off microphone if not in use.
3. Adjust microphone volume to lower mode.
4. Keep mobile away from the speaker whilst a
ending a call.
5. Keep the speaker away from other wireless
equipment.
INFORMATION ON THE REMOVAL AND DISPOSAL OF BATTERIES
Used batteries should not be disposed of with household waste or thrown into fire or water. Used batteries should be recycled or
disposed of in separate waste collection centres.
BATTERY REMOVAL
Warning: Only high-qualified personnel should perform this operation!
The appliance should not be plugged to the mains socket when performing this operation!
1. Remove the screws that tighten the battery housing panel (bottom metal panel);
2. Remove the metal panel and locate the battery;
3. Disconnect the battery and remove it;
4. Replace the battery with one of the same characteristics and capacity.
16
Page 17
ENGLISH
Precautions for correct disposal of the product.
The symbol shown on the equipment indicates that waste must be disposed of in “separate collection” and so the product must
not be disposed of together with urban waste.
The user must take the product to special “separate waste collection centres” provided by local government, or deliver it to the
retailer against the purchase of a new product.
Separate collection of waste and subsequent treatment, recycling and disposal operations promotes the production of equipment
with recycled materials and limits negative effects on the environment and on health caused by improper handling of waste.
Illegal disposal of the product leads to the enforcement of administrative penalties.
XF 3600 PRO
TECHNICAL SPECIFICATIONS
Power Supply: .........................................................100-240V 50/60Hz
internal rechargeable lithium battery 12,8V 8A
Power consumption: ............................................................................ Max 100W
Output Audio power: .................................................................................... 200W
FM frequency band: ............................................................... 87.5MHz - 108MHz
Operating temperature: ............................................................................. 0° ~ 40°C
Frequency response: ........................................................................ 40Hz - 20KHz
S/N ratio: ................................................................................. >68dB
Bluetooth max power transmission: .............................................................................. 0,8mW
Band transmission Bluetooth: .................................................................................. 2,4GHz
Wireless microphone frequency: .............................................................................. 668,5MHz
Dimensions: ................................................................ 380x 350x 860mm
Weight: ................................................................................. 18,5 kg
17
Page 18
FRANCAIS
XF 3600 PRO
NOTES D’EMPLOI
Cet appareil est un instrument électronique de haute précision; évitez donc de l’utiliser dans les cas suivants:
• Près de grosses sources de chaleur comme des radiateurs et des poêles.
• L'écoute d'un volume élevé pendant longtemps pourrait endommager votre audition.
• Ne fermez pas l'oreille au haut-parleur pendant le réglage de l'étape et les réglages de volume, et en particulier réduisez le
volume au contact.
• Dans des endroits très humides comme les salles de bains, les piscines, etc.
• Dans des endroits très poussiéreux.
• Dans des endroits exposés à de fortes vibrations.
• Placez l’appareil de sorte qu’il y ait toujours assez d’espace sur ses côtés pour laisser circuler librement l’air (au moins 5 cm).
• Ne bouchez pas les fentes d’aération.
• Si des liquides pénètrent à l’intérieur de l’appareil, débranchez-le immédiatement et portez-le au centre d’assistance agréé
TREVI le plus proche.
• Contrôlez toujours, avant d’allumer l’appareil, que les câbles d’alimentation et les câbles de branchement sont correctement
installés.
• L'appareil ne doit pas être exposé à des éclaboussures d'eau. Aucun objet rempli de liquide, comme des vases, doivent être
placés sur l'appareil.
• Aucune source de flamme nue, telle que des bougies allumées, doivent être placés sur.
• L’adaptateur secteur doit être connecté à une prise proche de l’appareil et doit être facilement accessible.
• Si vous remarquez une chaleur excessive sur l’appareil ou l’adaptateur secteur, débranchez immédiatement la fiche de la prise
de courant principale.
• Ne tirez pas sur le cordon d’alimentation.
• Conservez ce manuel.
AVERTISSEMENT RELATIF À L’UTILISATION ADÉQUATE DE LA BATTERIE RECHARGEABLE
- Rechargez la batterie à une température ambiante comprise entre 5°C et 35°C.
- Ne la rechargez pas plus longtemps que la durée appropriée afin d'éviter tout risque de surchauffe et d'éclatement.
- Une recharge insuffisante ou une longue période d'inactivité peut réduire la durée de vie de la batterie.
- La batterie rechargeable est sujette à l'usure et ses performances diminuent progressivement.
- Évitez de recharger la batterie pendant la nuit.
MANIEMENT ET ENTRETIEN
Pour le nettoyage, il est conseillé d’utiliser un chiffon doux légèrement humide. Évitez l’emploi de solvants ou de substances abrasives.
IMPORTANT
Cet appareil est conçu pour un usage domestique (usage non professionnel). La bonne fabrication de cet appareil garantit un
fonctionnement parfait pour une longue période. Si toutefois quelques inconvénients devaient se présenter, adressez-vous au
Centre d’Assistance agréé TREVI le plus proche.
TREVI observe une politique de recherche et de développement continus. C’est pourquoi ses produits peuvent présenter des
caractéristiques différentes par rapport à celles qui sont décrites.
Pour éviter d'éventuels dommages auditifs, limiter la durée d'écoute à volume élevé
DESCRIPTION DES CONNECTEURS ET DES COMMANDES
1. Écho du microphone
2. VOLUME de la guitare
3. Bouton , fonction REC
4. VOLUME du microphone
5. Bouton , lumière LED
6. Bouton , PREV
7. Bouton , MODE
8. Bouton , NEXT
9. Bouton , fonction sans fil
10. Contrôle du VOLUME
11. Bouton , PLAY(pause)/TWS
12. Bouton , priorité au microphone
13. Commande TREBLE
14. Contrôle des BASS
15. Bouton POWER ON/OFF
18
Page 19
XF 3600 PROFRANCAIS
MUTE
REC
EQ
0
1
2
3
4
5
6
7
8
9
TWS
16. Fente Micro SD
17. Port USB
18. Prise AUX IN
19. Prise microphone-1
1
2
3
4
20. Prise microphone-2
21. Entrée guitare
22. Prise d'alimentation AC 230V 50Hz.
14
13
12
11
17 18 19 20 21 22
5106 7 8 9
16
TÉLÉCOMMANDE
23
24
25
26
27
28
29
15
34
33
32
31
23. Bouton , mise sous tension/veille
24. Touche REC, (appuyez pour démarrer l'enregistrement. Appuyez à nouveau
pour arrêter l'enregistrement)
25. Bouton VOL+
30
26. Bouton 9/CH-, chanson précédente/CH-
27. Bouton VOL-
28. Bouton , Répétition unique/ Répéter tout
29. Boutons numériques
30. Touche EQ Sound Mode (POP/ ROCK/ JAZZ/ CLASSIC/ FLAT)
31. Bouton :/CH+, chanson suivante/CH+
32. Bouton/TWS, Lecture/Pause/TWS
33. Bouton , fonction mode (sélection entre AUX/USB/SD/Wireless)
34. Touche MUTE
19
Page 20
FRANCAIS
XF 3600 PRO
Installation des batteries:
Ôter le couvercle au dos de la télécommande, introduire 2 batteries en format "AAA" ayant soin de respecter la polarité indiquée,
et remettre le couvercle.
TRANSPORT
Pour le transport, utilisez la poignée supérieure, pliez légèrement l'appareil et utilisez les deux roues arrière.
FONCTIONS DE BASE
MARCHE/ARRÊT
- Tournez l'interrupteur POWER (15) en position "1" (ON), pour allumer et utiliser l'appareil avec sa batterie interne.
- Tournez l'interrupteur POWER (15) en position "0" (OFF) pour éteindre complètement l'appareil.
RECHARGE DE LA BATTERIE
- Placez le commutateur POWER (15) en position "0" (OFF) et branchez le câble d'alimentation à la prise (22) pour recharger la
batterie; les segments de l'icône de la batterie sur l'écran commencent à clignoter.
- Attendez que les trois segments soient fixes avant de débrancher l'appareil.
Pour prolonger la durée de vie de la batterie, il est recommandé de débrancher le câble d'alimentation après un maximum de 15
heures de charge.
Remarque:
- Ne pas brancher l'appareil sur des prises dont la tension est différente de celle indiquée.
- En cas d'inactivité prolongée, il est nécessaire de recharger périodiquement la batterie (au moins une fois par mois).
MODE VEILLE
Vous pouvez mettre le système en mode veille à l'aide de la touche (23) de la télécommande; deux segments sur l'écran
indiquent l'activation de la fonction de veille;
Appuyez à nouveau sur cette touche pour allumer l'appareil.
FONCTION DE RÉGLAGE DU MODE
Pour changer de mode, appuyez plusieurs fois sur la touche (7) de l'appareil ou de la télécommande pour sélectionner :
Sans fil (l'écran affiche BLEU), USB/SD (uniquement si la prise USB (17)/Micro SD (16) est connectée à une mémoire, l'écran
affiche pendant quelques secondes "USB" ou "SD"), AUX-IN (l'écran affiche "AUX").
RÉGLAGE DU VOLUME
1. Tournez le bouton VOLUME (10) pour régler le volume global de la lecture ou utilisez les boutons (27) et (25) de la télécommande;
2. Tourner le bouton VOL- MIC (7) pour régler le volume du signal sur les entrées MIC1 et MIC2. Le réglage agit sur les deux
entrées simultanément.
PRÉ-ÉQUALISATEUR
Cet appareil est doté d'un système d'égalisations audio préréglées. Appuyez plusieurs fois sur la touche EQ (30) de la télécommande
pour sélectionner l'une des 6 égalisations audio disponibles qui convient le mieux à la lecture du son en cours.
RÉGLAGE DES AIGUS ET DES BASSES
Tourner le bouton BASS (14) pour régler les basses, se référer aux signes + et - pour augmenter ou diminuer.
Tourner le bouton TREBLE (13) pour régler les aigus, se référer aux signes + et - pour augmenter ou diminuer.
EFFET D'ECHO DU MICRO
Tournez le bouton ECHO (1) pour régler l'effet d'écho sur le microphone, repor tez-vous aux signes + et - pour augmenter ou diminuer.
Remarque: l'effet d'écho n'agit que sur les entrées du microphone.
20
Page 21
FRANCAIS
XF 3600 PRO
EFFETS DISCO-LIGHT
Appuyez plusieurs fois sur la touche (5) pour sélectionner l'effet Moving Disc-Light, chaque pression correspondra à un
effet de lumière.
ANNONCE VOCALE
Appuyez sur la touche (7) de l'appareil ou de la télécommande et maintenez-la enfoncée pendant quelques secondes pour
activer/désactiver la voix de guidage (en anglais).
RADIO FM
1. Allumez l'appareil et sélectionnez la fonction RADIO (l'indication de la fréquence apparaît sur l'écran);
2. Appuyez sur la touche
et la mémorisation automatiques des stations (la radio lance une recherche automatique des stations de radio et les stocke
automatiquement dans la mémoire).
Le nombre de stations mémorisées dépend du signal radio dans votre région;
3. Une fois la recherche terminée, utilisez les touches (6) ou (8) de l'appareil, ou les touches 9/CH- (26) et :/CH+
(31) de la télécommande pour vous déplacer dans les présélections des stations mémorisées.
Remarque:
-
La réception FM dépend beaucoup de l'endroit où l'appareil est placé.
- La proximité de téléviseurs, lampes néon ou autres appareils électriques peut provoquer des interférences dans la
réception des programmes radio, dans ce cas éloignez l'appareil.
(11) de l'appareil ou sur la touche
/TWS
(32) de la télécommande pour lancer la recherche
FONCTION SANS FIL
1. Allumez l'appareil et appuyez sur le bouton (9) de l'appareil ou sur le bouton (30) de la télécommande et sélectionnez
la fonction sans fil, "BLUE" apparaîtra sur l'écran;
2. Le mot "BLUE" commence à clignoter sur l'écran et le système entre automatiquement en mode de recherche;
3. Activez la fonction sans fil sur l'appareil externe à appairer;
4. Lancez la recherche de l'appareil. Une fois la recherche terminée, sélectionnez l'appareil "XF 3600 PRO";
5. Saisissez le mot de passe "0000" si vous y êtes invité;
6. Appuyez sur le bouton
utilisez les boutons
sélectionner les pistes.
(11) de l'appareil ou sur le bouton
(6) ou (8) de l'appareil, ou les boutons 9/CH- (26) et :/CH+ (31) de la télécommande pour
/TWS
(32) de la télécommande pour démarrer la lecture,
FONCTIONNEMENT DE LA FONCTION TWS (Technologie True Wireless)
La technologie TWS permet à l’utilisateur d’établir une connexion sans fil entre deux haut-parleurs du même modèle compatibles
avec TWS. Dans la connexion TWS, deux haut-parleurs seront automatiquement regroupés pour former un système stéréophonique
qui sortira les canaux gauche et droit.
COMMENT ETABLIR
Remarque: Deux haut-parleurs doivent être du même modèle et tous deux compatibles avec TWS.
1. Désactivez la fonction sans fil du téléphone ou de l'autre appareil;
2. Allumez les deux haut-parleurs et sélectionnez le mode "Sans fil" sur les deux;
3. Appuyez sur le bouton (11) de l'appareil et maintenez-le enfoncé pendant quelques secondes (l'appairage TWS est activé, le
message "Slau" commence à clignoter sur l'écran) ; après quelques secondes, les deux haut-parleurs sont appariés (le message
"Slau" reste fixe);
4. Activez la connexion sans fil sur votre téléphone ou autre appareil ; recherchez et appairez l'appareil. Une fois la connexion
établie, il sera possible d'écouter de la musique avec le système d'enceintes stéréo TWS.
Les réglages effectués sur l'enceinte principale seront également effectués simultanément sur l'autre enceinte. Par exemple, le
réglage du volume, de la lecture et de la pause.
Remarque:
- Si les 2 haut-parleurs ne sont pas appariés, éteignez les deux appareils et répétez les étapes 1, 2 et 3.
- La fonction TWS ne fonctionne qu'entre des enceintes équivalentes ou avec d'autres enceintes utilisant le même microprocesseur
ou la même solution.
21
Page 22
FRANCAIS
XF 3600 PRO
ENTRÉE USB/SD
1. Allumer l'appareil;
2. Insérez une clé USB ou une carte Micro SD dans la fente USB ou SD (17 ou 16). La lecture démarre automatiquement;
3. Pour interrompre la lecture, appuyez sur le bouton
l'écran affichera "PAUS"; appuyez à nouveau sur le bouton pour reprendre la lecture;
4. Appuyez sur la touche (8) de l'appareil ou sur la touche :/CH+ (31) de la télécommande pendant l'écoute pour passer
à la piste suivante. Appuyez sur la touche (6) de l'appareil ou sur la touche 9/CH- (26) de la télécommande pour passer
aux pistes précédentes;
5. A l'aide du pavé numérique (29) de la télécommande, vous pouvez entrer directement le numéro de la chanson que vous voulez jouer;
6. Appuyez une fois sur le bouton (28) de la télécommande, l'écran affichera "ONE", pour lire en continu la même piste;
appuyez une deuxième fois, l'écran affichera "ALL" pour lire en continu toutes les chansons contenues dans l'USB/SD.
Remarque:
- Le lecteur peut ne pas prendre en charge certains périphériques USB/SD, en raison de l'incompatibilité de certains processeurs.
- Pour éviter les interférences nuisibles, connectez toujours les périphériques USB directement à l'appareil, n'utilisez pas de
rallonges.
- A partir de l'ordinateur, formatez la mémoire USB/SD en FAT (16 ou 32).
(11)
de l'appareil ou sur la touche/TWS
(32)
de la télécommande,
AUX-IN
1. Appuyez sur la touche (7) de l'appareil ou de la télécommande pour sélectionner la fonction "AUX";
2. onnectez un appareil équipé d'une sortie audio à l'entrée AUX (18) à l'aide d'un câble de 3,5 mm;
3. Utiliser l'appareil externe à par tir de ses commandes.
UTILISATION DU MICROPHONE SANS FIL
1. Retirez le couvercle situé à l'arrière du microphone, insérez 2 piles de taille "AA" en respectant la polarité indiquée et refermez
le couvercle;
2. Allumez le microphone en actionnant l'interrupteur vers le haut;
3. Régler le volume en tournant le bouton MIC VOL (4);
4. Si l'indicateur d'alimentation clignote lorsque le microphone est allumé, les piles sont faibles, remplacez-les immédiatement.
Remarque:
- La distance de réception du microphone sans fil est d'environ 15 mètres sans obstacles, ne pas utiliser à de plus grandes
distances.
- Si plusieurs microphones sans fil sont utilisés dans la même pièce en même temps, ils doivent être réglés sur des fréquences
différentes et doivent être conservés à au moins 30 mètres.
- Ne placez pas l'appareil trop près des lecteurs DVD/CD/VCD car ils ont des fréquences susceptibles d'affecter le microphone.
LIMITATIONS D'UTILISATION POSSIBLES
- Cet appareil peut fonctionner sur des fréquences non autorisées dans la région où se trouve l'utilisateur. Nous vous recommandons de contacter les autorités compétentes et de demander les informations nécessaires concernant les fréquences
autorisées dans votre région pour les systèmes de microphone sans fil. Dans certains cas, une licence ministérielle peut être
requise pour l'utilisation de cet appareil. Pour d'éventuelles exigences, contactez les autorités compétentes. L'utilisateur assume
la responsabilité exclusive de l'acquisition de la licence des radio-microphones et la licence dépend de la classification et de
l'application de l'utilisateur et de la fréquence choisie. (Décret législatif 269/2001 art.6 paragraphe 3). Les fréquences utilisées
par ce produit sont autorisées uniquement sur le territoire italien et peuvent ne pas être utilisables dans d'autres pays. Il est
recommandé de contacter les autorités compétentes et de demander les informations pertinentes.
Pays européens pour lesquels le produit a des restrictions:
Estonie: MISE EN ŒUVRE LIMITÉE
Finlande: MISE EN ŒUVRE LIMITÉE
France: MISE EN ŒUVRE LIMITÉE
Grèce: MISE EN ŒUVRE LIMITÉE
EE FI FR
Lituanie: MISE EN ŒUVRE LIMITÉE
Pologne: MISE EN ŒUVRE LIMITÉE
EL LT PL
Espagne: MISE EN ŒUVRE LIMITÉE
ES
22
Page 23
FRANCAIS
XF 3600 PRO
ENREGISTREMENT DE LA VOIX
Cet appareil est capable d'enregistrer sur la mémoire USB ou SD la partie vocale lorsque vous utilisez le microphone fourni. Dans la
mémoire USB, l'appareil crée automatiquement un dossier appelé "Record" dans lequel il stocke tous les fichiers d'enregistrement.
1. Allumez l'appareil;
2. Insérez une mémoire USB ou une carte SD dans la prise;
3. Sélectionner la fonction USB ou SD à l'aide du bouton (7) de l'appareil ou de la télécommande;
4. Appuyez sur le bouton (3)de l'appareil ou sur le bouton REC (24) de la télécommande pour commencer l'enregistrement,
l'indication de l'heure apparaîtra sur l'écran;
5. Appuyez à nouveau sur le bouton (3) de l'appareil ou sur le bouton REC (24) de la télécommande pour arrêter l'enregistrement.
Remarque:
- E 'peut enregistrer uniquement la voix.
- Lorsque vous activez le "Record" fonctionnalité certains des contrôles de l'appareil sont inhibées, y compris le réglage du
volume de la télécommande, ils reprendront leur fonction normale lorsque l'enregistrement cesse.
DÉPANNAGE
Si un problème se produit, suivez les étapes dans le tableau suivant.
Si le problème ne peut être résolu, contactez votre revendeur.
Problème Causes possibles Solution
Aucun son lorsque l'appareil est
en marche.
Distorsion du son. 1. Volume trop élevé.
Aucun son du microphone. 1. La prise de microphone ne peut pas être
Pas de son lorsque vous insérez
un périphérique USB/SD carte.
Vous ne pouvez pas charger
la batterie ou la batterie a un
court-terme.
Les haut-parleurs que vous
entendez des bruits forts.
1. Sans Source sonore.
2. Manopola Volume au niveau 0.
3. Voce off Guide.
4. Nessun Dispositif SD/USB connecté.
2. Errore Fichiers audio.
correctement connecté.
2. Le contacteur d'allumage sur le
microphone peut être en position "off".
3. Volume du microphone de basse.
1. Format de fichier non pris en charge.
2. USB/SD carte est pas correctement
connecté.
1. Branchez le cordon d'alimentation pour
recharger.
2. La batterie est pas complètement
chargée.
3. La batterie peut avoir exécuter son cycle
de vie.
1. Microphone sur mais trop près.
2. Microphone sur mais non utilisés.
3. Volume du microphone peut être trop
élevé.
4. Une cellule est utilisé trop près.
5. équipements sans fil peut être très
proche de ceux qui utilisent le
microphone.
1. Connectez un appareil à la prise AUX-IN.
2. Réglez le volume.
3. Attivare le guidage vocal.
4. Connecter USB/SD Carte, jouer MP3.
1. Baissez le volume.
2. Vérifier et lire un autre fichier audio.
1. Assurez-vous que le microphone est
correctement branché.
2. Allumez le microphone.
3. Réglez correctement le volume du
microphone.
1. Le format de fichier audio doit être MP3.
2. Connectez le périphérique USB/SD carte
correctement.
1. Vérifiez si le câble d'alimentation est
correctement connecté.
2. Normalement, il prend 6-8 heures pour
charger complètement la batterie.
3. Remplacez la pile par une nouvelle avec
les mêmes spécifications techniques.
1. Tenez le microphone à 2 mètres du
haut-parleur.
2. Éteignez le microphone si non utilisé.
3. Abaisser le volume du microphone.
4. Gardez le téléphone de haut-parleur
pendant un appel.
5. Gardez le haut-parleur loin de
périphériques sans fil.
23
Page 24
XF 3600 PROFRANCAIS
NOTE D'INFORMATION SUR LE RETRAIT ET ÉLIMINATION DES BATTERIES
Les piles usagées ne doivent pas être jetés avec les déchets ménagers ou jetés dans le feu ou l'eau. Les batteries usagées doivent
être recyclés ou éliminés dans les centres de collecte de déchets séparés.
RETRAIT DE LA BATERIE
Attention: Seul le personnel de haute qualifié doit effectuer cette opération!
L'appareil ne doit pas être branché à la prise de courant lors de l'exécution de cette opération!
1. Retirez les vis qui serrent le panneau du logement de la batterie (panneau métallique inférieur);
2. Retirez le panneau métallique et localisez la batterie;
3. Déconnectez la batterie et retirez-la;
4. Remplacer la batterie par une batterie ayant les mêmes caractéristiques et la même capacité.
Recommandations pour l’élimination correcte du produit
Le symbole figurant sur l’appareil indique que le produit fait l’objet d’une “collecte séparée“. C’est pourquoi, le produit ne doit
pas être éliminé avec les déchets urbains.
L’utilisateur doit remettre le produit auprès de “décharges spécialisées de collecte séparée“ prévues par les autorités locales, ou
bien le rendre au revendeur quand il achètera un nouvel appareil équivalent.
La collecte séparée du produit et les opérations successives de traitement, recyclage et élimination favorisent la production
d’appareils composés par des matériaux recyclés ainsi que permettent d’éviter des effets négatifs sur l’environnement et sur la
santé des personnes suite à une gestion impropre du déchet.
Toute élimination abusive du produit entraîne l’application de sanctions administratives.
CARACTÉRISTIQUES
Alimentation: ........................................................ 100-240V 50/60Hz
batterie interne rechargeable au lithium 12,8V 8A
Consommation: ............................................................................ Max 100W
Power Audio Maximum: .................................................................................... 200W
Bande de fréquence FM: ............................................................... 87,5MHz - 108MHz
Température de fonctionnement: ............................................................................. 0° ~ 40°C
Réponse en fréquence: ........................................................................ 40Hz - 20KHz
S/N: ................................................................................. >68dB
Transmission de puissance max Bluetooth: ................................................................... 0,8mW
Transmission de bande Bluetooth: ................................................................................ 2,4GHz
Fréquence du microphone sans fil: ........................................................................... 668,5MHz
Dimensions: ................................................................ 380x 350x 860mm
Poids: ................................................................................. 18,5 Kg
24
Page 25
XF 3600 PRODEUTSCH
GEBRAUCHSHINWEISE
Dieses Gerät ist ein elektronisches Instrument höchster Präzision. Die Inbetriebnahme des Geräts sollte daher in den folgenden
Fällen vermieden werden:
• In der Nähe von Wärmequellen wie Heizkörpern und Öfen.
• Das Hören einer hohen Lautstärke für eine lange Zeit kann Ihr Gehör schädigen.
• Schließen Sie das Ohr nicht auf den Lautsprecher während der Schritteinstellung und der Lautstärkeregelung und halten Sie
die Lautstärke insbesondere bei der Zündung fest.
• In sehr feuchten Räumen wie Badezimmern, Schwimmbädern usw.
• In sehr staubigen Räumen.
• An Orten, die starken Schwingungen ausgesetzt sind.
• Das Gerät sollte so aufgestellt werden, dass an den Seiten jeweils genügend Raum verbleibt, um eine freie Luftzirkulation zu
ermöglichen (mindestens 5 cm).
• Die Ventilationsöffnungen dürfen nicht abgedeckt werden.
• Sollten Flüssigkeiten ins Innere des Geräts eindringen, den Stecker von der Steckdose unmittelbar abziehen und sich an die
nächstgelegene autorisierte TREVI-Kundendienststelle wenden.
• Vor dem Einschalten des Geräts ist sicherzustellen, dass Netzkabel und Anschlusskabel korrekt installiert sind.
• Das Gerät darf nicht mit Wasser oder Spritzwasser ausgesetzt werden. Keine Gegenstände, die mit Flüssigkeit gefüllt ist, wie
Vasen, auf das Gerät gestellt werden.
• Keine offenen Flammen, wie brennende Kerzen, platziert werden.
• Das Netzteil muss an eine Steckdose in der Nähe des Geräts angeschlossen und leicht zugänglich sein.
• Wenn Sie eine anhaltende Hitze am Gerät oder Netzteil bemerken, ziehen Sie den Stecker sofort aus der Hauptsteckdose.
• Ziehen Sie nicht am Netzkabel.
• In diesem Handbuch halten.
HINWEISE FÜR DEN KORREKTEN GEBRAUCH DER AUFLADBAREN BATTERIE
- Laden Sie den Akku bei einer Umgebungstemperatur zwischen 5°C und 35°C auf.
- Laden Sie den Akku nicht länger als nötig auf, um das Risiko einer Überhitzung und eines Berstens zu vermeiden.
- Das Aufladen über einen unzureichenden Zeitraum oder eine lange Zeit der Inaktivität kann die Lebensdauer des Akkus verkürzen.
- Der Akku unterliegt einer gewissen Abnutzung und seine Leistung nimmt allmählich ab.
- Vermeiden Sie es, den Akku über Nacht aufzuladen.
PFLEGE UND WARTUNG
Für die Reinigung wird die Verwendung eines leicht angefeuchteten, weichen Tuchs empfohlen. Der Einsatz von Lösungsmitteln
oder scheuernden Substanzen sollte vermieden werden.
WICHTIG
Dieses Gerät ist für den Heimgebrauch (nicht professionellen Gebrauch). Der fachgemäße Bau dieses Geräts gewährleistet langfristig
einen einwandfreien Betrieb. Sollten dennoch Betriebsstörungen auftreten, wenden Sie sich bitte an nächstgelegene autorisier te
TREVI-Kundendienststelle.
Die Firma TREVI verfolgt eine Politik ständiger Forschung und Weiterentwicklung. Die Produkte können daher andere als die
beschriebenen Eigenschaften aufweisen.
Um mögliche Hörschäden zu vermeiden, begrenzen die Höhe der Zeit bei hohen Lautstärke hören
STANDORT DER KONTROLLE
1. Mikrofon-Echo
2. Gitarre VOLUME
3. Taste, REC-Funktion
4. Mikrofon VOLUME
5. Taste, LED-Licht
6. Taste, PREV
7. Taste, MODE
8. Taste, NEXT
9. Taste, Wireless-Funktion
10. VOLUME-Regler
11. Taste, PLAY(pause)/TWS
12. Taste, Mikrofonpriorität
25
Page 26
DEUTSCH
MUTE
REC
EQ
0
1
2
3
4
5
6
7
8
9
TWS
XF 3600 PRO
13. TREBLE-Regler
14. BAS S-Regler
15. POWER ON/OFF-Taste
16. Micro SD-Steckplatz
17. USB -Anschluss
18. AUX IN-Buchse
1
2
3
19. Mikrofonbuchse-1
14
20. Mikrofonbuchse-2
21. Gitar reneingang
13
12
22. Netzsteckdose 230V 50Hz.
11
4
17 18 19 20 21 22
5106 7 8 9
16
FERNBEDIENUNG
23
24
25
26
27
28
29
15
34
33
32
31
30
23. Taste, Power ON/ Stand-by
24. REC-Taste, (drücken, um die Aufnahme zu starten. Erneut drücken, um die
Aufnahme zu stoppen)
25. VOL+ -Taste
26. 9/CH-Taste, Vorheriger Song/CH-
27. VOL- Taste
28. Taste, Einzelwiederholung/ Alles wiederholen
29. Ziffer ntasten
30. EQ Sound Mode Taste (POP/ ROCK/ JAZZ/ CLASSIC/ FLAT)
31. :/CH+ Taste, Nächster Song/CH+
32. /TWS -Taste, Wiedergabe/Pause/TWS
33. Taste, Modusfunktion (Auswahl zwischen AUX/USB/SD/Wireless)
34. MUTE-Taste
26
Page 27
DEUTSCH
XF 3600 PRO
Einsetzen der Batterien:
Den Deckel im hinteren Bereich der Fernbedienung entfernen, die beiden AAA-Batterien unter Beachtung der richtigen Polarität
einlegen und den Deckel wieder schließen.
TRANSPORT
Verwenden Sie zum Transport den oberen Griff, klappen Sie das Gerät leicht zusammen und verwenden Sie die beiden Hinterräder.
GRUNDFUNKTIONEN
EINSCHALTEN/AUSSCHALTEN
- Drehen Sie den POWER-Schalter (15) auf die Position "1" (ON), um das Gerät mit seinem internen Akku einzuschalten und zu verwenden.
- Drehen Sie den POWER-Schalter (15) in die Position "0" (OFF), um das Gerät vollständig auszuschalten.
AUFLADEN DES AKKUS
- Stellen Sie den POWER-Schalter (15) in die Position "0" (AUS) und schließen Sie das Netzkabel an die Steckdose (22) an, um
den Akku aufzuladen; die Segmente des Akkusymbols auf dem Display beginnen zu blinken.
- Warten Sie, bis alle drei Segmente durchgehend leuchten, bevor Sie das Gerät ausstecken.
Um die Lebensdauer des Akkus zu verlängern, empfiehlt es sich, das Netzkabel nach maximal 15 Stunden Ladezeit zu trennen.
Achtung!
- Schließen Sie das Gerät nicht an Steckdosen mit einer anderen als der angegebenen Spannung an.
- Bei längerer Inaktivität muss die Batterie regelmäßig (mindestens einmal im Monat) aufgeladen werden.
BEREITHALTEN
Sie können das System mit der Taste (23) auf der Fernbedienung in den Standby-Modus schalten; zwei Segmente auf dem
Display zeigen die Aktivierung der Standby-Funktion an.
Drücken Sie die Taste erneut, um das Gerät einzuschalten.
MODUS EINSTELLUNG FUNKTION
Um die Modus Funktion zu ändern, drücken Sie mehr 'mal die -Taste (7) auf dem Gerät oder von der Fernbedienung zu wählen:
Drahtlos (das Display zeigt BLAU), USB/SD (nur wenn die USB-Buchse (17)/Micro SD (16) mit einem Speicher verbunden ist,
zeigt das Display für einige Sekunden "USB" oder "SD"), AUX-IN (das Display zeigt "AUX").
EINSTELLEN DER LAUTSTÄRKE
1. Drehen Sie den VOLUME-Regler (10), um die Gesamtlautstärke der Wiedergabe einzustellen, oder verwenden Sie die Tasten
(27) und (25) auf der Fernbedienung;
2. Drehen Sie den VOL- MIC-Regler (7), um die Signallautstärke an den Eingängen MIC1 und MIC2 einzustellen. Die Einstellung
wirkt sich auf beide Eingänge gleichzeitig aus.
EQUALIZER
Dieses Gerät verfügt über ein System von voreingestellten Audio-Entzerrungen. Drücken Sie mehrmals die Taste EQ (30) auf der
Fernbedienung, um eine der 6 verfügbaren Audio-Entzerrungen auszuwählen, die am besten zur aktuellen Tonwiedergabe passt.
EINSTELLUNG DER HÖHEN UND BÄSSE
Drehen Sie den BASS-Regler (14), um die Basstöne einzustellen, siehe die + und - Zeichen zum Erhöhen oder Verringern.
Drehen Sie den TREBLE-Regler (13), um die hohen Töne einzustellen, siehe die + und - Zeichen zum Erhöhen oder Verringern.
MIKROFON-ECHOEFFEKT
Drehen Sie den ECHO-Regler (1), um den Echo-Effekt des Mikrofons einzustellen; beachten Sie die + und - Zeichen, um ihn zu
erhöhen oder zu verringern.
Hinweis: Der Echoeffekt wirkt nur auf die Mikrofoneingänge.
27
Page 28
DEUTSCH
XF 3600 PRO
DISCO-LICHTEFFEKTE
Drücken Sie mehrmals auf die Taste (5), um den Effekt "Moving Disc-Light" auszuwählen; jeder Druck entspricht einem Lichteffekt.
SPRACHANSAGE
Halten Sie die Taste (7) am Gerät oder auf der Fernbedienung einige Sekunden lang gedrückt, um die Sprachansage (in
Englisch) zu aktivieren/deaktivieren.
FM-RADIO
1. Schalten Sie das Gerät ein und wählen Sie die RADIO-Funktion (die Frequenzanzeige erscheint auf dem Display);
2. Drücken Sie die Taste (11) am Gerät oder die Taste/TWS
Sendersuche und -speicherung zu starten (das Radio startet eine automatische Suche nach Radiosendern und speicher t sie
automatisch).
Die Anzahl der gespeicherten Sender hängt vom Radiosignal in Ihrem Gebiet ab;
3. Sobald der Suchlauf abgeschlossen ist, verwenden Sie die Tasten (6) oder (8) am Gerät oder die Tasten 9/CH- (26)
und :/CH+ (31) auf der Fernbedienung, um durch die gespeicherten Sender zu gehen..
Notiz:
-
Der UKW-Empfang hängt stark vom Standort des Geräts ab.
- Die Nähe von Fernsehgeräten, Neonlampen oder anderen Elektrogeräten kann den Empfang von Radioprogrammen
stören, in diesem Fall entfernen Sie das Gerät.
(32) auf der Fernbedienung, um die automatische
DRAHTLOSE FUNKTION
1. Schalten Sie das Gerät ein und drücken Sie die am Gerät oder die Taste (30) auf der Fernbedienung und wählen Sie
die drahtlose Funktion, "BLUE" erscheint auf dem Display;
2. Das Wort "BLUE" beginnt auf dem Display zu blinken und das System wechselt automatisch in den Suchmodus;
3. Aktivieren Sie die Wireless-Funktion am zu koppelnden externen Gerät;
4. Starten Sie die Gerätesuche. Wenn die Suche beendet ist, wählen Sie das Gerät "XF 3600 PRO";
5. Geben Sie das Passwort "0000" ein, wenn Sie dazu aufgefordert werden;
6. Drücken Sie die Taste (11) am Gerät oder die Taste/TWS
starten; verwenden Sie die
Fernbedienung, um Titel auszuwählen.
Tasten (6) oder (8) am Gerät oder die Tasten 9/CH- (26) und :/CH+ (31) auf der
(32) auf der Fernbedienung, um die Wiedergabe zu
TWS FUNKTIONSBETRIEB (Wireless Stereo Technologie)
Mithilfe der TWS-Technologie kann der Benutzer eine drahtlose Verbindung zwischen zwei Lautsprechern herstellen, die das gleiche
Modell aufweisen und mit TWS kompatibel sind. Bei einer TWS-Verbindung werden zwei Lautsprecher automatisch zu einem StereoLautsprechersystem zusammengefasst, das den linken und rechten Kanal ausgibt.
WIE MAN EINSTELLT
Hinweis: Zwei Lautsprecher müssen dasselbe Modell sein und beide mit TWS kompatibel sein.
1. Deaktivieren Sie die Drahtlosfunktion des Telefons oder anderen Geräts;
2. Schalten Sie beide Lautsprecher ein und wählen Sie an beiden den Modus "Drahtlos";
3. Halten Sie die Taste (11) am Gerät einige Sekunden lang gedrückt (TWS-Pairing wird aktiviert, "Slau" beginnt auf dem
Display zu blinken), nach einigen Sekunden sind die beiden Lautsprecher gekoppelt (die Anzeige "Slau" bleibt konstant);
4. Aktivieren Sie die drahtlose Verbindung auf Ihrem Telefon oder einem anderen Gerät; suchen Sie das Gerät und verbinden Sie
es. Nach der Verbindung können Sie mit dem TWS-Stereolautsprechersystem Musik abspielen.
Anpassungen am Hauptlautsprecher werden gleichzeitig auch am anderen Lautsprecher vorgenommen. Zum Beispiel die Einstellung
der Lautstärke, der Wiedergabe und der Pause.
Hinweis:
- Wenn die beiden Lautsprecher nicht gekoppelt sind, schalten Sie beide Geräte aus und wiederholen Sie die Schritte 1, 2 und 3.
- Die TWS-Funktion funktioniert nur zwischen gleichen Lautsprechern oder mit anderen Lautsprechern, die denselben Mikroprozessor oder dieselbe Lösung verwenden.
SPIELEN SIE AUF INPUT USB/SD
1. Schalten Sie das Gerät ein;
2. Stecken Sie einen USB-Speicher oder eine Micro-SD-Kar te in den USB- oder SD-Steckplatz (17 oder 16). Die Wiedergabe
beginnt automatisch;
28
Page 29
DEUTSCH
XF 3600 PRO
3. Um die Wiedergabe zu unterbrechen, drücken Sie die Taste
dienung; auf dem Display wird "PAUS" angezeigt;
4. Drücken Sie während der Wiedergabe die Taste (8) am Gerät oder die Taste :/CH+ (31) auf der Fernbedienung, um
zum nächsten Titel zu wechseln. Drücken Sie die Taste (6) am Gerät oder die Taste 9/CH- (26) auf der Fernbedienung,
um zu den vorherigen Titeln zu wechseln;
5. Über den Ziffernblock (29) der Fernbedienung können Sie direkt die Nummer des gewünschten Titels eingeben;
6. Drücken Sie einmal die Taste (28) auf der Fernbedienung, auf dem Display wird "ONE" angezeigt, um denselben Titel
kontinuierlich abzuspielen; drücken Sie sie ein zweites Mal, auf dem Display wird "ALL" angezeigt, um alle Titel auf dem USB/
SD-Speicher kontinuierlich abzuspielen.
Hinweis:
- Der Spieler kann keine Unterstützung für einige USB-Geräte, ist dies aufgrund der Unvereinbarkeit von einigen Prozessoren.
- Zur Vermeidung funktechnischer Störungen, immer eine Verbindung USB-Geräte direkt an das Gerät, verwenden Sie keine
Verlängerungskabel.
- Vom Computer auf den USB-Speicher/SD FAT (16 oder 32) zu formatieren.
(11)
am Gerät oder die Taste/TWS
(32)
auf der Fernbe-
AUX-IN
1. Drücken Sie die Taste (7) am Gerät oder auf der Fernbedienung und wählen Sie die Funktion "AUX";
2. Schließen Sie ein beliebiges Gerät, das mit einem Audioausgang ausgestattet ist, über ein 3,5-mm-Klinkenkabel an den AUX-
Eingang (18) an;
3. Verwenden Sie das externe Gerät von ihren Befehlen.
VERWENDUNG DES DRAHTLOSEN MIKROFONS
1. Nehmen Sie die Abdeckung auf der Rückseite des Mikrofons ab, legen Sie 2 Batterien der Größe "AA" ein und schließen Sie
die Abdeckung, wobei Sie auf die angegebene Polarität achten müssen;
2. Schalten Sie das Mikrofon mit dem Schalter nach oben ein.
3. Stellen Sie die Lautstärke durch Drehen des MIC VOL-Knopfes (4) ein;
4. Wenn die Betriebsanzeige beim Einschalten des Mikrofons blinkt, sind die Batterien schwach, ersetzen Sie sie sofort.
Hinweis:
- Die Empfangsentfernung des Funkmikrofons beträgt ca. 15 Meter ohne Hindernisse, nicht in größerer Entfernung verwenden.
- Wenn mehrere Funkmikrofone gleichzeitig im selben Raum verwendet werden, sollten sie auf unterschiedliche Frequenzen
eingestellt und mindestens 30 Meter entfernt sein.
- Stellen Sie das Gerät nicht zu nahe an DVD/CD/VCD-Playern auf, da diese Frequenzen haben, die das Mikrofon beeinträchtigen können.
BENUTZUNGSBESCHRÄNKUNGEN
- Dieses Gerät kann bei nicht autorisierten Frequenzen in der Region betrieben werden, in der sich der Benutzer befindet. Es
wird empfohlen, dass Sie sich mit den zuständigen Behörden in Verbindung setzen und die Informationen anfordern, die für
die in Ihrer Region zugelassenen Frequenzen für Funkmikrofonsysteme relevant sind. In einigen Fällen kann eine ministerielle
Lizenz für die Verwendung dieses Gerätes erforderlich sein. Bitte wenden Sie sich an die zuständigen Behörden. Der Benutzer
übernimmt die ausschließliche Verantwortung für den Erwerb der Lizenz für das Funkmikrofon und die Lizenzfähigkeit hängt
von der Einstufung und Anwendung e des Benutzers und der gewählten Frequenz ab. Die von diesem Produkt verwendeten
Frequenzen sind in einigen Ländern möglicherweise nicht verwendbar. Es wird empfohlen, dass Sie sich an die zuständigen
Behörden wenden und die entsprechenden Informationen anfordern.
EU-Länder, für die das Produkt Beschränkungen hat:
Estland: BEGRENZTE UMSETZUNG.
Finnland: BEGRENZTE UMSETZUNG.
Frankreich: BEGRENZTE UMSETZUNG.
Griechenland: BEGRENZTE UMSETZUNG.
EE FI FR
Litauen: BEGRENZTE UMSETZUNG.
EL LT PL
Polen: BEGRENZTE UMSETZUNG.
Spanien: BEGRENZTE UMSETZUNG.
ES
29
Page 30
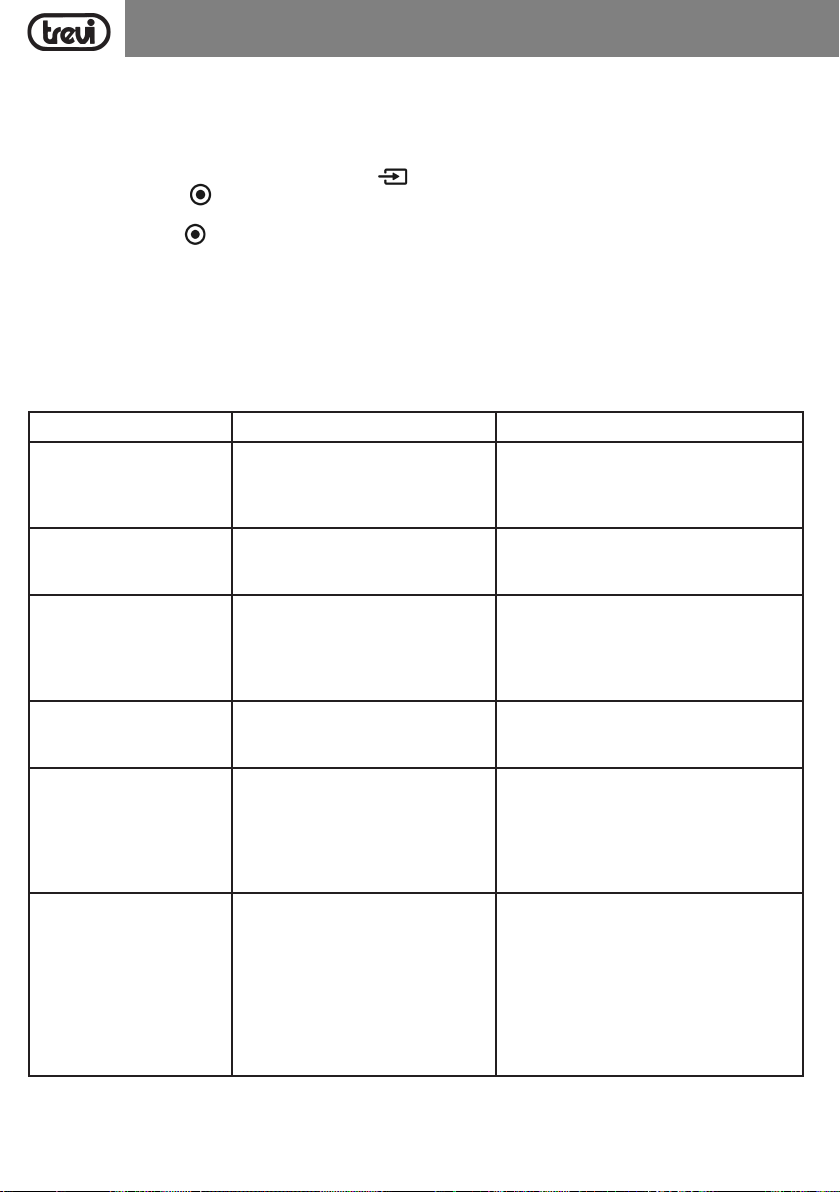
DEUTSCH
XF 3600 PRO
SPRACHAUFZEICHNUNG
Dieses Gerät kann die Stimme auf dem USB- oder SD-Speicher aufzeichnen, wenn Sie das mitgelieferte Mikrofon verwenden. Im
USB-Speicher erstellt das Gerät automatisch einen Ordner mit dem Namen "Record", in dem alle Aufnahmedateien gespeichert werden.
1. Schalten Sie das Gerät ein;
2. Stecken Sie einen USB-Speicher oder eine SD-Karte in den Anschluss;
3. Wählen Sie die USB- oder SD-Funktion über die Taste (7) am Gerät oder über die Fernbedienung;
4. Drücken Sie die Taste (3) am Gerät oder die REC-Taste (24) auf der Fernbedienung, um die Aufnahme zu starten; die
Zeitanzeige erscheint auf dem Display;
5. Drücken Sie die Taste (3) am Gerät oder die REC-Taste (24) auf der Fernbedienung erneut, um die Aufnahme zu beenden.
Hinweis:
- Sie können nur die Stimme aufnehmen.
- Die Aufnahme-Funktion können einige USB-Geräte nicht unterstützt, ist dies aufgrund der Unverträglichkeit von einigen
Prozessoren.
FEHLERBEHEBUNG
Wenn ein Problem auftritt, führen Sie die Schritte in der folgenden Tabelle.
Wenn das Problem nicht behoben werden kann, kontaktieren Sie Ihren Händler.
Problem Mögliche Ursachen Lösung
Kein Ton, wenn das Gerät eingeschaltet ist.
Verzerrter Ton. 1. Die Lautstärke ist zu hoch.
Kein Ton aus dem Mikrofon. 1. Die Mikrofonbuchse kann nicht richtig
Kein Ton, wenn Sie ein USBGerät/SD-Karte einsetzen.
Kann nicht den Akku laden oder
die Batterie hat eine kurzfristige.
Die Lautsprecher hören Sie laute
Geräusche.
1. Keine Quelle Ton.
2. Lautstärkeregler auf Stufe 0.
3. Artikel aus Führungs.
4. Keine SD/USB-Gerät angeschlossen.
2. Dateifehler Audio.
angeschlossen werden.
2. Das Zündschloss am Mikrofon kann
in Stellung "Aus" sein.
3. Lautstärke des Bass-Mikrofon.
1. Dateiformat wird nicht unterstützt.
2. USB/SD-Karte ist nicht richtig
angeschlossen.
1. Schließen Sie das Netzkabel zum
Aufladen.
2. Die Batterie ist nicht vollständig
geladen.
3. Die Batterie kann haben seinen
Lebenszyklus laufen.
1. Mikrofon auf, aber zu nah.
2. Mikrofon auf, aber nicht verwendet.
3. Lautstärke des Mikrofons kann zu
hoch sein.
4. Eine Zelle verwendet wird, zu nahe an.
5. Drahtlose Geräte können zu denen
sehr nahe sein, die das Mikrofon
verwenden.
1. Schließen Sie ein Gerät an den AUX-IN.
2. Stellen Sie die Lautstärke.
3. Aktivieren Sie die Sprachführung.
4. Verbinden Sie USB/SD-Karte, spielen MP3.
1. Drehen Sie die Lautstärke.
2. Überprüfen Sie und spielen eine andere Datei
Audio.
1. Stellen Sie sicher, dass das Mikrofon richtig
angeschlossen ist.
2. Schalten Sie das Mikrofon.
3. richtig einstellen Die Lautstärke des
Mikrofons.
1. Die Audio-Dateiformat muss MP3 sein.
2. Verbinden Sie das USB/SD-Karten-Gerät
richtig.
1. Überprüfen Sie, ob das Netzkabel richtig
angeschlossen ist.
2. Normalerweise dauert es 6-8 Stunden
vollständig um die Batterie aufzuladen.
3. Setzen Sie die alte Batterie durch eine neue
mit den gleichen technischen Spezifikationen.
1. Halten Sie das Mikrofon zu 2 Meter entfernt
vom Lautsprecher.
2. Schalten Sie das Mikrofon, wenn nicht
verwendet.
3. Senken Sie die Lautstärke des Mikrofons.
4. Halten Sie das Telefon aus dem Lautsprecher
entfernt, während Sie einen Anruf tätigen.
5. Halten Sie den Lautsprecher weg von
Wireless-Geräten.
30
Page 31
XF 3600 PRODEUTSCH
INFORMATIONEN ZUR ENTFERNUNG UND ENTSORGUNG VON BATTERIEN
Verbrauchte Batterien gehören nicht in den Hausmüll entsorgt werden oder in Feuer oder Wasser geworfen. Gebrauchte Batterien
müssen recycelt oder in separaten Sammelstellen entsorgt werden.
BATTERIE AUSBAUEN
Achtung: Nur qualitativ qualifiziertes Personal darf diese Operation durchzuführen!
Das Gerät darf nicht an die Netzsteckdose angeschlossen werden um diesen Vorgang auszuführen!
1. Entfernen Sie die Schrauben, mit denen das Batteriegehäuse (untere Metallplatte) befestigt ist;
2. Entfernen Sie die Metallplatte und suchen Sie die Batterie;
3. Klemmen Sie die Batterie ab und nehmen Sie sie heraus;
4. Ersetzen Sie die Batterie durch eine Batterie mit den gleichen Eigenschaften und der gleichen Kapazität.
Hinweise zur ordnungsgemäßen Entsorgung des Produkts
Das auf dem Gerät angebrachte Symbol weist darauf hin, dass das Altgerät “getrennt zu sammeln” ist und das Produkt daher
nicht zusammen mit dem Gemeindeabfall entsorgt werden darf. Der Benutzer muss das Produkt zu den entsprechenden, von der
Gemeindeverwaltung eingerichteten “Wertstoffsammelstellen” bringen oder dem Händler beim Kauf eines neuen Produkts übergeben. Die getrennte Müllsammlung und anschließende Aufbereitung, Wiederverwer tung und Entsorgung fördern die Herstellung
von Geräten unter Verwendung wiederverwerteter Materialien und vermindern die negativen Auswirkungen auf die Umwelt und
Gesundheit in Folge einer falschen Müllverwaltung.
Die widerrechtliche Entsorgung des Produkts führt zur Auferlegung von Verwaltungsstrafen.
TECHNISCHE DATEN
Stromversorgung: ........................................................ 100-240V 50/60Hz
Verbrauch: ............................................................................ Max 100W
Maximale Audio-Leistungs: .................................................................................... 200W
FM-Frequenzband: ............................................................... 87,5MHz - 108MHz
Betriebstemperatur: ............................................................................. 0° ~ 40°C
Frequenzgang: ........................................................................ 40Hz - 20KHz
S/N-Verhältni: ................................................................................. >68dB
Sendeleistung max Bluetooth: .................................................................................. 0,8mW
Band Übertragung Bluetooth: .................................................................................. 2,4GHz
Drahtloses Mikrofon Frequenz: .............................................................................. 668,5MHz
Größe: ................................................................ 380x 350x 860mm
Gewicht: ................................................................................. 18,5 Kg
interne wiederaufladbare Lithium-Batterie 12,8V 8A
31
Page 32
ESPANOL
XF 3600 PRO
NOTAS PARA EL USO
Este aparato es un instrumento electrónico de alta precisión; por lo tanto debe evitar utilizarlo en los siguientes casos:
• Cerca de fuertes fuentes de calor como caloríferos y estufas.
• Escuchar un volumen alto durante mucho tiempo podría dañar su audición.
• No cierre el oído al altavoz durante el ajuste por pasos y los ajustes de volumen y, en particular, mantenga el volumen bajo en
el encendido.
• En lugares muy húmedos como cuartos de baño, piscinas, etc.
• En lugares muy polvorientos.
• En lugares sujetos a fuertes vibraciones.
• Posicione el aparato de manera que el espacio circundante sea amplio para la libre circulación del aire (por lo menos 5 cm).
• No obstruya las ranuras de ventilación.
• Si penetran líquidos dentro del aparato, desconecte inmediatamente el enchufe de la toma de corriente y lleve el aparato al
centro de asistencia autorizado TREVI más cercano.
• Siempre compruebe que los cables de alimentación y de conexión estén instalados correctamente antes de encender el aparato.
• El aparato no debe exponerse a goteos o salpicaduras de agua. Los objetos que contengan líquidos, como floreros, debe ser
colocado en la unidad.
• No hay fuente de llamas, como una vela encendida, se deben colocar en.
• El adaptador de corriente debe estar conectado a una toma de corriente cercana al dispositivo y debe ser fácilmente accesible.
• Si nota calor excesivo en el dispositivo o adaptador de corriente, desconecte el enchufe de la toma de corriente principal de
inmediato.
• No tire del cable de alimentación.
• Mantenga este manual.
ADVERTENCIA PARA LA CORRECTA UTILIZACIÓN DE LA BATERÍA RECARGABLE
- Recargue la batería a una temperatura de entre 5°C y 35°C.
- No la recargue durante más tiempo del adecuado para evitar el riesgo de sobrecalentamiento y explosión.
- Recargar la batería durante un período inadecuado o un largo período de inactividad puede acortar su vida útil.
- La batería recargable está sujeta a desgaste y su rendimiento disminuirá gradualmente.
- Evite recargar la batería durante la noche.
CUIDADO Y MANTENIMIENTO
Para efectuar la limpieza se aconseja utilizar un paño suave, ligeramente humedecido. Evite solventes o sustancias abrasivas.
IMPORTANTE
Este dispositivo está diseñado para uso doméstico (uso no profesional). La buena construcción del aparato garantiza su perfecto
funcionamiento durante mucho tiempo. Si se presentase algún inconveniente, será oportuno consultar al Centro de Asistencia
autorizado TREVI más cercano.
TREVI cultiva una política de investigación y desarrollo continuos. Por consiguiente, los productos pueden presentar características
distintas a las descritas.
Para evitar posibles daños a la audición, limitar la cantidad de tiempo de escucha a un volumen alto
DESCRIPCIÓN DE LOS CONECTORES/MANDOS
1. Eco del micrófono
2. VOLUMEN Guitarra
3. Botón , función REC
4. VOLUMEN del micrófono
5. Botón , Luz LED
6. Botón , PREV
7. Botón , MODE
8. Botón , NEXT
9. Botón , Función inalámbrica
10. Control de VOLUMEN
11. Botón , PLAY(pausa)/TWS
12. Botón , Prioridad del micrófono
13. Control de AGUDOS
14. Control de GRAVES
15. Botón POWER ON/OFF
16. Ranura Micro SD
32
Page 33
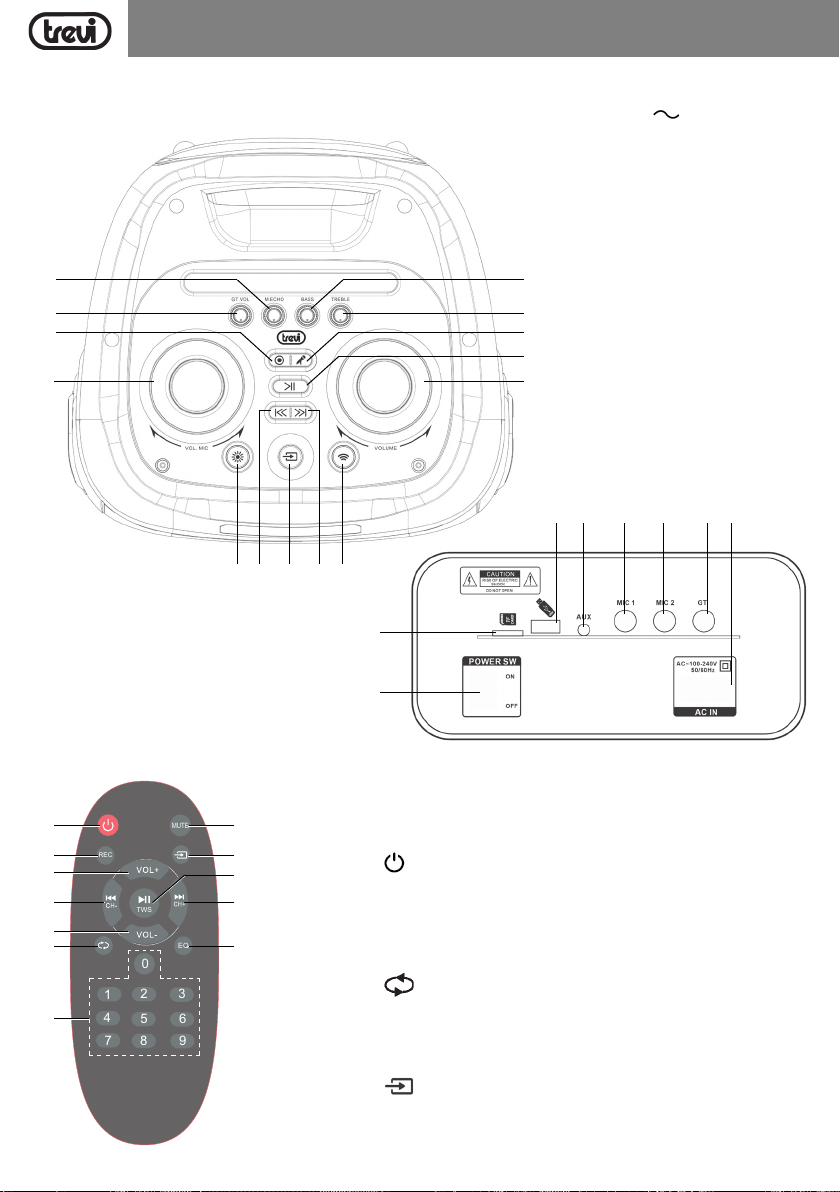
XF 3600 PROESPANOL
MUTE
REC
EQ
0
1
2
3
4
5
6
7
8
9
TWS
17. Puerto USB
18. Toma AUX IN
19. Toma de micrófono-1
1
2
3
4
20. Toma de micrófono-2
21. Entrada de guitarra
22. Toma de corriente alterna 230V 50Hz.
14
13
12
11
17 18 19 20 21 22
5106 7 8 9
16
MANDO A DISTANCIA
23
24
25
26
27
28
29
15
34
33
32
31
23. Botón , encendido/ stand-by
24. Botón REC, (pulse para iniciar la grabación. Pulse de nuevo para detener
la grabación)
25. Botón VOL+
30
26. Botón 9/CH-, Canción anterior/CH-
27. Botón VOL-
28. Botón Repetición única/ Repetir todo
29. Botones numéricos
30. Tecla de modo de sonido EQ (POP/ ROCK/ JAZZ/ CLASSIC/ FLAT)
31. Botón :/CH+, Siguiente canción/CH+
32. Botón/TWS, Reproducir/Pausa/TWS
33. Botón , función de modo (seleccionar entre AUX/USB/SD/Wireless)
34. Botón MUTE
33
Page 34
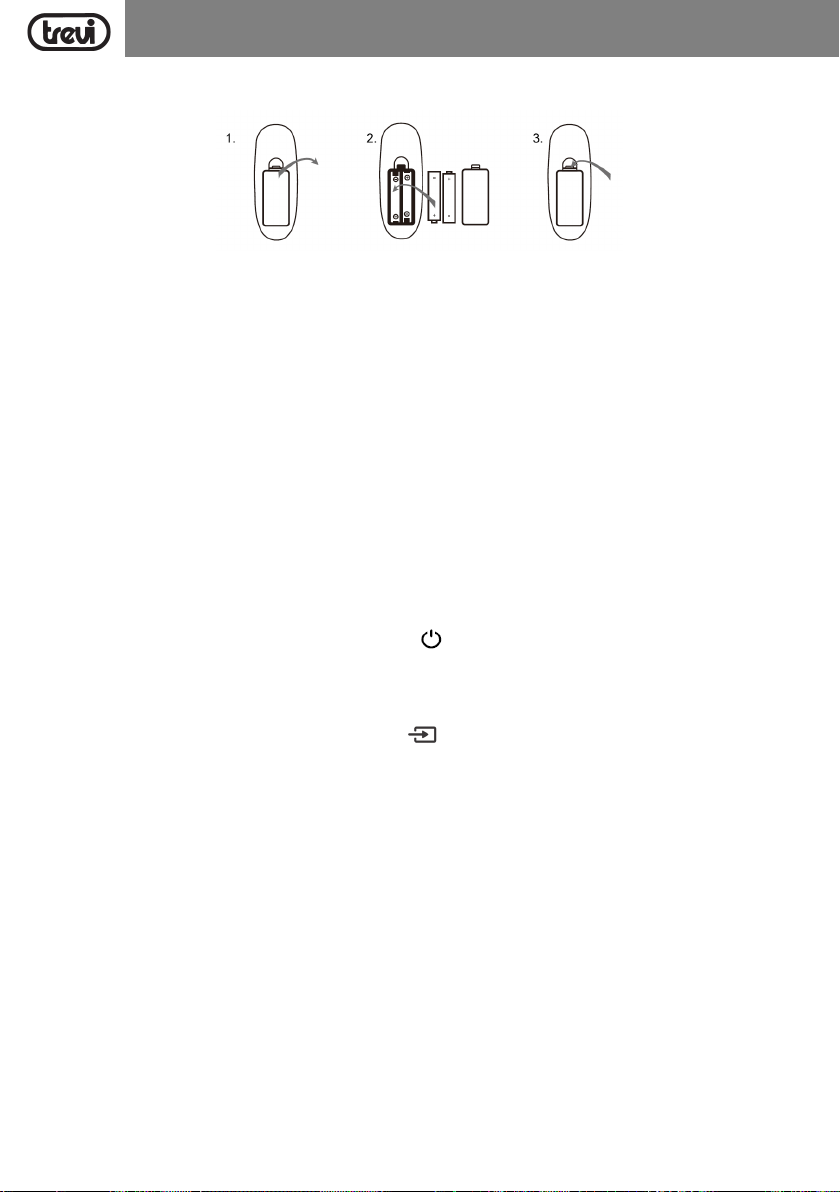
ESPANOL
XF 3600 PRO
Instalación de las pilas:
Retire la tapa de la parte posterior del control remoto, inserte 2 x "AAA", asegurándose de que la polaridad y cerrar la tapa.
TRANSPORTE
Para el transporte, utilice el asa superior, doble ligeramente el aparato y utilice las dos ruedas traseras.
FUNCIONES BÁSICAS
ENCENDIDO/APAGADO
- Gire el interruptor POWER (15) a la posición "1" (ON), para encender y utilizar el aparato con su batería interna.
- Gire el interruptor POWER (15) a la posición "0" (OFF) para apagar completamente el aparato.
CARGA DE LA BATERÍA
- Gire el interruptor POWER (15) a la posición "0" (OFF) y conecte el cable de alimentación a la toma (22) para recargar la batería;
los segmentos del icono de la batería en la pantalla comenzarán a parpadear.
- Espere hasta que los tres segmentos estén fijos antes de desconectar la unidad.
Para prolongar la vida útil de la batería, se recomienda desconectar el cable de alimentación tras un máximo de 15 horas de
carga.
Nota:
- No conecte el aparato a enchufes con una tensión diferente a la indicada.
- En caso de largos periodos de inactividad, es necesario recargar la batería periódicamente (al menos una vez al mes).
STAND-BY
Puede poner el sistema en modo de espera utilizando el botón (23) del mando a distancia; dos segmentos en la pantalla
indican la activación de la función de esper;
Vuelva a pulsarlo para encender el aparato.
SELECION DE LAS FUNCIÓN
Para cambiar la función de modo, presione más veces la tecla (7) en la unidad o desde el mando a distancia para seleccionar: Inalámbrico (la pantalla muestra AZUL), USB/SD (sólo si la toma USB (17)/Micro SD (16) está conectada a una memoria, la
pantalla muestra durante unos segundos "USB" o "SD"), AUX-IN (la pantalla muestra "AUX").
AJUSTE DEL VOLUMEN
1. Gire el botón VOLUME (10) para ajustar el volumen general de reproducción o utilice los botones (27) y (25) del mando a
distancia;
2. Gire el botón VOL- MIC (7) para ajustar el volumen de la señal en las entradas MIC1 y MIC2. El ajuste actúa sobre ambas
entradas simultáneamente.
PRE-EQUALIZADOR
Esta unidad dispone de un sistema de ecualizaciones de audio preajustadas. Pulse varias veces el botón EQ (30) del mando a
distancia para seleccionar una de las 6 ecualizaciones de audio disponibles que mejor se adapte a la reproducción de sonido actual.
AJUSTE DE AGUDOS Y GRAVES
Gire el mando BASS (14) para ajustar los tonos graves, consulte los signos + y - para aumentar o disminuir.
Gire el mando TREBLE (13) para ajustar los tonos agudos, consulte los signos + y - para aumentar o disminuir.
EFECTO ECO DEL MICRÓFONO
Gire el mando ECHO (1) para ajustar el efecto eco en el micrófono, consulte los signos + y - para aumentar o disminuir.
Nota: el efecto eco sólo actúa sobre las entradas de micrófono.
Nota: el eco sólo funciona en las entradas de micrófono.
34
Page 35
XF 3600 PROESPANOL
EFECTOS DISCO-LUZ
Pulse el botón (5) varias veces para seleccionar el efecto Disco-Luz en Movimiento, cada pulsación corresponderá a un
efecto de luz.
ANUNCIO DE VOZ
Mantenga pulsado el botón (7) del aparato o del mando a distancia durante unos segundos para activar/desactivar la voz
de guía (en inglés).
RADIO FM
1. Encienda el aparato y seleccione la función RADIO (la indicación de frecuencia aparecerá en la pantalla);
2. Pulse el botón
automática de emisoras (la radio inicia una búsqueda automática de emisoras de radio y las almacena automáticamente en
la memoria).
El número de emisoras almacenadas depende de la señal de radio de su zona;
3. Una vez finalizada la búsqueda, utilice los botones (6) u (8) de la unidad, o los botones 9/CH- (26) y :/CH+
(31) del mando a distancia para desplazarse por las presintonías de las emisoras almacenadas.
Nota:
-
La recepción de FM depende mucho del lugar donde se coloque el dispositivo.
- La proximidad de televisores, lámparas de neón u otros aparatos eléctricos puede provocar interferencias en la
recepción de programas de radio, en este caso alejar el aparato.
FUNCIÓN INALÁMBRICA
1. SEncienda la unidad y pulse el botón (9) en la unidad o pulse el botón (30) en el mando a distancia y seleccione
la función inalámbrica, "AZUL" aparecerá en la pantalla;
2. La palabra "BLUE" comenzará a parpadear en la pantalla y el sistema entrará automáticamente en el modo de búsqueda;
3. Active la función inalámbrica en el dispositivo externo que desea emparejar;
4. Inicie la búsqueda de dispositivos. Cuando termine, seleccione el dispositivo "XF 3600 PRO";
5. Introduzca la contraseña "0000" si se le solicita;
6. Pulse el botón
botones
(6) u (8) de la unidad, o los botones 9/CH- (26) y :/CH+ (31) del mando a distancia para seleccionar
las pistas.
(11) del aparato o el botón
(11) de la unidad o el botón
/TWS
/TWS
(32) del mando a distancia para iniciar la búsqueda y memorización
(32) del mando a distancia para iniciar la reproducción, utilice los
FUNCIONAMIENTO DE LA FUNCIÓN TWS (Tecnología inalámbrica estéreo)
La tecnología TWS permite al usuario hacer una conexión inalámbrica entre dos altavoces que son del mismo modelo y compatibles
con TWS. En la conexión TWS, dos altavoces se agruparán automáticamente para formar un sistema de altavoces estéreo que
emite los canales izquierdo y derecho.
COMO ESTABLECER
Aviso: Dos altavoces deben ser del mismo modelo y ambos compatibles con TWS.
1. Desactive la función inalámbrica en el teléfono u otro dispositivo;
2. Enciende ambos altavoces y selecciona el modo 'Inalámbrico' en ambos;
3. Mantén pulsado el botón
parpadear en la pantalla), pasados unos segundos los dos altavoces estarán emparejados (el mensaje 'Slau' permanecerá fijo);
4. Active la conexión inalámbrica en su teléfono u otro dispositivo; busque y empareje el dispositivo. Tras la conexión, será posible
reproducir música con el sistema de altavoces estéreo TWS.
Los ajustes en el altavoz principal también se realizarán simultáneamente en el otro altavoz. Por ejemplo, el ajuste del volumen, la
reproducción y la pausa.
Nota:
- Si los 2 altavoces no están emparejados, apague ambos dispositivos y repita los pasos 1, 2 y 3.
- La función TWS solo funciona entre parlantes iguales o con otros parlantes que usan el mismo microprocesador o solución.
(11)
de la unidad durante unos segundos (se activa el emparejamiento TWS, 'Slau' empezará a
REPRODUCCIÓN DE ENTRADA USB/SD
1. Encienda el aparato;
2. Inserte una memoria USB o una tarjeta Micro SD en la ranura USB o SD (17 o 16). La reproducción se inicia automáticamente;
3. Para pausar la reproducción, pulse el botón
(11)
en la unidad o la tecla/TWS
35
(32)
en el mando a distancia, la
Page 36
ESPANOL
pantalla mostrará "PAUS"; púlselo de nuevo para reanudar la reproducción;
4. Pulse el botón (8) de la unidad o la tecla :/CH+ (31) del mando a distancia mientras escucha para pasar a la pista
siguiente. Pulse el botón (6) de la unidad o la tecla 9/CH- (26) del mando a distancia para pasar a las pistas anteriores;
5. Con el teclado numérico (29) del mando a distancia puedes introducir directamente el número de la canción que quieres
reproducir;
6. Pulse una vez el botón (28) del mando a distancia, la pantalla mostrará "ONE", para reproducir continuamente la misma
canción; púlselo una segunda vez, la pantalla mostrará "ALL" para reproducir continuamente todas las canciones del USB/SD.
Nota:
- El jugador no puede apoyar algunos dispositivos USB, esto se debe a la incompatibilidad de algunos procesadores.
- Para evitar interferencias perjudiciales, siempre conecte los dispositivos USB directamente a la unidad, no utilice cables de
extensión.
- Desde el ordenador para formatear la memoria USB/SD FAT(16 ó 32).
XF 3600 PRO
AUX-IN
1. Pulse el botón (7) en el aparato o en el mando a distancia y seleccione la función "AUX";
2. Conecte cualquier unidad equipada con salida de audio, a través de un cable jack de 3,5mm a la entrada AUX (18);
3. Utilice el aparato externo a par tir de sus comandos.
MICRÓFONO INALÁMBRICO
OPERACIÓN
1. Retire la tapa situada en la parte posterior del micrófono, inserte 2 pilas de tamaño "AA" prestando atención a la polaridad
indicada y cierre la tapa;
2. Encienda el micrófono con el interruptor hacia arriba;
3. Ajuste el volumen girando el mando MIC VOL (4);
4. Si el indicador de encendido parpadea al encender el micrófono, las pilas están bajas, sustitúyalas inmediatamente.
Nota:
- La distancia de recepción del micrófono inalámbrico es de aproximadamente 15 metros sin obstáculos, no lo use a distancias
mayores.
- Si se utilizan múltiples micrófonos inalámbricos en el mismo entorno al mismo tiempo, deben configurarse en diferentes
frecuencias y deben mantenerse al menos a 30 m de distancia.
- No coloque el dispositivo demasiado cerca de reproductores de DVD/CD/VCD ya que tienen frecuencias que pueden afectar
el micrófono
POSIBLES LIMITACIONES DE USO
- Este dispositivo puede funcionar en frecuencias no autorizadas en la región donde se encuentra el usuario. Le recomendamos
que se ponga en contacto con las autoridades competentes y solicite la información necesaria relacionada con las frecuencias
autorizadas en su región para los sistemas de micrófonos inalámbricos. En algunos casos, se puede requerir una licencia
ministerial para el uso de este dispositivo. Para conocer los posibles requisitos, contactar con las autoridades competentes.
El usuario asume la responsabilidad exclusiva de la adquisición de la licencia para radio-micrófonos y la licencia depende de
la clasificación y aplicación del usuario y de la frecuencia seleccionada. (Decreto Legislativo 269/2001 art.6 párrafo 3). Las
frecuencias utilizadas por este producto están autorizadas solo en territorio italiano y pueden no ser utilizables en otros países.
Se recomienda contactar a las autoridades competentes y solicitar la información relevante.
Países europeos cuyo producto tiene restricciones:
Estonia: APLICACIÓN LIMITADA
Finlandia: APLICACIÓN LIMITADA
Francia: aplicación limitada: APLICACIÓN LIMITADA.
Grecia: aplicación limitada: APLICACIÓN LIMITADA.
EE FI FR
Lituania: APLICACIÓN LIMITADA.
Polonia: APLICACIÓN LIMITADA.
EL LT PL
España: APLICACIÓN LIMITADA.
ES
36
Page 37
ESPANOL
XF 3600 PRO
GRABACIÓN
Esta unidad es capaz de grabar en la memoria USB o SD la parte de voz cuando se utiliza el micrófono suministrado. Dentro de la
memoria USB, el aparato creará automáticamente una carpeta llamada 'Record' donde almacenará todos los archivos de grabación.
1. Encienda el dispositivo;
2. Inserte una memoria USB o una tarjeta SD en la toma;
3. Seleccione la función USB o SD mediante el botón (7) de la unidad o desde el mando a distancia;
4. Pulse el botón (3) de la unidad o el botón REC (24) del mando a distancia para iniciar la grabación, la indicación de tiempo
aparecerá en la pantalla;
5. Pulse de nuevo el botón (3) del aparato o el botón REC (24) del mando a distancia para detener la grabación.
Nota:
- E 'puede grabar sólo la voz.
- La función de grabación no sea compatible con algunos dispositivos USB, esto se debe a la incompatibilidad de algunos
procesadores.
SOLUCIÓN DE PROBLEMAS
Si se produce un problema, siga los pasos descritos en la siguiente tabla.
Si el problema no se puede resolver, póngase en contacto con su distribuidor.
Problema Posibles causas Solución
No hay sonido cuando la
unidad está encendida.
Sonido distorsionado. 1. El volumen es demasiado alto.
No hay sonido desde el
micrófono.
No hay sonido cuando se inserta una tarjeta de dispositivo
USB/SD.
No se puede cargar la batería o
la batería tiene un corto plazo.
Los altavoces se oyen ruidos
fuertes.
1. No hay sonido de la fuente.
2. Regulador de volumen en el nivel 0.
3. Elemento de guía.
4. No hay ningún dispositivo SD/USB
conectado.
2. Error de archivo de audio.
1. La toma de micrófono no se puede
conectar correctamente.
2. El interruptor de encendido en el
micrófono puede estar en la posición
"off".
3. Volumen del micrófono bajo.
1. Formato de archivo no admitido.
2. USB/Tarjeta SD no está conectado
correctamente.
1. Conectar el cable de alimentación
para recargar.
2. La batería no está completamente
cargada.
3. La batería puede haber llegado a su
ciclo de vida.
1. Micrófono en pero demasiado cerca.
2. micrófono utilizado en acción, sin.
3. Volumen del micrófono puede ser
demasiado alto.
4. Una célula se utiliza demasiado cerca.
5. Los equipos inalámbricos puede
estar muy cerca de aquellos que
están usando el micrófono.
1. Conectar un dispositivo a la toma AUX-IN.
2. Ajuste el volumen.
3. Active la guía de voz.
4. Conexión USB/Tarjeta SD, reproducir MP3.
1. Bajar el volumen.
2. Comprobar y reproducir otro archivo de audio.
1. Asegúrese de que el micrófono está conectado
correctamente.
2. Encender el micrófono.
3. Ajuste correctamente el volumen del micrófono.
1. El formato de archivo de audio debe ser MP3.
2. Conectar el dispositivo de tarjeta USB/SD
correctamente.
1. Compruebe si el cable de alimentación está
conectado correctamente.
2. Normalmente se tarda 6-8 horas para cargar
completamente la batería.
3. Vuelva a colocar la batería vieja por una nueva
con las mismas especificaciones técnicas.
1. Mantenga el micrófono a 2 metros de distancia
desde el altavoz.
2. Apagar el micrófono si no se usa.
3. Bajar el volumen del micrófono.
4. Mantenga el teléfono lejos del altavoz mientras
realiza una llamada.
5. Mantenga el altavoz alejado de dispositivos
inalámbricos.
37
Page 38
ESPANOL
XF 3600 PRO
NOTA INFORMATIVA SOBRE LA ELIMINACIÓN Y TRATAMIENTO DE LAS PILAS
Las pilas usadas no se deben tirar con la basura doméstica o arrojados al fuego o al agua. Las baterías usadas deben reciclarse
o desecharse en centros de recogida de residuos separados.
REMOCIÓN DE LA BATERÍA
Advertencia: Sólo el personal de alta cualificación deberían poder realizar esta operación!
El aparato no debe estar enchufado a la toma de red para realizar esta operación!
1. Retire los tornillos que aprietan el panel del alojamiento de la batería (panel metálico inferior);
2. Retire el panel metálico y localice la batería;
3. Desconecte la batería y retírela;
4. Sustituya la batería por otra de las mismas características y capacidad.
Advertencias para la correcta eliminación del producto.
El símbolo que aparece en el aparato indica que el residuo debe ser objeto de “recogida selectiva” por tanto el producto no se
debe eliminar junto con residuos urbanos.
El usuario deberá entregar el producto a los “centros de recogida selectiva” creados por las administraciones municipales o bien
al distribuidor cuando adquiera un nuevo producto.
La recogida selectiva del residuo y las sucesivas operaciones de tratamiento, recuperación y eliminación favorecen la fabricación de aparatos con materiales reciclados y limitan los efectos negativos en el medio ambiente y la salud causados por una
gestión incorrecta del residuo.
La eliminación abusiva del producto da lugar a la aplicación de sanciones administrativas.
ESPECIFICACIONES
Fuente de alimentación: ........................................................ 100-240V 50/60Hz
batería interna de litio recargable 12,8V 8A
Consumo: ............................................................................ Max 100W
Potencia máxima de audio: .................................................................................... 200W
Banda de frecuencia FM: ............................................................... 87,5MHz - 108MHz
Temperatura de funcionamiento: ............................................................................. 0° ~ 40°C
Respuesta de frecuencia: ........................................................................ 40Hz - 20KHz
S/N: ................................................................................. >68dB
Bluetooth potencia máxima de transmisión: .................................................................. 0,8mW
Bluetooth transmisión de banda: .................................................................................. 2,4GHz
Frecuencia del micrófono inalámbrico: ......................................................................668,5MHz
Dimensiones: ................................................................ 380x 350x 860mm
Peso: ................................................................................. 18,5 Kg
38
Page 39
DICHIARAZIONE DI CONFORMITA'
Dichiarazione di conformità UE semplificata
XF 3600 PRO
Il fabbricante TREVI S.p.a. dichiara che il tipo di apparecchiatura radio XF 3600 PRO
Il testo completo della dichiarazione di conformità UE è disponibile al seguente indirizzo internet:
Hereby TREVI S.p.a declares that the radio equipment type
"Power portable speaker with trolley" model XF 3600 PRO
The full text of the EU declaration of conformity is available at the following internet address:
é conforme alla direttiva 2014/53/EU.
https://www.trevi.it/dms/zidi/TREVI/DOCXF3600PRO.pdf
Simplified EU Declaration Of Conformity
is in compliance with Directive 2014/53/EU.
https://www.trevi.it/dms/zidi/TREVI/DOCXF3600PRO.pdf
EN
If you will not find your language on the instruction manual, please go on our website www.trevi.it to find it
FR
Si vous ne trouverez pas votre langue sur le mode d’emploi, veuillez vous visiter sur notre site Web www.trevi.it de le trouver
DE
Wenn Sie Ihre Sprache auf die Bedienungsanleitung nicht finden, gehen Sie bitte auf unsere Webseite www.trevi.it zu finden
ES
Si no encuentras tu idioma en el manual de instrucciones, por favor vaya a nuestra página web www.trevi.it se encuentra
PT
Se não encontrar a sua língua no manual de instruções, consulte o nosso site www.trevi.it para a encontrar
39
Page 40
Trevi S.p.A.
Strada Consolare Rimini-San Marino, 62
47924 Rimini (Rn) Italia
Tel. 0541/756420 Fax 0541/756430
www.trevi.it e-mail: [email protected]
Made in CHINA
 Loading...