

Page 1
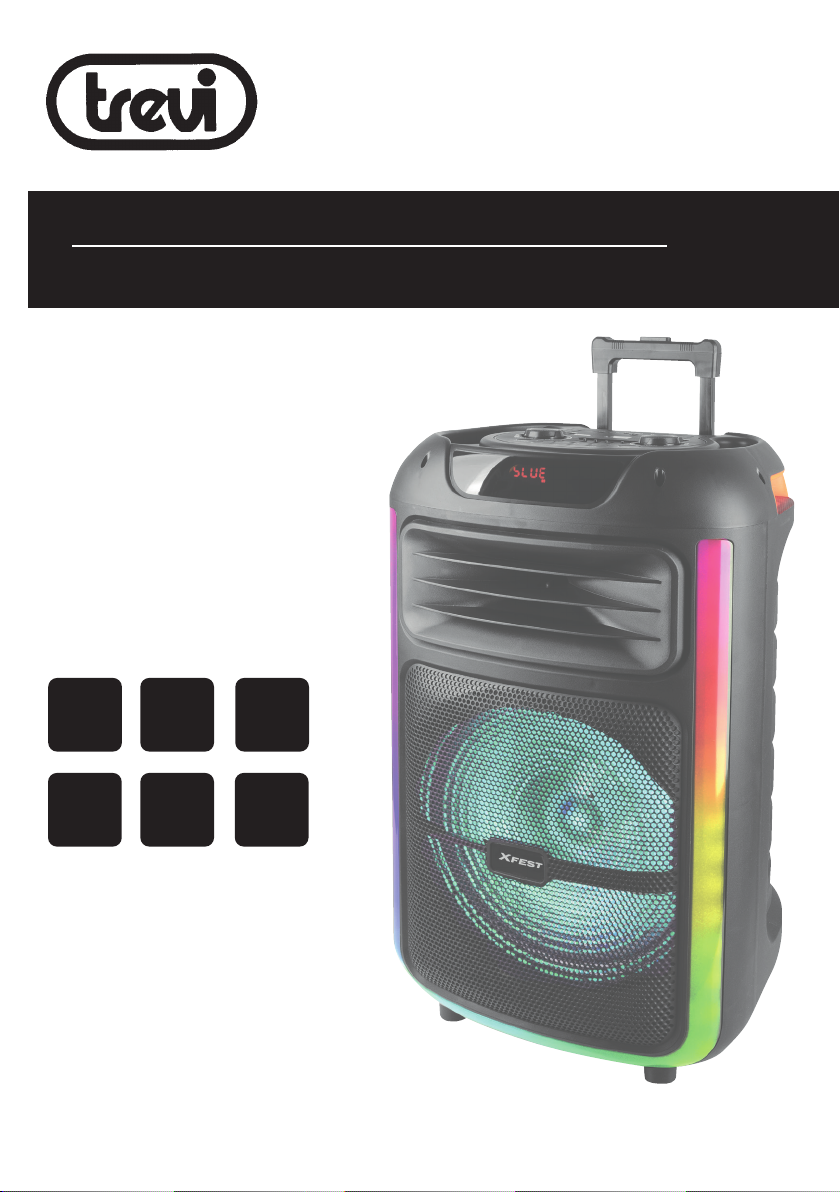
XF 1400 KB
Guida d’uso
User guide
ALTOPARLANTE AMPLIFICATO ALTA POTENZA
Manuale d'uso e collegamento
HIGH POWER PORTABLE SPEAKER
Connection and Operation Manual
HAUT-PARLEUR PORTABLE AMPLIFIE
Mode d'emploi et branchement
BEWEGLICHER LAUTSPRECHER
Gebrauchs- und Anschlusshandbuch
ALTAVOZ AMPLIFICADO PORTATIL
Manual para el uso y la conexión
AUDIO
WIRELESS
TWS
Per informazioni integrative ed aggiornamenti su questo prodotto visita www.trevi.it
For additional information and updates of this product see www.trevi.it
2X
MIC IN
LED
DISCO
LIGHT
USB
microSD
100W
MAX
Page 2

EN If you will not nd your language on the instruction manual, please go on our website www.trevi.it to nd it
FR Si vous ne trouverez pas votre langue sur le mode d’emploi, veuillez vous visiter sur notre site web www.trevi.it
DE Wenn Sie Ihre Sprache auf die Bedienungsanleitung nicht nden, gehen Sie bitte auf unsere Webseite www.trevi.it
ES Si no encuentras tu idioma en el manual de instrucciones, por favor vaya a nuestra página web www.trevi.it
PT Se não encontrar a sua língua no manual de instruções, consulte o nosso site www.trevi.it para a encontrar
Page 3
ITALIANO
XF 1400 KB
NOTE D'USO
Ascoltare a volume alto per lungo tempo, potrebbe danneggiare il vostro udito.
Evitare di posizionare il riproduttore:
• Vicino a campi magnetici.
• Vicino a fonti di calore come caloriferi e stufe.
• In luoghi molto umidi come stanze da bagno, piscine, ecc...
• In luoghi molto polverosi.
• In luoghi soggetti a forti vibrazioni.
• Non avvicinare l’orecchio all’altoparlante durante le fasi di messa punto e regolazioni del volume, e in particolare di
tenere il volume al minimo nella fase di accensione.
• Posizionare l’apparecchio in modo che ai suoi lati ci sia sempre abbastanza spazio per la libera circolazione di aria
(almeno 5 cm).
• Se dei liquidi penetrano all’interno dell’apparecchio scollegare immediatamente la spina dalla presa e portare l’apparecchio al più vicino centro assistenza autorizato TREVI.
• Prima di accendere/ricaricare l’apparecchio, controllare sempre che i cavi di alimentazione e di collegamento siano
installati correttamente.
• L’adattatore di corrente deve essere collegato a una presa vicina al dispositivo e deve essere facilmente accessibile.
• Se si nota un calore eccessivo sul dispositivo o sull’adattatore di corrente, scollegare immediatamente la spina dalla
presa di corrente principale.
• Non tirare il cavo di alimentazione
• Nessuna sorgente di amma nuda, quali candele accese, dovrebbe essere posta sull’apparecchio.
• L’apparecchio non deve essere esposto a stillicidio o a spruzzi d’acqua e nessun oggetto pieno di liquido, quali vasi,
deve essere posto sull’apparecchio.
• Istruire al corretto utilizzo bambini e persone con scarse conoscenze del prodotto.
• Conservare il presente manuale per futuri riferimenti.
CURA E MANUTENZIONE
Per la pulizia si consiglia l’uso di un panno morbido, leggermente inumidito. Evitate solventi o sostanze abrasive.
IMPORTANTE
Questo dispositivo e' progettato per uso domestico non professionale. La buona costruzione di questo apparecchio
ne garantisce per lungo tempo il perfetto funzionamento. Se tuttavia dovesse presentarsi qualche inconveniente, sarà
opportuno consultare il più vicino Centro Assistenza autorizzato TREVI.
TREVI persegue una politica di continua ricerca e sviluppo. Pertanto i prodotti possono presentare caratteristiche diverse
da quelle descritte.
Per evitare possibili danni all’udito, limitare il tempo di ascolto a volumi elevati
3
Page 4
ITALIANO
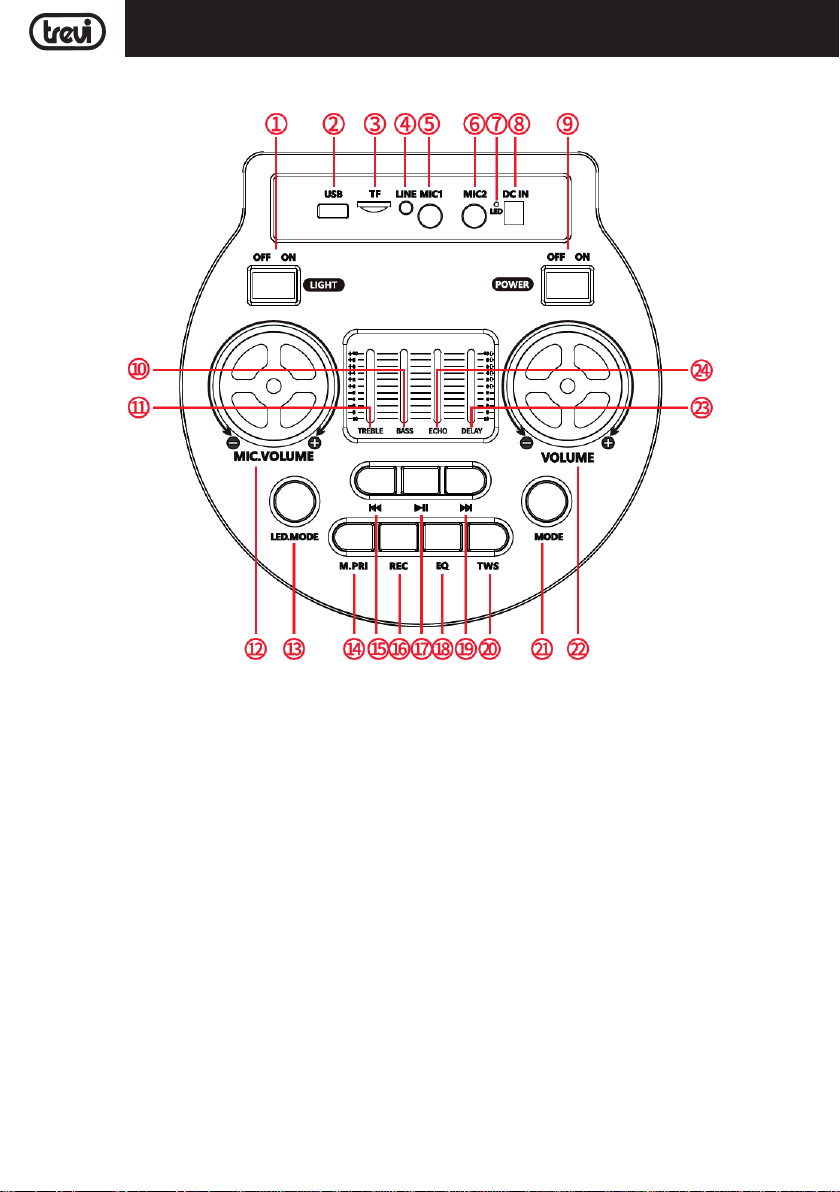
DESCRIZIONE COMANDI
XF 1400 KB
1. Attivazione Disco Light led
2. Ingresso memoria USB
3. Ingresso MicroSD card
4. Ingresso LINE IN
5. Ingresso MIC1, ingresso per microfono con cavo
6. Ingresso MIC2, ingresso per microfono con cavo
7. Indicatore led carica
8. Presa di ricarica
9. Interruttore POWER, accensione/spegnimento
10. BASS, regolazione toni bassi
11. TREBLE, regolazione toni alti
12. Volume microfono
13. Tasto effetti luminosi
14. Tasto M.PRI, attivazione funzione Mic priority
15. Tasto
9, traccia precedente
16. Tasto REC, funzione registrazione
17. Tasto
, Play/Pausa
18. Tasto EQ, equalizzazioni audio
19. Tasto
20. Tasto TWS
21. Tasto MODE, selezione funzione
22. Controllo volume
23. Controllo effetto DELAY
24. Controllo effetto ECHO
4
:, traccia successiva
Page 5
ITALIANO
XF 1400 KB
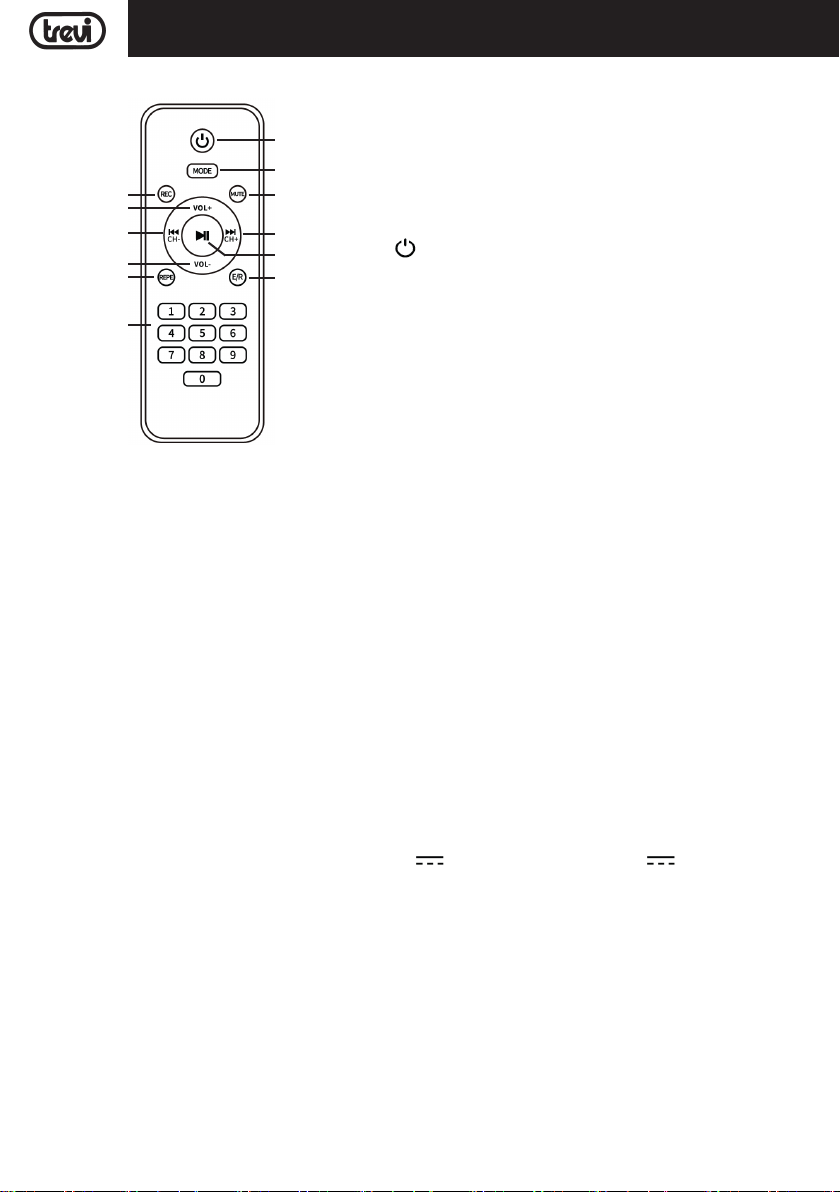
TELECOMANDO
5
12
1. Tasto MUTE, per silenziare l'audio in riproduzione
2. Tasto E/R, selezione equalizzazione audio
4
7
3 9
10
6
11
ATTIVAZIONE E SOSTITUZIONE DELLA BATTERIA DEL TELECOMANDO
Prima di utilizzare il telecomando inserire le batterie come descritto di seguito:
1. Rimuovere il coperchio del vano batterie;
2. Inserire 2 batterie formato “AAA” facendo attenzione alle polarità indicate e richiudere il coperchio.
IMPORTANTE
- Smaltire le batterie usate nel rispetto delle normative sul riciclaggio nella propria zona.
- Pericolo di esplosione se la batteria viene sostituita in modo errato.
- Sostituire solo con lo stesso tipo o equivalente.
- Se il telecomando non viene utilizzato per lunghi periodi, la batteria può perdere liquido e danneggiare il telecomando,
sostituirlo con uno nuovo se si dovesse vericare.
- Non cortocircuitare le batterie o gettarle nell'acqua, nella spazzatura generale o nel fuoco.
1
3. Tasto
4. Tasto REC, Registrazione
5. Tasto
8
6. Tasto REP, ripetizione
2
7. VOL +, regolazione volume
8. Tasto
9. Tasto
10. VOL -, regolazione volume
11. Tastiera numerica per selezione diretta traccia
12. Tasto MODE, selezione funzione
9, selezione traccia precedente
, Accensione/Stand-by
, Play/Pausa
:, selezione traccia successiva
TRASPORTO CON TROLLEY
Premere il pulsante presente sulla maniglia del trolley, alzare il manico no al blocco (si udira' uno scatto metallico). Per il
trasporto, agendo sulla maniglia del trolley, piegare leggermente l'apparecchio e sfruttare le due ruote posteriori.
Per lo sblocco e chiusura del trolley, premere nuovamente il pulsante sulla maniglia ed abbassare completamente il manico.
Per il trasporto è possibile utilizzare, eventualmente, anche le due maniglie poste lateralmente all'apparecchio.
ALIMENTAZIONE/ RICARICA BATTERIA
Questa unità funziona con batteria interna ricaricabile 7.4V 4500mAh e caricabatterie 9V 2A.
Quando la batteria è in fase di esaurimento o l'apparecchio non si accende, portare l'interruttore principale POWER (9)
in posizione "OFF", collegare l'alimentatore in dotazione alla presa (8) del dispositivo e la spina in una presa di corrente
ed effettuare la ricarica della batteria interna, l'indicatore Led (7) diventerà Rosso.
Stati della spia Led di segnalazione con batteria in ricarica:
- Spia Led (7) ROSSA ssa: il dispositivo e' collegato correttamente con l'alimentatore e la batteria è in fase di ricarica.
- Spia Led (7) spenta: operazione di ricarica terminata, la batteria è carica.
Nota:
- Non collegare l'apparecchio ad alimentatori con tensione o polarità diverse da quelle indicate.
- Evitare di scaricare eccessivamente la batteria e ricaricarla appena possibile per non deteriorarla
- Se l'apparecchio rimane inutilizzato per diverso tempo, spegnerlo tramite l'interruttore Power
5
Page 6

ITALIANO
XF 1400 KB
FUNZIONI DI BASE
ACCENSIONE/ SPEGNIMENTO
Premere l'interruttore principale POWER (9) per accendere e utilizzare l'apparecchio con la sua batteria interna.
Premere nuovamente l'interruttore principale POWER (9) per spegnere completamente l'apparecchio o per ricaricare
la batteria.
STAND-BY
E' possibile portare l'apparecchio in modalità Stand-by utilizzando il tasto (5) del telecomando.
Note:
- In modalità Stand-by l'illuminazione Led blu delle manopole rimane accesa per indicare l'attivazione della funzione Stand-by.
- Lasciando l'apparecchio in Stand-by la batteria tende a scaricarsi più velocemente che utilizzando l'interruttore principale
POWER (9).
SELEZIONE DELLA FUNZIONE
Per cambiare la modalità di funzionamento, premere piu' volte il tasto MODE sull'unità o sul telecomando per selezionare:
WIRELESS AUDIO (sul display compare "BLUE"), USB o Micro SD (solo se sulla presa USB (2) /Slot Micro SD (3) vi è
inserita una memoria, sul display compare la scritta "USB" o "SD", LINE-IN (sul display compare "LINE").
REGOLAZIONE DEL VOLUME E FUNZIONE MUTE
1. Ruotare la manopola del VOLUME (22) per aumentare o diminuire il volume generale di riproduzione oppure utilizzare
i tasti VOL + (7) e VOL - (10) del telecomando;
2. Ruotare la manopola MIC. VOL (12) per regolare il volume del segnale sugli ingressi MIC1 (5) e MIC2 (6).
3. Premere il tasto MUTE(1) sul telecomando per silenziare immediatamente l'apparecchio; ripremerlo per riattivare
l'audio.
CONTROLLO TONI ED EQUALIZZATORE
E' possibile regolare il tono della riproduzione audio utilizzando i controlli TREBLE (11) e BASS (10).
Premere più volte il tasto EQ (18) sull'unità o il tasto E/R (2) sul telecomando per selezionare una delle 6 equalizzazioni
audio disponibili.
EFFETTO ECHO (PER MICROFONO)
Utilizzare il controllo ECHO (24) per aumentare o diminuire l'effetto eco sugli ingressi MIC1 e 2.
EFFETTO DELAY (PER MICROFONO)
Utilizzare il controllo DELAY (23) per aumentare o diminuire l'effetto delay sugli ingressi MIC1 e 2.
EFFETTO DISCO-LIGHT
Per attivare l'effetto Disco-Light sull'altoparlante premere l'interruttore LIGHT (1).
Per disattivare l'effetto Disco-Light, premere nuovamente l'interruttore LIGHT (1).
E' possibile selezionare vari effetti uminosi premendo piu' volte il tasto LED MODE (13).
Nota: gli effetti luce Disco Light non sono disponibili in funzione radio FM (versione export), le luci rimangono
spente.
FUNZIONAMENTO AUDIO WIRELESS
1. Accendere l'apparecchio e selezionare la funzione Audio Wireless, sul display compare la scritta "BLUE";
2. La scritta "BLUE" sul display comincerà a lampeggiare e il sistema si porterà automaticamente in modalità ricerca;
3. Attivare la funzionalità Audio Wireless sul dispositivo esterno da accoppiare;
4. Avviare la ricerca dei dispositivi. Al termine selezionare il dispositivo "XF 1400 KB";
5. Inserire la password "0000" se richiesto;
6. Avviare la riproduzione musicale dal proprio dispositivo.
7. Premere il tasto
utilizzare i tasti :(19) o 9(15) sull'unità, oppure i tasti :(9) e 9(3) sul telecomando per la selezione dei brani.
(17) sull'unità oppure sul telecomando (8)
per avviare la riproduzione o mettere in pausa,
COLLEGAMENTO TWS
Tecnologia True Wireless Stereo (TWS)
La tecnologia TWS consente all'utente di effettuare una connessione wireless tra due altoparlanti dello stesso modello e
compatibili con la funzione TWS.
Con la connessione TWS, due altoparlanti verranno automaticamente collegati (senza li) per essere un unico sistema
stereo-altoparlante che emette il canale sinistro e destro.
6
Page 7

ITALIANO
XF 1400 KB
COLLEGAMENTO
Avviso: I due altoparlanti devono essere dello stesso modello ed entrambi compatibili con la tecnologia TWS.
1. Disattivare la connessione Audio Wireless sul telefono o altro dispositivo;
2. Accendere entrambi i diffusori e selezionare su entrambi la modalità Audio Wireless;
3. Premere il tasto "TWS" (20) di uno dei diffusori (attivazione dell’accoppiamento TWS, si udirà un suono e sul display
compare la scritta "btSt"), dopo pochi secondi i due altoparlanti saranno accoppiati;
4. Attivare l'Audio Wireless sul telefono o altro dispositivo, ricercare ed accoppiare l'apparecchio esterno all'altoparlante.
Dopo la connessione sarà possibile riprodurre musica con il sistema stereo-altoparlante TWS.
Le regolazioni sull'altoparlante principale verranno effettuate simultaneamente anche sull'altro altoparlante. Ad esempio,
regolazione del volume, selezione del brano precedente e successivo, riproduzione e pausa, accensione e spegnimento.
Note:
- In caso di mancato accoppiamento tra i 2 altoparlanti, spegnere entrambi gli apparecchi e ripetere i passi 1, 2 e 3.
- La funzione TWS funziona solamente tra diffusori uguali o con altri diffusori che utilizzano lo stesso micro processore o soluzione.
RIPRODUZIONE SU INGRESSO USB/ MICRO SD
1. Accendere l'apparecchio;
2. Inserire una memoria USB o una scheda Micro SD nei corrispettivi ingressi (2/3). La riproduzione verrà avviata auto-
maticamente;
3. Per mettere in pausa la riproduzione, premere il tasto
sul display comparirà la scritta "PAUS";
4. Per riprendere la riproduzione, premere nuovamente il tasto
5. Premere il tasto
Premere il tasto 9(15) sull'unità, o il tasto 9(3) sul telecomando per passare ai brani precedenti;
6. Utilizzando la tastiera numerica (11) del telecomando è possibile digitare direttamente il numero del brano musicale
che si vuole riprodurre;
7. Premere una volta il tasto REP (6) del telecomando, sul display comparirà la scritta "ONE" (per riprodurre continuamente
la stessa traccia); premerlo una seconda volta, sul display comparirà la scritta "ALL" (per riprodurre continuamente
tutti brani contenuti nel dispositivo USB/Micro SD); premerlo di nuovo, comparirà la scritta "RND" (per riproduzione
casuale delle tracce).
Note:
- Il lettore potrebbe non supportare alcuni dispositivi USB/microSD, questo è dovuto all'incompatibilità di alcuni processori.
- Per evitare interferenze dannose, collegare sempre le periferiche USB direttamente all'unità, non utilizzare cavi di prolunga.
- Dal computer formattare le memorie USB/Micro SD in FAT (16 o 32).
:(19) sull'unità o il tasto :(9) sul telecomando, durante l’ascolto per passare alla traccia successiva.
(17) sull'unità oppure il tasto
(17) sull'unità o sul telecomando (8)
(8) del telecomando
;
;
LINE-IN
1. Accendere l'apparecchio e selezionare la funzione "LINE";
2. Collegare una qualsiasi unità provvista di uscita audio tramite cavo Jack da 3,5mm all'ingresso LINE (4);
3. Regolare il dispositivo esterno dai propri comandi.
FUNZIONAMENTO RADIO (PRESENTE SOLO PER VERSIONI EXPORT)
MEMORIZZAZIONE AUTOMATICA DELLE STAZIONI
1. Accendere l'apparecchio e selezionare la funzione radio, sul display compare l'indicazione della frequenza;
2. Premere a lungo il tasto
ricerca/memorizzazione si fermerà al completamento dell’intera scansione della banda radio. Al termine verrà riprodotta la prima stazione radio memorizzata.
RICHIAMO DELLA STAZIONE MEMORIZZATA
- Premere il tasto :(19) per passare alla stazione successiva, premere il tasto 9(15) per passare alla stazione precedente.
Note:
- La ricezione in FM dipende molto dal luogo dove è posto l’apparecchio.
- La vicinanza ad apparecchi TV, lampade al neon o altri elettrodomestici può provocare disturbi nella ricezione di programmi
radio, in questo caso allontanare l’apparecchio.
(17) per eettuare una ricerca e memorizzazione automatica delle stazioni radio. La
7
Page 8
ITALIANO
XF 1400 KB
MICROFONO
Inserire la presa del microfono in dotazione nell'ingresso MIC1(5) o MIC2(6), accendere il microfono tramite interruttore
presente sul manico e regolare volume ed eetti tramite le regolazioni MIC VOLUME(12), ECHO(24) e DELAY(23).
FUNZIONE MIC PRIORITY
Premendo il tasto M.PRI(14) e' ossibile attivare o disattivare la funzione priorità al microfono, l'audio dello speaker viene
abbassato automaticamente durante il parlato al microfono.
REGISTRAZIONE
REGISTRAZIONE SU MEMORIA USB DA LINE IN E RADIO
1. Accendere l'apparecchio;
2. Inserire una memoria USB nella presa (2);
3. Selezionare la sorgente da riprodurre (LINE IN O RADIO FM) e premere in tasto REC (16) sull'unità o (4) sul tele-
comando;
4. Premere nuovamente in tasto REC per terminare la registrazione; il le registrato verrà salvato all'interno della me-
moria USB.
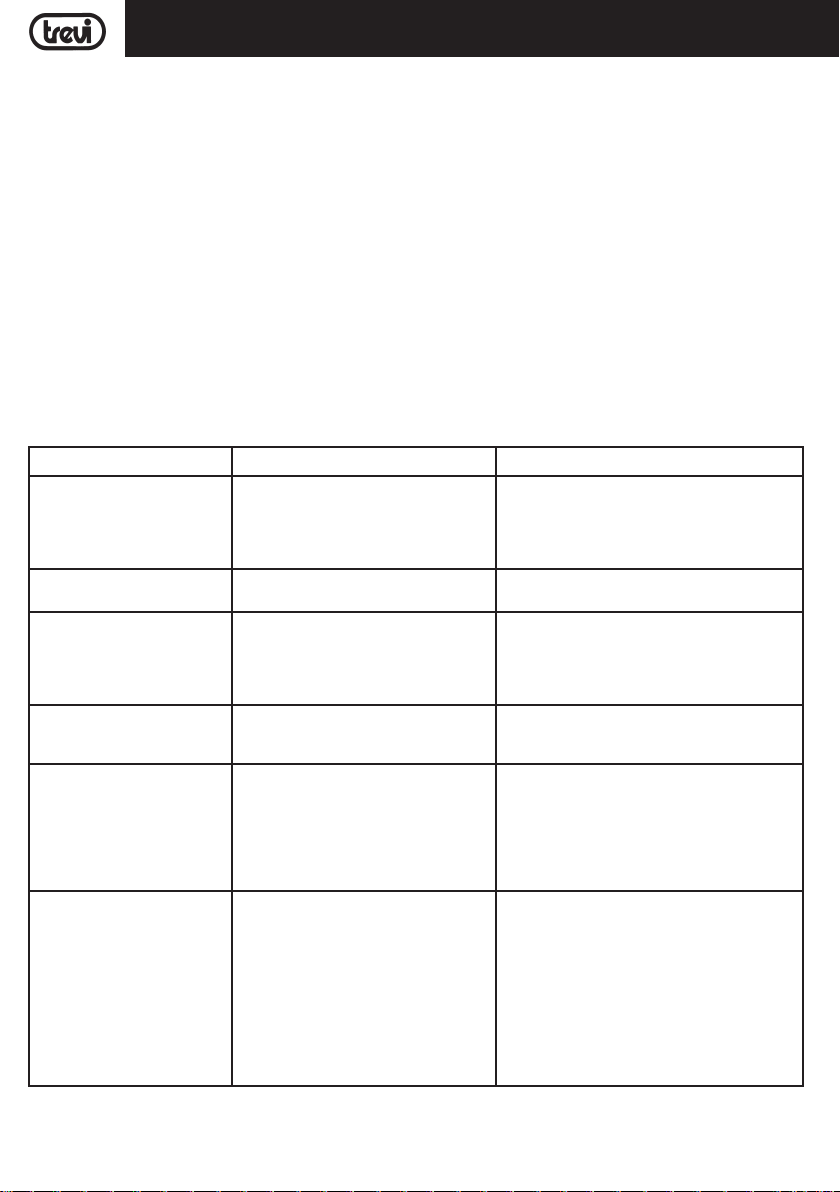
RISOLUZIONE DEI PROBLEMI
Se si verica un problema, attenersi alla procedura descritta nella seguente tabella.
Se il problema non può essere risolto, contattare il rivenditore o il centro assistenza.
Problema Possibili cause Soluzione
Nessun suono riprodotto quando
l'apparecchio viene acceso
Suono distorto 1. Volume troppo alto
Nessun suono dal microfono 1. La presa del microfono può non essere
Nessun suono quando si inserisce
un dispositivo USB/ Micro SD Card
Impossibile caricare la batteria o
la batteria ha una durata breve
Dagli altoparlanti si sentono forti
rumori
1. Nessuna sorgente sonora in ingresso
2. Manopola Volume a livello 0 o regolazione volume dal teleconado a livello 0
3. Nessun dispositivo Micro SD/USB
collegato
2. Errore le Audio
collegata correttamente.
2. L'interrutore di accensione sul microfo-
no può essere in posizione "spento".
3. Volume del microfono basso.
1. Formato le non supportato
2. USB/ Micro SD card non collegate
correttamente
1. Il cavo di alimentazione non è inserito
bene nella presa
2. La batteria non è completamente carica
3. La batteria potrebbe aver terminato il
suo ciclo di vita
1. Microfono acceso ma troppo vicino
all'altoparlante
2. Microfono acceso ma non viene
utilizzato
3. Il Volume del microfono potrebbe
essere troppo alto
4. Un cellulare viene utilizzato troppo
vicino all'altoparlante
5. Apparecchi senza li possono essere
molto vicini a chi sta utilizzando il
microfono
1. Collegare un dispositivo all'ingresso AUX-IN
2. Regolare il volume
3. Collegare USB/ Micro SD card, riprodurre MP3
4. Funzione MUTE attiva
1. Abbassare il volume
2. Controllare e riprodurre un'altro le Audio
1. Assicurarsi che il microfono sia collegato
correttamente alla presa.
2. Accendere il microfono.
3. Regolare correttamente il volume del microfono
1. Il formato dei le audio deve essere MP3
2. Collegare l'apparecchio USB/Micro SD card
correttamente
1. Controllare se l'alimentatore è collegato in
modo corretto
2. Normalmente ci vogliono 6-8 ore per ricaricare completamente la batteria
3. Sostituire la vecchia batteria con una nuova
avente le stesse speciche tecniche (rivolgersi
ad un centro assistenza tecnica).
1. Tenere il microfono a distanza dal diffusore
2. Spegnere il microfono se non utilizzato
3. Abbassare il volume del microfono
4. Tenere il cellulare lontano dall'altoparlante
mentre si effettua una chiamata.
5. Tenere il diffusore lontano da apparecchi
wireless
8
Page 9
ITALIANO
XF 1400 KB
INFORMATIVA SULLA RIMOZIONE E LO SMALTIMENTO DELLE BATTERIE
Attenzione: Questa operazione è riservata esclusivamente al personale tecnico specializzato!
PROCEDURA PER LA RIMOZIONE DELLA BATTERIA DALL’ALTOPARLANTE
AMPLIFICATO
Operare esclusivamente in assenza di collegamento dell’apparecchio alla rete elettrica!
1. Rimuovere le viti che serrano il pannello di controllo superiore;
2. Rimuoverlo e individuare la batteria;
3. Scollegare la batteria e rimuoverla.
SMALTIMENTO DELLA BATTERIA
Qualunque sia il tipo di batteria esaurita, essa non deve essere gettata tra i riuti domestici, nel fuoco o nell’acqua. Ogni
tipo di batteria esaurita deve essere riciclata oppure smaltita presso gli appositi centri di raccolta dedicati.
INFORMAZIONI AGLI UTENTI
ai sensi del Decreto Legislativo N° 49 del 14 Marzo 2014
“Attuazione della Direttiva 2012/19/UE sui riuti di apparecchiature elettriche ed elettroniche (RAEE)”
Il simbolo del cassonetto barrato riportato sull’apparecchiatura indica che il prodotto alla ne della propria vita utile
deve essere raccolto separatamente dagli altri riuti. L’utente dovrà, pertanto, conferire l’apparecchiatura integra dei
componenti essenziali giunta a ne vita agli idonei centri di raccolta differenziata dei riuti elettronici ed elettrotecnici,
oppure riconsegnarla al rivenditore al momento dell’acquisto di nuova apparecchiatura di tipo equivalente, in ragione di
uno a uno, oppure 1 a zero per le apparecchiature aventi lato maggiore inferiore a 25cm. L’adeguata raccolta differenziata
per l’avvio successivo dell’apparecchiatura dimessa al riciclaggio, al trattamento e allo smaltimento ambientale compatibile
contribuisce ad evitare possibili effetti negativi sull’ambiente e sulla salute e favorisce il riciclo dei materiali di cui è composta l’apparecchiatura. Lo smaltimento abusivo del prodotto da parte dell’utente comporta l’applicazione delle sanzioni
amministrative di cui al D.Lgs n. Decreto Legislativo N° 49 del 14 Marzo 2014.
CARATTERISTICHE TECNICHE
GENERALI
Alimentazione: ................................................. Caricabatterie esterno 9V 2A
Batteria interna al litio ricaricabile .......................................... 7.4V
Potenza massima Audio: ................................................. 100W
Potenza di trasmissione max: ................................................. 2,5mW
Banda di trasmissione audio wireless: ...................................... 2,4GHz
Banda frequenza radio FM (export version): ......................... 87.5-108 MHz
Dimensioni: ................................................. 420x360x670mm
Peso: ................................................. 9 Kg
9
, 4500mAh
Page 10
ENGLISH
XF 1400 KB
NOTES ON USE
Listening at high volume for a long time may damage your hearing.
This is a precision electronic appliance; avoid using it in the following cases:
• Near magnetic elds.
• Near heat sources such as heaters and stoves.
• In very humid places such as bathrooms, swimming pools, etc...
• In very dusty places.
• In places subject to strong vibrations.
• Do not bring your ear close to the speaker during the setting and volume adjustment phases, and in particular to keep
the volume to a minimum in the ignition phase.
• Position the appliance so that there is always enough space on its sides for the free circulation of air (at least 5 cm).
• If liquids penetrate inside the appliance, immediately disconnect the plug from the socket and take the appliance to
the nearest authorized TREVI service center.
• Before Switch On/Recharging the appliance, always check that the power and connection cables are installed correctly.
• The power adapter must be connected to an outlet near the device and must be easily accessible.
• If you notice excessive heat on the device or on the power adapter, immediately disconnect the plug from the main
power socket.
• Do not pull on the power cable.
• No naked ame sources, such as lighted candles, should be placed on the appliance.
• The appliance must not be exposed to dripping or splashing water and no objects lled with liquid, such as vases, must
be placed on the appliance.
• Instruct children and people with little knowledge of the product to use it correctly.
• Keep this manual for future reference.
CARE AND MAINTENANCE
Use a slightly damp soft cloth for cleaning. Do not use solvents and abrasive substances.
IMPORTANT
This device is designed for non-professional home use. The good construction of this device guarantees its perfect functioning
for a long time. If, however, a problem should arise, it is advisable to consult the nearest TREVI Authorized Service Center.
TREVI follows a policy of ongoing research and development. Therefore products may have different features from those
described.
To avoid possible hearing damage,limit the listening time to high volumes
10
Page 11
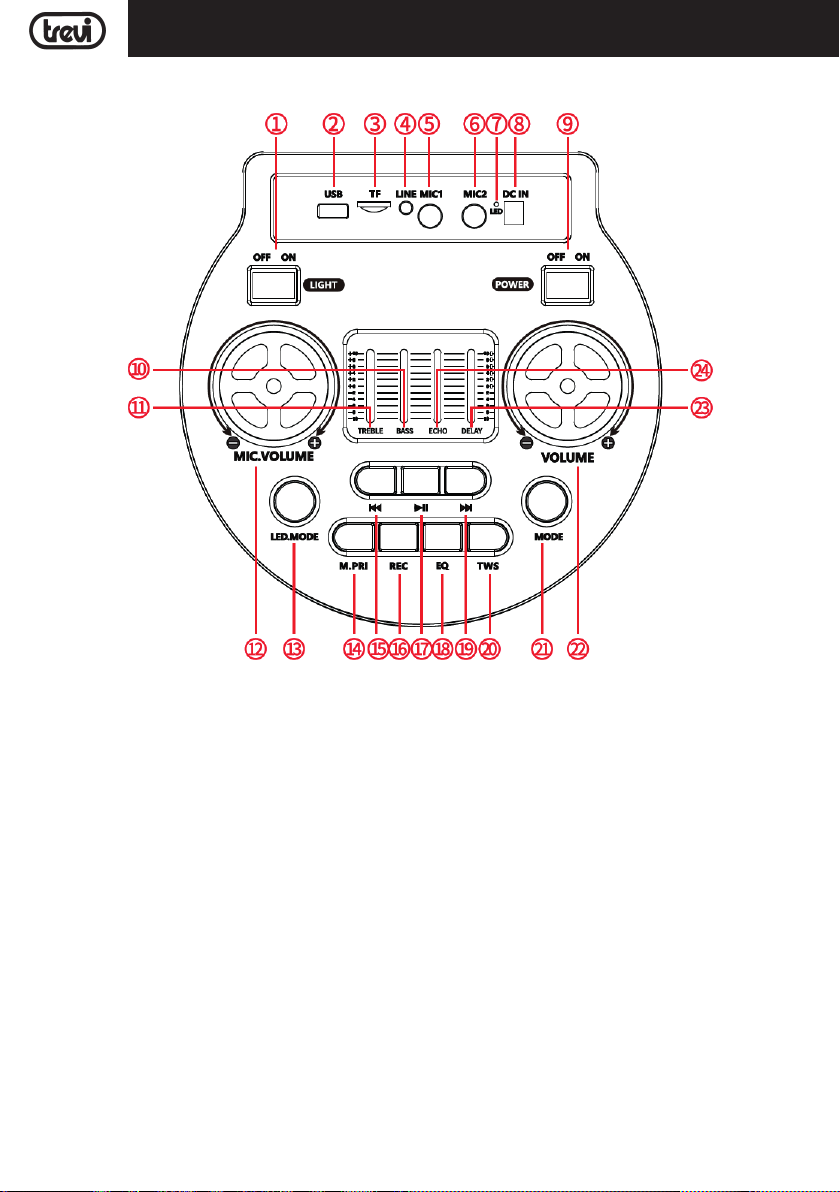
FRONT PANEL FUNCTIONS
XF 1400 KBENGLISH
1. Disco Light LED activation
2. USB memory input
3. MicroSD card input
4. LINE IN input
5. MIC1 input, input for wired microphone
6. MIC2 input, input for wired microphone
7. LED charge indicator
8. Charging socket
9. POWER switch, on/off
10. BASS, bass adjustment
11. TREBLE, treble adjustment
12. Microphone volume
13. Light effects button
14. M.PRI button, Mic priority function activation
15.
9 button, previous track
16. REC button, recording function
17.
button, Play/Pause
18. EQ button, audio equalizations
19.
: button, next track
20. TWS button
21. MODE button, function selection
22. Volume control
23. DELAY effect control
24. ECHO effect control
11
Page 12
ENGLISH
XF 1400 KB
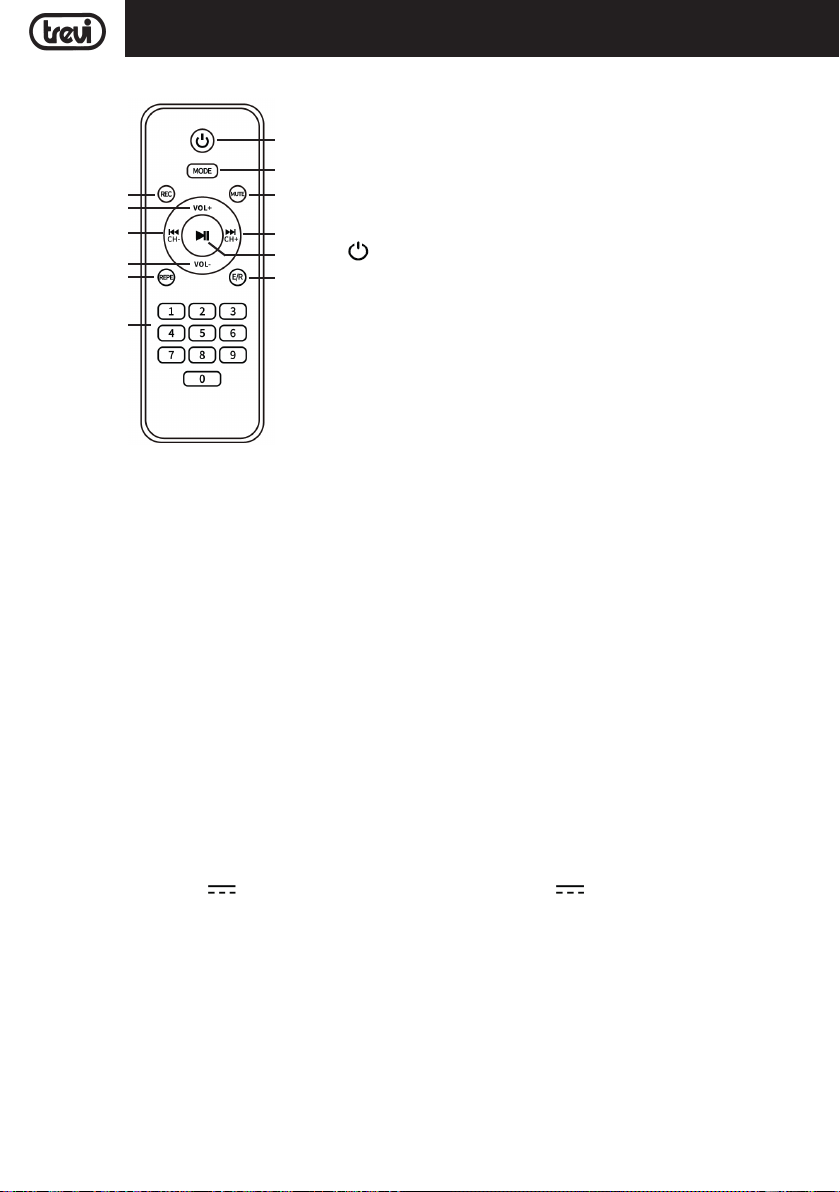
REMOTE CONTROL
5
12
1. MUTE button, to mute the audio being played
2. E/R button, to select audio equalization
4
7
3 9
10
6
11
ACTIVATION AND REPLACEMENT REMOTE CONTROL'S BATTERY
Before using the remote control, insert the batteries as described below:
1. Remove the battery compartment cover as shown in the gure;
2. Insert 2 "AAA" size batteries paying attention to the polarities indicated and close the cover.
CAUTION
- Dispose of used batteries according to the recycling regulations in your area.
- Danger of explosion if battery is incorrectly replaced.
- Replace only with the same type or equivalent.
- If the remote control is not used for long periods, the battery can leak and damage the remote control, replace it with
a new one if it should occur.
- DO NOT short-circuit the batteries or throw them in water, general trash or re.
1
3.
9 button, to select the previous track
4. REC button, to record
8
5.
button, to turn on/stand-by
6. REP button, to repeat
2
7. VOL +, to adjust the volume
8.
button, to play/pause
9.
: button, to select the next track
10. VOL -, to adjust the volume
11. Numeric keypad for direct track selection
12. MODE button, to select the function
TRANSPORTATION
Press the button on the handle of the trolley, lift the handle up to the block (you will hear a metallic click). For transport,
by acting on the handle of the trolley, slightly bend the appliance and take advantage of the two rear wheels.
To unlock and close the trolley, press the button on the handle again and lower the handle completely.
For transport, it is also possible to use the two handles placed laterally to the appliance.
POWER/BATTERY CHARGE
This unit works with a 7.4V 4500mAh internal rechargeable battery and a 9V 2A charger.
When the battery is running low or the device does not turn on, set the main POWER switch (9) to the "OFF" position,
connect the supplied power supply to the socket (8) of the device and the plug into a power outlet and charge the internal
battery, the LED indicator (7) will turn red.
States of the LED indicator light with the battery charging:
- LED light (7) xed RED: the device is correctly connected to the power supply and the battery is charging.
- LED light (7) off: charging operation completed, the battery is charged.
Note: Do not connect the device to power supplies with voltage or polarity other than those indicated.
12
Page 13

XF 1400 KBENGLISH
BASIC FUNCTIONS
SWITCHING ON/OFF
Press the main POWER switch (9) to switch on and use the appliance with its internal battery.
Press the main POWER switch (9) again to switch off the appliance completely or to recharge the battery.
STAND-BY
You can put the appliance into Stand-by mode using the button (5) on the remote control.
Notes:
- In Stand-by mode the blue LED lighting of the knobs remains on to indicate that the Stand-by function has been activated.
- Leaving the appliance in Stand-by tends to drain the battery more quickly than using the main POWER switch (9).
FUNCTION SELECTION
To change the operating mode, press the MODE button on the unit or on the remote control several times to select:
WIRELESS AUDIO (the display shows "BLUE"), USB or Micro SD (only if a memory is inserted in the USB socket (2) /
Micro SD slot (3), the display shows "USB" or "SD", LINE-IN (the display shows "LINE").
VOLUME ADJUSTMENT AND MUTE FUNCTION
1. Turn the VOLUME knob (22) to increase or decrease the general playback volume or use the VOL + (7) and VOL - (10)
buttons on the remote control;
2. Turn the MIC. VOL knob (12) to adjust the volume of the signal on the MIC1 (5) and MIC2 (6) inputs.
3. Press the MUTE button (1) on the remote control to immediately silence the device; press it again to reactivate the
audio.
TONE CONTROL AND EQUALIZER
You can adjust the tone of the audio playback using the TREBLE (11) and BASS (10) controls.
Press the EQ (18) button on the unit or the E/R (2) button on the remote control repeatedly to select one of the 6
available audio equalizations.
ECHO EFFECT (FOR MICROPHONE)
Use the ECHO control (24) to increase or decrease the echo effect on the MIC1 and 2 inputs.
DELAY EFFECT (FOR MICROPHONE)
Use the DELAY control (23) to increase or decrease the delay effect on the MIC1 and 2 inputs.
DISCO-LIGHT EFFECT
To activate the Disco-Light effect on the speaker, press the LIGHT switch (1).
To deactivate the Disco-Light effect, press the LIGHT switch (1) again.
You can select various light effects by pressing the LED MODE button (13) repeatedly.
Note: Disco Light effects are not available in FM radio function (export version), the lights remain off.
WIRELESS AUDIO OPERATION
1. Turn on the device and select the Wireless Audio function, the display will show "BLUE";
2. The "BLUE" display will start ashing and the system will automatically go into search mode;
3. Activate the Wireless Audio function on the external device to be paired;
4. Start the device search. Once nished, select the "XF 1400 KB" device;
5. Enter the password "0000" if requested;
6. Start music playback from your device.
7. Press the
9(15) buttons on the unit, or the 9(3) and :(9) buttons on the remote control to select tracks.
TWS CONNECTION
True Wireless Stereo (TWS) Technology
TWS technology allows the user to make a wireless connection between two speakers of the same model and compatible
with the TWS function.
With the TWS connection, two speakers will be automatically connected (without wires) to be a single stereo-speaker
system that emits the left and right channel.
button (17) on the unit or on the remote control (8) to start or pause playback, use the :(19) or
13
Page 14

ENGLISH
XF 1400 KB
CONNECTION
Notice: The two speakers must be of the same model and both compatible with TWS technology.
1. Deactivate the Wireless Audio connection on the phone or other device;
2. Turn on both speakers and select the Wireless Audio mode on both;
3. Press the "TWS" button (20) on one of the speakers (TWS pairing activation, you will hear a sound and the word "btSt"
appears on the display), after a few seconds the two speakers will be paired;
4. Activate the Wireless Audio on the phone or other device, search for and pair the external device to the speaker. After
connection, you can play music with the TWS stereo speaker system.
The adjustments on the main speaker will be made simultaneously on the other speaker. For example, adjusting the volume,
selecting the previous and next song, playing and pausing, turning on and off.
Notes:
- If the 2 speakers fail to pair, turn off both devices and repeat steps 1, 2 and 3.
- The TWS function only works between the same speakers or with other speakers that use the same microprocessor
or solution.
PLAYBACK ON USB/MICRO SD INPUT
1. Turn on the device;
2. Insert a USB memory or a Micro SD card into the corresponding inputs (2/3). Playback will start automatically;
3. To pause playback, press the
will show "PAUS";
4. To resume playback, press the
5. Press the
track. Press the 9(15) button on the unit, or the 9(3) button on the remote control to skip to the previous tracks;
6. Using the numeric keypad (11) on the remote control, you can directly enter the number of the music track you want
to play;
7. Press the REP button (6) on the remote control once, the display will show "ONE" (to continuously play the same track);
press it a second time, the display will show "ALL" (to continuously play all the tracks contained in the USB/Micro SD
device); press it again, the display will show "RND" (for random playback of the tracks).
Notes:
- The player may not support some USB/microSD devices, this is due to the incompatibility of some processors.
- To avoid harmful interference, always connect the USB devices directly to the unit, do not use extension cables.
- From the computer, format the USB/Micro SD memories in FAT (16 or 32).
:(19) button on the unit or the:(9) button on the remote control, during listening to skip to the next
button (17) on the unit or the button (8) on the remote control; the display
button (17) on the unit or on the remote control (8) again;
LINE-IN
1. Turn on the device and select the "LINE" function;
2. Connect any unit equipped with audio output via a 3.5mm Jack cable to the LINE input (4);
3. Adjust the external device from its controls.
RADIO OPERATION (ONLY FOR EXPORT VERSIONS)
AUTOMATIC MEMORIZATION OF STATIONS
1. Turn on the appliance and select the radio function, the frequency indication appears on the display;
2. Press and hold the
when the entire radio band scan is complete. At the end, the rst stored radio station will be played.
RECALLING THE STORED STATION
- Press the :(19) button to go to the next station, press the 9(15) button to go to the previous station.
Notes:
- FM reception depends greatly on the location where the appliance is located.
- The proximity to TV sets, neon lamps or other household appliances can cause disturbances in the reception of radio
programs, in this case move the appliance away.
(17) button to automatically search for and store radio stations. The search/storage will stop
14
Page 15
XF 1400 KBENGLISH
MICROPHONE
Insert the supplied microphone plug into the MIC1(5) or MIC2(6) input, turn on the microphone using the switch on the
handle and adjust the volume and effects using the MIC VOLUME(12), ECHO(24) and DELAY(23) controls.
MIC PRIORITY FUNCTION
By pressing the M.PRI(14) button you can activate or deactivate the microphone priority function, the speaker audio is
automatically lowered when speaking into the microphone.
RECORDING
RECORDING TO USB MEMORY FROM LINE IN AND RADIO
1. Turn on the device;
2. Insert a USB memory into the socket (2);
3. Select the source to be played (LINE IN OR FM RADIO) and press the REC button (16) on the unit or (4) on the
remote control;
4. Press the REC button again to end recording; the recorded le will be saved inside the USB memory.
TROUBLESHOOTING
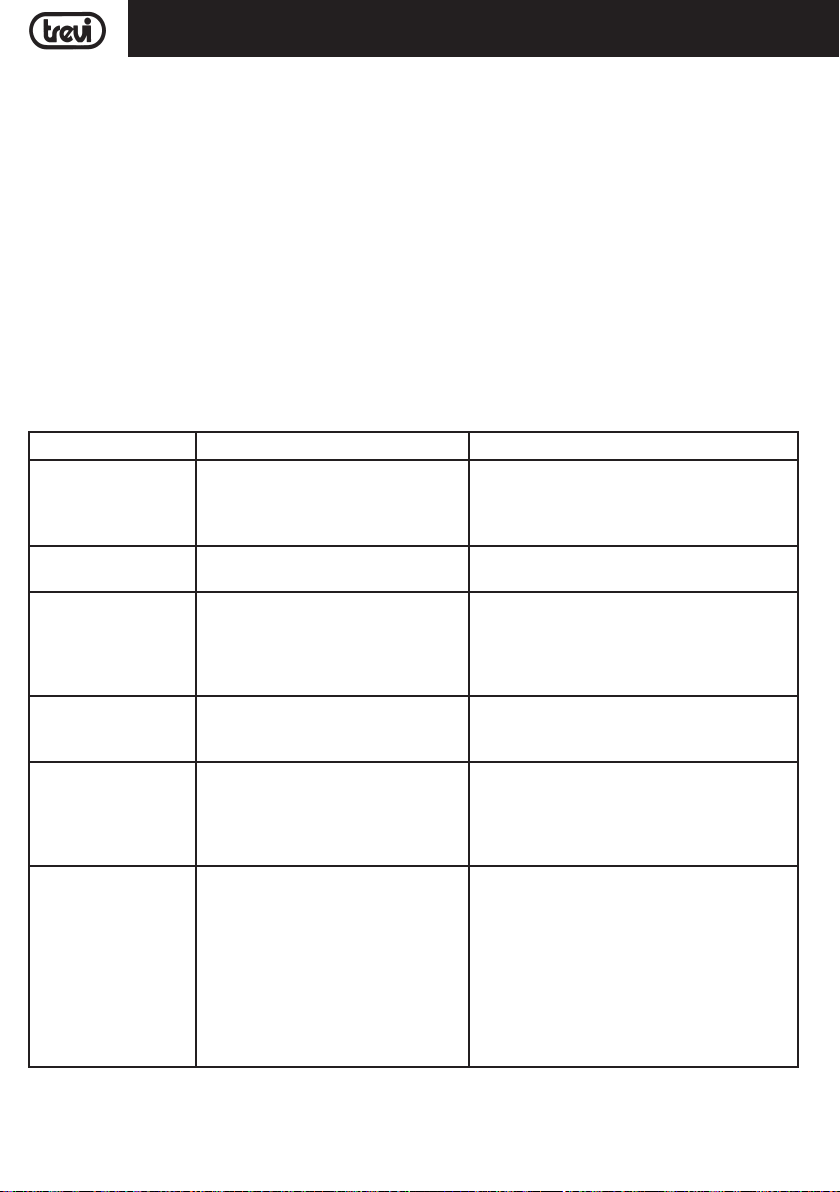
If a problem occurs, follow the steps in the table below.
If the problem still can’t be solved, please contact your retailer.
Problem Possible cause Solution
No sound when power
is turned ON
Distorted sound 1. Volume is too loud
No sound from the
microphone
No sound comes after
inserting USB/ Micro
SD Card
Unable to charge or the
battery works only for
short duration
Speaker makes loud
noises
1. No input sound source comes
2. Volume knob in the lowest position
3. Voice switch off
4. USB/Micro SD card not plugged
2. Audio le error
1. Microphone socket may not be
plugged properly.
2. Microphone switch may not be on.
3. Microphone volume is on lowest
mode.
1. Incorrect le format
2. USB/Micro SD may not be plugged
properly
1. Connect with power cord to charge
2. Battery not fully charged
3. Battery life may have ended
1. Microphone switched on but may
too close to the speaker
2. Microphone switched on but is not
being used
3. Microphone volume may be too
loud
4. Mobile phone is being used too
close to the speaker
5. Other wireless equipment may be
placed very close to the speaker
1. Input AUX signal
2. Adjust volume
3. Turn on voice switch
4. Plug USB/Micro SD card, play MP3
1. Turn the volume down
2. Check and change the audio le
1. Ensure the microphone is correctly plugged
into the socket.
2. Turn on the microphone
3. Adjust the microphone volume as per users
wish
1. File format should be MP3
2. Plug USB/Micro SD card correctly
1. Check if power cord connected properly
2. Extend charging time;normally it takes 6-8
hour to fully charge
3. Replace old batteries with the same specication as the old batteries.
1. Keep the microphone 2 meters away from
the speaker
2. Turn off microphone if not in use.
3. Adjust microphone volume to lower mode
4. Keep mobile away from the speaker whilst a
ending a call.
5. Keep the speaker away from other wireless
equipment
15
Page 16
ENGLISH
XF 1400 KB
INFORMATION NOTE ON THE REMOVAL BATTERY
Warning: Only high-qualied personnel should perform this operation!
BATTERY REMOVAL
The appliance should not be plugged to the mains socket when performing this operation!
1. Remove the screws that secure the top control panel;
2. Remove it and locate the battery;
3. Disconnect the battery and remove it.
INFORMATION ON DISPOSAL BATTERY
Used batteries should not be disposed of with household waste or thrown into re or water. Used batteries should be
recycled or disposed of in separate waste collection centres.
Precautions for correct disposal of the product.
The symbol shown on the equipment indicates that waste must be disposed of in “separate collection” and so the
product must not be disposed of together with urban waste.
The user must take the product to special “separate waste collection centres” provided by local government, or deliver
it to the retailer against the purchase of a new product.
Separate collection of waste and subsequent treatment, recycling and disposal operations promotes the production
of equipment with recycled materials and limits negative eects on the environment and on health caused by improper handling of waste.
Illegal disposal of the product leads to the enforcement of administrative penalties.
TECHNICAL SPECIFICATIONS
Power supply: ................................................. External charger 9V 2A
................................................. Internal rechargeable lithium battery 7.4V
Maximum Audio power: ................................................. 100W
Max transmission power: ................................................. 2.5mW
Wireless audio transmission band: .......................................... 2.4GHz
FM radio frequency band (export version): .......................... 87.5-108 MHz
Dimensions: ................................................. 420x360x670mm
Weight: ................................................. 9 Kg
16
, 4500mAh
Page 17
FRANCAIS
XF 1400 KB
NOTES D’EMPLOI
Une écoute prolongée à un volume élevé peut endommager votre audition.
Il s'agit d'un appareil électronique de précision; évitez de l'utiliser dans les cas suivants:
• Près de champs magnétiques.
• À proximité de sources de chaleur telles que radiateurs et poêles.
• Dans des endroits très humides tels que salles de bain, piscines, etc ...
• Dans des endroits très poussiéreux.
• Dans des endroits soumis à de fortes vibrations.
• N'approchez pas votre oreille de l'enceinte pendant les phases de réglage et de réglage du volume, et en particulier
pour maintenir le volume au minimum pendant la phase d'allumage.
• Positionnez l'appareil de manière à ce qu'il y ait toujours sufsamment d'espace sur ses côtés pour la libre circulation
de l'air (au moins 5 cm).
• Si des liquides pénètrent à l'intérieur de l'appareil, débranchez immédiatement la che de la prise et apportez l'appareil
au centre de service TREVI agréé le plus proche.
• Avant d'allumer/de recharger l'appareil, vériez toujours que les câbles d'alimentation et de connexion sont correctement installés.
• L'adaptateur secteur doit être connecté à une prise à proximité de l'appareil et doit être facilement accessible.
• Si vous remarquez une chaleur excessive sur l'appareil ou sur l'adaptateur secteur, débranchez immédiatement la che
de la prise d'alimentation principale.
• Ne tirez pas sur le câble d'alimentation
• Aucune source de amme nue, telle que des bougies allumées, ne doit être placée sur l'appareil.
• L'appareil ne doit pas être exposé à des gouttes d'eau ou des éclaboussures et aucun objet rempli de liquide, comme
des vases, ne doit être placé sur l'appareil.
• Demandez aux enfants et aux personnes ayant peu de connaissances sur le produit de l'utiliser correctement.
• Conservez ce manuel pour référence future.
MANIEMENT ET ENTRETIEN
Pour le nettoyage, il est conseillé d’utiliser un chiffon doux légèrement humide. Évitez l’emploi de solvants ou de substances abrasives.
IMPORTANT
Cet appareil est conçu pour un usage domestique (usage non professionnel). La bonne fabrication de cet appareil garantit
un fonctionnement parfait pour une longue période. Si toutefois quelques inconvénients devaient se présenter, adressez-
vous au Centre d’Assistance agréé TREVI le plus proche.
TREVI observe une politique de recherche et de développement continus. C’est pourquoi ses produits peuvent présenter
des caractéristiques différentes par rapport à celles qui sont décrites.
Pour éviter d'éventuels dommages auditifs, limiter la durée d'écoute à volume élevé
17
Page 18
FRANCAIS
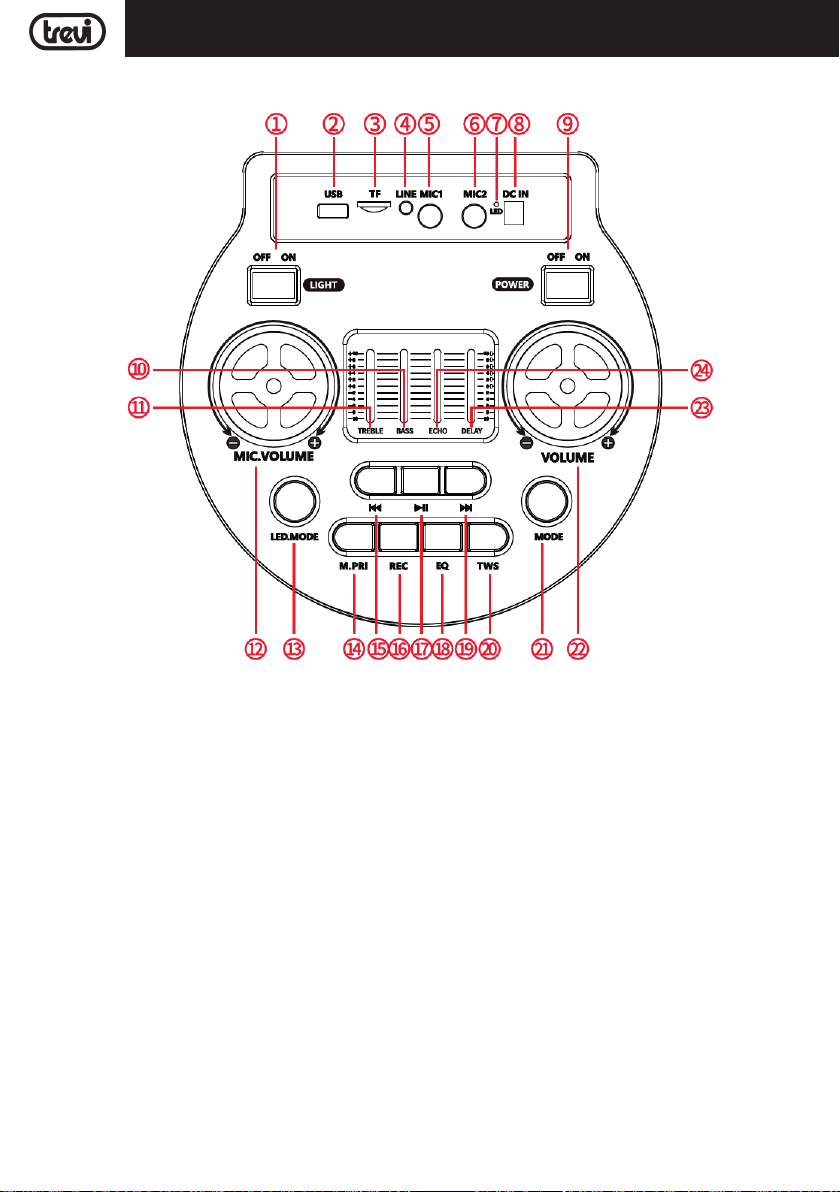
DESCRIPTION DE LA COMMANDE
XF 1400 KB
1. Activation LED Disco Light
2. Entrée mémoire USB
3. Entrée carte MicroSD
4. Entrée LINE IN
5. Entrée MIC1, entrée pour microphone laire
6. Entrée MIC2, entrée pour microphone laire
7. Indicateur de charge LED
8. Prise de charge
9. Interrupteur POWER, marche/arrêt
10. BASS, réglage des basses
11. TREBLE, réglage des aigus
12. Volume du microphone
13. Bouton effets lumineux
14. Bouton M.PRI, activation fonction priorité micro
15. Bouton
9, piste précédente
16. Bouton REC, fonction enregistrement
17. Bouton
18. Bouton EQ, égalisations audio
19. Bouton
20. Bouton TWS
21. Bouton MODE, sélection de fonction
22. Contrôle du volume
23. Contrôle de l'effet DELAY
24. Contrôle de l'effet ECHO
18
, lecture/pause
:, piste suivante
Page 19
FRANCAIS
XF 1400 KB
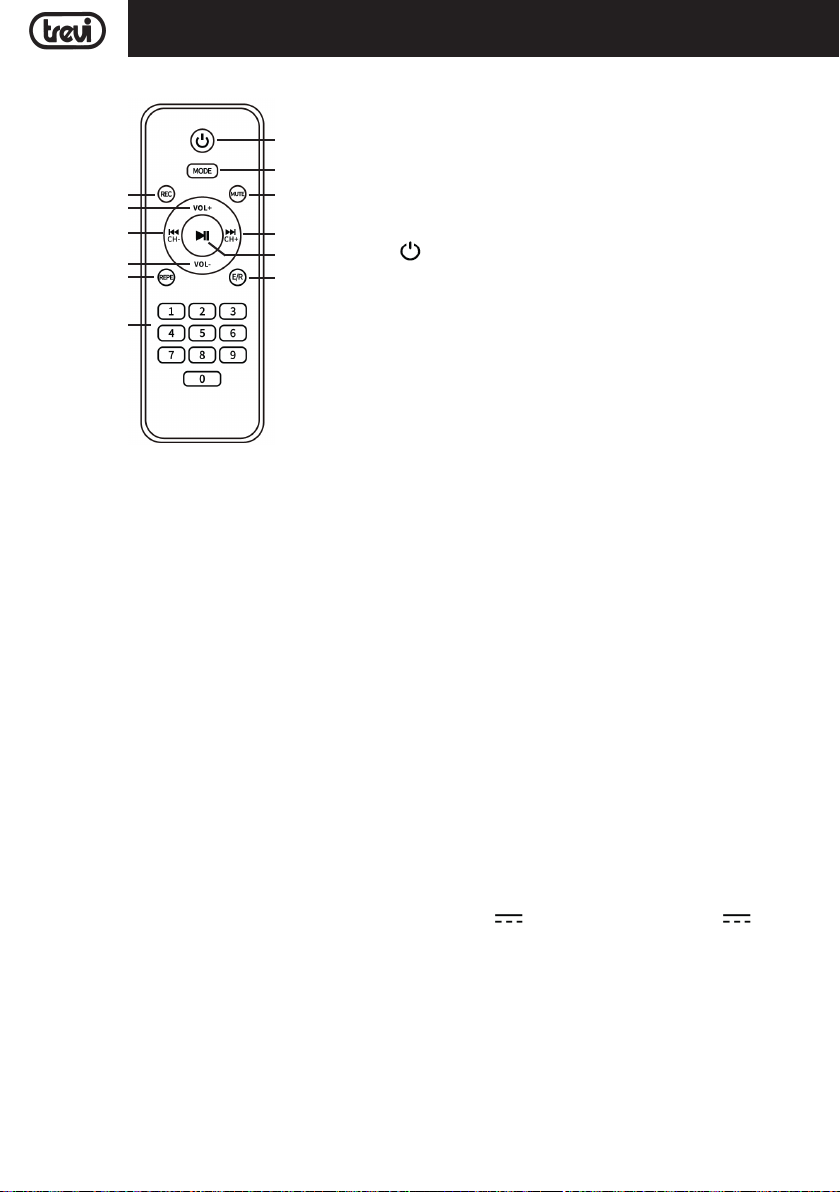
TELECOMMANDE
5
1. Bouton MUTE, pour couper le son en cours de lecture
12
2. Bouton E/R, pour sélectionner l'égalisation audio
4
7
3 9
10
6
11
ACTIVATION ET REMPLACEMENT DE LA BATTERIE DE TÉLÉCOMMANDE
Avant d'utiliser la télécommande, insérez les piles comme décrit ci-dessous:
1. Retirez le couvercle du compartiment des piles comme indiqué sur la gure;
2. Insérez 2 piles de taille "AAA" en faisant attention aux polarités indiquées et fermez le couvercle.
MISE EN GARDE
- Jetez les piles usagées conformément aux réglementations de recyclage en vigueur dans
votre région.
- Risque d'explosion si la batterie n'est pas remplacée correctement.
- Remplacez uniquement par le même type ou équivalent.
- Si la télécommande n'est pas utilisée pendant de longues périodes, la pile peut fuir et endommager la télécommande,
remplacez-la par une neuve si cela se produit.
- NE PAS court-circuiter les batteries ni les jeter dans l'eau, les ordures ménagères ou le feu.
1
3. Bouton
4. Bouton REC, pour enregistrer
8
5. Bouton
6. Bouton REP, pour répéter
2
7. VOL +, pour régler le volume
8. Bouton
9. Bouton
10. VOL -, pour régler le volume
11. Pavé numérique pour la sélection directe de piste
12. Bouton MODE, pour sélectionner la fonction
9, pour sélectionner la piste précédente
, pour allumer/mettre en veille
, pour lire/mettre en pause
:, pour sélectionner la piste suivante
TRANSPORT
Appuyez sur le bouton de la poignée du chariot, soulevez-la jusqu'au bloc (vous entendrez un clic métallique). Pour le
transport, en agissant sur la poignée du chariot, pliez légèrement l’appareil et tirez parti des deux roues arrière.
Pour déverrouiller et fermer le chariot, appuyez à nouveau sur le bouton de la poignée et abaissez-la complètement.
Pour le transport, il est également possible d’utiliser les deux poignées placées latéralement à l’appareil.
ALIMENTATION
Cet appareil fonctionne avec une batterie interne rechargeable de 7,4 V 4500 mAh et un chargeur 9 V 2 A.
Lorsque la batterie est faible ou que l'appareil ne s'allume pas, placez l'interrupteur principal POWER (9) sur la position
"OFF", connectez l'alimentation fournie à la prise (8) de l'appareil et branchez la che sur une prise secteur et chargez la
batterie interne, le voyant LED (7) deviendra rouge.
États du voyant LED avec la batterie en charge :
- Voyant LED (7) xe ROUGE : l'appareil est correctement connecté à l'alimentation et la batterie est en charge.
- Voyant LED (7) éteint : opération de charge terminée, la batterie est chargée.
Remarque : ne connectez pas l'appareil à des alimentations dont la tension ou la polarité sont différentes de
celles indiquées.
19
Page 20

FRANCAIS
XF 1400 KB
FONCTIONS DE BASE
MISE EN MARCHE/ARRÊT
Appuyez sur l'interrupteur principal POWER (9) pour allumer et utiliser l'appareil avec sa batterie interne.
Appuyez à nouveau sur l'interrupteur principal POWER (9) pour éteindre complètement l'appareil ou pour recharger la
batterie.
VEILLE
Vous pouvez mettre l'appareil en mode veille à l'aide du bouton (5) de la télécommande.
Remarques :
- En mode veille, l'éclairage LED bleu des boutons reste allumé pour indiquer que la fonction veille a été activée.
- Laisser l'appareil en veille a tendance à vider la batterie plus rapidement qu'en utilisant l'interrupteur principal POWER
(9).
SÉLECTION DES FONCTIONS
Pour changer le mode de fonctionnement, appuyez plusieurs fois sur le bouton MODE de l'appareil ou de la télécommande
pour sélectionner : AUDIO SANS FIL (l'écran afche « BLEU »), USB ou Micro SD (uniquement si une mémoire est insérée
dans la prise USB (2) / fente Micro SD (3), l'écran afche « USB » ou « SD », LINE-IN (l'écran afche « LINE »).
RÉGLAGE DU VOLUME ET FONCTION MUTE
1. Tournez le bouton VOLUME (22) pour augmenter ou diminuer le volume général de lecture ou utilisez les boutons
VOL + (7) et VOL - (10) de la télécommande ;
2. Tournez le bouton MIC. VOL (12) pour régler le volume du signal sur les entrées MIC1 (5) et MIC2 (6).
3. Appuyez sur le bouton MUTE (1) de la télécommande pour mettre immédiatement l'appareil en mode silencieux ;
appuyez à nouveau pour réactiver l'audio.
CONTRÔLE DE LA TONALITÉ ET ÉGALISEUR
Vous pouvez régler la tonalité de la lecture audio à l'aide de les commandes TREBLE (11) et BASS (10).
Appuyez plusieurs fois sur le bouton EQ (18) de l'appareil ou sur le bouton E/R (2) de la télécommande pour sélectionner
l'une des 6 égalisations audio disponibles.
EFFET ECHO (POUR MICROPHONE)
Utilisez la commande ECHO (24) pour augmenter ou diminuer l'effet d'écho sur les entrées MIC1 et 2.
EFFET DELAY (POUR MICROPHONE)
Utilisez la commande DELAY (23) pour augmenter ou diminuer l'effet delay sur les entrées MIC1 et 2.
EFFET DISCO-LIGHT
Pour activer l'effet Disco-Light sur l'enceinte, appuyez sur l'interrupteur LIGHT (1).
Pour désactiver l'effet Disco-Light, appuyez à nouveau sur l'interrupteur LIGHT (1).
Vous pouvez sélectionner différents effets lumineux en appuyant plusieurs fois sur le bouton LED MODE (13).
Remarque : Les effets d'éclairage Disco Light ne sont pas disponibles dans la fonction radio FM (version export), les lumières restent
éteintes.
FONCTIONNEMENT AUDIO SANS FIL
1. Allumez l'appareil et sélectionnez la fonction Audio sans l, l'écran afchera "BLUE" ;
2. L'afchage "BLEU" commencera à clignoter et le système passera automatiquement en mode recherche ;
3. Activez la fonction Audio sans l sur l'appareil externe à associer ;
4. Démarrez la recherche d'appareils. Une fois terminé, sélectionnez l'appareil "XF 1400 KB" ;
5. Entrez le mot de passe "0000" si demandé ;
6. Démarrez la lecture de musique depuis votre appareil.
7. Appuyez sur le bouton
lecture, utilisez les boutons :(19) ou 9(15) de l'appareil, ou les boutons :(9) et 9(3) de la télécommande pour
sélectionner les pistes.
(17) de l'appareil ou de la télécommande (8) pour démarrer ou mettre en pause la
CONNEXION TWS
Technologie True Wireless Stereo (TWS)
La technologie TWS permet à l'utilisateur d'établir une connexion sans l entre deux enceintes du même modèle et
compatibles avec la fonction TWS.
Avec la connexion TWS, deux enceintes seront automatiquement connectées (sans l) pour former un seul système d'enceintes stéréo qui émet le canal gauche et droit.
20
Page 21

XF 1400 KBFRANCAIS
CONNEXION
Remarque : les deux enceintes doivent être du même modèle et toutes deux compatibles avec la technologie TWS.
1. Désactivez la connexion audio sans l sur le téléphone ou autre appareil ;
2. Allumez les deux enceintes et sélectionnez le mode audio sans l sur les deux ;
3. Appuyez sur le bouton « TWS » (20) sur l'une des enceintes (activation de l'appairage TWS, vous entendrez un son et
le mot « btSt » apparaîtra sur l'écran), après quelques secondes les deux enceintes seront appairées ;
4. Activez l'audio sans l sur le téléphone ou autre appareil, recherchez et appairez l'appareil externe à l'enceinte. Une fois
la connexion établie, vous pouvez écouter de la musique avec le système d'enceintes stéréo TWS.
Les réglages sur l'enceinte principale seront effectués simultanément sur l'autre enceinte. Par exemple, régler le volume,
sélectionner la chanson précédente et suivante, lire et mettre en pause, allumer et éteindre.
Remarques :
- Si les 2 enceintes ne parviennent pas à s'appairer, éteignez les deux appareils et répétez les étapes 1, 2 et 3.
- La fonction TWS ne fonctionne qu'entre les mêmes enceintes ou avec d'autres enceintes qui utilisent le même micro-
processeur ou la même solution.
ENTRÉE USB/MICRO SD
1. Allumez l'appareil ;
2. Insérez une clé USB ou une carte Micro SD dans les entrées correspondantes (2/3). La lecture démarre automatiquement;
3. Pour mettre la lecture en pause, appuyez sur le bouton
télécommande ; l'écran afche « PAUS » ;
4. Pour reprendre la lecture, appuyez à nouveau sur le bouton
télécommande ;
5. Appuyez sur le bouton
à la piste suivante. Appuyez sur le bouton 9(15) de l'appareil ou sur le bouton 9(3) de la télécommande pour passer
aux pistes précédentes ;
6. À l'aide du pavé numérique (11) de la télécommande, vous pouvez saisir directement le numéro du morceau de musique
que vous souhaitez écouter ;
7. Appuyez une fois sur le bouton REP (6) de la télécommande, l'écran afchera "ONE" (pour lire en continu le même
morceau) ; appuyez une deuxième fois, l'écran afchera "ALL" (pour lire en continu tous les morceaux contenus dans le
périphérique USB/Micro SD) ; appuyez à nouveau, l'écran afchera "RND" (pour une lecture aléatoire des morceaux).
Remarques :
- Le lecteur peut ne pas prendre en charge certains périphériques USB/microSD, cela est dû à l'incompatibilité de certains
processeurs.
- Pour éviter les interférences nuisibles, connectez toujours les périphériques USB directement à l'appareil, n'utilisez pas
de rallonges.
- Depuis l'ordinateur, formatez les mémoires USB/Micro SD en FAT (16 ou 32).
:(19) de l'appareil ou sur le bouton :(9) de la télécommande pendant l'écoute pour passer
ENTRÉE LIGNE
1. Allumez l'appareil et sélectionnez la fonction "LINE" ;
2. Connectez n'importe quel appareil équipé d'une sortie audio via un câble Jack 3,5 mm à l'entrée LINE (4) ;
3. Réglez l'appareil externe à partir de ses commandes.
FONCTIONNEMENT RADIO (UNIQUEMENT POUR LES VERSIONS EXPORT)
MÉMORISATION AUTOMATIQUE DES STATIONS
1. Allumez l'appareil et sélectionnez la fonction radio, l'indication de fréquence apparaît sur l'écran ;
2. Appuyez et maintenez enfoncé le bouton
radio. La recherche/mémorisation s'arrêtera lorsque le balayage complet de la bande radio sera terminé. À la n, la
première station de radio mémorisée sera diffusée.
RAPPEL DE LA STATION MÉMORISÉE
- Appuyez sur le bouton :(19) pour passer à la station suivante, appuyez sur le bouton 9(15) pour passer à la station
précédente.
Remarques :
- La réception FM dépend fortement de l'emplacement où se trouve l'appareil.
- La proximité de téléviseurs, de lampes au néon ou d'autres appareils électroménagers peut provoquer des perturbations
dans la réception des programmes radio, dans ce cas, éloignez l'appareil.
(17) pour rechercher et mémoriser automatiquement les stations de
(17) de l'appareil ou sur le bouton (8) de la
(17) de l'appareil ou sur le bouton (8) de la
21
Page 22
FRANCAIS
XF 1400 KB
MICROPHONE
Insérez la che du microphone fournie dans l'entrée MIC1(5) ou MIC2(6), allumez le microphone à l'aide de l'interrupteur
sur la poignée et réglez le volume et les effets à l'aide des commandes MIC VOLUME(12), ECHO(24) et DELAY(23).
FONCTION PRIORITÉ MICRO
En appuyant sur le bouton M.PRI(14), vous pouvez activer ou désactiver la fonction de priorité du microphone, le son du
haut-parleur est automatiquement abaissé lorsque vous parlez dans le microphone.
ENREGISTREMENT
ENREGISTREMENT SUR UNE MÉMOIRE USB À PARTIR DE L'ENTRÉE DE LIGNE ET DE
LA RADIO
1. Allumez l'appareil ;
2. Insérez une clé USB dans la prise (2) ;
3. Sélectionnez la source à écouter (ENTRÉE DE LIGNE OU RADIO FM) et appuyez sur le bouton REC (16) de l'appareil
ou (4) de la télécommande ;
4. Appuyez à nouveau sur le bouton REC pour terminer l'enregistrement ; le chier enregistré sera sauvegardé dans la
clé USB.
DÉPANNAGE
Si un problème se produit, suivez les étapes dans le tableau suivant.
Si le problème ne peut être résolu, contactez votre revendeur.
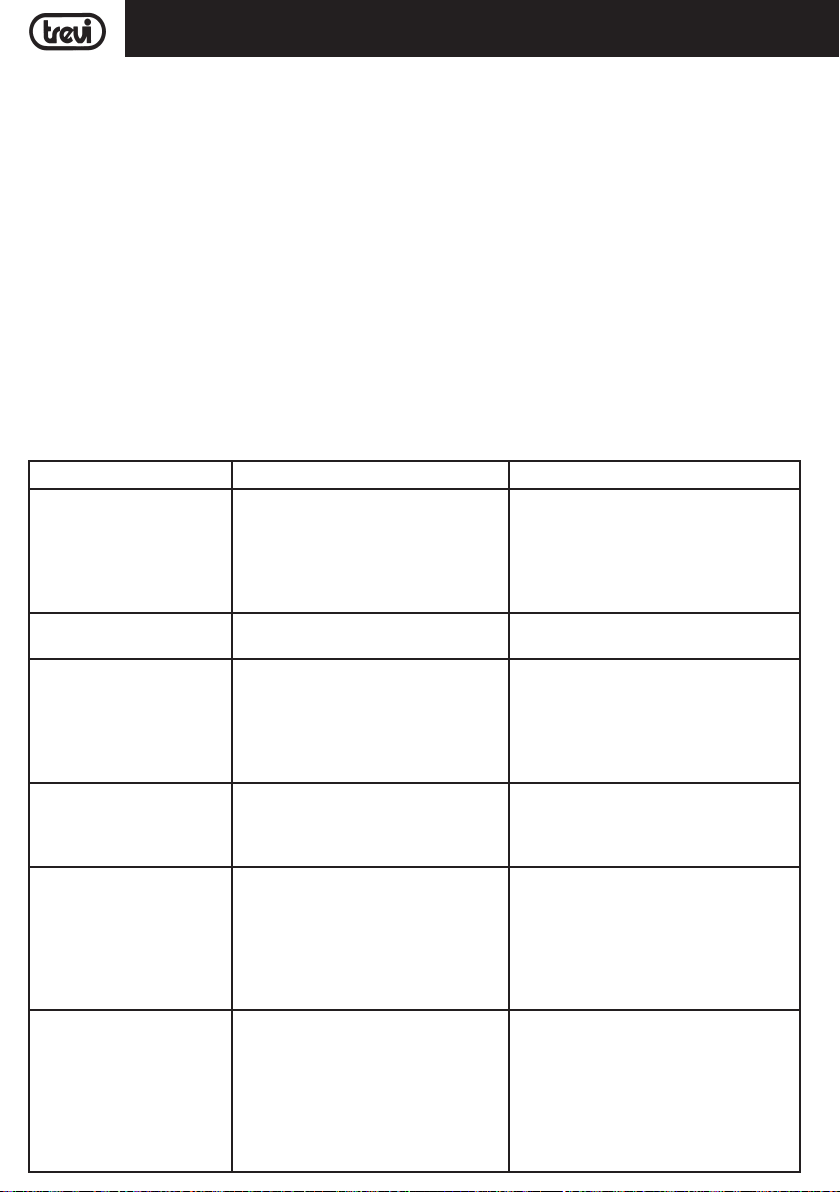
Problème Causes possibles Solution
Aucun son lorsque l'appareil
est en marche
Distorsion du son 1. Volume trop élevé
Aucun son du microphone 1. La prise de microphone ne peut pas
Pas de son lorsque vous
insérez un périphérique USB/
Micro SD carte
Vous ne pouvez pas charger
la batterie ou la batterie a un
court-terme
Les haut-parleurs que vous
entendez des bruits forts
1. Sans Source sonore
2. Manopola Volume au niveau 0
3. Voce off Guide
4. Nessun Dispositif Micro SD/USB
connecté
2. Errore Fichiers audio
être correctement connecté.
2. Le contacteur d'allumage sur le
microphone peut être en position
"off".
3. Volume du microphone de basse.
1. Format de chier non pris en charge
2. USB/Micro SD carte est pas correctement connecté
1. Branchez le cordon d'alimentation
pour recharger
2. La batterie est pas complètement
chargée
3. La batterie peut avoir exécuter son
cycle de vie
1. Microphone sur mais trop près
2. Microphone sur mais non utilisés
3. Volume du microphone peut être
trop élevé
4. Une cellule est utilisé trop près
5. équipements sans l peut être très
proche de ceux qui utilisent le
microphone
22
1. Connectez un appareil à la prise
AUX-IN
2. Réglez le volume
3. Attivare le guidage vocal
4. Connecter USB/Micro SD Carte, jouer
MP3
1. Baissez le volume
2. Vérier et lire un autre chier audio
1. Assurez-vous que le microphone est
correctement branché.
2. Allumez le microphone.
3. Réglez correctement le volume du
microphone
1. Le format de chier audio doit être
MP3
2. Connectez le périphérique USB/Micro
SD carte correctement
1. Vériez si le câble d'alimentation est
correctement connecté
2. Normalement, il prend 7-8 heures
pour charger complètement la batterie
3. Remplacez la pile par une nouvelle
avec les mêmes spécications techniques
1. Tenez le microphone à 2 mètres du
haut-parleur
2. Éteignez le microphone si non utilisé
3. Abaisser le volume du microphone
4. Gardez le téléphone de haut-parleur
pendant un appel.
5. Gardez le haut-parleur loin de
périphériques sans l
Page 23

FRANCAIS
XF 1400 KB
NOTE D'INFORMATION SUR LE RETRAIT ET ÉLIMINATION DES BATTERIES
Attention: Seul le personnel de haute qualié doit effectuer cette opération!
RETRAIT DE LA BATERIE
L'appareil ne doit pas être branché à la prise de courant lors de l'exécution de cette opération!
1. Retirez les vis qui xent le panneau de commande supérieur ;
2. Retirez-le et localisez la batterie ;
3. Débranchez la batterie et retirez-la.
ÉLIMINATION DE LA BATTERIE
Les piles usagées ne doivent pas être jetés avec les déchets ménagers ou jetés dans le feu ou l'eau. Les batteries usagées
doivent être recyclés ou éliminés dans les centres de collecte de déchets séparés.
Recommandations pour l’élimination correcte du produit.
Le symbole gurant sur l’appareil indique que le produit fait l’objet d’une “collecte séparée“. C’est pourquoi, le produit
ne doit pas être éliminé avec les déchets urbains.
L’utilisateur doit remettre le produit auprès de “décharges spécialisées de collecte séparée“ prévues par les autorités
locales, ou bien le rendre au revendeur quand il achètera un nouvel appareil équivalent.
La collecte séparée du produit et les opérations successives de traitement, recyclage et élimination favorisent la
production d’appareils composés par des matériaux recyclés ainsi que permettent d’éviter des eets négatifs sur
l’environnement et sur la santé des personnes suite à une gestion impropre du déchet.
Toute élimination abusive du produit entraîne l’application de sanctions administratives.
CARACTÉRISTIQUES
Alimentation : ................................................. Chargeur externe 9V 2A
................................................. Batterie lithium rechargeable interne 7,4V
Puissance audio maximale : ................................................. 100W
Puissance de transmission maximale : .................................... 2,5mW
Bande de transmission audio sans l : .................................... 2,4GHz
Bande de fréquence radio FM (version export) : ................ 87,5-108 MHz
Dimensions : ................................................. 420x360x670mm
Poids : ................................................. 9 Kg
23
, 4500mAh
Page 24
DEUTSCH
XF 1400 KB
GEBRAUCHSHINWEISE
Wenn Sie längere Zeit mit hoher Lautstärke hören, kann dies Ihr Gehör schädigen.
Dies ist ein elektronisches Präzisionsgerät. Vermeiden Sie die Verwendung in folgenden Fällen:
• In der Nähe von Magnetfeldern.
• In der Nähe von Wärmequellen wie Heizungen und Öfen.
• An sehr feuchten Orten wie Badezimmern, Schwimmbädern usw.
• An sehr staubigen Orten.
• An Orten, die starken Vibrationen ausgesetzt sind.
• Bringen Sie Ihr Ohr während der Einstell- und Lautstärkeregelungsphase nicht in die Nähe des Lautsprechers, insbesondere um die Lautstärke in der Zündphase auf ein Minimum zu beschränken.
• Stellen Sie das Gerät so auf, dass an den Seiten immer genügend Platz für die freie Luftzirkulation ist (mindestens 5
cm).
• Wenn Flüssigkeiten in das Gerät eindringen, ziehen Sie sofort den Stecker aus der Steckdose und bringen Sie das
Gerät zum nächstgelegenen autorisierten TREVI-Servicecenter.
• Überprüfen Sie vor dem Einschalten / Auaden des Geräts immer, ob die Strom- und Verbindungskabel korrekt installiert
sind.
• Das Netzteil muss an eine Steckdose in der Nähe des Geräts angeschlossen und leicht zugänglich sein.
• Wenn Sie am Gerät oder am Netzteil übermäßige Hitze bemerken, ziehen Sie sofort den Stecker aus der Hauptsteckdose.
• Ziehen Sie nicht am Netzkabel
• Auf das Gerät dürfen keine offenen Flammenquellen wie brennende Kerzen gestellt werden.
• Das Gerät darf keinem tropfenden oder spritzenden Wasser ausgesetzt werden, und es dürfen keine mit Flüssigkeit
gefüllten Gegenstände wie Vasen auf das Gerät gestellt werden.
• Weisen Sie Kinder und Personen mit geringen Kenntnissen über das Produkt an, es richtig zu verwenden.
• Bewahren Sie dieses Handbuch zum späteren Nachschlagen auf.
PFLEGE UND WARTUNG
Für die Reinigung wird die Verwendung eines leicht angefeuchteten, weichen Tuchs empfohlen. Der Einsatz von Lösungsmitteln oder scheuernden Substanzen sollte vermieden werden.
WICHTIG
Dieses Gerät ist für den Heimgebrauch (nicht professionellen Gebrauch). Der fachgemäße Bau dieses Geräts gewährleistet
langfristig einen einwandfreien Betrieb. Sollten dennoch Betriebsstörungen auftreten, wenden Sie sich bitte an nächstge-
legene autorisierte TREVI-Kundendienststelle.
Die Firma TREVI verfolgt eine Politik ständiger Forschung und Weiterentwicklung. Die Produkte können daher andere
als die beschriebenen Eigenschaften aufweisen.
Um mögliche Hörschäden zu vermeiden, begrenzen die Höhe der Zeit bei hohen Lautstärke hören
24
Page 25
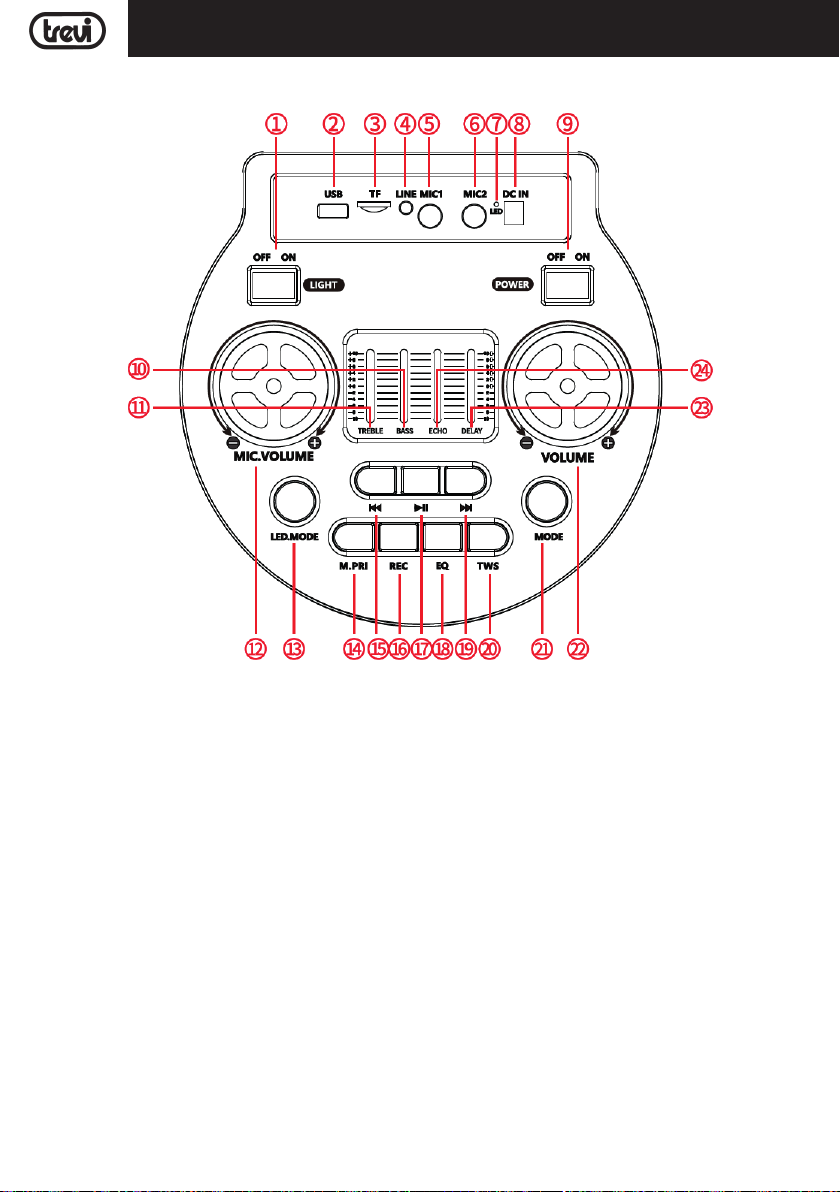
BESCHREIBUNG DER BEFEHLE
XF 1400 KBDEUTSCH
1. Disco Light LED-Aktivierung
2. USB-Speichereingang
3. MicroSD-Karteneingang
4. LINE IN-Eingang
5. MIC1-Eingang, Eingang für kabelgebundenes Mikrofon
6. MIC2-Eingang, Eingang für kabelgebundenes Mikrofon
7. LED-Ladeanzeige
8. Ladebuchse
9. POWER-Schalter, Ein/Aus
10. BASS, Basseinstellung
11. TREBLE, Höheneinstellung
12. Mikrofonlautstärke
13. Lichteffekttaste
14. M.PRI-Taste, Aktivierung der Mikrofonprioritätsfunktion
15.
9-Taste, vorheriger Titel
16. REC-Taste, Aufnahmefunktion
17.
-Taste, Wiedergabe/Pause
18. EQ-Taste, Audioentzerrung
19.
:-Taste, nächster Titel
20. TWS-Taste
21. MODE-Taste, Funktionsauswahl
22. Lautstärkeregler
23. DELAY-Effektsteuerung
24. ECHO-Effektsteuerung
25
Page 26
DEUTSCH
XF 1400 KB
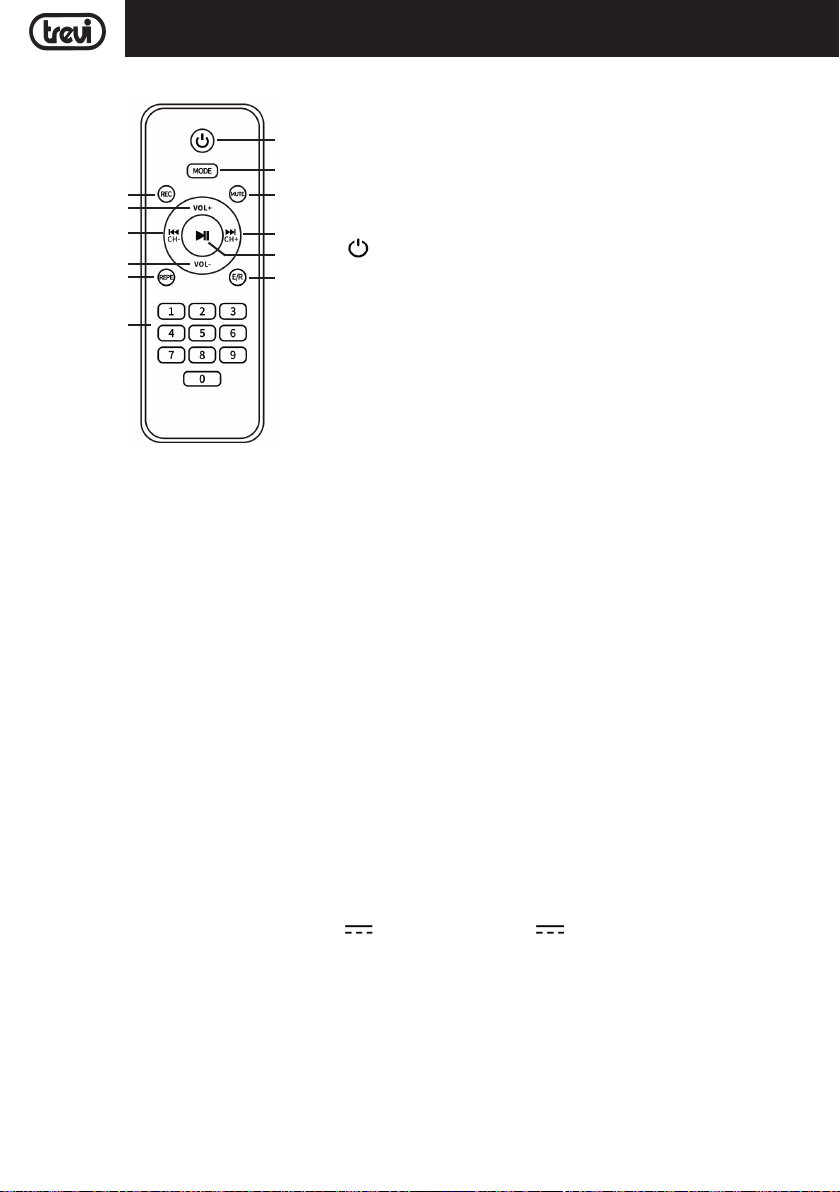
FERNBEDIENUNG
5
12
1. MUTE-Taste, um die Audiowiedergabe stummzuschalten
2. E/R-Taste, um die Audioentzerrung auszuwählen
4
7
3 9
10
6
11
AKTIVIERUNG UND ERSATZ DER BATTERIE DER FERNBEDIENUNG
Legen Sie die Batterien vor der Verwendung der Fernbedienung wie folgt ein:
1. Entfernen Sie den Batteriefachdeckel wie in der Abbildung gezeigt;
2. Legen Sie 2 Batterien der Größe "AAA" ein und achten Sie dabei auf die angegebenen Polaritäten. Schließen Sie die
Abdeckung.
1
3.
:-Taste, um den vorherigen Titel auszuwählen
4. REC-Taste, um aufzunehmen
8
5.
-Taste, um einzuschalten/Standby
6. REP-Taste, um zu wiederholen
2
7. VOL +, um die Lautstärke einzustellen
8.
-Taste, um abzuspielen/anzuhalten
9.
9-Taste, um den nächsten Titel auszuwählen
10. VOL -, um die Lautstärke einzustellen
11. Ziffernblock zur direkten Titelauswahl
12. MODE-Taste, um die Funktion auszuwählen
VORSICHT
- Entsorgen Sie gebrauchte Batterien gemäß den Recyclingbestimmungen in Ihrer Nähe.
- Explosionsgefahr bei falschem Batteriewechsel.
- Nur durch den gleichen Typ oder ein gleichwertiges Produkt ersetzen.
- Wenn die Fernbedienung längere Zeit nicht verwendet wird, kann die Batterie auslaufen und die Fernbedienung be-
schädigen. Ersetzen Sie sie gegebenenfalls durch eine neue.
- Schließen Sie die Batterien NICHT kurz und werfen Sie sie NICHT in Wasser, allgemeinen Müll oder Feuer.
TRANSPORT
Drücken Sie die Taste am Griff des Wagens und heben Sie den Griff bis zum Block an (Sie hören ein metallisches Klicken).
Biegen Sie das Gerät beim Transport leicht auf den Griff des Wagens und nutzen Sie die beiden Hinterräder.
Um den Wagen zu entriegeln und zu schließen, drücken Sie die Taste am Griff erneut und senken Sie den Griff vollständig ab.
Für den Transport können auch die beiden seitlich am Gerät angebrachten Griffe verwendet werden.
BATTERIEVERSORGUNG/AUFLADUNG
Dieses Gerät arbeitet mit einem internen Akku 7,4V 4500 mAh und einem 9V 2A Ladegerät.
Wenn der Akku fast leer ist oder sich das Gerät nicht einschalten lässt, stellen Sie den Hauptschalter POWER (9) auf die Position
„OFF“, schließen Sie das mitgelieferte Netzteil an die Buchse (8) des Geräts und den Stecker an eine Steckdose an und laden
Sie den internen Akku auf. Die LED-Anzeige (7) leuchtet rot.
Zustände der LED-Anzeige beim Laden des Akkus:
- LED-Leuchte (7) leuchtet durchgehend ROT: Das Gerät ist korrekt an die Stromversorgung angeschlossen und der Akku wird geladen.
- LED-Leuchte (7) aus: Ladevorgang abgeschlossen, der Akku ist geladen.
Hinweis: Schließen Sie das Gerät nicht an Stromversorgungen mit anderer Spannung oder Polarität als angegeben an.
26
Page 27

XF 1400 KBDEUTSCH
GRUNDFUNKTIONEN
EIN-/AUSSCHALTEN
Drücken Sie den Hauptschalter (9), um das Gerät einzuschalten und mit dem internen Akku zu verwenden.
Drücken Sie den Hauptschalter (9) erneut, um das Gerät vollständig auszuschalten oder den Akku wieder aufzuladen.
STANDBY
Sie können das Gerät mit der Taste (5) auf der Fernbedienung in den Standby-Modus versetzen.
Hinweise:
- Im Standby-Modus leuchtet die blaue LED-Beleuchtung der Knöpfe weiter, um anzuzeigen, dass die Standby-Funktion
aktiviert wurde.
- Wenn Sie das Gerät im Standby-Modus belassen, wird der Akku tendenziell schneller entladen als bei Verwendung des
Hauptschalters (9).
FUNKTIONSAUSWAHL
Um den Betriebsmodus zu ändern, drücken Sie die MODE-Taste am Gerät oder auf der Fernbedienung mehrmals, um
Folgendes auszuwählen: WIRELESS AUDIO (das Display zeigt „BLAU“), USB oder Micro SD (nur wenn ein Speicher in die
USB-Buchse (2) / den Micro SD-Steckplatz (3) eingesteckt ist, das Display zeigt „USB“ oder „SD“, LINE-IN (das Display
zeigt „LINE“).
LAUTSTÄRKEREGLER UND STUMMFUNKTION
1. Drehen Sie den VOLUME-Regler (22), um die allgemeine Wiedergabelautstärke zu erhöhen oder zu verringern, oder
verwenden Sie die Tasten VOL + (7) und VOL - (10) auf der Fernbedienung.
2. Drehen Sie den MIC. VOL-Regler (12), um die Lautstärke des Signals an den Eingängen MIC1 (5) und MIC2 (6) einzustellen.
3. Drücken Sie die MUTE-Taste (1) auf der Fernbedienung, um das Gerät sofort stumm zu schalten; drücken Sie sie erneut,
um den Ton wieder zu aktivieren.
KLANGREGLER UND EQUALIZER
Sie können den Ton der Audiowiedergabe mit den TREBLE (11) und BASS (10) Regler.
Drücken Sie die EQ (18) Taste am Gerät oder die E/R (2) Taste auf der Fernbedienung wiederholt, um eine der 6 verfügbaren
Audioentzerrungen auszuwählen.
ECHO EFFEKT (FÜR MIKROFON)
Verwenden Sie den ECHO Regler (24), um den Echoeffekt an den MIC1 und 2 Eingängen zu erhöhen oder zu verringern.
DELAY EFFEKT (FÜR MIKROFON)
Verwenden Sie den DELAY Regler (23), um den Delay Effekt an den MIC1 und 2 Eingängen zu erhöhen oder zu verringern.
DISCO-LICHTEFFEKT
Um den Disco-Lichteffekt am Lautsprecher zu aktivieren, drücken Sie den LIGHT Schalter (1).
Um den Disco-Lichteffekt zu deaktivieren, drücken Sie den LIGHT Schalter (1) erneut.
Sie können verschiedene Lichteffekte auswählen, indem Sie die LED MODE Taste (13) wiederholt drücken.
Hinweis: Disco Light-Lichteffekte sind in der UKW-Radiofunktion (Exportversion) nicht verfügbar, die Lichter bleiben ausgeschaltet.
DRAHTLOSER AUDIOBETRIEB
1. Schalten Sie das Gerät ein und wählen Sie die Funktion „Drahtloses Audio“, das Display zeigt „BLAU“ an;
2. Die „BLAUE“ Anzeige beginnt zu blinken und das System wechselt automatisch in den Suchmodus;
3. Aktivieren Sie die Wireless Audio-Funktion auf dem zu koppelnden externen Gerät;
4. Starten Sie die Gerätesuche. Wählen Sie anschließend das Gerät „XF 1400 KB“ aus;
5. Geben Sie das Passwort „0000“ ein, falls Sie dazu aufgefordert werden;
6. Starten Sie die Musikwiedergabe von Ihrem Gerät.
7. Drücken Sie die Taste
ten. Verwenden Sie die Tasten 9(15) oder :(19) am Gerät oder die Tasten 9(3) und :(9) auf der Fernbedienung,
um Titel auszuwählen.
TWS-VERBINDUNG
True Wireless Stereo (TWS)-Technologie
Die TWS-Technologie ermöglicht dem Benutzer eine drahtlose Verbindung zwischen zwei Lautsprechern desselben Modells,
die mit der TWS-Funktion kompatibel sind.
Bei der TWS-Verbindung werden zwei Lautsprecher automatisch (ohne Kabel) zu einem einzigen Stereo-Lautsprechersystem
verbunden, das den linken und rechten Kanal ausgibt.
(17) am Gerät oder auf der Fernbedienung (8), um die Wiedergabe zu starten oder anzuhal-
27
Page 28

DEUTSCH
XF 1400 KB
VERBINDUNG
Hinweis: Die beiden Lautsprecher müssen vom gleichen Modell sein und beide mit der TWS-Technologie kompatibel sein.
1. Deaktivieren Sie die Wireless Audio-Verbindung am Telefon oder anderen Gerät;
2. Schalten Sie beide Lautsprecher ein und wählen Sie auf beiden den Wireless Audio-Modus;
3. Drücken Sie die „TWS“-Taste (20) an einem der Lautsprecher (TWS-Kopplung aktivieren, Sie hören einen Ton und das
Wort „btSt“ erscheint auf dem Display), nach einigen Sekunden werden die beiden Lautsprecher gekoppelt;
4. Aktivieren Sie Wireless Audio am Telefon oder anderen Gerät, suchen Sie das externe Gerät und koppeln Sie es mit
dem Lautsprecher. Nach der Verbindung können Sie mit dem TWS-Stereo-Lautsprechersystem Musik abspielen.
Die Einstellungen am Hauptlautsprecher werden gleichzeitig am anderen Lautsprecher vorgenommen. Zum Beispiel die
Lautstärke regeln, den vorherigen und nächsten Song auswählen, abspielen und pausieren, ein- und ausschalten.
Hinweise:
- Wenn die Kopplung der beiden Lautsprecher fehlschlägt, schalten Sie beide Geräte aus und wiederholen Sie die Schritte
1, 2 und 3.
- Die TWS-Funktion funktioniert nur zwischen denselben Lautsprechern oder mit anderen Lautsprechern, die denselben
Mikroprozessor oder dieselbe Lösung verwenden.
SPIELEN SIE AUF INPUT USB/MCRO SD
1. Schalten Sie das Gerät ein;
2. Stecken Sie einen USB-Speicher oder eine Micro SD-Karte in die entsprechenden Eingänge (2/3). Die Wiedergabe startet
automatisch;
3. Um die Wiedergabe zu pausieren, drücken Sie die Taste
dienung; im Display erscheint „PAUS“;
4. Um die Wiedergabe fortzusetzen, drücken Sie erneut die Taste
5. Drücken Sie während des Hörens die Taste
nächsten Titel zu springen. Drücken Sie die Taste 9(15) am Gerät oder die Taste 9(3) auf der Fernbedienung, um zu
den vorherigen Titeln zu springen;
6. Über den Ziffernblock (11) auf der Fernbedienung können Sie die Nummer des Musiktitels, den Sie abspielen möchten,
direkt eingeben;
7. Drücken Sie die Taste REP (6) auf der Fernbedienung einmal, auf dem Display erscheint „ONE“ (für die kontinuierliche
Wiedergabe desselben Titels); drücken Sie sie ein zweites Mal, auf dem Display erscheint „ALL“ (für die kontinuierliche
Wiedergabe aller Titel auf dem USB-/Micro-SD-Gerät); drücken Sie sie erneut, auf dem Display erscheint „RND“ (für
die zufällige Wiedergabe der Titel).
Hinweise:
- Der Player unterstützt möglicherweise einige USB-/Micro-SD-Geräte nicht, dies liegt an der Inkompatibilität einiger
Prozessoren.
- Um Störungen zu vermeiden, schließen Sie die USB-Geräte immer direkt an das Gerät an, verwenden Sie keine Verlängerungskabel.
- Formatieren Sie die USB-/Micro-SD-Speicher vom Computer aus in FAT (16 oder 32).
:(19) am Gerät oder die Taste :(9) auf der Fernbedienung, um zum
(17) am Gerät oder die Taste (8) auf der Fernbe-
(17) am Gerät oder auf der Fernbedienung (8);
LINE-IN
1. Schalten Sie das Gerät ein und wählen Sie die Funktion „LINE“;
2. Schließen Sie ein beliebiges Gerät mit Audioausgang über ein 3,5-mm-Klinkenkabel an den LINE-Eingang (4) an;
3. Stellen Sie das externe Gerät über seine Bedienelemente ein.
RADIOBETRIEB (NUR FÜR EXPORTVERSIONEN)
AUTOMATISCHES SPEICHERN VON SENDERN
1. Schalten Sie das Gerät ein und wählen Sie die Radiofunktion. Die Frequenzanzeige erscheint auf dem Display.
2. Halten Sie die Taste
Suche/Speicherung wird beendet, wenn der gesamte Radiobandscan abgeschlossen ist. Am Ende wird der erste gespeicherte Radiosender abgespielt.
(17) gedrückt, um automatisch nach Radiosendern zu suchen und diese zu speichern. Die
28
Page 29
DEUTSCH
XF 1400 KB
ABRUFEN DES GESPEICHERTEN SENDERS
- Drücken Sie die Taste :(19), um zum nächsten Sender zu gelangen, drücken Sie die Taste 9(15), um zum vorherigen
Sender zu gelangen.
Hinweise:
- Der UKW-Empfang hängt stark vom Standort des Geräts ab.
- Die Nähe zu Fernsehgeräten, Neonlampen oder anderen Haushaltsgeräten kann den Empfang von Radioprogrammen
stören. Stellen Sie in diesem Fall das Gerät weiter weg.
MIKROFON
Stecken Sie den mitgelieferten Mikrofonstecker in den Eingang MIC1(5) oder MIC2(6), schalten Sie das Mikrofon mit dem
Schalter am Griff ein und stellen Sie Lautstärke und Effekte mit den Reglern MIC VOLUME(12), ECHO(24) und DELAY(23) ein.
MIC PRIORITY FUNCTION
Durch Drücken der Taste M.PRI(14) können Sie die Mikrofonprioritätsfunktion aktivieren oder deaktivieren, die Lautsprecherlautstärke wird automatisch gesenkt, wenn Sie in das Mikrofon sprechen.
AUFNAHME
AUFNAHME AUF USB-SPEICHER VON LINE IN UND RADIO
1. Schalten Sie das Gerät ein;
2. Stecken Sie einen USB-Speicher in die Buchse (2);
3. Wählen Sie die abzuspielende Quelle (LINE IN ODER FM-RADIO) und drücken Sie die REC-Taste (16) am Gerät oder
(4) auf der Fernbedienung;
4. Drücken Sie die REC-Taste erneut, um die Aufnahme zu beenden; die aufgenommene Datei wird im USB-Speicher
gespeichert.
FEHLERBEHEBUNG
Wenn ein Problem auftritt, führen Sie die Schritte in der folgenden Tabelle.
Wenn das Problem nicht behoben werden kann, kontaktieren Sie Ihren Händler.
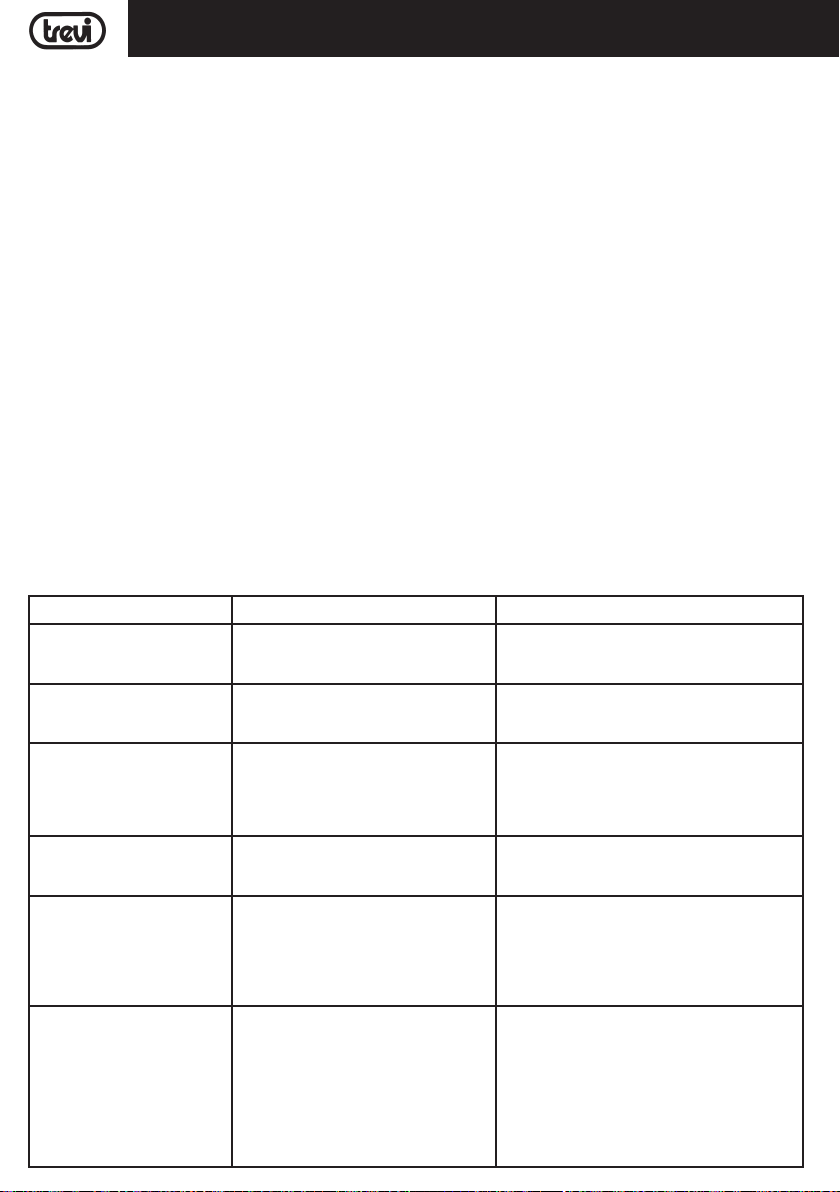
Problem Mögliche Ursachen Lösung
Kein Ton, wenn das Gerät eingeschaltet ist
Verzerrter Ton 1. Die Lautstärke ist zu hoch
Kein Ton aus dem Mikrofon 1. Die Mikrofonbuchse kann nicht richtig
Kein Ton, wenn Sie ein USB-Gerät/
SD-Karte einsetzen
Kann nicht den Akku laden oder
die Batterie hat eine kurzfristige
Die Lautsprecher hören Sie laute
Geräusche
1. Keine Quelle Ton
2. Lautstärkeregler auf Stufe 0
3. Keine SD/USB-Gerät angeschlossen
2. Dateifehler Audio
angeschlossen werden.
2. Das Zündschloss am Mikrofon kann in
Stellung "Aus" sein.
3. Lautstärke des Bass-Mikrofon.
1. Dateiformat wird nicht unterstützt
2. USB/SD-Karte ist nicht richtig angeschlossen
1. Schließen Sie das Netzkabel zum
Auaden
2. Die Batterie ist nicht vollständig geladen
3. Die Batterie kann haben seinen Lebenszyklus laufen
1. Mikrofon auf, aber zu nah
2. Mikrofon auf, aber nicht verwendet
3. Lautstärke des Mikrofons kann zu hoch
sein,
4. Eine Zelle verwendet wird, zu nahe an
5. Drahtlose Geräte können zu denen
sehr nahe sein, die das Mikrofon
verwenden
29
1. Schließen Sie ein Gerät an den AUX-IN
2. Stellen Sie die Lautstärke
3. Verbinden Sie USB/SD-Karte, spielen MP3
1. Drehen Sie die Lautstärke
2. Überprüfen Sie und spielen eine andere Datei
Audio
1. Stellen Sie sicher, dass das Mikrofon richtig
angeschlossen ist.
2. Schalten Sie das Mikrofon.
3. Richtig einstellen Die Lautstärke des Mikrofons
1. Die Audio-Dateiformat muss MP3 sein
2. Verbinden Sie das USB/SD-Karten-Gerät richtig
1. Überprüfen Sie, ob das Netzkabel richtig
angeschlossen ist
2. Normalerweise dauert es 6-8 Stunden vollständig um die Batterie aufzuladen
3. Setzen Sie die alte Batterie durch eine neue mit
den gleichen technischen Spezikationen
1. Halten Sie das Mikrofon zu 2 Meter entfernt
vom Lautsprecher
2. Schalten Sie das Mikrofon, wenn nicht verwendet
3. Senken Sie die Lautstärke des Mikrofons
4. Halten Sie das Telefon aus dem Lautsprecher
entfernt, während Sie einen Anruf tätigen.
5. Halten Sie den Lautsprecher weg von WirelessGeräten
Page 30
DEUTSCH
XF 1400 KB
INFORMATIONEN HINWEIS AUF DIE ENTFERNUNG UND ENTSORGUNG
VON BATTERIEN
Achtung: Nur qualitativ qualiziertes Personal darf diese Operation durchzuführen!
ENTFERNUNG DER BATTERIE
Das Gerät darf bei diesem Vorgang nicht an die Steckdose angeschlossen werden!
1. Entfernen Sie die Schrauben, mit denen das obere Bedienfeld befestigt ist.
2. Entfernen Sie es und suchen Sie die Batterie.
3. Trennen Sie die Batterie und entfernen Sie sie.
INFORMATIONEN ZUR ENTSORGUNGSBATTERIE
Gebrauchte Batterien dürfen nicht mit dem Hausmüll entsorgt oder ins Feuer oder Wasser geworfen werden. Gebrauchte
Batterien sollten recycelt oder in separaten Abfallsammelstellen entsorgt werden.
Hinweise zur ordnungsgemäßen Entsorgung des Produkts
Das auf dem Gerät angebrachte Symbol weist darauf hin, dass das Altgerät “getrennt zu sammeln” ist und das Produkt
daher nicht zusammen mit dem Gemeindeabfall entsorgt werden darf.
Der Benutzer muss das Produkt zu den entsprechenden, von der Gemeindeverwaltung eingerichteten “Wertstosammelstellen” bringen oder dem Händler beim Kauf eines neuen Produkts übergeben.
Die getrennte Müllsammlung und anschließende Aufbereitung, Wiederverwertung und Entsorgung fördern die Herstellung von Geräten unter Verwendung wiederverwerteter Materialien und vermindern die negativen Auswirkungen
auf die Umwelt und Gesundheit in Folge einer falschen Müllverwaltung.
Die widerrechtliche Entsorgung des Produkts führt zur Auferlegung von Verwaltungsstrafen.
TECHNISCHE DATEN
Stromversorgung: ................................................. Externes Ladegerät 9 V 2 A
.................................................
Maximale Audioleistung: ................................................. 100 W
Maximale Übertragungsleistung: .............................................. 2,5 mW
Drahtloses Audioübertragungsband: ....................................... 2,4 GHz
FM-Radiofrequenzband (Exportversion): ............................... 87,5–108 MHz
Abmessungen: ................................................. 420 x 360 x 670 mm
Gewicht: ................................................. 9 kg
Interner wiederauadbarer Lithium-Akku 7,4 V 4500 mAh
30
Page 31
XF 1400 KBESPANOL
NOTAS PARA EL USO
Escuchar a un volumen alto durante mucho tiempo puede dañar su audición.
Este es un aparato electrónico de precisión; evite usarlo en los siguientes casos:
• Cerca de campos magnéticos.
• Cerca de fuentes de calor como calentadores y estufas.
• En lugares muy húmedos como baños, piscinas, etc...
• En lugares muy polvorientos.
• En lugares sujetos a fuertes vibraciones.
• No acerque su oído al altavoz durante las fases de ajuste y ajuste de volumen, y en particular para mantener el volumen
al mínimo en la fase de encendido.
• Coloque el aparato de manera que siempre haya suciente espacio en sus lados para la libre circulación de aire (al
menos 5 cm).
• Si los líquidos penetran dentro del aparato, desconecte inmediatamente el enchufe de la toma de corriente y lleve el
aparato al centro de servicio TREVI autorizado más cercano.
• Antes de encender/recargar el aparato, compruebe siempre que los cables de alimentación y conexión estén instalados
correctamente.
• El adaptador de corriente debe estar conectado a una toma de corriente cerca del dispositivo y debe ser fácilmente
accesible.
• Si nota calor excesivo en el dispositivo o en el adaptador de corriente, desconecte inmediatamente el enchufe de la
toma de corriente principal.
• No tire del cable de alimentación.
• No se deben colocar fuentes de llamas descubiertas, como velas encendidas, sobre el aparato.
• El electrodoméstico no debe exponerse a goteos o salpicaduras de agua y no deben colocarse objetos llenos de
líquido, como jarrones, sobre el electrodoméstico.
• Indique a los niños y las personas con poco conocimiento del producto que lo usen correctamente.
• Guarde este manual para referencia futura.
CUIDADO Y MANTENIMIENTO
Para efectuar la limpieza se aconseja utilizar un paño suave, ligeramente humedecido. Evite solventes o sustancias abrasivas.
IMPORTANTE
Este dispositivo está diseñado para uso doméstico (uso no profesional). La buena construcción del aparato garantiza su
perfecto funcionamiento durante mucho tiempo. Si se presentase algún inconveniente, será oportuno consultar al Centro
de Asistencia autorizado TREVI más cercano.
TREVI cultiva una política de investigación y desarrollo continuos. Por consiguiente, los productos pueden presentar
características distintas a las descritas.
Para evitar posibles daños a la audición, limitar la cantidad de tiempo de escucha a un volumen alto
31
Page 32
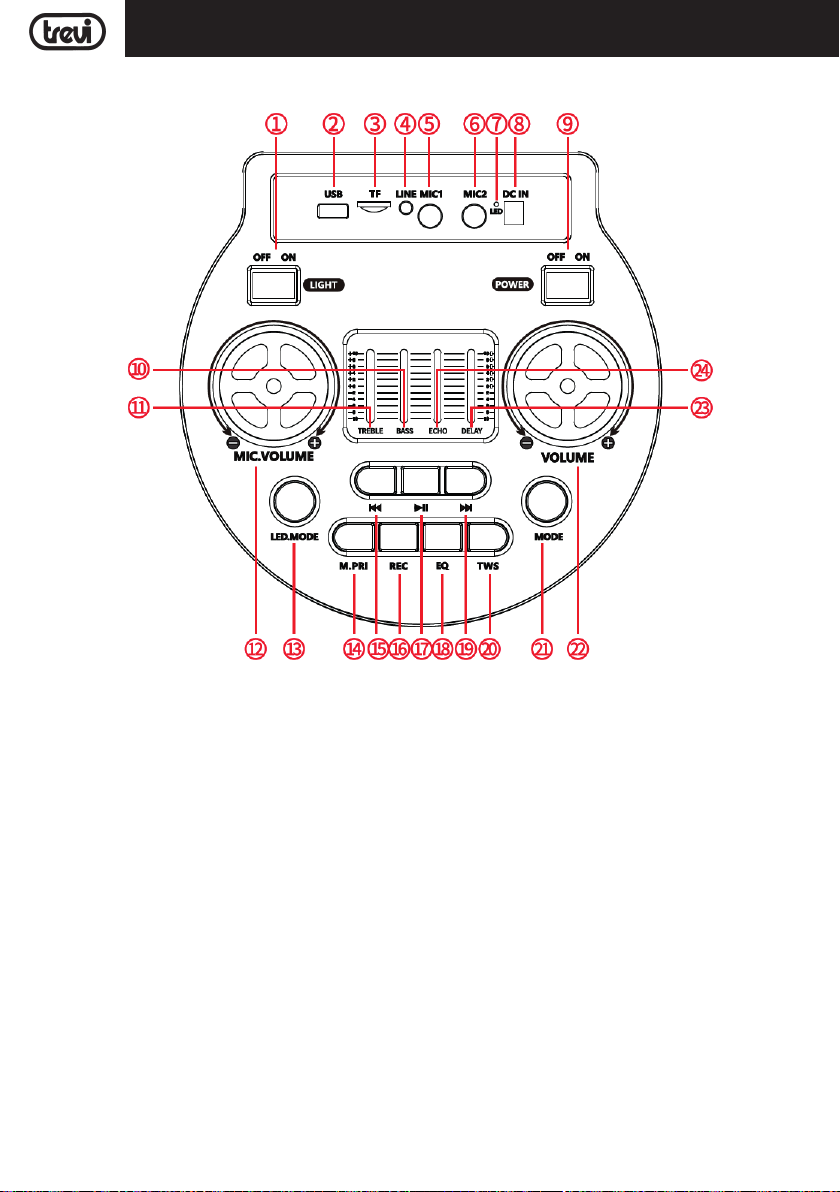
ESPANOL
FUNCIONES DEL PANEL FRONTAL Y TRASERO
XF 1400 KB
1. Activación del LED Disco Light
2. Entrada de memoria USB
3. Entrada de tarjeta MicroSD
4. Entrada LINE IN
5. Entrada MIC1, entrada para micrófono con cable
6. Entrada MIC2, entrada para micrófono con cable
7. Indicador LED de carga
8. Toma de carga
9. Interruptor POWER, encendido/apagado
10. BASS, ajuste de graves
11. TREBLE, ajuste de agudos
12. Volumen del micrófono
13. Botón de efectos de luz
14. Botón M.PRI, activación de la función de prioridad de
micrófono
15. Botón
16. Botón REC, función de grabación
17. Botón
18. Botón EQ, ecualizaciones de audio
19. Botón
20. Botón TWS
21. Botón MODE, selección de funciones
22. Control de volumen
23. Control de efecto DELAY
24. Control de efecto ECHO
32
9, pista anterior
, Reproducir/Pausa
:, pista siguiente
Page 33
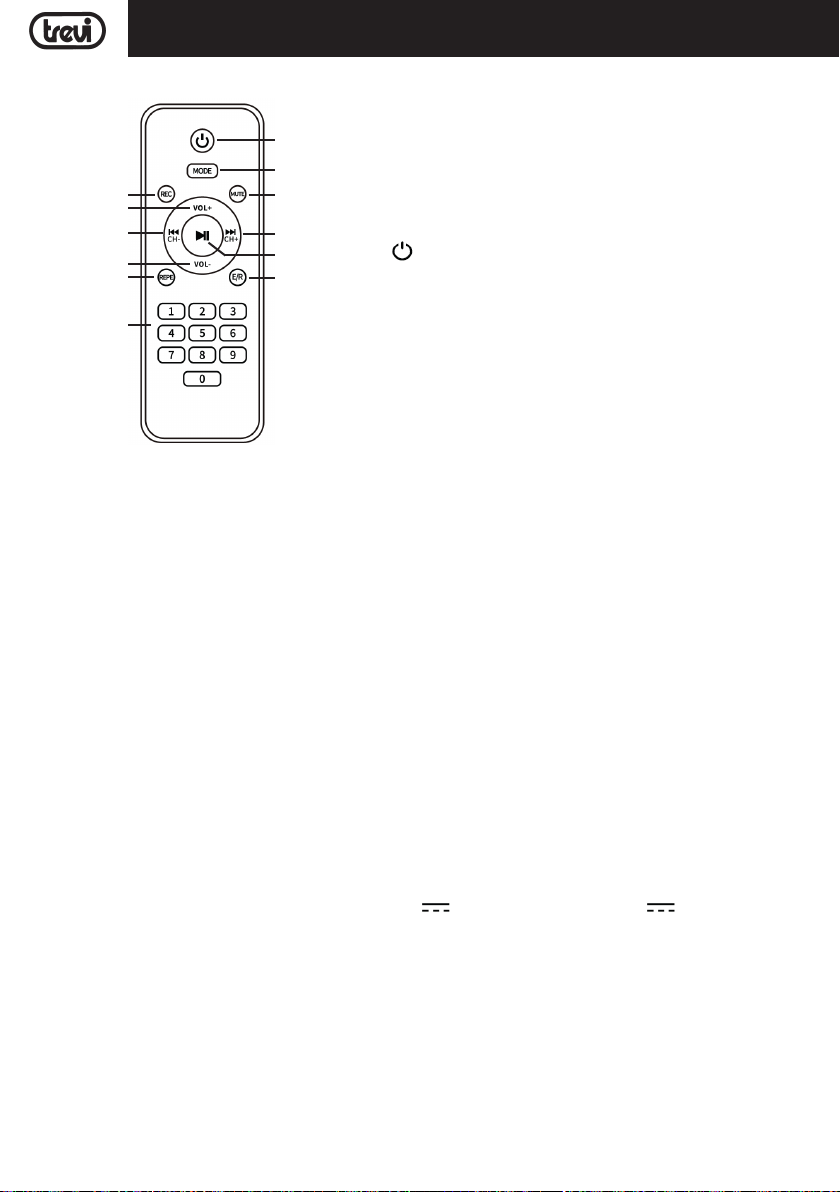
ESPANOL
XF 1400 KB
MANDO A DISTANCIA
5
1. Botón MUTE, para silenciar el audio que se está reproduciendo
12
2. Botón E/R, para seleccionar la ecualización de audio
4
7
3 9
10
6
11
ACTIVACIÓN Y REEMPLAZO DE LA BATERÍA DE CONTROL REMOTO
Antes de usar el control remoto, inserte las baterías como se describe a continuación:
1. Retire la tapa del compartimento de la batería como se muestra en la gura;
2. Inserte 2 baterías de tamaño "AAA" prestando atención a las polaridades indicadas y cierre la cubierta.
PRECAUCIÓN
- Deseche las baterías usadas de acuerdo con las regulaciones de reciclaje en su área.
- Peligro de explosión si la batería es reemplazada incorrectamente.
- Reemplace solo con el mismo tipo o equivalente.
- Si el control remoto no se usa por largos períodos, la batería puede tener fugas y dañar el control remoto, reemplácelo
por uno nuevo si ocurriera.
- NO cortocircuite las baterías ni las arroje al agua, basura general o fuego.
1
3. Botón
9, para seleccionar la pista anterior
4. Botón REC, para grabar
8
5. Botón
6. Botón REP, para repetir
2
7. VOL +, para ajustar el volumen
8. Botón
9. Botón
10. VOL -, para ajustar el volumen
11. Teclado numérico para selección directa de pista
12. Botón MODE, para seleccionar la función
, para encender/poner en espera
, para reproducir/pausar
:, para seleccionar la pista siguiente
TRANSPORTE
Presione el botón en el asa del carro, levante el asa hasta el bloque (oirá un clic metálico). Para el transporte, actuando
sobre el asa del carro, doble ligeramente el aparato y aproveche las dos ruedas traseras.
Para desbloquear y cerrar el carro, vuelva a presionar el botón de la palanca y baje la palanca por completo.
Para el transporte, también es posible utilizar las dos asas colocadas lateralmente en el aparato.
ALIMENTACION
Este equipo funciona con una batería interna recargable de 7,4V 4500mAh y un cargador de 9V 2A.
Cuando la batería se esté agotando o el equipo no se encienda, coloque el interruptor principal POWER (9) en la posición “OFF”,
conecte la fuente de alimentación suministrada a la toma (8) del equipo y el enchufe a una toma de corriente y cargue la batería
interna, el indicador LED (7) se pondrá rojo.
Estados del indicador LED con la batería cargándose:
- Indicador LED (7) ROJO jo: el equipo está conectado correctamente a la fuente de alimentación y la batería se está cargando.
- Indicador LED (7) apagado: operación de carga completada, la batería está cargada.
Nota: No conecte el equipo a fuentes de alimentación con voltaje o polaridad diferente a los indicados.
33
Page 34

ESPANOL
XF 1400 KB
FUNCIONES BÁSICAS
ENCENDIDO/APAGADO
Pulse el interruptor principal POWER (9) para encender y utilizar el aparato con su batería interna.
Pulse de nuevo el interruptor principal POWER (9) para apagar completamente el aparato o para recargar la batería.
STAND-BY
Puede poner el aparato en modo Stand-by utilizando el botón (5) del mando a distancia.
Notas:
- En el modo Stand-by la iluminación LED azul de los mandos permanece encendida para indicar que se ha activado la
función Stand-by.
- Dejar el aparato en modo Stand-by tiende a agotar la batería más rápidamente que utilizando el interruptor principal
POWER (9).
SELECCIÓN DE FUNCIONES
Para cambiar el modo de funcionamiento, pulse varias veces el botón MODE del aparato o del mando a distancia para
seleccionar: WIRELESS AUDIO (en el display aparece "BLUE"), USB o Micro SD (sólo si se introduce una memoria en la
toma USB (2) / ranura Micro SD (3), en el display aparece "USB" o "SD", LINE-IN (en el display aparece "LINE").
AJUSTE DEL VOLUMEN Y FUNCIÓN MUTE
1. Gire el mando VOLUME (22) para aumentar o disminuir el volumen general de reproducción o utilice los botones VOL
+ (7) y VOL - (10) del mando a distancia;
2. Gire el mando MIC. VOL (12) para ajustar el volumen de la señal en las entradas MIC1 (5) y MIC2 (6).
3. Pulse el botón MUTE (1) del mando a distancia para silenciar inmediatamente el dispositivo; púlselo de nuevo para
reactivar el audio.
CONTROL DEL TONO Y ECUALIZADOR
Puede ajustar el tono de la reproducción del audio mediante el Controles TREBLE (11) y BASS (10).
Presione el botón EQ (18) en la unidad o el botón E/R (2) en el control remoto repetidamente para seleccionar una de
las 6 ecualizaciones de audio disponibles.
EFECTO ECO (PARA MICRÓFONO)
Use el control ECHO (24) para aumentar o disminuir el efecto eco en las entradas MIC1 y 2.
EFECTO DELAY (PARA MICRÓFONO)
Use el control DELAY (23) para aumentar o disminuir el efecto delay en las entradas MIC1 y 2.
EFECTO DISCO-LIGHT
Para activar el efecto Disco-Light en el altavoz, presione el interruptor LIGHT (1).
Para desactivar el efecto Disco-Light, presione nuevamente el interruptor LIGHT (1).
Puede seleccionar varios efectos de luz presionando repetidamente el botón LED MODE (13).
Nota: Los efectos de iluminación Disco Light no están disponibles en la función de radio FM (versión de exportación), las luces
permanecen apagadas.
FUNCIONAMIENTO DE AUDIO INALÁMBRICO
1. Encienda el dispositivo y seleccione la función de Audio inalámbrico, la pantalla mostrará "AZUL";
2. El display “AZUL” comenzará a parpadear y el sistema entrará automáticamente en modo de búsqueda;
3. Activa la función Audio Inalámbrico en el dispositivo externo a emparejar;
4. Inicia la búsqueda de dispositivos. Una vez nalizada, selecciona el dispositivo “XF 1400 KB”;
5. Introduce la contraseña “0000” si se te solicita;
6. Inicia la reproducción de música desde tu dispositivo.
7. Pulsa el botón
botones 9(15) o :(19) de la unidad, o los botones 9(3) y :(9) del mando a distancia para seleccionar pistas.
(17) de la unidad o del mando a distancia (8) para iniciar o pausar la reproducción, utiliza los
CONEXIÓN TWS
Tecnología True Wireless Stereo (TWS)
La tecnología TWS permite al usuario realizar una conexión inalámbrica entre dos altavoces del mismo modelo y compatibles con la función TWS.
Con la conexión TWS, dos altavoces se conectarán automáticamente (sin cables) para ser un único sistema de altavoces
estéreo que emite el canal izquierdo y derecho.
34
Page 35

XF 1400 KBESPANOL
CONEXIÓN
Aviso: Los dos altavoces deben ser del mismo modelo y ambos compatibles con la tecnología TWS.
1. Desactiva la conexión de Audio Inalámbrico en el teléfono u otro dispositivo;
2. Enciende ambos altavoces y selecciona el modo Audio Inalámbrico en ambos;
3. Pulsa el botón “TWS” (20) en uno de los altavoces (activación de emparejamiento TWS, escucharás un sonido y aparecerá la palabra “btSt” en el display), tras unos segundos los dos altavoces estarán emparejados;
4. Activa el Audio Inalámbrico en el teléfono u otro dispositivo, busca y empareja el dispositivo externo al altavoz. Tras la
conexión, podrás reproducir música con el sistema de altavoces estéreo TWS.
Los ajustes en el altavoz principal se realizarán simultáneamente en el otro altavoz. Por ejemplo, ajustar el volumen, seleccionar la canción anterior y siguiente, reproducir y pausar, encender y apagar.
Notas:
- Si los 2 altavoces no se emparejan, apague ambos dispositivos y repita los pasos 1, 2 y 3.
- La función TWS solo funciona entre los mismos altavoces o con otros altavoces que utilicen el mismo microprocesador
o solución.
REPRODUCCIÓN DE ENTRADA USB/SD
1. Encienda el dispositivo;
2. Inserte una memoria USB o una tarjeta Micro SD en las entradas correspondientes (2/3). La reproducción comenzará
automáticamente;
3. Para pausar la reproducción, presione el botón
pantalla mostrará "PAUS";
4. Para reanudar la reproducción, presione nuevamente el botón
5. Presione el botón
siguiente pista. Presione el botón 9(15) en la unidad o el botón 9(3) en el control remoto para saltar a las pistas
anteriores;
6. Usando el teclado numérico (11) en el control remoto, puede ingresar directamente el número de la pista de música
que desea reproducir;
7. Pulse el botón REP (6) del mando a distancia una vez, en el display aparecerá “ONE” (para reproducir continuamente
la misma pista); púlselo una segunda vez, en el display aparecerá “ALL” (para reproducir continuamente todas las pistas
contenidas en el dispositivo USB/Micro SD); púlselo nuevamente, en el display aparecerá “RND” (para reproducción
aleatoria de las pistas).
Notas:
- El reproductor puede no soportar algunos dispositivos USB/micro SD, esto se debe a la incompatibilidad de algunos
procesadores.
- Para evitar interferencias perjudiciales, conecte siempre los dispositivos USB directamente a la unidad, no utilice cables
alargadores.
- Desde el ordenador, formatee las memorias USB/Micro SD en FAT (16 o 32).
:(19) en la unidad o el botón :(9) en el control remoto durante la escucha para saltar a la
LINE-IN
1. Encienda el dispositivo y seleccione la función “LINE”;
2. Conecte cualquier unidad dotada de salida de audio mediante un cable Jack 3,5mm a la entrada LINE (4);
3. Ajuste el dispositivo externo desde sus mandos.
FUNCIONAMIENTO DE LA RADIO (SOLO PARA VERSIONES DE
EXPORTACIÓN)
MEMORIZACIÓN AUTOMÁTICA DE EMISORAS
1. Encienda el aparato y seleccione la función de radio, la indicación de frecuencia aparece en la pantalla;
2. Mantenga pulsado el botón
almacenamiento se detendrá cuando se complete el escaneo de toda la banda de radio. Al nal, se reproducirá la primera
emisora de radio almacenada.
(17) para buscar y almacenar automáticamente las emisoras de radio. La búsqueda/
(17) en la unidad o el botón (8) en el control remoto; la
(17) en la unidad o en el control remoto (8);
35
Page 36
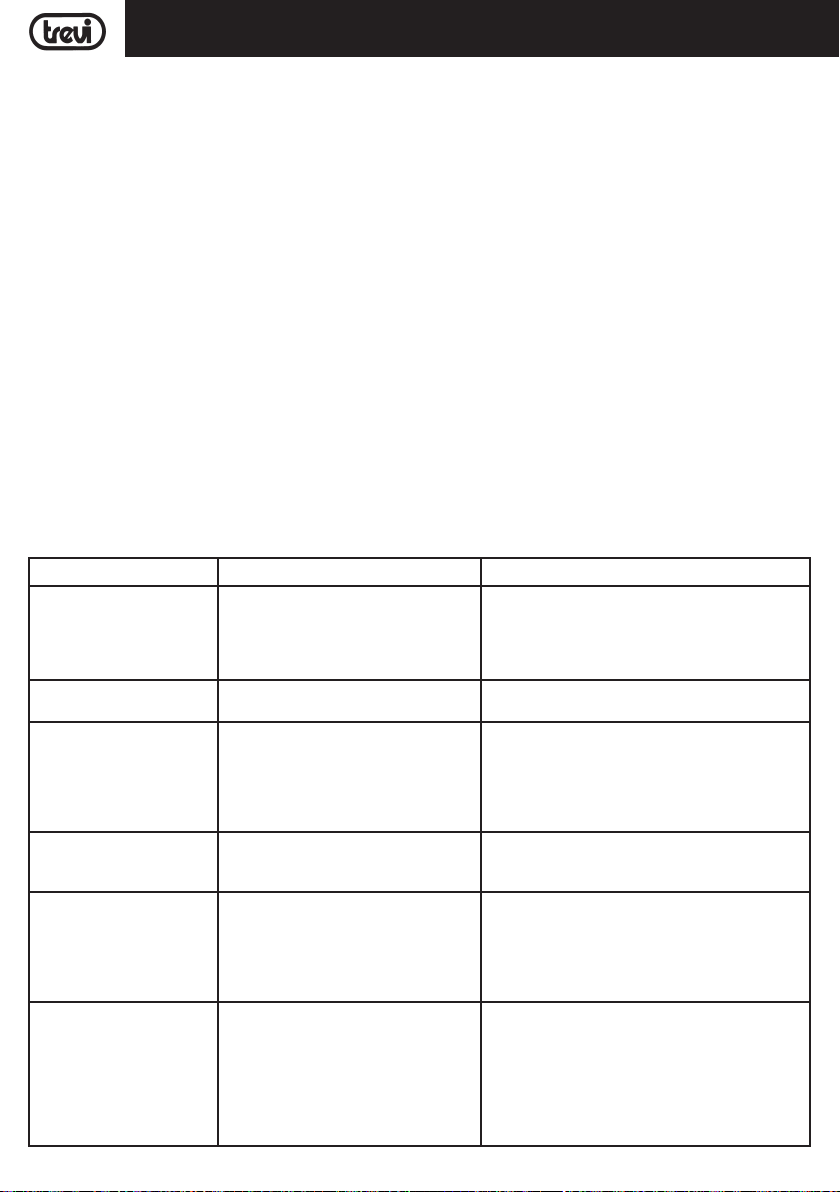
ESPANOL
XF 1400 KB
RECUPERACIÓN DE LA EMISORA ALMACENADA
- Pulse el botón :(19) para pasar a la siguiente emisora, pulse el botón 9(15) para pasar a la emisora anterior.
Notas:
- La recepción de FM depende en gran medida de la ubicación donde se encuentre el aparato.
- La proximidad a televisores, lámparas de neón u otros electrodomésticos puede provocar perturbaciones en la recepción
de los programas de radio, en este caso aleje el aparato.
MICRÓFONO
Introduzca el conector del micrófono suministrado en la entrada MIC1(5) o MIC2(6), encienda el micrófono mediante el
interruptor del mango y ajuste el volumen y los efectos mediante los controles MIC VOLUME(12), ECHO(24) y DELAY(23).
FUNCIÓN MIC PRIORITY
Pulsando el botón M.PRI(14) puede activar o desactivar la función de prioridad del micrófono, el audio del altavoz se reduce
automáticamente al hablar por el micrófono.
GRABACIÓN
GRABACIÓN A MEMORIA USB DESDE LINE IN Y RADIO
1. Encienda el dispositivo;
2. Inserte una memoria USB en el zócalo (2);
3. Seleccione la fuente a reproducir (LINE IN O FM RADIO) y pulse el botón REC (16) en la unidad o (4) en el control
remoto;
4. Pulse el botón REC nuevamente para nalizar la grabación; el archivo grabado se guardará dentro de la memoria USB.
SOLUCIÓN DE PROBLEMAS
Si se produce un problema, siga los pasos descritos en la siguiente tabla.
Si el problema no se puede resolver, póngase en contacto con su distribuidor.
Problema Posibles causas Solución
No hay sonido cuando la unidad
está encendida
Sonido distorsionado 1. El volumen es demasiado alto
No hay sonido desde el micrófono
No hay sonido cuando se inserta
una tarjeta de dispositivo USB/
Micro SD
No se puede cargar la batería o
la batería tiene un corto plazo
Los altavoces se oyen ruidos
fuertes
1. No hay sonido de la fuente
2. Regulador de volumen en el nivel 0
3. Elemento de guía
4. No hay ningún dispositivo Micro SD/
USB conectado
2. Error de archivo de audio
1. La toma de micrófono no se puede
conectar correctamente.
2. El interruptor de encendido en el
micrófono puede estar en la posición
"off".
3. Volumen del micrófono bajo.
1. Formato de archivo no admitido
2. USB/Tarjeta Micro SD no está conectado correctamente
1. Conectar el cable de alimentación para
recargar
2. La batería no está completamente
cargada
3. La batería puede haber llegado a su
ciclo de vida
1. Micrófono en pero demasiado cerca
2. Micrófono utilizado en acción, sin
3. Volumen del micrófono puede ser
demasiado alto
4. Una célula se utiliza demasiado cerca
5. Los equipos inalámbricos puede estar
muy cerca de aquellos que están usan-
do el micrófono
36
1. Conectar un dispositivo a la toma AUX-IN
2. Ajuste el volumen
3. Active la guía de voz
4. Conexión USB/Tarjeta Micro SD, reproducir MP3
1. Bajar el volumen
2. Comprobar y reproducir otro archivo de audio
1. Asegúrese de que el micrófono está conectado
correctamente.
2. Encender el micrófono.
3. Ajuste correctamente el volumen del micrófono
1. El formato de archivo de audio debe ser MP3
2. Conectar el dispositivo de tarjeta USB/Micro SD
correctamente
1. Compruebe si el cable de alimentación está conectado correctamente
2. Normalmente se tarda 7-8 horas para cargar
completamente la batería
3. Vuelva a colocar la batería vieja por una nueva con
las mismas especicaciones técnicas
1. Mantenga el micrófono a 2 metros de distancia
desde el altavoz
2. Apagar el micrófono si no se usa
3. Bajar el volumen del micrófono
4. Mantenga el teléfono lejos del altavoz mientras
realiza una llamada.
5. Mantenga el altavoz alejado de dispositivos
inalámbricos
Page 37
ESPANOL
XF 1400 KB
NOTA INFORMATIVA SOBRE LA ELIMINACIÓN Y TRATAMIENTO DE LAS
PILAS
Advertencia: Sólo el personal de alta cualicación deberían poder realizar esta operación!
REMOCIÓN DE LA BATERÍA
El aparato no debe estar enchufado a la toma de red para realizar esta operación!
1. Quite los tornillos que jan el panel de control superior;
2. Retírelo y localice la batería;
3. Desconecte la batería y retírela.
ELIMINACIÓN DE LA BATERÍA
Las pilas usadas no se deben tirar con la basura doméstica o arrojados al fuego o al agua. Las baterías usadas deben
reciclarse o desecharse en centros de recogida de residuos separados.
Advertencias para la correcta eliminación del producto.
El símbolo que aparece en el aparato indica que el residuo debe ser objeto de “recogida selectiva” por tanto el producto no se debe eliminar junto con residuos urbanos.
El usuario deberá entregar el producto a los “centros de recogida selectiva” creados por las administraciones municipales o bien al distribuidor cuando adquiera un nuevo producto.
La recogida selectiva del residuo y las sucesivas operaciones de tratamiento, recuperación y eliminación favorecen
la fabricación de aparatos con materiales reciclados y limitan los efectos negativos en el medio ambiente y la salud
causados por una gestión incorrecta del residuo.
La eliminación abusiva del producto da lugar a la aplicación de sanciones administrativas.
ESPECIFICACIONES
Alimentación: ................................................. Cargador externo 9V 2A
................................................. Batería interna recargable de litio 7.4V
Potencia máxima de audio: ................................................. 100W
Potencia máxima de transmisión: ............................................ 2.5mW
Banda de transmisión de audio inalámbrica: ......................... 2.4GHz
Banda de frecuencia de radio FM (versión de exportación): 87.5-108 MHz
Dimensiones: ................................................. 420x360x670mm
Peso: ................................................. 9 Kg
, 4500mAh
37
Page 38

NOTE
XF 1400 KB
38
Page 39

NOTE
39
Page 40
Dichiarazione di conformità UE semplicata
Il fabbricante TREVI S.p.a. dichiara che il tipo di apparecchiatura XF 1400 KB
Il testo completo della dichiarazione di conformità UE è disponibile al seguente indirizzo internet:
https://www.trevi.it/dms/zidi/TREVI/DOCXF1400KB.pdf
é conforme alla direttiva 2014/53/EU.
Simplied EU Declaration Of Conformity
Hereby TREVI S.p.a declares that equipment type
"Power portable speaker with trolley" model XF 1400 KB
The full text of the EU declaration of conformity is available at the following internet address:
Trevi S.p.A.
Strada Consolare Rimini-San Marino, 62
47924 Rimini (Rn) Italia
Tel. 0541/756420 Fax 0541/756430 www.trevi.it e-mail: [email protected]
is in compliance with Directive 2014/53/EU.
https://www.trevi.it/dms/zidi/TREVI/DOCXF1400KB.pdf
Made in CHINA
 Loading...