

Page 1

XF 1200 KB
Guida d’uso
User guide
ALTOPARLANTE AMPLIFICATO ALTA POTENZA
Manuale d'uso e collegamento
HIGH POWER PORTABLE SPEAKER
Connection and Operation Manual
HAUT-PARLEUR PORTABLE AMPLIFIE
Mode d'emploi et branchement
BEWEGLICHER LAUTSPRECHER
Gebrauchs- und Anschlusshandbuch
ALTAVOZ AMPLIFICADO PORTATIL
Manual para el uso y la conexión
BT
BLUETOOTH
TWS
100 W
MAX
USB/
Micro SD
PLAYER
LED
DISPLAY
Per informazioni integrative ed aggiornamenti su questo prodotto visita www.trevi.it
For additional information and updates of this product see www.trevi.it
Page 2

Page 3

WARNINGS
ATTENZIONE
RISCHIO DI SCOSSE
ELETTRICHE!
NON ESPORRE A PIOGGIA E
UMIDITÀ
ATTENZIONE: NON APRITE L'APPARECCHIO. ALL'INTERNO NON VI SONO
COMANDI MANIPOLABILI DALL'UTENTE NE PARTI DI RICAMBIO. PER TUTTE
LE OPERAZIONI DI SERVIZIO RIVOLGERSI AD UN CENTRO DI ASSISTENZA
AUTORIZZATO TREVI
ATTENTION
RISQUE DE DECHARGES
ELECTRIQUES
NE PAS EXPOSER A LA PLUIE ET A
L’HUMIDITE
ATTENTION: NE PAS OUVRIR L’APPAREIL, A L’INTERIEUR IL N’Y A PAS DE
COMMANDES A MANIPULER PAR L’UTILISATEUR OU DE PIECES DE RECHANGE.
POUR TOUTES LES OPERATIONS DE SERVICE IL FAUT S’ADRESSER A UN
SERVICE D’ASSISTANCE AUTORISE TREVI.
ATENCION
PELIGRO DE CHOQUES
ELECTRICOS
NO EXPONER A LLUVIA Y
HUMEDAD
ATENCION: NO ABRIR EL APARATO, EN SU INTERIOR NO HAY MANDOS QUE
PUEDAN SER MANIPULADOS POR EL USUARIO NI PARTES DE REPUESTO.
PARA TODAS LAS OPERACIONES DE SERVICIO DIRIGIRSE A UN CENTRO DE
ASISTENCIA AUTORIZADO TREVI.
WARNING!
DANGER OF ELECTRIC SHOCK!
DO NOT EXPOSE TO
RAIN OR HUMIDITY
WARNING: DO NOT OPEN THE SET. NEITHER CONTROLS OR SPARE PARTS TO
BE USED BY THE USER ARE TO BE FOUND INSIDE IT. APPLY TO AUTHORISED
TREVI CENTERS FOR SERVICE OPERATIONS.
ACHTUNG
GEFAHR ELEKTRISCHER SCHLÄGE
NICHT DER FEUCHTIGKEIT UND
DEM REGEN AUSSETZEN
ACHTUNG: DAS GERÄT NICHT ÖFFNEN. IM INNERN BEFINDEN SICH KEINE VOM
BENUTZER SELBST INSTANDSETZBAREN TEILE UND AUCH KEINE ERSATZTEILE.
FÜR JEGLICHE SERVICEARBEITEN, WENDEN SIE SICH BITTE AN EINE TREVI
AUTORISIERTEN KUNDENDIENSTSTELLE.
Per evitare possibili danni all’udito,
limitare il tempo di ascolto a volumi elevati
To avoid possible hearing damage,
limit the listening time to high volumes
Pour éviter d'éventuels dommages auditifs,
limiter la durée d'écoute à volume élevé
Um mögliche Hörschäden zu vermeiden,
begrenzen die Höhe der Zeit bei hohen Lautstärke
hören
Para evitar posibles daños a la audición,
limitar la cantidad de tiempo de escucha a un
volumen alto
Page 4

ITALIANO
XF 1200 KB
NOTE D'USO
Ascoltare a volume alto per lungo tempo, potrebbe danneggiare il vostro udito.
Evitare di posizionare il riproduttore:
- Vicino a campi magnetici.
- Vicino a fonti di calore come caloriferi e stufe.
- In luoghi molto umidi come stanze da bagno, piscine, ecc...
- In luoghi molto polverosi.
- In luoghi soggetti a forti vibrazioni.
- Non avvicinare l’orecchio all’altoparlante durante le fasi di messa punto e regolazioni del volume, e in particolare di tenere il
volume al minimo nella fase di accensione.
- Posizionare l’apparecchio in modo che ai suoi lati ci sia sempre abbastanza spazio per la libera circolazione di aria (almeno
5 cm).
- Se dei liquidi penetrano all’interno dell’apparecchio scollegare immediatamente la spina dalla presa e portare l’apparecchio
al più vicino centro assistenza autorizato TREVI.
- Controllare sempre prima di ricaricare l’apparecchio, che i cavi di alimentazione e di collegamento siano installati correttamente.
- Nessuna sorgente di fiamma nuda, quali candele accese, dovrebbe essere posta sull’apparecchio.
- L’apparecchio non deve essere esposto a stillicidio o a spruzzi d’acqua e nessun oggetto pieno di liquido, quali vasi, deve
essere posto sull’apparecchio.
- Istruire al corretto utilizzo bambini e persone con scarse conoscenze del prodotto.
- Conservare il presente manuale per futuri riferimenti.
CURA E MANUTENZIONE
Per la pulizia si consiglia l’uso di un panno morbido, leggermente inumidito. Evitate solventi o sostanze abrasive.
IMPORTANTE
Questo dispositivo e' progettato per uso domestico non professionale. La buona costruzione di questo apparecchio ne garantisce
per lungo tempo il perfetto funzionamento. Se tuttavia dovesse presentarsi qualche inconveniente, sarà opportuno consultare il
più vicino Centro Assistenza autorizzato TREVI.
TREVI persegue una politica di continua ricerca e sviluppo. Pertanto i prodotti possono presentare caratteristiche diverse da
quelle descritte.
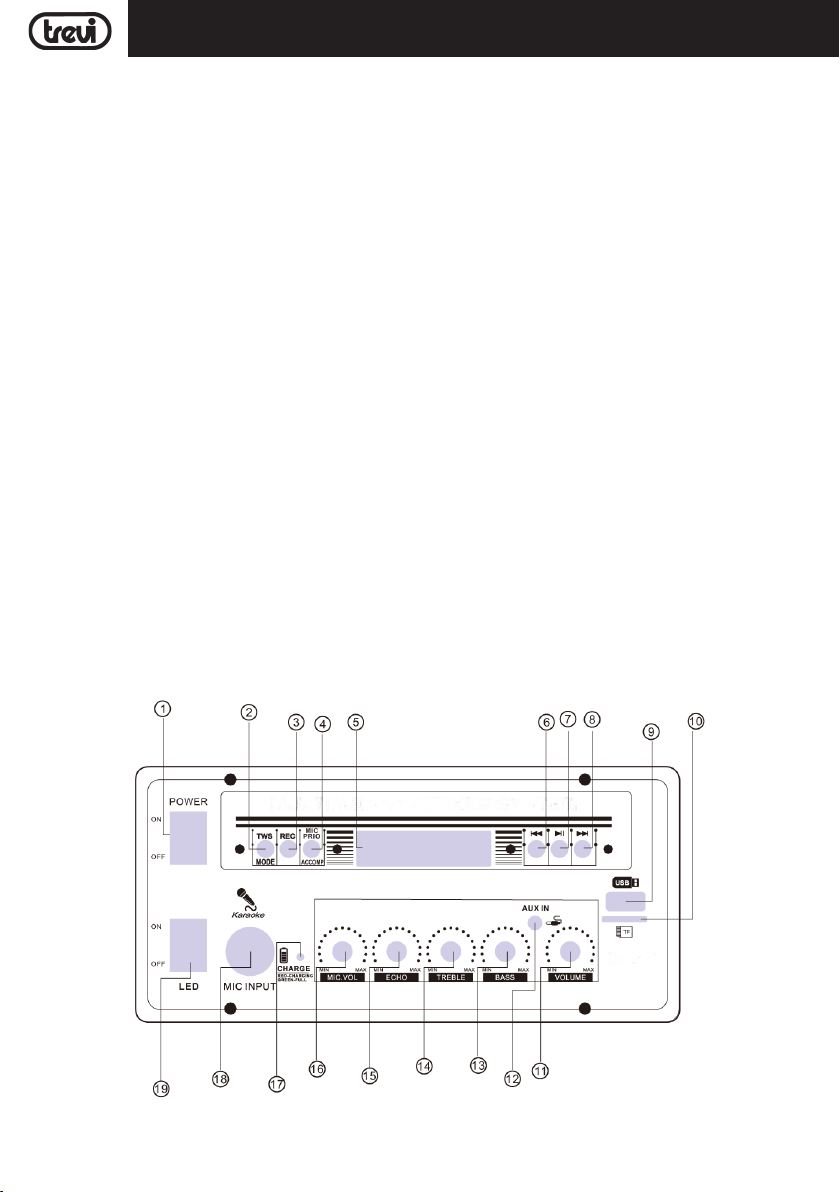
DESCRIZIONE COMANDI
1. Interruttore principale POWER ON/OFF (accensione/
spegnimento).
2. Tasto MODE, selezione funzione.
3. Tasto REC, funzione registrazione.
4. Tasto MIC PRIO/ACCOMP, funzione priorità microfono e
accompagnamento.
4
Page 5

TELECOMANDO
XF 1200 KBITALIANO
5. Display.
6. Tasto 9, precedente.
7. Tasto, Play/Pausa.
8. Tasto :, successivo.
9. Ingresso USB.
10. Ingresso TF Card (Micro SD).
11. Regolazione Volume generale.
12. Ingresso AUX IN.
13. BASS, regolazione toni bassi.
14. TREBLE, regolazione toni alti.
15. Regolazione ECHO microfono.
16. MIC VOL, regolazione Volume Microfono.
17. Spia Led di segnalazione Batteria in ricarica.
18. MIC INPUT, Ingresso Microfono.
19. Interruttore LED, attivazione/disattivazione Led frontali (Disco Light).
20. AUX OUT, uscita audio.
21. Ingresso 12V per eventuale batteria ausiliaria (non in dotazione).
22. Presa per inserimento cavo di alimentazione da rete.
1. Tasto , Stand-by
2. Tasto MODE: selezione funzione
3. Tasto , Play/Pausa
4. Tasto 9, selezione traccia precedente
5. Tasto EQ: equalizzazioni pre-impostate
6. Volume generale -
7. Tasti numerici 0-9
8. Tasto MUTE
9. Tasto :, selezione traccia successiva
10. Volume generale +
11. Tasto U/TF: selezione sorgente USB/ Micro SD (se inserite)
12. Tasto RPT: ripetizione singolo brano, ripetizione di tutti i brani
ATTIVAZIONE E SOSTITUZIONE DELLA BATTERIA DEL TELECOMANDO
TIRARE LA LINGUETTA
2- TIRARE
1- SPINGERE
Il telecomando monta una batteria tipo CR2025
Per attivare la batteria del telecomando (inclusa) togliere la linguetta plastica
di protezione.
Per la sostituzione della batteria:
1. Spingere il fermo plastico dell’alloggiamento porta batteria verso destra;
2. Estrarre l’alloggiamento porta batteria;
3. Inserire una batteria nuova facendo attenzione a rispettare le polarità;
4. Richiudere l'alloggiamento porta batteria.
TRASPORTO
Premere il pulsante presente sulla maniglia del trolley, alzare il manico fino al blocco (si udira' uno scatto metallico). Per il trasporto,
agendo sulla maniglia del trolley, piegare leggermente l'apparecchio e sfruttare le due ruote posteriori.
Per lo sblocco e chiusura del trolley, premere di nuovo il pulsante sulla maniglia ed abbassare completamente il manico.
Per il trasporto è possibile utilizzare, eventualmente, anche le due maniglie poste lateralmente all'apparecchio.
5
Page 6

ITALIANO
XF 1200 KB
ALIMENTAZIONE/RICARICA BATTERIA
Questa unità funziona con batteria interna ricaricabile al piombo da 12V , 2,6Ah o alimentazione di rete 230V 50Hz.
Quando la batteria è in fase di esaurimento o l'apparecchio non si accende, portare l'interruttore principale POWER ON/OFF (1) in
posizione "OFF", inserire il cavo di alimentazione nella presa (22) del dispositivo e la spina in una presa di corrente per effettuare
la ricarica della batteria interna, la spia Led Rossa (17) si accenderà.
Stati della spia Led di segnalazione con Batteria in ricarica:
- Spia Led (17) ROSSA fissa: il dispositivo e' collegato correttamente con il cavo di alimentazione e la batteria è in fase di
ricarica.
- Spia Led (17) VERDE fissa: operazione di ricarica terminata, la batteria è carica.
Nota: Non collegare l'apparecchio a prese con tensione diversa da quella indicata.
FUNZIONI DI BASE
ACCENSIONE/SPEGNIMENTO
Portare l'interruttore principale POWER ON/OFF (1) in posizione "ON" per accendere e utilizzare l'apparecchio con la sua batteria
interna.
Portare l'interruttore principale POWER ON/OFF (1) in posizione "OFF" per spegnere completamente l'apparecchio o per ricaricare
la batteria.
STAND-BY
E' possibile portare l'apparecchio in modalità Stand-by utilizzando il tasto (1) del telecomando.
Note:
- Non vi è nessun Led che segnali l'attivazione della funzione Stand-by.
- Lasciando l'apparecchio in Stand-by la batteria tende a scaricarsi più velocemente che utilizzando l'interruttore POWER ON/
OFF(1).
SELEZIONE DELLA FUNZIONE
Per cambiare la modalità di funzionamento, premere piu' volte il tasto MODE (2) sull'unità o sul telecomando per selezionare:
BLUETOOTH(sul display compare "BLUE"), USB o Micro SD (solo se sulla presa USB (9)/Slot Micro SD (10) vi è collegata una
memoria, sul display compare una piccola scritta "USB" o "SD"), AUX-IN (sul display compare "LINE").
REGOLAZIONE DEL VOLUME
1. Ruotare la manopola del VOLUME (11) per aumentare o diminuire il volume generale di riproduzione oppure utilizzare i tasti
Vol+ (10) e Vol- (6) sul telecomando;
2. Ruotare la manopola MIC VOL (16) per regolare il volume del segnale sull'ingresso MIC INPUT (18).
PRE-EQUALIZZAZIONI
Questa unità ha un sistema di equalizzazioni audio pre impostate. Premere più volte il tasto EQ (5) sul telecomando per selezionare
una delle 3 equalizzazioni audio disponibili e che meglio si adatta alla riproduzione sonora in corso.
REGOLAZIONE TONI ALTI E BASSI
Ruotare la manopola TREBLE (14) per regolare i toni alti.
Ruotare la manopola BASS (13) per regolare i toni bassi.
EFFETTO ECHO
Ruotare la manopola ECHO (15) per aumentare o diminuire l'effetto eco sull'ingresso MIC.
Nota: l'effetto eco agisce unicamente sull'ingresso microfonico.
EFFETTO DISCO-LIGHT
Per attivare l'effetto Disco-Light sull'altoparlante premere l'interruttore LED (19).
Per disattivare l'effetto Disco-Light, premere nuovamente l'interruttore LED (19).
MODALITA' RADIO FM (PRESENTE PER VERSIONI EXPORT)
1. Accendere l'apparecchio e selezionare la funzione RADIO (sul display comparirà l'indicazione della frequenza);
2. Tenere premuto per qualche secondo
il tasto
(7)
sull'unità per attivare la ricerca e memorizzazione automatica delle
6
Page 7

ITALIANO
emittenti (la radio inizia una ricerca automatica delle stazioni radio e le salva automaticamente in memoria). Il numero delle
stazioni memorizzate dipende dal segnale radio nella vostra zona. Durante la ricerca premere il tasto
arrestare la memorizzazione;
3. Una volta completata la scansione, utilizzare i tasti :(8) o 9(6)
Nota:
-
La ricezione in FM dipende molto dal luogo dove è posto l’apparecchio.
- La vicinanza di apparecchi TV, lampade al neon o altri elettrodomestici può provocare disturbi nella ricezione di
programmi radio, in questo caso allontanate l'apparecchio.
sull'unità
per muoversi tra i preset della stazione salvate.
XF 1200 KB
(15)
sull'unità per
FUNZIONAMENTO BLUETOOTH
1. Accendere l'apparecchio e selezionare la funzione bluetooth, sul display compare la scritta "BLUE";
2. Nella modalità Bluetooth, il simbolo e la scritta "BLUE" sul display cominceranno a lampeggiare e il sistema si porterà
automaticamente in modalità ricerca;
3. Attivare la funzionalità Bluetooth sul dispositivo esterno da accoppiare;
4. Avviare la ricerca dei dispositivi. Al termine selezionare il dispositivo "XF 1200 KB" o "Bluetooth";
5. Inserire la password "0000" se richiesto;
6. Premere il tasto
sull'unità, oppure i tasti :(9) e 9(4) sul telecomando per la selezione dei brani.
(7) sull'unità oppure sul telecomando
per avviare la riproduzione e utilizzare i tasti :(8) o 9(6)
COLLEGAMENTO TWS
Tecnologia True Wireless Stereo (TWS)
La tecnologia TWS consente all'utente di effettuare una connessione wireless tra due altoparlanti dello stesso modello e compatibili
con la funzione TWS.
Con la connessione TWS, due altoparlanti verranno automaticamente collegati (senza fili) per essere un unico sistema stereoaltoparlante che emette il canale sinistro e destro.
COLLEGAMENTO
Avviso: I due altoparlanti devono essere dello stesso modello ed entrambi compatibili con la tecnologia TWS.
1. Disattivare la funzione bluetooth sul telefono o altro dispositivo Bluetooth;
2. Accendere entrambi i diffusori e selezionare su entrambi la modalità "Bluetooth";
3. Tenere premuto il tasto "TWS" di uno dei diffusori (attivazione dell’accoppiamento TWS, si udirà un suono), dopo pochi secondi
i due altoparlanti saranno accoppiati (la voce guida avviserà dell’avvenuto accoppiamento);
4. Attivare il Bluetooth sul telefono o altro dispositivo, ricercare ed accoppiare l'apparecchio esterno all'altoparlante. Dopo la
connessione sarà possibile riprodurre musica con il sistema stereo-altoparlante TWS.
Le regolazioni sull'altoparlante principale verranno effettuate simultaneamente anche sull'altro altoparlante. Ad esempio, regolazione
del volume, selezione del brano precedente e successivo, riproduzione e pausa, accensione e spegnimento.
Note:
- In caso di mancato accoppiamento tra i 2 altoparlanti, spegnere entrambi gli apparecchi e ripetere i passi 1, 2 e 3.
- La funzione TWS funziona solamente tra diffusori uguali o con altri diffusori che utilizzano lo stesso micro processore o soluzione.
RIPRODUZIONE SU INGRESSO USB/ MICRO SD
1. Accendere l'apparecchio;
2. Inserire una memoria USB o una scheda Micro SD nei corrispettivi ingressi (9/10). La riproduzione verrà avviata automatica-
mente;
3. Per mettere in pausa la riproduzione, premere il tasto
comparirà la scritta "PAUS";
4. Per riprendere la riproduzione, premere nuovamente il tasto
5. Premere il tasto :(8) sull'unità o il tasto :(9) sul telecomando, durante l’ascolto per passare alla traccia successiva.
Premere il tasto 9(6) sull'unità, o il tasto 9(4) sul telecomando per passare ai brani precedenti;
6. Utilizzando la tastiera numerica(7) del telecomando è possibile digitare direttamente il numero del brano musicale che si vuole
(7) sull'unità oppure il tasto
(7) sull'unità o sul telecomando
7
(3) del telecomando
; sul display
;
Page 8
ITALIANO
riprodurre;
7. Premere una volta il tasto RPT (12) del telecomando, sul display comparirà la scritta "ONE" (per riprodurre continuamente la
stessa traccia); premerlo una seconda volta, sul display comparirà la scritta "ALL" (per riprodurre continuamente tutti brani
contenuti nel dispositivo USB/Micro SD).
Note:
- Il lettore potrebbe non supportare alcuni dispositivi USB, questo è dovuto all'incompatibilità di alcuni processori.
- Per evitare interferenze dannose, collegare sempre le periferiche USB direttamente all'unità, non utilizzare cavi di prolunga.
- Dal computer formattare le memorie USB/Micro SD in FAT (16 o 32).
XF 1200 KB
AUX-IN
1. Accendere l'apparecchio e selezionare la funzione "LINE IN";
2. Collegare una qualsiasi unità provvista di uscita audio tramite l'apposito cavo Jack da 3,5mm (in dotazione) all'ingresso AUX
IN (12);
3. Regolare il dispositivo esterno dai propri comandi.
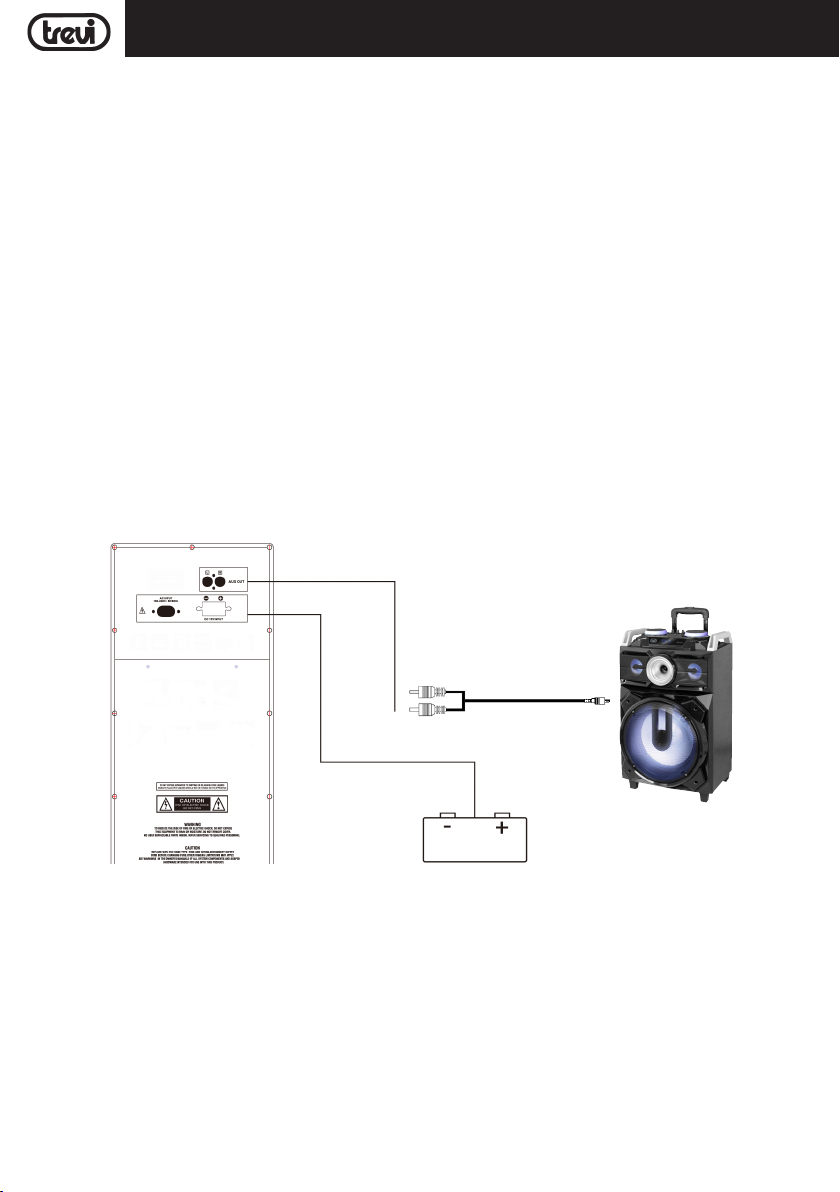
AUX-OUT (USCITA AUDIO)
Questa uscita (20) può essere utilizzata per collegare l'unità ad altri apparecchi amplificati (tramite il loro ingresso AUX-IN) per
aumentare l'audio e la potenza totale.
COLLEGAMENTO DI UNA BATTERIA AUSILIARIA
L'apparecchio è predisposto per collegare una batteria ausiliaria qualora vi trovaste con la batteria interna completamente scarica
e non vi fosse possibilità di collegare l'apparecchio ad una presa di rete.
Utilizzare la presa posteriore (21) e collegarvi una batteria esterna da 12V facendo molta attenzione a rispettare le polarità indicate .
Aux-out
DC 12V Input
UTILIZZO DEL MICROFONO
1. Collegare il microfono in dotazione all'ingresso MIC (11);
2. Accendere il microfono agendo sull'interruttore presente sul manico del microfono stesso portandolo in posizione ON;
3. Regolare il volume di ingresso del microfono e l'effetto eco come desiderato tramite gli appositi comandi (16/15);
4. Premere il tasto (10) se si vuole dare priorità alla voce del microfono rispetto alla musica riprodotta (la musica viene abbassata
automaticamente di volume quando si parla con il microfono), premerlo nuovamente per riportarlo alla condizione normale.
REGISTRAZIONE
REGISTRAZIONE DA MICROFONO A MEMORIA USB
1. Accendere l'apparecchio;
2. Inserire una memoria USB nella presa (9);
3. Collegare e accendere il microfono;
8
Page 9

ITALIANO
4. Premere in tasto REC (3) sull'unità e cantare utilizzando il microfono;
5. Premere nuovamente in tasto REC (3) sull'unità per terminare la registrazione; il file registrato verrà salvato all'interno della
memoria USB.
XF 1200 KB
RISOLUZIONE DEI PROBLEMI
Se si verifica un problema, attenersi alla procedura descritta nella seguente tabella.
Se il problema non può essere risolto, contattare il rivenditore o il centro assistenza.
Problema Possibili cause Soluzione
Nessun suono riprodotto quando l'apparecchio viene acceso
Suono distorto 1. Volume troppo alto
Nessun suono dal microfono 1. La presa del microfono può non
Nessun suono quando si inserisce un dispositivo USB/ Micro
SD Card
Impossibile caricare la batteria
o la batteria ha una durata breve
Dagli altoparlanti si sentono
forti rumori
1. Nessuna sorgente sonora in
ingresso
2. Manopola Volume a livello 0 o
regolazione volume dal teleconado
a livello 0
3. Nessun dispositivo Micro SD/USB
collegato
2. Errore file Audio
essere collegata correttamente.
2. L'interrutore di accensione sul
microfono può essere in posizione
"spento".
3. Volume del microfono basso.
1. Formato file non supportato
2. USB/ Micro SD card non collegate
correttamente
1. Il cavo di alimentazione non è inserito pene nella presa
2. La batteria non è completamente
carica
3. La batteria potrebbe aver terminato il
suo ciclo di vita
1. Microfono acceso ma troppo vicino
all'altoparlante
2. Microfono acceso ma non viene
utilizzato
3. Il Volume del microfono potrebbe
essere troppo alto
4. Un cellulare viene utilizzato troppo
vicino all'altoparlante
5. Apparecchi senza fili possono essere molto vicini a chi sta utilizzando il
microfono
1. Collegare un dispositivo all'ingresso AUX-IN
2. Regolare il volume
3. Collegare USB/ Micro SD card, riprodurre
MP3
1. Abbassare il volume
2. Controllare e riprodurre un'altro file Audio
1. Assicurarsi che il microfono sia collegato
correttamente alla presa.
2. Accendere il microfono.
3. Regolare correttamente il volume del
microfono
1. Il formato dei file audio deve essere MP3
2. Collegare l'apparecchio USB/Micro SD card
correttamente
1. Controllare se il cavo di alimentazione è
collegato in modo corretto
2. Normalmente ci vogliono 5-6 ore per
ricaricare completamente la batteria
3. Sostituire la vecchia batteria con una nuova
avente le stesse specifiche tecniche
1. Tenere il microfono alla distanza di 2 metri
dal diffusore
2. Spegnere il microfono se non utilizzato
3. Abbassare il volume del microfono
4. Tenere il cellulare lontano dall'altoparlante
mentre si effettua una chiamata.
5. Tenere il diffusore lontano da apparecchi
wireless
9
Page 10

ITALIANO
XF 1200 KB
INFORMATIVA SULLA RIMOZIONE E LO SMALTIMENTO DELLE BATTERIE
Attenzione: Questa operazione è riservata esclusivamente al personale tecnico specializzato!
PROCEDURA PER LA RIMOZIONE DELLA BATTERIA DALL’ALTOPARLANTE AMPLIFICATO
Operare esclusivamente in assenza di collegamento dell’apparecchio alla rete elettrica!
1. Rimuovere le viti che serrano il trolley;
2. Rimuovere le viti che serrano il pannello metallico posteriore;
3. Rimuoverlo e individuare la batteria;
4. Scollegare la batteria e rimuoverla.
SMALTIMENTO DELLA BATTERIA
Qualunque sia il tipo di batteria esaurita, essa non deve essere gettata tra i rifiuti domestici, nel fuoco o nell’acqua. Ogni tipo di
batteria esaurita deve essere riciclata oppure smaltita presso gli appositi centri di raccolta dedicati.
INFORMAZIONI AGLI UTENTI
ai sensi del Decreto Legislativo N° 49 del 14 Marzo 2014
“Attuazione della Direttiva 2012/19/UE sui rifiuti di apparecchiature elettriche ed elettroniche (RAEE)”
Il simbolo del cassonetto barrato riportato sull’apparecchiatura indica che il prodotto alla fine della propria vita utile deve essere
raccolto separatamente dagli altri rifiuti. L’utente dovrà, pertanto, conferire l’apparecchiatura integra dei componenti essenziali
giunta a fine vita agli idonei centri di raccolta differenziata dei rifiuti elettronici ed elettrotecnici, oppure riconsegnarla al rivenditore al
momento dell’acquisto di nuova apparecchiatura di tipo equivalente, in ragione di uno a uno, oppure 1 a zero per le apparecchiature
aventi lato maggiore inferiore a 25cm. L’adeguata raccolta differenziata per l’avvio successivo dell’apparecchiatura dimessa al
riciclaggio, al trattamento e allo smaltimento ambientale compatibile contribuisce ad evitare possibili effetti negativi sull’ambiente
e sulla salute e favorisce il riciclo dei materiali di cui è composta l’apparecchiatura. Lo smaltimento abusivo del prodotto da parte
dell’utente comporta l’applicazione delle sanzioni amministrative di cui al D.Lgs n. Decreto Legislativo N° 49 del 14 Marzo 2014.
CARATTERISTICHE TECNICHE
GENERALI
Alimentazione: .............................................................100-230V 50Hz
batteria interna al piombo ricaricabile 12V , 2,6Ah
Consumo: .............................................................................. Max 50W
Temperatura di funzionamento: ........................................................................... 0° ~ 40°C
Umidità: ........................................................................... 5% ~ 90%
Potenza massima Audio: ................................................................................... 100W
Risposta in frequenza: ...................................................................... 50Hz - 20KHz
Rapporto segnale rumore: .................................................................................... 60dB
Sensibilità: ................................................................................ 92±3dB
Impedenza: ....................................................................................... 4Ω
Potenza di trasmissione di picco Bluetooth: ................................................................. 2,5mW
Potenza di trasmissione max Bluetooth: ....................................................................... 1,9mW
Banda di trasmissione Bluetooth: ................................................................................. 2,4GHz
Dimensioni: ................................................................. 383x350x605mm
Peso: ................................................................................ 12,7 Kg
10
Page 11

XF 1200 KBENGLISH
NOTES ON USE
Listening at high volume for a long time may damage your hearing.
This is a precision electronic appliance; avoid using it in the following cases:
- Near magnetic fields.
- Near heat sources such as heaters and heaters.
- In very humid places like bathrooms, swimming pools, etc...
- In very dusty places.
- In places subject to strong vibrations.
- Do not place your ear near the loudspeaker during the set-up and volume adjustment phases, and in par ticular keep the volume
at minimum during the ignition phase.
- Position the appliance so that there is always enough space on its sides for the free circulation of air (at least 5cm).
- If liquids enter the appliance, immediately disconnect the plug from the socket and take the appliance to the nearest authorized
TREVI service center.
- Always check before recharging the appliance, that the power and connection cables are installed correctly.
- No naked flame sources, such as lighted candles, should be placed on the appliance.
- The appliance must not be exposed to dripping or splashing water and no objects filled with liquids, such as vases, must be
placed on the appliance.
- Instruct children and people with poor knowledge of the product to use correctly.
- Keep this manual for future reference.
CARE AND MAINTENANCE
Use a slightly damp soft cloth for cleaning. Do not use solvents and abrasive substances.
IMPORTANT
This device is designed for non-professional home use. The good construction of this device guarantees its perfect functioning
for a long time. If, however, a problem should arise, it is advisable to consult the nearest TREVI Authorized Service Center.
TREVI follows a policy of ongoing research and development. Therefore products may have different features from those described.
FRONT AND BACK PANEL FUNCTIONS
1. Power switch
2. True wireless stereo key (TWS)/ MODE key, to select input
signel source
3. REC key
4. MIC priority switch
5. Display Screen
6. 9 button. Previous key
7. button, Play/Pause key
8. : button. Next key
11
Page 12

ENGLISH
REMOTE CONTROL
XF 1200 KB
9. USB jack
10. TF card slot
11. Volume knob, to adjust the master volume
12. AUX IN
13. Bass control
14. Treble control
15. Echo control
16. MIC Volume control
17. Charging LED (Red-Char, Green-Full)
18. MIC jack
19. LED switch
20. Line out
21. DC 12V External battery input
22. AC 100-230V , Power Socket
1. Stand-by key
2. Mode key - To select input signal source
3. button, Play/Pause key
4. 9 button, Previous key
5. EQ mode key
6. Volume decrease key
7. Tracks select key
8. MUTE key
9. : button, Next Key
10. Volume increase key
11. MP3 mode is for USB/TF card switching
12. RPT, repet key
ACTIVATION AND REPLACEMENT REMOTE CONTROL'S BATTERY
PULL THE PLASTIC PART
2- PULL
1- PUSH
The remote control is equipped with a CR2025 battery
To activate the battery of the remote control (included), remove the plastic
protection tab.
For battery replacement:
1. Push the battery's plastic holder compartment to the right;
2. Remove the battery compartment;
3. Insert a new battery, taking care to respect the polarities;
4. Close the battery compartment.
TRANSPORTATION
Press the button on the handle of the trolley, lift the handle up to the block (you will hear a metallic click). For transport, by acting
on the handle of the trolley, slightly bend the appliance and take advantage of the two rear wheels.
To unlock and close the trolley, press the button on the handle again and lower the handle completely.
For transport, it is also possible to use the two handles placed laterally to the appliance.
12
Page 13

XF 1200 KBENGLISH
POWER
This unit works with internal rechargeable lead battery 12V 2,6Ah or 230V 50Hz mains power supply.
When the battery is running out or the unit does not turn on, turn the main POWER ON/OFF switch (1) to the "OFF" position, insert
the power cord into the socket (22) of the device and plug it into a socket to recharge the internal battery, the Red Led indicator
(17) will light up.
Indicator LED status with battery charging:
- LED indicator light (17) RED fixed: the device is correctly connected to the power cable and the battery is being charged.
- LED indicator light (17) GREEN fixed: charging operation completed, the battery is charged.
Note: Do not connect the appliance to an outlet with a voltage other than that indicated.
BASIC FUNCTIONS
POWER ON/OFF
Set the main switch POWER ON/OFF(1) to "ON" to turn on and use the device with its internal battery.
Set the main switch POWER ON/OFF(1) to "OFF" to completely switch off the device or charge the battery.
STAND-BY
It is possible to bring the appliance into Stand-by mode using the button (1) on the remote;
Caution:
- In stand-by function there is no LED indicating.
- Leaving the unit in stand-by function the battery discharges faster than using the POWER ON/OFF switch (1).
MODE SETTING FUNCTION
To change the mode function, press more times the MODE (2) key on the unit or press MODE button (2) on the remote control
to select: BLUETOOTH (on display "BLUE"), USB/Micro SD (only if the socket USB (9)/Micro SD socket (10) is connected to a
memory, a small writing "USB" or "SD" appears on the display), AUX-IN (on display "LINE").
ADJUSTING THE VOLUME
1. Turn the VOLUME knob (11) to increase or decrease the general playback volume or use the Vol+ (10) and Vol- (6) buttons
on the remote control;
2. Turn the MIC VOL knob (16) to adjust the volume of the signal at the MIC INPUT (18).
PRE-EQUALIZER
This unit has a pre audio equalization system set. Press the EQ button (5) on remote control to select one of 3 available audio
equalizers, and that best suits the sound playback.
SETTING TONE TREBLE AND BASS
Turn the TREBLE knob (14) to adjust the high tones.
Turn the BASS knob (13) to adjust the bass tones.
ECHO EFFECT
Turn the ECHO knob (15) to increase or decrease the echo effect on the input MIC.
Note: the echo only works on microphone input.
DISCO-LIGHT EFFECTS
Press the LED switch (19) to activate the Disco-Light effect on the loudspeaker.
Press the LED switch (19) to deactivate the Disco-Light effect.
RADIO MODE
1. Switch on the appliance and select the RADIO function (the frequency indication will appear on the display);
2. Press and hold key(7)
automatically searches for radio stations and saves them automatically). The number of stored stations depends on the radio
signal in your area. During the search, press the key
3. Once the scan is complete, use the keys :(8) or 9(6)
on the unit for a few seconds to activate the search and automatic storage of stations (the radio
(15)
on the unit to stop the recording;
on the unit to move between the saved station presets
13
.
Page 14

ENGLISH
Note:
-
FM reception depends very much on where the device is located..
- The proximity of TV sets, neon lamps or other household appliances can cause disturbances in the reception of radio
programs, in this case remove the appliance.
XF 1200 KB
BLUETOOTH FUNCTION
1. Switch on the appliance and select the bluetooth function, the word "BLUE" appears on the display;
2. In the Bluetooth mode, the symbol and the word "BLUE" on the display will start to flash and the system will automatically
go into search mode;
3. Activate the Bluetooth feature on the external device to be coupled;
4. Initiate a search for devices. After select the "XF 1200 KB" or "Bluetooth";
5. Enter the password "0000" if required;
6. Press the
unit, or the keys :(9) and 9(4) for selection of songs.
(7) button
on the unit or the key (3) on remote control, to start playing and the buttons :(8) o 9(6) on the
TWS FUNCTION OPERATION
True wireless stereo (TWS) technology
TWS technology enables user to make wireless connection between two speakers which are same model and compatible with
TWS. In TWS connection, two speakers will be automatically grouped to be a Stereo- Speaker System which outputs the left and
right channel.
HOW TO ESTABLISH
Notice: Two speakers must be same model and both compatible with TWS.
1. Please switch on both speakers and select "Bluetooth" mode;
2. Press "TWS" button of one of the speakers until hearing a "beep". It becomes the main speaker (left chennel), which will auto-
matically search and connect with another speaker (right channel). After connection, you will hear a "beep";
3. Connect mobile phone or Bluetooth player to the speaker by Bluetooth. After connection, you can play music with the TWS
Stereo- Speaker System.
TWS function operates in TWS mode, manipulations to the main speaker will be simultaneously effected in another speaker. For
example, volume adjustement, previous and next song selection, play and pause, power on and off.
Note:
- If the 2 loudspeakers are not paired, switch off both devices and repeat steps 1, 2 and 3.
- The TWS function only works between equal speakers or with other speakers that use the same micro processor or solution.
PLAY ON INPUT USB/MICRO SD
1. Switch on the appliance;
2. Insert a USB memory or an Micro SD card in the corresponding entries (9/10). Playback starts automatically;
3. To pause playback, press the
4. To resume playback, press the
5. Press :(8) button on unit or key :(9) on remote control while listening to switch to the next track. Press the 9(6) button
on unit or 9(4) on remote to go to the previous tracks;
6. Using the numeric keypad (7) on remote control you can directly enter the number of the song you want to play;
7. Press RPT button (12) on remote control, the display will show "ONE" (to reproduce the same track continuously); press it
a second time, the word "ALL" will appear on the display (to continuously play all the tracks contained in the USB/Micro SD
device).
Note:
- The player may not support some USB/Micro SD devices, this is due to the incompatibility of some processors.
- To avoid harmful interference, always connect USB devices directly to the unit, do not use extension cords.
- From the computer to format the USB memory/SD FAT (16 or 32).
(7)
button on the unit or the key (3) on remote control, the display will show "PAUS";
(7)
on the unit or on the remote control;
AUX-IN
1. Switch on the appliance and select the "LINE IN" function;
14
Page 15

XF 1200 KBENGLISH
2. Connect any unit equipped with audio output, through a cable 3.5mm jack (included) to the AUX IN (12);
3. Use the external device from their commands.
AUX-OUT
This output (20) can be used to connect the unit to other amplified devices (by AUX-IN input) to increase audio and total power.
BATTERY AUXILIARY CONNECTION
The appliance is set up to connect an auxiliary battery if you were with the internal battery completely empty and there was no
possibility of connecting the appliance to a mains socket.
Use the rear socket (21) and connect an external 12V battery making sure to respect the indicated polarities.
Aux-out
DC 12V Input
USING THE MICROPHONE
1. Connect the supplied microphone into the jack MIC (11);
2. Turn on the microphone using the switch on the handle of the microphone to the ON position;
3. Adjust the volume (16) of the microphone inputand the echo effect (15) as desired using the appropriate commands;
4. Press the button (10) if you want to give priority to the microphone's voice compared to the music played (the music is
automatically lowered in volume when speaking with the microphone), press it again to return it to the normal condition.
REC FUNCTION OPERATION
Recording from Microphone to USB flash drive
1. Turn on the speaker by POWER ON;
2. Insert the USB flash drive into USB socket (9);
3. Insert the wired microphone into MIC jack (18) and switch on the microphone;
4. Press REC button (3) on front control panel and then sing through microphone, the sound will be recorder into USB;
5. To finish recording, press REC button (3), the record will be saved into USB.
TROUBLESHOOTING
If a problem occurs, follow the steps in the table below.
If the problem still can’t be solved, please contact your retailer.
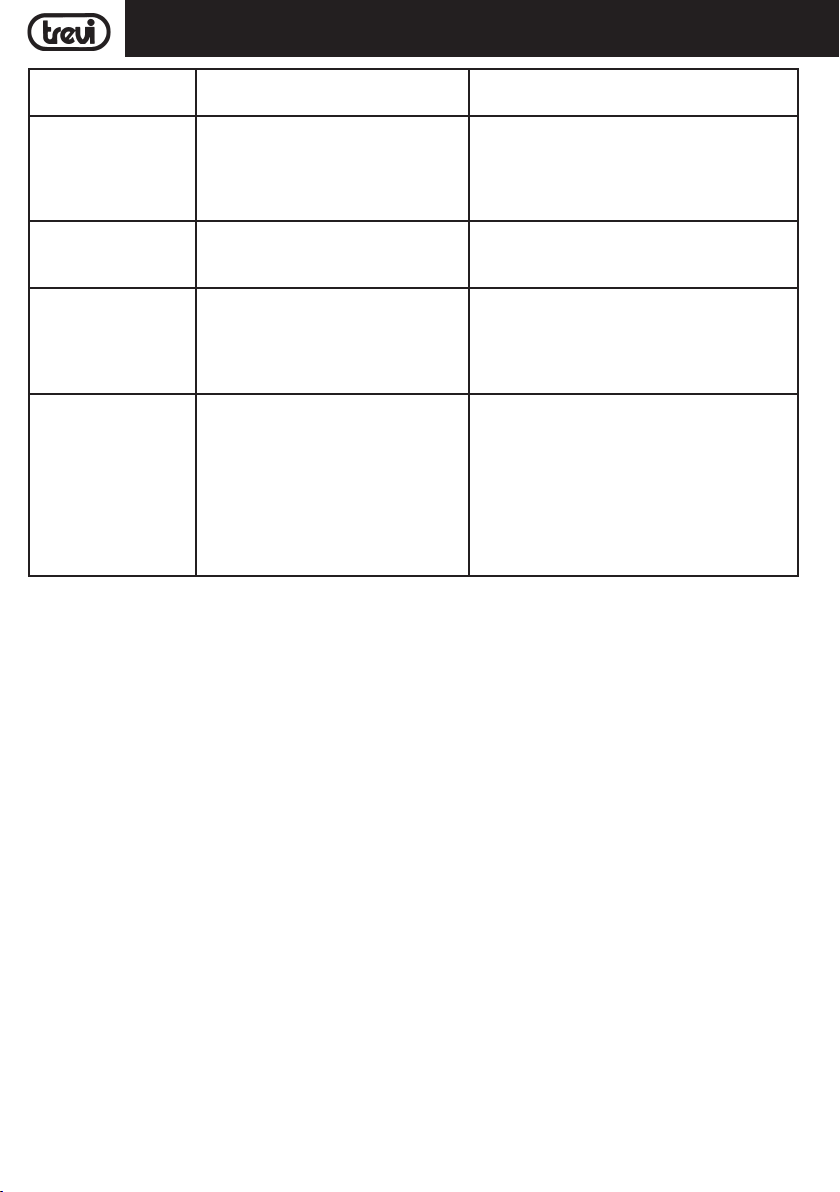
Problem Possible cause Solution
No sound when power is
turned ON
1. No input sound source comes
2. Volume knob in the lowest position
3. Voice switch off
4. USB/Micro SD card not plugged
15
1. Input AUX signal
2. Adjust volume
3. Turn on voice switch
4. Plug USB/Micro SD card, play MP3
Page 16
ENGLISH
XF 1200 KB
Distorted sound 1. Volume is too loud
No sound from the microphone
No sound comes after
inserting USB/ Micro
SD Card
Unable to charge or the
battery works only for
short duration
Speaker makes loud
noises
2. Audio file error
1. Microphone socket may not be
plugged properly.
2. Microphone switch may not be on.
3. Microphone volume is on lowest
mode.
1. Incorrect file format
2. USB/Micro SD may not be plugged
properly
1. Connect with power cord to charge
2. Battery not fully charged
3. Battery life may have ended
1. Microphone switched on but may too
close to the speaker
2. Microphone switched on but is not
being used
3. Microphone volume may be too loud
4. Mobile phone is being used too close
to the speaker
5. Other wireless equipment may be
placed very close to the speaker
INFORMATION NOTE ON THE REMOVAL BATTERY
Warning: Only high-qualified personnel should perform this operation!
1. Turn the volume down
2. Check and change the audio file
1. Ensure the microphone is correctly plugged
into the socket.
2. Turn on the microphone
3. Adjust the microphone volume as per users
wish
1. File format should be MP3
2. Plug USB/Micro SD card correctly
1. Check if power cord connected properly
2. Extend charging time;normally it takes 6-8 hour
to fully charge
3. Replace old batteries with the same specification as the old batteries.
1. Keep the microphone 2 meters away from the
speaker
2. Turn off microphone if not in use.
3. Adjust microphone volume to lower mode
4. Keep mobile away from the speaker whilst a
ending a call.
5. Keep the speaker away from other wireless
equipment
BATTERY REMOVAL
The appliance should not be plugged to the mains socket when performing this operation!
1. Remove the screws that tighten the trolley;
2. Remove the screws that tighten the rear metal panel;
3. Remove it and locate the battery;
4. Disconnect the battery and remove it.
INFORMATION ON DISPOSAL BATTERY
Used batteries should not be disposed of with household waste or thrown into fire or water. Used batteries should be recycled or
disposed of in separate waste collection centres.
16
Page 17

XF 1200 KBENGLISH
INFORMATION TO USERS
pursuant to Legislative Decree No. 49 of March 14, 2014
"Implementation of Directive 2012/19/EU on Waste Electrical and Electronic Equipment (WEEE)"
This wheeled bin symbol on the product indicates that at the end of its life must be collected separately from other waste. The
user must, therefore, take the remote control integrates the essential components that got to its life to the appropriate differentiated collection centers for electronic and electro-technical waste, or return it to the dealer when purchasing a new appliance of
equivalent type, in terms of one to one, or one to zero for equipment having longer side of less than 25cm. Appropriate separate
collection for the decommissioned equipment for recycling, processing and environmentally compatible disposal helps prevent
negative impact on the environment and human health and promotes recycling of the materials making up the product. Illegal
dumping of the product by the user entails the application of administrative sanctions stated in Legislative Decree n. Legislative
Decree No. 49 of March 14, 2014.
TECHNICAL SPECIFICATIONS
Power Supply: ....................................................... 100-230V 50/60Hz
internal lead acid rechargeable battery 12V 2,6Ah
Power: .............................................................................. Max 50W
Operating temperature: ........................................................................... 0° ~ 40°C
Humidity: ........................................................................... 5% ~ 90%
Output Audio power: ................................................................................... 100W
FM Radio bands reception: ................................................................ 87.5MHz - 108MHz
Frequency response: ...................................................................... 50Hz - 20KHz
S/N ratio: ................................................................................... 60dB
Sensibility: ................................................................................ 92±3dB
Impedance: ....................................................................................... 4Ω
Bluetooth peak transmission power: ............................................................................ 2,5mW
Bluetooth max power transmission: ............................................................................. 1,9mW
Band transmission Bluetooth: ................................................................................. 2,4GHz
Dimensions: ................................................................. 383x350x605mm
Weight: .................................................................................12,7 kg
17
Page 18

FRANCAIS
XF 1200 KB
NOTES D’EMPLOI
Écouter à fort volume pendant une longue période peut endommager votre audition.
Cet appareil est un instrument électronique de haute précision, évitez donc de l’utiliser dans les cas suivants:
- Près des champs magnétiques.
- À proximité de sources de chaleur telles que des radiateurs et des radiateurs.
- Dans des endroits très humides tels que salles de bains, piscines, etc...
- Dans des endroits très poussiéreux.
- Dans des endroits soumis à de fortes vibrations.
- Ne placez pas votre oreille près du haut-parleur pendant les phases de réglage et de réglage du volume, et en particulier
maintenez le volume au minimum pendant la phase d'allumage.
- Placez l'appareil de sorte qu'il y ait toujours assez de place sur les côtés pour permettre la libre circulation de l'air (au moins
5 cm).
- Si des liquides pénètrent dans l'appareil, débranchez immédiatement la fiche de la prise de courant et portez-le au centre de
réparation TREVI le plus proche.
- Vérifiez toujours, avant de recharger l'appareil, que les câbles d'alimentation et de connexion sont correctement installés.
- Ne placez aucune source de flamme nue, telle que des bougies allumées, sur l'appareil.
- L'appareil ne doit pas être exposé à des gouttes d'eau ni à des éclaboussures d'eau et aucun objet contenant des liquides,
tels que des vases, ne doit être placé sur l'appareil.
- Demandez aux enfants et aux personnes ayant une faible connaissance du produit d’utiliser correctement.
- Conservez ce manuel pour référence ultérieure.
MANIEMENT ET ENTRETIEN
Pour le nettoyage, il est conseillé d’utiliser un chiffon doux légèrement humide. Évitez l’emploi de solvants ou de substances abrasives.
IMPORTANT
Cet appareil est conçu pour un usage domestique (usage non professionnel). La bonne fabrication de cet appareil garantit un
fonctionnement parfait pour une longue période. Si toutefois quelques inconvénients devaient se présenter, adressez-vous au
Centre d’Assistance agréé TREVI le plus proche.
TREVI observe une politique de recherche et de développement continus. C’est pourquoi ses produits peuvent présenter des
caractéristiques différentes par rapport à celles qui sont décrites.
FONCTIONS DES PANNEAUX AVANT ET ARRIÈRE
1. Interrupteur POWER ON/OFF, marche/arrêt
2. True wireless stereo bouton (TWS)/ Bouton MODE, sélectionnez la fonction
3. Bouton REC, enregistrement
4. Bouton de priorité Microphone
5. Afficher
18
Page 19
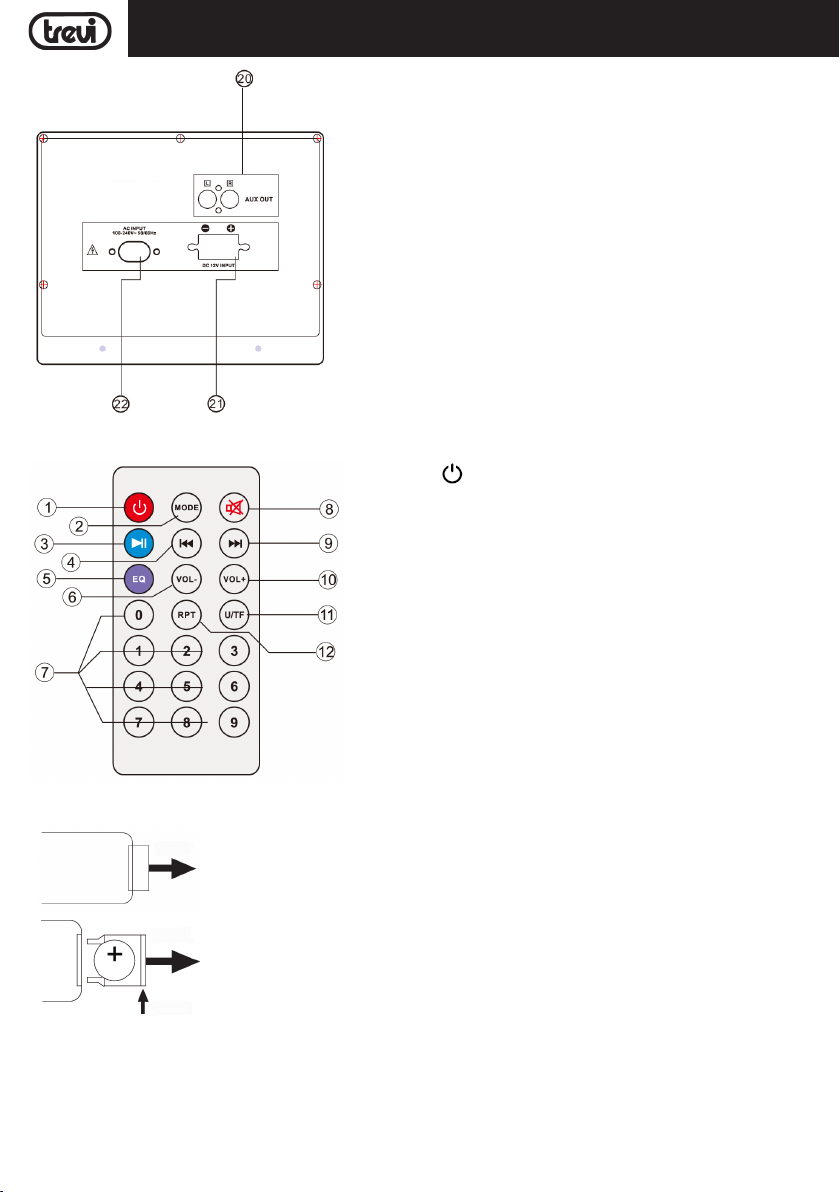
TELECOMMANDE
XF 1200 KBFRANCAIS
6. Bouton 9, précédent
7. Bouton, Lecture/Pause
8. Bouton :, suivant
9. Entrée USB
10. Entrée Micro SD Card
11. Réglage du volume
12. Entrée AUX-IN
13. BASS, réglage des basses tonalités
14. TREBLE, réglage de tonalité élevée
15. Réglage ECHO
16. MIC VOL, réglage du volume du microphone
17. Led indicateur de batterie décharge
18. Entrée MIC
19. Interrupteur marche/arrêt LEDs frontales (Disco Light)
20. AUX OUT, sortie audio
21. Entrée 12V pour toute batterie auxiliaire (non fournie)
22. Réseau de prise de courant
1. Bouton , Stand-by
2. Button MODE, sélection de fonction
3. Bouton, Lecture/Pause
4. Bouton 9, PREV, la sélection de piste précédente
5. Button EQ, preset EQ
6. Volume -
7. Boutons numériques 0-9
8. Bouton MUTE
9. Bouton :, NEXT, sélectionner la piste suivante
10. Volume +
11. Bouton U/TF: sélection de la source USB/Micro SD (si insérée)
12. Bouton RPT (Répétez seule chanson, répéter tous les morceaux)
ACTIVATION ET REMPLACEMENT DE LA BATTERIE DE TÉLÉCOMMANDE
TIRER LA PROTECTION
2- TIRER
1- POUSSER
La télécommande est équipée d'une pile CR2025
Pour activer la pile de la télécommande (fournie), retirez la protection en plastique.
Pour le remplacement de la batterie:
1. Poussez le support en plastique du compartiment à piles vers la droite.
2. Retirez le compartiment à piles.
3. Insérez une nouvelle pile en prenant soin de respecter les polarités.
4. Fermez le compartiment à piles.
TRANSPORT
Appuyez sur le bouton de la poignée du chariot, soulevez-la jusqu'au bloc (vous entendrez un clic métallique). Pour le transport,
en agissant sur la poignée du chariot, pliez légèrement l’appareil et tirez parti des deux roues arrière.
Pour déverrouiller et fermer le chariot, appuyez à nouveau sur le bouton de la poignée et abaissez-la complètement.
Pour le transport, il est également possible d’utiliser les deux poignées placées latéralement à l’appareil.
19
Page 20

FRANCAIS
XF 1200 KB
ALIMENTATION
Cet appareil fonctionne avec une batterie au plomb rechargeable 12V , 2,6Ah et alimentation 230V 50Hz.
Lorsque la batterie est épuisée ou que l'appareil ne s'allume pas, mettez l'interrupteur POWER ON/OFF (1) en position "OFF",
insérez le cordon d'alimentation dans la prise (22) de l'appareil et branchez-le dans une prise secteur. pour recharger, le voyant
rouge(17) s’allumera.
Etat de la LED indicatrice lors du chargement de la batterie:
- Voyant Led (17) ROUGE: l'appareil est correctement connecté au câble d'alimentation et la batterie est en cours de chargement.
- Voyant Led (17) VERT: le chargement est terminé, la batterie est chargée.
Remarque: Ne connectez pas l'appareil à une prise avec une tension autre que celle indiquée.
FONCTIONS
MARCHE/ARRÊT
Placez l’interrupteur principal POWER ON/OFF (1) sur "ON" pour allumer l’appareil et l’utiliser avec sa batterie interne.
Placez l’interrupteur principal POWER ON/OFF (1) sur "OFF" pour éteindre complètement l’appareil ou pour recharger la batterie.
STAND-BY
Et 'possible de basculer le système en mode veille à l'aide du bouton (1) de la télécommande;
Remarque:
- Il n'y a pas de LED indiquant l'activation de la fonction de stand-by.
- S'il vous plaît noter que sortant de l'unité de la fonction stand-by la batterie se vide plus vite que l'aide de interrupteur POWER
ON/OFF(1).
SELECTION DE LA FONCTION
Pour changer le mode de fonctionnement, appuyez plusieurs fois sur le bouton MODE (2) sur l'appareil ou appuyez sur le
boutton MODE (2) sur la télécommande pour sélectionner: BLUETOOTH (l'écran affiche le mode "BLUE"), USB ou Micro SD
Card (uniquement si une mémoire est connectée au port USB/Micro SD, un petit message "USB" ou "SD" apparaît à l'écran),
AUX-IN (l'écran affiche "LINE").
AJUSTEMENT DU VOLUME
1. Tournez le bouton VOLUME (11) pour augmenter ou diminuer le volume général de la lecture ou utilisez les touches Vol+(10)
et Vol- (6) de la télécommande pour un réglage plus précis;
2. Tournez la MIC VOL (16) pour régler le volume du signal sur les entrées MIC INPUT (18).
PRE-EGALISATION
Cette unité a un audio ensemble du système d'égalisation pré. Appuyez sur le bouton EQ (5) sur la télécommande pour sélectionner
l'un des 3 égaliseurs audio disponibles, et qui convient le mieux à la lecture du son.
REGLAGE TONALITE AIGUS ET DES GRAVES
Tournez le TREBLE (14) pour régler les aigus.
Tournez le BASS (13) pour régler les basses.
ECHO EFFET
Tournez le ECHO (15) pour augmenter ou diminuer l'effet d'écho sur les entrées MIC.
Remarque: l'écho ne fonctionne que sur les entrées MIC.
EFFET DE LUMIÈRE DISQUE
Pour activer l’effet de Lumière Disque sur le haut-parleur, appuyez sur le commutateur LED (19).
Pour annuler l'effet de Lumière Disque, appuyez sur le bouton LED (19) à nouveau.
RADIO
1. Allumez l'appareil et sélectionnez la fonction RADIO (l'indication de fréquence apparaîtra à l'écran);
2. TAppuyez sur la touche(7)
et l'enregistrement automatique des stations (la radio recherche automatiquement les stations de radio et les enregistre automatiquement). Le nombre de stations mémorisées dépend du signal radio de votre région. Pendant la recherche, appuyez
de l'appareil et maintenez-la enfoncée pendant quelques secondes pour activer la recherche
20
Page 21

XF 1200 KBFRANCAIS
sur la touche
3. Une fois la recherche terminée, utilisez les touches :(8) ou 9(6)
présélectionnées enregistrées
Remarque:
-
La réception FM dépend beaucoup de l'emplacement de l'appareil.
- La proximité d'appareils de télévision, de lampes au néon ou d'autres appareils ménagers peut perturber la réception
des programmes radio. Dans ce cas, retirez l'appareil.
(15)
de l'appareil pour arrêter l'enregistrement;
de l'appareil pour vous déplacer entre les stations
.
BLUETOOTH FONCTIONNEMENT
1. Allumez l'appareil et sélectionnez la fonction Bluetooth, le mot "BLEU" apparaît à l'écran;
2. En mode Bluetooth, le symbole sur l'écran se met à clignoter, le système passe automatiquement en recherche;
3. Activez la fonction Bluetooth sur l'appareil externe pour être couplé;
4. Lancez une recherche des appareils. Après sélectionnez l'option "XF 1200 PRO" ou "Bluetooth";
5. Entrez le mot de passe "0000" si nécessaire;
6. Appuyez sur la touche (7) de l’appareil ou de la télécommande pour lancer la lecture et utilisez les touches :(8) o
9(6), ou les touches :(9) e 9(4) sur la télécommande pour sélectionner les pistes.
FONCTIONNEMENT DE LA FONCTION TWS
Technologie True Wireless Stereo (TWS)
La technologie TWS permet à l’utilisateur d’établir une connexion sans fil entre deux haut-parleurs du même modèle compatibles
avec TWS. Dans la connexion TWS, deux haut-parleurs seront automatiquement regroupés pour former un système stéréophonique
qui sortira les canaux gauche et droit.
COMMENT ETABLIR
Remarque: Deux haut-parleurs doivent être du même modèle et tous deux compatibles avec TWS.
1. Allumez les deux enceintes et sélectionnez le mode "Bluetooth";
2. Appuyez sur le bouton "TWS" de l'une des enceintes jusqu'à ce que vous entendiez un "bip". Il devient le haut-parleur principal
(gauche), qui recherchera et se connectera automatiquement avec un autre haut-parleur (canal droit). Après la connexion, vous
entendrez un "bip";
3. Connectez le téléphone por table ou le lecteur Bluetooth au haut-parleur via Bluetooth. Une fois la connexion établie, vous pouvez
écouter de la musique avec le TWS Stereo-Speaker System.
La fonction TWS fonctionne en mode TWS, les manipulations sur le haut-parleur principal seront effectuées simultanément sur un
autre haut-parleur. Par exemple, réglage du volume, sélection de la chanson précédente et suivante, lecture et pause, mise sous
tension et hors tension.
Remarque:
- Si les 2 haut-parleurs ne sont pas appariés, éteignez les deux appareils et répétez les étapes 1, 2 et 3.
- La fonction TWS ne fonctionne qu'entre des enceintes équivalentes ou avec d'autres enceintes utilisant le même microprocesseur
ou la même solution.
ENTRÉE USB/MICRO SD
1. Allumez l'appareil;
2. Insérez une mémoire USB ou une carte Micro SD dans les entrées correspondantes (9/10). La lecture démarre automatique-
ment;
3. Pour interrompre la lecture, appuyez sur le bouton
l'écran affiche l'icône "PAUS";
4. Pour reprendre la lecture, appuyez sur le bouton
5. Appuyez sur la touche :(8) sur les unités ou la touche :(9) sur la télécommande tout en écoutant de passer à la piste
suivante. Appuyez sur 9(4) sur les unités ou 9(4) sur la télécommande pour passer aux pistes précédentes;
6. À l'aide du pavé numérique(7) sur la télécommande, vous pouvez entrer directement le numéro de la chanson que vous voulez
jouer;
7. Appuyez sur le bouton RPT (12) de la télécommande, l’écran affichera "ONE" (pour reproduire la même piste en continu);
appuyez une seconde fois dessus, le mot "ALL" apparaîtra à l'écran (pour lire en continu toutes les pistes contenues dans le
périphérique USB/Micro SD).
(7)
sur l'appareil ou sur la touche(3) de la télécommande,
(7)
sur l'appareil ou la télécommande;
21
Page 22
FRANCAIS
Remarque:
- Le joueur peut ne pas supporter certains périphériques USB, cela est dû à l'incompatibilité de certains processeurs.
- Pour éviter les interférences nuisibles, toujours connecter des périphériques USB directement à l'appareil, ne pas utiliser de
rallonges.
- De l'ordinateur pour formater la mémoire USB/SD FAT (16 ou 32).
XF 1200 KB
AUX-IN
1. Allumez l'appareil et sélectionnez la fonction "LINE IN";
2. Connectez toute unité équipée d'une sortie audio, via un câble jack 3,5 mm (fourni) à l'entrée AUX IN (12);
3. Utilisez le périphérique externe à partir de leurs commandes.
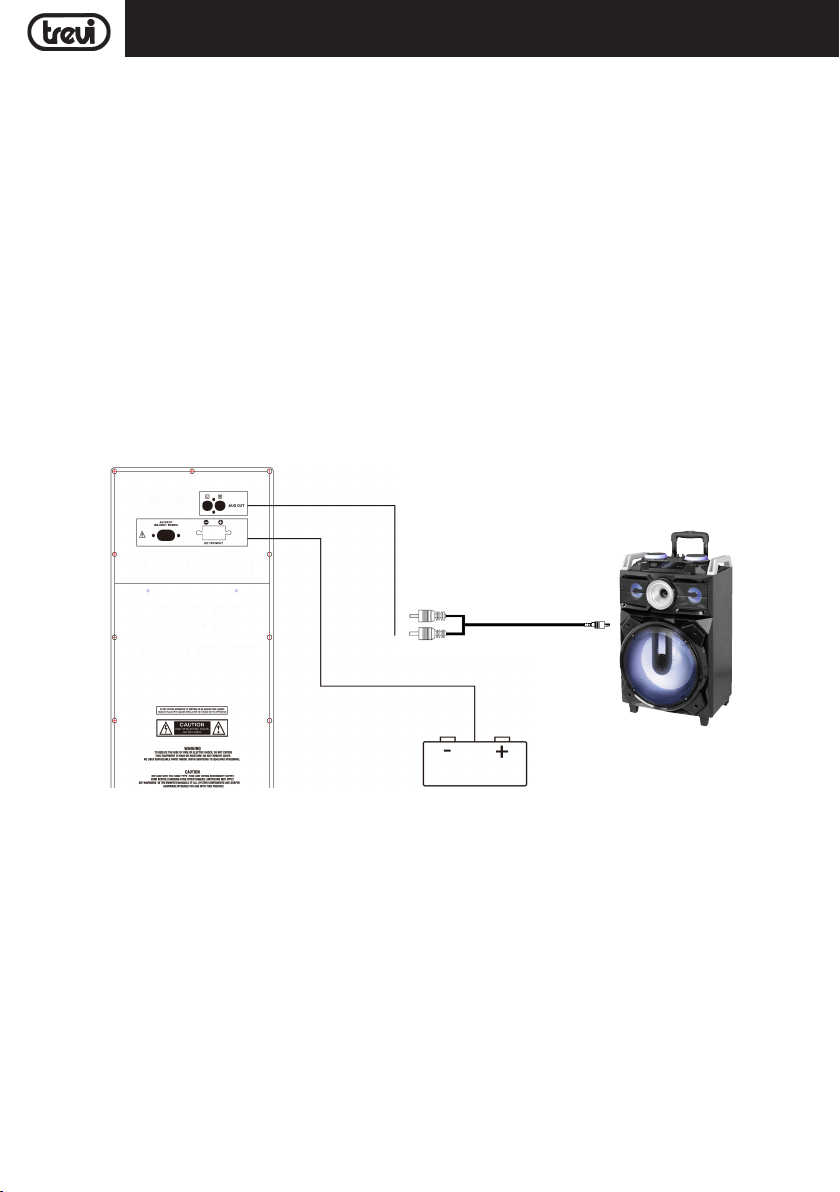
AUX-OUT (SORTIE AUDIO)
Cette sortie (20) peut être utilisée pour connecter l’appareil à d’autres appareils amplifiés (via l’entrée AUX-IN) afin d’augmenter
l’audio et la puissance totale.
CONNEXION D'UNE BATTERIE AUXILIAIRE
L'appareil est configuré pour connecter une batterie auxiliaire si la batterie interne était complètement vide et qu'il était impossible
de brancher l'appareil sur une prise secteur.
Utilisez la prise arrière (21) et connectez une batterie externe 12V en respectant les polarités indiquées.
Aux-out
DC 12V Input
UTILISATION DU MICROPHONE
1. Connectez le microphone fourni dans la prise MIC (11);
2. Allumez le microphone en utilisant l'interrupteur sur la poignée du microphone sur la position ON;
3. Réglez le volume (16) de l'entrée microphone et l'effet d'écho que désiré en utilisant les commandes appropriées;
4. Appuyez sur le bouton (10) si vous souhaitez donner la priorité à la voix du microphone par rapport à la musique en cours de
lecture (la musique est automatiquement réduite lorsque vous parlez au microphone), appuyez à nouveau pour rétablir l'état
normal.
FONCTION D'ENREGISTREMENT
Enregistrement du microphone sur un lecteur flash USB
1. Allumez le haut-parleur en appuyant sur POWER ON;
2. Insérez le lecteur flash USB dans la prise USB (9);
3. Insérez le microphone filaire dans la prise MIC (18) et allumez le microphone;
4. Appuyez sur le bouton REC (3) sur le panneau de commande avant, puis chantez dans le microphone, le son sera enregistré
en USB;
5. Pour terminer l'enregistrement, appuyez sur le bouton REC (3), l'enregistrement sera sauvegardé sur USB.
22
Page 23

FRANCAIS
DÉPANNAGE
Si un problème se produit, suivez les étapes dans le tableau suivant.
Si le problème ne peut être résolu, contactez votre revendeur.
Problème Causes possibles Solution
Aucun son lorsque l'appareil est
en marche
Distorsion du son 1. Volume trop élevé
Aucun son du microphone 1. La prise de microphone ne peut pas
Pas de son lorsque vous insérez
un périphérique USB/Micro
SD carte
Vous ne pouvez pas charger
la batterie ou la batterie a un
court-terme
Les haut-parleurs que vous
entendez des bruits forts
1. Sans Source sonore
2. Manopola Volume au niveau 0
3. Voce off Guide
4. Nessun Dispositif Micro SD/USB
connecté
2. Errore Fichiers audio
être correctement connecté.
2. Le contacteur d'allumage sur le microphone peut être en position "off".
3. Volume du microphone de basse.
1. Format de fichier non pris en charge
2. USB/Micro SD carte est pas correctement connecté
1. Branchez le cordon d'alimentation pour
recharger
2. La batterie est pas complètement
chargée
3. La batterie peut avoir exécuter son
cycle de vie
1. Microphone sur mais trop près
2. Microphone sur mais non utilisés
3. Volume du microphone peut être trop
élevé
4. Une cellule est utilisé trop près
5. équipements sans fil peut être très
proche de ceux qui utilisent le microphone
XF 1200 KB
1. Connectez un appareil à la prise AUX-IN
2. Réglez le volume
3. Attivare le guidage vocal
4. Connecter USB/Micro SD Carte, jouer
MP3
1. Baissez le volume
2. Vérifier et lire un autre fichier audio
1. Assurez-vous que le microphone est
correctement branché.
2. Allumez le microphone.
3. Réglez correctement le volume du
microphone
1. Le format de fichier audio doit être MP3
2. Connectez le périphérique USB/Micro SD
carte correctement
1. Vérifiez si le câble d'alimentation est
correctement connecté
2. Normalement, il prend 7-8 heures pour
charger complètement la batterie
3. Remplacez la pile par une nouvelle avec
les mêmes spécifications techniques
1. Tenez le microphone à 2 mètres du
haut-parleur
2. Éteignez le microphone si non utilisé
3. Abaisser le volume du microphone
4. Gardez le téléphone de haut-parleur
pendant un appel.
5. Gardez le haut-parleur loin de périphériques sans fil
NOTE D'INFORMATION SUR LE RETRAIT ET ÉLIMINATION DES BATTERIES
Attention: Seul le personnel de haute qualifié doit effectuer cette opération!
RETRAIT DE LA BATERIE
L'appareil ne doit pas être branché à la prise de courant lors de l'exécution de cette opération!
1. Enlevez les vis qui serrent le chariot;
2. Retirez les vis qui serrent le panneau métallique arrière;
3. Retirez-le et localisez la batterie;
4. Déconnectez la batterie et retirez-la.
ÉLIMINATION DE LA BATTERIE
Les piles usagées ne doivent pas être jetés avec les déchets ménagers ou jetés dans le feu ou l'eau. Les batteries usagées doivent
être recyclés ou éliminés dans les centres de collecte de déchets séparés.
23
Page 24

FRANCAIS
INFORMATIONS AUX UTILISATEURS
conformément au décret législatif N° 49 du 14 Mars, 2014
"La mise en œuvre de la directive 2012/19/UE relative aux déchets d'équipements électriques et électroniques (DEEE)"
Ce symbole de poubelle sur roues sur le produit indique que, à la fin de sa durée de vie doit être collecté séparément des autres
déchets. L'utilisateur doit donc prendre le contrôle à distance intègre les éléments essentiels qui ont obtenu à sa vie dans les centres
de collecte différenciés appropriés pour les déchets électroniques et électro-technique, ou le retourner chez le concessionnaire
lors de l'achat d'un nouvel appareil de type équivalent, en termes de un à un, ou une à zéro pour un équipement ayant le côté
plus long de moins de 25 cm. collecte séparée appropriée pour l'équipement mis hors service pour le recyclage, le traitement
et l'élimination respectueuse de l'environnement contribue à éviter les effets négatifs sur l'environnement et la santé humaine et
favorise le recyclage des matériaux qui composent le produit. le dumping illégal du produit par l'utilisateur substitutions l'application
des sanctions administratives prévues par le décret législatif n. Décret législatif n° 49 du 14 Mars 2014.
XF 1200 KB
CARACTÉRISTIQUES
Alimentation: ....................................................... 100-230V 50/60Hz
Consommation: ............................................................................. Max 50W
Température de fonctionnement: ........................................................................... 0° ~ 40°C
Humidité: ........................................................................... 5% ~ 90%
Power Audio Maximum: ................................................................................... 100W
Radio FM Fréquence de réception: ..............................................................87.5MHz - 108MHz
Réponse en fréquence: .......................................................................50Hz - 20KHz
S/N: .................................................................................... 60dB
Sensibilité: ................................................................................ 92±3dB
Impédance: ....................................................................................... 4Ω
Bluetooth de puissance d'émission de crête: ................................................................ 2,5mW
Transmission de puissance max Bluetooth: ..................................................................1,9mW
Transmission de bande Bluetooth: ............................................................................... 2,4GHz
Dimensions: ................................................................. 383x350x605mm
Poids: ................................................................................ 12.7 Kg
batterie interne plomb-acide rechargeable 12V , 2,6Ah
24
Page 25
DEUTSCH
XF 1200 KB
GEBRAUCHSHINWEISE
Wenn Sie längere Zeit mit hoher Lautstärke hören, kann dies Ihr Gehör schädigen.
Positionieren Sie den Player nicht:
- In der Nähe von Magnetfeldern.
- In der Nähe von Wärmequellen wie Heizungen und Heizungen.
- An sehr feuchten Orten wie Badezimmern, Schwimmbädern usw.
- An sehr staubigen Orten.
- An Orten, die starken Vibrationen ausgesetzt sind.
- Platzieren Sie Ihr Ohr während der Einstell- und Lautstärkeeinstellungen nicht in der Nähe des Lautsprechers. Halten Sie
insbesondere während der Zündphase die Lautstärke auf ein Minimum.
- Stellen Sie das Gerät so auf, dass an den Seiten immer genügend Platz für die freie Luftzirkulation vorhanden ist (mindestens
5 cm).
- Wenn Flüssigkeiten in das Gerät gelangen, ziehen Sie sofort den Stecker aus der Steckdose und bringen Sie das Gerät zum
nächsten autorisierten TREVI-Servicecenter.
- Prüfen Sie vor dem Aufladen des Geräts immer, ob die Netz- und Verbindungskabel korrekt installiert sind.
- Stellen Sie keine offenen Flammen wie z. B. brennende Kerzen auf das Gerät.
- Das Gerät darf keinem tropfenden oder spritzenden Wasser ausgesetzt werden. Es dürfen keine mit Flüssigkeiten gefüllten
Gegenstände (z. B. Vasen) auf dem Gerät abgestellt werden.
- Weisen Sie Kinder und Personen mit unzureichenden Kenntnissen des Produkts an, sie richtig zu verwenden.
- Bewahren Sie dieses Handbuch zum späteren Nachschlagen auf.
PFLEGE UND WARTUNG
Für die Reinigung wird die Verwendung eines leicht angefeuchteten, weichen Tuchs empfohlen. Der Einsatz von Lösungsmitteln
oder scheuernden Substanzen sollte vermieden werden.
WICHTIG
Dieses Gerät ist für den Heimgebrauch (nicht professionellen Gebrauch). Der fachgemäße Bau dieses Geräts gewährleistet
langfristig einen einwandfreien Betrieb. Sollten dennoch Betriebsstörungen auftreten, wenden Sie sich bitte an nächstgelegene
autorisierte TREVI-Kundendienststelle.
Die Firma TREVI verfolgt eine Politik ständiger Forschung und Weiterentwicklung. Die Produkte können daher andere als die
beschriebenen Eigenschaften aufweisen.
VORDER- UND RÜCKSEITENFUNKTIONEN
1. POWER ON/OFF, Ein/Aus-Schalter
2. True Wireless Stereo Key (TWS) / MODE-Taste zur Auswahl
der Eingangssignalquelle
3. REC-Taste
25
Page 26

DEUTSCH
FERNBEDIENUNG
XF 1200 KB
4. MIC-Prioritätsschalter
5. Anzeige
6. Taste 9, Zurück
7. Taste, Play/Pause
8. Taste :, folgende
9. USB Eingang
10. Micro SD-Karte Eingang
11. Lautstärkeregler zum Einstellen der Gesamtlautstärke
12. Eingang AUX IN
13. BASS, Bass Einstellung
14. TREBLE, die Anpassung Höhen
15. ECHO Einstellung
16. MIC VOL einstellen Mic
17. LED Signal-LED Batterie-Lade
18. MIC-Buchse
19. Ein/Aus -Taste Front-LED (Light Disco)
20. AUX OUT, Audioausgang
21. 12V-Eingang für eine Zusatzbatterie (nicht mitgeliefert)
22. Buchse zum Einführen des Netzkabels aus dem Netz
1. , Stand-by-Taste
2. MODE-Taste (BT/AUX/USB/Micro SD-Modus)
3. , Play/Pause
4. 9, vorherigen Track-Auswahl
5. EQ-Taste, voreingestellten Equalizern
6. Lautstärke -
7. Tasten 0-9, titel-Auswahltaste
8. MUTE-Taste
9. : taste, Nächste Taste
10. Lautstärke +
11. Der MP3-Modus dient zum Umschalten der USB/TF-Karte
12. Wiederholungstaste (Einzel Repeat, Alles wiederholen)
AKTIVIERUNG UND ERSATZ DER BATTERIE DER FERNBEDIENUNG
ZIEHEN SIE DEN
KUNSTSTOFFTEIL
2- ZIEHEN
1- DRÜCKEN
Die Fernbedienung ist mit einer CR2025-Batterie ausgestattet
Um die Batterie der Fernbedienung (im Lieferumfang enthalten) zu aktivieren,
entfernen Sie die Plastikschutzlasche.
Für den Batteriewechsel:
1. Schieben Sie das Kunststofffach des Akkus nach rechts.
2. Entfernen Sie das Batteriefach.
3. Legen Sie eine neue Batterie ein und achten Sie auf die Polarität.
4. Schließen Sie das Batteriefach.
TRANSPORT
Drücken Sie die Taste am Griff des Wagens, heben Sie den Griff bis zum Block (Sie hören ein metallisches Klicken). Zum Transport
biegen Sie das Gerät durch Betätigen des Griffs des Wagens leicht und nutzen Sie die beiden Hinterräder.
26
Page 27

XF 1200 KBDEUTSCH
Zum Entriegeln und Schließen des Wagens drücken Sie erneut die Taste am Griff und senken Sie den Griff vollständig ab.
Zum Transport können auch die zwei seitlich am Gerät angebrachten Griffe verwendet werden.
BATTERIEVERSORGUNG/AUFLADUNG
Dieses Gerät arbeitet mit wiederaufladbaren Blei und 12V , 2,6Ah, Stromversorgung 230V 50Hz.
Wenn der Akku leer ist oder sich das Gerät nicht einschalten lässt, schalten Sie den Hauptschalter POWER ON/OFF (1) in die
Position "OFF", stecken Sie das Netzkabel in die Buchse (22) des Geräts und schließen Sie es an eine Steckdose an anschluss
zum aufladen des internen akkus leuchtet die rote led-anzeige (17) auf.
LED-Statusanzeige beim Laden des Akkus:
- LED-Kontrollleuchte (17) ROT: Das Gerät ist korrekt an das Stromkabel angeschlossen und der Akku wird geladen.
- LED-Kontrollleuchte (17) GRÜN leuchtet: Ladevorgang ist abgeschlossen, der Akku ist aufgeladen.
Hinweis: Schließen Sie das Gerät nicht an eine Steckdose mit einer anderen als der angegebenen Spannung an.
GRUNDFUNKTIONEN
EINSCHALTEN/AUSSCHALTEN
Stellen Sie den Hauptschalter POWER ON/OFF (1) auf "ON", um das Gerät mit dem internen Akku einzuschalten.
Stellen Sie den Hauptschalter POWER ON/OFF (1) auf "OFF", um das Gerät vollständig auszuschalten oder den Akku aufzuladen.
BEREITHALTEN
Sie können das Gerät mit der Taste (1) auf der Fernbedienung in den Standby-Modus versetzen.
Achtung:
- Es gibt keine LED, die Aktivierung des Stand-by-Funktion angibt.
- Wir weisen darauf hin, dass das Gerät in Betrieb zu verlassen Stand-by die Batterie entlädt sich schneller als der Hauptschalter
POWER ON/OFF mit (1).
MODUS EINSTELLUNG FUNKTION
Um die Modusfunktion zu ändern, drücken Sie mehrmals die Taste MODE (2) am Gerät oder drücken Sie die Taste MODE (2) auf
der Fernbedienung, um Folgendes auszuwählen: BLUETOOTH (auf dem Display "BLUE"), USB/Micro SD (nur wenn die Buchse
angeschlossen ist) USB (9)/Micro-SD-Buchse (10) ist mit einem Speicher verbunden, auf dem Display erscheint eine kleine
Schrift "USB" oder "SD"), AUX-IN (auf dem Display "LINE").
LAUTSTÄRKE
1. Drehen Sie den VOLUME-Knopf (11), um die allgemeine Wiedergabelautstärke zu erhöhen oder zu verringern, oder verwenden
Sie die Tasten Vol + (10) und Vol- (6) auf der Fernbedienung;
2. Drehen Sie den MIC VOL-Knopf (16), um die Lautstärke des Signals am MIC INPUT (18) einzustellen.
PRE-EQUALIZER
Dieses Gerät verfügt über ein Pre-Audio-Equalizer-System. Drücken Sie die EQ-Taste (5) auf der Fernbedienung, um einen der 3
verfügbaren Audio-Equalizer auszuwählen, der am besten zur Klangwiedergabe passt.
EINSTELLUNG TONE HöHEN UND BäSSE
Drehen Sie den TREBLE-Regler (14), um die hohen Töne einzustellen.
Drehen Sie den BASS-Regler (13), um die Basstöne einzustellen.
ECHO EFFECT
Einwirken auf den Schieber ECHO-Regler(15) zu erhöhen oder die Echo-Effekt auf MIC.
Hinweis: das Echo funktioniert nur auf Mikrofoneingänge.
DISCO-LICHTEFFEKTE
Drücken Sie den LED-Schalter (19), um den Disco-Light-Effekt am Lautsprecher zu aktivieren.
Drücken Sie den LED-Schalter (19), um den Disco-Light-Effekt zu deaktivieren.
27
Page 28

DEUTSCH
XF 1200 KB
RADIO-MODUS
1. Schalten Sie das Gerät ein und wählen Sie die RADIO-Funktion (die Frequenzanzeige erscheint auf dem Display);
2. Halten Sie die Taste(7)
Sendern zu aktivieren (das Radio sucht automatisch nach Radiosendern und speichert sie automatisch). Die Anzahl der gespeicherten Sender hängt vom Funksignal in Ihrer Region ab. Drücken Sie während der Suche die Taste
um die Aufnahme zu stoppen;
3. Verwenden Sie nach Abschluss des Suchlaufs die folgenden Tasten :(8) oder 9(6)
cherten Senderspeichern zu wechseln
Hinweis:
-
Der UKW-Empfang hängt stark davon ab, wo sich das Gerät befindet.
- Die Nähe von Fernsehgeräten, Neonröhren oder anderen Haushaltsgeräten kann den Empfang von Radioprogrammen
stören. Entfernen Sie in diesem Fall das Gerät.
am Gerät einige Sekunden lang gedrückt, um die Suche und das automatische Speichern von
(15)
am Gerät, um zwischen den gespei-
.
am Gerät,
BLUETOOTH-BETRIEB
1. Schalten Sie das Gerät ein und wählen Sie die Bluetooth-Funktion. Das Wort "BLUE" erscheint auf dem Display;
2. Wählen Sie im Bluetooth-Modus wird das Symbol auf dem Display blinkt, geht das System automatisch den Suchmodus;
3. Aktivieren Sie die Bluetooth-Funktion auf dem externen Gerät gekoppelt werden;
4. Initiieren Sie eine Suche nach Geräten. Nach Auswahl von "XF 1200 KB" oder "Bluetooth";
5. Das Passwort "0000" eingeben, falls erforderlich;
6. Drücken Sie die
(7)
Taste auf dem Gerät oder der key (3) auf der Fernbedienung, um anfangen zu spielen und die Tasten
:(8) und 9(6) oder die Tasten:(9) und 9(4) für die Auswahl der Lieder.
TWS FUNKTIONSBETRIEB
Echte Wireless Stereo (TWS) Technologie
Mithilfe der TWS-Technologie kann der Benutzer eine drahtlose Verbindung zwischen zwei Lautsprechern herstellen, die das gleiche
Modell aufweisen und mit TWS kompatibel sind. Bei einer TWS-Verbindung werden zwei Lautsprecher automatisch zu einem StereoLautsprechersystem zusammengefasst, das den linken und rechten Kanal ausgibt.
WIE MAN EINSTELLT
Hinweis: Zwei Lautsprecher müssen dasselbe Modell sein und beide mit TWS kompatibel sein.
1. Schalten Sie beide Lautsprecher ein und wählen Sie den Bluetooth-Modus;
2. Drücken Sie die "TWS" -Taste an einem der Lautsprecher, bis Sie einen "Piepton" hören. Es wird zum Hauptlautsprecher (linker
Kanal), der automatisch einen anderen Lautsprecher sucht und mit diesem verbindet (rechter Kanal). Nach dem Herstellen der
Verbindung hören Sie einen Piepton;
3. Verbinden Sie das Mobiltelefon oder den Bluetooth-Player über Bluetooth mit dem Lautsprecher. Nach dem Anschließen können
Sie mit dem TWS Stereo-Lautsprechersystem Musik abspielen.
Die TWS-Funktion arbeitet im TWS-Modus. Manipulationen am Hauptlautsprecher werden gleichzeitig in einem anderen Lautsprecher
ausgeführt. Zum Beispiel Lautstärkeeinstellung, vor herige und nächste Songauswahl, Wiedergabe und Pause, Ein- und Ausschalten.
Hinweis:
- Wenn die beiden Lautsprecher nicht gekoppelt sind, schalten Sie beide Geräte aus und wiederholen Sie die Schritte 1, 2 und 3.
- Die TWS-Funktion funktioniert nur zwischen gleichen Lautsprechern oder mit anderen Lautsprechern, die denselben Mikropro-
zessor oder dieselbe Lösung verwenden.
SPIELEN SIE AUF INPUT USB/MCRO SD
1. Schalten Sie das Gerät ein;
2. Stecken Sie einen USB-Speicher oder eine Micro-SD-Karte in die entsprechenden Eingänge (9/10). Die Wiedergabe star tet
automatisch;
3. Um die Wiedergabe zu unterbrechen , drücken Sie die tasto(7) auf dem Gerät oder der tasto(3) der Fernbedienung,
erscheint auf dem Display "PAUS";
4. Zum Fortsetzen der Wiedergabe drücken Sie die tasto
5. Drücken Sie die Taste :(8) auf dem Gerät oder die Taste :(9) auf der Fernbedienung während der Wiedergabe zum nächsten
(7)
am Gerät oder an der Fernbedienung;
28
Page 29

DEUTSCH
Titel zu bewegen. Drücken Sie die 9(6) auf dem Gerät oder 9(4) Taste auf der Fernbedienung, um den vorherigen Titel zu
wechseln;
6. Mit dem numerischen Tastenfeld (7) auf der Fernbedienung können Sie direkt die Nummer des Songs, die Sie spielen möchten;
7. Drücken Sie die RPT-Taste (12) auf der Fernbedienung. Das Display zeigt "ONE" (um denselben Titel for tlaufend wiederzugeben).
Wenn Sie die Taste ein zweites Mal drücken, wird das Wort "ALL" auf dem Display angezeigt (um alle auf dem USB / Micro
SD-Gerät enthaltenen Titel fortlaufend abzuspielen).
Hinweis:
- Der Spieler kann keine Unterstützung für einige USB-Geräte, ist dies aufgrund der Unvereinbarkeit von einigen Prozessoren.
- Zur Vermeidung funktechnischer Störungen, immer eine Verbindung USB-Geräte direkt an das Gerät, verwenden Sie keine
Verlängerungskabel.
- Vom Computer auf den USB-Speicher/SD FAT (16 oder 32) zu formatieren.
XF 1200 KB
AUX-IN
1. Schalten Sie das Gerät ein und wählen Sie die Funktion "LINE IN";
2. Schließen Sie ein beliebiges Gerät mit Audioausgang über eine 3,5-mm-Kabelbuchse (im Lieferumfang enthalten) an den
AUX-Eingang (12) an.
3. Stellen Sie das externe Gerät aus ihren Befehlen.
AUX-OUT (AUDIO-AUSGANG)
Dieser Ausgang (20) kann verwendet werden, um das Gerät (über ihren AUX-IN-Eingang) an andere verstärkte Geräte anzuschließen,
um die Audio- und Gesamtleistung zu erhöhen.
VERBINDUNG EINER ZUSÄTZLICHEN BATTERIE
Das Gerät ist so eingerichtet, dass eine Zusatzbatterie angeschlossen wird, wenn der interne Akku vollständig leer war und das
Gerät nicht an eine Steckdose angeschlossen werden konnte. Verwenden Sie die hintere Buchse (21) und schließen Sie eine
externe 12V-Batterie an Achten Sie dabei auf die angegebenen Polaritäten.
Aux-out
DC 12V Input
MIKROFON
1. Schließen Sie das mitgelieferte Mikrofon an die Buchse MIC (11) an;
2. Schalten Sie das Mikrofon ein, indem Sie den Schalter am Griff des Mikrofons auf ON stellen;
3. Stellen Sie die Lautstärke (16) des Mikrofoneingangs und den Echoeffekt (15) mit den entsprechenden Befehlen wie gewünscht
ein;
4. Drücken Sie die Taste (10), wenn Sie der Stimme des Mikrofons Vorrang vor der abgespielten Musik einräumen möchten (die
Musik wird beim Sprechen mit dem Mikrofon automatisch leiser). Drücken Sie die Taste erneut, um den normalen Zustand
wiederherzustellen.
29
Page 30

DEUTSCH
XF 1200 KB
AUFNAHMEFUNKTION
Aufnahme vom Mikrofon auf USB-Stick
1. Schalten Sie den Lautsprecher mit POWER ON ein;
2. Stecken Sie den USB-Stick in die USB-Buchse (9);
3. Stecken Sie das verkabelte Mikrofon in die MIC-Buchse (18) und schalten Sie das Mikrofon ein;
4. Drücken Sie die Taste REC (3) auf dem vorderen Bedienfeld und singen Sie dann über das Mikrofon. Der Ton wird über USB
aufgezeichnet;
5. Um die Aufnahme zu beenden, drücken Sie die Taste REC (3). Die Aufnahme wird auf USB gespeichert.
FEHLERBEHEBUNG
Wenn ein Problem auftritt, führen Sie die Schritte in der folgenden Tabelle.
Wenn das Problem nicht behoben werden kann, kontaktieren Sie Ihren Händler.
Problem Mögliche Ursachen Lösung
Kein Ton, wenn das Gerät eingeschaltet ist
Verzerrter Ton 1. Die Lautstärke ist zu hoch
Kein Ton aus dem Mikrofon 1. Die Mikrofonbuchse kann nicht
Kein Ton, wenn Sie ein USBGerät/SD-Karte einsetzen
Kann nicht den Akku laden oder
die Batterie hat eine kurzfristige
Die Lautsprecher hören Sie laute
Geräusche
1. Keine Quelle Ton
2. Lautstärkeregler auf Stufe 0
3. Keine SD/USB-Gerät angeschlossen
2. Dateifehler Audio
richtig angeschlossen werden.
2. Das Zündschloss am Mikrofon kann
in Stellung "Aus" sein.
3. Lautstärke des Bass-Mikrofon.
1. Dateiformat wird nicht unterstützt
2. USB/SD-Karte ist nicht richtig
angeschlossen
1. Schließen Sie das Netzkabel zum
Aufladen
2. Die Batterie ist nicht vollständig
geladen
3. Die Batterie kann haben seinen
Lebenszyklus laufen
1. Mikrofon auf, aber zu nah
2. Mikrofon auf, aber nicht verwendet
3. Lautstärke des Mikrofons kann zu
hoch sein,
4. Eine Zelle verwendet wird, zu nahe
an
5. Drahtlose Geräte können zu denen
sehr nahe sein, die das Mikrofon
verwenden
1. Schließen Sie ein Gerät an den AUX-IN
2. Stellen Sie die Lautstärke
3. Verbinden Sie USB/SD-Karte, spielen MP3
1. Drehen Sie die Lautstärke
2. Überprüfen Sie und spielen eine andere
Datei Audio
1. Stellen Sie sicher, dass das Mikrofon richtig
angeschlossen ist.
2. Schalten Sie das Mikrofon.
3. Richtig einstellen Die Lautstärke des
Mikrofons
1. Die Audio-Dateiformat muss MP3 sein
2. Verbinden Sie das USB/SD-Karten-Gerät
richtig
1. Überprüfen Sie, ob das Netzkabel richtig
angeschlossen ist
2. Normalerweise dauert es 6-8 Stunden
vollständig um die Batterie aufzuladen
3. Setzen Sie die alte Batterie durch eine neue
mit den gleichen technischen Spezifikationen
1. Halten Sie das Mikrofon zu 2 Meter entfernt
vom Lautsprecher
2. Schalten Sie das Mikrofon, wenn nicht
verwendet
3. Senken Sie die Lautstärke des Mikrofons
4. Halten Sie das Telefon aus dem Lautsprecher entfernt, während Sie einen Anruf
tätigen.
5. Halten Sie den Lautsprecher weg von
Wireless-Geräten
30
Page 31
DEUTSCH
XF 1200 KB
INFORMATIONEN HINWEIS AUF DIE ENTFERNUNG UND ENTSORGUNG VON BATTERIEN
Achtung: Nur qualitativ qualifiziertes Personal darf diese Operation durchzuführen!
BATTERIE AUSBAUEN
Das Gerät darf nicht an die Netzsteckdose angeschlossen werden um diesen Vorgang auszuführen!
1. Entfernen Sie die Schrauben, mit denen der Wagen festgezogen ist;
2. Entfernen Sie die Schrauben, mit denen die hintere Metallplatte festgezogen ist;
3. Nehmen Sie es heraus und suchen Sie die Batterie;
4. Trennen Sie die Batterie und entfernen Sie sie.
INFORMATIONEN ÜBER DIE ENTSORGUNG VON AKKU
Verbrauchte Batterien gehören nicht in den Hausmüll entsorgt werden oder in Feuer oder Wasser geworfen. Gebrauchte Batterien
müssen recycelt oder in separaten Sammelstellen entsorgt werden.
INFORMATIONEN FÜR DIE NUTZER
gemäß Gesetzesdekret Nr 49 von 14, März 2014
"Die Umsetzung der Richtlinie 2012/19/EU über die Entsorgung von Elektro- und Elektronik-Altgeräte (WEEE)"
Dieses Mülleimers Symbol auf dem Produkt zeigt an, dass muss am Ende seines Lebens von anderen Abfällen getrennt gesammelt
werden. Der Benutzer muss daher nehmen die Fernbedienung die wesentlichen Komponenten integriert, die für elektronische und
elektrotechnische Abfälle in die entsprechenden differenzierten Sammelstellen zu seinem Leben bekam, oder es an den Händler
zurückgeben, wenn ein neues Gerät gleichwertiger Ar t Kauf in Bezug auf von 12.59 oder eine für Geräte mit längeren Seite von
weniger als 25cm auf Null. Die angemessene, getrennte Sammlung für die stillgelegte Anlagen für Recycling, Aufbereitung und
umweltgerechte Entsorgung trägt dazu bei, die Umwelt und die menschliche Gesundheit negative Auswirkungen zu vermeiden und
begünstigt das Recycling der Materialien das Produkt zusammengesetzt. Illegal Dumping des Produkts durch den Benutzer Entails
die Anwendung von Verwaltungssanktionen erklärte in Gesetzesverordnung Nr. Dekr 49 von 14. März 2014.
TECHNISCHE DATEN
Stromversorgung: ....................................................... 100-230V 50/60Hz
Verbrauch: ............................................................................. Max 50W
Betriebstemperatur: ........................................................................... 0° ~ 40°C
Luftfeuchtigkeit: ........................................................................... 5% ~ 90%
Maximale Audio-Leistungs: ................................................................................... 100W
Empfangsfrequenz FM Radio: ................................................................ 87.5MHz - 108MHz
Frequenzgang: ...................................................................... 50Hz - 20KHz
S/N-Verhältni: .................................................................................... 60dB
Empfindlichkeit: ................................................................................ 92±3dB
Impedanz: ....................................................................................... 4Ω
Spitzensendeleistung Bluetooth: ................................................................................. 2,5mW
Sendeleistung max Bluetooth: ................................................................................. 1,9mW
Band Übertragung Bluetooth: ................................................................................. 2,4GHz
Größe: ................................................................. 383x350x605mm
Gewicht: ................................................................................ 12,7 Kg
interne wiederaufladbare Blei-Säure-Batterie 12V , 2,6 Ah
31
Page 32

ESPANOL
XF 1200 KB
NOTAS PARA EL USO
Escuchar a un volumen alto durante mucho tiempo puede dañar su audición.
Este aparato es un instrumento electrónico de alta precisión; por lo tanto debe evitar utilizarlo en los siguientes casos:
- Cerca de fuertes fuentes de calor como caloríferos y estufas.
- Escuchar un volumen alto durante mucho tiempo podría dañar su audición.
- No cierre el oído al altavoz durante el ajuste por pasos y los ajustes de volumen y, en particular, mantenga el volumen bajo
en el encendido
- En lugares muy húmedos como cuartos de baño, piscinas, etc.
- En lugares muy polvorientos.
- En lugares sujetos a fuertes vibraciones.
- Posicione el aparato de manera que el espacio circundante sea amplio para la libre circulación del aire (por lo menos 5 cm).
- No obstruya las ranuras de ventilación.
- Si penetran líquidos dentro del aparato, desconecte inmediatamente el enchufe de la toma de corriente y lleve el aparato al
centro de asistencia autorizado TREVI más cercano.
- Siempre compruebe que los cables de alimentación y de conexión estén instalados correctamente antes de encender el
aparato.
- El aparato no debe exponerse a goteos o salpicaduras de agua. Los objetos que contengan líquidos, como floreros, debe ser
colocado en la unidad.
- No hay fuente de llamas, como una vela encendida, se deben colocar en.
- Mantenga este manual.
CUIDADO Y MANTENIMIENTO
Para efectuar la limpieza se aconseja utilizar un paño suave, ligeramente humedecido. Evite solventes o sustancias abrasivas.
IMPORTANTE
Este dispositivo está diseñado para uso doméstico (uso no profesional). La buena construcción del aparato garantiza su perfecto
funcionamiento durante mucho tiempo. Si se presentase algún inconveniente, será oportuno consultar al Centro de Asistencia
autorizado TREVI más cercano.
TREVI cultiva una política de investigación y desarrollo continuos. Por consiguiente, los productos pueden presentar características
distintas a las descritas.
FUNCIONES DEL PANEL FRONTAL Y TRASERO
1. Conmutador POWER ON/OFF (encendido/apagado)
2. Tecla estéreo inalámbrica verdadera (TWS)/tecla MODE,
para seleccionar la fuente de entrada
3. Tecla REC
4. Botón prioridad de Micrófono
5. Pantalla
32
Page 33

ELLEHNIKA
ESPANOL
MANDO A DISTANCIA
XF 1200 KB
6. Botón 9, Anterior
7. Botón, Play/Pausa
8. Botón :, Siguiente
9. Entrada USB
10. Entrada Micro SD
11. Perilla de volumen, para ajustar el volumen maestro
12. Entrada AUX IN
13. BASS, ajuste de graves
14. TREBLE, ajuste de agudos
15. Ajuste ECHO de micrófono
16. MIC VOL, ajuste de volumen de micrófono
17. LED de carga (Red-Char, Green-Full)
18. Entrada MIC
19. Conmutador de encendido/apagado LED Disco Light
20. AUX OUT, salida de audio
21. Entrada de 12V para cualquier batería auxiliar (no incluida)
22. Toma de alimentación
1. Botón , de espera
2. Botón MODE, selección de función
3. Botón, Reproducir/Pausa
4. Botón 9, selección de pista anterior
5. Botón EQ, preset EQ
6. Volumen -
7. Teclado numérico 0-9
8. Botón MUTE
9. Botón :, selección la siguiente pista
10. Volumen +
11. Botón U/TF, selección de fuente USB/Micro SD (si está insertada)
12. Botón RPT (repetición de una pista, repetir todas las pistas)
ACTIVACIÓN Y REEMPLAZO DE LA BATERÍA DE CONTROL REMOTO
TENER LA LINGUETTA
2- TIRE
1- EMPUJAR
Il telecomando monta una batteria tipo CR2025
Per attivare la batteria del telecomando (inclusa) togliere la linguetta plastica
di protezione.
Per la sostituzione della batteria:
1. Spingere il fermo plastico dell’alloggiamento porta batteria verso destra;
2. Estrarre l’alloggiamento porta batteria;
3. Inserire una batteria nuova facendo attenzione a rispettare le polarità;
4. Richiudere l'alloggiamento porta batteria.
TRANSPORTE
Presione el botón en el asa del carro, levante el asa hasta el bloque (oirá un clic metálico). Para el transporte, actuando sobre el
asa del carro, doble ligeramente el aparato y aproveche las dos ruedas traseras.
Para desbloquear y cerrar el carro, vuelva a presionar el botón de la palanca y baje la palanca por completo.
Para el transporte, también es posible utilizar las dos asas colocadas lateralmente en el aparato.
33
Page 34

ESPANOL
XF 1200 KB
ALIMENTACION
Esta unidad funciona con batería de plomo recargable 12V , 2,6Ah y red eléctrica 230V , 50Hz.
Cuando la batería se está agotando o la unidad no se enciende, coloque el interruptor principal de ENCENDIDO/APAGADO (1)
en la posición "OFF", inserte el cable de alimentación en la toma (22) del dispositivo y enchúfelo a un Para recargar la batería
interna, se encenderá el indicador LED rojo (17).
Indicador LED de estado con carga de batería:
- Luz indicadora LED (17) ROJA: el dispositivo está correctamente conectado al cable de alimentación y la batería se está
cargando.
- Luz indicadora de led (17) VERDE fija: operación de carga completada, la batería está cargada.
Nota: No conecte el dispositivo a un tomacorriente con un voltaje diferente al indicado.
FUNCIONES BÁSICAS
ENCENDIDO/APAGADO
Coloque el interruptor principal de POWER ON/OFF (1) en la posición "ON" para encender el aparato y utilizarlo con su batería interna.
Gire el interruptor principal de POWER ON/OFF (1) a la posición "OFF" para apagar la unidad completamente o para recargar la batería.
STAND-BY
Es posible poner el aparato en modo de espera usando el botón (1) del control remoto.
Nota:
- No hay LED que indica la activación de la función de stand-by.
- Tenga en cuenta que dejar la unidad en función de stand-by la batería se agota más rápido que con la tecla POWER ON/
OFF(1).
SELECION DE LAS FUNCIÓN
Para cambiar la función de modo, presione más veces la tecla MODE (2) en la unidad o presione el botón MODE (2) en el control
remoto para seleccionar: BLUETOOTH (en la pantalla "BLUE"), USB/Micro SD (solo si el enchufe El enchufe USB (9)/Micro SD
(10) está conectado a una memoria, aparece una pequeña escritura "USB" o "SD" en la pantalla, AUX-IN (en la pantalla "LÍNE").
AJUSTE DEL VOLUMEN
1. Gire la perilla VOLUME(11) para aumentar o disminuir el volumen general de la reproducción o use los botones Vol+ (10) y
Vol- (6) en el control remoto para un ajuste más preciso;
2. Gire el mando MIC VOL (16) para ajustar el volumen de la señal en la entrada MIC INPUT (18).
ECUALIZADOR
Esta unidad cuenta con un sistema de ecualización de audio pre-integrada. Pulse el botón EQ (5) en el control remoto para
seleccionar uno de los 3 ajustes de audio disponibles que mejor se adapte a la reproducción del sonido.
AJUSTE DE TONO AGUDOS Y BASS
Gire la perilla TREBLE (14) para ajustar los tonos altos.
Gire el mando BASS (13) para ajustar los tonos graves.
EFECTO ECHO
Gire el mando ECHO (15) para aumentar o disminuir el efecto de eco en la entrada MIC.
Nota: el eco sólo funciona en las entradas de micrófono.
EFECTO DISCO-LIGHT
Presione el interruptor LED (19) para activar el efecto Disco-Light en el altavoz.
Presione el interruptor LED (19) para desactivar el efecto Disco-Light.
MODO DE RADIO
1. Encienda el aparato y seleccione la función RADIO (la indicación de frecuencia aparecerá en la pantalla);
2. Mantenga presionada la tecla(7)
automático de las estaciones (la radio busca automáticamente las estaciones de radio y las guarda automáticamente). El
número de estaciones almacenadas depende de la señal de radio en su área. Durante la búsqueda, presione la tecla
en la unidad durante unos segundos para activar la búsqueda y el almacenamiento
(15)
34
Page 35

XF 1200 KBESPANOL
en la unidad para detener la grabación;
3. Una vez que se complete el escaneo, use las teclas :(8) o 9(6)
Nota:
-
La recepción de FM depende en gran medida de la ubicación del dispositivo.
- La proximidad de televisores, lámparas de neón u otros aparatos domésticos puede causar problemas en la recepción
de programas de radio, en este caso, retire el aparato.
OPERACIÓN DE BLUETOOTH
1. Encienda el dispositivo y seleccione la función Bluetooth, la palabra "AZUL" aparece en la pantalla;
2. En el modo Bluetooth, el símbolo y la palabra "BLUE" en la pantalla comenzarán a parpadear y el sistema pasará automáti-
camente al modo de búsqueda;
3. Active la función Bluetooth en el dispositivo externo a acoplar;
4. Iniciar una búsqueda de dispositivos. Después de seleccionar el "XF 1200 KB" o "Bluetooth";
5. Introduzca la contraseña "0000" si es necesario;
6. Pulse el tasto
unidad, o los botones :(9) y 9(4) en el control remoto para seleccionar las canciones.
(7)
en la unidad o el control remoto para iniciar la reproducción, y las teclas de uso :(8) o 9(6) de la
FUNCIONAMIENTO DE LA FUNCIÓN TWS
Verdadera tecnología inalámbrica estéreo (TWS)
La tecnología TWS permite al usuario hacer una conexión inalámbrica entre dos altavoces que son del mismo modelo y compatibles
con TWS. En la conexión TWS, dos altavoces se agruparán automáticamente para formar un sistema de altavoces estéreo que
emite los canales izquierdo y derecho.
COMO ESTABLECER
Aviso: Dos altavoces deben ser del mismo modelo y ambos compatibles con TWS.
1. Encienda ambos altavoces y seleccione el modo "Bluetooth";
2. Presione el botón "TWS" de uno de los altavoces hasta escuchar un "pitido". Se convier te en el altavoz principal (panel izquierdo),
que buscará y se conectará automáticamente con otro altavoz (canal derecho). Después de la conexión, escuchará un "pitido";
3. Conecte el teléfono móvil o el reproductor Bluetooth al altavoz mediante Bluetooth. Después de la conexión, puede reproducir
música con el sistema de altavoces estéreo TWS.
La función TWS funciona en modo TWS, las manipulaciones del altavoz principal se efectuarán simultáneamente en otro altavoz.
Por ejemplo, ajuste de volumen, selección de canciones anterior y siguiente, reproducir y pausar, encendido y apagado.
Nota:
- Si los 2 altavoces no están emparejados, apague ambos dispositivos y repita los pasos 1, 2 y 3.
- La función TWS solo funciona entre parlantes iguales o con otros parlantes que usan el mismo microprocesador o solución.
en la unidad para moverse entre los presintonías guardados
.
REPRODUCCIÓN DE ENTRADA USB/SD
1. Encienda la unidad;
2. Inser te una memoria USB o una tarjeta Micro SD en las entradas correspondientes (9/10). La reproducción comienza au-
tomáticamente;
3. Para pausar la reproducción, pulse el botón
mostrará el icono "PAUS";
4. Para reanudar la reproducción, pulse el botón
5. Pulse el botón :(9) en la unidad o la tecla :(9) en el mando a distancia durante la reproducción para pasar a la siguiente
pista. Pulse el botón 9(6) de la unidad, o 9(4) en el control remoto para cambiar a las pistas anteriores;
6. Mediante el teclado numérico (7) del mando a distancia puede introducir directamente el número de la canción que desea
reproducir;
7. Presione el botón RPT (12) en el control remoto, la pantalla mostrará "ONE" (para reproducir la misma pista continuamente);
presiónelo por segunda vez, la palabra "ALL" aparecerá en la pantalla (para reproducir continuamente todas las pistas con-
tenidas en el dispositivo USB/Micro SD).
Nota:
- El jugador no puede apoyar algunos dispositivos USB, esto se debe a la incompatibilidad de algunos procesadores.
- Para evitar interferencias perjudiciales, siempre conecte los dispositivos USB directamente a la unidad, no utilice cables de
(7)
en la unidad o la tecla (3) del mando a distancia, la pantalla
(7)
en la unidad o la tecla(3) del mando a distancia;
35
Page 36

ESPANOL
extensión.
- Desde el ordenador para formatear la memoria USB/SD FAT(16 ó 32).
XF 1200 KB
AUX-IN
1. Encienda el aparato y seleccione la función "LINE IN";
2. Conecte cualquier unidad equipada con salida de audio a través de un conector de 3,5mm cable especial (incluido) a la toma
AUX IN (12);
3. Ajuste el dispositivo externo de sus comandos.
AUX-OUT (SALIDA DE AUDIO)
Esta salida (20) se puede utilizar para conectar la unidad a otros dispositivos amplificados (a través de su entrada AUX-IN) para
aumentar el audio y la potencia total.
CONEXIÓN DE UNA BATERÍA AUXILIAR
El dispositivo está configurado para conectar una batería auxiliar si estaba con la batería interna completamente vacía y no había
posibilidad de conectar el dispositivo a una toma de corriente.
Use el zócalo trasero (21) y conecte una batería externa de 12V asegurándose de respetar las polaridades indicadas.
Aux-out
DC 12V Input
USO DEL MICRÓFONO
1. Conecte el micrófono suministrado a la entrada MIC (11);
2. Encienda el micrófono girando el interruptor de la manija del micrófono a la posición ON;
3. Ajuste el volumen (16) de la entrada del micrófono y el efecto de eco (15) según lo desee utilizando los comandos apropiados;
4. Presione el botón (10) si desea dar prioridad a la voz del micrófono en comparación con la música que se está reproduciendo
(la música se apaga automáticamente cuando se habla con el micrófono), presiónelo nuevamente para regresar a la condición
normal.
FUNCIONAMIENTO DE REC FUNCIÓN
Grabación desde micrófono a memoria USB
1. Encienda el altavoz con POWER ON;
2. Inserte la unidad flash USB en el conector USB (9);
3. Inserte el micrófono con cable en la toma MIC (18) y encienda el micrófono;
4. Presione el botón REC (3) en el panel de control frontal y luego cante a través del micrófono, el sonido se grabará en el USB;
5. Para finalizar la grabación, presione el botón REC (3), la grabación se guardará en USB.
36
Page 37

ESPANOL
SOLUCIÓN DE PROBLEMAS
Si se produce un problema, siga los pasos descritos en la siguiente tabla.
Si el problema no se puede resolver, póngase en contacto con su distribuidor.
Problema Posibles causas Solución
No hay sonido cuando la unidad
está encendida
Sonido distorsionado 1. El volumen es demasiado alto
No hay sonido desde el micrófono
No hay sonido cuando se inserta
una tarjeta de dispositivo USB/
Micro SD
No se puede cargar la batería o
la batería tiene un corto plazo
Los altavoces se oyen ruidos
fuertes
1. No hay sonido de la fuente
2. Regulador de volumen en el nivel 0
3. Elemento de guía
4. No hay ningún dispositivo Micro SD/
USB conectado
2. Error de archivo de audio
1. La toma de micrófono no se puede
conectar correctamente.
2. El interruptor de encendido en el
micrófono puede estar en la posición
"off".
3. Volumen del micrófono bajo.
1. Formato de archivo no admitido
2. USB/Tarjeta Micro SD no está
conectado correctamente
1. Conectar el cable de alimentación
para recargar
2. La batería no está completamente
cargada
3. La batería puede haber llegado a su
ciclo de vida
1. Micrófono en pero demasiado cerca
2. Micrófono utilizado en acción, sin
3. Volumen del micrófono puede ser
demasiado alto
4. Una célula se utiliza demasiado
cerca
5. Los equipos inalámbricos puede
estar muy cerca de aquellos que
están usando el micrófono
XF 1200 KB
1. Conectar un dispositivo a la toma AUX-IN
2. Ajuste el volumen
3. Active la guía de voz
4. Conexión USB/Tarjeta Micro SD, reproducir
MP3
1. Bajar el volumen
2. Comprobar y reproducir otro archivo de
audio
1. Asegúrese de que el micrófono está conectado correctamente.
2. Encender el micrófono.
3. Ajuste correctamente el volumen del
micrófono
1. El formato de archivo de audio debe ser
MP3
2. Conectar el dispositivo de tarjeta USB/Micro
SD correctamente
1. Compruebe si el cable de alimentación está
conectado correctamente
2. Normalmente se tarda 7-8 horas para
cargar completamente la batería
3. Vuelva a colocar la batería vieja por una
nueva con las mismas especificaciones
técnicas
1. Mantenga el micrófono a 2 metros de
distancia desde el altavoz
2. Apagar el micrófono si no se usa
3. Bajar el volumen del micrófono
4. Mantenga el teléfono lejos del altavoz
mientras realiza una llamada.
5. Mantenga el altavoz alejado de dispositivos
inalámbricos
NOTA INFORMATIVA SOBRE LA ELIMINACIÓN Y TRATAMIENTO DE LAS PILAS
Advertencia: Sólo el personal de alta cualificación deberían poder realizar esta operación!
REMOCIÓN DE LA BATERÍA
El aparato no debe estar enchufado a la toma de red para realizar esta operación!
1. Retire los tornillos que aprietan el carro;
2. Retire los tornillos que aprietan el panel metálico trasero;
3. Retíralo y ubica la batería;
4. Desconecta la batería y quítala.
37
Page 38

ESPANOL
XF 1200 KB
ELIMINACIÓN DE LA BATERÍA
Las pilas usadas no se deben tirar con la basura doméstica o arrojados al fuego o al agua. Las baterías usadas deben reciclarse
o desecharse en centros de recogida de residuos separados.
INFORMACIÓN A LOS USUARIOS
el marco del Decreto Legislativo N° 49 del 14 de marzo 2014
"Aplicación de la Directiva 2012/19/UE sobre residuos de aparatos eléctricos y electrónicos (RAEE)"
Este símbolo de contenedor de ruedas en el producto indica que al final de su vida útil debe ser recogido separadamente de
los demás residuos. El usuario debe, por lo tanto, tomar el control remoto integra los componentes esenciales que llegaron
a su vida útil a los centros adecuados de recogida de residuos electrónicos y electrotécnicos, o devolverlo al distribuidor al
comprar un nuevo aparato de tipo equivalente, en términos de uno a uno, o uno a cero para el equipo que tiene lado más largo
de menos de 25cm. la recogida selectiva apropiado para el equipo fuera de servicio para su reciclaje, tratamiento y eliminación
ambientalmente compatible ayuda a prevenir el impacto negativo sobre el medio ambiente y la salud, favoreciendo el reciclaje
de los materiales que componen el producto. El vertido ilegal del producto por los usuarios conlleva la aplicación de las
sanciones administrativas establecidas en el Decreto Legislativo n. Decreto Legislativo N° 49 de 14 de marzo de 2014.
ESPECIFICACIONES
Fuente de alimentación: ....................................................... 100-230V 50/60Hz
batería de plomo recargable interna 12V , 2,6Ah
Consumo: ............................................................................. Max 50W
Temperatura de funcionamiento: ........................................................................... 0° ~ 40°C
Humedad: ........................................................................... 5% ~ 90%
Potencia máxima de audio: ................................................................................... 100W
Rango de frecuencia FM: ................................................................ 87.5MHz - 108MHz
Respuesta de frecuencia: ....................................................................... 50Hz - 20KHz
S/N: .................................................................................... 60dB
Sensibilidad: ................................................................................ 92±3dB
Impedancia: ....................................................................................... 4Ω
Bluetooth potencia máxima de transmisión: ................................................................. 1,9mW
Bluetooth transmisión de banda: ................................................................................. 2,4GHz
Dimensiones: ................................................................. 383x350x605mm
Peso: ..................................................................................12,7 Kg
38
Page 39
DICHIARAZIONE DI CONFORMITA'/DECLARATION OF CONFORMITY
Dichiarazione di conformità UE semplificata
Il fabbricante TREVI S.p.a. dichiara che il tipo di apparecchiatura radio XF 1200 KB
Il testo completo della dichiarazione di conformità UE è disponibile al seguente indirizzo internet:
é conforme alla direttiva 2014/53/EU.
https://www.trevi.it/dms/zidi/TREVI/DOCXF1200KB.pdf
Simplified EU Declaration Of Conformity
Hereby TREVI S.p.a declares that equipment type
"Power portable speaker with trolley" model XF 1200 KB
The full text of the EU declaration of conformity is available at the following internet address:
is in compliance with Directive 2014/53/EU.
https://www.trevi.it/dms/zidi/TREVI/DOCXF1200KB.pdf
39
Page 40

Trevi S.p.A.
Strada Consolare Rimini-San Marino, 62
47924 Rimini (Rn) Italia
Tel. 0541/756420 Fax 0541/756430
www.trevi.it e-mail: [email protected]
Made in CHINA
 Loading...