

Page 1
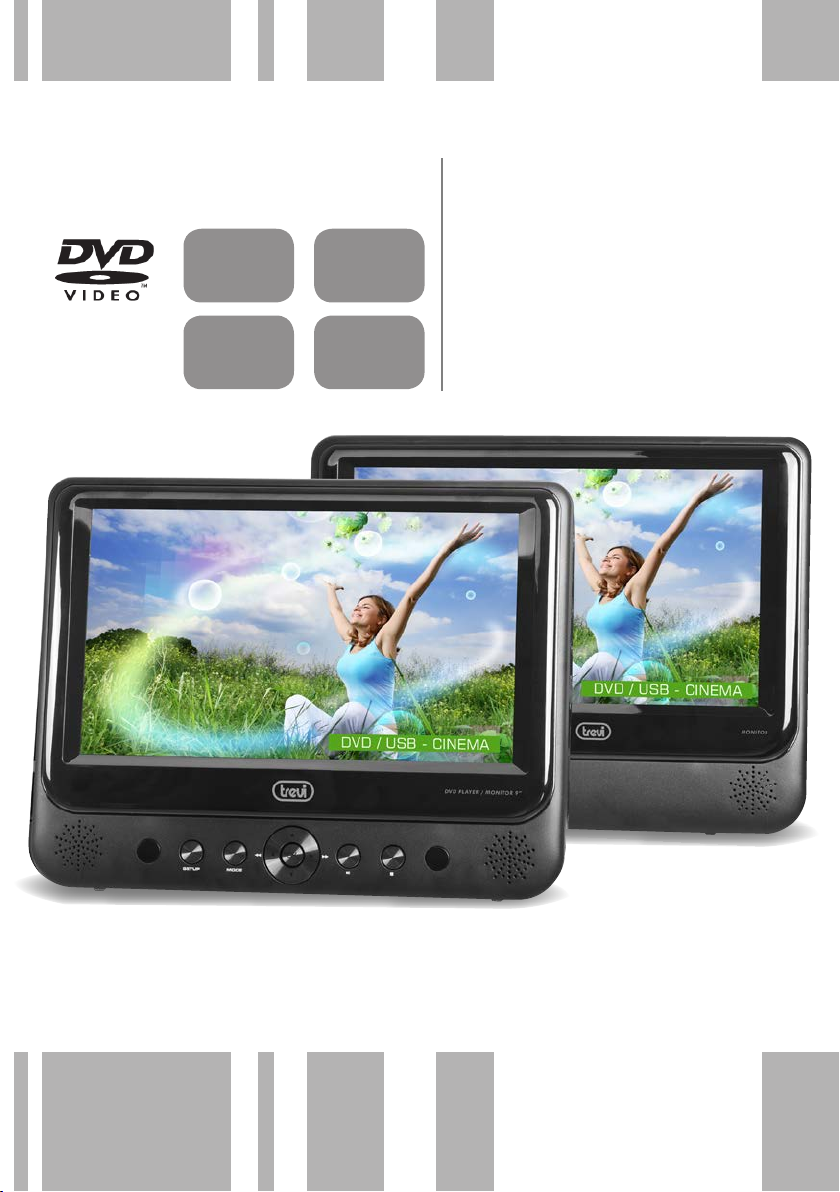
TW 7005
TWIN MONITOR
SD CARD
READER
READER
LITHIUM
BATTERY
USB
SISTEMA VIDEO PORTATILE DVD/
USB/SD CON DOPPIO SCHERMO
LED 9”
Manuale d'uso e collegamento
PORTABLE DVD/USB/SD VIDEO SYSTEM WITH TWIN 9” LED SCREEN
Instruction manual
Page 2
ITALIANO
TW 7005
ATTENZIONE
NON ESPORRE
A PIOGGIA E UMIDITÀ
ATTENZIONE: NON APRITE L’APPARECCHIO. ALL’INTERNO NON VI SONO COMANDI MANIPOLABILI
DALL’UTENTE NE PARTI DI RICAMBIO. PER TUTTE LE OPERAZIONI DI SERVIZIO RIVOLGERSI AD UN CENTRO
DI ASSISTENZA AUTORIZZATO TREVI
ATTENZIONE
Questo simbolo riportato sul retro dell’apparecchio e in questo manuale indicano la presenza sugli
stessi di importanti istruzioni per la sicurezza d’uso. Leggetele attentamente prima di utilizzare
l’apparecchio.
AVVERTENZE SUL LASER
Questo apparecchio è dotato di un sistema di lettura con raggio laser. Benché il laser sia di bassa
potenza e con dispositivo di sicurezza che ne impedisce il funzionamento a sportello aperto attenetevi scrupolosamente alle seguenti avvertenze:
■ NON AVVICINATE L'OCCHIO ALLA LENTE DEL LASER CON L'APPARECCHIO APERTO, PE-
RICOLO DI LESIONE DELLA RETINA.
■ NON TENTATE DI SMONTARE O MANOMETTERE L'UNITÀ LASER, PERICOLO DI ASSORBI-
MENTO DI RADIAZIONI.
INSTALLAZIONE E AVVERTENZE
• Posizionate il lettore su una superficie piatta e senza vibrazioni.
• Assicuratevi che abbia sufficiente spazio attorno (almeno 4-5 cm.) per assicurare una buona ventilazione.
• In particolare non posizionate il lettore sopra altri apparecchi che producono molto calore, ad
esempio amplificatori ad alta potenza.
• Non ostruite le feritoie di ventilazione.
• Non usate l’apparecchio in ambienti troppo caldi o troppo umidi.
• Se dei liquidi penetrano all’interno dell’apparecchio scollegate immediatamente la spina
dalla presa e portate l’apparecchio al più vicino centro assistenza autorizzato TREVI.
• L’apparecchio non deve essere esposto a stillicidio o a spruzzi d’acqua. Nessun oggetto
pieno di liquido, quali vasi, deve essere posto sull’apparecchio.
• Nessuna sorgente di fiamma nuda, quali candele accese, deve essere posta sull’apparecchio.
CURA E MANUTENZIONE: Per la pulizia si consiglia l’ uso di un panno morbido,
leggermente inumidito. Evitate solventi o sostanze abrasive.
Conservare il seguente manuale per future consultazioni.
IMPORTANTE: La buona costruzione di questo apparecchio ne garantisce per lungo tempo il perfetto funzionamento. Se tuttavia dovesse presentarsi qualche inconveniente, sarà opportuno consultare il più vicino Centro
Assistenza autorizzato.
TREVI persegue una politica di continua ricerca e sviluppo. Pertanto i prodotti possono presentare caratteristiche
diverse da quelle descritte.
PAG _2
Page 3

ITALIANO
TW 7005
INDICE
PRECAUZIONI DI SICUREZZA PAG.02
INSTALLAZIONE PAG.02
CURA E MANUTENZIONE PAG.02
COMANDI PAG.04
TELECOMANDO PAG.05
ATTIVAZIONE E SOSTITUZIONE DELLA BATTERIA DEL TELECOMANDO PAG.05
ALIMENTAZIONE 230V~ 50Hz PAG.05
ALIMENTAZIONE 12V PAG.06
ALIMENTAZIONE A BATTERIA PAG.06
COLLEGAMENTO DELL’UNITA’ MONITOR PAG.07
COLLEGAMENTO CUFFIE PAG.07
COLLEGAMENTO AL TELEVISORE PAG.08
COLLEGAMENTO TRAMITE PRESA USB/SD PAG.08
FUNZIONAMENTO DELL’UNITA’ PRINCIPALE PAG.08
ACCENSIONE E SPEGNIMENTO PAG.08
FUNZIONI APPLICABILI ALL’ASCOLTO DI QUALSIASI SORGENTE PAG.08
RIPRODUZIONE DI UN DISCO DVD/CD AUDIO PAG.09
RIPRODUZIONE DI UN DISCO CON FILE IMMAGINE/AUDIO/VIDEO PAG.10
UTILIZZO INGRESSO USB/SD PAG.11
MENU IMPOSTAZIONE DEL LETTORE DVD/CD PAG.12
FUNZIONAMENTO UNITA’ MONITOR PAG.14
UTILIZZO DELLE STAFFE PER INSTALLAZIONE POGGIATESTA AUTO PAG.14
SPECIFICHE PAG.15
CORRETTO SMALTIMENTO DEL PRODOTTO PAG.16
INFORMATIVA SULLA RIMOZIONE E SMALTIMENTO DELLA BATTERIA PAG.16
PROCEDURA PER LA RIMOZIONE DELLA BATTERIA PAG.16
ENGLISH USER’S MANUAL PAG.17
IN CAR INSTALLATION PAG.21
SPECIFICATION PAG.25
CORRECT DISPOSAL OF THE PRODUCT ENG PAG.26
INFORMATION NOTE ON THE REMOVAL AND DISPOSAL OF THE BATTERY PAG.26
QUICK REFERENCE - CONTROLS PAG.27
QUICK REFERENCE - LINKS PAG.28
QUICK REFERENCE - FRANCAIS PAG.29
QUICK REFERENCE - DEUTSCH PAG.32
QUICK REFERENCE - ESPANOL PAG.35
PAG _3
Page 4
ITALIANO
COMANDI
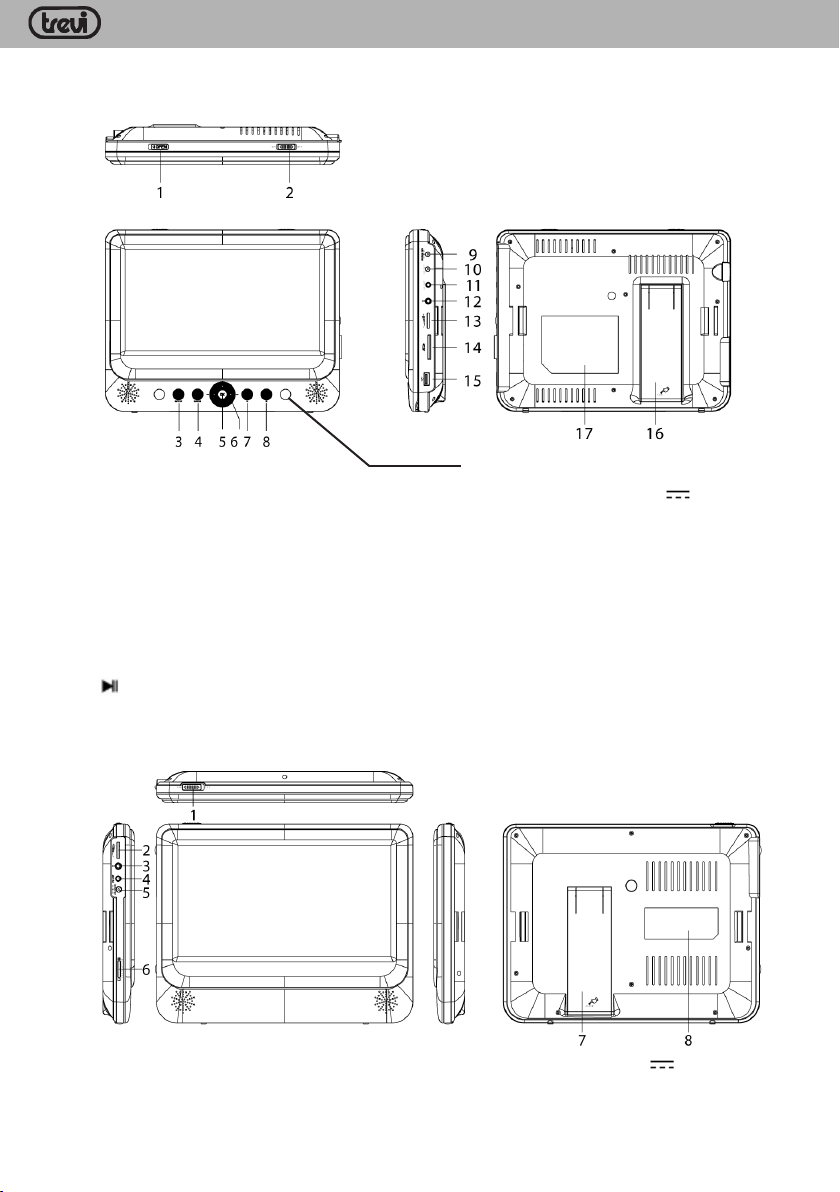
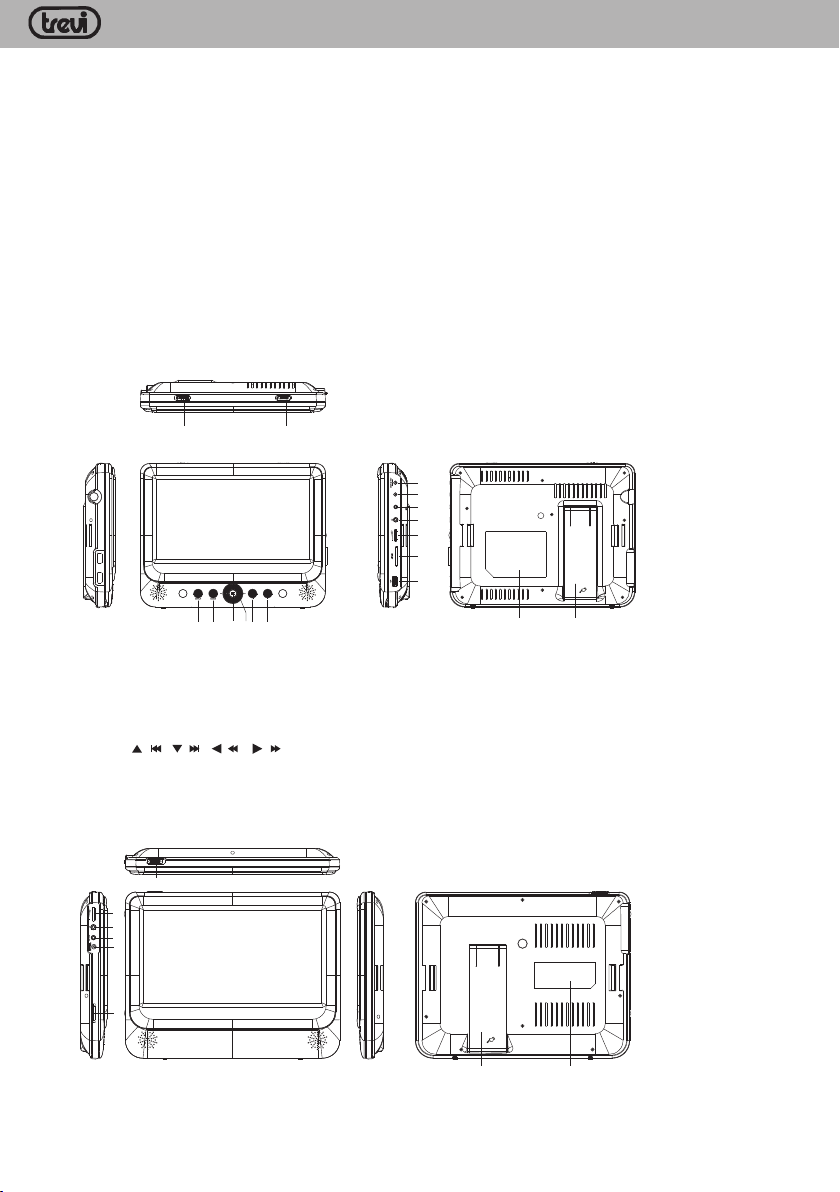
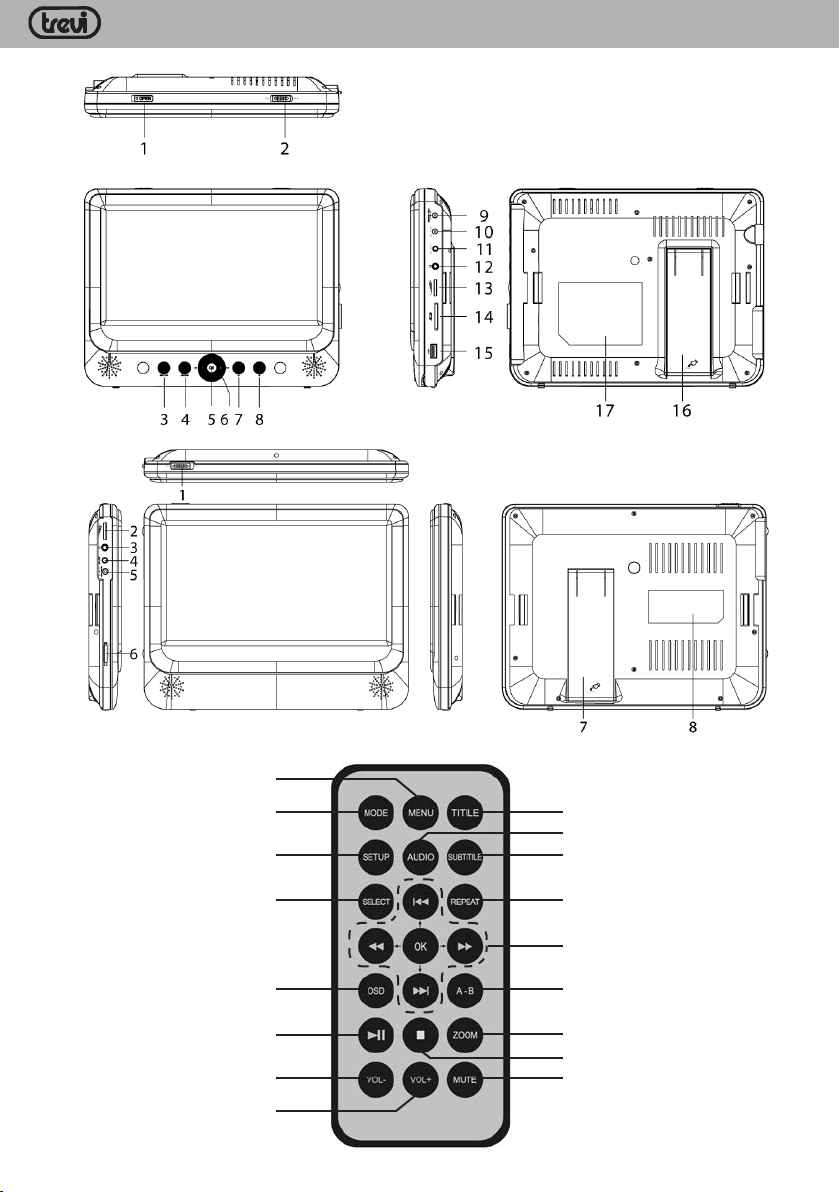
DESCRIZIONE COMANDI UNITA PRINCIPALE (DVD)
Indicatore di carica
1. Tasto di apertura vano disco CD/DVD.
2. Interruttore ON/OFF, accensione/spegnimento
unità principale.
3. Tasto SETUP, impostazioni.
4. Tasto MODE, commuta alle modalità DVD/SD/
USB e viceversa.
5. Tasto OK, conferma.
6. Tasti ()/(), ()/ (), selezione su -
giu voci nel menù.
7. Tasto , play/pausa.
8. Tasto STOP .
9. Presa alimentazione 9V/12V .
10. Presa DC OUT, uscita alimentazione per monitor
secondario.
11. Presa AUDIO/VIDEO OUT.
12. Presa per uscita cuffie.
13. Regolazione Volume unità principale.
14. Slot ingresso per scheda SD.
15. Ingresso USB.
16. Staffa supporto da tavolo.
17. Etichetta con informazioni tecniche
TW 7005
DESCRIZIONE COMANDI UNITA MONITOR
1. Interruttore ON/OFF, accensione/spegnimento
unità secondaria.
2. Regolazione Volume unità secondaria.
3. Presa per uscita cuffie.
4. Presa AV IN, ingresso video.
PAG _4
5. Presa alimentazione 9-12V. .
6. Regolazione Luminosità.
7. Staffa supporto da tavolo.
8. Etichetta con informazioni tecniche
Page 5
TELECOMANDO
ITALIANO
18
19
20
TW 7005
34
33
32
21
22
23
24
25
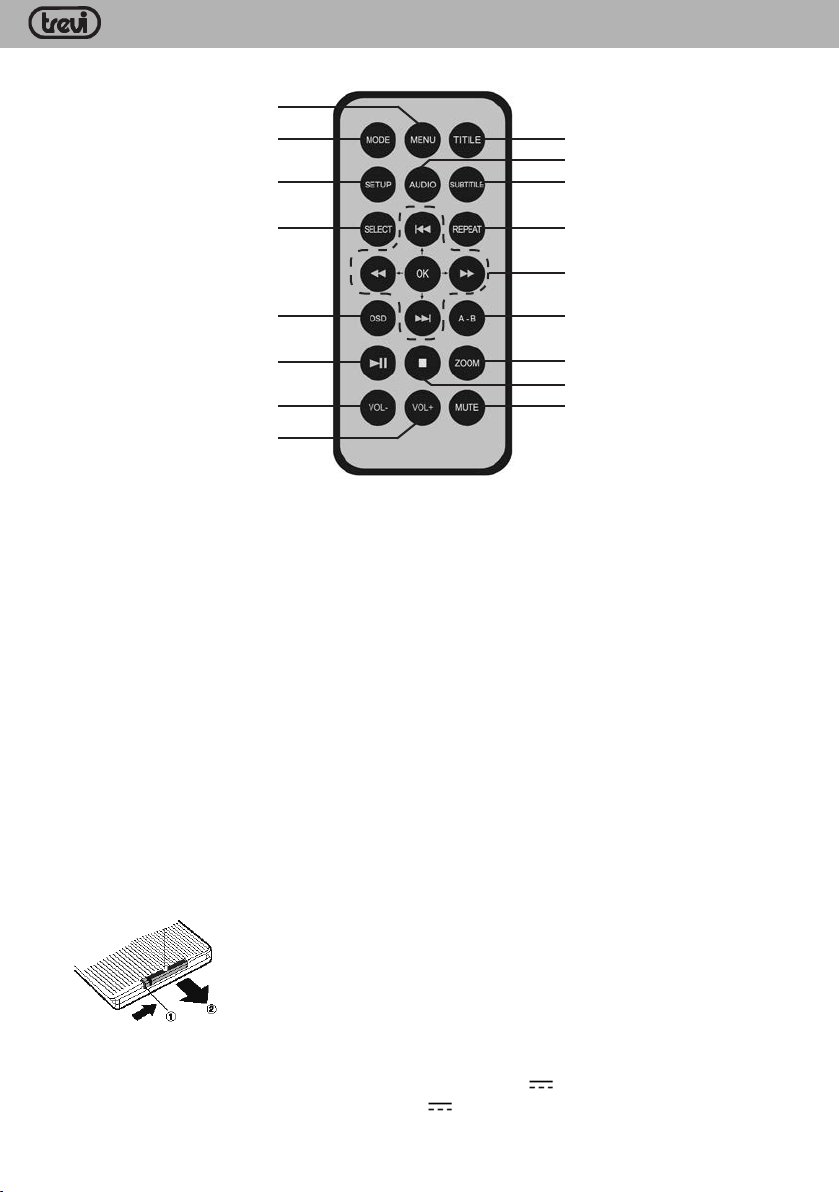
DESCRIZIONE COMANDI
18. Tasto MENU, ritorno al menù del disco DVD
19. Tasto MODE, selezione ingresso attivo
(dvd/usb/sd)
20. Tasto SETUP, accesso al menù di configurazione
21. Tasto SELECT, per ricercare un determinato capitolo, titolo o traccia
22. Tasto OSD, attivazione finestra informativa sul
disco riprodotto, come titolo, numero capitolo,
numero di traccia e tempo
23. Tasto PLAY/PAUSE /II, riproduzione/pausa
24. Tasto VOL-, diminuzione volume
25. Tasto VOL+, aumento volume
26. Tasto MUTE, esclusione audio
27. Tasto STOP , arresto riproduzione
28. Tasto ZOOM, ingrandimento fotogramma
31
30
29
28
27
26
29. Tasto AB, ripetizione di una specifica parte selezionata, premere nuovamente per tornare alla
normale riproduzione
30. Tasti navigazione
30a. Tasto OK, conferma selezione
30b. Tasto REV , indietro veloce
30c. Tasto FWD , avanti veloce
30d. Tasto NEXT , passaggio al capitolo/brano
successivo
30e. Tasto PREV , passaggio al capitolo/brano
precedente
31. Tasto REPEAT, ripetizione traccia/disco
32. Tasto SUBTITLE, attivazione sottotitoli
33. Tasto AUDIO, in lettura dvd cambio lingua d’ascolto
34. Tasto TITLE, ritorno al titolo del DVD
ATTIVAZIONE E SOSTITUZIONE DELLA BATTERIA DEL TELECOMANDO
Il telecomando monta una batteria tipo CR2025
Per attivare la batteria del telecomando (inclusa) togliere la linguetta plastica
di protezione.
Per la sostituzione della batteria:
1. Spingere il fermo plastico dell’alloggiamento porta batteria verso destra
2. Estrarre l’alloggiamento porta batteria
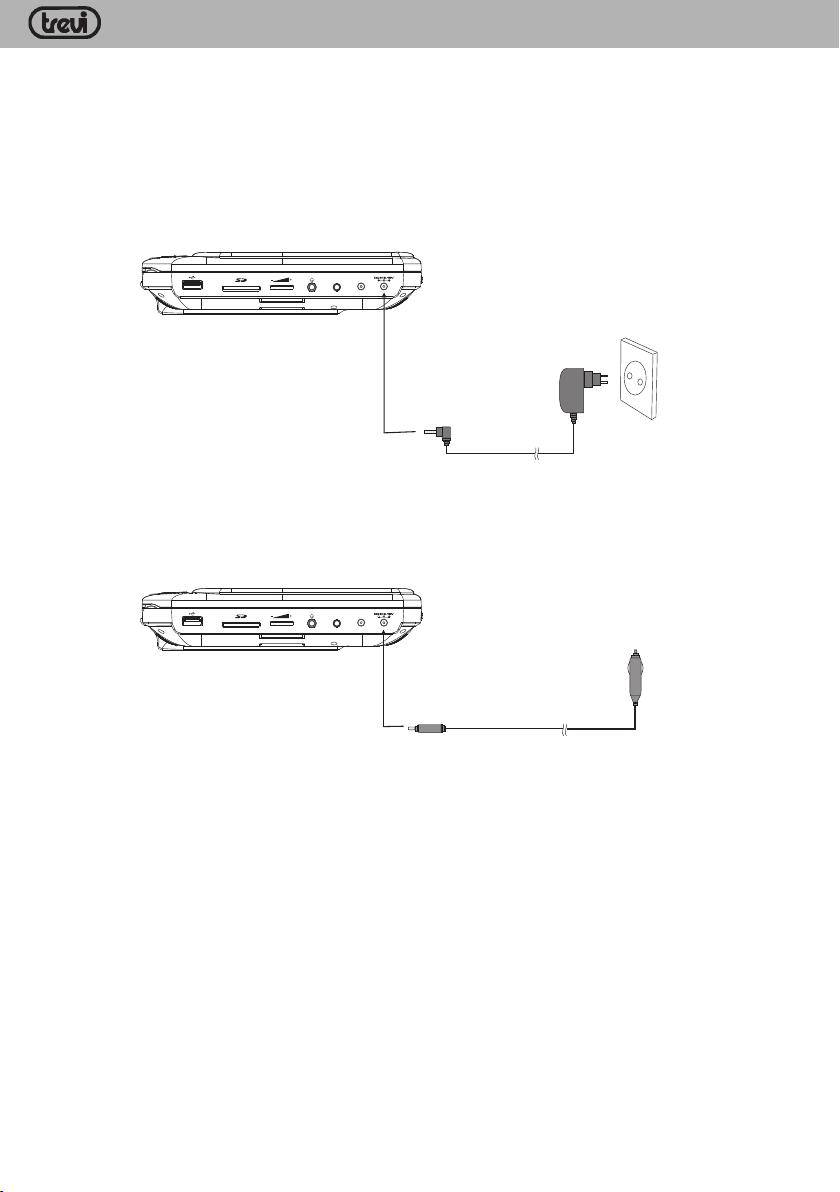
ALIMENTAZIONE 230V~ 50Hz (UNITÀ DVD)
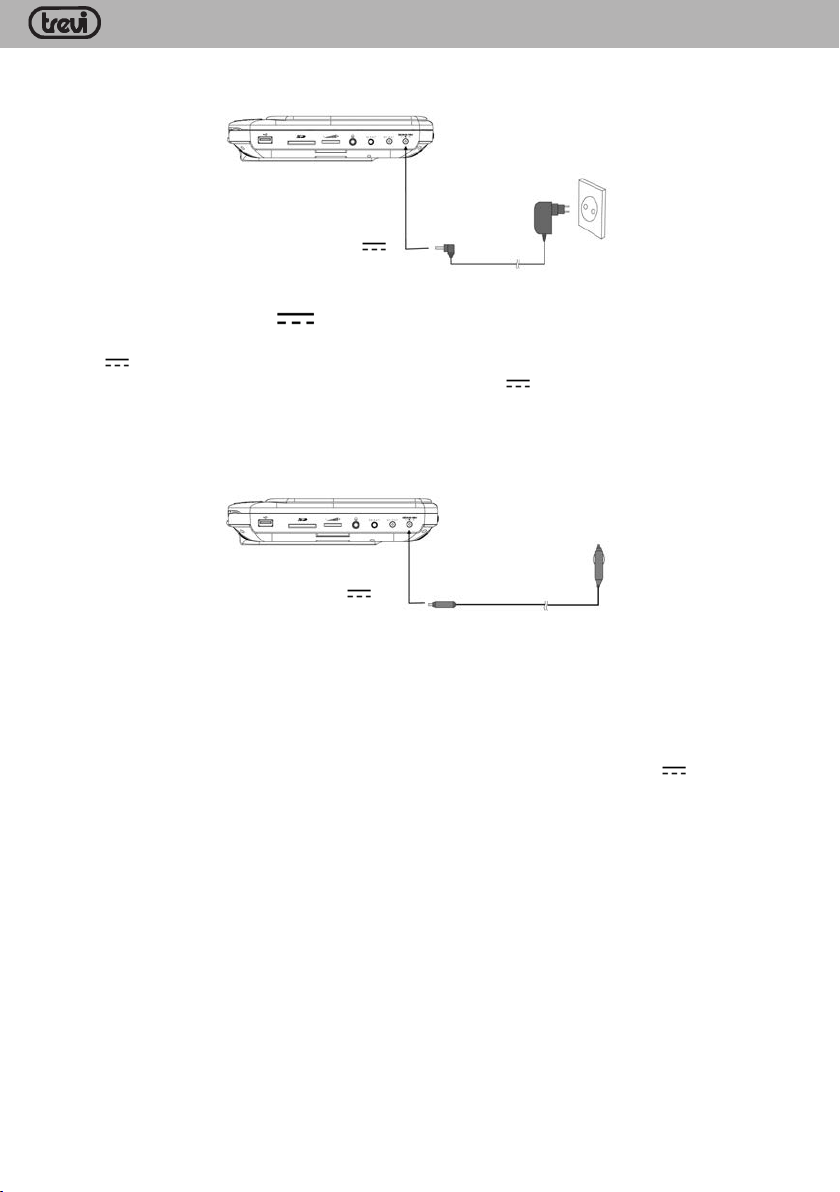
L’alimentatore in dotazione funziona con corrente 230V~ 50Hz /9V 1A. Inserire lo spinotto dell’alimentatore nella presa per alimentazione esterna 9V/12V 1A(9) dell’unita’ DVD e la spina in una presa di
corrente 230V~ 50HZ.
PAG _5
Page 6
ITALIANO
NOTA
Utilizzare solo l’alimentatore in dotazione, apparati diversi potrebbero avere polarità e/o tensioni diverse.
TW 7005
Ingresso adattatore 9V/12V
Alla presa elettrica 230V~ 50Hz
ALIMENTAZIONE 12V (UNITÀ DVD)
Il cavo in dotazione permette di alimentare l’apparecchio con la batteria dell’auto tramite la presa accendisigari 12V .
Inserire lo spinotto nella presa per alimentazione esterna 9V/12V 1A(9) dell’unita’ principale e l’apposito
adattatore nella presa accendisigari dell’auto.
NOTA
Si sconsiglia di usare il lettore per lungo tempo con motore spento per evitare di scaricare la batteria
dell’auto.
Alla presa accendisigari dell’automobile
Ingresso adattatore 9V/12V , 1 A
ALIMENTAZIONE A BATTERIE
L’unità principale (DVD) ha al suo interno una batteria ricaricabile al lithio, al completamento della carica
questa funzionerà senza essere collegata ad una presa di alimentazione.
Ricarica della batteria
Ricaricare la batteria solo a lettore spento e in ambienti interni.
1. Inserire lo spinotto dell’alimentatore nella presa per alimentazione esterna 9V/12V , 1A(9) dell’unita’
DVD e la spina in una presa di corrente.
2. L’indicatore di carica, dopo alcuni lampeggi, si illumina di rosso. Al completamento della carica l’indicatore
diventera’ verde.
Tempo di carica
Tempo di ricarica medio 3/4 ore; la prima volta effettuare una ricarica di 8 ore.
A batteria carica l’autonomia del lettore e’ superiore alle 1,5 ore in funzione DVD (con monitor collegato).
ATTENZIONE: quando la batteria è in fase di esaurimento puo’ capitare che sull’unita’ monitor il
segnale video non venga visualizzato correttamente; cio’ e’ dovuto alla bassa tensione di alimentazione
fornita dalla batteria. Effettuare la ricarica della batteria o collegare l’alimentatore in dotazione.
AVVERTENZA PER IL CORRETTO UTILIZZO DELLA BATTERIA RICARICABILE
Ricaricare la batteria ad una temperatura compresa tra i 5°C e i 35°C.
Non prolungare la ricarica oltre i tempi indicati per evitare il rischio di surriscaldamento e scoppio.
Non ricaricare la batteria per un tempo superiore alle 6 ore ( tranne la prima volta ).
La ricarica della batteria oltre i tempi indicati o un prolungato periodo di inattività possono ridurne la durata.
PAG _6
Page 7
ITALIANO
La batteria ricaricabile è soggetta ad usura e la sua capacità diminuisce gradualmente.
Per prolungare la durata della batteria, utilizzarla quando è completamente carica fino al completo scaricamento,
quindi ricaricarla completamente di nuovo prima di utilizzarla nuovamente. Mettendo in carica una batteria
non completamente esaurita, la sua durata risulterà ridotta. In questo caso, ripetere il ciclo caricamento/
scaricamento completo più volte.
Evitare di tenere la batteria sotto carica tutta la notte.
TW 7005
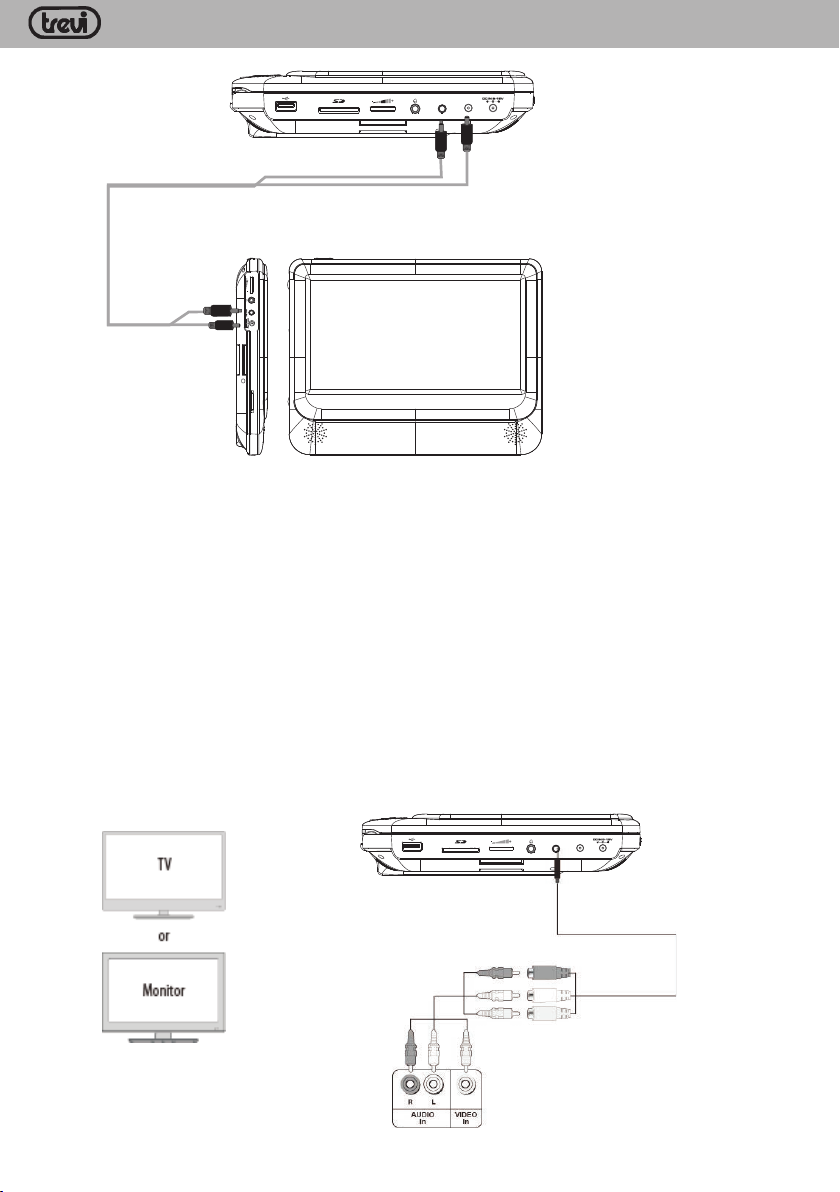
COLLEGAMENTO DELL’UNITA’ MONITOR
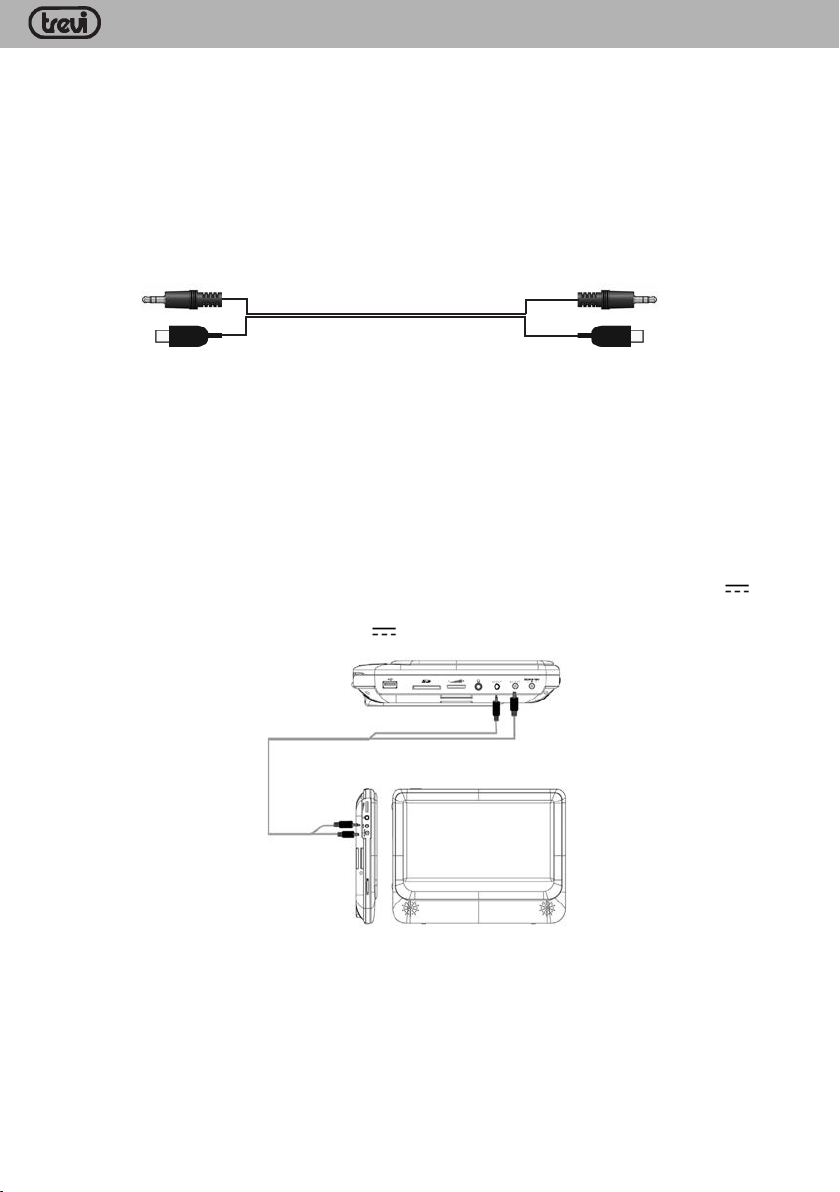
L’unità monitor riceve l’alimentazione necessaria al funzionamento e i segnali audio/video dall’unità principale
tramite il cavo Audio/Video/DC fornito:
- PRESTARE MOLTA ATTENZIONE AI COLLEGAMENTI TRA UNITÀ PRINCIPALE E
MONITOR.
- UN ERRATO CABLAGGIO DEI CAVI PUO’ COMPROMETTERE IL FUNZIONAMENTO
DEL DISPOSITIVO.
- EFFETTUARE IL CABLAGGIO SEMPRE CON LE UNITÀ SPENTE (INTERRUTTORI (2)
E (1) SU OFF).
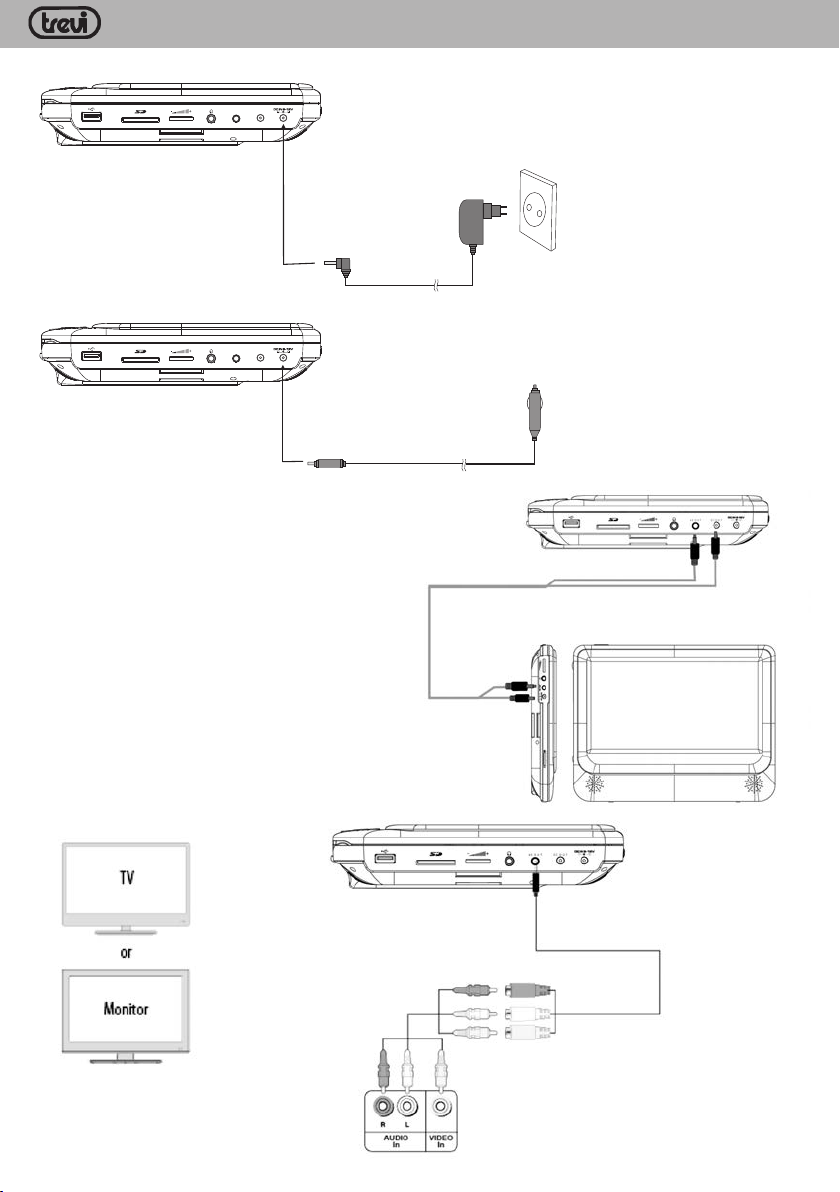
1. Collegare una delle prese jack del cavo A/V/DC alla presa AUDIO/VIDEO OUT(11) dell’unità principale;
collegare l’altra presa jack alla presa AV IN(4) dell’unità monitor.
2. Collegare la presa DC del cavo A/V/DC alla presa DC OUT(10) dell’unità principale.
ATTENZIONE: NON CONFONDERE LA PRESA DC OUT(10) CON LA PRESA 9V/12V 1A(9)
SULL’UNITÀ PRINCIPALE.
Collegare l’altra presa DC alla presa 9V/12V 1A(5) dell’unità monitor.
UNITA’ PRINCIPALE DVD
UNITA’ MONITOR
3. Portare l’interruttore di accensione dell’unità principale (2) su ON.
4. Portare l’interruttore di accensione dell’unità monitor (1) su ON.
Nota: l’unità monitor riceve l’alimentazione necessaria al funzionamento dall’unità principale solamente quando questa è collegata all’adattatore di rete o all’adattatore auto. Quando utilizza la sua
batteria interna il monitor non viene alimentato.
COLLEGAMENTO CUFFIE
È possibile collegare cuffie dotate di spina jack stereo da 3,5 mm sia all’unita’ principale che su quella monitor.
1. Sull’unita’ principale collegare le cuffie nella presa uscita cuffie(12).
PAG _7
Page 8
ITALIANO
2. Sull’unita’ monitor collegare le cuffie nella presa uscita cuffie(3).
Nota: e’ possibile l’utilizzo di due cuffie contemporaneamente una per ogni unita’.
Per evitare possibili danni all’udito, limitare il tempo di ascolto a volumi elevati.
TW 7005
COLLEGAMENTO AL TELEVISORE
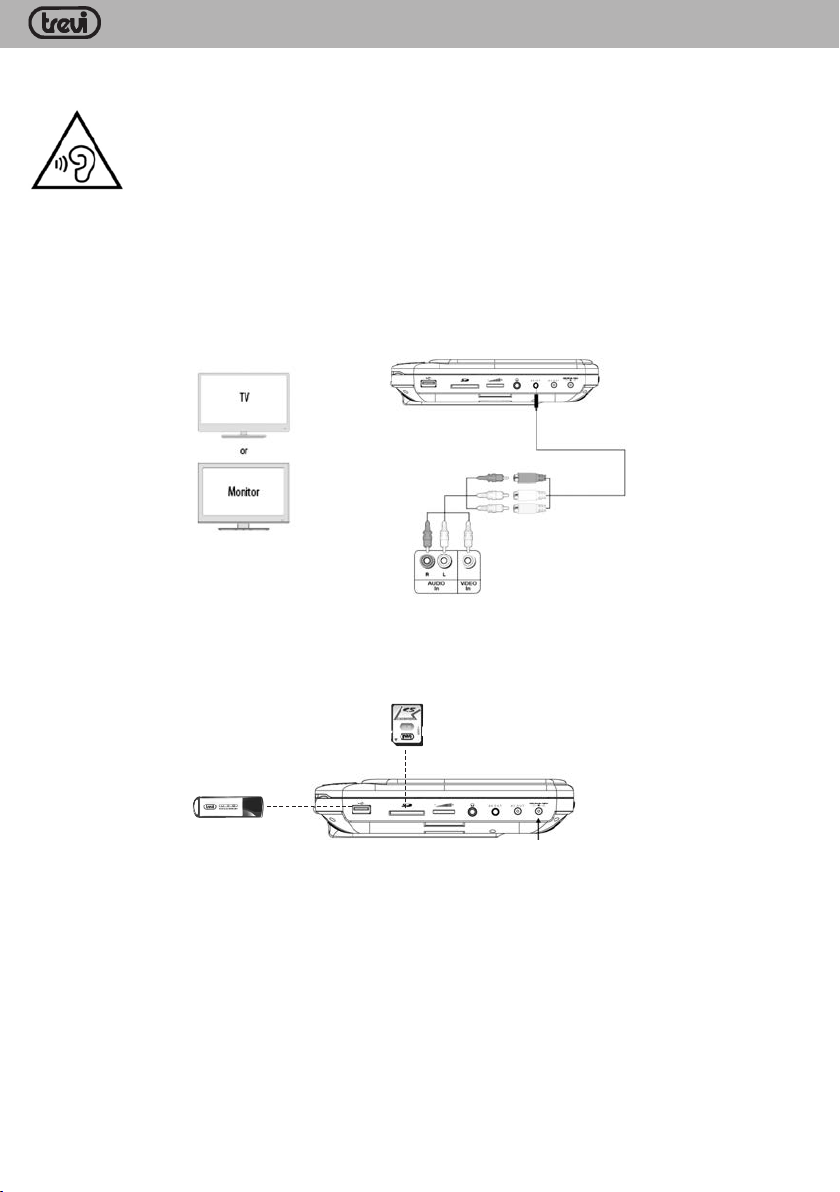
Se volete collegare l’apparecchio ad un televisore sarà necessario acquistare un cavo A/V (Jack/RCA).
1. Collegare il jack del cavo A/V alla presa A/V OUT(11) del lettore.
2. Collegare i connettori RCA del cavo A/V all’ingresso AV del televisore, rispettando i colori dei segnali: giallo
per il video, rosso per il canale audio destro e bianco per il canale audio sinistro (consultare il manuale del
vostro televisore).
COLLEGAMENTO TRAMITE PRESA USB/SD
A questo lettore (unita’ principale) potete collegare, tramite l’ingresso USB(15) presente a lato, un dispositivo
di memoria USB oppure tramite l’ingresso per schede SD(14) una memoria SD.
SCHEDA SD
DISPOSITIVO USB
FUNZIONAMENTO DELL’UNITÀ PRINCIPALE
ACCENSIONE/SPEGNIMENTO
1. Spostare il selettore OFF/ON(2) sulla posizione ON per accendere il lettore.
2. Spostare il selettore OFF/ON(2) sulla posizione OFF per spegnere il lettore.
FUNZIONI APPLICABILI ALL’ASCOLTO DI QUALSIASI SORGENTE
REGOLAZIONE VOLUME
E’ possibile aumentare/diminuire il volume agendo sul potenziometro (13) presente sul lettore oppure tramite
i tasti VOL+(25) e VOL-(24) presenti sul telecomando.
FUNZIONE MUTE
Permette di escludere completamente l’audio del vostro lettore.
PAG _8
Page 9

ITALIANO
1. Premere il tasto MUTE(26) del telecomando, sullo schermo compare il simbolo della funzione MUTE e
l’audio viene escluso.
2. Premere il tasto MUTE(26) del telecomando una seconda volta per ripristinare l’audio.
TW 7005
RIPRODUZIONE DI UN DISCO DVD/CD AUDIO
I comandi sul frontale dell’apparecchio hanno la stessa funzione di quelli presenti sul telecomando.
RIPRODUZIONE DI UN DISCO DVD/CD AUDIO
1. Accendere il lettore.
2. Aprire il vano disco tramite il tasto di apertura(1).
3. Inserire un disco DVD/CD.
4. Chiudere il vano disco, sullo schermo compare la scritta “Caricamento” ad indicare il caricamento del
disco.
5. Il DVD/CD verrà riprodotto automaticamente.
RICERCA VELOCE
1. Premere il tasto FWD (30c) per far avanzare velocemente le immagini.
2. Premere il tasto REV (30b) per far tornare indietro velocemente le immagini.
3. Ad ogni pressione del tasto la velocità aumenta.
4. Gli indicatori numerici presenti sullo schermo a fianco del simbolo - segnalano la velocità
(x2 - x4 - x8 - x16 - x32 ).
5. Per tornare alla riproduzione normale premere il tasto PLAY/PAUSE /II (23).
SALTO AL VIDEO/CAPITOLO/TRACCIA PRECEDENTE/SUCCESSIVO
Premere il tasto PREV (30e) per passare al video/capitolo precedente e il tasto NEXT (30d) per passare
al video/capitolo successivo.
ARRESTO DELLA RIPRODUZIONE
1. Premere una volta il tasto STOP (27) per fermare momentaneamente la riproduzione.
2. Premere una seconda volta il tasto STOP (27) per fermare definitivamente la riproduzione.
3. Premere il tasto PLAY/PAUSE /II (23) per riprendere la riproduzione del disco dall’inizio.
FUNZIONE A-B
1. Premere una prima volta il tasto AB (29) per selezionare un punto di partenza, sullo schermo viene visualizzata la scritta “A-”.
2. Premere il tasto AB (29) una seconda volta per selezionare un punto di arrivo, sullo schermo viene visualizzata la scritta “A-B”.
3. Il lettore ripeterà in continuazione la selezione compresa fra i punti A e B.
4. Premere una terza volta il tasto AB (29) per tornare alla normale riproduzione, sullo schermo viene
visualizzata la scritta “Disatt”.
FUNZIONE REPEAT
1. Premere una volta il tasto REPEAT(31) per ripetere continuamente lo stesso capitolo, sullo schermo
compare la scritta “Capitolo”.
2. Premere una seconda volta il tasto REPEAT(31) per ripetere continuamente lo stesso titolo, sullo schermo
compare la scritta “Titolo”.
3. Premere una treza volta il tasto REPEAT(31) per ripetere continuamente tutti i titoli, sullo schermo compare la scritta “Tutto”.
4. Per disattivare la funzione di ripetizione premere una quarta volta il tasto REPEAT(31), sullo schermo
compare la scritta “Disatt”.
PAG _9
Page 10

ITALIANO
FUNZIONE SELECT
1. Premere il tasto SELECT(21) per passare direttamente ad un determinato capitolo del filmato visualizzato;
comparirà una barra dove sarà possibile selezionare il numero del capitolo preferito.
2. Tramite i tati di navigazione(30) potrete andare a selezionare velocemente il numero del capitolo che si
desidera visionare.
3. Utilizzare i tasti FWD (30c) o REV (30b) per aumentare o diminuire di decine; utilizzare i tasti NEXT
(30d) o PREV (30e) per aumentare o diminuire di 1.
4. Utilizzare il tasto OK(30a) per confermare il numero del capitolo scelto ed avviare la riproduzione.
FUNZIONE ZOOM
1. Premere il tasto ZOOM(28) per ingrandire l’immagine visualizzata sullo schermo.
2. Gli indicatori numerici presenti sullo schermo segnalano le dimensioni dell’immagine (Zoom 2, Zoom 3,
Zoom 4, Zoom 1/2, Zoom 1/3, Zoom 1/4).
3. Per tornare alla riproduzione normale premere il tasto ZOOM(28) fino a quando non compare più l’indicatore e l’immagine torna nel formato standard.
FUNZIONE OSD
1. Premere in sequenza il tasto OSD(22) per visualizzare direttamente sul display le informazioni relative al
titolo/capitolo, il tempo trascorso e quello restante.
2. Continuare a premere il tasto OSD(22) fino alla scomparsa delle informazioni per uscire dalla funzione
OSD.
FUNZIONE AUDIO
1. Se il disco è predisposto per il cambio della lingua d’ascolto durante la riproduzione (consultate la confezione del disco per accertarvene) premere il tasto AUDIO(33) per selezionare quella desiderata.
2. Sullo schermo compare l’indicazione delle lingue (es. 1 Italiano, 2 Inglese) e dei canali disponibili (Ch 5.1
per indicare i 5.1 canali del Dolby Digital, Ch 2 per indicare 2 canali stereo, ecc.).
TW 7005
FUNZIONE SUBTITLE
1. Se il disco è predisposto per i sottotitoli (consultate la confezione del disco per accertarvene) premere
il tasto SUBTITLE(32) per selezionare quello desiderato.
2. Sullo schermo compare l’indicazione delle lingue (es. 1 Italiano, 2 Inglese).
3. Per disattivare questa funzione premere in sequenza il tasto SUBTITLE(32), fino a quando sullo schermo
compare la scritta “Sottotitoli Disatt”.
FUNZIONE TITLE
1. Premere il tasto TITLE(34) per mostrare il menù dei titoli del disco DVD.
Nota:
Il DVD deve essere predisposto per questa opzione, altrimenti la funzione risulterà inefficace.
FUNZIONE MENU
Premere il tasto MENU(18) del telecomando per passare in qualsiasi momento al menù principale del film.
RIPRODUZIONE DI UN DISCO CONTENENTE FILE IMMAGINE/FILE
AUDIO/FILE VIDEO
RIPRODUZIONE DI UN DISCO CONTENENTE FILE IMMAGINE/FILE AUDIO/FILE VIDEO
Per la riproduzion di un disco contenente file immagine/file audio/file video fare riferimento al paragrafo
“RIPRODUZIONE DI UN DISCO DVD/CD AUDIO”.
PAG _10
Page 11

ITALIANO
RIPRODUZIONE FILE AUDIO (MP3, WMA)
Se presenti file audio all’interno del disco, (ma non all’interno di una cartella) la riproduzione partirà automaticamente.
1. Per selezionare la cartella o il file audio desiderato premere i tasti di navigazione NEXT (30d) o PREV
(30e).
2. Premere il tasto OK(30a) per confermare.
3. Premere il tasto STOP (27) per fermare la riproduzione del file audio.
RIPRODUZIONE DI FILE IMMAGINE (JPEG)
1. Per selezionare il file immagine desiderato premere i tasti di navigazione NEXT (30d) o PREV (30e).
2. Premere il tasto OK(30a) per confermare.
3. Premere il tasto STOP (27) per fermare la riproduzione del file immagine.
ROTAZIONE DELLE IMMAGINI
Si possono selezionare quattro diverse modalità di rotazione, “Ruotare in senso antiorario”, “Ruotare in
senso orario”, “Su-Giù” e “Destra-Sinistra”. Queste funzioni possono essere impostate soltanto durante la
visualizzazione normale di una fotografia e si resettano nel momento in cui si passa alla visualizzazione di una
nuova fotografia.
Per selezionare le diverse modalità di trasformazione utilizzare i tasti di navigazione NEXT (30d), PREV
(30e), FWD (30c) o REV (30b).
SINISTRA - Rotazione in senso antiorario
DESTRA - Rotazione in senso orario
ALTO - Inversione Su-Giù
BASSO - Inversione Destra-Sinistra
TW 7005
RIPRODUZIONE DI FILE VIDEO (MPEG, AVI)
1. Per selezionare il file video desiderato premere i tasti di navigazione NEXT (30d) o PREV (30e).
2. Premere il tasto OK(30a) per confermare.
3. Premere il tasto PREV (30e) per passare al video precedente e il tasto NEXT (30d)), per passare al
video successivo.
4. Premere il tasto STOP (27) per fermare la riproduzione del file video.
FUNZIONE REPEAT IN RIPRODUZIONE FILE
Premere il tasto REPEAT(31) per scegliere tra le diverse modalità di ripetizione: BRANO=ripetizione singola
di un file, CARTELLA=ripetizione dei file di una cartella, DISATT=riproduzione normale
UTILIZZO INGRESSI USB/SD
ATTENZIONE:
Inserire il dispositivo USB/SD solo ed esclusivamente a lettore spento. Una volta inserito, accendere il lettore.
Se inserite un dispositivo USB/SD a lettore acceso, potrebbe non essere riconosciuto dall’unità
e quindi non funzionare.
1. Collegare il dispositivo USB alla presa USB(15) o inserire una scheda SD nell’ingresso SD(14).
2. Accendere il lettore.
3. Premere il tasto MODE(19) del telecomando per selezionare l’ingresso USB. o SD
4. Il lettore avvierà automaticamente la riproduzione dei file contenuti all’interno del dispositivo connesso.
Nota: il lettore potrebbe non supportare alcuni dispositivi dotati di presa USB, questo è dovuto
all’incompatibilità di alcuni processori.
PAG _11
Page 12
ITALIANO
RIPRODUZIONE DI FILE IMMAGINE, AUDIO, VIDEO DA DISPOSITIVO USB/SD
Per la riproduzione di file immagine da dispositivo USBSD vedere riproduzione di file immagine (pag.11).
Per la riproduzione di file audio da dispositivoUSB/SD vedere riproduzione di file audio (pag.10).
Per la riproduzione di file video da dispositivo USB/SD vedere riproduzione di file video(pag.11).
TW 7005
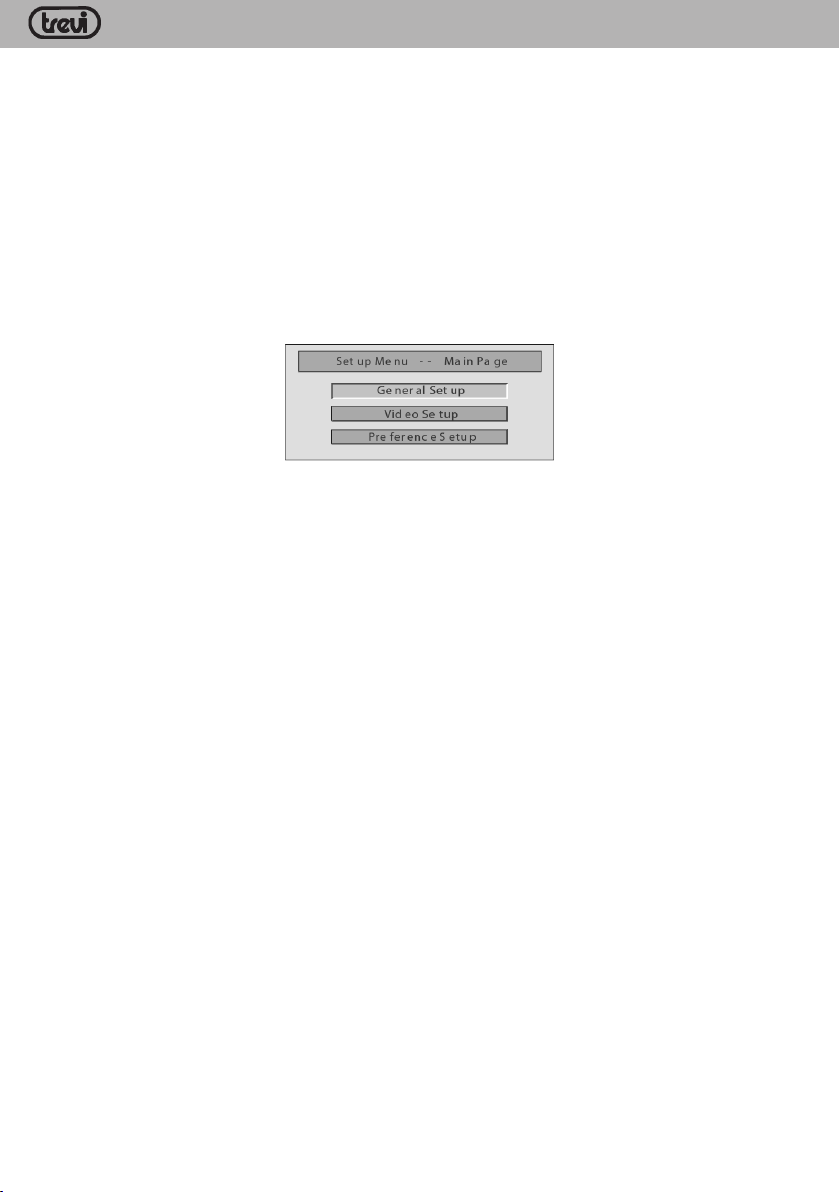
MENU IMPOSTAZIONE DEL LETTORE
Con il lettore in funzione STOP o senza disco presente al suo interno, entrare nel menù impostazioni premendo il tasto SETUP(20) sul telecomando.
Attraverso i tasti navigazione NEXT (30d), PREV (30e), FWD (30c) o REV (30b), selezionare la
voce desiderata.
Premere il tasto OK(30a) per confermare la scelta.
Per uscire dal menù impostazioni premere il tasto SETUP(20).
CONFIG. GENERALE
Formato Schermo
È possibile scegliere il formato dell’immagine: Normal/ PS (4:3 PANSCAN), Normal/ LB (4:3 LETTERBOX),
Wide (16:9).
Nota: Il formato TV dell’immagine dipende dal formato del disco. Alcuni dischi non sono in grado di
visualizzare immagini nel formato TV selezionato. Se si riproduce un disco registrato in formato 4:3 su
una TV a schermo panoramico, appariranno delle barre nere sui lati destro e sinistro dello schermo.
Occorre regolare le impostazioni dello schermo a seconda del tipo di TV.
Angolazione
È possibile Attivare o Disattivare la funzione Angolo.
Lingua OSD
Questa opzione permette di selezionare la lingua predefinita del menù del DVD (OSD).
Salvaschermo
Questa opzione permette di Attivare o Disattivare lo screen saver dopo un certo tempo di inattività dell’apparecchio.
CONFIG. VIDEO
Sistema TV
Permette di impostare il sistema NTSC o PAL nel caso di collegamento ad un televisore tramite l’uscita A/V
OUT(11).
Se il TV supporta soltanto il sistema NTSC o PAL, lo schermo lampeggerà e non visualizzerà più nulla se non
viene selezionato il sistema corretto.
Nota: per maggiori informazioni sui formati supportati, consultare le istruzioni del TV.
Risoluzione pannello
Permette di regolare i parametri principali dell’immagine:
PAG _12
Page 13

ITALIANO
Luminosità
Effettua la variazione della luminosità del display (effettuare la regolazione dal valore -15 a +15, standard 0)
Contrasto
Effettua la variazione del contrasto del display (effettuare la regolazione dal valore -16 a +16, standard 0)
Tinta
Effettua la variazione della tinta dei colori del display (effettuare la regolazione dal valore -9 a +9, standard 0)
Saturazione
Effettua la variazione della saturazione del display (effettuare la regolazione dal valore -9 a +9, standard 0)
PREFERENZE
Audio
Questa opzione permette di selezionare la lingua predefinita dell’audio del DVD.
Sottotitoli
Questa opzione permette di selezionare la lingua predefinita dei sottotitoli del DVD.
Selezionare DISATT. per disattivarli.
Menu disco
Questa opzione permette di selezionare la lingua predefinita del menu del DVD.
Contr. Parentale
Nota: non tutti i DVD supportano le categorie di controllo parentale.
Questa opzione permette di impostare la funzione di restrizione d’accesso ai minori.
Selezionare Controllo Genitori, quindi premere OK(30a) per scegliere la modalità desiderata;
Sono disponibili 8 livelli di protezione:
1.Adatto Bambini - permette la visione di programmi adatti ai bambini.
2.G - pubblico generale, permette la visione di programmi adatti a tutte le eta’
3.PG - controllo genitori, permette la visione con la presenza dei genitori.
4.PG13 - permette la visione di programmi adatti a maggiori di 13 anni.
5.6.7.PG-R, R, NC-17 - questi livelli permettono la visione di programmi adatti a maggiori di 17 anni.
8.Adult - permette la visione di materiale adatto ad un pubblico adulto.
Nota: occorre sbloccare la password per poter configurare l’opzione Controllo Genitori.
TW 7005
Predefiniti
Permette di ripristinare le impostazioni di fabbrica; selezionare RIPRISTINA e confermare con OK(30a).
Attenzione: tutte le impostazioni utente verranno riportate a quelle di fabbrica compresa la
password di protezione del sistema.
PAG _13
Page 14
A
B
C
ITALIANO
TW 7005
FUNZIONAMENTO DELL’UNITA’ MONITOR
NOTA: Le funzioni che seguono hanno invece effetto solo sull’unita’ secondaria.
ACCENSIONE/SPEGNIMENTO
1. Spostare il selettore OFF/ON(1) sulla posizione ON per accendere l’unita’.
2. Spostare il selettore OFF/ON(1) sulla posizione OFF per spegnere l’unita’.
REGOLAZIONE VOLUME
E’ possibile aumentare/diminuire il volume tramite il potenziometro rotativo (2).
REGOLAZIONE LUMINOSITA’
E’ possibile regolare la luminosità tramite il potenziometro rotativo (6).
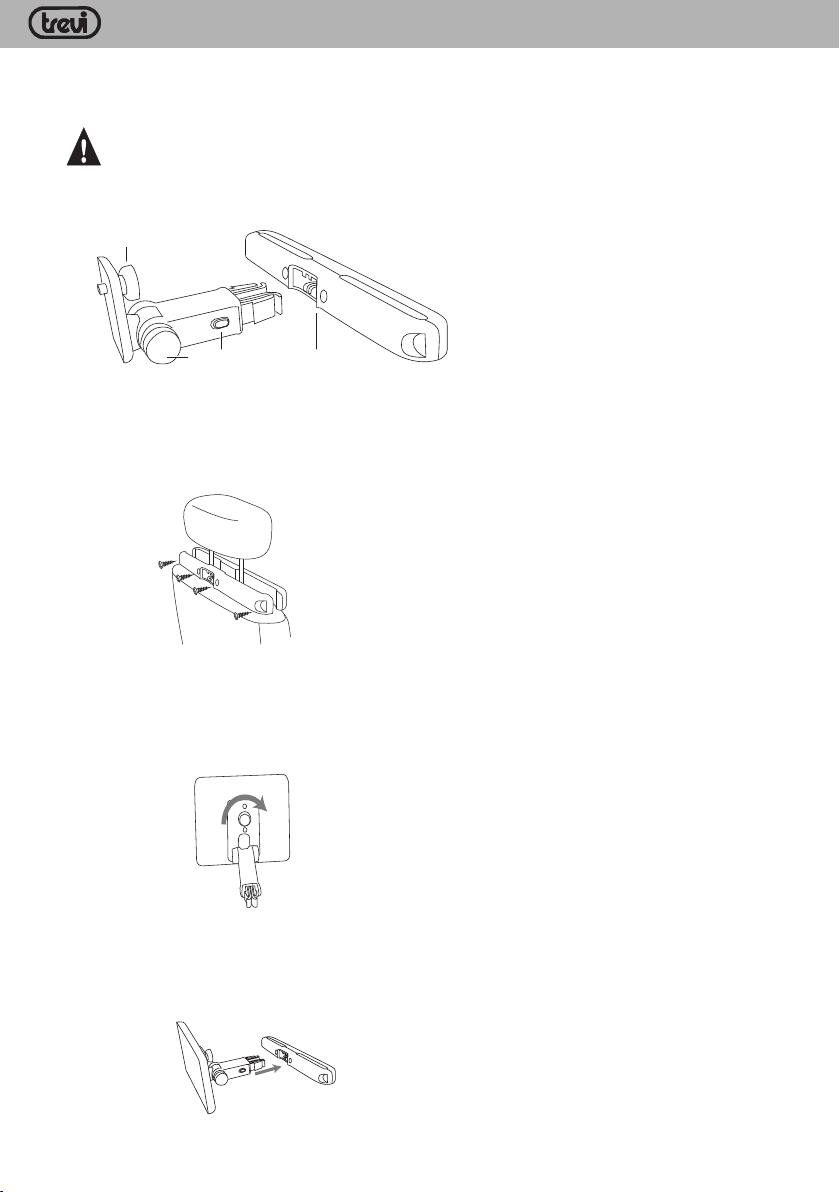
UTILIZZO DELLE STAFFE PER INSTALLAZIONE A POGGIATESTA
AUTO
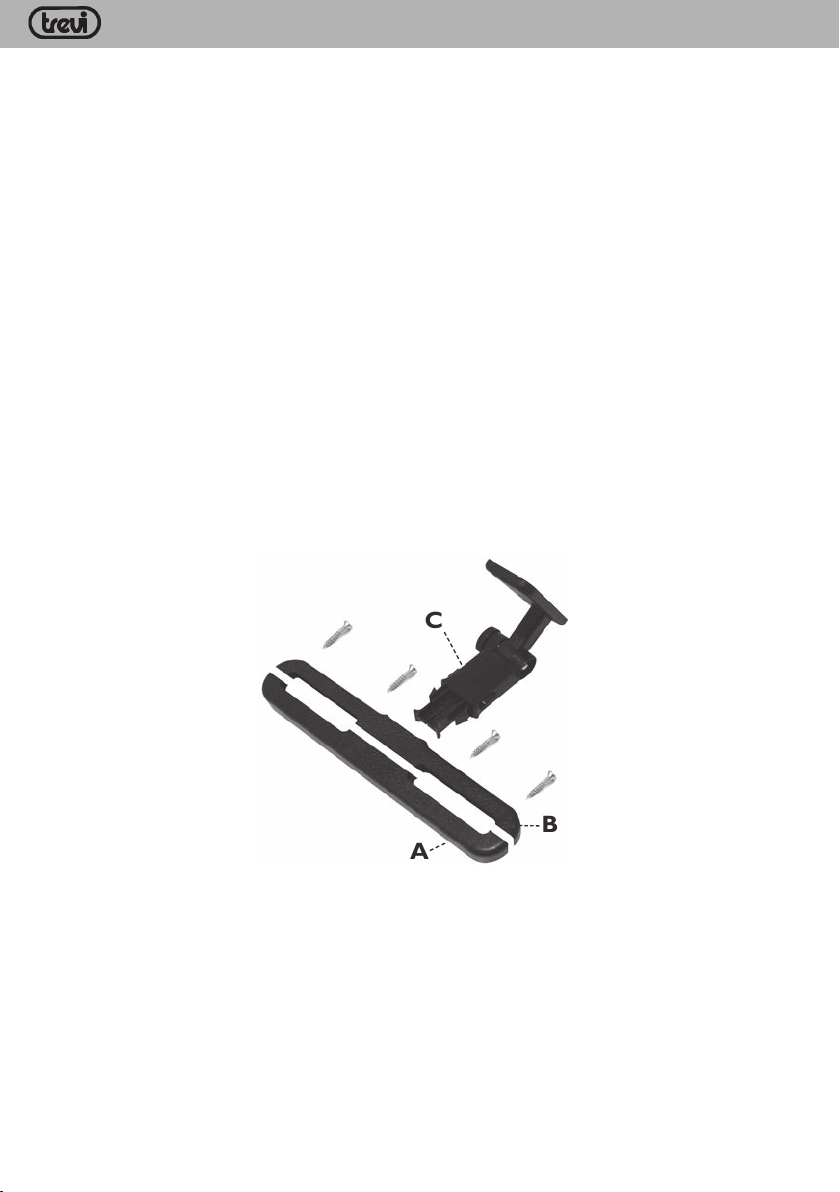
In dotazione sono presenti due staffe per installare le unita’ dvd e monitor sui poggiatesta dei sedili anteriori
dell’auto.
Per l’installazione delle staffe:
1. Fissare le parti A e B con le viti intorno ai sostegni del poggiatesta.
2. Inserire la parte C nell’apposito alloggio fino al completo aggancio meccanico (si udira’ un “click”);
controllare il corretto fissaggio della parte C.
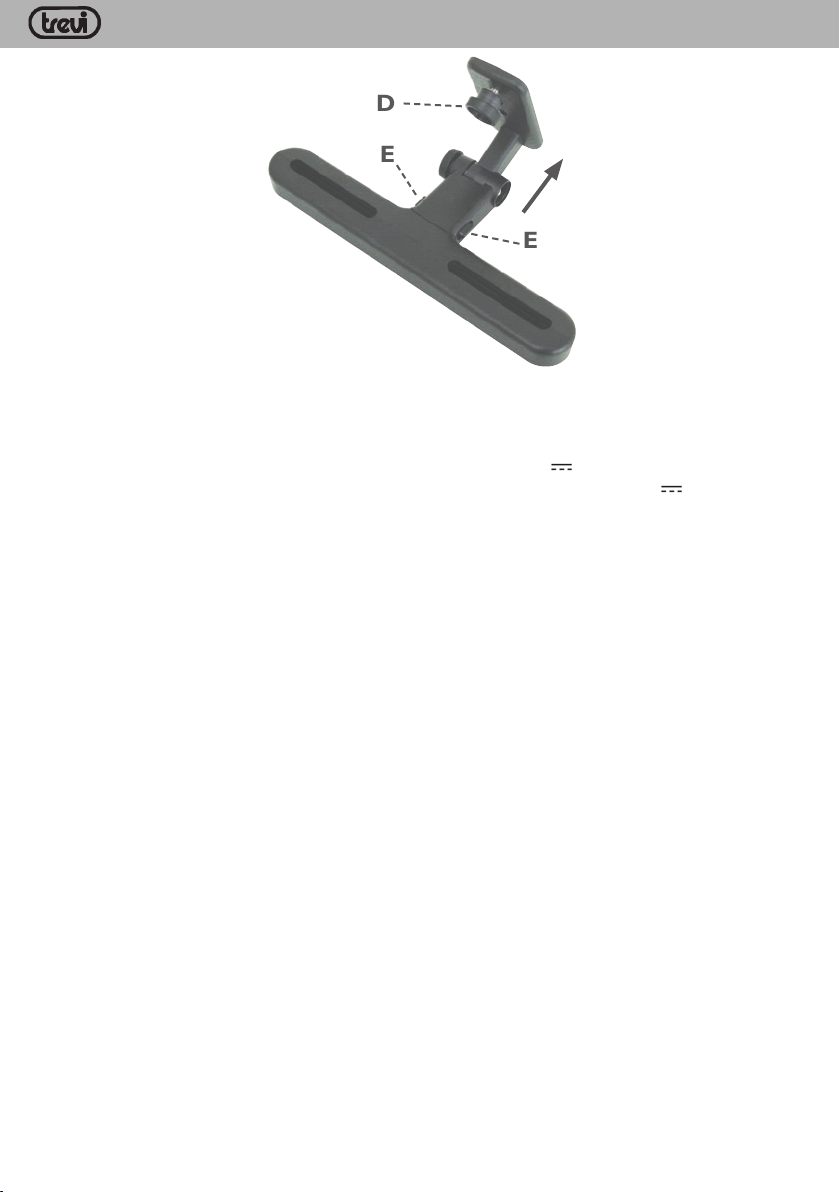
3. Tramite la vite di fissaggio D, assicurare il monitor sulla staffa di sostegno; controllare di aver ben serrato
la vite di fissaggio.
4. Per sganciare il monitor dalla staffa e' possibile utilizzare lo sgancio rapido; premere i pulsanti E tirando
dolcemente in direzione della freccia fino alla rimozione del monitor dalla staffa. Per l'aggancio inserire
di nuovo la parte C nel proprio alloggio.
PAG _14
Page 15
D
E
E
ITALIANO
SPECIFICHE
Generali
Alimentazione: ......................................................................................Rete: 100-240V~ 50/60Hz, 0.3A Max
OUT: 9V , 1A
Presa accendisigari: 12V
Pacco batterie ai polimeri di litio 7.4V,
1100mAh
Assorbimento: .......................................................................................10W
Risposta in frequenza: .........................................................................20Hz a 20KHz
Uscita Video: ..........................................................................................1 Vp-p/75Ohm
Uscita Audio: .........................................................................................1.4Vrms/10kOhm
Rapporto segnale rumore: .................................................................80dB
Laser: .......................................................................................................Semiconduttore laser, lunghezza d’onda:
650nm/795nm
Dimensioni diagonale schermo: ..................................................9” - 22,4 cm
Temperature d’uso: ..................................................da 0° a 40° centigradi
Dimensioni unita’ DVD: ......................................................................247x192x42 mm
Dimensioni unita’ monitor: ................................................................246,5x191,6x30 mm
Peso unita’ DVD: .................................................................................. 848gr
Peso unita’ monitor: ............................................................................473gr
TW 7005
Video e Audio
Formati video supportati: ................................................................... DVD, VCD,MPEG4
Formati audio supportati: ................................................................... CD Audio, CDr, CDrw, MP3
Rapporto schermo: ..................................................16:9
PAG _15
Page 16
ITALIANO
INFORMAZIONI AGLI UTENTI
ai sensi del Decreto Legislativo N° 49 del 14 Marzo 2014
“Attuazione della Direttiva 2012/19/UE sui rifiuti di apparecchiature elettriche ed elettroni-
che (RAEE)”
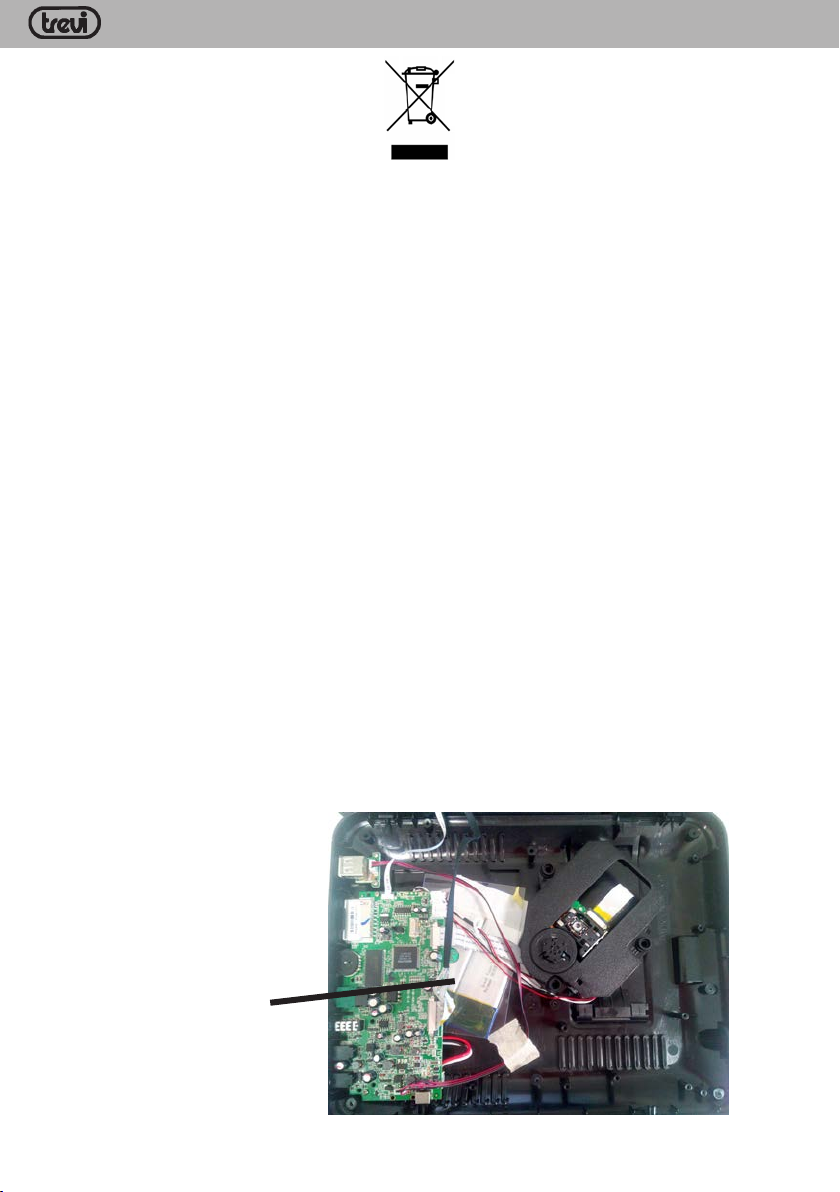
Il simbolo del cassonetto barrato riportato sull’apparecchiatura indica che il prodotto alla fine della propria
vita utile deve essere raccolto separatamente dagli altri rifiuti. L’utente dovrà, pertanto, conferire l’apparec-
chiatura integra dei componenti essenziali giunta a fine vita agli idonei centri di raccolta differenziata dei
rifiuti elettronici ed elettrotecnici, oppure riconsegnarla al rivenditore al momento dell’acquisto di nuova
apparecchiatura di tipo equivalente, in ragione
di uno a uno, oppure 1 a zero per le apparecchiature aventi lato maggiore inferiore a 25 cm. L’adeguata
raccolta differenziata per l’avvio successivo dell’apparecchiatura dimessa al riciclaggio, al trattamento e allo
smaltimento ambientale compatibile contribuisce ad evitare possibili effetti negativi sull’ambiente e sulla
salute e favorisce il riciclo dei materiali di cui è composta l’apparecchiatura. Lo smaltimento abusivo del
prodotto da parte dell’utente comporta
l’applicazione delle sanzioni amministrative di cui al D.Lgs n. Decreto Legislativo N° 49 del 14 Marzo 2014.
INFORMATIVA SULLA RIMOZIONE E LO SMALTIMENTO DELLE BATTERIE
Attenzione: Questa operazione è riservata esclusivamente al personale tecnico specializzato!
TW 7005
PROCEDURA PER LA RIMOZIONE DELLA BATTERIA
Attenzione: Pericolo di esplosione se la batteria è sostituita in modo non corretto. Sostituire solo
con lo stesso tipo o con un tipo equivalente.
Operare esclusivamente in assenza di collegamento dell’apparecchio alla rete elettrica!
1. Rimuovere le viti che serrano il mobile nella parte inferiore del lettore;
2. Individuare la batteria;
3. Scollegarla e rimuoverla.
Qualunque sia il tipo di batteria esaurita, essa non deve essere gettata tra i rifiuti domestici,nel fuoco o nell’acqua.
Ogni tipo di batteria esaurita deve essere, riciclata oppure smaltita presso gli appositi centri raccolta dedicati
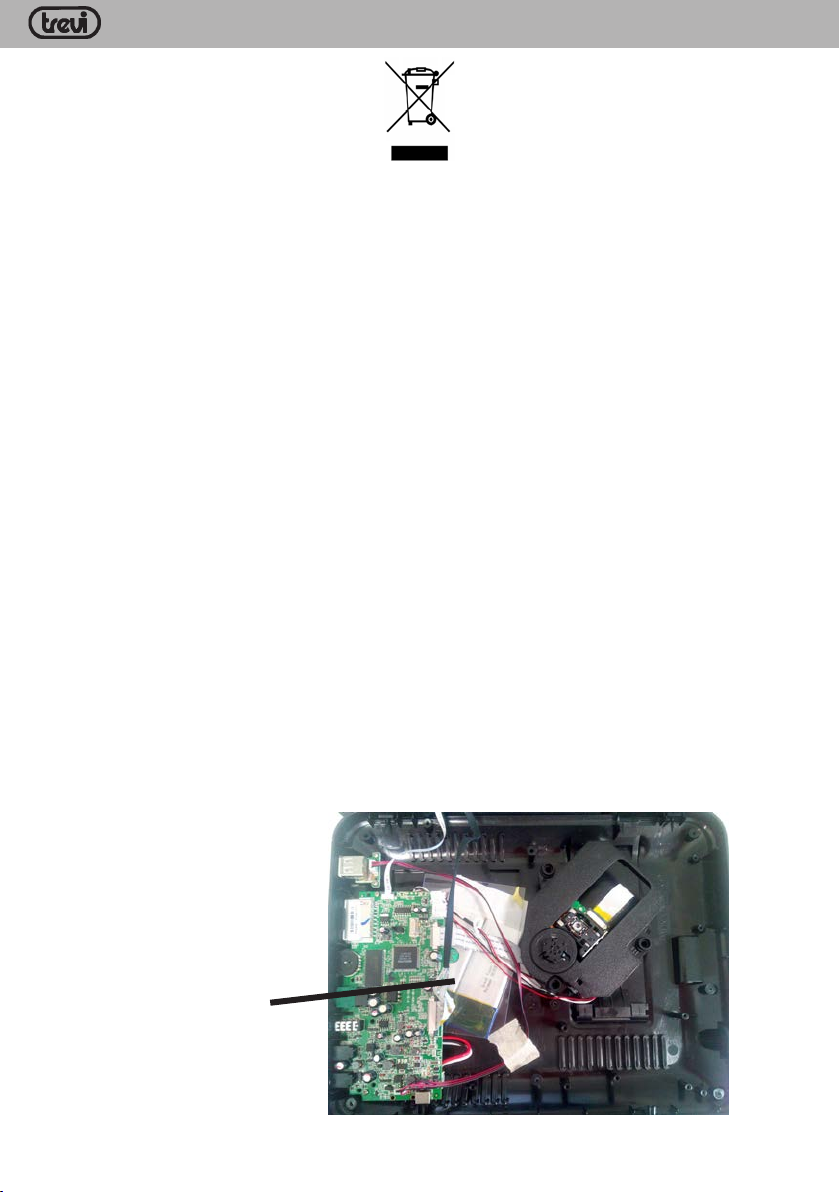
BATTERIA DA RIMUOVERE
PAG _16
Page 17
TW 7005
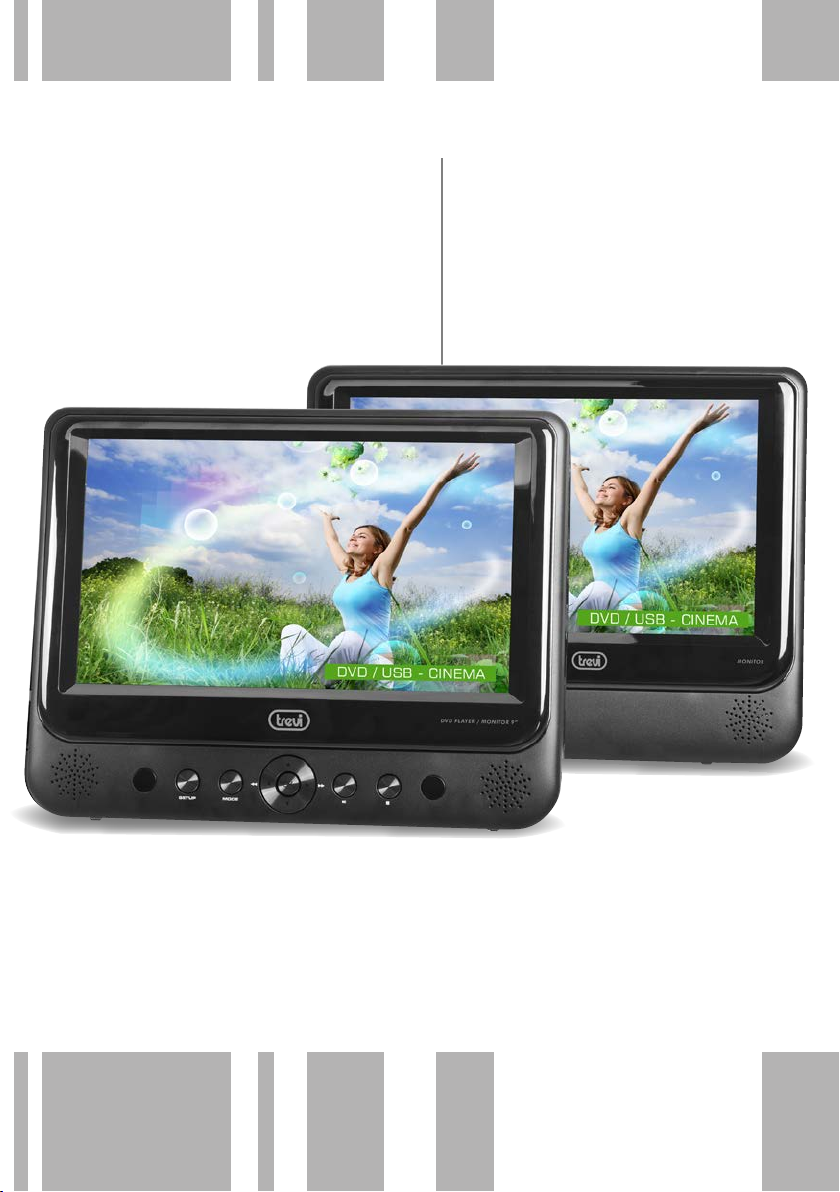
PORTABLE VIDEO DVD/USB/SD SYSTEM WITH TWIN 9” LED SCREEN
Instruction manual
Page 18
PORTABLE DVD
User Manual
Note:
1.Car cigarette lighter adaptor is not recommended to recharge the battery.
2.Car cigarette light adaptor can only be used when the car power supply is 9-12V.
3.The mains plug is used as the disconnect device, the disconnect device should remain
readily operable.
Powering and installation
Plug one end of the AC/DC power adaptor into the DC IN 9-12V jack on the right of the
unit, then plug the other end into the AC power receptacle. Please refer to the following
illustration.
If using car cigarette lighter adaptor to connect to the power:
Plug one end of the cigarette lighter adaptor into the DC IN 9-12V jack on the unit, plug
the other end into the car cigarette lighter socket.See illustration below.
System Connection
Connecting to monitor
The unit can also be connected to the external LCD monitor.
Connect the unit to power by AC/DC adapter or cigarette lighter adapter.
Then connect the unit DC OUT jack to DC IN 9-12V Jack of the LCD Monitor by a DC/AV
cable. Also use this DC/AV cable to connect the AV OUT jack of the unit to AV IN jack of
the Monitor.
Please refer to the illustration below.
Thank you for choosing our portable DVD player.
The unit applies the latest state of art electronics and is designed for use at
home, in hotels and in offices etc for relaxation. The compact size makes
carrying easier . Please read the manual carefully prior to use and keep it
well for later setup..
ENGLISH
TW 7005
Package
DVD Player
Remote Control with battery
Audio/Video Cable
AC/DC Power Adapter
Cigarette Lighter Adapter
User Manual
Earphone
Main Unit Controls
1 2
1. Open knob
2. Power ON/OFF switch
3. SETUP button
4. MODE button
5. OK button
( )/ ( )/ ( )/ ( )
6.
7. PLAY/PAUSE button
8. STOP button
9. DC IN 9-12V
Monitor View
ON OFF
1
2
3
4
5
BRIGHTNESS
6
1. Power ON/OFF
2. Volume knob
3. Earphone jack
4. AV I N
PAG _18
ON OFF
9
DC OUT
10
AV OUT
11
12
13
14
15
5 6 7 8
4
3
10. DC OUT
11. AV OUT
12. Earphone jack
13. Vo lu me kno b
14. SD card slot
15. USB Port
16. Bracket
17. Rating label position
CLOSE
1617
CLOSE
7 8
5. DC IN 9-12V
6. Brightness knob
7
. Bracket
Rating label position
8.
Page 19
Note:
You're advised to supply both units the power by the cigarette lighter adapter only.
The AC/DC adapter is used to supply power of one unit only and as the charger to charge
the main unit if it's with built-in battery.
CONNECTING TO A TV OR MONITOR
You can connect your DVD player to a TV or monitor via AV outso you can watch DVDs on
the TV or monitor.
Plug the end of the supplied AV cable that has one black connector into the AV OUT jack
on your DVD player,the other end to connect to the connectors on an RCA cable (not
included). Make sure colors on the connectors match.Plug the other end of the RCA cable
into the AV jacks on the TV or monitor, making sure to match the colors on the connectors \
with the jacks.You may have to select the correct input on your TV or monitor.
ENGLISH
TW 7005
System Connection
Powering and installation
Plug one end of the AC/DC power adaptor into the DC IN 9-12V jack on the right of the
unit, then plug the other end into the AC power receptacle. Please refer to the following
illustration.
DC OUT
AV OUT
If using car cigarette lighter adaptor to connect to the power:
Plug one end of the cigarette lighter adaptor into the DC IN 9-12V jack on the unit, plug
the other end into the car cigarette lighter socket.See illustration below.
DC OUT
AV OUT
Note:
1.Car cigarette lighter adaptor is not recommended to recharge the battery.
2.Car cigarette light adaptor can only be used when the car power supply is 9-12V.
3.The mains plug is used as the disconnect device, the disconnect device should remain
readily operable.
Connecting to monitor
The unit can also be connected to the external LCD monitor.
Connect the unit to power by AC/DC adapter or cigarette lighter adapter.
Then connect the unit DC OUT jack to DC IN 9-12V Jack of the LCD Monitor by a DC/AV
cable. Also use this DC/AV cable to connect the AV OUT jack of the unit to AV IN jack of
the Monitor.
Please refer to the illustration below.
PAG _19
Page 20
In Car Installation
To use the player in a car, attach the main unit and the second screen to the back of t h e front
seat headrests.
Preparation
1.Fix the headrest mount bracket on to the front seat headrest
ENGLISH
BRIGHTNESS
DC OUT
AV OUT
TW 7005
Note:
You're advised to supply both units the power by the cigarette lighter adapter only.
The AC/DC adapter is used to supply power of one unit only and as the charger to charge
the main unit if it's with built-in battery.
CONNECTING TO A TV OR MONITOR
You can connect your DVD player to a TV or monitor via AV outso you can watch DVDs on
the TV or monitor.
Plug the end of the supplied AV cable that has one black connector into the AV OUT jack
on your DVD player,the other end to connect to the connectors on an RCA cable (not
included). Make sure colors on the connectors match.Plug the other end of the RCA cable
into the AV jacks on the TV or monitor, making sure to match the colors on the connectors \
with the jacks.You may have to select the correct input on your TV or monitor.
PAG _20
White = left audio
Red = right audio
Yellow = video
RCA cable
(not included)
DC OUT
AV OUT
AV adapter cable
Page 21
ENGLISH
In Car Installation
Preparation
1.Remove the mounting kit and the DVD player from the seat when the DVD players
are not in use.
2.Take out all accessories including car mount kit from the car when the units are not in use.
To use the player in a car, attach the main unit and the second screen to the back of t h e front
seat headrests.
A
TW 7005
DCB
1.Fix the headrest mount bracket on to the front seat headrest
A. DVD player fastening screw node
B. Viewing angle adjustment node
C. Buckle release button
D. Headrest mount bracket
A:Position the bracket on the bars of the headrest.
B:Faste n the screw t o fix the bracket firmly on the cars.
Note: There are 4 short screws for fixing the on the 11mm metal bars, other 4
longer screws for 14mm metal bars.
2.Fix the DVD mount bracket to the portable DVD player.
N ote: there are three holes on the bracket. Use any one as you like.
bracket
3.Aim the screw of th e brack et to the sc rew nut on the back o f the DVD player.
S c r e w tight the bracket onto the DVD player.
4.Install the DVD player to the headrest.
Buckle DVD bracket into the headrest mount bracket.
PAG _21
Page 22
Basic Operation
Setup menu operation
General Setup
Video Setup
Preference
Your player has a Setup menu you can use to adjust settings.
To use the Setup menu:
1.Press SETUP. The Setup Menu - Main page shows with General Setup Highlighted.
2.Press or to select the menu option you want, then press OK.
3.Press or to select an option.
4.Press or to change the setting, then press OK to confirm.
5. Repeat Step 2 through Step 4 to change other menu options.
6. Press SETUP to exit.
Playing a DVD or CD
1 .Make sure that your player is connected to power.
2 .Slide the ON/OFF switch to the ON position.
3 .Press the OPEN button, the disc tray opens.
4. Place a disc, label side up, then close the tray. The disc starts playing automatically.
Note:
Most DVDs and your DVD player have region codes that help control illegal distribution of DVDs.
You can only play DVDs with a region code of 1 or ALL. The region code for a DVD is printed on
the DVD or the DVD packaging.
ENGLISH
TW 7005
5.Adjust the viewing angle
Release the node.
6.Press the release button to release the DVD player from headrest.
To attach the second screen, repeat the above steps.
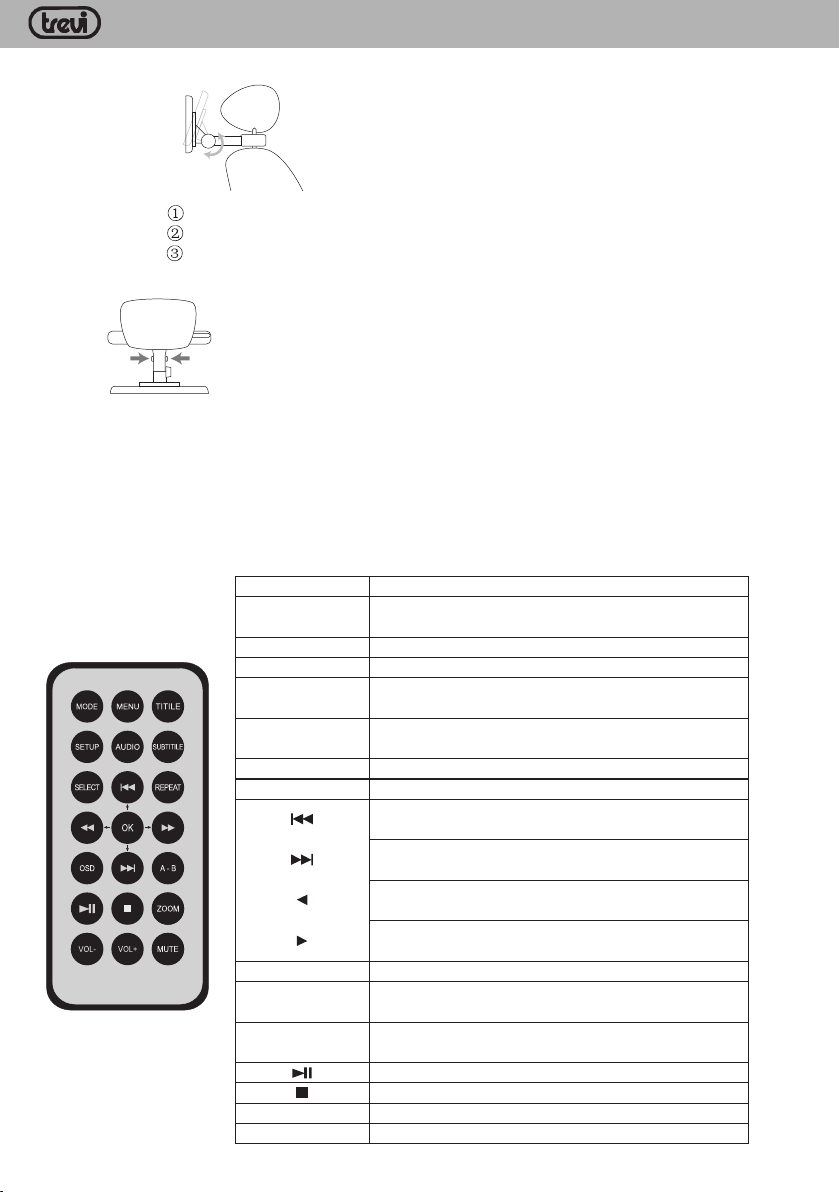
The Remote Control
PAG _22
Adjust the viewing angle as desired.
Fasten the node.
MODE
MENU
TITILE
SETUP
AUDIO
SUBTITILE
SELECT
REPEAT
OK
OSD
A-B
ZOOM
VOL- / VOL+ / MUTE
To select the source
MENU Select once to open the main DVD menu. This option
works only if the DVD has a main menu.
Select to display the DVD title information.
Press to open or close the Setup menu.
Select to select the DVD audio language. This option works
only if the DVD has multiple audio languages.
Select to turn subtitles on and off, or select to select the
subtitle language. This optionworks only if the DVD has subtitles.
Select to search the chapter, title, or track.
Select to repeat the current title, chapter, or all.
In Menu mode, press to move up in a list or menu.
In playback mode, press to go to the previous title, chapter, or track.
In Menu mode, press to move down in a list or menu.
In playback mode, press to go to the next title, chapter, or track.
In Menu mode, press to move left.
In playback mode, press to fast reverse the playback.
In Menu mode, press to move right.
In playback mode, press to fast forward the playback.
In menu mode, press to confirm a selection.
Select to display information about the disc, such as title,
chapter number, tracknumber, and time.
Repeat a specific portion from point A to B, press it again to
cancel repeat playing
Press to begin playback. Press again to pause playback.
Press to stop disc playback.
Select to enlarge the display image.
To adjust the volume
Page 23
Specification
Rechargeable Battery Use
The unit utilizes long-life Li polymer battery for portable power supply. The battery has no Memory
Effect and thus can be recharged safely regardless of whether the battery is fully or partially discharged.
It is enough to recharge no longer than 3H each time. Fully recharged battery can last about 2H with
earphones on.
Note
1. The normal working temperature is: 0 ~ 40 ;
2. Always unplug AC/DC power supply for the unit when not in use;
3. It gets hot during playing, it's normal, while avoid long time playing and unattended;
4. Avoid having the unit collide with any objects, and place away from all possible heat sources or
damp areas.
Using And Maintaining Rechargeable Battery
Caution:
Danger of explosion if battery is incorrectly replaced.Replace only with the same or equivalent type
and by professionals.
The battery can not be charing when using, when turn off the light is red indicating charging, and the
light turns yellow when fully charged.
IMPORTANT SAFETY INSTRUCTIONS
1 .Read these instructions.
2 .Keep these instructions.
3 .Heed all warnings.
4 .Follow all instructions.
5 .Do not use this apparatus near water.
6 .Clean only with a dry cloth.
7 .Do not block any ventilation openings. Install in accordance with the manufacturer¡¯s instructions.
8 .Do not install near any heat sources such as radiators, heat registers, stoves, or otherapparatus
(including amplifiers) that produce heat.
9 .Do not defeat the safety purpose of the polarized or grounding-type plug. The wide blade is provided
for your safety. If the provided plug does not fit into your outlet, consult an electrician for replacement
of the obsolete outlet.
10 .Protect the power cord from being walked on or pinched particularly at plugs, convenience receptacles,
and the point where they exit from the apparatus.
11 .Only use attachments/accessories specific by the manufacturer.
12 .Unplug this apparatus during lightning storms or when unused for long periods of time.
13 .Refer all servicing to qualified service personnel. Servicing is required when the apparatus has been
damaged in any way, such as power supply cord or plug is damaged,liquid has been spilled or objects
have fallen into the apparatus, the apparatus has been exposed to rain or moisture, does not operate
normally, or has been dropped.
14 .To reduce the risk of fire or electric shock, do not expose this device to rain, moisture, dripping, or
splashing, and no objects filled with liquids, such as vases, shall be placed on it.
Compatible disc: DVD/VCD/CD/MP3/MPEG4
Signal system: PAL/NTSC
Panel size: 9 inch
Frequency response: 20 Hz to 20 kHz
Video output: 1 Vp-p/75Ohm, unbalanced
Audio output: 1.4Vrms/10kOhm
Audio S/N: Better than 80dB
Dynamic range: Better than 85dB
Laser: Semiconductor Laser, Wave Length: 650nm/795nm
Power source: DC 9-12V
Power consumption: 10 W
Operating temperature: 0~40°C
Weight(Monitor/DVD Player): 0.55/1.1kg
Dimensions (Monitor/DVD Player)(W x D x H): 246.5x191.6x30/247x191.8x41.9mm
Battery Type: Li Polymer
ENGLISH
Basic Operation
Playing a DVD or CD
1 .Make sure that your player is connected to power.
2 .Slide the ON/OFF switch to the ON position.
3 .Press the OPEN button, the disc tray opens.
4. Place a disc, label side up, then close the tray. The disc starts playing automatically.
Note:
Most DVDs and your DVD player have region codes that help control illegal distribution of DVDs.
You can only play DVDs with a region code of 1 or ALL. The region code for a DVD is printed on
the DVD or the DVD packaging.
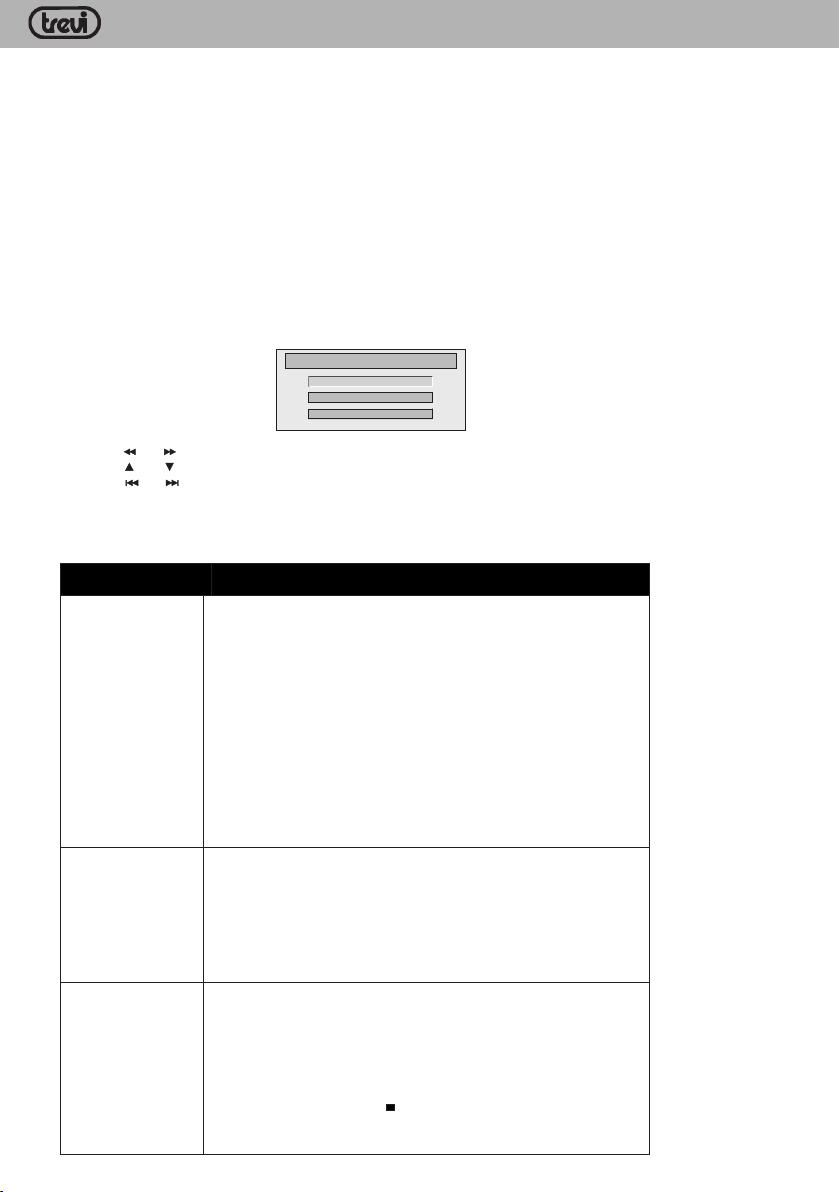
Setup menu operation
Your player has a Setup menu you can use to adjust settings.
To use the Setup menu:
1.Press SETUP. The Setup Menu - Main page shows with General Setup Highlighted.
Setup Menu -- Ma in Page
General Setup
Video Setup
Preference Setup
2.Press or to select the menu option you want, then press OK.
3.Press or to select an option.
4.Press or to change the setting, then press OK to confirm.
5. Repeat Step 2 through Step 4 to change other menu options.
6. Press SETUP to exit.
Option
General Setup
Video Setup
Preference
TV Display:Selects the aspect ratio. You can select:
• Normal/PS :Select this option when the player is connected to a normal TV
(4:3 aspect ratio). Wide-screen images are shown on the screen, but with some
parts cropped automatically.
• Normal/LB:Select this when the player is connected to a normal TV (4:3
aspect ratio).Wide-screen images are shown on the screen with a black band
on the top and bottom.
• Wide displays the video image full-screen when your player is connected to a
widescreen TV (16:9 aspect ratio).
Angle Mark:If this option is turned on and the DVD you are watching has
multiple viewing angles, the icon appears in scenes that have multiple viewing
angles.
OSD Language:Selects the language for the Setup menu. You can select
English, French, German,or Italian.
Screen Saver:When this option is turned on, your player displays a screen
saver when the same image stays on the screen for five minutes.
TV Type:Selects the TV type. Options are PAL (typically Europe) or NTSC
(typically USA). The default is NTSC.
Panel Quality:Select to adjust the following:
• Brightness:Increases the brightness to add more light to dark areas of the
picture or decr eases the brightness to add more dark to light areas of the picture.
• Contrast:Increases the contrast level to adjust the white areas of the picture
or decreases the contrast level to adjust the black areas of the picture.
• Hue:Increases the color level to add more green to skin tones or decreases
the color level to add more purple to skin tones.
• Saturation:Adjusts the color saturation.
Audio:Selects the audio language. If the language you select is not recorded
on the DVD, your player plays the default audio language.
Subtitle:Select the subtitle language. If the language you select is not recorded
on the DVD, your player displays the default subtitle language.
Disc Menu:Selects the DVD menu language. If the language you select is not
recorded on the DVD, your player displays the default language.
Parental:Blocks DVD playback based on ratings. Select this option to set the
parental control level. Options include: KID SAFE, G, PG,PG 13,PGR, R, Nc17,
and ADULT. The default is ADULT.
The password is pressing Stop( )four times.
Default:Reset all settings except the password and parental controls back to
the factory default.
Sub-options
TW 7005
PAG _23
Page 24
Warning: To reduce the risk of fire or electric shock, do not expose this apparatus to rain or
moisture.
Specification
Troubleshooting
Owing to continuous improvement, no prior notice will be given regarding changes on above feature and spec.
splashing, and no objects filled with liquids, such as vases, shall be placed on it.
15 .The wall plug is the disconnecting device. The plug must remain readily operable.
Compatible disc: DVD/VCD/CD/MP3/MPEG4
Signal system: PAL/NTSC
Panel size: 9 inch
Frequency response: 20 Hz to 20 kHz
Video output: 1 Vp-p/75Ohm, unbalanced
Audio output: 1.4Vrms/10kOhm
Audio S/N: Better than 80dB
Dynamic range: Better than 85dB
Laser: Semiconductor Laser, Wave Length: 650nm/795nm
Power source: DC 9-12V
Power consumption: 10 W
Operating temperature: 0~40°C
Weight(Monitor/DVD Player): 0.55/1.1kg
Dimensions (Monitor/DVD Player)(W x D x H): 246.5x191.6x30/247x191.8x41.9mm
Battery Type: Li Polymer
ENGLISH
Rechargeable Battery Use
The unit utilizes long-life Li polymer battery for portable power supply. The battery has no Memory
Effect and thus can be recharged safely regardless of whether the battery is fully or partially discharged.
It is enough to recharge no longer than 3H each time. Fully recharged battery can last about 2H with
earphones on.
Note
The battery can not be charing when using, when turn off the light is red indicating charging, and the
light turns yellow when fully charged.
Using And Maintaining Rechargeable Battery
1. The normal working temperature is: 0 ~ 40 ;
2. Always unplug AC/DC power supply for the unit when not in use;
3. It gets hot during playing, it's normal, while avoid long time playing and unattended;
4. Avoid having the unit collide with any objects, and place away from all possible heat sources or
damp areas.
Caution:
Danger of explosion if battery is incorrectly replaced.Replace only with the same or equivalent type
and by professionals.
°C °C
TW 7005
IMPORTANT SAFETY INSTRUCTIONS
1 .Read these instructions.
2 .Keep these instructions.
3 .Heed all warnings.
4 .Follow all instructions.
5 .Do not use this apparatus near water.
6 .Clean only with a dry cloth.
7 .Do not block any ventilation openings. Install in accordance with the manufacturer¡¯s instructions.
8 .Do not install near any heat sources such as radiators, heat registers, stoves, or otherapparatus
(including amplifiers) that produce heat.
9 .Do not defeat the safety purpose of the polarized or grounding-type plug. The wide blade is provided
for your safety. If the provided plug does not fit into your outlet, consult an electrician for replacement
of the obsolete outlet.
10 .Protect the power cord from being walked on or pinched particularly at plugs, convenience receptacles,
and the point where they exit from the apparatus.
11 .Only use attachments/accessories specific by the manufacturer.
12 .Unplug this apparatus during lightning storms or when unused for long periods of time.
13 .Refer all servicing to qualified service personnel. Servicing is required when the apparatus has been
damaged in any way, such as power supply cord or plug is damaged,liquid has been spilled or objects
have fallen into the apparatus, the apparatus has been exposed to rain or moisture, does not operate
normally, or has been dropped.
14 .To reduce the risk of fire or electric shock, do not expose this device to rain, moisture, dripping, or
15 .The wall plug is the disconnecting device. The plug must remain readily operable.
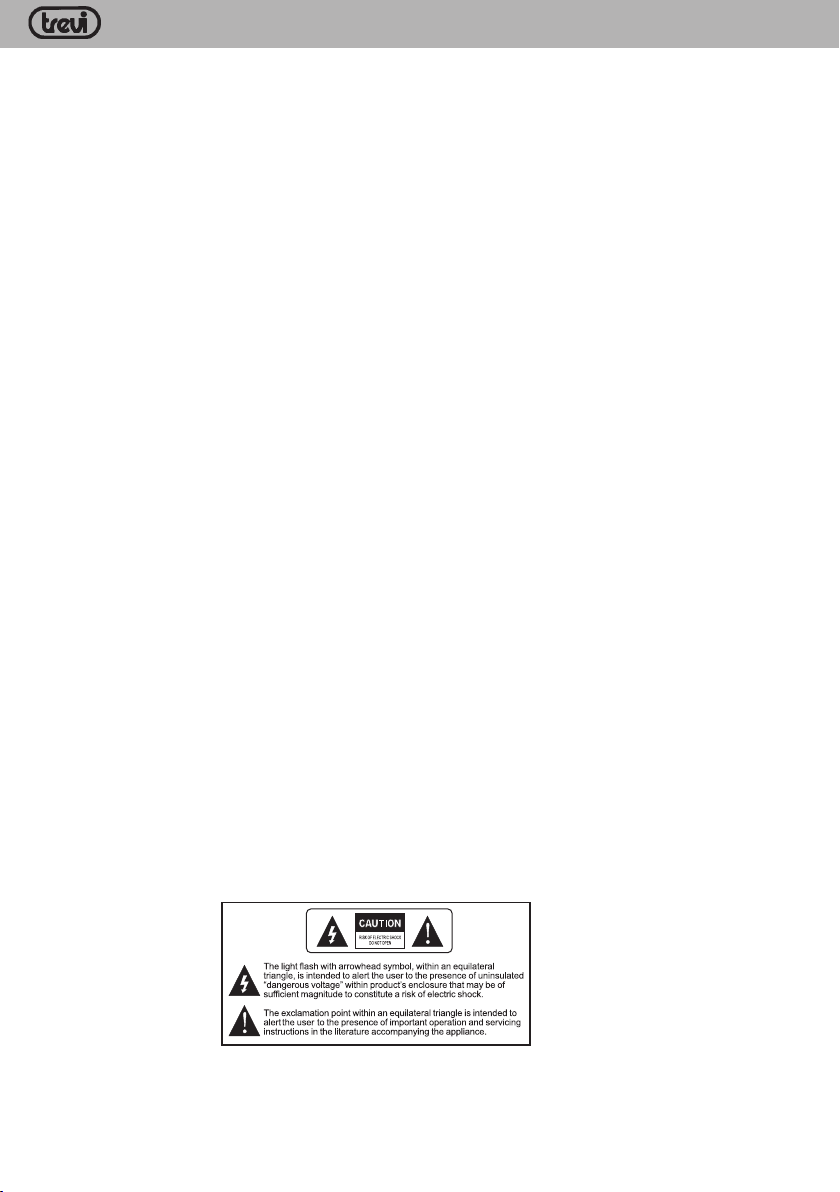
Warning: To reduce the risk of fire or electric shock, do not expose this apparatus to rain or
moisture.
PAG _24
Page 25
Warning: To reduce the risk of fire or electric shock, do not expose this apparatus to rain or
moisture.
15 .The wall plug is the disconnecting device. The plug must remain readily operable.
ENGLISH
Per evitare possibili danni all’udito, limitare il tempo di ascolto a volumi elevati.
TW 7005
To avoid possible hearing damage, limit the time listening at high volumes
Troubleshooting
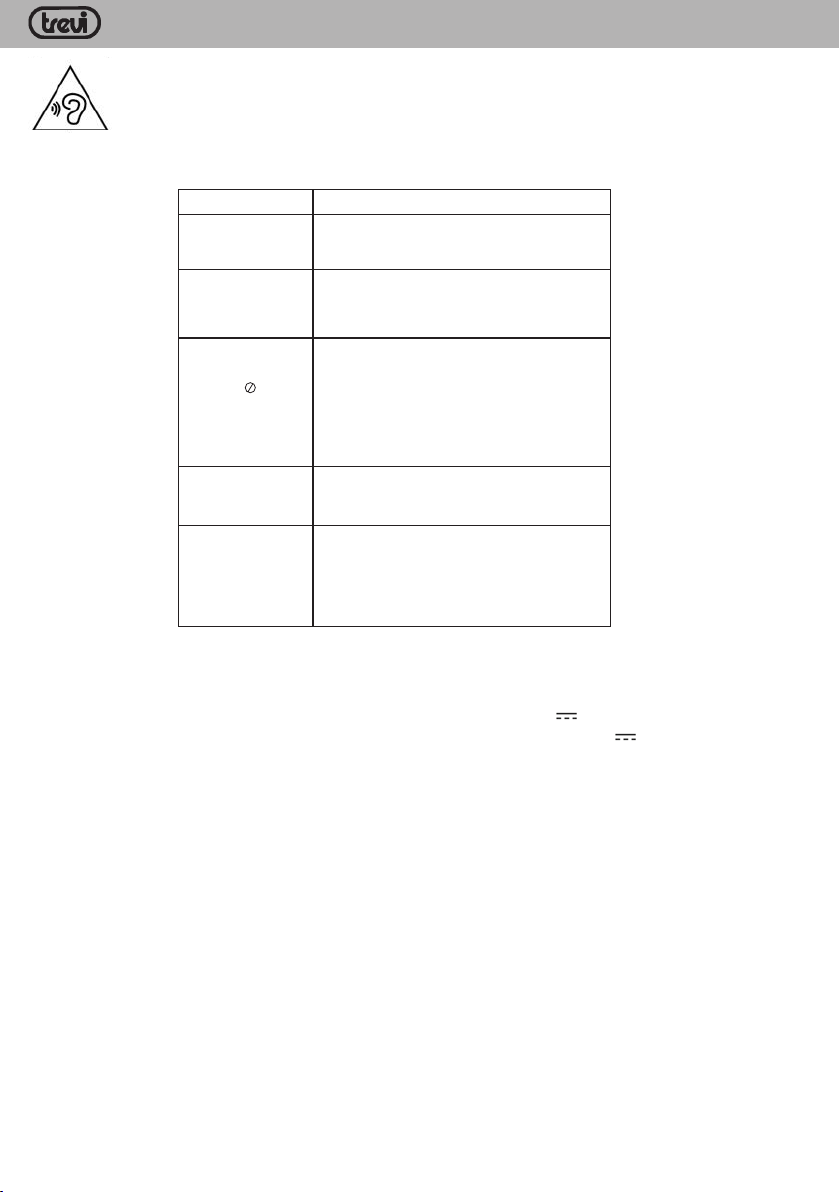
PR OB LE M SOLUTION
No sound or
distorted sound
Can't advance
through a movie
The icon
appears on
screen
Picture is
distorted
No forward or
reverse scan
SPECIFICATION
General
Power source: .......................................................................................IN: 100-240V~ 50/60Hz, 0.3A Max
OUT: 9V , 1A
Power consumption:: ...........................................................................10W
Frequency response: ............................................................................20Hz a 20KHz
Video output: ........................................................................................1 Vp-p/75Ohm
Audio output: ........................................................................................ 1.4Vrms/10kOhm
Audio S/N: .............................................................................................80dB
Laser: .......................................................................................................Semiconductor Laser, Wave Length:
Panel size: ..................................................9” - 22,4 cm
Operating temperature: ..................................................da 0° a 40° centigradi
Dimensions DVD unit: ........................................................................247x192x42 mm
Dimensions monitor unit: .................................................................. 246,5x191,6x30 mm
Weight DVD unit: ................................................................................848gr
Weight monitor unit: ...........................................................................473gr
Make sure the machine is connected properly.
Make sure all cables are securely inserted into
the appropriate jacks.
You can't advance through the opening credits
and warning information that appears at the
beginning of movies because the disc is
programmed to prohibit that action.
The feature or action cannot be completed at
this time because:
1. The disc's software restricts it.
2. The disc's software doesn't support the
feature (e.g., angles)
3. The feature is not available at the moment.
4. You've requested a title or chapter number
that is out of range.
The disc might be damaged. Try another disc;
It is normal for some distortion to appear during
forward or reverse scan.
Some discs have sections that prohibit rapid
scanning or chapter skip;
If you try to skip through the warning information
and credits at the beginning of a movie, you
won't be able to. This part of the movie is often
programmed to prohibit skipping through it.
Car adaptor: 12V
Lithio Polymer battery 7.4V, 1100mAh
650nm/795nm
Video and Audio
Compatible video format: ..................................................................DVD, VCD,MPEG4
Compatible audio format: ..................................................................CD Audio, CDr, CDrw, MP3
Screen Ratio: ..................................................16:9
PAG _25
Page 26
ENGLISH - CORRECT DISPOSAL PRODUCT
INFORMATION TO USERS
pursuant to Legislative Decree No. 49 of March 14, 2014
“Implementation of Directive 2012/19 / EU on Waste Electrical and Electronic Equipment
(WEEE)”
This wheeled bin symbol on the product indicates that at the end of its life must be collected separately
from other waste. The user must, therefore, take the remote control integrates the essential components
that got to its life to the appropriate differentiated collection centers for electronic and electro-technical
waste, or return it to the dealer when purchasing a new appliance of equivalent type, in terms
of one to one, or one to zero for equipment having longer side of less than 25 cm. Appropriate separate
collection for the decommissioned equipment for recycling, processing and environmentally compatible
disposal helps prevent negative impact on the environment and human health and promotes recycling of
the materials making up the product. Illegal dumping of the product by the user entails
the application of administrative sanctions stated in Legislative Decree n. Legislative Decree No. 49 of
March 14, 2014.
INFORMATION NOTE ON THE REMOVAL AND DISPOSAL OF BATTERIES
Warning: Only high-qualified personnel should perform this operation!
BATTERY REMOVAL
Warning: Danger of explosion if the battery is replaced incorrectly. Replace only with the same
or equivalent type.
The appliance should not be plugged to the mains socket when performing this operation!
1. Remove the screws tightening the lower part of the appliance;
2. Select the battery shown by the arrow in the picture;
3. Disconnect and remove the battery.
Used batteries should not be disposed of with household waste or thrown into fire or water. Used batteries
should be recycled or disposed of in separate waste collection centres.
TW 7005
PAG _26
BATTERY
Page 27
QUICK REFERENCE - CONTROLS
TW 7005
18
19
20
21
22
23
24
25
34
33
32
31
30
29
28
27
26
PAG _27
Page 28
AV OUT
DC OUT
Note:
You're advised to supply both units the power by the cigarette lighter adapter only.
The AC/DC adapter is used to supply power of one unit only and as the charger to charge
the main unit if it's with built-in battery.
CONNECTING TO A TV OR MONITOR
You can connect your DVD player to a TV or monitor via AV outso you can watch DVDs on
the TV or monitor.
Plug the end of the supplied AV cable that has one black connector into the AV OUT jack
on your DVD player,the other end to connect to the connectors on an RCA cable (not
included). Make sure colors on the connectors match.Plug the other end of the RCA cable
into the AV jacks on the TV or monitor, making sure to match the colors on the connectors \
with the jacks.You may have to select the correct input on your TV or monitor.
QUICK REFERENCE - LINKS
DC OUT
AV OUT
DC OUT
AV OUT
TW 7005
PAG _28
Page 29

QUICK REFERENCE - FRANÇAIS
TW 7005
UTILISATION ET RECHARGEMENT DE LA BATTERIE
Ce DVD utilise à l’intérieur une batterie au lithium rechargeable ; lorsqu’elle est complètement chargée il
fonctionnera sans besoin d’être connecté à une prise de courant.
L’alimentateur en dotation marche à courant alternatif 110/240V~ 50/60Hz.
Ne rechargez la batterie que lorsque le lecteur est éteint et à l’intérieur.
1. Branchez la petite fiche de l’alimentateur sur la prise d’alimentation externe (9) et la fiche sur une prise
de courant.
REMARQUE: employez uniquement l’alimentateur en dotation, puisque des appareils différents
pourraient avoir des polarités et/ou des tensions différentes.
2. L’état de charge de batterie indicateur sur la face avant s’allume. Pour continuer l’indicateur de charge
devient verte.
Le mode de charge rapide temps de recharge (le lecteur est éteint) est d’environ 3/4 heures.
Une autonomie de la batterie est complètement chargée du lecteur est environ 1,5 heures selon le DVD.
MARCHE/ARRÊT
1. Déplacez l’interrupteur ON/OFF (2) sur la position ON pour allumer le lecteur.
2. Déplacez l’interrupteur ON/OFF (2) sur la position OFF pour éteindre le lecteur.
FONCTIONS VALABLES POUR L’ÉCOUTE DE TOUT TYPE DE SOURCE
REGLAGE DU VOLUME
Pour régler le volume, utilisation du potentiomètre (13) sur le lecteur ou par le VOL +(25) et VOL -(24) sur
la télécommande.
FONCTION MUTE
Cette fonction permet de supprimer complètement le son de votre lecteur.
1. Appuyez sur la touche MUTE(26) sur la télécommande, l’écran affiche le symbole “MUTE” et le son est
coupé.
2. Appuyez sur la touche MUTE(26) sur la télécommande pour rétablir le son.
LECTURE D’UN DISQUE CD/DVD
Sauf indications contraires les commandes de la télécommande se réfèrent également aux commandes
sur le lecteur.
LECTURE D’UN DISQUE CD/DVD
1. Allumez le lecteur.
2. Ouvrez le tiroir du disque en utilisant le bouton d’éjection (1)
3. Insérez un disque DVD/CD avec les titres face vers le haut.
4. Fermez le tiroir du disque, l’écran affiche le message message “Chargement” indiquant que le disque est
chargé.
5. Le DVD/CD joue automatiquement.
ARRET DE LA LECTURE
1. Appuyez sur le bouton une fois STOP (27) pour interrompre la lecture.
2. Appuyez sur la touche à nouveau STOP (27) pour arrêter complètement la lecture.
3. Appuyez sur la touche PLAY/PAUSE /;(23) pour reprendre la lecture du disque depuis le début.
DEFILEMENT RAPIDE
1. Appuyez sur FWD (30c) pour faire avancer rapidement les images.
2. Appuyez sur la REV (30b) pour mettre les images rapidement.
3. Chaque pression sur le bouton, la vitesse augmente.
PAG _29
Page 30
QUICK REFERENCE - FRANÇAIS
Per evitare possibili danni all’udito, limitare il tempo di ascolto a volumi elevati.
To avoid possible hearing damage, limit the time listening at high volumes
4. Les indicateurs numériques sur l’écran à côté du symbole - indiquent la vitesse (x2 - x4 - x8 - x16x32).
5. Pour reprendre la lecture normale, appuyez sur la touche PLAY/PAUSE/;(23).
PASSAGE AU VIDEO/CHAPITRE/PISTE PRECEDENT/SUIVANT
Appuyez sur PREV (30d) pour passer à la vidéo / chapitre précédent ou appuyez sur NEXT (30e) pour
passer à la vidéo / chapitre suivant.
TW 7005
UTILISATION DE L’ENTRÉE USB/SD
AVERTISSEMENT: insérez la carte périphérique SD/USB uniquement lorsque le lecteur. Une fois
inséré, allumer le lecteur.
Si vous insérez un lecteur / SD USB activé, peuvent ne pas être reconnu par l’appareil, puis arrêter
de travailler.
1. Branchez le périphérique USB au port USB(15) ou insérer une carte SD dans la SD(14).
2. Allumez le lecteur.
3. Appuyez sur la touche MODE(4) sur la télécommande pour sélectionner l’entrée USB. ou SD
4. Le lecteur lira automatiquement les fichiers contenus dans le périphérique connecté.
Remarque: Le lecteur peut ne pas supporter certains appareils avec port USB, cela est dû à l’incompatibilité de certains processeurs.
Pour éviter d’éventuels dommages auditifs, limiter le temps d’écoute à volume élevé.
INFORMATIONS AUX UTILISATEURS
conformément au décret législatif n ° 49 du 14 Mars, 2014
“La mise en œuvre de la directive 2012/19 / UE relative aux déchets d’équipements électri-
ques et électroniques (DEEE)”
Ce symbole de poubelle sur roues sur le produit indique que, à la fin de sa durée de vie doit être collecté
séparément des autres déchets. L’utilisateur doit donc prendre le contrôle à distance intègre les éléments
essentiels qui ont obtenu à sa vie dans les centres de collecte différenciés appropriés pour les déchets élec-
troniques et électro-technique, ou le retourner chez le concessionnaire lors de l’achat d’un nouvel appareil
de un à un, ou une à zéro pour un équipement ayant le côté plus long de moins de 25 cm. collecte séparée
tueuse de l’environnement contribue à éviter les effets négatifs sur l’environnement et la santé humaine et
favorise le recyclage des matériaux qui composent le produit. le dumping illégal du produit par l’utilisateur
PAG _30
appropriée pour l’équipement mis hors service pour le recyclage, le traitement et l’élimination respec-
l’application des sanctions administratives prévues par le décret législatif n. Décret législatif n ° 49 du 14
de type équivalent, en termes
substitutions
Mars 2014.
Page 31
QUICK REFERENCE - FRANÇAIS
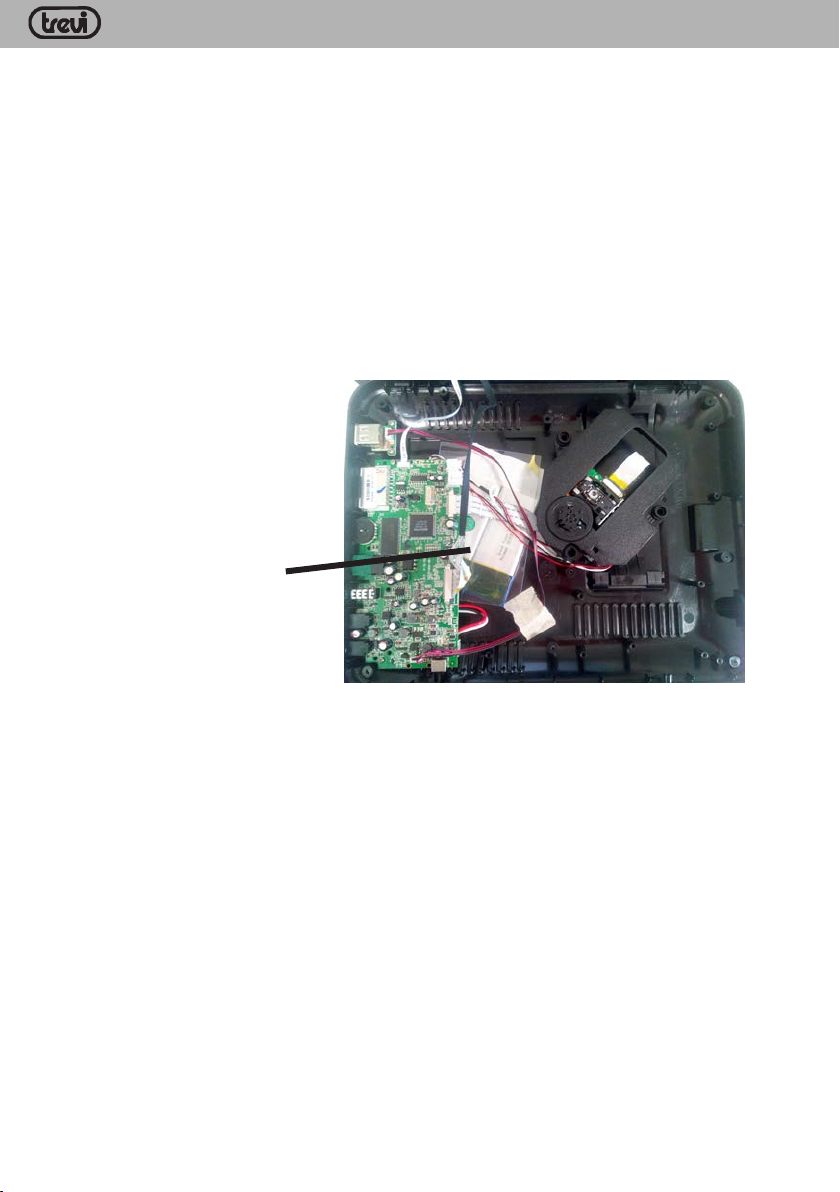
NOTE D’INFORMATION RELATIVE À L’ENLÈVEMENT ET L’ÉLIMINATION DES PILES
Attention : Cette opération doit être effectuée uniquement par des opérateurs qualifiés!
PROCÉDURE D’ENLÈVEMENT DE LA BATTERIE
Attention: Danger d’explosion si la batterie est remplacée de façon incorrecte. Remplacer
uniquement avec le même type ou équivalent.
Utiliser exclusivement en l’absence de raccordement de l’appareil au réseau électrique!
Débranchez l’appareil du secteur!
1. Enlevez les vis qui bloquent la partie inférieure de meuble ;
2. Identifiez la batterie indiquée par la flèche dans la figure;
3. Débranchez-la pour l’enlever.
Aucune batterie épuisée doit être éliminée avec les déchets domestiques, ou jetée dans le feu ou l’eau.
Tout type de batterie épuisée doit être recyclée ou remise auprès de décharges spécialisées de collecte.
BATTERIE POUR RETIRER
TW 7005
PAG _31
Page 32

QUICK REFERENCE - DEUTSCH
TW 7005
VERWENDUNG UND AUFLADUNG DER BATTERIE
Diese DVD benutzt eine aufladbare Lithiumbatterie. Nach vollständiger Aufladung wird sie ohne Anschluss
an eine Steckdose funktionieren.
Das mitgelieferte Netzgerät ist für Wechselstrom (110/240V~ 50/60Hz) geeignet.
Die Batterie nur bei abgeschaltetem Player und nur in Innenräumen aufladen.
1. Das Netzgerät an die Buchse für die Netzversorgung (9) und den Stecker an eine Steckdose anschließen.
HINWEIS: Nur das mitgelieferte Netzgerät verwenden. Andere Geräte könnten unterschiedliche Polungen und/oder Spannungen aufweisen.
2. Der Indikator Akkuladestatus auf der Vorderseite wird rot dargestellt. Weiterhin die Ladeanzeige grün
angezeigt.
Die Abklingzeit Schnellladung Modus (Spieler wird ausgeschaltet) ist ca. 3/4 Stunden.
Eine voll aufgeladener Akku Autonomie des Lesers ist ca. 1,5 Stunden, abhängig von der DVD.
EIN-/AUSSCHALTEN
1. Um den Player einzuschalten, den Schalter OFF/ON(2) auf die Position ON stellen.
2. Um den Player auszuschalten, den Schalter OFF/ON(2) auf die Position OFF stellen.
ANWENDBARE FUNKTIONEN BEIM ABSPIELEN BELIEBIGER
ABSPIELGERÄTE
LAUTSTÄRKEREGULIERUNG
E ‘kann die Lautstärke mit dem Potentiometer erhöhen/verringern (13) auf dem Player oder von der VOL+(25)
und VOL-(24) auf der Fernbedienung.
MUTE-FUNKTION
Mit dieser Funktion kann der Ton des Players vollständig ausgeschaltet werden.
1. Die Taste MUTE (26) der Fernbedienung drücken. Das Symbol der “MUTE” -Funktion wird auf dem
Bildschirm angezeigt und der Ton wird ausgeschaltet.
2. Die Taste MUTE (26) der Fernbedienung nochmal drücken, um den Ton wieder einzuschalten.
WIEDERGABE EINER CD/DVD
Die Bedienelemente der Fernbedienung beziehen sich auch auf die des Players, soweit nicht anders
angegeben.
WIEDERGABE EINER CD/DVD
1. Schalten Sie den Player.
2. Öffnen Sie das CD-Fach, indem Sie den DVD/CD-Auswurftaste (1)
3. Legen Sie eine DVD/CD Disc mit dem Titel nach oben zeigen.
4. Schließen Sie das Disc-Fach, zeigt der Bildschirm “Laden”, um die Disc-Lade anzuzeigen.
5. Die DVD/CD automatisch abgespielt.
ABBRECHEN DER WIEDERGABE
1. Drücken Sie die Taste einmal, STOP (27), um die Wiedergabe zu unterbrechen.
2. Drücken Sie die Taste erneut STOP (27), um die Wiedergabe vollständig zu stoppen.
3. Drücken Sie die PLAY / PAUSE/; (23), um die Wiedergabe der Disc von Anfang an wieder aufzunehmen.
SCHNELLSUCHLAUF
1. Drücken Sie FWD (30c), um schnell vorwärts zu Bildern.
2. Drücken Sie die REV (30b), um schnell wieder drehen Sie die Bilder.
3. Bei jedem Drücken der Taste erhöht sich die Geschwindigkeit.
4. Die numerischen Anzeigen auf dem Bildschirm neben dem Symbol - zeigen die Geschwindigkeit
PAG _32
Page 33
QUICK REFERENCE - DEUTSCH
Per evitare possibili danni all’udito, limitare il tempo di ascolto a volumi elevati.
To avoid possible hearing damage, limit the time listening at high volumes
Pour éviter d’éventuels dommages auditifs, limiter le temps d’écoute à volume élevé.
(x2 - x4 - x8 - x16 - x32).
5. Um zur normalen Wiedergabe drücken Sie die PLAY / PAUSE /;(23).
SPRUNG ZUM VORIGEN/NÄCHSTEN VIDEO/KAPITEL/STÜCK
Drücken PREV (30d), um zum Video / vorigen Kapitel oder drücken NEXT (30e) zu bewegen, um zu
dem Video/ nächsten Kapitel zu bewegen.
TW 7005
VERWENDUNG VON USB/SD-EINGÄNGEN
ACHTUNG: Das USB-/SD-Gerät nur bei abgeschaltetem Player einstecken. Nach dem Einstecken
den Player einschalten.
Wird das USB-/SD-Gerät bei eingeschaltetem Player eingesteckt, besteht die Möglichkeit, dass es von
der Einheit nicht erkannt wird und deshalb nicht funktioniert.
1. Schließen Sie das USB-Gerät an den USB(15) oder eine SD-Karte in den SD(14).
2. Schalten Sie den Player.
3. Drücken Sie die MODE(19) auf der Fernbedienung, um den USB-Eingang zu wählen. oder SD-
4. Der Player wird automatisch die in dem angeschlossenen Gerät enthaltenen Dateien.
Hinweis: Es besteht die Möglichkeit, dass der Player einige Vorrichtungen mit USB-Anschluss nicht
unterstützt. Dies ist auf die Inkompatibilität einiger Prozessoren zurückzuführen.
Um Hörschäden zu vermeiden, begrenzen Sie die Zeit bei hoher Lautstärke zu hören.
INFORMATIONEN FUR DIE NUTZER
gemäß Gesetzesdekret Nr 49 von 14, März 2014
“Die Umsetzung der Richtlinie 2012/19 / EU über die Entsorgung von Elektro- und Elektro-
nik-Altgeräte (WEEE)”
Dieses Mülleimers Symbol auf dem Produkt zeigt an, dass muss am Ende seines Lebens von anderen Abfäl-
gung trägt dazu bei, die Umwelt und die menschliche Gesundheit negative Auswirkungen zu vermeiden und
begünstigt das Recycling der Materialien das Produkt zusammengesetzt. Illegal Dumping des Produkts durch
die Anwendung von Verwaltungssanktionen erklärte in Gesetzesverordnung Nr. Dekr 49 von 14. März 2014.
len getrennt gesammelt werden. Der Benutzer muss daher nehmen die Fernbedienung die wesentlichen
Komponenten integriert, die für elektronische und elektrotechnische Abfälle in die entsprechenden differenzierten Sammelstellen zu seinem Leben bekam, oder es an den Händler zurückgeben, wenn ein neues
von 12.59 oder eine für Geräte mit längeren Seite von weniger als 25 cm auf Null. Die angemessene,
getrennte Sammlung für die stillgelegte Anlagen für Recycling, Aufbereitung und umweltgerechte Entsor-
Gerät gleichwertiger Art Kauf in Bezug auf
den Benutzer Entails
PAG _33
Page 34
QUICK REFERENCE - DEUTSCH
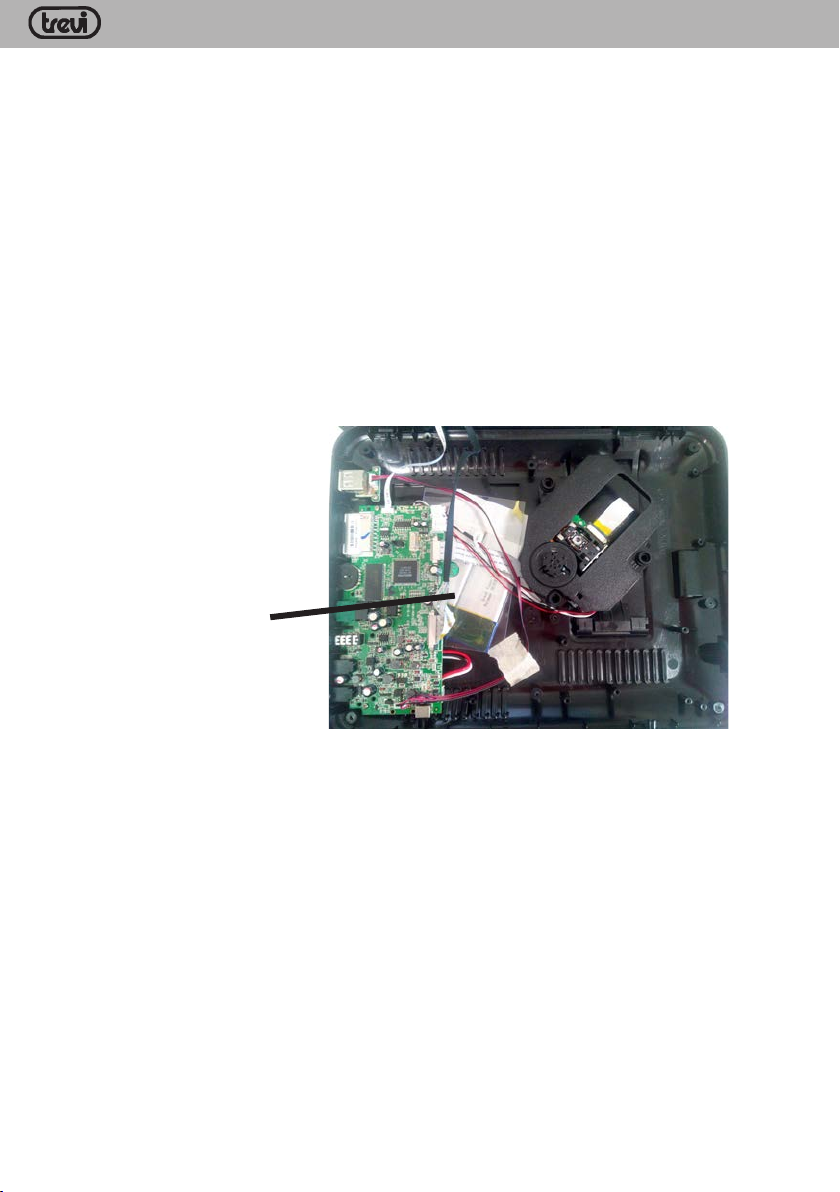
INFORMATIONEN ZUR ENTFERNUNG UND ENTSORGUNG DER BATTERIEN
Achtung: Dieser Arbeitsvorgang darf ausschließlich durch technisches Fachpersonal vorgenommen werden!
VORGEHENSWEISE FÜR DIE ENTFERNUNG DER BATTERIE
Warnung: Explosionsgefahr , wenn die Batterie nicht ordnungsgemäß ausgetauscht wird. Ersatz
nur mit dem gleichen oder gleichwertigen Typ.
Betreiben Sie ausschließlich in Abwesenheit das Gerät an das Stromnetz zu verbinden!
Die Vorgänge dürfen nur dann vorgenommen werden, wenn das Gerät vom Stromnetz abgenommen wurde!
1. Die Schrauben entfernen, mit denen die Unterseite befestigt ist;
2. Die Batterie wird in der Zeichnung durch den Pfeil gekennzeichnet;
3. Die Batterie abnehmen und entfernen.
Leere Batterien dürfen, gleichgültig, um welchen Batterietyp es sich handelt, keinesfalls über den Hausmüll,
durch Verbrennung oder im Wasser entsorgt werden.
Alle Altbatterien müssen recycelt oder über entsprechende Sammelstellen entsorgt werden.
TW 7005
AKKU ZU ENTFERNE
PAG _34
Page 35

QUICK REFERENCE - ESPAÑOL
TW 7005
UTILIZACIÓN Y RECARGA DE LA BATERÍA
Este DVD utiliza una batería recargable de litio en su interior; una vez completada la carga, funcionará sin
necesidad de estar conectado a una toma de alimentación.
El alimentador suministrado con el aparato funciona con corriente 110/240 V~ 50/60 Hz.
Recargue la batería sólo con el reproductor apagado y en interiores.
1. Introduzca el enchufe del alimentador en la toma de alimentación externa (9) y el enchufe principal en
una toma de corriente.
NOTA: utilice únicamente el alimentador suministrado con el aparato, ya que dispositivos distintos
podrían tener polaridades y/o tensiones diferentes.
2. El indicador de estado de carga de la batería en la parte delantera cambiará a rojo. Para continuar el
indicador de carga se volverá verde.
El modo de carga rápida de enfriamiento (reproductor está apagado) es de aproximadamente 3/4 horas. Una
autonomía de batería completamente cargada del lector es de 1,5 horas dependiendo del DVD.
ENCENDIDO / APAGADO
1. Lleve el interruptor OFF/ON(2) a la posición ON para encender el reproductor.
2. Lleve el interruptor OFF/ON(2) a la posición OFF para apagar el reproductor.
FUNCIONES APLICABLES A LA ESCUCHA DE CUALQUIER FUENTE
AJUSTE DEL VOLUMEN
E ‘puede aumentar/disminuir el volumen con el potenciómetro (13) de la unidad o por el VOL + (25) y VOL
(24) en el control remoto.
FUNCIÓN MUTE
Permite silenciar todo el audio en el reproductor.
1. Pulse el botón MUTE(26) en el control remoto, la pantalla muestra el símbolo MUTE y el sonido se silencia.
2. Pulse el botón MUTE(26) en el control remoto de nuevo para restaurar el sonido, aparece en la pantalla
durante unos segundos el MUTE OFF.
REPRODUCCIÓN DE UN DISCO CD/DVD
Salvo que se indique lo contrario, los mandos del mando a distancia también hacen referencia a los
mandos del reproductor.
REPRODUCCIÓN DE UN DISCO CD/DVD
1. Encienda el reproductor.
2. Abra la bandeja del disco utilizando el botón de expulsión (1).
3. Inserte un disco DVD/CD con los títulos boca arriba.
4. Cierre la bandeja del disco, la pantalla muestra “Carga” para indicar la carga de discos.
5. El DVD/CD se reproduce automáticamente.
PARADA DE LA REPRODUCCIÓN
1. Pulse el botón una vez STOP (27) para pausar la reproducción.
2. Pulse la tecla de nuevo STOP (27) para detener la reproducción por completo.
3. Pulse el PLAY/ PAUSA /;(23) para reanudar la reproducción del disco desde el principio.
BÚSQUEDA RÁPIDA
1. Pulse FWD (30c) para avanzar rápidamente las imágenes.
2. Pulse el REV (30b) para encender las imágenes rápidamente.
3. Cada vez que pulse el botón, la velocidad aumenta.
PAG _35
Page 36
QUICK REFERENCE - ESPAÑOL
Per evitare possibili danni all’udito, limitare il tempo di ascolto a volumi elevati.
To avoid possible hearing damage, limit the time listening at high volumes
Pour éviter d’éventuels dommages auditifs, limiter le temps d’écoute à volume élevé.
Um Hörschäden zu vermeiden, begrenzen Sie die Zeit bei hoher Lautstärke zu hören.
4. Los indicadores numéricos en la pantalla al lado del símbolo - indican la velocidad (x2 - x4 - x8 x16 - x32).
5. Para reanudar la reproducción normal presione el PLAY/ PAUSA /;(23).
SALTO AL VÍDEO/CAPÍTULO/PISTA ANTERIOR/SIGUIENTE
Presione PREV (30d) para desplazarse al video/capítulo anterior o presione NEXT (30e) para pasar a
la de vídeo/siguiente capítulo.
TW 7005
USO DE LOS PUERTOS USB
ATENCIÓN: conecte el dispositivo USB/SD sólo y exclusivamente con el reproductor apagado. A
continuación, encienda el reproductor.
Si conecta un dispositivo USB/SD con el reproductor encendido, la unidad podría no reconocerlo y
por tanto no funcionar.
1. Raccordez el dispositivo USB puerto del USB(15) o inserte y cuarto de la Tarjeta SD SD(14).
2. Encienda el reproductor. Pulso MODE(19) en el control remoto el select Para La entrada USB. o SD
4. El reproductor reproducirá automáticamente los Archivos Contenidos en el dispositivo Conectado
Nota: el reproductor podría no ser compatible con algunos dispositivos equipados con puerto USB,
debido a la incompatibilidad de los procesadores.
Para evitar posibles daños a la audición, limitar el tiempo de escuchar a un volumen alto.
INFORMACION A LOS USUARIOS
“Aplicación de la Directiva 2012/19 / UE sobre residuos de aparatos eléctricos y electrónicos
trónicos y electrotécnicos, o devolverlo al distribuidor al comprar un nuevo aparato de tipo equivalente, en
de uno a uno, o uno a cero para el equipo que tiene lado más largo de menos de 25 cm. la recogida selec-
tiva apropiado para el equipo fuera de servicio para su reciclaje, tratamiento y eliminación ambientalmente
compatible ayuda a prevenir el impacto negativo sobre el medio ambiente y la salud, favoreciendo el recicla-
PAG _36
Este símbolo de contenedor de ruedas en el producto indica que al final de su vida útil debe ser recogido
separadamente de los demás residuos. El usuario debe, por lo tanto, tomar el control remoto integra los
componentes esenciales que llegaron a su vida útil a los centros adecuados de recogida de residuos elec-
je de los materiales que componen el producto. El vertido ilegal del producto por los usuarios conlleva
la aplicación de las sanciones administrativas establecidas en el Decreto Legislativo n. Decreto Legislativo
el marco del Decreto Legislativo N ° 49 del 14 de marzo 2014
(RAEE)”
términos
N° 49 de 14 de marzo de 2014.
Page 37
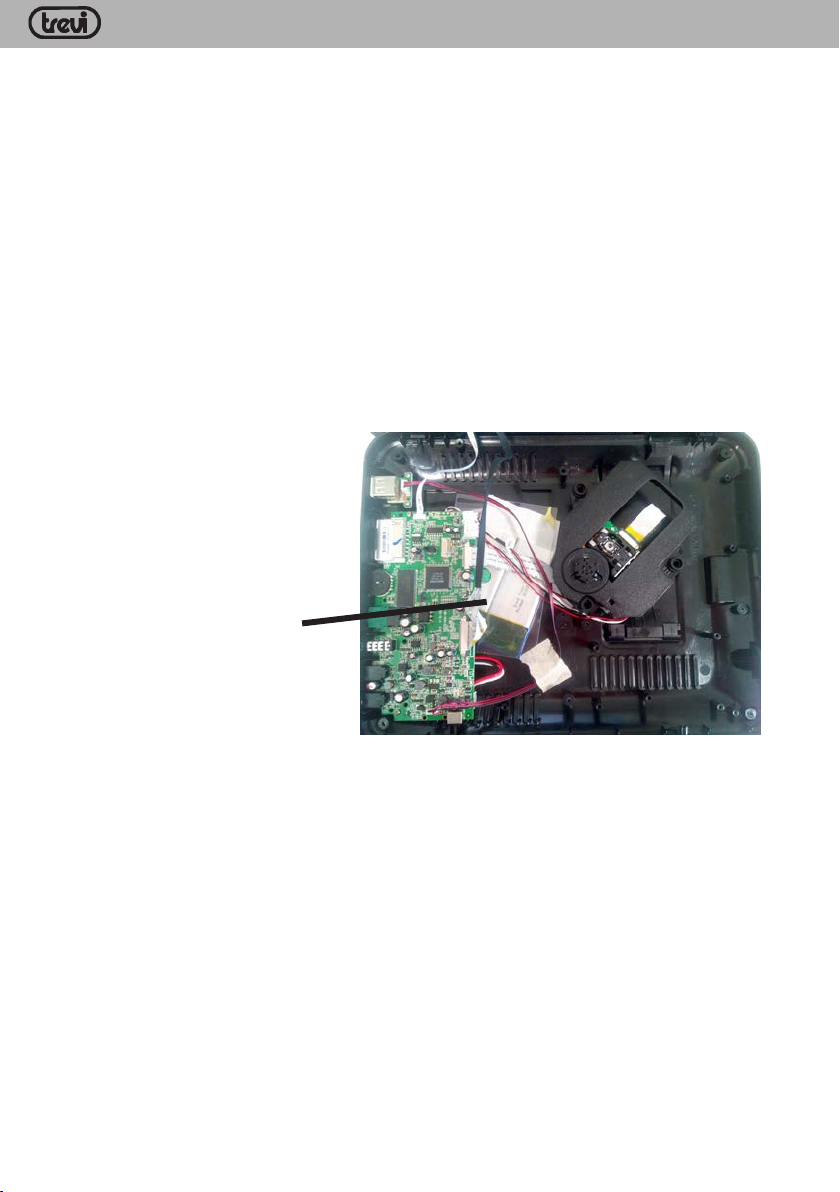
QUICK REFERENCE - ESPAÑOL
NOTA INFORMATIVA SOBRE LA REMOCIÓN Y LA ELIMINACIÓN DE LAS BATERÍAS
Atención: ¡Esta operación debe ser realizada exclusivamente por personal técnico especializado!
PROCEDIMIENTO PARA LA REMOCIÓN DE LA BATERÍA
Advertencia: Peligro de explosión si la batería se sustituye de forma incorrecta. Reemplace sólo
con el mismo tipo o equivalente.
Operar exclusivamente en ausencia de conectar el aparato a la red!
1. Quite los tornillos que cierran la parte inferior del aparato;
2. Individue la batería indicada por la flecha en la figura;
3. Desconéctela y retírela.
No eche ningún tipo de batería, una vez agotada, en los residuos domésticos, en el fuego o en el agua.
Las baterías agotadas deben ser recicladas o eliminadas en los centros de recogida específicos.
TW 7005
BATERÍA: REMOVER
PAG _37
Page 38

NOTE
TW 7005
PAG _38
Page 39

NOTE
TW 7005
PAG _39
Page 40
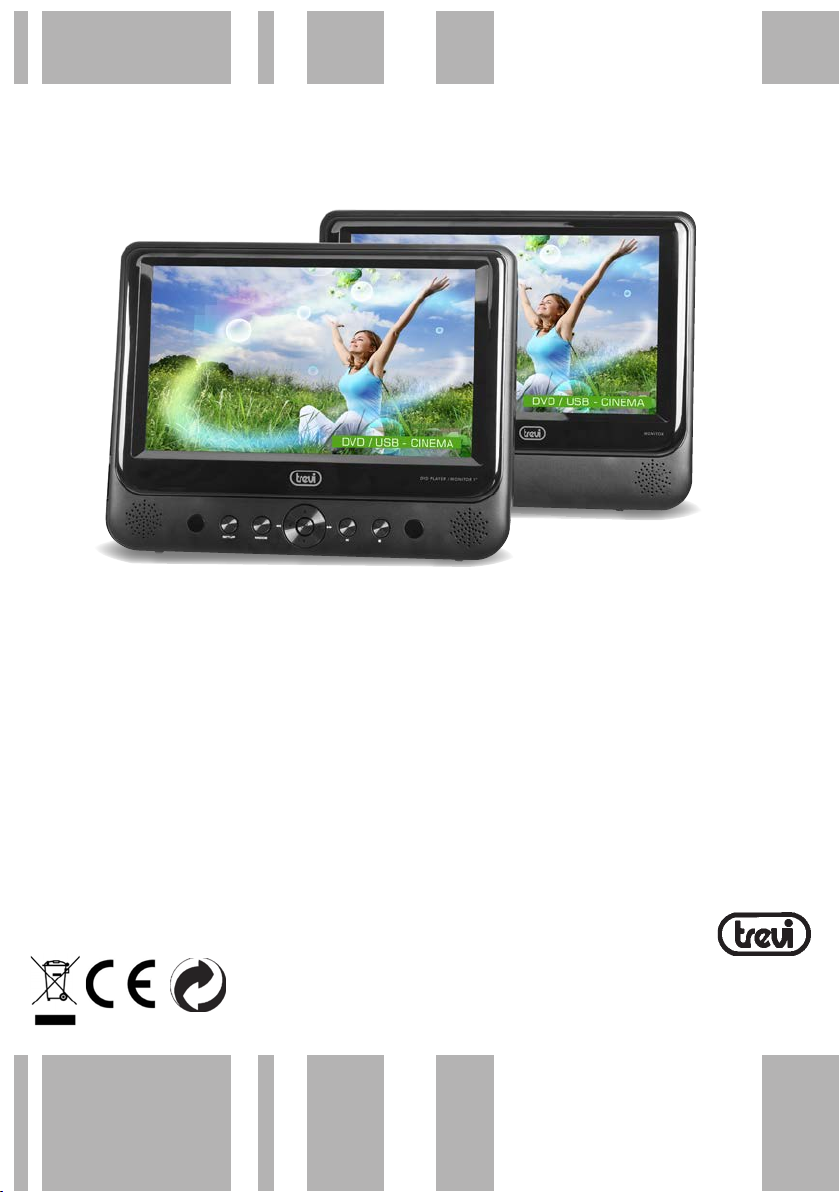
Made in China
TREVI S.p.A.
Strada Consolare Rimini-San Marino, 62 Rimini (RN) Italy
Tel. 0541-756420 - Fax 0541-756430
E-mail: [email protected] - www.trevi.it
 Loading...