

Page 1
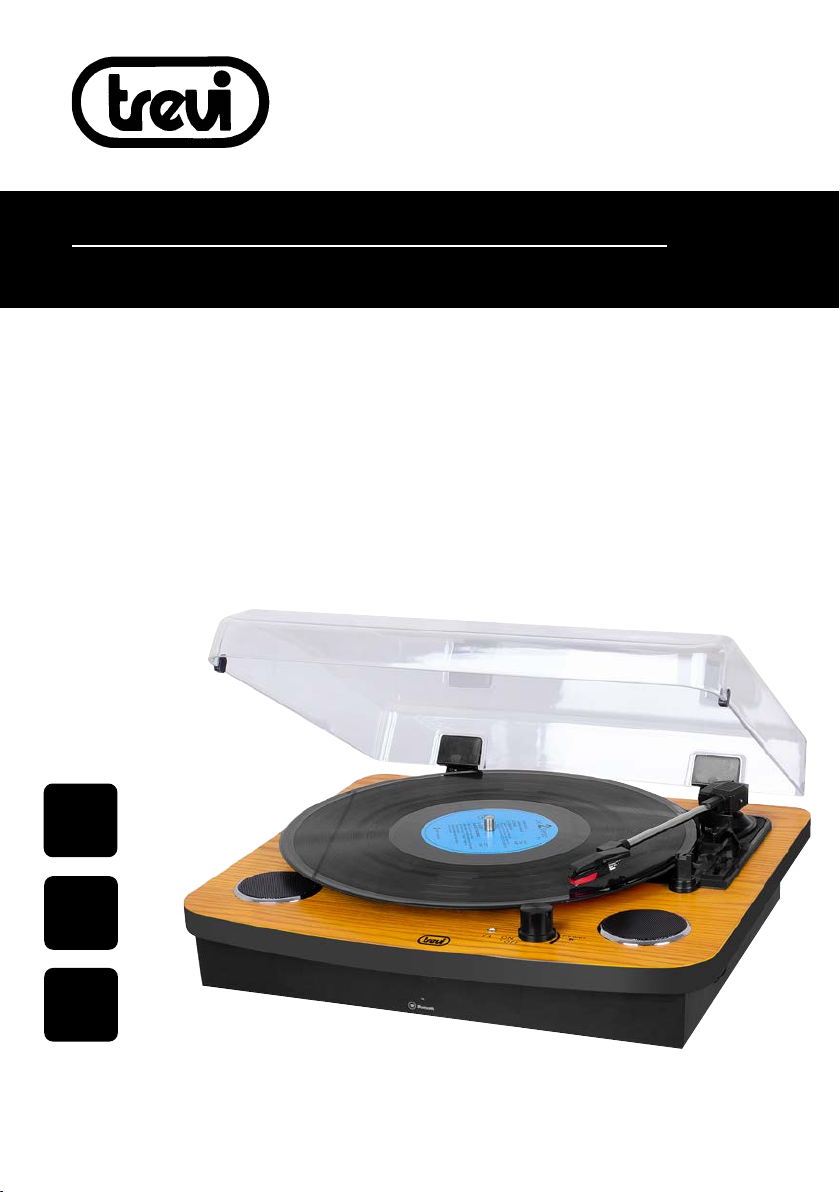
TT 1022 BT
Guida d’uso
User guide
SISTEMA STEREO GIRADISCHI CON BLUETOOTH
Manuale d'uso e collegamento
STEREO SYSTEM TURNTABLE WITH BLUETOOTH
Connection and Operation Manual
TOURNE-DISQUE STÉRÉO AVEC BLUETOOTH
Mode d'emploi et branchement
STEREOANLAGE PLATTENSPIELER MIT BLUETOOTH
Gebrauchs- und Anschlusshandbuch
SISTEMA ESTÉREO TOCADISCOS Y BLUETOOTH
Manual para el uso y la conexión
GIRADISCHI/
TURNTABLE
BT
FUNCTION
AUX-IN
IT - Informazioni nella tua lingua ed aggiornamenti su questo prodotto visita WWW.TREVI.IT
UK - Informations in yout language and updates of this product visit WWW.TREVI.IT
FR - Les informations contenue dans votre langue et mises a jour de ce produit visitez le site WWW.TREVI.IT
DE - Informationen in Ihrer Sprache und updates von diesem Produkt nden sie WWW.TREVI.IT
ES - Informacion en su idioma Y actualizaciones de este producto visite WWW.TREVI.IT
Page 2
WARNING!
TT 1022 BT
ATTENZIONE
RISCHIO DI SCOSSE
ELETTRICHE!
NON ESPORRE A PIOGGIA E
UMIDITÀ
ATTENZIONE: NON APRITE L'APPARECCHIO. ALL'INTERNO
NON VI SONO COMANDI MANIPOLABILI DALL'UTENTE NE
PARTI DI RICAMBIO. PER TUTTE LE OPERAZIONI DI SERVIZIO RIVOLGERSI AD UN CENTRO DI ASSISTENZA AUTORIZZATO TREVI
WARNING!
DANGER OF ELECTRIC SHOCK!
DO NOT EXPOSE TO
RAIN OR HUMIDITY
WARNING: DO NOT OPEN THE SET. NEITHER CONTROLS OR
SPARE PARTS TO BE USED BY THE USER ARE TO BE FOUND
INSIDE IT. APPLY TO AUTHORISED TREVI CENTERS FOR SERVICE
OPERATIONS.
ATTENTION
RISQUE DE DECHARGES
ELECTRIQUES
NE PAS EXPOSER A LA PLUIE
ET A L’HUMIDITE
ATTENTION: NE PAS OUVRIR L’APPAREIL, A L’INTERIEUR IL N’Y
A PAS DE COMMANDES A MANIPULER PAR L’UTILISATEUR OU
DE PIECES DE RECHANGE. POUR TOUTES LES OPERATIONS DE
SERVICE IL FAUT S’ADRESSER A UN SERVICE D’ASSISTANCE
AUTORISE TREVI.
ATENCION
PELIGRO DE CHOQUES
ELECTRICOS
NO EXPONER A LLUVIA Y
HUMEDAD
ATENCION: NO ABRIR EL APARATO, EN SU INTERIOR NO HAY
MANDOS QUE PUEDAN SER MANIPULADOS POR EL USUARIO
NI PARTES DE REPUESTO. PARA TODAS LAS OPERACIONES DE
SERVICIO DIRIGIRSE A UN CENTRO DE ASISTENCIA AUTORIZADO TREVI.
ACHTUNG
GEFAHR ELEKTRISCHER
NICHT DER FEUCHTIGKEIT UND
ACHTUNG: DAS GERÄT NICHT ÖFFNEN. IM INNERN BEFINDEN
SICH KEINE VOM BENUTZER SELBST INSTANDSETZBAREN TEILE
UND AUCH KEINE ERSATZTEILE. FÜR JEGLICHE SERVICEARBEITEN, WENDEN SIE SICH BITTE AN EINE TREVI AUTORISIERTEN
KUNDENDIENSTSTELLE.
WIRES CONNECTIONS TO A UK THREE-PIN PLUG
The wires in this mains lead are coloured in accordance with the following wiring codes:
Blue: ....................................................................Neutral
Brown: ................................................................ Live
The wires in this mains lead must be connected to the terminals in the plug as follows:
Blue wire: ..........................................................N or Black
Brown wire: ...................................................... L or Red
Neither wire is to be connected to the earth (E or W) terminal of three-pin plug.
Should the fuse fail in the plug remove the plug form the wall socket and replace the
fuse with a 3 Amp. ASTA approved BS 1362 fuse.
SCHLÄGE
DEM REGEN AUSSETZEN
UK PLUG ONLY
Per evitare possibili danni
all’udito, limitare il tempo di
ascolto a volumi elevati.
To avoid possible hearing
damage, limit the time listening at
high volumes.
Pour éviter d’éventuels
dommages auditifs, limiter le
temps d’écoute à volume élevé.
Um Hörschäden zu vermeiden,
begrenzen Sie die Zeit bei hoher
Lautstärke zu hören.
Para evitar posibles daños a la audición, limitar el tiempo de escuchar a
un volumen alto.
2
Page 3
TT 1022 BTDESCRIZIONE/ DESCRIPTION
11
10
9
5
8
7
6
5
4
1 2 3
12 13 14 15
3
Page 4
ITALIANO
TT 1022 BT
VOLTAGGIO PERICOLOSO
Questo simbolo riportato sul retro dell'apparecchio ed in
questo manuale segnala la presenza all'interno di questo
apparecchio di componenti operanti ad alta tensione,
non apritelo per evitare il rischio di scosse elettriche.
ATTENZIONE
Questo simbolo riportato sul retro dell'apparecchio ed
in questo manuale indicano la presenza sugli stessi di
importanti istruzioni per la sicurezza d'uso. Leggetele
attentamente prima di utilizzare l'apparecchio.
NOTE D'USO
Questo apparecchio è uno strumento elettronico di alta precisione, evitate quindi di utilizzarlo nei seguenti casi:
• Vicino a campi magnetici o a fonti di calore come caloriferi e stufe.
• In luoghi molto umidi come stanze da bagno, piscine, ecc... o in luoghi polverosi o soggetti a forti vibrazioni.
• Posizionate l'apparecchio in modo che ai suoi lati ci sia sempre abbastanza spazio per la libera circolazione di
aria (almeno 5cm).
• Non ostruite le feritoie di ventilazione.
• Se dei liquidi penetrano all’interno dell’apparecchio scollegare immediatamente la spina dalla presa e portare
l’apparecchio al più vicino centro assistenza autorizzato TREVI.
• Controllare sempre che i cavi di alimentazione e di collegamento siano installati correttamente.
• L’adattatore di corrente deve essere collegato a una presa vicina al dispositivo e deve essere facilmente accessibile.
• Se si nota un calore eccessivo sul dispositivo o sull’adattatore di corrente, scollegare immediatamente la spina
dalla presa di corrente principale.
• Non tirare il cavo di alimentazione
• Nessuna sorgente di amma nuda, quali candele accese, dovrebbe essere posta sull’apparecchio.
• L’apparecchio non deve essere esposto a stillicidio o a spruzzi d’acqua e nessun oggetto pieno di liquido, quali
vasi, deve essere posto sull’apparecchio.
• Conservare il presente manuale per future referenze.
CURA E MANUTENZIONE
Per la pulizia si consiglia l’uso di un panno morbido, leggermente inumidito. Evitate solventi o sostanze abrasive.
IMPORTANTE
La buona costruzione di questo apparecchio ne garantisce per lungo tempo il perfetto funzionamento. Se tuttavia
dovesse presentarsi qualche inconveniente, sarà opportuno consultare il più vicino Centro Assistenza autorizzato.
TREVI persegue una politica di continua ricerca e sviluppo. Pertanto i prodotti possono presentare caratteristiche
diverse da quelle descritte.
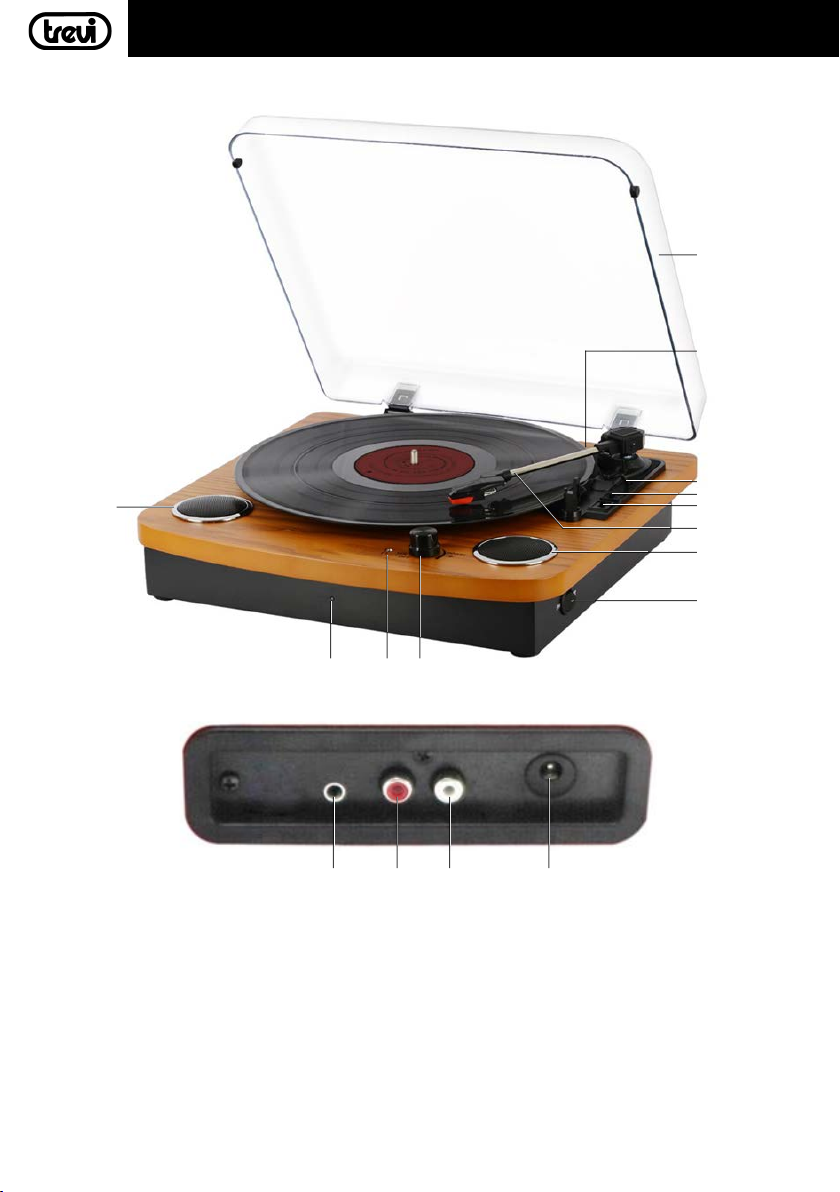
DESCRIZIONE COMANDI UNITÀ
1. Indicatore Led funzione Bluetooth
2. Ingresso cufe
3. Manopola accensione/spegnimento e regolazione
Volume
4. Selettore funzione Phone - Bluetooth
5. Altoparlanti
6. Braccio testina giradischi
7. Selettore velocita' di rotazione (33/45/78 giri/minuto)
8. Selettore Auto-Stop
9. Leva sollevamento/abbassamento braccio testina
giradischi
10. Adattatore per dischi 45 giri
11. Sportello protezione giradischi
12. Ingresso AUX-IN
13. Uscita LINE OUT (Canale destro)
14. Uscita LINE OUT (Canale sinistro)
15. Presa di alimentazione
ALIMENTAZIONE
Inserire la spina dell’alimentatore in dotazione nella presa di alimentazione (15) e collegare l’alimentatore in una
presa di corrente 110-230V~ 50/60Hz.
ACCENSIONE/SPEGNIMENTO/VOLUME
1. Ruotare la manopola (3) in senso orario per accendere l'apparecchio; portare il selettore funzioni (4) sulla posizione
PHONO o BLUETOOTH;
2. Ruotare la manopola (3) in senso anti orario no ad udire un "clic", per spegnere l'apparecchio;
3. Ruotare la maopola (3) per regolare il volume.
4
Page 5

TT 1022 BTITALIANO
COLLEGAMENTO AD AMPLIFICATORE O HI-FI (se richiesto)
USCITA LINE OUT
Sebbene sia possibile ascoltare il giradischi utilizzando i suoi altoparlanti incorporati, è possibile collegarlo, anche,
ad un vostro sistema Hi-Fi o ad un amplicatore esterno. Collegare l'uscita LINE OUT (L(14)/R(13)) all'ingresso audio
Line-In del vostro sistema Hi Fi o di un amplicatore utilizzando un cavo RCA (non fornito).
FUNZIONAMENTO GIRADISCHI
1. Portare il selettore (4) sulla posizione PHONO;
2. Aprire lo sportello giradischi (11);
3. Selezionare la corretta velocità del disco (33/45/78 giri) tramite il selettore velocità giradischi (7);
4. Posizionare il disco sul piatto. Utilizzare l'adattatore in dotazione (10) nel caso il disco sia un 45 giri;
5. Liberare il braccio dal gancio di blocco; alzare il braccio utilizzando la leva (9) e posizionare la puntina sulla prima
traccia del disco, utilizzare la leva (9) per abbassare molto delicatamente la testina sul disco.
NOTE:
- Rimuovere la protezione della puntina giradischi prima dell'utilizzo.
- Assicurarsi che il braccio sia bloccato dall'apposito fermo prima e dopo l'utilizzo.
- Alcuni dischi possono interrompersi prima della ne, poiché l'area del disco non coincide con le impostazioni di questo
apparecchio. In tal caso, posizionare il selettore AUTO STOP (8) su OFF. In questo modo, il disco verrà riprodotto no
alla ne, ma non si arresterà automaticamente.
CONSIGLI:
- Consigliamo di pulire i dischi con un panno antistatico o una apposita spazzola per dischi per trarne la massima
qualità audio e per farli durare.
- Segnaliamo, inoltre, che per lo stesso motivo è opportuno sostituire periodicamente lo stilo (ogni 250 ore circa).
- Spolverare lo stilo di tanto in tanto utilizzando una spazzola molto morbida imbevuta di alcool (spazzolando
delicatamente da dietro a davanti la testina facendo molta attenzione a non danneggiarla).
FUNZIONE BLUETOOTH
1. Dopo aver acceso l'apparecchio portare il selettore (4) sulla posizione BLUETOOTH, l'indicatore Led (1) comincerà
a lampeggiare;
2. Attivare la funzione Bluetooth sul dispositivo esterno da accoppiare e avviare la ricerca dei dispositivi;
3. Selezionare il dispositivo "TT 1022 BT" e inserire la password "0000" se richiesto;
4. Ad accoppiamento avvenuto si udirà un suono di conferma e la luce dell'indicatore Led (1) rimarrà ssa;
5. Utilizzare i tasti dell'apparecchio esterno per gestire le funzioni.
PRESA CUFFIE
Inserire il jack della cufa nella presa (2), gli altoparlanti verranno disabilitati.
INGRESSO AUX-IN
Collegare un cavo con presa Jack 3,5mm alla presa AUX IN (12) e l’altra estremità all’apparecchio esterno.
CARATTERISTICHE TECNICHE
Alimentazione: .................................................. 5V 1A
Consumo: .................................................. 3W
Dimensioni: .................................................. 375x 355x 120mm (L x P x A)
INFORMAZIONI AGLI UTENTI ai sensi del Decreto Legislativo N° 49 del 14 Marzo 2014
“Attuazione della Direttiva 2012/19/UE sui riuti di apparecchiature elettriche ed elettroniche (RAEE)”
Il simbolo del cassonetto barrato riportato sull’apparecchiatura indica che il prodotto alla ne della propria vita utile
deve essere raccolto separatamente dagli altri riuti. L’utente dovrà, pertanto, conferire l’apparecchiatura integra dei
componenti essenziali giunta a ne vita agli idonei centri di raccolta differenziata dei riuti elettronici ed elettro-
tecnici, oppure riconsegnarla al rivenditore al momento dell’acquisto di nuova apparecchiatura di tipo equivalente,
in ragione di uno a uno, oppure 1 a zero per le apparecchiature aventi lato maggiore inferiore a 25 cm. L’adeguata
raccolta differenziata per l’avvio successivo dell’apparecchiatura dimessa al riciclaggio, al trattamento e allo smaltimento ambientale compatibile contribuisce ad evitare possibili effetti negativi sull’ambiente e sulla salute e favorisce
il riciclo dei materiali di cui è composta l’apparecchiatura. Lo smaltimento abusivo del prodotto da parte dell’utente
comporta l’applicazione delle sanzioni amministrative di cui al D.Lgs n. Decreto Legislativo N° 49 del 14 Marzo 2014.
5
Page 6
TT 1022 BTENGLISH
DANGEROUS VOLTAGE
This symbol shown on the back of the appliance and in
this manual indicates the presence inside this appliance
of components operating at high voltage, do not open
it to avoid the risk of electric shock.
ATTENTION
This symbol on the back of the appliance and in this
manual indicate the presence on them of important
instructions for safe use. Read them carefully before
using the appliance.
NOTES ON USE
This is a precision electronic appliance; avoid using it in the following cases:
• Near magnetic elds or heat sources such as heaters and stoves.
• In very humid places such as bathrooms, swimming pools, etc... or in dusty places or places subject to strong
vibrations.
• Position the appliance so that there is always enough space on its sides for free circulation of air (at least 5cm).
• Do not obstruct the ventilation slots.
• If liquids penetrate inside the appliance, immediately disconnect the plug from the socket and take the appliance
to the nearest TREVI authorized service center.
• Always check that the power and connection cables are installed correctly.
• The power adapter must be connected to a socket close to the device and must be easily accessible.
• If you notice excessive heat on the device or on the power adapter, immediately disconnect the plug from the
main power outlet.
• Do not pull the power cord.
• No naked ame sources, such as lighted candles, should be placed on the device.
• The appliance must not be exposed to dripping or splashing water and no objects lled with liquid, such as vases,
must be placed on the appliance.
• Keep this manual for future reference.
CARE AND MAINTENANCE
Use a slightly damp soft cloth for cleaning. Do not use solvents and abrasive substances.
IMPORTANT
This device is designed for home use (not professional use). This appliance has been carefully built to ensure long-
lasting perfect performance. However, should any inconvenience occur, please contact your local authorised TREVI
Service Centre.
TREVI follows a policy of ongoing research and development. Therefore products may have different features from
those described.
CONTROLS
1. Bluetooth Led indicator
2. Headphone Input
3. Power switch/ Volume cotrol
4. Switch Function selector Phone - Bluetooth
5. Speakers
6. Tone arm
7. Speed selec tor - Three speed for choice: 33, 45, 78 rpm
8. Auto-Stop Selector
9. Tone arm lift
10. Adapter - Use this when playing 45rpm records with
cut out centres
11. Dust cover
12. AUX-IN input
13. LINE OUT socket R channel
14. LINE OUR socket L channel
15. DC power jack
POWER
Insert the plug of the adaptor supplied into the DC power socket (15) and connect the DC adaptor to a 110-230V
~ 50/60Hz socket.
POWER ON/OFF/VOLUME CONTROL
1. Turn the knob (3) clockwise to switch On the unit; set the function selector (4) to the PHONO or BLUETOOTH
position;
2. Turn the knob (3) anticlockwise until you hear a "click" to switch Off the unit;
3. Turn the knob (3) to adjust the volume.
6
Page 7

TT 1022 BTENGLISH
AMPLIFIER/ HI FI CONNECTION (if required)
LINE OUT
Whilst you can listen to your new turntable using the built in speakers you may wish to connect it to your existing
Hi Fi system. Connect the audio plugs to the Line input on your mixer or amplier using an RCA cable (not supplied).
TURNTABLE
1. Set selector switch (4) to PHONO position;
2. Open the turntable door (11);
3. Select the correct disc speed (33/45/78 turns) using the turntable speed selector (7);
4. Place the disc on the plate. Use the supplied adapter (10) if the disc is 45 turns;
5. Release the arm from the locking hook; raise the tonearm using the lever (9) and position the stylus on the rst
track of the record, use the lever (9) to very gently lower the head onto the record.
NOTES:
- Remove the turntable cap before use.
- Make sure that the arm is locked by the lock before and after use.
- Some discs may stop before the end, as the disc area does not match the settings of this unit. In this case, set the
AUTO STOP selector switch (8) to OFF. In this way, the disc will play back to the end but will not stop automatically.
ADVICE:
- We advise you to clean your records with an anti-static cloth to gain maximum enjoyment from them and to
make them last.
- We would also point out that for the same reason your stylus should be replaced periodically (approximately
every 250 hours).
- Dust the stylus from time to time using a very soft brush dipped in alcohol (brushing from back to front of the
cartridge).
BLUETOOTH FUNCTION
1. After turning on the device, turn the selector (4) to the BLUETOOTH position, the LED indicator (1) will begin to
ash;
2. Activate the Bluetooth function on the external device to be paired and start searching for devices;
3. Select the device "TT 1022 BT" and enter the password "0000" if requested;
4. Once pairing has been completed, a conrmation sound will be heard and the LED indicator light (1) will remain
steady;
5. Use the buttons of the external device to manage the functions.
HEADPHONE
Insert the headphone jack into the socket (2), the speakers will be disabled.
AUX-IN
Connect a cable with a 3.5mm jack plug to the AUX IN socket (12) and the other end to the external device.
TECHNICAL FEATURES
Power supply: .................................................. 5V 1A
Power consumption: .................................................. 3W
Dimensions: .................................................. 375x 355x 120mm (L x W x H)
Precautions for correct disposal of the product.
The symbol shown on the equipment indicates that waste must be disposed of in “separate collection” and so the
product must not be disposed of together with urban waste.
The user must take the product to special “separate waste collection centres” provided by local government, or deliver
it to the retailer against the purchase of a new product.
Separate collection of waste and subsequent treatment, recycling and disposal operations promotes the production of equipment with recycled materials and limits negative effects on the environment and on health caused by
improper handling of waste.
Illegal disposal of the product leads to the enforcement of administrative penalties.
7
Page 8
FRANÇAIS
TT 1022 BT
VOLTAGE DANGEREUX
Ce symbole apposé sur le dos de l’appareil et reproduit
dans ce manuel indique la présence d’éléments fonctionnant à haute tension à l’intérieur de cet appareil;
ne l’ouvrez pas, an d’éviter le risque de décharges
électriques.
ATTENTION
Ce symbole apposé sur le dos de l’appareil et reproduit
dans ce manuel indique la présence d’instructions importantes pour la sécurité d’emploi. Lisez-les avec attention
avant d’utiliser l’appareil.
NOTES D’EMPLOI
Cet appareil est un instrument électronique de haute précision; évitez donc de l’employer dans les cas suivants:
• A proximité de fortes sources de chaleur telles que des radiateurs ou tout appareil de chauffage.
• Dans des lieux très humides tels que des salles de bains, des piscines, etc..., dans des lieux très poussiéreux.
• Dans des lieux sujets à des fortes vibrations.
• Positionner l’appareil de façon à laisser toujours de l’espace pour la libre circulation de l’air à ses côtés (au moins 5cm).
• N’obstruez pas les fentes d’aération.
• L’adaptateur secteur doit être connecté à une prise proche de l’appareil et doit être facilement accessible.
• Si vous remarquez une chaleur excessive sur l’appareil ou l’adaptateur secteur, débranchez immédiatement la
che de la prise de courant principale.
• Ne tirez pas sur le cordon d’alimentation
• Si des substances liquides pénètrent à l’intérieur de l’appareil, débranchez immédiatement la che et apportez
l’appareil au centre d’assistance agréé TREVI le plus proche.
• Avant de mettre l’appareil en fonction, vériez toujours que les câbles d’alimentation et de connexion soient
correctement installés.
SOIN ET ENTRETIEN
Pour le nettoyage on conseille l’emploi d’un chiffon doux, légèrement imbibé. Evitez les solvants ou les substances
abrasives.
IMPORTANT
La bonne construction de cet appareil garantit pour longtemps son parfait fonctionnement. Si toutefois des inconvénients devaient se présenter, contactez le Centre d’Assistance agréé le plus proche.
TREVI poursuit une politique de recherche et de développement continus. Par conséquent, les produits peuvent
présenter des caractéristiques différentes par rapport aux données mentionnées.
CONTRÔLES
1. Indicateur LED Bluetooth
2. Entrée casque
3. Interrupteur d'alimentation/ Contrôle du volume
4. Sélecteur de fonction Phone - Bluetooth
5. Haut-parleurs
6. Bras de lecture
7. Sélecteur de vitesse - Trois vitesses au choix: 33, 45,
78 tr/min
8. Sélecteur d'arrêt automatique
9. Levée du bras de lecture
10. Adaptateur - Utilisez-le lors de la lecture de disques
45 tours avec des centres découpés
11. Couvercle anti-poussière
12. Entrée AUX-IN
13. Prise LINE OUT canal R
14. Prise LINE OUR canal L
15. Prise d'alimentation CC
PUISSANCE
Insérez la che de l'adaptateur fourni dans la prise d'alimentation CC (15) et connectez l'adaptateur CC à une prise
110-230V ~ 50/60Hz.
MARCHE/ARRÊT/CONTRÔLE DU VOLUME
1. Tournez le bouton (3) dans le sens des aiguilles d'une montre pour allumer l'appareil; réglez le sélecteur de fon-
ction (4) sur la position PHONO ou BLUETOOTH;
2. Tournez le bouton (3) dans le sens inverse des aiguilles d'une montre jusqu'à ce que vous entendiez un "clic" pour
éteindre l'appareil;
3. Tournez le bouton (3) pour régler le volume.
8
Page 9

TT 1022 BTFRANÇAIS
CONNEXION AMPLIFICATEUR/HI FI (si nécessaire)
LINE OUT
Pendant que vous pouvez écouter votre nouvelle platine vinyle à l'aide des haut-parleurs intégrés, vous souhaiterez
peut-être la connecter à votre système Hi Fi existant. Connectez les ches audio à l'entrée ligne de votre table de
mixage ou amplicateur à l'aide d'un câble RCA (non fourni).
PLAQUE TOURNANTE
1. Réglez le sélecteur (4) sur la position PHONO;
2. Ouvrez la porte de la plaque tournante (11);
3. Sélectionnez la vitesse de disque correcte (33/45/78 tours) à l'aide du sélecteur de vitesse du plateau tournant
(7);
4. Placez le disque sur la plaque. Utilisez l'adaptateur fourni (10) si le disque a 45 tours;
5. Libérez le bras du crochet de verrouillage; soulevez le bras de lecture à l'aide du levier (9) et positionnez le stylet
sur la première piste du disque, utilisez le levier (9) pour abaisser très doucement la tête sur le disque.
REMARQUES:
- Retirer le capuchon avant utilisation.
- Assurez-vous que le bras est verrouillé par le verrou avant et après l'utilisation.
- Certains disques peuvent s'arrêter avant la n, car la zone du disque ne correspond pas aux réglages de cet appareil.
Dans ce cas, réglez le sélecteur AUTO STOP (8) sur OFF. De cette façon, le disque retournera à la n mais ne s'arrêtera
pas automatiquement.
REMARQUES:
- Retirez le capuchon du plateau avant utilisation.
- Assurez-vous que le bras est verrouillé par le verrou avant et après utilisation.
- Certains disques peuvent s'arrêter avant la n, car la zone du disque ne correspond pas aux réglages de cet
appareil. Dans ce cas, réglez le sélecteur AUTO STOP (8) sur OFF. De cette manière, le disque sera lu jusqu'à la n
mais ne s'arrêtera pas automatiquement.
FUNCTION BLUETOOTH
1. Après avoir mis l'appareil sous tension, tournez le sélecteur (4) sur la position BLUETOOTH, le voyant LED (1)
commencera à clignoter;
2. Activez la fonction Bluetooth sur l'appareil externe à appairer et commencez à rechercher des appareils;
3. Sélectionnez l'appareil "TT 1022 BT" et entrez le mot de passe "0000" si demandé;
4. Une fois l'appairage terminé, un son de conrmation se fera entendre et le voyant LED (1) restera xe;
5. Utilisez les boutons de l'appareil externe pour gérer les fonctions.
CASQUE DE MUSIQUE
Insérez la prise casque dans la prise (2), les haut-parleurs seront désactivés.
AUX-IN
Connectez un câble avec une che jack 3,5 mm à la prise AUX IN (12) et l'autre extrémité à l'appareil externe.
CARACTÉRISTIQUES TECHNIQUES
Alimentation: .................................................. 5V 1A
Consommation électrique: .................................................. 3W
Dimensions: .................................................. 375x 355x 120mm (L x W x H)
Recommandations pour l’élimination correcte du produit.
Le symbole gurant sur l’appareil indique que le produit fait l’objet d’une “collecte séparée“. C’est pourquoi, le produit
ne doit pas être éliminé avec les déchets urbains.
L’utilisateur doit remettre le produit auprès de “décharges spécialisées de collecte séparée“ prévues par les autorités
locales, ou bien le rendre au revendeur quand il achètera un nouvel appareil équivalent.
La collecte séparée du produit et les opérations successives de traitement, recyclage et élimination favorisent la
production d’appareils composés par des matériaux recyclés ainsi que permettent d’éviter des effets négatifs sur
l’environnement et sur la santé des personnes suite à une gestion impropre du déchet. Toute élimination abusive
du produit entraîne l’application de sanctions administratives.
9
Page 10
GERMAN
TT 1022 BT
GEFÄHRLICHE SPANNUNGEN
Dieses Symbol, das auf der Rückseite des Gerätes und
auf diesem Handbuch abgebildet ist, weist den Benutzer auf das Vorhandensein von mit Hochspannung
betriebenen Bauteilen im Innern des Gerätes hin. Um
elektrische Schläge zu vermeiden, muß das Gerät nicht
geöffnet werden.
ACHTUNG
Dieses Symbol, das auf der Rückseite des Gerätes und
auf diesem Handbuch abgebildet ist, weist den Benutzer
auf wichtige Anweisungen zum sicheren Gebrauch hin.
Bevor das Gerät in Betrieb genommen wird, müssen diese
Anweisungen aufmerksam gelesen werden.
ANWEISUNGEN ZUM GEBRAUCH
Dieses Gerät ist ein elektronisches Instrument höchster Präzision; vermeiden Sie deshalb, das Gerät in folgenden
Fällen zu benutzen:
• In der Nähe von Wärmequellen, wie z.B. Heizkörpern oder Öfen.
• In sehr feuchten Räumen, wie z.B. Badezimmern, Schwimmbädern, usw, in sehr staubigen Räumen.
• An Plätzen, die starken Vibrationen ausgesetzt sind.
• Das Gerät muß so aufgestellt werden, daß an den Seiten genügend Raum für den freien Luftumlauf vorhanden
ist (mindestens 5cm).
• Die Ventilationsöffnungen nicht abdecken.
• Das Netzteil muss an eine Steckdose in der Nähe des Geräts angeschlossen und leicht zugänglich sein.
• Wenn Sie eine anhaltende Hitze am Gerät oder Netzteil bemerken, ziehen Sie den Stecker sofort aus der Hauptsteckdose.
• Ziehen Sie nicht am Netzkabel
• Sollten Flüssigkeiten im Innern des Geräts eindringen, ziehen Sie den Stecker sofort aus der Steckdose und bringen
Sie das Gerät in die nächstgelegene TREVI-autorisierte Kundendienststelle.
• Vor Inbetriebnahme des Gerätes überprüfen Sie stets, daß die Netzkabel und die Verbindungskabel ordnungsgemäß
installiert sind.
PFLEGE UND WARTUNG
Zum Reinigen benutzen Sie einen leicht angefeuchteten, weichen Lappen. Verwenden Sie keine Lösungsmittel
oder Scheuermittel.
WICHTIG
Die gute Bauweise des Geräts gewährleistet den einwandfreien Betrieb auf längere Zeit hin. Sollten trotzdem
irgendwelche Störungen auftreten, wenden Sie sich an die nächstgelegene TREVI-autorisierte Kundendienststelle.
Die Firma TREVI
können die Produkte andere Merkmale als die beschriebenen aufweisen.
ist für die ständige Forschung und Entwicklung seiner Produkte engagiert. Auf Grund dieser Tatsache
KONTROLLEN
1. Bluetooth-LED-Anzeige
2. Kopfhörereingang
3. Netzschalter/Lautstärkeregler
4. Schalter Funktionswahl Phone - Bluetooth
5. Lautsprecher
6. Tonarm
7. Geschwindigkeitswähler - Drei Geschwindigkeiten
zur Auswahl: 33, 45, 78 U/min
8. Auto-Stop-Auswahl
9. Tonarmheben
10. Adapter - Verwenden Sie diese Option, wenn Sie
45-U/min-Schallplatten mit ausgeschnittenen Mitten
abspielen
11. Staubschutz
12. AUX-IN-Eingang
13. LINE OUT-Buchse R-Kanal
14. LINE OUT-Buchse L-Kanal
15. Gleichstrombuchse
LEISTUNG
Stecken Sie den Stecker des mitgelieferten Adapters in die Gleichstromsteckdose (15) und schließen Sie den Gleichstromadapter an eine 110-230 V ~ 50/60Hz-Buchse an.
EIN/AUS/VOLUMEN
1. Drehen Sie den Knopf (3) im Uhrzeigersinn, um das Gerät einzuschalten. Stellen Sie den Funktionswähler (4) auf
die Position PHONO oder BLUETOOTH;
2. Drehen Sie den Knopf (3) gegen den Uhrzeigersinn, bis Sie ein "Klicken" hören, um das Gerät auszuschalten;
3. Drehen Sie den Knopf (3), um die Lautstärke einzustellen.
10
Page 11

TT 1022 BTGERMAN
VERSTÄRKER/HI FI-ANSCHLUSS (falls erforderlich)
LINE OUT
Während Sie Ihren neuen Plattenspieler über die eingebauten Lautsprecher anhören können, möchten Sie ihn
möglicherweise an Ihr vorhandenes HiFi-System anschließen. Schließen Sie die Audio-Stecker mit einem Cinch-Kabel
(nicht im Lieferumfang enthalten) an den Line-Eingang Ihres Mischpults oder Verstärkers an.
DREHSCHEIBE
1. Wählschalter (4) auf PHONO stellen;
2. Öffnen Sie die Drehtisch (11);
3. Mit dem Drehzahlwähler (7) die richtige Scheibengeschwindigkeit (33/45/78 Umdrehungen) auswählen;
4. Legen Sie die Disc auf die Platte. Verwenden Sie den mitgelieferten Adapter (10), wenn die Disc 45 Umdrehungen ist;
5. Lösen Sie den Arm vom Verriegelungshaken. Heben Sie den Tonarm mit dem Hebel (9) an und positionieren
Sie den Stift auf der ersten Spur der Schallplatte. Verwenden Sie den Hebel (9), um den Kopf vorsichtig auf die
Schallplatte abzusenken.
NOTIZEN:
- Entfernen Sie den Drehteller vor Gebrauch.
- Vergewissern Sie sich, dass der Arm vor und nach dem Gebrauch durch das Schloss verriegelt ist.
- Einige Discs können vor dem Ende stehen bleiben, da der Disc-Bereich nicht mit den Einstellungen dieses Geräts übereinstimmt. Stellen Sie in diesem Fall den AUTO STOP Wahlschalter (8) auf OFF. Auf diese Weise wird die Disc bis zum
Ende wiedergegeben, wird aber nicht automatisch aufhören.
RAT:
- Wir empfehlen Ihnen, Ihre Unterlagen mit einem antistatischen Tuch zu reinigen, um maximale Freude daran zu
haben und sie haltbar zu machen
- Wir möchten Sie auch darauf hinweisen, dass Ihr Stift aus dem gleichen Grund regelmäßig (ungefähr alle 250
Stunden) ausgetauscht werden sollte.
- Bestäuben Sie den Stift von Zeit zu Zeit mit einer sehr weichen, in Alkohol getauchten Bürste (Bürsten von hinten nach
vorne der Patrone).
BLUETOOTH-FUNKTION
1. Drehen Sie nach dem Einschalten des Geräts den Wahlschalter (4) in die Position BLUETOOTH. Die LED-Anzeige (1)
beginnt zu blinken;
2. Aktivieren Sie die Bluetooth-Funktion auf dem externen Gerät, das gekoppelt werden soll, und beginnen Sie mit
der Suche nach Geräten;
3. Wählen Sie das Gerät "TT 1022 BT" und geben Sie auf Wunsch das Passwort "0000" ein;
4. Nach Abschluss des Pairings ertönt ein Bestätigungston und die LED-Anzeigelampe (1) leuchtet konstant;
5. Verwenden Sie die Tasten des externen Geräts, um die Funktionen zu verwalten.
KOPFHÖRER
Stecken Sie die Kopfhörerbuchse in die Steckdose (2), die Lautsprecher werden deaktiviert.
AUX-IN
Schließen Sie ein Kabel mit einem 3,5-mm-Klinkenstecker an die AUX IN-Buchse (12) und das andere Ende an das externe Gerät an.
TECHNISCHE EIGENSCHAFTEN
Stromversorgung: .................................................. 5V 1A
Leistungsaufnahme: .................................................. 3W
Abmessungen: .................................................. 375x 355x 120mm (L x W x H)
Hinweise zur ordnungsgemäßen Entsorgung des Produkts.
Das auf dem Gerät angebrachte Symbol weist darauf hin, dass das Altgerät “getrennt zu sammeln” ist und das Produkt daher nicht zusammen mit dem Gemeindeabfall entsorgt werden darf. Der Benutzer muss das Produkt zu den
entsprechenden, von der Gemeindeverwaltung eingerichteten “Wertstoffsammelstellen” bringen oder dem Händler
beim Kauf eines neuen Produkts übergeben. Die getrennte Müllsammlung und anschließende Aufbereitung, Wieder-
verwertung und Entsorgung fördern die Herstellung von Geräten unter Verwendung wiederverwerteter Materialien
und vermindern die negativen Auswirkungen auf die Umwelt und Gesundheit in Folge einer falschen Müllverwaltung.
Die widerrechtliche Entsorgung des Produkts führt zur Auferlegung von Verwaltungsstrafen.
11
Page 12
ESPAÑOL
TT 1022 BT
VOLTAJE PELIGROSO
Este símbolo se halla en la parte trasera del aparato y
en el presente manual, su función es la de señalar la
presencia, en el interior del aparato, de componentes
que funcionan con alta tensión, no lo abra: evitará de
este modo el riesgo de descargas eléctricas.
ATENCION
Este símbolo se halla en la parte trasera del aparato y en
este manual, su función es la de indicar la presencia de instrucciones importantes para utilizar dichos aparatos con
seguridad. Léalas atentamente antes de utilizar el aparato.
NOTAS DE UTILIZACION
Este aparato es un instrumento electrónico de alta precisión, evite utilizarlo en los siguientes casos:
• En proximidad de fuentes de calor como caloríferos y estufas.
• En lugares donde exista alto grado de humedad como por ejemplo cuartos de baño, piscinas, etc.., en lugares
muy polvorientos.
• En lugares sujetos a fuertes vibraciones.
• Coloque el aparato de modo que por sus lados exista el espacio suciente para que el aire pueda circular siempre
libremente (por lo menos 5cm).
• No obstruya los oricios de ventilación.
• El adaptador de corriente debe estar conectado a una toma de corriente cercana al dispositivo y debe ser fácilmente accesible.
• Si nota calor excesivo en el dispositivo o adaptador de corriente, desconecte el enchufe de la toma de corriente
principal de inmediato.
• No tire del cable de alimentación
• Si entra líquido en el aparato, desconecte inmediatamente el enchufe de la corriente y lleve el aparato al centro
de asistencia TREVI más cercano.
• Controle siempre, antes de poner en funcionamiento el aparato, que los cables de alimentación y de conexión
estén instalados correctamente.
CUIDADOS Y MANTENIMIENTO
Para la limpieza se aconseja utilizar un paño suave, ligeramente humedecido. Evitar disolventes y sustancias abrasivas.
IMPORTANTE
La buena fabricación de este aparato garantiza durante largo tiempo su perfecto funcionamiento. Si aún así se
presenta algún inconveniente, resultará oportuno consultar el Centro Asistencia autorizado.
TREVI sigue una política de continua investigación y desarrollo. Por lo tanto los productos pueden presentar características distintas a las descritas.
CONTROLES
1. Indicador LED de Bluetooth
2. Entrada de auriculares
3. Interruptor de encendido/control de volumen
4. Cambiar el selector de funciones del Phono - Bluetooth
5. Altavoz
6. Brazo de tono
7. Selector de velocidad: tres velocidades para elegir: 33,
45, 78 rpm
8. Selector de parada automática
9. Levantamiento de brazo de tono
10. Adaptador: utilícelo cuando reproduzca discos de 45
rpm con centros recortados
11. Cubierta antipolvo
12. Entrada AUX-IN
13. LINE OUT canal R
14. LINE OUT canal L
15. Toma de corriente CC
ALIMENTACION
Inserte el enchufe del adaptador suministrado en la toma de corriente de CC (15) y conecte el adaptador de CC a
una toma de 110-230V ~ 50/60Hz.
ENCENDIDO/APAGADO/CONTROL DE VOLUMEN
1. Gire la perilla (3) en sentido horario para encender la unidad; coloque el selector de funciones (4) en la posición
PHONO o BLUETOOTH;
2. Gire el mando (3) en sentido antihorario hasta que escuche un "clic" para apagar la unidad;
3. Gire la perilla (3) para ajustar el volumen.
12
Page 13

TT 1022 BTESPAÑOL
CONEXIÓN AMPLIFICADOR/HI FI (si es necesario)
LINE OUT
Si bien puede escuchar su nuevo tocadiscos utilizando los altavoces incorporados, es posible que desee conectarlo
a su sistema Hi Fi existente. Conecte los enchufes de audio a la entrada de línea en su mezclador o amplicador
usando un cable RCA (no incluido).
PLACA GIRATORIA
1. Coloque el selector (4) en la posición PHONO;
2. Abra la puerta de la mesa giratoria (11);
3. S eleccione la velocidad correcta del disco (33/45/78 vueltas) utilizando el selector de velocidad del plato giratorio
(7);
4. Coloque el disco en la placa. Utilice el adaptador suministrado (10) si el disco tiene 45 vueltas;
5. Suelte el brazo del gancho de bloqueo; levante el brazo usando la palanca (9) y coloque el lápiz en la primera
pista del disco, use la palanca (9) para bajar muy suavemente la cabeza sobre el disco.
NOTAS:
- Retire la tapa del plato giratorio antes de usarla.
- Asegúrese de que el bloqueo del brazo esté bloqueado antes y después del uso.
- Algunos discos pueden detenerse antes del nal, ya que el área del disco no coincide con los ajustes de esta unidad.
En este caso, coloque el selector AUTO STOP (8) en OFF. De esta forma, el disco se reproducirá hasta el nal pero no
se detendrá automáticamente.
CONSEJO:
- Le recomendamos que limpie sus discos con un paño antiestático para disfrutarlos al máximo y hacerlos durar.
- También le indicamos que por la misma razón su lápiz debe ser reemplazado periódicamente (aproximadamente
cada 250 horas).
- Quite el polvo del lápiz de vez en cuando con un cepillo muy suave humedecido en alcohol (cepillando de atrás
hacia delante del cartucho).
FUNCIÓN BLUETOOTH
1. Después de encender el dispositivo, gire el selector (4) a la posición BLUETOOTH, el indicador LED (1) comenzará
a parpadear;
2. Active la función Bluetooth en el dispositivo externo que desee emparejar y comience a buscar dispositivos;
3. Seleccione el dispositivo "TT 1022 BT" e introduzca la contraseña "0000" si se solicita;
4. Una vez que se haya completado el emparejamiento, se escuchará un sonido de conrmación y la luz indicadora
LED (1) permanecerá ja;
5. Utilice los botones del dispositivo externo para administrar las funciones.
AURICULAR
Inserte la clavija para auriculares en la toma (2), los altavoces se deshabilitarán.
AUX-IN
Conecte un cable con un conector jack de 3,5mm a la toma AUX IN (12) y el otro extremo al dispositivo externo.
CARACTERÍSTICAS TÉCNICAS
Fuente de alimentación: .................................................. 5V 1A
Consumo de energía: .................................................. 3W
Dimensiones: .................................................. 375x 355x 120mm (L x W x H)
Advertencias para la correcta eliminación del producto.
El símbolo que aparece en el aparato indica que el residuo debe ser objeto de “recogida selectiva” por tanto el producto no se debe eliminar junto con residuos urbanos.
El usuario deberá entregar el producto a los “centros de recogida selectiva” creados por las administraciones municipales o bien al distribuidor cuando adquiera un nuevo producto. La recogida selectiva del residuo y las sucesivas
operaciones de tratamiento, recuperación y eliminación favorecen la fabricación de aparatos con materiales reciclados
y limitan los efectos negativos en el medio ambiente y la salud causados por una gestión incorrecta del residuo.
La eliminación abusiva del producto da lugar a la aplicación de sanciones administrativas.
13
Page 14
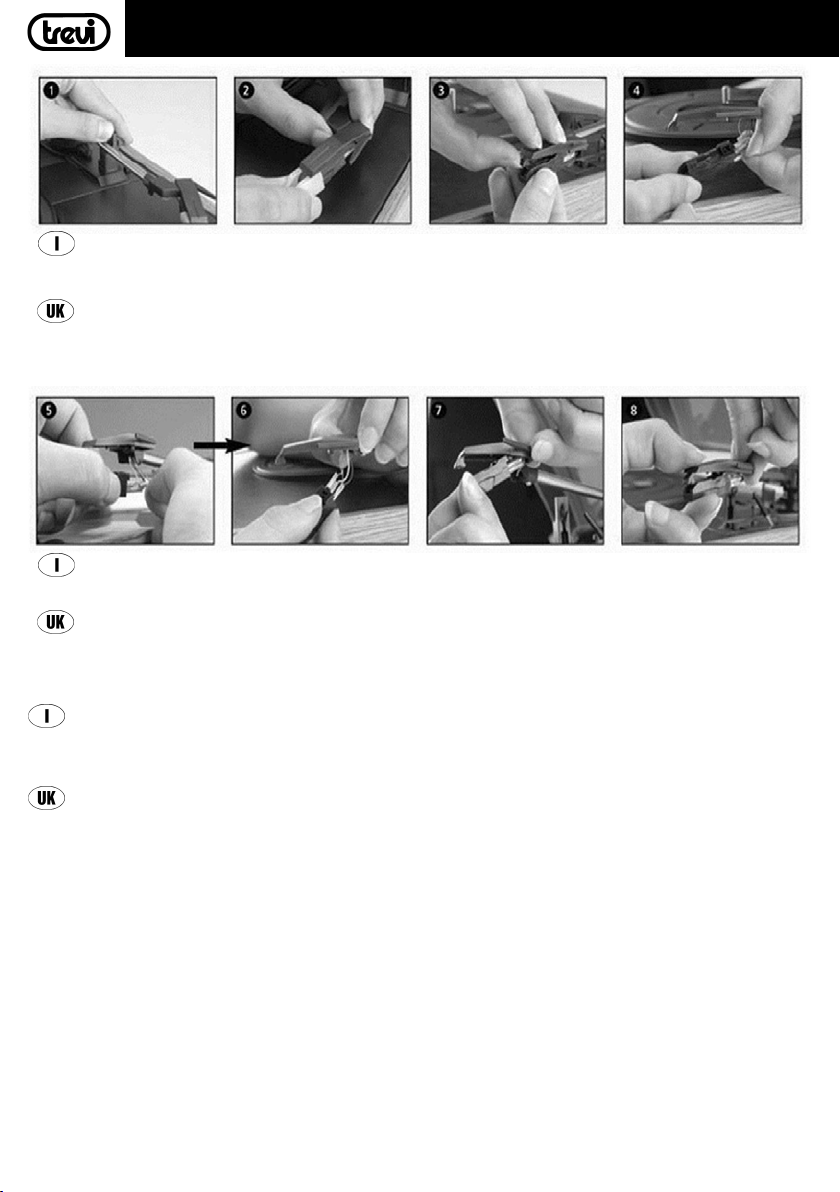
SOSTITUZIONE PUNTINA - INSTALLING A NEW STYLUS CARTRIDGE
Sganciare il blocco del
braccio
Push the arm lock to
release the tone arm
Sostituire la cartuccia con una nuova, collegare i cavi audio e ssare la cartuccia al braccio
To t a new one just in opposite deals. Insert the audio-line accordingly and installthe cartridge to the socket
lightly
Attenzione!:
- Prestare la massima attenzione durante l'esecuzione di queste operazioni in modo da evitare danni al braccio e
ai cavi audio.
Caution!:
- Please exercise extreme care whilst performing this operation so as to avoid the tone arm and audio line wires
from any damage
Togliere il cappuccio
della cartuccia
Take off cap of the
cartridge to expose the
needle out
Sganciare la cartuccia
dal braccio
Separate the cartridge
Separate the cartridge
from the socket lightly
from the socket lightly
Sganciare tutti i li audio
dalla cartuccia
Take off the audio-line
from the cartridges completely
14
Page 15
TT 1022 BTDECLARATION OF CONFORMITY
DICHIARAZIONE DI CONFORMITÀ UE SEMPLIFICATA
Il fabbricante TREVI dichiara che il tipo di apparecchiatura TT 1022 BT è conforme alla direttiva 2014/53/UE.
Il testo completo della dichiarazione di conformità EU è disponibile al seguente indirizzo Internet:
https://www.trevi.it/dms/zidi/TREVI/DOCTT1022BT.pdf
SIMPLIFIED EU DECLARATION OF CONFORMITY
Hereby TREVI Spa declares that the equipment type TT 1022 BT is in compliance with directive 2014/53/EU.
The full text of the EU declaration of conformity is available at the following internet address:
https://www.trevi.it/dms/zidi/TREVI/DOCTT1022BT.pdf
EN
If you will not nd your language on the instruction manual, please go on our website www.trevi.it to nd it
FR
Si vous ne trouverez pas votre langue sur le mode d’emploi, veuillez vous visiter sur notre site Web www.trevi.it
de le trouver
DE
Wenn Sie Ihre Sprache auf die Bedienungsanleitung nicht nden, gehen Sie bitte auf unsere Webseite www.trevi.
it zu nden
ES
Si no encuentras tu idioma en el manual de instrucciones, por favor vaya a nuestra página web www.trevi.it se
encuentra
PT
Se você não vai encontrar sua língua sobre o manual de instruções, por favor, vá em nosso site www.trevi.it para
encontrá-lo
15
Page 16

Trevi S.p.A.
Strada Consolare Rimini-San Marino, 62 47924 Rimini (RN) Italy
Tel. 0541/756420 - Fax 0541/756430 - www.trevi.it - e-mail: [email protected]
16
Made in CHINA
 Loading...