

Page 1
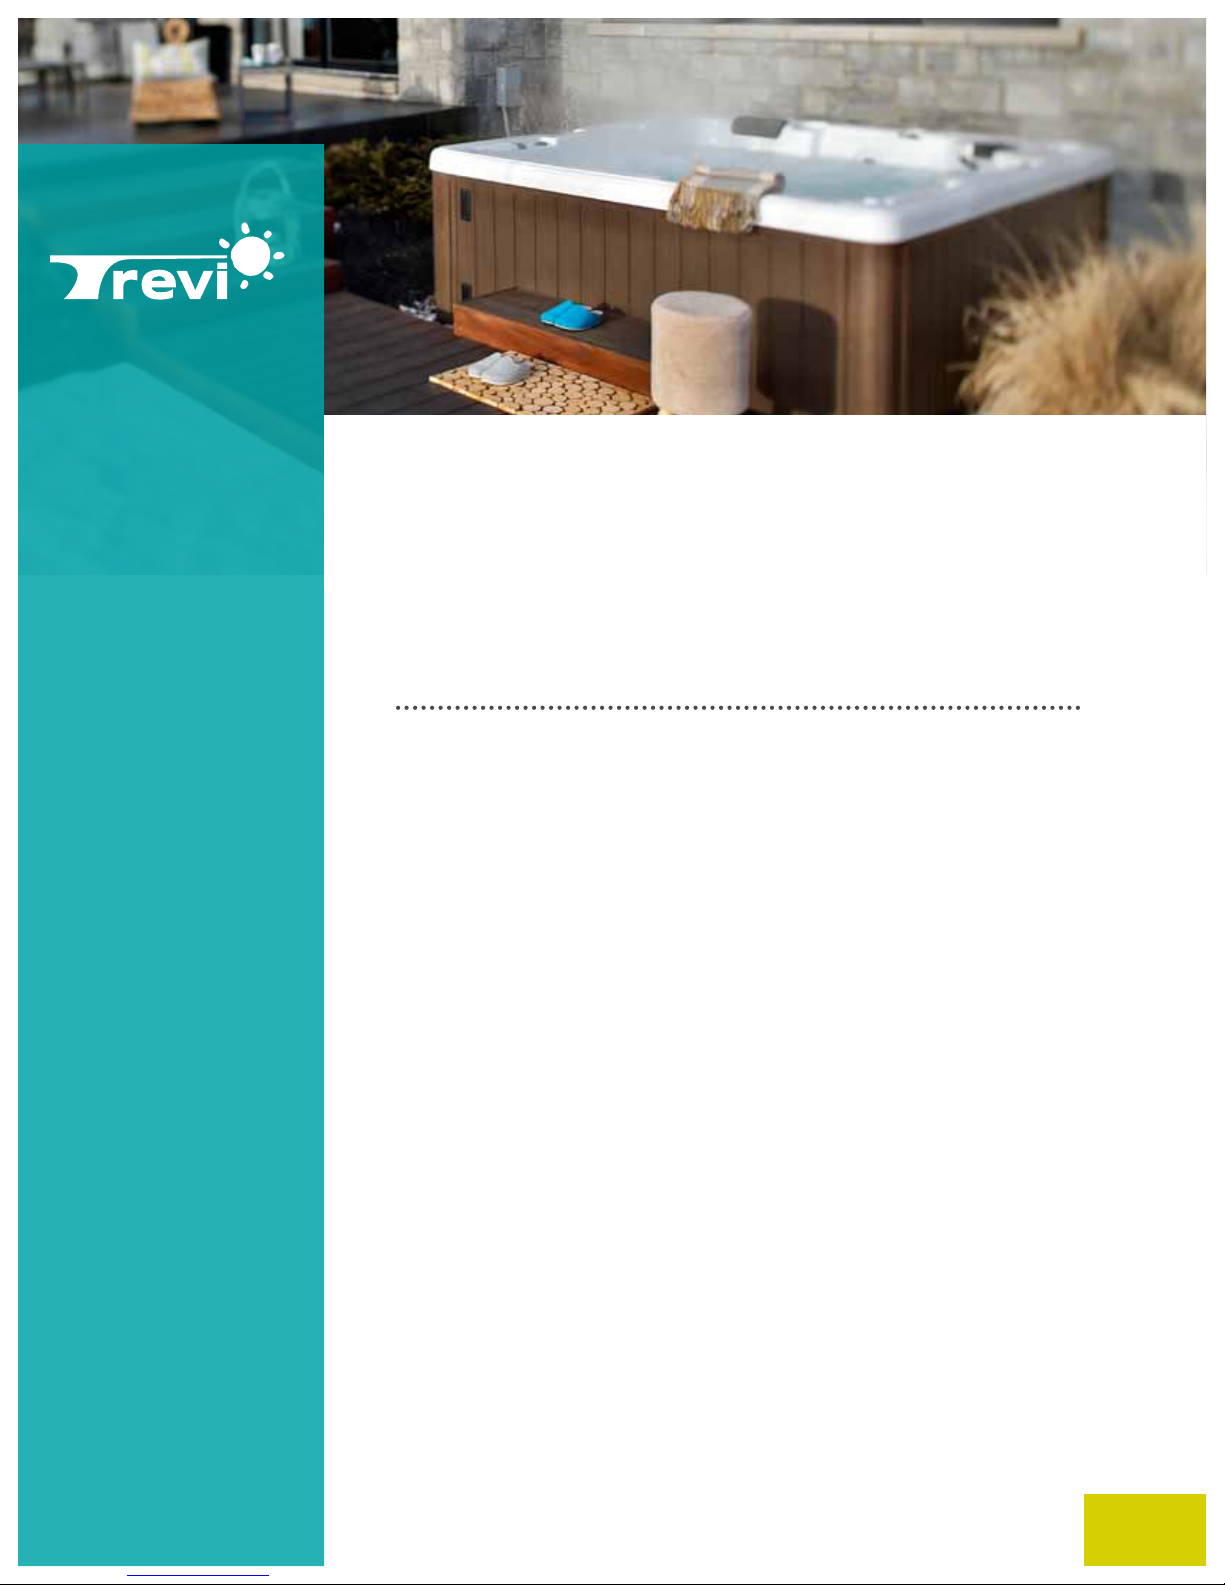
Trevi Spa User
Guide
Page 2

Table of contents
Reminder list ................................................................................................3
Introduction ..................................................................................................4
Choosing the best location for your spa ......................................................5
During delivery ......................................................................................... 5-6
Installation options for your spa .............................................................. 6-7
Initial start-up procedure .............................................................................7
Winterizing procedure ..................................................................................9
Opening procedures for spas .....................................................................12
Precautions when using your spa during winter .......................................13
Draining procedures ...................................................................................13
Winter emergency procedures............................................................. 14-15
Instruction spa cover ..................................................................................16
Maintenance of spa components and water balancing instructions .. 21-22
Trevi spa maintenance products ................................................................23
Spa Pack error codes..................................................................................24
Compulsory and optional training ..............................................................30
Customer access ........................................................................................31
Contact .......................................................................................................32
Trevi Spa User Guidea
2
Page 3

Reminder list
Model :
Year :
Height :
Quantity liters :
Customer number (TC)
Purchase date :
Important notes:
Trevi Spa User Guide
3
Page 4

Introduction
This guide was developed to help you enjoy a trouble-free spa. The information and instructions it presents
are easy to understand and apply to most types of installations. It explains how to maintain an adequate
level of chlorine and how to prevent problems. It also covers all procedures related to the care of your spa,
from opening to closing, including water testing and regular maintenance. At the end of the manual is a
Troubleshooting Guide to help you resolve problems. Of course, the experts at your nearest TRÉVI location are
available to answer any questions not covered by this manual. Refer to this guide to make the most of your
spa. Remember that for your safety, certain precautions must be taken when handling and storing chemicals.
Please be sure to read the warnings and dosage requirements on product labels and to follow package
directions carefully. Never put two chemicals in the water at the same time. Always dilute products in water
before pouring them into the pool. Don’t forget that chlorine is corrosive to steel. And most importantly, keep
all pool products out of the reach of children.
CAUTION : When using chlorine, always add the product to water. Do not pour water over chlorine or an
explosive reaction may result. A few drops of water are enough to trigger an explosion.
Safety precautions
▪ To avoid health hazards, never heat the spa water above 104°F (40°C). Limit the use of the spa to
15-minute intervals to avoid nausea.
▪ Never enter the spa when under the influence of alcohol or when using drugs that may cause
drowsiness. If you are taking medication, check with your doctor before using the spa.
▪ Because children are sensitive to high temperatures, they should use the spa with prudence
▪ and only under adult supervision.
▪ Pregnant women should consult their physician before using the spa.
▪ Hot water is an ideal medium for spreading infections. Do not use the spa if you have an open wound.
▪ Always be careful when entering and exiting the spa.
Emergency preparedness
▪ Always have a well-stocked First Aid kit on hand in a well-identified place that is easily accessible to
adults but out of reach of children.
▪ Keep a sheet outlining cardiopulmonary resuscitation (CPR) procedures near the spa. Make sure the
sheet is waterproof.
▪ Encourage each member of your family to learn CPR.
▪ Memorize emergency phone numbers.
Insurance
▪ Check with your insurance company to ensure that your spa is covered by your homeowner’s policy
Trevi Spa User Guidea
4
Page 5
Choosing the best location for your spa
Here are some basic elements you will have to remember when choosing the location of your new spa.
Safety first
Do not install your spa within 3 metres of overhead electrical lines.
How will you use your spa?
How you plan to use your spa will help you determine its location. For example, are you going to use it for
recreational or therapeutic purposes? If your spa is mainly used for the family, please allow enough space
around it for activities. If you intend to use it for relaxation and therapy, you probably want to create a
special atmosphere all around the spa.
Environment
If you intend using your spa during the winter season, it is advisable to place the spa close to an entrance
door to your property. By doing this, you’ll have a place to change in total comfort. During the winter,
bare trees don’t really provide any privacy. Take into account the environment of the spa all year round to
establish the best privacy solutions.
Also, think of the view you’ll have when you use your spa. Is your yard equipped with a special landscaped
area that you especially enjoy? Perhaps there’s a special place that boasts a soothing breeze during the day
or a beautiful sunset in the evening?
Prévoyez un accès pour l'entretien
Many people choose to build a decorative structure all around their spa. If you are installing your spa with
any type of structure on the outside, such as a gazebo, remember to allow access for maintenance. The spa
must have clear spaces of at least 18'' each around it to allow the technician to make repairs if need be.
In addition, it is vital that the control panel be made accessible at all times for the technician in
case of breakage.
During delivery
What is not included:
▪ Delivery inside the residence.
▪ Delivery if access is less than 100" high and 40" wide.
▪ Rock dust.
▪ Picking up earth and sod.
▪ The electrical connection.
▪ Installation of the GFCI (switch /circuit breaker compulsory grounding).
▪ Installation of the cover, its supports and fasteners.
▪ Installation of the steps.
Trevi Spa User Guide
5
Page 6
After-sale client responsibility
▪ Contact the insurer to determine if the spa is well insured for damages which are not covered by the Trevi
warranty. See the exclusions set forth in your general Trevi warranty.
▪ Determine the exact location of the spa before arrival of the deliverymen.
▪ Provide adequate access for installers, namely 100" high and 40" wide minimum.
▪ Contact a licensed electrician for the electrical connection. IMPORTANT: Please notify your
electrician that the 3/6 wire must be copper.
▪ Be sure to leave free access all around the spa (on 4 sides) for: service, closing, opening, maintenance
or future repairs (compulsory minimum 18" clearance on each side). It is also compulsory to provide the
same access if the spa is flush-mounted or embedded. If the spa is moved to access it, this will be at the
customer’s cost. Make sure that all screws of the spa are accessible at all times.
▪ Fill the spa and add cleaning products.
▪ Install the gazebo unless its installation is included in the contract.
▪ When the spa is completed and running, take a 500 ml water sample to the store for complete analysis
of your water.
▪ Take the free in-store courses for the opening, maintenance and closing of your spa. Only the
maintenance course is COMPULSORY.
▪ Following delivery of the spa, you have 3 days to make sure the jets are working well.
Installation options for your spa
Option 1: Installation on stone dust
Remove sod and excavate site to a depth of four inches. The perimeter of the site should allow for an
additional six inches on all sides of the spa (be sure to base calculations on the exact dimensions of your
spa). Fill site with six inches of compacted stone dust, i.e. to two inches above the ground level. You will
avoid that the spa cave in too much into the ground over time and the technician will be able to remove the
spa skirt if a repair must be made.
Option 2: Installation on a concrete slab
Remove sod and excavate site to a depth of six inches. The perimeter of the site should allow for an
additional six inches on all sides of the spa (be sure to base calculations on the exact dimensions of your
spa). Fill site with six inches of washed 3/4" clean gravel, then pour a four-inch concrete slab over gravel
layer.
NOTE: Ensure proper drainage of any water that may accumulate on the concrete slab.
Option 3: Installation on a wood or cement deck
Excavate holes for the installation of 8-inch cement pillars (sonotubes). Footing holes for the pillars must
extend below the frost line. Install pillars under the four corners and center of the spa. Set supports on
pillars and place 2"X 8" joists on supports at 12" intervals. Your deck needs to be able to support 85 lbs per
square foot.
Trevi Spa User Guidea
6
Page 7
Option 4: In-deck installation
Follow instructions for option 1 above (Installation on stone dust) and build patio around installation. Ensure
that the spa remains accessible. Do not let surface deck elements, such as planks, touch the spa. Be sure
to maintain a minimum clearance of 18” all around the spa. It must be accessible for servicing if required.
Option 5 :
Indoor installation
It is important to call on the expertise of a building specialist for this type of installation. Indoor installations
must comply with specific criteria, failing which serious problems may arise. Don’t hesitate to call a building
specialist who will be able to guide you in your project.
Option 6 :
Installation in gazebo
Be sure to maintain a minimum clearance of 18” all around the spa. It must be accessible for servicing if
required.
Electrical hook-up
All spas must be equipped with mechanical grounding (a no. 6 AWG connector), a 3/6 gauge wire
(MUST ABSOLUTELY BE A COPPER WIRE) and a ground fault interrupter (GFI) / ground fault circuit
interrupter (GFCI) with neutral 120/240 V voltage. The GFI must be installed 5 to 10 feet from the spa for
easy maintenance.
Initial start-up procedures
Step 1: Start-up and emptying the spa
▪ Fill the spa by inserting the hose into the skimmer, where the holes are under the cartridges, up to one
inch below the neck jets (at the level of the trapezoids) or one centimeter below the lowest pad. All
cushions must be outside the water.
▪ Fill the spa with the skimmer by removing the filters and filling to 1/4" below the lowest headrest.
▪ Put the GFCI to ON and activate the pumps.
▪ Put 2 cups of bleach directly into the tub and let agitate for an hour. Attention: the pumps will turn off
after 20 minutes, so do not forget to re-start them.
▪ Put the GFCI to OFF.
▪ Drain the spa according to one of the following methods:
- Using gravity, with the help of the drain hose: pull the drain plug and, once released, unscrew it.
Screw on the hose and pull the part forward again so that the water drains.
- Using gravity, with the help of a vacuum cleaner hose.
- With a submersible pump.
▪ Clean the spa shell with a cloth and mild soap (ideally dishwasher detergent because it won't make much
foam). Rinse well.
▪ Fill up the spa.
▪ Bring a 500 ml sample of the spa water once the water temperature has reached over 85°F (30°C) to your
Trevi store to analyze the water.
▪ Visit trevi.ca/services for the maintenance course schedule
Trevi Spa User Guide
7
Page 8
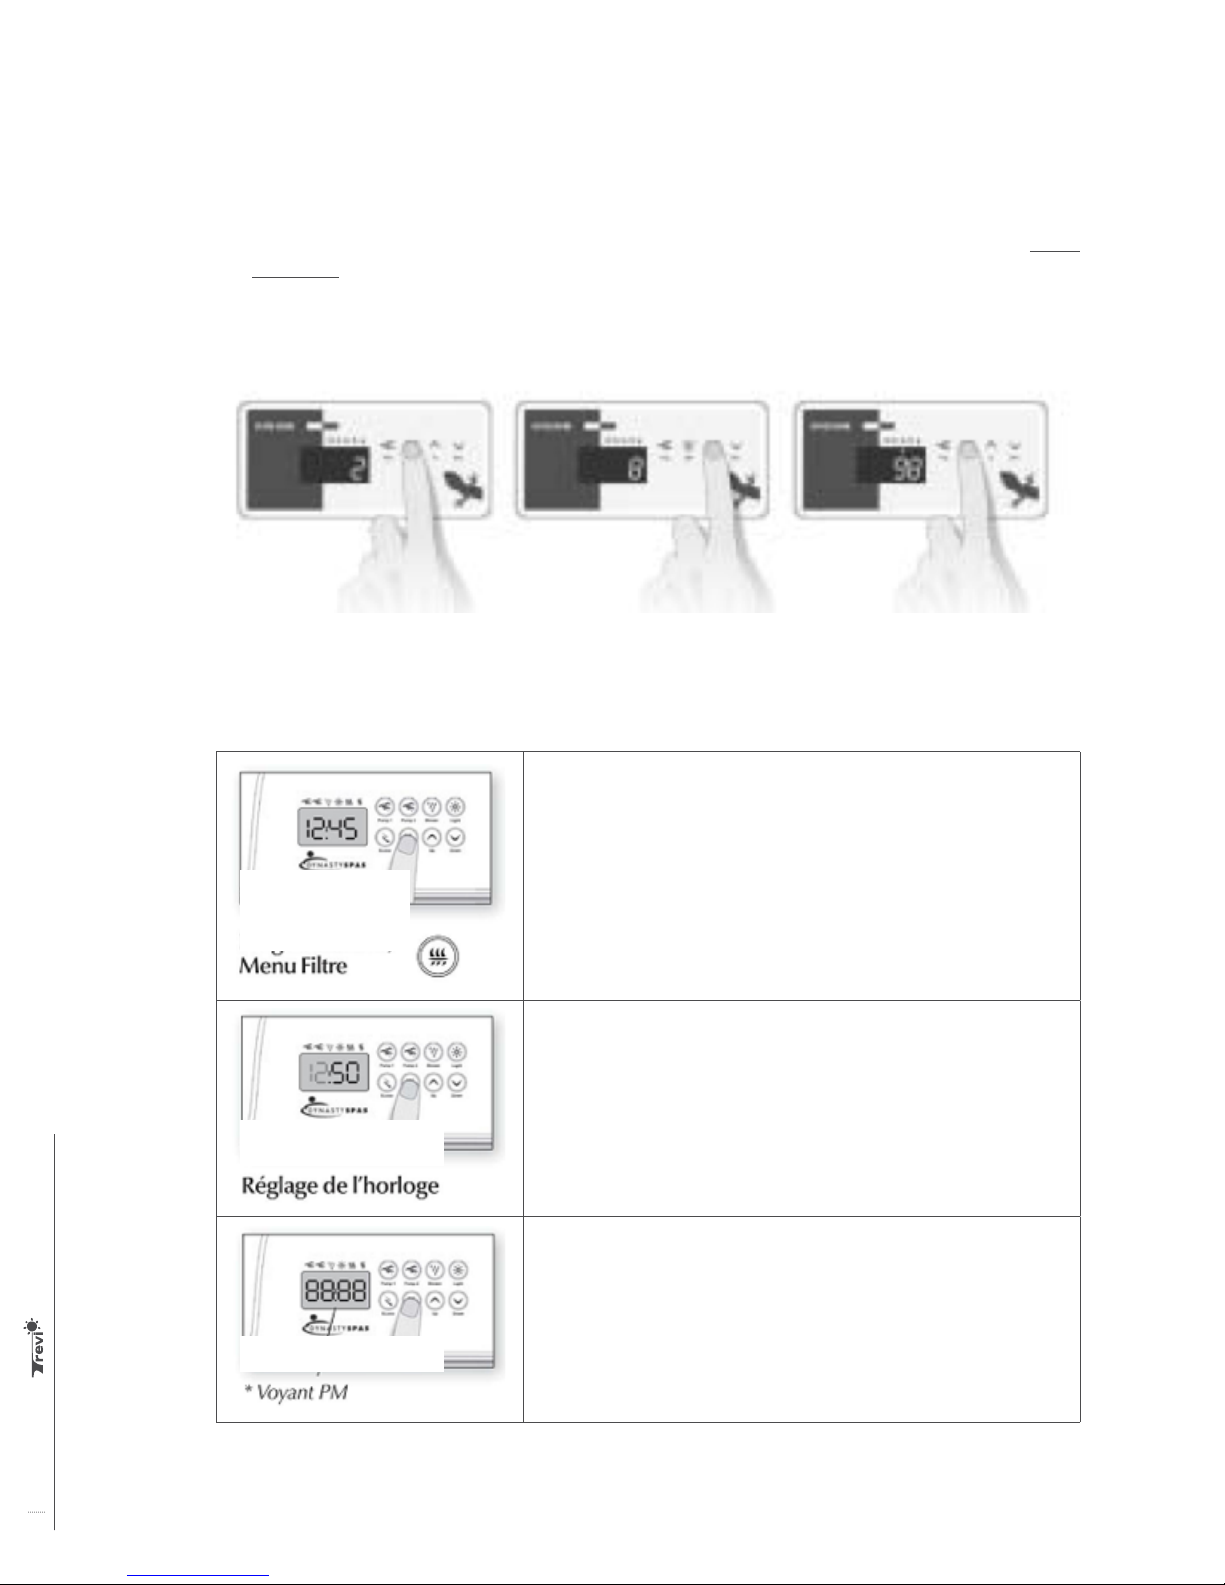
Step 2: Setting the time and the filtering cycle
▪ All information about each of the keyboards can be found on our web site at trevi.ca, in the virtual
documents section of the Customer Access section
▪ The filter cycle needs to be changed to increase the frequency and duration for a total of 8 hours of filtration
daily. We recommend that you adjust the frequency rather than the duration. In this way, the spa starts up more
frequently, but for less long.
Press the Light button for 5 seconds.
The display shows the current duration
of the filtration cycle in hours.
Filter menu /
Programming
Setting the clock
Use the Up or Down keys to set the
length of the cycle in hours.
0 = No filtration
12 = continuous Filtration.
Pressing and quickly releasing the Filter key will enable the clock display.
Pressing the key for 5 seconds will allow you to enter the programming menu.
In the programming menu, the following items can be set: the clock, the
filtering cycles or the purging cycles, economy mode and temperature units. In
the programming menu, use the +/- buttons to adjust the settings and use the
Filter key to move to the next setting. The changes will be saved only after
confirmation of the last setting. If you do not press the key for 10 seconds, the
system will exit the programming menu without saving the changes.
Enter the programming menu by holding down the Filter key for 5 seconds.
The display will show the current clock setting. The minutes will be set and
the hours will flash.
Depending on the manufacturer’s setting, your system can be adjusted
according to the military 24-hour designation or the regular 12-hour
designation.
When the desired value is displayed,
press the Light button to confirm. A
filtration cycle starts. The Filtration
display light is lit during a cycle.
PM
display
Trevi Spa User Guidea
8
Setting the hour: Use the +/- buttons to change the setting of the hour
(AM/PM). Press the Filter key to move to the next setting, minutes.
Setting the minutes: Use the +/- buttons to change the minutes setting.
Press the Filter key to move to the next setting, filtration (FS) start time.
Page 9
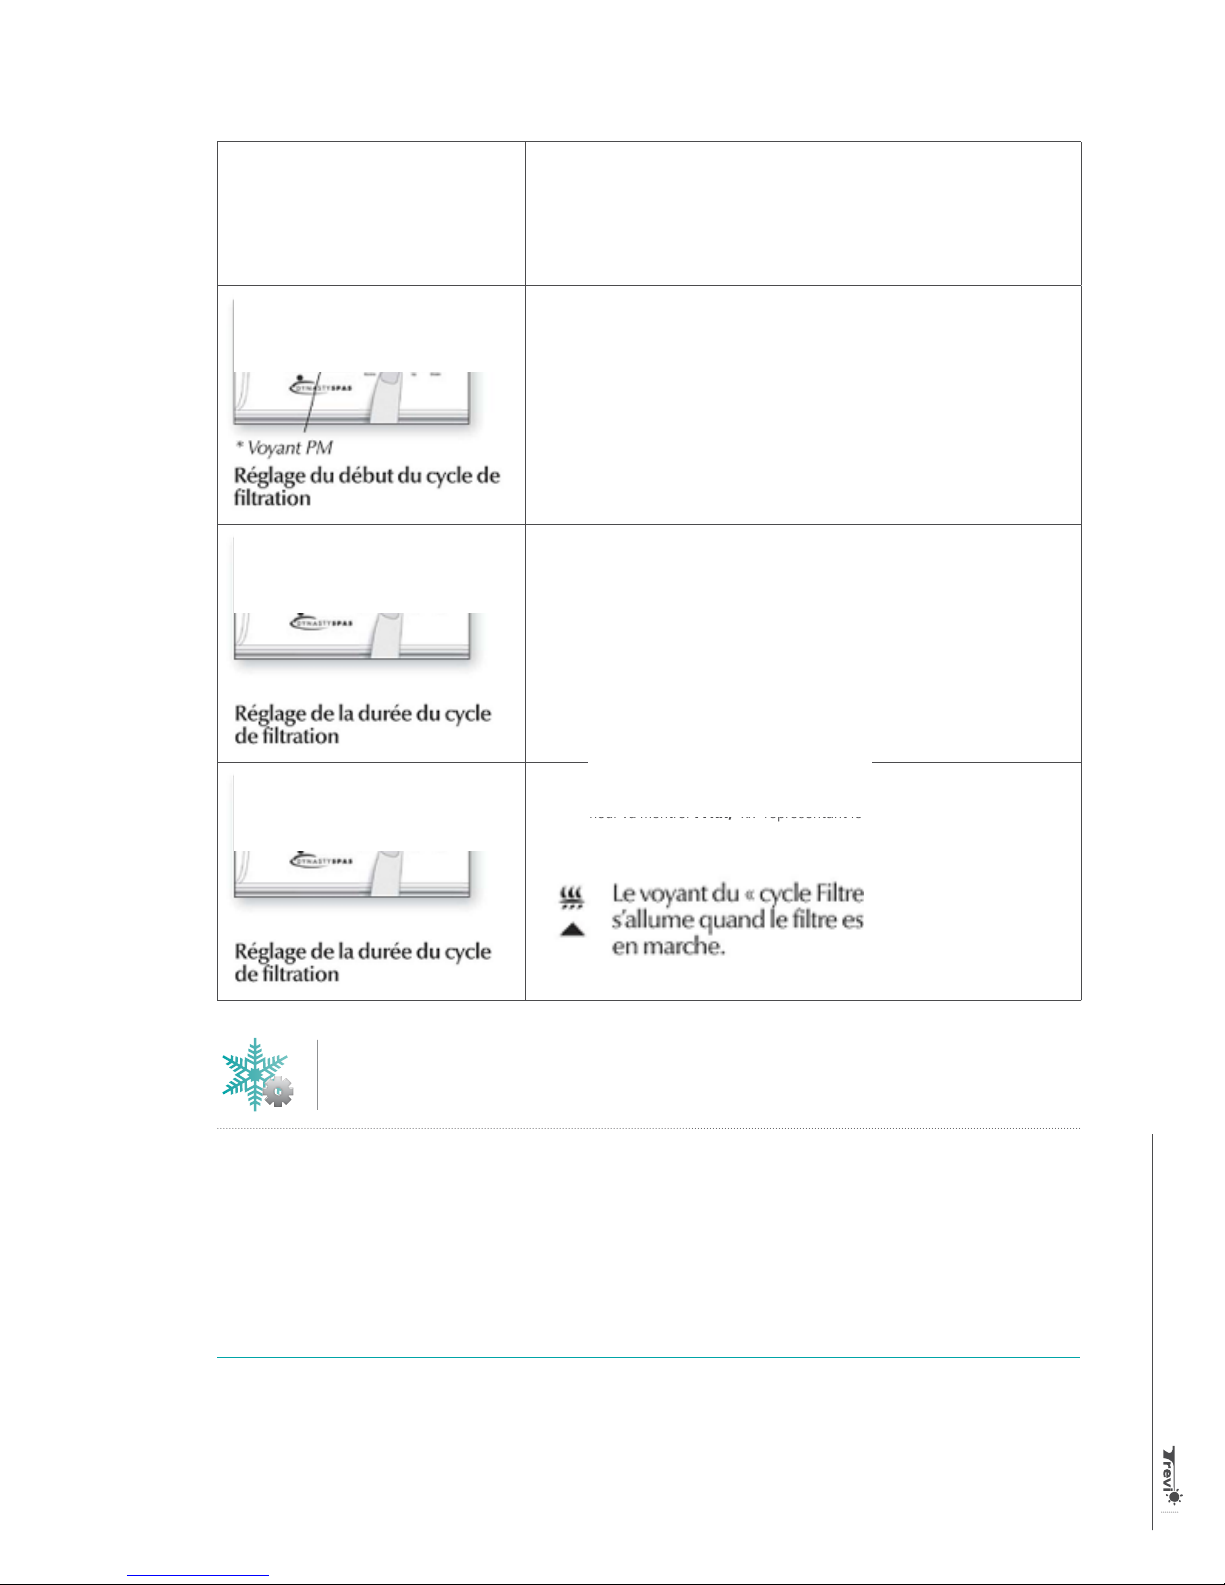
*PM
display
Setting the start-up of the
filtration cycle
Setting the duration of the
filtering cycle
Setting the duration of the
filtering cycle
Programming the filtration cycle: The filter cycle menu includes the
following settings: the start time (FS), the duration (Fd) and frequency (FF). A
filter cycle is to start all the pumps and the turbine at high speed for 1 minute
(purging stage) then, the filter pump will run at low speed for the remainder of
the filtration cycle (cleaning step).
The display will show FSxx, "xx" representing the filter cycle start time. Use
the +/- buttons to adjust the hours. Use the Filter button to move to the next
setting, filtration duration (FD).
The display will show Fdxx, "xx" represents the duration in hours of the filter
cycle. Use the +/- buttons to adjust the duration. Use the Filter key to move to
the next setting, the filter frequency (FF).
0 = No filtration
24 = Continuous Filtration
It is not recommended to put the setting to "0".
The ‘’Filter cycle’’ display
lights up when the filter is
being operated.
L'afficheur va montrer FFxx, "xx" représentant le nombre de cycles de filtration
par jour. Utilisez les touches +/- pour ajuster la fréquence. Utilisez la touche
Filtre pour passer au paramètre suivant, le mode économie (EP).
Winterizing procedure
Note: Carefully read this entire document before proceeding with the closure of your spa.
In order to avoid unpleasant surprises, please check with your insurance company to make sure that your spa
is insured. If you choose not to make optimum use of your spa and prefer closing it for the winter, we suggest
that you continue to maintain it until the time of closure and have a complete test of your water done in one
of our two superstores or six branches. Keeping the water clean longer helps minimize the accumulation of
dirt and the formation of bacteria, thereby preventing any risk of contamination. To protect equipment against
freezing and to maintain clear water, never turn off the filter system prior to winterizing the spa.
Step 1 : Procedure
▪ First, run pumps and pour 2 cups of bleach into the spa, let the pumps run for one hour. (Warning: pumps
will shut off automatically after 20 minutes, so don’t forget to restart them periodically).
▪ Disconnect the power supply to the pumps, the lights and the ozone generator.
▪ Empty the spa using one of the following methods:
Trevi Spa User Guide
9
Page 10

- By gravity, with a draining hose
- By gravity, using a vacuum hose
-With a submersible pump.
▪ Remove cartridge(s) and rinse with clean running water. Let them soak in Cartridge cleaner for
12 hours, as per the product’s instructions. Rinse, air dry and store for the winter. If the cartridges are no
longer any good, make sure to note all relevant information (such as model number) and photograph the
cartridges before discarding them.
▪ Remove all adjustable jets Leave headrests in place.
▪ Clean the shell with a mild soap, such as liquid dishwashing soap.
▪ Make sure that the guillotine valves are open (located on either side of the heating element as well as
in front of the pump(s). If your system is equipped with In.Clear, refer to section Cleaning your in.clear
below
Step 2 : Draining the pipes
You should use a Shop-Vac type vacuum with 4.5 HP blower or more to shut down your spa properly.
Scenario 1: Spa with one bypass valve for each pump:
▪ Step 1 (Begin with pump 1) – Unscrew the bypass valve by 2" and remove all o-rings to avoid losing them.
Remove the black swivel inside the valve, and blow into the centre with the blower. Insert the swivel
backwards and direct it towards the left or right opening. Make sure you do this for both valves. Reinstall
the o-rings, taking care to lubricate with Jack’s formula and replace pivot correctly to close valve.
Vacuum the remaining water from the footwell.
▪ Repeat step 1 for pump # 2 (and pump # 3, if applicable)
▪ Step 2 (secondary pipes) – Neck jet and waterfall valves. Unscrew the on/off valve, remove the o-rings
and the swivel. Blow into the valve using the blower cone until no water is left in waterfalls and neck
jets. Reinstall the o-rings, taking care to lubricate with Jack’s formula, and reinstall the swivel properly.
Close the valve. Vacuum the remaining water from the footwell.
▪ Step 3 – Vacuum the spa’s drain for about 1 or 2 minutes with the vacuum cleaner. Vacuum each body jet
at least twice using vacuum. Vacuum the ozone generator nozzle using the vacuum cleaner, as well as
the holes in the skimmer and bottom drains.
▪ Dry any residual traces of water on the spa shell with a chamois.
Scenario 2: Spa with 1 bypass valve for 2 pumps, or no bypass valve at all.
NOTE: If the spa is not equipped with a bypass valve, begin at step 2 and repeat step 2
for pump 1 as well.
▪ Step 1 (Begin with pump 1) – Unscrew the bypass valve by 2" and remove all o-rings to avoid losing them.
Remove the black swivel inside the valve, and blow into the centre with the blower. Insert the swivel
backwards and direct it towards the left or right opening. Make sure you do this for both valves. Reinstall
the o-rings, taking care to lubricate with Jack’s formula and replace pivot correctly to close valve.
Vacuum the remaining water from the footwell.
▪ Step 2: Remove the skirt on the side where pump 2 is located. Unscrew the two rings from pump 2. It is
sometimes necessary to remove the pump entirely from its position. Be careful not to break anything on or
around the pump when removing it. Blow into the front tube to clear the drains properly. Blow into the top
pipe to thoroughly flush the jets. You should do this at least twice for each pipe. Vacuum the remaining
water from the footwell.
▪ Step 3 (secondary pipes) – Neck jet and waterfall valves. Unscrew the on/off valve, remove the o-rings
Trevi Spa User Guidea
10
and the swivel. Blow into the valve using the blower cone until no water is left in waterfalls and neck
jets. Reinstall the o-rings, taking care to lubricate with Jack’s formula, and reinstall the swivel properly.
Page 11
Close the valve. Vacuum the remaining water from the footwell.
▪ Vacuum the spa’s drain for about 1 or 2 minutes with the vacuum cleaner.
▪ Vacuum each body jet at least twice using vacuum.
▪ Vacuum the ozone generator nozzle using the vacuum cleaner, as well as the holes in the skimmer and
bottom drains.
▪ Don’t forget to replace the skirt panels and to screw them back into place.
Step 3 : Winterizing
▪ Switch off GFCI breaker outside and breaker on main panel inside.
▪ Dry off the shell.
▪ Pour non-toxic antifreeze into each skimmer hole until antifreeze starts coming out through the drains
inside the spa. Add another 1/2 cup of antifreeze into each jet.
▪ Clean your spa cover with Cover cleaner and allow to dry. Apply a coat of wax to keep leather hydrated
throughout winter. Position cover on top of spa.
▪ Cover your spa cover with a sheet of plywood so that the cover is entirely protected (only the cover, not
the skirt).
▪ Cover your spa with a sheet of polyethylene and ensure that it is well attached to make it through the
winter. Leave a space between the polyethylene sheet and the spa skirt to avoid moisture build-up.
Step 4 : Cleaning your In.Clear
▪ Disconnect the In.Clear and unscrew the joints on either side of the cell. Remove the cell from the spa.
▪ Install the rubber ring and plastic screw on the threaded end of the cell. Screw thoroughly.
▪ Place the cell in vertical position in a plastic bucket, with the closed end at the bottom. Pour
Lectra Clean into it until the electrodes are covered. Let stand for 15 minutes and pour product back into
bottle for future use.
▪ Remove rubber ring and plastic screw, then rinse the inside of the cell with clean water.
▪ Reposition cell under spa and carefully screw it back into place on either side.
Notes
Trevi Spa User Guide
11
Page 12

Opening procedures for spas
Preparation
If you followed our advice when you closed your spa, opening procedures will be very simple for you!
▪ Check the general condition of your spa for the following problems: split hoses, broken valves; loose
collars or clamps; dried up seals; cracked acrylic, etc.
▪ Make the necessary repairs before continuing. If necessary, do not hesitate to go to your TREVI store.
▪ Check the chemicals you have in stock. If they are outdated, throw them out. If you are missing any,
procure them before continuing with the opening. If you have an Aqua check or Trévi 3-IN-1 TEST KIT,
check the expiration date.
Step 1: Preparation of spa
▪ Make sure the spa is level.
▪ Remove wooden cover installed when winterizing.
▪ Remove cover and clean with the Cleaner for spa cover or 1 teaspoon of liquid dish soap to 9 liters of
water. Rince thoroughly.
▪ Place filtering cartridges and basket in skimmer.
▪ Connect motor, blower and ozonator (if applicable) and light.
▪ Open ball valves on the pipe ends.
▪ Clean the acrylic using slightly soapy water.
▪ Replace jets in their housings.
▪ Fill the spa with a garden hose up to 1 cm below the lowest cushion.
▪ Place the garden hose towards the hole(s) of the cartridge(s).
▪ Put the GFCI to « ON ».
▪ Close air controls and jets.
▪ Operate the 2 pumps and add 250 ml of TREVINERGY WHIRL. Leach for 1 hour.
▪ Drain the spa using the drain plug.
▪ Fill the spa with a garden hose up to 1 cm below the lowest cushion.
▪ Place the garden hose towards the hole(s) for the cartridge(s).
▪ Put the GFCI to « ON ».
▪ Adjust the desired temperature on the keyboard.
Step 2: Water treatment
▪ Balance alkalinity. It should be between 80 and 100 ppm, ideally 100 ppm. Chlorine and bromine tablets
have a tendency to gradually reduce alkalinity. When total alkalinity is low, pH is unstable, water becomes
corrosive and disinfectants do not work. To increase total alkalinity, add TREVINERGY ALKA. To reduce
it, add ph-
▪ Balance pH. The spa water should be slightly alkalic, i.e. between 7.2 and 7.6.
Trevi Spa User Guidea
12
▪ Add 5 caps of TREVINERGY CLEAR. Wait 1 hour.
Page 13

▪ Add 5 caps of TREVINERGY SECURE. Wait 1 hour.
▪ Begin disinfecting the water with your usual sanitizer.
Precautions when using your spa during winter
So you’ve decided to take advantage of your spa year-round? Here are a few precautions you should take to
avoid damage that may be caused by frost or power outages.
▪ Check with your insurance company to ensure that your spa is covered by your homeowner’s policy.
▪ Increase your filtration cycle (FD : 02 - FF : 04) to 8 hours of filtration daily.
▪ Have two 15A ceramic heaters handy, in the event a mechanical breakdown occurs. It is important
not to connect the two heaters onto the same electrical outlet. If you only have one outlet
outside, you will need to use an extension cord and plug the other heater inside the property.
▪ Always have 4 (four) gallons of non toxic antifreeze Permafrost on hand in case a power failure forces
you to shut down your spa.
▪ Even in cold weather, you should always treat your water to avoid contamination.
▪ Remove the snow from your spa cover on a regular basis : it can only support a maximum
▪ weight of 100 lb.
▪ If you plan on being away for an extended period of time, make sure there is someone to take care of your
spa and that this person knows what to do if the spa breaks or if there is a power failure. Otherwise, shut
down your spa before leaving.
▪ Change the water in your spa one last time before frost sets in, in order to perform the operation as safely
as possible. Clean all of your spa’s components thoroughly; this way, you will start the winter with clean
water which will make maintenance easier, as water cannot be changed in winter due to the risk of frost.
▪ Have a specialist perform a full analysis of your water quality in order to start the winter season with
ideal conditions and check your spa daily.
▪ Should you require any assistance, our service department will be open all winter. Here is the phone
number to reach us : (514)22-TREVI (87384).
Draining procedures
Because your spa holds a relatively small amount of water, contaminants such as body oil, perspiration, dirt,
hair, etc., may become quite concentrated. For this season, the water should be drained and replaced
every three months depending on use.
▪ Step 1: Turn off power at the breaker.
▪ Step 2: Pull hose bib out approximately 2" from bottom corner of spa. Remove cap by turning counter
clockwise.
▪ Step 3: Hook up a garden hose to the hose bib located on the exterior corner of the cabinet. With hose
still attached to bib, push the bib approximately half way back in. Water should-then start flowing.
▪ Step 4: When water begins to drain out of the hose, be sure to drain the water to a convenient place.
▪ Step 5: After draining is completed, pull bib back out the full distance. Remove the hose. Replace cap.
Push bib all the way back into corner of spa. Wipe down the inside of your spa making sure your surface
is dry and free from standing water. We recommend that after draining or cleaning your spa that you
put the cover back on. Avoid exposing the acrylic surface to direct sunlight for an extended period of
Trevi Spa User Guide
13
Page 14
time. Extended exposure can cause surface fading or cracking, which could void the acrylic warranty.
Note: Be sure that hose is on a downward grade to properly drain spa.
Winter emergency procedure
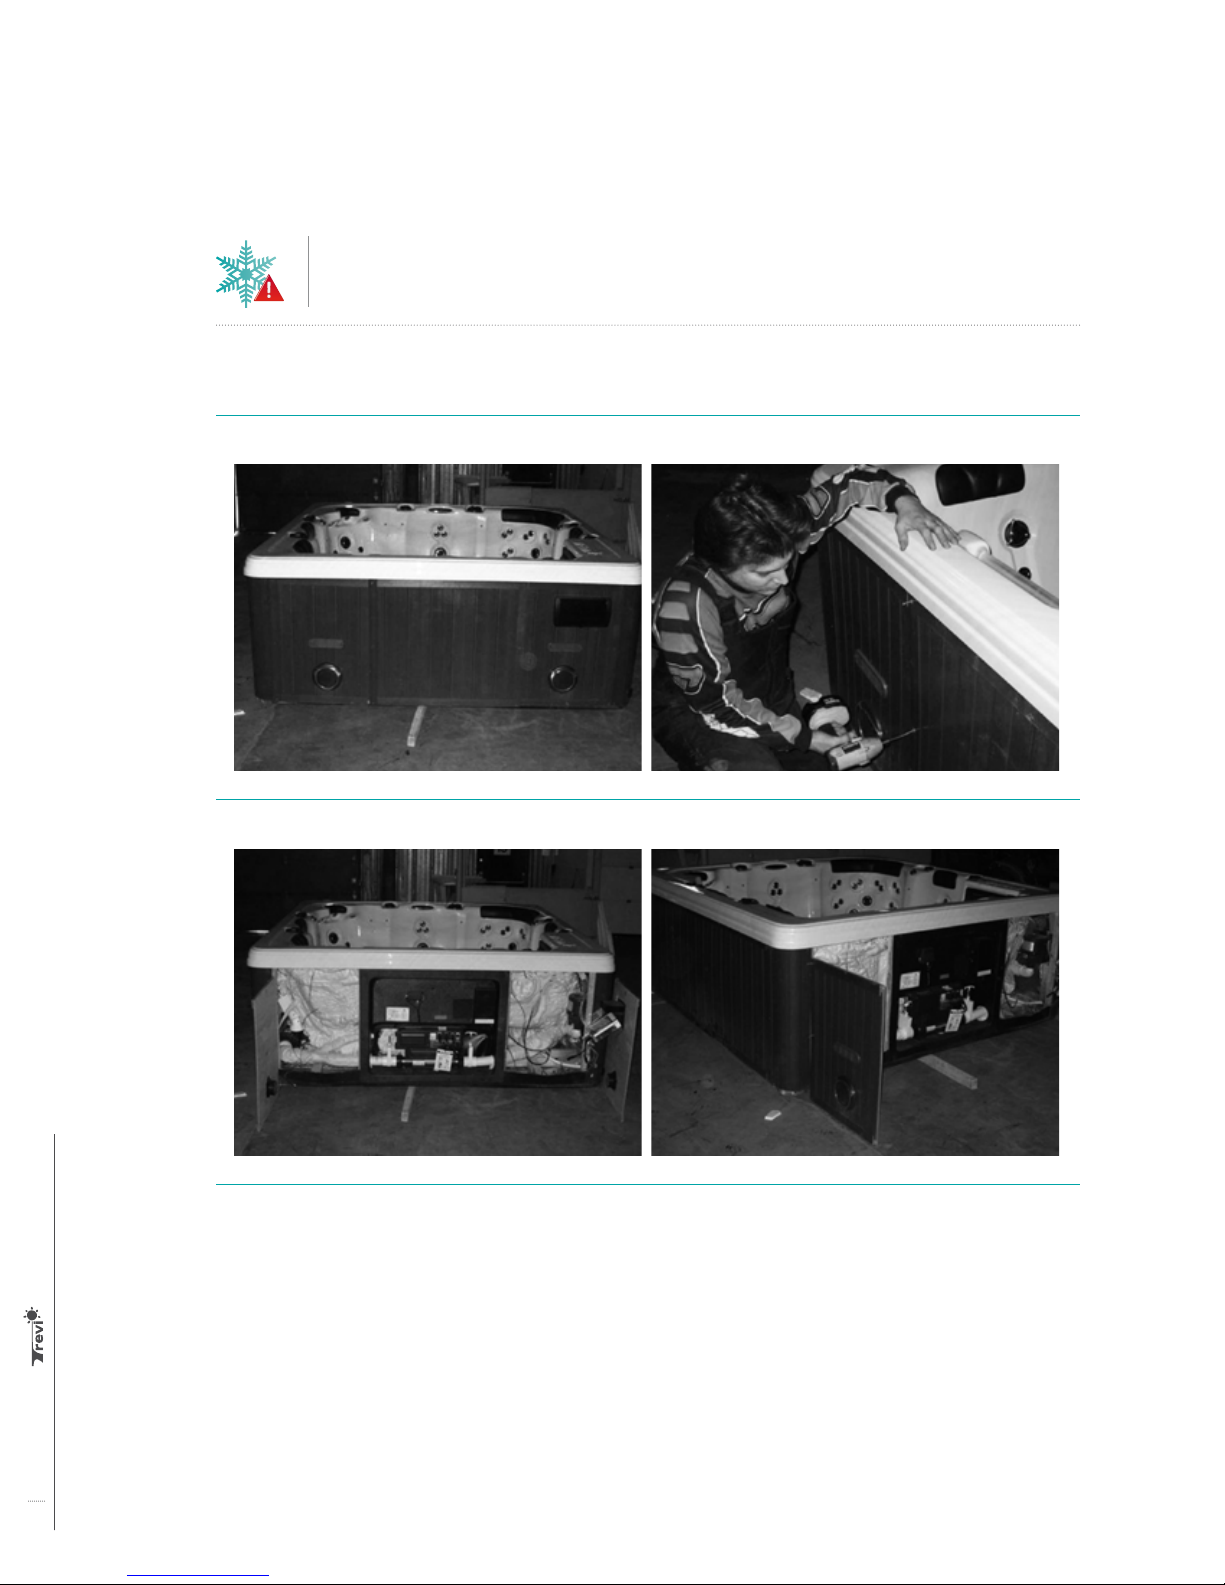
If you need to temporarily install heaters near your spa to prevent the water from freezing in the piping and
avoid damaging it, here's how:
Step 1: Open the panels on the front of your spa.
Step 2: Arrange the panels at an angle to form a wall on each side.
Step 3: Place the heaters.
Trevi Spa User Guidea
14
Page 15
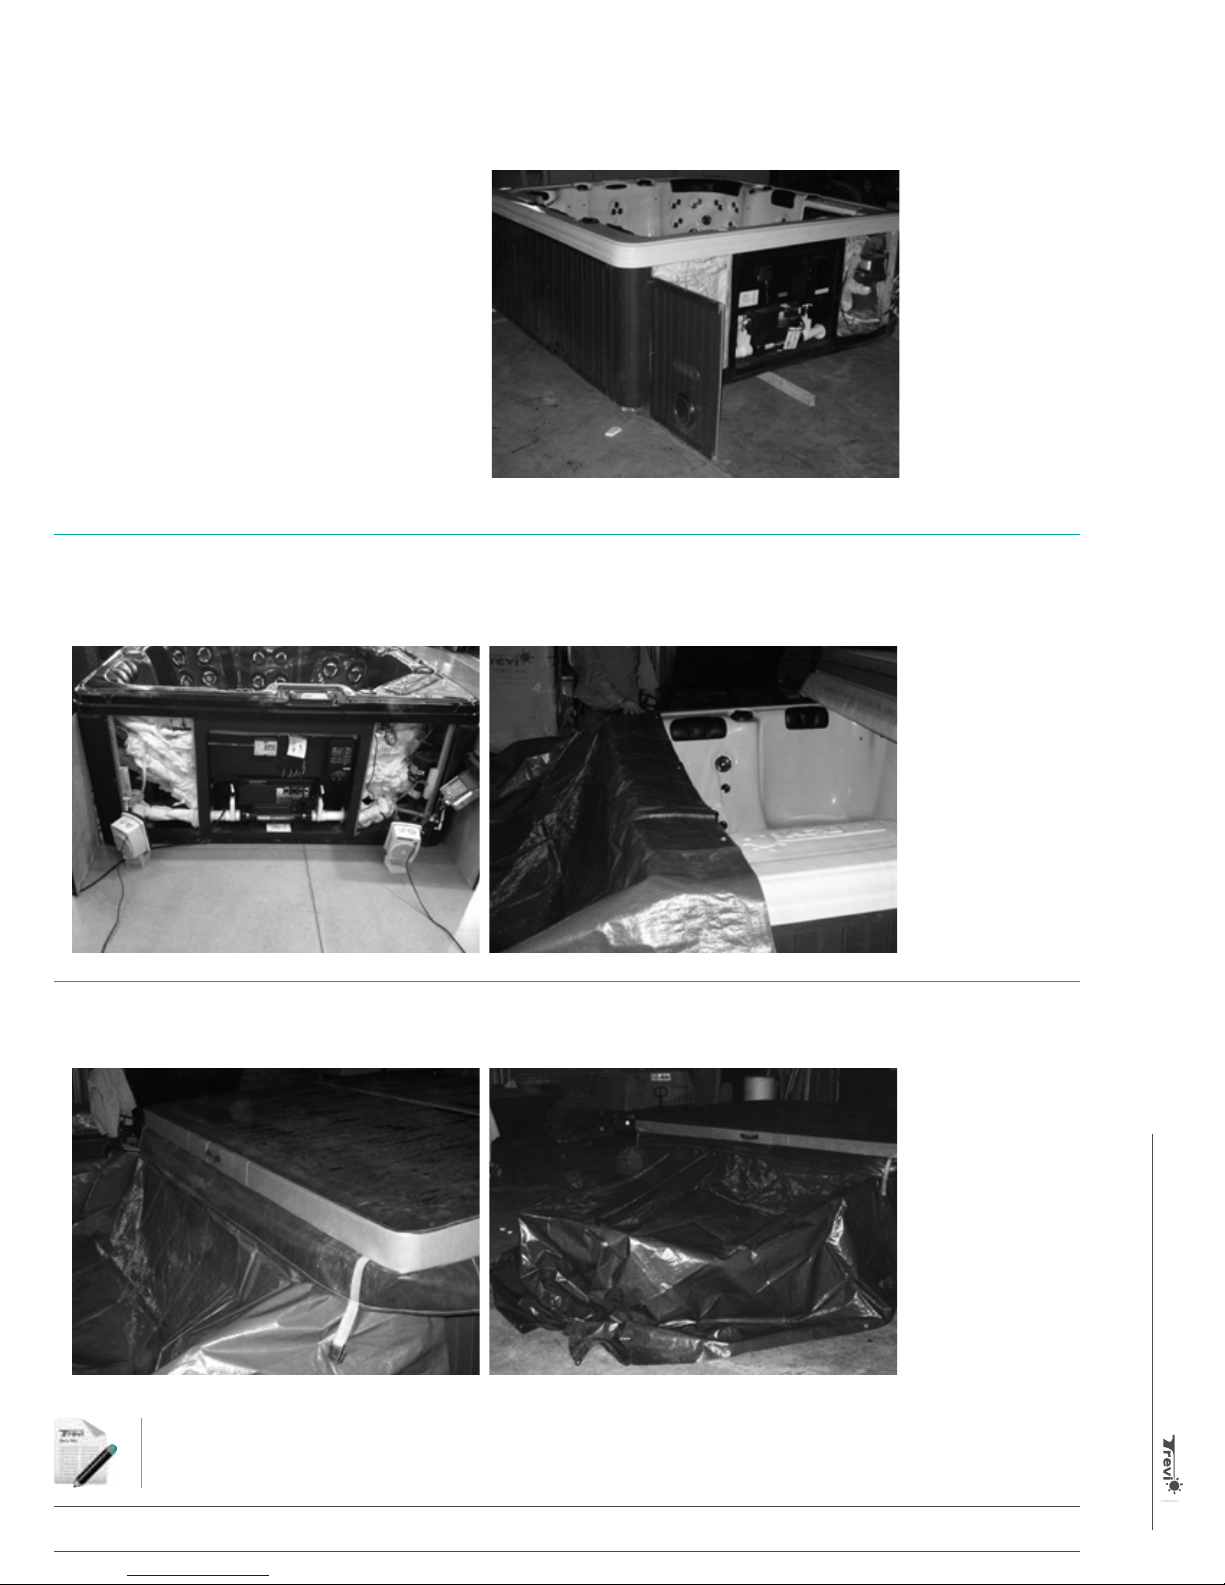
The left side heater should be directed 45
degrees to the right. The right side heather
should be positioned straight in-line or slightly
oriented towards the right. In this way, the
hose of the water heater will remain hot and
air can circulate everywhere below the spa,
thus avoiding frozen piping. You must raise
the heaters onto blocks or pieces of wood so
that the hot air circulates inside the spa and
not on the black membrane.
Step 4: Protect and insulate the spa
Place a canvas of about 15' x 10' on the spa, then replace the cover. Use the center panel of your spa skirt as a wall to create a
shelter with canvas.
Step 5: Insulate the spa
Next, place snow all around the canvas to insulate and retain heat inside the shelter.
Notes
Trevi Spa User Guide
15
Page 16
G
G
Fig ure 1
A
C
D
D
C
B
F
G
G
A
E
E
Courroies
Figure 1
Strap
Installation of a manual spa cover
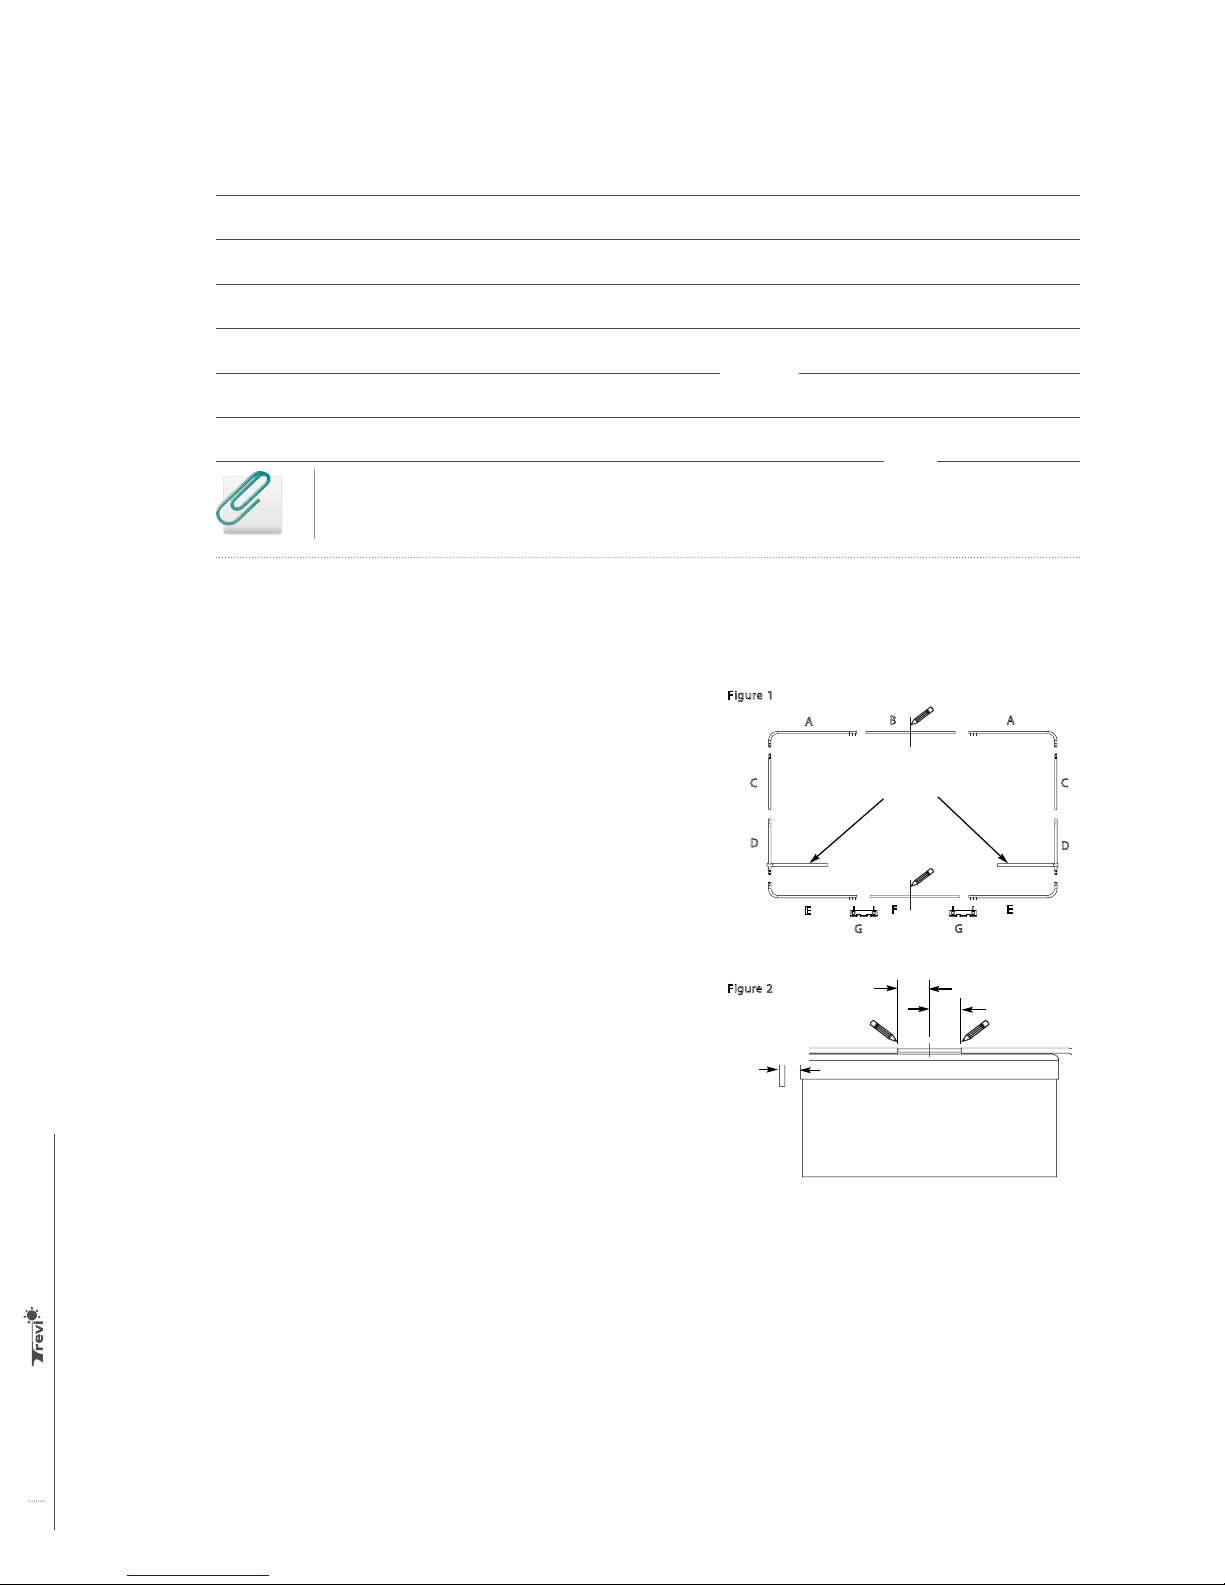
Step 1: Preparation
▪ For installation, the following is required: drill with a star bit,
measuring tape and a pencil.
Note: See content of the parts at the end.
▪ Place the frame parts to the ground next to your spa to form
a rectangle (Figure 1). Mark the center of (B) and (F) with a
pencil. Insert a strap on each side in sections (D).
Step 2: Assembly of the upper section
▪ Insert the ends of (B) in (A). Place this section of the
framework thus formed on the central stitching of the cover.
Adjust the parts (A) so that they are approximately 6.5 cm
(2 1/2") from the sides of the cover. Center (B) in (A) using a
tape measure and the center mark. Make a pencil mark at the
junction of (A) and (B) (Figure 2).
▪ Place the upper section on the ground and align the pencil
marks made at the ends of (B) and (A). Be sure that the short
sides of (A) are level to the other. Connect the different parts
of the upper section of the frame using 3/4'' long self-drilling
screws (3 at each end). The screw heads should be inside
the frame.
▪ Insert the tapered end (C) in (A). Connect (A) and (C) with the
5/16" x 1 5/8" long screws and nuts (2 per side). The nuts must
be facing towards the ground.
Figure 2
Fig ure 1
C
D
Fig ure 2
Figure 3
6.5 cm
2 1/2”
A
E
B
Courroies
F
=
=
A
C
D
E
Trevi Spa User Guidea
16
skirt spa
4 screws
Page 17
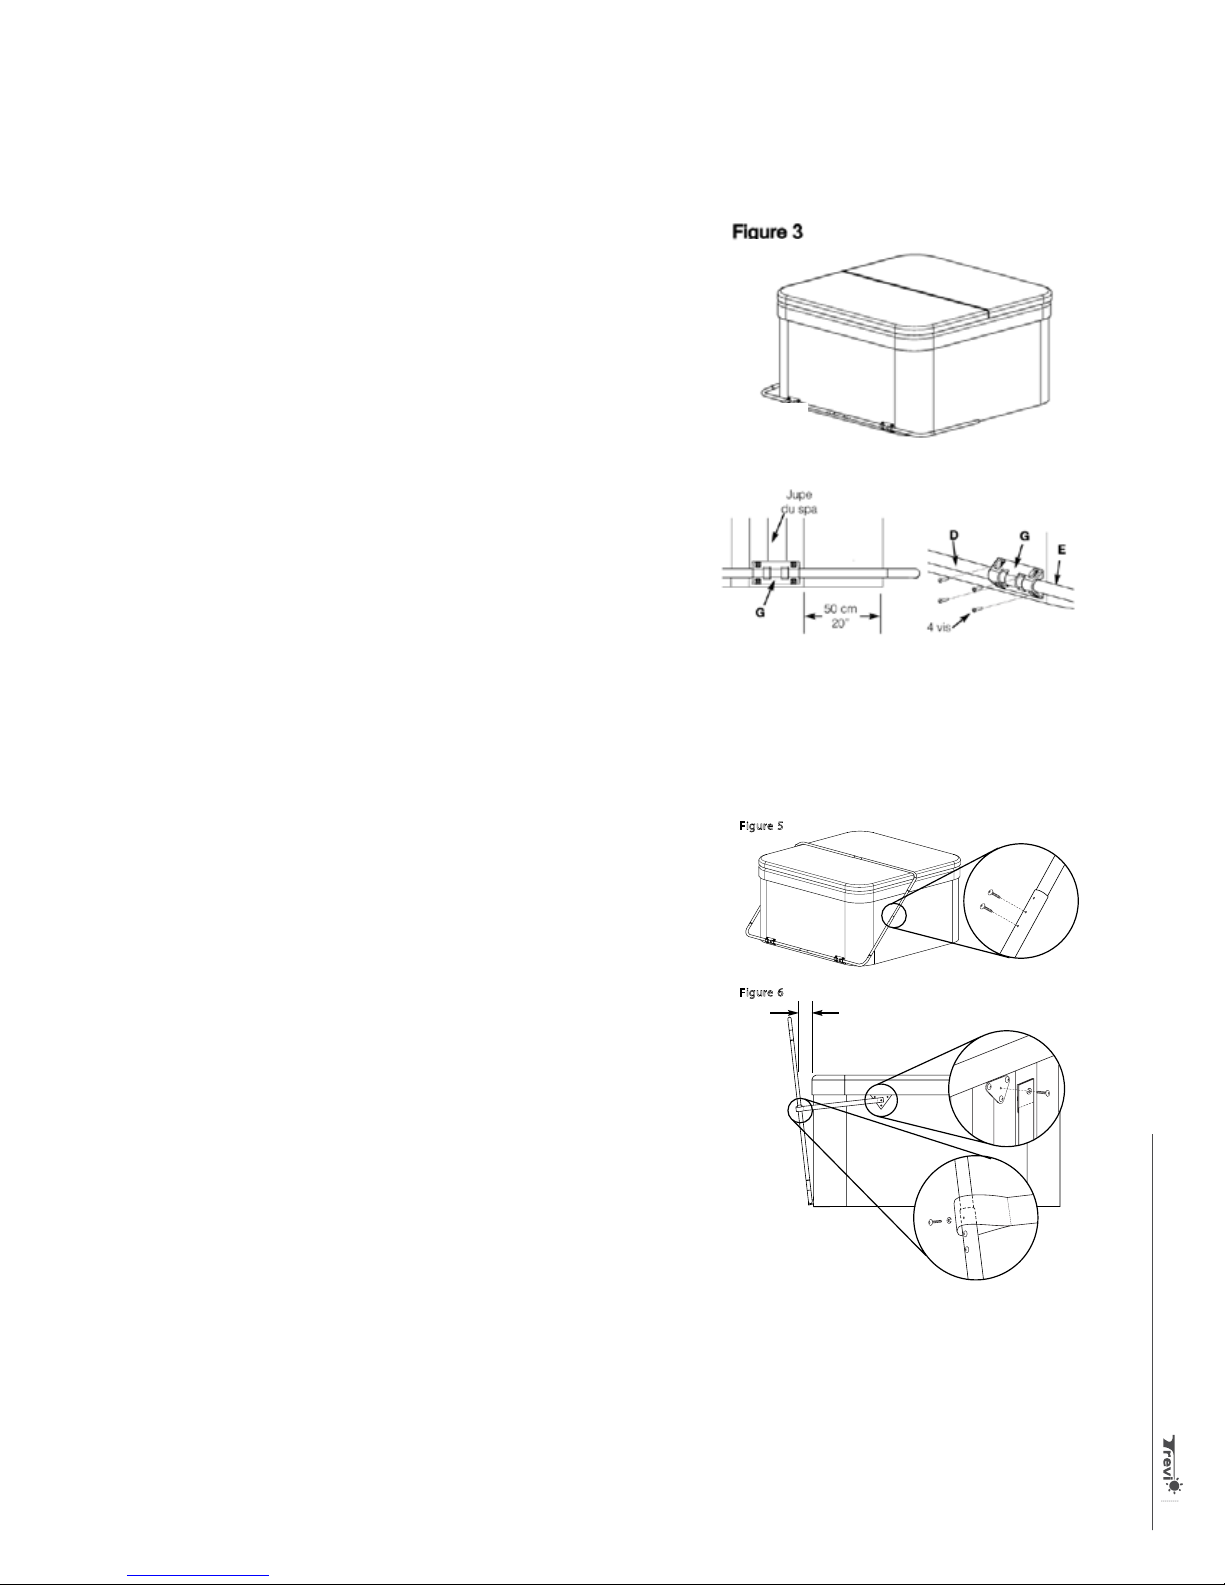
Step 3: Assembly of the lower section
▪ Insert the ends of (F) in (E). Place the shorter end (E) on the
conic nose tapered end of (D). To adjust the width, slide the
other end of the tubes (D) onto the upper section (C) tubes.
▪ Center (F) in (E) using a tape measure and the center mark.
Connect the different parts of the lower section using the 3/4''
long self-drilling screws (3 at each end). The screw heads
should be on the outside of the frame.
▪ Connect (D) and (E) using the 5/16" x 1 5/8" long screws and nuts
(2 per side). The nuts must be facing towards the ground.
Step 4: Section assembly
▪ Place the assembled lower section of the frame (DEF) at the
bottom of the spa. Install the frame’s 2 mounting brackets (G)
50 cm (20") from each end of the spa. Attach the mounting
brackets (G) to the spa with 1 ¼’’ long wood screws and flat
washers (4 per support). Do not screw into the joints of the
skirt (Figure 3).
Step 5: Section assembly
▪ Place the top section (ABC) on the central stitching of the
spa cover. Insert (C) in (D). Connect (C) and (D) using the 2
holes of (D) with 3/4'' long self-drilling screws (Figure 4).
Figure 6 Figure 7
Step 6: Installation of belts
▪ Attach the belt which is already inserted into section (D) into
the top hole using 3/4" long self-drilling screws of the flat
washer (Figure 5).
▪ Hold the frame so it is 13 cm (5") from the spa. Tighten one of
the belts against the edge of the spa. Mark the spot. Fasten
the belt bracket against the edge of the spa with 3 1" long
wood screws. Do not screw into the joints of the skirt. Attach
the belt through the hole in the center of the belt holder using
1¼" wood screws and flat washers (Figure 5).
Figure 4
Figure 5
Fig ure 5
Fig ure 6
13 cm
5”
▪ Do the same thing on the other side the spa.
Step 7: Removal of cover
▪ Place the removal mechanism on the spa cover and
fold the cover over the upper section of the framework
(Figure 6). Lift the folded cover away from the spa; the
withdrawal mechanism should hold it in place above the
ground in a vertical position (Figure 7).
Trevi Spa User Guide
17
Page 18
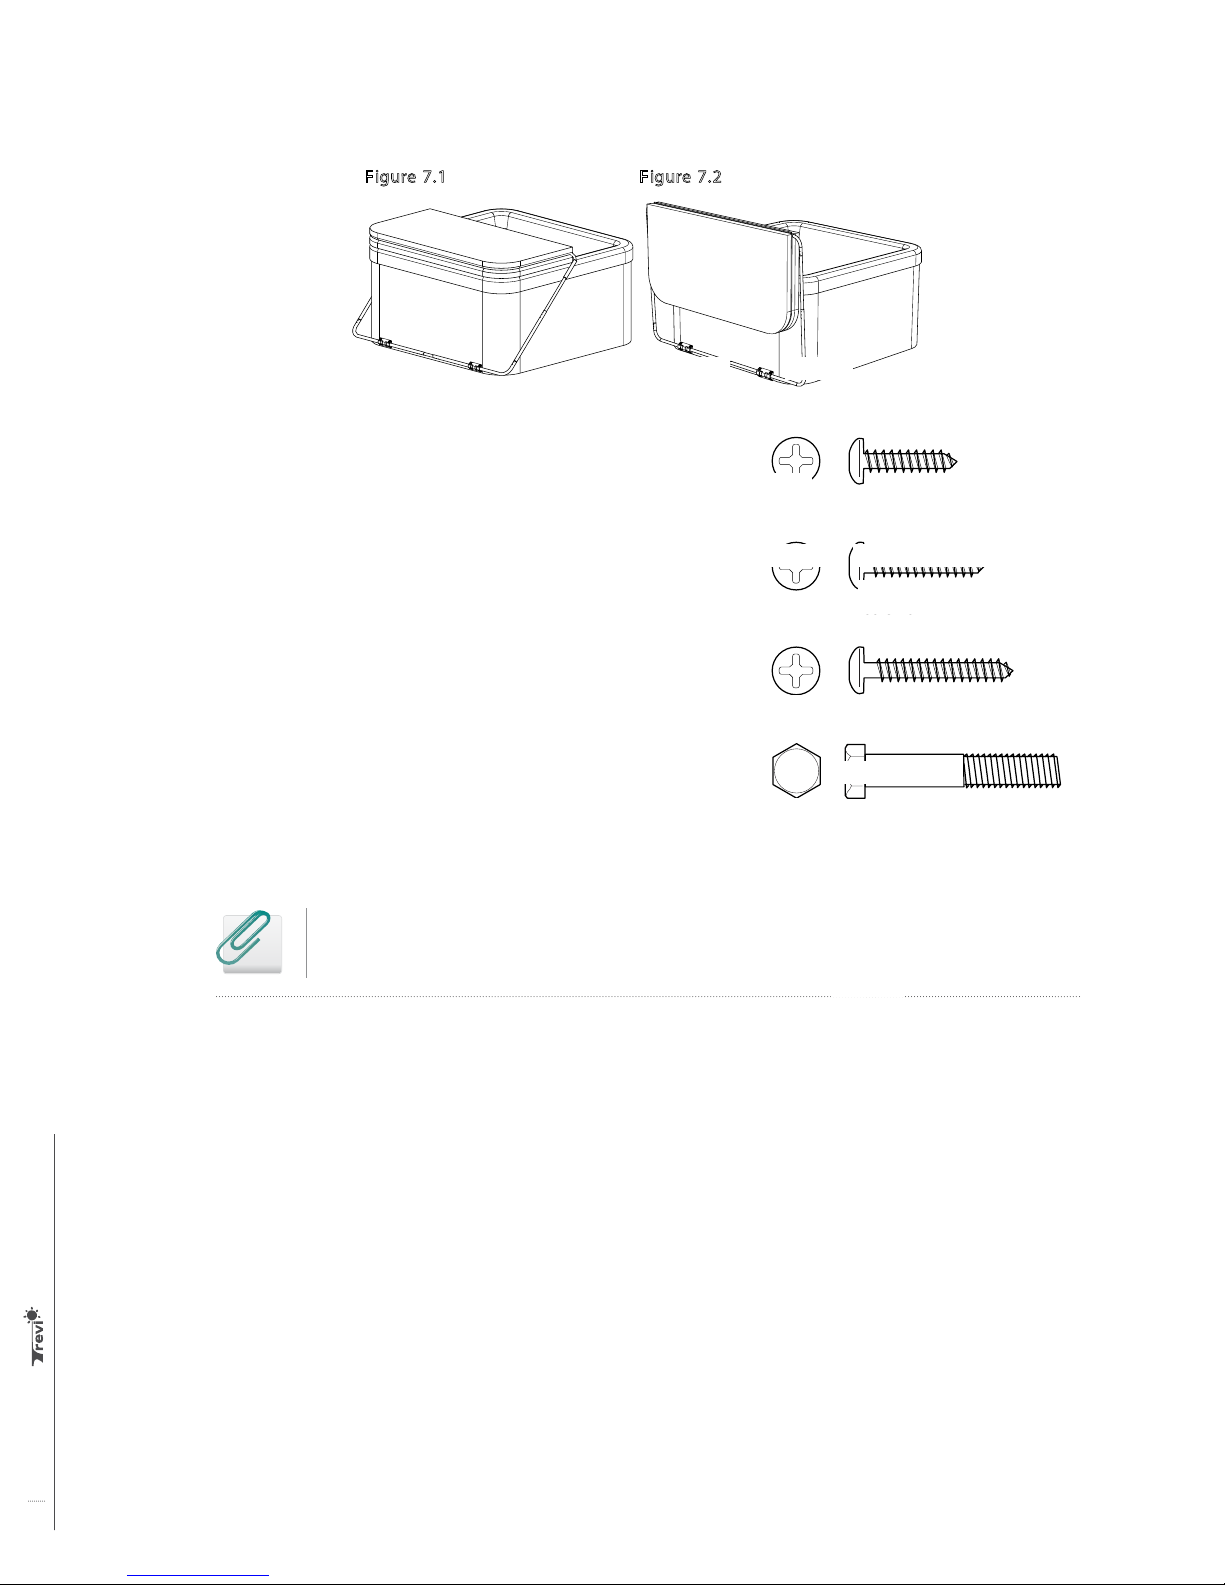
Figure 5
Figure 7.1
Figure 6
13 cm
5”
Figure 7. 2
Figure 7. 2
Figure 7. 2
Figure 7. 2
Figure 7.2
(A) “L” shaped upper corner part - 2.5 cm (1") dia. (2)
(B) Upper central tube - 2.2 cm (7/8") dia. x 110 cm (40") long (1)
(C) Upper side tube - 2.5 cm (1") dia. x 89 cm (35") long (2)
(D) Lower side tube - 28.6 cm (1 1/8") dia. x 63.5 cm (25") long (2)
(E) “L” shaped lower corner part - 28.6 cm (1 1/8") dia. (2)
(F) Lower central tube - 2.5 cm (1") dia. x 110 cm (40") long (1)
(G) Frame assembly support (2)
Belt support (2)
Belts (2)
5/16" x 1 5/8" long screw with hexagonal head and nuts (8)
¾" long self-drilling screws (18)
1" wood screws for the belt support (6)
3/16" x 1 1/4" long wood screws (6)
Flat washers (4)
Installation of the hydraulic spa cover
Figure 1.1
Spa edge
Cover
18 – ¾" self-drilling screws
Figure 1.2: Surface installation
6 – 1" wood screws
4 lag bolts
10 - 3/16" x 1 ¼" wood screws
Figure 2.1
5/8" bolt
Locking
8 - 5/16" x 1 5/8" long screws
key
with hexagonal head
Stabilizer
bar
Pivoting
bar
U-support
Figure 1.3: Side installation
minimum of
4 ¾" bolts
4 lag bolts
Figure 2.2
Pivoting arm
1 ¾" bolt
Before you begin, please determine if you are making a surface or side installation.
NOTE: You will find the parts drawing at the end of this document.
Trevi Spa User Guidea
18
Figure 3
Nut
Threaded
stud
Blocking
tube
Threaded
stud
Stabilizer
bar
Hydraulic
cylinder
Nut
U-Support
Page 19
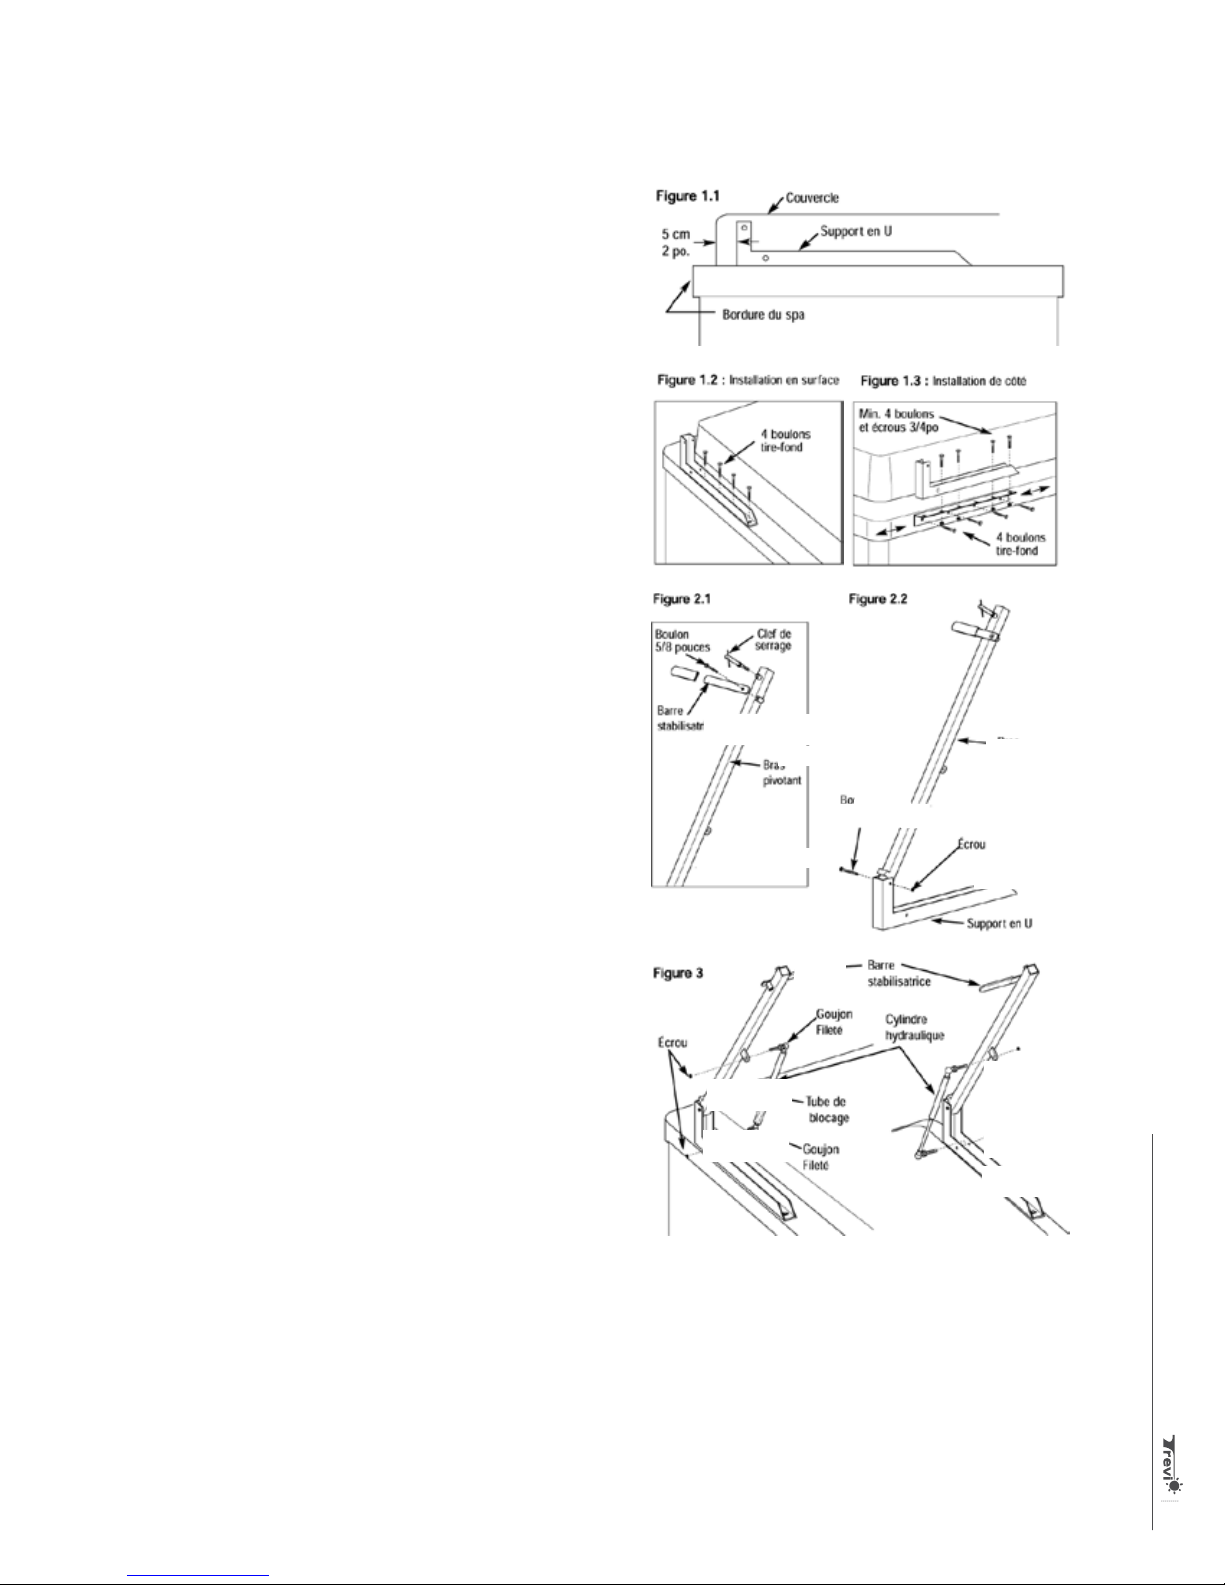
Step 1: Attaching the removal support.
Note: Place the spa cover in the closed position. Offset
the back of the U-bracket for the cover border 5 cm
(2") forward. Make sure the U-bracket is parallel to the
spa cover. (Figure 1.1)
▪ Surface installation: Attach the U-bracket on the
top of the frame in the pre-drilled wood holes using
4 1 1/4" bolts. Install the other side the same way.
(Figure 1.2)
▪ Side installation: Check that once assembled, the
bracket and the support will have at least 4 aligned
holes and that the support will be at 5 cm (2") from
the edge of the spa.
▪ Mark the position of the side bracket holes on
the wooden edge of the spa and attach it using
4 1 ¼" bolts. Install the other side the same way.
(Figure 1.3)
▪ Align the holes of the side bracket with the
holes in the U-bracket. There are 5 holes on the
U-support and 6 on the bracket. You must align at
Figure 4.2
least 4 holes and secure with the 3/4" bolts and
nuts. (Figure 1.3)
Figure 4.1
Step 2: Assembly of pivoting arms.
▪ Screw the stabilizer bar into the small threaded
cylinder on the pivoting arm using a 5/8" bolt so
that the bar passes over the square tube and is
perpendicular to the tube (Figure 2.1).
Note: If the cover is more than 12.5 cm (5") thick,
screw it parallel to the tube or omit it. Partially
Cover stitching
screw the extension arm tightening key in the hole
located above the stabilizer bar. (Figure 2.1)
Select the swivel arm with the stabilizer bar
pointing inwards and attach it to the U-bracket using
a hexagonal 1 ¾" bolt and self-locking nut. Do not
overtighten. (Figure 2.2)
Locking
key
2 pins
Figure 4.3
Cover
stitching
Drawing of parts
4 pins with casing
2 extension arms
2 1¾" bolts
and nuts
2 U-supports
2 5/8" bolts
2 stabilizer bars
2 pivoting
arms
2 locking
keys
2 hydraulic
cylinders
10 ¾" bolts
and nuts
2 brackets
4 nuts
8 1¼"
lag nuts
Figure 5
Trevi Spa User Guide
19
Page 20
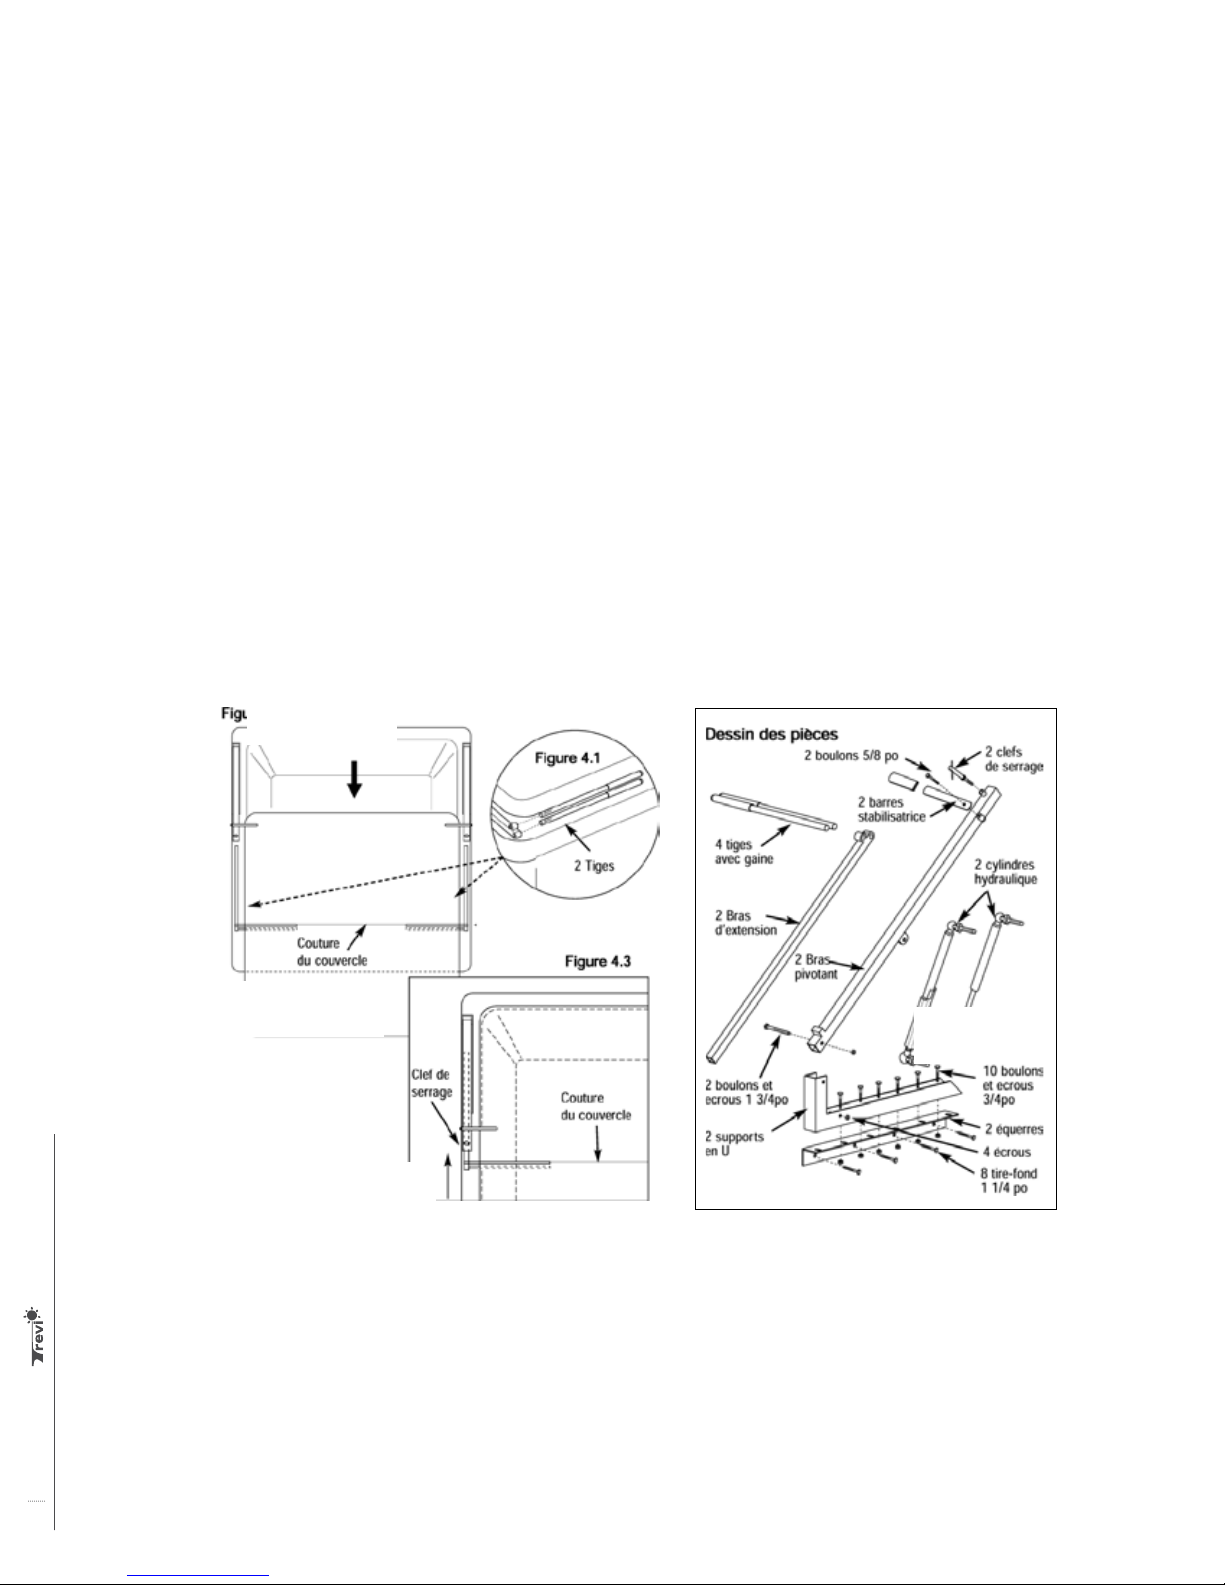
Step 3: Cylinder installation
Note : Installez le cylindre hydraulique avec blocage du coté le plus accessible du spa. Le tube de blocage doit être
en bas et sa partie chevauchante doit être du coté du support en U. Sa partie coupée fait face à l'arrière. Fixez le
goujon fileté du petit tube du cylindre hydraulique dans le support en U et sécurisez avec l'écrou indésserrable.
Fixez l'autre bout, le gros tube du cylindre hydraulique, dans le bras pivotant et sécurisez à l'aide d'un autre écrou
Rear sink
clearance for
manual sink
indésserrable. (Figure 3)
Rear clearance for
hydraulic sink
Step 4: Assembly of the extension arm
▪ Place the extension arms on each side of the spa and make sure that the set-back, attached, threaded cylinder is
on the top. Screw the 2 pins into the end of each lower side extension arms. (Figure 4.1) Place the spa cover to the
closed position and pull it forward. Slide the extension arm pins into the center of the cover seam by keeping the
upper pin visible (Figure 4.2). Do the second side. Fold the pivoting arms and push the cover to reinsert the extension
Clearance on each side
arms until the cover is in its normal position. Check that the extension arms are inserted at an equal distance. Screw
for sink
the locking key to maintain the position (Figure 4.3).
Step 5: Removing the cover
▪ Fold the front half of the cover and lift the cover to the rear (Figure 5).
Step 6: Removing the cover
▪ Push the hydraulic cylinder blocking tube and push the spa cover. Unfold the cover.
Distance to be drilled
under the spa for the
electrical power supply
Rear sink clearance for
manual sink
Clearance on each side
for sink
Distance to be drilled
under the spa for the
electrical power supply
Trevi Spa User Guidea
20
Rear clearance for
hydraulic sink
Page 21
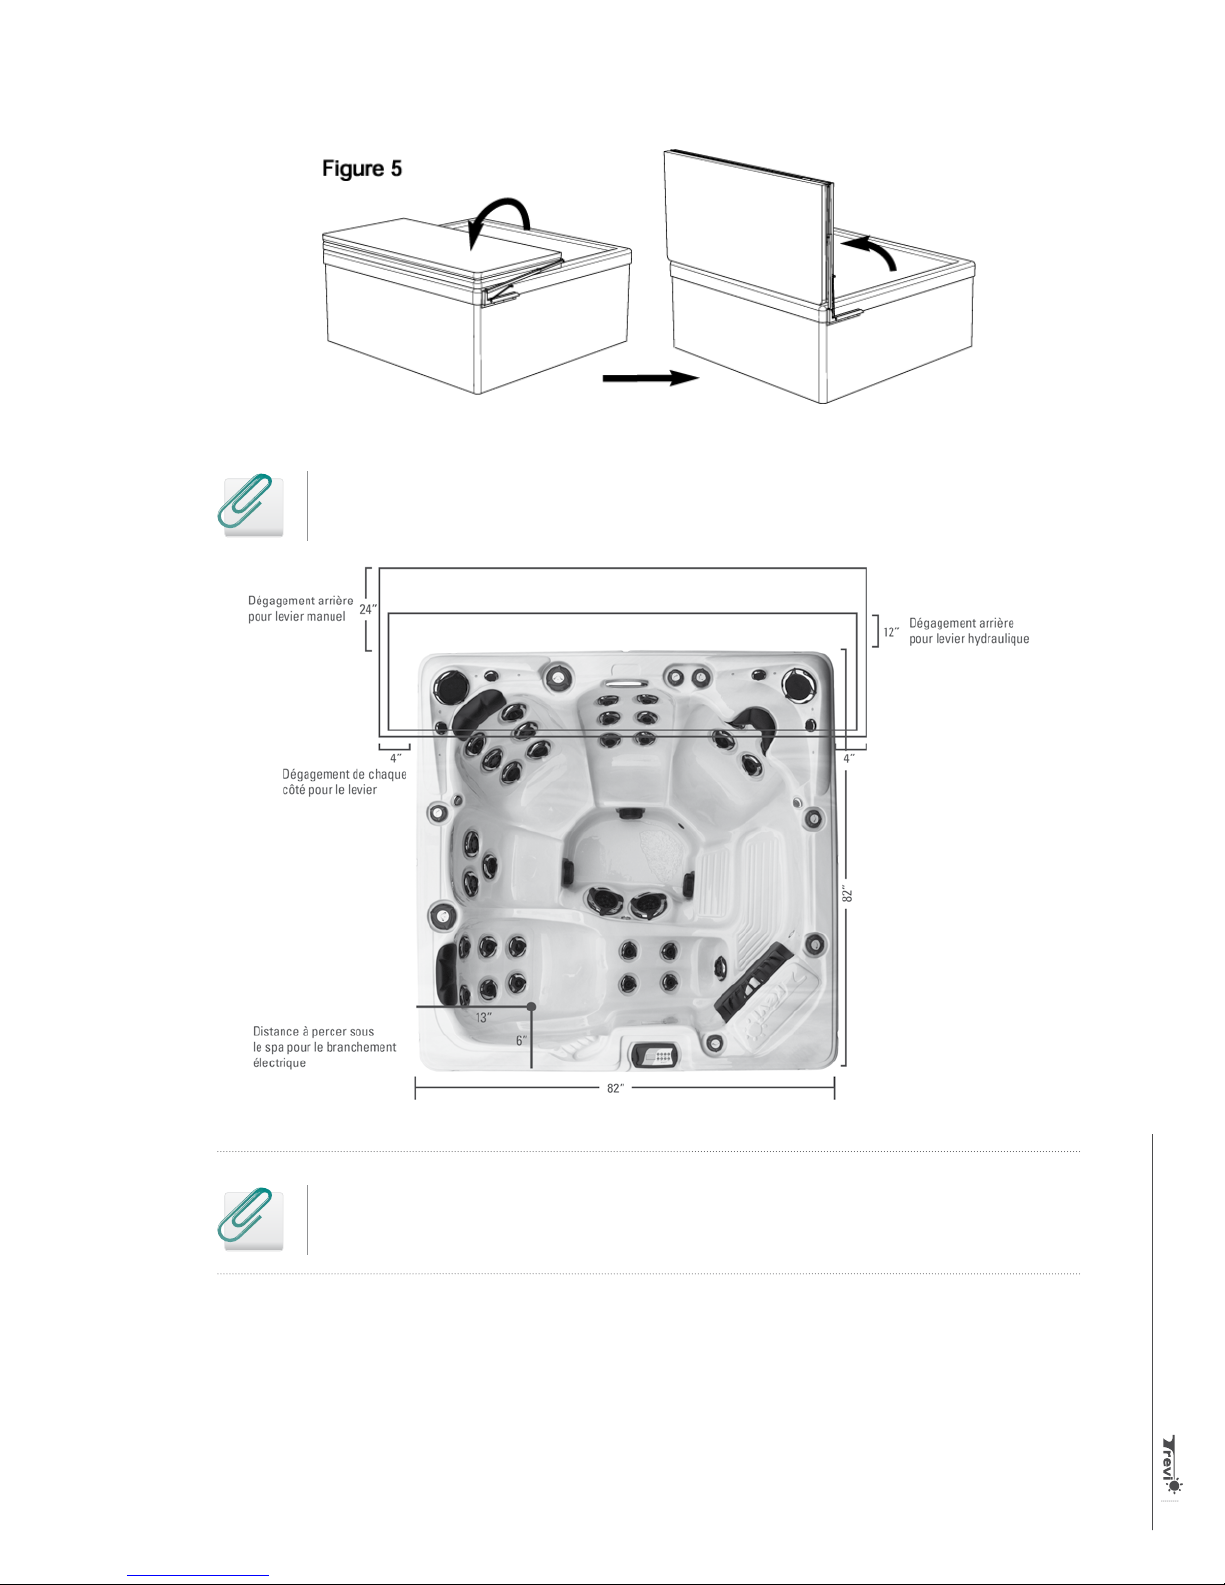
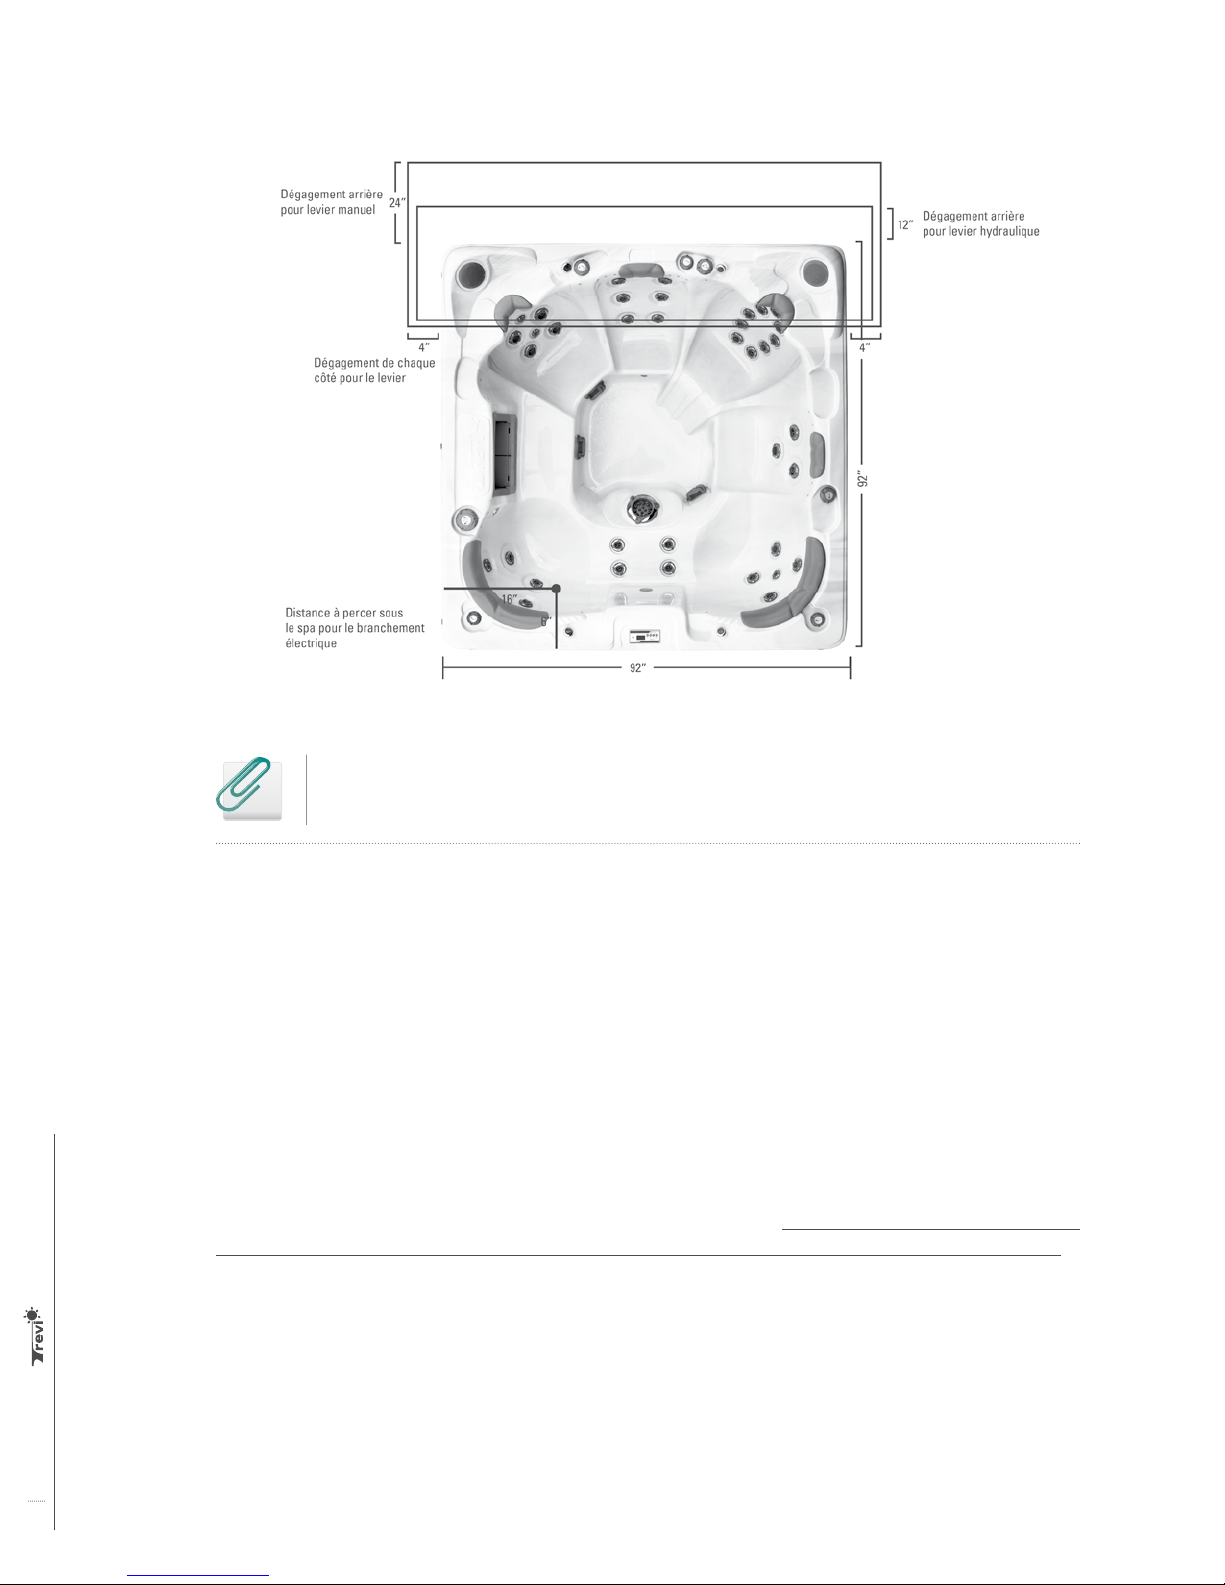
Rear sink clearance for 82" spa
Rear sink clearance for 92" spa
Trevi Spa User Guide
21
Page 22
Maintenance of spa components
The jets
All jets are adjustable, with the exception of those which are fully chromed (euro jet), so the power can be
adjusted. You can also remove them by unscrewing them. Same size jets are interchangeable.
The jets should be examined every time the water is drained to check the level of accumulated scale. If there is
scale build-up, the jets must be soaked in a solution containing TREVINERGY SECURE 4 and gently brushed.
They then should be rinsed thoroughly.
Valves
Depending on the spa, the number of valves as well as their positioning may vary. Normally, smaller valves are
for air control. They allow air to be inserted into the water to make the seat jets more powerful.
There are 2 other types of valves: the shut-off valve and the bypass valve. The first is used to completely open
and close the cervical stations as well as the falls. It’s a medium-sized valve. The largest is the bypass valve.
It directs the water to a specific station at the expense of any another. It is very important to close the pump
before adjusting by-pass valves, otherwise strong pressure in the piping and pumps could cause breakage.
Acrylic
A ring may form on the acrylic at the water mark level. This ring will eventually disappear with time, but to
remove it, use a microfiber cloth or a Miracle Pad.
Cushions
We recommend that you do not remove the cushions. If you must, it is very important to insert your fingers
onto each side of the cushion buckles and lift very slowly not to damage them.
Trevi Spa User Guidea
22
It is recommended to apply wax on the cushions with a cloth to protect them against the effects of chemical
products (auto, Armor All, paste wax).
Page 23
Cover
It is important to well maintain the spa cover; we recommend that you clean the cover twice a year so
that it keeps its shine and flexibility.
▪ To clean it, first rinse with water. Then, use a mixture of one teaspoon of mild liquid dish soap for every 9
litres of water to clean it with a nylon bristle brush. Do not dry the soap, and rinse immediately. Once the
cover is dry, apply a high quality leather protector (wax) to keep the leather hydrated and supple.
▪ It is important to open the cover at least 2 hours per week to allow the chemical fumes to evaporate and
to give a chance for the cover to dry.
▪ The cover should also be reversed on the spa twice every year for a period of 3 or 4 hours each time.
Please note that it is advisable to wait approximately 20 to 30 minutes before closing the spa cover following
the addition of chemicals.
Maintenance and Water Balancing
Water balancing
▪ Bring a water sample to the store to balance the water parameters. We'll tell you the procedures to
follow.
▪ Add 5 full caps of TREVINERGY CLEAR3 to the spa, wait 1 hour.
▪ Add 5 full caps of TREVINERGY SECURE4 to the spa, wait 1 hour.
▪ Begin water disinfection with the chosen conditioning method.
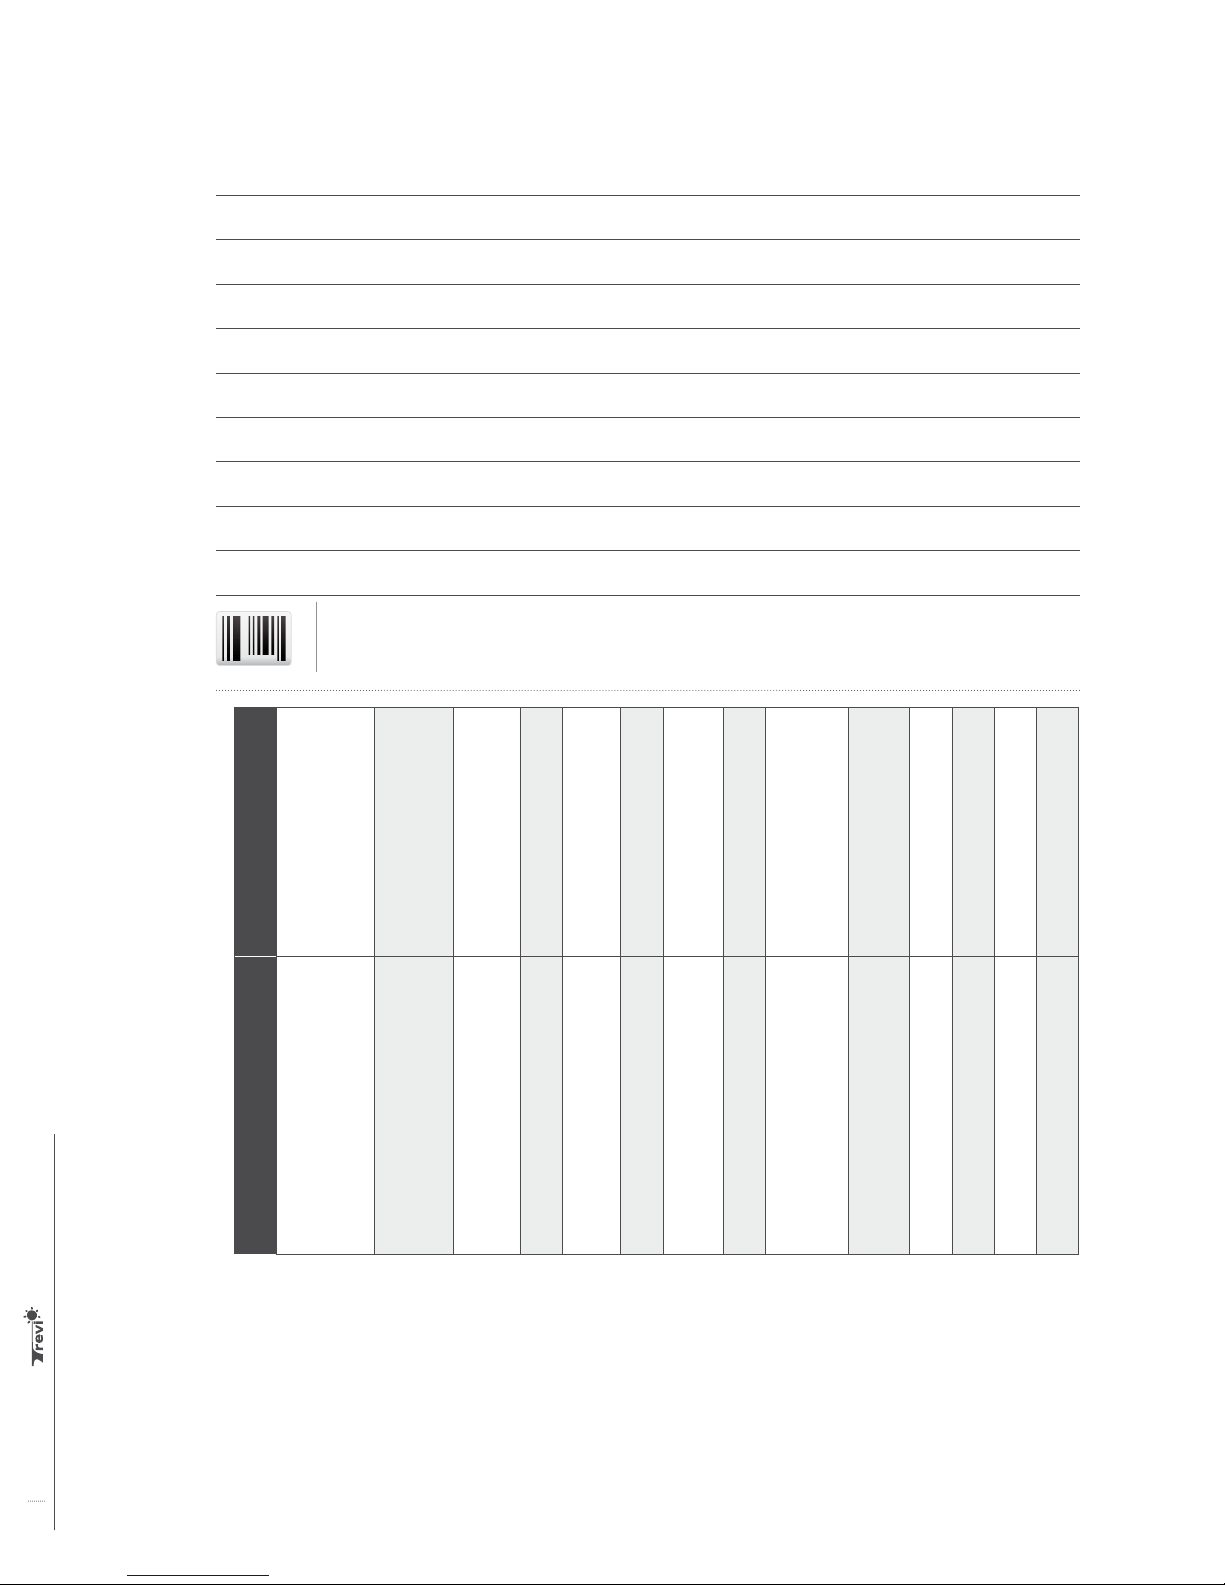
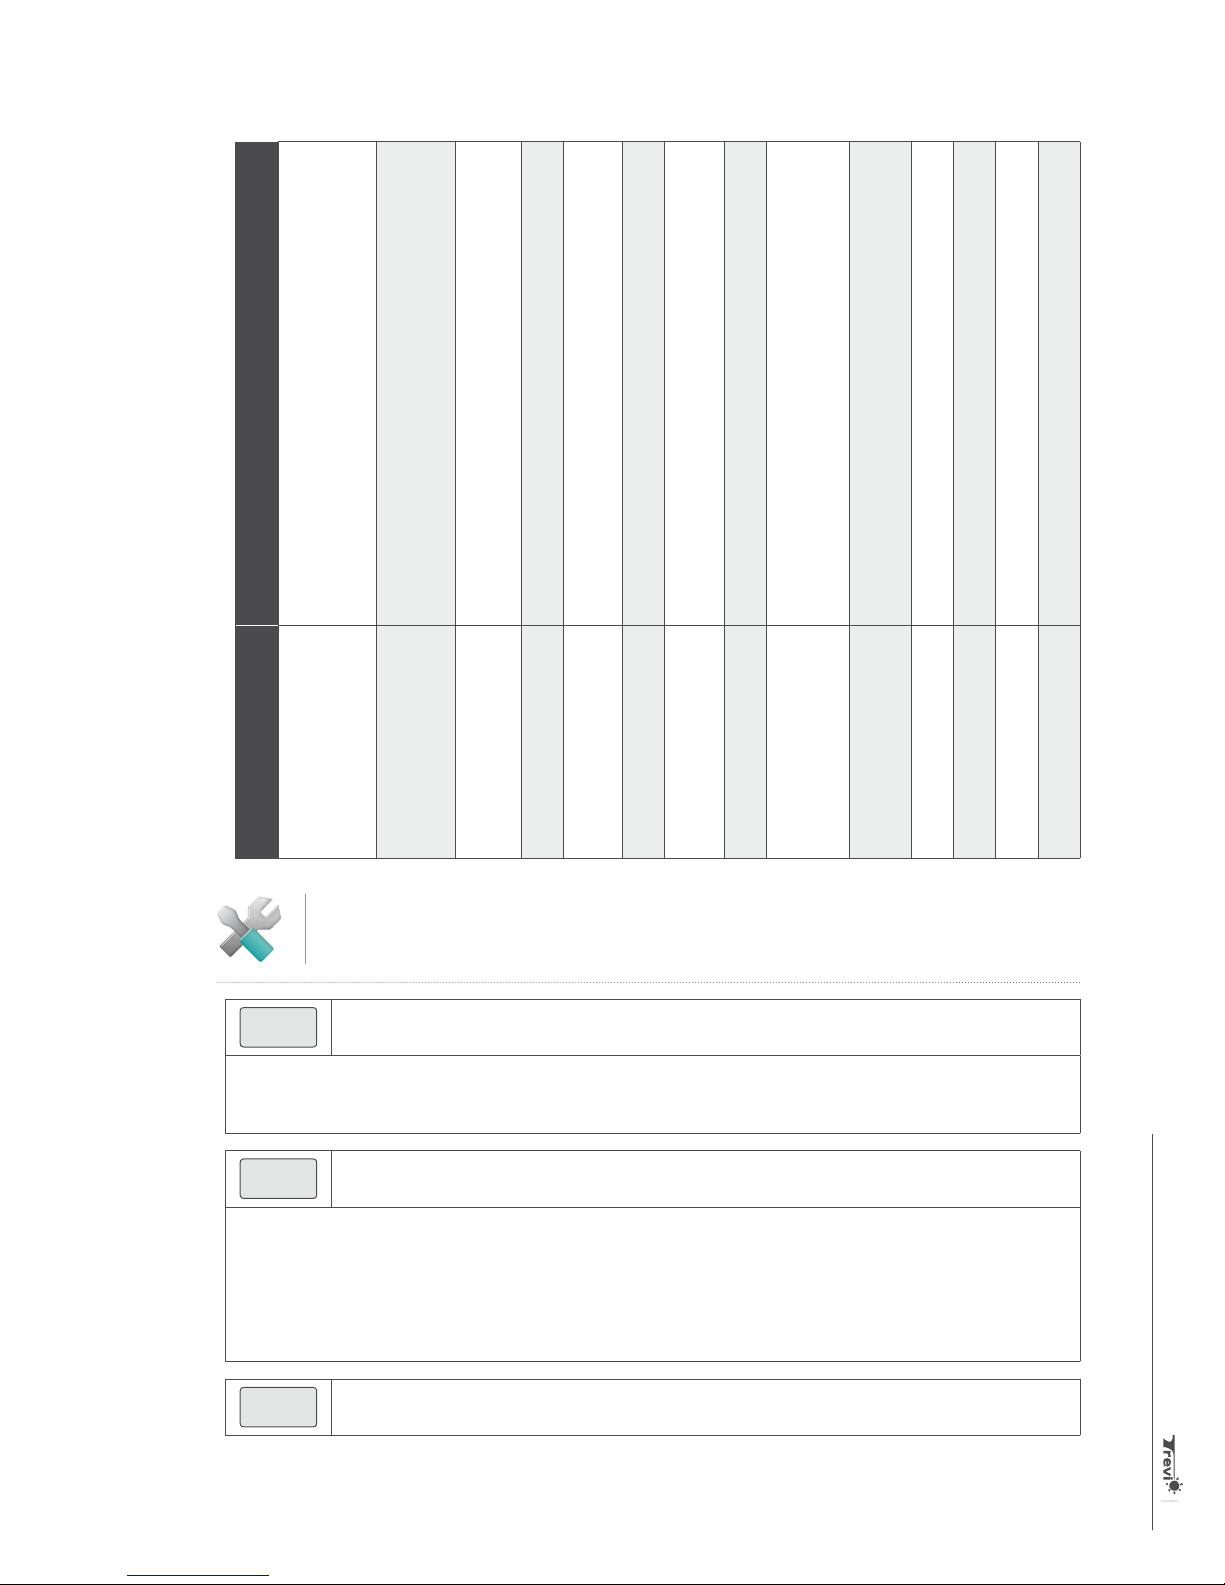
▪ Trust Spa Maintenance Products shown in the table for weekly and monthly maintenance, as well as
the products and their effects
Notes
Trevi Spa User Guide
Notes: One tablespoon = 15 ml
Always dilute granular cleaning products before putting them in the spa. Powdered products must be diluted before placing them in the spa water to avoid residues and stains on the acrylic.
You must start the pumps before pouring a product in water and the lid must remain open for 20 minutes after the product has been paid. Do not mix 2 products together. Always wait at least 30
minutes before bathing if a product has just been put in the spa and also, before putting other products in the spa. There are 2 exceptions: for Secure, wait at least an hour and for lithium, wait at
least 4 hours. The emptying of the spa should be done every 3 months because the solid dissolving rate in water (SDR) becomes too high and the water becomes over-saturated.
23
Page 24
102234
Frequency
Trevi spa maintenance products
Trevi Spa User Guidea
24
Quantity
Every day after bathing
1 tbsp. by bather or 1 tbsp. if not bathing
(max 4 tbsp. per day)
Twice a week. Keep the brome
rate constant
1 to 2 tablets. Maximum of 3 tablets
Every 2-4 days depending on use
of the spa
Once a week
Once a week
Once a week
1 tablet
3 tbsp. or 1 40 g bag
3 full caps
4 full caps
At least every month or every 3
months (depending on usage)
When needed
Put in before emptying the spa in
the spring, once per year
In the spring following the use
250 ml per 10 L of water
Let soak 12 hours
1 cap-full. Repeat as needed
250 ml and operate the pumps for 60
minutes
of Whirl
When needed
When needed
When needed
When needed
When needed
When needed
Keep between 80 and 120 ppm
Keep between 7.2 and 7.6 ppm
Keep between 180 and 240 ppm
Page 25
Functioning or properties
Dilute lithium before placing it in the spa after bathing. (Tendency to
increase pH). For every 4 tablespoons of Lithium, add 1 tablespoon of
pH - (or) 1 to 2 tablespoons of pH per week
Put bromine tablets in a floating dispenser. (Tendency to reduce
alkalinity.) Put 1 tablespoon of Alca per week.
Product
Put the tablets in a floating dispenser or the skimmer.
Destroys bacteria, algae and helps to clear the water.
Clears water, prevents the formation of foam and eliminates fatty
deposits.
Eliminates and prevents the formation of tartar and stains.
Dissolves grease, body oils, lotions, cosmetics and calcareous wastes.
Eliminates and prevents the accumulation of foam.
Removes fats, body oils, lotions and cosmetics. Remove the cartridge
before using the product in the spa and close the air control
Restores luster to acrylic.
Cleans the spa cover and headrests.
Increases alkalinity.
Increases the pH / Decreases the pH.
Increases calcium hardness.
Lithium
Brome
Spa Tab
Shock treatment (Oxy)
Clarifying agent (Clear 3)
Descaler (Secure 4)
Cartridge cleaner
Anti-foam
Whirl
Acrylic cleaner
Cover cleaner
Alca +
Error codes on Spa Pack in.xm
SP-HR
▪ Restart the Spa Pack then start and stop all pumps and turbine.
▪ If the error reappears, replace the Spa Pack in.xm
SP-BR
▪ Increase the nominal current in.xm and the adjustment of the circuit breaker.
▪ Increase the size of the circuit breaker as well as the cables from the manufacturer or decrease the size of the pump.
Sp-Br is not considered an error, so the SERVICE icon does not appear on the display. Although Sp-Br should be seen as a
warning, it is unable to activate the water heater and other accessories if the available current is insufficient.
SP-IN
An internal error of the in.xm equipment has been detected
The rated current of the selected entry is less than the sum of the current of all pumps
The supply voltage is too low
pH + / pH -
Calcium
Trevi Spa User Guide
25
Page 26
This indicates a problem with the connections of the terminals or power lines.
▪ Check to see if the connections of the terminals at the input are well executed.
▪ Have the quality of the power lines checked by a certified electrician.
You should read 240V between phase 1 (L1) and phase 2 (L2), and 120v between each phase and neutral.
The
in.xm
SP-F1
Fan, turbine, circulating pump and fibre optics.
▪ Replace the F1 fuse that has blown with a fuse of same calibre (SC-20, SC - 25, etc.)
▪ If the new fuse blows, unplug the fan, the turbine, the circulation pump and the fibre optic.
▪ Replace the fuse and reconnect all the elements one-by-one until the fuse blows.
▪ Replace the element that blew the fuse.
SP-F2
Pump 2, pump 3 or turbine more than 5A.
▪ Replace the fuse F2 fuse which has blown with a fuse of the same calibre (SC-20, SC-25, etc.)
▪ If the new fuse blows, unplug pump 2, pump 3 or the turbine.
▪ Replace the fuse and reconnect all the elements one by one until the fuse blows.
▪ Replace the element that blew the fuse.
The
F1 fuse is blown
in.xm
F2 fuse has blown
The
in.xm
SP-F3
Pump 1
▪ Replace the F3 fuse which has blown with a fuse of the same calibre (SC-20, SC-25, etc.)
▪ If the new fuse blows, replace pump 1.
SP-OT
The temperature inside the spa skirt is too high, causing an increase in the internal temperature of in.xm above normal limits
(overheat condition).
▪ Remove the skirt of the spa and cool the system.
▪ You may have to trip and then reset the circuit breaker to clear the error.
SP-OH
The keypad displays a temperature of 44°C (112°F) and flashes. The system detects a higher water temperature than 44°C
(112°F – overheating condition).
▪ Remove the spa protection (cover, lid...) and allow the water to cool.
▪ Add cold water and decrease the filtration cycle.
▪ If the error persists, measure the temperature of the water with a DIGITAL thermometer and compare its reading to the
display. If temperature readings are different, replace the in.therm and if the problem persists, replace the Spa Pack
The temperature inside the spa skirt is too high
Temperature above 44°C (112°F) temperature – overheating condition
F3 fuse is blown
in.xm
water heater error codes
Trevi Spa User Guidea
26
Page 27
in.therm
RH-HR
An in.therm hardware error was detected (concerns the electronic circuit only).
▪ Trip then reset the main circuit breaker; make sure that the water heater restarts by changing the set point and by starting
and stopping each output (pumps).
▪ If the problem persists, replace the in.therm.
error (electronics)
RH-NH
This error occurs if the in.therm tries to heat the water but does not detect any increase in temperature.
▪ Check and see if the in.therm is connected properly (you should hear a click).
▪ Trip and then reset the main circuit breaker.
▪ Measure the voltage on the Di connector; you should read:
- 240vac at the Di connector: Pin 1 and Pin 2
- 120vac at the Di connector: Pin 5 and Pin 6
- 120vac at the Di connector: Pin 5 and Pin 2
▪ If the voltage is not correct, switch off then reset the breaker.
▪ If the voltage is correct, replace the in.therm.
RH-NF
This code appears when the in.therm detects a "no flow" condition (no flow).
▪ Make sure that the valves are open and that the water level is high enough.
▪ Check and clean the filters.
▪ Make sure that there are no air pockets (or that no object obstructs the passage of water into the in.therm channel). The
pumps can create strange sounds and error messages such as "P1 ER" that may appear on the display. Follow the air-lock
procedure to delete these messages.
▪ Make sure that pump coupled to the water heater (pump 1) turns by pressing the P1 button. If the message "P1 ER" appears
on the display, go to the pump 1 (error) section and follow the procedure.
in.therm error (water heater)
in.therm error ("no flow" condition)
RH-HL
There are 2 possible causes:
▪ The water heater has been stored in a place where it was very hot before installation and there is no water in the tube to
cool it: use a garden hose to cool the inside of the tube.
▪ The external ambient temperature is high enough to heat the water, even if the pumps are not operating.
- Add cold water into the spa and allow the heater to cool.
▪ Reset the Spa Pack with the circuit breaker.
RH-NC
▪ Make sure that the water heater cables are connected properly and that none of the wires on the cable connectors are
damaged.
▪ If the problem persists, the in.xm or the in.therm will need to be replaced (the two devices must be returned to find out
which of the two is defective).
The equipment overheating circuit has been tripped
Communication problem between
in.xm
and the
in.therm
Accessory error codes
Trevi Spa User Guide
27
Page 28
P1-ER
The system has detected no change in current when pump 1 is activated or stopped.
▪ Make sure that pump 1 is connected properly (you should hear a click when properly connected).
▪ Change the output status (on/off) of pump 1 and try all possible conditions (i.e. low, high, and stop).
▪ Reset the Spa Pack by pressing the Select button twice.
▪ If the error is not cleared, the problem is surely pump 1. It must be replaced.
▪ If pump 1 is replaced, learning mode must be performed again.
Pump 1 error
P2-ER
The system has detected no change in current when pump 2 is activated or stopped.
▪ Make sure that pump 2 is plugged in correctly (you should hear a click when properly done).
▪ Change the output status (on/off) of pump 2 and try all possible conditions (i.e. low, high, and stop).
▪ Reset the Spa Pack by pressing the Select button twice.
▪ If the error is not cleared, the problem is surely pump 2. It must be replaced.
▪ If pump 2 is replaced, the learning mode must be performed again.
P3-ER
The system has detected no change in current when pump 3 is activated or stopped.
▪ Make sure that pump 3 is plugged in correctly (you should hear a click when properly done).
▪ Change the output status (on/off) of pump 3 and try all possible conditions (i.e. low, high, and stop).
▪ Reset the Spa Pack by pressing the Select button twice.
▪ If the error is not cleared, the problem is surely pump 3. It must be replaced.
▪ If pump 3 is replaced, the learning mode must be performed again.
CP-ER
Pump 2 error
Pump 3 error
Circulation pump error
The system has detected no change in current when the circulation pump is activated or stopped.
▪ Make sure that the circulation pump is plugged in correctly (you should hear a click when properly done).
▪ Change the output status by changing the set value.
▪ Reset the Spa Pack by pressing the Select button twice.
▪ If the error is not cleared, the problem is surely the circulation pump. It must be replaced.
▪ If the circulation pump is replaced, the learning mode must be performed again.
Turbine error
Trevi Spa User Guidea
BL-ER
The system has detected no change in current when the turbine is activated or stopped.
▪ Make sure that the turbine is plugged in correctly.
▪ Change the output status (on/off) of the turbine.
▪ Reset the Spa Pack.
▪ If the error is not cleared, the problem is surely the turbine. It must be replaced.
▪ If the turbine is replaced, the learning mode must be performed again.
28
Page 29
O3-ER
The system has detected no change in current when the ozonator is activated or stopped.
▪ Make sure that the ozonator is connected correctly.
▪ Change the output status (on/off) of the ozonator.
▪ Reset the Spa Pack.
▪ If the error is not cleared, the problem is surely the ozonator. It must be replaced.
▪ If the ozonator is replaced, the learning mode must be performed again.
Ozonator error
A1-ER
The system has detected no change in current when Aux.1 is activated or stopped.
▪ Make sure that the aux.1 device is connected properly.
▪ Change the output status (on/off) the Aux.1 device.
▪ If the error is not cleared, the problem is surely the Aux.1 device. It must be replaced.
▪ If the Aux.1 device is replaced, the learning mode must be performed again.
A2-ER
The system has detected no change in current when Aux.2 is activated or stopped.
▪ Make sure that Aux.2 is connected correctly.
▪ Change the output status (on/off) of the Aux.2 device.
▪ If the error is not cleared, the problem is surely the Aux.2 device. It must be replaced.
▪ If Aux.2 is replaced, the learning mode must be performed again.
FN-ER
Aux.1 error
Aux.2 error
Fan error
The system has detected no change in current when the fan is activated or stopped.
▪ Make sure that the fan is connected correctly.
▪ Change the output status (on/off) of the fan.
▪ Reset the
▪ If the error is not cleared, the problem is surely the fan. It must be replaced.
▪ If the fan is replaced, the learning mode must be performed again.
▪ Replace the ozonator with the fan.
FB-ER
The system has detected no change in current when the fibre optic is activated or stopped.
▪ Make sure that the fibre optic is connected correctly.
▪ Change the output status (on / off) of the fibre optic and try all possible conditions (high or low intensity).
▪ Reset the
▪ If the error is not cleared, the problem is surely the fibre optic. It must be replaced.
▪ If the fibre optic is replaced, the learning mode must be performed again.
Spa Pack
.
Fibre optic error
Spa Pack.
Trevi Spa User Guide
29
Page 30
SC-ER
When an internal option is changed, the system must relearn the currents associated with each output/load. During this
learning mode, the device connected to Di (direct output, no relay) must be disconnected IF IT REQUESTS MORE THAN 0.4A.
Otherwise, the system will detect an SC error code
▪ Disconnected load.
▪ Restart the learning mode by pressing the Select button for 5 seconds.
▪ Press Change as many times as you need for all internal programming settings.
▪ When the procedure is completed, the accessory connected to the Di can be reconnected.
The keyboard does not work
Note: the keyboard connected to in.xm is detected only when the main circuit breaker is reset. Do not forget to trip and then
reset the circuit breaker if you change the keyboard model (the in.k400 for the in.k600).
If a keyboard does not work:
▪ Check the connections of the keyboard and try a replacement keyboard.
▪ Replace the keyboard if the problem is solved.
▪ Replace in.xm if the problem persists.
System learning error
Notes
Spa Pack in.xe
HR
▪ Restart the
▪ If the error reappears, replace the
Prr
▪ Check the connection of the control probe (located above the heater).
▪ If the problem persists, replace the water heater.
▪ Replace the
HL
Trevi Spa User Guidea
30
An internal
Spa Pack
; then start and stop all pumps and turbine.
The system has detected a problem in the control probe. The system constantly checks if the control
probe readings are within normal limits.
Spa Pack
if the problem persists.
The water temperature at the water heater reached 119°F (48°C). Do not enter the water!
error codes
in.xe
equipment error was detected.
Spa Pack in.xe
.
Page 31
▪ Remove the spa protection (cover, lid...) and allow the water to cool.
▪ Add cold water and decrease the filtration cycle.
▪ If the error persists, measure the temperature of the water with a DIGITAL thermometer and compare its reading with the
display. If the temperature readings are different, replace the in.therm and if the problem persists, replace the
Spa Pack
.
FLO
▪ Make sure that the valves are open and that the water level is sufficient.
▪ Check and remove anything that could clog the filter.
▪ Make sure that there are no air pockets (or that no object is obstructing the water flow in the water heater).
The pumps can make strange noises.
UPL
▪ New internal configuration software must be downloaded to the spa the in.xe system, otherwise the system will not work.
AOH
▪ Check that the spa has enough water to work properly (a minimum of 18 gpm must circulate in the water heater).
▪ Remove the spa skirt and let the system cool down until the error disappears.
▪ Replace the
OH
The system does not detect any pressure in the pipes when the pump is running.
No internal configuration software was downloaded to the system.
The temperature inside the spa skirt is too high, causing an increase in the internal temperature
of the
in.xe
above normal limits.
Spa Pack
The temperature of the water in the spa has reached 42°C (108°F). Do not enter the water!
if the problem persists.
▪ Using a digital thermometer, measure the temperature of the water, and compare the value with the one displayed on the
keyboard. If the readings are different, replace the water heater.
▪ Remove your spa protection and let the water cool.
▪ Add cold water and reduce the duration of the filtering cycle.
▪ If the problem persists, replace the
Spa Pack
.
Compulsory and optional training
Three, free, in-store, training sessions are given so that you can better know your product, its operation and
maintenance. This training is given at different hours, several days a week. Please see the training table on
our Iinternet site at trevi.ca/services to find out the course days and hours. The days and hours are different
for each store. You can follow your training in the Trevi store of your choice:
Trevi Boucherville Trevi Blainville Trevi Laval Trevi Dorval
1235 Ampère Street 89 Jean-Guyon Street 515 Curé-Labelle Blvd 2052 Transcanadienne Road
Boucherville (Quebec) Blainville (Quebec) Laval (Quebec) Dorval (Quebec)
J4B 7M6 J7C 0K6 H7P 2P5 H9P 2N4
There is only one number to reach us: 514 22-TREVI (87384)
Trevi Spa User Guide
Training to open your spa
This course is not compulsory. No advance registration is required if you wish to take this course. See the
31
Page 32

Your contacts
Thank you for placing your trust in Trevi
You can, at any time, view and retrieve online guarantees, construction specifications, installation guides,
procedures for opening and closing, maintenance guides and a host of important documents for the proper
operation of your new purchase at TREVI.CA - Customer Access section.
Now a single number to reach us:
(87384)
514 22-TREVI
Delivery departement :
Phone : 514 22-TREVI (87384), Ext. 3
Email : [email protected]
Installation departement:
Trevi Spa User Guidea
32
Rev. : 02/2014
 Loading...