

Page 1
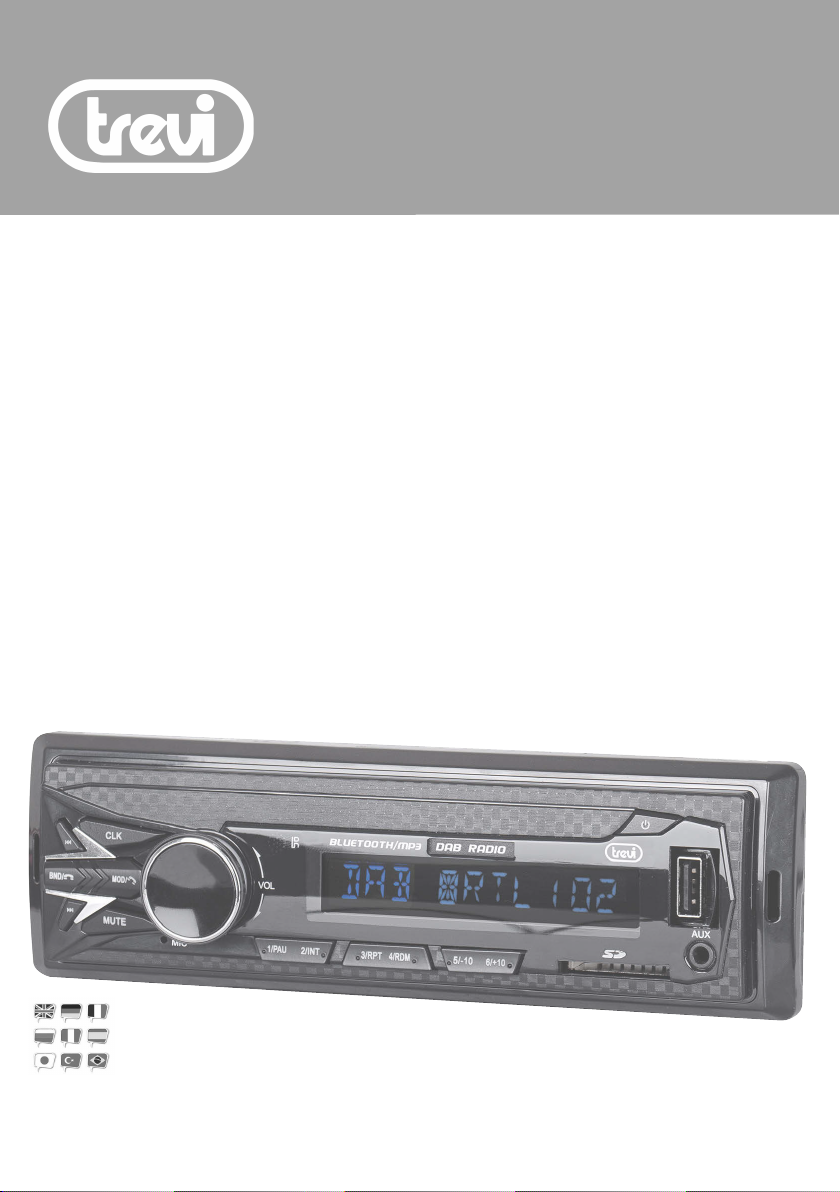
DAB/FM/BLUETOOTH/MP3/SD/USB/AUX-IN
SCD 5751 DAB
DAB/DAB+/FM
BLUETOOTH
USB
SD
AUX-IN
RADIO RIPRODUTTORE MP3
CON INGRESSO AUX-IN E SD/USB
Manuale d'uso e collegamento
SYSTEM CAR-STEREO MP3 PLAYER WITH AUXIN - SD/USB
Instruction manual
RADIO LECTEUR MP3
AVEC AUX-IN - SD/USB
Mode d’emploi
RADIO MP3-SPIELER EINZUG AUX-IN SD/USB
Gebrauchs- und Anschlußhandbuch
RADIO REPRODUCTOR MP3
CON ENTRADA AUX-IN - SD/USB
Manual de uso y conexiones
Manuale d'uso e collegamento
Instruction manual
EN If you will not find your language on the instruction manual, please go on our website www.trevi.it to find it
* Per informazioni integrative e aggiornamenti di questo prodotto vedi: www.trevi.it
* For additional information and updates of this product see: www.trevi.it
Page 2
CONNESSIONI - WIRES CONNECTION
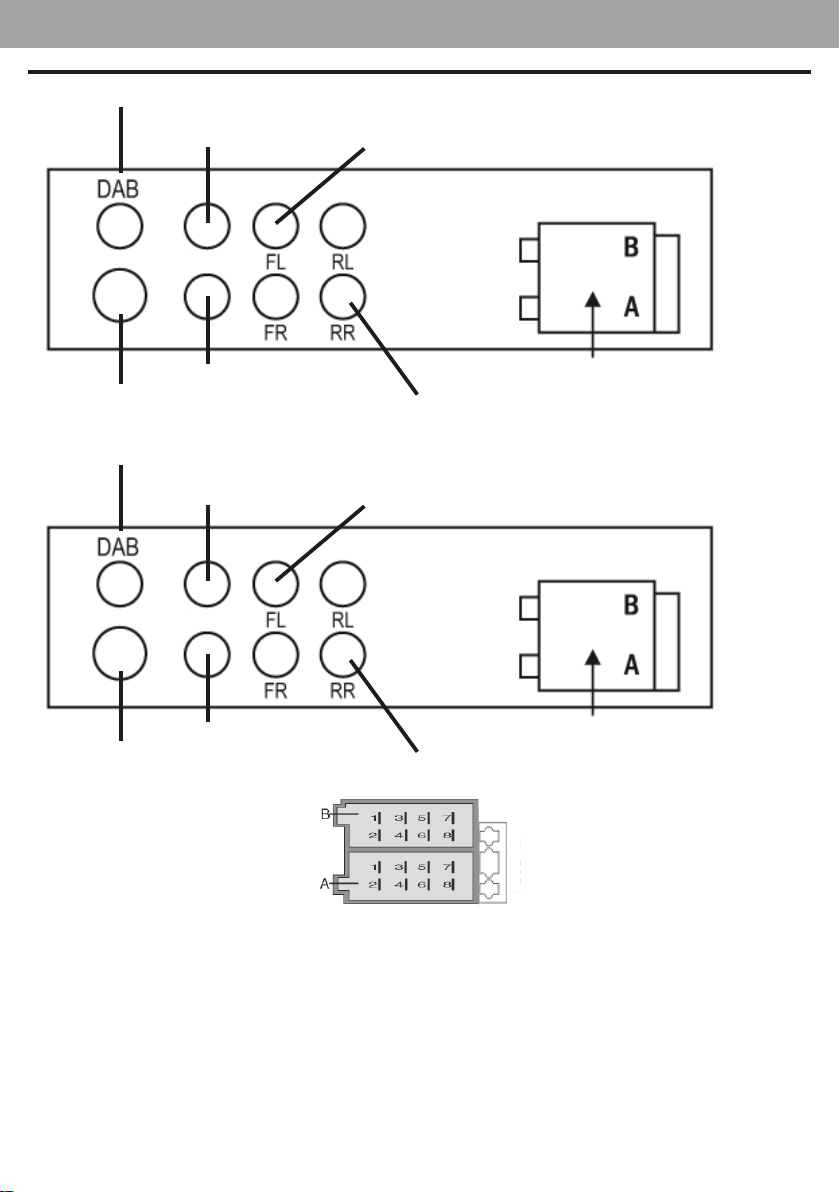
CONNESSIONI - WIRES CONNECTION
INGRESSO ANTENNA DAB
SCD 5751 DAB
SUB 2 OUT
SUB 1 OUT
INGRESSO ANTENNA FM
DAB Antenna
SUB 2 OUT
USCITA AUDIO FL/FR RCA ANTERIORE
CONNETTORE ISO
USCITA AUDIO RL/RRRCA POSTERIORE
RCA FL/FR Audio output
SUB 1 OUT
FM Antenna
A ALIMENTAZIONE
1. Libero
2. Libero
3. Libero
4. Alimentazione permanente
+12V (alla batteria)
5. Uscita antenna elettrica
+12V
6. Libero
7. Alimentazione principale
+12V (al quadro)
8. Massa (negativo)
RCA RL/RR Audio output
B ALTOPARLANTI
1. + Posteriore destra
2. - Posteriore destra
3. + Anteriore destra
4. - Anteriore destra
5. + Anteriore sinistra
6. - Anteriore sinistra
7. + Posteriore sinistra
8. - Posteriore sinistra
ISO connector
FUSE 10A
A POWER SUPPLY
1. Free
2. Free
3. Free
4. Memor y (permanent supply)
5. Auto antenna OUTPUT
6. Free
7. Main supply (positive)
8. Ground (negative)
2
B LOUDSPEAKERS
1. + Rear right
2. - Rear right
3. + Front right
4. - Front right
5. + Front left
6. - Front left
7. + Rear left
8. - Rear left
Page 3
INSTALL ATION - CONTROLS
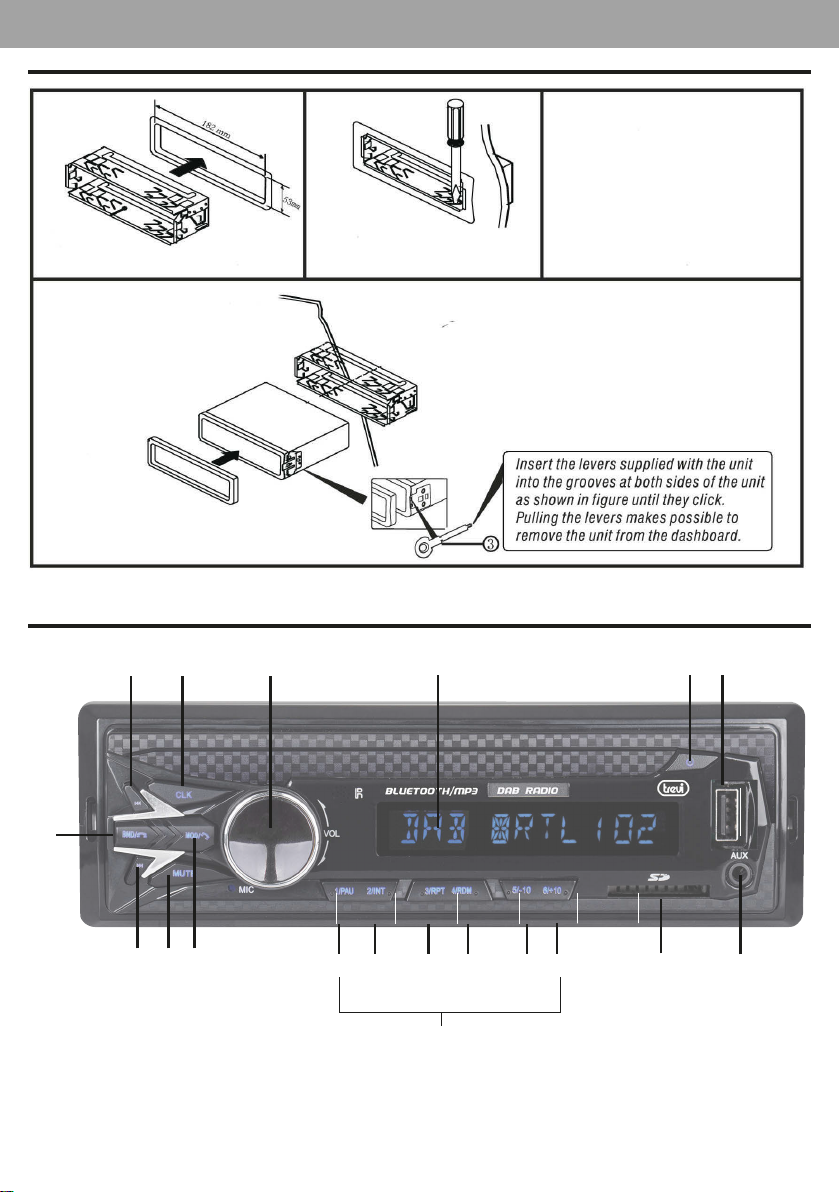
ESEMPIO DI INSTALLAZIONE - MOUNTING EXAMPLE
SCD 5751 DAB
COMANDI - CONTROLS
19
8
9
7
18
21
4
13101611
12
3
1514
6
5
3
17
Page 4
ITALIANO
SCD 5751 DAB
PRECAUZIONI DI SICUREZZA
• Non avvicinare l’orecchio all’altoparlante durante le fasi di messa punto e regolazioni del volume
Se dei liquidi penetrano all’interno dell’a
•
centro assistenza autorizato TREVI.
• L’apparecchio non deve essere esposto a stillicidio o a spruzzi d’acqua e nessun oggetto pieno di liquido, deve essere
posto sull’apparecchio.
Mantener
•
traffico.
ll par
•
areare l'interno dell'auto prima dell'utilizzo.
L'installazione de
•
• Conservare il presente manuale per futuri riferimenti.
CURA E MANUTENZIONE
Per la pulizia si consiglia l’ uso di un panno morbido, leggermente inumidito. Evitate solventi o sostanze abrasive.
IMPORTANTE
Questo dispositivo e’ progettato per uso domestico non professionale. La buona costruzione di questo apparecchio ne
garantisce per lungo tempo il perfetto funzionamento. Se tuttavia dovesse presentarsi qualche inconveniente, sarà opportuno
consultare il più vicino Centro Assistenza autorizzato TREVI.
e il livello del volume adeguato in maniera tale da essere a conoscenza delle condizioni della strada e del
cheggio alla luce diretta del sole può produrre temperature molto elevate all'interno del veicolo. Rinfrescare ed
ve essere effettuata da personale qualificato.
pparecchio scollegare immediatamente e portare l’apparecchio al più vicino
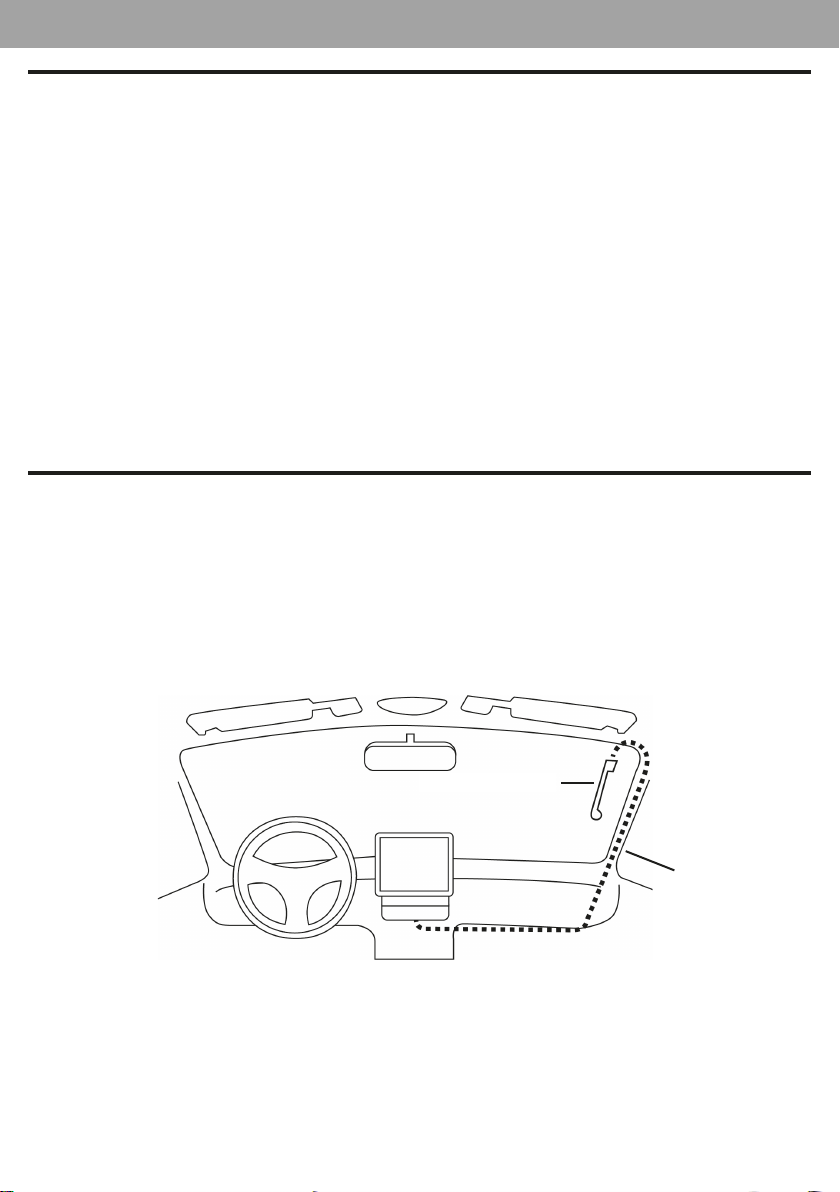
INSTALLAZIONE ANTENNA DAB
Per questa operazione rivolgersi ad un installatore professionale.
1.
L'antenna D
2. Pulire il vetro nel punto in cui si desidera applicare l'antenna.
3.
Rim
deve essere posizionata in modo che il contatto di massa possa essere steso sulla carrozzeria metallica dell'auto (non
e' necessario rimuovere la vernice).
4.
osizionare il cavo (lunghezza 3 mt.) all'interno del cruscotto auto fino a raggiungere la posizione dell'autoradio.
P
Collegare il cavo con connettore dorato nell'ingresso antenna DAB sul retro dell'autoradio ed assicurarlo avvitando
il connettore. Se presente un secondo cavo nero piu' sottile, questi va collegato all'alimentazione principale
+12V (al quadro).
AB fornita richiede installazione su parabrezza anteriore in posizione verticale (vedi figura).
uovere con attenzione la pellicola a protezione dell'adesivo sull'antenna e posizionarla nel punto scelto. L'antenna
Antenna DAB
Suggerimento
di percorso del
cavo antenna
Attenzione:
- Non installare l'antenna in una posizione che ostacola la visuale del conducente.
- Non posizionare il cavo e l'antenna dove potrebbero interferire con il buon funzionamento di AirBag
o altri dispositivi di sicurezza o dove potrebbero ostacolare la guida del veicolo.
- L'utilizzo su vetri schermati riduce le prestazioni dell'antenna.
4
Page 5

ITALIANO
SCD 5751 DAB
DESCRIZIONE COMANDI UNITÀ
1. Tasto I<<, sintonia, traccia precedente.
Contr
2.
Alloggio SD car
3.
4 Display.
5.
T
6.
T
7.
T
8.
T
9.
10.
11.
12.
13.
14.
15.
16.
17.
18.
19.
ollo volume/Tasto SEL, Controllo volume e toni / accesso opzioni utente.
Ingr
esso USB.
asto POWER, accensione/spegnimento.
asto MODE, modalità RADIO FM/DAB/SD/USB/AUX/BT, chiusura conversazione telefonica.
asto BAND, selezione banda di frequenza F1, F2, F3 / scansione e memorizzazione frequenze radio(FM e DAB)/
selezione RICERCA TRACCIA in modalità lettore MP3 / apertura conversazione telefonica.
asto >>I, sintonia, traccia successiva.
T
asto 1/PAU, inizio/pausa/ripristino riproduzione.
T
asto 2/INT, riproduzione dei primi 10 secondi di un brano.
T
asto 3/RPT, funzione ripetizione traccia.
T
asto 4/RDM, riproduzione casuale.
T
asto 5/-10, salto alla decima traccia precedente.
T
asto 6/+10, salto alla decima traccia successiva.
T
asti stazioni radiofoniche memorizzate da 1 a 6.
Ingr
esso AUX.
T
asto MUTE, silenziamento audio.
T
asto CLK, mostra/imposta l'orologio.
d.
ACCENSIONE / SPEGNIMENTO
1. Premere il tasto POWER (6) per accendere l’apparecchio.
Pr
2.
emere il tasto POWER (6) per spegnere l’apparecchio.
NOTA: in caso di malfunzionamenti generali, per tornare al corretto funzionamento spegnere l'autoradio per alcuni secondi e riac-
cenderla tramite il tasto POWER(6).
REGOLAZIONE OROLOGIO
1. Premere il tasto POWER (6) per accendere l’apparecchio.
2. PremerealungoiltastoCLK(19)noacheildisplaymostral'oralampeggiante.
3. Ruotare il Controllo volume (2) in senso orario/antiorario per regolare l'ora corrente. Premere il Controllo volume
(2) per confermare.
Ruotar
4.
e il Controllo volume (2) in senso orario/antiorario per regolare i minuti correnti. Premere il tasto CLK(19)
per confermare.
SELEZIONE SORGENTE
Premere in sequenza il tasto MODE (7) per selezionare le sorgenti RADIO FM, DAB, SD, USB, AUX, BT (le sorgenti SD/
USB vengono visualizzate solo se presente un dispositivo di memoria).
CONTROLLI AUDIO
REGOLAZIONE VOLUME
Ruotare il Controllo volume (2) in senso orario/antiorario per aumentare/diminuire il volume.
REGOLAZIONE ILLUMINAZIONE TASTI/VOLUME/TONI BASSI/ALTI
1. Premere una volta il tasto SEL (2) per selezionare il colore dell'illuminazione dei tasti (Auto=colore variabile).
2. Premere due volte il tasto SEL (2) per selezionare la regolazione del volume.
3. Premere tre volte il tasto SEL (2) per selezionare la regolazione dei toni bassi, sul display appare l’indicazione del livello
dei toni bassi “BAS”. Ruotare il Controllo volume (2) in senso orario/antiorario per aumentare/diminuire il livello dei
toni bassi.
4. Premere quattro volte il tasto SEL (2) per selezionare la regolazione dei toni alti, sul display appare l’indicazione del
livello dei toni alti “TRE”. Ruotare il Controllo volume (2) in senso orario/antiorario per aumentare/diminuire il livello
dei toni alti.
5
Page 6

ITALIANO
CONTROLLO BILANCIAMENTO/FADER
Pr
1.
emere cinque volte il tasto SEL (2) per selezionare il bilanciamento dei canali.
Sul displa
2.
3. Ruotare il Controllo volume (2) in senso orario/antiorario per bilanciare l'audio sul canale destro/sinistro
Pr
4.
Sul displa
5.
Ruotar
6.
ULTERIORI IMPOSTAZIONI
LOUDNESS
- Premere sette volte il tasto SEL (2) per attivare/disattivare la funzione LOUD (esaltazione dei bassi).
EQUALIZZATORE PREDEFINITO
-
Nota:
DX/LOCAL (disponibile in modo Radio)
DX: durante la ricerca automatica delle stazioni radio verranno ricevute tutte le stazioni, anche quelle disturbate. Questa
opzione è impostata di fabbrica.
LOCAL: durante la ricerca automatica delle stazioni radio verranno ricevute solo le stazione con il segnale più forte.
STEREO/MONO (disponibile in modo radio)
STEREO: imposta l'ascolto della radio in stereo.
MONO: imposta l'ascolto della radio in mono.
SUB
Attival'uscitapreamplicataSUB1perilcollegamentodiunsubwooferesterno.
SUB 2
Attival'uscitapreamplicataSUB2perilcollegamentodiunsecondosubwooferesterno.
SUB LEVEL
Imposta il levello audio delle uscite SUB1 e SUB2.
CUT
Imposta il taglio di frequenza delle uscite SUB1 e SUB2.
y appare la scritta "BAL".
emere sei volte il tasto SEL (2) per selezionare la regolazione del fader.
y appare la scritta "FAD".
e il Controllo volume (2) in senso orario/antiorario per regolare l'audio sulle casse posteriori/anteriori.
Pr
emere otto volte il tasto SEL (2) per selezionare l'equalizzazione preimpostata preferita. E' possibile scegliere tra
CLASS, ROCK, POP, FLAT, JAZZ, OFF(nessuna equalizzazione).
selezionando una equalizzazione preimpostata non e' possibile regolare i valori di toni alti/bassi.
SCD 5751 DAB
RADIO FM
SINTONIA AUTOMATICA
Pr
1.
emere il tasto BAND(8) per selezionare la banda di frequenza (FM1/FM2/FM3) che si desidera ascoltare.
2. Premere il tasto >>I (9) per sintonizzarsi automaticamente sulla stazione seguente.
3. Premere il tasto I<< (1) per sintonizzarsi automaticamente sulla stazione precedente.
SINTONIA MANUALE
Pr
1.
emere il tasto BAND(8) per selezionare la banda di frequenza (FM1/FM2/FM3) che si desidera ascoltare.
2. Tenerepremutoa
>>I (9) o I<< (1) per avanzare o retrocedere la sintonizzazione di 0,05MHz in FM. Attenedere qualche secondo per
ritornare alla sintonia automatica (sul display compare AUTO).
MEMORIZZAZIONE DELLE STAZIONI
1. Sintonizzarsi sulla stazione desiderata come descritto precedentemente.
2. Tenere premuto un tasto di memoria da 1 a 6 (16) desiderato.
3. Ripetere il punto 2 per memorizzare tutte le altre stazioni in tutte le bande.
MEMORIZZAZIONE AUTOMATICA DELLE STAZIONI
Questo apparecchio è dotato di un sistema di auto memorizzazione che ricerca e memorizza le stazioni più forti.
1. Tenere premuto il tasto BAND(8). L’apparecchio ricercherà e memorizzerà automaticamente le stazioni con il segnale
più forte.
lungoiltasto>>I(9)oI<<(1)noacheildisplaymostralascrittaMANU
6
AL,
pr
emereil
tasto
Page 7

ITALIANO
SCD 5751 DAB
RADIO DAB
1. Premere il tasto MODE(7) per selezionare la sorgente DAB.
Pr
2.
emere a lungo il tasto BAND(8) per effettuare la scansione automatica delle stazioni radio presenti, premere bre-
vemente per visualizzare informazioni sulla stazione radio in ascolto.
3. Dopo aver cercato automaticamente le stazioni radio, 6 stazioni vengono automaticamente memorizzate nei tasti
numerici (16). Premere i tasti numerici (16) per selezionare e riprodurre le stazioni memorizzate corrispondenti.
Premere a lungo uno dei tasti (16) per memorizzare la stazione in ascolto nella memoria desiderata.
4. Premere il tasto >>I (9) o I<< (1) per passare alla stazione radio successiva o precedente.
INGRESSO SD/USB
INIZIO DELLA RIPRODUZIONE
1. Inserire un dispositivo SD/USB nell'ingresso SD(3) o nell'ingresso USB(5).
2.
La ripr
NOTA: L'autoradio potrebbe non supportare alcuni apparecchi esterni con presa USB, questo è dovuto all'incompatibilità dei processori.
3.
Pr
SALTO TRACCIA/CARTELLA
1.
Pr
2. Premere il tasto I<< (1) durante l'ascolto per tornare all'inizio della traccia corrente. Premerlo più volte per passare
3.
Pr
RICERCA VELOCE
1.
Tenere premuto il tasto >>I (9) durante l’ascolto della traccia per avanzare velocemente.
2.
T
FUNZIONI AVANZATE
1.
Pr
2. Premere il tasto RPT (12) per attivare la ripetizione automatica della traccia in ascolto (RPT ONE), di una cartella
3. Premere il tasto RDM (13) per attivare l'ascolto in sequenza casuale delle tracce sul disco (RDM ON). Premerlo
RICERCA PER TRACCIA
1.
Tenere premuto il tasto BAND (8). Sul display verrà visualizzata la scritta TRK con *** lampeggiante
2. Ruotar
3.
Ruotare il tasto SEL/Controllo volume (2) per impostare la seconda cifra. Premere il tasto I<< (1) per confermare.
4. Ruotar
5. Automaticamente v
oduzione partirà automaticamente e sul display verrà mostrato il numero della traccia riprodotta.
emere il tasto 1/PAU(10) per arrestare momentaneamente la riproduzione. Premerlo nuovamente per riprendere
la riproduzione.
emere il tasto >>I (9) durante l’ascolto per passare alla traccia successiva.
alle tracce precedenti.
emere i tasti 5 o 6 (14 o 15) per indietreggiare o avanzare di 10 tracce.
enere premuto il tasto I<< (1) durante l'ascolto della traccia per indietreggiare velocemente.
emere il tasto INT (11) per ascoltare in sequenza i primi 10 secondi di ogni traccia del disco (INTRO). Premerlo
nuovamente per tornare al normale ascolto (OFF).
(RPT DIR) se presente o di tutte le tracce (RPT ALL).
nuovamente per tornare alla riproduzione in sequenza delle tracce.
e il tasto SEL/Controllo volume (2) per impostare la prima cifra. Premere il tasto I<< (1) per confermare.
e il tasto SEL/Controllo volume (2) per impostare la terza cifra. Premere il tasto SEL/Controllo volume (2) per
confermare.
errà riprodotta la traccia selezionata.
INGRESSO AUX IN
1. Premere in sequenza il tasto MODE (7) per portarsi sulla sorgente AUX IN.
2. Collegare una qualsiasi unità provvista di uscita audio all'ingresso AUX (17).
3. Comandare l'unità esterna dai propri comandi.
CONNESSIONE TRAMITE BLUETOOTH (MODALITÀ HANDS-FREE)
È possibile effettuare chiamate dal proprio cellulare in modalità HANDS-FREE (in modalità libera) grazie alla compatibilità
con il sistema internazionale wireless Bluetooth.
- Quando effettuate una chiamata, parlare con voce forte e chiara.
- Per avere una condizione ottimale prima di effettuare o ricevere una chiamata, chiudere i finestrini dell'automobile.
- La voce può essere riprodotta in maniera distorta nel caso in cui ci siano problemi di campo telefonico.
- L'utilizzo della funzione HANDS-FREE dipende dalla compatibilità parziale/totale del telefono cellulare.
- Assicurarsi che nel proprio telefono cellulare sia disponibile la connessione Bluetooth.
7
Page 8

ITALIANO
CONNESSIONE
1. Premere in sequenza il tasto MODE (7) per portarsi sulla sorgente BT (CONNECT) ed attivare la funzione Bluetooth
del telefono cellulare. Effettuare la ricerca degli accessori/dispositivi audio.
2. Dal telefono cellulare selezionare il dispositivo CAR BT che corrisponde all'autoradio.
Se richiesto
3.
Ora la connessione è stabilita, sul display dell'autoradio comparirà la scritta PHONE.
4.
RICEZIONE/RIFIUTO/TERMINE DI UNA CHIAMATA
Quando si rice
1.
Pr
2.
emere il tasto
L'audio della con
-
- Durante la conversazione le funzioni dell'autoradio verranno interrotte.
Pr
3.
emere il tasto
- Terminata la conversazione l'ascolto della sorgente in riproduzione verrà automaticamente ripresa da dove era stata
interrotta.
RIACCENSIONE AUTOMATICA
Ad autoradio spenta in modalità stand-b
1.
l'autoradio si accenderà automaticamente per poter usufruire della funzione HANDS-FREE.
2. Al termine della chiamata l'autoradio si riporterà automaticamente in modalità di stand-by.
RIPRODUZIONE FILE AUDIO
Tramite la connessione Bluetooth è possibile riprodurre i file audio presenti nel telefono cellulare.
Nota: l'autoradio riproduce solo file audio con telefoni cellulari compatibili con il protocollo A2DP.
Consultare il manuale del proprio telefono cellulare.
Durante l'ascolto dei brani musicali da smartphone sono possibili le seguenti operazioni:
Pr
1.
emere il tasto 1/PAU(10) per arrestare momentaneamente la riproduzione. Premerlo nuovamente per riprendere
la riproduzione.
2. Premere il tasto >>I (9) durante l’ascolto per passare alla traccia successiva.
Pr
3.
emere il tasto I<< (1) durante l'ascolto per tornare all'inizio della traccia corrente.
Premerlo più volte per passare alle tracce precedenti.
, inserire il codice a 4 cifre "0000".
ve una chiamata, l'ascolto della sorgente in riproduzione verrà interrotta e si udirà il suono di chiamata.
(7) per avviare la conversazione oppure premere il tasto (8) per rifiutarla.
versazione sarà udibile dall'impianto audio dell'auto.
(8) per terminare la conversazione.
y, nel caso di ricezione di una chiamata del dispositivo Bluetooth accoppiato,
SCD 5751 DAB
CARATTERISTICHE TECNICHE
GENERALI
Alimentazione: ..... .............. ...........................................................................12V
Assorbimento max .....................................................................................10A
Potenza di uscita massima: ........................................................................ 40W x 4 canali
Impedenza degli altoparlanti: ....................................................................4 ohm per canale
Banda di frequenza:
....................................................................................................................... D
Potenza max di trasmissione Bluetooth:
Frequenza di trasmissione Bluetooth:
.....................................................................................FM 87.5MHz - 108 MHz
................................................0,8mW
....................................................2,4GHz
AB 174 - 240 MHz
NOTA
TREVI persegue una politica di continuo miglioramento dei prodotti. Per tale motivo le caratteristiche tecniche
sono soggette a modifiche senza preavviso.
8
Page 9
ENGLISH
SCD 5751 DAB
SAFETY PRECAUTIONS
• Do not put your ear close to the speaker during the setting and volume adjustments
If liquids penetrate inside the a
•
TREVI service center.
• The appliance must not be exposed to dripping or splashing water and no objects filled with liquid must be placed
on the appliance.
Maintain the a
•
Parking in dir
•
the car before use.
Installation m
•
K
eep this manual for future reference.
•
CARE AND MAINTENANCE
For cleaning, we recommend the use of a soft, slightly moistened cloth. Avoid solvents or abrasive substances.
IMPORTANT
This device is designed for non-professional home use. The good construction of this appliance guarantees perfect operation
for a long time. However, should any inconvenience arise, it is advisable to consult the nearest TREVI Authorized Ser vice Center.
ppropriate volume level so that you are aware of the road and traffic conditions.
ect sunlight can produce very high temperatures inside the vehicle. Refresh and ventilate the interior of
ust be carried out by qualified personnel.
ppliance, immediately disconnect and bring the appliance to the nearest authorized
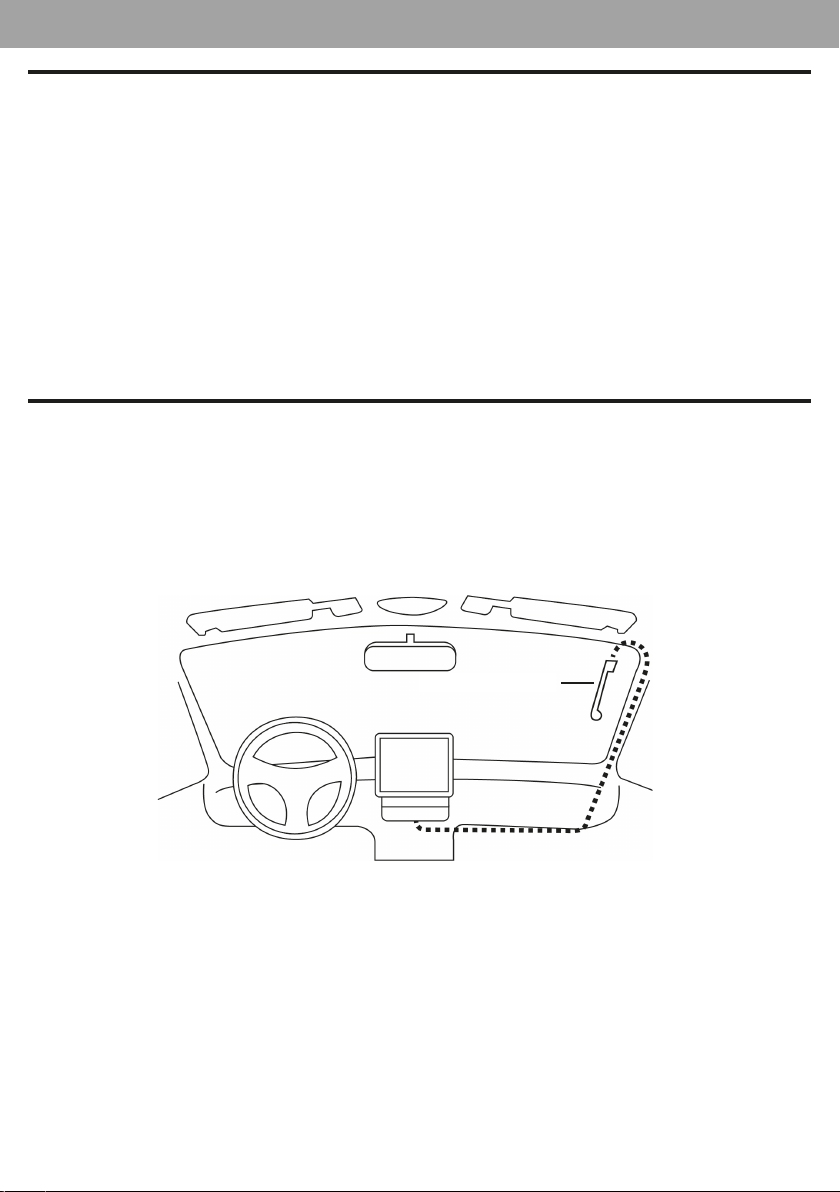
INSTALLATION OF DAB ANTENNA
For this operation, contact a professional installer.
1.
2. Clean the glass where you want to attach the antenna.
3.
Car
4.
P
AB antenna supplied requires installation on the front windscreen in a vertical position (see figure).
The D
efully remove the protective film from the adhesive on the antenna and place it in the chosen location. The antenna
must be positioned so that the ground contact can be spread on the metal body of the car (it is not necessary to
remove the paint).
osition the cable (length 3 m) inside the car dashboard until you reach the position of the radio. Connect the cable
with golden connector to the DAB antenna input on the rear of the car radio and secure it by screwing the connector.
If a second thinner black cable is present, it must be connected to the main power supply + 12V (key).
DAB Antenna
Caution:
-
Do not install the antenna in a position that obstructs the driv
-
Do not place the cab
AirBag or other safety devices or where they could impede the driving of the vehicle.
- The use on shielded glass reduces the antenna performance.
le and the antenna where they could interfere with the proper functioning of the
9
er's view.
Page 10

ENGLISH
SCD 5751 DAB
DESCRIPTION OF UNITS COMMANDS
1. I << button, tuning, previous track.
2. Volume control / SEL button, Volume and tone control / user options access.
SD car
3.
4
5.
6.
POWER button, on / off.
7.
B
8.
9.
10.
11.
12.
13.
14.
15.
16.
17.
18.
19.
d input.
Displa
y.
USB input.
MODE k
ey, FM / DAB / SD / USB / AUX / BT RADIO mode, closing the telephone conversation.
AND key, selection of frequency band F1, F2, F3 / scanning and storing radio frequencies (FM and DAB) / selecting
SEARCH TRACK in MP3 player mode / acept telephone conversation.
>> I button,
1 / P
2 / INT k
3 / RPT button,
4 / RDM button,
5 / -10 button,
6 / + 10 button,
Radio station buttons stor
A
UX input.
MUTE button,
CLK button,
tuning, next track.
AU button, start / pause / restore playback.
ey, playback of the first 10 seconds of a song.
track repeat function.
random play.
jump to the previous tenth track.
jump to the tenth next track.
ed from 1 to 6.
audio muting.
shows / sets the clock.
SWITCHING ON / OFF
1. Press the POWER button (6) to switch on the appliance.
2. Press the POWER button (6) to switch off the appliance.
NOTE: in the event of general malfunctions, to return to correct operation, switch off the radio for a few seconds and switch it on
again using the POWER button (6).
CLOCK ADJUSTMENT
1. Press the POWER button (6) to switch on the appliance.
Long pr
2.
3. Turn the Volume control (2) clockwise / counterclockwise to adjust the current time. Press the Volume control (2) to
T
4.
ess the CLK button (19) until the display shows the flashing hour.
confirm.
urn the Volume control (2) clockwise / counterclockwise to adjust the current minutes. Press the CLK button (19)
to confirm.
SOURCE SELECTION
Press the MODE key (7) in sequence to select the RADIO sources FM, DAB, SD, USB, AUX, BT (the SD / USB sources are
displayed only if a memory device is present).
AUDIO CONTROLS
VOLUME ADJUSTMENT
Turn the Volume control (2) clockwise / counterclockwise to increase / decrease the volume.
ADJUSTING button / volume / LOW / HIGH TONE lighting
1. Press the SEL key (2) once to select the key illumination color (Auto = variable color).
2. Press the SEL button (2) twice to select the volume adjustment.
Press the SEL button (2) three times to select the low tone adjustment, the indication of the "BAS" low tone level
3.
appears on the display. Turn the Volume control (2) clockwise / counterclockwise to increase / decrease the bass level.
4. Press the SEL button (2) four times to select the treble adjustment, the indication of the "TRE" treble level appears
on the display. Turn the Volume control (2) clockwise / counterclockwise to increase / decrease the level of high tones.
BALANCE / FADER CONTROL
1. Press the SEL button (2) five times to select the channel balance.
2. "BAL" appears on the display.
3. Turn the Volume Control (2) clockwise / counterclockwise to balance the sound on the right / left channel
4. Press the SEL (2) button six times to select the fader setting.
10
Page 11

ENGLISH
5. "FAD" appears on the display.
6. Turn the Volume control (2) clockwise / counterclockwise to adjust the sound on the rear / front speakers.
ADDITIONAL SETTINGS
LOUDNESS
Pr
ess the SEL button (2) seven times to activate / deactivate the LOUD function (bass enhancement).
-
DEFAULT EQUALIZER
Pr
-
ess the SEL key (2) eight times to select the preferred preset equalization. It is possible to choose between CLASS,
ROCK, POP, FLAT, JAZZ, OFF (no equalization).
Note: by selecting a preset equalization it is not possible to adjust the high / low tone values.
DX / LOCAL (AVAILABLE IN RADIO MODE)
during the automatic sear
DX:
is factory set.
LOCAL: during the automatic radio station search, only the stations with the strongest signal will be received.
STEREO / MONO (AVAILABLE IN RADIO MODE)
STEREO:
MONO:
SUB
Activates the SUB1 pre-amplified output for connecting an external subwoofer.
SUB 2
Activates the pre-amplified SUB2 output for connecting a second external subwoofer.
SUB LEVEL
Sets the audio level of the SUB1 and SUB2 outputs.
CUT
Sets the cutoff frequency of the SUB1 and SUB2 outputs.
set to listen to the radio in ster
set the radio to listen in mono
ch for radio stations, all the stations will be received, even the disturbed ones. This option
eo.
.
SCD 5751 DAB
FM RADIO
AUTOMATIC TUNING
1. Press the BAND button (8) to select the frequency band (FM1 / FM2 / FM3) you want to listen to.
2. Press the >> I (9) button to automatically tune in the next station.
3. Press the I << button (1) to automatically tune in to the previous station.
MANUAL TUNING
1. Press the BAND button (8) to select the frequency band (FM1 / FM2 / FM3) you want to listen to.
2. Long press the >> I (9) or I << (1) key until the display shows MANUAL, press the >> I (9) or I << (1) key to move
forward or downgrade the tuning to 0.05MHz in FM. Wait a few seconds to return to automatic tuning (AUTO appears
on the display).
STORAGE OF STATIONS
1. Tune in to the desired station as described above.
2. Press and hold a desired memory button 1 to 6 (16).
3. Repeat step 2 to store all other stations on all bands.
AUTOMATIC STORAGE OF STATIONS
This appliance is equipped with an auto memorization system that searches and memorizes the strongest stations.
1. Press and hold the BAND button (8). The device will automatically search for and store the stations with the strongest
signal.
11
Page 12

ENGLISH
SCD 5751 DAB
RADIO DAB
1. Press the MODE button (7) to select the DAB source.
Long pr
2.
3. After automatically searching for radio stations, 6 stations are automatically stored in the numeric buttons (16). Press
4. Press the >> I (9) or I << (1) button to move to the next or previous radio station.
ess the BAND key (8) to automatically scan the present radio stations, short press to display information on
the radio station being listened to.
the number buttons (16) to select and play the corresponding stored stations. Long press one of the keys (16) to
store the station being listened to in the desired memory.
SD / USB INPUT
START OF REPRODUCTION
1. Insert an SD / USB device into the SD input (3) or the USB input (5).
2.
yback will start automatically and the track number being played will be shown on the display.
Pla
NOTE: The car radio may not support some external devices with USB socket, this is due to the incompatibility of the processors.
3. Press the 1 / PAU button (10) to temporarily stop playback. Press it again to resume playback.
SKIP TRACK / FOLDER
1. Press the >> I (9) key while listening to go to the next track.
2.
ess the I << (1) button while listening to return to the beginning of the current track. Press it several times to go
Pr
to previous tracks.
3. Press the 5 or 6 buttons (14 or 15) to step back or advance 10 tracks.
QUICK SEARCH
1. Press and hold the >> I (9) key while listening to the track to fast forward.
ess and hold the I << button (1) while listening to the track to quickly step back.
2.
Pr
ADVANCED FUNCTIONS
1. Press the INT key (11) to listen in sequence to the first 10 seconds of each track on the disc (INTRO). Press it again
to return to normal listening (OFF).
2.
ess the RPT button (12) to activate automatic repetition of the track being listened to (RPT ONE), of a folder (RPT
Pr
DIR) if present or of all tracks (RPT ALL).
3. Press the RDM button (13) to activate listening to the tracks on the disc in random sequence (RDM ON). Press it
again to return to sequential track playback.
SEARCH BY TRACK
1. Press and hold the BAND button (8). TRK will appear on the display with a flashing ***
2. Turn the SEL / Volume control button (2) to set the first digit. Press the I << key (1) to confirm.
3. Turn the SEL / Volume control button (2) to set the second digit. Press the I << key (1) to confirm.
4.
Turn the SEL / Volume control button (2) to set the third digit. Press the SEL / Volume control button (2) to confirm.
The selected track will automaticall
5.
y play.
AUX IN INPUT
1. Press the MODE key (7) in sequence to go to the AUX IN source.
2. Connect any unit with audio output to the AUX input (17).
3.
ol the external unit from its commands.
Contr
CONNECTION VIA BLUETOOTH (HANDS-FREE MODE)
You can make calls from your mobile phone in HANDS-FREE mode (in free mode) thanks to compatibility with the international Bluetooth wireless system.
- When making a call, speak loud and clear.
- For optimum condition before making or receiving a call, close the car windows.
- The voice can be reproduced in a distorted way in case of telephone field problems.
- The use of the HANDS-FREE function depends on the partial / total compatibility of the mobile phone.
- Make sure that Bluetooth connection is available in your mobile phone.
12
Page 13

ENGLISH
CONNECTION
Pr
1.
ess the MODE button (7) in sequence to go to the BT (CONNECT) source and activate the Bluetooth function
of the mobile phone. Search for accessories / audio devices.
2. From the mobile phone, select the CAR BT device that corresponds to the car radio.
If r
equired, enter the 4-digit code "0000".
3.
4. Now the connection is established, the word PHONE will appear on the display of the car radio.
RECEPTION / REFUSAL / END OF A CALL
When y
1.
2. Press the key (7) to start the conversation or press the key (8) to reject it.
-
- During the conversation the car radio functions will be interrupted.
3.
- After the conversation, listening to the source being played will automatically resume from where it was interrupted.
AUTOMATIC POWER ON
With the car radio off in stand-b
1.
2.
AUDIO FILE PLAYBACK
Via the Bluetooth connection, you can play the audio files in the mobile phone.
Note: the car radio only plays audio files with A2DP-compatible mobile phones.
Consult the manual of your mobile phone.
The following operations are possible while listening to music from smartphone:
1. Press the 1 / PAU button (10) to temporarily stop playback. Press it again to resume playback.
2.
3.
Press the I << (1) button while listening to return to the beginning of the current track.
Press it several times to go to previous tracks.
ou receive a call, listening to the source being played will stop and you will hear the call sound.
The audio of the conversation will be audible from the car audio system.
Pr
ess the button (8) to end the conversation.
automatically switch on to take advantage of the HANDS-FREE function.
At the end of the call,
Pr
ess the >> I (9) key while listening to go to the next track.
the radio will automatically return to stand-by mode.
y mode, if a call from the paired Bluetooth device is received, the car radio will
SCD 5751 DAB
TECHNICAL FEATURES
Power supply: .............................................................................................. 12V
Absorption: ................................................................................................... max 10A
Maximum output power: .......................................................................... 40W x 4 channels
Speaker impedance: ................................................................................... 4 ohms per channel
Frequency band: ......................................................................................... FM 87.5MHz - 108 MHz
....................................................................................................................... DAB 174 - 240 MHz
Max Bluetooth transmission power: .....................................................0.8mW
Bluetooth transmission frequency: ........................................................ 2.4GHz
NOTE
TREVI pursues a policy of continuous product improvement. For this reason, the technical characteristics are subject to
change without notice.
13
Page 14
FRANCAIS
SCD 5751 DAB
PRÉCAUTIONS DE SÉCURITÉ
• Ne placez pas votre oreille près du haut-parleur pendant le réglage et le réglage du volume
Si des liquides pénètr
•
service TREVI agréé le plus proche.
• L'appareil ne doit pas être exposé à des gouttes ou des éclaboussures d'eau et aucun objet rempli de liquide ne doit
être placé sur l'appareil.
Maintenez le niv
•
Le
•
stationnement en plein soleil peut produire des températures très élevées à l'intérieur du véhicule. Rafraîchissez
et aérez l'intérieur de la voiture avant de l'utiliser.
L'installation doit êtr
•
Conser
•
ENTRETIEN ET MAINTENANCE
Pour le nettoyage, nous recommandons l'utilisation d'un chiffon doux et légèrement humide. Évitez les solvants ou les
substances abrasives.
IMPORTANT
Cet appareil est conçu pour un usage domestique non professionnel. La bonne construction de cet appareil garantit un
fonctionnement parfait pendant longtemps. Cependant, en cas de désagrément, il est conseillé de consulter le centre de
service agréé TREVI le plus proche.
vez ce manuel pour référence future.
ent à l'intérieur de l'appareil, débranchez-le immédiatement et apportez l'appareil au centre de
eau de volume approprié afin de connaître les conditions routières et de circulation.
e effectuée par du personnel qualifié.
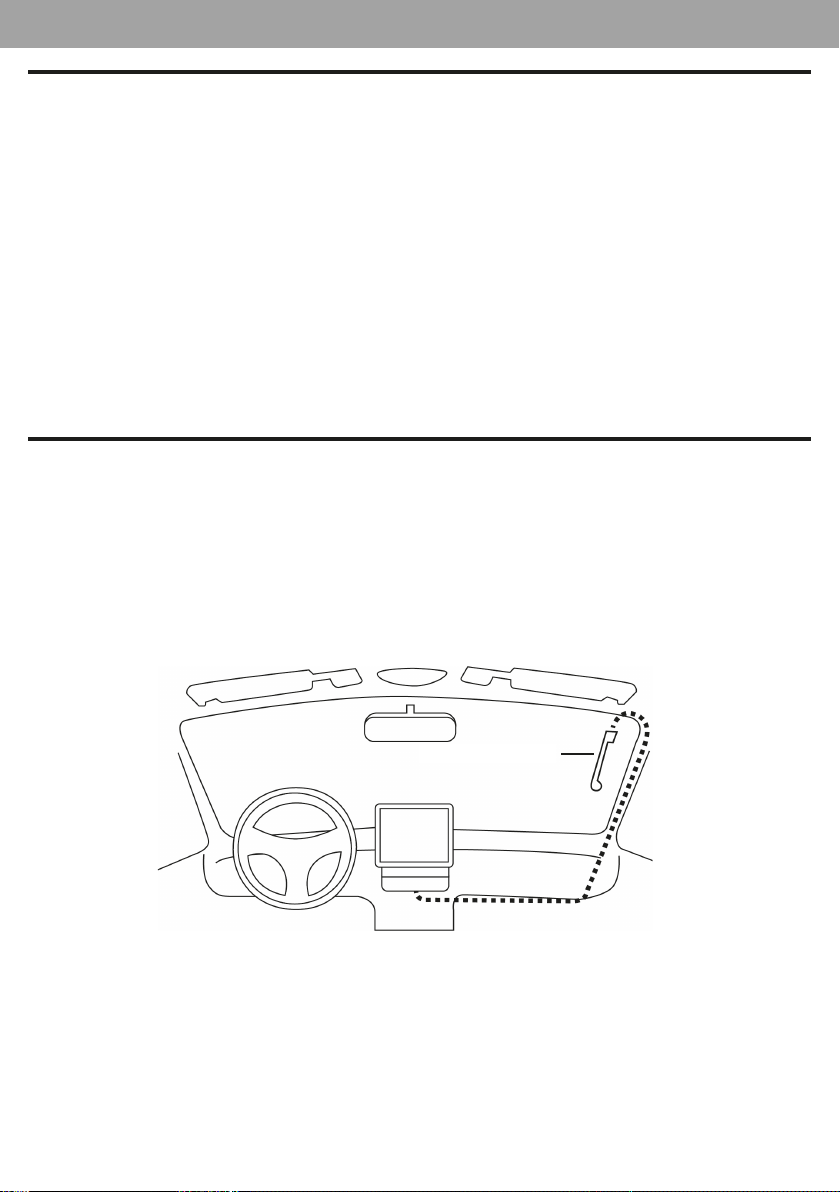
INSTALLATION D'UNE ANTENNE DAB
Pour cette opération, contactez un installateur professionnel.
1.
L'antenne D
2. Nettoyez la vitre à l'endroit où vous souhaitez fixer l'antenne.
3.
Retir
être positionnée de manière à ce que le contact au sol puisse se propager sur la carrosserie métallique de la voiture
(il n'est pas nécessaire d'enlever la peinture).
4.
ositionnez le câble (longueur 3 m) à l'intérieur du tableau de bord de la voiture jusqu'à ce que vous atteigniez la
P
position de la radio. Connectez le câble avec le connecteur doré à l'entrée d'antenne DAB à l'arrière de l'autoradio et
fixez-le en vissant le connecteur. Si un deuxième câble noir plus fin est présent, il doit être connecté à l'alimentation
principale + 12V (clé).
AB fournie nécessite une installation sur le pare-brise avant en position verticale (voir figure).
ez soigneusement le film protecteur de l'adhésif sur l'antenne et placez-le à l'emplacement choisi. L'antenne doit
DAB Antenna
- N'installez pas l'antenne dans une position qui obstrue la vue du conducteur.
- Ne placez pas le câble et l'antenne là où ils pourraient gêner le bon fonctionnement de l'AirBag ou
d'autres dispositifs de sécurité ou où ils pourraient gêner la conduite du véhicule.
- L'utilisation sur du verre blindé réduit les performances de l'antenne.
14
Page 15

FRANCAIS
SCD 5751 DAB
DESCRIPTION DES COMMANDES DES UNITÉS
1. Bouton I <<, réglage, piste précédente.
Bouton de contrôle du v
2.
Entrée de car
3.
Affichage
4
Entrée USB.
5.
6.
Bouton PO
T
ouche MODE, mode FM / DAB / SD / USB / AUX / BT RADIO, fermant la conversation téléphonique.
7.
T
8.
ouche BAND, sélection des bandes de fréquences F1, F2, F3 / balayage et mémorisation des fréquences radio (FM et
DAB) / sélection de RECHERCHE DE PISTE en mode lecteur MP3 / prise en charge des conversations téléphoniques
>> Bouton I,
9.
1 / Bouton P
10.
T
ouche 2 / INT, lecture des 10 premières secondes d'un morceau.
11.
T
ouche 3 / RPT, fonction de répétition de piste.
12.
Bouton 4 / RDM,
13.
T
ouche 5 / -10, passez à la dixième piste précédente.
14.
T
ouche 6 / + 10, passez à la dixième piste suivante.
15.
Boutons de station de radio enr
16.
Entrée A
17.
Bouton MUTE,
18.
19. Touche CLK, affiche / règle l'horloge.
te SD.
.
WER, marche / arrêt.
réglage, piste suivante.
AU, démarrer / mettre en pause / restaurer la lecture.
UX.
coupure audio.
olume / SEL, contrôle du volume et de la tonalité / accès aux options utilisateur.
lecture aléatoire.
egistrés de 1 à 6.
MISE SOUS / HORS TENSION
1. Appuyez sur le bouton POWER (6) pour allumer l'appareil.
Appuy
2.
REMARQUE: en cas de dysfonctionnements généraux, pour revenir au bon fonctionnement, éteignez la radio pendant quelques
secondes et rallumez-la à l'aide du bouton POWER (6).
ez sur le bouton POWER (6) pour éteindre l'appareil.
RÉGLAGE DE L'HORLOGE
1. Appuyez sur le bouton POWER (6) pour allumer l'appareil.
Appuy
2.
3. Tournez la commande de volume (2) dans le sens horaire / antihoraire pour régler l'heure actuelle. Appuyez sur la
T
4.
ez longuement sur le bouton CLK (19) jusqu'à ce que l'écran affiche l'heure clignotante.
commande de volume (2) pour confirmer.
ournez la commande de volume (2) dans le sens horaire / antihoraire pour régler les minutes actuelles. Appuyez sur
le bouton CLK (19) pour confirmer.
SÉLECTION DE SOURCE
Appuyez successivement sur la touche MODE (7) pour sélectionner les sources RADIO FM, DAB, SD, USB, AUX, BT (les
sources SD / USB ne s'affichent que si un dispositif mémoire est présent).
COMMANDES AUDIO
RÉGLAGE DU VOLUME
Tournez la commande de volume (2) dans le sens horaire / antihoraire pour augmenter / diminuer le volume.
BOUTON REGLAGE / VOLUME / ÉCLAIRAGE LOW / HIGH TONE
1. Appuyez une fois sur la touche SEL (2) pour sélectionner la couleur d'éclairage des touches (Auto = couleur variable).
2. Appuyez deux fois sur le bouton SEL (2) pour sélectionner le réglage du volume.
3. Appuyez trois fois sur le bouton SEL (2) pour sélectionner le réglage de la tonalité basse, l'indication du niveau de
tonalité basse "BAS" apparaît sur l'affichage. Tournez la commande de volume (2) dans le sens horaire / antihoraire
pour augmenter / diminuer le niveau des graves.
4. Appuyez quatre fois sur le bouton SEL (2) pour sélectionner le réglage des aigus, l'indication du niveau des aigus
"TRE" apparaît sur l'affichage. Tournez la commande de volume (2) dans le sens horaire / antihoraire pour augmenter
/ diminuer le niveau des sons aigus.
15
Page 16

FRANCAIS
BALANCE / FADER CONTROL
Appuy
1.
2. "BAL" apparaît sur l'affichage.
3. Tournez la commande de volume (2) dans le sens horaire / antihoraire pour équilibrer le son sur le canal droit / gauche
4.
"F
5.
T
6.
ez cinq fois sur le bouton SEL (2) pour sélectionner la balance des canaux.
Appuy
ez six fois sur le bouton SEL (2) pour sélectionner le réglage du fader.
AD" apparaît sur l'affichage.
ournez la commande de volume (2) dans le sens horaire / antihoraire pour régler le son sur les haut-parleurs arrière
/ avant.
SCD 5751 DAB
PARAMÈTRES ADDITIONNELS
LOUDNESS
- Appuyez sept fois sur le bouton SEL (2) pour activer / désactiver la fonction LOUD (amélioration des basses).
ÉGALISEUR PAR DÉFAUT
Appuy
-
Remarque: en sélectionnant une égalisation prédéfinie, il n'est pas possible de régler les valeurs de tonalité haute / basse.
DX / LOCAL (DISPONIBLE EN MODE RADIO)
DX: lors de la recherche automatique de stations de radio, toutes les stations seront captées, même celles perturbées.
LOCAL: pendant la recherche automatique de stations radio, seules les stations avec le signal le plus fort seront reçues.
STÉRÉO / MONO (DISPONIBLE EN MODE RADIO)
STEREO: réglé pour écouter la radio en stéréo.
MONO:
SUB
Active la sortie pré-amplifiée SUB1 pour connecter un subwoofer externe.
SUB 2
Active la sortie SUB2 pré-amplifiée pour connecter un deuxième caisson de basse externe.
SUB LEVEL
Règle le niveau audio des sorties SUB1 et SUB2.
CUT
Règle la fréquence de coupure des sorties SUB1 et SUB2.
ez huit fois sur la touche SEL (2) pour sélectionner l'égalisation préréglée préférée. Il est possible de choisir
entre CLASS, ROCK, POP, FLAT, JAZZ, OFF (pas d'égalisation).
Cette option est réglée en usine.
paramétr
ez la radio pour écouter en mono.
RADIO FM
REGLAGE AUTOMATIQUE
Appuy
1.
2. Appuyez sur le bouton >> I (9) pour syntoniser automatiquement la station suivante.
3. Appuyez sur le bouton I << (1) pour syntoniser automatiquement la station précédente.
REGLAGE MANUEL
1. Appuyez sur le bouton BAND (8) pour sélectionner la bande de fréquences (FM1 / FM2 / FM3) que vous souhaitez
2. Appuyez longuement sur la touche >> I (9) ou I << (1) jusqu'à ce que l'écran affiche MANUAL, appuyez sur la touche
STOCKAGE DES STATIONS
1. Syntonisez la station souhaitée comme décrit ci-dessus.
2. Maintenez enfoncée la touche mémoire souhaitée 1 à 6 (16).
ez sur le bouton BAND (8) pour sélectionner la bande de fréquences (FM1 / FM2 / FM3) que vous souhaitez
écouter.
écouter.
>> I (9) ou I << (1) pour avancer ou rétrograder le réglage à 0,05 MHz en FM. Attendez quelques secondes pour
revenir au réglage automatique (AUTO apparaît sur l'affichage).
16
Page 17

FRANCAIS
3. Répétez l'étape 2 pour enregistrer toutes les autres stations sur toutes les bandes.
STOCKAGE AUTOMATIQUE DES STATIONS
Cet appareil est équipé d'un système de mémorisation automatique qui recherche et mémorise les stations les plus puissantes.
Appuy
1.
ez sur le bouton BAND (8) et maintenez-le enfoncé. L'appareil recherchera et mémorisera automatiquement
les stations avec le signal le plus fort.
SCD 5751 DAB
RADIO DAB
1. Appuyez sur le bouton MODE (7) pour sélectionner la source DAB.
2.
Appuy
3. Après avoir recherché automatiquement les stations de radio, 6 stations sont automatiquement enregistrées dans
4. Appuyez sur le bouton >> I (9) ou I << (1) pour passer à la station de radio suivante ou précédente.
ez longuement sur la touche BAND (8) pour balayer automatiquement les stations de radio actuelles, appuyez
brièvement pour afficher des informations sur la station de radio écoutée.
les touches numériques (16). Appuyez sur les touches numériques (16) pour sélectionner et écouter les stations
mémorisées correspondantes. Appuyez longuement sur l'une des touches (16) pour enregistrer la station écoutée
dans la mémoire souhaitée.
ENTRÉE SD / USB
DÉBUT DE REPRODUCTION
1. Insérez un périphérique SD / USB dans l'entrée SD (3) ou l'entrée USB (5).
La lectur
2.
REMARQUE: l'autoradio peut ne pas prendre en charge certains appareils externes avec prise USB, cela est dû à l'incompatibilité
des processeurs.
Appuyez sur le bouton 1 / PAU (10) pour arrêter temporairement la lecture. Appuyez à nouveau pour reprendre la
3.
SKIP TRACK / DOSSIER
1.
2. Appuyez sur la touche I << (1) pendant l'écoute pour revenir au début de la piste en cours. Appuyez plusieurs fois
3. Appuyez sur les boutons 5 ou 6 (14 ou 15) pour reculer ou avancer de 10 pistes.
RECHERCHE RAPIDE
1.
2.
FONCTIONS AVANCÉES
1. Appuyez sur la touche INT (11) pour écouter en séquence les 10 premières secondes de chaque piste du disque
2. Appuyez sur le bouton RPT (12) pour activer la répétition automatique de la piste écoutée (RPT ONE), d'un dossier
Appuy
3.
RECHERCHE PAR PISTE
1.
Tournez le bouton de commande SEL / Volume (2) pour définir le premier chiffre. Appuyez sur la touche I << (1) pour
2.
3. Tournez le bouton de commande SEL / Volume (2) pour définir le deuxième chiffre. Appuyez sur la touche I << (1)
4. T
La piste sélectionnée sera lue automatiquement.
5.
ENTRÉE A
1.
2.
Connectez tout appareil doté d'une sortie audio à l'entrée AUX (17).
e démarre automatiquement et le numéro de la plage en cours de lecture s'affiche à l'écran.
lecture.
Appuy
ez sur la touche >> I (9) pendant l'écoute pour passer à la piste suivante.
pour revenir aux pistes précédentes.
Maintenez la touche >> I (9) enf
Maintenez enf
(INTRO). Appuyez à nouveau pour revenir à l'écoute normale (OFF).
(RPT DIR) s'il est présent ou de toutes les pistes (RPT ALL).
Appuyez à nouveau pour revenir à la lecture séquentielle des pistes.
Appuy
confirmer.
pour confirmer.
ournez le bouton de commande SEL / Volume (2) pour définir le troisième chiffre. Appuyez sur le bouton de com-
mande SEL / Volume (2) pour confirmer.
Appuy
oncé le bouton I << (1) tout en écoutant la piste pour reculer rapidement.
ez sur le bouton RDM (13) pour activer l'écoute des pistes du disque dans un ordre aléatoire (RDM ON).
ez sur le bouton BAND (8) et maintenez-le enfoncé. TRK apparaîtra sur l'affichage avec un clignotement ***
UX IN
ez successivement sur la touche MODE (7) pour accéder à la source AUX IN.
oncée tout en écoutant la piste pour avancer rapidement.
17
Page 18

FRANCAIS
3. Contrôlez l'unité externe à partir de ses commandes.
SCD 5751 DAB
CONNEXION VIA BLUETOOTH (MODE MAINS LIBRES)
Vous pouvez passer des appels depuis votre téléphone mobile en mode MAINS LIBRES (en mode gratuit) grâce à la compatibilité avec le système sans fil Bluetooth international.
- Lors d'un appel, parlez fort et clairement.
- Pour un état optimal avant d'émettre ou de recevoir un appel, fermez les vitres de la voiture.
- La voix peut être reproduite de manière déformée en cas de problèmes de champ téléphonique.
- L'utilisation de la fonction MAINS LIBRES dépend de la compatibilité partielle / totale du téléphone mobile.
- Assurez-vous que la connexion Bluetooth est disponible sur votre téléphone mobile.
LIEN
Appuy
1.
2.
3.
4.
RÉCEPTION / REFUS / FIN D'UN APPEL
Lorsque v
1.
2.
- L'audio de la con
- P
3.
-
MISE SOUS TENSION AUTOMATIQUE
Lorsque l'autoradio est éteint en mode v
1.
2.
LECTURE AUDIO
Via la connexion Bluetooth, vous pouvez lire les fichiers audio sur le téléphone mobile.
Remarque: l'autoradio ne lit que les fichiers audio avec les téléphones por tables compatibles A2DP.
Consultez le manuel de votre téléphone portable.
Les opérations suivantes sont possibles lors de l'écoute de musique à partir d'un smartphone:
Appuy
1.
2.
3.
Appuyez plusieurs fois pour revenir aux pistes précédentes.
ez successivement sur le bouton MODE (7) pour accéder à la source BT (CONNECT) et activer la fonction
Bluetooth du téléphone mobile. Recherchez des accessoires / appareils audio.
Sur le téléphone mobile
Si nécessair
Maintenant que la connexion est établie
Appuy
Appuy
Après la conversation, l'écoute de la source en cours de lecture reprendra automatiquement à l'endroit où elle a
été interrompue.
s'allume automatiquement pour profiter de la fonction MAINS LIBRES.
À la fin de l'a
lecture.
Appuy
Appuy
e, entrez le code à quatre chiffres "0000".
ous recevez un appel, l'écoute de la source en cours de lecture s'arrête et vous entendez le son de l'appel.
ez sur la touche (7) pour démarrer la conversation ou appuyez sur la touche (8) pour la rejeter.
endant la conversation, les fonctions de l'autoradio seront interrompues.
ez sur le bouton (8) pour mettre fin à la conversation.
ppel, la radio revient automatiquement en mode veille.
ez sur le bouton 1 / PAU (10) pour arrêter temporairement la lecture. Appuyez à nouveau pour reprendre la
ez sur la touche >> I (9) pendant l'écoute pour passer à la piste suivante.
ez sur la touche I << (1) pendant l'écoute pour revenir au début de la piste en cours.
, sélectionnez l'appareil CAR BT correspondant à l'autoradio.
, le mot PHONE apparaîtra sur l'écran de l'autoradio.
versation sera audible depuis le système audio de la voiture.
eille, si un appel du périphérique Bluetooth couplé est reçu, l'autoradio
CARACTÉRISTIQUES TECHNIQUES
Alimentation: ............................................................................................... 12V
Absorption: ................................................................................................... max 10A
Puissance de sortie maximale: ................................................................40 W x 4 canaux
Impédance des haut-parleurs: ................................................................. 4 ohms par canal
Bande de fréquence: .................................................................................. FM 87,5 MHz - 108 MHz
....................................................................................................................... DAB 174 - 240 MHz
Puissance de transmission Bluetooth maximale: ................................. 0,8 mW
Fréquence de transmission Bluetooth: ................................................. 2,4 GHz
REMARQUE
TREVI poursuit une politique d'amélioration continue des produits. Pour cette raison, les caractéristiques techniques
peuvent être modifiées sans préavis.
18
Page 19
DEUTSCH
SCD 5751 DAB
SICHERHEITSVORKEHRUNGEN
• Stellen Sie Ihr Ohr während der Einstellung und Lautstärkeeinstellung nicht in die Nähe des Lautsprechers
W
•
enn Flüssigkeiten in das Gerät eindringen, trennen Sie das Gerät sofort vom Gerät und bringen Sie es zum nächsten
autorisierten TREVI-Servicecenter.
• Das Gerät darf keinem tropfenden oder spritzenden Wasser ausgesetzt werden, und es dürfen keine mit Flüssigkeit
gefüllten Gegenstände auf das Gerät gestellt werden.
Stellen Sie die entspr
•
Das Park
•
•
•
PFLEGE UND WARTUNG
Zur Reinigung empfehlen wir die Verwendung eines weichen, leicht angefeuchteten Tuchs. Vermeiden Sie Lösungsmittel
oder abrasive Substanzen.
WICHTIG
Dieses Gerät ist für den nicht professionellen Heimgebrauch konzipiert. Die gute Konstruktion dieses Gerätes garantiert
einen einwandfreien Betrieb für lange Zeit. Sollten sich jedoch Unannehmlichkeiten ergeben, wenden Sie sich an das nächstgelegene autorisierte TREVI-Servicecenter.
en in direktem Sonnenlicht kann zu sehr hohen Temperaturen im Fahrzeug führen. Vor Gebrauch den Innenraum des Fahrzeugs auffrischen und belüften.
Die Installation m
Be
wahren Sie dieses Handbuch zum späteren Nachschlagen auf.
echende Lautstärke ein, damit Sie die Straßen- und Verkehrsbedingungen kennen.
uss von qualifiziertem Personal durchgeführt werden.
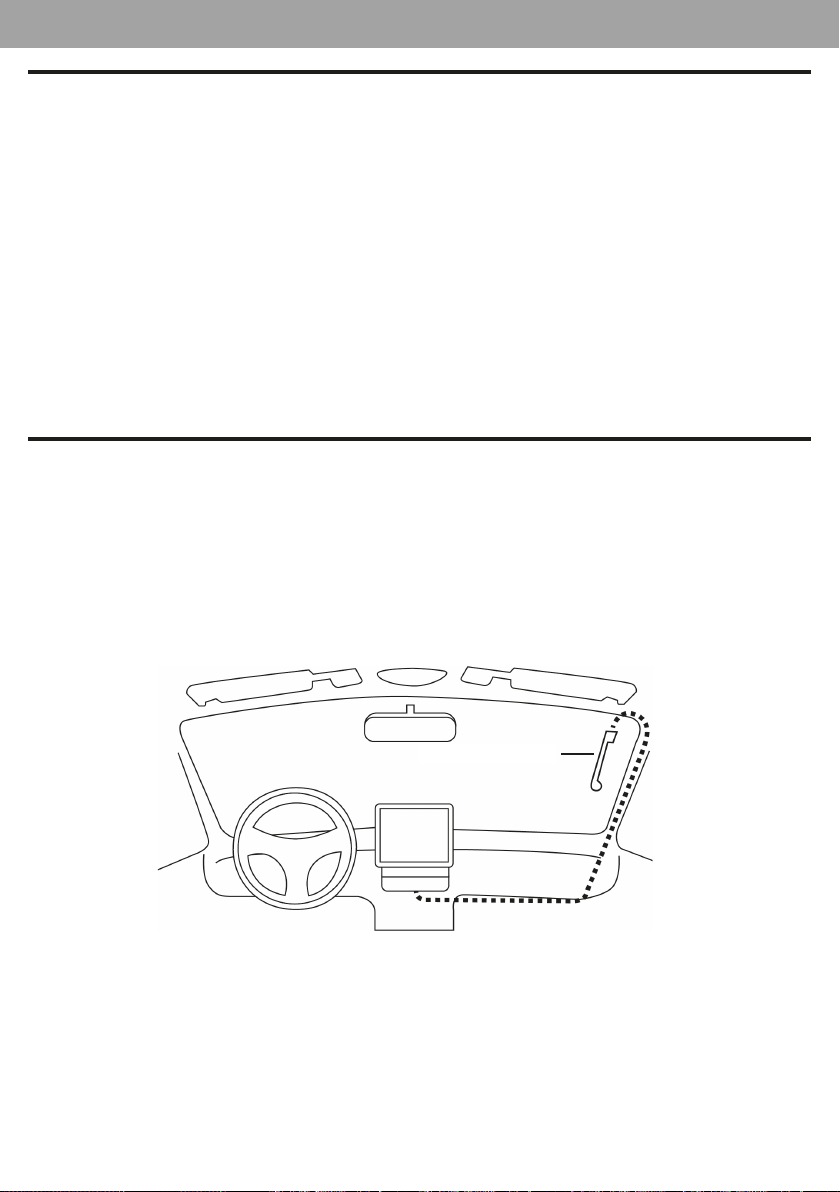
INSTALLATION DER DAB-ANTENNE
Wenden Sie sich für diesen Vorgang an einen professionellen Installateur.
1.
Die mitgelief
2. Reinigen Sie das Glas an der Stelle, an der Sie die Antenne anbringen möchten.
3.
Entf
Stelle. Die Antenne muss so positioniert sein, dass der Bodenkontakt auf der Metallkarosserie des Fahrzeugs verteilt
werden kann (es ist nicht erforderlich, den Lack zu entfernen).
4.
ositionieren Sie das Kabel (Länge 3 m) im Armaturenbrett, bis Sie die Position des Radios erreichen. Schließen Sie
P
das Kabel mit dem goldenen Stecker an den DAB-Antenneneingang auf der Rückseite des Autoradios an und sichern
Sie es durch Anschrauben des Steckers. Wenn ein zweites dünneres schwarzes Kabel vorhanden ist, muss es an die
12-V-Hauptstromversorgung (Schlüssel) angeschlossen werden.
erte DAB-Antenne muss in vertikaler Position an der Frontscheibe installiert werden (siehe Abbildung).
ernen Sie vorsichtig den Schutzfilm vom Klebstoff auf der Antenne und platzieren Sie ihn an der ausgewählten
DAB Antenna
- Installieren Sie die Antenne nicht in einer Position, die die Sicht des Fahrers behindert.
- Platzieren Sie das Kabel und die Antenne nicht dort, wo sie die ordnungsgemäße Funktion des AirBags
oder anderer Sicherheitsvorrichtungen beeinträchtigen oder das Fahren des Fahrzeugs behindern
könnten.
- Die Verwendung von abgeschirmtem Glas verringert die Antennenleistung.
19
Page 20

DEUTSCH
SCD 5751 DAB
BESCHREIBUNG DER EINHEITSBEFEHLE
1. I << Taste, Stimmung, vorheriger Titel.
Lautstärk
2.
3.
4
5.
6.
POWER-Taste ein / aus.
7.
B
8.
9.
10.
11.
12.
13.
14.
15.
16.
17.
MUTE-T
18.
19.
eregler / SEL-Taste, Lautstärke- und Tonregler / Benutzeroptionen zugreifen.
SD-Kar
teneingang.
Anzeige
.
USB-Eingang.
MODE-T
aste, FM / DAB / SD / USB / AUX / BT-RADIO-Modus, um das Telefongespräch zu schließen.
AND-Taste, Auswahl des Frequenzbandes F1, F2, F3 / Scannen und Speichern von Radiofrequenzen (FM und DAB)
/ Auswahl von SEARCH TRACK im MP3-Player-Modus / Akzeptieren von Telefongesprächen.
>> I-T
aste, Stimmung, nächster Titel.
1 / P
AU-Taste, Wiedergabe starten / pausieren / wiederherstellen.
2 / INT
-Taste, Wiedergabe der ersten 10 Sekunden eines Songs.
3 / RPT
-Taste, Track-Wiederholungsfunktion.
4 / RDM-T
5 / -10
6 / + 10-T
Radiosender
A
CLK-T
aste, zufällige Wiedergabe.
Taste, springe zum vorherigen zehnten Titel.
aste, springen Sie zum zehnten nächsten Titel.
-Schaltflächen von 1 bis 6 gespeichert.
UX-Eingang.
aste, Audio-Muting.
aste, zeigt / stellt die Uhr ein.
EIN / AUS EINSCHALTEN
1. Drücken Sie die POWER-Taste (6), um das Gerät einzuschalten.
Drück
2.
HINWEIS: Bei allgemeinen Fehlfunktionen das Radio für einige Sekunden ausschalten und mit der POWER-Taste (6) wieder einsc halten,
um zum ordnungsgemäßen Betrieb zurückzukehren.
en Sie die POWER-Taste (6), um das Gerät auszuschalten.
UHRSTELLUNG
1. Drücken Sie die POWER-Taste (6), um das Gerät einzuschalten.
Drück
2.
3. Drehen Sie den Lautstärkeregler (2) im / gegen den Uhrzeigersinn, um die aktuelle Uhrzeit einzustellen. Drücken Sie
4.
en Sie lange die CLK-Taste (19), bis auf dem Display die blinkende Stunde angezeigt wird.
zur Bestätigung den Lautstärkeregler (2).
Dr
ehen Sie den Lautstärkeregler (2) im / gegen den Uhrzeigersinn, um die aktuellen Minuten einzustellen. Drücken
Sie zur Bestätigung die CLK-Taste (19).
QUELLENAUSWAHL
Drücken Sie nacheinander die MODE-Taste (7), um die RADIO-Quellen FM, DAB, SD, USB, AUX, BT auszuwählen (die SD
/ USB-Quellen werden nur angezeigt, wenn ein Speichergerät vorhanden ist).
AUDIO-STEUERUNGEN
VOLUMENANPASSUNG
Drehen Sie den Lautstärkeregler (2) im / gegen den Uhrzeigersinn, um die Lautstärke zu erhöhen / verringern.
ADJUSTING-TASTE / LAUTSTÄRKE / LOW / HIGH TONE-BELEUCHTUNG
1. Drücken Sie einmal die SEL-Taste (2), um die Tastenbeleuchtungsfarbe auszuwählen (Auto = variable Farbe).
2. Drücken Sie zweimal die SEL-Taste (2), um die Lautstärkeeinstellung auszuwählen.
3. Drücken Sie dreimal die SEL-Taste (2), um die Tieftoneinstellung auszuwählen. Die Anzeige des Tieftonpegels "BAS"
erscheint auf dem Display. Drehen Sie den Lautstärkeregler (2) im / gegen den Uhrzeigersinn, um den Basspegel zu
erhöhen / verringern.
4. Drücken Sie viermal die SEL-Taste (2), um die Höheneinstellung auszuwählen. Die Anzeige des Höhenpegels "TRE"
erscheint im Display. Drehen Sie den Lautstärkeregler (2) im / gegen den Uhrzeigersinn, um den Pegel der hohen Töne
zu erhöhen / zu verringern.
BALANCE / FADER-STEUERUNG
1. Drücken Sie fünfmal die SEL-Taste (2), um die Kanalbalance auszuwählen.
20
Page 21

DEUTSCH
2. Auf dem Display erscheint "BAL".
Dr
3.
ehen Sie den Lautstärkeregler (2) im / gegen den Uhrzeigersinn, um den Klang auf dem rechten / linken Kanal
auszugleichen
4. Drücken Sie sechsmal die Taste SEL (2), um die Fadereinstellung auszuwählen.
Auf dem Displa
5.
Dr
ehen Sie den Lautstärkeregler (2) im / gegen den Uhrzeigersinn, um den Klang an den hinteren / vorderen Lautspre-
6.
chern einzustellen.
y erscheint "FAD".
SCD 5751 DAB
ZUSÄTZLICHE EINSTELLUNGEN
LAUTSTÄRKE
- Drücken Sie die SEL-Taste (2) sieben Mal, um die LOUD-Funktion (Bassverstärkung) zu aktivieren / deaktivieren.
STANDARDGLEICHSTELLER
Drück
-
Hinweis: Durch Auswahl einer voreingestellten Entzerrung können die hohen / niedrigen Tonwerte nicht angepasst werden.
DX / LOCAL (VERFÜGBAR IM RADIOMODUS)
DX: Während der automatischen Suche nach Radiosendern werden alle Sender empfangen, auch die gestörten. Diese
LOKAL: Während der automatischen Radiosendersuche werden nur die Sender mit dem stärksten Signal empfangen.
STEREO / MONO (IM RADIOMODUS VERFÜGBAR)
STEREO: Stellen Sie ein, um Radio in Stereo zu hören.
MONO:
SUB
Aktiviert den vorverstärkten SUB1-Ausgang zum Anschließen eines externen Subwoofers.
SUB 2
Aktiviert den vorverstärkten SUB2-Ausgang zum Anschließen eines zweiten externen Subwoofers.
SUB LEVEL
Legt den Audiopegel der Ausgänge SUB1 und SUB2 fest.
CUT
Legt die Grenzfrequenz der Ausgänge SUB1 und SUB2 fest.
en Sie achtmal die SEL-Taste (2), um die bevorzugte voreingestellte Entzerrung auszuwählen. Es kann zwischen
CLASS, ROCK, POP, FLAT, JAZZ, OFF gewählt werden (kein Ausgleich).
Option ist werkseitig eingestellt.
Stellen Sie das Radio so ein,
dass es in Mono hört.
FM-RADIO
AUTOMATISCHES ABSTIMMEN
1. Drücken Sie die BAND-Taste (8), um das Frequenzband (FM1 / FM2 / FM3) auszuwählen, das Sie hören möchten.
2. Drücken Sie die Taste >> I (9), um den nächsten Sender automatisch einzustellen.
3. Drücken Sie die Taste I << (1), um automatisch den vorherigen Sender einzustellen.
MANUELLES ABSTIMMEN
1. Drücken Sie die BAND-Taste (8), um das Frequenzband (FM1 / FM2 / FM3) auszuwählen, das Sie hören möchten.
2. Drücken Sie lange die Taste >> I (9) oder I << (1), bis auf dem Display MANUAL angezeigt wird. Drücken Sie die Taste
>> I (9) oder I << (1), um die Abstimmung vorwärts oder rückwärts auf 0,05 zu verschieben MHz in FM. Warten Sie
einige Sekunden, um zur automatischen Abstimmung zurückzukehren (AUTO erscheint im Display).
LAGERUNG VON STATIONEN
1. Stellen Sie die gewünschte Station wie oben beschrieben ein.
2. Halten Sie eine gewünschte Speichertaste 1 bis 6 (16) gedrückt.
3. Wiederholen Sie Schritt 2, um alle anderen Sender auf allen Bändern zu speichern.
AUTOMATISCHE LAGERUNG VON STATIONEN
Dieses Gerät ist mit einem automatischen Speichersystem ausgestattet, das die stärksten Stationen sucht und speichert.
21
Page 22

DEUTSCH
1. Halten Sie die BAND-Taste (8) gedrückt. Das Gerät sucht und speichert automatisch die Sender mit dem stärksten
Signal.
SCD 5751 DAB
RADIO DAB
1. Drücken Sie die MODE-Taste (7), um die DAB-Quelle auszuwählen.
2.
3.
4.
en Sie lange die BAND-Taste (8), um die aktuellen Radiosender automatisch zu scannen, und drücken Sie kurz,
Drück
um Informationen über den gerade gehörten Radiosender anzuzeigen.
Nach der automatischen Suche nach Radiosendern w
chert. Drücken Sie die Zifferntasten (16), um die entsprechenden gespeicherten Sender auszuwählen und abzuspielen.
Drücken Sie lange eine der Tasten (16), um den zu hörenden Sender im gewünschten Speicher zu speichern.
en Sie die Taste >> I (9) oder I << (1), um zum nächsten oder vorherigen Radiosender zu gelangen.
Drück
erden 6 Sender automatisch in den Zifferntasten (16) gespei-
SD / USB-EINGANG
BEGINN DER REPRODUKTION
1. Stecken Sie ein SD / USB-Gerät in den SD-Eingang (3) oder den USB-Eingang (5).
Die
2.
Wiedergabe startet automatisch und die wiedergegebene Titelnummer wird auf dem Display angezeigt.
HINWEIS: Das Autoradio unterstützt möglicherweise einige externe Geräte mit USB-Buchse nicht. Dies liegt an der Inkompatibilität
der Prozessoren.
Drück
3.
TRACK / ORDNER ÜBERSPRINGEN
1.
2. Drücken Sie während des Hörens die Taste I << (1), um zum Anfang des aktuellen Titels zurückzukehren. Drücken Sie
3.
SCHNELLE SUCHE
1. Halten Sie die Taste >> I (9) gedrückt, während Sie den Titel anhören, um schnell vorzuspulen.
2.
ERWEITERTE FUNKTIONEN
1. Drücken Sie die INT-Taste (11), um die ersten 10 Sekunden jedes Titels auf der Disc (INTRO) nacheinander anzuhören.
2. Drücken Sie die RPT-Taste (12), um die automatische Wiederholung des gehörten Titels (RPT ONE), eines Ordners
3. Drücken Sie die RDM-Taste (13), um das Abhören der Titel auf der Disc in zufälliger Reihenfolge zu aktivieren (RDM
SUCHE NACH SPUR
1.
2.
3. Dr
4.
5.
en Sie die 1 / PAU-Taste (10), um die Wiedergabe vorübergehend zu stoppen. Drücken Sie erneut, um die
Wiedergabe fortzusetzen.
en Sie beim Hören die Taste >> I (9), um zum nächsten Titel zu gelangen.
Drück
mehrmals darauf, um zu den vorherigen Titeln zu gelangen.
Drück
en Sie die 5 oder 6 Tasten (14 oder 15), um 10 Titel zurückzutreten oder vorzurücken.
Halten Sie die
Drücken Sie erneut, um zum normalen Hören zurückzukehren (AUS).
(RPT DIR) (falls vorhanden) oder aller Titel (RPT ALL) zu aktivieren.
ON). Drücken Sie erneut, um zur sequentiellen Titelwiedergabe zurückzukehren.
Halten Sie die B
Drehen Sie die SEL / Lautstärkeregelungstaste (2), um die erste Ziffer einzustellen. Drücken Sie zur Bestätigung die
Taste I << (1).
ehen Sie die Taste SEL / Volume (2), um die zweite Ziffer einzustellen. Drücken Sie zur Bestätigung die Taste I <<
(1).
Drehen Sie die SEL / Lautstärkeregelungstaste (2), um die dritte Ziffer einzustellen. Drücken Sie zur Bestätigung die
Taste SEL / Lautstärke (2).
Der ausgewählte Titel wird automatisch abgespielt.
Taste I << (1) gedrückt, während Sie den Titel anhören, um schnell einen Schritt zurückzutreten.
AND-Taste (8) gedrückt. TRK erscheint auf dem Display mit einem blinkenden ***
AUX IN INPUT
1. Drücken Sie nacheinander die MODE-Taste (7), um zur AUX IN-Quelle zu gelangen.
2. Schließen Sie ein Gerät mit Audioausgang an den AUX-Eingang (17) an.
3. Steuern Sie die externe Einheit über ihre Befehle.
VERBINDUNG ÜBER BLUETOOTH (HANDS-FREE-MODUS)
Dank der Kompatibilität mit dem internationalen Bluetooth-Funksystem können Sie von Ihrem Mobiltelefon aus im HANDSFREE-Modus (im Free-Modus) telefonieren.
22
Page 23

DEUTSCH
- Sprechen Sie beim Telefonieren laut und deutlich.
- Für einen optimalen Zustand vor dem Tätigen oder Empfangen eines Anrufs die Autofenster schließen.
- Bei Telefonfeldproblemen kann die Stimme verzerrt wiedergegeben werden.
- Die Verwendung der HANDS-FREE-Funktion hängt von der teilweisen / vollständigen Kompatibilität des Mobiltelefons ab.
- Stellen Sie sicher, dass die Bluetooth-Verbindung in Ihrem Mobiltelefon verfügbar ist.
VERBINDUNG
Drück
1.
2.
3. Geben Sie bei Bedarf den 4-stelligen Code "0000" ein.
4.
EMPFANG / ABLEHNUNG / ENDE EINES ANRUFS
1. Wenn Sie einen Anruf erhalten, hört das Hören der abgespielten Quelle auf und Sie hören den Anrufton.
2.
- Das
-
3.
- Nach dem Gespräch wir
AUTOMATISCHES EINSCHALTEN
1.
2.
AUDIO FILE
Über die Bluetooth-Verbindung können Sie die Audiodateien auf dem Mobiltelefon abspielen.
Hinweis: Das Autoradio spielt Audiodateien nur mit A2DP-kompatiblen Mobiltelefonen ab.
Konsultieren Sie das Handbuch Ihres Mobiltelefons.
Die folgenden Vorgänge sind möglich, während Sie Musik vom Smartphone hören:
1.
2.
3.
Drücken Sie mehrmals darauf, um zu den vorherigen Titeln zu gelangen.
en Sie nacheinander die MODE-Taste (7), um zur BT-Quelle (CONNECT) zu gelangen und die BluetoothFunktion des Mobiltelefons zu aktivieren. Suchen Sie nach Zubehör / Audiogeräten.
Wählen Sie auf dem Mobiltelef
Nachdem die
Drück
Während des Gesprächs werden die Autoradio-Funktionen unterbrochen.
Drück
sie unterbrochen wurde.
W
enn das Autoradio im Standby-Modus ausgeschaltet ist und ein Anruf vom gekoppelten Bluetooth-Gerät eingeht,
wird das Autoradio automatisch eingeschaltet, um die HANDS-FREE-Funktion zu nutzen.
Am Ende des
Drück
Wiedergabe fortzusetzen.
Drück
Drück
Verbindung hergestellt wurde, erscheint das Wort PHONE auf dem Display des Autoradios.
en Sie die Taste (7), um das Gespräch zu starten, oder drücken Sie die Taste (8), um es abzulehnen.
Audio des Gesprächs ist über das Auto-Audiosystem hörbar.
en Sie die Taste (8), um das Gespräch zu beenden.
Anrufs kehrt das Radio automatisch in den Standby-Modus zurück.
en Sie die 1 / PAU-Taste (10), um die Wiedergabe vorübergehend zu stoppen. Drücken Sie erneut, um die
en Sie beim Hören die Taste >> I (9), um zum nächsten Titel zu gelangen.
en Sie während des Hörens die Taste I << (1), um zum Anfang des aktuellen Titels zurückzukehren.
on das CAR BT-Gerät aus, das dem Autoradio entspricht.
d das Abhören der wiedergegebenen Quelle automatisch an der Stelle fortgesetzt, an der
SCD 5751 DAB
TECHNISCHE EIGENSCHAFTEN
Stromversorgung: ....................................................................................... 12V
Absorption: ................................................................................................... max 10A
Maximale Ausgangsleistung: .....................................................................40 W x 4 Kanäle
Lautsprecherimpedanz: ............................................................................. 4 Ohm pro Kanal
Frequenzband: ............................................................................................. FM 87,5 MHz - 108 MHz
....................................................................................................................... DAB 174 - 240 MHz
Maximale Bluetooth-Sendeleistung: ....................................................... 0,8 mW
Bluetooth-Übertragungsfrequenz: .......................................................... 2,4 GHz
HINWEIS
TREVI verfolgt eine Politik der kontinuierlichen Produktverbesserung. Aus diesem Grund können sich die technischen
Eigenschaften ohne vorherige Ankündigung ändern.
23
Page 24
ESPANOL
SCD 5751 DAB
PRECAUCIONES DE SEGURIDAD
• No acerque la oreja al altavoz durante la configuración y los ajustes de volumen.
Si los líquidos penetran dentr
•
rizado más cercano.
• El aparato no debe exponerse a goteos o salpicaduras de agua y no se deben colocar objetos llenos de líquido sobre
el aparato.
Mantenga el niv
•
Estacionarse
•
el interior del automóvil antes de usarlo.
La instalación debe ser r
•
Guar
•
CUIDADO Y MANTENIMIENTO
Para la limpieza, recomendamos el uso de un paño suave y ligeramente humedecido. Evitar solventes o sustancias abrasivas.
IMPORTANTE
Este dispositivo está diseñado para uso doméstico no profesional. La buena construcción de este aparato garantiza un funcionamiento perfecto durante mucho tiempo. Sin embargo, en caso de que surjan inconvenientes, es aconsejable consultar
con el Centro de servicio autorizado TREVI más cercano.
de este manual para referencia futura.
el de volumen adecuado para estar al tanto de las condiciones de la carretera y del tráfico.
bajo la luz solar directa puede producir temperaturas muy altas dentro del vehículo. Actualice y ventile
o del aparato, desconéctelo inmediatamente y llévelo al centro de servicio TREVI auto-
ealizada por personal calificado.
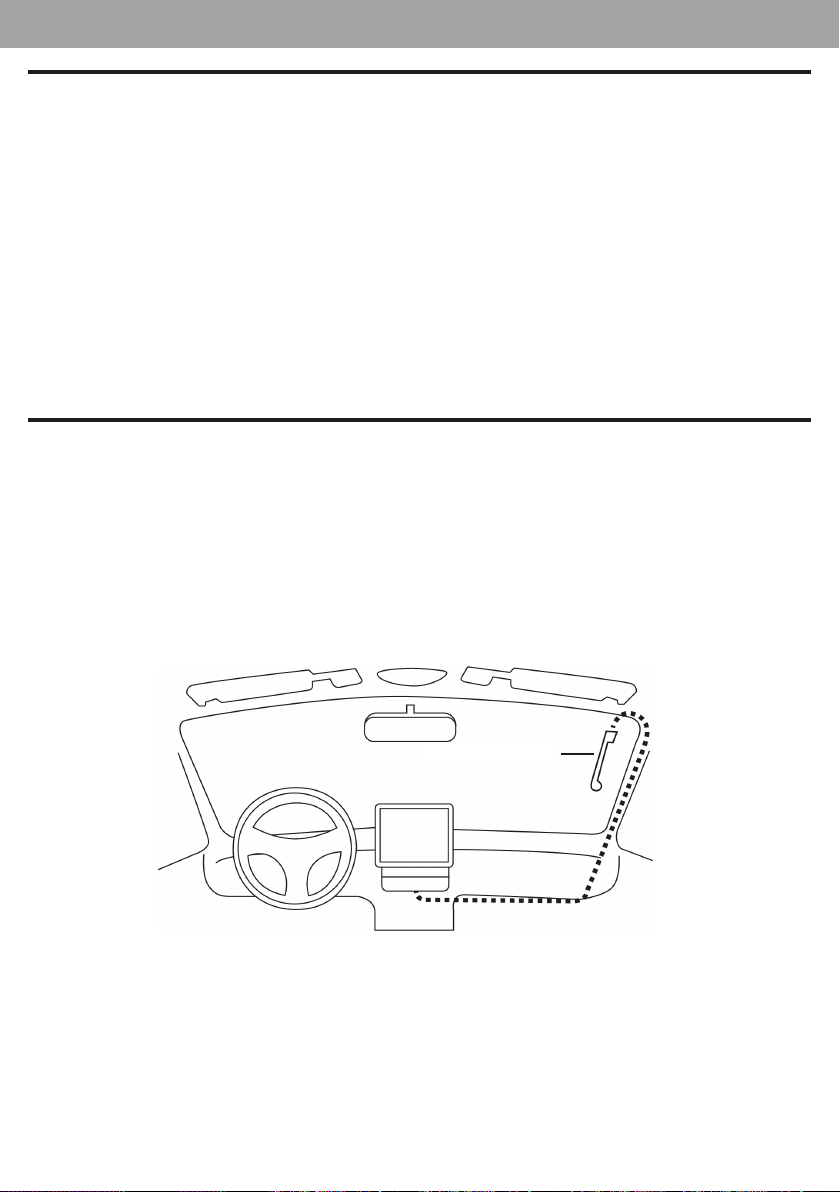
INSTALACIÓN DE ANTENA DAB
Para esta operación, contacte a un instalador profesional.
1.
La antena D
2. Limpie el vidrio donde desea colocar la antena.
3.
Retir
colocarse de modo que el contacto con el suelo pueda extenderse sobre el cuerpo metálico del automóvil (no es
necesario quitar la pintura).
4.
Coloque el cable (longitud 3 m) dentr
cable con conector dorado a la entrada de antena DAB en la parte posterior de la radio del automóvil y asegúrelo
atornillando el conector. Si hay un segundo cable negro más delgado, debe estar conectado a la fuente de alimentación
principal de 12V (clave).
AB suministrada requiere instalación en el parabrisas delantero en posición vertical (ver figura).
e con cuidado la película protectora del adhesivo en la antena y colóquela en la ubicación elegida. La antena debe
o del tablero del automóvil hasta llegar a la posición de la radio. Conecte el
DAB Antenna
Advertencia:
- No instale la antena en una posición que obstruya la vista del conductor.
- No coloque el cable y la antena donde puedan interferir con el correcto funcionamiento del AirBag u
otros dispositivos de seguridad o donde puedan impedir la conducción del vehículo.
- El uso en vidrio blindado reduce el rendimiento de la antena.
24
Page 25

ESPANOL
SCD 5751 DAB
DESCRIPCIÓN DE LAS UNIDADES COMANDOS
1. I << botón, sintonización, pista anterior.
Contr
2.
3.
4
5.
6.
7.
8.
9.
10.
11.
12.
13.
14.
15.
16.
17.
18.
19.
ol de volumen / botón SEL, control de volumen y tono / acceso a opciones de usuario.
Entrada de tarjeta SD
Displa
y.
Entrada USB.
Botón PO
T
T
(FM y DAB) / selección de BÚSQUEDA DE PISTA en modo reproductor de MP3 / aceptar conversación telefónica.
Boton >>I,
Botón 1 / P
Botón 2 / INT
Botón 3 / RPT
Botón 4 / RDM,
Botón 5 / -10,
Botón 6 / + 10,
Botones de emisoras de radio almacenados del 1 al 6.
Entrada auxiliar
Botón MUTE,
Botón CLK,
WER, encendido / apagado.
ecla MODE, modo FM / DAB / SD / USB / AUX / BT RADIO, que cierra la conversación telefónica.
ecla BAND, selección de la banda de frecuencia F1, F2, F3 / exploración y almacenamiento de frecuencias de radio
sintonización, siguiente pista.
AU, iniciar / pausar / restaurar la reproducción.
muestra / ajusta el reloj.
.
, reproducción de los primeros 10 segundos de una canción.
, función de repetición de pista.
reproducción aleatoria.
salta a la décima pista anterior.
salta a la décima pista siguiente.
AUX IN.
silenciamiento de audio.
ENCENDIDO / APAGADO
1. Presione el botón de ENCENDIDO (6) para encender el aparato.
2. Presione el botón de ENCENDIDO (6) para apagar el aparato.
NOTA: en caso de mal funcionamiento general, para volver al funcionamiento correcto, apague la radio durante unos segundos y
vuelva a encenderla con el botón de ENCENDIDO (6).
AJUSTE DE RELOJ
1. Presione el botón de ENCENDIDO (6) para encender el aparato.
Mantenga pr
2.
3. Gire el control de volumen (2) en sentido horario / antihorario para ajustar la hora actual. Presione el control de
volumen (2) para confirmar.
Gir
4.
CLK (19) para confirmar.
esionado el botón CLK (19) hasta que la pantalla muestre la hora que parpadea.
e el control de volumen (2) en sentido horario / antihorario para ajustar los minutos actuales. Presione el botón
SELECCION DE FUENTES
Presione la tecla MODE (7) en secuencia para seleccionar las fuentes de RADIO FM, DAB, SD, USB, AUX, BT (las fuentes
SD / USB se muestran solo si hay un dispositivo de memoria).
CONTROLES DE AUDIO
AJUSTE DE VOLUMEN
Gire el control de volumen (2) en sentido horario / antihorario para aumentar / disminuir el volumen.
BOTÓN DE AJUSTE / VOLUMEN / ILUMINACIÓN BAJA / ALTA TONO
1. Presione la tecla SEL (2) una vez para seleccionar el color de iluminación de la tecla (Auto = color variable).
2. Presione el botón SEL (2) dos veces para seleccionar el ajuste de volumen.
3. Presione el botón SEL (2) tres veces para seleccionar el ajuste de tono bajo, la indicación del nivel de tono bajo "BAS"
aparece en la pantalla. Gire el control de volumen (2) en sentido horario / antihorario para aumentar / disminuir el
nivel de graves.
4. Presione el botón SEL (2) cuatro veces para seleccionar el ajuste de agudos, la indicación del nivel de agudos "TRE"
aparece en la pantalla. Gire el control de volumen (2) en sentido horario / antihorario para aumentar / disminuir el
nivel de tonos altos.
EQUILIBRIO / CONTROL DE FADER
1. Presione el botón SEL (2) cinco veces para seleccionar el balance del canal.
25
Page 26

ESPANOL
2. "BAL" aparece en la pantalla.
Gir
3.
e el control de volumen (2) en sentido horario / antihorario para equilibrar el sonido en el canal derecho / izquierdo
4. Presione el botón SEL (2) seis veces para seleccionar la configuración del fader.
5. "FAD" aparece en la pantalla.
6. Gire el control de volumen (2) en sentido horario / antihorario para ajustar el sonido en los altavoces traseros /
frontales.
SCD 5751 DAB
AJUSTES ADICIONALES
VOLUMEN
- Presione el botón SEL (2) siete veces para activar / desactivar la función LOUD (mejora de graves).
ECUALIZADOR PREDETERMINADO
-
esione la tecla SEL (2) ocho veces para seleccionar la ecualización preestablecida preferida. Es posible elegir entre
Pr
CLASS, ROCK, POP, FLAT, JAZZ, OFF (sin ecualización).
Nota: al seleccionar una ecualización preestablecida, no es posible ajustar los valores de tono alto / bajo.
DX / LOCAL (DISPONIBLE EN MODO RADIO)
DX: durante la búsqueda automática de estaciones de radio, se recibirán todas las estaciones, incluso las perturbadas. Esta
opción está configurada de fábrica.
LOCAL: durante la búsqueda automática de emisoras de radio, solo se recibirán las emisoras con la señal más fuerte.
ESTÉREO / MONO (DISPONIBLE EN MODO RADIO)
ESTÉREO: configurado para escuchar la radio en estéreo.
MONO:
SUB
Activa la salida preamplificada SUB1 para conectar un subwoofer externo.
SUB 2
Activa la salida SUB2 preamplificada para conectar un segundo subwoofer externo.
SUB LEVEL
Establece el nivel de audio de las salidas SUB1 y SUB2.
CUT
Establece la frecuencia de corte de las salidas SUB1 y SUB2.
configura la radio para escuchar en mono
.
RADIO FM
SINTONIZACIÓN AUTOMÁTICA
1. Presione el botón BAND (8) para seleccionar la banda de frecuencia (FM1 / FM2 / FM3) que desea escuchar.
2. Presione el botón >> I (9) para sintonizar automáticamente la siguiente estación.
3. Presione el botón I << (1) para sintonizar automáticamente la estación anterior.
SINTONIZACIÓN MANUAL
1. Presione el botón BAND (8) para seleccionar la banda de frecuencia (FM1 / FM2 / FM3) que desea escuchar.
2.
Mantenga pr
o I << (1) para avanzar o bajar la afinación a 0.05 MHz en FM. Espere unos segundos para volver a la sintonización
automática (AUTO aparece en la pantalla).
ALMACENAMIENTO DE ESTACIONES
1.
Sintonice la estación deseada como se describe ar
2. Mantenga presionado el botón de memoria deseado 1 a 6 (16).
3. Repita el paso 2 para almacenar todas las otras estaciones en todas las bandas.
ALMACENAMIENTO AUTOMÁTICO DE ESTACIONES
Este aparato está equipado con un sistema de memorización automática que busca y memoriza las estaciones más fuertes.
esionada la tecla >> I (9) o I << (1) hasta que la pantalla muestre MANUAL, presione la tecla >> I (9)
riba.
26
Page 27

ESPANOL
1. Mantenga presionado el botón BAND (8). El dispositivo buscará y almacenará automáticamente las estaciones con la
señal más fuerte.
SCD 5751 DAB
RADIO DAB
1. Presione el botón MODE (7) para seleccionar la fuente DAB.
2.
Mantenga pr
brevemente para mostrar información sobre la estación de radio que se está escuchando.
3.
Después de buscar automáticamente estaciones de radio
nes numéricos (16). Presione los botones numéricos (16) para seleccionar y reproducir las estaciones almacenadas
correspondientes. Mantenga presionada una de las teclas (16) para almacenar la estación que se está escuchando en
la memoria deseada.
esione el botón >> I (9) o I << (1) para pasar a la estación de radio siguiente o anterior.
4.
Pr
esionada la tecla BAND (8) para escanear automáticamente las estaciones de radio actuales, presione
, 6 estaciones se almacenan automáticamente en los boto-
ENTRADA SD / USB
INICIO DE REPRODUCCION
1. Inserte un dispositivo SD / USB en la entrada SD (3) o en la entrada USB (5).
La
2.
reproducción comenzará automáticamente y el número de pista que se está reproduciendo se mostrará en la
pantalla.
NOTA: es posible que la radio del automóvil no sea compatible con algunos dispositivos externos con toma USB, esto se debe a la
incompatibilidad de los procesadores.
3. Presione el botón 1 / PAU (10) para detener temporalmente la reproducción. Presiónelo nuevamente para reanudar
la reproducción.
SALTAR PISTA / CARPETA
1. Presione la tecla >> I (9) mientras escucha para ir a la siguiente pista.
2. Presione el botón I << (1) mientras escucha para volver al comienzo de la pista actual. Presiónelo varias veces para
ir a las pistas anteriores.
3. Presione los botones 5 o 6 (14 o 15) para retroceder o avanzar 10 pistas.
BÚSQUEDA RÁPIDA
Mantenga pr
1.
2. Mantenga presionado el botón I << (1) mientras escucha la pista para retroceder rápidamente.
FUNCIONES AVANZADAS
1. Presione la tecla INT (11) para escuchar en secuencia los primeros 10 segundos de cada pista del disco (INTRO).
Presiónelo nuevamente para volver a la escucha normal (APAGADO).
Pr
2.
esione el botón RPT (12) para activar la repetición automática de la pista que se está escuchando (RPT ONE), de
una carpeta (RPT DIR) si está presente o de todas las pistas (RPT ALL).
3. Presione el botón RDM (13) para activar la escucha de las pistas del disco en secuencia aleatoria (RDM ON). Presiónelo
nuevamente para volver a la reproducción secuencial de pistas.
BUSCAR POR PISTA
1. Mantenga presionado el botón BAND (8). TRK aparecerá en la pantalla con un parpadeo ***
2. Gir
Gire el botón de control SEL / Volumen (2) para configurar el segundo dígito. Presione la tecla I << (1) para confirmar.
3.
4. Gire el botón de control SEL / Volumen (2) para configurar el tercer dígito. Presione el botón de control SEL / Volumen
(2) para confirmar.
5. La pista seleccionada se reproducirá automáticamente.
esionada la tecla >> I (9) mientras escucha la pista para avanzar rápidamente.
e el botón de control SEL / Volumen (2) para configurar el primer dígito. Presione la tecla I << (1) para confirmar.
ENTRADA AUXILIAR
1. Presione la tecla MODE (7) en secuencia para ir a la fuente AUX IN.
2. Conecte cualquier unidad con salida de audio a la entrada AUX (17).
3. Controle la unidad externa desde sus comandos.
CONEXIÓN A TRAVÉS DE BLUETOOTH (MODO MANOS LIBRES)
Puede realizar llamadas desde su teléfono móvil en modo MANOS LIBRES (en modo libre) gracias a la compatibilidad con
el sistema inalámbrico internacional Bluetooth.
27
Page 28

ESPANOL
- Al hacer una llamada, hable alto y claro.
- Para una condición óptima antes de hacer o recibir una llamada, cierre las ventanas del automóvil.
- La voz se puede reproducir de forma distorsionada en caso de problemas de campo telefónico.
- El uso de la función MANOS LIBRES depende de la compatibilidad parcial / total del teléfono móvil.
- Asegúrese de que la conexión Bluetooth esté disponible en su teléfono móvil.
CONEXIÓN
Pr
1.
esione el botón MODE (7) en secuencia para ir a la fuente BT (CONECTAR) y activar la función Bluetooth del
teléfono móvil. Busque accesorios / dispositivos de audio.
Desde el teléf
2.
3. Si es necesario, ingrese el código de 4 dígitos "0000".
Ahora que la conexión está establecida,
4.
RECEPCIÓN / RECHAZO / FINALIZACIÓN DE UNA LLAMADA
Cuando r
1.
la llamada.
Pr
esione la tecla (7) para iniciar la conversación o presione la tecla (8) para rechazarla.
2.
- El audio de la con
- Durante la con
Pr
esione el botón (8) para finalizar la conversación.
3.
- Después de la con
donde se interrumpió.
ENCENDIDO AUTOMÁTICO
Con la radio del automóvil a
1.
la radio del automóvil se encenderá automáticamente para aprovechar la función MANOS LIBRES.
Al final de la llamada,
2.
REPRODUCCIÓN AUDIO
A través de la conexión Bluetooth, puede reproducir los archivos de audio en el teléfono móvil.
Nota: la radio del automóvil solo reproduce archivos de audio con teléfonos móviles compatibles con A2DP.
Consulte el manual de su teléfono móvil.
Las siguientes operaciones son posibles mientras se escucha música desde el teléfono inteligente:
Pr
1.
esione el botón 1 / PAU (10) para detener temporalmente la reproducción. Presiónelo nuevamente para reanudar
la reproducción.
Pr
esione la tecla >> I (9) mientras escucha para ir a la siguiente pista.
2.
3.
Presione el botón I << (1) mientras escucha para volver al comienzo de la pista actual.
Presiónelo varias veces para ir a las pistas anteriores.
ono móvil, seleccione el dispositivo CAR BT que corresponde a la radio del automóvil.
la palabra TELÉFONO aparecerá en la pantalla de la radio del automóvil.
eciba una llamada, se detendrá la escucha de la fuente que se está reproduciendo y escuchará el sonido de
versación será audible desde el sistema de audio del automóvil.
versación se interrumpirán las funciones de la radio del automóvil.
versación, escuchar la fuente que se está reproduciendo se reanudará automáticamente desde
pagada en modo de espera, si se recibe una llamada del dispositivo Bluetooth emparejado,
la radio volverá automáticamente al modo de espera.
SCD 5751 DAB
CARACTERÍSTICAS TÉCNICAS
Fuente de alimentación: ............................................................................ 12V
Absorción: ..................................................................................................... max 10A
Potencia máxima de salida: ...................................................................... 40 W x 4 canales
Impedancia del altavoz: ............................................................................. 4 ohmios por canal
Banda de frecuencia: .................................................................................. FM 87.5MHz - 108 MHz
....................................................................................................................... DAB 174 - 240 MHz
Potencia máxima de transmisión Bluetooth: ....................................... 0.8mW
Frecuencia de transmisión de Bluetooth: ............................................. 2.4GHz
NOTA
TREVI persigue una política de mejora continua del producto. Por esta razón, las características técnicas están sujetas a
cambios sin previo aviso.
28
Page 29

NOTE
SCD 5751 DAB
29
Page 30
CORRECT DISPOSAL OF THE PRODUCT
INFORMAZIONI AGLI UTENTI ai sensi del Decreto Legislativo N° 49 del 14 Marzo 2014
“Attuazione della Direttiva 2012/19/UE sui rifiuti di apparecchiature elettriche ed elettroniche (RAEE)”
Il simbolo del cassonetto barrato riportato sull’apparecchiatura indica che il prodotto alla fine della propria vita utile deve
essere raccolto separatamente dagli altri rifiuti. L’utente dovrà, pertanto, conferire l’apparecchiatura integra dei componenti
essenziali giunta a fine vita agli idonei centri di raccolta differenziata dei rifiuti elettronici ed elettrotecnici, oppure riconsegnarla al rivenditore al momento dell’acquisto di nuova apparecchiatura di tipo equivalente, in ragione di uno a uno, oppure
1 a zero per le apparecchiature aventi lato maggiore inferiore a 25 cm. L’adeguata raccolta differenziata per l’avvio successivo
dell’apparecchiatura dimessa al riciclaggio, al trattamento e allo smaltimento ambientale compatibile contribuisce ad evitare
possibili effetti negativi sull’ambiente e sulla salute e favorisce il riciclo dei materiali di cui è composta l’apparecchiatura. Lo
smaltimento abusivo del prodotto da parte dell’utente comporta l’applicazione delle sanzioni amministrative di cui al D.Lgs
n. Decreto Legislativo N° 49 del 14 Marzo 2014.
SCD 5751 DAB
PRECAUTIONS FOR CORRECT DISPOSAL OF THE PRODUCT
Thesymbolshownontheequipmentindicatesthatwastemustbedisposedofin“separatecollection”andsotheproduct
mustnotbedisposedoftogetherwithurbanwaste.
Theuserm
totheretaileragainstthepurchaseofanewproduct.
Separate
equipmentwithr
handling
Illegal disposal of the product leads to the enforcement of administrative penalties.
ust
takethepr
collectionofwasteandsubsequenttr
ofwaste.
oductto
ecycled
special“separatewastecollectioncentr
materialsand limitsnegativeeff
eatment,recycling
ectson
es”providedby
anddisposaloperationspr
vironment
theen
localg
andonhealthcausedbyimpr
overnment,
omotes
thepr
erit
ordeliv
oductionof
oper
RECOMMANDATIONS POUR L’ÉLIMINATION CORRECTE DU PRODUIT
Lesymbolegurantsurl’appareilindiquequeleproduitfaitl’objetd’une“collecteséparée“.C’estpourquoi,leproduit
ne
doitpasêtreéliminéaveclesdéchetsurbains.
L
’utilisateur
locales,
Lacollecteséparéeduproduitetlesopérationssuccessivesdetraitement,recyclageetéliminationfavorisentlaproduction
d’a
ppareils
surlasantédespersonnessuiteàunegestionimpropredudéchet.
Touteéliminationabusiveduproduitentraînel’applicationdesanctionsadministratives.
doitr
oubienlerendreaurevendeurquandilachèteraunnouvelappareiléquivalent.
emettreleproduit
composéspardesmatériauxr
auprèsde“déchargesspécialiséesdecollecteséparée“prévuesparlesautorités
ainsiquepermettentd’éviterdeseff
ecyclés
négatifssurl’en
ets
vironnementet
30
Page 31

CORRECT DISPOSAL OF THE PRODUCT
SCD 5751 DAB
HINWEISE ZUR ORDNUNGSGEMÄSSEN ENTSORGUNG DES PRODUKTS
DasaufdemGerätangebrachteSymbolweistdaraufhin,dassdasAltgerät“getrenntzusammeln”istunddasProduktdaher
zusammenmitdemGemeindeabfallentsorgtwerdendarf.
nicht
utzermuss
DerBen
stellen” bringen oder dem Händler beim Kauf eines neuen Produkts übergeben.
ennte
Die
getr
on
v
GerätenunterV
GesundheitinFolgeeinerfalschenMüllverwaltung.
und
DiewiderrechtlicheEntsorgungdesProduktsführtzur
MüllsammlungundanschließendeAufber
oduktzu
dasPr
erwendung
wieder
denentspr
verwerteter
echenden,von
Materialienundv
derGemeinde
eitung,
Wieder
erlegungvonVerwaltungsstrafen.
Auf
verwaltung
verwertung
ermindern
dienegativ
eingerichteten“W
undEntsorgungför
en
wirkungen
Aus
ertstoffsammel-
dern
dieHerstellung
aufdieUmw
elt
ADVERTENCIAS PARA LA CORRECTA ELIMINACIÓN DEL PRODUCTO
Elsímboloqueapareceenelaparatoindicaqueelresiduodebeserobjetode“recogidaselectiva”portantoelproducto
nosedebeeliminarjuntoconresiduosurbanos.
El usuario
o bien al distribuidor cuando adquiera un nuevo producto.
La recogida selectiva del residuo y las sucesivas operaciones de tratamiento, recuperación y eliminación favorecen la fabricación de aparatos con materiales reciclados y limitan los efectos negativos en el medio ambiente y la salud causados por
una gestión incorrecta del residuo.
La eliminación abusiva del producto da lugar a la aplicación de sanciones administrativas.
deberá entregar el producto a los “centros de recogida selectiva” creados por las administraciones municipales
31
Page 32
SCD 5751 DAB
Dichiarazione di Conformità UE semplicata
Il fabbricante TREVI dichiara che il po di apparecchiatura radio
SCD 5751 DAB
e’ conforme alla direva 2014/53/UE.
Il testo completo della dichiarazione di conformità UE e’ disponibile al
seguente indirizzo Internet
hps://www.trevi.it/dms/zidi/TREVI/DOCSCD5751DAB.pdf
Simplied EU Declaraon Of Conformity
Hereby Trevi Spa declares that the radio equipment type
SCD 5751 DAB
is in compliance with Direcve 2014/53/EU.
The full text of the EU declaraon of conformity is available at the
following internet address
hps://www.trevi.it/dms/zidi/TREVI/DOCSCD5751DAB.pdf
TR EV I S .p .A . - Strada Consolare Rimini-San Marino, 62 47924 Rimini (RN) Italy
Tel. 0541-756420 - Fax 0541-756430 - e-mail: [email protected] - www.trevi.it
32
Made in CHINA
 Loading...