

Page 1
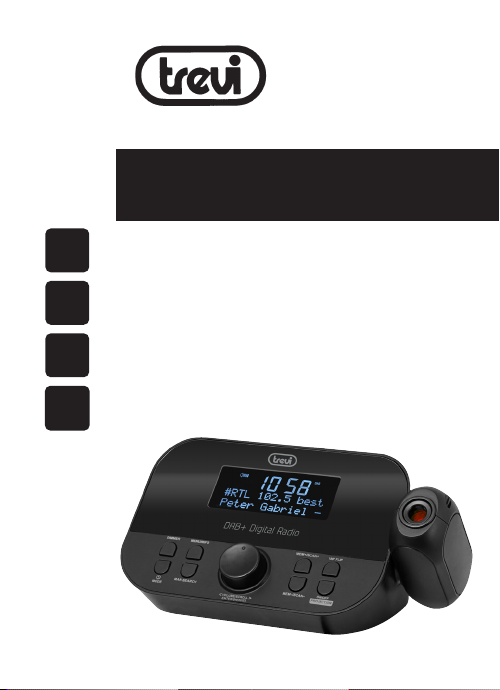
RC 85D8 DAB
Guida d’uso - User guide
Italiano - English - Française - Deutsch - Español
DAB/FM
RADIO
BIG
DISPLAY
DUAL
ALARM
PRESA
CUFFIA
* Per informazioni integrative e aggiornamenti di questo prodotto vedi: www.trevi.it
* For additional information and updates of this product see: www.trevi.it
RADIO SVEGLIA CON SISTEMA DAB/ DAB+/ FM
Manuale d'uso e collegamento
CLOCK RADIO ALARM WITH DAB/ DAB + / FM SYSTEM
User Manual
ALARME RADIO AVEC SYSTÈME DAB/ DAB+/ FM
Manuel utilisateur
RADIOALARM MIT DAB/ DAB+/ FM-SYSTEM
Benutzerhandbuchl
ALARMA DE RADIO CON SISTEMA DAB/ DAB+/ FM
Manual de usuario
Page 2

Page 3
2
3
RC 85D8 DAB
1
11
4 6 8 9 1075
12 13 14
15 16
Page 4
Note d’uso
Non usare alimentatori con un voltaggio superiore a 5V , causa il danneggiamento dell’apparecchio.
• Ascoltare a volume alto per lungo tempo, potrebbe danneggiare il vostro udito.
• Evitare di posizionare il riproduttore:
Italiano
- Vicino a campi magnetici.
- Vicino a fonti di calore come caloriferi e stufe.
- In luoghi molto umidi come stanze da bagno, piscine, ecc...
- In luoghi molto polverosi.
- In luoghi soggetti a forti vibrazioni.
• Posizionare l’apparecchio in modo che ai suoi lati ci sia sempre abbastanza
spazio per la libera circolazione di aria (almeno 5cm).
• Se dei liquidi penetrano all’interno dell’apparecchio scollegare
immediatamente la spina dalla presa e portare l’apparecchio al più vicino
centro assistenza autorizato TREVI.
• Controllare sempre prima di collegare l’apparecchio, che i cavi di alimentazione
e di collegamento siano installati correttamente.
• Nessuna sorgente di amma nuda, quali candele accese, dovrebbe essere posta
sull’apparecchio.
• L’apparecchio non deve essere esposto a stillicidio o a spruzzi d’acqua e nessun
oggetto pieno di liquido, quali vasi, deve essere posto sull’apparecchio.
• Conservare il presente manuale per futuri riferimenti.
Cura e manutenzione
Per la pulizia si consiglia l’uso di un panno morbido, leggermente inumidito. Evitate
solventi o sostanze abrasive.
Importante
La buona costruzione di questo apparecchio ne garantisce per lungo tempo il
perfetto funzionamento. Se tuttavia dovesse presentarsi qualche inconveniente,
sarà opportuno consultare il più vicino Centro Assistenza autorizzato.
TREVI persegue una politica di continua ricerca e sviluppo. Pertanto i prodotti
possono presentare caratteristiche diverse da quelle descritte.
Per evitare possibili danni all’udito, limitare il tempo di ascolto a
volumi elevati.
RC 85D8 DAB
Page 5

Descrizione comandi
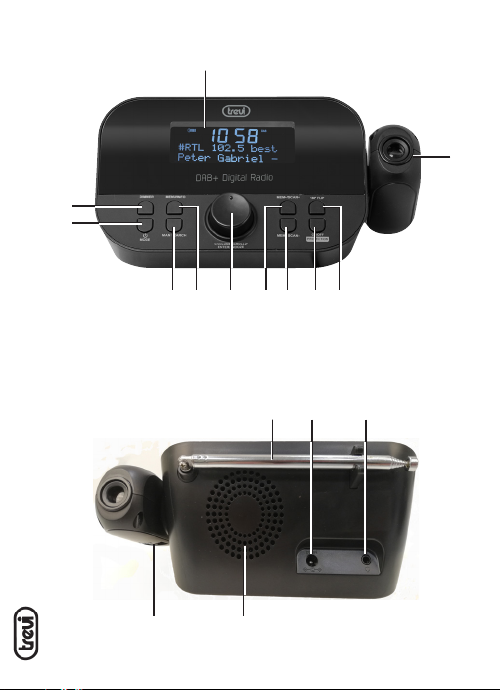
1. Display
2. Tasto DIMMER
3. Tasto : Stand-by/MODE
Italiano
4. Tasto PRESET/SCAN
5. Tasto MENU/INFO
6. VOLUME/ SCROLL/ ENTER/ SNOOZE
7. Tasto P+/ TUNE+
8. Tasto P-/ TUNE-
9. Tasto Projection ON/OFF
Installazione
Inserire la spina dell’alimentatore in dotazione nella presa di alimentazione (13) e
collegare l’alimentatore ad una presa di corrente 110-230V~ 50/60Hz.
10. Tasto 180° FLIP
11. Proiettore
12. Antenna telescopica
13. Presa di alimentazione
14. Presa Cufa
15. Controllo rotativo per messa a
fuoco della proiezione.
16. Altoparlante
Funzionamento
Accensione/Standby:
1. Premere il tasto Stand-by/MODE (3) per accendere l’apparecchio;
2. Tenere premuto nuovamente per 2 secondi il tasto Stand-by/MODE (3) per
portare l’apparecchio in modalità Stand-by (sul display rimane visualizzata l’ora
e la data).
Regolazione Volume
Ruotare la manopola VOLUME/SCROLL/ENTER/SNOOZE (6) per aumentare o
diminuire il volume.
Regolazione Ora
L’ora si imposterà automaticamente accendendo l’apparecchio in modalità DAB, se
volete impostarla manualmente:
1. Premere il tasto Stand-by/MODE (3) per accendere l’apparecchio;
2. Tenere premuto per 2 secondi il tasto MENU/INFO (5);
3. Ruotare la manopola VOLUME/ SCROLL (6) e selezionare la voce “System”,
premere la manopola VOLUME/ SCROLL (6) per selezionarla;
4. Ruotare la manopola VOLUME/ SCROLL (6) e selezionare la voce “Time”,
premere la manopola VOLUME/ SCROLL (6) per selezionarla;
5. Ruotare la manopola VOLUME/ SCROLL (6) e selezionare la voce “Set Time/
Date”, premere la manopola VOLUME/ SCROLL (6) per selezionarla;
RC 85D8 DAB
6. Ruotare la manopola VOLUME/ SCROLL (6) per regolare l’ora e premere la
manopola VOLUME/ SCROLL (6) per confermarla e passare alla regolazione dei
minuti;
7. Regolare anche la data utilizzando sempre la manopola VOLUME/ SCROLL (6).
Page 6

Impostazione Sveglia
Per impostare l’allarme 1 o 2, seguire i passi successivi:
1. In modalità orologio (Stand-by), tenere premuto per 2 secondi il tasto MENU
INFO (5), alla voce “System” premere la manopola VOLUME/ SCROLL (6);
2. Ruotare la manopola VOLUME/ SCROLL (6) e selezionare la voce “Alarm”,
Italiano
premerla per selezionarla;
3. Ruotare la manopola VOLUME/ SCROLL (6) e selezionare “Alarm 1” o “Alarm 2”,
premerla per confermare;
4. Ruotare la manopola VOLUME/ SCROLL (6) per regolare l’ora e premerla per
confermarla e passare alla regolazione dei minuti;
5. Ruotare la manopola VOLUME/ SCROLL (6) per regolare la durata e premerla
confermarla;
6. Ruotare la manopola VOLUME/ SCROLL (6) per selezionare il tipo di suoneria
(FM, DAB o BUZZER) e premerla per confermarla;
7. Ruotare la manopola VOLUME/ SCROLL (6) per selezionare la frequenza (una
volta, giornaliero, settimanale, solo week end) e premerla per confermare;
8. Ruotare la manopola VOLUME/ SCROLL (6) per regolare la data di avvio e
premerla confermarla;
9. Ruotare la manopola VOLUME/ SCROLL (6) per regolare il volume e premerla
per confermare;
10.Ruotare la manopola VOLUME/ SCROLL (6) per attivare o disattivare la sveglia
e premerla per confermare.
Una volta attivata la sveglia sul display comparirà il simbolo della campanella con
il numero 1 per la prima sveglia e numero 2 per la seconda sveglia.
Spegnimento della sveglia
Per arrestare completamente il suono della sveglia (suoneria o radio) premere il
tasto Stand-by/ MODE (3).
Per arrestare momentaneamente il suono della sveglia, premere la manopola VOLUME/ SCROLL (6); l’interruzione dura 9 minuti, trascorsi i quali la sveglia si riaccende.
Radio DAB/DAB+
Scansione automatica
1. Regolare l’estensione dell’antenna e l’angolo per ottenere la migliore ricezione;
2. Tenere premuto per qualche secondo il tasto PRESET/ SCAN (4) per avviare
la scansione automatica delle stazioni DAB. Durante la scansione, il display
mostrerà la barra di avanzamento e il numero di stazioni memorizzate;
3. Tenere premuto per qualche secondo il tasto P+/ TUNE+ (7) oppure il tasto P-/
TUNE- (8), ruotare la manopola VOLUME/ SCROLL (6) per selezionare la stazio-
RC 85D8 DAB
ne desiderata; premere la manopola VOLUME/ SCROLL (6) per confermare e
avviare l’ascolto della stazione.
Note:
- Potrebbe essere necessario attendere qualche secondo che l’unità si sintonizzi sul
nuovo canale.
Page 7

- In modalità DAB la data e l’ora del dispositivo vengono sincronizzati con quelli
della stazione che si stà ascoltando.
Scansione manuale
1. Tenere premuto per 2 secondi il tasto MENU/ INFO (5);
2. Ruotare la manopola VOLUME/ SCROLL (6) e selezionare la voce “Manual Tune”,
premere la manopola VOLUME/ SCROLL (6) per selezionarla;
Italiano
3. Ruotare la manopola VOLUME/ SCROLL (6) per selezionare il canale desiderato
(es: 5A-13F), premere la manopola VOLUME/ SCROLL (6) per selezionarlo.
Nota: Si possono memorizzare no a 30 stazioni. Una frequenza memorizzata può
essere cancellata dalla memoria memorizzando un’altra frequenza al suo posto.
Informazioni trasmissione DAB/DAB+
In modalità DAB, sul display, verranno visualizzate una serie di informazioni relative
alla stazione in ascolto.
1. Premere ripetutamente il tasto MENU/ INFO (5) per cambiare le informazioni
visualizzate.
Nota: non tutte le stazioni DAB forniscono informazioni visualizzabili all’apparecchio.
DLS: visualizza informazioni relative al brano musicale trasmesso (artista, titolo
brano, ecc...).
Potenza segnale: visualizza le informazioni relative alla potenza del segnale
tramite una barra sul display, più il segnale è forte, più la barra risulterà piena.
Tipo programma: visualizza le informazioni relative al tipo di programma
trasmesso.
Nome trasmittente: visualizza le informazioni relative al trasmittente del
servizio.
Numero/Frequenza trasmittente: visualizza le informazioni relative a numero
e frequenza della stazione DAB/DAB+ trasmessa.
Bit Rate: visualizza informazioni relative al rapporto di compressione della
trasmissione corrente. Più è alto il valore, migliore è la qualità della
trasmissione.
Ora/Data: visualizza informazioni relative all’orario e alla data della
trasmissione corrente.
Menu DAB/DAB
1. I n modalità DAB, tenere premuto per qualche secondo il tasto MENU/ INFO (5);
2. Ruotare la manopola VOLUME/ SCROLL (6) per selezionare la voce desiderata
tra: Full Scan, Preset Recall, Preset Store, Manual tune, DRC, Prune, TA, System;
3. Premere la manopola VOLUME/ SCROLL (6) per selezionare la voce desiderata
ed entrare nelle sue impostazioni:
RC 85D8 DAB
A) Full scan (Ricerca completa): permette di scansionare l’intera banda DAB/
DAB+.
B) Preset Recall (richiamo stazione memorizzata): selezionare una stazione
R adio tra quelle memorizzate.
C) Preset Store: permette di memorizzare una stazione.
+
Page 8

D) Manual tune (Sintonizzazione manuale): permette di scansionare
manualmente una singola frequenza DAB/DAB+.
E) DRC: permette di abilitare/disabilitare la funzione DRC per migliorare il suono
durante l’ascolto in ambienti rumorosi. È possibile impostare il livello di DRC in
alto (high), basso (low) o OFF (spento).
F) Prune (Elimina): permette di eliminare dalla lista delle stazioni memorizzate
Italiano
tutte le radio trovate ma non disponibili (scarso segnale o inattive). Ruotare la
manopola VOLUME/ SCROLL (6) su Y (YES) e confermare l’eliminazione
premendo la manopola VOLUME/ SCROLL (6).
G) TA: On, Off.
H) System (Sistema): Permette di accedere al sottomenù di sistema:
1. Sleep: Per impostare l’autospegnimento (Sleep off, 15min, 30min, 45min,
60min e 90min).
2. Alarm: Per impostare Alarm1 e Alarm 2.
3. Time:
- Set Time/Date: Impostazione data/ora.
- Auto Update: Aggiornamento data e ora automatico da sorgente
oppure O ff. Si consiglia di tenerlo impostato “Aggiornamento da DAB”
per evitare spostamenti continui d’orario.
- Set 12/ 24 hour: Impostazione formato ora 12/24 ore.
- Set data format: Impostazione formato data.
4. Language: E’ possibile scegliere la lingua dei menù; sono disponibili Inglese
(default), Italiano, Deutsch, Francais, Nederlands, Espanol, Dansk.
5. Factory Reset (Ripristino valori di fabbrica): permette di ripristinare le
impostazioni di fabbrica dell’apparecchio.
6. SW version (Versione del software): permette di visualizzare la versione del
software dell’apparecchio.
Radio FM
1. Regolare l’estensione dell’antenna e l’angolo per ottenere la migliore ricezione;
2. Premere il tasto Stand-by/ MODE (3) per accendere l’unità;
3. Premere ripetutamente il tasto Stand-by/ MODE (3) e selezionare la modalità FM.
Scansione automatica:
4. Tenere premuto per 3 secondi il tasto PRESET/ SCAN (4) per avviare la scansione e memorizzazione automatica delle stazioni;
5. A ne scansione utilizzare i tasti P+/ TUNE+ (7) e P-/ TUNE- (8) per selezionare
una stazione radio memorizzata.
RC 85D8 DAB
Nota: La sensibilità della scansione automatica è regolabile nel Menu.
Scansione manuale e memorizzazione:
1. Tenere premuto per qualche secondo il tasto P+/ TUNE+ (7) o P-/ TUNE- (8) e
rilasciare, per sintonizzarsi sulla stazione radio successiva o precedente;
2. Per memorizzare una stazione radio:
Page 9

- Portarsi sulla frequenza da memorizzare e premere il tasto PRESET/ SCAN (4);
- Ruotare la manopola VOLUME/ SCROLL (6) per selezionare il numero dove
memorizzare la stazione;
- Premere la manopola VOLUME/ SCROLL (6) per per confermare.
Informazioni trasmissione FM
Italiano
In modalità FM, sul display verranno visualizzate una serie di informazioni relative
alla stazione in ascolto.
1. Premere ripetutamente il tasto MENU/ INFO (5) per cambiare le informazioni
visualizzate.
Nota: non tutte le stazioni FM forniscono le informazioni visualizzabili
dall’apparecchio.
Informazioni RDS: visualizza informazioni relative alla stazione FM.
PTY, Tipo programma: visualizza le informazioni relative al tipo di programma
trasmesso.
Frequenza di trasmissione: visualizza la frequenza di trasmissione.
Ricezione: visualizza sel la ricezione è Mono o Stereo.
Ora: visualizza informazioni relative all’orario della trasmissione corrente.
Data: visualizza informazioni relative alla data della trasmissione corrente.
Menu
FM
1. I n modalità FM, tenere premuto per qualche secondo il tasto MENU/ INFO (5);
2. Ruotare la manopola VOLUME/ SCROLL (6) per selezionare la voce desiderata
tra: Preset Recall, Preset Store, Scan Setting, Audio setting, System;
3. Premere la manopola VOLUME/ SCROLL (6) per selezionare la voce desiderata
ed entrare nelle sue impostazioni.
A) Preset Recall (richiamo stazione memorizzata): selezionare una stazione
R adio tra quelle memorizzate
B) Preset Store: permette di memorizzare una stazione.
C) Scan setting (impostazioni scansione): permette di scegliere il tipo si
scansione:
- All stations: Scansione di tutte le stazioni.
- Strong stations: Scansione delle sole stazioni con segnale più forte.
D)Audio setting: permette di selezionare tra trasmissioni Stereo o Mono.
E) System (Sistema): Permette di accedere al sottomenù di sistema:
1. Sleep: Per impostare l’autospegnimento (Sleep off, 15min, 30min, 45min,
60min e 90min).
2. Alarm: Per impostare Alarm1 e Alarm 2.
3. Time:
RC 85D8 DAB
- Set Time/Date: Impostazione data/ora,
- Auto Update: Aggiornamento data e ora automatico,
- Set 12/ 24 hour: Impostazione formato ora 12/24 ore,
- Set data format: Impostazione formato data.
4. Language: E’ possibile scegliere la lingua dei menù; sono disponibili Inglese
Page 10
(default), Italiano, Deutsch, Francais.
5. Factory Reset (Ripristino valori di fabbrica): permette di ripristinare le
impostazioni di fabbrica dell’apparecchio.
6. SW version (Versione del software): permette di visualizzare la versione del
software dell’apparecchio.
Italiano
Proiezione
Accensione/ Spegnimento e regolazione
1. Premere il tasto Projection ON/OFF (9) per accendere la proiezione;
2. Premere il tasto 180° FLIP (10) per ruotare di 180° la proiezione se necessario;
3. Regolare il fuoco con il controllo di messa a fuoco (15);
4. Premere il tasto Projection ON/OFF (9) per spegnere la proiezione.
Dimmer
Premere più volte il tasto DIMMER (2) per cambiare l’intensità luminosa del display.
CARATTERISTICHE TECNICHE
Alimentazione: .....................................5V 1000mA
Potenza Audio: .....................................1W
Ricezione banda in FM: .....................87.5 - 108 MHz
Ricezione banda DAB/DAB+:...........174.928 - 239.200 MHz
Dimensioni: ............................................150x 80x 80mm
Peso: .........................................................332 gr.
INFORMAZIONI AGLI UTENTI ai sensi del Decreto Legislativo N° 49 del 14
Marzo 2014 “Attuazione della Direttiva 2012/19/UE sui riuti di apparecchiature
elettriche ed elettroniche (RAEE)”
Il simbolo del cassonetto barrato riportato sull’apparecchiatura indica che il prodotto
alla ne della propria vita utile deve essere raccolto separatamente dagli altri riuti.
L’utente dovrà, pertanto, conferire l’apparecchiatura integra dei componenti essen-
ziali giunta a ne vita agli idonei centri di raccolta differenziata dei riuti elettronici
ed elettrotecnici, oppure riconsegnarla al rivenditore al momento dell’acquisto di
nuova apparecchiatura di tipo equivalente, in ragione di uno a uno, oppure 1 a zero
per le apparecchiature aventi lato maggiore inferiore a 25cm. L’adeguata raccolta
differenziata per l’avvio successivo dell’apparecchiatura dimessa al riciclaggio, al
trattamento e allo smaltimento ambientale compatibile contribuisce ad evitare
RC 85D8 DAB
possibili effetti negativi sull’ambiente e sulla salute e favorisce il riciclo dei materiali
di cui è composta l’apparecchiatura. Lo smaltimento abusivo del prodotto da parte
dell’utente comporta l’applicazione delle sanzioni amministrative di cui al D.Lgs n.
Decreto Legislativo N° 49 del 14 Marzo 2014.
Page 11
Usage Notes
Do not use power supply with a voltage higher than 5V , cause damage to the player.
• Listen at high volume for long periods of time, may damage your hearing.
• Avoid using it in the following cases:
- Near strong heat sources, such as central heating plants or stoves.
English
- In very humid places such as bathrooms, swimming pools, etc...
- In very dusty places.
- In places subject to strong vibrations.
- Position the appliance in such a way that there is always enough room for free
air circulation (at least 5cm).
• Do not block the air inlets.
• If any liquid enters the appliance, unplug it immediately from the socket and
take it to the nearest TREVI authorised service centre.
• Before switching on the appliance, always check that the power cable and the
connection cable are properly installed.
• No naked ame sources, such as lighted candles, should be placed on this.
• The apparatus shall not be exposed to dripping or splashing water and no
objec t lled with water, such as vases, should be placed on the unit.
• Keep this manual for future reference.
Care and maintenance
For cleaning it is recommended to use a soft, slightly damp cloth. Avoid solvents
or abrasive substances.
Important
The construction of this device guarantees long awless operation. However, if
come some problem, you should consult your nearest authorized service center.
TREVI pursues a policy of continuous research and development. Therefore, the
products may show different characteristics from those described.
To avoid possible hearing damage, limit the listening time at
hight volumes
Command
1. Display
2. DIMMER button
3. button: Stand-by/MODE
4. PRESET/ SCAN button
RC 85D8 DAB
5. MENU/ INFO button
6. VOLUME/ SCROLL/ ENTER/ SNOOZE
7. P+/ TUNE+ button
8. P-/ TUNE- button
9. Projection ON/OFF button
10. 180° FLIP button
11. Projector
12. Antenna (Extend and reposition for
better reception)
13. DC-IN jack (Plug in appropriate AC
adaptor)
14. Headphone jack
15. Focus Thumbwheel
16. Speaker
Page 12

Installation
Insert the plug of the supplied power adapter into the power supply socket (13) and
connect the power supply to a 110-230V ~ 50/60Hz power socket.
OPERATION
English
Power On/ Standby:
1. Press Stand-by/ MODE (3) button to switch On the unit;
2. Press and hold for 2 seconds Stand-by/ MODE (3) button to put the unit in
Stand-by mode (the display shows time and date).
Volume adjustment
Turn the knob VOLUME/SCROLL/ENTER/SNOOZE (6) to increase or decrease the
volume.
Time Setting
The time will be set automatically by turning on the device in DAB mode, if you
want to set it manually:
1. Press Stand-by/ MODE (3) button to switch on the appliance;
2. Hold down the MENU/ INFO button (5) for 2 seconds;
3. Turn the VOLUME/ SCROLL knob (6) and select “System”; press the VOLUME/
SCROLL k nob (6) to select it;
4. Turn the VOLUME/ SCROLL knob (6) and select “Time”; press the VOLUME/
SCROLL k nob (6) to select it;
5. Turn the VOLUME/ SCROLL knob (6) and select “Set Time/Date”; press the
VOLUME/SCROLL knob (6) to select it;
6. urn the VOLUME/ SCROLL knob (6) to adjust the hour and press the VOLUME/
SCROLL k nob (6) to confirm it and go to setting the minutes;
7. Also adjust the date using the VOLUME/ SCROLL knob (6).
Setting Alarm
To set alarm 1 or 2, follow the next steps:
1. In clock mode (Stand-by), press and hold for 2 seconds MENU/ INFO button (5);
select “System” and press the VOLUME/ SCROLL knob (6) to conrm;
2. Turn the VOLUME/ SCROLL knob (6) and select the “Alarm” item, press it to
select it;
3. Turn the VOLUME/ SCROLL knob (6) and select “Alarm 1” or “Alarm 2”, press it to
conrm;
4. urn the VOLUME/ SCROLL knob (6) to adjust the hour and press it to conrm it
and move on to the minute setting;
RC 85D8 DAB
5. Turn the VOLUME/ SCROLL knob (6) to adjust the duration and press to
conrm;
Page 13

6. Turn the VOLUME/ SCROLL knob (6) to select the ringtone type (FM, DAB or
BUZZER) and press it to conrm it;
7. Turn the VOLUME/ SCROLL knob (6) to select the frequency (once, daily, weekly,
weekend only) and press it to conrm;
8. Turn the VOLUME/ SCROLL knob (6) to adjust the start date and press to
English
conrm it;
9. Turn the VOLUME/ SCROLL knob (6) to adjust the volume and press it to
conrm;
10. Rotate the VOLUME/ SCROLL knob (6) to activate or deactivate the alarm and
press it to conrm.
Once the alarm is activated, the bell symbol will appear on the display with the
number 1 for the rst alarm and number 2 for the second alarm.
Turn off the alarm
To stop the alarm completely (ringtone or radio) press Stand-by/ MODE (3) button.
To temporarily stop the alarm sound, press the VOLUME/ SCROLL knob (6); the
interruption lasts 9 minutes, after which the alarm goes back on.
DAB/DAB+ Radio
Automatic Storage
1. Adjust the antenna extension and the angle to get the best reception;
2. Press and hold the PRESET/ SCAN button (4) for a few seconds to start the
automatic scan of the DAB stations. During the scan, the display will show the
progress bar and the number of stored stations;
3. Hold down the P+/ TUNE+ key (7) or the P-/ TUNE- key (8) for a few seconds,
turn the VOLUME/ SCROLL knob (6) to select the desired station; press the
VOLUME/ SCROLL knob (6) to conrm and start listening to the station.
Note:
- It may be necessary to wait a few seconds for the unit to tune to the new channel.
- In DAB mode the date and time of the device are synchronized with those of the
station being listened to.
Manual Scan
1. Hold down the MENU/ INFO button (5) for 2 seconds;
2. Turn the VOLUME/ SCROLL knob (6) and select the “Manual Tune” item, press
the VOLUME/ SCROLL knob (6) to select it;
3. Turn the VOLUME/ SCROLL knob (6) to select the desired channe (5A-13F),
press the VOLUME/ SCROLL knob (6) to select it.
Note: Up to 30 stations can be stored. A stored frequency can be erased from the
memory by storing another frequency in its place.
RC 85D8 DAB
DAB/DAB+ information
In DAB function press the MENU/ INFO button (5) repeatedly to change the information displayed:
Page 14

Top line:
Station channel and frequency for the current station will be shown on the top
line.
Bottom line:
a. Scrolling text broadcast by most DAB stations
English
b. DAB ensemble
c. Type of content being broadcast. E.g. Sport, Pop music.
d. DAB Station name
e. DAB frequency
f. Signal error
g. 80kbps/DAB
Nota: not all DAB stations provide information that can be viewed by the device.
DAB/DAB+ Menu
1. In DAB mode, hold down the MENU/ INFO button (5) for a few seconds;
2. Turn the VOLUME/ SCROLL knob (6) to select the desired item from: Full Scan,
Manual tune, DRC, Prune, TA, System;
3. Press the VOLUME/ SCROLL knob (6) to select the desired item and enter its
settings.
A) Full Scan – Automatically scan DAB+ stations
B) Preset Recall - select a radio station from those stored.
C) Preset Store - allows you to store a station.
D) Manual Tune – manual tune
E) DRC – off, low, high
F) Prune – yes, no
G) TA - On, Off.
H) System –
1. Sleep – off, 15, 30, 45, 60, 90 (minutes)
2. Alarm - To set Alarm 1 and Alarm 2.
3. Time:
- Set Time/Date
- Auto update - Automatic update of date and time from source
or Off. It is advisable to keep it set to “Update from DAB” to avoid
continuous time shifts.
- Set 12/ 24 hour - Set AM/PM or 24 hour.
- Set date format - DD MM YYYY, MM DD YYY Y
4. Language – English, Deutsch, Italiano, Francais, Nederlands, Espanol, Dansk.
5. factory reset – No or Yes
6. SW version
RC 85D8 DAB
FM Radio
1. Extend the antenna and reposition for better reception;
2. Press Stand-by/ MODE (3) button to turn On the unit;
Page 15

3. Press Repeatedly Stand-by/ MODE button (3) and select FM mode.
Automatic storage:
4. Press and hold for 3 seconds PRESET/ SCAN (4) button to start scanning and
automatic storage of the stations;
5. At the end of the scan, use the P+/ TUNE + (7) and P-/ TUNE- (8) keys to select a
English
memorized radio station.
Note: The automatic scan sensitivity is adjustable by Menu.
Manual search and storage:
1. Press and hold the P+/ TUNE+ (7) or P-/ TUNE- (8) key for a few seconds to tune
in to the next or previous radio station;
2. To store a radio station:
- Move to the frequency to be stored and press the PRESET/ SCAN button (4);
- Turn the VOLUME/ SCROLL knob (6) to select the number where to store the
station;
- Press the VOLUME/ SCROLL knob (6) to conrm.
FM broadcast information
Press MENU/ INFO (5) button to view:
Top line:
Station name, reception type.
Bottom line:
a. Information (provided by the radio station).
b. information relating to the type of program broadcast.
c. Frequency.
d. Stereo/mono.
e. Time.
f. Date.
FM
Menu
1. In FM mode, hold down the MENU/ INFO key (5) for a few seconds;
2. Turn the VOLUME/ SCROLL knob (6) to select the desired item from: Preset
Recall, Preset Store, Scan Setting, Audio setting, System;
3. Press the VOLUME/ SCROLL knob (6) to select the desired item and enter its
settings.
A) Scan setting
1. All Stations
2. Strong Stations
B) Audio setting
RC 85D8 DAB
1. Stereo Allowed
2. Forced Mono
C) System
1. Sleep – Choose between OFF, 15, 30, 45, 60, 90 minutes
2. Alarm - To set Alarm 1 and Alarm 2.
Page 16
3. Time:
- Set Time/date
- Auto update - Automatic update of date and time from source
or Off. It is advisable to keep it set to “Update from DAB” to avoid
continuous time shifts.
English
- Set 12/ 24 hour - Set AM/PM or 24 hour.
- Set date format - DD MM YYYY, MM DD YYY Y
4. Language – English, Deutsch, Italiano, Francais, Nederlands, Espanol, Dansk.
5. Factory reset – No or Yes
6. SW version
Projection
Power ON/OFF and adjustment
1. Press the Projection ON/OFF button (9) to switch on the projection;
2. Press the 180° FLIP button (10) to rotate the projection 180° if necessary;
3. Scroll Focus Thumbwheel (15) for setting the best projection clock image;
4. Press the Projection ON/ OFF button (9) to switch off the projection.
Dimmer
Press the DIMMER button (2) several times to change the display light.
TECHNICAL FEATURES
Pow er: ...................................................... 5V 1000mA
Power Audio: ........................................1W
FM band reception: ............................87.5 - 108 MHz
DAB/DAB+ band reception: ............174.928 - 239.200 MHz
Dimensions: ..........................................150x 80x 80mm
Weight: ....................................................332 gr.
Precautions for correct disposal of the product.
The symbol shown on the equipment indicates that waste must be disposed of in
“separate collection” and so the product must not be disposed of together with
urban waste. The user must take the product to special “separate waste collection
centres” provided by local government, or deliver it to the retailer against the
purchase of a new product.
Separate collection of waste and subsequent treatment, recycling and disposal
RC 85D8 DAB
operations promotes the production of equipment with recycled materials and
limits negative effects on the environment and on health caused by improper
handling of waste. Illegal disposal of the product leads to the enforcement of
administrative penalties.
Page 17

Notes d’emploi
Ne pas utiliser les alimentateurs avec une tension supérieure à 5V . Cela cause
un endommagement du lecteur.
• Ne pas écouter à un volume trop élevé à plusieurs reprises. Cela pourrait
endommager votre ouïe.
• Éviter de placer le lecteur:
Française
- Près de champs magnétiques.
- Près de sources de chaleur comme des radiateurs et des poêles.
- Dans des endroits très humides comme les salles de bains, les piscines, etc...
- Dans des endroits très poussiéreux.
- Dans des endroits exposés à de fortes vibrations.
• Placez l’appareil de sorte qu’il y ait toujours assez d’espace sur les côtés pour
permettre la libre circulation de l’air (au moins 5cm).
• Si des liquides pénètrent à l’intérieur de l’appareil, débranchez immédiatement
la fiche de la prise de courant et por tez-le au centre de réparation TREVI le plus
proche.
• Avant de recharger l’appareil, vérifiez toujours que les câbles d’alimentation et
de connexion sont correctement installés.
• Aucune source de flamme nue, telle que des bougies allumées, ne doit être
placée sur l’appareil.
• L’appareil ne doit pas être exposé à des gouttes d’eau ni à des éclaboussures
d ’eau et aucun objet contenant des liquides, tels que des vases, ne doit être
placé sur l’appareil.
• Conservez ce manuel pour référence ultérieure.
Maniement et entretien
Pour le nettoyage, il est conseillé d’utiliser un chiffon doux, légèrement humide. Évitez
l’emploi de solvants ou de substances abrasives.
Important
La bonne fabrication de cet appareil garantit un fonctionnement parfait pour une
longue période. Si toutefois quelques inconvénients devaient se présenter, adressezvous au Centre d’Assistance agréé le plus proche.
TREVI poursuit une politique de recherche et de développement continus. C’est
pourquoi ses produits peuvent présenter des caractéristiques différentes par rapport
à celles qui sont décrites.
RC 85D8 DAB
Pour éviter d’éventuels dommages auditifs, limiter le temps
d’écoute à volume élevé.
Page 18
Description de la commande
1. Afchage
2. Bouton DIMMER
3. Bouton : mise en marche/
Stand-by
Française
4. Bouton PRESET/ SCAN
5. Bouton MENU/INFO
6. VOLUME/ SCROLL/ ENTER/ SNOOZE
7. Bouton P+/ TUNE+
8. Bouton P-/ TUNE-
9. Bouton Projection ON/OFF
Installation
Insérez la che de l’adaptateur secteur fourni dans la prise d’alimentation (13) et
branchez-la à une prise 110-230V ~ 50/60Hz.
10. Bouton 180° FLIP
11. Projecteur
12. Antenne (extension pour une
meilleure réception)
13. Prise DC-IN
14. Prise casque
15. Commande rotative FOCUS à la
projec tion ne mise au point.
16. Haut-parleur
Opération
Marche/Standby:
1. Appuyez sur le bouton Stand-by/ MODE (3) pour mettre l’appareil en
marche;
2. Appuyez à nouveau sur le bouton Stand-by/ MODE (3) et maintenez-le
enfoncé pendant 2 secondes pour mettre l’appareil en mode Stand-by (l’heure
et la date restent afchées).
Réglage du Volume
Tournez le bouton VOLUME/SCROLL/ENTER/SNOOZE (6) pour augmenter ou
diminuer le volume.
Réglage du Temps
L’heure sera réglée automatiquement en allumant l’appareil en mode DAB, si vous
souhaitez le régler manuellement:
1. Appuyez sur le bouton Stand-by/ MODE (3) pour allumer l’appareil;
2. Maintenez le bouton MENU/ INFO (5) enfoncé pendant 2 secondes;
3. Tournez le bouton VOLUME/ SCROLL (6) et sélectionnez l’élément “System”,
appuyez sur le bouton VOLUME/ SCROLL (6) pour le sélectionner;
4. Tournez le bouton VOLUME/ SCROLL (6) et sélectionnez l’élément “ Time”,
appuyez sur le bouton VOLUME/ SCROLL (6) pour le sélectionner;
5. Tournez le bouton VOLUME/ SCROLL (6) et sélectionnez l’élément “Set Time/
RC 85D8 DAB
Date”, appuyez sur le bouton VOLUME/ SCROLL (6) pour le sélectionner;
6. Tournez le bouton VOLUME/ SCROLL (6) pour régler l’heure et appuyez sur le
bouton VOLUME/ SCROLL (6) pour le confirmer et passez au réglage des
minutes;
7. Réglez également la date à l’aide du bouton VOLUME/ SCROLL (6).
Page 19

Réglage de l’alarme
Pour régler l’alarme 1 ou 2, suivez les étapes suivantes:
1. En mode horloge (veille), maintenez le bouton MENU/ INFO (5) enfoncé pe
dant 2 secondes, appuyez sur le bouton VOLUME/ SCROLL (6) sous “System”;
2. Tournez le bouton VOLUME/ SCROLL (6) et sélectionnez l’élément “Alarm”,
appuyez dessus pour le sélectionner;
Française
3. Tournez le bouton VOLUME/ SCROLL (6) et sélectionnez “Alarm 1” ou “Alarm 2”,
appuyez dessus pour conrmer;
4. Tournez le bouton VOLUME/ SCROLL (6) pour régler l’heure et appuyez dessus
pour la conrmer et passer au réglage des minutes;
5. Tournez le bouton VOLUME/ SCROLL (6) pour régler la durée et appuyez sur
pour la conrmer;
6. Tournez le bouton VOLUME/ SCROLL (6) pour sélectionner le type de sonnerie
(FM, DAB ou BUZZER) et appuyez dessus pour le conrmer;
7. Tournez le bouton VOLUME/ SCROLL (6) pour sélectionner la fréquence (une
fois, quotidiennement, hebdomadairement, le week-end uniquement) et
appuyez dessus pour conrmer;
8. Tournez le bouton VOLUME/ SCROLL (6) pour régler la date de début et
appuyez sur pour la conrmer;
9. Tournez le bouton VOLUME/ SCROLL (6) pour régler le volume et appuyez
dessus pour conrmer;
10. Tournez le bouton VOLUME/ SCROLL (6) pour activer ou désactiver l’alarme et
appuyez dessus pour conrmer.
Une fois que l’alarme est activée, le symbole de la cloche s’afche à l’écran avec le
numéro 1 pour la première alarme et le numéro 2 pour la deuxième alarme.
Éteindre l’alarme
Pour arrêter complètement l’alarme (sonnerie ou radio), appuyez sur le button
Stand-by/ MODE (3).
Pour arrêter le son de l’alarme, appuyez sur le bouton VOLUME/ SCROLL (6); l’interruption dure 9 minutes, après quoi l’alarme se rallume.
Radio DAB/DAB+
Stockage automatique
1. Réglez l’extension de l’antenne et l’angle pour obtenir la meilleure réception
possible;
2. Appuyez sur le bouton PRESET/ SCAN (4) et maintenez-le enfoncé pendant
quelques secondes pour démarrer le balayage automatique des stations DAB.
Pendant le balayage, l’écran afchera la barre de progression et le nombre de
RC 85D8 DAB
stations enregistrées;
3. Maintenez la touche P+/ TUNE + (7) ou la touche P-/ TUNE- (8) enfoncée
pendant quelques secondes, tournez le bouton VOLUME/ SCROLL (6) pour
sélectionner la station souhaitée; appuyez sur le bouton VOLUME/ SCROLL (6)
pour conrmer et commencer à écouter la station.
Page 20

Remarque:
- Il peut être nécessaire d’attendre quelques secondes pour que l’appareil syntonise
le nouveau canal.
- En mode DAB, la date et l’heure de l’appareil sont synchronisées avec celles de la
station en cours d’écoute.
Scan manuel
Française
1. Maintenez le bouton MENU/ INFO (5) enfoncé pendant 2 secondes;
2. Tournez le bouton VOLUME/ SCROLL (6) et sélectionnez l’élément “Manual
Tune”, appuyez sur le bouton VOLUME/ SCROLL (6) pour le sélectionner;
3. Tournez le bouton VOLUME/ SCROLL (6) pour sélectionner le canal souhaité
(ex: 5A-13F), appuyez sur le bouton VOLUME/ SCROLL (6) pour le sélectionner.
Remarque: Vous pouvez enregistrer jusqu’à 30 stations. Une fréquence stockée peut
être effacée de la mémoire en stockant une autre fréquence à sa place.
Informations DAB/DAB+
En fonction DAB, appuyez sur le bouton MENU/ INFO (5) pour afcher:
Ligne du haut:
Le canal et la fréquence de la station en cours apparaissent sur la ligne du haut.
Ligne de fond:
a. Texte délant diffusé par la plupart des stations DAB
b. Ensemble DAB
c. Type de contenu diffusé. Par exemple. Sport, musique pop
d. Nom de la station DAB
e. Fréquence DAB
f. Erreur de signal
g. 80kbps/DAB
Remarque: toutes les stations DAB ne fournissent pas des informations pouvant être
visualisées par le périphérique.
Menu DAB/DAB
1. En mode DAB, maintenez enfoncé le bouton MENU/ INFO (5) pendant quelques
secondes;
2. Tournez le bouton VOLUME/ SCROLL (6) pour sélectionner l’élément souhaité
parmi: Full Scan, Manual tune, DRC, Prune, TA, System;
3. Appuyez sur le bouton VOLUME/ SCROLL (6) pour sélectionner l’élément
souhaité et entrez ses paramètres.
A) Full Scan – Scanner automatiquement les stations DAB.
B) Preset Recall - sélectionnez une station de radio parmi celles enregistrées.
C) Preset Store - vous permet de mémoriser une station.
RC 85D8 DAB
D) Manual Tune – réglage manuel.
E) DRC – teint, bas, haut.
F) Prune – Oui, Non.
G) TA – On, Off.
+
Page 21

H) System –
1. Sleep – off, 15, 30, 45, 60, 90 (minutes)
2. Alarm - Pour régler les alarmes 1 et 2
3. Time
- Set Time/Date
- Auto update - Mise à jour automatique de la date et de l’heure
Française
depuis la source ou Off. Il est conseillé de le garder sur “Update
from DAB” pour éviter les décalages horaires continus.
- Set 12/ 24 hour
- Set date format
4. Language – English, Deutsch, Italiano, Francais, Nederlands, Espanol, Dansk.
5. factory reset – Oui ou non
6. SW version
FM Radio
1. Déployez l’antenne et repositionnez-la pour une meilleure réception;
2. Appuyez sur le bouton Stand-by/ MODE (3) pour allumer l’appareil;
3. Appuyez plusieurs fois sur le bouton Stand-by/ MODE (3) et sélectionnez
le mode FM.
Stockage automatique:
4. Appuyez sur le bouton PRESET/ SCAN (4) et maintenez-le enfoncé pendant 3
secondes pour démarrer le balayage et le stockage automatique des stations;
5. À la n du balayage, utilisez les touches P+/ TUNE+ (7) et P-/ TUNE- (8) pour
sélectionner une station de radio mémorisée;
Remarque: la sensibilité du balayage automatique est réglable dans le menu.
Recherche manuelle et stockage:
1. Appuyez et maintenez la touche P+/ TUNE+ (7) ou P-/ TUNE- (8) pendant
quelques secondes pour syntoniser la station de radio suivante ou précédente;
2. Pour enregistrer une station de radio:
- Accédez à la fréquence à mémoriser et appuyez sur le bouton PRESET/ SCAN
(4);
- Tournez le bouton VOLUME/ SCROLL (6) pour sélectionner le numéro où
enregistrer la station;
- Appuyez sur le bouton VOLUME/ SCROLL (6) pour conrmer.
Informations de diffusion FM
Appuyez sur le bouton MENU/ INFO (5) pour afcher:
Ligne du haut:
RC 85D8 DAB
Nom de la station, type de réception.
Ligne de fond:
a. Information (fournies par la station de radio).
b. informations relatives au type de programme diffusé.
c. Frequency
Page 22

d. Stereo/mono
e. Time
f. Date
Menu
FM
1. En mode FM, maintenez la touche MENU/ INFO (5) enfoncée pendant quelques
Française
secondes;
2. ournez le bouton VOLUME/ SCROLL (6) pour sélectionner l’élément souhaité
parmi: Preset Recall, Preset Store, Scan Setting, Audio setting, System;
3. Appuyez sur le bouton VOLUME/ SCROLL (6) pour sélectionner l’élément
souhaité et entrez ses paramètres.
A) Scan setting
1. All Stations
2. Strong Stations
B) Audio setting
1. Stereo Allowed
2. Forced Mono
C) System
1. Sleep – Choisissez entre OFF, 15, 30, 45, 60, 90 minutes
2. Alarm - Pour régler l’alarme 1 et l’alarme 2.
3. Time:
- Set Time/date
- Auto update
- Set 12/ 24 heures
- Set date format: Dénir le format de date
4. Language – English, Deutsch, Italiano, Francais, Nederlands, Espanol, Dansk.
5. Factory reset – No or Yes
6. SW version
Projection
Mise sous/ hors tension et réglage
1. Appuyez sur le bouton Projection ON/ OFF (9) pour activer la projection;
2. Appuyez sur le bouton FLIP de 180° (10) pour faire pivoter la projection de 180°
si nécessaire;
3. Réglez la mise au point avec le commande rotative FOCUS (15);
4. Appuyez sur le bouton Projection ON/OFF (9) pour désactiver la projection.
Dimmer
Appuyez plusieurs fois sur le bouton DIMMER (2) pour changer la lumière d’afchage.
RC 85D8 DAB
Page 23
CARACTÉRISTIQUES TECHNIQUES
Alimentation: ........................................5V 1000mA
Puissance audio: ..................................1W
Réception de la bande FM: ..............87,5 - 108 MHz
Réception de bande DAB/DAB +: .174,928 - 239,200 MHz
Dimensions: ..........................................150x 80x 80mm
Française
Poids: .......................................................332 gr.
Recommandations pour l’élimination correcte du produit.
Le symbole gurant sur l’appareil indique que le produit fait l’objet d’une “collecte
séparée“. C’est pourquoi, le produit ne doit pas être éliminé avec les déchets
urbains.
L’utilisateur doit remettre le produit auprès de “décharges spécialisées de collecte
séparée“ prévues par les autorités locales, ou bien le rendre au revendeur quand il
achètera un nouvel appareil équivalent.
La collecte séparée du produit et les opérations successives de traitement, recyclage et élimination favorisent la production d’appareils composés par des matériaux
recyclés ainsi que permettent d’éviter des effets négatifs sur l’environnement et
sur la santé des personnes suite à une gestion impropre du déchet.
Toute élimination abusive du produit entraîne l’application de sanctions administratives.
RC 85D8 DAB
Page 24

Befehlsbeschreibung
1. Anzeige
2. DIMMER - Taste
3. : EIN/Bereitschaft -Taste
4. PRESET/ SCAN - Taste
Deutsch
5. MENU/ INFO - Taste
6. VOLUME/ SCROLL/ ENTER/ SNOOZE
7. P+/ TUNE+ - Taste
8. P-/ TUNE- - Taste
9. Projektion EIN/ AUS-Taste
GEBRAUCHSHINWEISE
Netzgeräte mit einer Spannung von mehr als 5V dürfen nicht veSKIP-endet
werden. Sie könnten das Gerät beschädigen.
• Nicht für längere Zeit bei hoher Lautstärke Musik hören. Dies könnte zu
Hörschäden führen.
• Das Gerät sollte nicht in folgenden Bereichen aufgestellt werden:
- in der Nähe von Magnetfeldern.
- in der Nähe von Wärmequellen wie Heizkörpern und Öfen.
- in sehr feuchten Räumen wie Badezimmern, Schwimmbädern, usw.
- in sehr staubigen Räumen.
- An Orten, die starken Schwingungen ausgesetzt sind.
• Stellen Sie das Gerät so auf, dass an seinen Seiten immer genügend Platz für
die freie Luftzirkulation vorhanden ist (mindestens 5cm).
• Wenn Flüssigkeiten in das Gerät eindringen, ziehen Sie sofort den Stecker aus
der Steckdose und bringen Sie das Gerät zum nächsten autorisierten TREVI Kundendienst.
• Prüfen Sie immer vor dem Aufladen des Geräts, ob die Netz- und
Verbindungskabel korrekt installiert sind.
• Stellen Sie keine offenen Flammen wie brennende Kerzen auf das Gerät.
• Das Gerät darf keinem tropfenden oder spritzenden Wasser ausgesetzt werden.
Es dür fen keine mit Flüssigkeiten gefüllten Gegenstände (z. B. Vasen) auf dem
G erät abgestellt werden.
• Bewahren Sie dieses Handbuch zum späteren Nachschlagen auf.
Pege und wartung
Zur Reinigung empfehlen wir die Verwendung eines weichen, leicht angefeuchteten
Tuchs. Vermeiden Sie Lösungsmittel oder Scheuermittel.
Wichtig
RC 85D8 DAB
Die gute Konstruktion dieses Gerätes garantiert lange Zeit seine einwandfreie
Funktion. Sollte es dennoch zu Unannehmlichkeiten kommen, empehlt es sich, das
nächstgelegene Authorized Assistance Center zu konsultieren.
TREVI verfolgt eine Politik der kontinuierlichen Forschung und Entwicklung. Daher
können die Produkte von den beschriebenen Eigenschaften abweichen.
10. 180° FLIP - Taste
11. Projektor
12. Antenne (zum besseren Empfang
ausfahren und neu positionieren)
13. DC-IN Buchse
14. Kopfhöreranschluss
15. FOCUS, steuerung zur Feinfokus
Projektion
16. Lautsprecher
Page 25
Um mögliche Hörschäden zu vermeiden, beschränken Sie die Hörzeit
auf hohe Lautstärken.
Deutsch
Installation
Stecken Sie den Stecker des mitgelieferten Netzteils in die Netzteilbuchse (13) und
verbinden Sie das Netzteil mit einer 110-230V ~ 50/60Hz Steckdose.
OPERATION
Ein/Stand-by:
1. Drücken Sie die Stand-by/ MODE -Taste (3) das Gerät einschalten;
2. Halten Sie die Stand-by/ MODE -Taste (3) 2 Sekunden lang gedrückt, um
das Gerät in den Standby-Modus zu versetzen (auf dem Display werden Uhrzeit
und Datum angezeigt).
Lautstärke einstellen
Drehen Sie den Knopf VOLUME/SCROLL/ENTER/SNOOZE (6), um die Lautstärke zu
erhöhen oder zu verringern.
Zeiteinstellung
Die Uhrzeit wird automatisch eingestellt, wenn Sie das Gerät im DAB-Modus einschalten, wenn Sie es manuell einstellen möchten:
1. Drücken Sie die Taste Standby/MODE (3), um das Gerät einzuschalten;
2. Halten Sie die MENU/ INFO-Taste (5) 2 Sekunden lang gedrückt;
3. Drehen Sie den VOLUME/ SCROLL-Knopf (6) und wählen Sie “System”. Drücken
Sie den VOLUME/ SCROLL-Knopf (6), um ihn auszuwählen;
4. Drehen Sie den VOLUME/ SCROLL-Knopf (6) und wählen Sie “Time”. Drücken Sie
den VOLUME/ SCROLL-Knopf (6), um ihn auszuwählen;
5. Drehen Sie den VOLUME/ SCROLL-Knopf (6) und wählen Sie “Set Time/ Date”;
Drücken Sie den VOLUME/ SCROLL-Knopf (6), um ihn auszuwählen;
6. Drehen Sie den VOLUME/ SCROLL-Knopf (6), um die Stunde einzustellen, und
drücken Sie den VOLUME/ SCROLL-Knopf (6), um dies zu bestätigen, und fahren
Sie mit der Einstellung der Minuten fort;
7. Stellen Sie das Datum auch mit dem VOLUME/SCROLL-Knopf (6) ein.
Alarm einstellen
Führen Sie die folgenden Schritte aus, um Alarm 1 oder 2 einzustellen:
RC 85D8 DAB
1. Halten Sie im Uhrmodus (Standby) die MENU/ INFO-Taste (5) 2 Sekunden lang
gedrückt. Wählen Sie “System“ und drücken Sie zur Bestätigung den VOLUME/
SCROLL-Knopf (6);
2. Drehen Sie den VOLUME / SCROLL-Knopf (6) und wählen Sie den Punkt “Alarm”.
Drücken Sie ihn, um ihn auszuwählen;
Page 26

3. Drehen Sie den VOLUME/ SCROLL-Knopf (6) und wählen Sie “Alarm 1” oder
“Alarm 2”. Drücken Sie ihn zur Bestätigung;
4. Drehen Sie den VOLUME/ SCROLL-Knopf (6), um die Stunde einzustellen, und
drücken Sie ihn zur Bestätigung, um zur Minuteneinstellung überzugehen;
5. Drehen Sie den VOLUME/ SCROLL-Knopf (6), um die Dauer einzustellen, und
drücken Sie, um sie zu bestätigen;
Deutsch
6. Drehen Sie den VOLUME/ SCROLL-Knopf (6), um den Klingeltontyp (FM, DAB
oder BUZZER) auszuwählen, und drücken Sie ihn zur Bestätigung;
7. Drehen Sie den VOLUME/ SCROLL-Knopf (6), um die Frequenz (einmal, täglich,
wöchentlich, nur am Wochenende) auszuwählen, und drücken Sie ihn zur
Bestätigung;
8. Drehen Sie den VOLUME/ SCROLL-Knopf (6), um das Startdatum einzustellen,
und drücken Sie, um es zu bestätigen;
9. Drehen Sie den VOLUME/ SCROLL-Knopf (6), um die Lautstärke einzustellen,
und drücken Sie ihn zur Bestätigung;
10. Drehen Sie den VOLUME/ SCROLL-Knopf (6), um den Alarm zu aktivieren oder
zu deaktivieren, und drücken Sie ihn zur Bestätigung.
Sobald der Alarm aktiviert ist, erscheint auf dem Display das Glockensymbol mit
der Nummer 1 für den ersten Alarm und der Nummer 2 für den zweiten Alarm.
Schalten Sie den Alarm aus
Um den Alarm vollständig zu stoppen (Klingelton oder Radio), drücken Sie die Taste
Standby/ MODE (3).
Um den Alarmton vorübergehend zu unterbrechen, drücken Sie den VOLUME/
SCROLL-Knopf (6). Die Unterbrechung dauert 9 Minuten. Danach wird der Alarm
erneut ausgelöst.
DAB/DAB+ Radio
Automatische Speicherung
1. Passen Sie die Antennenverlängerung und den Winkel an, um den besten
Empfang zu erzielen;
2. Halten Sie die PRESET/ SCAN -Taste (4) einige Sekunden lang gedrückt, um den
automatischen Suchlauf der DAB-Sender zu starten. Während des Suchlaufs
werden auf dem Display der Fortschrittsbalken und die Anzahl der gespeicherten Sender angezeigt;
3. Halten Sie die Taste P+/ TUNE+ (7) oder die Taste P-/ TUNE- (8) einige Sekunden lang gedrückt, und wählen Sie mit dem VOLUME/ SCROLL-Knopf (6) den
gewünschten Sender aus. Drücken Sie den VOLUME/ SCROLL-Knopf (6), um zu
bestätigen und den Sender anzuhören.
Hinweis:
RC 85D8 DAB
- Eventuell müssen Sie einige Sekunden warten, bis das Gerät auf den neuen Kanal
eingestellt ist.
- Im DAB-Modus werden Datum und Uhrzeit des Geräts mit denen des empfangenen Senders synchronisiert.
Page 27

Manueller Scan
1. Halten Sie die MENU/ INFO-Taste (5) 2 Sekunden lang gedrückt;
2. Drehen Sie den VOLUME/ SCROLL-Knopf (6) und wählen Sie den Punkt „Manual
Tune“. Drücken Sie den VOLUME/ SCROLL-Knopf (6), um ihn auszuwählen;
3. Drehen Sie den VOLUME/ SCROLL-Knopf (6), um den gewünschten Kanal (5A13F) auszuwählen, und drücken Sie den VOLUME/ SCROLL-Knopf (6), um ihn
Deutsch
auszuwählen.
Hinweis: Bis zu 30 Sender können gespeichert werden. Eine gespeicherte Frequenz
kann aus dem Speicher gelöscht werden, indem an ihrer Stelle eine andere Frequenz
gespeichert wird.
DAB/DAB+ informationen
Drücken Sie in der DAB-Funktion wiederholt die MENU/ INFO-Taste (5), um die
angezeigten Informationen zu ändern:
Obersten Zeile:
Senderkanal und Frequenz des aktuellen Senders werden in der obersten Zeile
angezeigt.
Endeffekt:
a. Scrollender Text, der von den meisten DAB-Sendern gesendet wird
b. DAB ensemble
c. Art des gesendeten Inhalts Z.B. Sport, Popmusik
d. DAB-Stationsname
e. DAB-Frequenz
f. Signalfehler
g. 80kbps/DAB
Hinweis: icht alle DAB-Sender bieten Informationen, die vom Gerät angezeigt werden
können.
DAB/DAB
1. Halten Sie im DAB-Modus die MENU/ INFO-Taste (5) einige Sekunden lang
gedrückt.
2. Drehen Sie den VOLUME/ SCROLL-Knopf (6), um die gewünschte Option
auszuwählen: Full Scan, Manual Tune, DRC, Prune, TA, System;
3. Drücken Sie den VOLUME/ SCROLL-Knopf (6), um das gewünschte Element
auszuwählen und dessen Einstellungen einzugeben.
A) Full Scan – DAB-Sender werden automatisch gescannt
B) Preset Recall - Wählen Sie einen Radiosender aus den gespeicherten Sendern
C) Preset Store - Ermöglicht das Speichern eines Senders
D) Manual Tune – Manuelle Abstimmung
RC 85D8 DAB
E) DRC – Aus, niedrig, hoch.
F) Prune – ja, Nein
G) TA - Ein, Aus
H) System –
+ Menü
Page 28

1. Sleep – off, 15, 30, 45, 60, 90 (Minuten)
2. Alarm - Alarm 1 und Alarm 2 einstellen.
3. Time
- Set Time/Date
- Auto update - Automatische Aktualisierung von Datum und
Uhrzeit von Quelle oder Aus. Es wird empfohlen, die Einstellung
Deutsch
“Update from DAB“ beizubehalten, um kontinuierliche
Zeitverschiebungen zu vermeiden
- Stellen Sie 12/ 24 - Stellen Sie AM/PM oder 24 Stunden ein
- Set date format (Datumsformat einstellen)
4. Language – English, Deutsch, Italiano, Francais, Nederlands, Espanol, Dansk.
5. factory reset – Nein, Ja
6. SW version
UKW-Radio
1. Ziehen Sie die Antenne heraus und positionieren Sie sie für einen besseren
Empfang neu;
2. Drücken Sie die Standby/ MODE -Taste (3), um das Gerät einzuschalten;
3. Drücken Sie die Standby/ MODE -Taste (3) wiederholt und wählen Sie den
FM-Modus.
Automatische lagerung:
4. Halten Sie die Taste PRESET/ SCAN (4) 3 Sekunden lang gedrückt, um den
Suchlauf und das automatische Speichern der Sender zu starten;
5. Verwenden Sie am Ende des Suchlaufs die Tasten P+/ TUNE+ (7) und P-/ TUNE(8), um einen gespeicherten Radiosender auszuwählen;
Hinweis: Die Auto-Scan-Empndlichkeit ist im Menü einstellbar.
Manuelle Suche und Speicherung:
1. Halten Sie die Taste P+/ TUNE+ (7) oder P-/ TUNE- (8) einige Sekunden lang
gedrückt, um den nächsten oder vorherigen Radiosender einzustellen;
2. So speichern Sie einen Radiosender :
- Gehen Sie zur zu speichernden Frequenz und drücken Sie die PRESET/ SCANTaste (4);
- Drehen Sie den VOLUME/SCROLL-Knopf (6), um die Nummer auszuwählen,
unter der der Sender gespeichert werden sol;
- Drücken Sie zur Bestätigung den VOLUME/SCROLL-Knopf (6).
UKW-Sendeinformationen
Drücken Sie die MENU/ INFO-Taste (5), um Folgendes anzuzeigen:
Obersten Zeile:
RC 85D8 DAB
Sendername, Empfangstyp.
Endeffekt:
a. Informationen (vom Radiosender bereitgestellt)
b. Frequenz
Page 29

c. Stereo/mono
d. Zeit
e. Datum
UKW-Menü
1. Halten Sie im FM-Modus die MENU/ INFO-Taste (5) einige Sekunden lang
Deutsch
gedrückt;
2. Drehen Sie den VOLUME/ SCROLL-Knopf (6), um die gewünschte Option
auszuwählen: Preset Recall, Preset Store, Scan Setting, Audio setting, System;
3. Drücken Sie den VOLUME/ SCROLL-Knopf (6), um das gewünschte Element
auszuwählen und dessen Einstellungen einzugeben.
A) Scan setting
1. All Stations
2. Strong Stations
B) Audio setting
1. Stereo Allowed
2. Forced Mono
C) System
1. Sleep – Wählen Sie zwischen AUS, 15, 30, 45, 60, 90 Minuten
2. Alarm - Alarm 1 und Alarm 2 einstellen.
3. Time
- Set Time/Date
- Auto update - Automatische Aktualisierung von Datum und
Uhrzeit von Quelle oder Aus. Es wird empfohlen, die Einstellung
“Update from DAB“ beizubehalten, um kontinuierliche
Zeitverschiebungen zu vermeiden
- Stellen Sie 12/ 24 - Stellen Sie AM/PM oder 24 Stunden ein
- Set date format (Datumsformat einstellen)
4. Language – English, Deutsch, Italiano, Francais, Nederlands, Espanol, Dansk.
5. Factory reset – Nein, Ja
6. SW version
Projektion
Ein/ Ausschalten und Einstellen
1. Drücken Sie die Projection ON/OFF-Taste (9), um die Projektion einzuschalten;
2. Drücken Sie die 180° FLIP-Taste (10), um den Vorsprung bei Bedarf um 180° zu
drehen;
3. Stellen Sie den Fokus mit dem Fokussteuerung FOCUS(15);
4. Drücken Sie die Projection ON/OFF-Taste (9), um die Projektion auszuschalten
RC 85D8 DAB
Dimmer
Drücken Sie die DIMMER-Taste (2) mehrmals, um die Displaybeleuchtung zu ändern.
Page 30
TECHNISCHE EIGENSCHAFTEN
Stromversorgung: ...............................5V 1000mA
Audioleistung: ......................................1W
UKW-Bandempfang: ..........................87,5 - 108 MHz
DAB/DAB+ -Bandempfang: .............174.928 - 239.200 MHz
Abmessungen: .....................................150x 80x 80mm
Deutsch
Gewicht: .................................................332 gr.
Hinweise zur ordnungsgemäßen Entsorgung des Produkts
Das auf dem Gerät angebrachte Symbol weist darauf hin, dass das Altgerät
“getrennt zu sammeln” ist und das Produkt daher nicht zusammen mit dem
Gemeindeabfall entsorgt werden darf.
Der Benutzer muss das Produkt zu den entsprechenden, von der Gemeindeverwaltung eingerichteten “Wertstoffsammelstellen” bringen oder dem Händler
beim Kauf eines neuen Produkts übergeben.
Die getrennte Müllsammlung und anschließende Aufbereitung, Wiederverwertung und Entsorgung fördern die Herstellung von Geräten unter Verwendung
wiederverwerteter Materialien und vermindern die negativen Auswirkungen auf
die Umwelt und Gesundheit in Folge einer falschen Müllverwaltung.
Die widerrechtliche Entsorgung des Produkts führt zur Auferlegung von Verwaltungsstrafen.
RC 85D8 DAB
Page 31
NOTAS DE USO
No use alimentadores con voltaje superior a 5 V , pueden dañar el reproductor.
• No escuche teniendo el volumen alto por mucho tiempo, puede dañar su oído.
• Evite colocar el reproductor:
- cerca de campos magnéticos.
- cerca de fuentes de calor, como radiadores y estufas.
Español
- en lugares muy húmedos, como cuartos de baño, piscinas, etc...
- en lugares muy polvorientos.
- en lugares sujetos a fuertes vibraciones.
• Coloque el aparato de manera que siempre haya suficiente espacio en sus lados
para que el aire circule libremente (al menos 5cm).
• Si penetran líquidos dentro del aparato, desconecte inmediatamente el enchufe
del tomacorriente y lleve el aparato al centro de servicio TREVI autorizado más
cercano.
• Antes de recargar el dispositivo, compruebe siempre que los cables de
alimentación y de conexión están correctamente instalados.
• No se deben colocar fuentes de llamas, como velas encendidas, sobre el
aparato.
• El aparato no debe exponerse a goteo o salpicaduras de agua y no deben
colocarse objetos llenos de líquidos, como jarrones, sobre el aparato.
• Guarde este manual para futuras referencias.
Cuidado y mantenimiento
Para efectuar la limpieza, se aconseja utilizar un paño suave y ligeramente humedecido.
Evite el uso de disolventes o sustancias abrasivas.
Importante
La buena construcción del aparato garantiza su perfecto funcionamiento durante
mucho tiempo. Si se presentase algún inconveniente, es oportuno consultar al Centro
de Asistencia autorizado más cercano.
TREVI cultiva una política de investigación y desarrollo continuos. Por consiguiente,
los productos pueden presentar características distintas a las descritas.
Para evitar posibles daños a la audición, limitar el tiempo de
escuchar a un volumen alto.
RC 85D8 DAB
Page 32

Descripción del comando
1. Pantalla
2. Botón DIMMER
3. Botón : espera/MODE
4. Botón PRESET/ SCAN
Español
5. Botón MENU/ INFO
6. VOLUME/ SCROLL/ ENTER/ SNOOZE
7. Botón P+/ TUNE+
8. Botón P-/ TUNE-
9. Botón de encendido/ apagado de
proyección
Instalación
Inserte el enchufe del adaptador de alimentación suministrado en la toma de la
fuente de alimentación (13) y conecte la fuente de alimentación a una toma de
corriente de 110-230V ~ 50/60Hz.
10. Botón 180° FLIP
11. Proyector
12. Antena (Extender y reposicionar
para una mejor recepción)
13. Toma DC-IN
14. Toma de auriculares
15. Proyección control de foco a foco
no.
16. Altavoz
OPERACIÓN
Encendido/apagado en espera:
1. Presione el botón espera/ MODE (3);
2. Mantenga presionado durante 2 segundos el botón espera/ MODE (3) para
poner la unidad en modo Stand-by (la pantalla muestra la hora y la fecha).
Ajuste de Volumen
Gire la perilla VOLUME/SCROLL/ENTER/SNOOZE (6) para aumentar o disminuir el
volumen.
Ajuste de Hora
El tiempo se congurará automáticamente encendiendo el dispositivo en modo
DAB, si desea congurarlo manualmente:
1. Presione el botón Stand-by/ MODE (3) para encender el aparato;
2. Mantenga presionado el botón MENU/ INFO (5) durante 2 segundos;
3. Gire la perilla VOLUME/SCROLL (6) y seleccione “System”; presione la perilla
VOLUME/SCROLL (6) para seleccionarla;
4. Gire la perilla VOLUME/SCROLL (6) y seleccione “Time”; presione la perilla
VOLUME/SCROLL (6) para seleccionarla;
5. Gire la perilla VOLUME/SCROLL (6) y seleccione “Set Time/Date”; presione la
perilla VOLUME/SCROLL (6) para seleccionarla;
RC 85D8 DAB
6. Gire la perilla VOLUME/SCROLL (6) para ajustar la hora y presione la perilla
VOLUME/SCROLL (6) para confirmarla y vaya a configurar los minutos;
7. Ajuste también la fecha con la perilla VOLUME/SCROLL (6).
Page 33

Ajuste Alarma
Para congurar la alarma 1 o 2, siga los siguientes pasos:
1. En el modo de reloj (Stand-by), presione y mantenga presionado durante 2
segundos el botón MENU/ INFO (5); seleccione “System” y presione la perilla
VOLUME/SCROLL (6) para conrmar;
2. Gire la perilla VOLUME/SCROLL (6) y seleccione el elemento “Alarm”, presiónelo
Español
para seleccionarlo;
3. Gire la perilla VOLUME/SCROLL (6) y seleccione “Alarm 1” o “Alarm 2”, presiónela
para conrmar;
4. Gire la perilla VOLUME/SCROLL (6) para ajustar la hora y presiónela para
conrmarla y continúe con la conguración de minutos;
5. Gire la perilla VOLUME/SCROLL (6) para ajustar la duración y presione para
conrmarla;
6. Gire la perilla VOLUME/SCROLL (6) para seleccionar el tipo de tono de llamada
(FM, DAB o BUZZER) y presiónelo para conrmarlo;
7. Gire la perilla VOLUME/SCROLL (6) para seleccionar la frecuencia (una vez,
diariamente, semanalmente, solo los nes de semana) y presiónela para
conrmar;
8. Gire la perilla VOLUME/SCROLL (6) para ajustar la fecha de inicio y presione
para conrmarla;
9. Gire la perilla VOLUME/SCROLL (6) para ajustar el volumen y presiónela para
conrmar;
10. Gire la perilla VOLUME/SCROLL (6) para activar o desactivar la alarma y
presiónela para conrmar.
Una vez que se activa la alarma, el símbolo de la campana aparecerá en la pantalla
con el número 1 para la primera alarma y el número 2 para la segunda alarma.
Apagar la alarma
Para detener la alarma completamente (tono de llamada o radio), presione el botón
espera/ MODE (3).
Para detener el sonido de la alarma, presione el botón VOLUME/SCROLL (6); la interrupción dura 9 minutos, después de lo cual la alarma vuelve a sonar.
DAB/DAB+ Radio
Almacenamiento automatico
1. Ajuste la extensión de la antena y el ángulo para obtener la mejor recepción;
2. Mantenga presionado el botón PRESET/ SCAN (4) durante unos segundos para
iniciar el escaneo automático de las estaciones DAB. Durante el escaneo, la
pantalla mostrará la barra de progreso y el número de estaciones almacenadas;
RC 85D8 DAB
3. Mantenga presionada la tecla P+/ TUNE+ (7) o la tecla P-/ TUNE- (8) durante
unos segundos, gire la perilla VOLUME/SCROLL (6) para seleccionar la estación
deseada; presione la perilla VOLUME/SCROLL (6) para conrmar y comenzar a
escuchar la estación.
Page 34

Nota:
- Puede ser necesario esperar unos segundos para que la unidad sintonice el nuevo
canal.
- En el modo DAB, la fecha y la hora del dispositivo se sincronizan con las de la
estación que se está escuchando.
Español
Almacenamiento manual
1. Mantenga presionado el botón MENU/ INFO (5) durante 2 segundos;
2. Gire la perilla VOLUME/SCROLL (6) y seleccione el elemento “Manual Tune”,
presione la perilla VOLUME/SCROLL (6) para seleccionarla;
3. Gire la perilla VOLUME/SCROLL (6) para seleccionar el canal deseado (5A-13F),
presione la perilla VOLUME/SCROLL (6) para seleccionarla.
Nota: Se pueden almacenar hasta 30 estaciones. Una frecuencia almacenada puede
borrarse de la memoria almacenando otra frecuencia en su lugar.
DAB/DAB+ información
En la función DAB, presione el botón MENU/ INFO (5) varias veces para cambiar la
información que se muestra:
Línea superior:
El canal de la estación y la frecuencia de la estación actual se mostrarán en la línea
superior.
Línea de fondo:
a. Desplazamiento de texto transmitido por la mayoría de las estaciones DAB
b. Conjunto de DAB
c. Tipo de contenido que se está transmitiendo, Deporte, música pop
d. Nombre de la estación DAB
e. Frecuencia DAB
f. Error de señal
g. 80kbps/DAB
Nota: no todas las estaciones DAB proporcionan información que puede ver el
dispositivo.
Menú DAB/DAB
1. En el modo DAB, mantenga presionado el botón MENU/ INFO (5) durante unos
segundos;
2. Gire la perilla VOLUME/SCROLL (6) para seleccionar el elemento deseado entre:
Full Scan, Manual tune, DRC, Prune, TA, System;
3. Presione la perilla VOLUME/SCROLL (6) para seleccionar el elemento deseado e
ingresar su conguración.
A) Full Scan – escanea automáticamente las estaciones DAB
RC 85D8 DAB
B) Preset Recall - seleccione una estación de radio de las almacenadas
C) Preset Store - allows you to store a station
D) Manual Tune – le permite almacenar una estación
E) DRC – apagado, bajo, alto
F) Prune – sI, no
+
Page 35

G) TA - On, Off.
H) System –
1. Sleep – off, 15, 30, 45, 60, 90 (minutos)
2. Alarm - para congurar la alarma 1 y la alarma 2
3. Time:
- Set Time/Date
Español
- Auto update - Actualización automática de fecha y hora desde
origen o apagado. Es recomendable mantenerlo congurado en
“Actualizar desde DAB” para evitar cambios continuos de tiempo.
- Set 12/ 24 hour
- Set date format
4. Language – English, Deutsch, Italiano, Francais, Nederlands, Espanol, Dansk.
5. factory reset – No o Si
6. SW version
Radio FM
1. Extienda la antena y reposicione para una mejor recepción;
2. Presione el botón espera/ MODE (3) para encender la unidad;
3. Presione repetidamente el botón espera/ MODE (3) y seleccione el modo
FM.
Almacenamiento automático:
4. Presione y sostenga durante 3 segundos el botón PRESET/ SCAN (4) para
comenzar a escanear y almacenar automáticamente las estaciones;
5. Al nal de la exploración, use las teclas P+/ TUNE+ (7) y P-/ TUNE- (8) para
seleccionar una estación de radio memorizada.
Nota: La sensibilidad del escaneo automático es ajustable en el Menú.
Búsqueda manual y almacenamiento:
1. Mantenga presionada la tecla P+/ TUNE+ (7) o P-/ TUNE- (8) durante unos
segundos para sintonizar la estación de radio siguiente o anterior;
2. Para almacenar una estación de radio:
- Muévase a la frecuencia que se va a almacenar y presione el botón PRESET/
SCAN (4);
- Gire la perilla VOLUME/SCROLL (6) para seleccionar el número donde almace-
nar la estación;
- Presione la perilla VOLUME/SCROLL (6) para conrmar.
Información de transmisión de FM
Presione el botón MENU/ INFO (5) para ver:
RC 85D8 DAB
Línea superior:
Nombre de la estación, tipo de recepción.
Línea de fondo:
a. Información (proporcionada por la estación de radio)
b. Frecuencia
Page 36

c. Estéreo/mono
d. Hora
e. Fecha
Menu
FM
1. En el modo FM, mantenga presionada la tecla MENU/ INFO (5) durante unos
Español
segundos;
2. Gire la perilla VOLUME/SCROLL (6) para seleccionar el elemento deseado entre:
Full Scan, Manual tune, DRC, Prune, TA, System;
3. Presione la perilla VOLUME/SCROLL (6) para seleccionar el elemento deseado e
ingresar su conguración.
A) Scan setting
1. All Stations
2. Strong Stations
B) Audio setting
1. Stereo Allowed
2. Forced Mono
C) System
1. Sleep – Elija entre OFF, 15, 30, 45, 60, 90 minutos
2. Alarm - Para congurar la alarma 1 y la alarma 2.
3. Time:
- Set Time/date
- Auto update - Actualización automática de fecha y hora desde la
fuente o apagado. Es aconsejable mantenerlo congurado en
“Actualizar desde DAB” para evitar cambios de tiempo continuos.
- Set 12/ 24 hour
- Set date format
4. Language – English, Deutsch, Italiano, Francais, Nederlands, Espanol, Dansk.
5. Factory reset – No o Si
6. SW version
Proyección
Encendido/apagado y ajuste
1. Presione el botón Projection ON/OFF (9) para encender la proyección;
2. Presione el botón FLIP 180° (10) para rotar la proyección 180° si es necesario;
3. Ajuste el enfoque con el enfoque de control de enfoque (15);
4. Presione el botón Projection ON/OFF (9) para apagar la proyección.
Dimmer (Regulador de intensidad)
RC 85D8 DAB
Presione el botón DIMMER (2) varias veces para cambiar la luz de la pantalla.
Page 37
CARACTERÍSTICAS TÉCNICAS
Fuente de alimentación: ..................5V 1000mA
Potencia de audio: ..............................1W
Recepción de banda FM: ..................87.5 - 108 MHz
Recepción de banda DAB/DAB +: 174.928 - 239.200 MHz
Dimensiones: ........................................150x 80x 80mm
Español
Peso: .........................................................332 gr.
Advertencias para la correcta eliminación del producto.
El símbolo que aparece en el aparato indica que el residuo debe ser objeto de
“recogida selectiva” por tanto el producto no se debe eliminar junto con residuos
urbanos.
El usuario deberá entregar el producto a los “centros de recogida selectiva” creados por las administraciones municipales o bien al distribuidor cuando adquiera
un nuevo producto.
La recogida selectiva del residuo y las sucesivas operaciones de tratamiento,
recuperación y eliminación favorecen la fabricación de aparatos con materiales reciclados y limitan los efectos negativos en el medio ambiente y la salud causados
por una gestión incorrecta del residuo.
La eliminación abusiva del producto da lugar a la aplicación de sanciones administrativas.
RC 85D8 DAB
Page 38
DICHIARAZIONE DI CONFORMITÀ UE SEMPLIFICATA
Il fabbricante TREVI dichiara che il tipo di apparecchiatura RC 85D8 DAB
Hereby TREVI Spa declares that equipment type RC 85D8 DAB
EN If you will not nd your language on the instruction manual, please go on our
website www.trevi.it to nd it
FR Si vous ne trouverez pas votre langue sur le mode d’emploi, veuillez vous visiter
sur notre site Web www.trevi.it de le trouver
DE Wenn Sie Ihre Sprache auf die Bedienungsanleitung nicht nden, gehen Sie
bitte auf unsere Webseite www.trevi.it zu nden
ES Si no encuentras tu idioma en el manual de instrucciones, por favor vaya a
RC 85D8 DAB
nuestra página web www.trevi.it se encuentra
PT Se você não vai encontrar sua língua sobre o manual de instruções, por favor, vá
em nosso site www.trevi.it para encontrá-lo
è conforme alla direttiva 2014/53/UE.
Il testo completo della dichiarazione di conformità EU
è disponibile al seguente indirizzo Internet:
https://www.trevi.it/dms/zidi/TREVI/DOCRC85D8DAB.pdf
SIMPLIFIED EU DECLARATION OF CONFORMITY
is in compliance with directive 2014/53/EU.
The full text of the EU declaration of conformity
is available at the following internet address:
https://www.trevi.it/dms/zidi/TREVI/DOCRC85D8DAB.pdf
Page 39

Page 40

Strada Consolare Rimini-San Marino, 62 47924 Rimini (RN) Italy
Tel. 0541/756420 - Fax 0541/756430 - www.trevi.it - e-mail: [email protected]
Made in CHINA
 Loading...