

Page 1
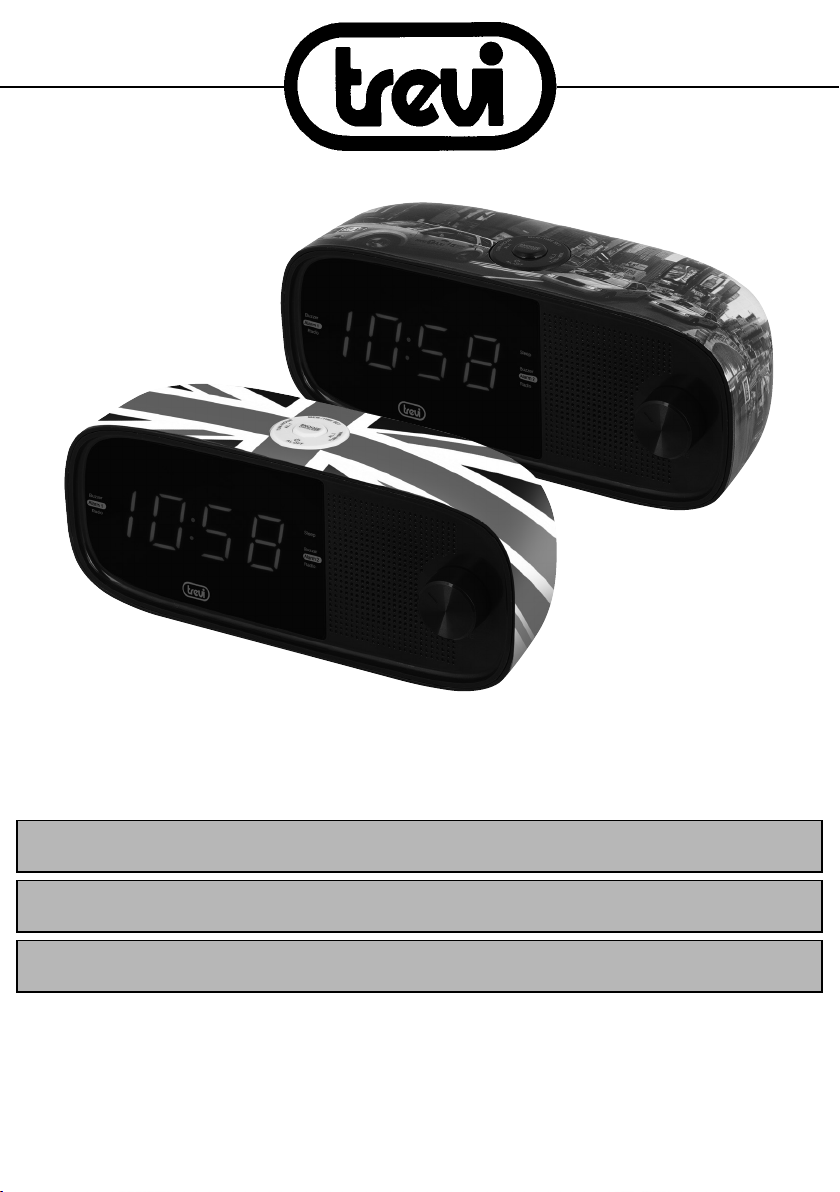
RC 853 D
RADIO SVEGLIA ELETTRONICA
MANUALE D’USO
MULTILANGUAGE USER GUIDE
ENG FRA DEU ESP
Per informazioni integrative e aggiornamenti di questo prodotto vedi: www.trevi.it
For additional information and updates of this product see: www.trevi.it
Page 2

Page 3
RC 853 D FM ALARM CLOCK
ATTENZIONE
RISCHIO DI SCOSSE
ELETTRICHE
NON ESPORRE
A PIOGGIA E UMIDITÀ
ATTENZIONE: NON APRIRE L’APPARECCHIO. ALL’INTERNO NON VI SONO
COMANDI MANIPOLABILI DALL’UTENTE NE PARTI DI RICAMBIO. PER TUTTE
LE OPERAZIONI DI SERVIZIO RIVOLGERSI AD UN CENTRO DI ASSISTENZA
AUTORIZZATO TREVI
ACHTUNG
GEFAHR ELEKTRISCHER SCHLÄGE
NICHT DER FEUCHTIGKEIT
UND DEM REGEN AUSSETZEN
ACHTUNG: DAS GERÄT NICHT ÖFFNEN. IM INNERN BEFINDEN SICH KEINE
VOM BENUTZER SELBST INSTANDSETZBAREN TEILE UND AUCH KEINE
ERSATZTEILE. FÜR JEGLICHE SERVICEARBEITEN, WENDEN SIE SICH BITTE
AN EINE TREVI AUTORISIERTEN KUNDENDIENSTSTELLE.
ATTENTION
DANGER DE DECHARGES ELECTRIQUES
NE PAS EXPOSER A LA PLUIE
NI A L’HUMIDITE
ATTENTION: NE PAS OUVRIR L’APPAREIL. SON INTERIEUR NE CONTIENT AUCUNE
COMMANDE DESTINEE A L’UTILISATEUR NI DE PIECES DE RECHANGE. POUR TOUTE
OPERATION D’ASSISTANCE CONTACTER UN CENTRE
D’ASSISTANCE AGREE TREVI.
CAUTION
DANGER OF ELECTRIC SHOCK!
DO NOT EXPOSE TO
RAIN OR HUMIDITY
CAUTION: TO REDUCE THE RISK OF ELECTRIC SHOCK, DO NOT REMOVE
COVER OR BACK. NO USER SERVICEABLE PERTS INSIDE. REFER SERVICING
TO QUALIFIED PERSONNEL ONLY.
ATENCION
PELIGRO DE CHOQUES ELECTRICOS
NO EXPONER A LLUVIA Y
ATENCION: NO ABRIR EL APARATO, EN SU INTERIOR NO HAY MANDOS QUE
PUEDAN SER MANIPULADOS POR EL USUARIO NI PARTES DE REPUESTO.
PARA TODAS LAS OPERACIONES DE SERVICIO DIRIGIRSE A UN CENTRO DE
ASISTENCIA AUTORIZADO TREVI.
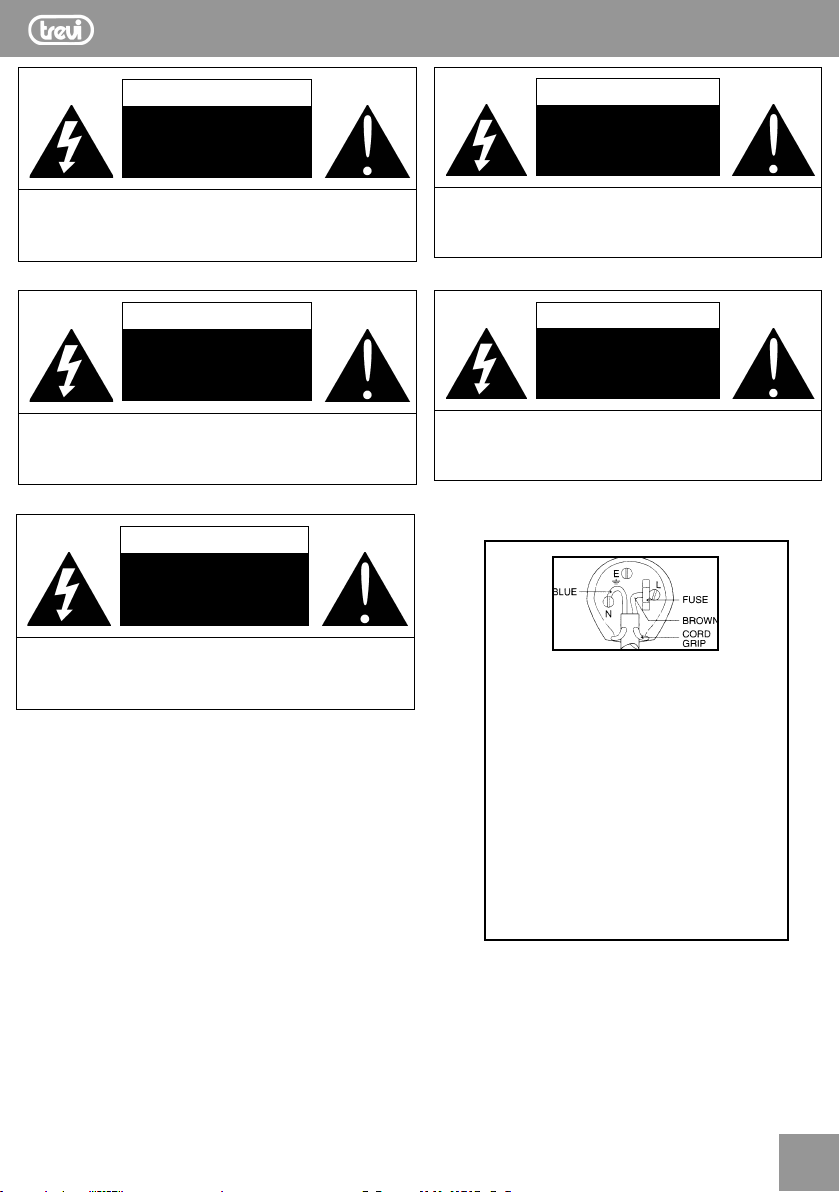
WIRES CONNECTIONS TO A THREE-PIN
The wires in this mains lead are coloured in accordance
with the following wiring codes:
Blue: ...........................................................Neutral
Brown: .......................................................Live
The wires in this mains lead must be connected to the
terminals in the plug as follows:
Blue wire: .................................................N or Black
Brown wire: ............................................. L or Red
Neither wire is to be connected to the earth (E or W)
terminal of three-pin plug.
Should the fuse fail in the plug remove the plug form
the wall socket and replace the fuse with a 3 Amp. ASTA
approved BS 1362 fuse.
UKPLUG ONLY
PLUG
3
Page 4

RC 853 D FM ALARM CLOCK
NOTE D'USO
Ascoltare a volume alto per lungo tempo, potrebbe danneggiare il vostro udito.
Questo apparecchio è uno strumento elettronico di alta precisione, evitate quindi di utilizzarlo nei seguenti casi:
• Vicino a campi magnetici.
• Vicino a fonti di calore come caloriferi e stufe.
• In luoghi molto umidi come stanze da bagno, piscine, ecc...
• In luoghi molto polverosi.
• In luoghi soggetti a forti vibrazioni.
• Tenere l’apparecchio fuori dalla portata dei bambini.
• Posizionare l’apparecchio in modo che ai suoi lati ci sia sempre abbastanza spazio per la libera circolazione di aria (almeno 5 cm).
• Se dei liquidi penetrano all’interno dell’apparecchio scollegare immediatamente la spina dalla presa e portare l’apparecchio al più
vicino centro assistenza autorizato TREVI.
• Controllare sempre prima di ricaricare l’apparecchio, che i cavi di alimentazione e di collegamento siano installati correttamente.
• Nessuna sorgente di fiamma nuda, quali candele accese, dovrebbe essere posta sull’apparecchio.
• L’apparecchio non deve essere esposto a stillicidio o a spruzzi d’acqua e nessun oggetto pieno di liquido, quali vasi, deve essere
posto sull’apparecchio.
• Conservare il presente manuale per futuri riferimenti.
CURA E MANUTENZIONE
Per la pulizia si consiglia l’ uso di un panno morbido, leggermente inumidito. Evitate solventi o sostanze abrasive.
IMPORTANTE
Questo dispositivo è progettato per uso domestico non professionale. La buona costruzione di questo apparecchio ne garantisce per
lungo tempo il perfetto funzionamento. Se tuttavia dovesse presentarsi qualche inconveniente, sarà opportuno consultare il più vicino
Centro Assistenza autorizzato TREVI.
TREVI persegue una politica di continua ricerca e sviluppo. Pertanto i prodotti possono presentare caratteristiche diverse da quelle
descritte.
NOTES ON USE
This is a precision electronic appliance; avoid using it in the following cases:
• Near strong heat sources, such as central heating plants or stoves.
• Listening to high volume for a long time could damage your hearing.
• In very humid places such as bathrooms, swimming pools, etc.
• In very dusty places.
• In places subject to strong vibrations.
• Position the appliance in such a way that there is always enough room for free air circulation (at least 5 cm).
• Do not block the air inlets.
• Keep the appliance out of the reach of children.
• If any liquid enters the appliance, unplug it immediately from the socket and take it to the nearest TREVI authorised service centre.
• Before switching on the appliance, always check that the power cable and the connection cable are properly installed.
• The apparatus shall not be exposed to dripping or splashing water. No objects filled with liquid, such as vases, should be placed on
the unit.
• No naked flame sources, such as lighted candles, should be placed on.
• Keep this manual.
CARE AND MAINTENANCE
Use a slightly damp soft cloth for cleaning. Do not use solvents and abrasive substances.
IMPORTANT
This device is designed for home use (not professional use). This appliance has been carefully built to ensure long-lasting perfect
performance. However, should any inconvenience occur, please contact your local authorised TREVI Service Centre.
TREVI follows a policy of ongoing research and development. Therefore products may have different features from those described.
4
Page 5
RC 853 D FM ALARM CLOCK
COMANDI RADIO
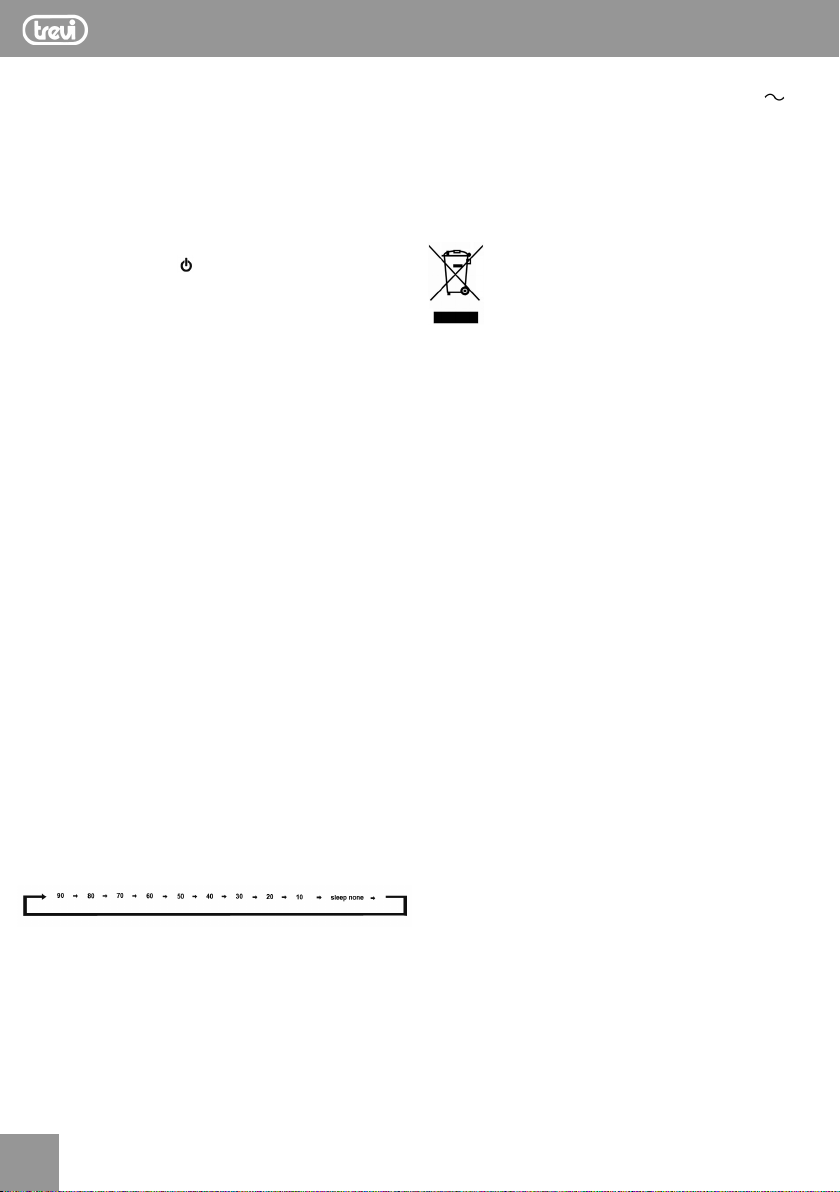
1
2
10
11
12
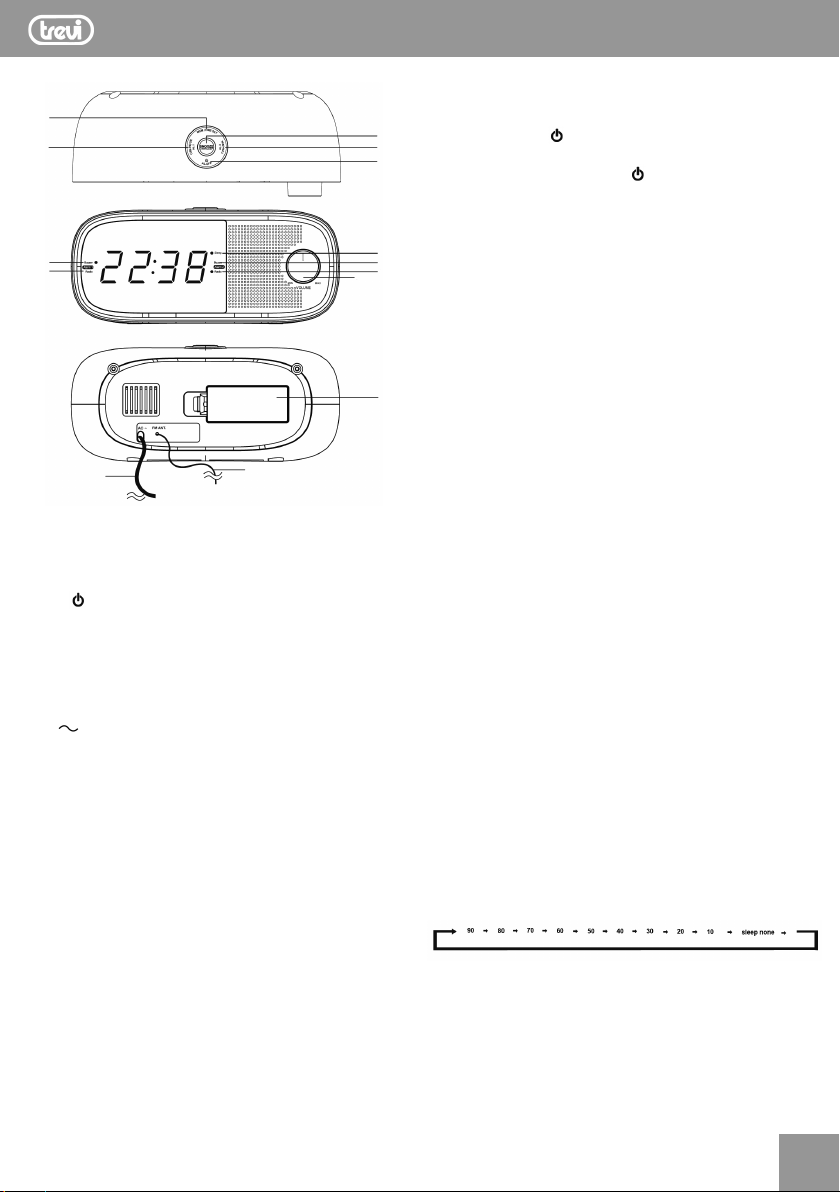
1. Tasto MEM/TIME SET
2. Tasto TUN-/HOUR AL1
3. Tasto SNOOZE DIM/SLEEP
4. Tasto AL2 TUN+/MIN
5. Tasto
6. Indicatore Sleep
7. Indicatore Alarm 2 BUZZER
AL.OFF
9
13
8. Indicatore Alarm 2 RADIO
9. Volume
10. Indicatore Alarm 1 BUZZER
11. Indicatore Alarm 1 RADIO
12. Cavo di alimentazione
13. Antenna radio FM
14. Compartimento Batteria
Srotolare il cavo d’antenna (13) sul retro della radiosveglia. Estendere
e posizionare l’antenna per ottenere la migliore ricezione radio.
3
1. Premere il tasto “
4
5
6
7
8
14
quenza della stazione radio apparirà sul display. Tenere premuto
per qualche secondo il tasto “ AL.OFF” (5) per spegnere la
radio;
2. Sintonizzatevi sulla vostra stazione preferita selezionando la
giusta frequenza con i tasti “TUN-/HOUR AL1” (2) o “AL2 TUN+/
MIN” (4). Durante l’operazione sul display viene visualizzata la
frequenza sintonizzata.
3. Premendo i tasti “TUN-/HOUR AL1” (2) o “AL2 TUN+/MIN” (4)
per 3 secondi, la radio effettua una scansione della frequenza
fino a fermarsi alla prima stazione radio ricevuta.
4. Dopo aver visualizzato la frequenza per qualche secondo l’apparecchio tornerà a mostrare l’ora. Premere il pulsante “TUN-/
HOUR AL.1” (2) o “AL.2 TUN+/MIN” (4) per visualizzare la
frequenza radio.
Ascolto di stazioni radio memorizzate e memorizzazione di una
stazione radio
È possibile memorizzare fino a 10 stazioni radio in banda FM:
1. Per salvare una stazione radio,sintonizzare la stazione radio
desiderata premere a lungo il tasto “MEM/TIME SET” (1), fino
a quando il display lampeggerà mostrando “P01”. Ora spostarsi
con i tasti “TUN-/HOUR AL.1” (2) o “AL2 TUN+/MIN” (4) per
scegliere la cella di memoria. Premere il pulsante “MEM/TIME
SET” (1) per confermare, la stazione radio è ora salvata.
2. Per ascoltare una stazione radio salvata in memoria premere più
volte il tasto “MEM/TIME SET” (1) fino a visualizzare il numero
di memoria desiderato.
ITALIANO
AL.OFF” (5) per accendere la radio. La fre-
INSTALLAZIONE
Inserire la spina del cavo di alimentazione (12) in una presa di corrente
230V
Per mantenere in funzione l’orologio e la memorizzazione dell’orario
anche durante una momentanea man canza di energia elettrica,
inserire due batterie AAA (non fornite) nell’apposito vano (14) sul
retro dell’apparecchio seguendo le indicazioni di polarità stampate
sul mobile.
50Hz.
REGOLAZIONE OROLOGIO
1. Dopo aver collegato l’alimentazione le cifre del display lampeggeranno, oppure premere e tenere premuto il tasto “MEM/TIME
SET” (1) per circa 3 secondi;
2. Premere più volte il tasto “TUN-/HOUR AL1” (2) per cambiare
l’impostazione dell’ora;
3. Premere più volte il tasto “AL2 TUN+/MIN” (4) per cambiare
l’impostazione dei minuti.
4. Premere il tasto “MEM/TIME SET” (1) per confermare le impostazioni.
Nota: se durante la fase di regolazione (display lampeggiante) non
viene premuto nessun tasto per un certo tempo, la radio sveglia si
riporta automaticamente in standby (display fisso).
REGOLAZIONE VOLUME
Ruotare la manopola del VOLUME (9) per regolare il volume d’ascolto.
FUNZIONE SLEEP
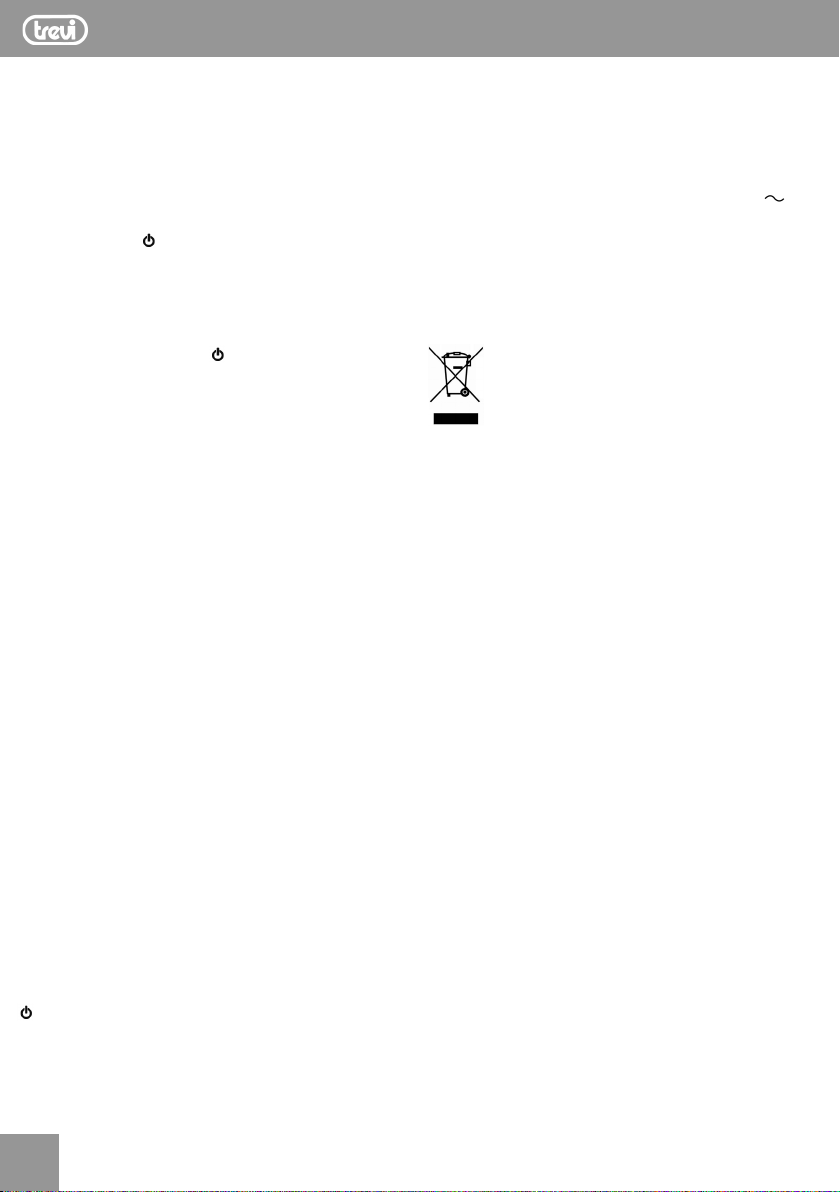
Premere il tasto SNOOZE DIM/SLEEP (3) per programmare lo spegnimento automatico della radio fino ad un massimo di 90 minuti.
Regolare il tempo di spegnimento premendo il tasto SNOOZE DIM/
SLEEP (3) più volte; inizialmente verrà mostrato il tempo massimo
di 90 minuti, premendo più volte il tasto questo tempo si abbasserà
a passi di 10 minuti fino alla comparsa della scritta OFF (funzione
SLEEP disattivata).
Quando la funzione SLEEP viene attivata, l’indicatore Sleep (6)
si accenderà.
SVEGLIA
Con questo apparecchio si possono impostare indipendentemente
fino a due sveglie. Prima di impostare l’ora della sveglia, assicurarsi
che l’orario sia impostato correttamente. La procedura per impostare
5
Page 6
RC 853 D FM ALARM CLOCK
ITALIANO
entrambi gli allarmi è la stessa.
Per entrambi gli allarmi è possibile scegliere la modalità di sveglia:
Modalità Buzzer: La sveglia emetterà il classico BEEP.
Modalità Radio: La sveglia si accenderà su una stazione Radio.
IMPOSTAZIONE SVEGLIA 1
1. Premere e tenere premuto il tasto “TUN-/HOUR AL1” (2) per
circa 2 secondi per visualizzare l’ora della sveglia;
2. Le cifre lampeggierano;
3. Premere il tasto “
della sveglia;
4. Premere più volte il tasto “TUN-/HOUR AL1” (2) per cambiare
l’impostazione dell’ora;
5. Premere più volte il tasto “AL2 TUN+/MIN” (4) per cambiare
l’impostazione dei minuti;
6. Premere una volta il tasto “
il display smetterà di lampeggiare e tornerà a mostrare l’ora
corrente.
Nota: questo attiverà il segnale acustico dell’allarme.
IMPOSTAZIONE SVEGLIA 2
Per impostare l’ora della sveglia 2, sostituire il pulsante “TUN-/
HOUR AL1” (2) con il pulsante “AL2 TUN+/MIN” (4).
AL.OFF” (5) una volta per impostare l’ora
AL.OFF” (5) per confermare;
ATTIVAZIONE DELL’ALLARME
1. Impostare l’ora della sveglia come descritto sopra;
ALLARME 1
2. Premere e tenere premuto per 3 secondi il pulsante “TUN-/HOUR
AL1” (2) finché le cifre non lampeggiano;
3. Premere il tasto “TUN-/HOUR AL1” (2) per passare da allarme
con buzzer (l’indicatore Alarm 1 BUZZER (10) acceso), allarme
con radio (l’indicatore Alarm 1 RADIO (11) acceso) o l’allarme
disattivato (nessun indicatore acceso).
ALLARME 2
2. Premere e tenere premuto per 3 secondi il pulsante “AL2 TUN+/
MIN” (4) finché le cifre non lampeggiano;
3. Premere il tasto “AL2 TUN+/MIN” (4) per passare da allarme
con buzzer (l’indicatore Alarm 2 BUZZER (7) acceso), allarme
con radio (l’indicatore Alarm 2 RADIO (8) acceso) o l’allarme
disattivato (nessun indicatore acceso).
- premere e tenere premuto il tasto “SNOOZE DIM/SLEEP” (3) per
2 secondi per cambiare la luminosità del display
Nota: la luminosità del display non viene modificata mentre si
imposta la radiosveglia e quando la sveglia è attivata.
SPECIFICHE TECNICHE
Alimentazione: .......................................................... 230V 50Hz
Batterie tampone(non fornite):
Gamma frequenza FM:
Dimensioni:
Consumo:
Peso:
Legislativo N° 49 del 14 Marzo 2014
“Attuazione della Direttiva 2012/19/UE sui rifiuti di apparecchiature elettriche ed elettroniche (RAEE)”
Il simbolo del cassonetto barrato riportato sull’apparecchiatura
indica che il prodotto alla fine della propria vita utile deve essere
raccolto separatamente dagli altri rifiuti. L’utente dovrà, pertanto,
conferire l’apparecchiatura integra dei componenti essenziali giunta a
fine vita agli idonei centri di raccolta differenziata dei rifiuti elettronici
ed elettrotecnici, oppure riconsegnarla al rivenditore al momento
dell’acquisto di nuova apparecchiatura di tipo equivalente, in ragione
di uno a uno, oppure 1 a zero per le apparecchiature aventi lato
maggiore inferiore a 25 cm. L’adeguata raccolta differenziata per
l’avvio successivo dell’apparecchiatura dimessa al riciclaggio, al
trattamento e allo smaltimento ambientale compatibile contribuisce
ad evitare possibili effetti negativi sull’ambiente e sulla salute e
favorisce il riciclo dei materiali di cui è composta l’apparecchiatura.
Lo smaltimento abusivo del prodotto da parte dell’utente compor ta
l’applicazione delle sanzioni amministrative di cui al D.Lgs n. Decreto
Legislativo N° 49 del 14 Marzo 2014.
..............................................................190*83*65 mm
................................................. ................................... 2W
............................................................................................ 343g
INFORMAZIONI AGLI UTENTI ai sensi del Decreto
.......................2 batterie “AAA” 1.5V
...............................................87.5-108MHz
SPEGNIMENTO DELLA SVEGLIA
Se desiderate spegnere momentaneamente la sveglia, premere il
pulsante “SNOOZE DIM/SLEEP” (3); l’interruzione dura 9 minuti,
trascorsi i quali la sveglia si riaccende. L’operazione può essere
ripetuta diverse volte entro un’ora di tempo.
Per spegnere definitivamente l’allarme-sveglia premere il tasto
AL.OFF (5).
L’allarme rimane comunque attivo per ripetersi 24 ore dopo.
FUNZIONE DIMMER
La funzione DIMMER vi permette di impostare la luminosità.
6
Page 7
RC 853 D FM ALARM CLOCK
ENGLISH
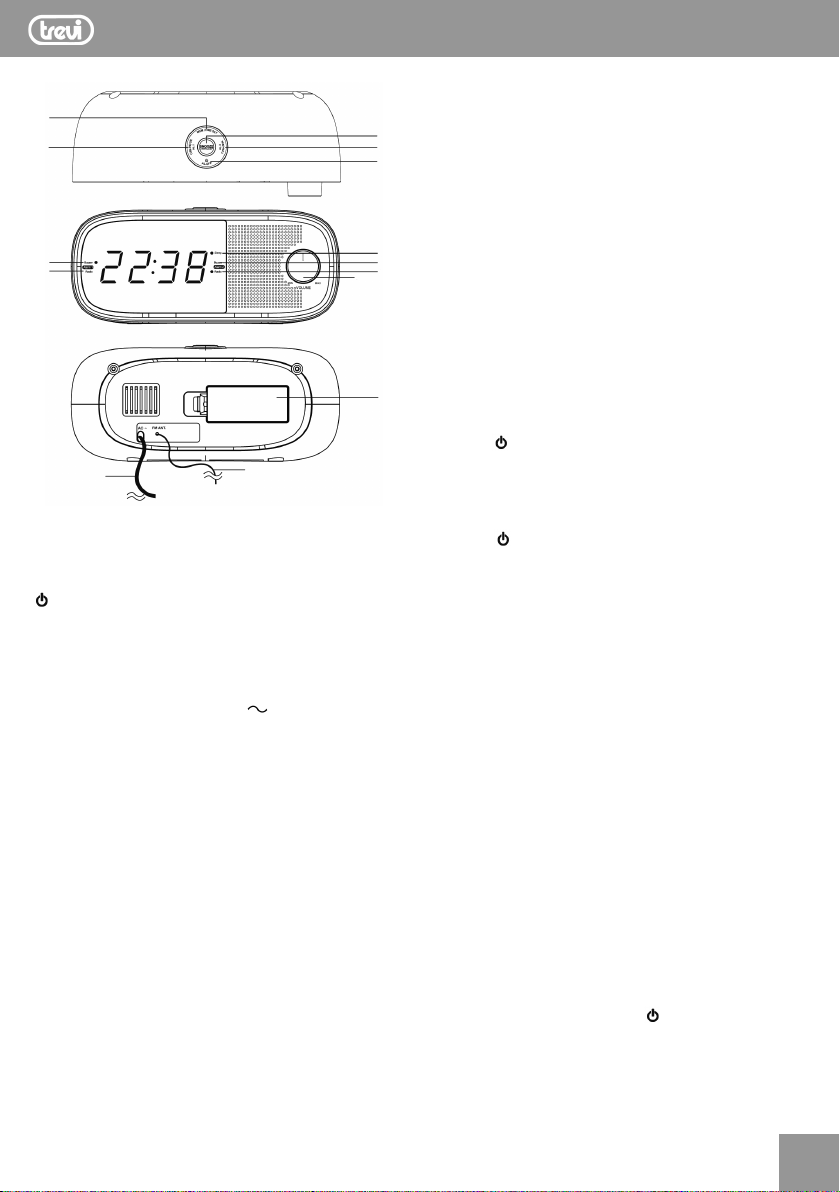
CONFIGURATION AND FUNCTIONS
1
2
10
11
12
1. MEM/TIME SET button
2. TUN-/HOUR AL1 button
3. SNOOZE DIM/SLEEP button
4. AL2 TUN+/MIN button
5.
AL.OFF button
6. Sleep indicator
7. Alarm 2 BUZZER indicator
13
8. Alarm 2 RADIO indicator
9. Volume dial
10. Alarm 1 BUZZER indicator
11. Alarm 1 RADIO indicator
12. Power cable
13. Radio Antenna
14. Battery compartment
3
4
5
6
7
8
9
14
PREPARATION FOR USE
This clock radio is AC powered 230V 50Hz.
Use two ‘AAA’ size batteries to keep accurate time during temporary
power interruption. Insert batteries by matching the polarity (+/-)
markings in the battery compar tment (14). Please replace all batteries at the same time with only new batteries. Remove all batteries
when the clock radio is not in use for extended periods of time.
Place the clock radio only on protected furniture. Avoid direct sunlight
and any area that is exposed to water or moisture.
Plug power cable (12) into electrical outlet with correct voltage.
Check rating labels on the radio. DO NOT PLUG THE RADIO INTO
AN ELECTRICAL OUTLET IF YOU ARE UNSURE OF THE VOLTAGE.
Unwind the radio antenna (13) on the back of the clock radio. Extend
and reposition the antenna for best radio reception.
and hold down “MEM/TIME SET” button (1) for approximately
3 seconds until the display flashes;
2. Press “TUN-/HOUR AL1” button (2) repeatedly to change the
hour setting;
3. Press “AL2 TUN+/MIN” button (4) repeatedly to change the
minute setting;
4. Press “MEM/TIME SET” button (1) to confirm the time.
SETTING THE ALARM TIME
This clock radio has dual alarms that can be set and used concurrently. The procedure to set both alarms are the same. Both alarms
can either sound the buzzer or wake up to radio.
Follow the instructions below to set alarm time 1.
For alarm time 2, substitute “TUN-/HOUR AL1” button (2) with
“AL2 TUN+/MIN” button (4).
1. Press and hold down “TUN-/HOUR AL1” button (2) for approximately 2 seconds to view alarm time;
2. The digits will flash;
3. Press “
4. Press “TUN-/HOUR AL.1” button (2) repeatedly to change the
hour setting;
5. Press “AL2 TUN+/MIN” button (4) repeatedly to change the
minute setting;
6. Press “
stop flashing.
Note: This will turn on the alarm buzzer.
AL.OFF” button (5) once to set alarm time;
AL.OFF” button (5) once to confirm and digits will
ACTIVATING THE ALARM 1
1. Set alarm time as above. Once the alarm time is set, press
“TUN-/HOUR AL.1” button (2) once to view alarm time;
2. Press and hold down “TUN-/HOUR AL.1” button (2) until the
digit flash, approximately 3 seconds;
3. Press “TUN-/HOUR AL.1” button (2) to change between alarm
with buzzer (BUZZER Indicator (10) will be on), alarm with radio
(RADIO Indicator (11) will be on), or alarm off (no indicators).
ACTIVATING THE ALARM 2
1. Set alarm time as above. Once the alarm time is set, press “AL2
TUN+/MIN” button (4) once to view alarm time;
2. Press and hold down “AL2 TUN+/MIN” button (4) until the digit
flash, approximately 3 seconds;
3. Press “AL2 TUN+/MIN” button (4) to change between alarm
with buzzer (BUZZER Indicator (7) will be on), alarm with radio
(RADIO Indicator (8) will be on), or alarm off (no indicators).
CLOCK and ALARM CLOCK OPERATION
Note: The time and alarm times can only be set when the radio
is turned off.
SETTING THE TIME
1. The digits will flash after connecting power to the radio, or press
WHEN THE ALARM SOUNDS
1. When the alarm sounds, press “ AL.OFF” button (5) to turn
off alarm or press “SNOOZE DIM/SLEEP” button (3) for snooze;
2. Once in snooze, alarm will sound again after 9 minutes.
7
Page 8
RC 853 D FM ALARM CLOCK
ENGLISH
DISPLAY BRIGHTNESS
When the radio is off and the current time showing, press and hold
down “SNOOZE DIM/SLEEP” button (3) for 2 seconds to change
the brightness of the display between high and low.
Note: Do not change the display brightness while setting the clock
radio and when the alarm is on.
RADIO OPERATIONS
General Operations
1. Press and hold down “
and off. The radio station frequency will appear on the display;
2. Press “TUN-/HOUR AL1” button (2) or “AL2 TUN+/MIN”
button (4) to change radio frequency, or press and hold down
“TUN-/HOUR AL1” button (2) or “AL2 TUN+/MIN” button (4)
for approximately 3 seconds to auto scan for the next available
station;
3. Turn “VOLUME” dial (9) to adjust volume level;
4. Radio will show the time in a few seconds after changing frequency. Press “TUN-/HOUR AL.1” button (2) or “AL2 TUN+/
MIN” button (4) to view radio frequency.
Pre-set Station Memory
1. The radio can store up to 10 FM stations.
2. To store a station in memory, tune to the desired radio station.
Press and hold down “MEM/TIME SET” button (1) and a number
starting with “P” on the display will flash. This “P” number
represent one of the ten memory stations. Press “TUN-/HOUR
AL1” button (2) or “AL2 TUN+/MIN” button (4) to change the
station number. Press “MEM/TIME SET” button (1) to confirm.
3. To recall a pre-set station, turn the radio on. Press “MEM/TIME
SET” button (1) repeatedly until station number is found. The
station frequency will be display momentarily.
AL.OFF” button (5) to turn radio on
SPECIFICATIONS
Power Source: ..........................................................230V 50Hz
Back-up Batteries:
Frequency Range:
Dimensions:
Power Consumption:
Weight:
.........................................................................................343g
PRODUCT.
The symbol shown on the equipment indicates that waste must be
disposed of in “separate collection” and so the product must not
be disposed of together with urban waste.
The user must take the product to special “separate waste collection
centres” provided by local government, or deliver it to the retailer
against the purchase of a new product.
Separate collection of waste and subsequent treatment, recycling
and disposal operations promotes the production of equipment
with recycled materials and limits negative effects on the environment
and on health caused by improper handling of waste.
Illegal disposal of the product leads to the enforcement of administrative penalties.
........................................ 2 batteries “AAA” 1.5V
...................................................... 87.5-108MHz
............................................................ 190*83*65 mm
.................................................................... 2W
PRECAUTIONS FOR CORRECT DISPOSAL OF THE
SLEEP MODE
Press the SNOOZE DIM/SLEEP button (3) to program the radio to
turn off automatically for up to 90 minutes.
Set the switch-off time by pressing the SNOOZE DIM/SLEEP button (3) repeatedly; initially the maximum time of 90 minutes will
be shown, by pressing the button several times the time will be
lowered in steps of 10 minutes until the word OFF appears (SLEEP
function deactivated).
When the SLEEP function is activated, the Sleep indicator (6)
will light up.
8
Page 9
RC 853 D FM ALARM CLOCK
FRANÇAISE
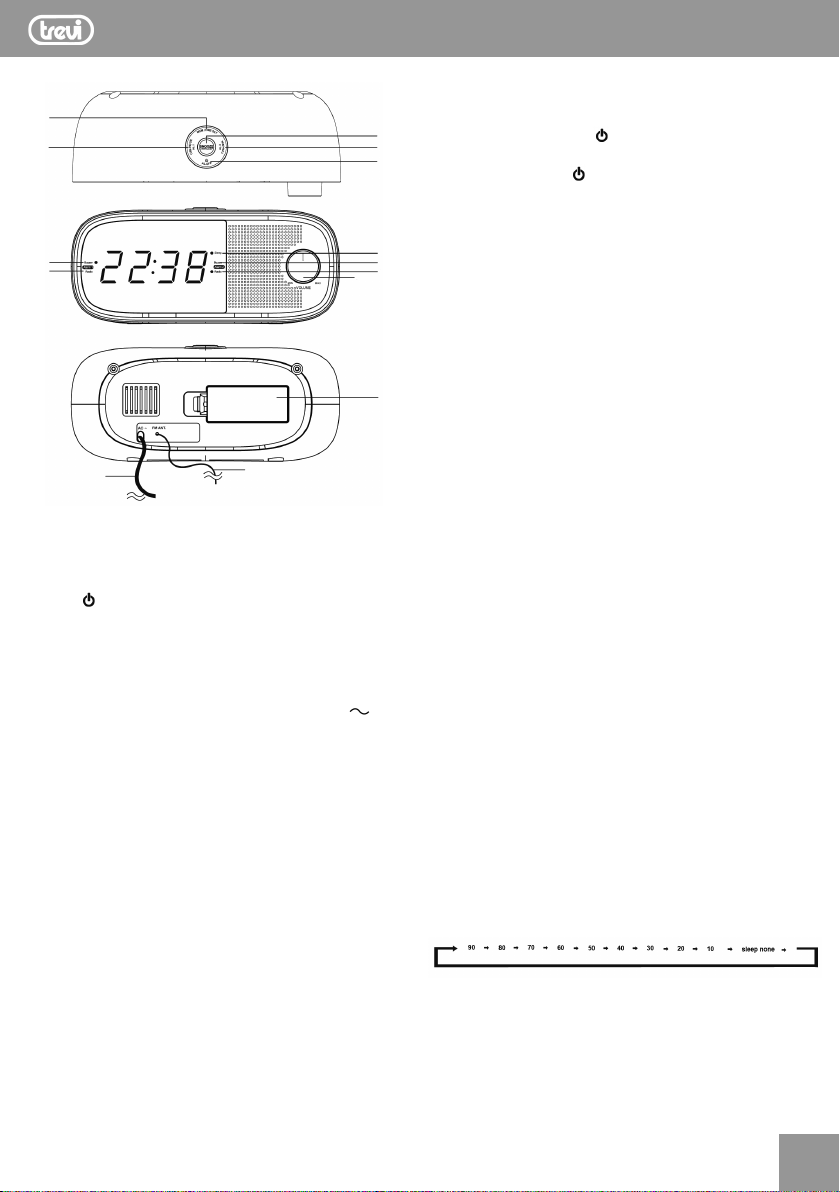
CONFIGURATION ET FONCTIONS
1
2
10
11
12
1. Bouton MEM/TIME SET
2. Bouton TUN-/HOUR AL1
3. Bouton SNOOZE DIM/SLEEP
4. Bouton AL2 TUN+/MIN
5. Bouton
6. Indicateur Sleep
7. Indicateur Alarm 2 BUZZER
AL.OFF
8. Indicateur Alarm 2 RADIO
9. Volume
10. Indicateur Alarm 1 BUZZER
11. Indicateur Alarm 1 RADIO
12. Câble d’alimentation
13. Antenne radio
14. Compartiment de la batterie
13
RADIO
Déroulez le câble d’antenne (13) à l’arrière du radio-réveil. Étendez
et positionnez l’antenne pour obtenir la meilleure réception radio.
3
1. Appuyez sur le bouton “
4
5
6
7
8
9
14
La fréquence de la station de radio apparaîtra sur l’affichage.
Maintenez la touche “ AL.OFF” (5) enfoncée pendant quelques
secondes pour éteindre la radio;
2. Syntonisez votre station favorite en sélectionnant la bonne
fréquence avec les touches “TUN-/HOUR AL1” (2) ou “AL2
TUN+/MIN” (4). Pendant l’opération, la fréquence accordée
est affichée sur l’affichage.
3. En appuyant sur les touches “TUN-/HOUR AL1” (2) ou “AL2 TUN
+/MIN” (4) pendant 3 secondes, la radio balaie la fréquence
jusqu’à ce qu’elle s’arrête à la première station de radio reçue.
4. Après avoir affiché la fréquence pendant quelques secondes,
l’appareil revient pour afficher l’heure. Appuyez sur la touche
“TUN-/HOUR AL1” (2) ou “AL2 TUN+/MIN” (4) pour afficher
la fréquence radio.
Écoute de stations de radio et de mémoriser une station de radio
Et possible de mémoriser jusqùà 10 stations de radio sur la bande FM:
1. Pour enregistrer une station de radio, syntonisez la station de
radio désirée en appuyant longuement sur le bouton “MEM/TIME
SET” (1), jusqu’à ce que l’affichage clignote indiquant “P01”.
Maintenant, déplacez avec les touches “TUN-/HOUR AL.1” (2) ou
“AL2 TUN+/MIN” (4) pour choisir la cellule mémoire. Appuyez
sur la touche “MEM/TIME SET” (1) pour confirmer, la station
de radio est maintenant sauvegardée.
2. Pour écouter une station de radio sauvegardée en mémoire,
appuyez plusieurs fois sur la touche “MEM/TIME SET” (1) jusqu’à
ce que le numéro de mémoire souhaité s’affiche.
AL.OFF” (5) pour allumer la radio.
INSTALLATION
Branchez le câble d’alimentation (12) à une prise 230V 50Hz.
Pour garder l’horloge en marche et temps de stockage en cas
de panne de courant momentanée, insérez deux piles AAA (non
fournies) dans le compartiment de la batterie (14) sur le fond des
signes de polarité suivants imprimé sur le Mobile.
RÉGLAGE DE L’HORLOGE
1. Après avoir connecté l’alimentation, les chiffres de l’affichage
clignotent ou appuyez sur le bouton “MEM/TIME SET” (1) pendant
environ 3 secondes;
2. Appuyer plusieurs fois sur la touche “TUN-/HOUR AL1” (2) pour
changer le réglage de l’heure;
3. Appuyez plusieurs fois sur le bouton “AL2 TUN+/MIN” (4) pour
modifier le réglage des minutes.
4. Appuyez sur le bouton “MEM/TIME SET” (1) pour confirmer
les réglages.
Remarque: Si pendant la phase de réglage (affichage clignotant)
ne pas appuyer sur n’importe quelle touche pendant un certain
temps, le radio-réveil revient automatiquement au mode (affichage
fixe) veille.
RÉGLAGE DU VOLUME
Tournez le bouton VOLUME (9) pour régler le volume d’écoute.
SLEEP
Appuyez sur le bouton SNOOZE DIM/SLEEP (3) pour programmer
la radio pour qu’elle s’éteigne automatiquement pendant 90
minutes maximum.
Réglez l’heure d’arrêt en appuyant plusieurs fois sur le bouton
SNOOZE DIM/SLEEP (3); Au départ, le temps maximum de 90
minutes sera affiché, en appuyant plusieurs fois sur le bouton, ce
temps sera abaissé par pas de 10 minutes jusqu’à ce que le mot
OFF apparaisse (fonction SLEEP désactivée).
Lorsque la fonction SLEEP est activée, l’indicateur de veille (6)
s’allume.
ALARME
Avec cette unité, jusqu’à deux alarmes peuvent être réglées
9
Page 10
RC 853 D FM ALARM CLOCK
FRANÇAISE
indépendamment. Avant de régler l’heure de l’alarme, assurez-vous
que l’heure est réglée correctement. La procédure de réglage des
deux alarmes est la même.
Pour les deux alarmes, il est possible de choisir le mode d’alarme:
Mode Buzzer: L’alarme retentira sur le BEEP classique.
Mode radio: L’alarme s’allume sur une station de radio.
RÉGLAGE DE L’ALARME 1
1. Appuyez sur le bouton “TUN-/HOUR AL1” (2) et maintenez-le
enfoncé pendant environ 2 secondes pour afficher l’heure de
l’alarme;
2. Les chiffres clignotent;
3. Appuyez une fois sur la touche “
l’heure de l’alarme;
4. Appuyez plusieurs fois sur la touche “TUN-/HOUR AL1” (2) pour
changer le réglage de l’heure;
5. Appuyez plusieurs fois sur la touche “AL2 TUN+/MIN” (4) pour
modifier le réglage des minutes;
6. Appuyez une fois sur la touche “
l’affichage cessera de clignoter et retournera pour afficher
l’heure actuelle.
Note: ceci activera le signal acoustique d’alarme.
RÉGLAGE DE L’ALARME 2
Pour régler l’heure d’alarme 2, remplacer le bouton “TUN-/HOUR
AL1” (2) par le bouton “AL2 TUN+/MIN” (4).
AL.OFF” (5) pour régler
AL.OFF” (5) pour confirmer;
ACTIVATION DE L’ALARME
1. Réglez l’heure de l’alarme comme décrit ci-dessus;
ALARME 1
2. Appuyez sur le bouton “TUN-/HOUR AL1” (2) et maintenez-le
enfoncé pendant 3 secondes jusqu’à ce que les chiffres clignotent;
3. Appuyer sur la touche “TUN-/HOUR AL1” (2) pour passer de
l’alarme à l’avertisseur sonore (témoin d’alarme 1 BUZZER (10)
allumé), alarme avec radio (indicateur RADIO alarme 1 (11)
allumé) ou l’alarme est désactivée (aucun indicateur allumé).
ALARME 2
2. Appuyez sur le bouton “AL2 TUN+/MIN” (4) et maintenez-le
enfoncé pendant 3 secondes jusqu’à ce que les chiffres clignotent;
3. Appuyer sur la touche “AL2 TUN+/MIN” (4) pour passer de
l’alarme à l’avertisseur sonore (voyant d’alarme 2 BUZZER
allumé), alarme avec radio (l’indicateur RADIO alarme 2 (8)
allumé) ou alarme désactivée (aucun indicateur allumé).
FONCTION DIMMER
La fonction DIMMER vous permet de régler la luminosité.
- appuyer et maintenir le bouton “SNOOZE DIM/SLEEP ” (3) pendant
2 secondes pour changer la luminosité de l’affichage
Remarque: La luminosité de l’affichage n’est pas modifiée lors du
réglage du radio-réveil et lorsque l’alarme est activée.
CARACTERISTIQUES TECHNIQUES
Alimentation: .........................................................230V 50Hz
Les piles de sauvegarde (non inclus):
Gamme de fréquence FM:
Taille:
.........................................................................190*83*65mm
Consommation:
Poids: .
DU PRODUIT.
Le symbole figurant sur l’appareil indique que le produit fait l’objet
d’une “collecte séparée“. C’est pourquoi, le produit ne doit pas être
éliminé avec les déchets urbains.
L’utilisateur doit remettre le produit auprès de “décharges spécialisées de collecte séparée“ prévues par les autorités locales, ou
bien le rendre au revendeur quand il achètera un nouvel appareil
équivalent.
La collecte séparée du produit et les opérations successives de
traitement, recyclage et élimination favorisent la production d’appareils composés par des matériaux recyclés ainsi que permettent
d’éviter des effets négatifs sur l’environnement et sur la santé des
personnes suite à une gestion impropre du déchet.
Toute élimination abusive du produit entraîne l’application de
sanctions administratives.
............................................................................ 2W
........................................................................................ 343g
RECOMMANDATIONS POUR L’ELIMINATION CORRECTE
.........................................87.5-108MHz
............ 2 piles “AAA” 1.5V
ARRET DE L’ALARME
Si vous souhaitez désactiver temporairement l’alarme, appuyez sur
le bouton “SNOOZE DIM/SLEEP” (3); l’interruption dure 9 minutes,
après quoi l’alarme est à nouveau activée. L’opération peut être
répétée plusieurs fois en une heure.
Pour éteindre l’alarme en permanence, appuyez sur le bouton
AL.OFF (5).
L’alarme est toujours active pour se répéter 24 heures plus tard.
10
Page 11
RC 853 D FM ALARM CLOCK
DEUTSCH
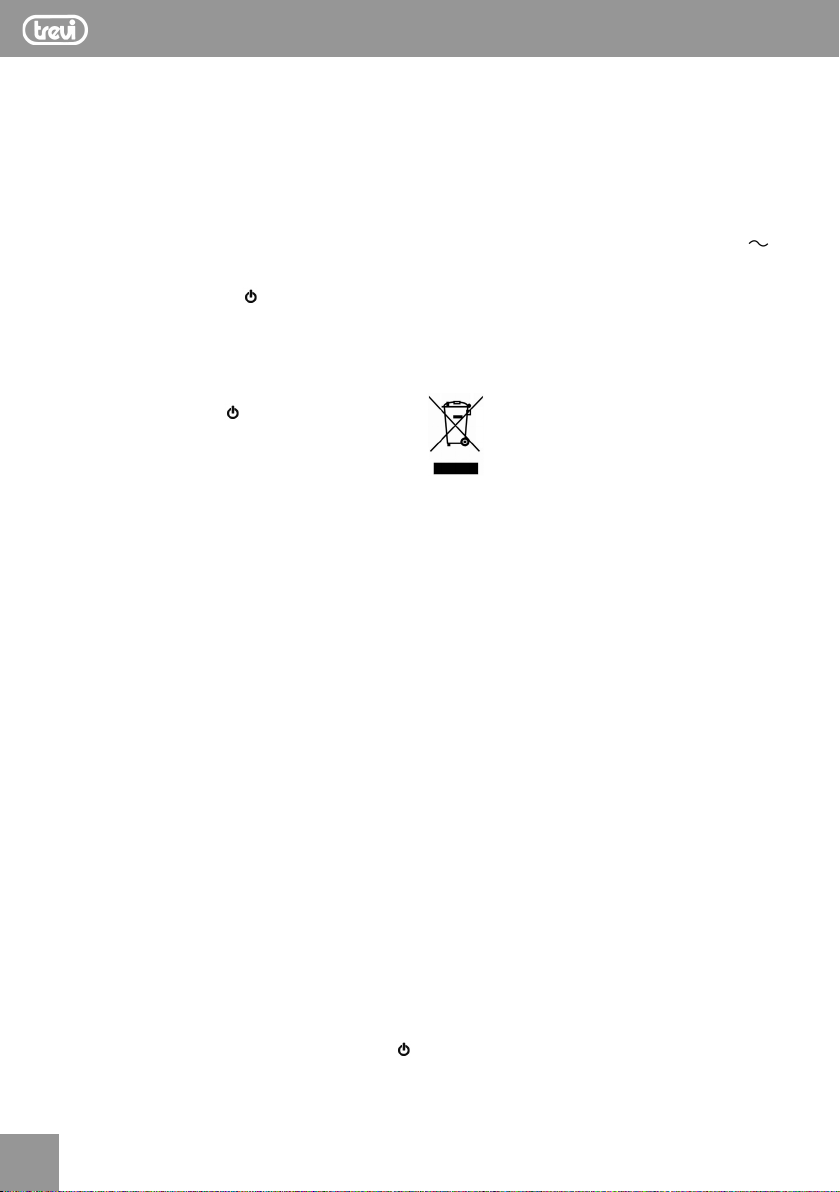
KONFIGURATION UND FUNKTIONEN
1
2
10
11
12
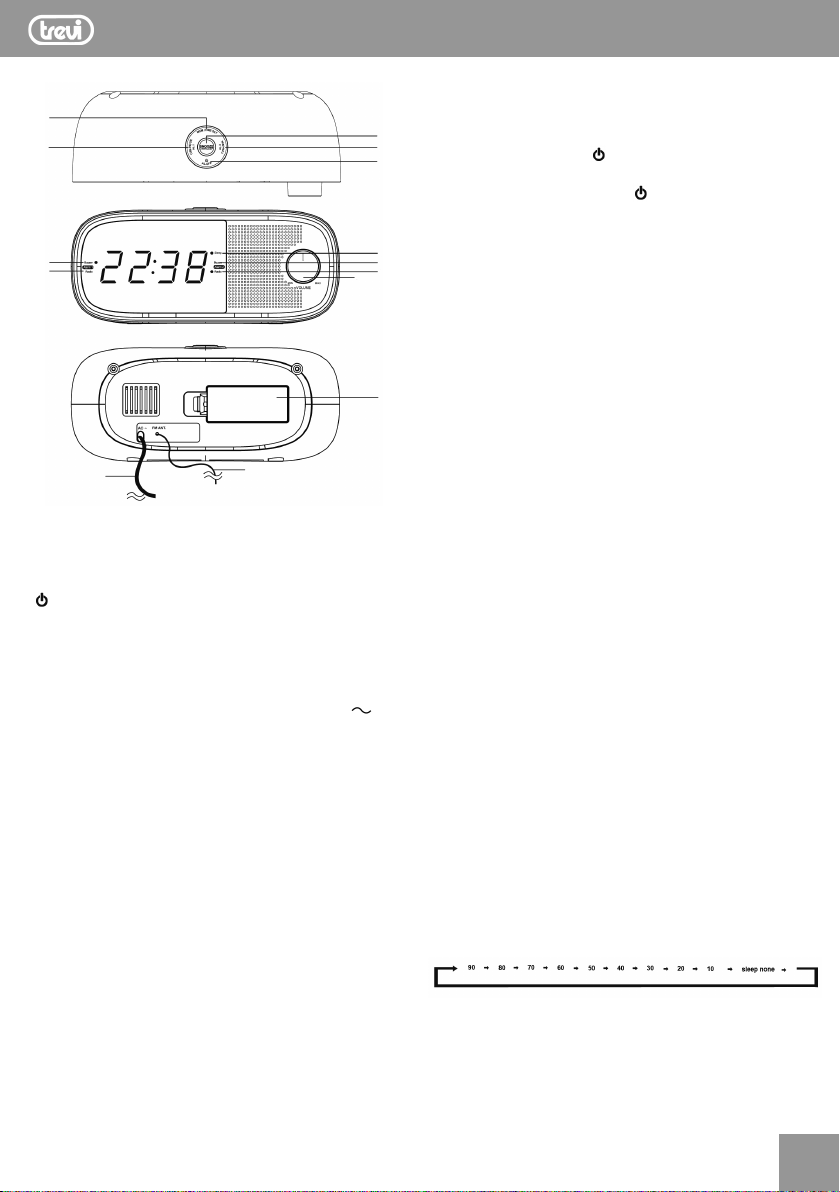
1. MEM/TIME SET taste
2. TUN-/HOUR AL1 taste
3. SNOOZE DIM/SLEEP taste
4. AL2 TUN+/MIN taste
5.
AL.OFF taste
6. Sleep Indikator
7. Alarm 2 BUZZER Indikator
13
8. Alarm 2 RADIO Indikator
9. Lautstärkeregler
10. Alarm 1 BUZZER Indikator
11. Alarm 1 RADIO Indikator
12. Netzkabel
13. Radioantenne
14. Batteriefach
3
4
5
6
7
8
9
14
INSTALLATION
Schließen Sie das Netzkabel (12) in eine Steckdose 230V 50Hz.
Um die Uhr läuft und Lagerzeit bei Stromunterbrechung zu halten,
legen Sie zwei AAA-Batterien (nicht enthalten) in das Batteriefach
(14) an der Unterseite der folgenden Symptome der Polarität am
Mobile gedruckt.
UHR EINSTELLEN
1. Nach dem Anschließen der Stromversorgung blinken die Ziffern
auf dem Display, oder halten Sie die Taste “MEM/TIME SET” (1)
etwa 3 Sekunden lang gedrückt.
2. Drücken Sie mehrmals die Taste “TUN-/HOUR AL1” (2), um die
Zeiteinstellung zu ändern.
3. Drücken Sie mehrmals die Taste “AL2 TUN+/MIN” (4), um die
Minuteneinstellung zu ändern.
4. Drücken Sie die Taste “MEM/TIME SET” (1), um die Einstellungen
zu bestätigen.
Hinweis: Wenn während der Anpassungsphase (blinkende Anzeige)
nicht drücken eine beliebige Taste für eine Weile, kehrt die Uhr
automatisch in den Radio-Modus (feste Anzeige) vor.
RADIO
Wickeln Sie das Antennenkabel (13) auf der Rückseite des Radioweckers ab. Verlängern und positionieren Sie die Antenne, um den
besten Radioempfang zu erhalten.
1. Drücken Sie die Taste “
schalten. Die Frequenz des Radiosenders wird auf dem Display
angezeigt. Halten Sie die Taste “
lang gedrückt, um das Radio auszuschalten.
2. Wählen Sie mit den Tasten “TUN-/HOUR AL1” (2) oder “AL2
TUN+/MIN” (4) die gewünschte Frequenz aus. Während des
Vorgangs wird die eingestellte Frequenz auf dem Display angezeigt.
3. Durch Drücken der Tasten “TUN-/HOUR AL1” (2) oder “AL2
TUN+/MIN” (4) für 3 Sekunden scannt das Radio die Frequenz
bis zum ersten empfangenen Radiosender.
4. Nach der Anzeige der Frequenz für einige Sekunden kehrt das
Gerät zur Anzeige der Uhrzeit zurück. Drücken Sie die Taste
“TUN-/HOUR AL.1” (2) oder “AL.2 TUN+/MIN” (4), um die
Radiofrequenz anzuzeigen.
Hören von Radiosendern und speichern Sie einen Radiosender
Sie können bis zu 10 FM-Radiosender speichern:
1. Um einen Radiosender zu speichern, stellen Sie durch langes
Drücken der Taste “MEM/TIME SET” (1) den gewünschten
Radiosender ein, bis das Display mit “P01” blinkt. Bewegen
Sie sich nun mit den Tasten “TUN-/HOUR AL.1” (2) oder “AL2
TUN+/MIN” (4) um die Speicherzelle auszuwählen. Drücken Sie
die Taste “MEM/TIME SET” (1) zur Bestätigung, der Radiosender
ist jetzt gespeichert.
2. Um einen gespeicherten Radiosender anzuhören, drücken Sie
mehrmals die Taste “MEM/TIME SET” (1), bis die gewünschte
Speichernummer angezeigt wird.
AL.OFF” (5), um das Radio einzu-
AL.OFF” (5) einige Sekunden
LAUTSTÄRKEREGELUNG
Drehen Sie den VOLUME-Knopf (9), um die Lautstärke einzustellen
SLEEP
Drücken Sie die Taste SNOOZE DIM/SLEEP (3), um das Radio
so einzustellen, dass es sich automatisch für bis zu 90 Minuten
ausschaltet.
Stellen Sie die Ausschaltzeit durch wiederholtes Drücken der
SNOOZE DIM/SLEEP-Taste (3) ein; Zunächst wird die maximale
Zeit von 90 Minuten angezeigt, durch mehrmaliges Drücken der
Taste wird diese Zeit in 10-Minuten-Schritten verringert, bis das
Wort OFF erscheint (SLEEP-Funktion deaktiviert).
Wenn die SLEEP-Funktion aktiviert ist, leuchtet die Sleep-Anzeige
(6) auf.
11
Page 12
RC 853 D FM ALARM CLOCK
DEUTSCH
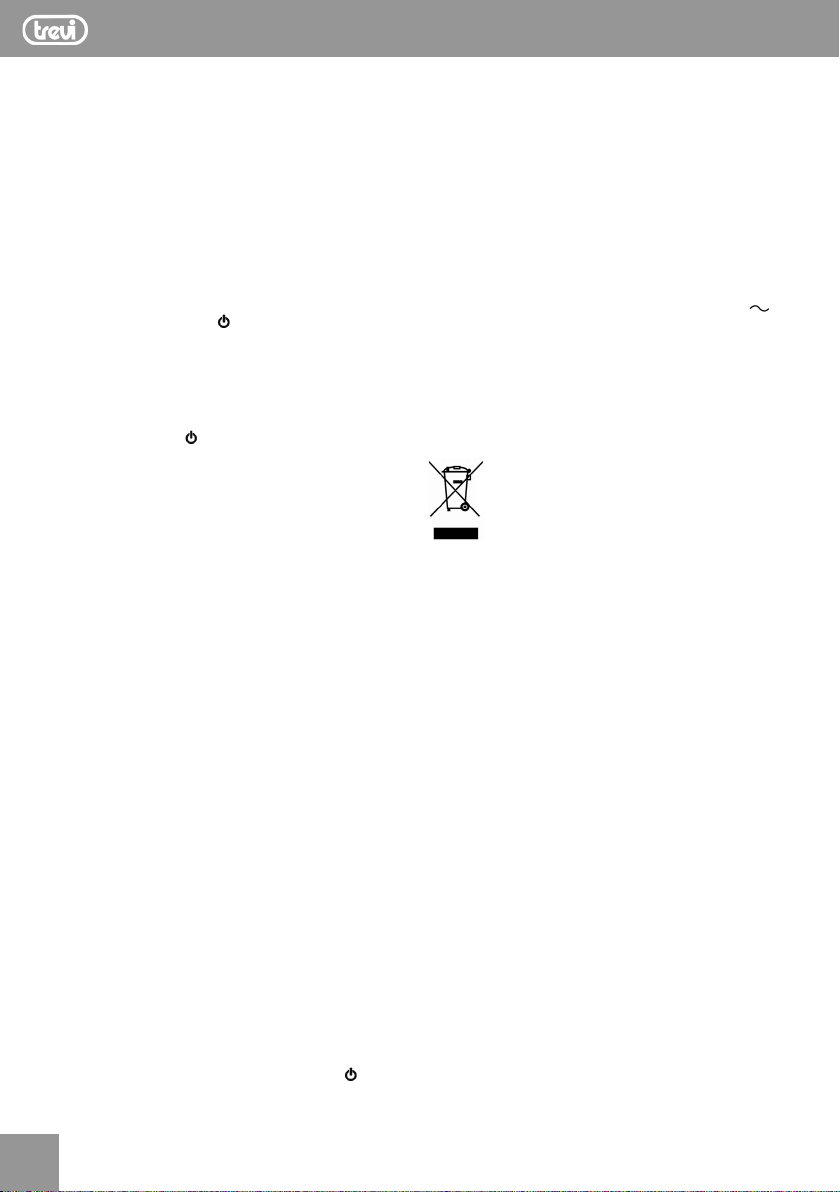
WECKDIENST
Mit dieser Einheit können bis zu zwei Alarme unabhängig voneinander eingestellt werden. Stellen Sie vor dem Einstellen der Weckzeit
sicher, dass die Uhrzeit richtig eingestellt ist. Die Vorgehensweise
zum Einstellen beider Alarme ist identisch.
Für beide Alarme kann der Alarmmodus gewählt werden:
Buzzer Mode: Der Alarm ertönt als klassischer BEEP.
Radiomodus: Der Alarm wird auf einem Radiosender aufleuchten.
ALARMEINSTELLUNG 1
1. Halten Sie die Taste “TUN-/HOUR AL1” (2) etwa 2 Sekunden
lang gedrückt, um die Weckzeit anzuzeigen.
2. Die Figuren werden blinken;
3. Drücken Sie einmal die Taste “
einzustellen;
4. Drücken Sie mehrmals die Taste “TUN-/HOUR AL1” (2), um die
Zeiteinstellung zu ändern.
5. Drücken Sie mehrmals die Taste “AL2 TUN+/MIN” (4), um die
Minuteneinstellung zu ändern.
6. Drücken Sie einmal die “
Das Display hört auf zu blinken und kehr t zur Anzeige der aktuellen
Uhrzeit zurück.
Hinweis: Dadurch wird das akustische Alarmsignal aktiviert.
ALARMEINSTELLUNG 2
Um die Weckzeit 2 einzustellen, ersetzen Sie die Taste “TUN-/HOUR
AL1” (2) durch die Taste “AL2 TUN+/MIN” (4).
AL.OFF” (5), um die Weckzeit
AL.OFF” Taste (5) zur Bestätigung;
AKTIVIERUNG DES ALARMS
1. Stellen Sie die Weckzeit wie oben beschrieben ein;
ALARM 1
2. Halten Sie die Taste “TUN-/HOUR AL1” (2) 3 Sekunden lang
gedrückt, bis die Ziffern blinken.
3. Drücken Sie die Taste “TUN-/HOUR AL1” (2), um von Alarm mit
Summer (Alarm 1 SUMMER Anzeige (10) an), Alarm mit Radio
(Alarm 1 Anzeige RADIO (11) an) oder zu schalten der Alarm
ist deaktiviert (keine Anzeige leuchtet).
ALARM 2
2. Halten Sie die Taste “AL2 TUN+/MIN” (4) 3 Sekunden lang
gedrückt, bis die Ziffern blinken.
3. Drücken Sie die Taste “AL2 TUN+/MIN” (4), um von Alarm mit
Summer (die Anzeige für Alarm 2 BUZZER (7) an), Alarm mit
Radio (die Anzeige für Alarm 2 RADIO (8) leuchtet) oder Alarm
deaktiviert (keine Anzeige leuchtet).
Der Alarm ist immer noch aktiv, um sich 24 Stunden später zu
wiederholen.
DIMMER FUNKTION
Mit der DIMMER-Funktion können Sie die Helligkeit einstellen.
- Halten Sie die Taste “SNOOZE DIM/SLEEP” (3) 2 Sekunden lang
gedrückt, um die Helligkeit des Displays zu ändern
Hinweis: Die Helligkeit des Displays wird beim Einstellen des
Radioweckers und bei aktiviertem Alarm nicht geändert.
TECHNISCHE DATEN
Spannungsversorgung: ....................................... 230V 50Hz
Backup-Batterien (nicht enthalten):
FM-Frequenzbereich: ............................................87.5-108MHz
Größe:
........................................................................190*83*65mm
Verbrauch:
Gewicht:
DES PRODUKTS.
Das auf dem Gerät angebrachte Symbol weist darauf hin, dass
das Altgerät “getrennt zu sammeln” ist und das Produkt daher
nicht zusammen mit dem Gemeindeabfall entsorgt werden darf.
Der Benutzer muss das Produkt zu den entsprechenden, von der
Gemeindeverwaltung eingerichteten “Wer tstoffsammelstellen” bringen oder dem Händler beim Kauf eines neuen Produkts übergeben.
Die getrennte Müllsammlung und anschließende Aufbereitung, Wiederverwer tung und Entsorgung fördern die Herstellung von Geräten
unter Verwendung wiederverwerteter Materialien und vermindern
die negativen Auswirkungen auf die Umwelt und Gesundheit in
Folge einer falschen Müllverwaltung.
Die widerrechtliche Entsorgung des Produkts führt zur Auferlegung
von Verwaltungsstrafen.
..................................................................................... 2W
......................................................................................343g
HINWEISE ZUR ORDNUNGSGEMÄßEN ENTSORGUNG
.......... 2 “AAA”-Batterien 1,5V
ALARM AUSSCHALTEN
Wenn Sie den Alarm vorübergehend ausschalten möchten, drücken
Sie die Taste “SNOOZE DIM/SLEEP” (3). Die Unterbrechung dauer t
9 Minuten. Danach wird der Alarm wieder eingeschaltet. Die Operation kann mehrmals innerhalb einer Stunde wiederholt werden.
Um den Alarm dauerhaft zu löschen, drücken Sie die
Taste (5).
12
AL.OFF-
Page 13
RC 853 D FM ALARM CLOCK
ESPAÑOL
CONFIGURACIÓN Y FUNCIONES
1
2
10
11
12
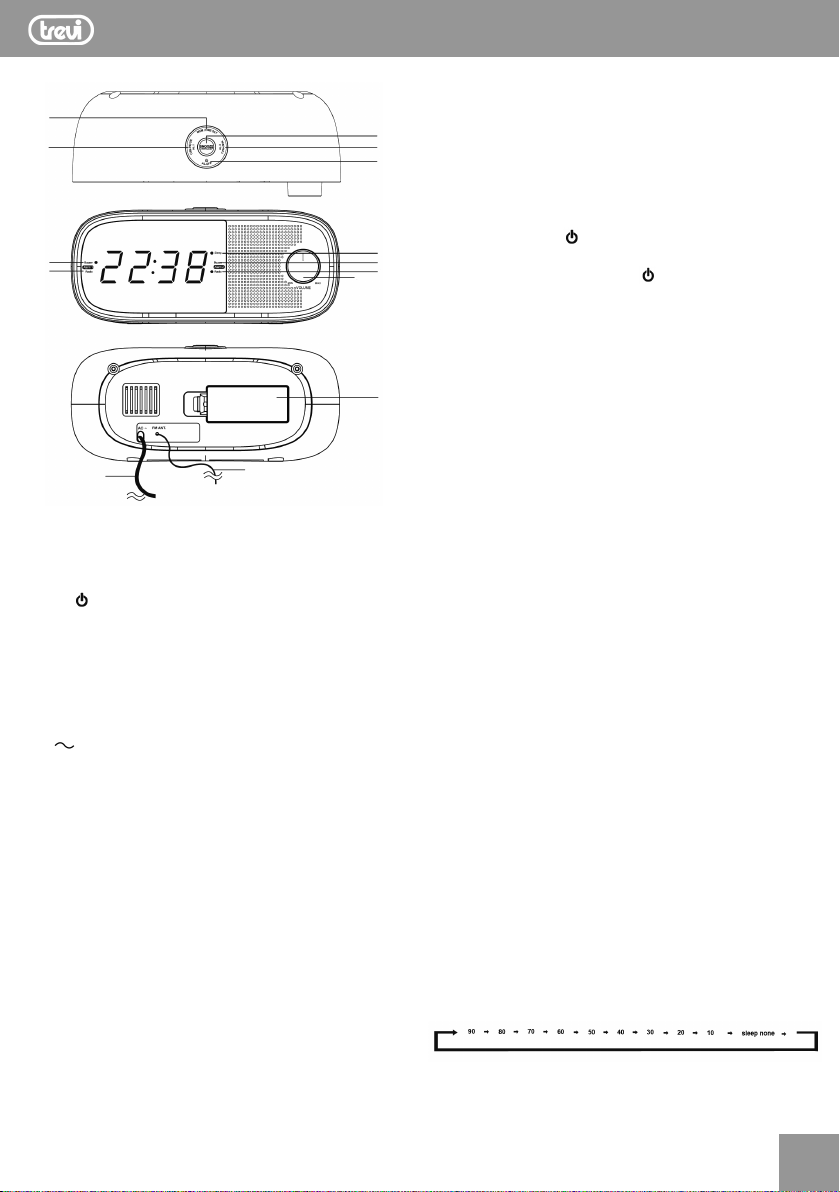
1. Botón MEM/TIME SET
2. Botón TUN-/HOUR AL1
3. Botón SNOOZE DIM/SLEEP
4. Botón AL2 TUN+/MIN
5. Botón
6. Indicadores Sleep
7. Indicadores Alarm 2 BUZZER
8. Indicadores Alarm 2 RADIO
AL.OFF
13
9. Volumen
10. Indicadores Alarm 1 BUZZER
11. Indicadores Alarm 1 RADIO
12. Cable de alimentación
13. Antena de radio
14. Compartimiento de la
batería
3
4
5
6
7
8
9
14
INSTALACIÓN
Conecte el cable de alimentación (12) a una toma de corriente de
230V 50Hz.
Para mantener en funcionamiento el reloj y el tiempo de almacenamiento durante un corte momentáneo de alimentación, inserte
dos pilas AAA (no incluidas) en el compartimiento de la batería
(14) en la parte inferior de los siguientes signos de polaridad
‘impresa en la Mobile.
AJUSTE DE RELOJ
1. Después de conectar la fuente de alimentación, los dígitos de la
pantalla parpadearán, o presione y mantenga presionado el botón
“MEM/TIME SET” (1) durante aproximadamente 3 segundos;
2. Presione la tecla “TUN-/HOUR AL1” (2) varias veces para cambiar
la configuración de la hora;
3. Presione el botón “AL2 TUN+/MIN” (4) varias veces para cambiar
la configuración de los minutos;
4. Presione el botón “MEM/TIME SET” (1) para confirmar la
configuración.
Nota: Si durante la fase de ajuste (pantalla parpadea) no presione
ningún botón durante un cierto tiempo, el radio reloj vuelve automáticamente al modo (pantalla fija) de espera.
RADIO
Desenrolle el cable de la antena (13) en la parte posterior de la
radio reloj. Extienda y coloque la antena para obtener la mejor
recepción de radio.
1. Presione el botón “
frecuencia de la estación de radio aparecerá en la pantalla.
Mantenga presionada la tecla “ AL.OFF” (5) durante unos
segundos para apagar la radio;
2. Sintonice su estación favorita seleccionando la frecuencia
correcta con los botones “TUN-/HOUR AL1” (2) o “AL2 TUN+/
MIN” (4). Durante la operación, la frecuencia ajustada se muestra
en la pantalla.
3. Al presionar las teclas “TUN-/HOUR AL1” (2) o “AL2 TUN+/
MIN” (4) durante 3 segundos, la radio escanea la frecuencia
hasta que se detiene en la primera estación de radio recibida.
4. Después de mostrar la frecuencia durante unos segundos, el
dispositivo volverá a mostrar la hora. Presione el botón “TUN-/
HOUR AL.1” (2) o “AL.2 TUN+/MIN” (4) para visualizar la
frecuencia de radio.
Escucha de emisoras preestablecidas y almacenar una emisora
de radio
Es posible almacenar hasta 10 estaciones de radio en la banda FM:
1. Para guardar una estación de radio, sintonice la estación de radio
deseada presionando prolongadamente el botón “MEM/TIME
SET” (1), hasta que la pantalla muestre “P01”. Ahora mueva con
las teclas “TUN-/HOUR AL.1” (2) o “AL2 TUN+/MIN” (4) para
elegir la celda de memoria. Presione el botón “MEM/TIME SET”
(1) para confirmar, la estación de radio ahora está guardada.
2. Para escuchar una estación de radio guardada en la memoria,
presione el botón “MEM/TIME SET” (1) varias veces hasta que
aparezca el número de memoria deseado.
AL.OFF” (5) para encender la radio. La
AJUSTE DEL VOLUMEN
Gire el mando VOLUME (9) para ajustar el volumen de escucha.
SLEEP
Presione el botón SNOOZE DIM / SLEEP (3) para programar que la
radio se apague automáticamente por hasta 90 minutos.
Configure el tiempo de apagado presionando el botón SNOOZE
DIM/SLEEP (3) repetidamente; inicialmente se mostrará el tiempo
máximo de 90 minutos, al presionar el botón varias veces se
reducirá el tiempo en pasos de 10 minutos hasta que aparezca la
palabra OFF (función SLEEP desactivada).
Cuando la función SLEEP está activada, el indicador Sleep (6)
se ilumina.
13
Page 14
RC 853 D FM ALARM CLOCK
ESPAÑOL
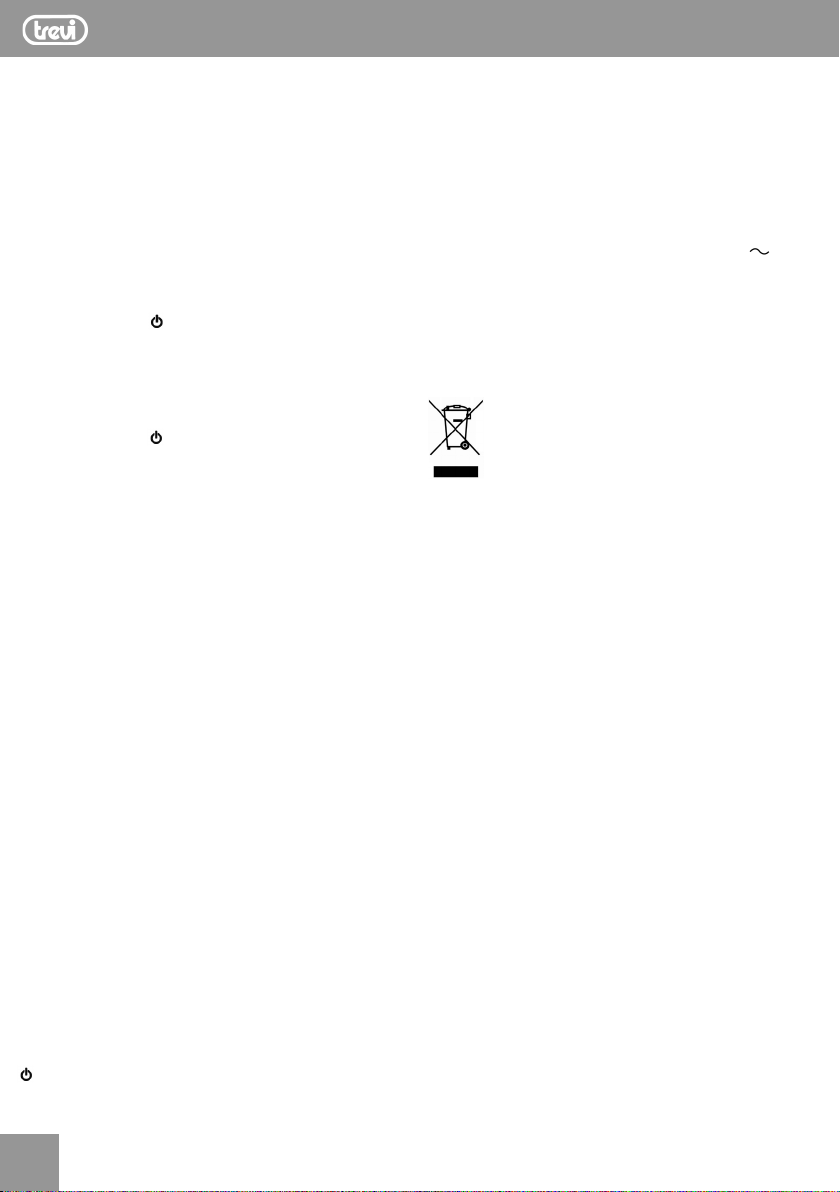
ALARMA
Con esta unidad, se pueden configurar hasta dos alarmas de forma
independiente. Antes de configurar la hora de la alarma, asegúrese
de que la hora esté configurada correctamente. El procedimiento
para configurar ambas alarmas es el mismo.
Para ambas alarmas, es posible elegir el modo de alarma:
Modo zumbador: la alarma sonará el BEEP clásico.
Modo de radio: la alarma se encenderá en una estación de radio.
CONFIGURACIÓN DE ALARMA 1
1. Mantenga presionado el botón “TUN-/HOUR AL1” (2) durante
aproximadamente 2 segundos para mostrar la hora de la alarma;
2. Las figuras parpadearán;
3. Presione la tecla “
hora de la alarma;
4. Presione la tecla “TUN-/HOUR AL1” (2) varias veces para cambiar
la configuración de la hora;
5. Presione la tecla “AL2 TUN+/ MIN” (4) varias veces para cambiar
la configuración de los minutos;
6. Presione la tecla “
pantalla dejará de parpadear y volverá a mostrar la hora actual.
Nota: esto activará la señal acústica de alarma.
CONFIGURACIÓN DE ALARMA 2
Para configurar la hora de alarma 2, reemplace el botón “TUN-/
HOUR AL1” (2) con el botón “AL2 TUN+/MIN” (4).
AL.OFF” (5) una vez para configurar la
AL.OFF” (5) una vez para confirmar; la
ACTIVACIÓN DE LA ALARMA
1. Configure la hora de la alarma como se describe arriba;
ALARMA 1
2. Mantenga presionado el botón “TUN-/HOUR AL1” (2) durante
3 segundos hasta que los dígitos parpadeen;
3. Presione la tecla “TUN-/HOUR AL1” (2) para pasar de la alarma
con el zumbador (el indicador de alarma 1 BUZZER (10) encendido), la alarma con la radio (el indicador de alarma 1 RADIO (11)
encendido) o la alarma desactivada (sin indicador encendido).
ALARMA 2
2. Mantenga presionado el botón “AL2 TUN+/MIN” (4) durante 3
segundos hasta que los dígitos parpadeen;
3. Presione la tecla “AL2 TUN+/MIN” (4) para pasar de la alarma
con el zumbador (el indicador de alarma 2 BUZZER (7) encendido), la alarma con la radio (el indicador de alarma 2 RADIO
(8) encendido) o alarma desactivada (sin indicador encendido)
FUNCIÓN DIMMER
La función DIMMER le permite configurar el brillo.
- Mantenga presionado el botón “SNOOZE DIM/SLEEP ” (3) durante
2 segundos para cambiar el brillo de la pantalla
Nota: El brillo de la pantalla no cambia al configurar la radio reloj
y cuando la alarma está activada.
ESPECIFICACIONES TÉCNICAS
Fuente de alimentación: ...................................... 230V 50Hz
Baterías de respaldo (no incluido):
Rango de frecuencia FM:
Dimensiones:
Consumo de energía:
Peso:
DEL PRODUCTO.
El símbolo que aparece en el aparato indica que el residuo debe
ser objeto de “recogida selectiva” por tanto el producto no se debe
eliminar junto con residuos urbanos.
El usuario deberá entregar el producto a los “centros de recogida
selectiva” creados por las administraciones municipales o bien al
distribuidor cuando adquiera un nuevo producto.
La recogida selectiva del residuo y las sucesivas operaciones de
tratamiento, recuperación y eliminación favorecen la fabricación
de aparatos con materiales reciclados y limitan los efectos negativos en el medio ambiente y la salud causados por una gestión
incorrecta del residuo.
La eliminación abusiva del producto da lugar a la aplicación de
sanciones administrativas.
.......................................................... 190*83*65mm
.................................................................. 2W
.......................................................................................... 343g
ADVERTENCIAS PARA LA CORRECTA ELIMINACIÓN
............ 2 pilas “AAA” de 1,5V
......................................... 87.5-108MHz
APAGANDO LA ALARMA
Si desea apagar la alarma temporalmente, presione el botón
“SNOOZE DIM/SLEEP” (3); la interrupción dura 9 minutos, luego
de lo cual se vuelve a activar la alarma. La operación se puede
repetir varias veces en una hora.
Para apagar la alarma-alarma permanentemente, presione el botón
AL.OFF (5).
La alarma todavía está activa para repetirse 24 horas después.
14
Page 15

RC 853 D FM ALARM CLOCK
WARRANTY
GARANZIA
1. L’apparecchio è garantito per 24 mesi dalla data di fabbricazione indicata sull’etichetta applicata sul prodotto.
2. La garanzia si applica solo ad apparecchi, non manomessi, riparati da centri assistenza TREVI, essa comprende la riparazione dei
componenti per difetti di fabbricazione con l’esclusione di etichette, manopole e parti aspor tabili.
3. TREVI non risponde di danni diretti o indiretti a cose o/e persone causati dall’uso o sospensione d’uso dell’apparecchio.
WARRANTY
1. This unit is guaranteed for a period of 24 months from the date of production printed on the product itself or on label on product.
2. The warranty is valid only if the unit has not been tampered with. The warranty is valid only at authorized TREVI assistance centres,
that will repair manufacturing defects, excluded replacement of labels and removable parts.
3. TREVI is not liable for damage to people or things caused by the use of this unit or by the interruption in the use of this unit.
GARANTIE
1. L’appareil est garanti pendant une période de 24 mois de la date de fabrication indiquée sur l’étiquette se trouvant sur le produit.
2. La garantie n’est appliquée que sur les appareils non altérés, ayant été réparés chez un Service Après-Vente TREVI. Elle comprend la
réparation des composantes à la suite de défauts de fabrication, à l’exclusion d’étiquettes, boutons de réglage et parties amovibles.
3. TREVI ne répond pas des dommages directs ou indirects aux choses et/ou aux personnes entraînés pendant l’usage ou la suspension
d’usage de l’appareil.
GARANTIEBESTIMMUNGEN
1. Das Gerät hat eine Garantie von 24 Monaten ab dem Herstellungsdatum. Das Herstellungsdatum ist auf der am Produkt angebrachten
Etikette angegeben.
2. Die Garantie gilt nur für Geräte, an denen nicht selbst ausgeführ te Reparaturen erfolgt sind, sonder n die von TREVI-Kundendienststellen
durchgeführt wurden. Die Garantie umfaßt die Reparatur von Bauteilen, wenn diese auf Herstellungsfehler zurückzuführen sind. Die
Garantie gilt hingegen nicht für Etiketten, Drucktasten, Knöpfe und entfernbare Teile.
3. TREVI haftet nicht für direkte oder indirekte Sach- und/oder Personen schäden, die vom Gebrauch des Gerätes verursacht worden
sind.
GARANTIA
1. El aparato tiene una garantía de 24 meses a partir de la fecha de fabricación indicada en la tarjeta sobre el producto.
2. La garantía está aplicada solamente a los productos no desarreglados y reparados por los centros de asistencia TREVI. Además,
la garantía incluye la reparación de los componentes a causa de defectos de fabricación, con la exclusión de etiquetas, botones y
partes removibles.
3. TREVI no es responsable por daños directos o indirectos a cosas y/o personas causados por el uso o suspensión del uso del
aparato.
15
Page 16
DICHIARAZIONE DI CONFORMITÀ UE
SEMPLIFICATA
SIMPLIFIED EU DECLARATION OF
CONFORMITY
Il fabbricante TREVI dichiara che l’apparecchio
RC 853 D è conforme alla direttiva 2014/53/UE.
Il testo completo della dichiarazione di conformità EU
è disponibile al seguente indirizzo Internet www.trevi.it
Hereby TREVI Spa declares that the equipment type
RC 853 D is in compliance with directive 2014/53 /EU.
The full text of the EU declaration of conformity is
available at the following internet address www.trevi.it
Trevi S.p.a.
Strada Consolare Rimini-San Marino, 62
47924 Rimini (RN) Italy
Tel. 0541/756420 - Fax 0541/756430
www.trevi.it - E-mail: [email protected]
Made in CHINA
 Loading...