

Page 1
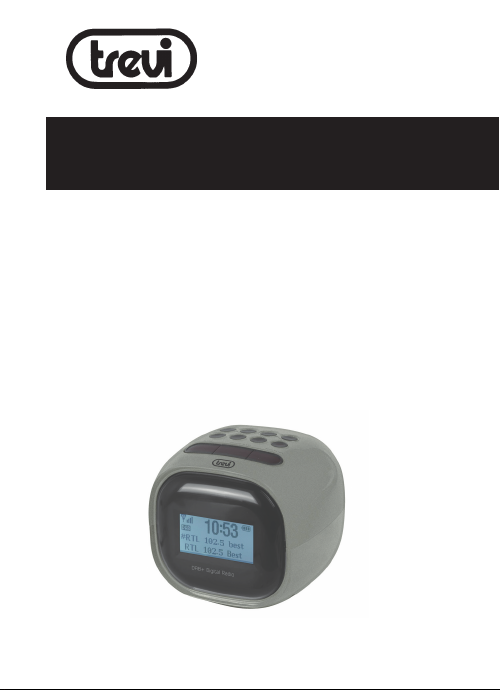
RC 80D2 DAB
Guida d’uso - User guide
Italiano - English - Française - Deutsch - Español
RADIO SVEGLIA CON SISTEMA DAB/ DAB+/ FM
Manuale d'uso e collegamento
CLOCK RADIO ALARM WITH DAB/ DAB + / FM SYSTEM
User Manual
ALARME RADIO AVEC SYSTÈME DAB/ DAB+/ FM
Manuel utilisateur
RADIOALARM MIT DAB/ DAB+/ FM-SYSTEM
Benutzerhandbuchl
ALARMA DE RADIO CON SISTEMA DAB/ DAB+/ FM
Manual de usuario
* Per informazioni integrative e aggiornamenti di questo prodotto vedi: www.trevi.it
* For additional information and updates of this product see: www.trevi.it
Page 2
WARNING!
ATTENZIONE
RISCHIO DI SCOSSE
ELETTRICHE!
NON ESPORRE A PIOGGIA
E UMIDITÀ
ATTENZIONE: NON APRITE L'APPARECCHIO. ALL'INTERNO NON VI SONO
COMANDI MANIPOLABILI DALL'UTENTE NE PARTI DI RICAMBIO. PER TUTTE
LE OPERAZIONI DI SERVIZIO RIVOLGERSI AD UN CENTRO DI ASSISTENZA
AUTORIZZATO TREVI
ATTENTION
RISQUE DE DECHARGES
ELECTRIQUES
NE PAS EXPOSER A LA PLUIE ET
A L’HUMIDITE
ATTENTION: NE PAS OUVRIR L’APPAREIL, A L’INTERIEUR IL N’Y A PAS DE
COMMANDES A MANIPULER PAR L’UTILISATEUR OU DE PIECES DE RECHANGE.
POUR TOUTES LES OPERATIONS DE SERVICE IL FAUT S’ADRESSER A UN
SERVICE D’ASSISTANCE AUTORISE TREVI.
ATENCION
PELIGRO DE CHOQUES
ELECTRICOS
NO EXPONER A LLUVIA Y
HUMEDAD
ATENCION: NO ABRIR EL APARATO, EN SU INTERIOR NO HAY MANDOS QUE
PUEDAN SER MANIPULADOS POR EL USUARIO NI PARTES DE REPUESTO.
PARA TODAS LAS OPERACIONES DE SERVICIO DIRIGIRSE A UN CENTRO DE
ASISTENCIA AUTORIZADO TREVI.
PROSOCH
KINDUNOS HLEKTROPLHXIAS
MHN EKQETETE
SE BROCH KAI UGRASIA
PROSOCH. MHN ANOIGETE THN SUSKEUH. DEN UPARCOUN
STO ESWTERIKO THS ENTOLES POU NA MPOREI NA CEIRISTEI
O KATANALWTHS OUTE ANTALLAKTIKA TMHMATA. GIA OPO
IADHPOTE EPISKEUH H¢ SUNTHRHSH APEUQUNQEITE SE ENA
APO TA EXOUSIODOTHMENA KENTRA ANTIPROSWPEIAS TREVI.
EN If you will not find your language on the instruction manual, please go on our
website www.trevi.it to find it
WARNING: DO NOT OPEN THE SET. NEITHER CONTROLS OR SPARE PARTS TO
BE USED BY THE USER ARE TO BE FOUND INSIDE IT. APPLY TO AUTHORISED
TREVI CENTERS FOR SERVICE OPERATIONS.
ACHTUNG: DAS GERÄT NICHT ÖFFNEN. IM INNERN BEFINDEN SICH KEINE VOM
BENUTZER SELBST INSTANDSETZBAREN TEILE UND AUCH KEINE ERSATZTEILE.
FÜR JEGLICHE SERVICEARBEITEN, WENDEN SIE SICH BITTE AN EINE TREVI
AUTORISIERTEN KUNDENDIENSTSTELLE.
ATENÇÃO: NÃO ABRIR O APARELHO. NO INTERIOR DO MESMO NÃO EXISTEM
COMANDOS OU PEÇAS DE SUBSTITUIÇÃO QUE POSSAM SER MANIPULADOS
PELO USUÁRIO. EM CASO DE EVENTUAL OPERAÇÃO DE SERVIÇO, DIRIGIR-SE
A UM CENTRO DE ASSISTÊNCIA AUTORIZADO TREVI
-
WARNING!
DANGER OF ELECTRIC SHOCK!
DO NOT EXPOSE TO
RAIN OR HUMIDITY
ACHTUNG
GEFAHR ELEKTRISCHER SCHLÄGE
NICHT DER FEUCHTIGKEIT UND
DEM REGEN AUSSETZEN
ATENÇÃO
PERIGO DE CHOQUES ELÉTRICOS
NÃO EXPOR A CHUVA E UMIDADE
Page 3
COMMAND DESCRIPTION
RC 80D2 DAB
Page 4

NOTE D’USO
Ascoltare a volume alto per lungo tempo, potrebbe danneggiare il vostro udito.
Questo apparecchio è uno strumento elettronico di alta precisione, evitate quindi di utilizzarlo
nei seguenti casi:
• Vicino a campi magnetici.
• Vicino a fonti di calore come caloriferi e stufe.
Italiano
• In luoghi molto umidi come stanze da bagno, piscine, ecc...
• In luoghi molto polverosi.
• In luoghi soggetti a forti vibrazioni.
• Non avvicinare l’orecchio all’altoparlante durante le fasi di messa punto e regolazioni del
volume, e in particolare di tenere il volume al minimo nella fase di accensione.
• Posizionare l’apparecchio in modo che ai suoi lati ci sia sempre abbastanza spazio per la
libera circolazione di aria (almeno 5 cm).
• Se dei liquidi penetrano all’interno dell’apparecchio scollegare immediatamente la spina
dalla presa e portare l’apparecchio al più vicino centro assistenza autorizato TREVI.
• Controllare sempre prima di ricaricare l’apparecchio, che i cavi di alimentazione e di
collegamento siano installati correttamente.
• Nessuna sorgente di fiamma nuda, quali candele accese, dovrebbe essere posta sull’ap
parecchio.
• L’apparecchio non deve essere esposto a stillicidio o a spruzzi d’acqua e nessun oggetto
pieno di liquido, quali vasi, deve essere posto sull’apparecchio.
• Prima di accendere l’apparecchio, verificare sempre che il cavo di alimentazione e il cavo
di collegamento siano installati correttamente.
• L’adattatore di corrente deve essere collegato a una presa vicina al dispositivo e deve
essere facilmente accessibile.
• Se si nota un calore eccessivo sul dispositivo o sull’adattatore di corrente, scollegare
immediatamente la spina dalla presa di corrente principale.
• Non tirare il cavo di alimentazione
• Conservare il presente manuale per futuri riferimenti.
CURA E MANUTENZIONE
Per la pulizia si consiglia l’ uso di un panno morbido, leggermente inumidito. Evitate solventi
o sostanze abrasive.
IMPORTANTE
Questo dispositivo e’ progettato per uso domestico non professionale. La buona costruzione
di questo apparecchio ne garantisce per lungo tempo il perfetto funzionamento. Se tuttavia
dovesse presentarsi qualche inconveniente, sarà opportuno consultare il più vicino Centro
Assistenza autorizzato TREVI.
TREVI persegue una politica di continua ricerca e sviluppo. Pertanto i prodotti possono
presentare caratteristiche diverse da quelle descritte.
RC 80D2 DAB
Page 5

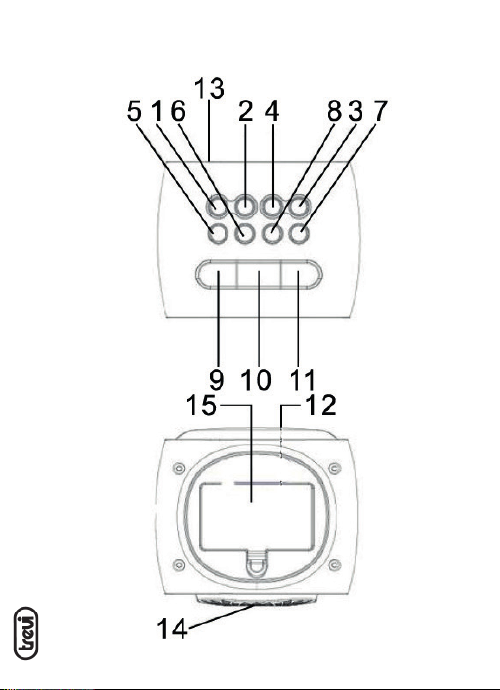
DESCRIZIONE COMANDI
1. Tasto POWER: accensione/
Stand-by
2. Tasto PRESET
3. Tasto UP
Italiano
4. Tasto DOWN
5. Tasto MENU
6. Tasto MODE
7. Tasto VOL +
8. Tasto VOL -
9. Tasto ALARM
10. Tasto SNOOZE/SLEEP
11. Tasto SELECT
12. Display Lcd
13. Presa di alimentazione
14. Altoparlante
15. Vano batterie
ALIMENTAZIONE
ADATTATORE
Collegare l’adattatore CA a una presa di corrente e il jack dell’adattatore alla presa di alimentazione
(13) presente sul lato posteriore dell’unità.
BATTERIE
Inserire 4 batterie AA (non incluse) nel vano batteria presente sul lato inferiore dell’unità
rispettando le polarità indicate (positivo della batteria sul contatto a bugno, negativo della
batteria sul contatto a molla).
Nota: quando si inseriscono le batterie rimuovere l’adattatore CA dalla presa di corrente.
Durante il funzionamento a batteria, con dispositivo in standby, il display viene spento per
salvaguardare il consumo delle batterie. Per riaccendere il display e visualizzare l’ora corrente
premere il tasto SNOOZE/SLEEP(10). La funzione di allarme sveglia e’ comunque sempre attivo
anche a display spento, se programmata, la sveglia funzionerà attivando l’allarme impostato
come descritto nel relativo paragrafo.
Sul display in alto a destra e’ presente una icona che mostra il livello di carica delle batterie,
sostituirle quando il livello indicato e’ basso (una tacca).
Con batterie in fase di esaurimento sono possibili alcuni malfunzionamenti come variazione della
luminosità del display o malfunzionamenti generali dell’apparecchio; in questi casi sostituire
le batterie scariche.
In caso di blocchi o malfunzionamenti dell’apparecchio effettuare un ripristino scollegando
l’adattatore e togliendo le batterie per circa 5 minuti.
PULSANTE MENU
Quando l’unità è in modalità standby, tenere premuto il pulsante MENU(5) per circa 2 secondi
e quindi rilasciare il pulsante. Premere ripetutamente il pulsante UP(3)/DOWN(4) per selezionare
quanto segue:
RC 80D2 DAB
1) Impostazione ora/data (Set time/Date, per regolare l’ora/data corrente)
2) Blacklight (per impostare il tempo di attivazione della retroilluminazione)
3) Lingua (Language, per impostare lalingua del menu’, default English))
4) Factry Reset (Ripristino di fabbrica, per riportare l’apparecchio ai valori di fabbrica)
Page 6

5) Versione SW, mostra la versione del software installata.
Premere il pulsante SELECT(11) per confermare la selezione.
IMPOSTA DATA E ORA
1. Tenere premuto il pulsante MENU(2) per circa 2 secondi, quindi rilasciare il pulsante.
Premere ripetutamente il pulsante UP(3)/DOWN(4) finché non viene visualizzato “Set time/
Italiano
date”. Premere una volta il pulsante SELECT(11) per accedere alla modalità di impostazio
ne di ora / data.
2. Premere il pulsante UP(3)/DOWN(4) per selezionare la modalità Set time (Imposta ora),
Set data(Imposta data) o Auto update(Aggiornamento automatico) e premere
SELECT(11) per effettuare la selezione.
3. Sotto ogni selezione, premere il pulsante UP(3)/DOWN(4) e il pulsante SELECT(11)
per effettuare ogni selezione. Tenere premuto il pulsante Menu per circa 2 secondi (o
attendere circa 5 secondi senza premere alcun pulsante) per completare l’impostazione di
DATA E ORA.
IMPOSTAZIONE DELLA SVEGLIA
1. Premere il pulsante ALARM(9) per selezionare l’impostazione dell’allarme sveglia 1 o
dell’allarme sveglia 2.
2. Premere il pulsante UP(3)/DOWN(4) per attivare(ON) o disattivare(OFF) l’allarme sveglia
selezionato e confermare con SELECT(11).
3. È possibile regolare l’ora della sveglia, selezionare:
- ONCE(Una volta), DAILY(Giornaliero), WEEKDAYS(Giorni feriali) o WEEKEND(Fine
settimana)
- Buzzer / FM / DAB come sorgente sonora dell’allarme
- Durata dell’allarme (15, 30, 45 o 60 minuti).
5. Quando l’allarme impostato si attiva, premere il tasto SNOOZE(10) per ritardare la suone
ria di 9 minuti altrimenti premere il tasto POWER(1) per spegnere definitivamente l’allarme.
6. E’ possibile impostare i due allarmi sveglia contemporaneamente ripetendo i passi sopra
indicati.
FUNZIONAMENTO RADIO (FM / DAB)
Quando si accende e si accende l’unità per la prima volta, inizia una scansione automatica delle
stazioni DAB. Una barra di avanzamento mostrerà l’avanzamento della scansione e il numero
di stazioni trovate verrà visualizzato.
1. Premere una volta il pulsante di accensione POWER(1) per accendere l’unità in modalità Radio.
2. Premere il pulsante MODE(6) per selezionare la modalità FM o DAB.
3. In modo DAB, selezionare una stazione premendo il pulsante UP(3)/DOWN(4) e conferma
re con il tasto SELECT(11).
4. In modo FM, premere i pulsanti UP(3)/DOWN(4) per effettuare una ricerca manuale delle
RC 80D2 DAB
stazioni, premerli a lungo per effettuare una ricerca al primo segnale forte ricevuto.
5. Regolare il volume premendo i pulsanti VOL-(8) e VOL+(7).
6. Premere il pulsante MENU(5) per visualizzare le informazioni sulla stazione radio sintoniz
zata.
Page 7

7. Per spegnere la radio, premere il pulsante POWER(1).
Durante l’ascolto della radio FM premendo a lungo il tasto MENU(5) e’ possibile accedere
alle seguenti voci di configurazione:
- Scan setting: confermando con il tasto SELECT(11) e’ possibile effettuare una ricerca
con memorizzazione automatica delle stazioni radio con forte segnale fino ad un massimo
Italiano
di 20 stazioni memorizzate.
- Audio setting: questa voce di menu’ non ha effetto sull’ascolto.
Durante l’ascolto della radio DAB premendo a lungo il tasto MENU(5) e’ possibile accedere
alle seguenti voci di configurazione:
- Full scan: effettua una nuova scansione delle stazioni radio disponibili.
- Manual tune: per effettuare la ricerca manuale di stazioni radio DAB
- DRC: permette di abilitare/disabilitare la funzione DRC per migliorare il suono durante
l’ascolto in ambienti rumorosi. È possibile impostare il livello di DRC in alto (high), basso
(low) o Off (spento).
- Prune:permette di eliminare dalle lista delle stazioni memorizzate tutte le radio trovate ma
non disponibili (scarso segnale).
MEMORIZZAZIONE STAZIONI RADIO
È possibile memorizzare fino a 10 stazioni per DAB e 20 stazioni per FM:
1. Sintonizzarsi su una stazione desiderata come descritto nella sezione precedente.
2. Tenere premuto il pulsante di preselezione PRESET(2) per circa 2 secondi, quindi il
numero della locazione di memoria (P**) inizierà a lampeggiare.
3. Premere una o più volte il pulsante UP(3)/DOWN(4) per selezionare la locazione desidera
ta.
4. Confermare con il tasto SELECT(11).
Per richiamare una stazione precedentemente memorizzata premere una o più volte il pulsante
PRESET(2).
FUNZIONE SNOOZE
Questa funzione permette di silenziare l’allarme sveglia di 9 minuti, per attivarla premere il tasto
SNOOZE(10) quando la suoneria della sveglia e’ in funzione.
L’allarme si attiverà di nuovo dopo 9 minuti, durante l’attesa l’icona di allarme sul display
lampeggerà.
FUNZIONE SLEEP
È possibile utilizzare la funzione SLEEP per spegnere automaticamente la radio dopo un
tempo prestabilito.
1. Con la radio accesa, premere piu’ volte il pulsante SLEEP(10) per selezionare il tempo di
RC 80D2 DAB
spegnimento automatico (15-30-45-60-90 minuti, Sleep Off per disattivare la funzione). A
funzione attiva sul display compare l’indicazione SLEEP.
ANTENNA
Per una miglior ricezione, stendere il cavo antenna presente sul retro dell’apparecchio.
Page 8

CARATTERISTICHE TECNICHE
Alimentazione principale: .................. DC5V, 1200mA
Batterie: ............................................ DC6V, 4x1,5V tipo “AA”
.................................................. (batteria non inclusa)
Adattatore CA / CC: ........................... ingresso 100-240 V ~, 50/60 Hz
Italiano
.................................................. Uscita 5 V c.c., 1,2 A, 6,0 W.
Gamma di frequenza: ......................... FM 87,5-108 MHz
.................................................. DAB 174 - 240 MHz
INFORMAZIONI AGLI UTENTI ai sensi del Decreto Legislativo N° 49 del 14 Marzo 2014
“Attuazione della Direttiva 2012/19/UE sui rifiuti di apparecchiature elettriche ed elettroniche (RAEE)”
Il simbolo del cassonetto barrato riportato sull’apparecchiatura indica che il prodotto alla fine della
propria vita utile deve essere raccolto separatamente dagli altri rifiuti. L’utente dovrà, pertanto,
conferire l’apparecchiatura integra dei componenti essenziali giunta a fine vita agli idonei centri
di raccolta differenziata dei rifiuti elettronici ed elettrotecnici, oppure riconsegnarla al rivenditore
al momento dell’acquisto di nuova apparecchiatura di tipo equivalente, in ragione di uno a uno,
oppure 1 a zero per le apparecchiature aventi lato maggiore inferiore a 25cm. L’adeguata raccolta
differenziata per l’avvio successivo dell’apparecchiatura dimessa al riciclaggio, al trattamento e
allo smaltimento ambientale compatibile contribuisce ad evitare possibili effetti negativi sull’ambiente e sulla salute e favorisce il riciclo dei materiali di cui è composta l’apparecchiatura. Lo
smaltimento abusivo del prodotto da parte dell’utente comporta l’applicazione delle sanzioni
amministrative di cui al D.Lgs n. Decreto Legislativo N° 49 del 14 Marzo 2014.
RC 80D2 DAB
Page 9

NOTES ON USE
This is a precision electronic appliance; avoid using it in the following cases:
• Near magnetic fields.
• Near heat sources such as heaters and stoves.
• In very humid places such as bathrooms, swimming pools, etc ...
English
• In very dusty places.
• In places subject to strong vibrations.
• Do not bring your ear close to the speaker during the setting up and volume adjustment
phases, and in particular to keep the volume to a minimum in the ignition phase.
• Position the appliance so that there is always enough space on its sides for the free
circulation of air (at least 5 cm).
• If liquids penetrate inside the appliance, immediately disconnect the plug from the socket
and take the appliance to the nearest authorized TREVI service center.
• Always check before recharging the appliance, that the power and connection cables are
installed correctly.
• No naked flame sources, such as lighted candles, should be placed on the appliance.
• The appliance must not be exposed to dripping or splashing water and no objects filled
with liquid, such as vases, must be placed on the appliance.
• Before turning on the appliance, always check that the power cable and the connection
cable are installed correctly.
• The power adapter must be connected to an outlet near the device and must be easily
accessible.
• If you notice excessive heat on the device or on the power adapter, immediately discon
nect the plug from the main power socket.
• Do not pull on the power cable
• Keep this manual for future reference.
CARE AND MAINTENANCE
Use a slightly damp soft cloth for cleaning. Do not use solvents and abrasive substances.
IMPORTANT
This device is designed for home use (not professional use). This appliance has been carefully
built to ensure long-lasting perfect performance. However, should any inconvenience occur,
please contact your local authorised TREVI Service Centre.
TREVI follows a policy of ongoing research and development. Therefore products may have
different features from those described
COMMAND
1. Power Button
2. Preset Button
3. Up Button
RC 80D2 DAB
4. Down Button
5. Menu Button
6. Mode Button
7. Volume Up Button
8. Volume Down Button
9. Alarm Button
10. Snooze/Sleep Button
11. Select Button
12. LCD
13. DC Input Socket (Back side)
14. Built-In Speaker (Back side)
15. Battery Compartment
(Bottom side-Backup batteries)
Page 10

POWER THE UNIT
AC POWER
Plug the AC adaptor into a power outlet and the jack of the adaptor into the
DC Input Socket (on the back side of unit).
BATTERIES
English
Insert 4 AA batteries (not included) into the battery compar tment on the underside of the unit,
respecting the indicated polarity (positive of the battery on the pin contact, negative of the
battery on the spring contact).
Note: when inserting the batteries, remove the AC adapter from the power outlet.
During battery operation, with the device in standby, the display is turned off to safeguard battery
consumption. To turn the display back on and view the current time, press the SNOOZE / SLEEP
button (10). The alarm alarm function is always active even with the display off, if programmed,
the alarm will work by activating the alarm set as described in the relevant paragraph.
On the display at the top right there is an icon that shows the charge level of the batteries, replace
them when the level indicated is low (one notch).
With batteries running low, some malfunctions are possible such as changes in the brightness
of the display or general malfunctions of the device; in these cases, replace the flat batteries.
In the event of blockages or malfunctions of the device, perform a reset by disconnecting the
adapter and removing the batteries for about 5 minutes.
MENU BUTTON
When the unit is in standby mode, press and hold the Menu Button for about 2 seconds
and then release the button. Press Up/Down Button repeatedly to select the following :-
1) Set Time/Date
2) Blacklight
3) Language
4) Factry Reset
5) SW Version
Press Select Button to confirm your selection. Under each selection, press Up/Down Button
and Select Button for each setting.
SET DATE AND TIME
1. Press and hold the Menu Button for about 2 seconds and then release the button.
Press Up/Down Button repeatedly until “Set Time/Date” is displaying. Press once the
Select Button to enter Time/Date setting mode.
2. Press Up/Down Button to select Set Time, Set Date or Auto Update mode and press
RC 80D2 DAB
Select Button to make selection.
3. Under each selection, press Up/Down Button and Select Button to make every
selection. Press and hold the Menu Button for about 2 seconds (or wait for about 5
seconds without pressing any button) to complete the DATE AND TIME setting.
Page 11

SET ALARM TIME AND ALARM MODE
1. Press the Alarm Button to select Alarm 1 or Alarm 2.
2. Press the Up/Down Button to toggle the Alarm 1 (Alarm 2) symbol on and off .
3. When the Alarm 1 (Alarm 2) symbol is on, press once the Select Button to enter
alarm setting mode.
English
4. You can adjust the alarm time, select Once, Daily, Weekdays or Weekends, Buzzer/
FM/DAB, Duration-15, 30, 45 or 60 Mins by pressing Up/Down Button and Select
Button under each selection.
5. Under each selection, press and hold the Menu Button for about 2 seconds (or
wait for about 5 seconds without pressing any button) will complete the alarm setting
mode.
6. When it reaches the alarm time, you can hear the Buzzer or radio. Press once the
Power Button to turn off the alarm sound.
RADIO OPERATION (FM / DAB)
When you first power up and turn on your unit, it begins an automatic scan for DAB stations.
A progress bar will show the progress of the scan and the number of stations found
will also be displayed. When scan is completed, your radio will select the first available
station and begin to play. Stations are listed in numerical and then alphabetical order by
default.
1. Press once the Power Button to set the unit to Radio mode.
2. Press the Mode Button to select FM or DAB mode.
3. Tune a station by pressing the Up/Down Button.
Pressing either Up/Down Button for more than 1 second to activate the
automatic tuning mode. The automatic tuner will scan up or down and lock onto the
next station. If the automatic tuning does not precisely tune into a radio station, press
the Up/Down Button to adjust the tuning.
4. Adjust the volume by pressing Volume Up/Down Button.
5. Press the Menu Button to check the information of the tuned radio station.
6. To turn off the radio, press once again the Power Button to set the unit to Standby
mode.
Note: The DAB radio station list is stored in the memory and so the next time you switch
your radio on, the station search will not start again.
STORES PRESET STATIONS
Up to 10 stations for DAB and 20 stations for FM can be stored in memory :
1. Tune to a desired station as described in previous section.
2. Press and hold the Preset Button for about 2 seconds then the Preset Station Number
will fl ash. Release the button.
RC 80D2 DAB
3. Press once or more times the Up/Down Button to select your desired Preset
Station Number from P1 to P10 in DAB mode or P1 to P20 in FM mode.
4. Press once the Select Button then the Preset Station Number will stop fl ashing.
Now the station is stored in your desired Preset Station Number.
Page 12

To replace a station stored in the memory, repeat all the stages described above. The
new station will replace the previously stored one.
To receive Preset Stations :
Under DAB or FM mode, press once or more times the Preset Button to select the
desired Preset Station Number.
English
SNOOZE OPERATION
To obtain approximatively further 9 minutes sleep, press the Snooze Button after the radio
or the buzzer switch on at the preset wake-up time. The Alarm Indicator will be flashing.
This will silence the radio or the buzzer for 9 minutes.
SLEEP FUNCTION
You can only use SLEEP FUNCTION when the unit is in FM or DAB mode.
1. Press once and repeatly the Sleep Button to select the sleeping time (minutes) as
15-30-45-60-90-Sleep Off (Sleep Off meaning that Sleep function is cancelled).
After setting a sleeping time, the SLEEP indicator will appear on the LCD.
2. The FM or DAB will be off and return to standby mode when it reached the sleep set
time.
If you want to cancel the sleep function, press the Sleep Button to select the sleeping
time as Sleep Off .
ANTENNA
The unit has a fl exible wire on the back of the unit and it should be extended to its full
length for best reception white receiving radio.
TECHNICAL FEATURES
Main Power : .................................... DC5V, 1200mA
Batteries : ......................................... DC6V , 4x1.5V “AA” batteries type
.................................................. (battery not included)
AC/DC Adaptor : ............................... Input 100-240V~, 50/60Hz
.................................................. Output 5V d.c., 1.2A, 6.0W
Frequency Range : ............................ FM 87.5-108 MHz
.................................................. DAB 174 - 240 MHz
Precautions for correct disposal of the product.
The symbol shown on the equipment indicates that waste must be disposed of in “separate
collection” and so the product must not be disposed of together with urban waste.
The user must take the product to special “separate waste collection centres” provided by local
RC 80D2 DAB
government, or deliver it to the retailer against the purchase of a new product.
Separate collection of waste and subsequent treatment, recycling and disposal operations
promotes the production of equipment with recycled materials and limits negative effects on
the environment and on health caused by improper handling of waste.
Illegal disposal of the product leads to the enforcement of administrative penalties.
Page 13

NOTES D’EMPLOI
Cet appareil est un instrument électronique de haute précision ; évitez donc de l’utiliser dans
les cas suivants :
• Près des champs magnétiques.
• Près de sources de chaleur telles que des radiateurs et des poêles.
• Dans des endroits très humides tels que salles de bain, piscines, etc ...
Française
• Dans des endroits très poussiéreux.
• Dans des endroits soumis à de fortes vibrations.
• Ne rapprochez pas votre oreille du haut-parleur lors des phases de réglage et de réglage du
volume, et notamment pour maintenir le volume au minimum en phase d’allumage.
• Positionnez l’appareil de manière à ce qu’il y ait toujours suffisamment d’espace sur ses
côtés pour la libre circulation de l’air (au moins 5 cm).
• Si des liquides pénètrent à l’intérieur de l’appareil, débranchez immédiatement la fiche de
la prise et apportez l’appareil au centre de service TREVI agréé le plus proche.
• Vérifiez toujours avant de recharger l’appareil que les câbles d’alimentation et de connexion
sont correctement installés.
• Aucune source de flamme nue, telle que des bougies allumées, ne doit être placée sur
l’appareil.
• L’appareil ne doit pas être exposé à des gouttes ou des éclaboussures d’eau et aucun objet
rempli de liquide, comme des vases, ne doit être placé sur l’appareil.
• Avant d’allumer l’appareil, vérifiez toujours que le câble d’alimentation et le câble de
connexion sont correctement installés.
• L’adaptateur secteur doit être connecté à une prise à proximité de l’appareil et doit être
facilement accessible.
• Si vous constatez une chaleur excessive sur l’appareil ou sur l’adaptateur secteur, débranchez immédiatement la fiche de la prise d’alimentation principale.
• Ne tirez pas sur le câble d’alimentation
• Conservez ce manuel pour référence future.
MANIEMENT ET ENTRETIEN
Pour le nettoyage, il est conseillé d’utiliser un chiffon doux légèrement humide. Évitez l’emploi
de solvants ou de substances abrasives.
IMPORTANT
Cet appareil est conçu pour un usage domestique (usage non professionnel). La bonne fabrication de cet appareil garantit un fonctionnement parfait pour une longue période. Si toutefois
quelques inconvénients devaient se présenter, adressez-vous au Centre d’Assistance agréé
TREVI le plus proche.
TREVI observe une politique de recherche et de développement continus. C’est pourquoi ses
produits peuvent présenter des caractéristiques différentes par rapport à celles qui sont décrites.
RC 80D2 DAB
Page 14

DESCRIPTION DE LA COMMANDE
1. Bouton d’alimentation
2. Bouton de préréglage
3. Bouton Haut
4. Bouton Bas
Française
5. Bouton de menu
6. Bouton de mode
7. Bouton d’augmentation du volume
8. Bouton de réduction du volume
ALIMENTER L’UNITÉ
ALIMENTATION AC
Branchez l’adaptateur secteur dans une prise de courant et la prise de l’adaptateur dans le
Prise d’entrée CC (à l’arrière de l’appareil).
BATTERIES
Insérez 4 piles AA (non fournies) dans le compartiment à piles sur la face inférieure de l’appareil,
en respectant la polarité indiquée (positif de la pile sur le contact à broche, négatif de la pile
sur le contact à ressort).
Remarque: lors de l’insertion des piles, retirez l’adaptateur secteur de la prise de courant.
Pendant le fonctionnement sur batterie, avec l’appareil en veille, l’écran s’éteint pour préserver
la consommation de la batterie. Pour rallumer l’affichage et voir l’heure actuelle, appuyez sur
le bouton SNOOZE / SLEEP (10). La fonction d’alarme d’alarme est cependant toujours active
même avec l’affichage éteint, si elle est programmée, l’alarme fonctionnera en activant le jeu
d’alarmes comme décrit dans le paragraphe correspondant.
Sur l’écran en haut à droite se trouve une icône qui indique le niveau de charge des batteries,
remplacez-les lorsque le niveau indiqué est bas (un cran).
Lorsque les piles sont faibles, certains dysfonctionnements sont possibles tels que des modifications de la luminosité de l’écran ou des dysfonctionnements généraux de l’appareil; dans
ces cas, remplacez les piles déchargées.
En cas de blocage ou de dysfonctionnement de l’appareil, effectuez une réinitialisation en
débranchant l’adaptateur et en retirant les piles pendant environ 5 minutes.
BOUTON DE MENU
Lorsque l’appareil est en mode veille, maintenez le bouton Menu enfoncé pendant environ 2
secondes
puis relâchez le bouton. Appuyez plusieurs fois sur le bouton Haut / Bas pour sélectionner les
RC 80D2 DAB
éléments suivants: -
1) Régler l’heure / la date
2) Lumière noire
3) Langue
4) Réinitialisation Factry
9. Bouton d’alarme
10. Bouton Snooze / Sleep
11. Bouton de sélection
12. LCD
13. Prise d’entrée CC (face arrière)
14. Haut-parleur intégré (face arrière)
15. Compartiment à piles
(Batteries de secours côté inférieur)
Page 15

5) Version SW
Appuyez sur le bouton de sélection pour confirmer votre sélection. Sous chaque sélection,
appuyez sur le bouton Haut / Bas
et bouton de sélection pour chaque paramètre.
RÉGLER LA DATE ET L’HEURE
Française
1. Appuyez et maintenez le bouton Menu pendant environ 2 secondes, puis relâchez le
bouton.
Appuyez sur le bouton Haut / Bas à plusieurs reprises jusqu’à ce que «Set Time / Date»
s’affiche. Appuyez une fois sur
Sélectionnez le bouton pour accéder au mode de réglage de l’heure / date.
2. Appuyez sur le bouton Haut / Bas pour sélectionner Régler l’heure, Régler la date ou le
mode Mise à jour automatique et appuyez sur
Sélectionnez le bouton pour effectuer la sélection.
3. Sous chaque sélection, appuyez sur le bouton haut / bas et sur le bouton de sélection
sélection. Appuyez sur le bouton Menu et maintenez-le enfoncé pendant environ 2 secon
des (ou attendez environ 5 secondes sans appuyer sur aucun bouton) pour terminer le
réglage DATE ET HEURE.
RÉGLER L’HEURE D’ALARME ET LE MODE D’ALARME
1. Appuyez sur le bouton Alarme pour sélectionner Alarme 1 ou Alarme 2.
2. Appuyez sur le bouton Haut / Bas pour activer et désactiver le symbole Alarme 1 (Alarme
2).
3. Lorsque le symbole Alarme 1 (Alarme 2) est allumé, appuyez une fois sur le bouton de
sélection pour entrer mode de réglage de l’alarme.
4. Vous pouvez régler l’heure de l’alarme, sélectionnez Une fois, Quotidien, Jours de la
semaine ou Week-ends, Buzzer / FM / DAB, Durée-15, 30, 45 ou 60 minutes en appuyant
sur le bouton Haut / Bas et sélectionnez Bouton sous chaque sélection.
5. Sous chaque sélection, maintenez le bouton Menu enfoncé pendant environ 2 secondes
(ou attendez environ 5 secondes sans appuyer sur aucun bouton) terminera le réglage de
l’alarme mode.
6. Lorsqu’il atteint l’heure de l’alarme, vous pouvez entendre le buzzer ou la radio. Appuyez
une fois sur Bouton d’alimentation pour désactiver le son de l’alarme.
FONCTIONNEMENT DE LA RADIO (FM / DAB)
Lorsque vous allumez et allumez votre appareil pour la première fois, il lance une recherche
automatique des stations DAB.
Une barre de progression affichera la progression de l’analyse et le nombre de stations trouvées
sera également affiché. Lorsque l’analyse est terminée, votre radio sélectionnera le premier
station et commencez à jouer. Les stations sont répertoriées par ordre numérique puis
RC 80D2 DAB
alphabétique par
défaut.
1. Appuyez une fois sur le bouton d’alimentation pour mettre l’appareil en mode radio.
2. Appuyez sur le bouton Mode pour sélectionner le mode FM ou DAB.
3. Syntonisez une station en appuyant sur le bouton Haut / Bas.
Page 16

Appuyez sur l’un des boutons Haut / Bas pendant plus d’une seconde pour activer le
mode de réglage automatique. Le tuner automatique balaye vers le haut ou vers le bas et
se verrouille sur le prochaine station. Si la syntonisation automatique ne syntonise pas
précisément une station de radio, appuyez sur le bouton haut / bas pour régler l’accord.
4. Réglez le volume en appuyant sur le bouton Volume haut / bas.
5. Appuyez sur le bouton Menu pour vérifier les informations de la station de radio synto
Française
nisée.
6. Pour éteindre la radio, appuyez à nouveau sur le bouton d’alimentation pour mettre
l’appareil en veille mode.
Remarque: la liste des stations de radio DAB est stockée dans la mémoire et donc la prochaine
fois que vous changez
votre radio allumée, la recherche de stations ne redémarrera pas.
MAGASINE LES STATIONS PRÉRÉGLÉES
Jusqu’à 10 stations pour DAB et 20 stations pour FM peuvent être stockées en mémoire:
1. Syntonisez la station souhaitée comme décrit dans la section précédente.
2. Appuyez et maintenez le bouton de préréglage pendant environ 2 secondes, puis le
numéro de la station préréglée clignotera. Relâchez le bouton.
3. Appuyez une ou plusieurs fois sur le bouton Haut / Bas pour sélectionner le préréglage
souhaité Numéro de station de P1 à P10 en mode DAB ou P1 à P20 en mode FM.
4. Appuyez une fois sur le bouton de sélection, puis le numéro de station préréglée s’arrêtera
de clignoter.
La station est maintenant mémorisée dans le numéro de station préréglé souhaité.
Pour remplacer une station mémorisée, répétez toutes les étapes décrites ci-dessus. le
la nouvelle station remplacera celle précédemment enregistrée.
Pour recevoir des stations préréglées:
En mode DAB ou FM, appuyez une ou plusieurs fois sur le bouton de préréglage pour
sélectionner le Numéro de station préréglé souhaité.
SNOOZE
Pour obtenir environ 9 minutes de sommeil supplémentaires, appuyez sur le bouton Snooze
après la radio
ou le buzzer s’allume à l’heure de réveil prédéfinie. L’indicateur d’alarme clignotera.
Cela arrêtera la radio ou le buzzer pendant 9 minutes.
FONCTION SOMMEIL
Vous ne pouvez utiliser la FONCTION SLEEP que lorsque l’appareil est en mode FM ou DAB.
1. Appuyez une fois et plusieurs fois sur le bouton Sleep pour sélectionner la durée de
sommeil (minutes) comme
15-30-45-60-90-Sleep Off (Sleep Off signifie que la fonction Sleep est annulée).
RC 80D2 DAB
Après avoir réglé une durée de sommeil, l’indicateur SLEEP apparaît sur l’écran LCD.
2. Le FM ou le DAB sera éteint et reviendra en mode veille lorsqu’il atteindra le réglage de
veille
temps.
Page 17
Si vous souhaitez annuler la fonction de veille, appuyez sur le bouton Sleep pour sélectionner
temps comme Sleep Off.
ANTENNE
L’unité a un fil flexible à l’arrière de l’unité et il doit être étendu à sa pleine
longueur pour une meilleure réception radio de réception blanche.
Française
CARACTÉRISTIQUES TECHNIQUES
Alimentation principale: ..................... DC5V, 1200mA
Piles: ................................................ DC6V, type de piles 4x1.5V «AA»
.................................................. (batterie non incluse)
Adaptateur AC / DC: .......................... entrée 100-240V ~, 50 / 60Hz
.................................................. Sortie 5V d.c., 1.2A, 6.0W
Gamme de fréquences: ..................... FM 87,5-108 MHz
.................................................. DAB 174 - 240 MHz
Recommandations pour l’élimination correcte du produit.
Le symbole figurant sur l’appareil indique que le produit fait l’objet d’une “ collecte séparée “.
C’est pourquoi, le produit ne doit pas être éliminé avec les déchets urbains.
L’utilisateur doit remettre le produit auprès de “ décharges spécialisées de collecte séparée “
prévues par les autorités locales, ou bien le rendre au revendeur quand il achètera un nouvel
appareil équivalent.
La collecte séparée du produit et les opérations successives de traitement, recyclage et élimination favorisent la production d’appareils composés par des matériaux recyclés ainsi que
permettent d’éviter des effets négatifs sur l’environnement et sur la santé des personnes suite
à une gestion impropre du déchet.
Toute élimination abusive du produit entraîne l’application de sanctions administratives.
RC 80D2 DAB
Page 18

GEBRAUCHSHINWEISE
Dieses Gerät ist ein elektronisches Instrument höchster Präzision. Die Inbetriebnahme des
Geräts sollte daher in den folgenden Fällen vermieden werden:
• In der Nähe von Magnetfeldern.
• In der Nähe von Wärmequellen wie Heizungen und Öfen.
• An sehr feuchten Orten wie Badezimmern, Schwimmbädern usw.
Deutsch
• An sehr staubigen Orten.
• An Orten, die starken Vibrationen ausgesetzt sind.
• Bringen Sie Ihr Ohr während der Einrichtungs- und Lautstärkeregelungsphase nicht in die
Nähe des Lautsprechers, insbesondere um die Lautstärke in der Zündphase auf ein Minimum
zu beschränken.
• Stellen Sie das Gerät so auf, dass an den Seiten immer genügend Platz für die freie
Luftzirkulation ist (mindestens 5 cm).
• Wenn Flüssigkeiten in das Gerät eindringen, ziehen Sie sofort den Stecker aus der
Steckdose und bringen Sie das Gerät zum nächsten autorisierten TREVI-Servicecenter.
• Überprüfen Sie vor dem Aufladen des Geräts immer, ob die Strom- und Verbindungskabel
korrekt installiert sind.
• Auf das Gerät dürfen keine offenen Flammenquellen wie brennende Kerzen gestellt werden.
• Das Gerät darf keinem tropfenden oder spritzenden Wasser ausgesetzt werden, und es
dürfen keine mit Flüssigkeit gefüllten Gegenstände wie Vasen auf das Gerät gestellt werden.
• Überprüfen Sie vor dem Einschalten des Geräts immer, ob das Netzkabel und das Verbindungskabel richtig installiert sind.
• Das Netzteil muss an eine Steckdose in der Nähe des Geräts angeschlossen und leicht
zugänglich sein.
• Wenn Sie am Gerät oder am Netzteil übermäßige Hitze bemerken, ziehen Sie sofort den
Stecker aus der Hauptsteckdose.
• Ziehen Sie nicht am Netzkabel
• Bewahren Sie dieses Handbuch zum späteren Nachschlagen auf.
PFLEGE UND WARTUNG
Für die Reinigung wird die Verwendung eines leicht angefeuchteten, weichen Tuchs empfohlen.
Der Einsatz von Lösungsmitteln oder scheuernden Substanzen sollte vermieden werden.
WICHTIG
Dieses Gerät ist für den Heimgebrauch (nicht professionellen Gebrauch). Der fachgemäße
Bau dieses Geräts gewährleistet langfristig einen einwandfreien Betrieb. Sollten dennoch
Betriebsstörungen auftreten, wenden Sie sich bitte an nächstgelegene autorisierte TREVIKundendienststelle.
Die Firma TREVI verfolgt eine Politik ständiger Forschung und Weiterentwicklung. Die Produkte
können daher andere als die beschriebenen Eigenschaften aufweisen.
RC 80D2 DAB
Page 19

BEFEHLSBESCHREIBUNG
1. Ein- / Ausschalter
2. Preset-Taste
3. Aufwärts-Taste
4. Ab-Taste
5. Menütaste
Deutsch
6. Modustaste
7. Lauter-Taste
8. Lautstärketaste
Wechselstromversorgung
Stecken Sie das Netzteil in eine Steckdose und die Buchse des Adapters in die
DC-Eingangsbuchse (auf der Rückseite des Geräts).
BATTERIEN
Legen Sie 4 AA-Batterien (nicht im Lieferumfang enthalten) unter Beachtung der angegebenen
Polarität (Plus der Batterie am Stiftkontakt, Minus der Batterie am Federkontakt) in das Batteriefach
an der Unterseite des Geräts ein.
Hinweis: Ziehen Sie beim Einlegen der Batterien das Netzteil aus der Steckdose.
Während des Batteriebetriebs im Standby-Modus wird das Display ausgeschaltet, um den
Batterieverbrauch zu sichern. Drücken Sie die Taste SNOOZE / SLEEP (10), um das Display
wieder einzuschalten und die aktuelle Uhrzeit anzuzeigen. Die Alarmalarmfunktion ist auch bei
ausgeschaltetem Display immer aktiv. Wenn programmiert, wird der Alarm durch Aktivieren des
Alarmsatzes wie im entsprechenden Absatz beschrieben aktiviert.
Auf dem Display oben rechts befindet sich ein Symbol, das den Ladezustand des Akkus anzeigt.
Ersetzen Sie diese, wenn der angezeigte Ladezustand niedrig ist (eine Stufe).
Bei schwachen Batterien sind einige Fehlfunktionen möglich, z. B. Änderungen der Helligkeit
des Displays oder allgemeine Fehlfunktionen des Geräts. Ersetzen Sie in diesen Fällen die
leeren Batterien.
Führen Sie bei Verstopfungen oder Fehlfunktionen des Geräts einen Reset durch, indem Sie den
Adapter abziehen und die Batterien etwa 5 Minuten lang entfernen.
MENÜTASTE
Wenn sich das Gerät im Standby-Modus befindet, halten Sie die Menütaste etwa 2 Sekunden
lang gedrückt
und lassen Sie dann die Taste los. Drücken Sie wiederholt die Auf- / Ab-Taste, um Folgendes
RC 80D2 DAB
auszuwählen: -
1) Uhrzeit / Datum einstellen
2) Schwarzlicht
3) Sprache
4) Factry Reset
9. Alarmtaste
10. Snooze / Sleep-Taste
11. Wählen Sie die Schaltfläche
12. LCD
13. DC-Eingangsbuchse (Rückseite)
14. Eingebauter Lautsprecher (Rückseite)
15. Batteriefach
(Bottom Side-Backup-Batterien)
Page 20

5) SW-Version
Drücken Sie die Auswahltaste, um Ihre Auswahl zu bestätigen. Drücken Sie unter jeder Auswahl
die Auf- / Ab-Taste
und Auswahltaste für jede Einstellung.
DATUM UND UHRZEIT EINSTELLEN
Deutsch
1. Halten Sie die Menütaste etwa 2 Sekunden lang gedrückt und lassen Sie dann die Taste
los.
Drücken Sie wiederholt die Auf- / Ab-Taste, bis „Set Time / Date“ angezeigt wird. Drücken
Sie einmal die Wählen Sie die Schaltfläche, um den Zeit- / Datumseinstellungsmodus
aufzurufen.
2. Drücken Sie die Aufwärts- / Abwärts-Taste, um Zeit einstellen, Datum einstellen oder
Auto-Update-Modus auszuwählen, und drücken Sie Wählen Sie die Schaltfläche, um eine
Auswahl zu treffen.
3. Drücken Sie unter jeder Auswahl die Auf- / Ab-Taste und die Auswahltaste, um alle
auszuwählen Auswahl. Halten Sie die Menütaste etwa 2 Sekunden lang gedrückt (oder
warten Sie etwa 5 Sekunden Sekunden ohne Drücken einer Taste), um die Einstellung
DATUM UND ZEIT abzuschließen.
ALARMZEIT UND ALARMMODUS EINSTELLEN
1. Drücken Sie die Alarmtaste, um Alarm 1 oder Alarm 2 auszuwählen.
2. Drücken Sie die Auf- / Ab-Taste, um das Symbol Alarm 1 (Alarm 2) ein- und auszuschal
ten.
3. Wenn das Symbol Alarm 1 (Alarm 2) aktivier t ist, drücken Sie einmal die Auswahltaste,
um die Eingabe zu starten Alarmeinstellungsmodus.
4. Sie können die Alarmzeit anpassen und Einmal, Täglich, Wochentage oder Wochenenden,
Summer / auswählen.
FM / DAB, Dauer 15, 30, 45 oder 60 Minuten durch Drücken der Auf- / Ab-Taste und
Auswählen Schaltfläche unter jeder Auswahl.
5. Halten Sie unter jeder Auswahl die Menütaste etwa 2 Sekunden lang gedrückt (oder
War ten Sie ca. 5 Sekunden, ohne eine Taste zu drücken.) Damit ist die Alarmeinstellung
abgeschlossen Modus.
6. Wenn die Alarmzeit erreicht ist, können Sie den Summer oder das Radio hören. Drücken
Sie einmal die Ein- / Ausschalter zum Ausschalten des Alarmtons.
FUNKBETRIEB (FM / DAB)
Wenn Sie Ihr Gerät zum ersten Mal einschalten und einschalten, wird automatisch nach DABStationen gesucht.
Ein Fortschrittsbalken zeigt den Fortschritt des Scans und die Anzahl der gefundenen Stationen an
wird ebenfalls angezeigt. Wenn der Scan abgeschlossen ist, wählt Ihr Radio die erste verfügbare aus
RC 80D2 DAB
Station und beginnen zu spielen. Stationen werden in numerischer und dann alphabetischer
Reihenfolge nach aufgelistet
Standard.
1. Drücken Sie einmal den Netzschalter, um das Gerät in den Radiomodus zu versetzen.
Page 21

2. Drücken Sie die Modustaste, um den FM- oder DAB-Modus auszuwählen.
3. Stellen Sie einen Sender ein, indem Sie die Auf- / Ab-Taste drücken.
Drücken Sie eine der Auf- / Ab-Tasten länger als 1 Sekunde, um die zu aktivieren
automatischer Abstimmungsmodus. Der automatische Tuner scannt nach oben oder
unten und rastet ein nächste Station. Wenn die automatische Abstimmung einen Radio
sender nicht genau einstellt, drücken Sie ie Auf / Ab-Taste, um die Stimmung anzupassen.
Deutsch
4. Stellen Sie die Lautstärke durch Drücken der Lauter- / Leiser-Taste ein.
5. Drücken Sie die Menütaste, um die Informationen des eingestellten Radiosenders zu
überprüfen.
6. Um das Radio auszuschalten, drücken Sie erneut die Ein- / Aus-Taste, um das Gerät auf
Standby zu stellen Modus.
Hinweis: Die DAB-Radiosenderliste wird im Speicher gespeichert und somit beim nächsten
Wechsel
Wenn Ihr Radio eingeschaltet ist, wird die Sendersuche nicht erneut gestartet.
STORES PRESET STATIONS
Bis zu 10 Sender für DAB und 20 Sender für FM können gespeichert werden:
1. Stellen Sie eine gewünschte Station ein, wie im vorherigen Abschnitt beschrieben.
2. Halten Sie die Preset-Taste ca. 2 Sekunden lang gedrückt und dann die Preset-Stations
nummer wird blinken. Lass den Knopf los.
3. Drücken Sie einmal oder mehrmals die Auf- / Ab-Taste, um die gewünschte Voreinstel
lung auszuwählen tationsnummer von P1 bis P10 im DAB-Modus oder P1 bis P20 im
FM-Modus.
4. Drücken Sie einmal die Auswahltaste, dann hört die voreingestellte Stationsnummer auf zu
blinken.
Jetzt wird der Sender in Ihrer gewünschten voreingestellten Sendernummer gespeichert.
Wiederholen Sie alle oben beschriebenen Schritte, um eine im Speicher gespeicherte
Station zu ersetzen. Das Die neue Station ersetzt die zuvor gespeicherte.
So erhalten Sie voreingestellte Stationen:
Drücken Sie im DAB- oder FM-Modus ein- oder mehrmals die Preset-Taste, um die
auszuwählen gewünschte voreingestellte Stationsnummer.
SNOOZE-BETRIEB
Drücken Sie nach dem Radio die Schlummertaste, um ungefähr weitere 9 Minuten Schlaf zu
erhalten oder der Summer schaltet sich zur voreingestellten Weckzeit ein. Die Alarmanzeige blinkt.
Dadurch wird das Radio oder der Summer 9 Minuten lang stummgeschaltet.
SCHLAFFUNKTION
Sie können SLEEP FUNCTION nur verwenden, wenn sich das Gerät im FM- oder DAB-Modus
befindet.
RC 80D2 DAB
1. Drücken Sie einmal und wiederholen Sie die Sleep-Taste, um die Schlafzeit (Minuten) als
auszuwählen
15-30-45-60-90-Sleep Off (Sleep Off bedeutet, dass die Sleep-Funktion deaktiviert ist).
Nach dem Einstellen einer Schlafzeit erscheint die SLEEP-Anzeige auf dem LCD.
2. Der FM oder DAB ist ausgeschaltet und kehrt in den Standby-Modus zurück, wenn der
Page 22

Ruhezustand erreicht ist
Zeit.
Wenn Sie die Schlaffunktion abbrechen möchten, drücken Sie die Schlaftaste, um den
Ruhezustand auszuwählen
Zeit als Sleep Off.
Deutsch
ANTENNE
Das Gerät hat einen flexiblen Draht auf der Rückseite des Geräts und sollte vollständig ausgefahren werden
Länge für besten Empfang weiß empfangendes Radio.
TECHNISCHE EIGENSCHAFTEN
Hauptstrom: ..................................... DC5V, 1200mA
Batterien: .......................................... DC6V-, 4x1,5V-AA-Batterietyp
.................................................. (Batterie nicht im Lieferumfang .
.................................................. enthalten)
AC / DC-Adapter: .............................. Eingang 100-240 V ~, 50/60 Hz
.................................................. Ausgang 5 V Gleichstrom, 1,2 ..
.................................................. A,6,0 W.
Frequenzbereich: .............................. FM 87,5-108 MHz
.................................................. DAB 174 - 240 MHz
Hinweise zur ordnungsgemäßen Entsorgung des Produkts
Das auf dem Gerät angebrachte Symbol weist darauf hin, dass das Altgerät “getrennt zu sammeln”
ist und das Produkt daher nicht zusammen mit dem Gemeindeabfall entsorgt werden darf.
Der Benutzer muss das Produkt zu den entsprechenden, von der Gemeindeverwaltung
eingerichteten “Wertstoffsammelstellen” bringen oder dem Händler beim Kauf eines neuen
Produkts übergeben.
Die getrennte Müllsammlung und anschließende Aufbereitung, Wiederverwer tung und Entsorgung fördern die Herstellung von Geräten unter Verwendung wiederverwer teter Materialien
und vermindern die negativen Auswirkungen auf die Umwelt und Gesundheit in Folge einer
falschen Müllverwaltung.
Die widerrechtliche Entsorgung des Produkts führt zur Auferlegung von Verwaltungsstrafen.
RC 80D2 DAB
Page 23

NOTAS PARA EL USO
Este aparato es un instrumento electrónico de alta precisión; por lo tanto debe evitar utilizarlo
en los siguientes casos:
• Cerca de campos magnéticos.
• Cerca de fuentes de calor como calentadores y estufas.
Español
• En lugares muy húmedos como baños, piscinas, etc.
• En lugares muy polvorientos.
• En lugares sujetos a fuertes vibraciones.
• No acerque el oído al altavoz durante las fases de configuración y ajuste de volumen, y en
particular para mantener el volumen al mínimo en la fase de encendido.
• Coloque el aparato de modo que siempre haya suficiente espacio en sus lados para la libre
circulación de aire (al menos 5 cm).
• Si los líquidos penetran dentro del aparato, desconecte inmediatamente el enchufe de la
toma de corriente y lleve el aparato al centro de servicio TREVI autorizado más cercano.
• Antes de recargar el aparato, compruebe siempre que los cables de alimentación y
conexión estén instalados correctamente.
• No se deben colocar fuentes de llamas descubiertas, como velas encendidas, sobre el
aparato.
• El aparato no debe exponerse a goteos o salpicaduras de agua y no deben colocarse
objetos llenos de líquido, como jarrones, sobre el aparato.
• Antes de encender el aparato, compruebe siempre que el cable de alimentación y el cable
de conexión estén instalados correctamente.
• El adaptador de corriente debe estar conectado a una toma de corriente cerca del dispositivo y debe ser fácilmente accesible.
• Si nota calor excesivo en el dispositivo o en el adaptador de alimentación, desconecte
inmediatamente el enchufe de la toma de corriente principal.
• No tire del cable de alimentación.
• Guarde este manual para referencia futura.
CUIDADO Y MANTENIMIENTO
Para efectuar la limpieza se aconseja utilizar un paño suave, ligeramente humedecido. Evite
solventes o sustancias abrasivas.
IMPORTANTE
Este dispositivo está diseñado para uso doméstico (uso no profesional). La buena construcción
del aparato garantiza su perfecto funcionamiento durante mucho tiempo. Si se presentase algún
inconveniente, será oportuno consultar al Centro de Asistencia autorizado TREVI más cercano.
TREVI cultiva una política de investigación y desarrollo continuos. Por consiguiente, los productos
pueden presentar características distintas a las descritas..
RC 80D2 DAB
Page 24

DESCRIPCIÓN DEL COMANDO
1. Botón de encendido
2. Botón de preajuste
3. Botón Arriba
4. Botón Abajo
Español
5. Botón de menú
6. Botón de modo
7. Botón para subir el volumen
8. Botón para bajar el volumen
ENCENDER LA UNIDAD
ALIMENTACIÓN
Enchufe el adaptador de CA a una toma de corriente y la clavija del adaptador a la
Toma de entrada de CC (en la parte posterior de la unidad).
BATERIAS
Inserte 4 baterías AA (no incluidas) en el compar timiento de baterías en la parte inferior de la
unidad, respetando la polaridad indicada (positivo de la batería en el contacto del pin, negativo
de la batería en el contacto de resorte).
Nota: cuando inserte las baterías, retire el adaptador de CA del tomacorriente.
Durante el funcionamiento con batería, con el dispositivo en espera, la pantalla se apaga para
salvaguardar el consumo de batería. Para volver a encender la pantalla y ver la hora actual,
presione el botón SNOOZE / SLEEP (10). Sin embargo, la función de alarma de alarma está
siempre activa incluso con la pantalla apagada, si está programada, la alarma funcionará activando
la alarma configurada como se describe en el párrafo correspondiente.
En la pantalla en la parte superior derecha hay un icono que muestra el nivel de carga de las
baterías, reemplácelas cuando el nivel indicado sea bajo (una muesca).
Cuando las baterías se están agotando, es posible que se produzcan algunos fallos, como
cambios en el brillo de la pantalla o mal funcionamiento general del dispositivo; en estos casos,
reemplace las baterías descargadas.
En caso de bloqueos o mal funcionamiento del dispositivo, realice un reinicio desconectando
el adaptador y quitando las baterías durante unos 5 minutos.
BOTÓN DE MENÚ
Cuando la unidad está en modo de espera, mantenga presionado el botón de menú durante
RC 80D2 DAB
aproximadamente 2 segundos
y luego suelte el botón. Presione el botón Arriba / Abajo repetidamente para seleccionar lo
siguiente: -
1) Establecer hora / fecha
2) luz negra
9. Botón de alarma
10. Botón Snooze / Sleep
11. Botón Seleccionar
12. LCD
13. Toma de entrada de CC (parte trasera)
14. Altavoz incorporado (parte trasera)
15. Compartimento de la batería
(Baterías de respaldo del lado inferior)
Page 25

3) Idioma
4) Reinicio de la fábrica
5) Versión SW
Presione el botón Seleccionar para confirmar su selección. Debajo de cada selección, presione
el botón Arriba / Abajo y el botón Seleccionar para cada ajuste.
Español
FIJAR FECHA Y HORA
1. Mantenga presionado el botón de menú durante aproximadamente 2 segundos y luego
suelte el botón.
Presione el botón Arriba / Abajo repetidamente hasta que aparezca “Establecer hora /
fecha”. Presione una vez el
Seleccione el botón para ingresar al modo de configuración de hora / fecha.
2. Presione el botón Arriba / Abajo para seleccionar el modo Establecer hora, Establecer
fecha o Actualización automática y presione Seleccione el botón para realizar la selección.
3. Debajo de cada selección, presione el botón Arriba / Abajo y el botón Seleccionar para
hacer selección. Mantenga pulsado el botón de menú durante unos 2 segundos (o espere
unos 5 segundos sin presionar ningún botón) para completar el ajuste de FECHA Y HORA.
CONFIGURAR ALARMA
1. Presione el botón de alarma para seleccionar Alarma 1 o Alarma 2.
2. Presione el botón Arriba / Abajo para activar y desactivar el símbolo de Alarma 1 (Alarma
2).
3. Cuando el símbolo de Alarma 1 (Alarma 2) esté encendido, presione una vez el Botón
Seleccionar para ingresar modo de ajuste de alarma.
4. Puede ajustar la hora de la alarma, seleccione Una vez, Diariamente, Días de semana o
Fines de semana, Timbre / FM / DAB, Duración-15, 30, 45 o 60 minutos presionando el
botón Arriba / Abajo y Seleccionar Botón debajo de cada selección.
5. Debajo de cada selección, presione y mantenga presionado el botón de menú durante
aproximadamente 2 segundos (o espere unos 5 segundos sin presionar ningún botón)
completará la configuración de la alarma modo.
6. Cuando llega la hora de la alarma, puede escuchar el zumbador o la radio. Presione una
vez el Botón de encendido para apagar el sonido de la alarma.
FUNCIONAMIENTO DE RADIO (FM / DAB)
Cuando enciende y enciende su unidad por primera vez, comienza una búsqueda automática
de estaciones DAB.
Una barra de progreso mostrará el progreso del escaneo y el número de estaciones encontradas
también se mostrará. Cuando se completa el escaneo, su radio seleccionará el primero disponible
estación y empezar a jugar. Las estaciones se enumeran en orden numérico y luego alfabético por
defecto.
RC 80D2 DAB
1. Presione una vez el botón de encendido para configurar la unidad en modo Radio.
2. Presione el botón Mode para seleccionar el modo FM o DAB.
3. Sintonice una estación presionando el botón Arriba / Abajo.
Page 26

Pulsando cualquiera de los botones Arriba / Abajo durante más de 1 segundo para activar
el modo de sintonización automática. El sintonizador automático buscará hacia arriba
o hacia abajo y se bloqueará siguiente estacion. Si la sintonización automática no sinto
niza con precisión una estación de radio, presione el botón Arriba / Abajo para ajustar la
afinación.
4. Ajuste el volumen presionando el botón para subir / bajar el volumen.
Español
5. Presione el botón Menú para verificar la información de la estación de radio sintonizada.
6. Para apagar la radio, presione una vez más el botón de encendido para poner la unidad en
espera modo.
Nota: La lista de emisoras de radio DAB se almacena en la memoria, por lo que la próxima
vez que cambie su radio encendida, la búsqueda de emisoras no comenzará de nuevo.
ALMACENAMIENTO DE ESTACIONES DE RADIO
Se pueden almacenar en la memoria hasta 10 estaciones para DAB y 20 estaciones para FM:
1. Sintonice la emisora deseada como se describe en la sección anterior.
2. Mantenga presionado el botón de preajuste durante aproximadamente 2 segundos y luego
el número de estación preajustada parpadeará. Suelta el botón.
3. Presione una o más veces el botón Arriba / Abajo para seleccionar el preset deseado
Número de estación de P1 a P10 en modo DAB o P1 a P20 en modo FM.
4. Presione una vez el botón Seleccionar y el número de estación preestablecida dejará de
parpadear.
Ahora la estación está almacenada en el número de estación preestablecida que desee.
Para reemplazar una estación almacenada en la memoria, repita todas las etapas descri
tas anteriormente la nueva estación reemplazará a la almacenada previamente.
Para recibir estaciones preestablecidas:
En el modo DAB o FM, presione una o más veces el botón de preajuste para seleccionar
el Número de estación preestablecida deseada.
FUNCION SNOOZE
Para dormir aproximadamente 9 minutos más, presione el botón Snooze después de que la radio
o el zumbador se enciende a la hora programada para despertarse. El indicador de alarma
parpadeará.
Esto silenciará la radio o el timbre durante 9 minutos.
FUNCIÓN SLLEP
Solo puede utilizar la FUNCIÓN SLEEP cuando la unidad está en modo FM o DAB.
1. Presione una vez y repetidamente el botón Sleep para seleccionar el tiempo de sueño
(minutos) como
15-30-45-60-90-Sleep Off (Sleep Off significa que la función Sleep está cancelada).
Después de configurar un tiempo para dormir, el indicador SLEEP aparecerá en la pantalla
RC 80D2 DAB
LCD.
2. El FM o DAB se apagará y volverá al modo de espera cuando alcance el ajuste de
suspensión.
hora.
Page 27
Si desea cancelar la función de suspensión, presione el botón de suspensión para seleccionar la función de suspensión.
tiempo como Sleep Off.
ANTENA
La unidad tiene un cable fl exible en la parte posterior de la unidad y debe extenderse al máximo.
Español
longitud para una mejor recepción de radio receptora blanca.
CARACTERÍSTICAS TÉCNICAS
Energía principal: .............................. DC5V, 1200mA
Baterías: ........................................... DC6V, 4x1.5V tipo pilas “AA”
.................................................. (batería no incluida)
Adaptador AC / DC: .......................... Entrada 100-240V ~, 50 / 60Hz
.................................................. Salida 5V d.c., 1.2A, 6.0W
Rango de frecuencia: ........................ FM 87,5-108 MHz
.................................................. DAB 174 - 240 MHz
Advertencias para la correcta eliminación del producto.
El símbolo que aparece en el aparato indica que el residuo debe ser objeto de “recogida selectiva”
por tanto el producto no se debe eliminar junto con residuos urbanos.
El usuario deberá entregar el producto a los “centros de recogida selectiva” creados por
las administraciones municipales o bien al distribuidor cuando adquiera un nuevo producto.
La recogida selectiva del residuo y las sucesivas operaciones de tratamiento, recuperación y
eliminación favorecen la fabricación de aparatos con materiales reciclados y limitan los efectos
negativos en el medio ambiente y la salud causados por una gestión incorrecta del residuo.
La eliminación abusiva del producto da lugar a la aplicación de sanciones administrativas.
RC 80D2 DAB
Page 28
Strada Consolare Rimini-San Marino, 62 47924 Rimini (RN) Italy
Tel. 0541/756420 - Fax 0541/756430 - www.trevi.it - e-mail: [email protected]
DICHIARAZIONE DI CONFORMITÀ UE SEMPLIFICATA
Il fabbricante TREVI dichiara che il tipo di apparecchiatura RC 80D2 DAB è conforme
Il testo completo della dichiarazione di conformità EU è disponibile al seguente
https://www.trevi.it/dms/zidi/TREVI/DOCRC80D2DAB.pdf
alla direttiva 2014/53/UE.
indirizzo Internet:
SIMPLIFIED EU DECLARATION OF CONFORMITY
Hereby TREVI Spa declares that equipment type RC 80D2 DAB is in compliance with
The full text of the EU declaration of conformity is available at the following internet
https://www.trevi.it/dms/zidi/TREVI/DOCRC80D2DAB.pdf
directive 2014/53/EU.
address:
Made in CHINA
 Loading...